THE WORLD S FIRST SEAMLESS LINKING ROLLER BANNER
|
|
|
- Debra Elliott
- 5 years ago
- Views:
Transcription

1
2 THE WORLD S FIRST SEAMLESS LINKING ROLLER BANNER

3 The new Link² roller banner is the World s first true light-weight affordable linking banner stand. The Link² allows for unlimited banners to be seamlessly joined together creating professional, promotional and exhibition backdrops. Also, each Link² banner stand has interchangeable graphic capabilities, so for the first time you can now easily change graphics yourself, meaning that you can use Link² hardware indefinitely. Other advantages include a patented tension system that aids graphic alignment on uneven floors, integrated LED lighting and a flexible panel option making it ideal for shell schemes. THE UNIQUE ROLLER BANNER THAT PROVIDES ULTIMATE FLEXIBLITY

4 PROBLEM SOLVED The Link² roller banner has been designed and engineered to create near instantaneous backdrops and exhibition stands with the minimum of fuss. Many of us have experienced displays that have either been difficult, overly complicated or time-consuming to erect only to discover that the graphics do not align correctly or have become damaged. Whilst having the benefits of traditional roller banners, such as cost, ease of use and portability, the Link² also addresses many of the issues that have traditionally plagued portable exhibition equipment. For example, any number of Link² can be joined together to create quick, professional and seamless exhibition displays with no visible gaps. This process is made even easier using the patented levelling system because graphics will always align on difficult and uneven surfaces. If more flexibility is needed then using a flexi-link panel, allows unique and bespoke configurations to be created. Finally, graphics never need to be handled and are always protected when not in use reducing the potential for damage. THE SIMPLE WAY TO ALIGN GRAPHICS

5

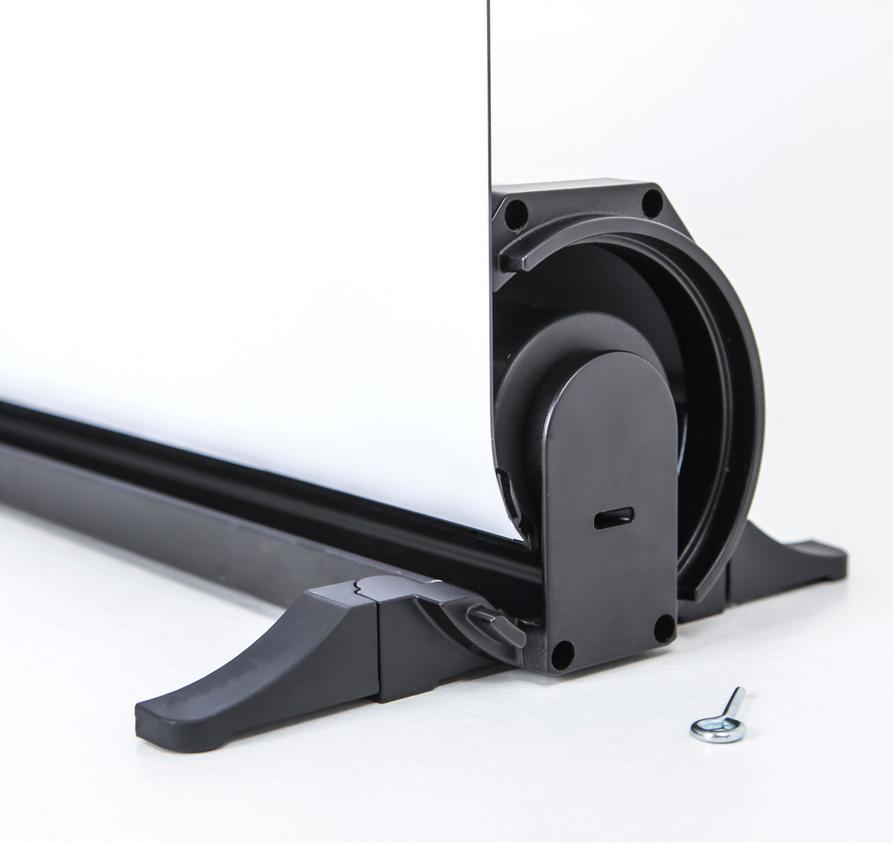
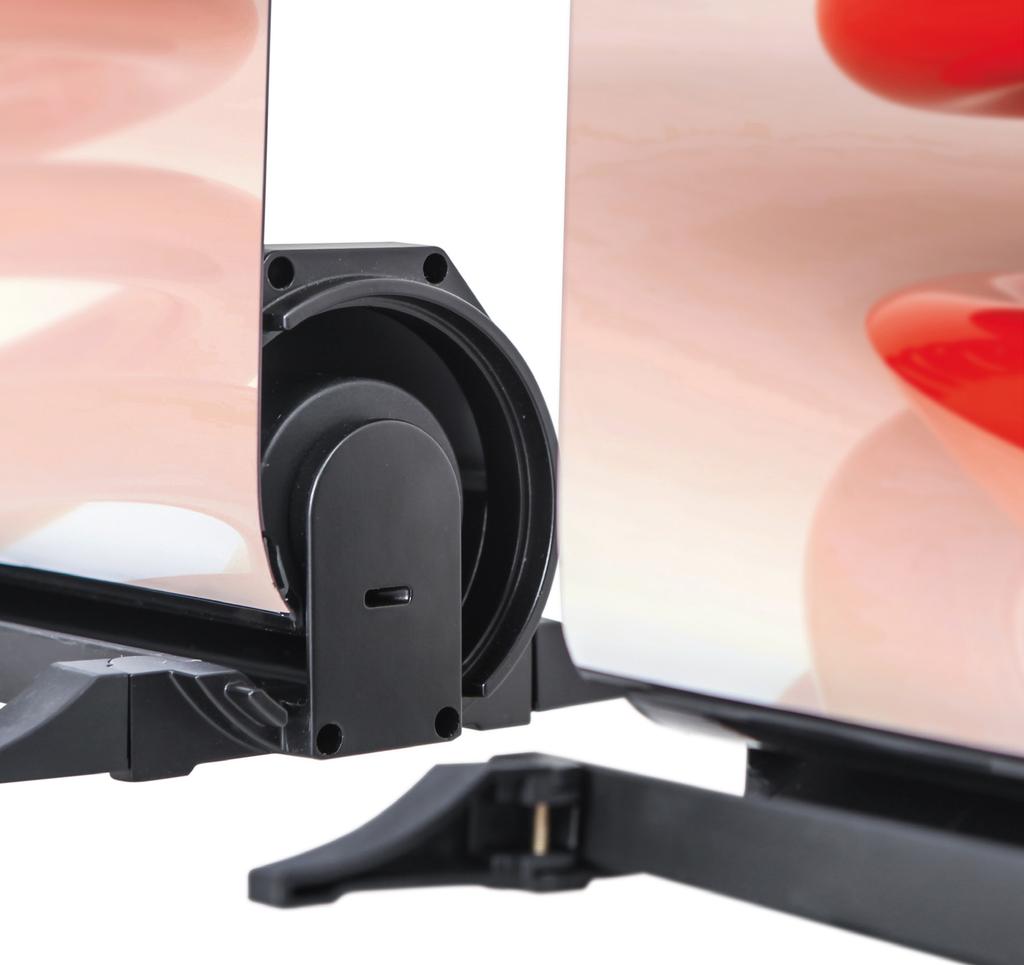
6 JOIN UNLIMITED LINK² ROLLER BANNERS TOGETHER


7 1. To stop a graphic from retracting insert a locking pin into the base of the Link². 2. Unhook the finishing bar from the roller mechanism and then carefully remove the complete graphic and store accordingly. MAKE A CHANGE When replacement graphics are required for traditional roller banners, a customer is usually faced with two options. A banner can either be returned to the supplier for a new graphic to be applied or simply thrown away and a new one purchased. Each can be time consuming, costly or just not good for our 3. Hook the replacement graphic to the Link² top cap. Pull the graphic down and hook on to the roller banner mechanism. 4. Remove the locking pin and then unhook the graphic from the top cap so that the graphic can retract into its base. environment. Link² banners provide a fresh new approach. You simply keep Link² hardware indefinitely and change the graphics as many times as you like. Just order a replacement graphic and attach it to the mechanism using our easy-change process. The older graphic can be stored for future use if needed. REPLACING GRAPHICS HAS NEVER BEEN SO EASY

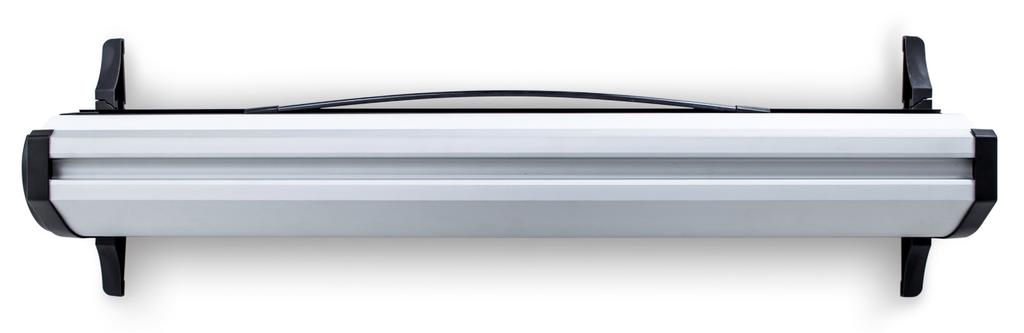
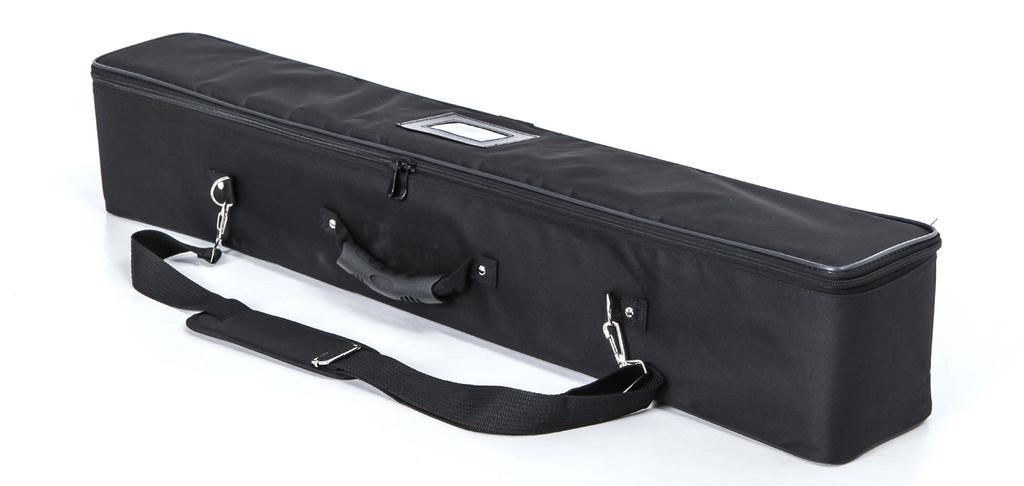
8 STAND OUT The Link² roller banner is the perfect solution for small to medium stand spaces. Its versatility means that you have total control of the configurations you create. This is especially relevant because available stand spaces can vary from exhibition to exhibition. Available graphic widths: Straight: 850mm Flexible: 235mm Available graphic heights: 2000mm 2175mm 2300mm Packed weight: 6.1kg including graphics SIMPLE, SEAMLESS AND INTERCHANGEABLE


9 With exhibition space at a premium the Link² has the ability to go right up against a wall. Just fold back the rear stabilising feet and push back up against a wall. BUILD SMALL TO MEDIUM EXHIBITION STANDS USING LINK²


10 lirk?' Lighter. S-tronger & sea,r,less IM A GIN G
Budget rollup stand. A perfect lightweight rollup stand for those on a tighter budget. Double twist out feet for extra stability
 Budget rollup stand 1 Year Guarantee A perfect lightweight rollup stand for those on a tighter budget. Double twist out feet for extra stability Complete with a padded carry bag High quality inkjet graphic
printing & display solutions
 printing & display solutions Foamex Boards Graphic Panels Roll Up Banners Instagram Frames Custom Freestanding Stands Pop Up Banners ajit@ukvenues.co.uk 07939 180 226 020 8123 9161 Venue Printing Design
features and benefits: dimensions: Hardware: Straight Frames:
 Hopup A variety of sizes, kits and options of Hopup displays are available. Hopup tension fabric displays are simple, versatile and can be set up in seconds. Hopups feature a lightweight, durable frame
4 Fabric Display Stand 6 Wide Fabric Display Stand 8 Pedestal Fabric Display Stand 10 Ultra Large Fabric Wall 12 Partition Display 14 Modular Fabric
 BRAVURA RANGE 4 Fabric Display Stand 6 Wide Fabric Display Stand 8 Pedestal Fabric Display Stand 10 Ultra Large Fabric Wall 12 Partition Display 14 Modular Fabric Display Wall 16 Tension Fabric System
1 Intro Folding Panel System 12 Panel Display Backwall Set-up Instructions 1. 2.
 1 Intro Folding Panel System 12 Panel Display Backwall Set-up Instructions Right Stack top panels on bottom panels Unfold display wall Set in desired configuration Wrong Pull from here Remove each folded
Systems Catalogue 2017
 Systems Catalogue 2017 Contents INDOOR SIGNAGE INDOOR OR OUTDOOR SIGNAGE Budget Roller Banner 3 Premium Roller Banner 4 Banner Lite 5 A-Boards 6 A1 Easel Sign 7 A1 Budget Easel Sign 8 Multimaster 9 Comet
CRL OVERHEAD TRACK BI-FOLD DOORS (OTC)
") INSTALLATION INSTRUCTIONS CRL OVERHEAD TRACK BI-FOLD DOORS (OTC) HALF PANEL OVERHEAD TRACK SYSTEM ALUMINUM Phone: (800) 421-6144 Fax: (866) 587-7501 crlaurence.com usalum.com crl-arch.com 11M0283 CONTENTS
INSTALLATION INSTRUCTIONS CRL OVERHEAD TRACK BI-FOLD DOORS (OTC) HALF PANEL OVERHEAD TRACK SYSTEM ALUMINUM Phone: (800) 421-6144 Fax: (866) 587-7501 crlaurence.com usalum.com crl-arch.com 11M0283 CONTENTS
features and benefits: dimensions:
 Hopup A variety of sizes, kits and options of Hopup displays are available. Hopup tension fabric displays are simple, versatile and can be set up in seconds. Hopups feature a lightweight, durable frame
INSTALLING YOUR SHUTTERS OUTSIDE MOUNT FULL HEIGHT SHUTTERS
 Shutters so good, you won t believe you ve done it yourself Installation is simple but a little preparation goes a long way to making it a smooth process. What You ll Have Shutter panels in big boxes Shutter
BMW X5 OEM RUNNING BOARD PART#SBBW
 INSTALLATION INSTRUCTIONS 2014-2016 BMW X5 OEM RUNNING BOARD PART#SBBW-146-74 QTY HARDWARE 1 Driver Side OEM Running Board 1 Passenger Side OEM Running Board 8 Rivet Pin 1 Page Step 1: Verify all parts
The Archer Bow Press OPERATING INSTRUCTIONS Partridge Woods Elk Rapids, MI
 The Archer Bow Press OPERATING INSTRUCTIONS 8203 Partridge Woods Elk Rapids, MI 49629 www.bowforcearchery.com 1 MAINTENANCE AND FINE TUNING Horizontal Pulling Bar The Horizontal Pulling Bar has a break-in
Formulate Designer Series 20 Backwall - Kit 07
 Formulate Designer Series 20 Backwall - Kit 07 FMLT-DS-20-07 Formulate Designer Series 20ft displays have unique stylistic features and shapes, are portable and easy to assemble. The aluminum tube frame
MODEL H9565 BALL BEARING GUIDE FOR G0513/G0514 INSTRUCTION SHEET
 MODEL H9565 BALL BEARING GUIDE FOR G0513/G0514 INSTRUCTION SHEET Introduction The Model H9565 replaces the upper and lower Euro-style guides on your G0513 or G0514 Bandsaw. Inventory (Figure 1) A. Upper
Display System Price Guide
 Display System Price Guide edition 5 Exhibitions Photography Design BANNER STANDS A widely used, fast and simple to set up promotion medium. Ideal for point of sale and exhibitions. Easy to transport and
Grand Slam 380 and Grand Slam 380XL Installation Instructions
 Grand Slam 380 and Grand Slam 380XL Installation Instructions Patent #7,114,283 GS-380 GS-380XL Taco Metals, Inc., info@tacomarine.com TacoMarine.com Thank you for purchasing a quality Taco Marine product.
BABY WOLF LOOM. Assembly Instructions for Knocked-Down Looms
 BABY WOLF LOOM Assembly Instructions for Knocked-Down Looms BEFORE YOU BEGIN Please read through the directions before beginning to assemble your loom. Unpack the loom parts carefully. Do not throw away
features and benefits: dimensions: Approximate weight with cases: 122 lbs / 28 kgs Shipping Packing case(s): 1 OCE 1 OCH
: 1 OCE 1 OCH") Formulate Kiosk - 01 FMLT-KIOSK-01 Formulate Kiosks combine lightweight aluminum tube frames with state-of-the-art printed stretch zipper pillowcase fabric graphics to create funky and functional multimedia
Formulate Kiosk - 01 FMLT-KIOSK-01 Formulate Kiosks combine lightweight aluminum tube frames with state-of-the-art printed stretch zipper pillowcase fabric graphics to create funky and functional multimedia
DIY GLASS BALUSTRADE AND POOL FENCING THE CHOICE IS SIMPLE
 DIY GLASS BALUSTRADE AND POOL FENCING THE CHOICE IS SIMPLE SAFE STYLISH AND AFFORDABLE FOR DIY GLASS FENCE SOLUTIONS THE CHOICE IS SIMPLE Bring your outdoor areas to life with clear views and clean lines.
Mounting Instructions Item No.: /521/522/420/421/422
 Mounting Instructions Item No.: 541.35.520/521/522/420/421/422 Revolving Corner Unit In addition to these general mounting instructions, please refer to the fitting instructions, where the individual drilling
PM4S3 Monitor Kiosk. features and benefits: dimensions: additional information:
 PM4S3 Monitor Kiosk PM4S3-MK-M PM4S3-MK-L Kiosk displays are portable and easy to assemble. The aluminum extrusion frame features cam locks, tension glide connections and medium or large monitor mounts.
TIP FOR GETTING STARTED
 Tip for getting started TIP FOR GETTING STARTED Be careful not to drill into any electrical wires, ductwork, plumbing or other damagable components. If you have any questions on the locations of these
installation instructions
 installation instructions Easi-Plan WC Frame 820mm with Dual Flush Cistern ref: EPWC-05-1005 Easi-Plan WC Frame 980mm with Dual Flush Cistern ref: EPWC-05-1505 EASI-PLAN installation instructions Parts
BIFOLD FUTON FRAME TRINITY ARM. Seat Rails and Slats x 1. *Note: Use 4pc of 100mm Bolts and 4pc of 60mm Bolts to attach the arms to the Stretchers.
 1A Parts in this box. 2pc with extra holes 2pc with extra holes & plastic stoppers Arms x 2 Back Rails and Slats x 1 Full Size: Slat Supports x 6 3pc are longer for the Back deck Back Side Rails x 2 Seat
FabLite Designer Series 10' Kit 06 - FL10-DS06
 FabLite Designer Series 10' Kit 06 - FL10-DS06 FL10-DS06 FabLite Designer Series 10ft displays have unique stylistic features and shapes, are portable and easy to assemble. The aluminum tube frame features
Marimba One 3100 OWNER S MANUAL. for. Wood Rails and Combination Wood and Aluminum Rails
 Marimba One 3100 TM OWNER S MANUAL for Wood Rails and Combination Wood and Aluminum Rails www.marimbaone.com info@marimbaone.com tel 707 822 9570 fax 707 822 6256 901 O St, Suite D Arcata, CA 95521 USA
Installation instructions, accessories. Rails. Volvo Car Corporation Gothenburg, Sweden. Instruction No Version Part. No
 Instruction No Version Part. No. 8685942 1.0 Rails J8401014 Page 1 / 9 Equipment A0000162 A0000161 J8401006 Page 2 / 9 INTRODUCTION Read through all of the instructions before starting installation. Notifications
Tradewinds Amplify Display System Instructions
 Table of Contents Packing & Unpacking... Standard Kits... Component Identification... Primary Components Vertical Pole Top... Vertical Pole Bottom... Horizontal... Cross/Hanging Bar... Amplify Shelf Package
Owner s Guide. Roller Shades. Clutch Operated Standard Shades
 Owner s Guide Roller Shades Clutch Operated Standard Shades CONTENTS Product View...4 Introduction...5 Getting Started...5 Tools And Fasteners Needed...5 Install The Mounting Brackets...6 Install The
STEP 1 STEP 6 STEP 5 STEP 1 STEP 3 STEP 4 STEP 7
 Step 1:Attach the tube join support by sliding in tube into legs, make sure height of the 2 legs are the same. Step 2:Attach the second join support in front of the tube join support using provided allen
Mounting Instructions Item No.: xxx
 Mounting Instructions Item No.: 271.92.xxx Wall-Beds 1 General Notes For vertical folding beds Successful and safe installation of Bed-Lift and construction of casework requires a professional skill level
ASSEMBLY PREPARATION IMPORTANT PRECAUTIONS
 2 ASSEMBLY PREPARATION To ensure ease of product assembly, please take time to verify the size and quantities of all required assembly hardware. Use the itemized parts listing and hardware chart for reference.
Installation Instructions
 The IMS ETERNAL FIX PATENT PENDING Installation Instructions EPS recommends professional installation for the Eternal IMS Fix. Please take all precautionary safety measures. We also recommend putting the
roller blind installation & operation instructions
 roller blind installation & operation instructions You will need: Tape measure Step Ladder Pencil Screw Drill IMPORTANT! Exercise extreme caution when unpacking your new eblind. Care must be taken when
Formulate Designer Series 10 Backwall - Kit 11
 Formulate Designer Series 10 Backwall - Kit 11 FMLT-DS-10-11 Formulate Designer Series 10ft displays have unique stylistic features and shapes, are portable and easy to assemble. The aluminum tube frame
Formulate Designer Series 20 Backwall - Kit 06
 Formulate Designer Series 20 Backwall - Kit 06 FMLT-DS-20-06 Formulate Designer Series 20ft displays have unique stylistic features and shapes, are portable and easy to assemble. The aluminum tube frame
Formulate Designer Series 10 Backwall - Kit 10
 Formulate Designer Series 10 Backwall - Kit 10 FMLT-DS-10-10 Formulate Designer Series 10ft displays have unique stylistic features and shapes, are portable and easy to assemble. The aluminum tube frame
Mod e l Trim Li n e B i - F o l d
 Installation Instructions Mod e l Trim Li n e B i - F o l d Illustrated Parts Breakdown (IPB) 8 8A 13 2 NO. QTY PART # PART DESCRIPTION 1 2 Door Panels 2 1 A200* Top Track 3 1 A200* Bottom Track A350 Top
Replacement PVCu Door Lock
 Replacement PVCu Door Lock Universal replacement lock designed to fit most PVCu doors Pack contents Lock Fixing tab Keep Before you begin Please read these instructions carefully Following the steps in
TABLE OF CONTENTS Missouri Over There / Traveling Exhibit
 TABLE OF CONTENTS 1 Packing List 2 Floor Plans 3 Setup Directions 4 Case Contents PACKING LIST PACKING LIST case description weight dimensions 1A 5 - Graphic Panels 4 - Magnetic Struts 1 - Setup Book (in
Usage and Assembly Instructions
 Instructions #1037447 Product #795234 Revision D Usage and Assembly Instructions Rear Fork (Buttstock) Rear Fork Lock Knob Rail Lock Knob Front Fork (Forend) Rails Tilt Friction Knob Rail Extension Locks
TAMBOUR DOOR SYSTEMS. Construction Automotive Industry
 TAMBOUR DOOR SYSTEMS C3 Installation instructions www.rehau.com Construction Automotive Industry C3 Parts Overview 8 1 Slats 2 Handle 6 7 3 Handle gliders 4 Track cover 5 1 9 5 Track base 6 End caps 4
Formulate Designer Series 10 Backwall - Kit 09
 Formulate Designer Series 10 Backwall - Kit 09 FMLT-DS-10-09 Formulate Designer Series 10ft displays have unique stylistic features and shapes, are portable and easy to assemble. The aluminum tube frame
Tools Needed Hardware Provided (per shade) Hardware Needed
 Hardware Needed") Baby Grande or Grande Motorized (XQ5 Premium) Shade with Cables and Housing Installation Instructions Tools Needed Hardware Provided (per shade) Hardware Needed Drill 3/8 Metal Drill Bit Measuring Tape
Baby Grande or Grande Motorized (XQ5 Premium) Shade with Cables and Housing Installation Instructions Tools Needed Hardware Provided (per shade) Hardware Needed Drill 3/8 Metal Drill Bit Measuring Tape
Vinyl Cutter Instruction Manual
 Vinyl Cutter Instruction Manual 1 Product Inventory Inventory Here is a list of items you will receive with your vinyl cutter: Product components (Fig.1-4): 1x Cutter head unit complete with motor, plastic
Before Assembling the Storage Wall
 Chapter 1 Assembling the Lista Storage Wall Lista provides two types of standard Storage Walls: B251 and B255. The design, construction, assembly, and quality are identical for both types, however, B251
Design Drives Efficiency
 Design Drives Efficiency EZ Breaker Chain Breaker EZ Chain Rack EZ Chain Wear Gauge EZ Breaker Chain Breaker Made in U.S.A. EZ BREAKER is a compact, easy to use tool for cutting roller chain. This simple,
Overlay Door Panel Preparation and Installation Instructions
 DOOR PANEL INSTALLATION GUIDE Overlay Door Panel Preparation and Installation Instructions The Built-In Undercounter Leader Since 1962 U-LINE.COM Overlay Door Panel Door panel Preparation A Full overlay
Simple, yet impactful designs created and built just for you. Yours to own after the show, making them a terrific value.
 Portable Solutions Simple, yet impactful designs created and built just for you. Yours to own after the show, making them a terrific value. All options are: Big Branding. Lots of creative space to show
Assembly and Installation Guide
 The Easy Hang Closet Solution SM Install Your elfa In An Instant. Enjoy The Benefits For A Lifetime. Basic Tools For elfa Assembly and Installation Level Hand or Power Drill Drill Bits 1/8", 3/8", 5/16"
OCTANORM -Vertriebs-GmbH, Germany ( /2003)
") OCTANORM -Vertriebs-GmbH, Germany (1605-04/2003) 2 3 OCTAquick Exhibiting has never been easier or more cost-effective Participating in exhibitions requires an investment of both time and money. New OCTAquick
OCTANORM -Vertriebs-GmbH, Germany (1605-04/2003) 2 3 OCTAquick Exhibiting has never been easier or more cost-effective Participating in exhibitions requires an investment of both time and money. New OCTAquick
installation instructions WC Frame 1180mm with Dual Flush Cistern
 installation instructions WC Frame 1180mm with Dual Flush Cistern (C,D,E) K F/G N L M 12 13 14 16 1 2 11 A 5 6 Q O Y 3 C 10 E D B P,Z,AA R T V S 4 U 2 No. Part no. Description Quantity A WC Frame with
INSTALLATION INSTRUCTIONS
 TreadClimber INSTALLATION INSTRUCTIONS STAR TRAC FITNESS 1 of 14 635-4175 Rev: B NOTICE Installation of this product requires that 2 or more people are available to safely perform certain steps outlined
INSTALLATION GUIDE. TRANZFORM Sound TRANZFORM Space
 INSTALLATION GUIDE TRANZFORM Sound TRANZFORM Space Cornell Iron Works, Inc. 100 Elmwood Ave. Crestwood Industrial Park Mountain Top, PA 18707 Phone: 800.233.8366 or 570.474.6773 Fax: 800.526.0841 INSTALLATION
TOOLS REQUIRED Metal Wood Wood and Metal Screws. #16 Drill #12-24 Tap. 1/8 Drill
 DEVICES COVERED IN THIS DOCUMENT: 4700S Surface Vertical Rod Device 4700SF Fire Exit Surface Vertical Rod Device TOOLS REQUIRED Metal Wood Wood and Metal Screws Sex Bolts #7 Drill ¼ -20 Tap #16 Drill #12-24
4 DOOR JK ROCK SLIDERS INSTALLATION
 SIGNATURE SERIES 4 DOOR JK ROCK SLIDERS INSTALLATION 1. To remove either the Jeep JK Wrangler Unlimited Rubicon rocker guards or Sahara running boards, use a 10mm wrench to remove the 3 pairs of nuts securing
Section 1 Safety working at height
 Contents Section 1 Safety working at height. Section 2 Hi-Step package contents & parts identification. Section 3 Assembly. Section 4 Operation. Section 5 Maintenance. Section 6 Extender package contents
EmagiKit. Privacy Pod Plus. Quiet. Easy. Affordable. INSTRUCTIONS ASSEMBLY
 EmagiKit Privacy Pod Plus Quiet. Easy. Affordable. INSTRUCTIONS ASSEMBLY DIMENSIONS AND COMPONENTS 47 47 Ceiling Unit 2-B 2-L 2-R Glass Door Corner Trim Door Handle 90 Adjustable Height Work Surface 1-B
Pocket Door Kit PD1 / PD2 Installation Instructions. Kit Contents.
 Pocket Door Kit PD1 / PD2 Installation Instructions Kit Contents. 1, Create Rough Opening In Stud Wall Construct rough opening ensuring all sides are square and level. Rough opening should be; Height =
Thanks for shopping with Improvements! Accordion Drying Rack Item #456954
 Thanks for shopping with Improvements! Accordion Drying Rack Item #4694 To order, call 1-800-64-11 West Chester, OH 4069 Made in China 1113 If you have questions regarding this product, call 1-800-64-11
SCHACHT STANDARD FLOOR LOOMTM
 SCHACHT STANDARD FLOOR LOOMTM FL3109 FL3111 FL3113 FL3115 FL3121 FL3123 FL3125 FL3127 FL3310 FL3312 FL3314 FL3316 FL3322 FL3324 FL3326 FL3328 Assembly instructions LOW CASTLE LOOM IN MAPLE Find out more
MODUS 770 AND MODUS 1280 (FLAT PACK) OPERATIONAL, ASSEMBLY & FIXING INSTRUCTION LEAFLET
 OPERATIONAL, ASSEMBLY & FIXING INSTRUCTION LEAFLET") MODUS 770 AND MODUS 1280 (FLAT PACK) TM TM OPERATIONAL, ASSEMBLY & FIXING INSTRUCTION LEAFLET NOTE: Ensure that all relevant personnel read the points listed below and that a copy is passed on to staff
MODUS 770 AND MODUS 1280 (FLAT PACK) TM TM OPERATIONAL, ASSEMBLY & FIXING INSTRUCTION LEAFLET NOTE: Ensure that all relevant personnel read the points listed below and that a copy is passed on to staff
LifeGear G1 /HOME GYM ITEM NO.: 63100
 LifeGear G1 /HOME GYM ITEM NO.: 63100 OWNER S MANUAL IMPORTANT: Read all instructions carefully before using this product. Retain this owner s manual for future reference. The specifications of this product
Usage and Assembly Instructions
 Instructions #1037447 Product #795234 Revision C Usage and Assembly Instructions Rear Fork (Buttstock) Rear Fork Lock Knob Rail Lock Knob Front Fork (Forend) Rails Tilt Friction Knob Rail Extension Locks
19 to 39 TV WALL MOUNT - FULL MOTION
 19 to 39 TV WALL MOUNT - FULL MOTION RF-HTVMMAB For wood-stud and concrete wall installations Safety information and specifications...2 Tools needed...2 Package contents...3 Installation instructions...5
INSTALLATION INSTRUCTIONS
 INSTALLATION INSTRUCTIONS FURNITURE VALENCIA Vanity Floor Standing Models Contemporary design and quality construction, providing affordable storage for bathrooms of any size or style. It s the details
======================================================================================== ( DR / DR) JK WRANGLER MOD RACK
 JK WRANGLER MOD RACK") (10984 4DR / 10982 2DR) JK WRANGLER MOD RACK INSTALLATION SHEET Important Notes: Some brands of windshield light brackets and snorkels may not be compatible with the 10984 MOD Rack System. Body lifts are
(10984 4DR / 10982 2DR) JK WRANGLER MOD RACK INSTALLATION SHEET Important Notes: Some brands of windshield light brackets and snorkels may not be compatible with the 10984 MOD Rack System. Body lifts are
marimba one Izzy OWNER S MANUAL combination wood and aluminum rails
 marimba one Izzy OWNER S MANUAL combination wood and aluminum rails Please register your marimba for warranty service at www.marimbaone.com/ordering/service www.marimbaone.com tel 707 822 9570 fax 707
Tensile Traditional Marque Installation Manual
 Tensile Traditional Marque Installation Manual Tensile Traditional Marquee Installation Instructions Tools Needed: Sledgehammers/Mechanical Wackers Gloves Ladder and Stepladder Safety helmets Method: 1.
PFW Installation Guide Installationsanleitung, Guía de Instalacíon, Guida de Installazione, Guide d Installation, Installatie gids
 Maximum Flat Panel Weight: 100 lb. / 45.35 kg. Included Components Wall Mount (Qty 1) Extension Bracket (Qty 1 Pair) Bracket (Qty 1 Pair) 5/16 Flat Washers (Qty 4) Universal Spacers (Qty 8) M5 Allen Driver
PEARL DRUM PEDAL. Instruction Manual
 PEARL DRUM PEDAL Instruction Manual Congratulations on your purchase! To get optimum performance from your P-932 / P-932L / P-931 Drum Pedal, please read this Instruction Manual before playing. Assembly
PFW 6875 Installation Guide Installationsanleitung, Guía de Instalacíon, Guida de Installazione, Guide d Installation, Installatie gids
 Maximum Flat Panel Weight: 160 lb. / 72.57 kg. Included Components Wall Mount (Qty 1) Extension Brackets (Qty 2) Bracket (Qty 1 Pair) 5/16 Flat Washers (Qty 4) Universal Spacers (Qty 8) M5 Allen Driver
P.O. Box 8400 Green Bay, WI (920)
") P.O. Box 8400 Green Bay, WI 54308-8400 (920) 468-2165 Change Notice No. 112 Implemented By: KI-Pembroke Notification By: Scott Vissers Date: 03/15/10 Component Product Title: Series XXI Lateral Filing
P.O. Box 8400 Green Bay, WI 54308-8400 (920) 468-2165 Change Notice No. 112 Implemented By: KI-Pembroke Notification By: Scott Vissers Date: 03/15/10 Component Product Title: Series XXI Lateral Filing
Vastex Manual Press Registration System Assembly and Operations Manual
 Vastex Manual Press Registration System Assembly and Operations Manual Contents Pg. # Introduction 2 Component Identification 2-3 Pallet Jig Assembly (Manual Rear Clamp) 4 Pallet Jig Assembly (Manual Side
FitSpine R.E.D. 5YEAR. Inversion Table Assembly Instructions WA R R A N T Y
 R FitSpine R.E.D. Inversion Table Assembly Instructions TEETER HANG UPS 5YEAR WA R R A N T Y BEFORE YOU BEGIN: Review all steps before beginning assembly and read all precautions before using the inversion
PFW 6870 Installation Guide Installationsanleitung, Guía de Instalacíon, Guida de Installazione, Guide d Installation, Installatie gids
 Installationsanleitung, Guía de Instalacíon, Guida de Installazione, Guide d Installation, Installatie gids Max: 72kg/160lbs MOUIN_PFW6870_V01 Included Components Wall Mount (Qty 1) Bracket (Qty 1 Pair)
OPERATOR'S MANUAL 46" SNOW BLADE. Model Numbers OEM IMPORTANT: READ SAFETY RULES AND INSTRUCTIONS CAREFULLY
 OPERATOR'S MANUAL 46" SNOW BLADE Model Numbers 190-833-OEM IMPORTANT: READ SAFETY RULES AND INSTRUCTIONS CAREFULLY MTD PRODUCTS INC. P.O. BOX 368022 CLEVELAND, OHIO 44136-9722 PRINTED IN U.S.A. FORM NO.
LOWLINE SINGLE FOLD DOWN WALL BEDS
 ASSEMBLY INSTRUCTIONS LOWLINE SINGLE FOLD DOWN WALL BEDS Tools Required For Assembly No 2 & No 4 Phillips Head Screwdrivers No 2 Slot Head Screwdriver Hammer Electric Drill (Hammer Drill for Masonry) 6.5mm
Jass.Performance Low Profiles Installation Manual
 Jass.Performance Low Profiles Installation Manual What is in the box: 2x Adapter Frame 2x Outer Panels 2x Inner Panels Pushrod, Ball Joints & Brackets 2x Hella Headlights 6x Springs 4x M6x25 Cross Head
-1- J K L (X2) (X3)
 (X3)") www.smartrike.com 680 LOOK US UP ON YOUTUBE: www.youtube.com/user/smarttrikeofficial Thank you for buying smartrike, If you have any assembly issues or are missing a part, please call us for assistance.
www.smartrike.com 680 LOOK US UP ON YOUTUBE: www.youtube.com/user/smarttrikeofficial Thank you for buying smartrike, If you have any assembly issues or are missing a part, please call us for assistance.
POWER TOWER OWNER S. Item #1720
 POWER TOWER OWNER S Item #1720 TABLE OF CONTENTS SERVICE ------------------------------------------------------------------------- 2 IMPORTANT LABELS --------------------------------------------------------
INSTALLATION INSTRUCTIONS
 ECLIPSE CANOPY INSTALLATION INSTRUCTIONS IMPORTANT NOTE: ENSURE ALL RELEVANT PERSONNEL READ THE POINTS LISTED WITHIN THIS LEAFLET AND THAT A COPY IS GIVEN TO STAFF INVOLVED WITH THE INSTALLATION AND MAINTENANCE
Series Assembly Instructions
 ComforTrak TM Series Assembly Instructions EP-560, EP-860, EP-960 & EP-970 Models *Inversion Table images may vary slightly from your model. The EP-560 is shown here. BEFORE YOU BEGIN: Review all steps
INSTALLATION INSTRUCTIONS FOR HAND OPERATED MODELS: 170, 171-R, 171-N, 172, 260
 INSTALLATION INSTRUCTIONS FOR HAND OPERATED MODELS: 170, 171-R, 171-N, 172, 260 I. SUSPENDED INSTALLATIONS NOTE: MODEL 260 FENSTEEL TRACK IS ASSEMBLED IN THE SAME MANNER AS DESCRIBED BELOW WITH THE EXCEPTION
Topo Freestanding Applications - Private Office
 4 3 2 Topo Freestanding Applications - Private Office Combo Wrench If you have a problem, question, or request, call your local dealer, or Coalesse at 1.800.627.6770 Or visit our website: www.coalesse.com
WOLF PUP LOOM TM & WOLF PUP LT LOOM TM
 WOLF PUP LOOM TM & WOLF PUP LT LOOM TM Assembly Instructions FL3000 FL3006 FL3009 WOLF PUP WOLF PUP LT Find out more at schachtspindle.com Schacht Spindle Company 6101 Ben Place Boulder, CO 80301 p. 303.442.3212
PACLEASE Hybrid Sacagawea VK-1222 Display Instructions / PAGE 1 - General Layout
 PACLEASE Hybrid Sacagawea VK-222 Display Instructions / PAGE - General Layout 800-676-3976 425-556-95 4054 48th Ave. NE Redmond, WA 98052 0 0 Plan View PACLEASE Hybrid Sacagawea VK-222 Display Instructions
Create a big impression. A Family of Dependable Displays. Ideal systems for large format graphics
 Frames & Banner Rails Pop-Up Stands Sign & Poster Stands Literature Racks Modular displays Towers A tower unit resembles a traditional advertising pillar, giving an exceptional creative display area. Available
THE HLM SERIES MATCHPLATE MOLDING MACHINE
 THE HLM SERIES MATCHPLATE MOLDING MACHINE 1 THE HLM SERIES MATCHPLATE MOLDING MACHINE THE HUNTER ADVANTAGE Since 1964, our products and our reputation have been built on the fact that (using our prescribed
OPERATING INSTRUCTIONS for. Gold-Print TM. Model SPR-10 Screen and Stencil Printer
 OPERATING INSTRUCTIONS for Gold-Print TM Model SPR-10 Screen and Stencil Printer TABLE OF CONTENTS INSTALLATION...3 Z ADJUSTMENTS...3 X, Y & Ø ADJUSTMENTS...4 CIRCUIT BOARD POSITIONING...5 ILLUSTRATIONS...6
Hardware and Components:
 Hardware and Components: (A) 5/16 x 2 Hex Bolt (B) 5/16 x 2-1/4 Hex Bolt (C) 5/16 x 2-1/2 Hex Bolt (D) 4X 5/16 x 3/4 Hex Bolt (E) 4X 5/16 x 1-1/4 Hex Bolt (F) 11X 5/16 Flat Washer (G) 12X 5/16 Nylock Nut
4 DOOR JK ROCK SLIDERS INSTALLATION
 SIGNATURE SERIES 4 DOOR JK ROCK SLIDERS INSTALLATION 1. To remove either the Jeep JK Wrangler Unlimited Rubicon rocker guards or Sahara running boards, use a 10mm wrench to remove the 3 pairs of nuts securing
Instruction Manual. Banner Grip -banner stretching frame. Manual Version Sept27, Any size made: by Graphic size, OD Size, Live Area -1 or 1,000!
 Instruction Manual Banner Grip -banner stretching frame Above: Open frame to reveal clamps pulling banner tight. Above: Closed frame to conceal all mounting hardware, NICE! Manual Version Sept27, 2012
CL4500 Installation Instructions
 CL4500 Installation Instructions Box Contents Check the contents of the box are correct according to the model 4510 4520 1 Front Plate 2 Back Plate 3 Lever Handles 4 Gaskets 5 Sprung Spindle (x1) 6 Spring
XXL-Center. Cutting. Bending. Forming. R E I N H A R D T MASCHINENBAU D SINDELFINGEN D SINDELFINGEN RICHARD-WAGNER-STR.
 Cutting. Bending. Forming. XXL-Center D-71045 SINDELFINGEN P O S T F A C H 3 6 9 T E L E F O N 0 7 0 3 1-8 6 3-0 D-71065 SINDELFINGEN RICHARD-WAGNER-STR. 4 10 T E L E F A X 0 70 31-863-185 R E I N H A
Your Performance Partner
 Assembly Instructions Attic Storage System Your Performance Partner CONTENTS Safety Precautions.................................. 2 Warranty.......................................... 2 Important User Information............................
MS25 OPERATION MANUAL
 SAFETY INSTRUCTIONS SPECIFICATIONS OPERATING INSTRUCTIONS MAINTENANCE ADJUSTMENTS REPLACEMENT OF PARTS MS25 DIAGRAM MS25 PARTS LIST MS25 OPERATION MANUAL SAFETY INSTRUCTIONS Please read these instructions
INSTALLATION GUIDE 2009-CURRENT HUMMER H3T PRODUCT CODE:
 INSTALLATION GUIDE 2009-CURRENT HUMMER H3T PRODUCT CODE: 268 June 22, 2010 TOOLS NEEDED COMPONENTS INCLUDED P2 Tip 3/8" Drill Rubber Gasket(s) x 2 Bracket(s) x 2 1/2" Drill Bit Bulkhead Flange #2 Phillips
Installation, Operation and Care Instructions. Continuous Cord Loop Operating System
 Installation, Operation and Care Instructions Continuous Cord Loop Operating System CONTENTS Getting Started: Product View... 1 Tools and Fasteners Needed... 2 Installation: Installation Overview... 3
Insolroll Clutch Operated Shades Installation Instructions Installation Instructions
 All clutch operated shades are shipped fully assembled and ready for installation. Mounting screws are not provided. Screws for chain guide installation to meet the child safety standards are provided.
Overlay Installation Guide
 INSTALL GUIDE Overlay Installation Guide The Built-In Undercounter Leader Since 1962 U-LINE.COM 1 Overlay Model Coverage This guide covers the following models U-2115WCOL-00 U-2175WCCOL-00 U-2175BEVCOL-00