AccuFlex VRF Application Training
|
|
|
- Eleanor Manning
- 6 years ago
- Views:
Transcription
1 AccuFlex VRF Application Training May 2015

2 Pre Design Checklist Accurate Room/Zone Load Calculation Building Blueprint or Drawing with Scale Jobsite Voltage Load Calculations Block Load Method Room/Zone Load Method Peak Zone Load Method 1
3 Block Load Room/Zone Load Front Offices 8Tons West Office 4Tons East Office 4Tons Block load = Room/Zone Load 4 Tons 4 Tons 4 Tons 4 Tons Mini Split Application 2

 8 Tons 6 Tons = 1.")
4 Peak Room/Zone Load West Office 4 Tons East Office 2Tons West Office 2 Tons East Office 4 Tons East Office Peak Zone Load = 4 Tons West Office Peak Zone Load = 4 Tons Highest Block Load = 6 Tons 4Tons 4Tons Combination Ratio (Indoor / Outdoor) 8 Tons 6 Tons = Tons AccuFlex VRF Application 3


5 Peak Zone Load regardless of the time of day 240,117 Btu/h Highest Block Load occurring at hour ,067 Btu/h Size the indoor units to each peak zone load Total Peak Zone Load Highest Block Load = Combination Ratio 240, ,067 = 1.02 Cooling Combination Ratio Size the outdoor unit to the highest block load 4

6 Blueprints & Drawings Elevation Drawings Floor Plans VRF Training Example 1 5


7 Click Sales to begin Always download all available Updates Click New to start the design 6


8 Enter the project name Enter the customer s information Enter your information as the designer Select the design state then the city Double click in a cell to change it Click OK 3 Add Indoor Units 2 Add Rooms & Loads 4 Add Indoor Accessories 5 Add Outdoor Units 1 Add Floors to Building 6 Locate Units In Building 7


9 1 Add Floors to Building Click Edit Note each column s heading when entering new floors Additional floors are entered at the bottom of each column 8


10 Ceiling Height Floor Height Press TAB twice then enter the floor height. Click the blank cell at the bottom of the column and enter the quantity of floors in the Building Press ENTER Press TAB then enter the ceiling height. Note the total number of floors have been added Click any cell to change the data When warned, click OK to confirm the need to redo all outdoor unit checks 9


11 To delete a floor, click to the the left of the floor on the arrow then press DELETE After all floors are added or edited, click Done To add a basement, enter 1 in the floor cell, press TAB to enter the heights, then press ENTER 2 Add Rooms & Loads 10


12 Double click the blank cell under Name then enter the first room (zone) name Press TAB then enter the total cooling load Press TAB then enter the total heating load Press TAB then enter the sensible cooling load Double click the next blank cell in the room column to enter the next room Enter all of the remaining rooms and loads in the building 11


13 Double Click column line to see entire column content To delete a room, select the name then press DELETE Click Yes to confirm deleting the room 3 Add Indoor Units 12

14 VRF Training Example 1 To start the process of selecting the indoor units, select the first room name 13


15 The different styles of indoor units are listed in the top section The available sizes of the style selected above are listed below Qty indicates the quantity of this model that are needed to satisfy the loads Click the style of indoor unit you want for the room Click the size of indoor unit with the quantity needed for the room Click Add If you select a model with a Qty of 2, then 2 units will be added to the room To manually change the quantity, click the default number, then press BACKSPACE and then enter the new quantity 14


16 A yellow checkmark indicates an accessory has automatically been added, in this case a cassette 4 way panel The indoor unit is now shown with the room Click the style of indoor unit Click the size & quantity of unit Click the next room Click Add 15


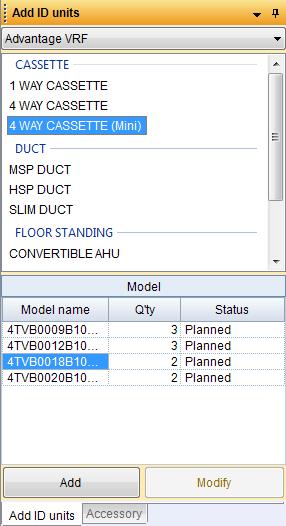
17 Click the style of indoor unit Click the size & quantity of unit Click the next room Click Add Click the style of indoor unit Click the size of unit with a quantity of 2 Click the next room Click Add 16


18 Note that 2 units were added to the room Click the style of indoor unit Click the next room 17

19 For high wall indoor units, there appears to be 2 of each size Pause the mouse over the unit to see the entire model number Models ending in B need an external EEV. Models ending in C come with a factory installed EEV High Wall style has been selected Click the size of unit, with factory installed EEV and with a quantity of 2 Click Add 18


20 You will need to manually confirm that units added without load information satisfy the required capacities Indoor units can be added without room or load information To delete an indoor unit, click the Model Name then press DELETE Click Yes to confirm deleting the unit 19
21 Then click the indoor unit To see the specifications of an indoor unit, click Property tab To see all the indoor unit information click Auto Hide Click the Building Management tab to return to the building 20
22 You can also Auto Hide the Add ID Units section Click any tab to see the information again Click Auto Hide to unhide the section 21

23 4 Add Indoor Accessories VRF Training Example 1 22


24 The yellow checkmarks indicate some accessories were automatically selected Select the unit you want to add accessories to manually Click the boxes to add accessories Double Click column line to see entire column content or click, hold and drag column line to move it Click the Accessory tab 23

25 Note Auto Hide applied Click the boxes for the accessories Add all of the additional accessories Click the next unit No controller was needed for second indoor unit in these rooms 24

26 5 Select Outdoor Units Note Auto Hide applied Note Auto Hide was turned off 25
27 Click the first unit to be connected to the outdoor unit Press and hold CTRL then click the other indoor units connected to the outdoor unit Pressing SHIFT in place of CTRL will select all units up to the second selection Drag the group down to the Outdoor List and release the mouse button Once all the indoor units are selected, click the group and hold 26

28 Select VRF for 3 Phase units or Mini VRF for 1 Phase units For 3 Phase units only, select Heat Recovery or Heat Pump Change the outdoor unit name Set the Combination Ratio to match your design 27


29 Size the indoor units to each peak zone load Non Hourly Zone Load Calculation Zone Load = Block Load Combination Ratio = 1.00 Size the outdoor unit to the highest block load Click the outdoor model for the project To remove an indoor unit from this system, click the model then the minus sign Click OK 28

30 A green checkmark indicates the indoor unit is attached to the outdoor unit The outdoor unit is now shown To delete an outdoor unit, click the Model Name then press DELETE Click Yes to confirm deleting the unit 29


31 6 Locate Units In Building Click a room and hold Drag the room over to the floor where the unit it located and release the mouse button 30
32 Also, the room and unit now appear on the floor Note the room and unit are blue indicating they are located in the building Continue locating the rooms and units in the building Never drag just the unit to the floor, always drag the room Drag the outdoor unit over to the roof or floor where the unit it located Click the outdoor unit and hold 31

33 A green checkmark means the piping for the system can now be designed Note the outdoor unit now appears Select the Piping tab to begin laying out the refrigerant piping Note that Auto is checked Auto will create a piping system automatically for heat pump systems 32
34 VRF Training Example 1 Check Manual to lay out the piping according to the project Select and drag a Branch Joint or Header to the empty box Empty boxes indicate a component can be located here 33


35 Magnifying glass features are also available Use the mouse s thumbwheel to increase or decrease the drawing Size Press & hold the mouse s thumbwheel to move the drawing around the page Select the indoor unit for this location Right click in the empty box to see the available indoor units 34
 will be available to select When designing a Heat Recovery system, a Mode Change Unit (MCU) will be available to")
36 Note that the unit now appears on the diagram Select additional components until all the indoor units are in place When designing a Heat Recovery system, a Mode Change Unit (MCU) will be available to select When designing a Heat Recovery system, a Mode Change Unit (MCU) will be available to select 35


37 Click and hold the left border then drag it to enlarge the section To see the specifications of any unit, click the unit 36

38 Right click on a component to remove it from the drawing Click the Actual Piping Length box and enter the length Click the No. of Elbows box and enter the quantity Click a section of pipe which then turns red Actual Length/Equivalent Length/Elbows ( Equivalent Length & Pipe Size calculated during System Check 37

39 After all lengths and elbows are entered, click System Check to check the piping Click each section of pipe and enter the length and elbows Review all of the system piping checks. Double click or drag the column line to expand it Note the additional refrigerant charge 38
![An [ERROR] System check failure warning](/docs-images/78/77308291/images/40-0.jpg "appears if the piping is incorrect")

40 An [ERROR] System check failure warning appears if the piping is incorrect Click the to return to the piping diagram Review the ERROR that must be corrected 39

41 After all corrections are made, click System Check to recheck the piping After confirming a successful system check, click Capacity Correction 40

42 Note the outdoor unit Simulated Capacity Note the indoor unit Simulated Capacity Click Capacity Correction Select OK Click the Indoor Unit tab to review the simulated capacities 41

43 Note Auto Hide applied Note Auto Hide applied You may need to modify the indoor unit size if the simulated capacity does not satisfy the room Load Click the style of the unit Click the size of the unit Click the Model Name of the unit you want to modify Click Modify 42
44 If you forget to reselect Heat Pump you will have to redo the piping layout Since the system capacity has changed, reselect the outdoor unit that meets the new load Click OK Click Piping to rerun System Check Note new indoor unit size 43


45 Click System Check to recheck the piping To print the piping diagram, click Print After confirming a successful system check, click Capacity Correction 44
46 Note the updated outdoor unit Simulated Capacity Note the updated indoor unit Simulated Capacity Click Capacity Correction Select OK Confirm the updated simulated capacities satisfy the room loads 45

47 Click the Wiring tab to view a simple system wiring diagram Note the amp draw and circuit protection is listed for each circuit The amp draw of the field installed electric heat option in 4TVM air handlers are not included Click the Breaker Name or Breaker Size box to edit the information Click a fuse or breaker 46

48 Click an indoor unit to view the specifications or edit the addressing Click the TEXT box to add text to indoor units or MCUs Click the Controller tab Click an empty box to view optional components Although outdoor units have a terminal block, click to add one with all central controllers 47

49 Click a central controller to add it to the system Click the yellow dot to connect a controller to the R1/R2 control layer Note the yellow dot turns red indicating a pending connection Right click on a component to remove or move it 48


50 Click System Check to check the control system Any controller errors will appear at the bottom Click OK Select any tab to review or update the design 49


51 When the design is complete, click Save As Save the project file to your choice of location Click Report to save a complete project report Rename the report to match the project, then click Save 50
52 Refrigerant Concentration Limit (RCL) 26 lbs./1,000 ft lbs./ft 3 51

53 Refrigerant Concentration Limit (RCL) 26 lbs./1,000 ft lbs./ft 3 Total System Charge = lbs = 1512 ft 3 minimum volume 1512 ft 3 x 12 ft. = 126 ft 2 minimum square feet Smallest Room = 120 ft 2 Solutions? Possibly louvers, transfer grilles, undercut doors need engineer/inspector approval 2 Smaller Systems in Place of 1 Thank You for Attending American Standard AccuFlex Application Training 52

54 AccuFlex VRF Massachusetts Default Design Conditions \


55 New Hampshire Default Design Conditions Rhode Island Default Design Conditions
Kitchen and Bath Design Tutorial
 Kitchen and Bath Design Tutorial This tutorial continues where the Interior Design Tutorial left off. You should save this tutorial using a new name to archive your previous work. The tools and techniques
Kitchen and Bath Design Tutorial
 Kitchen and Bath Design Tutorial This tutorial continues where the Interior Design Tutorial left off. You should save this tutorial using a new name to archive your previous work. The tools and techniques
House Design Tutorial
 Chapter 2: House Design Tutorial This House Design Tutorial shows you how to get started on a design project. The tutorials that follow continue with the same plan. When we are finished, we will have created
SAMSUNG Modeling Guide for Trace 700
 SAMSUNG ing Guide for Trace 700 V1_102017A Disclaimer The information contained in this Trace 700 ing Guide and in the DVM S library file ("Information ) is for informational purposes only and should not
Kitchen and Bath Design Tutorial
 Kitchen and Bath Design Tutorial This tutorial continues where the Interior Design Tutorial left off. You should save this tutorial using a new name to archive your previous work. The tools and techniques
Archicad Layout of Drawings
 Archicad Layout of Drawings NOTE: It is important that house features (Walls, Cabinets, Floors, etc.) Have been placed on the proper layer and layer combination for ease of transferring your final drawings
Kitchen and Bath Design Tutorial
 Adding Cabinets Chapter 5: Kitchen and Bath Design Tutorial This tutorial continues where the Materials Tutorial left off. You should save this tutorial using a new name to archive your previous work.
Archicad Layout of Drawings
 Archicad Layout of Drawings NOTE: It is important that house features (Walls, Cabinets, Floors, etc.) Have been placed on the proper layer and layer combination for ease of transferring your final drawings
House Design Tutorial
 Chapter 2: House Design Tutorial This House Design Tutorial shows you how to get started on a design project. The tutorials that follow continue with the same plan. When you are finished, you will have
Deck Tutorial. Decks and Porches. Drawing Decks
 Deck Tutorial The Deck Tutorial continues where the Landscaping Tutorial left off, and explains how to create a deck off the back of the house and connect it to the terrain with an exterior staircase.
House Design Tutorial
 House Design Tutorial This House Design Tutorial shows you how to get started on a design project. The tutorials that follow continue with the same plan. When you are finished, you will have created a
Spreadsheets 3: Charts and Graphs
 Spreadsheets 3: Charts and Graphs Name: Main: When you have finished this handout, you should have the following skills: Setting up data correctly Labeling axes, legend, scale, title Editing symbols, colors,
ThermaSkirt User Manual
 ThermaSkirt User Manual Step 1 Draw the Whole Room Outline Click on Start or Go to File Menu and Click on New or Open to start the program. Clicking on Start or New option from the menu will open the designer
Comparing Across Categories Part of a Series of Tutorials on using Google Sheets to work with data for making charts in Venngage
 Comparing Across Categories Part of a Series of Tutorials on using Google Sheets to work with data for making charts in Venngage These materials are based upon work supported by the National Science Foundation
House Design Tutorial
 House Design Tutorial This House Design Tutorial shows you how to get started on a design project. The tutorials that follow continue with the same plan. When you are finished, you will have created a
House Design Tutorial
 Chapter 2: House Design Tutorial This House Design Tutorial shows you how to get started on a design project. The tutorials that follow continue with the same plan. When you are finished, you will have
Creo: Hole, Fillet, and Round Layout/Dimension Tutorial. By: Matthew Jourden Brighton High School
 Creo: Hole, Fillet, and Round Layout/Dimension Tutorial Layout of a Part with Holes 1. Open a blank drawing with your border and title block By: Matthew Jourden Brighton High School 2. Place the front,
Materials Tutorial. Chapter 6: Setting Materials Defaults
 Setting Materials Defaults Chapter 6: Materials Tutorial Materials display on the surfaces of objects in 3D views and can make a 3D view appear highly realistic. When applied to most objects, material
imos Getting Started
 imos 12.0 - Getting Started June 2015 imos Aktiengesellschaft Planckstraße 24 D-32052 Herford Tel. +49(0)5221.976-0 Fax +49(0)5221.976-123 info@imos3d.com www.imos3d.com This document is provided just
Tas Engineering Training Workbook 1
 Tas Engineering Training Workbook 1 Tas 3D Modeller Tas Manager Your Tas Manager contains two main folders: a Tas folder and a Tas Data folder. See the directory-tree on the left-hand side above. If you
How to create a cove for cove lighting in DIALux In this tutorial you will learn how to make a cove similar to the one in the following image
 How to create a cove for cove lighting in DIALux In this tutorial you will learn how to make a cove similar to the one in the following image The cove dimension will be 4 meter by 5 meter and the other
Deck Tutorial. Chapter 8: Decks and Porches
 Chapter 8: Deck Tutorial Now we ll continue where the Landscaping Tutorial left off and create a deck off the back of the house, connecting it to the terrain with an exterior staircase. You may want to
Deck Tutorial. Chapter 6: Decks and Porches
 Chapter 6: Deck Tutorial Now we ll continue where the Landscaping Tutorial left off and create a deck off the back of the house, connecting it to the terrain with an exterior staircase. You may want to
PlanSwift 3D Viewer Plugin User Guide
 PlanSwift 3D Viewer Plugin User Guide UPDATED ON 7/13/2018 PlanSwift Authored by: Dave Hansen 1 Table of Contents Overview... 3 Purchasing and Installation... 4 Purchasing Plugins... 4 Installation and
In this project you ll learn how to code your own musical instruments!
 Rock Band Introduction In this project you ll learn how to code your own musical instruments! Step 1: Sprites Before you can start coding, you ll need to add in a thing to code. In Scratch, these things
Floorplanner Editor Manual
 Editor Manual Floorplanner Editor Manual 1 Overview 2 Canvas a 2D view b View Settings 3 3D view a Orbital and walkthrough mode b How to navigate c Adding cameras d Scenery image e Create a render 4 Sidebar
Introduction to QTO. Objectives of QTO. Getting Started. Requirements. Creating a Bill of Quantities. Updating an existing Bill of Quantities
 QTO User Manual Contents Introduction to QTO... 5 Objectives of QTO... 5 Getting Started... 5 QTO Manager... 6 QTO Layout... 7 Bill of Quantities... 8 Measure Folders... 9 Drawings... 10 Zooming and Scrolling...
Materials Tutorial. Setting Materials Defaults
 Materials Tutorial Materials display on the surfaces of objects in 3D views and can make a 3D view appear highly realistic. When applied to most objects, material quantities will also be calculated in
PosterArtist Quick Guide
 PosterArtist Quick Guide Create posters in four easy steps STEP STEP STEP STEP Use Auto Design to Create Posters Simply select a poster type and a design image to automatically create high-quality posters.
Materials Tutorial. Chapter 6: Setting Materials Defaults
 Setting Materials Defaults Chapter 6: Materials Tutorial Materials display on the surfaces of objects in 3D views and can make a 3D view appear highly realistic. When applied to most objects, material
CHATS Meals On Wheels Online Ordering User Guide
 CHATS Meals On Wheels Online Ordering User Guide We want to make ordering Meals on Wheels easier for you so we have added an online ordering option from MobiDines! You can now order from your computer,
OF LEVELS & ADJUSTMENTS TO THE GRID. Bldg: Levels. PROF. PAUL C. KING RA New York City College of Technology. Learning Community.
 Bldg: Levels DEVELOPMENT OF LEVELS & ADJUSTMENTS TO THE GRID Overview: The existing drawing includes 2 levels set 10' apart. For the Lab Building we need to createe a total of 6 levels with a vertical
Part 6: Checking an existing kitchen design
 Welcome, Thank you for choosing, an innovative surveying tool for kitchen surveying. To help you get started with, we will guide you on the following pages through the registration, installation and handling
AreaSketch Pro Overview for ClickForms Users
 AreaSketch Pro Overview for ClickForms Users Designed for Real Property Specialist Designed specifically for field professionals required to draw an accurate sketch and calculate the area and perimeter
Deck Tutorial. Decks and Porches. Drawing Decks
 Deck Tutorial The Deck Tutorial continues where the Landscaping Tutorial left off, and explains how to create a deck off the back of the house and connect it to the terrain with an exterior staircase.
midas Dshop (Basic Tutorial) Basic Tutorial Reinforced Concrete Structure - 1 -
 Basic Tutorial Reinforced Concrete Structure - 1 -") midas Dshop (Basic Tutorial) midas DrawingShop Basic Tutorial Reinforced Concrete Structure - 1 - Index Ch.1 Summary of Design 1. Summary of Building Model 2. Standards of Structural Design 3. Structural
midas Dshop (Basic Tutorial) midas DrawingShop Basic Tutorial Reinforced Concrete Structure - 1 - Index Ch.1 Summary of Design 1. Summary of Building Model 2. Standards of Structural Design 3. Structural
Create styles that control the display of Civil 3D objects. Copy styles from one drawing to another drawing.
 NOTES Module 03 Settings and Styles In this module, you learn about the various settings and styles that are used in AutoCAD Civil 3D. A strong understanding of these basics leads to more efficient use
Getting Started. with Easy Blue Print
 Getting Started with Easy Blue Print User Interface Overview Easy Blue Print is a simple drawing program that will allow you to create professional-looking 2D floor plan drawings. This guide covers the
Floorplanner Drawing Manual
 Floorplanner Floorplanner Drawing Manual Drawing Manual Floorplanner lets you easily create interactive floorplans and publish them online. This manual explains the floorplanner drawing tool. For details
EG1003 Help and How To s: Revit Tutorial
 EG1003 Help and How To s: Revit Tutorial Completion of this tutorial is required for Milestone 1. Include screenshots of it in your Milestone 1 presentation. Downloading Revit: Before beginning the tutorial,
Microsoft Excel Lab Two (Completed 03/02/18) Transcript by Rev.com. Page 1 of 6
 Transcript by Rev.com. Page 1 of 6") [00:00:31] Speaker 1: Hello everyone and welcome to excel lab two. To get started with this lab you will need two files. You will need excel lab two instructions file also, you will need excel lab two
[00:00:31] Speaker 1: Hello everyone and welcome to excel lab two. To get started with this lab you will need two files. You will need excel lab two instructions file also, you will need excel lab two
Chief Architect X3 Training Series. Layers and Layer Sets
 Chief Architect X3 Training Series Layers and Layer Sets Save time while creating more detailed plans Why do you need Layers? Setting up Layer Lets Adding items to layers Layers and Layout Pages Layer
Deck Tutorial. Chapter 8: Decks and Porches
 Decks and Porches Chapter 8: Deck Tutorial Now we ll continue where the Landscaping Tutorial left off and create a deck off the back of the house, connecting it to the terrain with an exterior staircase.
NCSS Statistical Software
 Chapter 147 Introduction A mosaic plot is a graphical display of the cell frequencies of a contingency table in which the area of boxes of the plot are proportional to the cell frequencies of the contingency
Importing and processing gel images
 BioNumerics Tutorial: Importing and processing gel images 1 Aim Comprehensive tools for the processing of electrophoresis fingerprints, both from slab gels and capillary sequencers are incorporated into
COPYRIGHT NATIONAL DESIGN ACADEMY
 National Design Academy How 2 Guide Use SketchUp with LayOut COPYRIGHT NATIONAL DESIGN ACADEMY Use SketchUp with LayOut In order to be able to produce accurate scale drawings in SketchUp, you must use
FLIR Tools for PC 7/21/2016
 FLIR Tools for PC 7/21/2016 1 2 Tools+ is an upgrade that adds the ability to create Microsoft Word templates and reports, create radiometric panorama images, and record sequences from compatible USB and
PowerPoint 2016: Formatting Pictures. Introduction
 PowerPoint 2016: Formatting Pictures Introduction There are a variety of ways to format the pictures in your slide show. The picture tools in PowerPoint make it easy to personalize and modify the images
Roof Tutorial Wall Specification
 Roof Tutorial The majority of Roof Tutorial describes some common roof styles that can be created using settings in the Wall Specification dialog and can be completed independent of the other tutorials.
Architectural Design
 Punch! Pro Dream House Project After completing the tutorial and scale drawing exercises the students will design their dream home using Professional Home Design program, Punch! Home Design. Using Professional
HVAC in AutoCAD MEP: New and Improved. David Butts Gannett Fleming MP3724-L. Learning Objectives. At the end of this class, you will be able to:
 David Butts Gannett Fleming MP3724-L In the Building Information Modeling (BIM) world, there are still many users who have AutoCAD MEP but aren't ready to make the move to Autodesk Revit for a variety
Room 2D/3D Diagram Demo
 Room 2D/3D Diagram Demo PART 1) Basic Room Layout (2D) 1) Open the Crash Zone or Crime Zone diagram program. 2) Click on to open the CZ Point Cloud tool. 3) Click on 3D/Cloud Preferences. a) Set the Cloud
Let s start by making a pencil, that can be used to draw on the stage.
 Paint Box Introduction In this project, you will be making your own paint program! Step 1: Making a pencil Let s start by making a pencil, that can be used to draw on the stage. Activity Checklist Start
COURSE UNIT 3. Plan Creation. Messerli EliteCAD Version
 Messerli EliteCAD Version 13 27.09.2013 COURSE UNIT 3 Plan Creation Switzerland: Austria: Germany: Messerli Informatik AG Messerli Informatik GmbH Messerli Informatik GmbH Pfadackerstrasse 6 Hamoderstraße
10.2. Scanning Document Camera Scoring. Page 1 of 5. How do I score answer sheets using a document camera? STEP 1
 Step by Step How do I score answer sheets using a document camera? STEP 1 Click on the Assessment icon in the top navigation bar. STEP 2 To locate your assessment in an assessment list, first select the
Autodesk Medical Center
 Autodesk Medical Center Page 1 Contents Autodesk Medical Center... 1 Revit Projects... 3 Exercise 1 Create a new project file... 3 Datum Elements... 4 Exercise 2 Add Grids... 5 Exercise 3 Edit Levels...
We recommend downloading the latest core installer for our software from our website. This can be found at:
 Dusk Getting Started Installing the Software We recommend downloading the latest core installer for our software from our website. This can be found at: https://www.atik-cameras.com/downloads/ Locate and
GEO/EVS 425/525 Unit 2 Composing a Map in Final Form
 GEO/EVS 425/525 Unit 2 Composing a Map in Final Form The Map Composer is the main mechanism by which the final drafts of images are sent to the printer. Its use requires that images be readable within
Congratulations on your decision to purchase the Triquetra Auto Zero Touch Plate for All Three Axis.
 Congratulations on your decision to purchase the Triquetra Auto Zero Touch Plate for All Three Axis. This user guide along with the videos included on the CD should have you on your way to perfect zero
Version 8 Tutorial
 Version 8 Tutorial 800-989-4243 214-340-9436 support@vertigraph.com www.vertigraph.com 1 Table of Contents A. Overview... 4 B. About the SiteWorx/OS Window... 4 C. File Types Raster, Vector and PDF...
CHM 152 Lab 1: Plotting with Excel updated: May 2011
 CHM 152 Lab 1: Plotting with Excel updated: May 2011 Introduction In this course, many of our labs will involve plotting data. While many students are nerds already quite proficient at using Excel to plot
Instructions for Rotary Marking
 (Original Instruction) Instructions for Rotary Marking COBALT LT lasermarktech.com Laser Marking Technologies, LLC 1 Thank you for choosing LMT for your laser needs! please feel free to contact us per
POWER DEMAND FOR MULTIPLE ZONES
 IDA Indoor Climate and Energy Basic Course POWER DEMAND FOR MULTIPLE ZONES Guide Copyright EQUA Simulation AB February 2018 Purpose This is the second part of the IDA ICE basic course 1. You learn how
4) Click on Load Point Cloud to load the.czp file from Scene. Open Intersection_Demo.czp
 Click on Load Point Cloud to load the.czp file from Scene. Open Intersection_Demo.czp") Intersection 2D Demo 1) Open the Crash Zone or Crime Zone diagram program. 2) Click on to open the CZ Point Cloud tool. 3) Click on 3D/Cloud Preferences. a) Set the Cloud File Units (Feet or Meters). b)
Intersection 2D Demo 1) Open the Crash Zone or Crime Zone diagram program. 2) Click on to open the CZ Point Cloud tool. 3) Click on 3D/Cloud Preferences. a) Set the Cloud File Units (Feet or Meters). b)
Term Definition Introduced in: Tab(s) along the ribbon that show additional programs or features (e.g. Acrobat )
 along the ribbon that show additional programs or features (e.g. Acrobat )") 60 Minutes of Excel Secrets Key Terms Term Definition Introduced in: Tab(s) along the ribbon that show additional programs or features (e.g. Acrobat ) Add-Ins AutoCorrect Module 1 Corrects typographical,
60 Minutes of Excel Secrets Key Terms Term Definition Introduced in: Tab(s) along the ribbon that show additional programs or features (e.g. Acrobat ) Add-Ins AutoCorrect Module 1 Corrects typographical,
Scanning Electron Microscope FEI INSPECT F50. Step by step operation manual
 Scanning Electron Microscope FEI INSPECT F50 Step by step operation manual Scanning Electron Microscope, FEI Inspect F50 FE-SEM-F Observation Flow Saving Data And Analysis Specimen preparation Error check
LESSON 02: GET STRONGER FOR PS USERS COMPANION BOOK. Digital Scrapbook Academy. February 2018: Lesson 02 Get Stronger for Photoshop Users
 Digital Scrapbook Academy February 2018: Lesson 02 LESSON 02: GET STRONGER FOR PS USERS COMPANION BOOK Page 1 of 19 Table of Contents Table of Contents 2 Welcome to Lesson 02 for Photoshop Users 4 1: Add
Introduction. Basic Image Formatting. PowerPoint 2010 Formatting Pictures. To Crop an Image: Page 1
 PowerPoint 2010 Formatting Pictures Introduction Page 1 Once you've added pictures to your presentations, you can format them in various ways. The picture tools in PowerPoint 2010 make it easy to incorporate
Introduction. Basic Image Formatting. Word 2010 Formatting Pictures. To Crop an Image: Page 1
 Word 2010 Formatting Pictures Introduction Page 1 Once you've added pictures to your documents, you can format them in various ways. The picture tools in Word 2010 make it easy to incorporate images into
GD.FINDI FUNCTIONS OVERVIEW
 GD.FINDI FUNCTIONS OVERVIEW ASSOC. PROF. DR. CHAWALIT JEENANUNTA HEAD OF CENTER FOR DEMONSTRATION AND TECHNOLOGY TRANSFER OF INDUSTRY 4.0 HEAD OF LOGISTICS AND SUPPLY CHAIN SYSTEM ENGINEERING RESEARCH
Stratigraphy Modeling Boreholes and Cross. Become familiar with boreholes and borehole cross sections in GMS
 v. 10.3 GMS 10.3 Tutorial Stratigraphy Modeling Boreholes and Cross Sections Become familiar with boreholes and borehole cross sections in GMS Objectives Learn how to import borehole data, construct a
Camera & Photos Apps ios10
 2017 Class Camera & Photos Apps ios10 iphone and ipad 1 Camera iphone also has filter options Live Photos, iphone 6s, 7 and ipad Pro Grid HDR - High Dynamic Range Timer Flash Switch Cameras Exposure Adjust
Revit Structure 2012 Basics:
 SUPPLEMENTAL FILES ON CD Revit Structure 2012 Basics: Framing and Documentation Elise Moss autodesk authorized publisher SDC PUBLICATIONS www.sdcpublications.com Schroff Development Corporation Structural
The lump sum amount that a series of future payments is worth now; used to calculate loan payments; also known as present value function Module 3
 Microsoft Excel Formulas Made Easy Key Terms Term Definition Introduced In Absolute reference A cell reference that is fixed to a specific cell and contains a constant value throughout the spreadsheet
User Guide V10 SP1 Addendum
 Alibre Design User Guide V10 SP1 Addendum Copyrights Information in this document is subject to change without notice. The software described in this document is furnished under a license agreement or
Physical Inventory System User Manual. Version 19
 Physical Inventory System User Manual Version 19 0 Physical Inventory System User Manual 1 Table of Contents 1. Prepare for Physical Inventory... 2. Chapter 1: Starting Inventory... 2.1. CDK/ADP... 3.
Introduction to 3D Printing. Activity 1: Design a keychain using computer-aided design software
 Introduction to 3D Printing Activity 1: Design a keychain using computer-aided design software 1 In this activity we ll design a keychain name tag and learn the fundamentals of computer-aided design, the
BERNINA Embroidery Software 6 for the Garment-Maker
 BERNINA Embroidery Software 6 for the Garment-Maker BERNINA Embroidery software makes garment-making and embellishing fast and easy using basic tools in the software. Scanning You may choose to use the
nvision Actuals Drilldown (Non-Project Speedtypes) Training Guide Spectrum+ System 8.9 November 2010 Version 2.1
 Training Guide Spectrum+ System 8.9 November 2010 Version 2.1") nvision Actuals Drilldown (Non-Project Speedtypes) Training Guide Spectrum+ System 8.9 November 2010 Version 2.1 Table of Contents Introduction. Page 03 Logging into Spectrum.Page 03 Accessing the NVision
nvision Actuals Drilldown (Non-Project Speedtypes) Training Guide Spectrum+ System 8.9 November 2010 Version 2.1 Table of Contents Introduction. Page 03 Logging into Spectrum.Page 03 Accessing the NVision
Cast Unit Drawings Tekla Structures 11.0 Basic Training August 25, 2005
 Tekla Structures 11.0 Basic Training August 25, 2005 Copyright 2005 Tekla Corporation Contents 11... 3 11.1 Create...4 Define cast unit drawing properties for beams...4 Create a cast unit drawing for a
CREATING A COMPOSITE
 CREATING A COMPOSITE In a digital image, the amount of detail that a digital camera or scanner captures is frequently called image resolution, however, this should be referred to as pixel dimensions. This
LIGHT-SCENE ENGINE MANAGER GUIDE
 ambx LIGHT-SCENE ENGINE MANAGER GUIDE 20/05/2014 15:31 1 ambx Light-Scene Engine Manager The ambx Light-Scene Engine Manager is the installation and configuration software tool for use with ambx Light-Scene
User Guide. Version 1.2. Copyright Favor Software. Revised:
 User Guide Version 1.2 Copyright 2009-2010 Favor Software Revised: 2010.05.18 Table of Contents Introduction...4 Installation on Windows...5 Installation on Macintosh...6 Registering Intwined Pattern Studio...7
Autodesk University Project Navigator to the Rescue in AutoCAD Architecture: Fix Standard Mismatches in a Project
 Autodesk University Project Navigator to the Rescue in AutoCAD Architecture: Fix Standard Mismatches in a Project Good afternoon. Thank you for choosing the class Project Navigator to the Rescue in AutoCAD
Applied Precast Concrete Detailing
 Applied Precast Concrete Detailing Tekla Structures 11.0 August 30, 2005 Copyright 2005 Tekla Corporation Copyright 2005 Tekla Corporation Applied Precast Concrete Detailing i Copyright 2005 Tekla Corporation
SMALL OFFICE TUTORIAL
 SMALL OFFICE TUTORIAL in this lesson you will get a down and dirty overview of the functionality of Revit Architecture. The very basics of creating walls, doors, windows, roofs, annotations and dimensioning.
Context-Aware Planning and Verification
 7 CHAPTER This chapter describes a number of tools and configurations that can be used to enhance the location accuracy of elements (clients, tags, rogue clients, and rogue access points) within an indoor
GEO/EVS 425/525 Unit 3 Composite Images and The ERDAS Imagine Map Composer
 GEO/EVS 425/525 Unit 3 Composite Images and The ERDAS Imagine Map Composer This unit involves two parts, both of which will enable you to present data more clearly than you might have thought possible.
Digital Photo Guide. Version 8
 Digital Photo Guide Version 8 Simsol Photo Guide 1 Simsol s Digital Photo Guide Contents Simsol s Digital Photo Guide Contents 1 Setting Up Your Camera to Take a Good Photo 2 Importing Digital Photos into
Vectorworks / MiniCAD Tutorials
 Vectorworks / MiniCAD Tutorials Tutorial 1: Construct a simple model of a little house Tutorial 2: Construct a 4 view Orthographic drawing of the Model These tutorials are available as Adobe Acrobat 4
NEORSD. Cad Standards and Procedures Manual
 NEORSD Cad Standards and Procedures Manual This Manual is being provided to you on loan from the NEOSRD and is the property of the NEOSRD. Periodic updates will be provided and you are responsible for
QUICKSTART COURSE - MODULE 7 PART 3
 QUICKSTART COURSE - MODULE 7 PART 3 copyright 2011 by Eric Bobrow, all rights reserved For more information about the QuickStart Course, visit http://www.acbestpractices.com/quickstart Hello, this is Eric
Revit Structure 2014 Basics
 Revit Structure 2014 Basics Framing and Documentation Elise Moss Authorized Author SDC P U B L I C AT I O N S Better Textbooks. Lower Prices. www.sdcpublications.com Powered by TCPDF (www.tcpdf.org) Visit
Revit Structure 2013 Basics
 Revit Structure 2013 Basics Framing and Documentation Elise Moss Supplemental Files SDC P U B L I C AT I O N S Schroff Development Corporation Better Textbooks. Lower Prices. www.sdcpublications.com Tutorial
Ask Jo: Quilt Designing on the Computer
 Ask Jo: Quilt Designing on the Computer If you are new to the blog, welcome. You have reached an archived free pattern. We typically put up new blog post twice daily so there is always something new and
Meteor Game for Multimedia Fusion 1.5
 Meteor Game for Multimedia Fusion 1.5 Badly written by Jeff Vance jvance@clickteam.com For Multimedia Fusion 1.5 demo version Based off the class How to make video games. I taught at University Park Community
Autodesk Revit MEP Plumbing: Mystery Solved
 Plamen Hristov Capital Engineering Consultants, Inc The plumbing portion of Revit MEP has the undeserved reputation of not ready yet." We will dispel that notion in this hands-on lab where you will have
How to use Photo Story 3
 How to use Photo Story 3 Photo Story 3 helps you to make digital stories on the computer using photos (or other images), text and sound. You can record your voice and write your own text. You can also
Stratigraphy Modeling Boreholes and Cross Sections
 GMS TUTORIALS Stratigraphy Modeling Boreholes and Cross Sections The Borehole module of GMS can be used to visualize boreholes created from drilling logs. Also three-dimensional cross sections between
Advance Steel. Tutorial
 Advance Steel Tutorial Table of contents About this tutorial... 7 How to use this guide...9 Lesson 1: Creating a building grid...10 Step 1: Creating an axis group in the X direction...10 Step 2: Creating