Fan Speed Controller/Accelerator Mods
|
|
|
- Stuart Summers
- 6 years ago
- Views:
Transcription
1 Fan Speed Controller/Accelerator Mods For the Playstation 3 User Manual
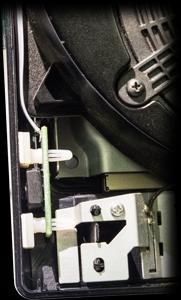
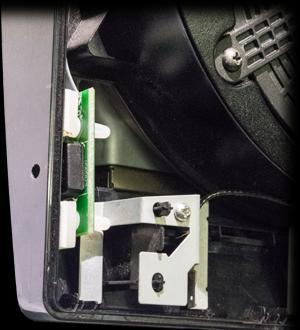
2 Description This is a series of small modules designed to be inserted between the fan and the mainboard of the Playstation 3 in order to increase the speed of the fan within the console to give more airflow than that designed into the PS3. Basic Accelerator (Blue) This version increases the speed of the fan by a fixed 50% of the speed set by the system. For example, if the system is driving the fan at 20% of full speed, this module will increase the speed to about 30% of full speed. 30% of full speed will increase to 45% etc. System fan-speeds above 66% will result in the fan being driven at full speed by the module. Adjustable Accelerator (Green) This module does the same as the basic version with the added facility of being able to change the amount of increase by setting the switch to the required position. Each position represents a 10% increase: Posn. 1. Posn. 2. : : Posn. 0. Fan speed increased by 10% of that set by the console Fan speed increased by 20% of that set by the console Fan speed increased by 100% of that set by the console (double the speed). Adjustment is made using a small flat-bladed screwdriver to turn the switch to the desired setting. Adjustable Controller (Red) This version allows the user to set the minimum speed at which the fan will run. This gives the user the option of setting the fan to spin at a high rate even when the console is cold. If the console asks the fan to run faster than that set by the user, this higher rate will take priority. The fan speed can be continuously varied between the speed demanded by the console and full speed, by adjusting the small pot on the board. Adjustment is made using a small flat-bladed screwdriver to turn the switch to the desired setting. Externally Variable Controller (Yellow) Unlike previous versions, this module allows the user to vary the speed of the fan from outside the case by means of a potentiometer (pot) fitted to the console s case. The fan speed can be varied continuously between the speed set by the console (based on the temperature of the CPU) and full speed. The module will not allow the speed to be reduced below that set by the console as that could allow the console to overheat and therefore potentially bring on YLOD. Fitting this module is identical to that described for the other modules, but with the additional requirement to fit the pot in a suitable position. For information about fitting the pot, turn to the back page of this leaflet. Illuminated Controller (Yellow/Red) This version is the same as the "Externally Variable Controller" except that the control is mounted inside the case and is adjusted by means of a screwdriver inserted through a small hole drilled in the case. A red LED provides illumination of the hole to assist with location when adjustment is required. Total Over-ride (Grey) This is similar to the Yellow version except that this version does not allow the console to take priority. The fan may be set to spin at an rate irrespective of the demand from the console. Caution must be exercised when using this mod as it is possible to make the fan spin too slowly to give sufficient cooling, and therefore allow the console to overheat!


 If you have a later version of the PS3 Fat, you may not need to go further than removing the top cover as the fan connector is on the top of the")

 For earlier versions of the PS3 Fat it will be necessary to remove the mainboard")
3 Fitting Details BEFORE YOU BEGIN, PLEASE NOTE THAT OPENING YOUR CONSOLE TO FIT THIS UNIT WILL INVALIDATE YOUR WARRANTY. NO RESPONSIBILITY WILL BE ACCEPTED FOR DAMAGE OR INJURY CAUSED DURING THE INSTALLATION OF THIS MODULE. The dis-assembly of your Playstation is quite straightforward, and details may be found on numerous websites as well as on Youtube, therefore that information will not be repeated here. These instructions illustrate three versions of the PS3, however there may be other, different, configurations. The main point to remember is that you are simply looking for the point at which the wires from the fan connect to the main system board. Once that has been found, it is simply a case of unplugging the fan and plugging it into the accelerator module and then plugging the module into the mainboard fan socket. This is the same for all versions of the module. The fitting of the controls for the Yellow, Yellow/Red and Grey modules is described towards the end of this document. Original PS3 (Later Version) If you have a later version of the PS3 Fat, you may not need to go further than removing the top cover as the fan connector is on the top of the mainboard just behind the power supply unit. Gently but firmly pull the fan connector upwards out of its socket. In its place, insert the plug of the accelerator. This will only fit one way round. Once inserted into the socket, press firmly to make sure it s fully home. Take the fan connector and insert into the socket of the accelerator. Tuck the unit into the space under the power unit. Temporarily removing the plug from the PSU will make this easier Original PS3 (Earlier Version) For earlier versions of the PS3 Fat it will be necessary to remove the mainboard assembly from the case, as the fan connector is on the underside of the board. Gently but firmly pull the fan connector upwards out of its socket. In its place, insert the plug of the accelerator. This will only fit one way round. Once inserted into the socket, press firmly to make sure it s fully home. Take the fan connector and insert into the socket of the accelerator. Tuck the unit neatly into the space just behind the USB ports.
.")


4 PS3 Slim You will need to temporarily remove the PSU in order to expose the fan connector in this model. Once the console top has been removed, unplug the mains connector and the low voltage connector (circled). Remove the two fixing screws (arrowed) and lift the PSU out. There will be some resistance but gently wriggling the PSU whilst lifting upwards will ease it out. Once the fan connector has been exposed, gently but firmly pull the fan connector upwards out of its socket. In its place, insert the plug of the accelerator. This will only fit one way round. Once inserted into the socket, press firmly to make sure it s fully home. Take the fan connector and insert into the socket of the accelerator. Lay the accelerator wires flat and route to the side of the console as shown. The power supply may now be replaced into the console, the fixing screws replaced and the electrical connections reconnected. Tuck the excess wiring neatly down between the fan housing and the side of the case, and lay the module near the fan and next to the side of the case. Take care to keep wires etc well clear of the fixing screw hole (circled). Next page: Fitting the control of the yellow, Grey and Yellow/Red modules...
5 Externally Variable Controller - Fitting the Control The pot is designed to fit through a hole 7.5mm diameter with a second locating hole of 3mm diameter (see diagram over the page). Whilst that is the ideal method of fitting, it s not strictly necessary to have both holes if the locating lug is removed from the pot - it s there to ensure the pot doesn t rotate in its fixing. If you prefer not to drill holes in your console s case, then it s possible to make a small slot somewhere inconspicuous on the edge of the case which the cable may be routed through, and the pot stuck to the outside of the case using glue or double-sided tape. This is not such an attractive way of mounting the pot, but it does have the advantage of ease, and does not leaving an unsightly hole should you remove this mod to sell the console on at a later date. If you decide to fit the pot as designed, then with reference to Figure 1, the first thing that needs to be done is to locate a suitable position within the console with enough space to fit the pot. Make sure that this position has enough clearance all round so that when fitted, neither the body nor the terminals of the pot will come into contact with any internal part of the console when the case is put back together. Place the self adhesive drilling template on the chosen location on the outer surface of the case. For guidance, the outline of the body of the pot is shown on the template. Carefully mark the centre of both holes using a scribe or similar sharp point. When drilling the holes, do so with a moderate to low drill speed; too high a speed may cause the plastic to melt resulting in an unclean hole. Once the internals of the console have been replaced into the case, the module can be fitted, the cable routed carefully to the hole and the pot fitted and secured with the nut and washer supplied. When refitting the top half of the console s shell, be careful not to nip the pot s cable between the plastic mouldings and also make sure that the cable does not cover the case fixing screw holes. Figure 1: Potentiometer Dimensions Illuminated Controller - Fitting the Control Fitting the illuminated control is easier than above as there is only one small hole to drill in the case. Locate a suitable position inside the case which has enough space to accommodate the pcb/pot assembly. Press the stand-offs into the holes in the pcb from the same side as the control pot. Offer the assembly to the selected position, but do not remove the protective film from the feet at this stage. This will give an idea as to where the hole needs to be drilled in the case. Drill a 3mm hole at the selected position. In order to best align the pot with the hole, it may be easiest to insert a small (2mm) screwdriver through the hole to act as a guide. Remove the protective film from the feet and engage the control pot with the end of the screwdriver. Keeping the two together, present the assembly to the wall of the console. The pads will now stick to the case and the control should be suitably aligned with the hole. The following images show the control fitted to a PS3 Slim:


6 For further information or support, please Circuit Surgery No part of this publication may be reproduced in any form, whether physically or electronically without prior written consent.
Fan Speed Controller/Accelerator Mods
 Fan Speed Controller/Accelerator Mods For the Playstation 4 User Manual www.circuitsurgery.com Page 1 of 6 Description This is a series of small modules designed to be easily fitted to the your Playstation
ASSEMBLY INSTRUCTIONS FOR SL500A AND SL500AL
 ASSEMBLY INSTRUCTIONS FOR SL500A AND SL500AL January 2013 The SL500A is a square upright glass cabinet with a single hinged lockable door. It has five adjustable shelves plus the base. It also has an optional
Instructions to fit Emulator in place of floppy drive M.D.R.
 Instructions to fit Emulator in place of floppy drive M.D.R. Before starting, read through all the following instructions, and then when you do begin, read each number section before attempting that particular
Assembly Instructions Nevins Phone Booth
 Assembly Instructions Nevins Phone Booth Included Hardware Tools Required supplied by installer Drill & Bit Bolt A - (16) 1/4-20 x 1-1/2 hex head Bolt B - (20) 1/4-20 x 2-1/2 phillips head Screw 1 - (24)
Written By: Joseph O'Connor
 PlayStation 3 Super Slim Fan Replacement PS3 keeps overheating? This guide will walk you through replacing your PS3's fan. Written By: Joseph O'Connor ifixit CC BY-NC-SA www.ifixit.com Page 1 of 13 INTRODUCTION
Written By: Walter Galan
 Xbox 360 CPU Heat Sink Replacement CPU heat sink replacement. Written By: Walter Galan ifixit CC BY-NC-SA www.ifixit.com Page 1 of 27 INTRODUCTION Use this guide to remove the CPU heat sink from your Xbox
UPLIFT Height Adjustable Standing Desk 3-Leg (T-Frame) DIRECTIONS FOR ASSEMBLY AND USE
 DIRECTIONS FOR ASSEMBLY AND USE") UPLIFT Height Adjustable Standing Desk 3-Leg (T-Frame) DIRECTIONS FOR ASSEMBLY AND USE CAUTION MAKE SURE NO OBSTACLES ARE IN THE DESK S PATH AND ALL CORDS ARE OF APPROPRIATE LENGTH FOR DESK TRAVEL. FAILURE
UPLIFT Height Adjustable Standing Desk 3-Leg (T-Frame) DIRECTIONS FOR ASSEMBLY AND USE CAUTION MAKE SURE NO OBSTACLES ARE IN THE DESK S PATH AND ALL CORDS ARE OF APPROPRIATE LENGTH FOR DESK TRAVEL. FAILURE
Desk/Wall-Mount Rack
 Desk/Wall-Mount Rack Patent(s) Pending Installation Instructions Post P/N: 119-1752 119-1781 119-1782 119-4014 Frame P/N: 119-1591 119-1754 119-1755 Kit Contents (2) Frames (4) Posts Assembly Hardware
Repairing your Porsche 928 Central Warning System (CWS) controller
 controller") Repairing your Porsche 928 Central Warning System (CWS) controller Disclaimer: This procedure is for a 1984 Porsche 928 S controller. Overview: Under the left foot pedal (dead pedal) of the Porsche 928
Repairing your Porsche 928 Central Warning System (CWS) controller Disclaimer: This procedure is for a 1984 Porsche 928 S controller. Overview: Under the left foot pedal (dead pedal) of the Porsche 928
Build your own. Pack. Stages 19-22: Continue building Robi s left arm
 Build your own Pack 06 Stages 19-22: Continue building Robi s left arm Build your own All rights reserved 2015 Published in the UK by De Agostini UK Ltd, Battersea Studios 2, 82 Silverthorne Road, London
Assembly Instructions Nevins Phone Booth
 Assembly Instructions Nevins Phone Booth Included Hardware Tools Required supplied by installer Drill & Bit Socket Wrench Bolt A - (16) 1/4-20 x 1-1/2 hex head Bolt B - (20) 1/4-20 x 2-1/4 phillips head
GE Monogram. Installation. Instructions. Microwave Oven. Under Cabinet Installation. and. JX827 Series Built-In Kit. Models.
 GE Monogram Installation Instructions Under Cabinet Installation and JX827 Series Built-In Kit Models ZEM200 Series CAUTION WARNING Before you begin Read these instructions completely and carefully. IMPORTANT:
Installation instructions, accessories. TV receiver, digital
 Installation instructions, accessories Instruction No 30756561 Version 1.1 5 Part. No. 30756181, 30756569 TV receiver, digital Volvo Car Corporation TV receiver, digital- 30756561 - V1.1 Page 1 / 36 Equipment
KN-8828B Upgrade Directions
 KN-8828B Upgrade Directions This document outlines the steps to take to update earlier Hottop Bean Roasters to the KN-8828B 2007 by Chang Yue and Hottop USA - All Rights Reserved No part of this document
LP-200 Dummy Load / Wattmeter
 LP-200 Dummy Load / Wattmeter Enclosure Retrofit Assembly Instructions March 2009 TelePost Incorporated LP-200 is a trademark of TelePost Inc. Material in this document copyrighted 2009 TelePost Inc. 1
Installing Your New Creature From The Black Lagoon Tail Light DMD Panel MOD
 Installing Your New Creature From The Black Lagoon Tail Light DMD Panel MOD A few things before we start: The wooden speaker panel provided in this MOD was manufactured using a Precision CNC machine and
CLEANING THE GALVO MIRRORS
 CLEANING THE GALVO MIRRORS Formlabs Customer Support can provide additional information on mirror cleaning and in some cases, provide the customer with the appropriate cleaning supplies. Tools: 2.5mm hex
Build your own. Stages 47-50: Continue building up Robi s left leg
 Build your own Pack 13 Stages 47-50: Continue building up Robi s left leg Build your own All rights reserved 2016 CONTENTS Published in the UK by De Agostini UK Ltd, Battersea Studios 2, 82 Silverthorne
Series----SP3600A SHOWER DOOR
 Series----SP3600A SHOWER DOOR INSTALLATION INSTRUCTIONS Please read these instructions carefully to familiarize yourself with the required tools, materials, and installation sequences. The Exploded Diagram
BL-ER-P Ethernet Radio Unit for Pedestal Installation Guide
 Assemble the Antenna Riser 1. Remove the antenna riser assembly and the antenna from its packaging. 2. Remove the plastic cap, the nut, and the lock washer from the stem of the antenna. 3. Put the stem
Woodline USA Woodline Spacer Fence System
 Woodline USA Woodline Spacer Fence System MADE IN THE USA Includes: (1) ¼ Spacer Fence (1) 3/8 Spacer Fence (1) ½ Spacer Fence (1) Hardware Package (1) 3 Piece Brass bar set (2) Setup Blocks Visit Us Online
PERSONAL RECORD KEEPING
 2 P R O 3 7 0 A s s e m b l y i n s t r u c t i o n s PERSONAL RECORD KEEPING Tip: Record the serial numbers of your Octane Fitness elliptical in the spaces below. This will make it easier for you to obtain
EPPA2-KIT DUAL MONITOR ARM CONVERSION
 EPPA2-KIT DUAL MONITOR ARM CONVERSION EPPA2-KIT Rev A 10/17 Model EPPA2-KIT-XXX ASSEMBLY AND ADJUSTMENT EPPA2-KIT PARTS AND TOOLS PLEASE REVIEW these instructions before beginning the assembly and adjustment
Preference Collection 5580 Treatment Console INSTALLATION GUIDE
 Preference Collection 5580 Treatment Console INSTALLATION GUIDE 0 WARNING Failure to install the 5580 as described in this installation guide may cause the unit to collapse, resulting in serious injury
BIG CEE. ENGINEERING 627 N Michigan Ave #5 Pasadena, CA
 Garmin Emap power adapter housing BIG CEE ENGINEERING 627 N Michigan Ave #5 Pasadena, CA 91106 bigcee@bigcee.com www.bigcee.com This kit allows you to remove the circuit board from your Emap 12V adapter
Sea Doo Spark Engine Access Kit
 Sea Doo Spark Engine Access Kit PART# - RS4-130-EAK APPLICATION(S): Sea Doo Spark. 2up & 3up Models. We strongly recommend the use of a service manual to familiarize yourself with the various components
Congratulations on purchasing the Spirit Rails Magnetic Attach that allows easy wand to pack removal and reattachment by just getting close!
 Introduction Congratulations on purchasing the Spirit Rails Magnetic Attach that allows easy wand to pack removal and reattachment by just getting close! The Spirit Rails Magnetic Attach Kit is designed
Tech Sheet. T4 Interior conversion kit how to - fitting instructions. 1. Rear seat belts. 2.
 Page 1 of 8 T4 Interior conversion kit how to - fitting instructions Thank you for purchasing our T4 interior conversion kit. This kit will enable you to convert any SWB left hand loading door T4 into
EDGE2 DUAL MONITOR ARM
 EDGE2 DUAL MONITOR ARM EDGE2 Rev A 2/17 Model EDGE2-SLV Model EDGE2-BLK Model EDGE2-WHT ASSEMBLY AND ADJUSTMENT EDGE2 DUAL MONITOR ARM PARTS AND TOOLS PLEASE REVIEW these instructions before beginning
MOTOR & BULK HEAD. A Manual for Repair and Maintenance Technicians
 MOTOR & BULK HEAD A Manual for Repair and Maintenance Technicians CAUTION This manual is designed to help technicians who are already experienced in workshop procedures and know how to handle tools. Only
Harmony Remote Repair
 Harmony Remote Repair harmonyremoterepair.com How to install your new Harmony One Front Cover/Touch Screen Important! Before you begin working on your Harmony One, you must discharge any static electricity
EA6500 Antenna Installation Instructions:
 Thank you for purchasing the 6 Antenna Mod Kit for your Linksys router. First we will show you how to install the antennas for your router. Next we will teach you how to setup the DD-WRT firmware which
LED Cup Holder Lights Installation Guide
 LED Cup Holder Lights Installation Guide (20112015 Kia Optima) Thanks for purchasing this LED Cup Holder Light Kit! If you have any questions or feedback please email us direct at Sales@K5OptimaStore.com
Custom Pendant- Hardwire Assembly and Installation Instructions
 Custom Pendant- Hardwire Assembly and Installation Instructions CAUTION: BEFORE INSTALLING FIXTURE, MAKE SURE THE POWER TO THE CIRCUIT IS TURNED OFF AT THE MAIN FUSE BOX / CIRCUIT BREAKER UTILITY BOX.
Installation Instructions
 READ BEFORE INSTALLING UNIT INSTALLATION WARNINGS AND CAUTION Carefully read the installation manual before beginning. Follow each step as shown. Observe all local, state, and national electrical codes
Build your own. Stages 7-10: See Robi s head move for the first time
 Build your own Pack 03 Stages 7-10: See Robi s head move for the first time Build your own All rights reserved 2015 Published in the UK by De Agostini UK Ltd, Battersea Studios 2, 82 Silverthorne Road,
For additional assistance call
 The following pages will help guide you through the process of assembling your new 48 custom prize wheel. Choose an assembly area with plenty of room to lay your pieces on the floor and also a bench or
Signal Mirror Installation Instructions
 Signal Mirror Installation Instructions 2006 2007 Honda Ridgeline THE safety accessory of the 21 st Century. P/N 210 0142 0 Rev. A (9/5/07), BTV 2007 Muth Company, LLC Professional Installation Recommended:
ASSEMBLY AND ADJUSTMENT
 EDGE MONITOR ARM EDGE Rev A 2/17 Model EDGE-SLV Model EDGE-BLK Model EDGE-WHT ASSEMBLY AND ADJUSTMENT EDGE MONITOR ARM PARTS AND TOOLS PLEASE REVIEW these instructions before beginning the assembly and
Single Sided Height Adjustable Benching
 Single Sided Height Adjustable Benching Bit Holder Power Drill Long # Square Drive Bit 5mm Hex Drive Bit T-30 Torx Drive Bit Hex Key -.5mm (Provided) SERIES 5 Hex Key - 3mm Socket Adaptor (or) If you have
Installation tutorial for Console Customs PS3 TrueFire Standard Rapid fire Microchip for Sixaxis and Dualshock 3 controllers
 Installation tutorial for Console Customs PS3 TrueFire Standard Rapid fire Microchip for Sixaxis and Dualshock 3 controllers This tutorial is designed to aid you in installation of a console customs rapid
Installing the Onyx Heated Bed
 Installing the Onyx Heated Bed This short supplement will guide you through replacing the Phebe I heated bed on your Rostock MAX with the new Onyx heated bed. Your Onyx upgrade kit should include the following
Film Scanner 24V Inverter Replacement
 Overview Please read and understand the entire work instruction before beginning any procedures. WARNING: icrco assumes no liability for damage done to the unit while following these instructions. These
Ford Police Interceptor Utility Vehicle
 Ford Police Interceptor Utility Vehicle 1 TOOLS NEEDED 13 MM Twelve Point Deep Socket Socket Wrench Extension Socket Wrench Hand Drill or Cordless Drill Phillips Head Screwdriver Measuring Tape or Ruler
Conversion of a Marconi Blue Cap LNB into a 3cms 30-50mW Tx.
 Conversion of a Marconi Blue Cap LNB into a 3cms 30-50mW Tx. These mods. are based on the article by Bob Platts, G8OZP, in CQ-TV 181 P64-68. In this variation the various bias voltages are generated from
MM340 Installation Instructions IMPORTANT SAFETY INSTRUCTIONS - SAVE THESE INSTRUCTIONS
 MM30 Installation Instructions IMPORTANT SAFETY INSTRUCTIONS - SAVE THESE INSTRUCTIONS Please read this entire manual before you begin. Do not unpack any contents until you verify all requirements on PAGE.
DO NOT PULL ON THE SHEATH.
 Removing and Replacing the Head Cover To remove and replace the head cover you will need the following tools: #2 Phillips screwdriver (magnetic tip preferred) Removing the Head Cover 1. Ready the machine
Sony BDV-NF620 Teardown
 This is the teardown on a amp/bd player/media receiver that looks like a PlayStation 3 Super Slim Written By: Federico Barutto ifixit CC BY-NC-SA www.ifixit.com Page 1 of 18 TOOLS: Phillips #2 Screwdriver
Arched Top Lantern Pendant Assembly and Installation Instructions. Country of Destination: US/CN UK/EU/AUS Middle East
 CAUTION: Arched Top Lantern Pendant Assembly and Installation Instructions Country of Destination: US/CN UK/EU/AUS Middle East BEFORE INSTALLING FIXTURE, MAKE SURE THE POWER TO THE CIRCUIT IS TURNED OFF
MantelMount. TM1A Installation Instructions IMPORTANT SAFETY INSTRUCTIONS - SAVE THESE INSTRUCTIONS
 MantelMount TMA Installation Instructions IMPORTANT SAFETY INSTRUCTIONS - SAVE THESE INSTRUCTIONS TM Thank you for choosing the MantelMount television wall mount. Please read this entire manual before
Installation Instructions
 Installation Instructions READ BEFORE INSTALLING UNIT For Slider Casement Air Conditioners INSTALLATION WARNINGS AND CAUTION Carefully read the installation manual before beginning. Follow each step as
installation instructions
 installation instructions Easi-Plan WC Frame 820mm with Dual Flush Cistern ref: EPWC-05-1005 Easi-Plan WC Frame 980mm with Dual Flush Cistern ref: EPWC-05-1505 EASI-PLAN installation instructions Parts
TRUE TECHNICAL SERVICE MANUAL - ALL MODELS. DOORS/DRAWERS/LIDS
 DOORS/DRAWERS/LIDS 55 56 NOTES DOORS/DRAWERS/LIDS Swing s 73 74 NOTES INSTALLATION OF A GDM-SWING DOOR Phillips Head Screwdriver (2) - 1/8" Drift Punches (forged) Top Bracket NOTE: It may be necessary
INSTALLATION INSTRUCTIONS
 INSTALLATION INSTRUCTIONS Universal Low Profile Tilt Mount Model: U.S. Toll Free: 1-866-752-6271 Outside N. America: 1-503-748-5799 E-mail: ts@planar.com FRANCE Phone: +33 5 6378 3810 E-mail: emeats@planar.com
ABM International, Inc.
 ABM International, Inc. Lightning Stitch required 1 1.0: Parts List head and motor assembly (Qty. 1) Reel stand (Qty. 1) Needle bar frame clamp (Qty. 1) Motor drive (Qty. 1) 2 Cable harness with bracket
E-FLIGHT BLADE CX COMPLETE DISASSEMBLY JANUARY 2006
 E-FLIGHT BLADE CX COMPLETE DISASSEMBLY JANUARY 2006 AERONUTS THIS IS NOT AN OFFICIAL E-FLIGHT MANUAL OR INSTRUCTION. IT IS BEING PROVIDED FOR INFORMATIONAL PURPOSES ONLY. AUTHOR ASSUMES NO LIABILITY FOR
ROPE CHANDELIER - FRAME ASSEMBLY & INSTALLATION INSTRUCTIONS
 ROPE CHANDELIER - FRAME ASSEMBLY & INSTALLATION INSTRUCTIONS CAUTION: BEFORE INSTALLING FIXTURE, MAKE SURE THE POWER TO THE CIRCUIT IS TURNED OFF AT THE MAIN FUSE BOX / CIRCUIT BREAKER UTILITY BOX. IMPORTANT
LCD LIFT Flat Panel Display System Installation Manual. Table of Contents
 LCD LIFT Flat Panel Display System Installation Manual Table of Contents Page Installation Overview... 2 Trim Ring Installation... 3 LCD Lift Installation....4 Actuator Switch Installation.5 Top Plate
PERSONAL RECORD KEEPING
 Q47e/Q47ce 2 Q 4 7 e / Q 4 7 c e A s s e m b l y i n s t r u c t i o n s PERSONAL RECORD KEEPING IMPORTANT: Record the serial numbers of your Octane Fitness elliptical in the spaces below. This will make
Installation tutorial for Console Customs Xbox Mode Dual Button (RFX-5B) Rapid fire Microchip for all Wired and Wireless controllers
 Rapid fire Microchip for all Wired and Wireless controllers") Installation tutorial for Console Customs Xbox 360 5-Mode Dual Button (RFX-5B) Rapid fire Microchip for all Wired and Wireless controllers This tutorial is designed to aid you in installation of a console
Installation tutorial for Console Customs Xbox 360 5-Mode Dual Button (RFX-5B) Rapid fire Microchip for all Wired and Wireless controllers This tutorial is designed to aid you in installation of a console
UPLIFT 2-Leg Height Adjustable Standing Desk
 UPLIFT -Leg Height Adjustable Standing Desk Also watch our assembly video http://bit.ly/9ywwh DIRECTIONS FOR ASSEMBLY AND USE TABLE OF CONTENTS PAGE Safety and Warnings Usage Parts List Assembly Instructions
Explorer Wiring Kit (assembled)
") Explorer Wiring Kit (assembled) For Vintage, Firestorm & Standard Series Please Read All Instructions Before Beginning. Tools you will need: Soldering Iron (35 watt preferably) Solder Wet Sponge Wire Clippers
Explorer Wiring Kit (assembled) For Vintage, Firestorm & Standard Series Please Read All Instructions Before Beginning. Tools you will need: Soldering Iron (35 watt preferably) Solder Wet Sponge Wire Clippers
Mount to the Wall INSTALLATION MANUAL
 Mount to the Wall 15 Locate the Wooden Studs This step applies to wooden stud wall installation only. Determine and mark the exact locations of two stud centers on the wall. Wooden studs should be spaced
ASSEMBLY AND ADJUSTMENT
 EPPA MONITOR ARM EPPA Rev A 10/17 Model EPPA-XXX ASSEMBLY AND ADJUSTMENT EPPA MONITOR ARM PARTS AND TOOLS PLEASE REVIEW these instructions before beginning the assembly and adjustment procedures. Check
TITAN2-EDGE Public Access Computer Station Dual Track
 TITAN2-EDGE Public Access Computer Station Dual Track TITAN2-EDGE Rev A 6/17 Model TITAN2-EDGE ASSEMBLY AND ADJUSTMENT TITAN2-EDGE PARTS AND TOOLS PLEASE REVIEW these instructions before beginning the
ANATOMY OF A BIT TM how you can tell top from bottom. four on the floor!
 ARCADE GAME BASICS 1 Learn BITSNAP ANATOMY OF A BIT TM how you can tell top from bottom. TOP BOTTOM BIT FEET 2 which COLOR-CODED BY FUNCTION Bits TM are grouped into four different categories, are color-coded.
Stall warner - retrofit installation - XS
 Stall warner - retrofit installation - XS Part 1 - retrofit to aircraft with XS wings Mark a point on the starboard wing root rib half way between the forward lift pin and the front of the spar, and half
PetSafe Cat Windoor. Installation Guide. Please read this entire guide before beginning
 PetSafe Cat Windoor Installation Guide Please read this entire guide before beginning Thank you for choosing PetSafe. Our mission is to be the most trusted brand in the pet ownership experience. We want
Removing and Replacing the Y-truck
 Service Documentation Removing and Replacing the Y-truck To remove and replace the Y-truck you will need the following tools: 4mm Allen wrench 12mm stamped flat wrench #2 Phillips screwdriver (magnetic
Repairing Microsoft Wedge Touch Mouse Battery Cover Retaining Clip
 Repairing Microsoft Wedge Touch Mouse Battery Cover Retaining Clip Disassembly, repair and reassembly of Wedge Touch mouse when the battery cover will not stay closed. Also is a good guide to repair other
SUT-1000CLC ASSEMBLY REQUIREMENTS
 SUT-1000CLC Torque wrench, carpenters square, wire cutters, Phillips screwdriver, 7/16, 9/16, and 3/4 combination wrenches, ratchet, 9/16, 3/4, 13/16, and 7/8 sockets. ASSEMBLY REQUIREMENTS *Torque all
Additional Items Included But Not Shown:
 Nanodyne Replacement Illuminator for Nikon E00 Microscope Installation Instructions: Included Items PN 07 TPI Main ssy with LED dditional Items Included ut Not Shown: PN 06 Hex Key.mm (for pot knob) PN
iphone 4S Dismantling Instructions
 iphone 4S Dismantling Instructions These instructions will show you how to open the iphone to replace the digitizer, LCD screen and other internal parts. Opening your iphone will void your warrantee, and
MM540 Installation Instructions IMPORTANT SAFETY INSTRUCTIONS - SAVE THESE INSTRUCTIONS
 MM50 Installation Instructions IMPORTANT SAFETY INSTRUCTIONS - SAVE THESE INSTRUCTIONS Please read this entire manual before you begin. Do not unpack any contents until you verify all requirements on PAGE.
Rugged Ridge Body Armor Guard Kit, 5 Pieces, Black (07-Current JK 4-door)
") Rugged Ridge Body Armor Guard Kit, 5 Pieces, Black (07-Current JK 4-door) Installation Time: 60 Minutes Tools Required: Notes: Phillips head screwdriver 3/8 socket or Flat head screwdriver 1/2 socket 7
Rugged Ridge Body Armor Guard Kit, 5 Pieces, Black (07-Current JK 4-door) Installation Time: 60 Minutes Tools Required: Notes: Phillips head screwdriver 3/8 socket or Flat head screwdriver 1/2 socket 7
Fitting Instructions. MGF Roll Bar Stainless Steel TT Style Roll Hoops TF New. Part No.: SWRB001
 Fitting Instructions MGF Roll Bar Stainless Steel TT Style Roll Hoops TF New Part No.: SWRB001 MGF TWIN HOOP FITTING INSTRUCTIONS PLEASE READ THESE INSTRUCTIONS BEFORE COMMENCING THE WORK TOOLS REQUIRED
Assembly Instructions
 InTandem Table System November 20 InTandem Table System - Worksurface #4 x/" 4 wood screw power beam Tools Provided T-0 Extended Torx Driver T-25 Torx Driver Additional Tools Required Soft protective
LAND ROVER DEFENDER UNDER CONSOLE SAFE
 LAND ROVER DEFENDER UNDER CONSOLE SAFE SAFE008 INSTALL TIME: 30 mins IMPORTANT WARNING! IT IS CRITICAL THAT ALL FRONT RUNNER PRODUCTS BE PROPERLY AND SECURELY ASSEMBLED AND ATTACHED TO YOUR VEHICLE. IMPROPER
EllisSaw.com. EllisSaw.com P.O. Box Verona, WI
 P.O. Box 9019 Verona, WI 9-019 GENERAL OPERATING & SAFETY INSTRUCTIONS * READ INSTRUCTIONS BEFORE USE * CAUTION: Disconnect power supply cord from power source when doing repair work or changing belt.
Installation Instructions
 For Medium (15-18.5K) + Heavy duty (-8.5K) Air Conditioner READ BEFORE INSTALLING UNIT To avoid risk of personal injury, property damage, or product damage due to the weight of this device and sharp edges
Termination Procedure
 Connector Piece Parts Contact/Connector Head Twist On Nut MX MX Boot Procedure Chart Procedure Tool Required Tool Part Number Cable Preparation & Fiber Cleaning Jacket Stripper 86710-0004 Cable Preparation
AM8 Printer A metal frame for your Anet A8 By Pheneeny v1.0 April 20, 2017
 AM8 Printer A metal frame for your Anet A8 By Pheneeny v1.0 April 20, 2017 Please read this entire document before printing parts or building this frame Disclaimer: This guide is for informational purposes
Seamed Undermount Bowls
 CUTOUT TEMPLATES MAKING CUTOUT TEMPLATES 7.1 CUTOUT TEMPLATES The use of an accurate template is one of the most essential elements to the successful completion of a cutout in Corian. For the completion
MasterFlow Green Machine Dual Powered Roof Vent
 MasterFlow Green Machine Dual Powered Roof Vent Application Instructions Updated: 2/10 Quality You Can Trust Since 1886... From North America s Largest Roofing Manufacturer Safety Considerations and Warnings
PERSONAL RECORD KEEPING
 PRO3700 2 P R O 3 7 0 0 A s s e m b l y i n s t r u c t i o n s PERSONAL RECORD KEEPING Tip: Record the serial numbers of your Octane Fitness elliptical in the spaces below. This will make it easier for
MM Strut Tower Brace, Cobra (MMSTB-7)
") The MM strut Tower Brace attaches to each strut tower and to the firewall. 3430 Sacramento Dr., Unit D San Luis Obispo, CA 93401 Telephone: 805/544-8748 Fax: 805/544-8645 www.maximummotorsports.com MM
The MM strut Tower Brace attaches to each strut tower and to the firewall. 3430 Sacramento Dr., Unit D San Luis Obispo, CA 93401 Telephone: 805/544-8748 Fax: 805/544-8645 www.maximummotorsports.com MM
The IntoPlay build. This section will show how to fill the components into the case halves, and also the case base, which will look like this:
 The IntoPlay build Ok, I presume you have read the sections about cutting the holes in the case front, speaker holes and spray painting, modding components, preparing the case, etc. So far, the guides
SAFETY THIS PRODUCT IS FOR OFFROAD USE ONLY. ALL LIABILITY FOR INSTALLATION AND USE RESTS WITH THE OWNER.
 SAFETY Your safety and the safety of others is very important. In order to help you make informed decisions about safety, we have provided installation instructions and other information. These instructions
Adhesive Application & Laminating System
 U S E R S G U I D E Adhesive Application & Laminating System The XM2500 is an economical and easy to use document finishing system. This versatile and non-electric system has been designed to laminate
ARROW SAW PRECISE CUT 8000 RPM WITH DUST COLLECTING ATTACHMENT INSTRUCTION BOOK MODEL NO
 ATTENTION If any components of this unit are broken or the unit does not operate properly, please contact Cabela s Customer Service. Retail Store Purchases: 1-800-905-2731 (U.S. & Canada) Catalog and Internet
FitWork Walkstation Series 7 AdjusTables
 FitWork Walkstation Tools Required: #2 Phillips Bit with Extension Page 1 of 20 A7TG660606H A7TR663232H FitWork Walkstation 4mm Hex Head Bit A7TG660632H A7TR383030H www.details-worktools.com A7TG663206H
Under Seat Storage Drawer Installation Instructions
 Under Seat Storage Drawer Installation Instructions Parts List: 1) Drawer Assembly 8) Self Tapping Screws 1) Instructions 1) Template Tools Needed: Drill and/or Bit Driver Tape Measure Jigsaw or metal
PRINTER REPAIR ARTICLE HP LJ 4345/M4345 Swing Plate Replacement
 a1 output bin a2 DUPLEXER a4 FORMATTER COVER a5 FORMATTER a3 fuser entr. guide PRINTER REPAIR ARTICLE HP LJ 4345/M4345 Swing Plate Replacement Grinding noise near the fuser means it is time to replace
Replacing a Wheel on the Pinch Wheel assembly
 14140 NE 200th St - Woodinville, WA. 98072 - PH: (425) 398-8282 - Fax: (425) 398-8383 Replacing a Wheel on the Pinch Wheel assembly Determine which pinch wheel assembly your plotter or cutter has. See
SuperTrack Parts List
 SuperTrack Parts List [indicates number for 6 lane tracks] SuperTrack Installation Instructions www.supertimer.com 1-800-654-2088 1 Track Instruction Manual (this booklet) 2 Start sections [3] Start Gate
Xyron Professional 2500 Laminating System
 Xyron Professional 2500 Laminating System Instruction Manual Provided By http://www.mybinding.com http://www.mybindingblog.com U S E R S G U I D E 2500 Adhesive Application & Laminating System The XM2500
Written By: Chad Facciolo
 HTC One Mini 2 Charging Port Replacement These instructions will show you how to replace your charging port. Written By: Chad Facciolo ifixit CC BY-NC-SA www.ifixit.com Page 1 of 11 INTRODUCTION The charging
Strata. urniture. Mission Rim Instructions. Parts in the Arm Box: Parts in the Body Box:
 1A Watch our assembly videos at www.strataf.com/videos.html Parts in the Arm Box: Arm - Outside View Arm - Inside View Corbels x 4 1B Parts in the Body Box: Back Deck x 1 Seat Deck x 1 with the Feet attached
OVER THE RANGE MICROWAVE OVEN INSTALLATION INSTRUCTIONS
 OVER THE RANGE MICROWAVE OVEN INSTALLATION INSTRUCTIONS Please read and save these installation instructions. MODEL NO.: DOTR12CWIV/DOTR12CBIV P/N: 3828W5U0202 YOUR SAFETY FIRST Read this entire manual
Razr Adapter Retrofit Project by Craig Hoy, Edmonton, AB, Canada
 Razr Adapter Retrofit Project by Craig Hoy, Edmonton, AB, Canada The following is a description of the process that I have used to modify the console eject box for e38, e39, e46 and x5 s, part number 84-21-6-933-415.