Creating a Historical Tour in Alice
|
|
|
- Willis Harvey
- 6 years ago
- Views:
Transcription

1 Creating a Historical Tour in Alice

2 Overview Making a historical tour in Alice is a good way to visualize a historical place, event, or person, and can help you learn facts about history. In this tutorial, I will be making a historical tour in Alice about the building and unveiling of the Brooklyn Bridge. However, the tutorial will provide guidelines for making a tour about any topic that interests you.

3 Choosing a Host The first thing to do is to choose a host that will narrate your tour. I want my host to be John A. Roebling, the designer of the Brooklyn Bridge. I will choose the MadScientist object to represent Roebling, and add it to my world. Go to Add Objects to choose an object that you think best represents your host.

4 In your object tree, right click on your host, in my case, MadScientist. Click rename, and then give your host its real name. I will name mine John Roebling. Naming Your Host

5 Picking a Background Open up your internet browser and do a Google image search for the main topic of your tour. I m searching for brooklyn bridge. Pick one that you like for the background of your introduction. Save that image onto your computer, somewhere where you can find it again.

6 Inserting the Background Click on File in Alice, and then click on Make Billboard in the drop down list. Use the window that pops up to find where you saved the picture. When you find it, click on it, and then click on Import. A small picture will appear in your world.

7 Now we want to adjust the size and position of the picture so that it takes up the entire screen as a background. Use the object positioning buttons to make it larger, turn it, and bring it forward until it fills up the screen of your Alice world. It should look like mine does on the next slide. Adjusting the Background
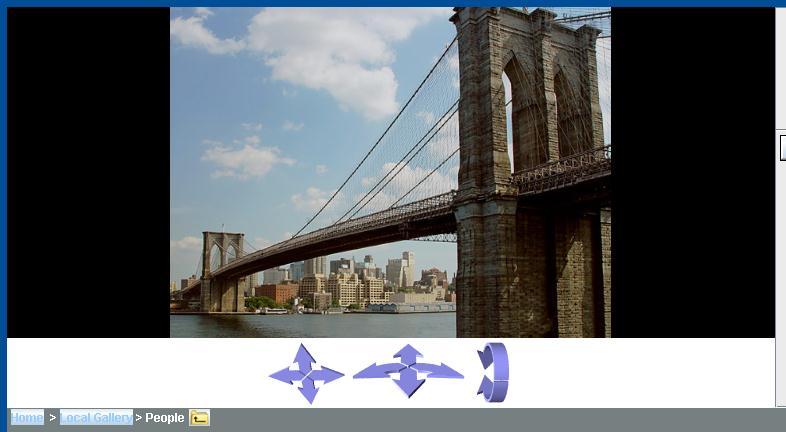
8

9 Positioning Your Host Now that you ve got your background, you need to make your host visible again. Click on your host s name in the object tree, and drag and drop it over your worlds viewing window. A drop down list will appear.

10 Select move to, then the name of your picture background in the list. Your host will move to the picture and you will be able to see him/her again. Using the object positioning buttons,position your host so that they are standing in front of the picture somewhere. See mine on the next slide. Positioning Your Host

11

12 Saving the Position of the Camera and Host We re going to be moving the host and the camera around more as we set up the world, but we want to to remember where they are now. Click on more controls under the object positioning buttons. Click on drop dummy at camera. A Dummy Objects folder will appear in your object tree. Click on the plus sign next to it to see what s in it.


13 Saving the Position of the Camera and Host Right click on the dummy object, and rename it introview. You can return to this object when you want your camera to go back to the beginning. Now click on your host in the object tree, and then click on the drop dummy at selected object button. Another dummy will appear in the object tree. Rename this one introposition.

14 Now it s time to write the first scene. Click the Done button to get out of the objects screen. Then click on world in your object tree, and click on create new method in the details pane. Writing the Intro Scene

15 Writing the Intro Scene In the box that pops up, name the method introscene. Now it s time to write the method. Have your host introduce the tour, and say some basic facts about your topic. You can write methods so that your host moves around some, or you can keep your host stationary. At the end of this scene, you may want to have your host introduce the next scene, which will be in front of another picture that you decide. See the next slide for the code in my introscene.

16 As you re writing your method, test it out by setting your When the world starts event to world.introscene. This is a method I wrote to make my host make a follow me type of gesture. When your host speaks, make sure the duration is long enough so that you can easily read what they are saying.

17 Setting up the Second Scene Now we ll move the camera and the host so we have a fresh area to set up a new scene. Click on camera in the object tree and drag and drop it onto the viewing screen for your world. Go to move, then right, then 10 meters. Your camera will move to an empty area.

18 Now we want our host back in view of the camera. Click on your host in the object tree, and drag and drop it over the viewing area for your world. Go to move, then left, then 10 meters. Position him in front of the camera as you wish. Setting up the Second Scene

19 Setting up the Second Scene Now go back to Google and find a background picture for your second scene. Repeat the process to add the background into your world. It will drop into your world in the area where your first scene is, so to move it, click on its name in the object tree, drag and drop it over the viewing screen, and go to move to, then the name of your host.

20 Since my picture is a different shaped rectangle, I ll have to fill in the rest of the background with something else. Setting up the Second Scene Adjust your background with the object moving buttons until it looks right to you. Now, this may not be the case for you, but my picture is a strange shape, and can t really be fit into the background very well. We can fix this.

21 Go to your object gallery, and click on the Shapes folder. Scroll over until you find the Square, and add it into your world. Make it move to your host so that you can see it in your second scene area. Fixing the Background

22 Fixing the Background Now position the square so that it takes up the rest of the background space not covered by the picture. You can change the color of the square if you want, by clicking on square in the object tree, then going to its properties tab on the pane below that, then clicking next to color. Try out a few colors to see what looks best.

23 Saving the Position of the Camera and Host When you ve got the host positioned how you want him/her, save the position of both the host and the camera by dropping dummy objects where they are, using the buttons in the add objects window. Don t forget to rename them as they appear in your object tree, you should name them scenetwoview for the camera object, and scenetwoposition for the host.

24 Writing Scene Two Now its time to write scene two. Click on world in the object tree and then go to its methods pane. Click on create new method, and name it scenetwo.

25 Writing Scene Two The first thing scene two needs is code that moves the host from the intro scene to where they are now. Put a Do together in SceneTwo s code, then click on your host in the object tree, and drag a move to into the Do Together. Make the host move to scenetwoposition.

26 Writing Scene Two Now we want to do the same thing to the camera. Click on camera in the object tree and go to the camera s methods. Find move to, and in the Do together, make the camera move to scenetwoview.

27 Writing Scene Two Now write the rest of scene two. Your host should give information about the new background picture, and you can also write code so that your host moves around if you want. My finished code is on the next slide.
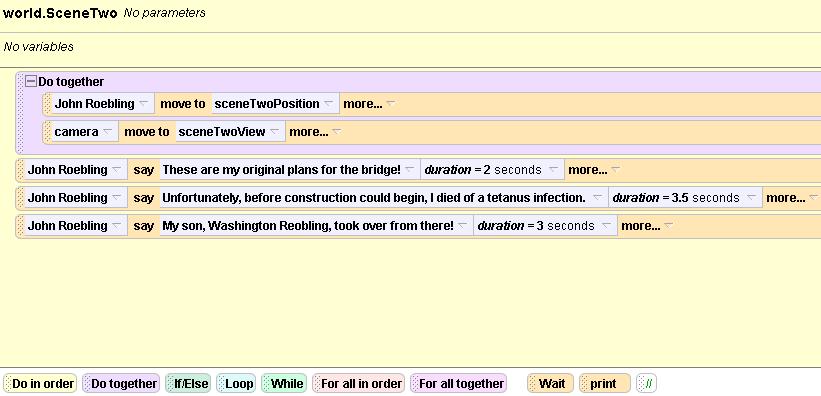
28

29 For the third scene, we need to move the camera and the host again. Using the steps I outlined before, move the camera and the host to a new, empty area, and position the host until he is in a good position in front of the camera. Setting up the Third Scene

30 Setting up the Third Scene Find another background picture using Google, and place it into your world. Move it to your host so that it is in the new Scene Three area. Mine is another oddly shaped picture, so I will also add in a square again to cover the rest of the area.


31 Setting up the Third Scene Now, again, you must drop dummy objects at both the camera and the host to save their positions. Use the buttons on the add object screen, and name the object for the camera scenethreeview, and the host object scenethreeposition. Remember to click on the host before you drop a dummy for him, so that it goes to the right place.
32 Now you can write the third scene. Make a new world method called SceneThree. Remember, at the beginning of the scene you must move the host and the camera to their new positions. Then the host will describe the new background picture. Remember to test out your code as you are writing it. See the next slide for my code for this scene. Writing the Third Scene

33
34 Setting up the Final Scene This will be the last scene. Move the host and the camera just as you did in the previous two scenes, and choose a picture on Google that will be good for a concluding scene. Remember that your picture will drop into your world in the intro scene area, so you must use move to to get it into the final scene. Also, don t forget to drop dummy objects at your camera and your host, to remember their positions.

35 Now create a new world method called FinalScene, and write the code for the final scene. Remember to include code at the beginning to move the camera and host to the final scene area. See my code for this scene on the next page. Writing up the Final Scene
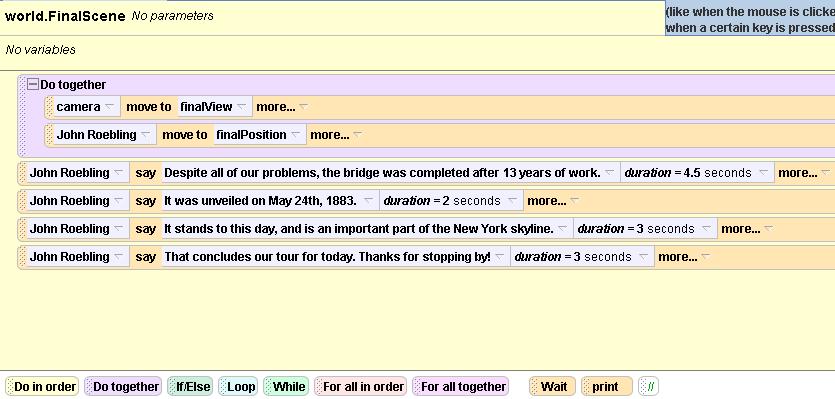
36

37 Putting it All Together Now we just have a few more steps to make our historical tour complete. First of all, we must move the camera and the host back to the intro positions, so that when we press Play to see our world, that is where they begin. Use the object tree and move to to get them back to these positions.

38 The last step is to put all of the code for our scenes together. Go to the world.my first method tab in your method editor, and drag your scenes in order from the world s methods into this area. See the next page for what it should end up looking like. Putting it All Together
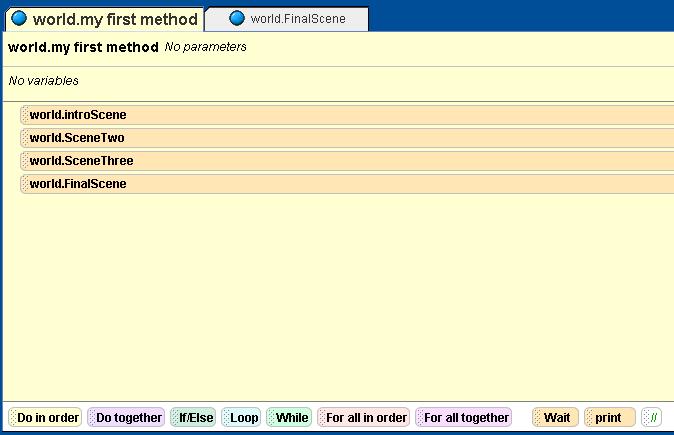
39

40 Now the only thing left to do is press play! Although I have ended my world here, you can certainly add as many scenes and backgrounds as you wish, to make your tour longer. You can also introduce other characters into your tour, besides your host. There are endless possibilities for variation! Test your World!

41 Fixing the Light If you add more than three stops into your world, you may notice that the further you move your camera, the darker your screen becomes. To fix this, you can click on light in your object tree, go to its properties tab, click the plus sign next to Seldom Used Properties, and change its vehicle to camera. Good luck with your tour!
Princess & Dragon Version 2
 Princess & Dragon Version 2 Part 3: Billboards, Events, Sounds, 3D text and Properties By Michael Hoyle under the direction of Professor Susan Rodger Duke University July 2012 Overview In this last part,
Alice Learning to program: Part Two by Ruthie Tucker and Jenna Hayes Under the direction of Professor Susan Rodger Duke University, July 2008
 Alice Learning to program: Part Two by Ruthie Tucker and Jenna Hayes Under the direction of Professor Susan Rodger Duke University, July 2008 Animating your Characters Once you have your characters in
Begin at the beginning," the King said, very gravely, "and go on till you come to the end
 An Introduction to Alice Begin at the beginning," the King said, very gravely, "and go on till you come to the end By Teddy Ward Under the direction of Professor Susan Rodger Duke University, May 2013
Once you have chosen the water world this is how your screen should look.
 Getting Started t With Alice By Ruthie Tucker under the direction of Prof. Susan Rodger Duke University, July 2008 www.cs.duke.edu/csed/alice/aliceinschools/ Let s Get Started The first step in making
Part II Coding the Animation
 Part II Coding the Animation Welcome to Part 2 of a tutorial on programming with Alice and Garfield using the Alice 2 application software. In Part I of this tutorial, you created a scene containing characters
Princess & Dragon Part 2: Teaching a Dragon to Fly Methods & Proper:es
 Princess & Dragon Part 2: Teaching a Dragon to Fly Methods & Proper:es By Elizabeth Liang under the direc:on of Professor Susan Rodger Duke University June 2010 Updated June 2014 by Ellen Yuan Introduc)on
Learning to Program: Part 2 Wri0ng Methods and Events
 Learning to Program: Part 2 Wri0ng Methods and Events by Ruthie Tucker and Jenna Hayes Under the direc0on of Professor Susan Rodger Duke University, July 2008 www.cs.duke.edu/csed/alice/aliceinschools
Let's Race! Typing on the Home Row
 Let's Race! Typing on the Home Row Michael Hoyle Susan Rodger Duke University 2012 Overview In this tutorial you will be creating a bike racing game to practice keyboarding. Your bike will move forward
How Tall Are You? Introducing Functions
 How Tall Are You? Introducing Functions In this tutorial you will be learning to use functions to ask how tall a character is. Using this information two characters will compare their height and give a
Princess & Dragon Part 3: A Knight Comes Riding In Cameras & Events
 Princess & Dragon Part 3: A Knight Comes Riding In Cameras & Events By Elizabeth Liang under the direccon of Professor Susan Rodger Duke University June 2010 Introduc)on Welcome to Part 3 of the Princess
How Tall Are You? Introducing Func6ons
 How Tall Are You? Introducing Func6ons By Jenna Hayes under the direc6on of Professor Susan Rodger Duke University July 2008 Updates made June 2014 by Yossra Hamid Step 1: Getting Started In this tutorial
Demo. Getting Started with Alice Demo
 Getting Started with Alice Demo Demo This is a fast paced beginner demo to illustrate many concepts in Alice to get you started on building an Alice world This demo includes setting up and moving objects,
Alice. our characters it would be nice to be able to. This can simplify the story and sometimes add. Zoom in on our first character when she talks
 Alice Learning to program: Part Three Camera Control, Invisibility, and 3 D Text By Ruthie Tucker and Jenna Hayes, Under the direction of Professor Rodger Duke University, 2008 Camera Control Now that
Objects in Alice: Positioning and. Moving Them July 2008
 Objects in Alice: Positioning and By Jenna Hayes under the direction of Professor Susan Rodger Duke University July 2008 Moving Them July 2008 www.cs.duke.edu/csed/alice/aliceinschools Download the Alice
Jing PDF Tutorial Template
 Jing PDF Tutorial Template Developer Name: Microsoft App Utilized: Video URL from Camtasia: https://www.youtube.com/watch?v=kcp7hg8vbvs&feature=youtu.be Table of Contents New Slide pg. 2-3 Action Button
Challenge 1: Tami s World
 Challenge 1: Tami s World In this challenge, you will: Practice using the main areas of Storytelling Alice including the Scenes window, Objects tree, details panel and method editor Add objects from the
DESIGN A SHOOTING STYLE GAME IN FLASH 8
 DESIGN A SHOOTING STYLE GAME IN FLASH 8 In this tutorial, you will learn how to make a basic arcade style shooting game in Flash 8. An example of the type of game you will create is the game Mozzie Blitz
An Introduction to Alice
 An Introduction to Alice This is a modifica,on of the Shark A5ack Introduc,on to Alice wri5en by Teddy Ward in 2013 By David Yan, Erin Taylor, and Alex Boldt Duke University Under the direc,on of Susan
To solve a problem (perform a task) in a virtual world, we must accomplish the following:
 in a virtual world, we must accomplish the following:") Chapter 3 Animation at last! If you ve made it to this point, and we certainly hope that you have, you might be wondering about all the animation that you were supposed to be doing as part of your work
Chapter 3 Animation at last! If you ve made it to this point, and we certainly hope that you have, you might be wondering about all the animation that you were supposed to be doing as part of your work
Ready, SET, go! By Melissa Dalis Professor Susan Rodger Duke University July 2011
 Ready, SET, go! By Melissa Dalis Professor Susan Rodger Duke University July 2011 Overview This tutorial will teach you how to build SET, a card game whose objechve is to idenhfy as many groupings (sets)
In this project you ll learn how to code your own musical instruments!
 Rock Band Introduction In this project you ll learn how to code your own musical instruments! Step 1: Sprites Before you can start coding, you ll need to add in a thing to code. In Scratch, these things
The Basics. By Jenna Hayes under the direction of Professor Susan Rodger Duke University July
 Getting Started With Alice: The Basics By Jenna Hayes under the direction of Professor Susan Rodger Duke University July 2008 www.cs.duke.edu/csed/alice/aliceinschools Step 1: Background Open up Alice,
Creating a Blog at Blogger.com
 Creating a Blog at Blogger.com Getting Started on Blogger.com Blogger.com (Click on the link to go to Blogger.) boasts that you can create a blog in three easy steps. You really can. This is a powerful,
Creating Digital Stories for the Classroom
 Using Photo Story 3 to Create a Digital Story Creating Digital Stories for the Classroom When you open Photo Story 3 you have a few options. To begin a new story select the option Begin a New Story and
Photo Story Tutorial
 Photo Story Tutorial To create a new Photo Story Project: 1. Start 2. Programs 3. Photo Story 4. Begin a New Story 5. Next 6. Import Pictures 7. Click on your Flash Drive s name from the window on the
Making Your World with the Aurora Toolset
 Making Your World with the Aurora Toolset The goal of this tutorial is to build a very simple module to ensure that you've picked up the necessary skills for the other tutorials. After completing this
ChatBot. Introduction. Scratch. You are going to learn how to program your own talking robot! Activity Checklist. Test your Project.
 Scratch 1 ChatBot Introduction You are going to learn how to program your own talking robot! Activity Checklist Test your Project Save your Project Follow these INSTRUCTIONS one by one Click on the green
In this project, you will create a memory game where you have to memorise and repeat a sequence of random colours!
 Memory Introduction In this project, you will create a memory game where you have to memorise and repeat a sequence of random colours! Step 1: Random colours First, let s create a character that can change
Table of Contents. Creating Your First Project 4. Enhancing Your Slides 8. Adding Interactivity 12. Recording a Software Simulation 19
 Table of Contents Creating Your First Project 4 Enhancing Your Slides 8 Adding Interactivity 12 Recording a Software Simulation 19 Inserting a Quiz 24 Publishing Your Course 32 More Great Features to Learn
Once you ve completed your real world scale diagram, you can print or create a.pdf file of your work.
 Fire Investigation Tools V10.6 Introduction The FARO CAD Zone diagram program has the tools you need to create a 2D and 3D fire scene diagram with data collected from hand measurements, a total station,
EG1003 Help and How To s: Revit Tutorial
 EG1003 Help and How To s: Revit Tutorial Completion of this tutorial is required for Milestone 1. Include screenshots of it in your Milestone 1 presentation. Downloading Revit: Before beginning the tutorial,
Materials Tutorial. Setting Materials Defaults
 Materials Tutorial Materials display on the surfaces of objects in 3D views and can make a 3D view appear highly realistic. When applied to most objects, material quantities will also be calculated in
Try what you learned (and some new things too)
") Training Try what you learned (and some new things too) PART ONE: DO SOME MATH Exercise 1: Type some simple formulas to add, subtract, multiply, and divide. 1. Click in cell A1. First you ll add two numbers.
Training Try what you learned (and some new things too) PART ONE: DO SOME MATH Exercise 1: Type some simple formulas to add, subtract, multiply, and divide. 1. Click in cell A1. First you ll add two numbers.
iphoto Getting Started Get to know iphoto and learn how to import and organize your photos, and create a photo slideshow and book.
 iphoto Getting Started Get to know iphoto and learn how to import and organize your photos, and create a photo slideshow and book. 1 Contents Chapter 1 3 Welcome to iphoto 3 What You ll Learn 4 Before
CS Problem Solving and Structured Programming Lab 1 - Introduction to Programming in Alice designed by Barb Lerner Due: February 9/10
 CS 101 - Problem Solving and Structured Programming Lab 1 - Introduction to Programming in lice designed by Barb Lerner Due: February 9/10 Getting Started with lice lice is installed on the computers in
Managing images with NewZapp
 Managing images with NewZapp This guide is for anyone using the NewZapp Fixed editor as opposed to the Drag and Drop editor. The Image Manager is where images are uploaded and stored in your NewZapp account
Alice: A Visual Introduction to Programming. Chapter 1 Part 2
 Alice: A Visual Introduction to Programming Chapter 1 Part 2 Objects Alice uses objects o Tent o Soldier o Princess Objects perform actions Turn Move Fly Wave 1-2 The Alice System 1-3 Open SnowLove in
Tutorial Three: Categorising ideas using the SuperGrouper tool In Kidspiration there are two basic ways to organise ideas in Picture View: links and
 Tutorial Three: Categorising ideas using the SuperGrouper tool In Kidspiration there are two basic ways to organise ideas in Picture View: links and SuperGrouper categories. You have already seen how links
COMPUTER GENERATED ANIMATION
 COMPUTER GENERATED ANIMATION Dr. Saurabh Sawhney Dr. Aashima Aggarwal Insight Eye Clinic, Rajouri Garden, New Delhi Animation comes from the Latin word anima, meaning life or soul. Animation is a technique,
Mediasite Desktop Recorder: Recording a Lecture 2017
 Mediasite Desktop Recorder: Recording a Lecture 2017 This lesson will show you how to record a presentation using the Mediasite Desktop Recorder. In browser go to - https://http://mediasite.umaryland.edu/mediasite/mymediasite
Lab 3 Introduction to SolidWorks I Silas Bernardoni 10/9/2008
 1 Introduction This lab is designed to provide you with basic skills when using the 3D modeling program SolidWorks. You will learn how to build parts, assemblies and drawings. You will be given a physical
A quick overview of the basics of my workflow in. Those gaps in Photoshop s Histogram indicate missing information.
 Another Photoshop tutorial by Bruce Philpott Copyright 2007 Bruce Philpott A quick overview of the basics of my workflow in Adobe Camera Raw This short tutorial certainly won t cover everything about Adobe
Materials Tutorial. Chapter 6: Setting Materials Defaults
 Setting Materials Defaults Chapter 6: Materials Tutorial Materials display on the surfaces of objects in 3D views and can make a 3D view appear highly realistic. When applied to most objects, material
Scribble Maps Tutorial
 Scribble Maps Tutorial Go to the homepage of Scribble Maps here: h t t p : / / w w w. s c r i b b l e m a p s. c o m / Getting to know the Interface Scribble Maps is a free online mapping application with
2
 1 2 3 4 5 6 7 of 14 7/11/17, 8:46 AM 7 8 9 10 11 12 13 Apply an animation 1. Select the object or text on the slide that you want to animate. An "object" in this context is any thing on a slide, such as
PebblePad LEARNER HANDBOOK
 PebblePad LEARNER HANDBOOK CONTENTS Overview of the online learning environment... 3 Overview of how to find and submit work... 4 Logging Onto the IOS Online... 5 Seeing your Courses... 6 Using Your PebblePad
Memory. Introduction. Scratch. In this project, you will create a memory game where you have to memorise and repeat a sequence of random colours!
 Scratch 2 Memory All Code Clubs must be registered. Registered clubs appear on the map at codeclubworld.org - if your club is not on the map then visit jumpto.cc/ccwreg to register your club. Introduction
Alice and Daisies: Posi/oning and Moving Objects in Alice. By Jenna Hayes under the direc/on of Professor Susan Rodger Duke University July 2008
 Alice and Daisies: Posi/oning and Moving Objects in Alice By Jenna Hayes under the direc/on of Professor Susan Rodger Duke University July 2008 Introduction Download the Alice World that goes along with
Game Making Workshop on Scratch
 CODING Game Making Workshop on Scratch Learning Outcomes In this project, students create a simple game using Scratch. They key learning outcomes are: Video games are made from pictures and step-by-step
ALICE TUTORIAL. Introduction to Alice 3
 ALICE TUTORIAL Introduction to Alice 3 STEP 1: SET UP THE SCENE In this step you will open Alice and setup the scene. To set up a scene you will pick a template, create objects from classes, and position
Civ 6 Unit Asset Tutorials Level 1 - Hello World
 Civ 6 Unit Asset Tutorials Level 1 - Hello World By Leugi So making units is pretty much a basic and much necessary knowledge for almost all possible Civilization VI mods; whether Leaders, Civilizations
Creating Your Own Ballad of an Eagle Scout Using the Ballad Template. Produced by Scoutworks.weebly.com All Rights Reserved
 Creating Your Own Ballad of an Eagle Scout Using the Ballad Template Produced by Scoutworks.weebly.com All Rights Reserved Please take NOTE: This tutorial has been designed to show you how you can create
In this tutorial you will use Photo Story 3, a free software program from Microsoft, to create digital stories using text, graphics and music.
 In this tutorial you will use Photo Story 3, a free software program from Microsoft, to create digital stories using text, graphics and music. What you will learn: o System Requirements and Recommendations
PHOTOSHOP YOURSELF GREEN SCREEN TUTORIAL
 PHOTOSHOP YOURSELF GREEN SCREEN TUTORIAL What you need to know: Basic understanding of a computer What you need: Green Screen LED Lights Yourself (or a subject: an individual, or thing, whatever you prefer)
Creating a Frame by Frame Animation for PhotoStory
 Creating a Frame by Frame Animation for PhotoStory There are an unlimited number of animation styles that you can create using the PhotoShop Elements software. Depending on the type of animation you want,
Sheet Metal Punch ifeatures
 Lesson 5 Sheet Metal Punch ifeatures Overview This lesson describes punch ifeatures and their use in sheet metal parts. You use punch ifeatures to simplify the creation of common and specialty cut and
Welcome to Weebly. Setting up Your Website. Write your username here:
 Welcome to Weebly Setting up Your Website Write your username here: You will need to remember enter this username each time you log in, so you may want to write it somewhere else that is safe and easy
1. Creating geometry based on sketches 2. Using sketch lines as reference 3. Using sketches to drive changes in geometry
 4.1: Modeling 3D Modeling is a key process of getting your ideas from a concept to a read- for- manufacture state, making it core foundation of the product development process. In Fusion 360, there are
TECHNOTravel. For Microsoft Word & PowerPoint 2010 Student Workbook. TECHNOeBooks Project-based Computer Curriculum ebooks.
 TECHNOTravel For Microsoft Word & PowerPoint 2010 Student Workbook TECHNOeBooks Project-based Computer Curriculum ebooks www.bepublishing.com Copyright 1993 2010. TechnoKids Inc. in partnership with B.E.
Ask Jo: Quilt Designing on the Computer
 Ask Jo: Quilt Designing on the Computer If you are new to the blog, welcome. You have reached an archived free pattern. We typically put up new blog post twice daily so there is always something new and
Using 3D thematic symbology to display features in a scene
 Using 3D thematic symbology to display features in a scene www.learn.arcgis.com 380 New York Street Redlands, California 92373 8100 USA Copyright 2018 Esri All rights reserved. Printed in the United States
Personalize Your Napkins
 Dress up a table with embroidered napkins. These napkins are great for gifts, but don t forget to make some for yourself. In this project, we ll be working with text, adding a decorative outline to it,
ParentZone. Your guide to accessing your child s account and their learning journey.
 ParentZone Your guide to accessing your child s account and their learning journey. Accessing ParentZone Shortly after your child has started, you will receive an email to one or both of your registered
Assignment 5 due Monday, May 7
 due Monday, May 7 Simulations and the Law of Large Numbers Overview In both parts of the assignment, you will be calculating a theoretical probability for a certain procedure. In other words, this uses
Overview. The Game Idea
 Page 1 of 19 Overview Even though GameMaker:Studio is easy to use, getting the hang of it can be a bit difficult at first, especially if you have had no prior experience of programming. This tutorial is
REVIT - RENDERING & DRAWINGS
 TUTORIAL L-15: REVIT - RENDERING & DRAWINGS This Tutorial explains how to complete renderings and drawings of the bridge project within the School of Architecture model built during previous tutorials.
The original image. The final rainbow effect.
 ADD A realistic rainbow to a photo In this Photoshop photo effects tutorial, we re going to learn how to easily add a rainbow, even a double rainbow, to a photo. Of course, as with most photo effects,
How To Handbook For Learners
 How To Handbook For Learners 2017 Contents 3 How do I log in? 4-5 How do I watch a video? 6-9 How do I take an assessment? 10-11 How do I review an assessment I have just written? 12-13 How do I review
Lesson 4: Develop and Launch an Engaging Website
 Chapter 1, Video 1: "Welcome to Lesson 4" Welcome to Lesson number 4. This is a lesson in which the old proverbial the rubber meets the road. To this point, you've created a strategy. You've got your business
BEGINNER APP INVENTOR
 Table of Contents 5 6 About this series Getting setup Creating a question Checking answers Multiple questions Wrapping up.....5.6 About this series These cards are going to introduce you to App Inventor.
GotSoccer works well with and recommends using Internet Explorer, Safari and Google Chrome.
 Cal North CCSL Member Clubs Internet Browser Notice: GotSoccer works well with and recommends using Internet Explorer, Safari and Google Chrome. Some GotSoccer features will not work with Firefox Using
Annex IV - Stencyl Tutorial
 Annex IV - Stencyl Tutorial This short, hands-on tutorial will walk you through the steps needed to create a simple platformer using premade content, so that you can become familiar with the main parts
How to Build a Game Console. David Hunt, PE
 How to Build a Game Console David Hunt, PE davidhunt@outdrs.net Covering: Drafts Fillets Shells Patterns o Linear o Circular Using made-for-the-purpose sketches to define reference geometry Using reference
Family History: Genealogy Made Easy with Lisa Louise Cooke Republished 2014
 Family History: Genealogy Made Easy with Lisa Louise Cooke Republished 2014 Welcome to this step-by-step series for beginning genealogists and more experienced ones who want to brush up or learn something
AP Art History Flashcards Program
 AP Art History Flashcards Program 1 AP Art History Flashcards Tutorial... 3 Getting to know the toolbar:... 4 Getting to know your editing toolbar:... 4 Adding a new card group... 5 What is the difference
The Beauty and Joy of Computing Lab Exercise 10: Shall we play a game? Objectives. Background (Pre-Lab Reading)
") The Beauty and Joy of Computing Lab Exercise 10: Shall we play a game? [Note: This lab isn t as complete as the others we have done in this class. There are no self-assessment questions and no post-lab
The Beauty and Joy of Computing Lab Exercise 10: Shall we play a game? [Note: This lab isn t as complete as the others we have done in this class. There are no self-assessment questions and no post-lab
Let s start by making a pencil, that can be used to draw on the stage.
 Paint Box Introduction In this project, you will be making your own paint program! Step 1: Making a pencil Let s start by making a pencil, that can be used to draw on the stage. Activity Checklist Start
user guide for windows creative learning tools
 user guide for windows creative learning tools Page 2 Contents Welcome to MissionMaker! Please note: This user guide is suitable for use with MissionMaker 07 build 1.5 and MissionMaker 2.0 This guide will
Introduction to programming with Fable
 How to get started. You need a dongle and a joint module (the actual robot) as shown on the right. Put the dongle in the computer, open the Fable programme and switch on the joint module on the page. The
How to create beautiful B&W images with Adobe Photoshop Elements 12
 How to create beautiful B&W images with Adobe Photoshop Elements 12 Whether it s an Instagram snap or a film portrait, black and white photography is never out of style. Today, there are a number of ways
Creating Transparent Floors. Creating Transparent Floors. Contents. Introduction. Requirements. By Cyclonesue, 1 July 2006
 Creating Transparent Floors Contents SECTION 1: INSTALLING AND PREPARING YOUR TOOLS SECTION 2: CREATING A FLOOR TILE GRAPHIC SECTION 3: CLONE A FLOOR TILE PACKAGE IN HOMECRAFTER SECTION 4: COMPLETE YOUR
MITOCW watch?v=ir6fuycni5a
 MITOCW watch?v=ir6fuycni5a The following content is provided under a Creative Commons license. Your support will help MIT OpenCourseWare continue to offer high quality educational resources for free. To
Photo Retouching. Get more model faces from Google
 Get more model faces from Google Part 1 - Basic Model Retouching 1.- Face and Hair... Here we have a very Beautiful lady, but she is not as beautiful as she could be. Here, in this tutorial, you will see
Quick Start Training Guide
 Quick Start Training Guide To begin, double-click the VisualTour icon on your Desktop. If you are using the software for the first time you will need to register. If you didn t receive your registration
The Essen(als of Alice (Bunny) By Jenna Hayes under the direc(on of Professor Susan Rodger Duke University July 2008
 By Jenna Hayes under the direc(on of Professor Susan Rodger Duke University July 2008") The Essen(als of Alice (Bunny) By Jenna Hayes under the direc(on of Professor Susan Rodger Duke University July 2008 This tutorial will teach you how to create a short anima2on in an Alice world. Follow
The Essen(als of Alice (Bunny) By Jenna Hayes under the direc(on of Professor Susan Rodger Duke University July 2008 This tutorial will teach you how to create a short anima2on in an Alice world. Follow
Be sure to print this out for easy use. Let s get you started!
 Before you use this guide I highly recommend that you watch the install video at least one time all the way through that walks you through this guide. You can see the video at http://resalerightsfornewbies.com/installwalk-through-video
3. Ready-to-Make Projects
 3. Ready-to-Make Projects Ready-to-Make projects overview Cricut Design Space features ready-to-make projects created by professional artists. These projects include everything from home décor to fashion
Overview. Scene Changes. Camera Markers in Alice 3. Open a new Alice world
 Overview Scene Changes This is an modification of the June 2009/July 2012 scene change tutorial by Deborah Nelson and Chris Brown By Natalie Huffman Under the direction of Susan Rodger Duke University
Basics Pictures Media Bar
 Basics 1 The right pictures can make your publication stand out from the crowd. In this tutorial, we ll show you how to: Add and replace pictures. Use the Media Bar. Pan, zoom, and crop pictures. Apply
Basic Recording. Start --> Programs --> Panopto --> Panopto Recorder. Logging In
 Basic Recording Logging In Presenters are able to log into the Recorder with their credentials and record video, audio, PowerPoint presentations and also add Screen Capture functionality. NOTE: If using
Star Defender. Section 1
 Star Defender Section 1 For the first full Construct 2 game, you're going to create a space shooter game called Star Defender. In this game, you'll create a space ship that will be able to destroy the
Autodesk 123-D Catch ipad App
 Autodesk 123-D Catch ipad App At a Glance... lets you turn a real-life object into a 3-dimensional digital 3-D model capture something small or something as large as a building manipulate the model on
Creating a Slide Show with Background Music in Adobe Lightroom January 2017 Maryann Flick
 Creating a Slide Show with Background Music in Adobe Lightroom January 2017 Maryann Flick Adobe Lightroom is widely used by many photographers for image organization and editing. If you are already using
An Introduction to ScratchJr
 An Introduction to ScratchJr In recent years there has been a pro liferation of educational apps and games, full of flashy graphics and engaging music, for young children. But many of these educational
Welcome to Storyist. The Novel Template This template provides a starting point for a novel manuscript and includes:
 Welcome to Storyist Storyist is a powerful writing environment for ipad that lets you create, revise, and review your work wherever inspiration strikes. Creating a New Project When you first launch Storyist,
Actor Face to Character Face
 56 1 Chapter 56 ctor Face to Character Face Overview This tutorial shows you how to constrain an ctor face to a Character face. The major steps of this tutorial are as follows: Preparing the Scene (page
CAD Tutorial. CAD Detail Windows. In this tutorial you ll learn about: CAD Detail Windows Exploding and Modifying a CAD Block
 CAD Tutorial In this tutorial you ll learn about: CAD Detail Windows Exploding and Modifying a CAD Block Creating a New CAD Block CAD Detail from View Creating a Plot Plan CAD Detail Windows CAD Details
SIMPLE POP ART EFFECT
 SIMPLE POP ART EFFECT In this Photoshop tutorial, we re going to see how to turn a photo into a simple 1950 s and 60 s pop art-style effect. If you can make a selection with the Lasso tool and you understand
Basic Tutorials Series: Import A Photograph. RenoWorks Support Team Document #HWPRO0003
 Basic Tutorials Series: Import A Photograph RenoWorks Support Team Document #HWPRO0003 Import A Photograph 2 1 Import Your Own Photograph The Photo Import Wizard The Photo Import Wizard is the first tool
Kitchen and Bath Design Tutorial
 Adding Cabinets Chapter 5: Kitchen and Bath Design Tutorial This tutorial continues where the Materials Tutorial left off. You should save this tutorial using a new name to archive your previous work.