Holiday Gift Box By Jean Bernard
|
|
|
- Russell Andrews
- 6 years ago
- Views:
Transcription

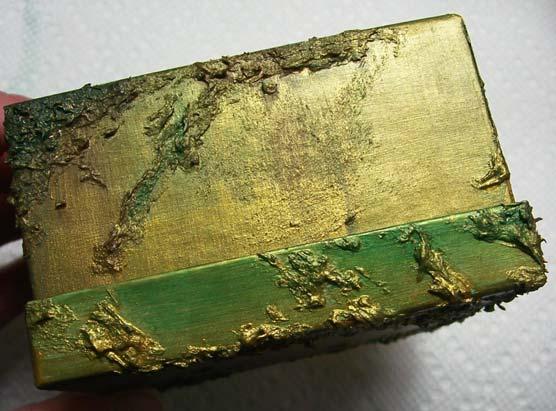
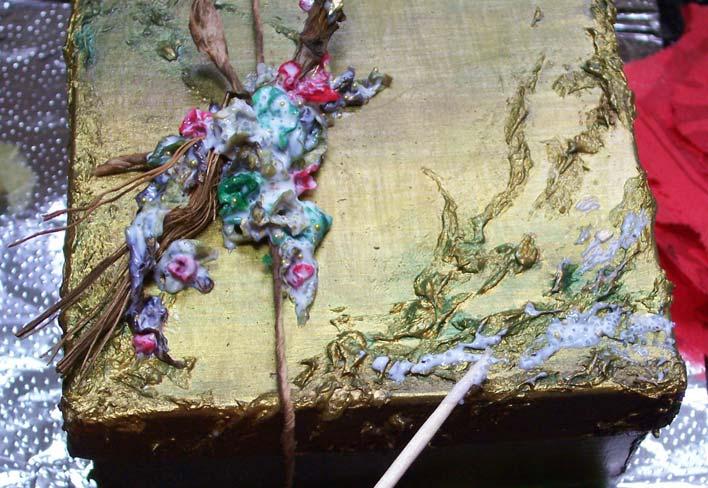
1 Holiday Gift Box By Jean Bernard Please read the entire lesson before you begin to gather your supplies. The supply list holds exactly what I used to create this project. You may not have a particular item in your studio but there are alternatives which I have listed for you in the body of this lesson. May I suggest that you practice the painting technique on a scrap piece of cardboard, wood, tin etc., sealed with gesso until you get the hang of my painting style or best of all discover your own personalized technique. Supply List: * Gift Box * Golden Fiber Paste * Paint Brushes * White Gesso * Acrylic Paints ~ Black, Metallic: Emperors Gold (bright gold), Metallic: Venetian Gold (bronze), Dark Green, Dark Brown * Glossy Varnish (sealer) * Colorful Napkins * Mod Podge * Ribbon * Twigs * Clear Micro Marbles * Gold Micro Marbles with Gold Glass Shards * Toothpicks * Aluminum Foil * Scissors * Black Felt (optional) This particular package was created for someone who loves the great outdoors. I chose earth tone colors and added a bit of glitz using the metallic paints. Paint the outside of the box and lid with one coat of gesso. Let dry. Please note: I will not put too much paint where the lid meets the box. Too much paint in that area will not allow the lid to fit properly. Place the lid onto the box. I wanted to create the illusion of a woodland scene using texture. This was achieved using the Golden Fiber Paste. The fiber paste creates beautiful textures and dries very hard. If you do not have the Golden Fiber Paste think of ways to create your own texture medium. Fine sand mixed Page 1


2 with a gel medium works well. Micro beads and fibers mixed with Mod Podge is an idea. Test your concoction on a scrap piece of paper to see how well it accepts paint. Scoop up some fiber paste from a container with a toothpick and place the paste onto the box. Try different techniques when applying the paste. I will strategically place the paste on the box or lid as well as roll the toothpick over the surface of the box creating random textures. The less I plan the more I like the effects. Try different techniques smear the paste on with a dry paintbrush, toothbrush, old rag, splatter it on, the possibilities are endless. Simply play and have fun. Allow the Fiber Paste to dry completely. Page 2


3 Lets paint My painting style is very unconventional to say the least. I was afraid to paint until my friend and mentor gave me permission to cut loose and find my own style. Since then I continue to find myself in various painting techniques that I love. Not all are immediately successful but they do push me to explore new ideas until the final outcome is a success! You may or may not like the following steps but I urge you to explore and find what you love as well. Place a drop of the paints side by side on a sheet of aluminum foil. Page 3


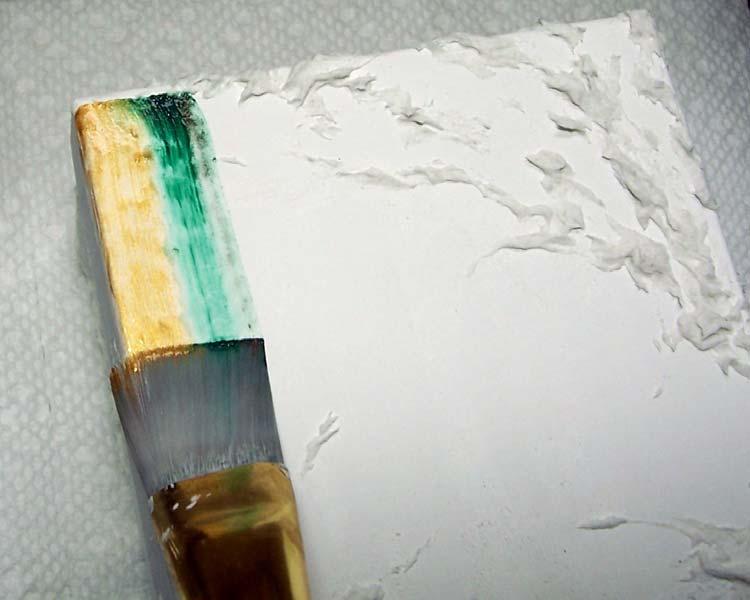
4 The following steps are time sensitive. We do not want the paints to dry too quickly between coats. Have a clean bowl of water nearby. Place a straight edge paintbrush into the water. Remove excess water from the paintbrush by blotting it on a dry paper towel. Pickup some gold paint on ONE edge of the paint brush. Pick up some green on the other edge of the paintbrush. Barely dip the edge of the paintbrush into the water. Place the edge of the paintbrush onto the corner of the box/lid. Press and pull the paintbrush down the length of the box. Page 4
5 Page 5


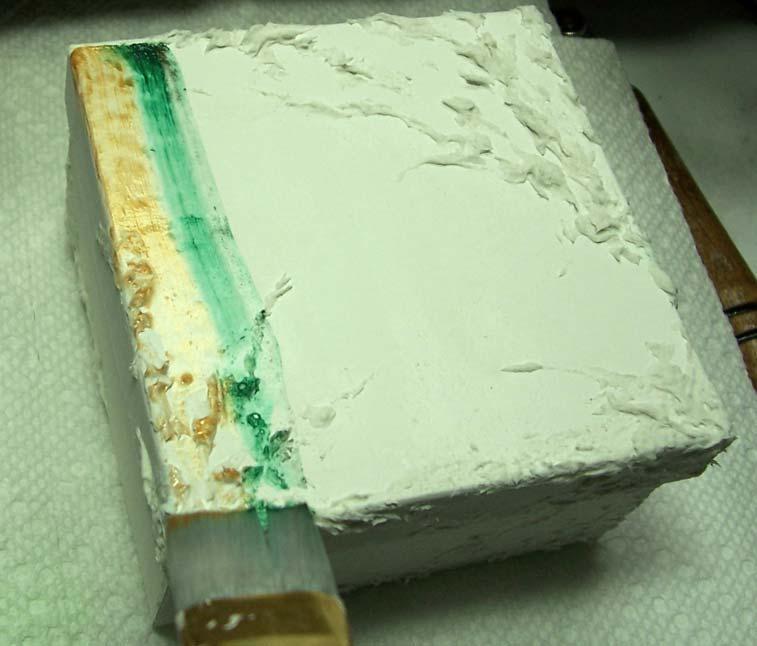
6 I do not clean my paintbrush between paint color changes. Dip one edge of the paintbrush into the brown and the other edge into the green. Barely dip the tip of the paintbrush into the water. Place the side of the paintbrush against the previously laid paint overlapping slightly. Press and pull the paintbrush down the length of the box. Page 6


7 Slightly dip the tip of the paintbrush into the water. Place the tip of the paintbrush on the corner of the box where you laid your paintbrush previously. Press and pull down the paintbrush. When the brush meets the Fiber Paste gently wiggle the brush from side to side covering the area with paint and continue down the box. Please note: The brush strokes are vertical without any breaks in the strokes. Paint the remainder of the lid using the metallic gold paint and the techniques outlined above. Let dry. You have finished the first layer of paint. Doesn t look like much but it will with the other layers of paint Page 7


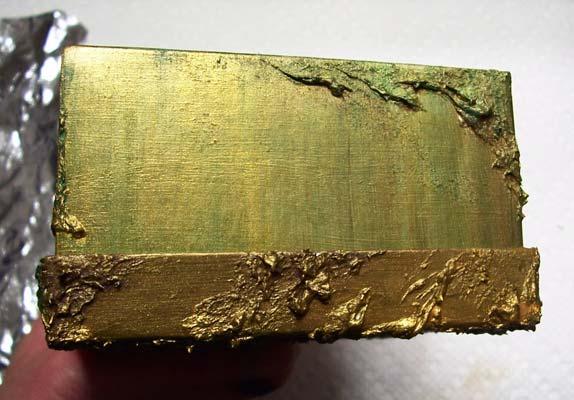
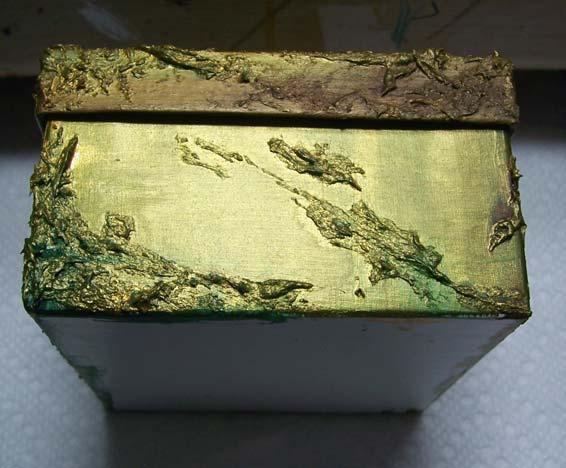
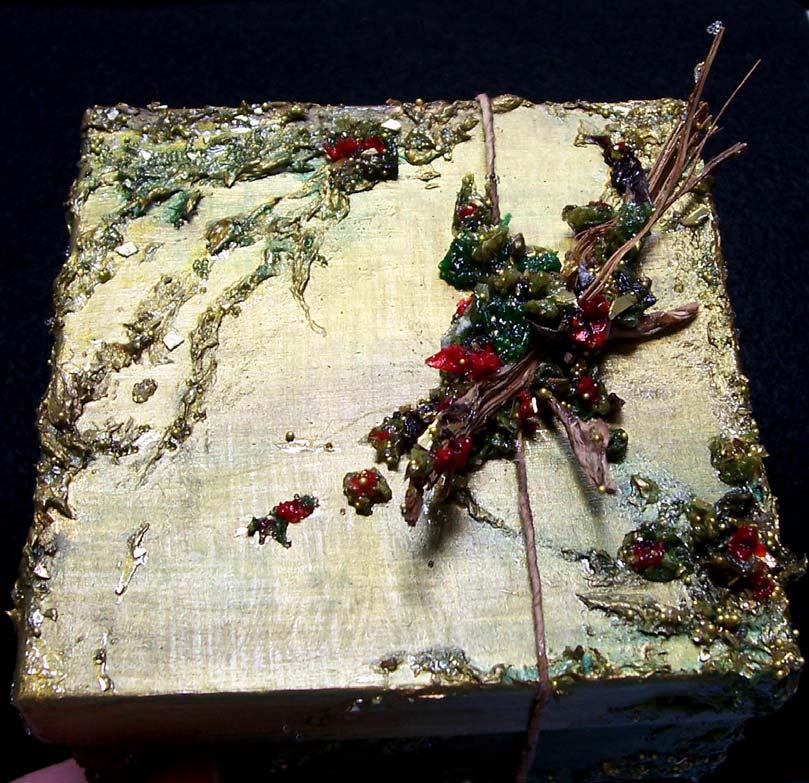
8 The first layer of paint has dried. We will add a few more layers of paint. Dip one edge of the paintbrush into the dark brown paint. Dip the other edge in the Metallic Gold paint. Continue the steps outlined above. Overlapping the colors, incorporating new colors adds depth and richness to the gift box. Don t be afraid! Just have fun. You can always add more paint or simply start over using gesso. The final layer is the gold metallic paint. I will wash my paintbrush, blot off excess moisture. Load the edge with the gold paint and barely dip the tip in water. Paint over the dried paint with a light painting motion. This creates a translucent finish allowing all the gorgeous colors below to shine thru the finish. You may omit this step but give it a whirl. You might like it!. Page 8


9 Once the bottom and sides are painted we are ready to seal the entire box with varnish. One coat is sufficient. I used black felt on the bottom of the box so it could be displayed on a dresser without fear of scratching the furniture. Simply paint glue on the bottom of the box, apply the felt and trim to fit. Page 9
10 Page 10


11 Lets embellish! I used colorful napkins to compliment the holidays as well as the paint used on the box. Remove all the backing from the napkins. Typically there are two layers but some may have 3 layers. Page 11


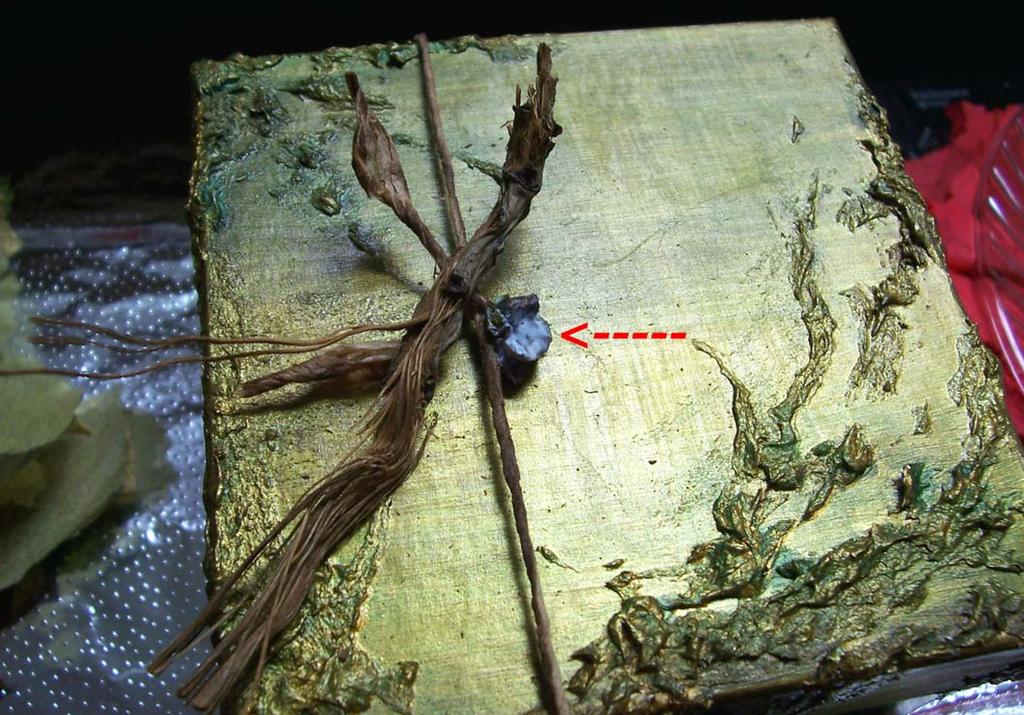
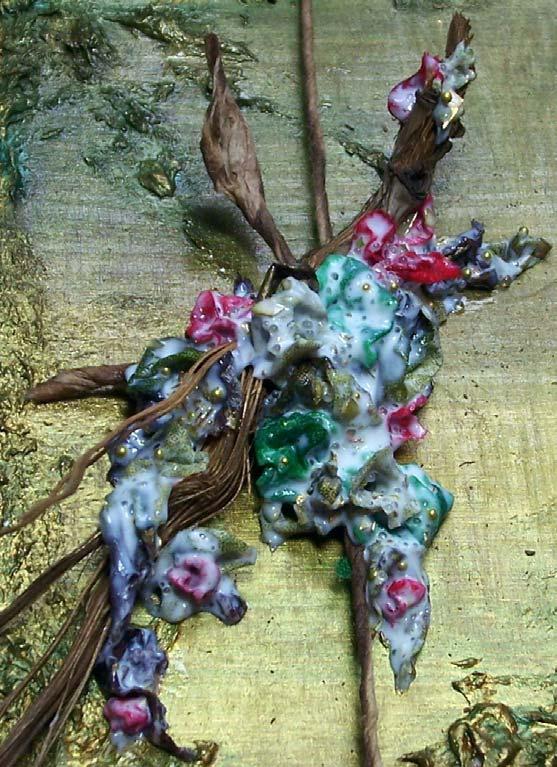
12 Tie a ribbon around the box. Please note: The ribbon is wrapped around the ENTIRE box and knotted on the top. The embellishments are placed over the ribbon. The only way into the box is by cutting the ribbon. If the cutting of the ribbon bothers you, simply tie the knot on the BOTTOM of the box allowing access to the gift. I wanted a woodsy center piece for my box so I tore some bark away from a fig branch. The woodsy fibers were exposed so I split the fibers apart and voila! A perfect centerpiece emerged Page 12


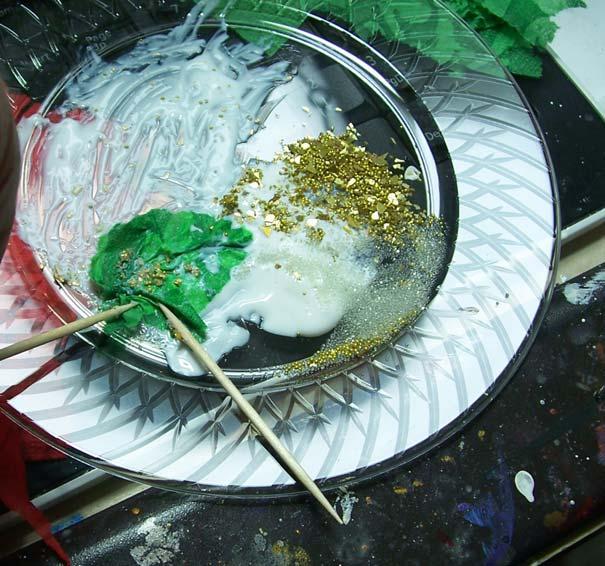
13 Prepare your work space. Tear the napkins into small pieces about the size of a matchbook. Pour ModPodge onto a solid surface. I like to use plastic plates or large study plastic lids. Pour the clear micro marbles and gold micro marbles with shards next to the Mod Podge. Have two toothpicks on hand. Page 13

14 I m going to share a quick trick with you then I will shut up lol Have you ever worked with thin paper like napkins only to soak up way too much ModPodge or other liquids resulting in a blob of pasty looking goop? Well, I have. Here s me trick.. I gently lay the paper onto the ModPodge. The ModPodge will automatically adhere to the paper. See photo below. This is what you want. Less is best in this regard. Now we are ready to play Page 14

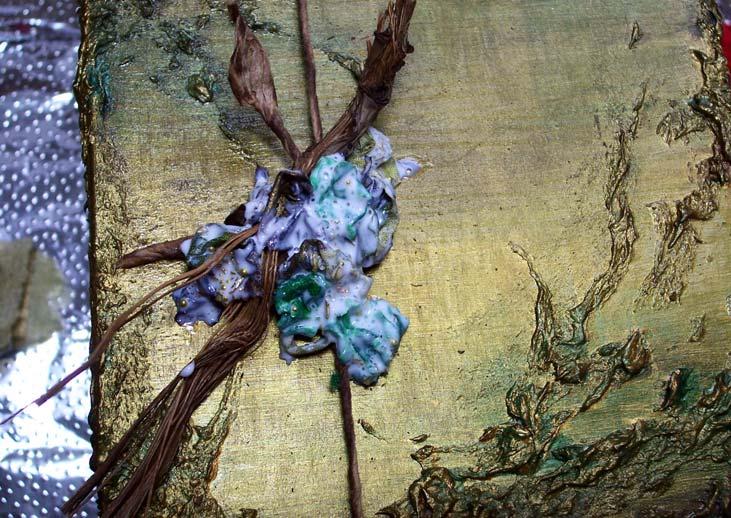
15 Place a piece of torn napkin onto the Mod Podge. Using a toothpick lift the piece of napkin off the ModPodge and place on a hard surface. Gently move the napkin from side to side with a toothpick. This motion distributes the Modpodge evenly under the napkin. Roll your toothpick thru the micro marbles and place them on top of the napkin. Tear a small section of napkin away using a toothpick. Using two toothpick bring the ends of the napkin together creating a rosette. May seem clumsy at first but it wont take you long to get the hang of it. You can also press the tip of a toothpick onto the end of the napkin and swirl the napkin. Play with it. You ll find your rhythm Page 15

16 Place the rosette onto the box and ribbon. We are now anchoring the fig branch centerpiece to the box. Continue to add more foliage and flowers until the fig branch centerpiece is secured to the box. Don t forget to add some stray foliage and flowers here and there to add dimension. Add the micro marbles over the rest of the box for more sparkle. Page 16
17 Page 17
18 Page 18
19 Page 19

20 I hope you had fun! If you have any questions feel free to contact me. Jean Page 20 THE END
Trim areas that may have overlapped and heat again if necessary.
 Wings Supplies: *28-gauge wire *Fantasy Film *Bond Grrrip Glue * Ranger Adirondack Alcohol Inks: Stream Wild Plum Butterscotch *Ranger Adirondack Alcohol Blending Solution *Glass Glitter extra fine *Micro
Ornament Dolls: A Doll Project Tutorial. Ornament Dolls
 1 Ornament Dolls These 6 (15cm) mini dolls make perfect holiday ornaments or small gifts! The faces are sealed paper, which makes these dolls fast and easy to create. Try printing and drawing your own
Welcome to our Wee Work section that will provide you. and your child with a learning activity that will engage
 Welcome to our Wee Work section that will provide you and your child with a learning activity that will engage their senses and emerging skills. Scroll down the page to find the activity that meets your
Pressed Flowers. Materials: Directions: Pressed flowers Heavyweight paper Picture frame Craft glue Small paint brush Tweezers
 Pressed Flowers Pressed flowers Heavyweight paper Picture frame Craft glue Small paint brush Tweezers 1. Pressed flowers can be purchased online or you can easily press them yourself. Begin by folding
Laminated Fabric Tray
 Laminated Fabric Tray There are a few things one would assume you can t add embroidery to. Metal. Buildings. Cats. All these things are inadvisable to hoop. You might also think a hard plastic serving
TECHNIQUES AND INSPIRATION. Daily Visual Journal KELLY DARKE
 TECHNIQUES AND INSPIRATION Daily Visual Journal KELLY DARKE DAILY VISUAL JOURNAL Introduction On June 5th, 2009 I decided to start creating a visual journal on individual pieces of paper. This gave me
Drop Spine Box. Tricia Morris. Design by: 2006 Craft TV Weekly, Inc.
 Drop Spine Box Design by: Tricia Morris 1 Think inside the box! In a marathon of gluing, folding and smoothing, Tricia shows how to make a Drop Spine Box. The steps are many, but the reward is great! So
Table of Contents. Pom-Pom Bookmark Yarn covered Pencil Holder Yarn Hangers... Yarn Hair Bows
 1 Table of Contents Pom-Pom Bookmark... 3-5 Yarn covered Pencil Holder... 6-8 Yarn Hangers... 9-11 Yarn Hair Bows... 12-14 Tassel Necklace or Gift Wrapping... 15-17 No Knit Infinity Scarf... 18-20 Braided
Mini 4-H Arts & Crafts
 Mini 4-H Arts & Crafts Mini 4-H is open to youth who are currently in Kindergarten, first, or second grade at the time of their enrollment on 4HOnline. Enroll in Mini 4-H through the 4HOnline website by
Snakes Alive! Kathy Grajek K-12 Art Valley R-6 Schools
 Snakes Alive! Kathy Grajek K-12 Art Valley R-6 Schools Caledonia, MO 63631. kgrajek@valley.k12.mo.us One Workshop 18 Lessons will have one or two make and take and examples of others for photo op. 1. Popsicle
Wax Resist. Judi Watanabe. Design by: 2007 Craft TV Weekly, Inc.
 Wax Resist Design by: Judi Watanabe 1 Wax on, wax off! Judi is resisting her paper crafting projects with wax! She protects photos and inked items with a little wax and then she gets creative. Judi rubs
Your Personal Artist Tree. Lesson prepared by Esther Saulnier
 Your Personal Artist Tree Lesson prepared by Esther Saulnier This art activity can be used in conjunction with the study of trees in your local forests. What do your students know about trees? What types
DO-IT-YOURSELF DISNEY-INSPIRED GIFT WRAP DISNEY
 DO-IT-YOURSELF DISNEY-INSPIRED GIFT WRAP YOU WILL NEED*: Printed templates Scissors Tape Glue Craft paper Various ribbon *Additional supplies may be needed for each version and are listed before Step 1.
A Precision 2000 Mixed Media Project
 Día de los Muertos (Day of the Dead) Panel A Precision 2000 Mixed Media Project PROJECT TITLE: Día de los Muertos (Day of the Dead) Panel DESIGNED BY: Andy Spencer SKILL LEVEL: (Adult 1-5: 1 being the
1. Using black paper, draw and cut out a pot of gold and glue it to your water color paper.
 Stencil art Supplies: 1. Acrylic paint 2. Water 3. Paint brushes/ Makeup sponges 4. Water color paper Directions: 1. Using black paper, draw and cut out a pot of gold and glue it to your water color paper.
Mezuzah A Fused Glass Project
 Mezuzah A Fused Glass Project Mezuzah A Fused Glass Project PROJECT TITLE: Mezuzah DESIGNED BY: Jeanne Baruth SKILL LEVEL: (Adult 1-5: 1 being the easiest, 5 being most difficult) 3 TIME TO COMPLETE: 3
CARBORUNDUM MEZZOTYPE dark field & reductive techniques
 CARBORUNDUM MEZZOTYPE dark field & reductive techniques with Akua Carborundum Gel, a platemaking medium July 2017 AKUA CARBORUNDUM GEL The Akua Carborundum Gel for platemaking is used to create collagraph
Mini 4-H ARTS & CRAFTS
 Mini 4-H ARTS & CRAFTS An Introduction to 4-H For Youth in Grades K - 2 A replacement manual will cost $1.00. Purdue University is an equal access/equal opportunity institution. Developed by Purdue Extension
JOY, PEACE AND HOPE. by Debby Forshey-Choma
 JOY, PEACE AND HOPE by Debby Forshey-Choma EXCLUSIVE Joy, Peace And Hope by Debby Forshey-Choma PALETTE DecoArt Americana Acrylics Antique Maroon #13160 Black Green #13157 Cadmium Red #13015 Grey Sky #13111
HICKORY HOMESTEAD. by Debby Forshey-Choma
 HICKORY HOMESTEAD by Debby Forshey-Choma EXCLUSIVE Hickory Homestead by Debby Forshey-Choma PALETTE DecoArt Americana Acrylics Avocado #13052 Black Green #13157 Black Plum #13172 Bleached Sand #13251 Charcoal
Poured Paint. Create with Yarn and. Use yarn and poured paint to create a vibrant folk-art style painting
 Level: Beginner to Intermediate Flesch-Kincaid Grade Level: 7.3 Flesch-Kincaid Reading Ease: 69.84 Drawspace Curriculum 8.4.A4-6 Pages and 12 Illustrations Create with Yarn and Poured Paint Use yarn and
Building the Bell Tower
 Building the Bell Tower Mold #55 does not contain all of the blocks to build this tower. You will need extra regular blocks (1/2" x 1/2" x 1") and square blocks (1/2" x 1/2" x 1/2"). These blocks can be
Binding a Limp-bound Book which make great site tokens or personal largess
 Binding a Limp-bound Book which make great site tokens or personal largess As presented by THLady Jorhildr Hrafnkelsdottir version 1.2 2 Miniature Bookbinding - THLady Jorhildr Hrafnkelsdottir Larger books
Monster Marionette ART GRADE LEVEL FOURTH FIFTH MATERIALS
 MATERIALS FOR STUDENT: (one per student unless otherwise noted) FloraCraft Make It: Fun Foam: Rectangular pieces (arms & legs) cut from large Foam Block: Four 1" x 3" x 1" thick, Four 1" x 2 1/2" x 1"
WHAT TO DO WITH STOCKROOM MATERIAL LEFTOVERS.
 Sidewalk Chalk WHAT TO DO WITH STOCKROOM MATERIAL LEFTOVERS http://www.positivelysplendid.com/2011/05/sidewalk-chalk-paint-ssg-idea-7.html Permanent Chalk Pictures To make your chalk artwork more permanent
Building the Gothic Church
 Building the Gothic Church Mold #54 does not contain all of the blocks to build this church. You will need extra regular blocks (1/2" x 1/2" x 1") and square blocks (1/2" x 1/2" x 1/2"). These blocks can
Miniature Floral Wreath
 Miniature Floral Wreath With Deb Wood Create a Delicate, Delightful Miniature Floral Wreath Headpiece Learn techniques for making several styles of durable, miniature flowers from polymer clay and weave
Taking the mystery out of working with Acrylic By S. Taylor Hedges
 Taking the mystery out of working with Acrylic By S. Taylor Hedges Sandra Taylor Studio One Cat Squared Working with Acrylic Paint Definitions: Glaze thin transparent layers of color that enable the artist
Meredith Sinclair s DIY Clothespin Xmas Tree
 Meredith Sinclair s DIY Clothespin Xmas Tree Materials: Clothespins of various sizes, old or new Empty paper towel rolls, TP rolls, or craft tubes Glue gun Glue sticks Miniature decorations (optional)
A How-To From CHRYSANTHEMUMS
 A How-To From DIPPED-Tip CHRYSANTHEMUMS How-to Materials Adding Color For personal use only / Copyright THUSSFARRELL, LLC. All rights reserved. 5 - Paper to Petal How-to How-to Materials Double-sided
Tutorials. To create your antique embroidered book, you'll need:
 Tutorials Part of the beauty in some books is simply how they look, and if we can t find them that way, we ll make 'em! It s a perfect and unusual way to display your favorite literary embroidery designs
Please read through the entire document before starting your installation process to better understand what is required.
 1 P a g e How s It Hanging? Step-by-Step Guide for Hanging your Wallpaper Walls Republic offers a richer and wider selection of designs, textures and colours than ever before found in the wallpaper world,
DIY DISNEY CHAR M BR ACELET
 DIY CHAR M BR ACELET YOU WILL NEED: Polymer clay in various colors 5/32 Silver/Gold eyelets Sculpting tools Clay gloss varnish or polyurethane matte varnish* Paint brush Craft knife An oven and pan A ruler
Tips & Tricks using Part 8
 Tips & Tricks using Part 8 Easy Sand Texturing...1 Advanced Sand Texturing...3 Making Palm Trees...5 Tips & Tricks using Bruce Hirst Part 8 Page i Easy Sand Texturing I'm going to make the sand textured
Tips & Tricks using Part 2
 Tips & Tricks using Part 2 Using the cobblestone mold #210...1 Making a dungeon diorama...2 Making torches...3 Making a textured door...4 Making a portcullis...5 Adding moss...6 Tips & Tricks using Bruce
A Colorful World Illustrated Art Lessons
 A Colorful World Preparing to Paint Materials: paint egg cartons paintbrushes newspaper paper towels water jars paper Gather materials. If possible, provide a variety of brushes: small round, medium round,
Football Silhouettes Project Sheet 1 of 2: Classic Beads
 Project Sheet 1 of 2: Classic Beads This project as shown at left has 4 designs 2 in classic beads and 2 in mini beads. They are intended to be displayed together; however, you may choose to make only
Mediums Guide. For more product information visit our website at
 REtarder Chromacryl Retarder has been designed to stop paint drying quickly. If you add about 10% Retarder to your colour by volume, it will slow the drying time of your paint considerably. This product
Do # 11 Tile Message Board
 Do # 11 Tile Message Board Supplies Needed: 6x6 tiles (or larger!), felt scraps, embellishments (feather, copies of the Be you, Bravely logo, ribbon, stickers, scrapbook paper), Mod Podge, 1 dry erase
Delightful Miniature Purses! By Karin Buttigieg
 Delightful Miniature Purses! By Karin Buttigieg The idea for this came to me a few months ago when a customer ordered lots of miniature purse frames that I thought were pretty unattractive and I had sold
Americana Banner & Watering Can. by Diane Miller
 Americana Banner & Watering Can by Diane Miller Americana Banner & Watering Can By Diane Miller Palette: DecoArt Americana Light Buttermilk #13164 Santa Red #13170 Uniform Blue #13086 Surface: Triangle
Water-colour painting techniques
 INFORMATION SHEET Water-colour painting techniques Andrew Newland T E A C H I N G A R T & D E S I G N Sheeaun, Kilmaley, Ennis, Co. Clare, Ireland. These notes are copyright Andrew Newland Introduction
HP Create. HP Create: Polymer Clay Photo Pendant
 : Polymer Clay Photo Pendant I love custom handmade gifts, especially if they include a photo. My little Polymer Clay Photo Pendants are perfect gifts to share to spread the love! You can make them into
Sealer, Primer, Isolation Coat, & Varnish
 Sealer, Primer, Isolation Coat, & Varnish A seal can be applied between the substrate and gesso/primer, or between the substrate and the first layer of paint if gesso is not desired. A seal may also be
Skull Party Favors. Instructions:
 Skull Party Favors Treat your Halloween party guests to a frightfully fantastic table! Easy to make decorations with Tulip 3D Fashion Paint, Fashion Glitter, Iron-On Crystals and Aleene s Acid-FreeTacky
Textured Geopapers Jill K. Berry
 Textured Geopapers Jill K. Berry I love beautiful papers, and I paint my own for use in my artwork. Here are some simple techniques that result in a geographic look, perfect for use in collaged maps, books
January Instructions Willem van Aelst Study 2008 David Jansen. For the Video Link, Please see Page 3
 January Instructions Willem van Aelst Study 2008 David Jansen For the Video Link, Please see Page 3 Historical Information To start the painting we first need to establish the Ground. The ground is the
From My Sketchbook Study of Yellow Kansas Sunflower Prismacolor Colored Pencils & Prismacolor Lightfast Pencils
 From My Sketchbook 2009 Janelle Johnson CDA, TDA Cozy Nest Designs PO Box 219 Rose Hill, KS 67133-0219 janelle@janellejohnson.com * www.janellejohnson.com * (316) 776-0440 Study of Yellow Kansas Sunflower
VACATION CHURCH SCHOOL. Crafts
 VACATION CHURCH SCHOOL Crafts 1 TABLE OF CONTENTS Homemade Sidewalk Chalk Cupcake Crayons Artwork Weaving Hut Collection Cans Village Hut Coin Wrapper Twist a Wire Form Papier Mache Bowl Eco-Friendly Multimedia
These wings were created exclusively for Sherry Goshon s Libelle Doll
 These wings were created exclusively for Sherry Goshon s Libelle Doll Recommended Materials Spray Clear Gloss Lacquer FabriTac Adhesive Libelle Dragonfly Wing prints Diamond Glaze Dimensional Adhesive
Part 3 J. Serresseque, 2012
 Part 3 J. Serresseque, 2012 Vellum wings are among my favorite wing media. I get excited when I see a new pattern that can be translated into a potential wing design. The nice thing about Vellum is the
FIRST SNOWFALL. by Debby Forshey-Choma
 FIRST SNOWFALL by Debby Forshey-Choma EXCLUSIVE First Snowfall by Debby Forshey-Choma BRUSHES Royal Brushes sm., med. Debby s Texture brush Majestic Filbert size 8 Soft-Grip White Blending mop size 1/2
C Paint. Product Information Sheets
 T A T G O E C Paint Product Information Sheets Cottage Paint- 8oz jar Available in many pre-tinted colors -see chart. Used for painting furniture and cabinetry. Water based Clay paint that is easily distressed
Base for Foliage Scholastic Inc. 4665
 9999311210 Spring arrow 2.indd 3 9999313302 19/1/07 10:31:10 9999311210 Spring arrow 2.indd 1 19/1/07 10:34:26 Base for Foliage Materials Cardboard boxes Green bulletin board or wrapping paper Stapler
ARLENE LINTON A LACE DOILY ART PLAY DATE 2015
 ARLENE LINTON A LACE DOILY ART PLAY DATE 2015 A Lace Doily Palette (FolkArt): Vintage White (515) Brushes: Scharff Series 3000 Kolinsky Sable Round (#4) Surface: 8-inch Scooped Plate (#WPSCO) Available
Planner / Journal Tutorial
 Planner / Journal Tutorial Sewing your own planners and journals is so much fun! You get to choose every part of the design, and your new book will delight you every time you open it. This method quickly
Building the Wizards Tower
 Building the Wizards Tower Building Instructions You will need to fill this mold 18 times to have enough blocks to build the tower. Also, the blocks should be completely dry before gluing them together.
Techniques and ideas. by Marie Browning
 TM Techniques and ideas by Marie Browning TM Fiskars Parchamoré Crafting System is a beautiful addition to the Mini ShapeBoss Embossing System. You can make gorgeous cards, tags and scrapbook pages. The
Trash to Treasure Projects
 Table of Contents 1. Food Box Note Pads and Journals 2. Paper Beads 3. Blender Paper Ornaments 4. Paper Roll Music Shaker 5. Picture Frame from Cardboard 6. Checker Board Game 7. Milk Carton Bird Feeder
Ribbon Beads. Metal Clay Jewelry Projects Chapter 7. Figure 7.64 Remember the wrapped hook clasp directions are available in Chapter 6.
 07 PYMCJ ch07 part2 4/6/08 8:31 PM Page 175 Figure 7.64 Remember the wrapped hook clasp directions are available in Chapter 6. If you d like an ID bracelet that is a little more colorful, consider adding
Tips & Tricks using Part 17
 Tips & Tricks using Part 17 Making a Secret Door Using Mold #96...1 Using Cotton Swabs For Antiquing...4 Planning Dungeon Waterways...5 Pouring and Texturing Water...6 Making Water for Fountains...11 Tips
 Supplies WARM AND NATURAL COTTON BATTING FIBER FILL STUFFING COTTON PRINT FABRIC FOR DRESS OLD LIGHT WEIGHT SWEATER TO CUT UP SMALL PIECE OF MUSLIN FOR CANDY RABBIT PLAID-APPLE BARREL NUTMEG BROWN CRAFT
The Gothic Chess Set
 The Gothic Chess Set Please note that this chess set is a fairly difficult and time consuming project. I strongly suggest building one or two easier models before tackling this one! The miniatures used
Fee Fi Faux Fabulous
 Fee Fi Faux Fabulous Mimicking enamel and metal with polymer and mixed media A floral focal pendant project with Christi Friesen For this project you will need:. polymer clay I recommend Premo for this
The Mill by Barb Halvorson
 The Mill by Barb Halvorson The Mill By Barb Halvorson Palette: DecoArt Americana Acrylics Alizarin Crimson #13179 Black Forest Green #13083 Blue Violet #13141 Bright Yellow #13227 Brilliant Red #13145
Crepe Paper Holly Leaves with Berries
 Crepe Paper Holly Leaves with Berries One of the most traditional botanicals to have around for the holidays is holly. Here we used crepe paper holly leaves for gift toppers and wreaths, but you can incorporate
Tips & Tricks using Part 12
 Tips & Tricks using Part 12 How to Use Mold #164...1 Painting Small Parts...3 Floor Tile Patterns...5 Tips & Tricks using Bruce Hirst Part 12 Page i How to Use Mold #164 1. The round connector block mold
Fairy Tale #4 Little Red Riding Hood. Fairy Tale #4: Mixed Media
 Fairy Tale #4: Mixed Media Little Red Riding Hood For this lesson s mixed-media assignment, I offer you three oil pastel techniques to add to your toolbox! 1 Technique #1 Masking Oil pastel on paper. SUPPLIES
Fish & Other Seafood Grades 3-5
 Fish & Other Seafood Grades 3-5 Source: https://www.eathappyproject.com/resources/.../how-salmon-get-from-farm-to-fork Make M Salty the Fish! Materials: paper (white or blue) printer salt tempera paint
Collaborative Weaving
 Autumn Anderson - Fall 2013 Student Teaching Pittsburgh Conroy Art Centers Ages: 5-21! Art Centers are created so that the students can move around the classroom and go to various stations that appeal
SA Additional Projects
 Paper Bead Necklace You will need: paper (magazines, newspaper, tissue paper, construction paper), glue, yarn, pencil or crayon (for wrapping) Cut strips of paper and tightly wrap them around a thin pencil
Winter View. by Debby Forshey-Choma
 Winter View by Debby Forshey-Choma Winter s View By Debby Forshey-Choma Palette: DecoArt Americana Acrylics Admiral Blue #13213 Autumn Red #13280 Black Green #13157 Camel #13191 Cool Neutral #13089 Country
SEIZE THE CLAY. Shape your success as a sculptor with these six easy projects. TRY IT
 TRY IT SEIZE THE CLAY Shape your success as a sculptor with these six easy projects. PROJECTS JODI MENSING HARRIS PHOTOGRAPHS STEVEN MCDONALD WORDS HEIDI PALKOVIC 8 DO IT YOURSELF Spring 2017 A PRESS TO
Heavenly deco ideas angels
 Heavenly deco ideas angels With FIMOair light and FIMO soft, you can conjure up wonderful Christmas decorations - even at the very last minute. FIMOair light modelling clay can be dried in microwave ovens
Arctic Maze. The cubs are lost! Help them find their way back to their mother.
 Arctic Maze The cubs are lost! Help them find their way back to their mother. Illustrations copyright 2008 by Vincent Nguyen Time to bloom! Circle the items that will help the flower to grow. Illustrations
COMPOSITES LAB MANUAL
 COMPOSITES LAB MANUAL Version 1 Lab 3: Surface Preparation, Wet Layup, and Vacuum Bagging The original version of this manual was a one student senior design project written by Katherine White, the Composite
Basic Stenciling Techniques
 Metal Stencil Techniques For each technique you ll need the equipment listed in addition to your stencil and removable tape. To avoid bending your stainless steel stencils, keep them flat at all times.
Solder Technique Studio Soldering Iron Fundamentals for the Mixed Media Artist
 Solder Technique Studio Soldering Iron Fundamentals for the Mixed Media Artist Giuseppina Josie Cirincione north light books CreateMixedMedia.com Cincinnati, Ohio Materials Basic soldering tool kit Solder,
Great Escape- Upcycle Cereal Boxes Sue Kohlman September 27, 2015
 Great Escape- Upcycle Cereal Boxes Sue Kohlman September 27, 2015 Drawer Organizers http://iheartorganizing.blogspot.com/2013/01/diy-cereal-box-drawerdividers.html Materials Pretty papers, {both wrapping
Paint with Texture. Use Impasto to. Create a richly textured painting with tissue paper and a painting knife
 Level: Beginner to Advanced Flesch-Kincaid Grade Level: 8.2 Flesch-Kincaid Reading Ease: 62.7 Drawspace Curriculum 8.4.A2-6 Pages and 12 Illustrations Use Impasto to Paint with Texture Create a richly
The author assumes no liability for damages or accidents from the use of the information contained herein.
 Note: I can t say this enough- but thank you so much for your order on Amazon and for downloading the complimentary ebook of Mod Podge crafts. Having you as a customer means more to me than some may imagine
Snow Wonder. by Debby Forshey-Choma
 Snow Wonder by Debby Forshey-Choma Snow Wonder By Debby Forshey-Choma Palette: DecoArt Americana Acrylics Deep Midnight Blue #13166 Dioxazine Purple #13101 Hauser Light Green #13131 Lavender #13034 Hauser
Lesson Plan: Acrylic Painting Techniques Grades: 6 th -HS Art
 Lesson Plan: Acrylic Painting Techniques Grades: 6 th -HS Art Supplies: Palette-Plastic plate or small tray 2 regular length paper towels 1 sheet of wax paper as long as the plate, scissors 1 spray bottle
Creating Unique Fused Glass Designs Using Stencils & Powdered Glass
 Creating Unique Fused Glass Designs Using Stencils & Powdered Glass Written by Jackie L. Doehling 2014 Full Moon Loon Designs http://www.fullmoonloon.com http://www.facebook.com/fullmoonloondesigns 2 Supplies
Venetian masks. Venetian masks
 Venetian masks These wonderful masks from the Canevale di Venezia are both beautiful and mysterious at the same time. Whether elegant-looking in black and gold or conspicuously colourful, you can custom-make
Building the Circular Tower
 Building the Circular Tower You will need to fill this mold 18 times to have enough blocks to build the circular tower. Be sure the blocks are completely dry before gluing them together. For detailed instructions
Golden angels in an elegant design
 Golden angels in an elegant design The magic of advent these modern-looking, golden-gowned angels are simply perfect for giving your home a festive Christmas feel. Made using the clay-like FIMOair basic
STEP 14 STEP 13. With a #8 to #12 shader, begin at the top of the design background and begin by applying pure black to the top 1/3 of the design.
 STEP 13 Cut the frisket along the outside pattern lines of your design. You are freeing the remaining background frisket from the pattern work area. Cut along the outer boundary line of your design; this
Makes Sense SCIENCE GRADE LEVEL KINDERGARTEN FIRST MATERIALS
 MATERIALS FOR STUDENT: (one per student unless otherwise noted) FloraCraft Make It: Fun Foam Ball, 4" diameter Jar band (from a canning jar lid) (optional) Cardstock paper features (See FOR TEACHER below)
Fish & Other Seafood Grades K-2
 Fish & Other Seafood Grades K-2 Make M Salty the Fish! While making the craft you can sing some songs to go with it see page 4! Materials: paper (white or blue) printer salt tempera paint powder or colored
MAKE IT YOURS. Digital Photo Decoupage Art. How-2 instruction books for cool projects you can make your own.
 MAKE IT YOURS Digital Photo Decoupage Art How-2 instruction books for cool projects you can make your own. DIGITAL PHOTO DECOUPAGE ART WHAT YOU WILL NEED Computer / Internet Connection Digital photos you
The Essential Guide to Embossing.
 The Essential Guide to Embossing How to WOW! This guide will run you through a whole host of Embossing Techniques from the basic Stamp, Sprinkle, Tap, Heat, WOW! to the more complex and beautiful effects
SUPPLIES OTHER SUPPLIES Carson 10 Teddy Bear Pattern
 SUPPLIES Fat 1/8 yd of 5/8 faux fur or mohair (sample is faux fur) 5 x 5 piece of wool felt for paw pads 11mm black glass eyes (1 pair) Small piece white felt (optional) eye whites 2 1 1/8 Joint discs
From Trash to Treasure ~ Ornaments E-Book (SRP) $14.99
 $14.99") Bowdabra R Bow Maker, Favor Maker & Craft Tool Decorating Your Tree with Trash: From Trash to Treasure Holiday Ornaments! Step-By-Step Instructions With Pictures From Trash to Treasure ~ Ornaments E-Book
Bowdabra R Bow Maker, Favor Maker & Craft Tool Decorating Your Tree with Trash: From Trash to Treasure Holiday Ornaments! Step-By-Step Instructions With Pictures From Trash to Treasure ~ Ornaments E-Book
Do it Yourself Ideas for. Spring and Easter Décor
 Do it Yourself Ideas for Spring and Easter Décor Whitney Danhof, UT Extension Agent March 2016 Umbrella Wreath Wreaths don t always have to be round and the umbrella wreaths are becoming very popular for
SHOW ME YOUR FLORALS
 STEPHANIE FEHRENBACH SHOW ME YOUR FLORALS WATERCOLOUR BASICS STARTUP GUIDE & SUPPLY LIST Stephanie Fehrenbach Welcome! I m so excited you ve decided to paint with me! Don t worry if you ve never picked
FACTFILE: GCSE ART AND DESIGN
 FACTFILE: GCSE ART AND DESIGN Watercolours Watercolour paints come in various forms, including tubes and tablets. Watercolour paint is a translucent medium that is perfect for building up layers and colours.
LESSON PRESENTATION INSTRUCTIONS VALUE
 LESSON PRESENTATION INSTRUCTIONS VALUE WATERCOLOR TREES Students will paint a realistic tree and its background using Watercolors to see the different values it makes. Time Required: 1 hour Artist: John
Mirrorcraft Project Especially for Dogs
 Mirrorcraft Project Especially for Dogs DIY Customized Pet Mirror Make a mirror photo frame to Display your Pets Photo Irene Jacobs April 2007 Mirrorcraft is a fun craft to easily create you own customized
Tag... You re It! In-the-Hoop Felt Tags
 Tag... You re It! In-the-Hoop Felt Tags by Pamela Cox This time around...you want to be tagged!!! These quick-to-stitch, in-the-hoop projects are just too cute to pass on, or avoid being tagged by having