Learn to Fold. Origami Animals
|
|
|
- Augustine Geoffrey Flowers
- 6 years ago
- Views:
Transcription
1 Learn to Fold Origami Animals
2 Table of Contents Introduction... 2 Fish... 4 Hopping Frog... 9 Snake Tiger Frog Flapping Bird Elephant Dog Crane Cow Cat Butterfly Bird Base Square Base Water Balloon Base End Copyright 2005 Origami Instructions Making copies (except for your individual use), selling copies, or otherwise distributing this ebook, is not allowed. 2
3 Introduction This is our first ebook of origami, from the makers of the Origami Instructions website. This set of animal folding instructions is our free gift to our website members. Thank you for being a part of our origami community! After making origami with this book, visit our website and post some pictures in the gallery, we would love to see them! To give us feedback on this ebook, or to suggest other ebooks, contact us. 3


4 Fish This origami fish is relatively easy to make. It builds into an oceandwelling angel fish. Start with a single piece of brightly colored origami paper. First make a bird base, shown below. Review our instructions for the bird base if needed. Fold the top points of the bird base down, to make a kite shape, as shown in the next two photos. 4


5 Now fold one of the lower points of the kite upwards, to meet the top point. Fold that point across to the left corner of the kite. Now fold that corner across to the right, as shown in the sequence of the next three pictures. This creates one half of the fish tail. 5


6 Fold the fish tail down. The flip the origami piece over, and repeat the last six photo-steps to make another fish tail half. 6
7 Now fold the Left and Right corners of the kite onto the centerline as shown. Repeat on the other side. We're almost there. Hold each bottom point of the kite, one in each hand, and pull gently to unfold the fish. 7


8 You can apply a small amount of glue or tape to hold the tail together. Also optional is decoration with pens, pencils, markers or crayons. Below we see our origami fish living "under the sea". 8


9 Hopping Frog The hopping frog is not quite as realistic-looking as the other origami frog shown in this book. However, it is simple to make and can hop considerably further, so it's a fun action toy. Start with a square piece of paper. As always, green makes the best frogs (Kermit would agree). With the colored side face down, make valley folds along the North-South and East-West lines as shown in the second photo. Now fold each of the four corners into the center point, to make another square. Next fold two of the squares edges onto the centerline: Now fold the short corner of the kite up. Then fold the lower corners of the triangle onto the centerline: 9


10 Next fold the lower edge up...then fold it back down. Then fold the top corner down as shown. 10


11 And that's all! Simple, huh? Turn the frog over and it's ready to go. You can decorate it with pens or markers if you like. To make the frog hop, press down near the back end the back and let your finger slide off. 11


12 Snake The origami snake is very simple to make. With some imagination, it can be used as a base for spiders, dragons, Loch Ness monsters, etc. Start with a square of origami paper. Fold it in two, down the center, then tear along the crease. You now have a rectangle. Start at one corner of the rectangle, and begin rolling the paper into a tube. You will roll diagonally as shown in the photo. Try to roll as tightly as possible. Near the end of the roll, you will need to roll the other corner of the paper in towards the main roll. Make that roll tight also. Then continue with the original roll, in the original direction. The point of doing this is that the end of the roll will now stay put, without needing tape or glue. Tighten the roll by holding one end in each hand, and twisting (gently!) in opposite directions. 12


13 Now take your origami tube, and gently shape it into a series of curves. The resulting origami snake can sit up on flat surface and rear its head. 13
.")

14 Tiger This origami tiger is folded from two pieces of origami paper. Orange makes a good base color (unless of course, you're doing a white tiger). Start by making the head of the origami cow. Right before you fold the ears forward, stop. Looking at the pictures below, we are actually going to fold the ears across each other. At the same time, we will flatten (broaden) the tiger's face, with our thumb and fingers (third photo below). 14
15 You may prefer a small piece of tape between the ears to hold them in place. Use a key or similar object to open the tiger's ears slightly. Now crease and tear off about half of the lower part of the tiger's neck. Unfold the torn part and lay it flat; we'll use it to make the tiger's tail. Now start rolling the paper diagonally, from one corner. Go slowly and keep the roll as tight as possible. When you get near the end of the roll, start a roll from the opposite corner, as shown below. Now complete the roll in the original direction. (The roll on the end piece will allow it to overlap the main paper tube, without needing tape or glue to prevent unrolling.) You can tighten the final tube a bit by holding the ends and turning your hand in opposite directions. 15


.")
16 The paper tube will be fairly flexible. Bend it into a gentle "S" shaped curve to form the tiger's tail. Now all that's left is to make the tiger's body. Again we recycle an origami design, using the body of the origami cow. Place the tiger's head and tail into the body (we used tape). Now decorate with pens and markers if you like. 16
.")
17 Below is Tony the Tie-Dye Tiger. Made with sheets of multicolored origami paper (white, red, yellow on the same sheet). Origami, it's Greeaaat! TM 17
.")


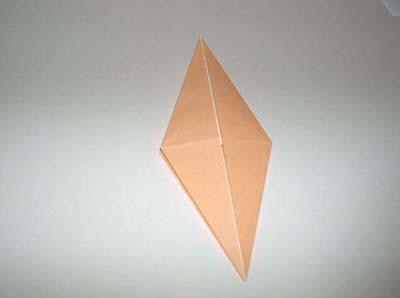
18 Frog The origami frog looks neat and can also be made to hop. Start with a square piece of paper (green makes convincing frogs). Now make a square base. Next insert your finger in one of the pockets in the square base. Move the pocket around to the front, then flatten and crease it. This classic origami move is known as the squash fold. Photo below shows one of the squash folds completed. Now perform the squash fold three more times

19 ...until the piece has the diamond shape shown below. Next fold and unfold the corners as shown, to make crease marks. 19
20 Next comes another classic origami move, the petal fold. The next photo shows the completed petal fold. Now perform the petal fold three more times (on the other three faces of the diamond), to create the frog base. Fold the frog base down the centerline as shown. Then fold the lower edges of one layer into the centerline. 20

21 Now fold edge A to edge B as shown by the arrow. The perform the previous three steps again, 3 more times, until the piece looks like below right. Now it's time to turn the tadpole into a frog! I like to pre-crease the leg, then use reverse folds to create the two front legs (reverse folds are explained in the flapping bird instructions here). 21

22 Now use reverse folds to stretch the back legs. Apply reverse folds again, twice each on the front and back pairs of legs, as shown in the photos below. 22
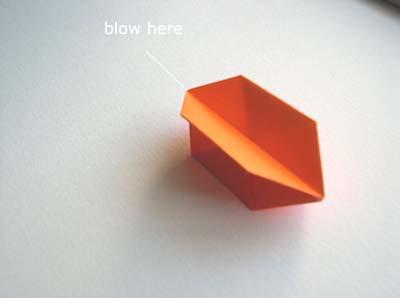
23 Now you'll need to blow where shown, to inflate the frog's body. 23

24 You can make the frog hop for short distances by pressing on the rear of the body, then sliding your finger off onto the table: O-ribit-gami! 24
. The crane is of ancient Japanese origin, but the origin of the flapping bird is uncertain. Start with the bird base, below left.")
25 Flapping Bird The origami flapping bird is another neat and fun action piece. It looks a bit like the origami crane, and they both start with the bird base. However, they are different (the crane will not flap). The crane is of ancient Japanese origin, but the origin of the flapping bird is uncertain. Start with the bird base, below left. Crease both lower "legs" of the bird base, in preparation for reverse folds. The next two photos show what the reverse fold looks like after completion. We show the sequence in detail for the left "leg" of the bird base. 25


26 Note how the folded leg is opened up, and the paper brought inwards and upwards. 26


27 Here is the piece with both reverse folds completed, below left. Now do a reverse fold to make the head of the bird. Next start folding the wings downwards, one wing then the other. The bird is now complete. Hold the tail with one hand, and the spot below the front of the wings with the other hand. Move your hands back and forth rapidly (but gently, it's only paper!), this will cause the wings to flap. Enjoy your flapping bird! 27

 Actually, you can learn about these folds right here. St")
.")
28 Elephant The origami elephant from a dollar bill is sure to amuse and delight your friends, dining partners and waitpersons. It should be considered somewhat advanced origami. If you have trouble making an origami crane, this one might be a bit much. We'll make frequent use of the terms valley fold and mountain fold. If you do not know what these are, then you are in way over your head :) Actually, you can learn about these folds right here. Start with a U.S. one dollar bill. Other currencies or denominations would work, but this one has a special "feature" that will show up later. Place the bill in front of you, face up but upside down (again, you'll see why later). Now make valley folds at the halfway points of the bill, as well as the top corners. Now valley fold the top corners, twice as shown in the next two photos. 28


29 Then fold the top pointed corner down, at the white line shown. With us so far? Good! Now fold the right edge of the bill back behind, until the bill is doubled as shown. Crease the fold. Next unfold the bill. The fold the right edge back again, until it lines up with the crease you made in the previous step. Make another crease. Now fold along crease A...then B and C, as shown in the two photos below. 29

30 The following photo shows what the backside should look like. Now turn the folded bill back over. You will now make a valley fold approximately where the white line is in the photo below. This will give the result below. This stage is shown from the backside in the next photo. For clarity, we're showing this stage from the side also. The idea is to get the distance "x" to be equal to the distance "y". 30


31 Now fold the 4 corners of the center channel as shown below. Next, squash fold the top and bottom as shown. It can be a little tricky to get these small pieces folded and creased, you may need help from a rounded tool as shown. A car key might help. Now unfold the top pointy part. Make valley folds on the outside of the center channel. Also make a mountain fold just in front of the channel, so that this piece overlaps the channel. Now flip the piece over. Whew! This would be as good a time as any to break for drinks :) 31

32 Ready again? OK, make another valley fold at the front edge of the front legs. And a mountain fold a short distance in front of that. The idea is to overlap the front legs by about half their width. These next two photos show those folds: Now fold the whole thing in half down the centerline as shown, using a mountain fold. Next you will make the ears. Fold the point of the trunk 32


 along the trunk crease shown")
33 back as shown to make the ear crease line (ignore the trunk crease for now). Note the ear is angled forward slightly. Unfold the trunk then use the crease line to make a reverse fold inside the body of the elephant. If you're drawing a blank on reverse fold, check out our instructions for the origami flapping bird. Now unfold the trunk. Next push the trunk into the body, making two valley folds (one on either side) along the trunk crease shown below. The trunk crease lines will end up in contact with the front edge of the front legs. It should look something like the photo below. Next, crease then reverse fold the trunk so that it points down. 33

34 Do a couple more reverse folds to get the trunk pointing up, and the trunk tip pointing slightly back. Now turn the elephant over and open the legs a bit. Valley fold out a small tail. Now your elephant is ready to stand on his own four legs! Note that the floating eye in the pyramid from the backside of the dollar bill lines up quite nicely to be the eye of the elephant. Neat! 34

35 If you're performing this little stunt at a bar, we hear that these little fellas like peanuts. 35

36 Dog The origami dog is a simple animal that you can make from folded paper. It looks a lot like a dog with floppy ears. Start with a square piece of paper. If it is colored paper, put the colored side face down on the table as shown below. Then fold along the diagonal to give a triangle. Now fold the corners together and unfold, to give a crease as shown. Then fold the dog ears down, using the crease line as a guide. Next fold the top and bottom of the head, away from you. The dog is done! If you like, you can draw eyes, a nose and a mouth. 36
37 37


38 Crane There is a legend concerning the origami crane. This states that if someone makes one thousand cranes, their wish will be granted. So what are you waiting for? Follow our instructions below to get started on your first crane! Start with the bird base, below left. Fold the outside corners to the middle, as shown. Flip the piece over and repeat the fold. Now crease each lower "leg" of the piece as shown, in preparation for reverse folds. Using the reverse fold, make the neck and tail of the crane. Use a reverse fold to make the head of the crane. Now fold the wings down, one at a time. 38


39 Almost there. Pull the wings gently apart to open up the crane, and push down on the back of the bird to flatten it a bit. Now you're ready for the next nine-hundred and ninety-nine cranes! 39


40 Cow The origami cow is so life-like you can practically hear the "moos". We'll try to not milk this one for laughs. Start with a square piece of paper. Then make a water balloon base. Next fold the tip of the balloon base down the centerline. The tip should cover about half of the folded length. Now unfold the balloon base and squash fold it as shown. 40


41 You will end up with the pattern in the next photo. Now simply fold this in half to make the cow's body. 41

42 To make the cow's head, use another square of paper. Fold it in half with the colored side (if any) on the outside. Next fold each half upwards, as shown in the next two photos: Now crease the end of the folded rectangle, as shown below. The next three photos show how the head is folded. Each outside layer of the folded rectangle is squash-folded backwards. 42


43 Now reverse fold the nose of the cow (reverse folds are explained in the flapping bird instructions here). Then fold the cow's ears forward. Next, crease the neck of the cow at right angles to the head. Then do a reverse fold, as shown in these two photos: 43


44 To make the neck fit into the body, reverse fold the bottom of the neck as shown below. It can be tricky to get the right amount of fold: too little and it won't fit into the body, too much and the head will be front heavy and fall forward. You may want to use a small piece of tape or glue to keep the head in place. Now your cow is done. It can be decorated with pens, markers or crayons. 44

45 Origami. It's the cheese! TM 45


46 Cat This origami cat is one of the simplest animals that you can make out of folded paper. It is easy to customize the final look of the cat, to make it your very own. Start with a square piece of paper. Fold and crease it along the diagonal like so: The fold the left corner on top of the right, and crease the fold: Now unfold the triangle so it lays flat again. Then fold each corner upwards to make the ears: 46


47 Now fold the top corner over towards you: Now flip the cat over. Optional: draw eyes, a nose and whiskers on the front. What could be simpler! You can also combine this with a hat, to make an origami cat in the hat. 47


48 Butterfly The origami butterfly is easy to make, and is also a fun action toy. You can decorate it with colored pencils or crayons. Start with a square piece of paper. If it is colored paper, put the colored side face down on the table as shown below. Then fold along the diagonal to give a triangle. Next fold the triangle in half to make a smaller triangle. Then fold one corner upwards to make the first butterfly wing. Then fold the second wing upwards. Now open the butterfly out as shown, and it's done! 48


49 But wait, there's more! By gently pressing up and down on the body of the butterfly, as shown below, the wings will flap up and down. You can also decorate your butterfly to look like a real one or a picture that you've seen. 49


50 Bird Base The origami bird base can be used as a starting point for different types of birds, such as the crane and the flapping bird. Start with a square base (below left). Fold the corners inwards as shown in the next two photos, then unfold. This is to create crease marks. Now begin the petal fold. Lift the bottom corner upwards, and fold along the crease lines as shown. 50


51 Your bird base is now half-done. Flip the piece over, then fold in the three corners on the backside, to make crease marks. Now lift the bottom corner and do another petal fold. 51

52 Now your bird base is complete! 52


53 Square Base The origami square base is a starting point for many neat origami pieces, such as birds and frogs. It is simple to learn and to make. Start with a square piece of paper. Fold it on the diagonals, as well as on the North-South and East-West lines, as shown below. Note that the type of fold is important. A mountain fold means folding the halves away from you, so that the fold sticks up from the table, like a mountain. A valley fold means folding the halves away towards you, so that the fold is lower than the halves, like a valley. Place the colored side of the paper upwards, then fold the diagonals as valley folds, and the N-S and E-W folds as mountain folds, below left. 53


54 Now it will be very easy to simply collapse the piece of paper along the fold lines. It will collapse right into a square folded piece of paper. This is your square base! 54

55 Water Balloon Base The origami water balloon (also called water bomb) is an easy to make, working toy. Start with a square of paper. Then make mountain and valley folds as if you were making a square base. The difference is that the mountain and valley folds are reversed when compared to the square base. Now start to collapse the pre-folded piece of paper. You will end up with the folded triangle shown below. This piece occurs so often in origami that it has its own name, the balloon base (or water bomb base). 55
56 Now fold each of the four corners upwards as shown in the next three photos: Now fold the four horizontal corners into the center as shown: Use your finger to expand the little pocket as shown below. You are going to tuck the flap into the pocket. However, the flap must first be folded in two to make it small enough for the pocket. 56

57 This sequence shows the flap folded, then tucked in. Now fold and tuck in the other three flaps. Finally expand the balloon as shown below. First unfold the balloon partially, then blow gently into the hole at one end. At our school, we actually filled these with water for some recess hijinks

58 End 58
Origami Butterfly Instructions
 Origami Butterfly Instructions www.origami-fun.com 1. Start with your paper white side up. Fold in half, open, then fold in half the other way. 2. Now Fold the Paper in half diagonally, both ways. 3. Fold
Fun with Art. May lesson Plan for Fourth Grade. Origami
 Fun with Art May lesson Plan for Fourth Grade Origami Biographical information Origami: from ori meaning "folding", and kami meaning "paper" is the traditional Japenese Folk Art of paper folding, which
How to make Origami Flowers
 How to make Origami Flowers Instruction for Iris, Water Lily, and Lotus Flowers Prepared by: Zikra Toure Brandon Thurman Ashton Zitterkopf TECM 2700.023 Table of contents iii Table of contents Table of
The Art of CHINESE PAPER FOLDING
 The Art of CHINESE PAPER FOLDING f o r Y o u n g a n d O l d WRITTEN AND ILLUSTRATED by Maying S o o n g INTRODUCTION The different objects in this book are arranged in such a way that the simpler and
3 Puppy 4 Cat 5 Heart FUN ACTIVITY. Activities Include:
 FUN ACTIVITY Origami Basics Origami is the art of folding paper to make beautiful shapes. The number of shapes that you can make by simply folding paper is astonishing! Activities Include: 3 Puppy 4 Cat
Puppets. Paper Bag Puppets. Rocky Raccoon* Wee Reggie puppet. Materials: Procedure: Procedure:
 Puppets Puppetry can be an effective and entertaining means for conveying simple messages. Use some of the puppets featured here to teach various activities found in the Wee Recyclers Activity Guide. Encourage
The Hearse Carriage Assembly Instructions Page 1.
 The Hearse Carriage Assembly Instructions Page 1. The Hearse Carriage Assembly Instructions Page 2. WHAT YOU'LL NEED: Scissors, Elmer's glue (or a glue stick), a needle, two toothpicks, a sharpened pencil,
Watch Math Unfold! Origami Owl
 Watch Math Unfold! Origami Owl Instructions 1. Start with a square piece of paper. (All sides should be equal, and all angles should be 90 degrees.) A good size to use is 15 centimeters by 15 centimeters.
Overview: These flying oddities aren t your typical paper airplane. They may be strange to look at, but they re simple to make and fun to fly.
 17 THESE THINGS FLY! Overview: These flying oddities aren t your typical paper airplane. They may be strange to look at, but they re simple to make and fun to fly. Paper Paper or foam cups Straw Elastic
Paper Pinwheel. Supplies
 Paper Pinwheel 1. Draw some lines. Measure and cut a square piece of paper.» Use the ruler and pen to draw lines from each corner of the paper towards the center. These lines should be half the size of
Let s paw-ty! Children love their pets. It s a day to celebrate our furry friends.
 Paw Party Required: Let s paw-ty! Children love their pets. It s a day to celebrate our furry friends. Game Suggestions: Dog Trick Balloons- Fill several balloons with a paper with a dog trick written
THE FLOATING CANDELABRA ASSEMBLY INSTRUCTIONS page 1.
 THE FLOATING CANDELABRA ASSEMBLY INSTRUCTIONS page 1. THE FLOATING CANDELABRA ASSEMBLY INSTRUCTIONS page 2. WHAT YOU'LL NEED: Scissors, Elmer's glue (or a glue stick), a toothpick, a ruler, a needle and
Fine Motor Skills Development Activities
 Level 1-2 Fine Motor Skills Development Activities Copyright June 2016 by Solve Learning Disabilities, LLC Project Design and Production by Barbara and Britany Boss Published by Solve Learning Disabilities,
ORIGAMI BOXES Using Paper Folding to Teach Geometry
 W 409 ORIGAMI BOXES Using Paper Folding to Teach Geometry James Swart, Extension Graduate Assistant, 4-H Youth Development MANAGEMENT OF APHIDS AND BYD IN TENNESSEE WHEAT 1 Tennessee 4-H Youth Development
Giant Origami Quilt. by C. Kenneth Fan
 Page 1 of 5 by C. Kenneth Fan With these two origami units, you can make very large origami quilts. During the summer of 2006, girls of Science Club for Girls designed and folded a butterfly quilt measuring
FM-a. Learn Origami - The Art Of Folding Paper Learn a new skill and increase the fine motor coordination in your hands.
 FM-a. Learn Origami - The Art Of Folding Paper Learn a new skill and increase the fine motor coordination in your hands. 1 Preparation Begin with the Hand Exercises found on page V. Position Sit at a table.
Terrific Papers Creative Project Instructions
 Origami flowers You ll need: two sheets of Terrific Papers in the design of your choice, glue or a glue gun, small-diameter dowel, florist s tape, green construction paper, and scissors Note: Each flower
The Colour-Change Collapsible Cube
 The Colour-Change Collapsible Cube Designed by David Mitchell The Colour-Change Collapsible Cube is a 4-part modular design from 1993 in the form of a tube that collapses to a rather odd shaped cube. Alternatively,
Page 1 of 5. Instructions for assembling your PacknMove boxes
 Instructions for assembling your PacknMove boxes The majority of our boxes are very easy to construct, but a couple might look like cardboard origami at first. If you are having any problems constructing
ILLUSION CONFUSION! - MEASURING LINES -
 ILLUSION CONFUSION! - MEASURING LINES - WHAT TO DO: 1. Look at the line drawings below. 2. Without using a ruler, which long upright or vertical line looks the longest or do they look the same length?
Sweet Softies: Funny Bunny
 Published on Sew4Home Sweet Softies: Funny Bunny Editor: Liz Johnson Thursday, 08 April 2010 10:00 Stuffed animals make me happy. They live on my desk at home and at work, so I can glance over at them
Folding Tips and Tricks
 Folding Tips and Tricks This section is primarily for beginning folders, or those who always dreaded having to fold their school papers in half due to no knowledge of paper folding technique BUT there
a free sewing pattern by
 a free sewing pattern by 2 kitty wallet This project is a fun companion piece to my Kitty Purse pattern. It's a bi-fold wallet with the traditional slots for cards (6) and one for receipts or bills. A
7 Materials for teaching
 7 Materials for teaching (1) Hat (KABUTO) Preparation: a page of a newspaper or a 50-60 cm square piece of paper How to Make Illustration 1 Fold a page of a newspaper so that one vertical (side) edge touches
SUPPLIES. OTHER SUPPLIES Marking pen Masking tape Aleene s Stop Fraying Toothpick Basic sewing supplies (See Tools link at
 SUPPLIES 30 x 9 piece of 5/8 curly matted mohair 7 x 6 piece of wool felt or ultrasuede 8 mm black glass eyes (1 pair) 6-1 fiberboard discs (neck & front legs) 4-1 ¼ fiberboard discs (rear legs) 5 Cotterpins
Mylar Moon Boots. Supplies. Cardboard. Mylar blanket. Duct tape. Craft knife. Ruler. Pen/Pencil
 Mylar Moon Boots 1. Design a custom box. Measure the length, width, and height of your foot and add an inch to each of these measurements.» Now draw a rectangle on your cardboard that has the new dimensions
Maritime Knots. Materials: Directions: Red jute twine Scissors
 Maritime Knots Red jute twine 1. Measure twine to gift box size (with a little extra). 2. Cut 6 equal lengths. 3. Separate into two sets of 3 strands. 4. Form each into a loop. 5. Arrange side-by-side.
The Bird of Paradise Napkin Fold. Stage 1. Stage 2. Stage 3. Stage 4. Stage 5. Lay the napkin face-down in front of you. Fold the napkin in half
 The Bird of Paradise Napkin Fold Fold the napkin in half Fold the napkin in quarters Fold the napkin in half diagonally, creating a triangle Orient the triangle so the open tip is facing away from you
Combination Silverhedra 1, 2 and 3
 Combination Silverhedra 1, 2 and 3 Designed by David Mitchell Combination silverhedra are modular origami polyhedra whose faces are a combination of silver triangles and other regular polygonal shapes.
Pinwheel. Method. Materials
 Pinwheel Square sheet of construction paper. Marker or pencil Scissors Tape or staple Thumbtack Pencil with an eraser on the end Start with a square piece of construction. Draw an X, from corner to corner.
Origami Solutions for Teaching Selected Topics in Geometry
 Origami Solutions for Teaching Selected Topics in Geometry Blount County Schools - 1 st Annual Math Conference - Friday, May 28, 2010 Dr. Deborah A. McAllister, UC Foundation Professor The University of
Trumpet : Assembly Instructions
 A trumpet is a brass instrument which is played by blowing air into the mouthpiece and causing vibrations with the lips, while operating piston or rotary valves. A trumpet's shape and the length of its
The Bleak Estate Assembly Instructions - Page 1.
 The Bleak Estate Assembly Instructions - Page 1. The Bleak Estate Assembly Instructions - Page 2. The Bleak Estate Assembly Instructions - Page 3. WHAT YOU'LL NEED: Scissors, glue (or a glue stick), a
Origami Nigger Mouth
 Origami Nigger Mouth Here is a great, eye-catching origami-style promotional prop that you can make yourself and leave out around for niggers and other prospective human niggermaniacs to enjoy. Make a
Name: Class: Monster Doll. Grading Rubric
 Name: Class: Monster Doll Grading Rubric Grade yourself on the skills listed below. (0 being the lowest, and 5 being the highest.) Once you have graded yourself in each area, pin your grading sheet to
DARC MANSION ASSEMBLY INSTRUCTIONS page 1.
 DARC MANSION ASSEMBLY INSTRUCTIONS page 1. DARC MANSION ASSEMBLY INSTRUCTIONS page 2. NOTE: This project should be printed on heavy card stock. WHAT YOU'LL NEED: Scissors, Elmer's glue (or a glue stick),
Read This Before Printing Anything!
 Read This Before Printing Anything! coca-cola polar bears papercraft 2 guidelines Printing When printing with Adobe Reader, it is important to use proper print settings 1 for correct alignment and scaling.
Accordion : Assembly Instructions
 An accordion is a musical instrument which is played by compressing or expanding a bellows in a horizontal direction. When the central bellows are compressed and expanded, air flows to the instrument's
DIY Eliza: Instructions
 Make sure you first download from Redlightsonthebrain the list of things required for a DIY Eliza. 1. Take your bucket, ruler and marking pen. We will put on all the markings before we start cutting the
Bound and Determined:
 Think You Don t Have Time to Create Beautiful Quilts? From quick-quilt adaptations of classic patterns to fun, fresh novelty designs, McCall s Quick Quilts provides you with a treasury of time- and effort-saving
Designed by David Mitchell The Ariadne module is made by applying the metamorphosis 1 distortion to the Sonobe module.
 Ariadne and Phaedra Designed by David Mitchell The Ariadne module is made by applying the metamorphosis 1 distortion to the Sonobe module. The Ariadne module can be used to make a distorted version of
THE PHANTOM SEMI Assembly Instructions Page 1.
 THE PHANTOM SEMI Assembly Instructions Page 1. (Continued on next page...) THE PHANTOM SEMI Assembly Instructions Page 2. (Continued on next page...) THE PHANTOM SEMI Assembly Instructions Page 3. WHAT
Fun Ways to Re-Use Paper at Home
 FOR FUN Fun Ways to Re-Use Paper at Home You and your family can transform your used paper into something new. Take a look at some useful ways you can re-use paper around the house. Activities Include:
Copyright Bumblebee Linens LLC
 Crafts Instructions Included 1. Hankie Wedding Dress 2. Pillowcase Dress 3. Hankie Bonnet 4. Hankie Pin Cushion 5. Hankie Angel 6. Hankie Bunny 7. Pillowcase Reusable Grocery Bag 8. Linen Towel Drawstring
Spring Quilling. By Eileen Walters. Materials Required: To Make The Card: Daffodils:
 Spring Quilling By Eileen Walters In this article I have included instructions for marbling your own paper, using a method which is both very simple and effective but, if you don t want to give it a try
(Moving) Clowns out of a cannon : Assembly Instructions
 Clowns out of a cannon : Assembly Instructions") http://www.canon.com/c-park/ Before starting assembly : Writing the number of each section on its back side before cutting out the sections is highly recommended. (* This way, you can be sure which section
http://www.canon.com/c-park/ Before starting assembly : Writing the number of each section on its back side before cutting out the sections is highly recommended. (* This way, you can be sure which section
Skew Sonobe Modules and the Broken Star Cube
 Skew Sonobe Modules and the Broken Star Cube Skew Sonobe modules are centre-pocket parallelogram modules in which the central slit that forms the pockets is set at an angle to, rather than parallel to,
TRICKS & TIPS. Make sure all your equipment is ready before you begin a trick.
 TRICKS & TIPS Make sure all your equipment is ready before you begin a trick. Practice each trick so often that you can do it almost without thinking, and practice in front of a mirror so you can see how
Page 1. Jumblenut. The Head. Design by Barbara Allen
 Page 1 Needle felting Needle felting is quite different from creating felt by shrinking wet wool. There s no water involved, it requires very little space and creates no mess at all. It s a craft that
The word origami is derived from the Japanese oru, meaning to fold, and kami, meaning
 MASTERING THE MINIATURE ORIGAMI A PERENNIAL FAVORITE Metal clay paper tulips take traditional origami from ephemeral to permanent. by Sara Jayne Cole The word origami is derived from the Japanese oru,
Linda Brown, Sue Dittler, Sandy Miller, Lucy Ricardo, and Carole Thommen
 Linda Brown, Sue Dittler, Sandy Miller, Lucy Ricardo, and Carole Thommen Edited by: Sharon Reilly Teena Livsey YO-YO s especially ornament balls By: Lucy Ricardo Supply list: Scraps of fabric 1 ½ circle
Master Template Unusual Minibooks 1
 Master Template Unusual Minibooks 1 Arrow 4-page 4 Minibook Cut out the 2 pages. Fold on the dotted lines. Place the inside pages inside the front page. Staple at the folded edge. Front page Back page
The Sonobe module and the Corner-pocket Sonobe module
 The Sonobe module and the Corner-pocket Sonobe module The original Sonobe module was designed sometime in the late 1960s by the Japanese paperfolder Mitsonobu Sonobe, after whom it is named. I found the
Rainy Day Emergency Kit
 FOR FUN Rainy Day Emergency Kit Don t let a rainy day spoil your fun. You can make creative and fun activities with a few supplies and a little imagination. Activities Include: 2 Animal Finger Puppets
Make-A-Movie Run the Show Art Silent Movies Creative Dramatics
 Make-A-Movie Run the Show Help students make their own 2-frame movies. They should keep the animation simple, changing only one feature from the first frame to the second. For example: Art a frown changes
Enterprise 1701D STNG
 Enterprise 1701D STNG General notes: Print the model page on 'card stock' which is the thickness of those subscription and cards inserted in magazines. An office supply store has it labeled as 65lb. The
(Moving) Cute acrobat puppies : Assembly Instructions
 Cute acrobat puppies : Assembly Instructions") Before starting assembly : Writing the number of each section on its back side before cutting out the sections is highly recommended. (* This way, you can be sure which section is which even after cutting
Before starting assembly : Writing the number of each section on its back side before cutting out the sections is highly recommended. (* This way, you can be sure which section is which even after cutting
Hydralisk 2.5 by Jason Ku
 Hydralisk 2.5 by Jason Ku Original CP: Jason Ku - http://scripts.mit.edu/~jasonku Instructions: Gerwin Sturm - http://www.origamiaustria.at The original CP by Jason Ku can be found here: http://scripts.mit.edu/~jasonku/index.php?id=2004&model=hydralisk1
Contents. Chapter 1 Before You Start Twelve Pointers for Covering Makers 1. Chapter 2 Understanding the Terms Definitions of Covering Makers Lingo 3
 Contents Foreword i Acknowledgments ii Introduction iii Chapter 1 Before You Start Twelve Pointers for Covering Makers 1 Chapter 2 Understanding the Terms Definitions of Covering Makers Lingo 3 Chapter
It s done! The Herrnhuter Star as Origami-Model
 It s done! The Herrnhuter Star as Origami-Model Dear Origami-friends, I guess everyone knows the famous Herrnhuter Star from childhood times and there is an inseparable connection to Christmas, because
EasyDrawingGuides.com
 How to Draw My Little Pony - Rainbow Dash Easy Fast Hasbro's My Little Pony franchise has been popular with a variety of audiences - ranging from preschoolers to adults - since the release of its first
Table of Contents. Pom-Pom Bookmark Yarn covered Pencil Holder Yarn Hangers... Yarn Hair Bows
 1 Table of Contents Pom-Pom Bookmark... 3-5 Yarn covered Pencil Holder... 6-8 Yarn Hangers... 9-11 Yarn Hair Bows... 12-14 Tassel Necklace or Gift Wrapping... 15-17 No Knit Infinity Scarf... 18-20 Braided
(Moving) Clown and sea lion acrobatics : Assembly Instructions
 Clown and sea lion acrobatics : Assembly Instructions") http://www.canon.com/c-park/en/ Before starting assembly : Writing the number of each section on its back side before cutting out the sections is highly recommended. (* This way, you can be sure which
http://www.canon.com/c-park/en/ Before starting assembly : Writing the number of each section on its back side before cutting out the sections is highly recommended. (* This way, you can be sure which
Hello, Here is an outline to follow to replace the Magnepan MMG socks.
 Hello, I am writing this simply because I needed to replace my Magnepan MMG grill cloths, (or socks as most people call them), and felt there are other people out there that may enjoy seeing how to do
Hubble Space Telescope Paper Model Directions Downloads, patterns, and other information at:
 Hubble Space Telescope Paper Model Directions Downloads, patterns, and other information at: www.hubblesite.org/go/model Materials: model pattern printed onto cardstock/coverstock instructions printed
Products We Love: Clover Quick Yo-Yo Makers
 Published on Sew4Home Products We Love: Clover Quick Yo-Yo Makers Editor: Liz Johnson Friday, 10 February 2017 1:00 There s no research confirming a link between the classic yo-yo string toy and the fabric
Carton loads of fun for the family
 Carton loads of fun for the family Before recycling their finished cartons, parents can have a lot of fun with their kids this holiday, by turning empty paper cartons in to credit-crunch-busting toys and
FUNKY FRIENDS FACTORY
 FUNKY FRINDS FACTORY the ASY Teddy An original design created by Pauline McArthur 2005 Hi there! Welcome to the Funky Friends Factory. Soft Toys you ll love to make! Finished Toy Size: 33cm/13inches is
Written By: Brook Drumm
 Simple 1401 Assembly For kits produced between 1/15/14-6/1/14. This guide is for kits with the Fan Shroud. Instructions for metal and wood extruder (and bed) included below. Written By: Brook Drumm TOOLS:
For a flat or four-sided reticule:
 Page 1 of 8 DRAWSTRINGS When purchasing, one fabric store meter is the minimum to make two drawstrings of a nice length for one reticule in most designs. If you like longer drawstrings, increase the length.
Triangle Earrings. Another important step is to use split or jump rings on the hooks. They help the earrings dangle more freely.
 Triangle Earrings Description: The Triangle Earrings are based on the Celtic Triangle knot, which is an artistic design called the Triquetra. This Celtic symbol represents the Trinity as well as Body,
Elephants Extreme. Designed by David Mitchell and Paul Jackson
 Elephants Extreme Designed by David Mitchell and Paul Jackson In 1993, in British Origami magazine, Paul Jackson proposed an Elephantine Challenge to design an elephant using no more than five folds. The
Alpha and Beta Letterbox 12-Part 8-Point Stubby Stars
 Alpha and Beta Letterbox 12-Part 8-Point Stubby Stars These diagrams show you how to make 12-part 8-point Stubby Stars from Letterbox parallelogram modules, in both alpha and beta versions. I have drawn
Easy Twist Pop-Up Panel Card
 Easy Twist Pop-Up Panel Card These cards are very popular, and the instructions online vary greatly. Some are just way to complicated. This is the easiest way I ve found to make it. I hope it helps you.
SUPPLIES OTHER SUPPLIES Marco 12 Teddy Bear Pattern
 SUPPLIES Fat ¼ yd of 1 sparse, straight mohair 4 x 4 piece of wool felt or ultrasuede 10mm black glass eyes (1 pair) 2 1 ¼ Joint discs 4 1 ½ Joint discs 4 1 ¾ Joint discs Jointing hardware of choice (5
BOBS CARD MODELS. Canadair CL-215 (1:72)
") BOBS CARD MODELS www.bobscardmodels.com Canadair CL-215 (1:72) Canadair was a civil and military aircraft manufacturer in Canada. It was the subsidiary of other aircraft manufacturers and a nationalized
BOBS CARD MODELS www.bobscardmodels.com Canadair CL-215 (1:72) Canadair was a civil and military aircraft manufacturer in Canada. It was the subsidiary of other aircraft manufacturers and a nationalized
Cut first cork in half in the middle (the two pieces will serve for two horses). Cut 2 corks in half lengthwise for the four legs.
. Cut 2 corks in half lengthwise for the four legs.") Christmas Cork Horse Supplies: 3 1/2 corks. 4 x 4 piece red bandanna material for bandanna (cut in half diagonally makes two bandannas). White/Black yarn for mane & tail. Two black push pins for eyes.
Christmas Cork Horse Supplies: 3 1/2 corks. 4 x 4 piece red bandanna material for bandanna (cut in half diagonally makes two bandannas). White/Black yarn for mane & tail. Two black push pins for eyes.
"Forcing" a Card Making the spectator pick the card YOU want, while they think they re picking the card THEY want.
 "Forcing" a Card Making the spectator pick the card YOU want, while they think they re picking the card THEY want. The Cut Force The Scarf Force Before starting the trick, secretly remember the top card
Science - Year 3. Light Block 3L. Light and Shadows. Session 1 Resource Pack
 Science - Year 3 Light Block 3L Light and Shadows Session 1 Resource Pack Original resource copyright Hamilton Trust, who give permission for it to be adapted as wished by individual users. We refer you
Elastic-powered Bus : Assembly Instructions
 Elastic-powered Bus : Assembly Instructions Assembly Instructions 1. Carefully cut out the parts. 2. Fold along the dotted lines, making mountain or valley folds as indicated. 3. Attach the glue spots
DYI shelter enrichment items
 DYI shelter enrichment items Toys out of paper towel or toilet paper rolls: TP ball: Cut four pieces of paper towel roll about ½ to ¾ inch thick. Then make into a ball by slipping them together making
Monster Marionette ART GRADE LEVEL FOURTH FIFTH MATERIALS
 MATERIALS FOR STUDENT: (one per student unless otherwise noted) FloraCraft Make It: Fun Foam: Rectangular pieces (arms & legs) cut from large Foam Block: Four 1" x 3" x 1" thick, Four 1" x 2 1/2" x 1"
A How-To From CHRYSANTHEMUMS
 A How-To From DIPPED-Tip CHRYSANTHEMUMS How-to Materials Adding Color For personal use only / Copyright THUSSFARRELL, LLC. All rights reserved. 5 - Paper to Petal How-to How-to Materials Double-sided
c Fold the two outer flaps inside and then fold in half so it so it looks like this. While it is folded cut along the red lines to create a notch.
 Building the Paper Dice Tower Tools Needed: A pen, pencil, or bone folder for scoring the paper (this will make folding easier). Paper (heavy card stock preferred). Scissors, a razor knife, and straight
Trebuchet Construction Instructions
 Trebuchet Construction Instructions Follow these instructions step by step to create your trebuchet. Materials: Trebuchet Template (6 pages cardstock) Trebuchet Template (1 page paper) One unsharpened
Bob's Card Models and [Resources]
![Bob's Card Models and [Resources]](/thumbs/94/120604139.jpg "Bob's Card Models and [Resources]") Bob's Card Models www.bobscardmodels.altervista.org and www.zealot.com [Resources] Short 330-200 (Scale 1:72) The Short 330-200 is a short haul airlcraft produced by Short Brothers in the UK. The aircraft
Bob's Card Models www.bobscardmodels.altervista.org and www.zealot.com [Resources] Short 330-200 (Scale 1:72) The Short 330-200 is a short haul airlcraft produced by Short Brothers in the UK. The aircraft
Pajama Sock Monkey 2009 Cutest Creations
 Materials needed: Pajama Sock Monkey 2009 Cutest Creations 1 pair of size Large Brown Red-Heel socks can be purchased from my online store www.ohboyorgirl.com Black embroidery thread Other color embroidery
SuperTrack Parts List
 SuperTrack Parts List [indicates number for 6 lane tracks] SuperTrack Installation Instructions www.supertimer.com 1-800-654-2088 1 Track Instruction Manual (this booklet) 2 Start sections [3] Start Gate
Freestanding Lace Bouquet #12454 / 6 Designs / 14 Files
 Note: Some designs in this collection may have been created using unique special stitches and/or techniques. To preserve design integrity when rescaling or rotating designs in your software, always rescale
Birthday Birdy Never-Ending Hexagon
 Birthday Birdy Never-Ending Hexagon Stamp Set & Die: 11234MC Birthday Birdy Clear Set IAD-002 Never-Ending Hexagon Die Cardstock: White 1-148 Watermelon Sensation 3-345 Marmalade Blast 6-685 Grape Delight
Mini Roses : Assembly Instructions
 is a registered trademark of Inc. Inc. Cut line Mountain fold Valley fold Slot http://www.canon.com/c-park/en/ Making the Rose Petals Glue the back of parts 5 to 14 and fold it outwards. Cut out the petals
Crocodile : Assembly Instructions
 Crocodile (Nile crocodile) Reptilia Crocodilia Crocodylidae Crocodylus Length: Up to 6 m Weight: Up to 1 t Habitat: Rivers, lakes, ponds and marshes in Africa *This photo shows a model which uses the optional
Interactive Activities Workshop Active Learning Institute Nov., 2014
 Interactive Activities Workshop Active Learning Institute Nov., 2014 Abra-Kid-Abra 314-961-6912 www.abrakid.com info@abrakid.com Bringing out the STAR in Kids! After School Classes Camps Shows Boomerangs
Paper: H06QF Quantity Food Production Module: H06QF28 Napkin Folds Name of the content writer: Dr. S. Deena
 Component I Role Name Affiliation Principal Investigator Dr. N. Vasugi Raaja Avinashilingam Institute for Home Science and Higher Education for Women, Coimbatore Co-Principal Investigators Dr. G. Bagyalakshmi
The Amazing, Folding Puzzle... 2 Meet RUBIK S Magic... 3 Basic Magic... 6 Magic Sequences... 8 Magic Hints Magic Shapes...
 SOLUTION BOOKLET The Amazing, Folding Puzzle............ 2 Meet RUBIK S Magic................. 3 Basic Magic..................... 6 Magic Sequences................... 8 Magic Hints................ 14 Magic
Lesson Plans for Pre-K and Up. Create Exciting Projects with Barney Saltzberg s Colorful and Interactive Picture Books!
 The Arlo Needs Glasses and Beautiful Oops! Lesson Plans for Pre-K and Up Create Exciting Projects with Barney Saltzberg s Colorful and Interactive Picture Books! Arlo is a shaggy, free-spirited dog who
owl bear plush a free sewing pattern by
 owl bear plush a free sewing pattern by 2 owl bear plush This pattern is a variation of my previous owl plush, an adorable bear version that's an homage to the classic monsters from Dungeons and Dragons
Sled Kite Plan (Allison)
") Sled Kite Plan (Allison) Light to Moderate (4mph to 18mph) Crochet or button hole thread (1) 24" x 30" plastic trash bag (kitchen size) (2) 16" x 1/8" wooden dowels ALTERNATIVE: Use match-stick bamboo
Sled Kite Plan (Allison) Light to Moderate (4mph to 18mph) Crochet or button hole thread (1) 24" x 30" plastic trash bag (kitchen size) (2) 16" x 1/8" wooden dowels ALTERNATIVE: Use match-stick bamboo
The Allie An in-the-hoop project
 The Allie An in-the-hoop project A wallet/coin purse for the 5x7 hoop. The Allie has 3 credit card slots in the front section which features a large flap with a snap closure. You can carry coins or other
Welcome! Now, let s get started!
 Welcome! You re about to embark upon a wonderful journey, creating a Teddy Bear! But, I m warning you; once you start you just might get hooked! Whether you make this as a gift or for yourself, your heart