Visit our web site:
|
|
|
- Colleen Brown
- 6 years ago
- Views:
Transcription


1 The all-in-one, compact carry-case which allows you to score, measure, trim, embellish; and create boxes, shaped card blanks, envelopes and more Visit our web site:
 and is designed to take your crafting onto the next level by providing an array")


2 Introduction The Ultimate Pro is everything you will ever need for your card making projects, in one handy and portable carry case. It builds on the features of its award winning predecessor (The Ultimate Crafter s Companion) and is designed to take your crafting onto the next level by providing an array of crafting utilities at your fingertips. Card making (p4) Fold perfect cards with this easy-to-use card-scoring facility. Each scoreline is marked with fold names for easy identification and this booklet shows you how to use it to make simple cards or advanced creations such as concertina and aperture cards. Bow maker (p11) The innovative and easy-to-use peg system will allow you to make bows in various s using all types of ribbon in seconds. Achieve perfect and professional results every single time with ease, regardless of the thickness of ribbon that you start with. Box maker (p12) Make boxes in any shape or with the boxmaking function. Your box and lid will fit together perfectly, regardless of the style you choose. Boxes can be made to any specification, in depths of multiples of half an inch right up to 3.5. Envelope Making (p17) Make standard and three-dimensional envelopes using the innovative envelope folding gridlines. Using our simple-to-follow six step instruction guide, you can make envelopes in over twelve different styles and shapes, quickly and easily.


3 Popout & K-card creator (p9) By combining the functionality of the card making section with the popout card shapes you can create a whole host of popout cards in various shapes and s. The popout shapes can also be used for making K-cards and for decorative embossing too. Decorative embossing (p20) A selection of popular designs to dry emboss onto your card and box projects. Various themes appear throughout the case, with decorative borders and corners as well as the popout shape templates and decorative images, such as the one featured here. Storage compartment trimmer (p22) The handy pivot-centre storage compartments allow you to store everything you need on hand when using The Ultimate Pro, including the paper trimmer and associated extras, the double-ended scoring tool and this instruction booklet. Any crafter knows how handy paper trimmers are, so we ve built one in! Measurements are clearly marked in inches and centimeters for reference. The trimmer comes with its own cutting mouse and folds away into the storage compartment. Accessories (p23) All of the additional extras you will need are stored within the case itself, including the ergonomically designed and innovative scoring and embossing tool, the cutting mouse, ruler and bow making pegs. Everything you will need right at your fingertips.


4 Card Making This section of the case is designed to fold all different s, styles and shapes of card using A4 or A5 cardstock, or variants cut from this. Simply place your cardstock onto the board with the shorter edge butted against the sidebar where the handle is. From here, read along the markings to determine which groove to score down. Use the pointed edge of the scoring tool to crease the cardstock into the groove, pressing gently with the tip. Then turn over the card, fold along the creased line and run the side of the tool down the fold for a professional finish. Basic half-fold For this basic half-fold card, begin with a sheet of A4 cardstock and butt the shorter edge of the card against the sidebar. Score along the Halffold A4 line. This gives an A5 folded card. Turn the card over, butt the same edge against the raised butting surface and take the opposite edge over to meet it. The card will naturally fold along the crease line. To ensure the edges of your card meet perfectly, push the two edges together against the sidebar before running the edge of your scoring tool along the scored line to form your crease mark. For an A6 card, begin with a sheet of A5 cardstock and repeat the same process but using the Half-fold A5 scoreline to crease your card.


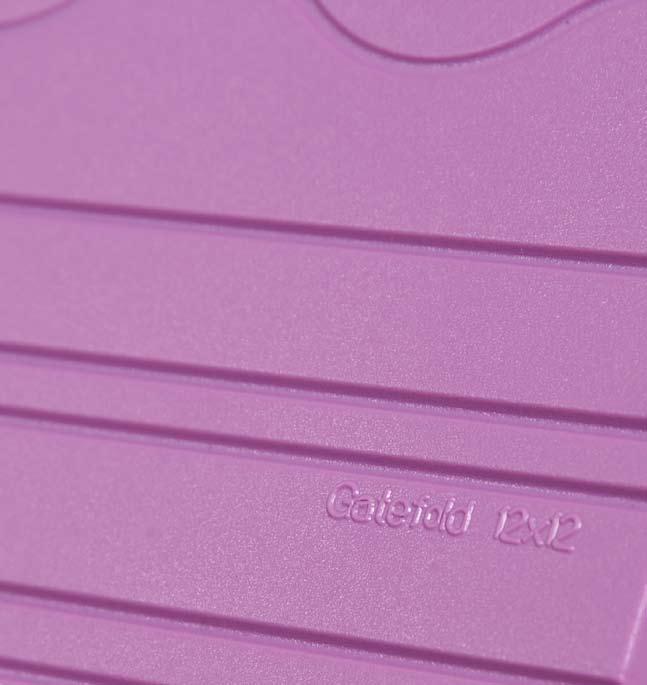
5 Gatefold For a large gatefold card, begin with standard A4 cardstock and butt the shorter edge of the card against the sidebar. Score along the Gatefold A4 line. Turn the cardstock through 180 then score the same line on the opposite edge. Crease both score lines inwards to meet in the centre. Once you are happy with where the lines meet, rub the edge of the scoring tool along the crease to finalise the position. For a smaller gatefold use A5 cardstock and score along the Gatefold A5 line. Square Cards It s easy to create square cards with A4 cardstock using the Ultimate Pro. For a 6 square card, perform the half-fold technique on an A4 sheet of card. Then turn the card through 90, butt the longer edge up against the sidebar and score the Half-fold A4 line again. Using the paper trimmer cut off the excess waste from the sheet. For a 5 square card use the same technique of scoring the card twice, but this time using the 5 square line. For a 4 square card, fold a sheet of A4 card into a tri-fold, cut away one of the panels and put it back onto the board with the short edge against the sidebar. Score the half-fold A4 line and crease the fold.


6 Tri-fold Place the sheet of A4 cardstock against the sidebar and score along the Tri-fold A4 line. Turn the cardstock through 180 then score the same line on the opposite edge. Crease both score lines inwards and they will fold over the top of each other. Once you are happy with where the lines meet, rub the edge of the scoring tool along the crease to finalise the position. You can either leave the card as a threefold, or alternatively cut away one of the panels for a simple bi-fold DL card. Slimline For a standard slimline, take an A5 sheet of card and place the longer edge against the sidebar. Score down the Gatefold A4 line and crease your fold. For a short slimline, place this card blank back onto the board opened out, with the shorter edge against the sidebar. Score the Half-fold A4 line and cut away the excess. For an even shorter notelet card repeat this but with the 5 square fold line. Note: you can make matching envelopes for all of these card s - see page 17.


.")

7 Concertina For a four-fold concertina, begin with A4 cardstock. Score and fold both the Gatefold A4 and the Halffold A4 lines. Then turn the card through 180 and score the Gatefold A4 line on the opposite edge to split the card into four equal panels. Cut away a diagonal section running from the edge of the first panel to mid-way down the end panel, as shown here. For a three-fold concertina simply follow the instructions for a tri-fold card and cut away a diagonal panel from the end of the first panel (as shown right). For a mini-accordion card, repeat as above, but using an A5 cardstock and scoring on lines Gatefold A5 and the Half-fold A5. TOP TIP Once you have cut away the diagonal panel, you can place the card back onto the board in line with one of the decorative scoring lines. Emboss your chosen line (see page 21 for embossing tips and directions) and cut along the embossed line to give a decorative finish.


8 Jump-Up Cards 1. Cut a sheet of A4 card in half lengthways and position it with the short edge against the sidebar. 2. Score the Gatefold A4 and Half Fold A4 lines. 3. Fold in the bottom score line and butt this against the sidebar. Mark a notch at the Half Fold A4 line on both sides. 4. Turn the card and butt the long edge against the sidebar. Mark a notch at the top against the Gatefold A5 line. 5. Position the card diagonally at 45 against any groove and join the lines as shown in the diagram below. 6. Crease the lines and pull the card together to form the shape shown here. This card is aptly named as it will lie flat into a box or envelobox and once removed will jump into shape. TOP TIP You can easily create alternative variants of this card by starting with a different cardstock. The basic principle is to section the base cardstock into four panels, then mark the halfway point at the top of the card and join the lines as per the diagram. You can create a perfect custom shape box for your card quickly and with ease using the magic ruler box-making technique on page 14.


9 Popout Cards 1. For any shape popout you need to begin with two sheets of A4 cardstock. Fold one as a plain half-fold card and the other as a four-fold concertina card. 2. Take the concertina card, and crease down the centre line to fold the card in half. Place this card against one of the popout template shapes on the inner panel of the case. 3. Place the creased side up against the raised edges and using the scoring tool s round edge, trace the larger version of your chosen shape. 4. Now cut the inside of the shape. Apply doublesided tape to the two outer panels at the far edge and on the inside of the crease. 5. Take the half-fold card and butt the shorter edge up against the sidebar. Position the first panel of your concertina card above and against the sidebar for a neat edge. 6. Place the other edge of the card against the sidebar and position the final edge of the concertina card above it, in the same way as in step 5. - You can also make a smaller popout card in exactly the same way, but using two sheets of A5 cardstock. The two card blanks you d need for this would be an A5 half-fold, and an A5 concertina. - On the inner panel of the case, each shape has two s - the larger is for large (A5) popout cards, and the smaller is for smaller (A6 ) popout cards. - In addition to the embossing shapes on the inner panel, you can also use the two shapes on the outer panel of the case for both large and small popouts. Alternatively, you can also draw your own popout shape. As long as the shape is symmetrical and doesn t extend past the Gatefold scoreline then the card will work.


. 2.")


10 K-Cards The K-Card uses the basic popout card technique, but takes it onto the next level with a half aperture protruding through the front face of the card. The large and small embossing shapes on the inner panel of the case have been designed with cards like this in mind. 1. Begin with two sheets of A4 cardstock. Fold one as a plain half-fold card and the other as a concertina card (see previous pages). 2. Place the concertina shape card against one of the shapes inside the board and ensure the centre of the shape aligns with the vertical scoreline. Emboss the shape. 3. Assemble the card as though it were a popout card, as per the instructions on the previous page. 4. Cut through half of the embossed shape (the half to the left of the crease line), ensuring that you cut through both layers of card. 5. Emboss a second version of the shape in a corresponding colour - cut this shape out just inside of the score lines. 6. Stick the cutout shape over the embossed shape on the K-card and fold it back on itself so that it protrudes from the front of the card. TOP TIP For more hints on dry embossing see the Embossing tutorials on pages 20 and


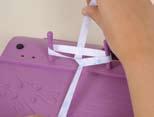
11 Bow Making Inside the storage compartment of the case you will find some long thin pegs. These are designed to be positioned within the set of holes on the outer envelope-making section of the case to enable you to easily create perfectly formed bows with the minimum of effort and in a variety of s, using different thicknesses of ribbon. You can position these pegs at various intervals - the width of your ribbon and the desired of bow will determine how far apart you position the pegs. The wider the ribbon, the further apart you need the pegs. 1. Position the two pegs at your desired width apart and wrap the ribbon around these pegs. 2. Cross the left piece over the top of the right piece. 3. Take the top piece underneath and to the right of the second piece. 4. Then take this bottom piece underneath the ribbon which is between the pegs. 5. Bring it back over the top of the ribbon between the pegs. 6. Tie a knot to hold the bow in place, then slide it off the pegs. 11


12 Basic Box Technique The box-making section of the board can be used to create boxes of all shapes and s using the same basic technique as outlined below. 1. Cut two sheets of card identical in. Top Tip: one of these will form the box lid, one the box base. You can save on expensive decorative cardstock by using a plainer card for the base. 2. Take the card you have chosen to form the box base and place it onto the board with one edge butted up against the box base sidebar. 3. Using the pointed edge of the scoring tool, score the line of your choice. Repeat on all edges of the card. Note: the lines are spaced at ½ inch intervals which represents the depth of your box. 4. In each of the corners where the scored-lines intersect, cut a small v-shaped notch. The first cut should be along one of the scored lines and the diagonal line should be cut from the excess corner piece. 5. To assemble the box, crease neatly along each of the scored lines using the edge of the scoring tool, then at each corner, tuck the flap inside the box and secure using a wet glue. 6. Make the box lid in exactly the same way using the other sheet of card, but this time butt up against the box lid sidebar to score your lines. 12 TOP TIP To ensure that the glue sets in the correct place when assembling your box, hold the corners together using a paperclip or peg until the glue is dry.

.")


13 Shaped Boxes Boxes with more or less than four sides are made in the same way as outlined on the previous page, but need more work at the corners to ensure a professional finish to the edge. Start with two sheets of identical card cut to shape. It helps if all sides of the shape are equal length but this is not essential. Triangular Boxes (acute angles) Score the edges of your card on the desired lines according to the instructions on the previous page. Then at each corner, where the scored lines intersect, mark a right-angle (as shown right). For each corner, cut along one of the marked lines, score the other and cut away any excess which is not required. Crease down all of the scored lines and assemble the box in the same way as you would for a standard shape box. Diamond shape boxes Using two diamond shaped pieces of card, follow the box technique outlined previously. When you mark the corner right angles, you ll find that two opposite corners will use the same technique as the triangular box, and the other two corners use the same as for a box with more than four sides. Boxes with >4 sides (obtuse angles) This is the same technique as for the triangular box, but the right-angle markings are in a slightly different place. Try not to score right to the end of the card with the initial score lines to avoid these appearing on the final box. Obtuse Acute Obtuse Follow the instructions listed above for all corners taking extra care until you are more familiar with this shape box. Acute 13


 between the object and the ruler.")
.")

14 The Magic Ruler Technique If you have a specific project or item for which you want to make a box, you will need to measure your base cardstock to a specific so that the item will fit perfectly inside. The easiest way to do this, is using the magic ruler technique. 1. Begin with the item you wish to make the box for and determine what depth box you require (in a multiple of ½ inch). Top Tip: place the item on the box-maker pressed against the box-base sidebar and judge which line depth will be adequate. 2. Take an excess piece of waste cardstock. Place it against the box base sidebar and score along your chosen line. Cut off this piece of card to leave yourself with a strip of card the exact depth of your box. This becomes your magic ruler. 3. Place your object in the centre of your chosen cardstock. Position your magic ruler against the first side of the object leaving a small gap (⅛ ) between the object and the ruler. Use the outer edge of your ruler to draw a line. 4. Repeat this on all sides of the object. This will give you a template which is the same shape as your item but larger in (how much larger will depend on the depth of your box). This technique can be used for any shape or box. 5. Use the shape you have drawn as a template for your second sheet. Top Tip: use the magic ruler to draw the shape on the plain card you re using for the base, then use the base as a template for the lid. Then any mistakes will only be on the plain card. 6. Follow the instructions on the previous pages to score and assemble your box. Important: make sure that you use the same depth or number scoring line which you used to create the magic ruler. 14


 also gently score the next line below this.")

.")
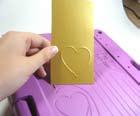
15 Aperture Centres You can also use the box-making facilities to measure and mark out aperture centres in your box. This technique can be applied to any shape or box. An aperture is only required for the lid of your box and the markings are made when you do the initial scoring on the box lid cardstock. Once you have scored the box lid, in addition to the standard score line (which determines the depth of box) also gently score the next line below this. Repeat on all sides, and you will end up with a smaller shape inside your scoring line which you can cut out with a craft knife. You can adapt this technique to measure apertures which only cover a diagonal in your box lid (known as a semi-aperture). For a semi-aperture,mark the lines on two sides of your box, then join these lines with a diagonal line. Complete as detailed above. 15


16 Wedge Boxes This is an unusual shape box which is folded using a half- sheet of A4 cardstock and scored on the card-folding section of the case. 1. Measure and cut the A4 sheet in half lengthways, then butt the shorter edge of the cardstock against the top sidebar and score on the Half-fold A4 line 2. Rotate the card 90 and place it on the board the other way. Using the Gatefold A5 line, mark a notch at the top and bottom of the card, but do not score all of the way down the line. 3. Position the card diagonally at 45 against any groove and join the notches with a scoreline as shown in the picture here. 4. Repeat this on all four corners and fold them inwards so that your box looks something like this. Top Tip: Run the edge of the scoring tool down the creases for a sharp edge. 5. Crease along the centre fold line to bring the top two flaps over the top of the bottom flaps to form a lid. 6. Make a hole in each of the sides of the card as shown here and thread a ribbon through the holes to hold the box together (as shown below). You can re-create the same box in different s by using different pieces of cardstock. Once you have mastered the basic technique of scoring in half and marking the half-way lines on the remaining sides, this becomes a quick and easy box to make. 16


. 4.")


 sides.")
17 Envelope Making For each envelope, you need to follow the simple six-step instructions below, in conjunction with the grid on the following page which gives guidance for standard envelope s. You can also make your own envelope s by following the three simple rules outlined at the bottom of the page. 1. Place your paper on the board with the corner positioned into the locator point and score down the first indicated groove. 2. Rotate the paper 180 and score the opposite corner to the one you have just scored on the same line. 3. Score the remaining 2 corners on the second indicated line according to the chart (the corners lines should cross). 4. Fold the shorter outside edges towards the centre. Apply double-sided tape to the bottom flap s edges. 5. Fold in this bottom flap and press down firmly to secure the tape. 6. To add a finishing touch you can tuck in the excess flap as shown here. The Three Golden Rules of Envelope Making Apply the six-step process with these principles to create custom- envelopes: 1. Regardless of whether your final envelope needs to be square or rectangular, you must always start with a perfectly square piece of paper. 2. Always use the same lines on opposite (never adjacent) sides. The exception to this rule are square envelopes where you must use the same line for all four sides. 3. The lines in each corner of the envelope must cross in order for the envelope to have some overlap between the sides to enable you to stick it together. 17


18 Enveloboxes As well as standard envelopes, you can also use the Ultimate Pro to make dimensional or box envelopes which we refer to as Enveloboxes. 1. Place your card-blank onto the board with the corner positioned into the locator point and score the first indicated groove. 2. Drop the cardstock into the lip marked envelobox and score the same line again. 3. This will give a double score line at each end. Repeat this step on all four corners (as outlined on the previous page). 4. At each corner where the lines intersect, cut out a small notch as shown here. 5. Fold in the two sides and apply double-sided tape to the bottom edges. To line your envelope or envelobox 6. Fold the bottom up to meet the sides and ensure that you have a neat corner before removing the tape backing. 18 Choose a co-ordinating paper and lie this over the top of the completed envelope. trim the left and right corners to ensure the insert fits, then stick this into your envelope.
19 C6 envelope To fit an A6 card (A4 folded into quarters) 21cm x 21cm C & E 5 square envelope To match 5 square card from the card making board 21cm x 21cm D & D Notelet envelope To match notelet card from the card making board 17cm x 17cm B & D ATC envelope To fit an ATC card 12cm x 12cm A & B 7 x 5 envelope To fit specialised cards C5 envelope To fit an A5 card (A4 folded in half) 28cm x 28cm E & G Mini-slim envelope To match mini-slim card from the card making board 21cm x 21cm C & F Mini square envelope Ideal for scrapbooking, tags or for mini-notelets 10cm x 10cm A & A 6 square envelope To match 6 square card from the card making board 24.5cm x 24.5cm E & E 7 x 4 envelope To fit specialised cards DL envelope To fit a DL card (A4 folded into thirds) 24.5cm x 24.5cm C & G 4 square envelope To match 4 square card from the card making board 17cm x 17cm C & C Mini oblong envelope Ideal for scrapbooking, tags or for mini-notelets 11cm x 11cm A & B Slimline envelope To fit A5 folded in half lengthways 22.5cm x 22.5cm G & B 6 x 3 envelope To fit specialised cards 24.5cm x 24.5cm F & D 24.5cm x 24.5cm D & G 21cm x 21cm C & F 19


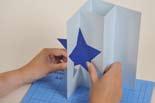
20 Decorative Embossing Embossing shapes On the front panel of the case there are a number of decorative embossing elements. The two larger shapes are designed for making popout cards (see page 6) and the butterfly, star and heart have been designed for decorating cards and boxes. Simply place a sheet of card face down over the shape and rub the rounded edge of the embossing tool into the channel. You can keep lifting the card slightly to see the shape underneath for easy reference. For best results, emboss onto a lightweight cardstock. TOP TIP Rub soap or candle wax over the back of the card before you emboss. This will help the tool glide smoothly over the card, and also, if you rub hard enough, the lines will begin to show through the card to act as a guide. Embossing corners The same technique can be applied with the embossing corners. These make ideal embellishments for the top flaps of envelopes, or the corners of boxes. Simply place the edge of the card against the raised upstands and emboss as detailed above. 20


21 Embossed lines On the card-scoring section of the case you will find three basic decorative embossing lines and inside the case there are a further four detailed embossing patterns. These can be used to create decorative edges on your cards. Butt the edge of your card up against the sidebar and gently follow the line of the shape down the channel using the rounded edge of your scoring tool. Intricate Embossing Concertina card with embossing line See Page 7 for details on embossing decorative lines onto accordion cards to give a beautiful finish. This is a simple technique which can be applied to numerous card shapes to add depth and dimension to projects. The four embossing lines on the inside of the case are more intricate and are therefore slightly harder to emboss. Try practicing on scrap card beforehand to master the technique and use your practice sheet as a visual guide on the final project. Double Embossing 1. After scoring the first line, move the card ¼ to the side and emboss the same line again. 2. Cut away the edge of the card stock - cutting just to the right of the embossed line. 3. This gives a beautiful decorative edging for card fronts as well as box lids. 21


 and sits inside the slot in the centre of the ruler. 4.")


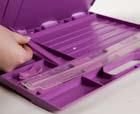
22 Using the Trimmer The paper trimmer needs to be assembled on the board. The component parts can be found in the storage compartment of the case. Please note that whilst the paper trimmer is clipped into place you cannot use the underside of the case, nor can you close the case. 1. Take the trimmer parts out of the storage compartment and lie them flat over the centre of the open case. 2. The ruler can fit into the case both ways and once the ruler is lined up over the hinges it will drop into place and hold there. 3. The cutting mouse is stored separately (see opposite page) and sits inside the slot in the centre of the ruler. 4. Lift the top layer of the ruler to position your card or paper underneath, then replace this top panel over the card and position it back in place. 5. On the top of the boxmaking panel of the board there are ruler markings in inches. The bottom panel also has centimetre measurements. 6. The cutting mouse is ergonomically designed to fit inside your hand and cut on the downward stroke as you pull the mouse towards you. TOP TIP As well as using the cutting mouse provided with the Ultimate Pro, you can also use any standard cutting knife in conjunction with the ruler function. Simply place the centre of your craft knife in line with the groove in the centre of the ruler and pull gently towards you. 22 Be careful not to press too hard or you may damage the plastic below.


23 The Mouse Cutter The mouse cutter is designed to work with the ruler or as a stand alone cutter. The cutter comes with the blade concealed inside. To open it, place your thumbnail into each of the notches and push firmly down and through. To close, push the two sides together and snap shut. The mouse is designed to house a standard Stanley blade which are available to buy from most good hardware stores. The great thing about Stanley blades is that being double-sided, they last twice as long. The blade will store in place inside the mouse. When you are ready to use it, simply pop it out and reposition it ¼ to the right with the second groove in the blade held firmly against the top notch. The Embossing Tool The double-ended embossing and scoring tool has been ergonomically designed for ease of use and comfort. It is an invaluable tool which you will use in all of your projects with the Ultimate Pro and is referred to throughout this booklet. Round Embossing Head Designed for dry embossing, this is ideal for most card scoring and embossing uses and especially good for shapes. Pointed Bone Folder This edge is much sharper than the rounded head making it ideal for scoring thicker cardstock or acetate. Small Inch Ruler The side of the tool includes a small ruler which is handy for quick and short measurements. 23


24 Over 2½ hours of fantastic projects! The Ultimate Pro DVD is a real treat for Ultimate Pro owners, with over two and a half hours of fantastic video tutorials. To help you get started, there s a full walkthrough of the case s features. Once you ve mastered the basics, you can try the twelve fabulous step-by-step video projects, incorporating all of the functions of the board! The DVD can be stored on the special spindle in the storage compartment of your Ultimate Pro. To remove your DVD from the spindle, twist the disc and pull gently. CAUTION - The cutter contains an open blade The blade is sharp. Do not touch the sharp edge of the blade. Study pages 22 and 23 of booklet before use. WARNING : CHOKING HAZARD : Small parts. Not suitable for children under three years. Parental supervision recommended Crafter s Companion 11 Collingwood Street, Coundon, Bishop Auckland, County Durham, DL14 8LG info@crafterscompanion.co.uk Visit our web site:
Visit our web site:
 The all-in-one, compact carry-case which allows you to score, measure, trim, embellish; and create boxes, shaped card blanks, envelopes and so much more The all in, compact carry-case which allows you
Basic Scrapbook Cover
 A KoalaKat Designs TUTORIAL SKILL LEVEL: BEGINNER Basic Scrapbook Cover 2014 by Geneva Campitelli / Koalakat Designs All Rights Reserved www.koalakat.com This tutorial is about creating a basic chipboard
card KeEper Tricia Morris Design by: 2006 Craft TV Weekly, Inc.
 card KeEper Design by: Tricia Morris card KeEper 1 Tricia folds and she scores! With basic bookbinding materials and a handy Scor-it tool, Tricia creates an elegant organizational Card Keeper that can
Drop Spine Box. Tricia Morris. Design by: 2006 Craft TV Weekly, Inc.
 Drop Spine Box Design by: Tricia Morris 1 Think inside the box! In a marathon of gluing, folding and smoothing, Tricia shows how to make a Drop Spine Box. The steps are many, but the reward is great! So
DOROTHY SIMPSON KRAUSE: PROJECTS
 DOROTHY SIMPSON KRAUSE: PROJECTS Gathering Memories: a paper portfolio This small portfolio of colored paper with pockets is perfect to hold and display some of the small items you ll collect on your cruise.
Christmas Magic Merry Christmas Lantern
 Designed by ~ Annette Green Graphic 45 Supplies: 1 each Deep Rectangular Matchbook Box (4501520) 1 each Christmas Magic Collection Pack (4501735) 1 pack Christmas Magic Chipboard (4501737) 1 pack Metal
Follow the numbered instructions that correspond to an illustration below:
 Folded Christmas Star Materials needed: Colored or white paper X-acto knife and cutting mat or scissors Ruler Patience and practice :) Instructions Follow the numbered instructions that correspond to an
Printable Tutorial: Exploding Box Mini Album
 Printable Tutorial: Exploding Box Mini Album scrapgirls.com/all-posts/printable-tutorial-exploding-box-mini-album/ Digital scrapbooking supplies used: Spring is Here Collection Biggie ScrapSimple Craft
Decorative Box with Easel Card Set & Side Waterfall Album
 Designed by ~ Annette Green Graphic 45 Supplies: 1 ea Botanical Tea Deluxe Collector's Edition (4501684) 1 ea Kraft 5 x 5 Mixed Media Box (4500984) 1 pk G45 Staples Metal Door Pulls (4500548 or 4500842)
DO-IT-YOURSELF DISNEY-INSPIRED GIFT WRAP DISNEY
 DO-IT-YOURSELF DISNEY-INSPIRED GIFT WRAP YOU WILL NEED*: Printed templates Scissors Tape Glue Craft paper Various ribbon *Additional supplies may be needed for each version and are listed before Step 1.
~MINI Scrapbooks~ By: Charlene Adair Hunter Of the Dating Divas Step 1) Make sure you have ALL the supplies you will need.
 Make sure you have ALL the supplies you will need.") ~MINI Scrapbooks~ By: Charlene Adair Hunter Of the Dating Divas Step 1) Make sure you have ALL the supplies you will need. Cutting For cutting you are welcome to use scissors and a ruler, I used a 12 paper
~MINI Scrapbooks~ By: Charlene Adair Hunter Of the Dating Divas Step 1) Make sure you have ALL the supplies you will need. Cutting For cutting you are welcome to use scissors and a ruler, I used a 12 paper
Bound and Determined:
 Think You Don t Have Time to Create Beautiful Quilts? From quick-quilt adaptations of classic patterns to fun, fresh novelty designs, McCall s Quick Quilts provides you with a treasury of time- and effort-saving
Garden Goddess Mixed Media Binder Album
 Designed by ~ Annette Green Graphic 45 Supplies: 1 each Garden Goddess 8 x 8 Paper Pad 1 pack Garden Goddess Chipboard 1 pack Garden Goddess Tags & Pockets 1 each Mixed Medium Album Kraft 1 pack G45 Staples
Floral Shoppe Four Card Set w/ Die Cut Paper Flowers
 Designed by ~ Maggi Harding Graphic 45 Supplies: 1 sheet Midnight Medley (4501689) 1 sheet Sunlit Medley (4501690) 1 sheet Burgundy Blossoms (4501691) 2 sheets Verdant Blossoms (4501692) 1 sheet Pink Lilies
Paper Pinwheel. Supplies
 Paper Pinwheel 1. Draw some lines. Measure and cut a square piece of paper.» Use the ruler and pen to draw lines from each corner of the paper towards the center. These lines should be half the size of
Class #7 Fold out Photos
 Class #7 Fold out Photos In this class we re going to make a fun page that holds five photos on the one page. We ll be using the washi tape for this although if you don t have any you can use regular household
lay it on me sketch layouts
 scrapbook s lay it on me sketch layouts featured products/ Chatterbox Happy Garden papers Scenic Route Loveland papers Crate Paper Sweet Branch papers BasicGrey painted brads Crate Paper brads and rub-ons
Easy Twist Pop-Up Panel Card
 Easy Twist Pop-Up Panel Card These cards are very popular, and the instructions online vary greatly. Some are just way to complicated. This is the easiest way I ve found to make it. I hope it helps you.
Shopping List:- How to make a... Strictly Dancing Tri Fold Box. How to make a... Sue Wilson Delicate Garden Frame Sunken Shaker Box
 Shopping List Grand Calibur Die Cutting Machine : WIZGC-200 Shopping List:- Creative Expressions John Lockwood Christmas Shades 8 x 8 Collection Paper Pad : JLPP0003 Grand Sue Wilson Calibur Shadow Die
INSTALLATION GUIDE SLIMLINE ROOF LANTERN 4 PANE CONFIGURATION
 INSTALLATION GUIDE SLIMLINE ROOF LANTERN 4 PANE CONFIGURATION SLIMLINE STEP-BY-STEP INSTALLATION GUIDE Thank you for choosing Roof Maker, we hope you are delighted with your new rooflight. Our roof lanterns
Circular Drawer Storage Unit
 Instructions 1. Take a piece of cardstock and cut down to 3 7/8 x 8 (you will need 4 of these per section) 2. Place this piece on your scoreboard with the long side (8 ) sitting on the top and score at:
Shopping List:- Shopping List:- How to make a... Strictly Dancing Tri Fold Box. How to make a... Craft Consortium Spring Pop Up Card
 Shopping List:- Shopping List:- Grand Calibur Die Cutting Machine : WIZGC-200 Sue Wilson Noble Pierced Rectangle Dies : CED5508 Grand Craft Consortium Calibur Die Bloom Cutting Beautiful Machine 12" :
How to make a... Strictly Dancing Tri Fold Box
 Shopping List Grand Calibur Die Cutting Machine : Shopping WIZGC-200 List:- Grand Sue Calibur Wilson Die New Cutting Zealand Machine Collection : WIZCAL Sue ~ Wilson Wellington Austrian Die Collection
Binding a Limp-bound Book which make great site tokens or personal largess
 Binding a Limp-bound Book which make great site tokens or personal largess As presented by THLady Jorhildr Hrafnkelsdottir version 1.2 2 Miniature Bookbinding - THLady Jorhildr Hrafnkelsdottir Larger books
MAT MASTER TM SYSTEMS
 FrameCo MAT MASTER TM SYSTEMS #14225 BEVEL MOUNT CUTTERS Welcome and thank you for purchasing a FrameCo Mat Master System. Through these instructions we will endeavour to show you the benefits of the system
Do # 11 Tile Message Board
 Do # 11 Tile Message Board Supplies Needed: 6x6 tiles (or larger!), felt scraps, embellishments (feather, copies of the Be you, Bravely logo, ribbon, stickers, scrapbook paper), Mod Podge, 1 dry erase
SIMPLEX ELITE MAT CUTTER
 INSTRUCTION MANUAL MODEL 750-1 / 760-1 SIMPLEX ELITE MAT CUTTER INSTRUCTIONS AND OPERATION MANUAL 40 in (101 cm) mat cutting system with bevel & straight cutters, production stops, 27 in (68 cm) squaring
MAT MASTER TM SYSTEMS
 FrameCo MAT MASTER TM SYSTEMS #14225 BEVEL MOUNT CUTTERS Welcome and thank you for purchasing a FrameCo Mat Master System. Through these instructions we will endeavour to show you the benefits of the system
Envelope Punch Board Techniques
 Envelope Punch Board Techniques Welcome! Construction workers and do-it-yourselfers aren t the only ones that need tools. Stampers and papercrafters love tools, too! The new Envelope Punch Board is a must
A Proper Gentleman's Board Book
 Designed by ~ Annette Green Graphic 45 Supplies: 1 pack A Proper Gentleman DCE 1 pack 12x12 Chipboard Sheets Black 1 pack G45 Staples Antique Metal Clock Keys 1 pack G45 Staples Regular Tags Black (4501806)
June 2017 Greetings to Go. Pattern Play
 Assembly Line Cardmaking June 2017 Greetings to Go Pattern Play Pattern Play Materials: Greetings to Go Tools and Supplies: Scor-Pal Adhesive Tape Bone Folder CS Foam Adhesive Circles Paper Trimmer 3x14
GENERAL NOTES: Page 1 of 9
 Laminating A Zia Into A Turning Blank by W. H. Kloepping, Jan. 2009 This describes how a zia (the New Mexico state symbol) can be laminated into a turning blank. Materials needed: Square Turning Block
How To Make A Simple Circuit & Switch
 How To Make A Simple Circuit & Switch Our video tutorial at www.artgonewild.com shows how to make a simple circuit & switch, which you can view at www.artgonewild.com. The sample card shown in the video
Page 1 of 5. Instructions for assembling your PacknMove boxes
 Instructions for assembling your PacknMove boxes The majority of our boxes are very easy to construct, but a couple might look like cardboard origami at first. If you are having any problems constructing
Pop UPS with Ease JUDI WATANABE. Design by: 2006 Craft TV Weekly, Inc.
 Pop UPS with Ease Design by: JUDI WATANABE 1 It s poppin fresh! Judi Watanabe from JudiKins pops in to show how to add a fun 3-D element to pages--the pop up! She creates a beautiful layout of a day exploring
May 2008 Greetings to Go Body & Soul
 May 2008 Greetings to Go Body & Soul Materials: Body & Soul Greetings to Go Body & Soul CS Wood Mounted Stamp Set Body & Soul Unmounted Borders & Backgrounds and Fonts Body & Soul I Love Your Spirit Stamp
Simplex Studio. Model 700-S MAT CUTTER INSTRUCTION AND OPERATION MANUAL
 Model 700-S Simplex Studio 22 1 /2" Mat cutting system with production stops, parallel mat guide, flush cut squaring arm, including straight and bevel cutting heads. MAT CUTTER www.logangraphic.com For
5If the protruding part is. 6Place 1 as is shown in the. 7Place what was assembled
 Yamato: Step-by-step 49 The base of the bridge and strakes a c b d a Base of the bridge b Base of the bridge c Base of the bridge d Strakes x 10 THE BASE OF THE BRIDGE 1Smooth 1 to 3, first using the metal
euphoria collection kit
 scrapbook.com euphoria collection kit featuring/ Euphoria paper collection collection kit created by/ kelly goree designer note/ Use scraps first if at all possible. instructions/ kit supplies/ 1 Euphoria
andy Cane Pop-Up Card
 andy Cane Pop-Up Card Project created by Jo-Ann Fabric and Craft Stores SUPPLIES & TOOLS: Cardstock: white, green, light red 12"x12" Paper, cream holly print Glitter alphabet stickers, black Self-adhesive
Mini Pizza Box Album. Part of the warmth of Christmas comes wrapped up in special memories. What are some of your treasured holiday moments?
 Holiday Helper 2017 Mini Pizza Box Album Part of the warmth of Christmas comes wrapped up in special memories. What are some of your treasured holiday moments? Many times we try to capture those memories
Winter Lantern Designed By: Amanda Corbet January 2012
 Winter Lantern Designed By: Amanda Corbet January 2012 Do you know someone who loves snowflakes? Or just needs a little something to light up their day? This pretty winter lantern will add some sparkle
How to make a... Strictly Dancing Tri Fold Box
 Shopping List Grand Calibur Die Cutting Machine : WIZGC-200 Shopping Sue Wilson Festive List:- Collection Snow Globe : CED3079 Sue Wilson Cottage Snow Scene Die Set : CED3080 Grand Creative Calibur Expressions
Linda Brown, Sue Dittler, Sandy Miller, Lucy Ricardo, and Carole Thommen
 Linda Brown, Sue Dittler, Sandy Miller, Lucy Ricardo, and Carole Thommen Edited by: Sharon Reilly Teena Livsey YO-YO s especially ornament balls By: Lucy Ricardo Supply list: Scraps of fabric 1 ½ circle
Designed by Gloria Stengel
 Designed by Gloria Stengel Graphic 45 Supplies: 2 sheets Cut Apart (#4501051) 2 sheets Flourish (#4501052) 1 pack Cardstock Tags and Pockets (#4501056) 2 Large Tags - Ivory (#4500849) 1 pack Washi Tape
Six FUN! projects for those who are new to sewing, returning to sewing or just want to sharpen basic skills.
 Six FUN! projects for those who are new to sewing, returning to sewing or just want to sharpen basic skills. 1. Clutter Control Bags 2. 3-Button Book Cover 3. Fabric Stash Pincushion 4. Pocket Tissue Case
Hedgehog Card. Hedgehog Design Topper. Shaped Card Template, place the dashed line up to the fold, draw around and cut it out.
 Hedgehog Design Topper Hedgehog Card Shaped Card Template, place the dashed line up to the fold, draw around and cut it out. Hedgehog Card Print off the hedgehog template sheet and cut out the base card
Shopping List:- How to make a... Sue Wilson Magical Butterfly Card. Sue Wilson Spanish Collection Granada Die & Galicia Die,
 How to make a... Sue Wilson Magical Butterfly Card Shopping List:- Sue Wilson Spanish Collection Granada Die & Galicia Die, Sue Wilson Finishing Touches Filigree 3D Itty Bitty Bows & Magical Butterflies
Rosalina Accessories Tutorial Version March 2011 Martyn
 Rosalina Accessories Tutorial Version 1.0 - March 2011 Martyn Star Brooch Feel free to experiment with these dimensions, you should make a template you are happy with, the method still works. 1) Creating
Framework joints FABRICATION - WOOD JOINTS. Corner joints. Tee joints. Worksheet 15a. Cable Educational Ltd
 FABRICATION - WOOD JOINTS The word: fabricate means to join together. Most wooden products are held together with adhesive. Adhesive works very well when the edge of a piece of wood is being glued to the
SIMPLEX STUDIO ELITE MAT CUTTER
 INSTRUCTION MANUAL MODEL 700- SIMPLEX STUDIO ELITE MAT CUTTER INSTRUCTIONS AND OPERATION MANUAL 0 inch (50 cm) capacity mat cutting system with bevel & straight cutters, production stops and squaring arm
Trebuchet Construction Instructions
 Trebuchet Construction Instructions Follow these instructions step by step to create your trebuchet. Materials: Trebuchet Template (6 pages cardstock) Trebuchet Template (1 page paper) One unsharpened
Print all pieces you require for your party in full colour, ensuring you print to fit so as to not cut off any of the designs.
 NOTES ABOUT MAKING THE ELEMENTS IN THIS PRINTABLES PACK: Print all pieces you require for your party in full colour, ensuring you print to fit so as to not cut off any of the designs. Recommendations will
TOTT Hair Bow Instructions Ribbon Covered Snap Clips These instructions may not be reproduced or copied. Hair Bows made using these instructions MAY
 Supplies & Tools Ribbon and supplies may be purchased from: http://www.theribbonretreat.com Hair Bow Making Tip Hair Bow Maker Ribbon Barrettes & Clips Cutting Mat Scissors Hi-Temp Glue Gun Glue Sticks
How to make a... Strictly Dancing Tri Fold Box
 Shopping List Grand Calibur Die Cutting Machine : WIZGC-200 For the box the following extra item is needed: Shopping Sue Wilson Festive List:- Collection Snowflake Mini Striplet : Grand CED3036 Calibur
Retreat 2007 Greetings to Go Hometown
 Retreat 2007 Greetings to Go Hometown Materials: Hometown Greetings to Go UM Borders and Backgrounds Embellishment Pack Don t Get Us Started Wood Mounted Stamp Welcome Home Alphabet Stickers White Glossy
Products We Love: Clover Quick Yo-Yo Makers
 Published on Sew4Home Products We Love: Clover Quick Yo-Yo Makers Editor: Liz Johnson Friday, 10 February 2017 1:00 There s no research confirming a link between the classic yo-yo string toy and the fabric
September 2008 Greetings to Go Cyprus
 September 2008 Greetings to Go Cyprus Materials: Cyprus Greetings to Go Cyprus Unmounted Font and Borders & Backgrounds Cyprus Wood Mounted Stamp Cyprus Wood Mounted Celebrate Everything Stamp Cyprus Wood
Heirloom Pillow with Wave Tucks and Woven Lace
 Published on Sew4Home Heirloom Pillow with Wave Tucks and Woven Lace Editor: Liz Johnson Monday, 01 May 2017 1:00 Perhaps best known as the provence of christening gowns and wedding ensembles, heirloom
Shopping List:- Shopping List:- How to make a... Sue Wilson Striplet Card How to make a... Strictly Dancing Tri Fold Box
 Shopping List:- Shopping List:- Grand Calibur Die Cutting Machine : WIZCAL Spellbinders All in One Tool : WIZTOOL Grand Sue Wilson Calibur Striplet Die Cutting Collection Machine Floral : WIZCAL Meadow
Fast Gift Wrap Sleeves in Felt & Cotton
 Published on Sew4Home Fast Gift Wrap Sleeves in Felt & Cotton Editor: Liz Johnson Thursday, 07 December 2017 1:00 Slice, stitch, tie, give. Just four steps to fast and festive (and reusable!) gift wrap
3Insert the second rod no. 4
 Yamato: Step-by-step 37 The stern block and searchlight control towers a b c d e f Recommended tools and materials Wood glue Sandpaper (no. 800 grain) Metal file Putty Craft knife For metal: Super Glue
Linda's Scallop Directions for Dear Jane Friends Copyright February
 Linda's Scallop Directions for Dear Jane Friends Copyright February 1999 email: linda@lindafranz.com Please Note: In February 1999, when I finished my Dear Jane Quilt, "In Time of Friendship," I put my
How to assemble the Reims Gueux Pit End Modules #005
 How to assemble the Reims Gueux Pit End Modules #005 Depending on which kit you have purchased you will either have a pair of end sections, some centre sections or both. We will describe building of the
Please read through the entire document before starting your installation process to better understand what is required.
 1 P a g e How s It Hanging? Step-by-Step Guide for Hanging your Wallpaper Walls Republic offers a richer and wider selection of designs, textures and colours than ever before found in the wallpaper world,
Time to Celebrate Acetate Pop-Up Card Tutorial
 Time to Celebrate Acetate Pop-Up Card Tutorial Wait til they see all those cupcakes popping up! Supplies Used: Stamp Set(s), Ink and Coloring Accessories: Cupcake Party by Stampin Up Coastal Cabana, Rich
Intermediate+ Model 450 MAT CUTTER INSTRUCTION AND OPERATION MANUAL. 40" Mat cutting system with production stop, straight and bevel cutting heads
 Model 450 Intermediate+ 40" Mat cutting system with production stop, straight and bevel cutting heads MAT CUTTER www.logangraphic.com For best results use only authentic Logan blades INSTRUCTION AND OPERATION
Layout and Fitting. Chapter 6 Layout and Fitting
 6 Layout and Fitting A. RESILIENT SHEET FLOORING Layout and Fitting There are three general methods of fitting resilient sheet flooring into a room: freehand knifing, direct (or straight) scribing and
Make Trousers (beginners)
") Make Trousers (beginners) This tutorial will help you to make your first pair of trousers. If you have already made some in the past and are just looking for a recap, you probably want the refresher tutorial.
Make Trousers (beginners) This tutorial will help you to make your first pair of trousers. If you have already made some in the past and are just looking for a recap, you probably want the refresher tutorial.
House of ATC cards. Michael strong. Design by: 2007 Craft TV Weekly, Inc.
 House of ATC cards Design by: Michael strong House of atc cards 1 Scallops! Michael is building a house of cards for his Artists Trading Cards. Because each card is a work of art in miniature, each deserves
The image above is intended to give you an idea of what the dovecote will look like when finished.
 Thank you for buying my book, I hope it is useful and enjoyable in your quest to building your own dovecote. This book will give you step-by step instructions on how to build your own dovecote also included
Christmas Stocking 1. The finished size is 17.5 long from top of folded cuff to toe, 21.5 unfolded, and 6.5 wide.
 Christmas Stocking 1 The finished size is 17.5 long from top of folded cuff to toe, 21.5 unfolded, and 6.5 wide. For each stocking you ll need: 2 outside pieces 2 lining pieces 2 cuff pieces 1 6 piece
Shopping List:- Shopping List:- How to make a... Strictly Dancing Tri Fold Box. How to make a... Sue Wilson Wellington Gift Bag
 Shopping List:- Shopping List:- Grand Calibur Die Cutting Machine : WIZGC-200 Sue Wilson New Zealand Collection ~ Wellington Die : Grand CED8205 Calibur, Frames Die & Cutting Tags Collection Machine :
Instruction Manual. Banner Grip -banner stretching frame. Manual Version Sept27, Any size made: by Graphic size, OD Size, Live Area -1 or 1,000!
 Instruction Manual Banner Grip -banner stretching frame Above: Open frame to reveal clamps pulling banner tight. Above: Closed frame to conceal all mounting hardware, NICE! Manual Version Sept27, 2012
MonOgrams To Mail. Tricia Morris. Design by: 2007 Craft TV Weekly, Inc.
 MonOgrams To Mail Design by: Tricia Morris 1 Stamp and mail! Tricia is reviving two classic arts: monogramming and hand-written notes! She starts by making two clever folders to hold her projects. Then
Shopping List:- How to make a... Strictly Dancing Tri Fold Box. How to make a... A Friend is like a Rainbow Kite Card
 Shopping List:- Grand Calibur Die Cutting Machine : WIZCAL Couture Shopping Creations Vintage List:- Rose 12" x 12" Paper Pad : CO723971 Sue Grand Wilson Calibur Noble Die Collection Cutting Pierced Machine
Layout and Fitting. Chapter 6 Layout and Fitting 6. 1
 6 Layout and Fitting Chapter 6 Layout and Fitting 6. 1 Layout and Fitting A. RESILIENT SHEET FLOORING There are three general methods of fitting resilient sheet flooring into a room: freehand knifing,
Saucer. Tea Party Hat
 Tea Party Crafts Serving Bowl Teacups Saucer Saucer Sugar Cubes Tea Party Hat Tea Party Hat Teacups What you'll need White plastic cups Wa shi tape (½-in.-wide or ⅝-in.-wide tape works best) Printouts
School & Crayon Totes
 LeisureArtsLibrary.com Sewing #803361 School & Crayon Totes Basic Tote Design by Nancy Burdette 2 Variations by Paula Hagerman Approx Design Size: 12" x 13 3 /4" each Click Here to sign up for the FREE
INSTRUCTIONS. Vintage Scrapbook Page Layout #1 12 x 12 inches with photo mat and pull-out photo/journaling tag
 INSTRUCTIONS Vintage Scrapbook Page Layout #1 12 x 12 inches with photo mat and pull-out photo/journaling tag My Angel Policy You may use the instructions included with this tutorial to create and produce
Folk-Art Dish Garden
 Folk-Art Dish Garden Designed by Kim Diehl Finished quilt size: 20½" x 24½" Finished center block size: 11½" x 15½" ~ 1 ~ Materials ⅝ yard of tan print #1 for background 1 chubby sixteenth (9" x 11") each
Marquetry Straw Valentines Card
 Marquetry Straw Valentines Card Sweet 'n Simple - a special card for that special person. You will need: Tools Ruler Pencil Scissors If you use straw that needs splitting: a seam ripper or a Hindenburg.
Copyright Bumblebee Linens LLC
 Crafts Instructions Included 1. Hankie Wedding Dress 2. Pillowcase Dress 3. Hankie Bonnet 4. Hankie Pin Cushion 5. Hankie Angel 6. Hankie Bunny 7. Pillowcase Reusable Grocery Bag 8. Linen Towel Drawstring
cards and Memories Judi watanabe Design by: 2007 Craft TV Weekly, Inc.
 cards and Memories Design by: Judi watanabe Cards and memories 1 Scrap your cards! Judi has an intriguing idea: use the same rubber stamp throughout the year to create beautiful cards for every occasion.
Extendable Large Dovetail Jig
 Extendable Large Dovetail Jig Instruction Manual Part # 3458 CAUTION: Please read, understand, and follow all manufacturers instructions, guidelines and owners manuals that come with your power tools.
DIY Christmas Advent Calendar Sewing Tutorial
 DIY Christmas Advent Calendar Sewing Tutorial I love counting down the days until Christmas with my children and seeing the smiles on their faces each morning as they get to check the advent calendar to
Shopping List:- Shopping List:- How to make a... Acetate Mothers Day Card How to make a... Strictly Dancing Tri Fold Box
 Shopping List:- Shopping List:- Grand Calibur Die Cutting Machine : WIZCAL Spellbinders All in One Tool : WIZTOOL Grand JustRite Calibur Floral Fan Elements Die Cutting : JRCR02092 Machine : WIZCAL JustRite
4 Position the Suntile to the x tile s position and mark the felt around the square box flange. Then remove the Suntile
 4 Position the Suntile to the x tile s position and mark the felt around the square box flange. Then remove the Suntile 5 Using a sharp bladed knife, cut through the felt from corner to corner in an x
Prima Diva. .Style, function and loads of compliments That s what the Stella Sling Bag brings!!
 .Style, function and loads of compliments That s what the Stella Sling Bag brings!! Supplies: 1/2 Yard Main Print (Outside of wallet, Outside of pockets, optional strap, etc..) 5/8 Yard Accent Print (Lining
Building Tips This model can be built using the following types of adhesives:
 Page 1 Building Tips This model can be built using the following types of adhesives: Epoxy (with or without microballons) Odorless cyanoacrylate (CA) with accelerator UHU Creativ for Styrofoam (or UHU
Gift Bag Class. You will need to make four flowers to complete all the projects in this class. Step 1
 Gift Bag Class During this class we will complete a Genie Bag, Corner Bookmark, Gift Card Holder and a Birthday Card. The instructions for most of these items can be found in many places on the internet,
1Take the keel (3) and
 and") 1 The hull and the bridge 1Take the keel (3) and apply PVA wood glue in the second slot from the left: a toothpick may make it easier. Take care: the left end is the one that has a projection. THE HULL
1 The hull and the bridge 1Take the keel (3) and apply PVA wood glue in the second slot from the left: a toothpick may make it easier. Take care: the left end is the one that has a projection. THE HULL
a free sewing pattern by
 a free sewing pattern by 2 kitty wallet This project is a fun companion piece to my Kitty Purse pattern. It's a bi-fold wallet with the traditional slots for cards (6) and one for receipts or bills. A
Maritime Knots. Materials: Directions: Red jute twine Scissors
 Maritime Knots Red jute twine 1. Measure twine to gift box size (with a little extra). 2. Cut 6 equal lengths. 3. Separate into two sets of 3 strands. 4. Form each into a loop. 5. Arrange side-by-side.
Window Pop-Up Surprise Instructions
 Window Pop-Up Surprise Instructions Robyn Cockburn 2012 purchased from www.craftsuprint.com These designs & more available at http://www.craftsuprint.com/robyn-cockburn/ ` 1. Print all of the sheets. I
CARD # 1. Designed by Gloria Stengel. Place In Time - December Card Be Merry. Graphic 45 Supplies: Additional Supplies: Tools & Adhesive Instructions:
 Place In Time - December Card Be Merry CARD # 1 Designed by Gloria Stengel Graphic 45 Supplies: 218 sheets piece December of red Cut-Apart twine (#4500614) 18 sheet piece December of red Foundations sparkle
Family Craft Ideas: A Royal Crown for All Ages
 Family Craft Ideas: A Royal Crown for All Ages Why Origami: We are always searching for fun things to do with the kids to keep them occupied without being too complicated or making too much of a mess.
Monster Marionette ART GRADE LEVEL FOURTH FIFTH MATERIALS
 MATERIALS FOR STUDENT: (one per student unless otherwise noted) FloraCraft Make It: Fun Foam: Rectangular pieces (arms & legs) cut from large Foam Block: Four 1" x 3" x 1" thick, Four 1" x 2 1/2" x 1"
Creating with the Envelope Punch Board Designed By: Regina Andari April 2014
 Creating with the Envelope Punch Board Designed By: Regina Andari April 2014 The Envelope Punch Board is no longer a new tool, but there are plenty of new ways to create with it. Learn to make a fun camera-shaped
Hinge Mortising Jig. One of the make it or break it parts of building a. 6 ShopNotes No. 74
 Hinge Mortising Jig A Mortise for a Hinge. Quick, clean, and accurate that s the only way to describe the mortise you get with a trim router and this hinge mortising jig. One of the make it or break it