Cool, Quiet & Comfortable
|
|
|
- Clinton George
- 6 years ago
- Views:
Transcription

1 installation in a 32 Ford Coupe Cool, Quiet & Comfortable By Mr. Al Knack, Cotter, Arkansas 1. These are the products and suggested tools needed to install Hushmat in any type vehicle. A tape measure, scissors, utility knife, straight edge, and small hard roller are essential, but the gloves are optional. I personally didn t need them and had no problems.

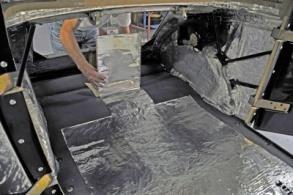
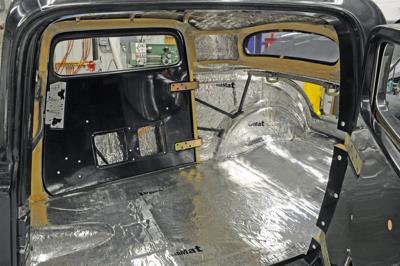
2 2. This is the bare interior of the 32 Ford coupe fiberglass car body before the installation began. The seat was removed along with the dash, steering column and everything under the dash as this is a new build street rod.

3 3. The trunk area was open as well so installation was easier. There is no special preparation of the surface needed before installing. No acetone or other solvent cleaning of the surface was required with. I vacuumed the complete inside of the body to remove any dirt that was loose on the floor.

4 4. The roof in the coupe has wooden bows for attaching a headliner. I unscrewed them from the wood frames around the doors, and removed them for ease of installing the sheets.

5 5. The roof area was installed first to eliminate potential damage of the Ultra sheets on the floor, if installed first. As you can see a measurement of the roof width was taken to find the center.

6 6. After locating the center of the roof area, a straight edge and felt tip pen were used to draw a line on the roof. I found this to be a good way to decide how I was going to install the Ultra sheets and get the most material use without waste. The Ultra sheets used are 12X23 inches (which made them very easy to handle and install).

7 7. The Ultra can be cut to fit any area using a straight edge and utility knife on a piece of wood as shown here.

8 8. You simply peel the brown backing paper off of the Ultra sheets as shown here. The sheets adhere very nicely to the surface. A good idea is to think ahead of the process and trial fit the pieces before peeling the backing paper off and pressing into place.

9 9. The decision was made to run the sheets longitudinal with the marked centerline. Here the small hard roller is being used to roll the sheet down as the backing paper is removed.

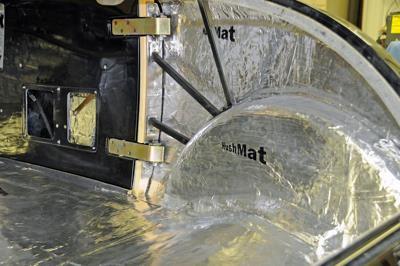
10 10.The wood frame areas on both sides of the rear window were going to be a problem, so I used a scrap piece of soft cardboard that conformed to the opening. I then used masking tape to hold it in place over the opening.

11 11.Next I used an exacto knife to cut out the area behind the cardboard giving me a perfect template.

12 12. Using the template just made, I traced it onto a sheet of Ultra with a felt tip pen as shown.

13 13.Now simply cut out the traced line on the Ultra sheet using the scissors.


14 14.The piece of just cut out can now be easily placed into the tight area next to the rear window as shown.

15 15.Next, the Silencer Megabond thermal insulating and high frequency sound absorbing semiclose cell foam rubber sheets were installed along the center line of the roof area. The small roller was used to roll it down firmly. I placed the Silencer Megabond directly onto the foil of the Ultra for the extra thermal benefit because I didn t have a fabric headliner on my 32 Coupe. 16. The wooden bows were reinstalled after the Silencer Megabond material was installed.

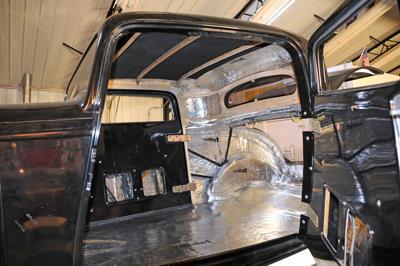
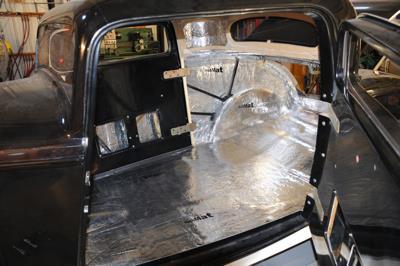
16 16.The sides of the body were the next area s to cover. The open flat sections were covered first and then patterns were made again using the brown backing paper peeled off of prior sheets. Draw out the area by pressing the paper into the section to be covered and trace it out with a felt tip pen.

17 17.After cutting out the drawing made on the backing paper, the pattern is placed on another sheet of Ultra and traced with a felt tip pen. This process of creating my own patterns allowed me to completely insulate my 32 covering 100% of the surface area. Pre-cuts never seem to cover the complete area as no two vehicles are exactly the same. It also prevented any unnecessary scrap and waste. I used 100% of the material in the kit.

18 19. This piece is now easily installed in the area it was made to fit into. The is so very easy to install and really sticks to the surface well. On compound curves like this area, it forms easily and lays down very nice.

19 20. Here the piece is installed and the fit is perfect!

20 21. The next area to be covered is under the dash/cowl on a 32 Ford. The underside of the cowl is exposed to the outside, so heat and sound deadening is important. This first sheet was placed in the very center under the cowl.

21 22. Here the sheet is rolled down using the small roller

22 23. The front kick panel area on the passenger side is installed after making a pattern as described earlier.

23 24. Using the same pattern, I merely turned it over or reversed the pattern, to make the piece for the driver side.

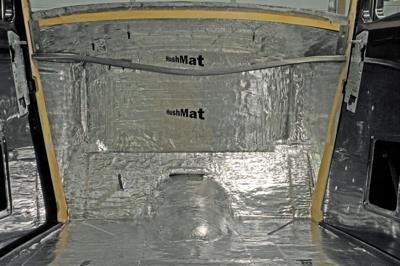
24 25. The next area to cover is the firewall. Again I started in the center of the firewall and filled in the sides as needed. Simply mark, press, and peel, it s that easy!

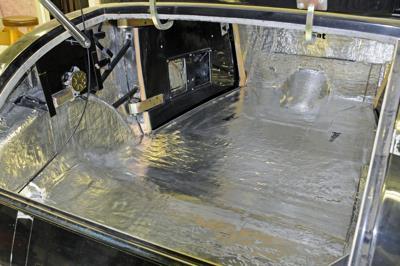
25 26. The floor is next. The brake pedal arm comes through the floor as most street rods do, so I simply measured where I needed to cut out for it and then slipped the sheet over the pedal arm as shown.

26 27. The next sheets of Ultra were laid next to each other as shown.

27 28. The center of the floor was determined next and a chalk line was snapped to mark it.

28 29. Now measure from the center line to determine where the sheets will go to make the best use of all the material and have a neat looking installation.


29 30. After determining these measurements, two more caulklines were snapped. 31. The sheets were then laid down along these guide lines. This will produce a very straight and neat installation.
30


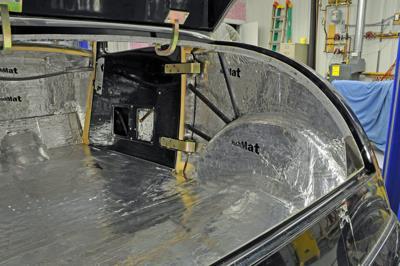
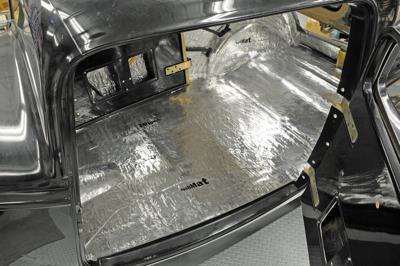
31 32. The Ultra sheets were laid all the way to the trunk area in the 32 Ford coupe and the sides were filled in with pieces cut to fit.


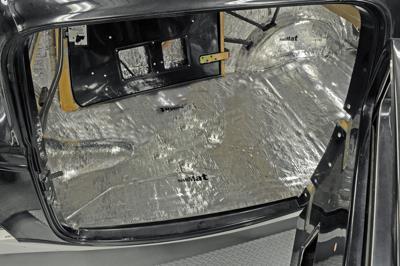
32 33. The doors were next to be covered on the insides. The 12X23 inch sheets were cut in half for ease of installing them through the small openings in the doors. I was able to install the pieces and then pull the baking paper off inside the doors which worked out fine and keeps them from sticking to other areas as they are installed. 34. Installation of the bottom part of the doors was done using horizontal pieces of.

33 35. I was able to cover almost every square inch inside the doors. The top most areas were covered by using vertical cut sheets as they will reach up to the top of the door easily. This method worked out great!

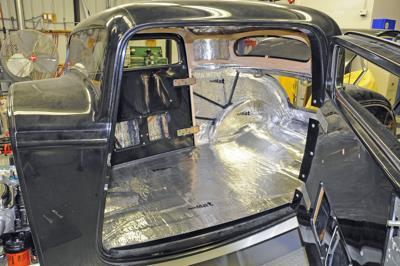
34 36. The areas to be cut out can be very easily identified by pressing your finger into the depressed areas and then with the utility knife simply cut those areas out. 37. The installation is now complete. The following photos show the finished project. The material was super flexible and molded to the exact contour of the 32. It was easy to install and looks great when finished!
35
36
37
38
39

40 Here is the finished 32 Coupe shown at the 2013 Hot Rod & Restoration Show in Indianapolis, IN Cool, Quiet & Comfortable with installed. Notes:
Instructions for Installing Vinyl Stair Treads with Musson 3 Wide Double-Face Tape
 Instructions for Installing Vinyl Stair Treads with Musson 3 Wide Double-Face Tape (For No. 300 & No. 334 treads see special note in the Installation of Vinyl Stair Tread section below) Where To Install
Upholstery. Chapter 6. Building A Ford
 Building A 1935-40 Ford Chapter 6 O f all the decisions to be made when building a street rod, some of the most important have to do with the interior. After all, that s where you ll spend your time driving
T-Top Headliner Repair Guide With detailed instructions
 T-Top Headliner Repair Guide With detailed instructions Supplies: Fabric: 1 ¼ yards will do -You can use any kind of fabric you want. Some fabrics will be harder to install than others. I d highly recommend
Installation Guidelines
 Page 1 Two inch () Porch Screening System Extruded Screen Walls Only Kit Installation Guidelines Tools You ll Need 4 ft. Carpenter s level Chalk line (to mark U channel locations) Chop saw with a metal
3. Be careful not to cut off all of the adjustment screws. It may be better to take a little off of each end rather than all off one side.
 QUIET DOOR KITS Description Quiet Door Soundproofing Kits are specifically designed for all your door soundproofing needs. The Quiet Door Perimeter Seal and Quiet Door Sweep are engineered to create a
Print template tiles and put together with clear tape to complete template.
 Print template tiles and put together with clear tape to complete template. Cut each pattern out with scissors or use a razor and strait edge ruler. Use the ruler as a guide for the razor to get nice strait
INSTALL INSTRUCTIONS KK & KK KWIK-KIT PRISONER TRANSPORT INSERT FORD and CHEVY VAN PRISONER TRANSPORT
 INSTALL INSTRUCTIONS KK-100-03 & KK-120-03 KWIK-KIT PRISONER TRANSPORT INSERT FORD and CHEVY VAN PRISONER TRANSPORT TOOLS REQUIRED: ¼ & 3/8 Ratcheting Wrenches ¼ & 3/8 Air Ratchets (recommended) 3/8 Impact
BMW X5 OEM RUNNING BOARD PART#SBBW
 INSTALLATION INSTRUCTIONS 2014-2016 BMW X5 OEM RUNNING BOARD PART#SBBW-146-74 QTY HARDWARE 1 Driver Side OEM Running Board 1 Passenger Side OEM Running Board 8 Rivet Pin 1 Page Step 1: Verify all parts
Installation Instructions Universal Crossmember Kit - 60 Track Width BEFORE Measure Twice, Weld Once! II
 Installation Instructions Universal Crossmember Kit - 60 Track Width Please read these instructions completely BEFORE starting your installation. Remember the basic rule for a successful installation:
INSTALL INSTRUCTIONS KK-XXX-02 XX-Specify length: FORD and CHEVY VAN PRISONER TRANSPORT INSERT
 INSTALL INSTRUCTIONS KK-XXX-02 XX-Specify length: 80 100 120 FORD and CHEVY VAN PRISONER TRANSPORT INSERT TOOLS REQUIRED: ¼ & 3/8 Ratcheting Wrenches ¼ & 3/8 Air Ratchets (recommended) 3/8 Impact Guns
Flash Coving. Chapter 8 Flash Coving 8. 1
 8 Flash Coving Chapter 8 Flash Coving 8. 1 Flash Coving A. TOOLS In addition to the normal tools (knives, dividers, recess scribers, straightedges, rollers, trowels, etc.), other tools are also needed
SCION FR-S REAR SPOILER Preparation
 Preparation Part Number: PT938-18130-XX Kit Contents Item # Quantity Reqd. Description 1 1 Spoiler 2 2 Strut 3 1 Hardware Bag Hardware Bag Contents Item # Quantity Reqd. Description 1 2 M6 x 1 Nut with
1) First off if you buy Al Knoch carpet the fit will be VERY close and require minimal trimming/gluing.
 First off if you buy Al Knoch carpet the fit will be VERY close and require minimal trimming/gluing.") Installing new carpet in a 61 Corvette Frank Dreano From the Corvette Forum (C1-C2) August 15 & 18, 2015 Link to C1-C2 Corvette Forum thread New '61 carpet I know, I know...been posted on 1,000 times -
Installing new carpet in a 61 Corvette Frank Dreano From the Corvette Forum (C1-C2) August 15 & 18, 2015 Link to C1-C2 Corvette Forum thread New '61 carpet I know, I know...been posted on 1,000 times -
FORWARD FUSELAGE SIDES & REAR TOP SKINS
 FORWARD FUSELAGE SIDES & REAR TOP SKINS WORK REPORT Step No. Check Parts / Tools Qty Preparations. 1 [ ] 6F5-3 Upper Front Longerons 2 2 [ ] 6F5-5 Heel Support 1 3 [ ] 6F5-2 Front Floor Skin 1 3 [ ] Firewall
MM Strut Tower Brace, GT (MMSTB-5.1)
") 3430 Sacramento Dr., Unit D San Luis Obispo, CA 93401 Telephone: 805/544-8748 Fax: 805/544-8645 www.maximummotorsports.com MM Strut Tower Brace, 1996-97 GT (MMSTB-5.1) MMSTB-5.1 is for 1996-97 GT s with
3430 Sacramento Dr., Unit D San Luis Obispo, CA 93401 Telephone: 805/544-8748 Fax: 805/544-8645 www.maximummotorsports.com MM Strut Tower Brace, 1996-97 GT (MMSTB-5.1) MMSTB-5.1 is for 1996-97 GT s with
Hatchback Wing Riser Kit
 Hatchback Wing Riser Kit 2015-06-11 Thank you for purchasing this PERRIN product for your car! Installation of this product should only be performed by persons experienced with installation of aftermarket
Jeep. Cut-Out Fender Flares Set of 4. Included in Hardware Kit: Set Part # Rev-8 06/29/16 STEP 1 PRIOR TO INSTALLATION
 STEP 1 PRIOR TO INSTALLATION A) Bushwacker only approves installing the flares according to these written instructions with the hardware provided. WARNING: Failure to install according to these instructions
TOYOTA YARIS 3 DOOR BODY SIDE MOLDING Preparation
 Preparation Part Number: PT938-52110-XX Kit Contents 1 1 Molding, LH Front Door 2 1 Molding, LH Rear Panel 3 1 Molding, RH Front Door 4 1 Molding, RH Rear Panel Hardware Bag Contents 1 2 Additional Items
Tech Sheet. T4 Interior conversion kit how to - fitting instructions. 1. Rear seat belts. 2.
 Page 1 of 8 T4 Interior conversion kit how to - fitting instructions Thank you for purchasing our T4 interior conversion kit. This kit will enable you to convert any SWB left hand loading door T4 into
Installation Instructions
 Installation Instructions Complete 19-piece carpet set for Porsche 911 77 through 86 Complete 16-piece carpet set for Porsche 911 69 through 73 2 B E FORE YOU BEGIN Installation of your carpet set takes
Hollywood Swing Away 2 and 4 Bike Racks Assembly and Installation Guide
 Hollywood Swing Away 2 and 4 Bike Racks Assembly and Installation Guide Tools Required: two adjustable wrenches, pliers, ¾ socket wrench recommended Note: please do assembly near your vehicle as you Can
Building the Gothic Church
 Building the Gothic Church Mold #54 does not contain all of the blocks to build this church. You will need extra regular blocks (1/2" x 1/2" x 1") and square blocks (1/2" x 1/2" x 1/2"). These blocks can
The Clarion SA200, a Sirius Satellite Radio approved antenna, has been designed and engineered to receive signal transmissions for Sirius' three
 d SA200 Introduction The Clarion SA200, a Sirius Satellite Radio approved antenna, has been designed and engineered to receive signal transmissions for Sirius' three satellites and network of ground-based
Installation for Full Size Polaris Ranger Crew Doors
 Installation for Full Size Polaris Ranger Crew Doors Order of Installation: Heater Doors Wiper on to Windshield Windshield Top & Back Panel Note: Most of the steps in these instructions need to be repeated
Installation instructions, accessories. TV receiver, digital
 Installation instructions, accessories Instruction No 30756561 Version 1.1 5 Part. No. 30756181, 30756569 TV receiver, digital Volvo Car Corporation TV receiver, digital- 30756561 - V1.1 Page 1 / 36 Equipment
MMD Convertible Styling Bar Customer Installation Guide
 MMD Convertible Styling Bar Customer Installation Guide TOOLS REQUIRED/RECOMMENDED: Electric Drill 1 Forstner Bit (Hole Saw) 1 3/8 Hole Saw (manual calls for 1 ¾ ) 1/8, 3/8 & ¾ Drill Bits Rivet Gun Trim
Roof Contour By Bob Parrish
 Roof Contour By Bob Parrish This text will show you how to shape the roof contour on Labelle passenger and trolley kits. The height of the clerestory on the two types of kits is different. Passenger kits
STYLE BAR & TONNEAU COVER INSTALLATION
 STYLE BAR & TONNEAU COVER INSTALLATION INSTALLATION MANUAL: 2005 to '09 Mustang P/N: 10-8002-C12071B Saleen Performance, Inc. 1225 East Maple Rd., MI 48083 800-888-8945 www.saleen.com 1 IF YOU ARE NOT
START HERE BEFORE YOU BEGIN FIG 1 STEP 2
 PROFESSIONAL INSTALL RECOMMENDED REAR MODULAR / MULTI LED ROOF MOUNTS PART#: Z350040 / Z350050 REAR ROOF LED LIGHT MOUNTS Parts included (1) - Driver Side Roof Mount Upright (1) - Passenger Side Roof Mount
Basic Spring Motor Roller Shades
 Basic Spring Motor Roller Shades ATTENTION!!! READ CAREFULLY! This shade has a reliable long-lasting Spring Motor. The Spring Motor must have proper tension in order to function as intended. Handling in
NISSAN NV200 CHEVY CITY EXPRESS WALL LINER KIT INSTALLATION INSTRUCTIONS
 NISSAN NV200 CHEVY CITY EXPRESS WALL LINER KIT INSTALLATION INSTRUCTIONS NOTES: 1. Before commencing, remove all wall liners and D Rings already installed in the vehicle. 2. Consult layout PDF and compare
Installation And Care Instructions. Vertical Honeycomb Shades
 Installation And Care Instructions Vertical Honeycomb Shades Rev 5/2013 Table Of Contents Getting Started... 3 Parts Overview... 4 Materials Required... 5 Tools Required... 6 Outside Mount Installation...
4 Position the Suntile to the x tile s position and mark the felt around the square box flange. Then remove the Suntile
 4 Position the Suntile to the x tile s position and mark the felt around the square box flange. Then remove the Suntile 5 Using a sharp bladed knife, cut through the felt from corner to corner in an x
Bushwacker Jeep Flat Style Fender Flares Front Pair
 Bushwacker Jeep Flat Style Fender Flares Front Pair Note: These instructions involve cutting parts of your vehicle. Please read all instructions prior to starting. Installation Time: 3-4 Hours Tools Required:
Roof Rack Installation Instructions
 Roof Rack Installation Instructions CAUTION: Do not use the mounting hardware contained in this roof rack kit for installation on Fiberglass or Composite Plastic surfaces. Supplemental hardware pack, part#
D. Drill Bolt Holes Through Topper Shell and Bed Rails
 A. Check Mounting Kit Check to make sure that all of the following items are included in the mounting kit. Call 515-272-4372 if you need to obtain a part from BrandFX. Double-stick tape (1 roll) White
General Prisoner Transport Install Instructions PT-2-INST
 General Prisoner Transport Install Instructions PT-2-INST 50 or 60 high x 80, 100 & 120 inch long / Double Compartment Inserts Also refer to PT-A-3XX instructions for vehicle specific mounting measurements
Bushwacker Jeep Flat Style Fender Flares Rear Pair (JK Wrangler 2dr)
") Bushwacker Jeep Flat Style Fender Flares Rear Pair (JK Wrangler 2dr) Note: These instructions involve cutting parts of your vehicle. Please read all instructions prior to starting. Installation Time: 3-4
Bushwacker Jeep Flat Style Fender Flares Rear Pair (JK Wrangler 2dr) Note: These instructions involve cutting parts of your vehicle. Please read all instructions prior to starting. Installation Time: 3-4
RH-412 STEEL DOORS INSTALLATION INSTRUCTIONS
 RH-412 STEEL DOORS INSTALLATION INSTRUCTIONS By following the steps outlined below, the assembly, installation and adjustment of the steel doors, will be a simple process. Let s start with the Driver Side.
Ziroli D-17 Beech Staggerwing
 Ziroli D-17 Beech Staggerwing Parts List Vacuform Parts: Miscellanous Pieces 1 Four Side Panels 1 3/16" Tube, 2" Long 2 Lower Dash - Back Dash 2 Felt, 12x24 3 Dash 3 Cordury 12x24 4 Dash Hood 4 Aluminum
RAMPAGE P R O D U C T S. INSTALLATION INSTRUCTIONS BRONCO ZIPPER FASTRACK TOP PART #984xx BRONCO TOOLS REQUIRED
 RAMPAGE P R O D U C T S 84 (+/- 1/4 ) INSTALLATION INSTRUCTIONS BRONCO ZIPPER FASTRACK TOP PART #984xx BRONCO 1966-1977 TOOLS REQUIRED 3/8 WRENCH 7/16 WRENCH ½ WRENCH #2 PHILLIPS SCREWDRIVER 1/8 DRILL
How To: Fit new trim including chrome door handles
 How To: Fit new trim including chrome door handles Ever since upgrading to a V6 from my Silver and Black I've always been disappointed with the interior. It just felt a bit drab but when I worked out what
Fitting the Roof Lining of a Traction Avant
 Fitting the Roof Lining of a Traction Avant The roof of the Traction Avant is lined with cloth like most of the cars of that era. The types and colours of the cloth have evolved over time, but the principle
Layout and Fitting. Chapter 6 Layout and Fitting
 6 Layout and Fitting A. RESILIENT SHEET FLOORING Layout and Fitting There are three general methods of fitting resilient sheet flooring into a room: freehand knifing, direct (or straight) scribing and
How to assemble the Reims Gueux Pit Centre Module #005
 How to assemble the Reims Gueux Pit Centre Module #005 We recommend quick drying super glue for our models. Just a few drops on the joining edges, press and hold them for a few seconds and the connection
Plexidor Pet Door Wall Kit Instruction for All Sizes Plexidor : S, M, L, XL; BiteGuard KennelPlex TM 1113,1418, 1419 & 1825 and Plexidor Electronic LG
 Plexidor Pet Door Wall Kit Instruction for All Sizes Plexidor : S, M, L, XL; BiteGuard KennelPlex TM 1113,1418, 1419 & 1825 and Plexidor Electronic LG Congratulations on your purchase of the Plexidor Pet
TOYOTA CAMRY & CAMRY HV BODY SIDE MOLDING Preparation
 Preparation Part Number: PT938-03120-XX Kit Contents 1 1 Molding, LH Front Door 2 1 Molding, LH Rear Door 3 1 Molding, RH Front Door 4 1 Molding, RH Rear Door Hardware Bag Contents 1 2 Additional Items
Installing a genuine HoodLift on a Jeep TJ
 Installing a genuine HoodLift on a Jeep TJ 1997-2006 To print a full-color version of these instructions go to www.hoodlift.com/products.html. Scroll down to the TJ HoodLift and click on the TJ HoodLift
Layout and Fitting. Chapter 6 Layout and Fitting 6. 1
 6 Layout and Fitting Chapter 6 Layout and Fitting 6. 1 Layout and Fitting A. RESILIENT SHEET FLOORING There are three general methods of fitting resilient sheet flooring into a room: freehand knifing,
Interior CHAPTER 21. Phantom Roadster Instruction Manual 273
 CHAPTER 21 Interior When you get to this chapter you are now starting on the finish that will make your car one that will be complete your hard work. This chapter will cover the installation of the door
RTS509 Rhino Heavy Duty Track Mount System - MITSUBISHI TRITON ML
 RTS509 Rhino Heavy Duty Track Mount System - MITSUBISHI TRITON ML Important: Please read these instructions carefully prior to installation. Please refer to your fitting instruction to ensure that the
Dash Recover Trim Fitting Instructions
 Tools required. We use a spray trim/carpet adhesive but a brush on contact glue will work just as well. Good scissors, very sharp knife, bradawl/scriber and hot air gun/hair dryer. Also carrying out this
SIDE SLIDING/ FIXED WINDOWS
 SIDE SLIDING/ FIXED WINDOWS ILLUSTRATED FITTING MANUAL You will need: General workshop tools Cloths and a mild cleaning agent Latex gloves, eye and ear protection An electric drill with an appropriate
HARDWARE KIT # KKM or Rear Compartment: (Some hardware not used in all applications)
") PRISONER TRANSPORT INSTRUCTIONS for CHEVROLET EXPRESS VAN PT-C01-100-2A TOOLS REQUIRED: Standard and Metric Socket Sets Awe or Scribe Tape Measure Impact Gun (recommended) Pry-bar Caulk gun Drill & drill
PRISONER TRANSPORT INSTRUCTIONS for CHEVROLET EXPRESS VAN PT-C01-100-2A TOOLS REQUIRED: Standard and Metric Socket Sets Awe or Scribe Tape Measure Impact Gun (recommended) Pry-bar Caulk gun Drill & drill
TOOLS REQUIRED: HARDWARE INCLUDED: 13MM FLAT WRENCH FOR LEVELING THE STRUCTURE RATCHET WITH 5MM HEX BIT FOR CORNER SCREWS ON TOP TRAVERSE BEAMS
 1 TOOLS REQUIRED: RATCHET WITH 5MM HEX BIT FOR CORNER SCREWS ON TOP TRAVERSE BEAMS 13MM FLAT WRENCH FOR LEVELING THE STRUCTURE RUBBER MALLET FOR INSERTING PANELS 8MM HEX BIT WITH EXTENSION FOR HEX BOLT
AUDI A8 D3 REPLACING THE OUTSIDE DRIVER DOOR HANDLE
 AUDI A8 D3 REPLACING THE OUTSIDE DRIVER DOOR HANDLE The keyless entry system in the D3 is a great feature. If you have the car key fob in your pocket, putting your hand under the door handle will unlock
WELDING. Section nine 9.1 CORRECT TOOLS
 Section nine 9.1 CORRECT TOOLS WELDING Polyflor strongly recommends vinyl sheet and 608mm vinyl tile floorings are welded, this includes the internal and external joints when the vinyl sheet is site cove
Perfect Placement. Put the design where you want it, each and every time, with this perfect placement technique!
 Perfect Placement Put the design where you want it, each and every time, with this perfect placement technique! Click on the image to the right to watch the free video tutorial. Videos are best viewed
84 WING SPAN MESSERSCHMITT BF-109
 84 WING SPAN MESSERSCHMITT BF-109 (COPYRIGHT PROTECTED 2014) ALL RIGHTS RESERVED MEISTER 84 ME-109 SIERRA GEAR UPDATE PLEASE NOTE: THE MAIN GEAR MOUNTING PLATE FROM SIERRA IS NOT SQUARE. YOU HAVE TO ROUND
Finish Line Emergency Brake Boot INSTRUCTION SHEET. Part Number. Application: Corvette. Part Includes.
 Application: 1997-2004 Corvette Part Includes 1 - Emergency Brake Boot Finish Line Emergency Brake Boot Tools Needed T15 10mm PRE-INSTALLATION NOTES Read completely through instructions to familiarize
Ford Ranger / Bronco II Set Part # Rev B 5-04
 Ford Ranger / Bronco II Set Part # 21008 Rev B 5-04 Step 1: Prior to Installation: A) Fit: Verify the fit of the flares to vehicle. (Some filing, sanding, or cutting may be necessary to ensure proper fit).
How to assemble the Reims Gueux Pit End Modules #005
 How to assemble the Reims Gueux Pit End Modules #005 Depending on which kit you have purchased you will either have a pair of end sections, some centre sections or both. We will describe building of the
TOYOTA MOTOR EUROPE CA Products Division Tel : Fax :
 TOYOTA MOTOR EUROPE CA Products Division Tel : + 32 2 745 26 77 Fax : + 33 2 745 26 99 Ordering part numbers Comments Part Numbers Wooden floor one hatch PZ449-D3C42-11 one hatch with carpet PZ449-D3C42-01
Modernizing Your Opel GT: Power Rear Quarter Windows
 1 Modernizing Your Opel GT: Power Rear Quarter Windows By Wayne Torman (wayneto@msn.com) My 1973 Opel was going to be in the shop for a few weeks, and I had finished stripping my $25 wrecked 1971 in the
Installation Instructions
 Installation Instructions Targa Top Restoration Kit Porsche 911 1965-1992 About Us: ClassicCarCarpets develops, manufactures and markets premium quality carpet sets for classic cars. Our handcrafted carpet
Top Installation Booklet
 Top Installation Booklet. CUT-AWAY VIEW OF COMPLETED TOP INSTALLATION Before tackling the replacement of the top material on a Closed Cars, it is best to have all necessary materials for the job near at
For the window switch piece, using a trim stick, pop the piece out below the wood trim:
 Facelift S8/A8 Removing Wood Trim Tools Needed: 1. Nylon Trim Stick 2. Philips Head Screwdriver 3. 5 and 6 mm allen heads 4. Small Torx screwdriver if removing emergency flasher switch Front and Rear Doors:
HURST COMP STICK KIT DODGE CHARGER, MAGNUM, AND CHRYSLER 300 (with AUTO-STICK) Catalog # & by Hurst Performance
 Catalog # & by Hurst Performance") HURST COMP STICK KIT 2005-2007 DODGE CHARGER, MAGNUM, AND CHRYSLER 300 (with AUTO-STICK) Catalog #538 0410 & 538 0411 2009 by Hurst Performance FORM 159 0410 03/09 Thank you for purchasing the Hurst Comp
HURST COMP STICK KIT 2005-2007 DODGE CHARGER, MAGNUM, AND CHRYSLER 300 (with AUTO-STICK) Catalog #538 0410 & 538 0411 2009 by Hurst Performance FORM 159 0410 03/09 Thank you for purchasing the Hurst Comp
Signal Mirror Installation Instructions
 Signal Mirror Installation Instructions Honda CRV 1997-2003 THE safety accessory of the 21 st Century. P/N 210-0032-0 Rev B2 (6-26-04), GG 2003 Muth Mirror Systems, LLC. Note: Professional Installation
15 - Interior. Interior. February GGG Page 15-1
 Interior February 2003 15-GGG Page 15-1 15 - Interior This Page Intentionally Left Blank Page 15-2 15-GGG February 2003 Contents 15.0 - Chapter Preface...15-4 15.0.1 - Parts List...15-4 15.0.2 - Tools
Fabric Replacement Top and Doors
 Fabric Replacement Top and Doors Installation Instructions For: Wrangler/TJ 1997 and Newer Part Number: 51131 WARNING This product is designed to enhance the appearance of the vehicle and to shield the
Xyron Professional 2500 Laminating System
 Xyron Professional 2500 Laminating System Instruction Manual Provided By http://www.mybinding.com http://www.mybindingblog.com U S E R S G U I D E 2500 Adhesive Application & Laminating System The XM2500
Suggested Instructions for: , , , C5 Emergency Brake Boot
 Suggested Instructions for: 608-348, 608-349, 614-653, 619-200 C5 Emergency Brake Boot Tools Ratchet, 10mm socket, extension #15 Torx screwdriver Needle nose pliers Masking Tape Very small flat head screwdriver
UPPER DOOR KIT P/N
 UPPER DOOR KIT P/N 2879946 Application RZR XP4 1000 Before you begin, read these instructions twice and check to be sure all parts and tools are accounted for. Please retain these installation instructions
GENUINE PARTS INSTALLATION INSTRUCTIONS
 GENUINE PARTS INSTALLATION INSTRUCTIONS DESCRIPTION: APPLICATION: PART NUMBER: Interior Accent Light (Multi-color) MURANO, MURANO CROSS CABRIOLET(2011) Interior Accent Light (Multi-color) (B64D0 1SX0A)
Adhesive Application & Laminating System
 U S E R S G U I D E Adhesive Application & Laminating System The XM2500 is an economical and easy to use document finishing system. This versatile and non-electric system has been designed to laminate
Experimental Procedure
 1 of 12 9/13/2018, 10:52 AM https://www.sciencebuddies.org/science-fair-projects/project-ideas/phys_p105/physics/maglev-train-magnetic-brakes (http://www.sciencebuddies.org/science-fair-projects /project-ideas/phys_p105/physics/maglev-train-magnetic-brakes)
Volvo 240/260 New Face Overlay Installation Models By Dave Barton
 Volvo 240/260 New Face Overlay Installation 1975-80 Models By Dave Barton These custom faces are the product of years of research and experimentation. They are printed with a special printer using waterproof
It is highly recommended that you use a thread lock compound such as Loctite brand on all threads to keep them from vibrating loose.
 Installation instructions for FC12 Forward Controls for Kawasaki Vulcan 750 It is highly recommended that you use a thread lock compound such as Loctite brand on all threads to keep them from vibrating
MM Strut Tower Brace, Cobra (MMSTB-7)
") The MM strut Tower Brace attaches to each strut tower and to the firewall. 3430 Sacramento Dr., Unit D San Luis Obispo, CA 93401 Telephone: 805/544-8748 Fax: 805/544-8645 www.maximummotorsports.com MM
The MM strut Tower Brace attaches to each strut tower and to the firewall. 3430 Sacramento Dr., Unit D San Luis Obispo, CA 93401 Telephone: 805/544-8748 Fax: 805/544-8645 www.maximummotorsports.com MM
INSTALLATION INSTRUCTIONS RH 412 STEEL DOORS
 By following the steps outlined below, the assembly, installation and adjustment of the steel doors, will be a simple process. Let s start with the Driver Side. Note: Having the hood open makes the job
Installation Guidelines
 TM TM Installation Guidelines * Guidelines also apply to installation of astroeco products More For Pre-Engineered Metal and Post-Frame Buildings icient, Safer To Use and Easier To Install Than Regular
How to make a template to mount your plaque to a surface
 How to make a template to mount your plaque to a surface A piece of heavy paper 3 4 wider than your plaque on all four sides (paper grocery bag works great too) Small amount of paint (latex dries the fastest)
8 x 10 Sandwich Panel
 *Before starting, please read entire manual *Changes can be made in order for this manual to work for you 8 x 10 Sandwich Panel Follow all applicable sections of the attached Manufacturing Plan. Objectives:
Installation Instructions
 Installation Instructions Follow these simple instructions to install your OneDayCab! IMPORTANT: Unpack and check shipment for damage. Verify color, size and parts before demolition. Installation of interiors
INSTALLATION AND CARE INSTRUCTIONS
 INSTALLATION AND CARE INSTRUCTIONS Vertical Applications Honeycomb Shades 52 C8-10-3401 Rev 2/14 CONTENTS Introduction...2 Before You Begin...3 Vertical Application Parts Overview...4 Materials Required...5
Signal Mirror Installation Instructions
 Signal Mirror Installation Instructions 2006 2007 Honda Ridgeline THE safety accessory of the 21 st Century. P/N 210 0142 0 Rev. A (9/5/07), BTV 2007 Muth Company, LLC Professional Installation Recommended:
After the canopy hinge is square with the firewall and the nut plates are installed you can set up the hinge mounts. Start by clamping a 1/16 tongue
 Written by: Sean Cole September 19, 2008 When fitting the stiffener use 3/32 clecos to hold it in place, it makes a smaller hole and is easier to work with. Only use the amount needed to hold the stiffener
Cut-Pile Carpet Set, Ghia Convertible
 Application: Ghia 1956-1974 Convertible Cut-Pile Carpet Set, Ghia Convertible Part Includes 1 - Carpet Set Tools Needed NOTE: Mid America Motorworks does not accept responsibility for personal injury that
R2C Performance Products 7550 Industrial Drive Forest Park, IL Ph: (708)
") Congratulations on your purchase of the finest Sprint Car Filter and stack sealing system available. This system has been designed for unparalleled ease of assembly, disassembly and cleaning while providing
Congratulations on your purchase of the finest Sprint Car Filter and stack sealing system available. This system has been designed for unparalleled ease of assembly, disassembly and cleaning while providing
Included in Hardware Kit. Jeep Cut-Out Fender Flare Set of 4 Set Part # Rev STEP 1 PRIOR TO INSTALLATION
 Jeep Cut-Out Fender Flare Set of 4 Set Part #10926-07 Rev-01 09-11-12 STEP 1 PRIOR TO INSTALLATION A) Bushwacker only approves installing the flares according to these written instructions with the hardware
Conflicts Note: Drop-in Bed liner
 Toyota Tundra 2015 LED Bed Lights Preparation Part Number: 00016-34089 Accessory Code: BU1000 Conflicts Note: Drop-in Bed liner Kit Contents Item # Quantity Reqd. Description 1 1 Hardware Kit 2 1 Driver
Christmas Magic Merry Christmas Lantern
 Designed by ~ Annette Green Graphic 45 Supplies: 1 each Deep Rectangular Matchbook Box (4501520) 1 each Christmas Magic Collection Pack (4501735) 1 pack Christmas Magic Chipboard (4501737) 1 pack Metal
Nojo Design: Large Step Cabinet: February 2012
 Nojo Design: Large Step Cabinet: February 2012 The largest single piece of furniture I ve ever made is this stepped cabinet. Finished piece is 8! tall and over 10 long. This project has been great, although
Heavy Wall Applied Stop Tube Frame and Door Installation
 INSTALLATION INSTRUCTIONS Heavy Wall Applied Stop Tube Frame and Door Installation Read all instructions before beginning installation. These instructions are provided to help prevent installation problems
Air Cooled VW Carpet Installation
 VW Tech Tip Air Cooled VW Carpet Installation This article was used with permission from: Rob and Dave s air-cooled VW pages Your Volkswagen Bug s carpeting is one of the most noticeable aspects of its
Bolt-On/Rugged Fender Flares Ford F150 (15-ON) Please read instructions entirely before installing this product.
 Please read instructions entirely before installing this product.") Please read instructions entirely before installing this product. Hardware Included QTY Hardware Included QTY Bolt Kit Included QTY EXTRUSION 29ft RETAINING CLIP 4 ALLEN KEY BOLT 42 ALCOHOL TOWELETTE 4
Please read instructions entirely before installing this product. Hardware Included QTY Hardware Included QTY Bolt Kit Included QTY EXTRUSION 29ft RETAINING CLIP 4 ALLEN KEY BOLT 42 ALCOHOL TOWELETTE 4
The Hearse Carriage Assembly Instructions Page 1.
 The Hearse Carriage Assembly Instructions Page 1. The Hearse Carriage Assembly Instructions Page 2. WHAT YOU'LL NEED: Scissors, Elmer's glue (or a glue stick), a needle, two toothpicks, a sharpened pencil,
Competition Engineering 8 Point Roll Bar (94-04 Mustang)
") Competition Engineering 8 Point Roll Bar (94-04 Mustang) Required tools: Socket set / Hand tools Welder of choice Welding blankets Welding safety gear Heat gun Putty knife Bar notching tool Adjustable
Competition Engineering 8 Point Roll Bar (94-04 Mustang) Required tools: Socket set / Hand tools Welder of choice Welding blankets Welding safety gear Heat gun Putty knife Bar notching tool Adjustable
Sailcloth Fabric Replacement Top and Doors with Tinted Side and Rear Curtains Installation Instructions
 Sailcloth Fabric Replacement Top and Doors with Tinted Side and Rear Curtains Installation Instructions TM For: Wrangler / TJ 2003 - Current Part Number: 79129 Inc. This product is only designed for the