Make It: Bottle Light. Making Bottle Lights with the Westmont Library Makery
|
|
|
- Luke Dorsey
- 5 years ago
- Views:
Transcription
1 Make It: Bottle Light Making Bottle Lights with the Westmont Library Makery
2 Introduction Welcome to the Westmont Library s Make It: Bottle Light program! We re very pleased to have you. In this program, we re going to make a simple bottle light. We will do this by: Selecting images Cutting them out with the Vinyl Cutter Affixing them to the bottle using transfer paper Let s get started!
3 Selecting Images part 1 There are two main ways you are probably going to get your images. Those are: Google Image Search The silhouette image folders on the desktop The first thing you should do is think about what sorts of images you want and where you intend to place them on the bottle. The bottles look like they have more space than they do, and unless you are using very small images you will be unlikely to get more than 4-5 images on the bottle.
4 Selecting Images part 2 If selecting from google: Search for the type of image you want (we recommend searching for silhouettes specifically) Change the search results to Images Once you see an image you want: Right-click on the image Select Save As Save the image to the desktop Make sure the images you select are high resolution (800 x 600 or bigger) and will look good in silhouette


5 Selecting Images part 3 The vinyl cutter is going to print silhouette outlines with no internal detail, so plan accordingly Avoid images with holes in them Works! Doesn t work :( If you find an image with a hole in it that you really like, all may not be lost. Look for the slide on using the Threshold function further down.
6 Getting your images into Silhouette Studio Open Silhouette Studio Go to File->Open, then find your image on the hard drive Open your file Repeat this process for more images (note: Silhouette opens each new image into a new project by default, but you can copy/paste those images into the same project once they re open) Continue until you have all your images in a single project You re going to be cutting from an 8.5 x 11 inch piece of material, so under Design Page Settings select the Letter option from the drop down menu under page size. The Vinyl Cutter doesn t deal with detail at the edge of the cut area well, so make sure you have a buffer around your images


7 Opening Images cont d File->Open, find the Silhouette Images Folder or your image on the desktop


8 Opening images cont d Select the image you want then either double click or select and press OK
9 Working with your images You may want to resize your images in order to fit them on your page better If you resize, hold down the Shift button on the keyboard and drag from the corners of the image. This will keep the length/width ratio the same (ie avoid stretching or smushing the image) As you position your images, make sure to leave some buffer area around the edges of the page. The Cameo doesn t always handle cuts at the edges of pages well. If something goes wrong, remember you can always Undo changes, either by pressing Ctrl + Z or by pressing the Undo area in Silhouette Studio


10 Resizing images Hold the Shift Key down and drag from the corner of the image
11 Prepping your images to cut Select the Trace function in Silhouette Studio Press the Select Trace Area button Select Trace Outer Edge in the Apply Trace Method section Drag the square or rectangle over all your images Select Cut You will see red outlines of your images Once you have the red outlines, you no longer need the original image, so select and delete the original image


12 Prepping images to cut part 1 Press the Open the Trace Window Button


13 Prepping images to cut part 2 Press Select Trace Area and Drag the selection area over your images

14 Prepping images to cut part 3 Select Trace Outer Edge while the selection area is over your images


15 Prepping images to cut part 4 Your images will now have a red outline. If you move your images, the red outlines will stay in place.

16 Prepping images to cut part 5 You can now delete your initial images. The red outlines are the cut paths the Cameo will use to make your stickers.
17 Threshold Function If you have an image you like with holes in it, you may still be able to use it. To do so: Instead of using Trace Outer Edge, Use Trace Adjust the Threshold slider until the image is solid yellow You should get an outline of the image without all the holes, which you can then send to the Cameo
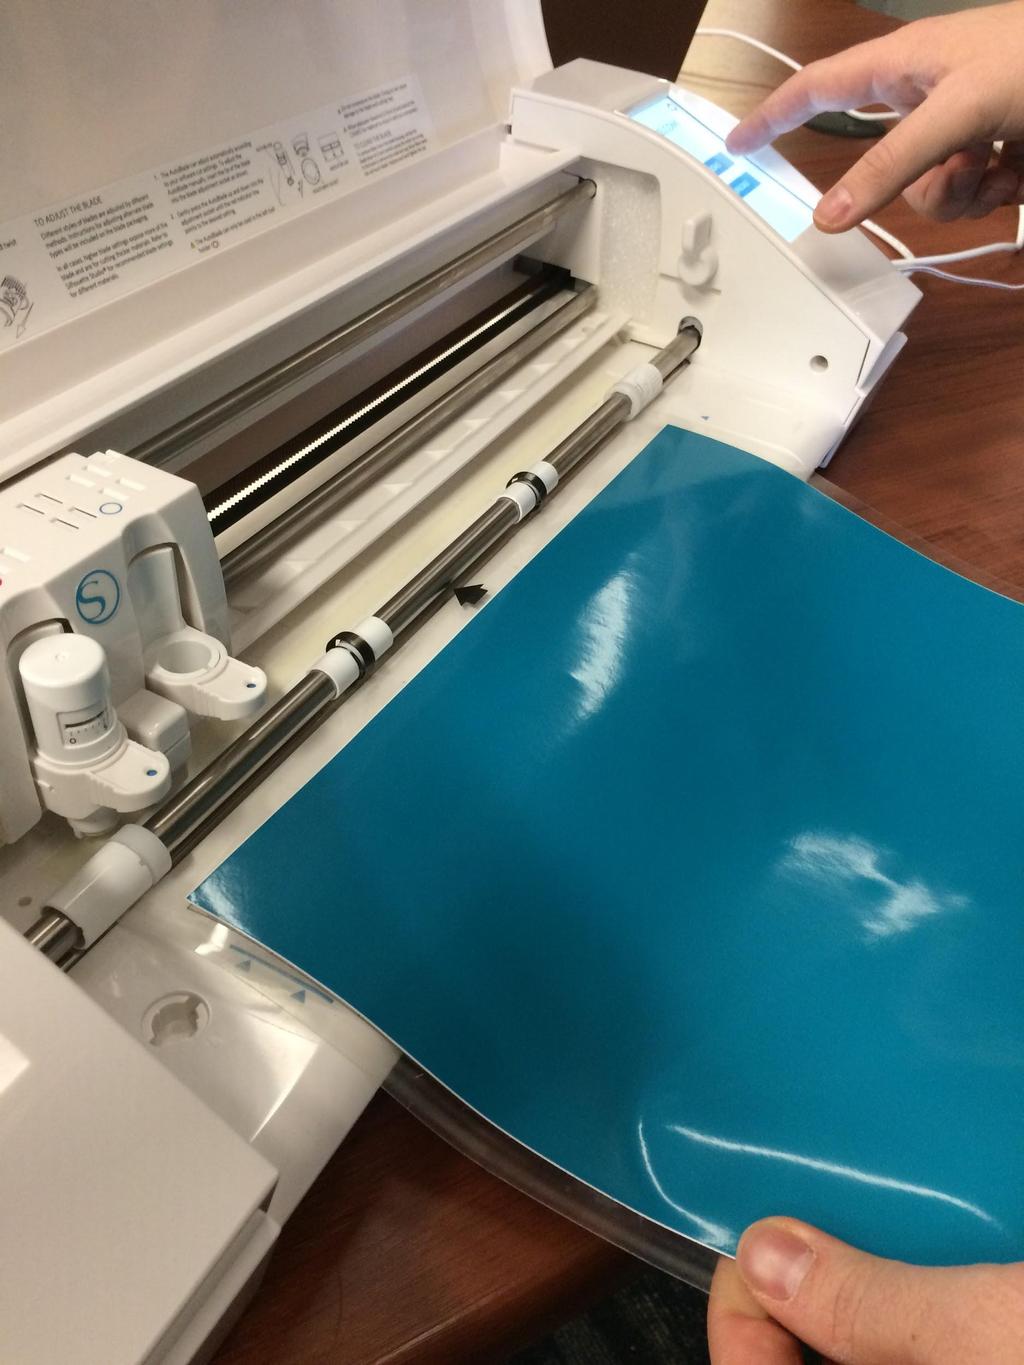
18 Connecting to the Vinyl Cutter Connect your laptop to the vinyl cutter via usb cord Make sure the vinyl cutter power cord is plugged in Turn the vinyl cutter on You should see an indication on your laptop screen that you are connected to the vinyl cutter
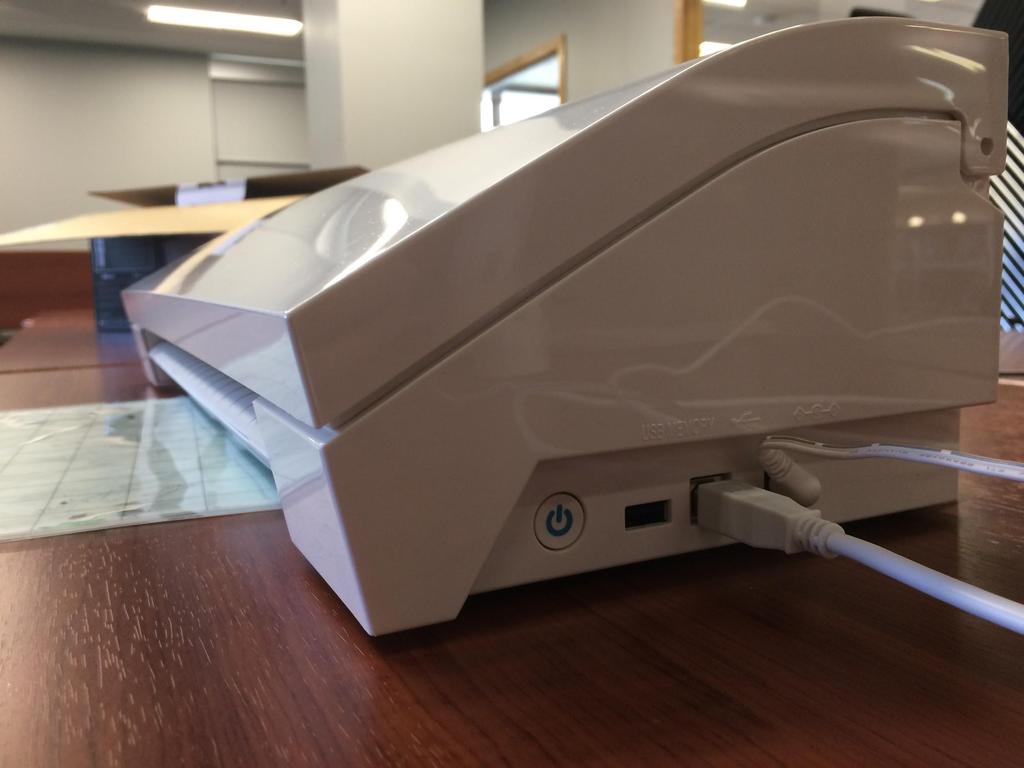
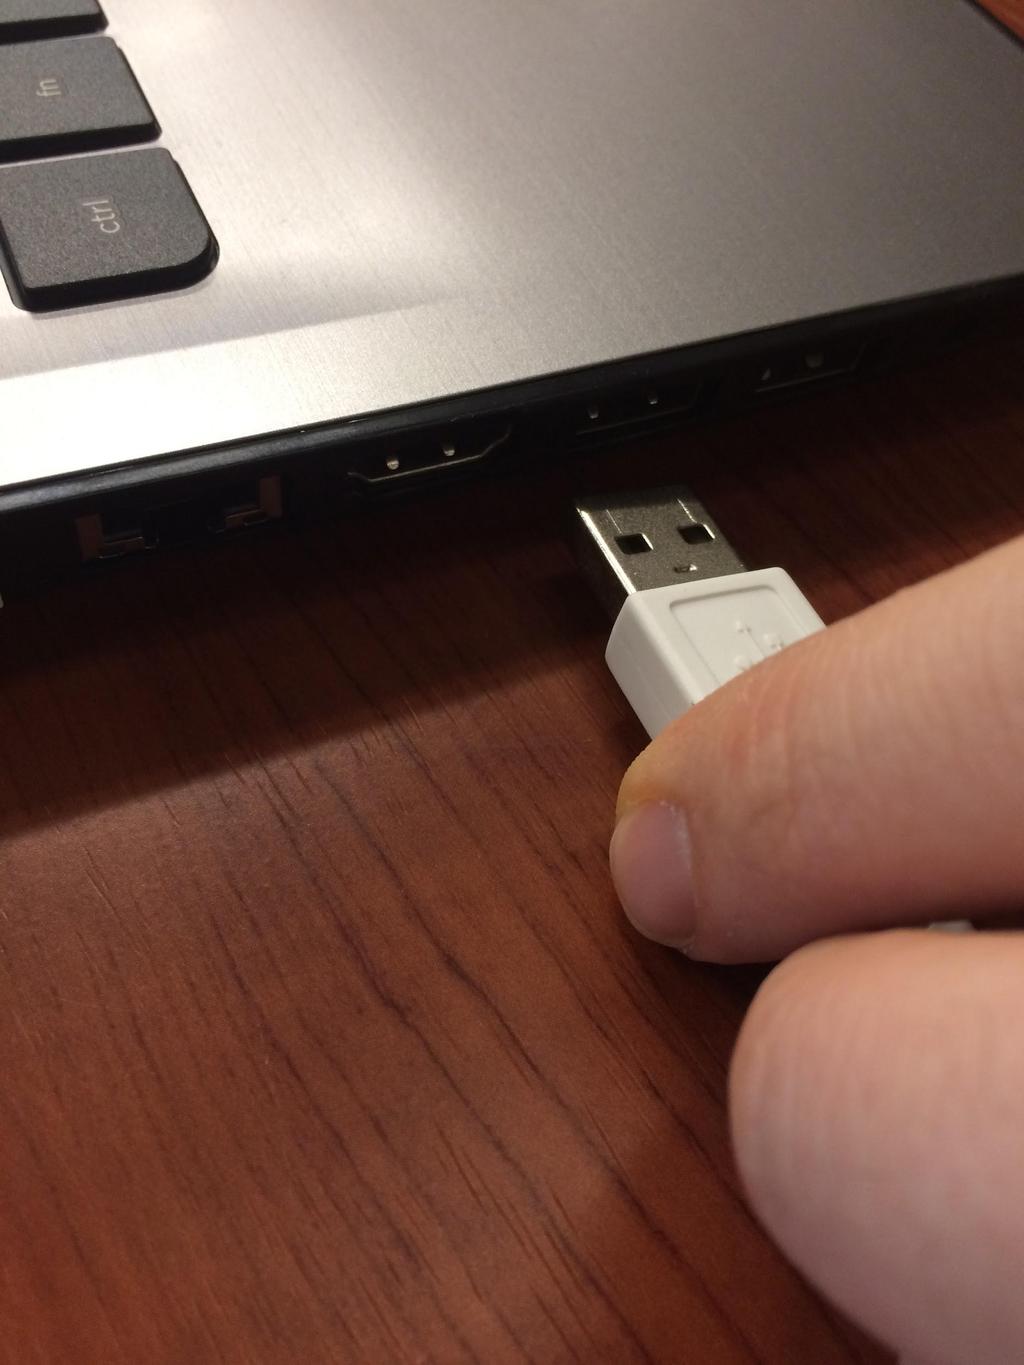
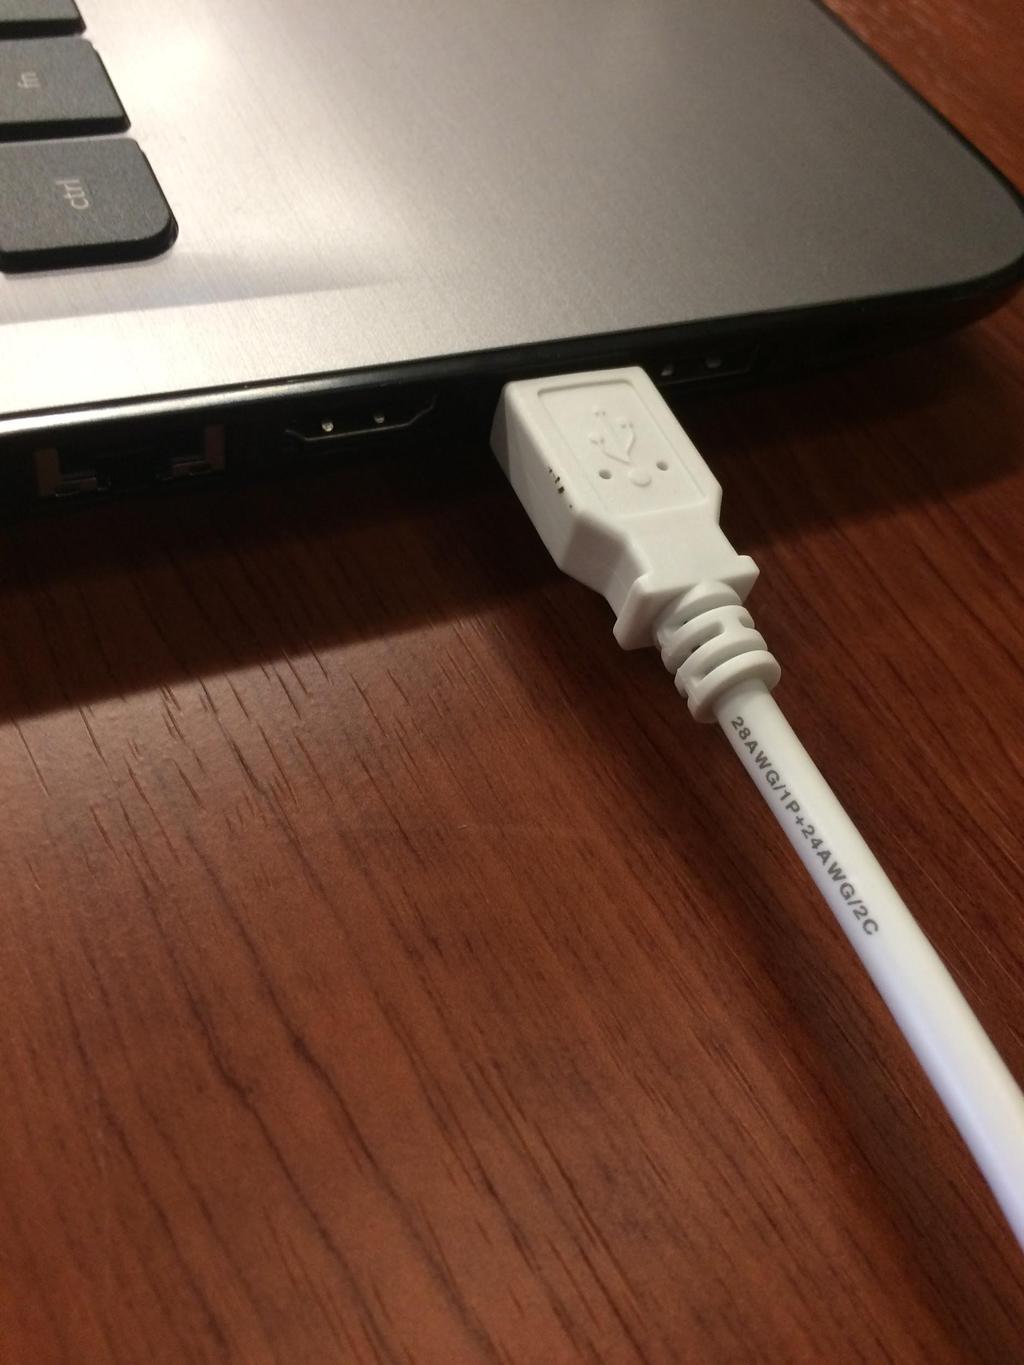
19 Connecting to the vinyl cutter
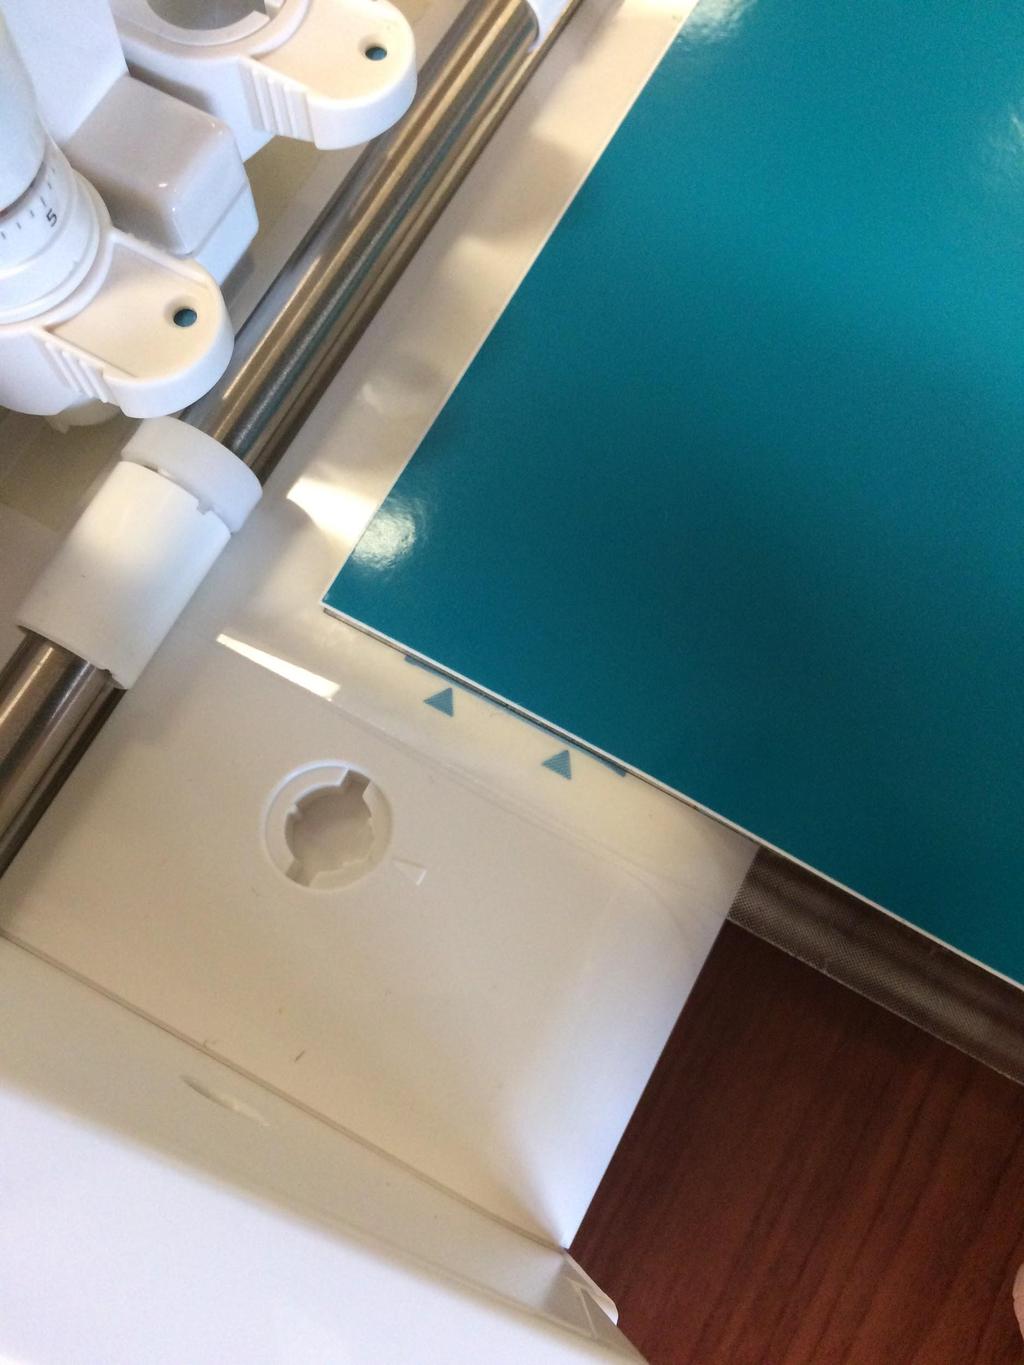
20 Prepping the vinyl cutter part 1 Get the cut mat and load your vinyl sticker material onto it, so the material is flush with the sides of the grid Position the cut mat up to the vinyl cutter The Arrow on the cut mat should be pointing to the vinyl cutter The line of the bed of the vinyl cutter should line up with the start of the grid on the cut mat. This is a green line with arrows, and you should use it to line up the cut mat. Press the Load Mat button on the vinyl cutter. The vinyl cutter will take up the cut mat
21 Prepping the vinyl cutter part 2 Go to Cut Settings in Silhouette Studio Set Cut Style for Selected Shape to Cut Set Material Type to Vinyl (NOTE: This would be different if we were using a different material, and there are a number of presets in the Silhouette Studio Program) (If you are using one of the new vinyl cutters, disregard below) Scroll down and take note of the Blade Number Setting under Silhouette Ratchet Blade Set the Blade to the recommended number setting and place it back in the blade holder of the machine Once the blade is set, you are ready to start the job! Press the Send to Silhouette button on the laptop to get going

22 Prepping the vinyl cutter

23 Prepping the vinyl cutter


24 Unloading the vinyl cutter
25 Removing your stickers Do not try to just pull your stickers off the decal backing. They are likely to tear or bunch up if you do First, remove all the materials that isn t your stickers. Do this gradually, make sure to gently press your stickers down to keep them from coming up too or tearing Once your stickers are all that s left on the backing material, cut a piece of transfer paper just big enough to cover one sticker and use that to remove the sticker Keep the sticker on the transfer paper and use that to place the sticker on the bottle, then smooth the sticker out Repeat until you are out of stickers


26 Remove the material around your stickers


27 Use Transfer paper to remove your stickers


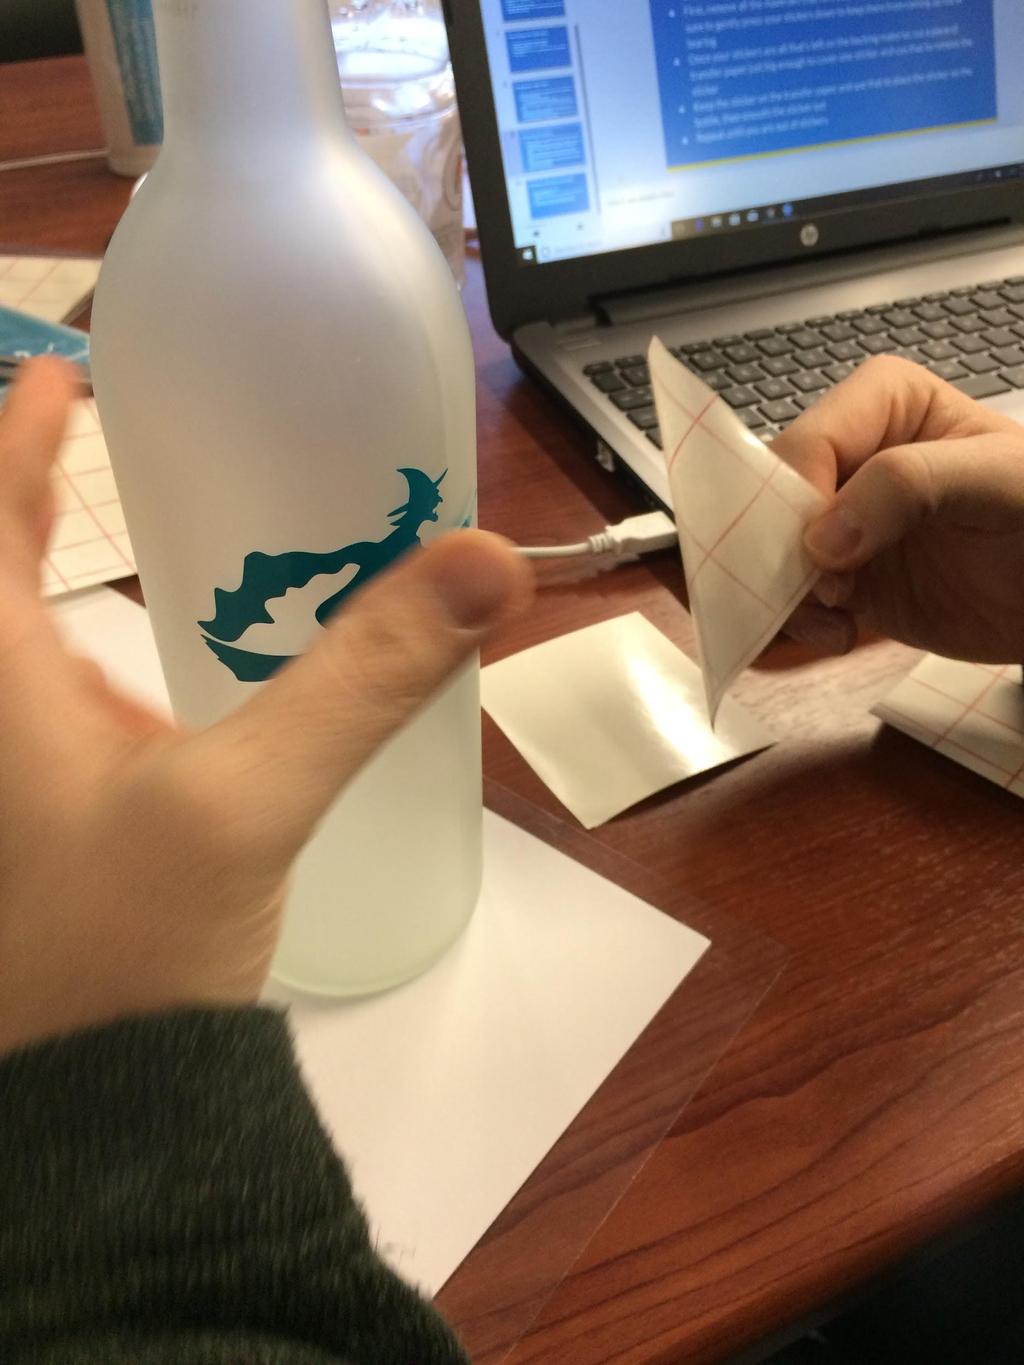
28 Place your stickers on the bottle
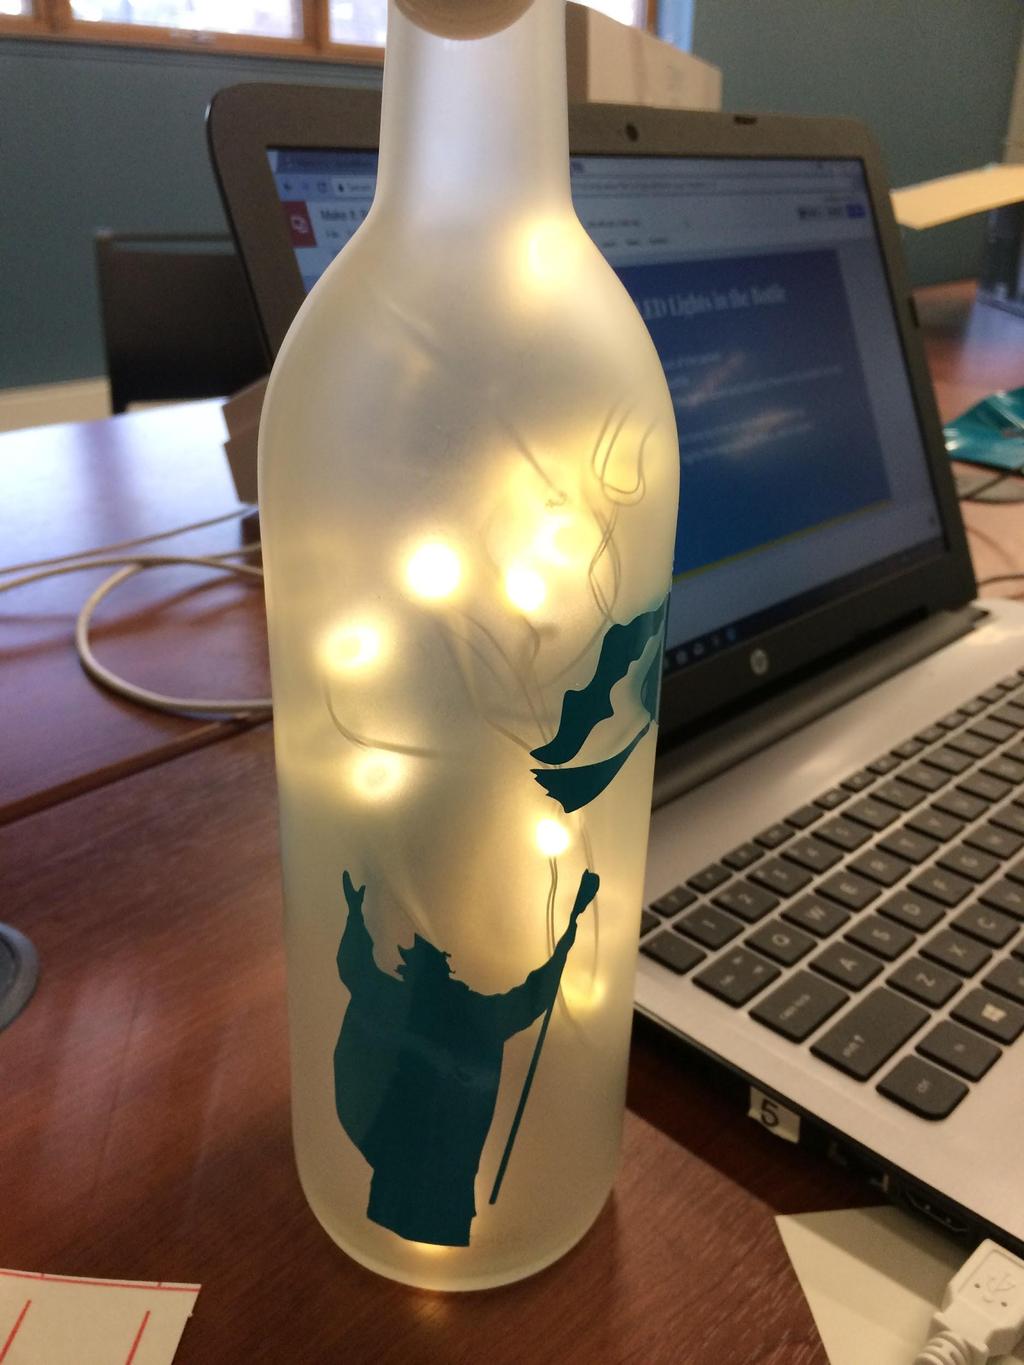
29 Placing the LED Lights in the Bottle Take your LED lights out of the packet Feed them down the bottle Use the stick to press the lights down and position them in the bottle to your liking Turn the lights on from time to time to see how you re doing Once you have your lights the way you like them, you re done!


30 Placing the LED Lights in the Bottle
Silhouette Cameo Cheat Sheet
 Silhouette Cameo Cheat Sheet Instead of printing, the Silhouette uses a small blade to cut paper, cardstock, vinyl, fabric and other material up to 12 inches wide and 10 feet long. It is available for
DESIGN BASICS: SILHOUETTE STUDIO
 DESIGN BASICS: SILHOUETTE STUDIO The Silhouette Studio is the design software that accompanies the Silhouette CAMEO, one of the DIY electronic cutting machines available in the Makery. EPL cardholders,
Tinker Tuesday Project - Drinking Glasses
 Tinker Tuesday Project - Drinking Glasses 1. Open CorelDRAW and create a new document. Near the top left corner of the screen, click File, and then click Import on the resulting menu. Select an image from
Tinker Tuesday Project - Wood Book Covers
 Tinker Tuesday Project - Wood Book Covers 1. On the laser engraver computer, click on the folder icon on the task bar. Then, select Thaw Space and open the document titled Living Hinge Template. 2. Measure
Tinker Tuesday Project - Stainless Steel Tumblers
 Tinker Tuesday Project - Stainless Steel Tumblers 1. Open CorelDRAW and create a new document. Near the top left corner of the screen, click File, and then click Import on the resulting menu. Select an
Tinker Tuesday Project - Fabric Engraving
 Tinker Tuesday Project - Fabric Engraving 1. Open CorelDRAW and create a new document. On the toolbar on the left side of the screen, select the Basic Shapes tool icon. This will allow you to create simple
Silhouette Connect Layout... 4 The Preview Window... 5 Undo/Redo... 5 Navigational Zoom Tools... 5 Cut Options... 6
 user s manual Table of Contents Introduction... 3 Sending Designs to Silhouette Connect... 3 Sending a Design to Silhouette Connect from Adobe Illustrator... 3 Sending a Design to Silhouette Connect from
Tinker Tuesday Project - Pumpkin Carving
 Tinker Tuesday Project - Pumpkin Carving 1. Acquire a small pumpkin (between six and seven inches tall excluding the stem). A full size pumpkin will not fit in the engraver. 2. Use a knife to remove the
Inkscape Tips And Tricks
 Inkscape Tips And Tricks Install Tux Plot extensions for Inkscape Select from the drop down list Install Inkscape Extensions. Your password will be needed to compile and install a component needed for
Embroidery Gatherings
 Planning Machine Embroidery Digitizing and Designs Floriani FTCU Digitizing Fill stitches with a hole Or Add a hole to a Filled stitch object Create a digitizing plan It may be helpful to print a photocopy
Audacity 5EBI Manual
 Audacity 5EBI Manual (February 2018 How to use this manual? This manual is designed to be used following a hands-on practice procedure. However, you must read it at least once through in its entirety before
Generations Automatic Stand-Alone Lace By Bernie Griffith Generations Software
 We are going to create an open Italian lace. Generations software products provide advanced image processing features allowing for the creation of stand-alone lace with just a few simple techniques. A
Quilt Pro 6 Lesson Quilt in a Quilt
 Quilt Pro 6 Lesson Quilt in a Quilt Quilt in a Quilt The Inner Quilt This quilt is a very complex design. We will cover a unique technique not covered in the manual. While any one can master the techniques
MEDIA CONVERSION PROJECT: DIGITIZING HISTORIC PHOTOS
 MEDIA CONVERSION PROJECT: DIGITIZING HISTORIC PHOTOS What you need to know: Basic understanding of a computer What you need: Computer Epson Perfection V550 Scanner (available in the Southglenn and Smoky
Adding Objects Creating Shapes Adding. Getting Started Creating a Workspace Pages, Masters and Guides Adding Objects Creating Shapes Adding
 and Guides ILLUSTRATOR Adding Objects Creating Shapes Adding Getting Started WORKSHOP: Creating a Workspace Pages, Masters Workspace Pages, ADVANCED Masters and Guides Adding Objects WORKSHOP OBJECTIVES
PHOTOSHOP YOURSELF GREEN SCREEN TUTORIAL
 PHOTOSHOP YOURSELF GREEN SCREEN TUTORIAL What you need to know: Basic understanding of a computer What you need: Green Screen LED Lights Yourself (or a subject: an individual, or thing, whatever you prefer)
Creating DXF Files. IDeAte Laser Micro Part 1c Dave Touretzky and Susan Finger
 Creating DXF Files IDeAte Laser Micro Part 1c Dave Touretzky and Susan Finger 1. Convert a part to a dxf format When you save a part in Solidworks it is saved as a 3D solid model with all the relationships
Taking the Picture. Getting Started
 Getting Started Taking the Picture What is PixScan? PixScan technology allows you to cut precisely around any printed image or position cut lines on a specific place on your material. PixScan technology
How to prepare your files for competition using
 How to prepare your files for competition using Many thanks to Margaret Carter Baumgartner for the use of her portrait painting in this demonstration. 2015 Christine Ivers Before you do anything! MAKE
MIRROR IMAGING. Author: San Jewry LET S GET STARTED. Level: Beginner+ Download: None Version: 1.5
 Author: San Jewry Level: Beginner+ Download: None Version: 1.5 In this tutorial, you will learn how to create a mirror image of your work. Both sides will look exactly the same no matter how much you tweak
Cutwork With Generations Automatic Digitizing Software By Bernadette Griffith, Director of Educational Services, Notcina Corp
 In this lesson we are going to create a cutwork pattern using our scanner, an old pattern, a black felt tip marker (if necessary) and the editing tools in Generations. You will need to understand the basics
TM Quick Start Guide
 TM Quick Start Guide Contacting Pazzles By Phone In the US: 866-729-9537 International: +1-208-922-3558 Phone Hours: Mon - Fri, 9am - 5pm Mountain Time By Email Customer Service: Technical Support: Sales:
Organization to the Letter!
 Organization to the Letter! Created by Jeanne Delpit Neaten up your space using the clever Kwik Sew pattern #3900, Olivia s Organizers. With a few easy pattern changes, personalize your pockets with the
Managing Your Workflow Using Coloured Filters with Snapper.Photo s PhotoManager Welcome to the World of S napper.photo
 Managing Your Workflow Using Coloured Filters with Snapper.Photo s PhotoManager Welcome to the World of S napper.photo Get there with a click Click on an Index Line to go directly there Click on the home
Introduction to Photoshop Elements
 John W. Jacobs Technology Center 450 Exton Square Parkway Exton, PA 19341 610.280.2666 ccljtc@ccls.org www.ccls.org Facebook.com/ChesterCountyLibrary Introduction to Photoshop Elements Chester County Library
Davis Art Images: Create and Share Slideshows
 Davis Art Images: Create and Share Slideshows Davis Art Images, you can create and curate custom sets of images to use in your art room with Tags. Your Tagged Image Sets can then be viewed and presented
SINGER FUTURA TM Water Bottle Carrier
 SINGER FUTURA TM Water Bottle Carrier Be ready for summer time with this water bottle carrier. It has a pocket for miscellaneous items and a key chain holder. Learn basic editing skills for your SINGER
How to Create Website Banners
 How to Create Website Banners In the following instructions you will be creating banners in Adobe Photoshop Elements 6.0, using different images and fonts. The instructions will consist of finding images,
Download here Design
 May 2014 Summer is Almost Here! It s hard to believe that end of the school year is fast approaching, and before you know it the kiddos will be home for the long hot summer. This is a perfect time to sneak
Room 2D/3D Diagram Demo
 Room 2D/3D Diagram Demo PART 1) Basic Room Layout (2D) 1) Open the Crash Zone or Crime Zone diagram program. 2) Click on to open the CZ Point Cloud tool. 3) Click on 3D/Cloud Preferences. a) Set the Cloud
Artistically Designed Crystal Pillow Created By: Nancy Fiedler Level: Intermediate
 Artistically Designed Crystal Pillow Created By: Nancy Fiedler Level: Intermediate Introduction: One image becomes many designs, with just one click of the mouse and you are on your way to having a designer
Tutorial Three: Categorising ideas using the SuperGrouper tool In Kidspiration there are two basic ways to organise ideas in Picture View: links and
 Tutorial Three: Categorising ideas using the SuperGrouper tool In Kidspiration there are two basic ways to organise ideas in Picture View: links and SuperGrouper categories. You have already seen how links
This guide will show you how to make multiple MP3 tracks from one long recording from a cassette or record player.
 Getting Started with Audacity Audacity is a popular audio editing software free to download For a full instruction manual or to get help, go to http://manual.audacityteam.org/ Before you begin This guide
Personalize Your Napkins
 Dress up a table with embroidered napkins. These napkins are great for gifts, but don t forget to make some for yourself. In this project, we ll be working with text, adding a decorative outline to it,
MAKING THE FAN HOUSING
 Our goal is to make the following part: 39-245 RAPID PROTOTYPE DESIGN CARNEGIE MELLON UNIVERSITY SPRING 2007 MAKING THE FAN HOUSING This part is made up of two plates joined by a cylinder with holes in
COPYRIGHT NATIONAL DESIGN ACADEMY
 National Design Academy How 2 Guide Use SketchUp with LayOut COPYRIGHT NATIONAL DESIGN ACADEMY Use SketchUp with LayOut In order to be able to produce accurate scale drawings in SketchUp, you must use
Photoshop CS part 2. Workshop Objective. Getting Started Quit all open applications Single click Adobe Photoshop from the Dock
 pg. 1 Photoshop CS part 2 Photoshop is the premier digital photo editor application used for photo retouching, creating web images, film/video compositing, and other pixel/vector-based imagery. Workshop
FLORAL CLUTCH SEWING SUPPLIES
 creative 1.5 FLORAL CLUTCH Create this beautiful floral clutch decorated with embroideries from the PFAFF creative 1.5 sewing and embroidery machine. The Embroidery Intro PC Software makes it easy to combine
Addendum 18: The Bezier Tool in Art and Stitch
 Addendum 18: The Bezier Tool in Art and Stitch About the Author, David Smith I m a Computer Science Major in a university in Seattle. I enjoy exploring the lovely Seattle area and taking in the wonderful
Importing an Image into LaserWorks
 Importing an Image into LaserWorks Importing an image to reproduce on the laser is not difficult. Try a google search for black and white logos or something more specific like black and white Ducks logo.
Addendum 27: Personalized Meander
 Addendum 27: Personalized Meander About the Author: Lynn Mintz Photo Lynn Mintz is a Florida resident. She spends summers in New Jersey. Lynn has been quilting, embroidering and digitizing for 20 years.
Read Before Use Accessories...2 Operating Precautions...2 Creating Data for the Roll Feeder... 3
 Roll Feeder CONTENTS Read Before Use... 2 Accessories...2 Operating Precautions...2 Creating Data for the Roll Feeder... 3 Activating the Roll Feeder Function...3 Creating Data...4 Weeding Box Function...5
EmbroideryWorks Cloth Baby Book
 EmbroideryWorks Cloth Baby Book The bright, colorful pictures and soft quilted fabric of this book are sure to interest any baby. Plus, when the book gets caught in spit-up, drool or other spills you can
Photo Story Tutorial
 Photo Story Tutorial To create a new Photo Story Project: 1. Start 2. Programs 3. Photo Story 4. Begin a New Story 5. Next 6. Import Pictures 7. Click on your Flash Drive s name from the window on the
Visioneer OneTouch Scanner. Installation Guide FOR WINDOWS
 Visioneer OneTouch Scanner Installation Guide FOR WINDOWS TABLE OF CONTENTS i TABLE OF CONTENTS Getting Started with your new Scanner....................... 1 Step 1: Installing the Scanner Software.......................
Education. Program comes with one model, Nina. Her measurements are changed to reflect your shape.
 My Label Mastery Opening Program Education Double click on the My Label icon on the screen to open My Label. The screen is divided into four main areas: 1. Drawer area, where items are selected 2. Worktable
BEST PRACTICES COURSE WEEK 21 Creating and Customizing Library Parts PART 7 - Custom Doors and Windows
 BEST PRACTICES COURSE WEEK 21 Creating and Customizing Library Parts PART 7 - Custom Doors and Windows Hello, this is Eric Bobrow. In this lesson, we'll take a look at how you can create your own custom
Love is a Puzzle. Created by Sylvain Bergeron BERNINA of America Page 1 of 7
 Love is a Puzzle Created by Sylvain Bergeron This monogram features PaintWork and CutWork. It combines layers of PaintWork to a CutWork base (CutWork puzzle design). The result is a monogram with assembly
Collage Images. By Rob MacIlreith For Use with GIMP 2.8 Last Updated July 2013
 Collage Images By Rob MacIlreith For Use with GIMP 2.8 Last Updated July 2013 Before Beginning: Have your collage images saved in your H:\Drive. You will have to copy and paste them from your flash drive
Four Leaf Clover Box. Making the box. step 1. Erin Bassett. projects
 projects Four Leaf Clover Box Erin Bassett This St. Patrick s Day, you can try your luck at catching a leprechaun and if you re kind to him, you might be able to convince him to share his gold with you!
Next Back Save Project Save Project Save your Story
 What is Photo Story? Photo Story is Microsoft s solution to digital storytelling in 5 easy steps. For those who want to create a basic multimedia movie without having to learn advanced video editing, Photo
Creating Digital Stories for the Classroom
 Using Photo Story 3 to Create a Digital Story Creating Digital Stories for the Classroom When you open Photo Story 3 you have a few options. To begin a new story select the option Begin a New Story and
SAVING, LOADING AND REUSING LAYER STYLES
 SAVING, LOADING AND REUSING LAYER STYLES In this Photoshop tutorial, we re going to learn how to save, load and reuse layer styles! Layer styles are a great way to create fun and interesting photo effects
Create a Flowchart in Word
 Create a Flowchart in Word A flowchart is a diagram of steps, movements or actions involved in a system or activity. Flowcharts use conventional geometric symbols and arrows to define relationships and
Creating multicolored wiring diagrams in Visio 2013
 Creating multicolored wiring diagrams in Visio 2013 You can use this wiring diagramming functionality in Visio based on the Custom Line Patterns I created in Visio 2013: (some features are not present
SolidWorks Tutorial 1. Axis
 SolidWorks Tutorial 1 Axis Axis This first exercise provides an introduction to SolidWorks software. First, we will design and draw a simple part: an axis with different diameters. You will learn how to
Apple Photos Quick Start Guide
 Apple Photos Quick Start Guide Photos is Apple s replacement for iphoto. It is a photograph organizational tool that allows users to view and make basic changes to photos, create slideshows, albums, photo
11 Advanced Layer Techniques
 11 Advanced Layer Techniques After you ve learned basic layer techniques, you can create more complex effects in your artwork using layer masks, path groups, filters, adjustment layers, and more style
Start Here. Installing your Microtek ScanMaker 9800XL Plus PC:
 Start Here Installing your Microtek ScanMaker 98XL Plus Step : Unpack Contents. Optional package items depend on the scanner configuration that you purchased. Unpack your scanner package and check for
ILLUSTRATOR BASICS FOR SCULPTURE STUDENTS. Vector Drawing for Planning, Patterns, CNC Milling, Laser Cutting, etc.
 ILLUSTRATOR BASICS FOR SCULPTURE STUDENTS Vector Drawing for Planning, Patterns, CNC Milling, Laser Cutting, etc. WELCOME TO THE ILLUSTRATOR TUTORIAL FOR SCULPTURE DUMMIES! This tutorial sets you up for
Activity Sketch Plane Cube
 Activity 1.5.4 Sketch Plane Cube Introduction Have you ever tried to explain to someone what you knew, and that person wanted you to tell him or her more? Here is your chance to do just that. You have
Instruction Manual for the Software of ASSAN V2 Series Receiver
 Instruction Manual for the Software of ASSAN V2 Series Receiver I. Setup 1. Double click SETUP to enter the welcome interface and click Next. 2. Enter your name and company name and click Next. 3. Select
ThermaSkirt User Manual
 ThermaSkirt User Manual Step 1 Draw the Whole Room Outline Click on Start or Go to File Menu and Click on New or Open to start the program. Clicking on Start or New option from the menu will open the designer
2. Creating and using tiles in Cyberboard
 2. Creating and using tiles in Cyberboard I decided to add some more detail to the first hexed grip map that I produced (Demo1) using the Cyberboard Design program. To do this I opened program by clicking
12. Creating a Product Mockup in Perspective
 12. Creating a Product Mockup in Perspective Lesson overview In this lesson, you ll learn how to do the following: Understand perspective drawing. Use grid presets. Adjust the perspective grid. Draw and
ARCHICAD Introduction Tutorial
 Starting a New Project ARCHICAD Introduction Tutorial 1. Double-click the Archicad Icon from the desktop 2. Click on the Grey Warning/Information box when it appears on the screen. 3. Click on the Create
Preparing Images For Print
 Preparing Images For Print The aim of this tutorial is to offer various methods in preparing your photographs for printing. Sometimes the processing a printer does is not as good as Adobe Photoshop, so
All files must be in the srgb colour space This will be the default for most programs. Elements, Photoshop & Lightroom info slides 71-73
 1 Resizing images for DPI Reflex Open Competitions Picasa slides 6-12 Lightroom slides 13-19 Elements slides 20-25 Photoshop slides 26-31 Gimp slides 32-41 PIXELR Editor slides 42-53 Smart Photo Editor
Exploring Photoshop Tutorial
 Exploring Photoshop Tutorial Objective: In this tutorial we will create a poster composed of three distinct elements: a Bokeh, an image and title text. The Bokeh is an effect which is sometimes seen in
XXXX - ILLUSTRATING FROM SKETCHES IN PHOTOSHOP 1 N/08/08
 INTRODUCTION TO GRAPHICS Illustrating from sketches in Photoshop Information Sheet No. XXXX Creating illustrations from existing photography is an excellent method to create bold and sharp works of art
Start Here. Installing your Microtek ScanMaker i280
 Start Here Installing your Microtek ScanMaker i280 Step 1: Unpack Contents Unpack your scanner package and check for major components. 1. ScanMaker i280 scanner 2. Hi-Speed USB cable 3. Software CDs/DVDs
BERNINA Sewing Machine Workbook 3
 my BERNINA Sewing Machine Workbook 3 Creative Options For BERNINA 880, 7 Series, 580, 570 QE, 560 (Pages 8-12: B 790, 880 only; Pages 13-15: B 880 only) 2016 BERNINA of America. Permission granted to copy
For customers in USA This device complies with Part 15 of the FCC rules. Operation is subject to the following two conditions:
 User manual For customers in North and South America For customers in USA This device complies with Part 15 of the FCC rules. Operation is subject to the following two conditions: (1) This device may not
The Joy of SVGs CUT ABOVE. pre training series 3. svg design Course. Jennifer Maker. CUT ABOVE SVG Design Course by Jennifer Maker
 CUT ABOVE svg design Course pre training series 3 The Joy of SVGs by award-winning graphic designer and bestselling author Jennifer Maker Copyright Jennifer Maker page 1 please Do not copy or share Session
Adobe Photoshop CS2 Workshop
 COMMUNITY TECHNICAL SUPPORT Adobe Photoshop CS2 Workshop Photoshop CS2 Help For more technical assistance, open Photoshop CS2 and press the F1 key, or go to Help > Photoshop Help. Selection Tools - The
Once you have chosen the water world this is how your screen should look.
 Getting Started t With Alice By Ruthie Tucker under the direction of Prof. Susan Rodger Duke University, July 2008 www.cs.duke.edu/csed/alice/aliceinschools/ Let s Get Started The first step in making
The Basics. By Jenna Hayes under the direction of Professor Susan Rodger Duke University July
 Getting Started With Alice: The Basics By Jenna Hayes under the direction of Professor Susan Rodger Duke University July 2008 www.cs.duke.edu/csed/alice/aliceinschools Step 1: Background Open up Alice,
!!! Warhol Project Tutorial! -From the top menus choose Image>Adjustments>Threshold! -Open Photoshop and Reset your tools!
 Warhol Project Tutorial -Open Photoshop and Reset your tools -Open the practice image file or an image of yourself -The image should be a medium to close up shot -DO NOT unlock the Background Layer -Threshold
Introduction to Autodesk Inventor for F1 in Schools (Australian Version)
") Introduction to Autodesk Inventor for F1 in Schools (Australian Version) F1 in Schools race car In this course you will be introduced to Autodesk Inventor, which is the centerpiece of Autodesk s Digital
Introduction to Autodesk Inventor for F1 in Schools (Australian Version) F1 in Schools race car In this course you will be introduced to Autodesk Inventor, which is the centerpiece of Autodesk s Digital
Lesson 16 Text, Layer Effects, & Filters
 Lesson 16 Text, Layer Effects, & Filters Digital Media I Susan M. Raymond West High School In this tutorial, you will: Create a Type Layer Add and Format Type within a Type Layer Apply Layer Effects Apply
Google SketchUp Assignment 5
 Google SketchUp Assignment 5 This advanced design project uses many of SketchUp s drawing tools, and involves paying some attention to the exact sizes of what you re drawing. You ll also make good use
This project covers the following design concepts:
 Design Project 5 This project covers the following design concepts: DRAWING TOOLS REGIONS SURFACES ADJUSTING DEPTH & HEIGHT CONSTRAINTS & ATTACHMENTS CARVING LIST MERGE MANAGING DATA UPLOADING TO MEMORY
Alibre Design Tutorial - Simple Extrude Step-Pyramid-1
 Alibre Design Tutorial - Simple Extrude Step-Pyramid-1 Part Tutorial Exercise 4: Step-Pyramid-1 [text version] In this Exercise, We will set System Parameters first. Then, in sketch mode, outline the Step
Photo Editing in Mac and ipad and iphone
 Page 1 Photo Editing in Mac and ipad and iphone Switching to Edit mode in Photos for Mac To edit a photo you ll first need to double-click its thumbnail to open it for viewing, and then click the Edit
Drawing a Plan of a Paper Airplane. Open a Plan of a Paper Airplane
 Inventor 2014 Paper Airplane Drawing a Plan of a Paper Airplane In this activity, you ll create a 2D layout of a paper airplane. Please follow these directions carefully. When you have a question, reread
IME-100 ECE. Lab 1. Electrical and Computer Engineering Department Kettering University. G. Tewolde, IME100-ECE,
 IME-100 ECE Lab 1 Electrical and Computer Engineering Department Kettering University 1-1 IME-100, ECE Lab1 Circuit Design, Simulation, and Layout In this laboratory exercise, you will do the following:
WORD ART - CHANGING LETTERING SPACING
 CHANGING LETTERING SIZE Enter single letters or words and use the icon to rescale the motif. When the Maintaining Proportions (lock) icon is outlined in white, the design will be resized proportionately.
PATHTRACE MANUAL. Revision A Software Version 5.4 MatDesigner
 PATHTRACE MANUAL Revision A Software Version 5.4 MatDesigner Wizard International, Inc., 4600 116th St. SW, PO Box 66, Mukilteo, WA 98275 888/855-3335 Fax: 425/551-4350 wizardint.com NOTES: B- MatDesigner
Tutorial: Correcting images
 Welcome to Corel PHOTO-PAINT, a powerful tool for editing photos and creating bitmaps. In this tutorial, you'll learn how to perform basic image corrections to a scanned photo. This is what the image looks
Photoshop CC 2018 Essential Skills
 Photoshop CC 2018 Essential Skills Adobe Photoshop Creative Cloud 2018 University Information Technology Services Learning Technology, Training, Audiovisual and Outreach Copyright 2018 KSU Division of
Hardware Installation. Do this first:
 1 Do this first: Hardware Installation Need some help? Here s what you ll need: 4 AA Batteries Phillips screwdriver Visit us online. support.remotelock.com We re here to help. 1 (877) 254 5625 support@remotelock.com
House Design Tutorial
 House Design Tutorial This House Design Tutorial shows you how to get started on a design project. The tutorials that follow continue with the same plan. When you are finished, you will have created a
For customers in Canada This Class B digital apparatus meets all requirements of the Canadian Interference-Causing Equipment Regulations.
 User manual For customers in North and South America For customers in USA This device complies with Part 15 of the FCC rules. Operation is subject to the following two conditions: (1) This device may not
Using Adobe Photoshop
 Using Adobe Photoshop 6 One of the most useful features of applications like Photoshop is the ability to work with layers. allow you to have several pieces of images in the same file, which can be arranged
ADDENDUM 10 - Borders and Matching Corner Designs
 ADDENDUM 10 - Borders and Matching Corner Designs About the Author, Mary Beth Krapil Mary Beth is a semi-retired pharmacist who loves quilts and quilting. An avid sewer since childhood, Mary Beth has been
General Workflow Instructions for capturing 360 images using Theta V, editing in Photoshop, and publishing to Google StreetView
 General Workflow Instructions for capturing 360 images using Theta V, editing in Photoshop, and publishing to Google StreetView This document attempts to give step-by-step instructions for capturing and
Rendering a perspective drawing using Adobe Photoshop
 Rendering a perspective drawing using Adobe Photoshop This hand-out will take you through the steps to render a perspective line drawing using Adobe Photoshop. The first important element in this process
Fotini. Software User s Guide
 Fotini Software User s Guide Table of Contents What is Fotini? How is Fotini set up on my computer? Getting Started How do I? Start the program End the program Open an album See photo details Move to the
Color Insight: Color Optimization
 Color Insight: Color Optimization Rev March 2016 Document Outline 1. Function of the optimization process 2. Color Insight terminology 3. Color matching preset creation 4. Optimization process overview