EVOLUTION OF POWER AMPLIFIERS M / M M / M / M M1500.1D / M2500.1D / M4000.1D
|
|
|
- Peregrine Martin
- 5 years ago
- Views:
Transcription
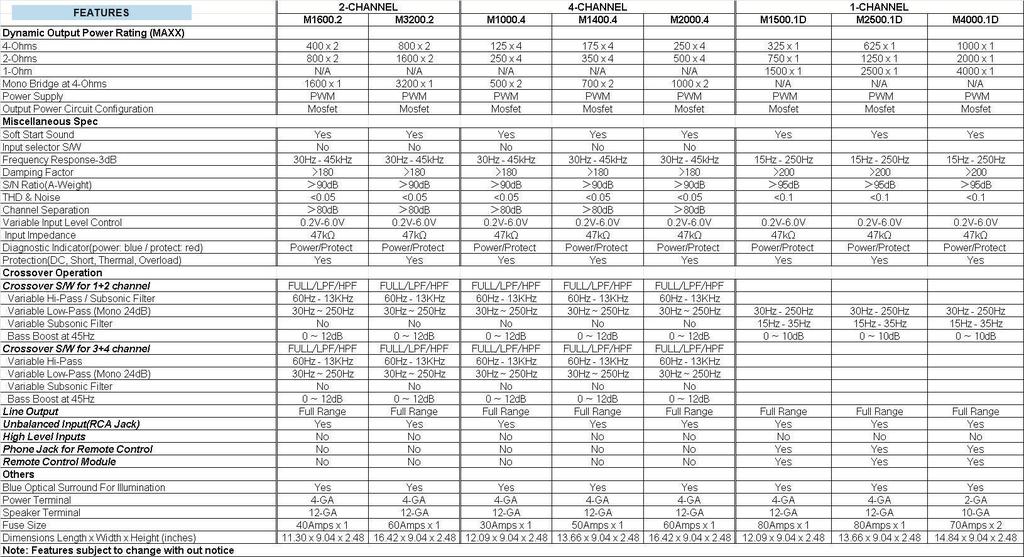
1 R EVOLUTION OF AMPLIFIERS M16. / M3. M1. / M1. / M. M15.1D / M5.1D / M.1D
2 GENERAL INSTALLATION PROCEDURE System Design The success of any car stereo system relies on several factors, such as the system design, execution of the installation, and system setup. Please remember that any system is only as good as its weakest link. Please remember that higher power systems are not necessarily useful purely for high sound pressure levels, but also to establish a headroom capability, to reproduce musical peaks cleanly without distortion. Lower power amplifiers will clip earlier than their more powerful cousins, and cause loudspeaker failure when overdriven, due to the harmonics generated by a clipped signal, thus overheating voice coils. Amplifiers should be mounted with the fins running horizontally for best convection cooling, to minimize overheating. Purchase the best quality RCA cables you can afford, for reliability and less engine noise interference in the audio system. Installation WOOD It is highly recommended that the amplifier be mounted to a board of MDF or other solid structure using the mounting screws provided. Avoid mounting the amplifier to metal as this can introduce noise and other unwanted issues. When mounting the amplifier, ensure that it is mounted HORIZONTALLY, as shown in the diagram above, for optimal heat dissipation. Mounting amplifiers to speaker enclosures is not recommended as this can cause damage to the amplifier components. When choosing a location for mounting the amplifier, ensure that you check for clearance from wires, gas tank, electrical devices and brake lines etc. General: Run the wiring so that RCA cables are at least 18 away from power and speaker cables. Keep RCA cables away from electrical devices in the vehicle that can cause electrical noise, such as electric fuel pumps, emission control modules and other on-board electronic modules. Power and ground connections(see the features matrix on page 7 for proper gauge cables per amplifier): Use a sufficient gauge power cable and ground cable using the chart below as reference to what size wire you require. In a multi amplifier system, add the total value of the manufacture recommended fusing to get your total system amperage. Some applications may require multiple runs of power wire to meet the system requirements. In multi amplifier systems it is advisable to mount a large enough fuse right at the battery, and run one or multiple +1 volt power cables to a fused distribution block near the amplifiers. It is then a simple matter to connect the +1 volt terminal of each amplifier to the distribution block. During this process, please ensure that the main power fuse is removed to avoid shorting the electrical system. The main fuse must be within 1 of the vehicles battery. Ground each amplifier with as short a ground lead as possible directly to the vehicle chassis using the same wire size as the amplifiers power wire. Use a ground distribution block, if you wish, but it is extremely important to keep the main ground lead from this distribution block to the chassis as short as possible, not more than 1. The ground connection integrity to the chassis is very important, and the best way to achieve a good, solid electrical and mechanical contact is to use a large round crimp lug, crimped and soldered to the ground cable. The next step is to scrape the paint off the vehicle chassis, slightly larger than the ground lug, at the connection point. Drill a clearance hole in the chassis, the same size as the lug hole, and use a bolt, spring washer and nut to securely fasten the ground lug. Use petroleum jelly to coat the bolt/lug connection, to prevent oxidization with time. TIP: Use the same approach when installing head units, equalizers or any audio equipment for that matter - run short individual grounds from each piece directly to the vehicle chassis, to minimize ground loops and system noise. All power, ground and speaker connections should be crimped and soldered for reliability. Make sure that none of the cable insulation can chafe against exposed metal in the vehicle, causing short circuits to the chassis. SYSTEM AMPERAGE WIRE LENGTH 7-1 ft ft ft ft. 19- ft. -8 ft WIRE GAUGE Safe connection sequence: After all cables are run, connect speaker wires to the speakers and amplifiers, then run and plug in RCA cables. Next, connect all power, ground, and remote turn on leads. Now connect all +1 volt cables to the amplifier/s and distribution blocks and fuse holders. Finally, connect the main +1 volt cable to the battery, with the main fuse removed, and we are almost ready to power up the system. Power up the system: The following procedure may seem like overkill, but there is nothing more frustrating when turning on a system for the first time, and it does not work properly immediately. First, make sure the head unit is off, and turn all level controls to minimum (counterclockwise), including the head unit volume control. Set all equalizers to db (no boost), and all crossover frequency controls at approximate frequencies, as recommended by the loudspeaker manufacturer. Set all input selector and crossover switches as required for the application. Remove all amplifier fuses, and insert the main fuse at the battery. If the fuse does not blow, you can insert the fuse in one of the amplifiers, and we are ready to turn on the system. Turn the head unit on, insert a CD, or select a radio station, and increase the head unit volume control. If the system sounds fine, turn off the head unit, and install fuses in the remaining amplifiers, one by one, till the complete system is powered up and functioning properly.
3 AMPLIFIER FEATURE DESCRIPTIONS MEAN MACHINE AMPLIFIERS: - Each model is capable of & -Ohms stereo per channel, or -Ohms mono bridged - All Autotek amplifiers feature a comprehensive diagnostic system, with speaker lead operation except the mono amps which are capable of, and 1-Ohm loads. short circuit, and amplifier DC faults indicated by the red LED. - Tri-Mode operation with any stereo pair of amplifier channels is possible, as with all CAUTION: DO NOT OPERATE ANY AMPLIFIER BELOW THE INTENDED bridgeable amplifiers. IMPEDANCE.. YOU WILL CAUSE DAMAGE TO THE AMPLIFIER THAT WILL NOT BE - The input sensitivities for rated output powers are variable from. volts to 6 volts. COVERED UNDER THE WARRANTY PRINTED IN THE BACK OF THE MANUAL. - All crossovers are fully variable in their respective ranges. Multi-Channel amps are capable of and -Ohms wired stereo and -Ohms wired - Crossover filters are 1dB/Octave. mono bridged. The mono amps are capable of, and 1-Ohm. - A LED indicates the powered up and turned on condition. The X-OVER slide switch selects the internal crossover functions: -The input signal is routed directly to the LINE OUT RCA jacks, regardless of the X-OVER setting simplifying daisy chaining of amplifiers. -HPF: Selects the built in HIGH PASS filter, variable from 6 Hz to 13kHz. -FULL: Bypasses all crossovers for full frequency range operation. -LPF: Selects the built in LOW PASS, variable from 3 Hz to 5Hz. MODE: The mode switch allows you to choose Stereo for full range channel operation or MONO for bridging operation LINE INPUT: The line input accepts unbalanced (RCA) inputs from.v to 6V. LINE OUTPUT: The line output passes through signal from the line inputs which allows you to daisy chain multiple amplifiers from one signal. L R OUTPUT INPUT M16. / M3. -CHANNEL AMPLIFIERS L LEVEL BASS EQ X-OVER HPF LPF MODE 6V.V db 1dB FULL LPF HPF 6Hz 13KHz 3Hz 5Hz MONO STEREO R Note that the LOW PASS signal is MONO. -In the LPF position, the HIGH PASS filter acts as a subsonic filter. -When the LPF mode is selected, a to +1dB, at 5Hz, BASS -EQ is also switched in. The channel amps have the same features as the channel models accept that there are sets of controls. 1 set for channels 1 & and 1 set for channels 3 &. In addition, the channel models have a Mode switch which allows you to select, 3 or channel operation. Switch to channel if you only have 1 set of RCA s in CH 1/ and the unit will automatically supply signal to channels 3/. Select 3 channel when you only have RCA s in CH 1/ but plan to run channels 3/ bridged. Select channel if you are providing RCA s to channels 1/ and 3/. The X-OVER slide switch selects the internal crossover functions: -The input signal is routed directly to the LINE OUT RCA jacks, regardless of the X-OVER setting simplifying daisy chaining of amplifiers. -HPF: Selects the built in HIGH PASS filter, variable from 6 Hz to 13kHz. -FULL: Bypasses all crossovers for full frequency range operation. -LPF: Selects the built in LOW PASS, variable from 3 Hz to 5Hz. MODE: The mode switch allows you to choose Stereo for full range channel operation or MONO for bridging operation LINE INPUT: The line input accepts unbalanced (RCA) inputs from.v to 6V. LINE OUTPUT: The line output passes through signal from the line inputs which allows you to daisy chain multiple amplifiers from one signal. Ch3 Ch M1. / M1. / M. -CHANNEL AMPLIFIERS LINE INPUT LEVEL BASS EQ X-OVER HPF LPF Ch1 6V.V db 1dB FULL LPF HPF 6Hz 13KHz 3Hz 5Hz LEVEL BASS EQ X-OVER HPF LPF MODE Ch 6V.V db 1dB FULL LPF HPF 6Hz 13KHz 3Hz 5Hz 3 LINE OUT Note that the LOW PASS signal is MONO. -In the LPF position, the HIGH PASS filter acts as a subsonic filter. -When the LPF mode is selected, a to +1dB, at 5Hz, BASS -EQ is also switched in. -The LINE INPUT signal is routed directly to the LINE OUT RCA jacks, regardless of the X-OVER setting simplifying daisy chaining of amplifiers. -SUBSONIC: Allows you to adjust the crossover filter from 15Hz to 35Hz. -LPF: Allows yo to adjust the LOW PASS crossover filter from 3Hz to 5Hz. LEVEL: Adjusts the input sensitivity from. volts to 6 volts. BASS EQ: The Bass EQ is adjustable from db to 1dB. REMOTE: This is the input jack for the remote Level control. LINE INPUT: The line input accepts unbalanced (RCA) inputs from.v to 6V. LINE OUTPUT: The line output passes through signal from the line inputs which allows you to daisy chain multiple amplifiers from one signal. M15.1D / M5.1D / M.1D MONO BLOCK AMPLIFIERS OUTPUT L R INPUT L R LEVEL BASS EQ REMOTE SUBSONIC LOW PASS 6V.V db 1dB 15Hz 35Hz 3Hz 5Hz The mono amps are capable of, & 1-Ohm loads. Operating the amp below 1-Ohm can cause damage to the amp not covered in the warranty.
4 M16. / M3. CHANNEL AMPLIFIER APPLICATIONS FULL RANGE STEREO This is the most basic application for the Mean Machine Series channel. MODE: amplifiers. Should be in the STEREO position. 5. Line Level: 1. Interconnect cable checklist: Refer to the section Setting up systems after installation for best performance Connect the LINE INPUTS to the Radio/CD with good quality RCA cables.. Crossover Switch: NOTE: Minimum final loudspeaker impedances: The X-OVER switch must be in the FULL position. & Ohms stereo mode or -Ohms mono mode 3. Crossover frequency control checklist: This amplifier will not do 1 Ohm stereo or /1 Ohm mono operation. N/A for full range operation. FULL RANGE STEREO LINE INPUT FULL RANGE SPEAKERS R R 6V.V db 1dB FULL LPF HPF 6Hz 13KHz 3Hz 5Hz MONO STEREO L L LEVEL BASS EQ X-OVER HPF LPF MODE OUTPUT INPUT SPEAKER OUTPUT BRIDGED - RIGHT + - LEFT + GND REM BATT+1V TO BATTERY +1v VIA REMOTE TURN-ON CHASSIS GROUND MONO This application illustrates the basic mono bridging method for all Autotek amplifiers. Interconnect cable checklist: A MONO signal source is required, such as would be available from the mono sub bass output of an active crossover, whether stand alone, or built into a head unit or equalizer. Important: Do not be tempted to connect the hot, or positive outputs, from any source together to obtain a mono signal, as this could very well damage the output stage of that source. It is necessary to feed the SAME signal to both left and right inputs via a Y- adapter RCA cable. Connect the mono speaker positive terminal to the LEFT +, and its negative terminal to RIGHT -. Switch setting checklist: - The AMPLIFIER X-OVER switch should be in the LPF position and the MODE should be in the MONO position. Crossover frequency control setting checklist: LPF: 11 o clock Minimum final loudspeaker impedance: - ohm mono. FULL RANGE MONO LINE INPUT VIA Y-ADAPTER FROM MONO SOURCE R R 6V.V db 1dB FULL LPF HPF 6Hz 13KHz 3Hz 5Hz MONO STEREO L L LEVEL BASS EQ X-OVER HPF LPF MODE OUTPUT INPUT SPEAKER OUTPUT BRIDGED - RIGHT + - LEFT + GND REM BATT+1V FULL RANGE MONO SPEAKER TO BATTERY +1v VIA REMOTE TURN-ON CHASSIS GROUND
5 M1. / M1. / M. -CHANNEL AMPLIFIER APPLICATIONS CHANNEL FULL RANGE SYSTEM Here we show how to use the channel amplifiers as straightforward discrete channel full range units. - HI PASS: N/A - LOW PASS: N/A Interconnect cable checklist: Channels 3/: - Connect the four inputs of the amplifier to a Radio/CD with quality RCA cables. - HI PASS: N/A - LOW PASS: N/A Switch setting checklist: - 1/CH X-OVER: FULL Level control checklist: - 3/CH X-OVER: FULL - Refer to the section Setting up systems after installation for best performance Crossover frequency control checklist: Channels 1/: Minimum final loudspeaker impedances: - ohm per channel. CH3/ CH1/ LEVEL BASS EQ X-OVER HPF LPF 6V.V db 1dB FULL LPF HPF 6Hz 13KHz 3Hz 5Hz LINE OUT LEVEL BASS EQ X-OVER HPF LPF MODE 6V.V db 1dB FULL LPF HPF 6Hz 13KHz 3Hz 5Hz 3 GND REM BATT+1V CH 1/ SPEAKER OUTPUT CH 3/ BRIDGED BRIDGED RIGHT + - LEFT RIGHT + - LEFT or 3 CHANNEL SYSTEM Here we show how to use the channel amplifiers as a 3 channel unit by taking Switch setting checklist: advantage of the mono bridging capability of all Autotek amplifiers. - 1/CH X-OVER: FULL - 3/CH X-OVER: LPF The following example shows how to create a 3 channel system by mono bridging channel pair 3 /. In order to create a channel system, simply follow Crossover frequency control checklist: the example to also mono bridge channel pair 1 /. Channels 1/: - HI PASS: N/A Interconnect cable checklist: - LOW PASS: N/A - Connect the inputs of channel pair 1/ to a suitable stereo source, e.g. a head unit with good quality RCA cables. Channels 3/: - A MONO signal source is required to bridge channel pair 3/, such as would be - HI PASS: N/A available from the mono sub bass output of an active crossover, whether - LPF: 11 o clock standalone, or built into a head unit or equalizer. If you only have 1 set of RCA outputs from your headunit, you can simply connect those to the inputs for ch TIP: If you are using the mono sub bass output of an active crossover, there is 1/ and switch the MODE to 3ch. The amplifier will auto sum the signal and nothing wrong with switching in the low pass filter in these amplifiers for a provide mono output for bridged channels 3/. steeper low pass rolloff. Important: Do not be tempted to connect the hot, or positive outputs, from any source together to obtain a mono signal, as this could very well damage the Level control checklist: output stage of that source. - Refer to the section Setting up systems after installation for best performance - It is necessary to feed the SAME signal to both left and right inputs via a Y- adapter RCA cable. Minimum final loudspeaker impedances: - Connect the mono speaker positive terminal to the LEFT +, and its negative - ohm per channel in stereo mode. terminal to RIGHT - as shown. - ohm mono bridged. MONO LINE INPUT (Unless using procedure listed above for 3ch) STEREO LINE INPUT 6V.V db 1dB FULL LPF HPF 6Hz 13KHz 3Hz 5Hz 3 LEVEL BASS EQ X-OVER HPF LPF MODE 6V.V db 1dB FULL LPF HPF 6Hz 13KHz 3Hz 5Hz CH3/ CH1/ LINE OUT LEVEL BASS EQ X-OVER HPF LPF CH 1/ SPEAKER OUTPUT CH 3/ BRIDGED BRIDGED RIGHT + - LEFT RIGHT + - LEFT GND REM BATT+1V
6 M1. / M1. / M. -CHANNEL AMPLIFIER APPLICATIONS Front/Rear high pass, using a channel amplifier for mono sub bass The combination of a and a channel amplifier, utilizing their built in crossovers, makes it a snap to put together a full system with front and rear highs, with mono sub bass. Channels 1/: - HI PASS: 1 Hz LOW PASS: N/A Interconnect cable checklist: Channels 3/: - Using good quality RCA cables, feed the front and rear outputs of a head unit to - HI PASS: 1 Hz the inputs of the channel amplifier as shown. - LOW PASS: N/A - Also connect the LINE OUT of the channel amplifier to the LINE INPUT of the channel amplifier as shown. channel bass amplifier: - HI PASS (Subsonic filter): 1 Hz to Hz Mono bass woofer wiring: - LOW PASS: 8 Hz Connect the mono speaker positive terminal to the LEFT +, and its negative terminal to RIGHT -. Please note that these frequency points are suggestions only. Refer to the loudspeaker manufacturer specifications and the section Setting up systems Switch setting checklist: after installation for best performance channel highs amplifier: - 1/CH X-OVER: HPF Level control checklist: - 3/CH X-OVER: HPF - Refer to the section Setting up systems after installation for best performance channel bass amplifier: Minimum final loudspeaker impedances: - X-OVER switch: LPF - ohm per channel in stereo mode. - ohm mono bridged. Crossover frequency control checklist: - channel highs amplifier: CH3/ CH1/ LEVEL BASS EQ X-OVER HPF LPF 6V.V db 1dB FULL LPF HPF 6Hz 13KHz 3Hz 5Hz LINE OUT LEVEL BASS EQ X-OVER HPF LPF MODE 6V.V db 1dB FULL LPF HPF 6Hz 13KHz 3Hz 5Hz 3 GND REM BATT+1V CH 1/ SPEAKER OUTPUT CH 3/ BRIDGED BRIDGED RIGHT + - LEFT RIGHT + - LEFT STEREO INTERCONNECT RCA CABLE SUBWOOFER R R 6V.V db 1dB FULL LPF HPF 6Hz 13KHz 3Hz 5Hz MONO STEREO L L LEVEL BASS EQ X-OVER HPF LPF MODE OUTPUT INPUT SPEAKER OUTPUT BRIDGED - RIGHT + - LEFT + GND REM BATT+1V TO BATTERY +1v VIA REMOTE TURN-ON CHASSIS GROUND
7 M15.1D / M5.1D / M.1D MONO AMPLIFIER APPLICATION Basic application These sub bass amplifiers can be used in any of the bi-amplification systems described in this manual, replacing the channel amplifiers as per the illustrations. Interconnect cable checklist: Connect the inputs to a suitable source, e.g. a head unit with good quality RCA cables. Connect the LINE OUT to the inputs of the system highs amplifier. Use at least #1 gauge speaker wiring. The amps have dual speaker terminals, simplifying the hookup of multiple speakers. These amps are mono, 1 channel, amplifiers which have multiple positive and negative connections for ease of wiring. The positives are the same internally and the negatives are the same internally. Crossover frequency control checklist: LOW PASS: 3Hz to 5Hz SUBSONIC:15 Hz to 35 Hz BASS EQ: to +1dB Level control checklist: Refer to the section Setting up systems after installation for best performance Minimum final loudspeaker impedance: 1-Ohm. DESIGNATED MONO OUTPUT FROM HEAD UNIT HFR-3 R R 6V.V db 1dB 15Hz 35Hz 3Hz 5Hz L L LEVEL BASS EQ REMOTE SUBSONIC LOW PASS OUTPUT INPUT SPEAKER OUTPUT GND REM BATT+1V MONO SUBWOOFER TO BATTERY + 1 Volts VIA REMOTE TURN-ON CHASSIS GROUND PARALLEL MONO SUBWOOFERS -OHMS EACH MINIMUM SPEAKER REM GND +1V FULL RANGE STEREO LINE INPUT Y-ADAPTOR NOT USED Note: You can use the Radio/CD designated mono line output or a full range stereo line output. For full range stereo line output, you will need an optional Y-Adaptor as shown.
8
9 SETTING UP SYSTEMS AFTER INSTALLATION FOR BEST PERFORMANCE M16. / M3. / M1. / M1. / M. General: At this point you are ready to get more specific on the settings for your amplifier. High Pass: -When in Hi Pass operation, this setting acts as a low frequency cut off for your system reproduction. The point that you set it at cuts off any frequencies from reproduction beyond this point. The 1 o clock position is a great starting point. EXAMPLE: If you adjust the High Pass to 1Hz, the amplifier will not play frequencies below 1Hz but will play frequencies from 1Hz to the chosen Low Pass frequency. -When in Low Pass/Bandpass operation, this setting acts as a low frequency cut off for your system reproduction aka Subsonic Filter. The point that you set it at cuts off any frequencies from reproduction beyond this point. The 1 o clock position is a great starting point. EXAMPLE: If you adjust the High Pass to 5Hz, the amplifier will not play frequencies below 5Hz but will play frequencies from 5Hz to the chosen Low Pass frequency. -When in Flat/Full operation, the High Pass crossover is bypassed. Bass EQ: This setting is a fixed bass boost at 5Hz that is variable from -1dB on all multi-channel models. This feature provides impact to your bass, but if not adjusted correctly, it can be over used and cause damage to your speakers and amplifiers. It is best to slowly turn this setting clockwise until the desired punch is felt. It is not recommended to exceed the 1 o clock position unless listening at a low volume or a low recording quality as this can result in high distortion and possibly clipping. Low Pass: The Low Pass control acts as a ceiling and doesn t allow frequencies to the right of the desired setting to be reproduced. Turning the potentiometer all the way to the right is a great starting point. EXAMPLE: If you adjust the Low Pass to 1Hz, the amplifier will not play frequencies above 1Hz but will play frequencies from 1Hz to the chosen Hi Pass or Subsonic frequency. -When in Hi Pass operation, this setting is bypassed. Level Control Setup: Ensure that the Level is turned completely to the left prior to turning the system on. Next you should insert a CD or cassette that you are familiar with to use as a reference, and turn the head unit volume control to about 8% of its full setting. The system sound level will of course be very low, and the following procedures will help you to match the amplifier input sensitivities properly to the head unit output signal level. It is important to match the amplifier LEVEL input sensitivity to the Radio/CD output sensitivity. This can be located in the Radio/CD manual. If the Radio/CD output sensitivity is volts, then adjust the amplifier LEVEL input to volts. If you are not sure what the Radio output sensitivity is, follow these general guide lines: Turn the level control up slowly, till you hear distortion, then back off a few degrees on the control. If at any point your amplifier goes into protection, you will need to turn the Level to the left a bit and then try again. If you reach a point where the output does not increase, stop turning the Level control to the right as the amplifier/speaker combo has reached its maxx output in this application. or 3 way active systems (all): Always start with the bass, or low frequency amplifier as a reference, by turning its control up to the point where distortion is audible, and back it off some. Now adjust the level control for the highs or tweeter channels in a way active system, to balance the highs to lows. In a 3 way active system, match the midrange level to the bass, and then the highs to the midrange and bass. It may be necessary to perform a few iterations of the midrange and highs level control M15.1D / M5.1D / M.1D General: At this point you are ready to get more specific on the settings for your amplifier. Subsonic: This setting acts as a low frequency cut off for your system bass reproduction. The point that you set it at cuts off any frequencies from reproduction beyond this point. The 1 o clock position is a great starting point. EXAMPLE: If you adjust the Subsonic to 5Hz, the amplifier will not play frequencies below 5Hz but will play frequencies from 5Hz to the chosen Low Pass frequency. Bass EQ: This setting is a fixed bass boost at 5Hz that is variable from -1dB. This feature provides impact to your bass, but if not adjusted correctly, it can be over used and cause damage to your subwoofers and amplifiers. It is best to slowly turn this setting clockwise until the desired punch is felt. It is not recommended to exceed the 1 o clock position unless listening at a low volume or a low recording quality as this can result in high distortion and possibly clipping. Low Pass: The Low Pass control acts as a ceiling and doesn t allow frequencies to the right of the desired setting to be reproduced. The 1 o clock position is a great starting point. EXAMPLE: If you adjust the Low Pass to 8Hz, the amplifier will not play frequencies above 8Hz but will play frequencies from 8Hz to the chosen Subsonic frequency. Level Control Setup: Ensure that the Level is turned completely to the left prior to turning the system on. Next you should insert a CD or cassette that you are familiar with to use as a reference, and turn the head unit volume control to about 8% of its full setting. The system sound level will of course be very low, and the following procedures will help you to match the amplifier input sensitivities properly to the head unit output signal level. It is important to match the amplifier LEVEL input sensitivity to the Radio/CD output sensitivity. This can be located in the Radio/CD manual. If the Radio/CD output sensitivity is volts, then adjust the amplifier LEVEL input to volts. If you are not sure what the Radio output sensitivity is, follow these general guide lines: Turn the level control up slowly, till you hear distortion, then back off a few degrees on the control. If at any point your amplifier goes into protection, you will need to turn the Level to the left a bit and then try again. If you reach a point where the output does not increase, stop turning the Level control to the right as the amplifier/subwoofer combo has reached its maxx output in this application. Sit back and enjoy the music!
10 TROUBLESHOOTING A SYSTEM The key to finding the problem in a misbehaving sound system is to isolate parts of that system in a logical fashion to track down the fault. Description of the system built into all Autotek amplifiers The diagnostic system will shut down the amplifier, until reset by turning the head unit off, and back on. This state of affairs will be indicated by the front panel LED lighting up under the following conditions: 1 - A sort circuit on the loudspeaker leads. - An internal amplifier fault that causes a DC offset on the loudspeaker output. Should the amplifier go into protect mode, simply disconnect all RCA and speaker leads, while keeping +1 volt, power ground and remote leads connected. 1. Now turn the amplifier back on, and if the diagnostic LED lights, the amplifier has an internal fault.. If not, plug the RCA cables back, and reset the amplifier. If it goes into diagnostic now, the fault lies in the input, either with bad cables or source unit. 3. If the amplifier seems fine with RCA cables plugged in, connect the speakers, one at a time, and if one of the speakers or its wiring is faulty, it will activate the diagnostic system. Amplifier heatsink overheating The amplifiers will shut down when the heatsink temperature reaches 8 degrees centigrade, and turn back on once the unit has cooled down below that point. Causes of overheating: 1 - Inadequate cooling - relocate or remount to provide better natural airflow over the fins. - Driving high power levels into low impedances - back off on the volume control, and/or make sure you are not loading the amplifier with less than the recommended loudspeaker impedance. Low output power 1 - Check that level controls have been set up properly. - Make sure that the battery voltage, as measured at the amplifier s +1 volt and ground terminals, is 11 volts or more. 3 - Check all +1 volt and ground connections. Fuses blowing 1 - The use of loudspeaker impedances below the recommended minimums will draw more current - check. - A short on the main +1 volt cable from the battery to the vehicle chassis will cause the main fuse to blow. 3 - If an amplifier fuse blows continually, with only +1 volt, ground and remote leads connected, the amplifier may be faulty. System does not turn on 1 - Check all fuses. - Check all connections. 3 - Measure the +1 volt and remote turn on voltages at the amplifier terminals. If these are non existent or low, take voltage measurements at fuse holders, distribution blocks, the head unit s +1 volt and remote leads to localize the problem. Noise problems System noise can be divided into two categories, hiss, and electrical interference. Hiss, or white noise 1 - High levels of white noise usually occurs when amplifier level controls are turned up too high - readjust according to the procedures in section Setting up systems after installation for best performance - Another major problem that can cause excessive hiss, is a noisy head unit - unplug the amplifier input RCA cables, and if the hiss level reduces, the source unit is at fault. Electrical interference The inside of an automobile is a very hostile electrical environment. The multitude of electrical systems, such as the ignition system, alternator, fuel pumps, air conditioners, to mention just a few, create radiated electrical fields, as well as noise on the +1 volt supply and ground. Remember to isolate the problem - first unplug amplifier input RCA cables, if the noise is still present, check the speaker leads, if not, plug the RCA s back, and investigate the source driving the amplifier, one component at a time. A ticking or whine that changes with engine RPM: 1 - This problem could be caused by radiation pickup of RCA cables too near to a fuel pump or a distributor, for instance, - relocate cables. - Check that the head unit ground is connected straight to the vehicle chassis, and does not use factory wiring for ground. 3 - Try to supply the head unit with a clean +1 volt supply directly from the battery +, instead of using a supply from the in dash wiring/fusebox. A constant whine: This type of noise can be more difficult to pinpoint, but is usually caused by some kind of instability, causing oscillations in the system. 1 - Check all connections, especially for good grounds. - Make sure that no speaker leads are shorting to exposed metal on the vehicle chassis. 3 -RCA cables are notorious for their problematic nature, so check that these are good, in particular the shield connections. AUTOTEK AMPLIFIERS CAR AMPLIFIERS
MYKRO RM440.4 / RM740.5 / RM Installation Manual
 MYKRO Installation Manual Congratulations! By purchasing an amplifier from MB Quart, you have decided on a product of the highest technical quality. MB Quart wishes you great enjoyment with your amplifier.
NAUTIC. Installation Manual NA180.2 / NA360.4 / NA710.5 / NA540.6
 NAUTIC Installation Manual Congratulations! By purchasing an amplifier from MB Quart, you have decided on a product of the highest technical quality. MB Quart wishes you great enjoyment with your amplifier.
NAUTIC. Installation Manual NA180.2 / NA360.4 / NA710.5 / NA540.6
 NAUTIC Installation Manual Congratulations! By purchasing an amplifier from MB Quart, you have decided on a product of the highest technical quality. MB Quart wishes you great enjoyment with your amplifier.
FORMULA FX2.60 / FX4.50 / FX4.70 / FX4.100 / FX1.400 / FX1.600 / FX Installation Manual WOOD
 FORMULA www.mbquart.com Installation Manual Congratulations! By purchasing an amplifier from MB Quart, you have decided on a product of the highest technical quality. MB Quart wishes you great enjoyment
EVOLUTION OF POWER MEAN MACHINE AMPLIFIERS MM404 / MM1000.1D / MM1500.1D
 R EVOLUTION OF POWER MEAN MACHINE AMPLIFIERS MM / MM1.1D / MM15.1D MEAN MACHINE AMPLIFIERS Autotek is proud to introduce the finest high end car audio products available and would like to thank you for
AMPLIFIERS GPA700.2 / GPA / GPA GPA / GPA / GPA GPA / GPA / GPA / GPA3000.1
 AMPLIFIERS GPA7. / GPA11. / GPA18. GPA1. / GPA15. / GPA. GPA1.1 / GPA15.1 / GPA.1 / GPA3.1 Ground Pounder GPA AMPLIFIERS Crunch is proud to introduce the finest high end car audio products available and
ONYX. Installation Manual OA240.2 / OA400.4 / OA600.4 / OA800.4 / OA / OA500.1 / OA750.1 / OA WOOD
 ONYX Installation Manual Congratulations! By purchasing an amplifier from MB Quart, you have decided on a product of the highest technical quality. MB Quart wishes you great enjoyment with your amplifier.
TREAD LOUDLY ATA SERIES AMPLIFIERS ATA800.2 / ATA / ATA ATA / ATA / ATA ATA / ATA2000.1
 R TREAD LOUDLY ATA SERIES AMPLIFIERS ATA8. / ATA1. / ATA. ATA1. / ATA1. / ATA. ATA1.1 / ATA.1 ATA SERIES AMPLIFIERS Congratulations on your purchase and thank you for supporting AUTOTEK! The ATA Series
EVOLUTION OF POWER STREET MACHINE AMPLIFIERS SM / SM SM / SM / SM6000.1
 R EVOLUTION OF POWER STREET MACHINE AMPLIFIERS SM16. / SM1. SM3.1 / SM8.1 / SM6.1 STREET MACHINE SERIES AMPLIFIERS Congratulations on your purchase and thank you for supporting AUTOTEK! The STREET MACHINE
DRIVE AMPLIFIERS DRA850.2 / DRA / DRA DRA / DRA / DRA / DRA DRA1850.1D / DRA2550.1D / DRA3250.
 DIVE AMPIFIES DA85. / DA115. / DA5. DA15. / DA15. / DA5. / DA5. DA185.1D / DA55.1D / DA35.1D GENEA INSTAATION POCEDUE System Design The success of any car stereo system relies on several factors, such
EVOLUTION OF POWER AXL AMPLIFIERS AXL / AXL / AXL AXL / AXL / AXL AXL / AXL2550.1
 EVOUTION OF POWE AX AMPIFIES AX15. / AX165. / AX35. AX15. / AX15. / AX5. AX155.1 / AX55.1 AX SEIES AMPIFIES Congratulations on your purchase and thank you for supporting AUTOTEK! The AX Series products
MAXX-LINK MLX-100 UNIVERSAL AMPLIFIER BRIDGING & SYNCHRONIZATION MODULE
 MAXX-LINK MLX-100 UNIVERSAL AMPLIFIER BRIDGING & SYNCHRONIZATION MODULE The MLX-100 Maxx-Link is a unique problem solving signal processor. The Maxx-Link allows interconnecting (a.k.a. Linking) of up to
Sm2-400 / SM / SM Sm / SM4-800 / SM Sm / SM1-1500
 Sm2-400 / SM2-1000 / SM2-1200 Sm2-3500 / SM4-800 / SM4-1000 Sm1-1000 / SM1-1500 STEET MACHINE AMPIFIES Autotek is proud to introduce the finest high end car audio products available and would like to thank
SUPER SPORT AMPLIFIERS
 SUPE SPOT AMPIFIES Autotek is proud to introduce the finest high end car audio products available and would like to thank you for your continued support. The Super Sport Series products have been designed
MX-1 / MX-2 MX-3 / MX-4 MX SERIES OEM INTEGRATION ACCESSORIES
 MX-1 / MX-2 MX-3 / MX-4 MX SERIES OEM INTEGRATION ACCESSORIES MX SERIES OEM INTEGRATION ACCESSORIES INDEX PAGE MX OEM Accessory Overview and Setup...1 Installation...2 MX-1 Feature Descriptions...3-4 MX-1
************* OWNER'S MANUAL STAX1250/2 STAX1800/2 STAX2200/2 STAX1200/4 STAX1600/4 STAX2300/4 STAX2000/1D STAX4000/1D STAX5500/1D
 ************* OWNER'S MANUAL STAX1250/2 STAX1800/2 STAX2200/2 STAX1200/4 STAX1600/4 STAX2300/4 STAX2000/1D STAX4000/1D STAX5500/1D INTRODUCTION Power Acoustik amplifiers provide high-performance sound
USER S MANUAL MAXP 1200 / 1055D / 1201D / 1601D / 2051D / 2055D / 2651D
 USER S MANUAL AMPLIFIERS: MAXP 1200 / 1055D / 1201D / 1601D / 2051D / 2055D / 2651D TABLE OF CONTENTS Contents and introdction - - - - - - - - - - - - - - - - - - - - - - - - - - - - - - - - - - - - -
BRIDGEABLE MOSFET POWER AMPLIFIERS BZA-2290/BZA-2390 BZA-2490/BZA-4190 OWNER'S MANUAL
 BRIDGEABLE MOSFET POWER AMPLIFIERS BZA-2290/BZA-2390 BZA-2490/BZA-4190 OWNER'S MANUAL Table of Contents Table of Contents 1 2 3~7 8 9~11 9 10~11 Troubleshooting 12 Wiring 13 Introduction & Features Introduction
PLANNING YOUR SYSTEM
 INTRODUCTION HERTIAGE amplifiers provide high-performance sound reinforcement for your mobile audio equipment. Its versatility enables compatibility with optional Equalizers, Frequency Dividing Crossover
BRUTUS 25th ANNIVERSARY EDITION HIGH PERFORMANCE AMPLIFIERS
 BUTUS 25th ANNIVESAY EDITION HIGH PEFOMANCE AMPIFIES As Hifonics celebrates it s 25th anniversary of producing the finest high end car audio products available, we would like to thank you for your continued
9 db/oct, variable bass boost
 Digital class-d linkable/dual mono block amplifier Dual MOS-FET PWM power supply Stable into 1 ohm load 24 db/oct, variable low pass filter 24 db/oct, variable subsonic filter 9 db/oct, variable bass boost
ENCOUNTER AMPLIFIER MANUAL EN-1502 EN-3001 EN-3004
 ENCOUNTER ENCOUNTER AMPLIFIER MANUAL EN-1502 EN-3001 EN-3004 ENGLISH AMPLIFIER SPECIFICATIONS EN-3004 (4 Channel) Class Class-AB Class-AB EN-1502 (2 Channel) Power 1800 Watts 1000 Watts Frequency Response
MODEL: M1u Product id:m1ud13 M1u OWNER S MANUAL
 MODEL: Product id:m1ud13 OWNER S MANUAL Foreword We congratulate you with your decision to purchase our reveered niche amplifiers. Every product developed by implements the keystones of our company philosophy;
L1.600D L1.1100D L1.1600D L1.2100D L2.290 L2.400 L4.540 L4.480 L5.850
 L1.600D L1.1100D L1.1600D L1.2100D L2.290 L2.400 L4.540 L4.480 L5.850 CONGRATULATIONS! You now own a Lil Wonder 4 Series Amplifier, the product of an uncompromising design and engineering philosophy. We
LFA4-840 / LFA / LFA LFA1-2000D / LFA1-4000D / LFA1-5500D LFA2-420 / LFA2-600 / LFA2-800 LFA / LFA / LFA / LFA2-2600
 OWNERS MANUAL LFA4840 / LFA41200 / LFA41600 LFA12000D / LFA14000D / LFA15500D LFA2420 / LFA2600 / LFA2800 LFA21250 / LFA21800 / LFA22200 / LFA22600 INTRODUCTION Power Acoustik amplifiers provide highperformance
D CHANNEL A MPLIFIER
 PA D5000.5 5 -CHANNEL A MPLIFIER TOOLS OF THE TRADE Listed next are the majority of the tools required to perform an installation. Having the proper tools will make the installation that much easier. Phillips
AMPLIFIERS BI BI BI BI4400.4
 LIMITED WARRANTY Bass Inferno warrants any products purchased in the U.S.A. from an authorized Bass Inferno dealer. All products are warranted to be free from defects in material and workmanship under
OWNER'S MANUAL. Super Natural Sound High Performance Technology. SP dbpro
 OWNER'S MANUAL Super Natural Sound High Performance Technology SP-1500.2 dbpro SP-2000.2 dbpro SP-2300.2 dbpro FEATURES [SP-1500.2 dbpro] 2/1 Channel Bridgeable Class A/B Amplifier MOSFET PWM Power Supply
HIGH PERFORMANCE CAR AMPLIFIER
 NS-1 HIGH PERFORMANCE CAR AMPLIFIER Digital Class-D Linkable Mono Block Amplifier Dual MOS-FET PWM Power Supply 1 Ohm Stable Load 24 db/octave - Variable Low Pass Filter 24 db/octave - Variable Subsonic
F O R T H E L O V E O F M U S I C LP100 OWNER'S MANUAL AND INSTALLATION GUIDE INTRODUCTION
 F O R T H E L O V E O F M U S I C LP100 OWNER'S MANUAL AND INSTALLATION GUIDE INTRODUCTION You have purchased an amplifier that leads the way with sound quality, reliability, and features. These high performance
N A U T I C. 6-Channel Amplifier NAA Kanal Verstärker NAA 665. Installation & Operation Einbau und Betrieb
 M A X X S O N IIC S UE SU A R, OI PN E C. G M B H 1290 Neckarstraße Ensell Road 20 Lake 74847 Zurich, Obrigheim, Illinois Germany 60047 USA Phone 1 49 847 (0) 62 54061 7700 6 380 FAXX 1 49 847 (0) 62 54061
Quota OWNER S MANUAL
 MODEL: MKII Product id:quotad12 OWNER S MANUAL Foreword We congratulate you with your decision to purchase our reveered niche amplifiers. Every product developed by implements the keystones of our company
RXA 1000 D CLASS D MONO AMPLIFIER USER S MANUAL
 RXA 1000 D CLASS D MONO AMPLIFIER USER S MANUAL Please read the user s manual carefully before the installation and the first operation of the amplifier. SPECIFICATIONS Output Power RMS Output Power Max.
Stealth Amplifier Series. Owner s Manual
 Stealth Amplifier Series Owner s Manual CONGRATULATIONS! You now own a Stealth Amplifier, the product of an uncompromising design and engineering philosophy. We suggest you take a moment to document the
AMPLIFIERS. Bi2200Tx Bi4200Fx. Bi1400Mx Bi2400Mx Bi3000Mx
 LIMITED WARRANTY Bass Inferno warrants any products purchased in the U.S.A. from an authorized Bass Inferno dealer. All products are warranted to be free from defects in material and workmanship under
MODEL: Duo Product id:duomk214f Duo OWNER S MANUAL
 MODEL: Product id:duomk214f OWNER S MANUAL Introduction We thank you for purchasing our amplifiers. Your decision to be part of something different is what we strive for. Our products reflects who we are,
Lanzar Audio Inc rd Street, Brooklyn, NY (718)
") Lanzar Audio Inc. 1600 63rd Street, Brooklyn, NY 11204 (718) 236-8000 www.lanzar.com Features and Controls Congratulations on your purchase of a Lanzar MAX PRO amplifier. You have purchased a quality product
Lanzar Audio Inc. 1600 63rd Street, Brooklyn, NY 11204 (718) 236-8000 www.lanzar.com Features and Controls Congratulations on your purchase of a Lanzar MAX PRO amplifier. You have purchased a quality product
D-Tower Amplifier Series. Owner s Manual
 D-Tower Amplifier Series Owner s Manual CONGRATULATIONS! You now own a D-Tower Amplifier, the product of an uncompromising design and engineering philosophy. We suggest you take a moment to document the
INTRODUCTION FEATURES SPECIFICATIONS. Built-in Crossover
 INTRODUCTION Congratulations on your purchase of a LEGACY ICON Car Amplifier. The unit is the result of an extensive engineering project to create the finest automotive high fidelity product available.
O P T I O W N E R ' S M A N U A L
 OPTI OWNER'S MANUAL 1. Contents 2. Introduction 3. Features 4. Specifications 5. Amplifier installation 6. 7. Features and controls 8.9.System wiring 10.11. Troubleshooting OPTI OWNER'S MANUAL - 1 Thank
APSM-1300/APSM
 APSM-1300/APSM-1500 1 2 3 4 15 14 6 7 9 8 5 10 11 13 12 APSM-2000 1 2 3 4 15 14 6 7 9 8 5 10 11 13 12 1 Speaker connection Never connect the speaker cables with the chassis ground. This may destroy your
GND Chassis ground terminal. The chassis ground cable must be connected very tight on a nearby massive and electric conductive place.
 1 Speaker connection Never connect the speaker cables with the chassis ground. This may destroy your amplifier. Check that your speakers are connected correctly which means plus to plus and minus to minus.
This amplifier is designed for low-frequency information only and it is not capable of reproducing any mid/high-frequency information.
 Thank you for purchasing the Lanzar OPTI Class-D amplifier. Rest assured you have purchased a quality product designed and engineered to give you many years of uncompromised musical service. The OPTI Class-D
OPTI OWNER'S MANUAL - 1
 1. Contents 2. Introduction 3. Features 4. Specifications 5. Amplifier installation 6. 7. Features and controls 8.9.System wiring 10.11. Troubleshooting OPTI OWNER'S MANUAL - 1 Thank you for purchasing
F O R T H E L O V E O F M U S I C SERIES 218 DPS200 OWNER'S MANUAL AND INSTALLATION GUIDE INTRODUCTION
 F O R T H E L O V E O F M U S I C SERIES 218 DPS200 OWNER'S MANUAL AND INSTALLATION GUIDE INTRODUCTION You have purchased an amplifier that leads the way with sound quality, reliability, and features.
Owner s manual & Installation manual Mode d emploi et manuel d installation Manual de instrucciones y de instalación XC6210 XC6410
 Owner s manual & Installation manual Mode d emploi et manuel d installation Manual de instrucciones y de instalación XC6210 XC6410 XC AMPLIFIERS AMPLIFICATEURS XC AMPLIFICADORES XC INTRODUCTION The Clarion
360mm (14-3/16 ) x 224mm (8-13/16 ) x 67mm (2-5/8 )
 x 224mm (8-13/16 ) x 67mm (2-5/8 )") EN-41400 (4 Channel) EN-21200 (2 Channel) Class Class-AB Class-AB Power 1400 Watts 1200 Watts Frequency Response 10Hz - 42kHz 10Hz - 45kHz Dimensions 360mm (14-3/16 ) x 224mm (8-13/16 ) x 67mm (2-5/8 )
EN-41400 (4 Channel) EN-21200 (2 Channel) Class Class-AB Class-AB Power 1400 Watts 1200 Watts Frequency Response 10Hz - 42kHz 10Hz - 45kHz Dimensions 360mm (14-3/16 ) x 224mm (8-13/16 ) x 67mm (2-5/8 )
CLASS D MONOBLOCK AMPLIFIER DM1500, DM2500 OWNER S MANUAL
 CLASS D MONOBLOCK AMPLIFIER DM1500, DM2500 OWNER S MANUAL INTRODUCTION Thank you for purchasing a DD Audio amplifier. DD Audio amplifiers are painstakingly designed to provide years of high-performance
MA6004 MA6002 MARINE AUDIO POWER AMPLIFIER OWNER S MANUAL. The Official Brand of Live Music.
 MA6004 MA6002 MARINE AUDIO POWER AMPLIFIER OWNER S MANUAL The Official Brand of Live Music. INSTALLATION THANK YOU for purchasing a JBL marine amplifier. In order that we may better serve you should you
MANUAL AQA430SL AQA430WT MODELS: '~.,t::r's
 ) '~.,t::r's MANUAL MODELS: AQA430SL AQA430WT INTRODUCTION Our Amplifiers provide high-performance sound reinforcement for your mobile audio equipment. Its versatility enables compatibility with optional
DD1-1300S. 500 Watts RMS Watts RMS Watts RMS- 1. Mono-Bloc Digital Power Amplifier
 DD1-1300S Mono-Bloc Digital Power Amplifier 500 Watts RMS- 4 900 Watts RMS- 2 Ultimate Sound, Inc. 1300 Watts RMS- 1 Ultimate Europe AB Ultimate Sound, Inc Ultimate Europe AB 163 University Parkway Flojelbergsgatan
Owner s Manual 7000 WATTS RMS WATTS RMS COMPETITION D HIGH CLASS D AMPLIFIER HIGH CLASS D AMPLIFIER MADE IN KOREA
 Owner s Manual COMPETITION 7000.1D 7000 WATTS RMS HIGH CLASS D AMPLIFIER COMPETITION 12000.1D 12000 WATTS RMS HIGH CLASS D AMPLIFIER MADE IN KOREA Manual size : 150 x 210mm 2 Installation If you intend
Owner's manual. ZX-series
 Owner's manual ZX-series Competition Class D, Competition Bass/SPL Amplifier Before operating the unit, please read this manual throughly and retain it for future reference. Protect your Investment Note
TA5604 Owner s Manual
 TA5604 Owner s Manual Introduction Thank you for choosing MTX to help reach the ultimate goal with your vehicle. Adding MTX amplifiers and matching MTX speakers and subwoofers with StreetWires connections
IA SERIES OWNER'S MANUAL
 IA SERIES OWNER'S MANUAL overview OVERVIEW / CONTACT contact Congratulations and thank you for purchasing an Incriminator Audio amplifier for your new automotive sound system. Like all of Incriminator
CONGRATULATIONS TABLE OF CONTENTS
 model 500/2 CONGRATULATIONS Congratulations for choosing a Directed Audio power amplifier from Directed Electronics, the industry leader in high quality automotive security and audio equipment since 1990.
TA4252 Owner s Manual
 TA4252 Owner s Manual Introduction Thank you for choosing MTX to help reach the ultimate goal with your vehicle. Adding MTX amplifiers and matching MTX speakers and subwoofers with StreetWires connections
A400HLX A600HLX. Installation Assistance. Amplifier Installation and Operation
 3 5 60 125 60 125 2 4 0dB 0dB 12dB 12dB 3 5 60 125 60 125 2 4 8V 8V.3V.3V MODE Amplifier Installation and Operation A400HLX A600HLX 400 MOSFET Power Supply 4 channel bridgeable BASS L-CHX R-CHX LEVEL POWER
Directed Electronics, Inc
 model 600/5 2 2003 Directed Electronics, Inc CONGRATULATIONS Congratulations for choosing a Directed Audio power amplifier from Directed Electronics, the industry leader in high quality automotive security
SOUND QUALITY AMPLIFIER
 Owner s Manual SKv2-800.1D SKv2-1500.1D SKv2-2500.1D SKv2-3500.1D SKv2-4500.1D SKv2-1300.2AB SKv2-85.4AB SKv2-100.4AB SKv2-200.4D SOUND QUALITY AMPLIFIER 1. INTRODUCTION Congratulations and thank you for
RAZOR. Class D Full Range & Monoblock Amplifiers RZ4-1200D RZ4-2000D RZ1-1500D RZ1-2300D
 RAZOR Class D Full Range & Monoblock Amplifiers RZ4-1200D RZ4-2000D RZ1-1500D RZ1-2300D WWW.POWERACOUSTIK.COM 4 Channel RZ4-1200D & RZ4-2000D Full MOSFET PWM Power Supply SMD Technology on Double Sided
MS-AM402. User/Installation Manual FUSIONENTERTAINMENT.COM
 MS-AM MARINE AMPLIFIER User/Installation Manual FUSIONENTERTAINMENT.COM Contents Feature Overview...Pg 3 Control Descriptions.................................Pg Installation.........................................Pg
English APSM Power Indicator LED 4. Protection Circuit Indicator LED. 1. RCA Input Jacks 2. Remote Bass Level Control
 English APSM-1150 2 1 3 4 1. RCA Input Jacks 2. Remote Bass Level Control 3. Power Indicator LED 4. Protection Circuit Indicator LED 1 5 4 3 2 1. Speaker Connection 2. Ground 3. Remote Turn-on Input 4.
USER MANUAL D-CLASS AMPLIFIER CA-DA12250 CA-DA41400 CA-DA Specifications and design are subject to change without notice
 USER MANUAL D-CLASS AMPLIFIER CA-DA12250 CA-DA41400 CA-DA51600 Specifications and design are subject to change without notice AMPLIFIER SPECIFICATIONS CA-DA12250 CA-DA41400 CA-DA51600 Peak Power (Watts)
TA7804 Owner s Manual
 TA7804 Owner s Manual Introduction Thank you for choosing MTX to help reach the ultimate goal with your vehicle. Adding MTX amplifiers and matching MTX speakers and subwoofers with StreetWires connections
When you check the list of features offered by the PLMRA220,PLMRA420 you ll know you made the right choice with a Pyle Marine amplifier.
 congratulations... on your purchase of a Pyle Marine Series amplifier. This amplifier extends the Pyle tradition into a totally new series of amps, designed from the ground up to deliver the power, performance
KX550.3 / KX KX Amplifier Features
 KX550.3 / KX700.5 Congratulations! You have just purchased the latest in amplifier technology to carry the famous KICKER name. Your KICKER KX series amplifier is designed and built to give you years of
Owner's Manual WARNING 65-C5009-MA INTRODUCTION FEATURES
 65-C5009-MA Model No.: SRX-D0504; SRX-D1501; SRX-D2501; SRX-D4001 :A3 INTRODUCTION Amplifiers provide high-performance sound reinforcement for your mobile audio equipment. It s versatility enables compatibility
CXA CXA CXA CXA CXD M. Dynamic Audio
 CXA CXA CXA CXA CXD 640 1040 820 1220 2800M Dynamic Audio Company Message Congratulations on the purchase of your new CX Series amplifier. Our engineers designed your amplifier with performance in mind,
MOSFET POWER AMPLIFIERS
 MOSFET POWER AMPLIFIERS Installation Instructions / Owner's Manual AP400 AP600 AP1000 AP1200 AP2000 AP740 AP1040 AP700M AP1000M INTRODUCTION Congratulations on your purchase of a California state-of-the-art
BAK1500 INSTALLATION/OWNER'S MANUAL. Compact Amplified Subwoofer
 BAK1500 INSTALLATION/OWNER'S MANUAL Compact Amplified Subwoofer PREPARATION Getting Started Thank you for purchasing the Dual BAK1500 compact amplified subwoofer. Although Dual has attempted to ensure
SXD SXD SXD SXD Dynamic Audio
 SXD SXD SXD SXD SXD 1000.1 2000.1 1100.2 1600.4 Dynamic Audio Company Message Congratulations on the purchase of your new SXD Series amplifier. Our engineers designed your amplifier with performance in
Slowly increase the volume control until you can hear comfortably, clearly and without distortion.
 Dear customer, Congratulations on your purchase of a Bazooka EL high-performance amplifier. At Bazooka, we are fanatics about accurate music reproduction. Your selection of our products for your sound
TA3202 Owners Manual. Input Sensitivity Switch: 100mV-1V/1V-10V Crossover: Hi, 12dB / Low, 85Hz, Defeatable
 TA3202 Owners Manual Introduction Thank you for choosing MTX to help reach your ultimate goal with your vehicle. Adding MTX amplifiers and matching MTX speakers and subwoofers with StreetWires connections
DA604D DA954D DA501D DA801D COMPACT SERIES. INSTALLATION / OWNER'S MANUAL Mobile Power Amplifiers
 DA604D DA954D DA501D DA801D COMPACT SERIES INSTALLATION / OWNER'S MANUAL Mobile Power Amplifiers Preparation Please read entire manual before installation. Due to the technical nature of amplifiers, it
XPR522 XPR540. XPR SERIES INSTALLATION / OWNER'S MANUAL Mobile Power Amplifiers
 XPR522 XPR540 XPR SERIES INSTALLATION / OWNER'S MANUAL Mobile Power Amplifiers Preparation Please read entire manual before installation. Due to the technical nature of amplifiers, it is highly recommended
PB 700 PB 1000 PB 1100 PB 1500 PB 2600 PB 1200 PB 1700 PB 2200 PB 2700 USER'S MANUAL.
 PB 700 PB 1000 PB 1100 PB 1500 PB 2600 PB 1200 PB 1700 PB 2200 PB 2700 USER'S MANUAL www.pyramidcaraudio.com congratulations... on your purchase of a Pyramid America Series amplifier. This amplifier extends
JAD SERIES OWNER S MANUAL. JAD Channel Full Range Class D Amplifier
 JAD SERIES OWNER S MANUAL JAD900.5 5 Channel Full Range Class D Amplifier Authorized Dealer Name: Purchase Date: Model Number: Serial Number: JAD900.5 PERFORMANCE MODEL: RMS Power (4 Ohms, Stereo) RMS
DA560D COMPACT SERIES. INSTALLATION / OWNER'S MANUAL Mobile Power Amplifiers
 DA560D COMPACT SERIES INSTALLATION / OWNER'S MANUAL Mobile Power Amplifiers Preparation Please read entire manual before installation. Due to the technical nature of amplifiers, it is highly recommended
PLBA330FRD PLBA430FRD PLBA530FRD
 Compact Class D Full Range Hybrid Amplifier USER' S MANUAL www. pyleaudio. com www. pyleaudio. com PLBA330FRD PLBA430FRD PLBA530FRD FEATURES CLASSD DESIGN Compact classd full range hybrid amplifer.high
SYN-DX SERIES FULL RANGE CLASS-D AMPLIFIERS SYN-DX 2, SYN-DX 2.3 HP, SYN-DX 4, SYN-DX 6 OWNER'S MANUAL. wetsounds.com HIGH PERFORMANCE MARINE AUDIO
 HIGH PERFORMANCE MARINE AUDIO SYN-DX SERIES FULL RANGE CLASS-D AMPLIFIERS SYN-DX 2, SYN-DX 2.3 HP, SYN-DX 4, SYN-DX 6 OWNER'S MANUAL REV DATE FEB 2017 wetsounds.com CONGRATULATIONS! Thank you for purchasing
OWNER S MANUAL. Models 150/250/400
 OWNER S MANUAL Models 150/250/400 CONGRATULATIONS Thank you for choosing a Directed Audio power amplifier. Directed has been the leader in high-quality and innovative security products in the U.S. since
PROAUDIO AMPLIFIERS BI2400PRO BI3400PRO
 LIMITED WARRANTY Bass Inferno warrants any products purchased in the U.S.A. from an authorized Bass Inferno dealer. All products are warranted to be free from defects in material and workmanship under
KX120.2 / KX150.2 / KX200.2
 KX120.2 / KX150.2 / KX200.2 Congratulations! You have just purchased the latest in amplifier technology to carry the famous KICKER name. Your KICKER KX series amplifier is designed and built to give you
XPA2100 XPA4100 XPA6100. XPA SERIES INSTALLATION/OWNER S MANUAL Mobile Power Amplifiers
 XPA2100 XPA4100 XPA6100 XPA SERIES INSTALLATION/OWNER S MANUAL Mobile Power Amplifiers XPA SERIES INSTALLATION Preparation Please read entire manual before installation. Due to the technical nature of
Features and Controls VIBE 226/236/246/256/266/276/286
 Features and Controls Congratulations on your purchase of a anzar Viberant amplifier. You have purchased a quality product designed and engineered to give you many years of uncompromised musical service.
MOREL PERFORMANCE SERIES AMPLIFIERS. Owner s Manual MPS MPS MPS 5.950
 MOREL PERFORMANCE SERIES AMPLIFIERS Owner s Manual MPS 4.400 MPS 1.550 MPS 5.950 MOREL PERFORMANCE SERIES AMPLIFIERS / Owner s Manual 2 MOREL PERFORMANCE SERIES AMPLIFIERS / Owner s Manual 3 We thank you
Owner s Manual PB444X PB446X PB448X PB449X
 Owner s Manual PB444X PB446X PB448X PB449X Super Blue 2 ch amp PB444X PB446X PB449X 4champPB448X specifications PB444X 2 ch amplifier PB446X 2 ch amplifier PB448X 4 ch amplifier PB449X 2 ch amplifier output
INTRODUCTION & FEATURES... 1 FEATU RES & CONTROLS... 3 SPECIFICATION... 4 CONTROLS & FUNCTIONS... 5 SYSTEM WIRING TROUBLESHOOTING,...
 TRBL.E OF C:ONTENTS TRBL.E OF C:ONTENTS INTRODUCTION & FEATURES... 1 FEATU RES & CONTROLS... 3 SPECIFICATION... 4 CONTROLS & FUNCTIONS... 5 SYSTEM WIRING... 6-8 TROUBLESHOOTING,... 9 WI RI NG... 10-1-
PLA3000D. user s manual. limited warranty policy. Class-D mono block car audio amplifier. Brooklyn, NY
 limited warranty policy a m p l i f i e r s All Pyle products are carefully constructed and thoroughly tested before shipment. Products purchased in the USA are warranted to be free of defects in material
Class D Topology IR2110S S/N 87dB at 1 ohm All "N" Channel MOSFET TO218 Transistors Unregulated Power Supply 140 Volt Rails +/- for INSANE
 3-4 5-9 10 11 12 Class D Topology IR2110S S/N 87dB at 15kW @ 1 ohm All "N" Channel MOSFET TO218 Transistors Unregulated Power Supply 140 Volt Rails /- for INSANE Amounts of Power Capacitance Voltage 160V
To achieve optimum performance, it is highly recommended that you read this Owners Manual defore beginning installation. WARNING
 Owner's manual Amplifier provide high-performance sound reinforcement for you mobile audio equipment. It's versatility enables compatibility with optional Equalizers. Frequency Dividing Network Crossovers,
TA5601 Owner s Manual
 TA5601 Owner s Manual Introduction Thank you for choosing MTX to help reach the ultimate goal with your vehicle. Adding MTX amplifiers and matching MTX speakers and subwoofers with StreetWires connections
BRIDGEABLE FOUR-CHANNEL POWER AMPLIFIER GM-A6604 GM-A4604. Owner s Manual
 BRIDGEABLE FOUR-CHANNEL POWER AMPLIFIER GM-A6604 GM-A4604 Owner s Manual Section 01 Before you start Thank you for purchasing this PIONEER product To ensure proper use, please read through this manual
XIA3145 INSTALLATION/OWNER S MANUAL 2/1-Channel Mobile Power Amplifier
 XIA3145 INSTALLATION/OWNER S MANUAL 2/1-Channel Mobile Power Amplifier XIA3145 INSTALLATION Preparation Please read entire manual before installation. Due to the technical nature of amplifiers, it is highly
XETEC design group GmbH
 XETEC design group GmbH www.xetec.de 05.2003 XETEC Vector V 200.4 Congratulations for buying this XETEC product and thank you for your confidence! With this XETEC amplifier you have purchased an innovative
Amplifier Manual. Models: MX MX MX Features
 Amplifier Manual Models: MX 800.5 MX 600.4 MX 800.1 Phoenix Gold is excited to introduce the series everyone has been asking for. A sub-compact series of amplifiers engineered for vehicles where space
USER MANUAL LIMITED WARRANTY AMPLIFIERS WDX300.4 : WDX400.4 : WDX800.4 WDX1K : WDX2K : WDX3K : WDX5K. Installation Instructions Owners Manual
 LIMITED WARRANTY DB Drive warrants any products purchased in the U.S.A. from an authorized DB Drive dealer. All products are warranted to be free from defects in material and workmanship under normal use
Amplifier Manual. Models: RX RX Features
 Amplifier Manual Models: RX2 750.5 RX2 400.4 The RX2-series amplifiers are the next evolution of the reliable and great sounding RX series. With a new, more efficient circuit design, we have increased
LK 705. Troubleshooting -12-
 Troubleshooting Before removing your amplifier, refer to the list below and follow the suggested procedures. Always test the speakers and their wires first. No Output Only one channel works Confirm that