REDSUN PF2100 PLL RADIO OPERATING MANUAL
|
|
|
- Joanna Lucas
- 6 years ago
- Views:
Transcription
1 REDSUN PF2100 PLL RADIO OPERATING MANUAL TRANSLATED BY LIYPN ALL RIGHTS RESERVED JUNE 2006 (We are the copyright holder of this manual in English. Please do NOT distribute this manual in any form nor post this manual on any web sites or radio groups without our written consent, Thank you for your cooperation.) INDEX Page A. ILLUSTRATIONS 3 B. POWER SUPPLY 1. USING BATTERY 6 2. USING EXTERNAL AC POWER 6 3. USING EXTERNAL DC SUPPLY (optional accessory) 6 C. BASIC OPERATION 1. TURNING ON THE RADIO 7 2. SELECTING THE FM BAND 7 3. SELECTING AM BANDS 7 4. SEARCHING & SAVING RADIO STATIONS TO MEMORIES 8 D. SPECIAL FUNCTIONS 1. MW and SW Gain Control 9 2. DX / LOCAL Switch 9 3. AUDIO LINE OUT 9 E. ANTENNA 1. LISTENING TO FM LISTENING TO SHORTWAVE 11 1
2 3. LISTENING TO MEDIUM WAVE EXTERNAL ANTENNA FOR FM / SW EXTERNAL ANTENNA FOR MW AM IF OUT 12 F. TIMER FUNCTIONS 1. SETTING THE TIMERS USING THE TIMERS USING THE SNOOZE FUNCTION ADJUSTING THE SLEEP TIME 13 G. SETTING THE CLOCK 1. SELECTING LOCAL / WORLD TIME SETTING LOCAL TIME SETTING WORLD TIME / 24 HOUR MODE DISPLAYING THE TIMERS SETTING THE TIMERS 15 H. OTHER FUNCTIONS 1. BACKLIGHT FOR LCD PANEL BACKLIGHTS FOR BUTTONS RE-CHARGING BATTERIES CHANGING MW STEPS USING THE RE-SET FUNCTION 16 I. SPECIAL NOTES 1. WIDE / NARROW BANDS SELECTION FOR AM MW / SW RF GAIN RE-CHARGING BATTERIES FM MONO OR FM STEREO 17 SPECIFICATIONS 18 2
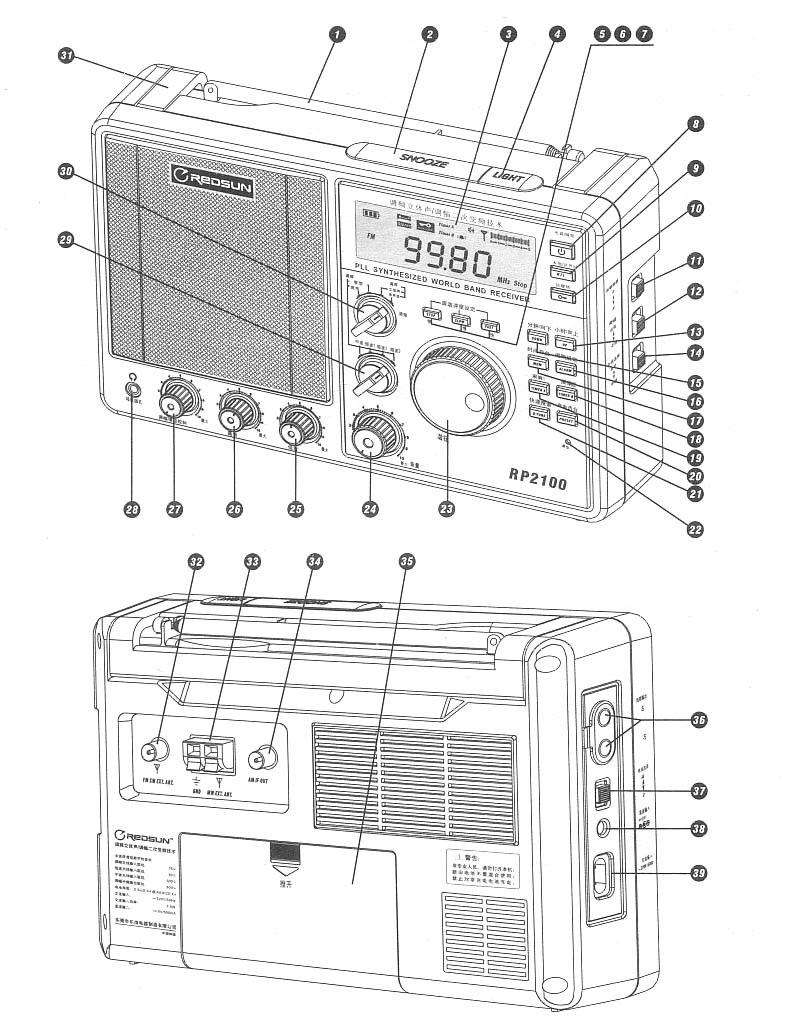
3 A. ILLUSTRATIONS 3
4 1. Whip Antenna for FM and Short Wave 2. SNOOZE Button 3. LCD Display 4. LIGHT Button press this button shortly the backlight will be on for 8 seconds; press this button for a longer while the backlight will be on always; press again to turn off the backlight 5. STOP Button locks the tuning knob from tuning frequencies 6. SLOW Button FM 10 KHz., MW and Short Wave 1 KHz. 7. FAST Button FM 100 KHz., SW 5 KHz., MW 9 or 10 KHz. 8. POWER / SLEEP Button 9. LOCAL / WORLD TIME Button press this button for 5 seconds will change the display clock from local time to world time 10. LOCK Button Press this button shortly will enable the lock function, all buttons will not function except the LIGHT Button; press this button for a longer time will disable the lock function 11. BUTTON LIGHTS Switch When this switch is on (up position), all buttons will be lighted up for 8 seconds when any button is touched 12. DX / LOCAL Switch Up position for DX, down position for local 13. UP Button When the radio is being turned off, press this button for 5 seconds will change the 12 / 24 hours time mode; When adjusting the clock, this button adjusts the hour; When the radio is being turned on, press this button shortly will manually increase the frequency; When pressing this key for a longer time, the radio will auto search for stations; When saving memory pre-set, this button will save to the selected address 14. INT. / EXT. ANTENNA Switch Up position for internal, down position for external antenna; 15. DOWN Button - When adjusting the clock, this button adjusts the second; When the radio is being turned on, press this button shortly will manually decrease the frequency; When pressing this key for a longer time, the radio will auto search for stations; When saving memory pre-set, this button will save to the selected address 16. ALARM MODE Button Sets the alarm modes of the Timer A and Timer B 17. MEM Button When the radio is being turned off, press this key for a longer period to adjust the time clock; When the radio is being turned off, press this key to store memory pre-sets 4
5 18. TIMER B Button When the radio is being turned off, press this key to set the Timer B; Press this key again to display the settings of the Timer B 19. TIMER A Button When the radio is being turned off, press this key to set the Timer B; Press this key again to display the settings of the Timer A 20. PRESET Button When the radio is being turned off, press this button to recharge the batteries inside the battery compartment; When the radio is being turned on, press this button to select the memory pre-sets 21. Q. TUNE Button Press this button for 1000 KHz. Steps in FM, 100 KHz. Steps for MW, and for band selections in short wave 22. RESET Use a sharp object to press this hidden button to reset the radio when the radio is not working properly 23. TUNING Knob For tuning frequencies, and for adjusting time 24. VOLUME Knob 25. BASS Knob 26. TREBLE Knob 27. RF GAIN Control knob for MW and short wave 28. HEADPHONE Socket Use a stereo headphone for FM listening 29. MW / SW1 / SW2 / SW3 BAND SELECTION SWITH 30. AM / FM MODE Switch (from left to right) AM wide, AM narrow, FM mono, FM stereo 31. HANDLE 32. EXT. ANTENNA Socket for FM and SW 33. EXT. ANTENNA Sockets for MW 34. AM IF OUT Socket 35. BATERRY COMPARTMENT 36. LINE OUT Upper is for right, lower for left 37. BATTERY TYPE Switch To select AA or D size battery inside the battery compartment 38. EXT. DC POWER Socket 6 to 9 volts 39. EXT. AC POWER Socket 220 volts 5
6 B. POWER SUPPLY 1. USING BATTERY AA size or D size batteries can be used with this radio. After inserting 4 pcs. of battery into the battery compartment (35), set the BATTERY TYPE switch (37) to the appropriate position The display panel will show the full battery strength sign if you are using new batteries If a flashing battery sign is displayed, the battery will soon be exhausted. The radio will be turned off automatically. You should replace new batteries as soon as possible. The sign will appear. Avoid mixing new and used batteries for use with the radio. Remove all batteries from the battery compartment if you will not use the radio for a long time. After replacing the batteries, there is no need to set the radio time again as the clock will last for some time even the radio is not connected to the batteries or power supply. 2. USING EXTERNAL AC POWER When the external power cord is inserted to the EXT. AC POWER Socket (39), the radio will be powered by external AC power. If the external AC power supply is interrupted, the radio will be powered by the batteries inside the radio automatically. This radio is set for use with 220V. AC, if your AC power supply is 110V., you will need to use the 110V. input 220V. output power transformer between the AC 110V. mains and the radio. 3. USING EXTERNAL DC SUPPLY (optional accessory) When the EXTERNAL DC POWER Socket is supplied with 6 9 V., the radio will be powered by the external DC power. The external DC power supply must be between 6 to 9 volts, output current > 500 m.a., and the polarity is. If not, it would be dangerous and may also cause damage to the radio. 6
7 If you also intend to use an External DC Supply for recharging the batteries inside the radio, the voltage of the External DC Supply should not be less than 8 volts. Priority of power supply to the radio is (in order of priority): External DC Supply, External AC Supply, Battery. C. BASIC OPERATION 1. TURNING ON THE RADIO Press the POWER / SLEEP Button (8) once, the LCD panel will display the 60 sign and the sign, meaning the radio will be turned off automatically in 60 minutes time. If you wish to change the auto turn off time, press this button again until the desired time is reached. If the ON sign is displayed, the radio will be turned on without a time limit. 2. SELECTING THE FM BAND If you are listening FM programs through the speaker of the radio, it is better to set the AM / FM / MODE Switch (30) to the FM mono position (second from right) for better sound to noise ratio. If you are using a headphone or an external amplifier, this switch (30) should be set to the FM stereo position (most right). 3. SELECTING AM BANDS Normally, set the AM / FM / MODE Switch (30) to the AM Narrow position (second from left), then set the MW / SW1 / SW2 /SW3 BAND SELECTION Switch (29) to the desired AM band. If you feel that the signal of the station being received is strong enough, you may wish to set the AM / FM / MODE Switch (30) to the AM Wide position (most left) for better sound quality. 7
8 4. SEARCHING & SAVING RADIO STATIONS TO MEMORIES 4.1 Manual Search Use the TUNING Knob (23) to tune to a radio station either by slow or fast speed, or Use the UP (13) OR DOWN (15) button to search for a station. This radio uses the PLL mode, all frequencies will not drift. 4.2 Automatic Search When the radio is being turned on, press the UP (13) or DOWN (15) button for a longer period of time, the radio will search for the strong signal stations. When such a station is found, the automatic search will cease. 4.3 Selection of Memory Pre-Sets This radio can store up to 50 memory pre-sets: 10 for each band. When the radio is being turned on, press the MEM button (17). The PRESET sign will flash and display on the LCD panel, the radio is not in the save memory mode. Press the UP (13) or DOWN (15) button to select a suitable address from 1 to 10. Press the MEM button (17) to save the frequency to the selected address. To retrieve the memory pre-sets, press MEM button (17) button followed by pressing the UP (13) or DOWN (15) button. The saved memory pre-sets can be retrieved in sequence. 5. TURNING OFF THE RADIO Press the POWER / SLEEP Button (8) when the radio is being turned on, the radio will be turned off and the digital time clock will appear on the LCD panel. 8
9 D. SPECIAL FUNCTIONS 1. MW AND SW GAIN CONTROL When listening to MW or SW stations, normally the RF GAIN Knob (27) should be set to full for best sensitivity. In case the station is of very strong signal, the signal may be overloaded resulting in distortion of sound quality, the RF GAIN Knob (27) should be turned counter-clockwise to eliminate the distortion. If the area where you use this radio is polluted with noise and interference, adjust this Knob (27) to lower the sensitivity may sometimes help to alleviate the interference. 2. DX / LOCAL SWITCH The DX / LOCAL Switch (12) on this radio may be used to overcome interference of strong signals in the SW and MW bands. Normally, the DX / LOCAL Switch (12) should be set to DX. When there is strong RF, VHF or BP signal intruding into the MW or SW bands, set this switch (12) to LOCAL may help to suppress such RF interferences. 3. AUDIO LINE OUT You can connect radio to an external amplifier via the LINE OUT Socket for more powerful and better sound quality. Set the AM / FM MODE Switch to the FM Stereo position when listening to FM stereo programs. The sign STEREO will display on the LCD panel. The VOLUME (24) control knob would not change the sound level of the LINE OUT function. 9

10 E. ANTENNA 1. LISTENING TO FM 10

11 Pull out the whip antenna, rotate the radio or the antenna to the best direction to listen to FM. Sometimes, shortening the whip antenna may also help to improve adjacent frequency interference when frequencies of the FM stations are too close together. 2. LISTENING TO SHORTWAVE Use the whip antenna on the radio to listen to short wave. Pull out the antenna fully and keep it vertical to get the best result. 3. LISTENING TO MEDIUM WAVE This radio uses internal ferrite rod antenna for receiving MW stations. This type of antenna is highly directional. Therefore, when listening to MW stations, you should rotate the radio body to find the direction that the radio can receive the strongest signal in order to improve reception. 4. EXTERNAL ANTENNA FOR FM / SW External antenna for FM (75 ohm) or external antenna for SW (50 ohm) can be connected to the EXT. ANTENNA Socket for FM and SW (32) for better position and FM-DX. The INT. / EXT. ANTENNA Switch (14) on the side of the radio should be set to external antenna (lower position). 5. EXTERNAL ANTENNA FOR MW The EXT. ANTENNA Sockets for MW (33) on this radio is for 11
12 connection of a long wire antenna (red socket) and to the ground (black socket). When there is a thunderstorm, please disconnect the external antenna from the radio and place it in a safe place. 6. AM IF OUT This radio has an AM IF OUT socket (34) that is for extended functions, such as SSB, DRM, SSTV, etc. (Please read other related materials re these topics), F. TIMER FUNCTIONS 1. Setting the Timers Press the TIMER A button (19) will display the alarm time of the Timer A and the sign of TIMER A will flash; press the ALARM MODE button (16) to select between buzzer or radio mode. Press the TIMER B button (18) will display the alarm time of the Timer A and the sign of TIMER A will flash; press the ALARM MODE button (16) to select between buzzer or radio mode. 2. Using the Timers When the buzzer timer is enabled, the sign appears on the LCD display; when the set time is reached, the buzzer will sound for 3 minutes continuously. When the radio timer is enabled, the sign appears on the LCD display; when the set time is reached, the radio will be turned on for 60 minutes continuously. When the radio is turned on by the timer, the respective sign or sign will flash on the LCD display. Press the POWER / SLEEP button (8) to disable the timer function 12
13 and turn off the radio, the sign or sign will no longer flash. If the radio is set to local time, the timer settings will work according to the local time; If the radio is set to world time, the timer settings will work according to the word time. 3. Using the Snooze Function When the timer is activated, press the SNOOZE button (2) once will temporarily turned off the buzzer or the radio, the snooze function is now enabled. Five minutes later, the timer will be in active mode again. If there is no further manual intervention, the buzzer will sound for 3 minutes or the radio will be turned on for 60 minutes, then the radio will be turned off automatically. This Snooze function can be repeated 4 times. When the SNOOZE button (2) is pressed for the 5 th time, the timer function will be disabled. 4. Adjusting the Sleep Time Press the POWER / SLEEP button (8) once, the LCD panel will display the 60 and the signs, representing that the radio will be turned off in 60 minutes time. If you wish to change the sleep time, press the POWER / SLEEP button (8) again before it disappears, the figures on the LCD panel will change as follows: 90 -> 60 -> 45 -> 30 -> 15 -> 5 -> 1 -> on -> (back to 90) If you stop at 30, the radio will be turned off automatically within 30 minutes. If you stop at on, the radio will be turned on until further manual intervention, the will not appear on the LCD panel. 13
14 G. SETTING THE CLOCK 1. SELECTING LOCAL / WORLD TIME This radio can display the local time or world time. Press the LOCAL / WORLD TIME button (9) will display local time or world time. Press the LOCAL / WORLD TIME button (9) for 5 minutes to change the Local / World time mode. 2. SETTING LOCAL TIME Press the LOCAL / WORLD TIME button (9) to select local time. Press the MEM button (17) until the time flashes on the LCD panel. Press the UP button (13) to select adjustment for hour; press the UP button (13) for a longer while to increase the hour, or rotate the TUNING knob (23) to increase or decrease the hour. Press the DOWN button (15) to select adjustment for hour; press the DOWN button (15) for a longer while to increase the hour, or rotate the TUNING knob (23) to increase or decrease the hour. When the desired time reading is reached, press the MEM button (17) again to confirm, the clock is now set. 3. SETTING WORLD TIME Press the LOCAL / WORLD TIME button (9) to select world time. The other steps are the same as setting local time, as items 2 5 above / 24 HOUR MODE Press the UP button (13) for 5 seconds to change the 12 / 24 hour mode. When the 12-hour mode is selected, AM or PM will be displayed on the LCD panel. 14
15 5. DISPLAYING THE TIMERS Press the TIMER A button (19) will display the set time of the Timer A, the TIMER A sign will also flash on the LCD panel. Press the TIMER B button (18) will display the set time of the Timer B, the TIMER B sign will also flash on the LCD panel. 6. SETTING THE TIMERS Timer A 1. Press the TIMER A button (19) until the TIMER A sign flashes. 2. Press the UP button (13) to select adjustment for hour; press the UP button (13) for a longer while to increase the hour, or rotate the TUNING knob (23) to increase or decrease the hour. 3. Press the DOWN button (15) to select adjustment for hour; press the DOWN button (15) for a longer while to increase the hour, or rotate the TUNING knob (23) to increase or decrease the hour. 4. When the desired time reading is reached, press the TIMER A button (19) again to confirm, the clock is now set. Timer B Press the TIMER B button (18) until the TIMER A sign flashes. The other steps as the same as for Timer A, items 2 4 above. H. OTHER FUNCTIONS 1. BACKLIGHT FOR LCD PANEL Press the LIGHT button (4) once, the backlight for the LCD panel will be on for 8 seconds. Press the LIGHT button (4) for 2 seconds or longer, the backlight for the LCD panel will be on always, until the LIGHT button (4) is pressed again. 15
16 2. BACKLIGHTS FOR BUTTONS Set the BUTTON LIGHTS switch (11) to the ON (upper) position, the backlights for buttons will be on for 8 seconds when any buttons are pressed. If you are using battery, it is suggested that this switch be set to the OFF (lower) position in order to save energy unless you are using the radio in complete darkness. 3. RE-CHARGING BATTERIES Use re-chargeable batteries only, do not re-charge normal batteries. Both the AC 220V. input or the DC 9V. input can recharge the batteries inside the battery compartment. When using the DC input to re-charge batteries, make sure that the voltage should maintain at 9V., and in any case not lower than 8V., other the re-charge function may not work. When the radio is being turned off, pres the PRESET button (20) to enter the re-charge mode, the battery sign will flash on the LCD panel. When the batteries are fully charged or the recharge time has reached 12 hours, the recharge function will cease automatically. When the radio is being turned on, the re-charge function will not work. 4. CHANGING MW STEPS There is a MW step switch to choose 9 KHz. steps or 10 KHz. Step inside the battery compartment. The frequency range for 10 KHz. Step is KHz., for 9 KHz. Is KHz. Use a sharp object to press the RESET button (22) after the MW step is changed, otherwise the change may not be effective. 5. USING THE RE-SET FUNCTION 16
17 This radio uses computer software that may enter to an unending loop due to outside interference or static, use a sharp object to press the RESET button (22) if the radio is not working properly. I. SPECIAL NOTES 1. WIDE / NARROW BANDS SELECTION FOR AM The wide band is +/- 6 KHz., the narrow band is +/- 3 KHz. When receiving strong signal stations of MW and SW, set to wide band for better sound quality. When you find adjacent stations are intruding into the station that you receive, set the radio to the narrow band. 2. MW / SW RF GAIN Since AM signal (especially in the SW bands) sometimes fades greatly and is beyond the AGC (automatic gain control) scope, you can use the RF gain to manually adjust the radio for better listening effect. 3. DX / LOCAL SWITCH FOR MW /SW If you find distorted FM radio stations or TV sound signals intruding to the MW or SW band, you should set this DX / LOCAL switch (12) to the local position to eliminate the interference. If you do not have such interference, you should set this switch to the DX position. 4. FM MONO OR FM STEREO If you are using the speaker on the radio to listen to FM programs, always use set the AM / FM MODE switch (30) to the FM mono position for better sound to noise ratio and the least interference. Set this switch to FM stereo mode when you are using headphone to listen to stereo FM stereo programs. 17
18 SPECIFICATIONS FREQUENCY RANGE FM: MHz. MW: KHz. (9 KHz. Step) KHz. (10 KHz. Step) SW1: KHz. SW2: KHz. SW3: KHz. ACCURACY FM: 10 KHz. AM: 1 KHz. SENSITIVITY FM > 5 uv MW > 0.2mV/m SW > 20 uv SELECTIVITY Wide: > 40 db (100x) Narrow: > 60 db (1000x) IMAGE INTERFERENCE CONTROL FM: > 46 db (200x) MW: > 60 db (1000x) SW: > 40 (100x) MEMORY PRE-SETS 18
19 10 for each band Total 50 AM IF OUTPUT For expansion of CW, SSB, DRM, SSTV, etc. DUAL CONVERSION First IF: MHz. Second IF: 455 KHz. AUDIO POWER OUTPUT (USING AC) > 2500 mw POWER SUPPLY Battery: 4 x D cells or 4 x AA cells DC: 6 9 V. (center is negative) AC: 220V. / 50 Hz. SPEAKER 8-OHM 5W EXTERNAL HEADPHONE 3.5 mm - 32 ohm DIMENSIONS 290 X 185 X 70 mm Please visit our ebay shop to find more updated items of your interest from time to time by visiting the following URL, thank you: 19
WORLD BAND RADIO. AM/FM/SW/L W/AIR Band /SSB radio with LCD backlight OWNER S MANUAL
 WORLD BAND RADIO AM/FM/SW/L W/AIR Band /SSB radio with LCD backlight display and keypad direct entry OWNER S MANUAL WARNING Do not expose this appliance to rain or moisture Do not submerge or expose to
DEGEN DE1103 FM / MW / SW RECEIVER FM / AM / SSB / CW MODES OPERATING MANUAL
 DEGEN DE1103 FM / MW / SW RECEIVER FM / AM / SSB / CW MODES OPERATING MANUAL (1) Power/Sleep (2) Reset (3) Lock Key (4) Time/Delete (5) St./Mono/SSB LED (6) Stereo/Mono/SSB (7) FM Band/Station Search Backward
D-808. FM Stereo/LW/MW/SW-SSB AIR RDS Synthesized Receiver
 XHDATA D-808 FM Stereo/LW/MW/SW-SSB AIR RDS Synthesized Receiver WARNING Do not expose this appliance to rain or moisture Do not submerge or expose to water Protect from high humidity and rain Only operate
DE1103 PLL FM STEREO/SW.MW.LW DUAL CONVERSION SYNTHESIZED WORLD RECEIVER OPERATION MANUAL
 DE1103 SYNTHESIZED WORLD RECEIVER SYNTHESIZED WORLD RECEIVER DE1103 OPERATION MANUAL INDEX POWER SUPPLY POWER SUPPLY... 1 POWER INDICATION... 3 BATTERY CHARGER... 4 BEFORE OPERATION..... 6 SET THE CLOCK...
PLL SYNTHESIZED RECEIVER FM STEREO / MW / LW / SW-SSB / AIR BAND OPERATION MANUAL TECSUN PL-660. Shortwave BW
 PL-660 PLL SYNTHESIZED RECEIVER FM STEREO / MW / LW / SW-SSB / AIR BAND OPERATION MANUAL TECSUN Shortwave BW FAST khz SYNC USB PL-660 AM SYNCHRONOUS DETECTOR FM STEREO/LW/MW/SW-SSB/AIR PLL SYNTHESIZED
INDEX POWER SOURCES OPERATING ON BATTERY BATTERY REPLACEMENT
 INDEX SOURCES... 1 OPERATING ON BATTERY... 1 OPERATING ON AC ADAPTOR... INDICATION... 3 BATTERY... 3 CLOCK FUNCTION...4 SET THE CLOCK...4 SELECT TIME MODE...5 MW STEP 9K/10K SELECTION...5 TURN ON / OFF
TECSUN TECSUN PL-680 PLL SYNTHESIZED RECEIVER FM STEREO / MW / LW / SW-SSB / AIR BAND OPERATION MANUAL TECSUN ELECTRONIC IND. LTD.
 TECSUN TECSUN PL-680 PLL SYNTHESIZED RECEIVER FM STEREO / MW / LW / SW-SSB / AIR BAND OPERATION MANUAL TECSUN ELECTRONIC IND. LTD. Address: Rm 11, 13/F, Block A, Hoi Luen Ind. Ctr., 55 Hoi Yuen Road, Kwun
R9939 ROBERTS. PLL Synthesised 3 band mains battery radio. Sound for Generations. Please read this manual before use
 ROBERTS Sound for Generations R999 PLL Synthesised band mains battery radio Please read this manual before use Contents Important Information... 1 Automatic FM setup... 2 Controls... - Display... Battery
TECSUN PL-365. FM stereo / MW / SW-SSB DSP RECEIVER OPERATION MANUAL ELECTRONIC IND. LTD. RADIOS AUSTRALIA
 TECSUN TECSUN RADIOS AUSTRALIA PL-365 FM stereo / MW / SW-SSB DSP RECEIVER OPERATION MANUAL TECSUN PL-365 FM STEREO/MW/SW-SSB DSP RECEIVER TECSUN RADIOS TECSUN AUSTRALIA ELECTRONIC IND. LTD. PL-365 Functional
Controls. LCD display A B C D E F
 H205 Version 1 1 2 3 4 5 6 13 12 11 7 8 9 10 14 15 17 18 16 1 19 Controls 1 2 3 4 5 6 7 8 9 10 11 12 13 14 15 16 17 18 19 Carrying strap holder Preset 1 Preset 2 Preset 3/STEP button Preset 4 LCD display
programming. Fifty-Four Memory Pre-sets offer instant access to your favorite stations on
 FEATURES Continuous Tuning permits reception of more stations than ever before without any break on LW, MW or SW bands. Cancel Button allows you to instantly change incorrect information keyed into the
Radio BMR100 INSTRUCTION MANUAL. ENGLISH (Original instructions)
") ENGLISH (Original instructions) INSTRUCTION MANUAL Radio BMR00 WARNING: For your personal safety, READ and UNDERSTAND before using. SAVE THESE INSTRUCTIONS FOR FUTURE REFERENCE. Symbols The following show
ENGLISH (Original instructions) INSTRUCTION MANUAL Radio BMR00 WARNING: For your personal safety, READ and UNDERSTAND before using. SAVE THESE INSTRUCTIONS FOR FUTURE REFERENCE. Symbols The following show
DT-250 Instruction manual AM/FM stereo 2 bands PLL Synthesized Personal Radio
 DT-250 Instruction manual AM/FM stereo 2 bands PLL Synthesized Personal Radio Controls 1. Headphone/Antenna jack To improve FM reception during speaker use, leave headphones or external antenna device
H201 中文 GB Version 1
 H201 中文 GB Version 1 Controls 1 2 3 4 5 6 7 8 9 10 11 12 13 14 15 16 17 LCD Display Preset stations (preset 3 also for tuning step change) Nap timer (Short timer) Power button Band and Time Set button
PR-D5 中文 GB. Version 1
 PR-D5 中文 GB Version 1 1. 2. 3. Important safety instructions Read and understand all safety and operating instructions before the radio is operated. Retain instruction: The safety and operating instructions
Rotary tuning knob /Fine tuning Clarify. Music/Normal /News Tone control SSB fine tune. Telescopic Antenna Earphones socket
 Control Locations Power/Sleep Power On/off/Alarm off/sleep function Display Switch between radio frequency and time while radio is power on Mode Mode set up (please see below mode button set up) Radio
R9999 ROBERTS. PLL Synthesised 3 band radio with station name display. Sound for Generations. Please read this manual before use
 ROBERTS Sound for Generations R9999 PLL Synthesised 3 band radio with station name display Please read this manual before use Contents Important Information... 1 Automatic plug and play setup... 2 Controls...
DX-395. FM/AM/SW1/SW2 PLL Synthesized Receiver OWNER S MANUAL. Cat. No Please read before using this equipment.
 20-225.fm Page 1 Wednesday, August 4, 1999 10:07 AM Cat. No. 20-225 OWNER S MANUAL Please read before using this equipment. DX-395 FM/AM/SW1/SW2 PLL Synthesized Receiver 20-225.fm Page 2 Wednesday, August
DT-120 / DT-180V. GB Version 1
 DT-120 / DT-180V GB Version 1 1 1 2 3 4 5 6 7 8 9 10 11 Controls LCD display Band selection DBB (Deep Bass Booster) On/Off Tuning Control Stereo/Mono switch Power On/Off Volume Control Lock Switch Battery
SP980. Cordless Stereo 863MHZ. Speaker System. User s Manual INTRODUCTION FEATURES. Please read before using the equipment
 SP980 Cordless Stereo 863MHZ Speaker System INTRODUCTION This 863 MHz stereo wireless speaker system uses latest wireless technology that enables you to enjoy music and TV sound anywhere inside or outside
Power Supply. Note: you can t charge the standard battery or rechargeable battery via Mains operation. 2
 MMR-77 GB Version 1 1 1 2 3 4 5 6 7 8 9 Controls AM/FM band switch Emergency buzzer Dynamo power AM/FM band indicator Tuning LED indicator Charging LED indicator Illumination button Dial scale Dial pointer
PR-D9CL. GB Version 1
 PR-D9CL GB Version 1 Table of contents Important safety instructions... 2-3 Controls... 4-6 Operating your radio Search tuning AM / FM... 8 Manual tuning AM / FM / Setting up the tuning step increment...
MMR-77CL 中文 GB. Revision 1
 MMR-77CL 中文 GB Revision 1 Controls 1 2 3 4 5 6 7 8 AM/FM band switch Dynamo power AM/FM band indicator Tuning LED indicator Charging LED indicator Backlight button Dial scale Dial pointer 9 Rotary tuning
TECSUN OPERATION MANUAL. FM Stereo/LW/MW/SW SSB PLL Synthesized Receiver TECSUN ELECTRONIC IND. LTD.
 TECSUN FM Stereo/LW/MW/SW SSB PLL Synthesized Receiver S-8800 OPERATION MANUAL TECSUN ELECTRONIC IND. LTD. CONTENTS 1. LCD SYMBOL DESCRIPTION... 1 2. LOCATION OF CONTROLS (FRONT OF THE RADIO)... 2 LOCATION
DT-800 中文 GB. Version 1
 DT-800 中文 GB Version 1 1. 2. 3. 4. 5. 6. 7. 8. 9. Important safety instructions Read and understand all safety and operating instructions before the radio is operated. Retain instructions: The safety and
ATS-909X GB F E NL D Version 1
 ATS-909X GB F E NL D Version 1 Important safety instructions 1. Read and understand all safety and operating instructions before the radio is operated. 2. Retain instruction: The safety and operating instructions
WIRELESS STEREO WOODEN PANEL SPEAKER SYSTEM
 WIRELESS STEREO WOODEN PANEL SPEAKER SYSTEM Owner s Manual Please read before using the equipment INTRODUCTION The 863 MHz stereo wireless speaker system uses latest wireless technology that enables you
Always there to help you. Register your product and get support at AJ3232. Question? Contact Philips.
 Always there to help you Register your product and get support at www.philips.com/support Question? Contact Philips AJ3232 User manual Contents 1 Important 2 Safety 2 2 Your clock radio 3 Introduction
Always there to help you. Register your product and get support at AJ3200. Question? Contact Philips.
 Always there to help you Register your product and get support at www.philips.com/support Question? Contact Philips AJ3200 User manual Contents 1 Important 2 2 Your clock radio 2 Introduction 2 What's
ENGLISH PORTUGUÊS NEDERLANDS DAB200
 DEUTSCH ENGLISH FRANÇAIS NEDERLANDS ESPAÑOL PORTUGUÊS NORSK DAB200 Contents Introduction..... 2 What is DAB + Digital Radio?.... 2 Setting up..... 3 Backlit display.... 4 Using headphones...... 4 Your
Always there to help you. Register your product and get support at AJ3200. Question? Contact Philips.
 Always there to help you Register your product and get support at www.philips.com/support Question? Contact Philips AJ3200 User manual Contents 1 Important 2 Safety 2 2 Your clock radio 3 Introduction
ROBERTS R9914. Sound for Generations. Multi-band digital preset stereo world radio. Please read this manual before use
 ROBERTS Sound for Generations WORLD SERVICE F M S te re o / M W /L W / S W R a d io R e c e iv e r R9914 Multi-band digital preset stereo world radio 2. 3 0 0 2. 4 9 5 1 3. 5 0 0 1 3. 8 7 0 T u n e / S
Always there to help you. Register your product and get support at AJ3400. Question? Contact Philips.
 Always there to help you Register your product and get support at www.philips.com/support Question? Contact Philips AJ3400 User manual Contents 1 Important 3 2 Your clock radio 4 What's in the box 4 3
TECSUN TECSUN RADIOS AUSTRALIA. TECSUN RADIO CO., LTD. RADIOS AUSTRALIA
 TECSUN TECSUN www.tecsun.com.cn RADIOS AUSTRALIA TECSUN RADIOS AUSTRALIA TECSUN RADIO CO., LTD. VER.2 03-2010 24/9 Powells Road, rookvale, N 2100 Australia Ph: +61 2 9939 4377 Email: info@tecsunradios.com.au
FM-stereo/ LW / MW / Shortwave / Aircraft Band Radio Receiver with SSB (Single Side Band) OWNER'S MANUAL
 OWNER'S MANUAL") TECSUN S-2000 FM-stereo/ LW / MW / Shortwave / Aircraft and Radio Receiver with SS (Single Side and) OWNER'S MANUAL TECSUN RADIO CO., LTD. MADE IN CHINA FEATURES Thank you for purchasing the TECSUN S-2000.
TECSUN S-2000 FM-stereo/ LW / MW / Shortwave / Aircraft and Radio Receiver with SS (Single Side and) OWNER'S MANUAL TECSUN RADIO CO., LTD. MADE IN CHINA FEATURES Thank you for purchasing the TECSUN S-2000.
Always there to help you. Register your product and get support at AJ5305D_12. Question? Contact Philips.
 Always there to help you Register your product and get support at www.philips.com/welcome Question? Contact Philips AJ5305D_12 User manual Contents 1 Important 3 Safety 3 2 Your Docking Entertainment System
Important safety instructions
 MMR-88 Version 1 Important safety instructions 1. 2. 3. 4. 5. 6. 7. 8. 9. Please read these instructions carefully. Please keep these instructions for future reference. Heed all warnings Follow all instructions
Important safety instructions
 RCR-29 GB Version 1 Important safety instructions VERY IMPORTANT PLEASE READ Sangean suggest that you keep your AC Adapter at least 12 inches away from the radio while listening to the AM Band. Your Sangean
RCR-24 中文 GB. Version 1
 RCR-24 中文 GB Version 1 GB Please note not all AC adapters are alike. The AC adapter that is included with this radio is designed to be used exclusively with this device. Do not use an AC adapter that differs
A WORLD OF LISTENING WARNING: TO PREVENT FIRE OR ELECTRIC SHOCK HAZARD, DO NOT EXPOSE THIS PRODUCT TO RAIN OR MOISTURE.
 DDR-3 FM RDS/DAB digital radio A WORLD OF LISTENING THE LIGHTNING FLASH AND ARROW- HEAD WITHIN THE TRIANGLE IS A WARNING SIGN ALERTING YOU OF DANGEROUS VOLTAGE INSIDE THE RADIO. WARNING: TO PREVENT FIRE
Always there to help you. Register your product and get support at AJ3400/79. Question? Contact Philips.
 Always there to help you Register your product and get support at www.philips.com/support Question? Contact Philips AJ3400/79 User manual Contents 1 Important 3 2 Your clock radio 4 What's in the box 4
Always there to help you. Register your product and get support at AJB4300. Question? Contact Philips.
 Always there to help you Register your product and get support at www.philips.com/support Question? Contact Philips AJB4300 User manual Contents 1 Important 2 Safety 2 2 Your FM/DAB+ clock radio 3 Introduction
American Red Cross SOLARLINKFR360
 American Red Cross SOLARLINKFR360 Self-powered Digital AM/FM/NOAA Weather Radio with Flashlight, Solar Power and USB Cell Phone Charger American Red Cross Radio Line By Etón Corporation Owner s manual
ENGLISH User s Guide. Safety & Regulatory Information
 ENGLISH User s Guide Creative SoundWorks 500DAB Information in this document is subject to change without notice and does not represent a commitment on the part of Creative Technology Ltd. No part of this
Contents ... What is DAB + Digital Radio?... 2 Setting up... 3 Backlit display... 4 Using headphones... 4 Your radio Switch off...
 Contents Introduction... 2 What is DAB + Digital Radio?........... 2 Setting up........... 3 Backlit display.............. 4 Using headphones........... 4 Your radio... 5 Switch on........... 6 Telescopic
 Register your product and get support at www.philips.com/welcome AJH5100 EN User manual Contents 1 Important 3 Safety 3 2 Your clock radio 4 Introduction 4 What's in the box 4 Overview of the main unit
Always there to help you. Register your product and get support at AJ5305D/05. Question? Contact Philips.
 Always there to help you Register your product and get support at www.philips.com/welcome Question? Contact Philips AJ5305D/05 User manual Content 1 Important 2 Safety 2 2 Your Docking Entertainment System
Always there to help you. Register your product and get support at AJ7045D. Question? Contact Philips.
 Always there to help you Register your product and get support at www.philips.com/welcome Question? Contact Philips AJ7045D User Manual Contents 1 Important 3 Risk of swallowing batteries 3 2 Your clock
SHORTWAVE BANDS 120m 90m 75m 60m 49m 41m 31m m 19m 16m 15m 13m 11m.
 37 25 26 27 28 AM EXT ANT STANDBY LINE OUT AM RF GANI REC TIME SET MANUAL AUTO UP DOWN WIDE NARR-AM STEREO MONO-FM 31 32 33 29 30 DC IN 6V MW-STEP 9K 10K NEWS MUSIC NORM VOLUME 34 35 36 1 38 3 ATS-909
S350 OPERATION MANUAL AM/FM/SHORTWAVE RADIO
 www.etoncorp.com S350 OPERATION MANUAL AM/FM/SHORTWAVE RADIO TABLE OF CONTENTS NEED HELP? HERE S HOW TO CONTACT US: From the United States: (800) 872-2228 From Canada: (800) 637-1648 From Everywhere Else:
Register your product and get support at AJ7010. User manual
 Register your product and get support at AJ7010 EN User manual A o a b n m c d e f l k j i h g B a b c g f e d C D E F EN 1 Important Read these instructions. Heed all warnings. Follow all instructions.
Assistive Listening Systems. RX-6 User s Guide
 Assistive Listening Systems RX-6 User s Guide Page ii RX-6 User s Guide Copyright Information Contents Introduction 1 Controls 2 Installing Batteries 3 Operation 3 Tuning the RX-6 4 Changing Preset Channels
E1100. AM/FM/Shortwave Radio OWNER S MANUAL
 E1100 AM/FM/Shortwave Radio OWNER S MANUAL DO YOU NEED HELP? Contact Us. If you need help, please contact us, Monday-Friday, 8:30 a.m.-4:00 p.m., North American Pacific Time. 1-800-872-2228 from the U.S.;
Dear Valued Customer,
 Dear Valued Customer, Thank you for choosing Listen! All of us at Listen are dedicated to provide you with the highest quality products available. We take great pride in their outstanding performance because
USER MANUAL. Model No.: DB-230
 USER MANUAL Model No.: DB-230 1 Location of controls 1. UP Press the button to select the different DAB station under DAB mode or press and hold to quick scan the FM station in upward frequency under FM
OWNER S MANUAL FRS RADIO
 OWNER S MANUAL FRS RADIO 21-1860 INTRODUCTION Your RadioShack FRS radio is a portable, easy-to-use, two-way radio that you can carry almost anywhere. Use it at shopping malls, amusement parks, sports events,
Always there to help you. Register your product and get support at AJ2000. Question? Contact Philips.
 Always there to help you Register your product and get support at www.philips.com/support Question? Contact Philips AJ2000 User manual Contents 1 Important 2 Safety 2 2 Your clock radio 3 Introduction
JHD905. Owner s Manual JENSEN MUTE DISP AM/FM AUX WB TIMER HEAVY DUTY JENSEN VOL+ AUDIO MENU VOL- SEEK SEEK AM/FM/WB RECEIVER JHD905
 Owner s Manual MUTE DISP AM/FM AUX WB TIMER HEAVY DUTY VOL+ FM TUN AUDIO MENU TUN + VOL- AM/FM/WB RECEIVER 1 2 3 4 5 6 + AUXIN Thank You! Thank you for choosing a Jensen product. We hope you will find
Always there to help you. Register your product and get support at AJ4300. Question? Contact Philips.
 Always there to help you Register your product and get support at www.philips.com/support Question? Contact Philips AJ4300 User manual Contents 1 Important 2 Safety 2 2 Your clock radio 3 Introduction
DENVER CR-918BLACK ENGLISH FUNCTION AND CONTROLS
 DENVER CR-918BLACK ENGLISH 14 15 FUNCTION AND CONTROLS 1. / TUNE - 2. TIME SET MEM/MEMORY+ 3. SNOOZE / SLEEP 4. ON / OFF 5. / TUNE + 6. VOLUME DOWN - / ALARM 1 ON/OFF SET 7. VOLUME UP + / ALARM 2 ON/OFF
DBB. On Off. Vol. Lock TUNING DBB FM STEREO/AM PLL SYNTHESIZED RECEIVER DT 110 BAND MO./ST.
 1 DBB On Off 11 12 Vol. 13 Lock 14 2 3 4 DBB TUNING FM STEREO/AM PLL SYNTHESIZED RECEIVER DT 110 BAND MO./ST. 5 6 7 8 9 10 2 LOCATION OF CONTROLS To insure proper operation, please familiarize yourself
Always there to help you. Register your product and get support at AJ3400/37. Question? Contact Philips.
 Always there to help you Register your product and get support at www.philips.com/support Question? Contact Philips AJ3400/37 User manual Contents 1 Important 3 Safety 3 2 Your clock radio 4 What's in
IMPORTANT SAFETY INSTRUCTIONS
 WR-2 GB Version 1 IMPORTANT SAFETY INSTRUCTIONS 1. 2. 3. 4. 5. 6. 7. 8. 9. Read these instructions. Keep these instructions. Heed all warnings. Follow all instructions. Do not use this apparatus near water.
Features:...2 Installing the back-up Batteries:...2 Connecting AC Power:...2 Connecting an External Antenna:...3 Connecting the Weather Radio to an
 Features:...2 Installing the back-up Batteries:...2 Connecting AC Power:...2 Connecting an External Antenna:...3 Connecting the Weather Radio to an External System:...3 Location of the Weather Radio:...3
ULTRASOUND DETECTOR D240x OPERATING INSTRUCTIONS. Pettersson. Phone: Fax:
 ULTRASOUND DETECTOR D240x OPERATING INSTRUCTIONS Pettersson www.batsound.com Phone:+46 1830 3880 Fax:+46 1830 3840 e-mail: info@batsound.com INTRODUCTION The ultrasound detector D240x is an easy-to-handle
Applications: FM wireless audio, USB PC audio broadcasting, wireless microphones, maternal and child care.
 Product Description 1: The use of advanced digital audio signal processing (DSP) technology and FM modulation phase-locked loop (PLL) to make sound more realistic, more stable performance, long working
CARE AND SAFETY ! SERVICE! Environmental note. 02 Yacht Boy 50, GB :27 Uhr Seite 22
 PT-50 GB Version 1 02 Yacht Boy 50, GB 19.08.2003 14:27 Uhr Seite 22 LOCK SUMMER Santiago New York Chicago Denver 12/24 Los Angeles Honolulu Wellington H/W SUMMER ON/OFF SLEEP ALARM SET ALARM Hr. TIME
Portable Digital & FM Radio
 SHELFORD II Portable Digital & FM Radio SEL-DAB-CRM-2 UK Instructions Guide Contents Controls And Functions... 1 What s In he Box?...3 Support... 4 Instructions Guide...5 Basic Operation... 5 DAB/DAB+
ROBERTS. DAB / DAB+ / FM RDS digital portable radio. Please read this manual before use
 ROBERTS DAB / DAB+ / FM RDS digital portable radio Please read this manual before use Contents Controls... 2-3 Battery operation...4 Using the AC adaptor...5 Operating your radio - DAB...6 Selecting a
MFJ-752C SIGNAL ENHANCER II
 MFJ-752C SIGNAL ENHANCER II INTRODUCTION The improved MFJ-752C SIGNAL ENHANCER II is comprised of two tunable audio filtering systems designed to clarity and remove interfering signals from both voice
ENVIRONMENTAL PROTECTION
 ENVIRONMENTAL PROTECTION Do not dispose of this product with the normal household waste at the end of its life cycle. Return it to a collection point for the recycling of electrical and electronic devices.
DX-396. AM/SW/FM Stereo PLL Portable Receiver OWNER S MANUAL. Cat. No Please read before using this equipment.
 20-226.fm Page 1 Tuesday, December 7, 1999 1:48 PM Cat. No. 20-226 OWNER S MANUAL Please read before using this equipment. DX-396 AM/SW/FM Stereo PLL Portable Receiver 20-226.fm Page 2 Tuesday, December
CONTROL LOCATIONS. 11.Multi functions for LW band knob,lw ATS and Standby by radio.
 CONTENTS Features 2 Control Locations 3 Display Information 7 Choosing a Power Supply 8 Preliminary Settings 13 Zero Second Set 19 Tuning Mode 23 Scan Tuning 32 Memory Tuning 35 ATS(Auto Tuning System)
USER GUIDE FOR FU-05B 0.5W FM TRANSMITTER
 USER GUIDE FOR FU-05B 0.5W FM TRANSMITTER CAUTIOIN: NEVER operate the transmitter without connecting a suitable antenna or dummy load to the output otherwise there is a serious danger of destruction of
ROBERTS RD-25. Sound for Generations. MW/FM RDS/DAB Digital Portable Radio. Please read this manual before use
 ROBERTS Sound for Generations RD-5 MW/FM RDS/DAB Digital Portable Radio Please read this manual before use Contents Controls... -4 Battery operation...5 Mains operation...5 Operating your radio - DAB...6
IEM 100 UHF wireless system. user manual
 IEM 100 UHF wireless system user manual Musikhaus Thomann Thomann GmbH Hans-Thomann-Straße 1 96138 Burgebrach Germany Telephone: +49 (0) 9546 9223-0 E-mail: info@thomann.de Internet: www.thomann.de 18.06.2018,
I.D.A. Operation manual
 TRX-200 Wide ide Band Receiver Operation manual Thank you for purchasing the TRX-200 all modes wide band monitoring receiver. Please read this operating manual carefully to avoid miss operation of the
LnR Precision, Inc. 107 East Central Avenue, Asheboro, NC
 LD5 CW/SSB QRP Transceiver Quick guide manual Description: At the development base of the digital signal processing unit, an algorithm is embedded for IQ processing of the channels with phase suppression
330 DUAL-CHANNEL CAMERA-MOUNT UHF WIRELESS MICROPHONE SYSTEM
 330 DUAL-CHANNEL CAMERA-MOUNT UHF WIRELESS MICROPHONE SYSTEM 330UPR - 35BT - 35HT - 35XT INSTRUCTION MANUAL Thank you for purchasing the Azden 330 Dual-Channel Wireless Microphone system. The components
AZATOM SONANCE T1 Digital Radio. DAB+/DAB/FM Radio Alarm Clock. User Manual. This manual is available to download online at
 AZATOM SONANCE T1 Digital Radio DAB+/DAB/FM Radio Alarm Clock User Manual This manual is available to download online at www.azatom.com Thank you for shopping with AZATOM Please read this manual carefully
Register your product and get support at AE5430. EN User manual
 Register your product and get support at www.philips.com/welcome AE5430 User manual Concents 1 Important 4 Hearing Safety 4 English 2 Your FM/DAB+ radio 5 Introduction 5 What s in the box 5 Overview of
VLR-502 Wireless System. Owner s Guide
 VLR-502 Wireless System Owner s Guide Introduction Thanks for purchasing a Vokal wireless microphone. Please read this manual carefully before connecting the product and turning it on, in order to understand
LOCATION OF CONTROLS Congratulations and welcome to The SANGEAN WORLD OF LISTENING!
 LOCATION OF CONTROLS Congratulations and welcome to The SANGEAN WORLD OF LISTENING! To insure proper operation please famililarize Yourself with these instructions before using your New receiver 1. On/Off
Model Number: GSDAB3004
 DAB/FM Digital Radio & Alarm Clock Model Number: GSDAB3004 Please read these instructions carefully and keep for future reference For Customer Services & Spare Parts please call 0845 209 7461 Opening times:
UHF Wireless Transmitter
 UHF Wireless Transmitter Model: EM-100 Diversity Wireless System for On Stage In-ear Monitor Table of Contents System Components...1 Transmitter Features...2 Receiver Features...4 System Setup...5 Specifications...7
DIGITAL RADIO INCLUDING FM, DAB AND DAB+
 DIGITAL RADIO INCLUDING FM, DAB AND DAB+ INSTRUCTION MANUAL Safety Precautions To achieve the utmost in enjoyment and performance, and in order to become familiar with its features, please read this manual
OWNER S MANUAL 311DRH 311DR 221R 211R 200R 31LT 31IT 32BT 32IT 31HT 31XT
 VHF PERFORMANCE SERIES WIRELESS MICROPHONE SYSTEMS OWNER S MANUAL 311DRH 311DR 221R 211R 200R 31LT 31IT 32BT 32IT 31HT 31XT AZDEN CORPORATION P.O. Box 10-147 New Hyde Park Road Franklin Square, NY 11010
Always there to help you. Register your product and get support at AE2430. User manual
 Always there to help you Register your product and get support at www.philips.com/support AE2430 User manual Contents 1 Important 2 Safety 2 Notice 3 2 Your Portable Radio 5 Introduction 5 What s in the
HDR-18. GB Version 1
 HDR-18 Version 1 HD Radio technology manufactured under license from ibiquity Digital Corporation. U.S. and Foreign Patents. HD Radio and the HD, HD Radio and Arc logos are proprietary trademarks of ibiquity
RD-21 ROBERTS. FM RDS/DAB digital radio. Sound for Generations. Please read this manual before use
 ROBERTS Sound for Generations RD- FM RDS/DAB digital radio Please read this manual before use Contents Controls... Battery operation...3 Mains operation...3 Operating your radio - DAB...4 Selecting a station
Revival UNO. DAB / DAB+ / FM RDS portable digital radio. Please read this manual before use
 Revival UNO / + / FM RDS portable digital radio Please read this manual before use Contents Controls... 2-3 Battery operation...3 Using the buttons...3...4 Operating your radio -...5 Selecting a station
R9962 ROBERTS. LW/MW/SW1-9/FM 12 band Portable World Radio. Sound for Generations
 ROBERTS Sound for Generations R9962 LW/MW/SW1-9/FM 12 band Portable World Radio Contents Controls... 2-3 Batteries... 4 Operating your radio - FM... 5 Operating your radio - Medium and Long wave... 6 Operating
DRM 2010 Receiver for Digital Radio Mondiale (Digital Radio on Long-, Medium- and Shortwave) Operating Instructions
 Operating Instructions") RM 2010 Receiver for igital Radio Mondiale (igital Radio on Long-, Medium- and Shortwave) Operating Instructions Order-No. RM2010 Revison level: 03/2004 Order-no.: RM2010 Revision level: 03/2004 MAYAH
RM 2010 Receiver for igital Radio Mondiale (igital Radio on Long-, Medium- and Shortwave) Operating Instructions Order-No. RM2010 Revison level: 03/2004 Order-no.: RM2010 Revision level: 03/2004 MAYAH
FM RADIO TRANSMITTER
 FM RADIO TRANSMITTER Instruction Manual i702 Please read this manual carefully before operating and save it for future reference. Questions? Please visit http://www.i-luv.com CONTENTS INTRODUCTION General
310 DIVERSITY CAMERA-MOUNT UHF WIRELESS MICROPHONE SYSTEM
 310 DIVERSITY CAMERA-MOUNT UHF WIRELESS MICROPHONE SYSTEM 310UDR - 35BT - 35HT - 35XT INSTRUCTION MANUAL Thank you for purchasing the Azden 310 Diversity Wireless Microphone system. The components included
The 21st Century R-390A/URR Reference Y2K-R3 Edited 7/09: No Technical Changes Chapter 2 - Operation. Page Table Of Contents 2-1
 Edited 7/09: No Technical Changes Chapter 2 - Operation Page Table Of Contents 2-1 2.1 Introduction. 2-2 2.2 Controls and Indicators 2-2 2.3 Operating Instructions And Control Settings 2-9 2.3.1 Pre-operational
INSTALLATION AND OPERATION GUIDE
 VHF Marine Radio RT-311 INSTALLATION AND OPERATION GUIDE Navicom plaisance: Z.A. des Boutries, 78700 Conflans Ste Honorine Tel: 01.39.72.19.90 Fax: 01.39.19.28.98 Navicom Pro: 3, rue J. Cugnot, Z.A.C Petit
TG37 SSB BFO ADAPTER
 TG37 SSB BFO ADAPTER Operation Manual History Rev 1.0: Sep-24-2011 by Tao Qu Rev 1.1: Oct-01-2011 by Tao Qu Table of Contents 01. Before Using 02. Power Supply 03. Power On and Power Off 04. Application
Icom IC-9100 HF/VHF/UHF transceiver
 263 Walsall Road, Great Wyrley, Walsall, WS6 6DL Established 1997. Open Monday - Friday 9am - 5pm and Saturday 9.30am - 4pm Tel: 01922 414 796 Fax: 01922 417829 Skype: radioworld_uk Icom IC-9100 HF/VHF/UHF
DEUTSCH NORSK ENGLISH SVENSKA FRANÇAIS DANSK NEDERLANDS ČEŠTINA ITALANIO Hersteller UR190
 DEUTSCH ENGLISH FRANÇAIS NEDERLANDS ITALANIO NORSK SVENSKA DANSK ČEŠTINA Hersteller Wörlein GmbH Tel.: +49 9103/71670 Gewerbestrasse 12 Fax.: +49 9103/716712 D 90556 Cadolzburg Email. info@woerlein.com