3 OSCILLATOR ANALOG MONOPHONIC SYNTHESIZER SE-02 A USER S GUIDE TO THE ROLAND/STUDIO ELECTRONICS SE-02
|
|
|
- Randell Daniel
- 6 years ago
- Views:
Transcription
1 3 OSCILLATOR ANALOG MONOPHONIC SYNTHESIZER SE-02 A USER S GUIDE TO THE ROLAND/STUDIO ELECTRONICS SE-02 1
2 2
3 ACKNOWLEDGEMENTS: This manual was assembled, illustrated, and written by Sunshine Jones. All of the contents is taken from either his personal experience, existing documentation, and techniques submitted and found in the public domain. The document is intended as a companion guide for the Roland/Studio Electronics SE-02 Synthesizer Module. It is in no way offered as a criticism, or intended to be an authoritative guide to replace the official documentation which accompanies the commercial purchase of Roland Boutique, or Roland AIRA musical instruments. Rather, this manual is intended to support the musician, the user of these and other synthesizer modules and inspire them to create music, share sounds, and fully realize the synthesizers in front of them. In the tradition of owner s manuals, rarely are they opened until problems arise. We tell you over and over again to RTFM, but do you listen? No, no you don t. Manuals should be both tools for reference and instruction, as well as inspirational guides to possibility. An owner s manual should be equally a pre purchase discovery, meant to inspire the curious with capability and possibility, and a post purchase celebration of depth, technique, guidance, and surprises. But this is by no means the last word. So many people have read and re read a manual only to still have no idea what the manual was attempting to suggest. This owner s manual is offered free of charge to anyone curious, or frustrated by the tiny little leaflet which covers the operations of the SE-02 in several languages, as a legible alternative to the official documentation. This manual is not associated in any way, personally or professionally with anyone connected to the Roland Corporation or Studio Electronics. The task was undertaken in a moment of fury, and assembled, proof read, and then hastily produced exclusively for love, and pleasure. It is our hope that as the result you will begin to explore and discover layers of sound and joy which were previously overlooked. We hope and trust that you will use the PATCH worksheets to document your discoveries, and our extensive encouragement to share, and import patches of your own into a thriving community of exploration and delight. If you wish to correspond with the author of this manual you may do so by navigating your web browser to the following destination: The original article and a bank of patches may be found within the non-fiction section of the site. While no rights are reserved for the copyrighted materials, nor the registered trademarks discussed or absorbed into this manual, the assemblage itself and subsequent sound examples, illustrations, and concept are offered exclusively under the Creative Commons license of share and share alike. This is and shall always be free of charge to the reader, and user of the Roland/Studio Electronics SE-02 synthesizer module, and must never be offered for sale or barter. This is freeware, and free information for all. With Love Sunshine Jones August 2017 San Francisco, California Version 0.1C 3
4 CONTENTS Acknowledgements 3 Basic Connections 6 Introduction 7 I. GENERAL FUNCTIONS Common Section 8 USB Interface 9 Data Backup & Restore 10 Preset Section 11 Manual Mode 11 Compare 12 Keyboard 12 Shifting The Pitch Range. 12 Transpose.. 12 II. FUNCTIONS FOR SOUND CREATION Control. 13 Oscillators. 14 XMOD. 16 Mixer. 17 Filter. 18 Filter Envelope. 20 Amplifier Envelope. 21 LFO. 22 Delay. 24 III. FUNCTIONS FOR PERFORMANCE Sequencer Mode.. 25 Selecting and Playing Patterns. 25 Entering Notes. 25 Entering Gates. 26 Synth Parameter Values. 26 Performance Settings. 26 Sequence Parameteres. 27 Song Mode.. 28 Selecting/Playing Songs 28 Song Edit. 28 IV. SYSTEM SETTINGS Patch Setup 30 Velocity Routing 30 Systen Setup. 31 Firmware Update. 31 Main Specifications.. 32 Options.. 32 IV. CV/GATE/TRIGGER CV 33 GATE 33 VCF-VC 33 CV JACK SETTINGS 33 TRIGGER 34 V. MIDI 35 MIDI Implementation Chart 36 Sound Synthesis Memo 38 4
5 5

6 BASIC CONNECTIONS NOTE - the use of the Commodore VIC-20 for the purposes of illustrating a personal computer in this diagram does not suggest that a Commodore VIC-20 will work in this instance. The fact is, the Commodore VIC-20 doesn t even have a USB port on it, nor do we know of a currently produced or functional ADB to USB adaptation technique. The Commodore VIC-20 was used in this illustration because it looks cool, it fit into the graphic nicely, and also perhaps to subconsciously introduce the idea that perhaps a computer is less of an inspirational musical instrument in the end than we might have originally hoped it would be. The idea of computers and music was once a thrilling concept - what sequencer isn t a computer of sorts, right? And yet as the world funnels down into tiny screens, and distraction it seems that our focus might be better placed into a more diverse and authentically inspirational tools which give back in a deeper and broader way. 6
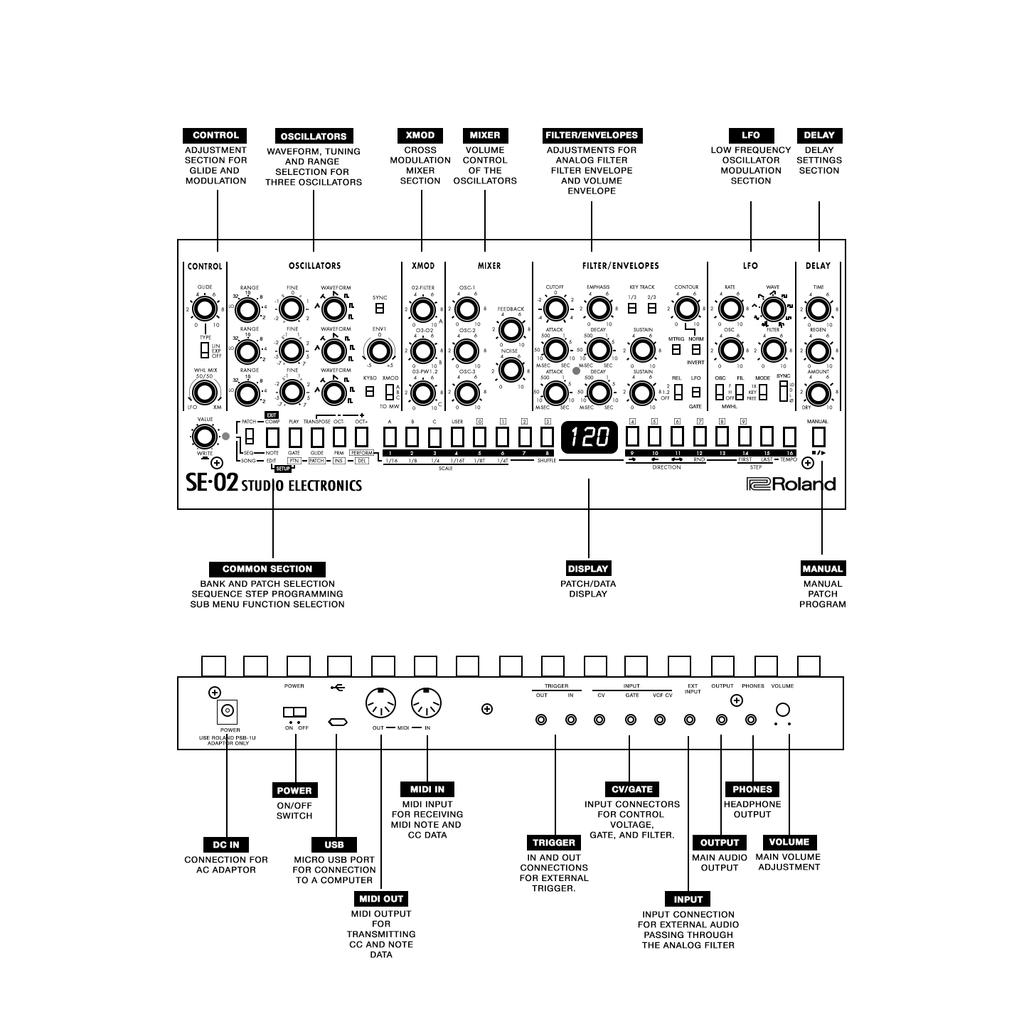
7 INTRODUCTION The SE-02's monophonic synthesizer engine features three voltage-controlled oscillators, a voltage-controlled 24 db low-pass filter, and a dual gain-stage amplifier. The oscillators have six different kinds of waveforms with the warmth and complex character associated with true analog VCOs. What s more, these VCOs are temperature stabilized with automatic tuning, so you get all the benefits and none of the downsides. The SE-02 is big and bold, with thick, rich lows and clear, vibrant highs exactly what you think of when you imagine classic vintage synth tone. And while the SE-02 can create astonishingly great vintage sounds, it can do so much more. It has three types of cross modulation (XMOD), a ripping filter feedback loop, a tempo-syncing LFO with nine waveforms, envelope sweeping and inverting, oscillator sync, a noise generator, and a tempo-syncing delay. While it s a compact go-anywhere device, the knobs, switches, and buttons are sturdy and plentiful, giving you a vast palette of sound-shaping capabilities at your fingertips. Everything is hands-on and knob-per-function, with deep control and a logical, intuitive layout. To get started, you can choose from 384 expertly programmed preset sounds that cover a wide range of classic and modern tones. Tweak and modify these sounds or create something completely new, storing your own custom creations in the 128 available user locations. Modern Flexibility The SE-02 is built solidly with a rugged metal top and quality knobs and switches. And despite having a control for just about everything, it s small enough to take just about anywhere. Due to its Roland Boutique format, it fits in our K-25m or DK-01 accessory docks, so you can add an integrated 25-key mini keyboard or have various tilt options for easy access in a variety of live and studio situations. The SE-02 also features convenient 1/8-inch stereo jacks that reduce cable clutter, plus full-sized, standard MIDI jacks for connecting any kind of keyboard you want or controlling the SE-02 remotely. And as with other Roland Boutique synths, Chain Mode lets you increase the polyphony by connecting two or more SE-02 units together via MIDI. There are CV inputs for both pitch and filter frequency, as well as trigger in and out, so the SE-02 works great with modular setups and other vintage gear. You can route external audio signals through the filter section, and there s even USB audio and MIDI capabilities to seamlessly integrate with computer-based setups. A More Musical Sequencer The SE-02 includes a powerful 16-step sequencer to add motion and dimension to your sounds. It can sync to external tempo via MIDI, USB, or trigger input, and per-step gate time, adjustable glide, tempo, and patch number are stored with each sequence. Creative performance features allow you to set shuffle, scale, direction, and first/last steps on the fly. Even synth parameters can be automated by sequencing changes just press a step and move a control. And despite the SE-02s compact size, the sequencer is fun and intuitive, lending itself to both studio and live usage. You can store 128 sequence patterns and construct 16 songs, each with up to 16 parts. About Studio Electronics Studio Electronics has been a leader in excellence and ingenuity in analog synthesizer design since Makers of the revered MidiMini, SE-1(X), ATC-1(X), Omega 8, CODE 8, Boomstar, Boomstar Modular, and Tonestar: Premium- Quality-Analog musical instruments, hand-built in the USA. 7

8 I. GENERAL FUNCTIONS COMMON SECTION The Common Section of the SE-02 is where bank and patch information is stored and recalled for performance. The first knob is the VALUE /WRITE knob. This is how you scroll through data and fine tune selections. This knob is used for PATCH selection as well as settings within the operating system. Clicking the VALUE knob will enter WRITE mode, and the the synthesizer will ask for a destination in the user bank for where to write the current sound or pattern. Don t worry, it will ask you to confirm before overwriting anything, and any writing to memory must be confirmed by a second click. Next is the MODE SELECT SWITCH where you can switch between PATCH, SEQUENCE or SONG mode. The buttons marked with COMP, PLAY, TRANSPOSE, OCT- and OCT + are the FUNCTION SELECT buttons for the common section. These perform different functions depending on which mode you are in. These are the buttons to access the settings for the SE-02. In PATCH mode, use these buttons to access a playable, and transposable keyboard. In SEQUENCE mode, use these buttons to choose the type of data you wish to sequence - Note, Gate, Glide, Parameters, or select the Scale of the sequence. In SONG mode, these buttons edit, select patterns, insert and delete steps of the song s chain. The set of 4 buttons marked A,B, C and USER are the BANK selection buttons The second set of 16 buttons are the PATCH selection buttons To select a bank choose the bank from the A, B, C or USER section and then select the patch. To select a patch use the corresponding number buttons for the patch you d like to call up. For example: To Call up patch C 101 simply press BANK C, and then Button 1, Button 0 and then Button 1. You can also just scroll through them all with the VALUE knob. But sometimes that really takes much too long, so it s good to know more than one way to get around. To store a patch is just as simple. But note that the internal banks A, B and C are not user writable. The sounds are stored in memory and can not be changed. The USER bank offers 128 locations for your own patches, and when attempting to store a patch, the SE-02 will direct you to the USER bank. 8
9 USB INTERFACE In the past many synthesizers came equipped with various interfaces. Connection methods like CV and Gate, Din Sync, S Trig, DCB, Tape I/O allowed synthesizers to connect to clocks, tape machines, sequencers and drum tracks. Thanks to the universal serial bus with which most personal computers are equipped today we have a number of interesting ways to handle these once complicated and tedious operations. The USB connection port can be used to: Pass midi as well as audio data to and from a computer based DAW Mount the Synthesizer to the desktop of a computer and backup and/or restore and share your patches. Mount the Synthesizer to the desktop for software updates. NOTE: The SE-02 works differently from the other Roland Boutique modules. The USB Port will not power the synthesizer, nor are there batteries for autonomous power. The Roland PSB 1U power supply must be used in order to power the SE-02. DATA BACKUP & RESTORE One of the coolest things about the boutique line of modules is their ability to mount onto the desktop of any USB enabled computer and you can drag and drop your patches in order to save them. This is much handier than the old fashioned midi librarian software, or the ancient and rarely reliable tape backup interface (although that actually is a thrill and you might want to try it sometime.) 9
10 To mount the SE-02 to your desktop follow this procedure: 1. Use a micro USB cable with a standard USB connector on the end. 2. Connect the micro end to the SE-02 and restart the synth holding down the [2] button. 3. Lights will dance, this means the SE-02 is awaiting connection to the computer. 4. Connect the USB cable to the computer and a drive icon named SE-02 will appear on the desktop. It takes a moment, so relax and trust that all is well. To create a backup of your patches: 1. Follow the above procedure for mounting the SE Copy the backup files from the SE-02 drive into an appropriately named folder on your computer 3. Once you re done, eject the SE-02 drive, disconnect the USB cable. 4. Note that all buttons in the common section are blinking green. 5. Once noted you may power cycle the SE-02 and you re done. To bring patches from your computer into the SE-02: 1. Connect the micro end to the SE-02 and restart the synth holding down the [3] button. 2. Copy the backup files, or the new patches you d like to check out into the appropriate PATCH, PATTERN or SONG folder on the SE-02 drive * NOTE: The 128 items in these folders represent the USER BANKS. The factory patches of the SE-02 can not be overwritten. 3. When copying is completed, eject the SE-02 drive. 4. Before power cycling the module note that all buttons are blinking Orange. 5. Once confirmed you may power cycle the SE-02 and disconnect the USB cable and you re done. What s so big about that? Any system exclusive file utility can do the same thing, why is this important? Well, the simplicity and visual aspect of this process is so novel that really anyone with basic computer skills can do it. This makes the process of file/patch sharing very easy. It s surprising that there aren t many amazing SE-02 or other Roland Boutique patches out there for the sharing and contributing to isn t it? It s possible that this process is just so easy, and painless to do that people still believe they need to connect a cassette deck, and record the sysex audio to tapes and then ship them to friends in order to share their files. Or many people are afraid to give away their precious patches? I m not sure, but I think it s pretty cool, and I plan to come up with a bank of patches or two and offer them up for anyone interested in them. I d also be very keen to see how others have undertaken the SE-02 in their own situations. Can you tell I think that patch exchanges are awesome? I do. And while I rarely use patches from other sound designers, I love to explore what synthesizers are capable of, and sometimes the best way to do that is by seeing how Carl Craig, or someone I ve never heard of does it. Restore the SE-02 to factory settings: This is the procedure for resetting your SE-02 back to it s factory state. Remember that if you do this, all your settings and all your sounds will be overwritten with the out of the box, factory fresh programming. 1. While holding down the [1] button, turn on the power. 2. The display should read rst. If it doesn t try that again. If you change your mind and decide not to go through with the reset, just power off the SE-02 and then turn it back on. 3. To execute the rest press the MANUAL button 4. When the display reads F in, restart the SE-02 and it ll be just the way it was the day you got it. 10
11 PRESET SECTION Unlike the other Roland Boutique synthesizers, the SE-02 has three banks of programmed presets. While all of the Boutique synths arrive with all of their preset destinations filled with sound examples to show what the synthesizers can do, the SE-02 hosts three permanent banks of sounds. BANK A, B and C Pre programmed patches permanently fixed into the memory. There are a wide variety of sounds here, and some have fun sequences associated with them. A great way to get a good idea of the patches intention is to go through the sequences and listen. They don t exactly correspond with the sequential order of the patches, but it s still a great overview. USER BANK 128 user programmable patches. Each of these 128 patch destinations have sounds in them, but they can be overwritten by the user to store 128 patches for later use, and exchange with other SE-02 users. PHILOSOPHY Consider that before the open architecture of the synthesizer was well established, the very idea of a patch meant that cables were physically connected between modules to create a sound, like in a modular synthesizer. This is where the word patch comes from. In early digital synthesizers, the possibility to save and later recall a patch was a revolutionary concept which was previously impossible. So the SE-02 is shipped with a basic set of presets to give users some idea of what a three oscillator, analog synthesizer might be capable of. While there are a wide array of sounds demonstrating what the synth can do, rather than begrudge this lack of space to save your own sounds, consider them a helpful starting point from which to create your own version of these sounds. Mercifully the backup and restore features of the SE-02 is so easy, that when you find you need more than 128 slots for your sounds, you can simply follow the procedure for backing up, and then freely overwrite the sounds with new ones, drag and drop to re arrange, and refine the patch order and contents of the USER BANK. MANUAL MODE In order to listen to the current settings of the knobs on the panel of the SE-02 simply press the MANUAL button. This will switch from whichever preset is currently selected to report the physical settings of the synthesizer. To return to the presets select the bank, and desired patch number. 11
12 COMPARING PATCHES To compare the currently-edited patch with a saved patch. Press the COMP button. Each time you press the button, you switch between the saved patch (button lit) and the currently-edited patch (button unlit). If there are any differences between the currently-edited patch and the saved patch, a dot appears in the display, and the entire content shown in the display blinks. USING THE COMMON BUTTONS AS A KEYBOARD You can use the [5] [16] buttons as a one-octave keyboard to play the sound. This produces a 1 octave keyboard which can be transposed. 1. Press the PLAY button. The [5] [16] buttons are lit. 2. Press the [5] [16] buttons to play the keyboard SHIFTING THE PITCH RANGE Transpose the keyboard in +/- 1 octave intervals with a range of +3/-3 octaves.. 1. Press the OCT+ button or OCT button. At one octave, the button is lit; at two octaves, the button blinks slowly; at three octaves, the button blinks rapidly. TRANSPOSING THE PITCH You can transpose the pitch in semitone units in a range of ±1 octaves. 1. Hold down the TRANSPOSE button and press the OCT+ button or OCT button. The display indicates the transpose value. You can also change this value by holding down the TRANSPOSE button and turning the VALUE knob. 2. Press the [TRANSPOSE] button to turn transpose on/off. 12
13 II. FUNCTIONS FOR SOUND CREATION CONTROL The CONTROL section is where you adjust the GLIDE and MODULATION WHEEL settings for the SE-02. GLIDE KNOB Adjusts the timing of the portamento/glide between notes. Counter clockwise is just about imperceptible, and as you proceed turning the knob to the right the effect of the glide increases. GLIDE TYPE SWITCH The type of glide is adjustable between OFF, Exponential, and Linear. OFF - No glide effect at all LINEAR - A mathematically correct, or linear curve is used for the glide between notes EXPONENTIAL - A exaggerated curve which more accurately approximates the human ear is used for the glide. Experiment: Press the PLAY button to bring up the internal keyboard and play a few notes. Select EXPONENTIAL GLIDE, and then rotate the knob clockwise. Listen to the changes between notes. Switch to LINEAR MODE and repeat the above exploration. Do you notice a difference? Glide can make things wet, plastic, and fluid, but it is also very emotive with long, slow performances. Spend some time with glide, and discover how interesting it can be. MOD WHEEL MIX KNOB This knob sets what the mod wheel of you r midi controller, or MIDI CC data for Modulation will do to the sound of the SE-02. The knob mixes between LFO and XM. This means that at counterclockwise the mod wheel will only engage the LFO. At all clockwise the mod wheel will only engage the cross modulation. At 12 o clock there will be a mixture of 50% LFO and 50% XMOD. Experiment: 1. Connect the SE-02 to a controller keyboard with a Mod Wheel (or establish a connection with a DAW and select MIDI CC data for sending Mod Wheel controllers to the SE-02.) 2. Choose a patch you like and pay a few notes. 3. Now pend the mod wheel and listen to what s happening. 4. Adjust the MOD WHEEL MIX KNOB and see how the results change. 13
14 OSCILLATORS The SE-02 is a 3 Oscillator analog monophonic synthesizer and the OSCILLATOR section is central to sound creation. With three oscillators mixing through a single filter/envelope section resulting in one synthesizer voice an inspiring array of sounds can be produced. At its root, a great bass sound can be made with a single oscillator, a second can be added to crete sub harmonics. Invert this idea and raise the range of oscillator 2 and find organ and other harmonics which create texture and interesting tones. The third oscillator is added to produce a sub harmonic for the complex waveform already created, or can be set into LOW mode where oscillator 3 acts as a modulation source for XMOD and PWM behavior. Or set them all the same, and then fine tune each one into a chord. The relationships between waveforms, range, and tuning alone can become fully engaging. Subtle changes produce huge differences in how the waveforms relate to one another and what inevitably comes out the speakers. A thoughtful exploration of this section, taking your time, and repeating ideas can result in a superb self-education in the basics of analog synthesis. OSCILLATOR 1 & 2 RANGE Sets the overall frequency range of the Oscillator s tuning from LO, 32, 16, 8, 4 and 2 TUNE/FINE Tunes Oscillator 1 s pitch. Fine is the relative tuning of Oscillator 2 s pitch in relation to Oscillator 1. With analog equipment tuning is important. Sometimes setting the TUNE pot to 12 o clock doesn t actually mean that you are in tune. Get out a guitar tuner, or call up a tuning plugin on your DAW and play a middle D note. Is it in tune? While there is an auto tuning feature on the SE-02 and the nature of modern electronics is more stable than vintage analog, remember that the SE-02 is still an analog synthesizer and it s always a good idea to allow them to warm up before tuning, and needing to at least verify the tuning before beginning to play. WAVEFORM This is the waveform selector for Oscillator 1 & 2 (respectively.) Choose between TRIANGLE, NARROW TRIANGLE (somewhere between a triangle wave and a saw wave), SAWTOOTH, SQUARE WAVE, PULSE WAVE 1 (wide,) and PULSE WAVE 2 (narrow.) Experiment: With only OSCILLATOR 1 turned up in the mixer, and the filter open enough to hear what you re doing, switch between the waves and listen to what they sound like. TRIANGLE is deep and pretty, SAW is sharp and a little 14
15 gritty, SQUARE is big and beautiful. Now switch the range around - listen to a very high SAW, and check out a very low PULSE. These are the building blocks of all sounds. Get a feel for how to create them, and what they re called. SYNC SWITCH This switch engages and disengages oscillator sync. In an analog synth, waveforms can report in and out of phase. This means that waveforms start, and unfold over time differently. Sync is how we force these waveforms to play together at the same time. The sync switch will force Oscillator 2 to return to the beginning of it s cycle (start again) whenever the master waveform starts again. This puts the waveform into a mandatory synchronization with the wave cycle of oscillator 1. Experiment: Set Oscillator 1 and 2 to playback sawtooth waveforms. Adjust the tuning of OSC 2 until it feels interesting to you. Now engage sync. What s happened to the sound? Disengage sync. Listen again. Sometimes you want sync for effect, other times you need sync for stability. Sometimes you really don t want sync at all. OSCILLATOR 3 RANGE Sets the overall frequency range of the Oscillator s tuning from LO, 32, 16, 8, 4 and 2 FINE Tunes Oscillator 3 s pitch relative to the tuning of Oscillator 1. WAVEFORM This is the waveform selector for Oscillator 3. Choose between TRIANGLE, REVERSE SAW, SAWTOOTH, SQUARE WAVE, PULSE WAVE 1 (wide,) and PULSE WAVE 2 (narrow.) ENV-1 KNOB This knob adjusts the amount of modulation is applied from the filter envelope to the frequency of Oscillator 2. At 12 o clock the result is nil. Rotating clockwise results in a positive modulation, and counterclockwise results in a negative modulation. Using frequency modulation with the Oscillators can seem counter intuitive to those just learning about analog synthesizers. Why would we want the sound to go in and out of tune? Try turning this up a bit, and then adjusting the filter envelope. Turn things up pretty far. Sometimes the effect is a gentle wave of vibrato, and other times it s just madness. Explore. Don t be afraid to make some noise. KEYBOARD SWITCH This switch tuns on and off keyboard tracking for Oscillator 3. When using OSC 3 as a modulation source, it s a nice thing to be able to turn off the keyboard tracking so the modulation can do it s own thing. It s also interesting to drone out OSC 3 without key tracking as a juxtaposition with tracked notes from OSC 1 & 2. XMOD SWITCH This is the selector switch for assigning which XMOD setting will be effected by the mod wheel. A - OSC 2 Modulates the FILTER cutoff frequency B - OSC 3 Modulates the waveform of OSC 2 C - Allows OSC 3 to modulate the pulse width of OSC 1 & 2 (which only works if you ve selected a square or pulse wave for OSC 1 and 2 - otherwise it won t do anything.) 15
16 XMOD The XMOD section is were you select how cross modulation will be applied. Cross Modulation is described as XMOD (the X is a cross, and MOD is short for modulation) and also frequency modulation. Frequency modulation is a vital component to analog sound design, and voltage control. It s easy to turn any cross modulation knob and conclude that it s a sort of crazy freak-out. But in measured and intentional amounts, XMOD can turn a simple pulse wave into a metallic ping, or a taught drum skin. O2-FILTER The O2-FILTER knob allows OSC 2 to modulate the cutoff frequency of the filter. This means that when you rotate the O2-FILTER knob, the frequency of the filter for the SE-02 will begin to modulate to the wave shape of OSC 2. Experiment: Turn down the volume of OSC 2 and 3. Lower the filter to create a deep, moody sound. Set the Waveform of OSC 2 to sine, and set the range to LO. Turn the O2-FILTER knob and listen to the wave shape of OSC 2 begin to modulate the filter frequency. O3-O2 The O3-FILTER knob allows OSC 3 to modulate the waveform of OSC 2. This means that the waveform of OSC 2 is changed by the waveform of OSC 3 and this makes for some crazy audio hooliganism. If the filter can be modulated by OSC 2, and the shape of OSC 2 can modulate the waveform of OSC 2 then the ramifications of this, and the impact on the sound can be very exciting. O3-PW1,2 The O3-PW 1 and 2 knob allows OSC 3 to modulate the pulse width of OSC 1 and OSC 2. In essence this is how PWM (pulse width modulation) is achieved in the SE-02. PWM is a wonderful way to animate the width of the pulse waveform. If you haven t set the waveform of oscillator 1 or 2 to PULSE/SQUARE then this won t have any effect on the output. Experiment: Set OSC 1 to make a SQUARE wave. Turn off the other sounds. Play a few notes and adjust the filter and envelope to make a sound you really like. Set OSC 3 to LO range, and a rising SAW waveform. Now slowly increase the level of O3-PW knob and listen to what happens to the texture of the sound. Do you hear a difference? Go further and turn up OSC 2 and set it to a SQUARE waveform, and tune it to very close to unison with OSC 1, but not quite. Now rotate the O3-PW knob again and listen to the pulse width begin to modulate to the wave shape of OSC 3. Pretty cool, right? 16
17 MIXER This is the section where the outputs of OSCILLATOR 1, 2, 3 and NOISE are established and mixed in relation to one another. There is also a FEEDBACK knob which adjusts how much of the SE-02 output is returned to the input of the FILTER section. OSC-1, OSC-2, & OSC-3 Adjust the output level of each oscillator, and mix them together. For a pure noise output first turn up the noise level, and then turn down the knobs for OSC 1, 2 and 3. Level mixing can help to shape and create interesting sounds as a practice on its own. Blending a SQUARE wave into two SAWTOOTH waves can have an interesting result in and of itself with and without additional modulation. FEEDBACK Adjusts the amount of the SE-02 s output (except for the DELAY) This can change the the nature of the sound radically. Experiment: For a close look at how FEEDBACK shapes sound, try turning off the volume of OSC 2 and OSC 3 and listen only to OSC 1. Now increase the FEEDBACK level and listen to what happens to the sound. NOISE Adjust the volume of the noise oscillator. Noise is a wonderful addition to the texture of a sound. It s also beautiful by itself. Experiment: Turn off OSC 1, 2 and 3. Listen to the NOISE. Shape the NOISE with the envelope and filter. Open the release and listen to the slow decay. Rotate the ATTACK knobs and listen to the slow rise of the NOISE. Shape this into ocean waves, or the distant sound of some sand storm. Get into it. Add this texture to an oscillator s wave. 17
18 FILTER/ENVELOPES FILTER These settings determine the brightness and thickness of the sound. Here you can also specify the time- varying change (filter envelope) for the filter and the time-varying change (amp envelope) for the volume. The filter is a 24dB/ octave ladder design and again has a very similar layout when compared to a classic analog mono synth filter section, though there are some additional controls like a contour inverting switch, restart on note press and an option to trigger the amp with a gate or the LFO. The envelopes are really snappy and just like on the classic analog synths, you get an ADS envelope with switches to enable release control with the decay knob. CUTOFF Adjusts the filter cutoff frequency. Clockwise lowers the frequency down to nominal, and counter clockwise opens the filter completely. EMPHASIS Boosts the region near the filter cutoff frequency. Higher values produce greater boost, creating a distinctively synthesizer-like character. This is essentially the resonance function found on most filters, where the moving edge of the cutoff frequency is exaggerated as EMPHASIS is increased until self oscillation is accomplished. KEY TRACK [1/3] [2/3] Specify how the filter cutoff frequency changes in response to the pitch that is played on the keyboard. [1/3]: The filter cutoff frequency changes by 1/3 of the pitch change. [2/3]: The filter cutoff frequency changes by 2/3 of the pitch change. If both switches are on, the filter cutoff frequency changes by the same amount as the change in keyboard pitch. 18
19 CONTOUR Adjusts the depth of change produced by the specified envelope settings. This is an effect similar to adding a gate pulse to the filter, and the CONTOUR attenuator controls the amount that the filter envelope will impact the frequency of the filter. Experiment: A great way to understand this knob is to set the filter frequency nearly to off, and play a series of notes, or a sequence. Now rotate the CONTOUR knob clockwise slowly, and listen to the introduction of the envelope and understand how an envelope effects filter frequency. MTRIG If this is on, the filter envelope restarts each time you press a key. That means that if you switch MTRIG on then with each key played, the filter envelope will re trigger. With the MTRIG switched off, the filter envelope will not be re triggered, but the envelope shape will be completed before the next key will trigger it again from the beginning. NORM/INVERT Specifies the polarity of the envelope that is controlled by the CONTOUR knob. If this is set to INVERT, the polarity is inverted. This is a very handy way of immediately transforming a sound just by effectively flipping the envelope. Experiment: Create a slow attack sound that you like. Now invert the envelope with the switch. Listen to what happens to the sound. Pretty cool, right? 19
20 ENVELOPES An envelope is a central method of shaping the sound of a synthesizer. Attack, decay, sustain and release are the 4 main attributes of an envelope. Envelopes can control volume, filter, and other aspects of audio, and voltage. Triggered by a gate pulse/key/note on the envelope is then fired and will move through its stages until it is either done, or re triggered by another gate or key. Attack is the time the envelope takes to rise from silence to full volume. Decay is the time the envelope takes to fall from full volume to the sustain level. Sustain is the time the envelope takes to drop from the sustain level to the release level. Release is the time the envelope takes to fall from the release level to silence. FILTER ENVELOPE ATTACK Specifies the time (attack time) from when the key is pressed until the cutoff frequency reaches the maximum level. DECAY Specifies the time (decay time) from when the cutoff frequency reaches the maximum level until it decreases to the sustain level. SUSTAIN Specifies the level (sustain level) that is held after the attack time and decay time have elapsed until the key is released. 20
21 AMPLIFIER ENVELOPE ATTACK Specifies the time (attack time) from when the key is pressed until the cutoff frequency reaches the maximum level. DECAY Specifies the time (decay time) from when the cutoff frequency reaches the maximum level until it decreases to the sustain level. SUSTAIN Specifies the level (sustain level) that is held after the attack time and decay time have elapsed until the key is released. GATE LED Lit while a note is sounding, or gate is present. RELEASE Specifies whether the setting of the amp envelope [DECAY] knob is applied to the release time (the time from when the key is released until the volume decays to zero). 1, 2: Applied to both the filter and amp envelope. 2: Applied only to the amp envelope. LFO/GATE Specifies the signal that controls the amp envelope. LFO: The LFO controls the amp envelope. GATE: The Note or Gate controls the amp envelope. 21
22 LFO LFO is an acronym for Low Frequency Oscillator. The frequency of the modulation source changes so slowly that if functions as an influence over volume, filter frequency, and other non audio rate aspects of voltage control. The SE-02 offers LFO control over the filter, the pitch and the volume of its output. Here you can create cyclic change (modulation) in the sound by applying vibrato (pitch modulation) or tremolo (volume modulation). RATE Adjusts the LFO frequency. This is how slow or how fast the LFO changes. Experiment: Choose a sound you like. Now turn the FILTER knob of the LFO section up to 12 o clock. Adjust the RATE of the LFO and listen to the changes. Adjust the main FILTER frequency and see how the LFO effects the relationship between the filter and low frequency oscillator. WAVE These are the wave shapes which the LFO is able to take. SAMPLE & HOLD SINE REVERSE SAWTOOTH SQUARE 1 SQUARE 2 SQUARE 3 RANDOM OSC Adjusts the depth to which the LFO affects the oscillator. This will apply an LFO to the pitch of the Oscillator section. Full counter clockwise will turn this effect completely off. As you rotate the knob clockwise the effect of the LFO on the oscillator section increases. 22
23 FILTER Adjusts the depth to which the LFO affects the filter. As demonstrated in the RATE experiment, this is where you set the amount which the LFO will apply to the filter frequency. Counter clockwise will turn the LFO filter relationship off completely. Rotating the LFO FILTER knob clockwise will increase the effect. MWHL Selects the modulator that is assigned to the LFO of the WHL MIX knob, and specifies the depth of the effect. F: The effect is applied strongly. H: The effect is applied weakly. OFF: No effect is applied. MODE Specifies the LFO s operating mode. 1X: The LFO applies only once. KEY: The LFO starts at note-on. FREE: The LFO applies always. SYNC Selects whether LFO and DELAY are synchronized with MIDI clock. Ø: Not synchronized. L: Only the LFO is synchronized to MIDI clock. D: Only the DELAY is synchronized to MIDI clock. LD: Both LFO and DELAY are synchronized to MIDI clock. 23
24 DELAY This section is where the settings for the delay are made. TIME Adjusts the delay time. NOTE: the timing of the delay will change depending on the sync settings in the LFO section. REGEN Sets the number of repeats the delay reports. Setting this to full counter clockwise will produce minimal repeats. Clockwise rotation will increase the number of repeats until a continuous report. AMOUNT This is the volume control for the DELAY. Full counter clockwise is essentially turning off the delay. As the knob rotates clockwise, the volume of the DELAY increases to full volume. 24
25 III. FUNCTIONS FOR PERFORMANCE SEQUENCER MODE The step sequencer lets you input a note at each of up to 16 steps, and play back the notes as a loop. You can change the number of steps between 1 and 16. Up to 128 patterns can be stored. ENTER STEP SEQUENCE MODE Set the mode select switch to SEQ STEP BUTTON [1] - [16] In step sequence mode, the [1] - [16] buttons are called step buttons. TO EXIT THE SEQUENCER Press STOP and set mode select switch to PATCH. SELECTING/PLAYING PATTERNS 1. Make the function select buttons (NOTE PERFORM) all go dark. 2. Use the [0] [9] buttons to enter a pattern number (1 128), or use the VALUE knob to select a pattern number. 3. The display shows the pattern number. 3. Press the PLAY button to play the pattern. Each time you press the button, the pattern plays or stops. You can also select the next pattern while a pattern is playing. When the current pattern finishes playing, the next pattern starts playing. ENTERING NOTES 1. Press the NOTE button to make it light. 2. While holding down the step button at which you want to enter a note, use the VALUE knob to select the note number. The display shows the note number. You can also select note numbers by holding down the step number and playing a key. If you want to enter the same note number at multiple steps, press the step buttons at which you want to enter the note; then hold down the [NOTE] button and turn the [VALUE] knob. A lit step button indicates note-on, and an unlit step button indicates note-off. 25
26 ENTERING GATES 1. Press the GATE button to make it light. 2. While holding down the step button at which you want to enter a gate, use the VALUE knob to select the gate (10 100). The display shows the note number. If you want to enter the same gate at all steps, press the step buttons where you want to enter the gate; then hold down the GATE button and turn the VALUE knob. GLIDE SETTINGS 1. Press the GLIDE button to make it light. 2. Press the step buttons for which you want to apply a glide effect, making them light. The pitch changes smoothly from each lit step to the next step. SYNTH PARAMETER VALUES The values of synth parameters that you change using the knobs and switches can be stored in each step. 1. Press the PRM button to make it light. 2. While holding down the step at which you cant to enter a parameter value, operate the knob or switch. The display indicates the synth parameter value. If you press a step button while holding down the PRM button, the parameter values of the button you pressed are erased. If you want to erase all of the parameter values, hold down the PRM button and turn the VALUE knob. The display indicates OFF, and all values are erased. A lit step button indicates PRM on, and an unlit step button indicates PRM off. TRANSPOSING A SEQUENCE 1. Program a sequence you like 2. Set the SYNC settings for the sequencer as you want them EX: Clocking the SE-02 sequencer from the GATE output of an external sequencer, or other clock source. 3. Set the key trigger (option 3 of the sequencer setup menu) to "TRIGGER" 4. Now when you play a key the sequence will begin and clock from whichever source you've assigned, and in whichever key you are playing. PERFORMANCE SETTINGS 1. Press the PERFORM button to make it light. 2. Press a step button to select a performance setting. 3. If you pressed step button [8] or [14] - [16] use the VALUE knob to specify the value. BUTTON PARAMETER VALUE EXPLANATION [1] - [16] SCALE Specifies the note length of one step 1/16 (sixteenth note) 1/8 (eighth note) 1/4 (quarter note) 1/16T (16th note triplet) 1/8T (8th note triplet) 1/4T (quarter note triplet) [8] SHUFFLE Adjusts the timing of the notes for even numbered steps [9] - [12] DIRECTION Specifies how the sequencer plays > Forward from the first step < Backward from the last step < > Forward from the first step, and then backward from the last step. RND Plays steps randomly [14] FIRST STEP 1-16 Specifies the step that is played first 26
27 [15] LAST STEP 1-16 Specifies the step that is played last [16] TEMPO Specifies the tempo for internal sync SEQUENCE PARAMETER SETTINGS 1. Press the NOTE button and GATE button to make them light 2. Use the [1] - [3] buttons to select a parameter, and use the VALUE knob to edit the parameter s value. The display indicates the value BUTTON PARAMETER VALUE/EXPLANATION [1] DESTINATION Specifies the output destination of the step sequencer. Int: Internal E=t: External Device bot: Both internal and external device [2] SYNC Specifies the clock to which the sequencer is synchronized. Int: Internal n id: MIDI IN USB: USB MIDI trg: Trigger In [3] KEY TRIGGER Specifies whether the step sequencer is controlled by the key trigger OFF: Not controlled On: Controlled trn: Controlled according to the transpose setting. 3. To save the edited settings, perform the Pattern Write operation. SAVING A PATTERN If you ve edited the settings, your edits are lost when you turn off the power or select another pattern. If you want to keep the changes that you made, perform the Write operation. NOTE: The pattern is saved together with the selected sound/patch. 1. Press the VALUE knob to access WRITE MODE - the current pattern blinks 2. Use the [0] - [9] buttons to select the writing-destination pattern. 3. Press the VALUE knob - a confirmation message appears in the display. To cancel press the EXIT button. 4. To save the settings, press the VALUE knob - when the settings have been saved, you ll return to the state prior to write mode. 27
28 SONG MODE A song consists of 1-16 parts. For each part, you can specify a pattern, the number of times that the pattern is repeated, and the sound/patch used during playback. Up to 16 songs can be stored. TO ACCESS SONG MODE Set the mode select switch to SONG TO EXIT SONG MODE Press STOP and set the mode select switch to PATCH mode. SELECTING/PLAYING SONGS 1. Make the function select buttons EDIT - DELETE all go dark. 2. Use the [1] - [16] buttons to select a song. The button you press is lit. 3. Press the PLAY button to play the song. Each time you press the button, the song plays or stops. You can also select the next song while a song is playing. When the current song finishes playing, the next song starts playing. EDITING A SONG 1. Select the song that you want to edit 2. Press the EDIT button - The EDIT button and PTN button light. CHANGING THE PATTERN 3. Use the VALUE knob to select the part whose pattern you want to change. 4. Use the [0] - [9] buttons to enter a pattern number (1-128) The display shows the pattern number. Pressing the INS button inserts a blank part at the currently selected part. A part cannot be inserted if the 16 parts are already being used. Pressing the DEL button deletes the currently selected part; subsequent parts are adjusted forward. Press the PLAY button to play/stop the song. 28
29 CHANGING THE NUMBER OF REPETITIONS 5. Press the PTN button to make it blink. 6. Use the VALUE knob to select the part whose number of pattern repetitions you want to change. 7. Use the [0] - [9] buttons to enter the number of repetitions. Pressing the INS button inserts a blank part at the currently selected part. A part cannot be inserted if 16 parts are already being used. Pressing the DEL button deletes the currently selected part; subsequent parts are adjusted forward. Pressing the PLAY/STOP button to PLAY/STOP the song. CHANGING THE PATCH 8. Press the PATCH button to make it light. 9. Use the VALUE knob to select the part whose patch you want to change. 10. Press one of the [A] - [C] or USER buttons to select a bank. 11. Use the [0] - [9] buttons to enter a number (1-128) - The display shows the patch number. You can also press MANUAL and select the sound of manual mode. Pressing the INS button inserts a blank part at the currently selected part. A part cannot be inserted if 16 parts are already being used. Pressing the DEL button deletes the currently selected part; subsequent parts are adjusted forward. 12. As necessary, press the PTN button to return to step 3, and repeat steps To save the settings that you ve edited, execute the Song Write operation. 29
30 IV. SYSTEM SETTINGS PATCH SETUP 1. Press the COMP button and PLAY button to make them light. 2. Use the [1] [6] buttons to select a parameter, and use the VALUE knob to edit the parameter s value. The main display will indicate the value set. BUTTON PARAMETER VALUE [1] PITCH BEND RANGE (semitone units) 0-24 [2] MOD WHEEL DEPTH [3] LFO AFTERTOUCH [4] VCF AFTERTOUCH [5] CONTOUR DEPTH [6] PATCH VOLUME VELOCITY ROUTING By default the VELOCITY is internally routed to the FILTER CONTOUR of the SE-02. This is how velocity is played or received via MIDI. This can be changed by selecting PATCH SETUP page [5] Using the encoder, set amount of velocity generated CONTOUR Think of it as the master attitude of the filter with both CUTOFF and EMPHASIS increasing with a positive value. 30
31 SYSTEM SETUP 1. While holding down the EXIT button, turn the power on. 2. Use the following buttons to select a parameter, and use the VALUE knob to specify the value. 3. Press the VALUE knob to save the setting. 4. Power Cycle the SE-02. BUTTON PARAMETER VALUE EXPLANATION [1] MIDI CHANNEL OFF, 1-16 Specifies the MIDI channel: 1-16 ONn ONn: All messages are received (transmitted on CH1) [2] CHAIN OFF, ON Increase the polyphony by using a MIDI cable to connect two or more SE-02 units and turning chain mode on. [3] AUTO OFF OFF The power does not turn off automatically 30, 240 The power turns off when the set time elapses. MINUTES Auto OFF does not occur while USB connected. [4] SAVER TIME OFF, 1, 3, 10 Specifies the time until the LED DEMO is shown MINUTES [5] CC OUT OFF, USB, Selects the output destination for control changes. MIDI, BOTH OFF: No output USB: Output only to USB USB & MIDI MID: Output only to MIDI u-n: USB and MIDI [16] VERSION Indicates the current version FIRMWARE UPDATE Update Procedure: 1) Connect to Computer 2) Power on while holding [8] Button - A disc image names SE-02 appears on desktop 3) Copy the SE02_UPD.BIN file to the SE-02 drive 4) Once the files have been copied, eject the SE-02, then remove the USB cable from the computer. 5) Press the MANUAL button on the SE-02 to start the update procedure. 6) When finished, turn off the power then on again on the SE-02 NOTE: Allow about 30 seconds to continue the update process after re starting the SE-02. It will seem like something s wrong, just a little light blinking. Relax, and take a deep breath. Everything is fine. Factory Reset: 1) Power on while holding [1] button 2) Press the green Manual button 3) When finished, power cycle the SE-02 Tuning Calibration: 1) Switch to Patch Mode 2) Hold Transpose and push in the Value Knob. Push the Value Knob again to start calibration 3) Perform the Tuning Calibration again (two times) 31
 x 45 (H) mm 11 13/16 (W) x 5 1/16 (D) x 1 3/4 (H) inches 950 g 2 lbs 2 oz Owners Manual, leaflet using the unit safely OPTIONS")
32 MAIN SPECIFICATIONS MAXIMUM POLYPHONY POWER SUPPLY CURRENT DRAW DIMENSIONS WEIGHT ACCESSORIES 1 Voice AC Adaptor 2 A 300 (W) x 128 (D) x 45 (H) mm 11 13/16 (W) x 5 1/16 (D) x 1 3/4 (H) inches 950 g 2 lbs 2 oz Owners Manual, leaflet using the unit safely OPTIONS 32
33 IV. CV/GATE/TRIGGER CONTROL VOLTAGE CV/Gate is an analog method of controlling synthesizers, drum machines and other similar equipment with external sequencers. The control voltage typically controls pitch and the gate signal controls note on-off. This method was widely used in the epoch of analog modular synthesizers and CV/Gate music sequencers from the mid 1970 s through the 1980s, when it was eventually superseded by the MIDI protocol. However, companies including Doepfer, Intellijel, Studio Electronics, MakeNoise, Mutable Instruments and a growing number of others continue to manufacture modular synthesizers that are increasingly popular and rely primarily on analog CV/Gate signals for communication. CV Here is where you connect the CV (or Pitch) from your external controller. Example: The Arturia Keystep offers CV and Gate output. You would connect a mono 3.5mm cable between the CV jack on the back of the SE-02 and the pitch jack of the Keystep. This allows transmission of pitch voltage from the controller (the Keystep) to the sound source (the SE-02.) This is true of all CV/Gate enabled devices. A vintage CSQ-600 will sequence the heck out of the SE-02 as well as a modern SQUARP Pyramid sequencer. GATE Here is where you connect the GATE output from your external controller. Example: On an Arturia Keystep there is a GATE output jack beside the pitch connector. To enable the controller to inform the SE-02 when to begin and end notes you need to connect GATE between the instruments. GATE is the note on and note off voltage. In analog CV/Gate protocol typically 5 volts is supplied via the Gate jack in the form of a pulse. Once received, the arrival of the pulse opens the VCA and allows sound to occur. The sound will only occur for the duration of the GATE pulse. VCF-CV Here is a dedicated connector for controlling the SE-02 FILTER cutoff using CV. Experiment: Connect the trigger out of the TR-09 drum machine to the VCF-CV input jack on the SE-02 and program a pattern using the Trigger track. Each pulse of the trigger which arrives into the SE-02 s VCF-CV jack will open the filter. Adjust the envelope and listen to the results. This result can also be accomplished via MIDI using CC information, but there is an immediacy and pleasure which is derived from a direct, dedicated connection. Try it. CV JACK SETTINGS The CV input jacks can be fine tuned to specify fine tune and key follow for the voltage that is input to the CV INPUT jack. 1. Set the MODE SELECT switch to PATCH 2. Press the COMP button and PLAY button to make them light - If you decide to exit the operation, press these buttons again to make them go dark. 3. Use the [15] - [16] buttons to select a parameter, and use the VALUE knob to edit the parameter s value. The display indicates the value. BUTTON PARAMETER VALUE EXPLANATION [15] CV Fine Tune Finely adjusts the pitch relative to the voltage input to the CV input jack [16] CV Key Follow Adjusts the width of pitch change relative to the voltage input to the CV input jack. NOTE: There is no need to execute the WRITE operation. CV Fine Tune and CV Key follow are saved as settings for the entire system. 33
JUNO-106. PLUG-OUT Software Synthesizer Owner s Manual 01A. Copyright 2017 ROLAND CORPORATION
 JUNO-106 PLUG-OUT Software Synthesizer Owner s Manual Copyright 2017 ROLAND CORPORATION 01A Introduction When using the JUNO-106 for the first time, you must specify the MIDI Input/Output setting in the
SYSTEM-100 PLUG-OUT Software Synthesizer Owner s Manual
 SYSTEM-100 PLUG-OUT Software Synthesizer Owner s Manual Copyright 2015 ROLAND CORPORATION All rights reserved. No part of this publication may be reproduced in any form without the written permission of
Mono/Fury. VST Software Synthesizer. Version by Björn Full Bucket Music
 Mono/Fury VST Software Synthesizer Version 1.0 2010-2012 by Björn Arlt @ Full Bucket Music http://www.fullbucket.de/music VST is a trademark of Steinberg Media Technologies GmbH Mono/Poly is a registered
Square I User Manual
 Square I User Manual Copyright 2001 rgcaudio Software. All rights reserved. VST is a trademark of Steinberg Soft- und Hardware GmbH Manual original location: http://web.archive.org/web/20050210093127/www.rgcaudio.com/manuals/s1/
PROGRAMMABLE POLYPHONIC SYNTHESIZER A USER S GUIDE TO THE ROLAND JU-06 JU-06
 PROGRAMMABLE POLYPHONIC SYNTHESIZER A USER S GUIDE TO THE ROLAND JU-06 JU-06 1 Acknowledgements: This manual was assembled, illustrated, and written by Sunshine Jones. All of the contents is taken from
PowerCore 01 Manual. Manual for PowerCore 01
 PowerCore 01 Manual English Manual for PowerCore 01 SUPPORT AND CONTACT DETAILS TABLE OF CONTENTS TC SUPPORT INTERACTIVE The TC Support Interactive website www.tcsupport.tc is designed as an online support
INTRODUCTION. Thank you for choosing Ekssperimental Sounds ES01 Analog Synthesizer.
 USER GUIDE INTRODUCTION Thank you for choosing Ekssperimental Sounds ES01 Analog Synthesizer. The ES01 incorporates advanced synthesizer technology and features developed for the Reason rack environment
PG-8X 2.0. Users Manual
 PG-8X 2.0 Users Manual by MLVST (Martin Lueders) 2016 Introduction The PG- 8X is a virtual synthesizer, inspired by the Roland JX-8P with the PG-800 programmer. The synth architecture is a standard 2-
VK-1 Viking Synthesizer
 VK-1 Viking Synthesizer 1.0.2 User Manual 2 Overview VK-1 is an emulation of a famous monophonic analog synthesizer. It has three continuously variable wave oscillators, two ladder filters with a Dual
P9700S Overview. In a P9700S, the 9700K MIDI2CV8 is the power source for the other modules in the kit. A separate power supply is not needed.
 P9700S Overview In a P9700S, the 9700K MIDI2CV8 is the power source for the other modules in the kit. A separate power supply is not needed. The wall-mount transformer for the 9700K is an ac power source
ZEEON synth User guide
 ZEEON synth User guide version 1.0 BeepStreet 2017 Introduction 2 Application 2 Audio unit 3 Control panel 3 Presets 4 Voice signal flow 4 Oscillators 5 Mixer 5 Filter 6 Envelope generators 6 Low frequency
INSANITY SAMPLES. Presents
 INSANITY SAMPLES Presents A 3 oscillator super synth modelled on a mixture of analogue beasts. Designed to tap into both the classic analogue sound, whilst stepping out into the modern age with a multitude
pittsburgh modular synthesizers lifeforms sv-1 user manual v.1
 pittsburgh modular synthesizers lifeforms sv-1 user manual v.1 the heart and soul of modular synthesis The Pittsburgh Modular Synthesizers Lifeforms SV-1 is a complete dual oscillator synthesizer, designed
Get t ing Started. Adaptive latency compensation: Audio Interface:
 Get t ing Started. Getting started with Trueno is as simple as running the installer and opening the plugin from your favourite host. As Trueno is a hybrid hardware/software product, it works differently
OCS-2 User Documentation
 OCS-2 User Documentation nozoid.com 1/17 Feature This is the audio path wired inside the synthesizer. The VCOs are oscillators that generates tune The MIX allow to combine this 2 sound sources into 1 The
Quick Start. Overview Blamsoft, Inc. All rights reserved.
 1.0.1 User Manual 2 Quick Start Viking Synth is an Audio Unit Extension Instrument that works as a plug-in inside host apps. To start using Viking Synth, open up your favorite host that supports Audio
I personally hope you enjoy this release and find it to be an inspirational addition to your musical toolkit.
 1 CONTENTS 2 Welcome to COIL...2 2.1 System Requirements...2 3 About COIL...3 3.1 Key Features...3 4 Getting Started...4 4.1 Using Reaktor...4 4.2 Included Files...4 4.3 Opening COIL...4 4.4 Control Help...4
Use the patch browser to load factory patches or save or load your own custom patches.
 1.0.1 User Manual 2 Overview Movement is an eight-stage arbitrary waveform generator that can act as an envelope, LFO, or high-frequency oscillator depending on how it is configured. The interactive graphical
PULSAR DUAL LFO OPERATION MANUAL
 PULSAR DUAL LFO OPERATION MANUAL The information in this document is subject to change without notice and does not represent a commitment on the part of Propellerhead Software AB. The software described
Aalto Quickstart version 1.1
 Aalto Quickstart version 1.1 Welcome to Aalto! This quickstart guide assumes that you are familiar with using softsynths in your DAW or other host program of choice. It explains how Aalto's dial objects
PROGRAMMABLE POLYPHONIC SYNTHESIZER JX-03
 1 PROGRAMMABLE POLYPHONIC SYNTHESIZER JX-03 A USER S GUIDE TO THE ROLAND JX-03 2 3 Acknowledgements: This manual was assembled, illustrated, and written by Sunshine Jones. All of the contents is taken
Q179 Envelope++ Q179 Envelope++ Specifications. Mar 20, 2017
 Mar 20, 2017 The Q179 Envelope++ module is a full-featured voltage-controlled envelope generator with many unique features including bizarre curves, a VCA and looping. Special modes offer dual-envelopes
Tinysizer. Anyware Instruments Tinysizer Analog Modular System
 In the laboratory of the mad Professor Thomas Welsch (a.k.a. Tommy Analog), a baby monster was born. Don t get fooled by its size, as I mentioned: it is a monster! Has a monster sound and monstrous possibilities
BoomTschak User s Guide
 BoomTschak User s Guide Audio Damage, Inc. 1 November 2016 The information in this document is subject to change without notice and does not represent a commitment on the part of Audio Damage, Inc. No
MKII. Tipt p + + Z3000. FREQUENCY Smart VC-Oscillator PULSE WIDTH PWM PWM FM 1. Linear FM FM 2 FREQUENCY/NOTE/OCTAVE WAVE SHAPER INPUT.
 MKII 1V/ EXT-IN 1 Linear 2 Smart VCOmkII Design - Gur Milstein Special Thanks Matthew Davidson Shawn Cleary Richard Devine Bobby Voso Rene Schmitz Mark Pulver Gene Zumchack Surachai Andreas Schneider MADE
PRELIMINARY USER S MANUAL OCTOBER 2012
 PRELIMINARY USER S MANUAL OCTOBER 2012 The MAGMA will make you go back into the 80's sounds with sonorities. The sound engine is inspired from the SH series by Roland, which had a waveform mix and a sequencer.
Owner s Guide. DB-303 Version 1.0 Copyright Pulse Code, Inc. 2009, All Rights Reserved
 Owner s Guide DB-303 Version 1.0 www.pulsecodeinc.com/db-303 Copyright Pulse Code, Inc. 2009, All Rights Reserved INTRODUCTION Thank you for purchasing the DB-303 Digital Bass Line. The DB-303 is a bass
Grendel Drone Commander CLASSIC PEDAL Analog Music Synthesizer. Rare Waves LLC USA rarewaves.net
 CLASSIC PEDAL Analog Music Synthesizer Rare Waves LLC USA rarewaves.net What is it? is a unique synthesizer that delivers thick drone tones with the convenience of an FX pedal stompbox. brings back the
Mixer Section. Sample & Hold (S\H) Section MIXER S\H
 Section MIXER S\H") Sample & Hold (S\H) Section Mixer Section S\H S\H IN Selects the parameter that the S&H will "sample" to input the note in the capacitor sequencer. ACCENT The S&H track can be used as an accent track.
Sample & Hold (S\H) Section Mixer Section S\H S\H IN Selects the parameter that the S&H will "sample" to input the note in the capacitor sequencer. ACCENT The S&H track can be used as an accent track.
PHENOL. Introduction. User Manual. Manual Sections. Download a PDF version of the manual here: phenol-manual.pdf
 PHENOL User Manual Download a PDF version of the manual here: phenol-manual.pdf Note that PDF manuals are automatically generated from webpages. Links and embedded media will not be accessible. For the
Pro 2 OS 1.4 Manual Addendum
 Pro 2 OS 1.4 Manual Addendum Pro 2 OS version 1.4 adds a number of new features not covered in the main Operation Manual. These features are described in the following addendum in the order shown below.
Galilean Moons. dual amplitude transmutator. USER MANUAL v1.02
 Galilean Moons dual amplitude transmutator USER MANUAL v1.02 Contents Contents... 2 Introduction... 3 Module Features and Specifications... 4 Module Description... 4 Features List... 4 Technical Details...
PITTSBURGH MODULAR SYSTEM 10.1 and SYNTHESIZER MANUAL AND PATCH GUIDE
 PITTSBURGH MODULAR SYSTEM 10.1 and 10.1+ SYNTHESIZER MANUAL AND PATCH GUIDE 1 Important Instructions PLEASE READ Read Instructions: Please read the System 10.1 Synthesizer manual completely before use
Q181V Whammy Bar Controller
 This document covers our Whammy Bar controllers in these configurations: Q181V1 Single-axis Whammy Bar in a single-channel Q181 panel Q181V1 Whammy Bar Q182V2 Dual-axis Whammy Bar in a dual-channel Q182
the blooo VST Software Synthesizer Version by Björn Full Bucket Music
 the blooo VST Software Synthesizer Version 1.0 2010 by Björn Arlt @ Full Bucket Music http://www.fullbucket.de/music VST is a trademark of Steinberg Media Technologies GmbH the blooo Manual Page 2 Table
STO Limited Warranty Installation Overview
 v2.5 2 STO Limited Warranty ----------------------------------------------------3 Installation --------------------------------------------------4 Overview --------------------------------------------------------5
Helm Manual. v Developed by: Matt Tytel
 Helm Manual v0.9.0 Developed by: Matt Tytel Table of Contents General Usage... 5 Default Values... 5 Midi Learn... 5 Turn a Module On and Of... 5 Audio Modules... 6 OSCILLATORS... 7 1. Waveform selector...
Technical Recording Data
 The sound of EPICA is rich, full and 'Real', its presets just fit into your projects ready to go. I have always found that virtual synths need a lot of work to make them fit into mixes, to my ears they
Kameleono. User Guide Ver 1.2.3
 Kameleono Ver 1.2.3 Table of Contents Overview... 4 MIDI Processing Chart...5 Kameleono Inputs...5 Kameleono Core... 5 Kameleono Output...5 Getting Started...6 Installing... 6 Manual installation on Windows...6
the blooo VST Software Synthesizer Version by Björn Full Bucket Music
 the blooo VST Software Synthesizer Version 1.1 2016 by Björn Arlt @ Full Bucket Music http://www.fullbucket.de/music VST is a trademark of Steinberg Media Technologies GmbH the blooo Manual Page 2 Table
Semi-modular audio controlled analog synthesizer
 Semi-modular audio controlled analog synthesizer Owner s manual 21.7.2017 - Sonicsmith Hello and thank you for purchasing a Squaver P1 synthesizer! The Squaver P1 is a semi-modular, audio controlled, analog
Q181EB Expression Block Controller
 The controller produces a voltage as you press the block, similar to the Ondes Martenot and other instruments. Perfect for controlling amplitude as you play notes on the keyboard, to control filter frequency,
semi-mod lar analog synthesizer Operation Man al
 semi-mod lar analog synthesizer Operation Man al Written and produced by Jered Flickinger Copyright 2007 Future Retro Synthesizers TABLE OF CONTENTS 1 Introduction 2. Welcome Overview Power Care Warranty
the blooo Software Synthesizer Version by Björn Full Bucket Music
 the blooo Software Synthesizer Version 2.1 2010 2017 by Björn Arlt @ Full Bucket Music http://www.fullbucket.de/music VST is a trademark of Steinberg Media Technologies GmbH Windows is a registered trademark
SNAKEBITE SYNTH. User Manual. Rack Extension for Propellerhead Reason. Version 1.2
 SNAKEBITE SYNTH Rack Extension for Propellerhead Reason User Manual Version 1.2 INTRODUCTION Snakebite is a hybrid digital analog synthesizer with the following features: Triple oscillator with variable
MMO-3 User Documentation
 MMO-3 User Documentation nozoid.com/mmo-3 1/15 MMO-3 is a digital, semi-modular, monophonic but stereo synthesizer. Built around various types of modulation synthesis, this synthesizer is mostly dedicated
pittsburgh modular synthesizers microvolt 3900 manual
 pittsburgh modular synthesizers microvolt 3900 manual 2 Thank You! Thank you for purchasing the Microvolt 3900. Your investment in our ideas help support innovative, boutique synthesizer design. Looking
// K3020 // Dual VCO. User Manual. Hardware Version E October 26, 2010 Kilpatrick Audio
 // K3020 // Dual VCO Kilpatrick Audio // K3020 // Dual VCO 2p Introduction The K3200 Dual VCO is a state-of-the-art dual analog voltage controlled oscillator that is both musically and technically superb.
EXCLUSIVELY ANALOGUE THE ANALOGUE SYNTHESIZER SPECIALISTS (UNIT 1) 18 THE MEADOWS, CHESTERFIELD, DERBYSHIRE, S42 7JY, ENGLAND
 18 THE MEADOWS, CHESTERFIELD, DERBYSHIRE, S42 7JY, ENGLAND") 1 EXCLUSIVELY ANALOGUE THE ANALOGUE SYNTHESIZER SPECIALISTS (UNIT 1) 18 THE MEADOWS, CHESTERFIELD, DERBYSHIRE, S42 7JY, ENGLAND 01246 272150 INTRODUCTION THE AVIATOR OWNERS MANUAL Welcome to the "AVIATOR"
1 EXCLUSIVELY ANALOGUE THE ANALOGUE SYNTHESIZER SPECIALISTS (UNIT 1) 18 THE MEADOWS, CHESTERFIELD, DERBYSHIRE, S42 7JY, ENGLAND 01246 272150 INTRODUCTION THE AVIATOR OWNERS MANUAL Welcome to the "AVIATOR"
Written by Jered Flickinger Copyright 2017 Future Retro
 Written by Jered Flickinger Copyright 2017 Future Retro www.future-retro.com TABLE OF CONTENTS Page 1 - Overview Page 2 Inputs and Outputs Page 3 Controls Page 4 Modulation Sources Page 5 Parameters Instrument
COS. user manual. Advanced subtractive synthesizer with Morph function. 1 AD Modulation Envelope with 9 destinations
 COS Advanced subtractive synthesizer with Morph function user manual 2 multi-wave oscillators with sync, FM 1 AD Modulation Envelope with 9 destinations LCD panel for instant observation of the changed
VCA. Voltage Controlled Amplifier.
 VCA Voltage Controlled Amplifier www.tiptopaudio.com Tiptop Audio VCA User Manual The Tiptop Audio VCA is a single-channel variable-slope voltage-controlled amplifier in Eurorack format. It has the following
Free SE-1X Manual Version 0.1 (Covers OS Version 0.75)
") Free SE-1X Manual Version 0.1 (Covers OS Version 0.75) Copyright c 2005, by Nectarine City, LLC. See the LICENSE section of this document for the details of your rights regarding this document. January
Free SE-1X Manual Version 0.1 (Covers OS Version 0.75) Copyright c 2005, by Nectarine City, LLC. See the LICENSE section of this document for the details of your rights regarding this document. January
Q106 Oscillator. Controls and Connectors. Jun 2014
 The Q106 Oscillator is the foundation of any synthesizer providing the basic waveforms used to construct sounds. With a total range of.05hz to 20kHz+, the Q106 operates as a powerful audio oscillator and
TURN2ON BLACKPOLE STATION POLYPHONIC SYNTHESIZER MANUAL. version device by Turn2on Software
 MANUAL version 1.2.1 device by Turn2on Software http://turn2on.ru Introduction Blackpole Station is a new software polyphonic synthesizer for Reason Propellerhead. Based on 68 waveforms in 3 oscillators
Q181RC Ribbon Controller
 The Controller produces a varying voltage as you move your finger along the ribbon strip. Great for pitch bending, playing notes, controlling filter frequency, or other parameters in the synthesizer system.
Q106A Oscillator. Aug The Q106A Oscillator module is a combination of the Q106 Oscillator and the Q141 Aid module, all on a single panel.
 Aug 2017 The Q106A Oscillator module is a combination of the Q106 Oscillator and the Q141 Aid module, all on a single panel. The Q106A Oscillator is the foundation of any synthesizer providing the basic
A-110 VCO. 1. Introduction. doepfer System A VCO A-110. Module A-110 (VCO) is a voltage-controlled oscillator.
 is a voltage-controlled oscillator.") doepfer System A - 100 A-110 1. Introduction SYNC A-110 Module A-110 () is a voltage-controlled oscillator. This s frequency range is about ten octaves. It can produce four waveforms simultaneously: square,
doepfer System A - 100 A-110 1. Introduction SYNC A-110 Module A-110 () is a voltage-controlled oscillator. This s frequency range is about ten octaves. It can produce four waveforms simultaneously: square,
If you have just purchased Solid State Symphony, thank-you very much!
 If you have just purchased Solid State Symphony, thank-you very much! Before you do anything else- Please BACK UP YOUR DOWNLOAD! Preferably on DVD, but please make sure that it s someplace that can t be
A-147 VCLFO. 1. Introduction. doepfer System A VCLFO A-147
 doepfer System A - 100 VCLFO A-147 1. Introduction A-147 VCLFO Module A-147 (VCLFO) is a voltage controlled low frequency oscillator, which can produce cyclical control voltages over a 0.01Hz to 50Hz frequency
AN Expert Editor. Manual. Important Notices
 AN Expert Editor Manual Important Notices The AN Expert Editor provides an easy, intuitive way to edit and create your own original AN voices for the PLG150-AN Plug-in Board. Do not use any of the panel
Anyware Instruments MOODULATOR. User s Manual
 Anyware Instruments MOODULATOR User s Manual Version 1.0, September 2015 1 Introduction Congratulations and thank you for purchasing the MOODULATOR compact classic synthesizer! The concept behind this
Welcome to an expanded "Analogue for the 90 s".
 OWNERS MANUAL CONTENTS INTRODUCTION Introduction...1 Front Panel Controls & Features...2 Rear Panel Features...2 Connections & Quick Set-up Guide...3 How The Controls Work...4 Master Volume Section...4
the qyooo Polyphonic Synthesizer Version by Björn Full Bucket Music https://www.fullbucket.de/music
 the qyooo Polyphonic Synthesizer Version 1.1 2016-2018 by Björn Arlt @ Full Bucket Music https://www.fullbucket.de/music Additional Presets by Krezie Sounds http://www.kreziesounds.com/ VST is a trademark
DOEPFER System A-100 Synthesizer Voice A Introduction. Fig. 1: A sketch
 DOEPFER System A-100 Synthesizer Voice A-111-5 1. Introduction Fig. 1: A-111-5 sketch 1 Synthesizer Voice A-111-5 System A-100 DOEPFER Module A-111-5 is a complete monophonic synthesizer module that includes
THREE-AXIS MORPHING WITH NONLINEAR WAVESHAPERS FREQUENCY +/- 8V SELECT FM/EXT IN AC 10VPP OSC A LINK FREQUENCY MODE SELECT OSC B CV +/- 8V MICRO SD
 PISTON HONDA DUAL WAVETABLE OSCILLATOR THREE-AXIS MORPHING WITH NONLINEAR WAVESHAPERS FREQUENCY SYN C 0-5V MODE SELECT CV +/- 8V PRESET/EDIT 1V/OCT 0-8V CV +/- 8V FM/EXT IN AC 10VPP OSC A LINK FREQUENCY
EasyStart CONTENTS. Connections; Tuning; Selecting Programs 2. Saving Programs; Individual Mode; Expression Quick Assign; 3
 EasyStart Main Features Korg s REMS modeling technology delivers 72 realistic classic and modern amp, cabinet and effects models 16 types of drive & amp models cover everything from vintage overdrive to
P. Moog Synthesizer I
 P. Moog Synthesizer I The music synthesizer was invented in the early 1960s by Robert Moog. Moog came to live in Leicester, near Asheville, in 1978 (the same year the author started teaching at UNCA).
AtomoSynth MochikaX2 v1.0
 AtomoSynth MochikaX2 v1.0 Thank you for purchasing the AtomoSynth, Mochika X2 version 1.0. Analog synthesizer sequencer. In order to enjoy long and trouble free use, please read this manual carefully and
Glossary DAW Patch Preset Voice
 OPERATOR'S MANUAL 1 Table of contents Glossary... 3 System requirements... 4 Overview... 5 Operating the controls... 5 Working with patches... 6 VST version... 6 Audio Unit version... 6 Building your sound...
Table of Contents. Introduction Editing Preparations Editing a synth program Quick Start... 7
 Thank you for purchasing the Korg microkorg S synthe sizer/ vocoder. To ensure trouble-free enjoyment, please read this manual carefully and use the product correctly. Introduction... 1 Explains the features
PITTSBURGH MODULAR FOUNDATION 3.1 and 3.1+ SYNTHESIZER MANUAL AND PATCH GUIDE
 PITTSBURGH MODULAR FOUNDATION 3.1 and 3.1+ SYNTHESIZER MANUAL AND PATCH GUIDE 1 Important Instructions PLEASE READ Read Instructions: Please read the Foundation 3.1 Synthesizer manual completely before
the qyooo VST Polyphonic Synthesizer Version by Björn Full Bucket Music https://www.fullbucket.de/music
 the qyooo VST Polyphonic Synthesizer Version 1.0 2016-2017 by Björn Arlt @ Full Bucket Music https://www.fullbucket.de/music Additional Presets by Krezie Sounds http://www.kreziesounds.com/ VST is a trademark
TiaR c-x-f synth rev 09. complex X filter synthesizer. A brief user guide
 1 Introduction TiaR c-x-f synth rev 09 complex X filter synthesizer A brief user guide by Thierry Rochebois The cxf synthesizer is a jsfx software synthesizer designed for Reaper. It can be downloaded
Getting Started. Pro Tools LE & Mbox 2 Micro. Version 8.0
 Getting Started Pro Tools LE & Mbox 2 Micro Version 8.0 Welcome to Pro Tools LE Read this guide if you are new to Pro Tools or are just starting out making your own music. Inside, you ll find quick examples
ÂØÒňΠGuitar synthesizer July 10, 1995
 GR-1 ÂØÒňΠGuitar synthesizer July 10, 1995 Supplemental Notes MIDI Sequencing with the GR-1 This is an application guide for use with the GR-1 and an external MIDI sequencer. This guide will cover MIDI
User s Manual - Rack Extension
 User s Manual - Rack Extension Copyright Synapse Audio Software 217. All rights reserved. Concept: Richard Hoffmann and Nico Herz / Bigtone Studios Graphic Design: Marcin Lezak Programming: Richard Hoffmann
Music Easel Aux Card User s Guide v1.0 by Joel Davel 1/15/2017
 Music Easel Aux Card User s Guide v1.0 by Joel Davel 1/15/2017 Congratulations!!!! The Aux Card is a natural complement to the Easel and way to expand your palette. Introducing the Music Easel Auxilary
ALM-011. Akemie s Castle. - Operation Manual -
 ALM-011 Akemie s Castle - Operation Manual - (V0.2) Introduction... 3 Technical Specifications 3 Background & Caveats... 4 Core Operation... 5 Panel Layout 5 General Usage 7 Patch Ideas... 13 Tuning Calibration...
ETHERA EVI MANUAL VERSION 1.0
 ETHERA EVI MANUAL VERSION 1.0 INTRODUCTION Thank you for purchasing our Zero-G ETHERA EVI Electro Virtual Instrument. ETHERA EVI has been created to fit the needs of the modern composer and sound designer.
Instant Delay 1.0 Manual. by unfilteredaudio
 Instant Delay 1.0 Manual by unfilteredaudio Introduction Instant Delay takes the Modern Instant mode from our hit delay/looper Sandman Pro and crosses it with our soft saturator and resonant filter from
The Atmosphere. Res System Resolution, the sample rate of the digital effects engine. Turn down for slower, lower, longer, grainier, more lofi reverb.
 Decay Reverb decay time. CTRL1 Displayed on the screen under Decay. CTRL2 Displayed on the screen above Tempo. Sidebar Markers tell you what features are active. BYP lights up red for Trails Bypass mode.
MANUAL v.1c CONTACT MORE THAN LOGIC. UNITING ART + ENGINEERING.
 MANUAL v.1c MORE THAN LOGIC. UNITING ART + ENGINEERING. CONTACT email: info@meris.us phone: 747.233.1440 website: www.meris.us TABLE OF CONTENTS SECTION 1 PG. 1 FRONT PANEL CONTROLS SECTION 2 PG. 2-4 GLOBAL
The Fantom-X Experience
 ÂØÒňΠWorkshop The Fantom-X Experience 2005 Roland Corporation U.S. All rights reserved. No part of this publication may be reproduced in any form without the written permission of Roland Corporation
Contents. Parameter Guide. Arpeggio Program Parameters Analog Part Digital Part Effects Pattern Sequencer...
 Parameter Guide Contents Program Parameters....................................... 2 Program Edit............................................. 2 Part Edit.................................................
ÂØÒňÎ. Workshop. Advanced Fantom-X Recording Techniques. No. 10 in the Fantom-X Workshop Series
 ÂØÒňΠWorkshop Advanced Fantom-X Recording Techniques No. 10 in the Fantom-X Workshop Series 1 2004 Roland Corporation U.S. All rights reserved. No part of this publication may be reproduced in any form
The included VST Instruments
 The included VST Instruments - 1 - - 2 - Documentation by Ernst Nathorst-Böös, Ludvig Carlson, Anders Nordmark, Roger Wiklander Additional assistance: Cecilia Lilja Quality Control: Cristina Bachmann,
MMO-4 User Documentation
 MMO-4 User Documentation nozoid.com This is a preliminary documentation 1/9 Feature This is the audio path wired inside the synthesizer. Modulation CV are routed to modulation fader in a digital matrix.
SOLID STATE SYMPHONY
 SOLID STATE SYMPHONY Congratulations, and thank-you for your support! Solid State Symphony is a kind of orchestra simulator that was created, for the most part, by using analogue synthesizers. In this
TABLE OF CONTENTS 1. MAIN PAGE 2. EDIT PAGE 3. LOOP EDIT ADVANCED PAGE 4. FX PAGE - LAYER FX 5. FX PAGE - GLOBAL FX 6. RHYTHM PAGE 7.
 Owner s Manual OWNER S MANUAL 2 TABLE OF CONTENTS 1. MAIN PAGE 2. EDIT PAGE 3. LOOP EDIT ADVANCED PAGE 4. FX PAGE - LAYER FX 5. FX PAGE - GLOBAL FX 6. RHYTHM PAGE 7. ARPEGGIATOR 8. MACROS 9. PRESETS 10.
Station X/Y. User Manual. Analogue solutions 2010
 Station X/Y User Manual Analogue solutions 2010 Station X/Y Minimodular Synthesisers Introduction We originally introduced a minimodular system of this size back in 2001. It ran for a few years. Now in
HERTZ DONUT MARK III OPERATIONS MANUAL FIRMWARE V1.0
 HERTZ DONUT MARK III OPERATIONS MANUAL FIRMWARE V1.0 FUNDAMENTALS The Hertz Donut Mark III is a complex oscillator utilizing the finest digital sound synthesis techniques from the mid-1980s. It uses a
HexVCA Manual v1.0. Front Panel. 1 - VCA Offset CV offset, also referred to as bias knob. CV indicator LED. 2 - IN 1-6 The signal input of the VCAs.
 HexVCA Manual v1.0 The HexVCA contains six separate DC coupled logarithmic VCAs that have their outputs normalled to two outputs. The front panel outputs of each VCA is a switching jack which breaks the
Mixwitch Mixer & Switcher
 Mixwitch Mixer & Switcher Voltage & clock-controlled analog switch with mixer Introduction Focused versatility seems an oxymoron when describing the features that led us to design the Mixwitch. With only
vintage modified user manual
 vintage modified user manual Introduction The Empress Effects Superdelay is the result of over 2 years of research, development and most importantly talking to guitarists. In designing the Superdelay,
Tubbutec Modypoly / Modysix
 Tubbutec Modypoly / Modysix Midi retrofit and feature extension for Polysix and Poly-6 User Manual for firmware version v.4 http://tubbutec.de Contents Modysix 3 2 Play Modes 3 2. Play Modes Overview......................
Modular Synthesizers Using VCV Rack FOR ABSOLUTE BEGINNERS. Iain Sharp lushprojects.com
 Modular Synthesizers Using VCV Rack FOR ABSOLUTE BEGINNERS Iain Sharp lushprojects.com About me I am not a musician, but I like the noise synthesizers make Wanted to play with modular synths on the cheap,
TONAL RECALL INSTRUCTIONS
 TONAL RECALL INSTRUCTIONS OVERVIEW: Forget everything you know about analog delay, this one s different. Built around a pair of re-issued versions of the legendary MN3005 bucket-brigade delay chips, the
Introduction. TUNE Explained:
 Introduction. The TOMS909 is a recreation of Roland's legendary TR-909 analog Tom drums sound generator for use in modular synthesizer format. The TOMS909 includes all the original controls found on the
RISE DESIGNER USER MANUAL
 RISE DESIGNER USER MANUAL CONTENTS: Overview Cod Psychology General Principle Of The Rise Designer The MIDI Keys Saving Your Settings GUI: RISE and TAIL The ATTACK SLOPE Control Knob DEPTH control knob