VNS Therapy System Overview and Dosing
|
|
|
- Shonda Stokes
- 6 years ago
- Views:
Transcription

 Handheld Computer Dell Axim X50 VNS Therapy Programming Wand Model 201 VNS Therapy Model 250 Programming Software Version 7.")
1 Course Outline VNS Therapy System Overview and Dosing Product Overview Basic parameters and dosing Programming System set up Model 102/102R Dosing Diagnostics End of Service Common error messages Model 103/104 Dosing Diagnostics End of Service Common error messages Summary of differences Misc. Software Features Lessons Learned 2 VNS Therapy System Components Pulse Generators VNS Therapy Generators: Pulse Model 102/ Pulse Duo 102R Pulse Generator Demipulse Model 103/ Demipulse Duo 104 Pulse Generator Model 100, Model 101 (no longer distributed) Handheld Computer Dell Axim X50 VNS Therapy Programming Wand Model 201 VNS Therapy Model 250 Programming Software Version 7.1 Model 220 Magnets (Patient Kit) Leads Model 302 and 303 Lead (distributed) Model 300 (no longer distributed) Surgical Components (n/a for clinic setting) Model 402 Tunneler Model 502 Accessory Kit 3 Pulse Model 102 Pulse Duo Model 102R Demipulse Model 103 Demipulse Duo Model 104 Location Subcutaneously in left chest Purpose Delivers electric pulses at programmed time intervals Stores selected information Model 102 and 103 (Single Pin receptacle) Model 102R and 104 (Dual Pin receptacle) 4 1
 VNS Therapy Patient")
 Use Hold over device to immediately stop stimulation Keep in place for 65 seconds or greater After at least 65 seconds and when removed, stimulation resumes after one complete")
2 Programming System Components VNS Therapy Leads Handheld Computer Platform for Programming Software Always keep charged when not in use Programming Wand Accessory to programming handheld computer Communication tool between Programming Software and Pulse Generator Lead Model 302 Perennia Model VNS Therapy Patient Magnets Inhibit Stimulation (all indications) VNS Therapy Patient Magnets-On Demand Stimulation (Epilepsy Only) Location Patient s wrist or belt Location Patient s wrist or belt Purpose Temporarily turn off the device to alleviate possible side-effects (due to stimulation parameters) Use Hold over device to immediately stop stimulation Keep in place for 65 seconds or greater After at least 65 seconds and when removed, stimulation resumes after one complete OFFtime period 7 Purpose To provide on-demand magnet mode stimulation before or at an onset of a seizure Can also be used to test device daily to ensure battery is functioning properly Details Magnetic field of at least 50 Gauss at 1 inch Apply or pass the Magnet over the Pulse Generator for >1 sec and <65 sec will result in magnet mode stimulation 8 2
 1-30 Pulse Width Microseconds ( msec) 130-1000 Signal On-time Seconds (sec) 7-60 Signal Off-time Minutes (min) 0.")
3 Parameters NORMAL MODE BASIC PARAMETERS AND DOSING Pulse Generator Dosing Parameters Parameter Units Range Output Current Milliamps (ma) Signal Frequency Hertz (Hz) 1-30 Pulse Width Microseconds ( msec) Signal On-time Seconds (sec) 7-60 Signal Off-time Minutes (min) Stimulation throughout the day (24 hours/day, 7 days/week) is referred to as the Normal Mode Stimulation 10 Parameters MAGNET MODE Pulse Generator Dosing Parameters Parameters Dose Output Current (ma) Parameter Units Range Magnet Output Current Milliamps (ma) Magnet Pulse Width Microseconds ( µ sec ) Magnet On-time Seconds (sec) 7-60 The magnet output current will always be set to 0 ma for patients diagnosed with Treatment-Resistant Depression Pulse Width (µsec) 1 Signal Frequency (Hz) Output Current Amount of electrical current delivered in a single pulse of stimulation. Pulse Width Duration of a single pulse within a stimulation period Signal Frequency Number of pulses per second; measured in Hertz
4 Parameters Dose Adjustment Parameters Timing Patient 1 Patient 2 Stimulation Time Ramp Up On Time Ramp Down (2 sec.) (2 sec.) Adjusting Output Current alone. Output Current 1 ma 2 ma Adjusting Pulse Width alone. 250 msec 500 msec 1 Signal Frequency Pulse Width Off Time Ramp Up Gradual increase in output current over approximately two seconds at the beginning of stimulation. Adjusting Signal Frequency alone. 20 Hz 30 Hz 13 Ramp Down Gradual decrease in output current over approximately two seconds at the end of stimulation. 14 Parameters Timing - Duty Cycle Calculation Duty cycle (%) = On Time (sec) + 4 seconds X 100 On Time (sec) + Off Time (sec) OFF TIME (Minutes) ON TIME (Seconds) PROGRAMMING SYSTEM Set-up

 Pulse Model 102/102R Generator: Dosing")
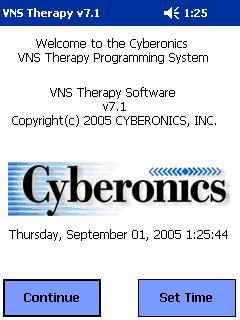
5 Dell AXIM x50 Dosing System Set-up Getting Started Wand Check Flash Card Slot Notice: Only 1 connection into Handheld Serial Cable Stylus Handheld Computer A/C Adapter Model 201 Programming Wand Briefly press and release the two red Reset buttons Check illumination time of green Power Light Illumination > 25 seconds indicates sufficient battery life Power LED Reset Buttons Illumination < 25 seconds, replace 9 Volt Battery Getting Started Handheld Turn Handheld ON Place Programming Wand over patient s generator ( 1 inch away) Pulse Model 102/102R Generator: Dosing ON/OFF 19 5

6 Typical Dose Adjustment Session 1. Interrogate generator 2. Adjust parameters if desired, based on efficacy, outcome and paying attention to patient s tolerability 3. Program parameters 4. Always interrogate generator as last step in session Ensures parameters are programmed as desired System and Normal Mode Diagnostics steps will be added to dose adjustment sessions once minimum stimulation parameters are achieved Step 1 Interrogate Device Interrogation is always the first and last step in a programming session From Main Menu, select Interrogate Device Step 1 Interrogate Device (cont.) With wand properly placed over the generator, select Start Interrogation Step 2 Selecting Parameters Tap the New button for the parameter you want to change. Allow time for completion
 Tap the desired value Use scroll buttons to view more selections Step 3 Programming Select Program then Start Programming.")
 NOTE: After completion the device will stimulate the patient as programmed.")
7 Step 2 Selecting Parameters (cont.) Tap the desired value Use scroll buttons to view more selections Step 3 Programming Select Program then Start Programming Step 3 Programming (cont.) Step 4 Final Interrogation (cont.) NOTE: After completion the device will stimulate the patient as programmed. Note: For patients with depression, the pulse generator s magnet mode output should remain at 0 ma Check parameters are programmed as desired, then, Select Menu followed by Main Menu, and turn handheld Off

8 Example of Titration Process Parameter Step #1 Step #2 Step #3 Output current Signal Frequency 20/30 20/30 20/30 Pulse Width 250/ / /500 Signal ON Time Signal OFF Time Example of Titration Process: cont. Parameter Step #4 Step #5 Step #6 Output current Signal Frequency 20/30 20/30 20/30 Pulse Width 250/ / /500 Signal ON Time Signal OFF Time Magnet Output Current Magnet Pulse Width Magnet Signal ON Time.5 (0 ma for TRD).75 (0 ma for TRD) 1.0 (0 ma for TRD) Magnet Output Current Magnet Pulse Width Magnet Signal ON Time 1.25 (0 ma for TRD) 1.5 (0 ma for TRD) 1.75 (0 ma for TRD) Step #3 diagnostic tests should be routinely performed when the output current reaches 0.75mA and greater 29 Step #3 diagnostic tests should be routinely performed when the output current reaches 0.75mA and greater 30 Normal Mode Diagnostics: Model 102/102R Pulse Model 102/102R Generator: Device Diagnostics Normal Mode Diagnostic To assess the deliverability of the normal mode output current. Minimum settings: Output Current 0.75 ma Signal Frequency > 10 Hz ON Time 30 seconds Recommend perform at every office visit once patient can tolerate minimum settings (see above) 32 8
9 System Diagnostics: Model 102/102R Purpose: Tests the VNS system s connection to the patient and integrity of the VNS Therapy Lead Automatically programs the device to the following settings: 1 ma, 20 Hz, 500 msecs, 30 sec ON, and 60 min OFF, then returns the device to its original Normal Mode parameters Recommend perform at every office visit (pending patient s tolerance of settings listed above) OTHER DIAGNOSTICS Generator Diagnostics Only used to troubleshoot in the operating room on the day of implant. DO NOT use for Follow-up visits. Magnet Mode Diagnostics (For patients with Epilepsy) Tests the system s magnet mode functionality in the same way as the Normal Mode, but with the use of the magnet to initiate the test Typical Dose Adjustment Session 1. Interrogate generator 2. Adjust parameters if desired, based on efficacy, outcome and paying attention to patient s tolerability 3. Program parameters 4. Perform System and Normal Mode Diagnostics 5. Always interrogate generator as last step in session Ensures parameters are programmed as desired Perform Normal Mode Diagnostics Confirm device settings meet the requirements for this test Minimum requirements: Output Current 0.75 ma Signal Frequency > 10 Hz ON Time 30 seconds


10 Perform Normal Mode Diagnostics Select Menu Select Device Diagnostics Perform Normal Mode Diagnostics Select Other Diagnostics Select Normal Mode Diagnostics Perform Normal Mode Diagnostics Place programming wand over generator, select OK. Normal Mode Diagnostics RESULTS Output Status: If OK - Programmed current is being delivered If LIMIT Programmed output current is NOT being delivered DC DC Converter: Ranges from 0-7 DCDC 7 typically coincides with a LIMIT Output Status

11 Comparison of Possible Results NORMAL MODE DIAGNOSTICS Output current being delivered Implanted Communication mm/dd/yy OK Output current not being delivered Implanted Communication mm/dd/yy OK Perform System Diagnostics Select Menu Select Device Diagnostics Output Status OK Output Status LIMIT Output Current 2.0ma Output Current 2.0ma Lead Impedance OK Lead Impedance HIGH DCDC Converter 5 DCDC Converter 7 Near End of Service NO Near End of Service NO See troubleshooting section for High Lead Impedance on a diagnostic Test at Follow-Up Visit in Physician s Manual for recommendations and course of action Perform System Diagnostics Choose System Diagnostics from the Diagnostics Menu of options. Place programming wand over device, select OK. System Diagnostics RESULTS Lead Impedance: OK If OK integrity of the system is WNL DCDC (0-3) coincides with OK impedance. Lead Impedance: HIGH If HIGH lead impedance is higher than expected DCDC (4-7) coincides with HIGH impedance conditions (e.g. fibrosis or lead break) Output Status: If OK 1mA current is being delivered If LIMIT 1mA current is NOT being delivered
12 Comparison of Possible Results System Diagnostics 1 ma being delivered Typical discontinuity results Implanted Communication Output Status Output Current Lead Impedance mm/dd/yy OK OK 1.0ma OK Implanted Communication Output Status Output Current Lead Impedance mm/dd/yy OK LIMIT 1.0ma HIGH Suspected Lead Breaks If diagnostics suggest that a fracture is present, consider turning the VNS Pulse Generator to zero milliamps (0 ma) of output current. Continuing stimulation with a fractured Lead may result in dissolution of the conductor material resulting in Pain Inflammation Vocal Cord dysfunction DCDC Converter 3 Near End of Service NO DCDC Converter 7 Near End of Service NO Risk/Benefit of leaving On should be evaluated and monitored by the treating medical professional. See troubleshooting section for High Lead Impedance on a diagnostic Test at Follow-Up Visit in Physician s Manual for recommendations and course of action Pulse Model 102/102R Generator: End of Service End of Service (EOS): 102/102R Clinical Indicators of potential EOS Increase in seizure activity Painful or erratic stimulation Report of decreased perception of stimulation or no stimulation when performing daily magnet activation If EOS has been reached, the pulse generator will not deliver any output, the patient will not feel stimulation, attempts to interrogate will be unsuccessful 48 12
13 End of Service (EOS): 102/102R Elective Replacement Indicator (ERI): Upon Interrogation, if the ERI is set to YES, this message will be displayed. The ERI should be used as the primary indicator of nearing EOS. The time from ERI to EOS is highly dependent on the programmed parameters and the Lead impedance. End of Service: All Diagnostics (102/102R) Each diagnostic test will provide the ERI, Near End of Service. NO indicates the device is NOT nearing End of Service at this time. YES indicates the device is nearing End-of Service. Prompt replacement may help minimize any possible relapse in seizures/depressive symptoms. Note: Model 100B generators (distributed prior to 1999) do not have the Elective Replacement Indicator function End of Service Summary: 102/102R For help in determining generator battery life, please contact Clinical Technical Support at with the patient s complete parameter history and latest System Diagnostic test results If longevity of the generator is shorter than expected, contact Clinical Technical Support at Pulse Model 102/102R Generator: Common Errors 51 13


 882-8804 See Troubleshooting Section in Physician")
14 Output Warning Common Diagnostic Errors: 102/102R Communication problems during a diagnostic test can result in the following messages 53 See Troubleshooting Section in Physician s Manual for recommendations and course of action 54 Common Interrogation Errors Communication problems during an interrogation can result in the following messages Solutions to Common Errors Be sure the handheld computer is fully charged and is not plugged into a wall outlet. Test the batteries in the programming wand. Make sure the programming wand is directly over the pulse generator. Check all cables and connections to ensure they are properly connected. Rule out an EMI (electromagnetic interference). If these steps do not address the problem, call Cyberonics Clinical Technical Support Team at (866) See Troubleshooting Section in Physician s Manual for recommendations and course of action


15 Cross-Programming What is it? Cross programming one patient s settings to another patient s device without interrogating the second patient s device first. There have been a few incidences of cross-programming reported recently. Cross-Programming What can be done to prevent cross-programming? Always Interrogate as the first and last step Set Inactivity Time-out to a lower value (3 min, 5 min, or 10 min) for Prescribing Physician Handheld When does it occur? If the patient previously interrogated has the same model number generator and the software is left on either the program new parameters screen or a diagnostic testing screen. What will happen? The programming event will appear in the programming software as if it was performed on the first patient, though it was actually performed on the second patient Typical Dose Adjustment Session Pulse Model 103/104 Generator: Dosing 1. Interrogate generator 2. Adjust parameters if desired, based on efficacy, outcome and paying attention to patient s tolerability 3. Program parameters 4. Perform System Diagnostic Test 5. Always interrogate generator as last step in session Ensures parameters are programmed and delivered as desired 60 15
16 Step 1 Interrogate Device Interrogation is always the first and last step in a programming session From Main Menu, select Interrogate Device Step 1 Interrogate Device (cont.) With wand properly placed over the generator, select Start Interrogation Allow time for completion Step 2 Selecting Parameters Tap the New button for the parameter you want to change. Step 2 Selecting Parameters (cont.) Tap the desired value Use scroll buttons to view more selections
17 Step 3 Programming Select Program then Start Programming. Step 3 Programming (cont.) NOTE: After completion the device will stimulate the patient as programmed. NOTE: For patients with depression, the pulse generator s magnet mode output should remain at 0 ma Step 4 Final Interrogation (cont.) Example of Titration Process Parameter Step #1 Step #2 Step #3 Output current Signal Frequency 20/30 20/30 20/30 Pulse Width 250/ / /500 Signal ON Time Signal OFF Time Check parameters are programmed and delivered as desired, then, Select Menu followed by Main Menu, and turn handheld Off. Magnet Output Current Magnet Pulse Width Magnet Signal ON Time.5 (0 ma for TRD).75 (0 ma for TRD) 1.0 (0 ma for TRD) A System diagnostic tests should be routinely performed at each dosing 68 17

 1.")
18 Example of Titration Process: cont. Parameter Step #4 Step #5 Step #6 Output current Signal Frequency 20/30 20/30 20/30 Pulse Width 250/ / /500 Signal ON Time Signal OFF Time Pulse Model 103/104 Generator: Device Diagnostics Magnet Output Current Magnet Pulse Width Magnet Signal ON Time 1.25 (0 ma for TRD) 1.5 (0 ma for TRD) 1.75 (0 ma for TRD) A System diagnostic tests should be routinely performed at each dosing 69 Automatic Lead Impedance Measurement Impedance value will display the true impedance between 7000 Ohms and >10000 Ohms if High, and <200 Ohms if Low. Typical Dose Adjustment Session 1. Interrogate generator 2. Adjust parameters if desired, based on efficacy, outcome and paying attention to patient s tolerability 3. Program parameters 4. Perform System Diagnostic Test 5. Always interrogate generator as last step in session Ensures parameters are programmed and delivered as desired Once every 24 hours a lead impedance measurement is taken. If the impedance has reached High or Low between interrogations (office visits), a warning message similar to the one above will be displayed upon interrogation of device
19 System Diagnostics: Model 103/104 System Diagnostic Evaluates the Lead impedance of the VNS system as well as the pulse generator s ability to deliver the programmed stimulation. Recommended at every office visit. System Diagnostic for Demipulse Model 103/104 When output current is > 0 ma (e.g. Follow-up) 1. Short 0.25 ma, 130 msec pulse (Assess Impedance) 2. Followed by ANY programmed parameters (Assess Output Current) When output current is = 0 ma (e.g., in OR) : 1. Short 0.25 ma, 130 msec pulse (Assess Impedance) 2. Followed by 1.0 ma, 20 Hz, 500 msec parameters (Assess Output Current) Note Automatic System Diagnostic (one per 24 hours) is not performed when the Demipulse is programmed to 0mA System Diagnostics: Follow-up Assessing Lead Impedance Model 103/ / 104 Results Focus on Lead Impedance and Impedance Value 0.5 ma 0.5 ma 0.5 ma > 7000 ohms is High impedance for Demipulse Model 103 and ma 0.25 ma, 130 m sec Impedance Measurement Pulse The System Diagnostic assesses both the Lead Impedance and the Output Current for 103 and 104 All programmable settings are allowed 75 > 10,000 ohms is indicative of a discontinuity or break < 200 ohms is Low impedance for Demipulse Model 103 and 104, could also indicate a break or short circuit NOTE: In this example, 0.5 ma was programmed as the output current prior to diagnostics

20 Assessing Output Current Model 103/104 Focus on Output Current and Current Delivered Model 103/104 Comparison of Possible Results System Diagnostics Implanted 1 ma being delivered Typical discontinuity results mm/dd/yy Implanted mm/dd/yy Output current should be OK Communication OK Communication OK If LOW, then Current Delivered Programmed Current Output Current Current Delivered OK 1.0 ma Output Current Current Delivered LOW 0.0ma Lead Impedance OK Lead Impedance HIGH NOTE: In this example, 0.5 ma was programmed as the output current prior to diagnostics. 77 Impedance Value 3000 ohms End of Service x yrs Impedance Value ohms End of Service x yrs See troubleshooting section for High Lead Impedance on a diagnostic Test at Follow-Up Visit in Physician s Manual for recommendations and course of action 78 System Diagnostics Suspected Lead Breaks If diagnostics suggest that a fracture is present, consider turning the VNS Pulse Generator to zero milliamps (0 ma) of output current. Continuing stimulation with a fractured Lead may result in dissolution of the conductor material resulting in Pain Inflammation Vocal Cord dysfunction Risk/Benefit of leaving On should be evaluated and monitored by the treating medical professional
21 OTHER DIAGNOSTICS Generator Diagnostics Only used to troubleshoot in the operating room on the day of implant. DO NOT use for clinic follow-up visits. Pulse Model 103/104 Generator: End of Service Magnet Mode Diagnostics (For patients with Epilepsy) Tests the system s magnet mode functionality in the same way as the Normal Mode, but with the use of the magnet to initiate the test. 81 End of Service (EOS): 103/104 Clinical Indicators of potential EOS Increase in seizure activity Painful or erratic stimulation Report of decreased perception of stimulation or no stimulation when performing daily magnet activation If EOS has been reached, the pulse generator will not deliver any output, the patient will not feel stimulation, attempts to interrogate will be unsuccessful Generator Battery Life Projection The Demipulse Model 103 and 104 have the ability to project battery life based on time of implant and programmed settings. Each generator s software monitors battery depletion. Upon interrogation, warning messages are displayed by the handheld software when the generator battery life is approaching or is past the projection for end of service. All VNS Pulse Generators eventually require surgical replacement as a result of battery depletion. Pulse Generator replacement does not, of itself, require Lead replacement unless a Lead discontinuity (break) is suspected


22 Generator Battery Life Projection Generator Near End of Service Warning Instant update to End of Service Projection when new device settings are chosen. Projection will update over time as well Generator Past End of Service Warning Pulse Model 103/104 Generator: Common Errors At this point the generator may or may not be delivering stimulation as intended


.")
23 Output Warning Common Diagnostic Errors Communication problems during a diagnostic test can result in the following messages 89 See Troubleshooting Section in Physician s Manual for recommendations and course of action 90 Common Interrogation Errors Communication problems during an interrogation can result in the following messages Solutions to Common Errors Be sure the handheld computer is fully charged and is not plugged into a wall outlet. Test the batteries in the programming wand. Make sure the programming wand is directly over the pulse generator. Check all cables and connections to ensure they are properly connected. Rule out an EMI (electromagnetic interference). If these steps do not address the problem, call Cyberonics Clinical Technical Support Team at (866) See Troubleshooting Section in Physician s Manual for recommendations and course of action


.")

24 VNS Therapy Pulse Generators Comparison Summary of Differences: Previous Pulse Generators vs. 103/104 Size Comparison of the Model 103 vs. the Model Feature Model 103 / 104 Enhancements Generator Battery Life Projection System Generator Battery Life Warning Message Smaller Size Direct Lead Impedance Measurement Automatic Lead Impedance Measurement Once Every 24 Hours Quicker Communication Parameter Retention Benefit Remaining generator battery life projected and displayed to assist with End of Service decision process. Displayed when battery life is within 6 months of the end of life projection to assist with End of Service decision process. Improve post implant cosmetics. No more DCDC codes. Impedance is measured directly and displayed to clinician to give accurate measurements (ohms). Warning message notification to clinician upon interrogation if impedance is High or Low. Faster patient dosing and diagnostics. Settings are not lost if generator is reset. 95 Generator Evolution The Demipulse Model 103 and 104 have a 48% reduction in Generator thickness and a 74% reduction in Generator volume compared with the Model 100, which has improved post implant cosmetics. Model 100 Thickness: 0.52 (13.2 mm) 31 cc Model (10.3 mm) 26 cc Model 102/102R 0.27 (6.9 mm) 14/16 cc Model 103/ (6.9 mm) 8/10 cc 96 24


25 VNS Therapy Pulse Generators Comparison Generator Model R Matching Lead Type Single Pin Dual Pin Single Pin Dual Pin Launch Year Thickness 7 mm 7 mm 7 mm 7 mm Volume 14 cc 16 cc 8 cc 10 cc Weight 25 gms 27 gms 16 gms 17 gms Battery Life* 6+ yrs 6+ yrs 6+ yrs 6+ yrs Computer Platform Handheld/ Laptop Handheld/ Laptop Handheld ONLY Handheld ONLY Software Miscellaneous Software Features *Predicted longevity at 2mA, 20Hz, 500µS, 10% duty cycle into a 4kOhm load. The dose settings impact how long the battery will last. For example, the battery may last for 3 years at a higher setting, compared with 8 years at a lower setting. For the full range of settings in relationship to battery life, see the Physician's Manual or the EOS Projection on the Handheld. 97 Programming Software Features Adjusting Date and Time Inactivity Timeout Feature Time Stamp It is very important that the date and time on the handheld are correct. All historical programming data is stored using the handheld date and time


26 Inactivity Timeout Warning Database Utility Feature Capability to view and print programming history database in an Excel spreadsheet Equipment needed: Flashcard Reader Not provided by Cyberonics Technical support for the Flashcard Reader is not provided by Cyberonics Personal PC Not provided by Cyberonics Database Utility Feature Located on the User Preferences Screen Database Utility Feature Exporting Files


27 Database Utility Feature Programming Software Features View Database Patient does not need to be present to perform View Database Remove Flashcard from Handheld Computer 2. Insert flashcard into a flashcard reader connected to a desktop computer 3. Open files PIExport, DiagExport, and MagExport in Microsoft Excel View Database VIEW PARAMETER HISTORY Select View Parameter History View Database VIEW DIAGNOSTIC HISTORY Select View Diagnostic History


28 View Database VIEW MAGNET HISTORY Select View Magnet History Parameters Screen Menu Select Standard Settings sets Output current to 0 ma and other predetermined parameters Program Patient Data Program Patient Data Allows user to enter patient ID and Implant Date. Should be performed in the OR. Display Device History Display Device History Allows user to view stored pulse generator information


29 Handheld Battery Charge Keep your handheld computer plugged in at all times when not in use PC Power Remaining status bar indicates charge remaining on handheld computer Parameters Screen Menu User Preferences Screen Miscellaneous Handheld Features 113 Soft Reset Press Reset button with Stylus for 5 seconds Perform during screen freeze Reset button Hard Reset Press Power button and Reset button simultaneously Perform only when soft reset does not resolve a screen freeze Power button Reset button Contacts button Note: When prompted, select the Contacts button


30 Hard Reset If the handheld computer has not been plugged in to an AC power for a period of time, the battery charge will completely deplete. When you plug in the AC power cord, the handheld computer will go through a hard reset. Steps during hard reset Hard Reset Steps during hard reset Hard Reset Steps during hard reset Hard Reset

31 Align Screen Press both buttons together to align screen Power button Lock Button Lock button located on left side Should remain in the UNLOCK position at all times Note: This screen align is not associated with a soft or hard reset. The screen align should be used to voluntarily align the screen when the screen is not aligned. Select button Handheld is locked, move button down to unlock Handheld is in the unlocked position with the button down Proper Handling of the VNS Programming System The VNS Therapy Programming System is designed to withstand normal wear and tear conditions for electronic devices Do not subject the Programming System to rough handling or abuse Lessons Learned Do not pull on data cables If adaptor cable must be disconnected from the Handheld, grasp the connector firmly and pull the adapter out Do not store or operate the Programming System with sharp bends in the data cables or adaptors. Avoid coiling cables into small diameters
32 Lessons Learned Having a clear understanding of the parameters will lead to intended dose adjustments. Always Interrogate as the FIRST and LAST step at every visit. Keep your Handheld computer plugged in at all times when not in use Always check the battery in the wand prior to use and keep a backup 9 Volt battery if necessary Pay close attention to all warning, error, and fault messages Routine diagnostic testing can prove beneficial in the long term The Technical Guide and Physician s Manual are valuable tools for any questions, concerns, and troubleshooting
Physician s Manual. June VNS Therapy Programming Software Model 250 Version 11.0 Programming Computer. For Healthcare Professionals.
 Physician s Manual VNS Therapy Programming Software Model 250 Version 11.0 Programming Computer For Healthcare Professionals June 2017 Rx Only Non-US Version Note: This manual contains information on the
Bionic Navigator 3D System Programming Manual
 Bionic Navigator 3D System Programming Manual CAUTION: Federal law restricts this device to sale, distribution and use by or on the order of a physician. 91005932-05 Content: 92126950 REV B Trademarks
Precision Spectra System Programming Manual
 Precision Spectra System Programming Manual Directions for Use CAUTION: Federal law restricts this device to sale, distribution and use by or on the order of a physician. 90834018-18 REV A Guarantees Boston
Boston Scientific Precision Spectra System Programming Manual
 Boston Scientific Precision Spectra System Programming Manual NM-7151-30 Clinician Programmer NM-7151-30R Clinician Programmer (Refurbished) NM-7153-30 Clinician Programmer NM-7153-30R Clinician Programmer
Bionic Navigator 3D System Programming Manual
 Bionic Navigator 3D System Programming Manual CAUTION: Federal law restricts this device to sale, distribution and use by or on the order of a physician. 91170722-03 Content: 92191006 REV A Trademarks
Neo Ultrasound Module Manual
 Neo Ultrasound Module Manual Installation Instructions For complete User Operating Instructions, including Cautions, Warnings, Dangers, Indications, and Contraindications, refer to the User s Manuals.
MRI with the VNS Therapy System October 2017
 MRI with the VNS Therapy System October 2017 The information contained in this document is one part of the full labeling for the implanted portions of the VNS Therapy System. It is not intended to serve
Impact of Cycling Feature on Longevity and Recharge Interval Activa PC, Activa RC, and Activa SC
 Impact of Cycling Feature on Longevity and Recharge Interval Activa PC, Activa RC, and Activa SC Current labeling indicates the use of cycling improves battery longevity and recharge interval under all
This manual is valid for the TM. In TENSity 5000 TENS Stimulator. This user manual is published by Current Solutions, LLC
 INSTRUCTION MANUAL This manual is valid for the TM In TENSity 5000 TENS Stimulator This user manual is published by Current Solutions, LLC Current Solutions, LLC does not guarantee its contents and reserves
IRIS \ IRIS-I QUICK SET-UP GUIDE STEP 1 INSTALL
 IRIS \ IRIS-I QUICK SET-UP GUIDE STEP 1 INSTALL Confirm contents of package: 1 sensor, 1 cable, 1 wide lens (default), 1 narrow lens, mounting template, User s Guide. Install the sensor at the desired
MH8001 Four Channels Pre-Programmed TENS and EMS combo device
 MH8001 Four Channels Pre-Programmed TENS and EMS combo device The MH8001 is provided with 4 controllable output channels, each independent of each other. The unit integrates EMS and TENS functions with
LVTX-10 Series Ultrasonic Sensor Installation and Operation Guide
 LVTX-10 Series Ultrasonic Sensor Installation and Operation Guide M-5578/0516 M-5578/0516 Section TABLE OF CONTENTS 1 Introduction... 1 2 Quick Guide on Getting Started... 2 Mounting the LVTX-10 Series
Transcutaneous Electrical Nerve Stimulator TENS 212. Instruction Manual. Read before using
 Transcutaneous Electrical Nerve Stimulator TENS 212 Instruction Manual Read before using TABLE OF CONTENTS GENERAL DESCRIPTION 1 SYSTEM COMPONENTS 1 WARRANTY 1 INDICATIONS AND CONTRAINDICATIONS 2 WARNINGS
COIL BINDING SYSTEM 3000
 COIL BINDING SYSTEM 3000 SETUP & OPERATOR MANUAL Performance Design LLC 2350 East Braniff St. Boise, Idaho 83716 www.rhin-o-tuff.com Office Elite Series Coil Binding System 3000 FEATURES: Open-ended Punch
Spectra WaveWriter System Implantable Pulse Generator
 Spectra WaveWriter System Implantable Pulse Generator Directions for Use CAUTION: Federal law restricts this device to sale, distribution and use by or on the order of a physician. 91171765-02 Content
Table 1. Placing the Sensor in the Sensor Cradle. Step Instruction Illustration
 Table 1. Placing the Sensor in the Sensor Cradle Step Instruction Illustration 1. A. Check "U-shaped" Positioner. The number pointing towards the Sensor (1 or 2) must correspond with the Sensor's size.
QUANTUM Qflash T2 / X2 OPERATING INSTRUCTIONS
 QUANTUM Qflash T2 / X2 OPERATING INSTRUCTIONS 1.0 DESIGNATIONS T2 AND X2 1. Removable Reflector, two positions Normal and Wide angle. 2. Flash-tube 2A. Modeling Lamp (for Model X2 only) 3. Bounce Head,
Instruction Manual. CAUTION: Federal law requires a prescription from your physician before use of this product.
 Instruction Manual Please read the Instruction Manual prior to use. CAUTION: Federal law requires a prescription from your physician before use of this product. 3504 Cragmont Dr. Suite #100 Tampa, FL 33619
ADI-100 Interrupter. Operator s Manual. 526 S. Seminole Bartlesville, OK /
 ADI-100 Interrupter Operator s Manual 526 S. Seminole Bartlesville, OK 74003 918/336-1221 www.sescocp.com ADI - 100 Interrupter FEATURES Clock Accuracy 100% during GPS lock Clock Drift 30 µsec per degree
INDEX. Accessories and Components System Unit and Joystick Assembly and Charging the Battery Using with LED System...
 USER GUIDE INDEX Accessories and Components... 4 System Unit and Joystick... 6 Assembly and Charging the Battery... 9 Using with LED System... 11 What is Ground Setting and How It Is Done... 14 Ground
Understanding & Using The HA2500's Sub Drives
 Understanding & Using The HA2500's Sub Drives When horizontal drive to the horizontal output stage is missing, expensive horizontal output stage components cannot be determined good or bad. If horizontal
QUANTUM Qflash MODEL T OPERATING INSTRUCTIONS
 QUANTUM Qflash MODEL T OPERATING INSTRUCTIONS 1.0 DESIGNATIONS 1. Removable Reflector, two positions Normal and Wide angle. 2. Flash-tube 3. Bounce Head, Rotates 180º 4. Swivel Head, Rotates ± 90º 5. Sensor
Sys*Stim 226. Maintenance Manual
 Sys*Stim 226 Maintenance Manual IR7 82 1333 S. Claudina Street Anaheim, CA 92805 U.S.A. Call toll free: (800) 854 9305 (U.S.A.) Tel: 1 (714) 533 2221 FAX: 1 (714) 635 7539 Web site: www.mettlerelectronics.com
VERCISE DIRECTIONAL SYSTEMS* VERCISE NEURAL NAVIGATOR 2.1 PROGRAMMING TUTORIAL
 VERCISE DIRECTIONAL SYSTEMS* VERCISE NEURAL NAVIGATOR 2.1 PROGRAMMING TUTORIAL *A System that includes the Vercise PC or Vercise Gevia IPG and Vercise Cartesia Directional Lead(s) form the Vercise Directional
Instructions for getting connected with Incus and using IHearYou
 Instructions for getting connected with Incus and using IHearYou Connect hearing aids Pair Incus Download IHearYou Incus connects your hearing aids Your Incus programmer connects your Blamey Saunders hearing
WEL-200 O P E R A T I N G I N S T R U C T I O N S W I R E L E S S E D G E L I N K
 O P E R A T I N G I N S T R U C T I O N S WEL-200 TM W I R E L E S S E D G E L I N K 4564 Johnston Parkway, Cleveland, Ohio 44128 P. 800 426 9912 F. 216 518 9884 Sales Inquiries: salessupport@emxinc.com
Fundamentals of Pacing Therapy
 1 4 7 2 5 8 3 6 9 Fundamentals of Pacing Therapy This presentation is provided with the understanding that the slide content must not be altered in any manner as the content is subject to FDA regulations.
EULAMBIA ADVANCED TECHNOLOGIES LTD. User Manual EAT-EOM-CTL-2. Alexandros Fragkos
 EULAMBIA ADVANCED TECHNOLOGIES LTD User Manual Alexandros Fragkos (alexandros.fragkos@eulambia.com) 11/28/2016 28/11/2016 User Manual User Manual 28/11/2016 Electro-Optic Modulator Bias Control Unit v2.0
Magic Wand Portable Scanner with Auto-Feed Dock. PDSDK-ST470-VP-BX2 User Manual
 Magic Wand Portable Scanner with Auto-Feed Dock PDSDK-ST470-VP-BX2 User Manual Table of Contents 1. KEY FEATURES... 2 2. FUNCTIONAL PARTS... 2 3. EXPLANATION OF THE STATUS ICONS... 4 4. GETTING STARTED...
Walkie-Talkie. User Manual and Instruction. Getting Started
 Walkie-Talkie User Manual and Instruction Getting Started Installing the AA Batteries Your radio uses 3 AA Alkaline batteries. 1. With the back of the radio facing you, lift the battery latch up to release
CROSS Chassis from 160 A to 450 A
 CROSS Chassis from 160 A to 450 A STS CATALOGUE Important note! The technical data enclosed is for general information. Please note that the operating instructions and references indicated on the products
UPDATE TO MEDICAL DEVICE CORRECTION
 8200 Coral Sea St. NE Minneapolis, MN 55112 USA November 2016 UPDATE TO MEDICAL DEVICE CORRECTION Software Update Now Available via MyCareLink Patient Monitor Reveal LINQ Insertable Cardiac Monitor (ICM)
GFL-1000 User Manual Ground Fault Locator
 GFL-Series User Manual V1.1 GFL-1000 User Manual Ground Fault Locator Contents Contents... 1 1 Declaration of Conformity... 3 2 Introduction... 3 3 Equipment Information... 3 3.1 Safety Precautions...
CAN BUS TROUBLESHOOTING
 2003 BMW X5 4.4i (E53) V8-4398cc 4.4L DOHC (M62 TU) Vehicle > Powertrain Management > Computers and Control Systems > Information Bus > Testing and Inspection > Initial Inspection and Diagnostic Overview
Thomas S. Narro David Zucker Darren Garnier 4/05. Copyright 2005 CPO Science
 Timer designed by: Dr. Thomas C. Hsu Thomas S. Narro David Zucker Darren Garnier 4/05 Copyright 2005 CPO Science Table of Contents Introduction........................................................ 1
Transmission Lines and TDR
 Transmission Lines and TDR Overview This is the procedure for lab 2b. This is a one- week lab. The prelab should be done BEFORE going to the lab session. In this lab, pulse propagation down transmission
Electronic regulator for PWM controlled proportional solenoid valves FABER -
 Electronic regulator for PWM controlled proportional solenoid valves STU Control Unit FABER - COM DESCRIPTION STU-PWM electronic card is a regulator for proportional solenoid valves, which can drive up
AS SUPER 4 digital. Elektrischer Nadelstimulator / Electrical needle stimulator. Art.-Nr
 AS SUPER 4 digital Elektrischer Nadelstimulator Electrical needle stimulator Art.-Nr. 200510 Gebrauchsanweisung Instruction Manual - Art.-Nr. 101477 20 Contents Foreword...21 Purpose for use...21 Safety
INSTALLATION AND OPERATION MANUAL
 RADIO/CAN REMOTE CONTROL SYSTEM -PRELIMINARY- INSTALLATION AND OPERATION MANUAL SDP GREEN 3B1151AJ.doc September 3, 2009 AP INDEX DESCRIPTION... 2 TRANSMITTER AND RECEIVER SYNCHRONIZATION... 3 INDICATOR
OPERATOR S MANUAL FOR DMS 300-4A HOLTER ECG RECORDER
 OPERATOR S MANUAL FOR DMS 300-4A HOLTER ECG RECORDER WARNING Only a physician can order a Holter ECG test. WARNING Only the ordering physician can decide on the application technique used for affixing
Exercise 8. Troubleshooting a Radar Target Tracker EXERCISE OBJECTIVE
 Exercise 8 Troubleshooting a Radar Target Tracker EXERCISE OBJECTIVE When you have completed this exercise, you will be able to apply an efficient troubleshooting procedure in order to locate instructor-inserted
TX CONTROLLER Model EM-IP Quick Start Guide
 TX CONTROLLER Model EM-IP Quick Start Guide 860 boul. de la Chaudière, suite 200 Québec (Qc), Canada, G1X 4B7 Tel.: +1 (418) 877-4249 Fax: +1 (418) 877-4054 E-Mail: gdd@gdd.ca Web site: www.gdd.ca Visit
SUNDIAL Light Dimmer. User's Manual
 Light Dimmer User's Manual 1. PRECAUTIONS Although fuses at the input and outputs of the controller protect its circuits in case of an overload or overvoltage, we recommend installing an additional protection
Progeny Imaging. User Guide V x and Higher. Part Number: ECN: P1808 REV. F
 Progeny Imaging User Guide V. 1.6.0.x and Higher Part Number: 00-02-1598 ECN: P1808 REV. F Contents 1 About This Manual... 5 How to Use this Guide... 5 Text Conventions... 5 Getting Assistance... 6 2 Overview...
CONTENTS. Accessories and Components System Unit and Joystick Assembly and Charging the Battery Jeotech Using Phases...
 CONTENTS Accessories and Components... 3 System Unit and Joystick... 4 Assembly and Charging the Battery... 6 Jeotech Using Phases... 9 What is ground setting and how it is done?... 11 Steps for the Ground
LSC Radio User Guide Information and Guidelines
 LSC Radio User Guide Information and Guidelines The following user guide applies to both the Motorola VL50 and CLS1410 Radio s. Below are guidelines established for usage. 1) Radios and headsets are to
Lone Star Neuromodulation
 Lone Star Neuromodulation Disruptive Pulse-Generator Technology Platform 1 Our Vision Target unmet clinical needs by creating a disruptive device platform that offers promising solutions for lowering costs,
2011 / Circuit Tracer
 INSTRUCTION MANUAL 2011 / 00521 Circuit Tracer Read and understand all of the instructions and safety information in this manual before operating or servicing this tool. 52044992 2008 Greenlee Textron
2012 Monitored Rehab Systems E1201 Manual Kneelax. Installation and user manual
 2012 Monitored Rehab Systems E1201 Manual Kneelax Installation and user manual Table of contents CHAPTER 1 Installation Manual... 3 1.1 Install Kneelax USB driver... 3 1.2 Detect COM-port... 6 1.3 Software
Metaphase ULC-2. Technologies ULC. Metaphase. Technologies Version 6.2 June 12, 2013 USER MANUAL. metaphase-tech.com. pg. 1
 ULC Version 6.2 June 12, 2013 USER MANUAL pg. 1 Overview Universal LED Controller () provides independent true constant-current or voltage control of two LED loads from 0.02 to 4 Amps continuous (DC) with
3050 Stereo Power Amplifier
 3050 Stereo Power Amplifier Owners Manual 10/26/2016 Boulder Amplifiers, Inc. 255 Taylor Ave. Louisville, CO 80027 (303) 449-8220 www.boulderamp.com Fault Conditions Boulderlink Appendix Remote Control
DXXX Series Servo Programming...9 Introduction...9 Connections HSB-9XXX Series Servo Programming...19 Introduction...19 Connections...
 DPC-11 Operation Manual Table of Contents Section 1 Introduction...2 Section 2 Installation...4 Software Installation...4 Driver Installastion...7 Section 3 Operation...9 D Series Servo Programming...9
DM 800H Twin Handheld UHF System (863.0Mhz-865.0Mhz)
") DM 800H Twin Handheld UHF System (863.0Mhz-865.0Mhz) User Manual Order code: MIC78 Safety advice WARNING FOR YOUR OWN SAFETY, PLEASE READ THIS USER MANUAL CAREFULLY BEFORE YOUR INITIAL START-UP! Before
DM 800H Twin Handheld UHF System (863.0Mhz-865.0Mhz) User Manual Order code: MIC78 Safety advice WARNING FOR YOUR OWN SAFETY, PLEASE READ THIS USER MANUAL CAREFULLY BEFORE YOUR INITIAL START-UP! Before
Shelti, Inc. 333 Morton Street Bay City, MI Phone Fax. Bayside Dollar Bill Acceptor Pool Table Manual & Instructions
 Shelti, Inc. 333 Morton Street Bay City, MI 48706 989-893-1739 Phone 989-893-1809 Fax Bayside Dollar Bill Acceptor Pool Table Manual & Instructions Contents Section-1 Introduction Bayside DBA Pool Table
SureTest Model ST-1THD & ST-1THDC Instructions
 #61-156 #61-157 #61-158 SureTest Model ST-1THD & ST-1THDC Instructions Introduction The SureTest family of Circuit/distortion analyzers identify problems common to electrical circuits and harmonic distortion
Digi-Stop. User Manual for: Digi-Stop. Digital Readout Firmware version d & Higher
 Digi-Stop User Manual for: Digi-Stop Digital Readout Firmware version d 2.000 & Higher Warranty Accurate Technology, Inc., warrants this product against defective parts and workmanship for 1 year commencing
Component Technical Specifications
 Component Technical Specifications 11 Control Unit Specifications Classification Operation Modes Battery Type Controls Indications Carrying Options Dimensions Environmental Ranges Internally powered, continuous
BlockMon Block Monitor LongMon Long Monitor
 BlockMon Block Monitor LongMon Long Monitor Bypass range 2.2V to 5.0V. Bypass current 0A to 2A (typically 1A). Over-voltage protection up to ±20V. Noise immune opto-isolated. Cell temperature and bypass
By Dogtra Remote Controlled Dog Training Collars. Owner's Manual. Please read this manual thoroughly before operating the Dogtra EDGE training collar.
 By Dogtra Remote Controlled Dog Training Collars Owner's Manual Please read this manual thoroughly before operating the Dogtra EDGE training collar. Product Safety and Health Statement Intended Use They
TECHNICAL PRODUCT DATASHEET
 FORM-ENG-0018 REV A 06-02-03 ISO 9001 CERTIFIED Phone: (352) 629-5020 or 800-533-3569 Fax: (352)-629-2902 SUITABLE FOR OEM DISTRIBUTION ONLY TECHNICAL PRODUCT DATASHEET High Density PDM 21 Output / 10
Owner s Manual. Model G-223. GMRS/FRS Radio. FEATURES 22 Channels Scan 22 Key Pad Lock Call Alert Power HI/LO Roger Beep Tone
 Owner s Manual Model G-223 GMRS/FRS Radio FEATURES 22 Channels Scan 22 Key Pad Lock Call Alert Power HI/LO Roger Beep Tone This device complies with Part 15 of the FCC rules. Operation is subject to the
Dynatel. 2273M Cable/Pipe and Fault Locators 2273M-iD Cable/Pipe/Fault and Marker Locators with id Read/Write
 3 Dynatel 2273M Cable/Pipe and Fault Locators 2273M-iD Cable/Pipe/Fault and Marker Locators with id Read/Write Designed to be more accurate, faster and more integrated than any other locator on the market,
DEUTSCH NORSK ENGLISH SVENSKA FRANÇAIS DANSK NEDERLANDS ČEŠTINA ITALANIO Hersteller UR190
 DEUTSCH ENGLISH FRANÇAIS NEDERLANDS ITALANIO NORSK SVENSKA DANSK ČEŠTINA Hersteller Wörlein GmbH Tel.: +49 9103/71670 Gewerbestrasse 12 Fax.: +49 9103/716712 D 90556 Cadolzburg Email. info@woerlein.com
FlatPack Ultrasonic Sensors
 FlatPack Ultrasonic Sensors Installation & Operation Guide May 23, 2017 The FlatPack Sensor product line listed in the introduction of this manual complies with the European Council EMC Directive 2004/108/EC
Tested Tough. Trusted Safe.
 TEST & MEASUREMENT Tested Tough. Trusted Safe. TOUGH METER Clamp Meters............................. 2-3 KLEIN TEST & MEASUREMENT Klein Tools has been manufacturing professional hand tools for almost 160
AA-35 ZOOM. RigExpert. User s manual. Antenna and cable analyzer
 AA-35 ZOOM Antenna and cable analyzer RigExpert User s manual . Table of contents Introduction Operating the AA-35 ZOOM First time use Main menu Multifunctional keys Connecting to your antenna SWR chart
OWNER S MANUAL 311DRH 311DR 221R 211R 200R 31LT 31IT 32BT 32IT 31HT 31XT
 VHF PERFORMANCE SERIES WIRELESS MICROPHONE SYSTEMS OWNER S MANUAL 311DRH 311DR 221R 211R 200R 31LT 31IT 32BT 32IT 31HT 31XT AZDEN CORPORATION P.O. Box 10-147 New Hyde Park Road Franklin Square, NY 11010
Metaphase ULC-2. Technologies ULC. Metaphase. Technologies Version 7.X August 2015 USER MANUAL. metaphase-tech.com. pg. 1
 ULC Version 7.X August 2015 USER MANUAL pg. 1 Overview Universal LED Controller () provides independent true constant-current or voltage control of two LED loads from 0.02 to 4 Amps continuous (DC) with
Boulder W Mono Power Amplifier
 Boulder 1050 500 W Mono Power Amplifier Owners Manual 4/11/04 Boulder Amplifiers, Inc. 3235 Prairie Ave. Boulder, CO 80301 www.boulderamp.com APPENDIX BOULDER LINK REMOTE CONTROL OPERATION GETTING STARTED
VersaMax Mixed Discrete / High-Speed Counter Module
 Product Description The VersaMax Mixed Discrete High-Speed Counter module, IC200MDD841, has twenty 24VDC positive-logic type inputs and twelve positive-logic 24VDC 0.5Amp outputs. In its default configuration,
Micromate User Manual
 Microcoin Table of Contents Page Essential Information 2 1.0 Connection and Configuration 3 1.1 Connection 3 1.2 Switch On 4 1.3 Configuration for Use 4 2.0 Check the Configuration of a Validator 5 2.1
Keycards come with an imbedded RFID chip and antenna, there is no battery in the keycards. The keycards are encrypted and only
 Index Keycards 02 The following is a description of the type of Keycards and function 03 Programming and Initialization of the RFID Lock 04 Procedure for Initialization 05 Programming- Adding Keycards
M-300 & M-320 Low Cost Ultrasonic Sensors
 M-300 & M-320 Family of Low Cost Ultrasonic Sensors December 23, 2014 Copyright 2014 by Massa Products Corporation. All rights reserved. Section TABLE OF CONTENTS Page 1 Introduction... 1 2 Quick Guide
Marantec bi linked Radio Accessories Service
 Marantec bi linked Radio Accessories 1 45 Service 2015.08 Impressions transmitters 2 45 Service 2015.08 Impressions wall controls 3 45 Service 2015.08 bi linked technology Simple encoding (e. g. Multi-Bit)
DPM Kit DK-1. Using the DPM Kit
 DPM Kit DK-1 Using the DPM Kit To ensure safe usage with a full understanding of this product's performance, please be sure to read through this manual completely. Store this manual in a safe place where
T25-35SA Subaudible Tone Decoder
 T25-35SA Subaudible Tone Decoder The Mueller Broadcast Design T25-35SA subaudible tone decoder provides a simple and reliable way to detect the 25 and 35 Hz control tones sent by many satellite-delivered
Digi-Stop. Installation & Operation
 Digi-Stop Installation & Operation WARRANTY Accurate Technology, Inc. warrants the ProScale Systems against defective parts and workmanship for 1 year commencing from the date of original purchase. Upon
TransAeris. System User Manual
 TransAeris System User Manual 2 This page left intentionally blank The following list includes trademarks or registered trademarks of Synapse Biomedical in the United States and possibly in other countries.
Model #2 UVB Midband Ultraviolet Lamp Assembly with Timer
 UVB Midband Technology The Model 2 Rayminder Lamp - The World's Only UVB Midband Lamp Based On Original Research Patented design based on research. Tested and certified to Rayminder's Proprietary Select
Appearance of device and accessories may vary.
 Mobile 4G Smart Technology Signal Booster Contents: How it Works.... 1 Before Getting Started.... 2 Quick Installation Overview.... 2 Installing the Outside Antenna.... 2 Installing the Low-Profile Antenna....
HAWK5000 Operators Manual
 HAWK5000 Operators Manual Keison Products P.O. Box 2124, Chelmsford CM1 3UP, England Tel: +44 (0) 1245 600560 Fax: +44 (0) 1245 600030 Email: sales@keison.co.uk www.keison.co.uk KANE INTERNATIONAL LIMITED
Field Hub Installation Guide. P/N Rev. C 05/15
 Field Hub Installation Guide P/N016-0171-380 Rev. C 05/15 E21714 Copyright 2015 Disclaimer While every effort has been made to ensure the accuracy of this document, Raven Industries assumes no responsibility
SECTION WIRELESS CLOCK/TONE GENERATOR SYSTEM
 SECTION 13805 WIRELESS CLOCK/TONE GENERATOR SYSTEM PART 1 GENERAL 1.01 SUMMARY A. Section Includes: Satellite based, synchronized wireless clock/tone generator system, including clocks, tone generator,
EScope Pro (P/N ESO1000) (Patent Pending)
 (Patent Pending)") EScope Pro (P/N ESO1000) (Patent Pending) The EScope Pro is an eight channel dual time base PC diagnostic scope. This allows for viewing of up to eight channels on two different time bases. This scope
EScope Pro (P/N ESO1000) (Patent Pending) The EScope Pro is an eight channel dual time base PC diagnostic scope. This allows for viewing of up to eight channels on two different time bases. This scope
Skull simulator Guide
 Because sound matters Oticon Medical is a global company in implantable hearing solutions, dedicated to bringing the magical world of sound to people at every stage of life. As a member of one of the world
TELECRANE REMOTE CONTROLS F21 12/6 S/D MANUAL
 November 7, 2004 Ref: TCM260904 Rev: 0.1 111 Woodhurst Road, Stanground, Peterborough, Cambridgeshire. PE2 8PQ United Kingdom. Tel: 07092 242773 Fax: 07092 182470 mark@mlhservices.co.uk TELECRANE REMOTE
Table of Contents. Polytel GMA Glucose Meter Accessory Model PWR USER MANUAL Version: 2
 Table of Contents Polytel GMA Glucose Meter Accessory Model PWR-08-03 USER MANUAL Version: 2 Polymap Wireless 310 S. Williams Blvd. Ste. 346 Tucson, Arizona 85711 (520) 747-1811 www.polymapwireless.com
Radio Control Installation and Operating Instructions System 4
 Radio Control Installation and Operating Instructions System 4 P.O. Box 403, One Cedar Parkway, Jackson, WI 53037 Phone: 800-628-1909 Fax: 262-677-2058 Revision: April 19, 2012 Contents Introduction 3
Installation Manual Mobile Integration System
 Installation Manual Mobile Integration System Table of Contents Kit Contents... 2 Overview... 3 Installation Instructions... 6 Power up... 12 Test the System... 13 Beam Coverage... 14 Trouble Shooting
High Intensity LED Stroboscope Digital Tachometer DT-361/365. Instruction manual. Be sure to read before use.
 98585A High Intensity LED Stroboscope Digital Tachometer DT-361/365 Instruction manual Be sure to read before use. Before use, please carefully read these safety precautions as well as instructions, and
PKG-171-MBC25-PS-CBL System Diagram and Specifications
 PKG-171-MBC25-PS-CBL System Diagram and Specifications Included Components: 17Y102S-LW4-MS Stepper Motor MBC25081TB Stepper Driver PSAM24V2.7A Power Supply CBL-20AWG-04C-010-MS Motor Cable CBL-AA4366 Power
stock Microstim2(v2) Instruction Manual
 Instruction Manual") stock Microstim2(v2) Instruction Manual SALISBURY DISTRICT HOSPITAL DEPARTMENT OF MEDICAL PHYSICS & BIOMEDICAL ENGINEERING www.salisburyfes.com WARNING: Output has a physiological effect! Read instructions
stock Microstim2(v2) Instruction Manual SALISBURY DISTRICT HOSPITAL DEPARTMENT OF MEDICAL PHYSICS & BIOMEDICAL ENGINEERING www.salisburyfes.com WARNING: Output has a physiological effect! Read instructions
DEUTSCH ITALANIO ENGLISH NORSK FRANÇAIS DANSK NEDERLANDS Hersteller UR8200
 DEUTSCH ENGLISH FRANÇAIS NEDERLANDS ITALANIO NORSK DANSK Hersteller Wörlein GmbH Tel.: +49 9103/71670 Gewerbestrasse 12 Fax.: +49 9103/716712 D 90556 Cadolzburg Email. info@woerlein.com GERMANY Web: www.woerlein.com
The Instructions should be read, prior to commencing the installation, failure to follow these instructions will void your warranty.
 Low Voltage System The Platinum Low Voltage lighting system can power up to 120 candle pods depending on the length of cables used during the installation this can reduce the number of pods to 24 per outlet
Jet Central Sequencer Plus
 Jet Central Sequencer Plus Features The Jet Central Sequencer Plus is a multipurpose electronic device, the capabilities of the unit include: Three part sequencer, operating landing gear and two independent
-Large Scent Holes -Weather Resistant Transmitter and Receiver Unit -Replaceable 9-volt batteries on Transmitter and Receiver
 -Large Scent Holes -Weather Resistant Transmitter and Receiver Unit -Replaceable 9-volt batteries on Transmitter and Receiver Package Contents Standard Sizes (500, 505, 509)- Holds standard sized birds
Table of Contents. Polytel GMA Glucose Meter Accessory for LifeScan Meters Model PWR USER MANUAL Version: 1
 Table of Contents Polytel GMA Glucose Meter Accessory for LifeScan Meters Model PWR-08-06 USER MANUAL Version: 1 Polymap Wireless 310 S. Williams Blvd. Ste. 350 Tucson, Arizona 85711 (520) 747-1811 Mon-Fri
CAT-260 Repeater Controller Computer Automation Technology, Inc
 CAT-260 Repeater Controller Computer Automation Technology, Inc 7378 W. Atlantic Blvd. #239 Margate, Florida 33063 Phone: (954) 978-6171 Fax: (561) 465-5891 Internet: http://www.catauto.com Table of Contents
VersaMax Mixed Discrete / High-Speed Counter Module
 Product Description The VersaMax Mixed Discrete High-Speed Counter (HSC) module,, has twenty 24VDC positive-logic type inputs and twelve positive-logic 24VDC 0.5Amp outputs. In its default configuration,
P/N: AX TECHNICAL DATASHEET #TDAX Single Input, Dual Output Valve Controller 1 Universal Input, +5V reference CAN (SAE J1939)
") TECHNICAL DATASHEET #TDAX022000 Single Input, Dual Output Valve Controller 1 Universal Input, +5V reference (SAE J1939) Features: 1 universal signal input 2 proportional or on/off outputs up to 3 A User
TECHNICAL DATASHEET #TDAX022000 Single Input, Dual Output Valve Controller 1 Universal Input, +5V reference (SAE J1939) Features: 1 universal signal input 2 proportional or on/off outputs up to 3 A User