Tutorial 1: Install Forecaster HD (Win XP, Vista, 7, 8)
|
|
|
- Brandon Wilkerson
- 5 years ago
- Views:
Transcription

1 Tutorial 1: Install Forecaster HD (Win XP, Vista, 7, 8) Download Forecaster HD (FHD) from Community s website


2 Open Setup.exe and follow the setup wizard


3 Open FHD from the desktop shortcut Choose your language

4 Change units or language as needed
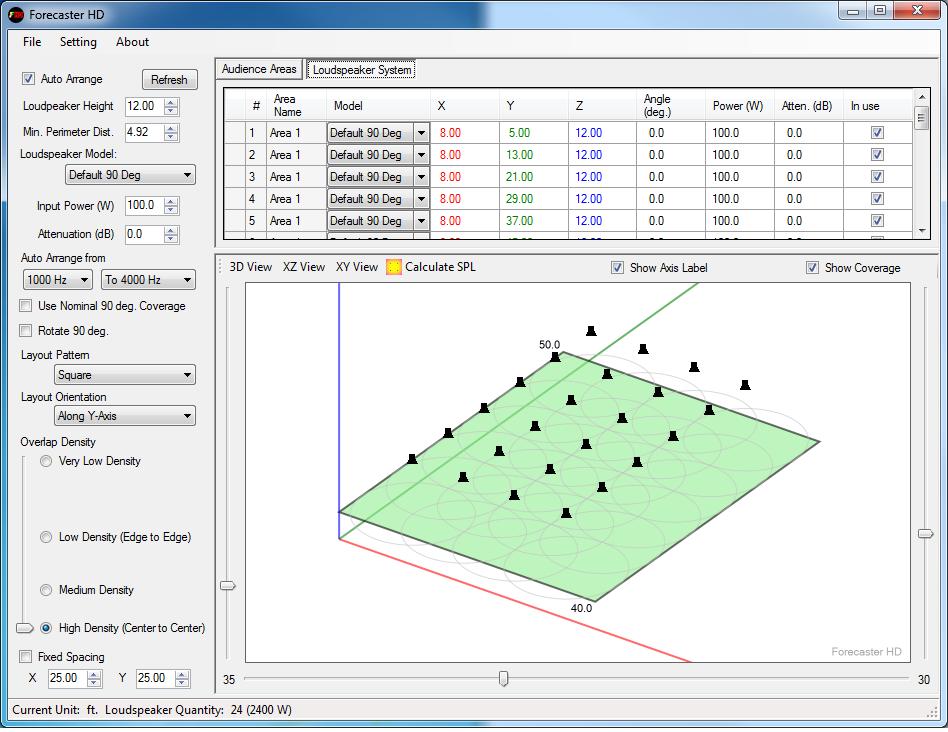
5 Tutorial 2: Introduce the interface List view of audience areas and loudspeakers Parameters for Loudspeaker Automatic Arrangement. See Tutorial 4 Status bar 3D View of audience areas and loudspeakers

6 Axis Label Loudspeaker -6dB coverage circle on audience area Loudspeaker Audience area Zoom in/out X,Y,Z coordinates X: red; Y: green; Z: blue Control horizontal view angle Control vertical view angle

7 In the XY View, click anywhere on the audience area Status bar will show the cursor location and its SPL


8 Click Tab to switch views Loudspeaker List Audience Area List
.")
 between two Audience Areas can be included as needed.")
9 FHD only calculates coverage for the Audience Area, not the room. FHD allows multiple audience areas, but they all need to have the same Y-axis value (green). X-Left/Right Columns (red) define each area s length. Aisles (blank space) between two Audience Areas can be included as needed. Z-left/right Columns (blue) define are the listener s ear height: Sitting audience: 4ft; Standing audience: 5.5ft.
10 Tutorial 3: Example A Elem. School Gymnasium Example Parameters: Width =100 ; Length=120 ; Standing Ear height=5 ; Ceiling Height =29 => loudspeaker Height 28. Use R.5COAX99.

11 1. Click Calculate SPL 2. Click Calculate 3. Click the arrow to show the distribution graph

12 Color legend Total loudspeaker quantity The mapping results in very uniform coverage, but what if a lower quantity is needed?
13 Move the slider to change the loudspeaker array density. Possible results will be: Medium Density: 20 loudspeakers; Low Density: 9 loudspeakers


14 Select any two loudspeakers => Right click => select Show Distance

15 You can also change the layout pattern to get different designs. Higher density is NOT absolutely better than lower density. Select the amount of density based on the sound coverage uniformity goals of the project.
16 How to decide the overlap density and other parameters? Be sure that the SPL is sufficient to overcome noise conditions. Keep the maximum SPL high enough to allow dynamic range (crest factor). Refer to SPL specifications determined by the consultant. Follow SPL standards required by law. Consider safe listening levels such as OSHA regulations. Maintain coverage uniformity as needed for the application. Coordinate the design layout with physical limits of the venue. Does the design meet the customer s budget goal?

17 At last, save the project file or export a report for future reference.
.")

18 Tutorial 4: Auto Arrangement Parameters Loudspeaker Height: The vertical distance from the loudspeaker to the (x-y plane). Please note that the loudspeaker height is not relative to the floor below the loudspeaker. For example, in this room, loudspeaker height is 16 for all areas, not 14. The raised floor levels will be defined in the Audience Area height (Z-left, Z-right).

19 Minimum Perimeter Distance: In order to minimize wall reflections, avoid placing the ceiling loudspeaker too close to the wall. Set the minimum distance from the loudspeaker to the audience area perimeter. Note that the audience area perimeter may or may not be the same as the room s perimeter depending on the project s coverage needs. For example, this audience area is 5 away from the wall. To be sure each loudspeaker is at least 8 away from the wall, then input 3. 5
20 Loudspeaker Model: choose the appropriate loudspeaker model from Community s product library. Often, it s worth experimenting with various models to compare results. Input Power/Attenuation: Input power is associated with attenuation. For example, the maximum input power for the D8 is 120 Watts. If the attenuation is set to -3dB, the input power (Watts) automatically changes to half of the maximum input power, which is 60 watts. Auto Arrange From: Choose the frequency range for auto arrangement between 400Hz to 10,000Hz. FHD calculates the average -6dB coverage angle based on the frequency range you choose. For example, the default setting ranges from 1,000Hz to 4,000Hz for the purpose of evaluating a key range of the human voice. If high frequency uniformity were a higher priority for a music system, perhaps, then the range can be adjusted accordingly. To make a broadband evaluation, simply increase the total range.
21 Coverage Angle Options: Choose from Use Nominal Coverage Angle, Use 90 Deg. Coverage Angle and Listening Plane -6dB Angle. Use 90 deg. Coverage Angle : Restricts the -6dB coverage angle to 90 degrees for any loudspeaker model. Listening Plane -6dB Angle, calculates the effective coverage angle based on the -6dB down point on the Listening Plane. This feature provides more reasonable design when ultra-wide dispersion loudspeakers are used in venues which require good speech intelligibility. Rotate 90 deg.: Rotates the loudspeaker 90 degrees on the horizontal (X, Y) plane. Use this option for loudspeakers that do not have conical coverage patterns (i.e. R.5-94, V1296) Layout Pattern: FHD provides 5 different layout patterns. In some cases, a certain pattern will create overlaps that maximize uniformity. Experiment with patterns to compare the mapping, distribution graph, and loudspeaker quantity.
22 Layout Orientation: This option will only affect the crisscross and hexagonal layout. FHD lines up loudspeakers along either the X or Y axis based on this setting. Overlap Density: Adjusts how much the -6dB coverage iso-lines overlap each other. More overlap yields less change in SPL throughout the audience area and generally improves intelligibility and music quality. Less overlap will lead to more hot vs. cold spots in the coverage and may degrade the clarity of the system. Fixed Spacing: Disables the overlap density. Arrange the loudspeakers by directly inserting coordinate values to restrict either the X, Y, or both values. Often, this is needed when the loudspeaker mounting must follow specific structural features such as trusses or a ceiling grid. Current loudspeaker spacing will be automatically entered into the Fixed Spacing input boxes, even if the Fixed Spacing option is not chosen.

23 Tutorial 5: Calculation and Graph Control Start a new project => choose D8 => then click Calculate SPL
24 Tutorial 5: Calculation and Graph Control Frequency band for calculation. (different from the frequency band for auto arrangement) Default title of each calculation follows the frequency range. Double click to change. Smaller patch size => more accurate but greater calculation time. Larger patch size => Faster but less accurate. Auto Patch Size => Chooses patch size that increases accuracy without excessive calculation time.
25 Tutorial 5: Calculation and Graph Control This changes how the data is shown, but won t create new calculation. Smaller standard deviation indicates better coverage uniformity. Hover the mouse around the graph. Coordinate of the cursor will show up.

26 Tutorial 6: Example B Auditorium This is a typical high school auditorium in need of a paging system. It has a partly sloped floor and a low ceiling area under the projection booth. For the sake of general paging, where source localization is not critical, a ceiling loudspeaker system will be demonstrated. Note that for theatrical productions, a very different layout would be needed based on stage localization to reinforce on-stage performances.

27 The width and length of each area
28 The length of each area Sloped floor and ceiling heights
29 Start a new project from the File Menu, Choose D10 and input the audience dimensions.
 is 13ft not 23ft, the loudspeakers for that area will have")
30 Uncheck In Use, then Press Enter Or Click Refresh. Area 3 will be evaluated separately later. Since the ceiling height for Area 3 (under balcony ) is 13ft not 23ft, the loudspeakers for that area will have to be arranged later.
 To make the coverage more uniform,")
31 Check the mapping of Area 1 and Area 2. Area 2 has higher levels than Area 1 (More yellow than Magenta) To make the coverage more uniform, turn down the loudspeaker input power for Area 2, but not Area 1.

32 1. Check Lock for Area Set -3dB Attenuation. Or, set the input power to 100 Watts. 3. Refresh and calculate SPL again.

33 Check the loudspeaker list view. Loudspeakers in Area 1: 200Watt Loudspeakers in Area 2: 100Watt

34 3. Under balcony area ceiling height is Use a smaller loudspeaker such as D6. 1. Lock both Area 1 and Bring Area 3 back into use.
35 Change the overlap density and check the mapping again. Finally, the design for this auditorium includes: (8) D10 for the Areas 1 & 2 plus (3) D6 for the Area 3.

36 Tutorial 7: Manual Edit and Miscellaneous Functions Auto arrangement is quick and easy, but manual editing is also sometimes necessary. For example, columns, lighting fixtures and HVAC ducts maybe conflict with the auto arranged loudspeaker locations. When it is necessary to move or remove some loudspeakers, Forecaster HD s manual mode allows users to do so.

37 Auto arrangement is recommended to determine the general arrangement, then switch to Manual Mode to make fine tunings. Uncheck to turn on Manual Mode. In Manual Mode, all parameters in this table are editable. In XY View, hold Control and the left mouse button to drag the loudspeaker to a new position.


38 Discover more options in the right-click menu, such as remove, add, group edit, etc. when the mouse pointer hovers over the table or mapping view windows. Apply changes to multiple loudspeakers at once.

39 Discover more functions in the File menu, such as open project, save project, export picture to file, export report, etc.


40 Product Data File Upgrade Utility When Community releases loudspeaker data files for new products, an updated setup.ddp file will be available for download. Save this file at any preferred location and specify its file path in Forecaster HD. Forecaster HD will automatically load the setup.ddp file when launching.
Quick Start guide. Introduction
 Introduction The purpose of this guide is to help new users in their first setup with the Adamson Shooter predictive software for Adamson Y-Axis and SpekTrix speaker systems. Further detail can be obtained
33-2 Satellite Takeoff Tutorial--Flat Roof Satellite Takeoff Tutorial--Flat Roof
 33-2 Satellite Takeoff Tutorial--Flat Roof Satellite Takeoff Tutorial--Flat Roof A RoofLogic Digitizer license upgrades RoofCAD so that you have the ability to digitize paper plans, electronic plans and
Alibre Design Tutorial: Loft, Extrude, & Revolve Cut Loft-Tube-1
 Alibre Design Tutorial: Loft, Extrude, & Revolve Cut Loft-Tube-1 Part Tutorial Exercise 5: Loft-Tube-1 [Complete] In this Exercise, We will set System Parameters first, then part options. Then, in sketch
House Design Tutorial
 House Design Tutorial This House Design Tutorial shows you how to get started on a design project. The tutorials that follow continue with the same plan. When you are finished, you will have created a
House Design Tutorial
 House Design Tutorial This House Design Tutorial shows you how to get started on a design project. The tutorials that follow continue with the same plan. When you are finished, you will have created a
House Design Tutorial
 Chapter 2: House Design Tutorial This House Design Tutorial shows you how to get started on a design project. The tutorials that follow continue with the same plan. When you are finished, you will have
AreaSketch Pro Overview for ClickForms Users
 AreaSketch Pro Overview for ClickForms Users Designed for Real Property Specialist Designed specifically for field professionals required to draw an accurate sketch and calculate the area and perimeter
House Design Tutorial
 Chapter 2: House Design Tutorial This House Design Tutorial shows you how to get started on a design project. The tutorials that follow continue with the same plan. When you are finished, you will have
Creo Revolve Tutorial
 Creo Revolve Tutorial Setup 1. Open Creo Parametric Note: Refer back to the Creo Extrude Tutorial for references and screen shots of the Creo layout 2. Set Working Directory a. From the Model Tree navigate
House Design Tutorial
 Chapter 2: House Design Tutorial This House Design Tutorial shows you how to get started on a design project. The tutorials that follow continue with the same plan. When we are finished, we will have created
Kitchen and Bath Design Tutorial
 Kitchen and Bath Design Tutorial This tutorial continues where the Interior Design Tutorial left off. You should save this tutorial using a new name to archive your previous work. The tools and techniques
Step 1: Set up the variables AB Design. Use the top cells to label the variables that will be displayed on the X and Y axes of the graph
 Step 1: Set up the variables AB Design Use the top cells to label the variables that will be displayed on the X and Y axes of the graph Step 1: Set up the variables X axis for AB Design Enter X axis label
Getting Started. with Easy Blue Print
 Getting Started with Easy Blue Print User Interface Overview Easy Blue Print is a simple drawing program that will allow you to create professional-looking 2D floor plan drawings. This guide covers the
SKF TKTI. Thermal Camera Software. Instructions for use
 SKF TKTI Thermal Camera Software Instructions for use Table of contents 1. Introduction...4 1.1 Installing and starting the Software... 5 2. Usage Notes...6 3. Image Properties...7 3.1 Loading images
Excel Tool: Plots of Data Sets
 Excel Tool: Plots of Data Sets Excel makes it very easy for the scientist to visualize a data set. In this assignment, we learn how to produce various plots of data sets. Open a new Excel workbook, and
Kitchen and Bath Design Tutorial
 Kitchen and Bath Design Tutorial This tutorial continues where the Interior Design Tutorial left off. You should save this tutorial using a new name to archive your previous work. The tools and techniques
CHM 152 Lab 1: Plotting with Excel updated: May 2011
 CHM 152 Lab 1: Plotting with Excel updated: May 2011 Introduction In this course, many of our labs will involve plotting data. While many students are nerds already quite proficient at using Excel to plot
Tiling. 1. Overlapping tiles with fixed number of tiles. Tutorial
 Tutorial Tiling Software version: Asanti 3.0 Document version: April 3, 2017 This tutorial demonstrates how to use tiling within Asanti. Download the Asanti Sample Files via the Asanti Client (Help > Asanti
Appendix 3 - Using A Spreadsheet for Data Analysis
 105 Linear Regression - an Overview Appendix 3 - Using A Spreadsheet for Data Analysis Scientists often choose to seek linear relationships, because they are easiest to understand and to analyze. But,
BacklightFly Manual.
 BacklightFly Manual http://www.febees.com/ Contents Start... 3 Installation... 3 Registration... 7 BacklightFly 1-2-3... 9 Overview... 10 Layers... 14 Layer Container... 14 Layer... 16 Density and Design
Create a Flowchart in Word
 Create a Flowchart in Word A flowchart is a diagram of steps, movements or actions involved in a system or activity. Flowcharts use conventional geometric symbols and arrows to define relationships and
Excel Lab 2: Plots of Data Sets
 Excel Lab 2: Plots of Data Sets Excel makes it very easy for the scientist to visualize a data set. In this assignment, we learn how to produce various plots of data sets. Open a new Excel workbook, and
PROFESSIONAL. EdgeMax EM90 and EM180 In-Ceiling Loudspeakers. Design Guide
 PROFESSIONAL EdgeMax and In-Ceiling Loudspeakers Design Guide Contents EdgeMax Loudspeaker Overview. 3 Comparison of In-Ceiling and Surface Mounted Loudspeaker Performance. 3 EdgeMax Loudspeaker Performance.
CAD Tutorial. CAD Detail Windows. In this tutorial you ll learn about: CAD Detail Windows Exploding and Modifying a CAD Block
 CAD Tutorial In this tutorial you ll learn about: CAD Detail Windows Exploding and Modifying a CAD Block Creating a New CAD Block CAD Detail from View Creating a Plot Plan CAD Detail Windows CAD Details
Getting Started. Before You Begin, make sure you customized the following settings:
 Getting Started Getting Started Before getting into the detailed instructions for using Generative Drafting, the following tutorial aims at giving you a feel of what you can do with the product. It provides
Kitchen and Bath Design Tutorial
 Adding Cabinets Chapter 5: Kitchen and Bath Design Tutorial This tutorial continues where the Materials Tutorial left off. You should save this tutorial using a new name to archive your previous work.
Advance Steel. Tutorial
 Advance Steel Tutorial Table of contents About this tutorial... 7 How to use this guide...9 Lesson 1: Creating a building grid...10 Step 1: Creating an axis group in the X direction...10 Step 2: Creating
PlanSwift 3D Viewer Plugin User Guide
 PlanSwift 3D Viewer Plugin User Guide UPDATED ON 7/13/2018 PlanSwift Authored by: Dave Hansen 1 Table of Contents Overview... 3 Purchasing and Installation... 4 Purchasing Plugins... 4 Installation and
Kitchen and Bath Design Tutorial
 Kitchen and Bath Design Tutorial This tutorial continues where the Interior Design Tutorial left off. You should save this tutorial using a new name to archive your previous work. The tools and techniques
Modeling Basic Mechanical Components #1 Tie-Wrap Clip
 Modeling Basic Mechanical Components #1 Tie-Wrap Clip This tutorial is about modeling simple and basic mechanical components with 3D Mechanical CAD programs, specifically one called Alibre Xpress, a freely
ISCapture User Guide. advanced CCD imaging. Opticstar
 advanced CCD imaging Opticstar I We always check the accuracy of the information in our promotional material. However, due to the continuous process of product development and improvement it is possible
ENGINEERING STAFF REPORT. The JBL Model L40 Loudspeaker System. Mark R. Gander, Design Engineer
 James B Lansing Sound, Inc, 8500 Balboa Boulevard, Northridge, California 91329 USA ENGINEERING STAFF REPORT The JBL Model L40 Loudspeaker System Author: Mark R. Gander, Design Engineer ENGINEERING STAFF
ARCHICAD Introduction Tutorial
 Starting a New Project ARCHICAD Introduction Tutorial 1. Double-click the Archicad Icon from the desktop 2. Click on the Grey Warning/Information box when it appears on the screen. 3. Click on the Create
Creo: Hole, Fillet, and Round Layout/Dimension Tutorial. By: Matthew Jourden Brighton High School
 Creo: Hole, Fillet, and Round Layout/Dimension Tutorial Layout of a Part with Holes 1. Open a blank drawing with your border and title block By: Matthew Jourden Brighton High School 2. Place the front,
Introduction to QTO. Objectives of QTO. Getting Started. Requirements. Creating a Bill of Quantities. Updating an existing Bill of Quantities
 QTO User Manual Contents Introduction to QTO... 5 Objectives of QTO... 5 Getting Started... 5 QTO Manager... 6 QTO Layout... 7 Bill of Quantities... 8 Measure Folders... 9 Drawings... 10 Zooming and Scrolling...
1. Setup Output mode. 2. Using a Fixed tile size
 Tutorial Tiling Software version: Asanti 2.0 Document version: June 23, 2015 This tutorial demonstrates how to use tiling with Asanti. Tiling can only be executed on a system where Acrobat Pro X or later
creation stations AUDIO RECORDING WITH AUDACITY 120 West 14th Street
 creation stations AUDIO RECORDING WITH AUDACITY 120 West 14th Street www.nvcl.ca techconnect@cnv.org PART I: LAYOUT & NAVIGATION Audacity is a basic digital audio workstation (DAW) app that you can use
FLIR Tools for PC 7/21/2016
 FLIR Tools for PC 7/21/2016 1 2 Tools+ is an upgrade that adds the ability to create Microsoft Word templates and reports, create radiometric panorama images, and record sequences from compatible USB and
PASS Sample Size Software. These options specify the characteristics of the lines, labels, and tick marks along the X and Y axes.
 Chapter 940 Introduction This section describes the options that are available for the appearance of a scatter plot. A set of all these options can be stored as a template file which can be retrieved later.
ENSC327 Communication Systems Fall 2011 Assignment #1 Due Wednesday, Sept. 28, 4:00 pm
 ENSC327 Communication Systems Fall 2011 Assignment #1 Due Wednesday, Sept. 28, 4:00 pm All problem numbers below refer to those in Haykin & Moher s book. 1. (FT) Problem 2.20. 2. (Convolution) Problem
Chapter 2. Drawing Sketches for Solid Models. Learning Objectives
 Chapter 2 Drawing Sketches for Solid Models Learning Objectives After completing this chapter, you will be able to: Start a new template file to draw sketches. Set up the sketching environment. Use various
Sports Sound. Loudspeaker System Design Reference Guide
 Sports Sound Loudspeaker System Design Reference Guide Recommended Effective Operating Distances Reference: 96 db R.15COAX Model Description R.35COAX* 2-way, Coaxial; LF: 1 x 6", HF: 1 x 1" 2-way, Coaxial;
Tas Engineering Training Workbook 1
 Tas Engineering Training Workbook 1 Tas 3D Modeller Tas Manager Your Tas Manager contains two main folders: a Tas folder and a Tas Data folder. See the directory-tree on the left-hand side above. If you
Learning Guide. ASR Automated Systems Research Inc. # Douglas Crescent, Langley, BC. V3A 4B6. Fax:
 Learning Guide ASR Automated Systems Research Inc. #1 20461 Douglas Crescent, Langley, BC. V3A 4B6 Toll free: 1-800-818-2051 e-mail: support@asrsoft.com Fax: 604-539-1334 www.asrsoft.com Copyright 1991-2013
Chapter 6: TVA MR and Cardiac Function
 Chapter 6 Cardiac MR Introduction Chapter 6: TVA MR and Cardiac Function The Time-Volume Analysis (TVA) optional module calculates time-dependent behavior of volumes in multi-phase studies from MR. An
Roof Tutorial Wall Specification
 Roof Tutorial The majority of Roof Tutorial describes some common roof styles that can be created using settings in the Wall Specification dialog and can be completed independent of the other tutorials.
Modeling an Airframe Tutorial
 EAA SOLIDWORKS University p 1/11 Difficulty: Intermediate Time: 1 hour As an Intermediate Tutorial, it is assumed that you have completed the Quick Start Tutorial and know how to sketch in 2D and 3D. If
ExtrAXION. Extracting Drawing data. Benefits.
 ExtrAXION Extracting Drawing data ExtrAXION is the simplest and most complete quantity takeoff software tool for construction plans. It has the ability to measure on vector files CAD (dwg, dxf, dgn, emf,
Introduction to Autodesk Inventor for F1 in Schools (Australian Version)
") Introduction to Autodesk Inventor for F1 in Schools (Australian Version) F1 in Schools race car In this course you will be introduced to Autodesk Inventor, which is the centerpiece of Autodesk s Digital
Introduction to Autodesk Inventor for F1 in Schools (Australian Version) F1 in Schools race car In this course you will be introduced to Autodesk Inventor, which is the centerpiece of Autodesk s Digital
There are two types of cove light in terms of light distribution inside a room
 DIALux evo Tutorials Tutorial 2 How to create a cove light detail In this tutorial you will learn the following commands. 1. Using help lines 2. Using ceiling. 3. Using cutout 4. Using Boolean operation
Laboratory 2: Graphing
 Purpose It is often said that a picture is worth 1,000 words, or for scientists we might rephrase it to say that a graph is worth 1,000 words. Graphs are most often used to express data in a clear, concise
FlashChart. Symbols and Chart Settings. Main menu navigation. Data compression and time period of the chart. Chart types.
 FlashChart Symbols and Chart Settings With FlashChart you can display several symbols (for example indices, securities or currency pairs) in an interactive chart. You can also add indicators and draw on
Ortelia Set Designer User Manual
 Ortelia Set Designer User Manual http://ortelia.com 1 Table of Contents Introducing Ortelia Set Designer...3 System Requirements...4 1. Operating system:... 4 2. Hardware:... 4 Minimum Graphics card specification...4
CPM Educational Program
 CC COURSE 3 ETOOLS Table of Contents General etools... 4 Algebra Tiles (CPM)... 5 Pattern Tile & Dot Tool (CPM)... 8 Base Ten Blocks (CPM)...10 Area and Perimeter (CPM)...12 Desmos Graphing Calculator...15
ACI Sketch. Copyright October 2008, ACI All Rights Reserved. 24 Old Kings Road North Palm Coast, FL appraiserschoice.com
 ACI Sketch Copyright October 2008, ACI All Rights Reserved 24 Old Kings Road North Palm Coast, FL 32137 appraiserschoice.com 800.234.8727 ACI Sketch Contents Getting Started 1 Working with the Grid 2 Unit
Photoshop CS6 automatically places a crop box and handles around the image. Click and drag the handles to resize the crop box.
 CROPPING IMAGES In Photoshop CS6 One of the great new features in Photoshop CS6 is the improved and enhanced Crop Tool. If you ve been using earlier versions of Photoshop to crop your photos, you ll find
Quick Start Guide for the PULSE PROFILING APPLICATION
 Quick Start Guide for the PULSE PROFILING APPLICATION MODEL LB480A Revision: Preliminary 02/05/09 1 1. Introduction This document provides information to install and quickly start using your PowerSensor+.
EG1003 Help and How To s: Revit Tutorial
 EG1003 Help and How To s: Revit Tutorial Completion of this tutorial is required for Milestone 1. Include screenshots of it in your Milestone 1 presentation. Downloading Revit: Before beginning the tutorial,
digitization station DIGITAL SCRAPBOOKING 120 West 14th Street
 digitization station DIGITAL SCRAPBOOKING 120 West 14th Street www.nvcl.ca techconnect@cnv.org DIGITAL SCRAPBOOKING With MyMemories Suite 6 The MyMemories Digital Scrapbooking software allows you to create
7.0 - MAKING A PEN FIXTURE FOR ENGRAVING PENS
 7.0 - MAKING A PEN FIXTURE FOR ENGRAVING PENS Material required: Acrylic, 9 by 9 by ¼ Difficulty Level: Advanced Engraving wood (or painted metal) pens is a task particularly well suited for laser engraving.
Quintic Software Tutorial 7c
 Quintic Software Tutorial 7c High-Speed Video Capture (Video Capture via USB or GigE) Contents Page 1. Single High-Speed Capture a. Camera Set-Up / Parameters b. Camera Tab (frame rate & exposure) c. Image
Sketch PowerTab. Sketch PowerView. Starting a New Floorplan with WinSketch
 Sketch PowerView The Sketch PowerView is your complete interface for digital sketches and their resulting area calculations to transfer into your form. In the Sketch PowerView, you can even access sketches
University Libraries ScanPro 3000 Microfilm Scanner
 University Libraries ScanPro 3000 Microfilm Scanner Help Guide Table of Contents Getting Started 3 Loading the Film 4-5 Viewing Your Film 6-7 Motorized Roll Film Control 6 Crop Box 7 Using the Toolbar
12. Creating a Product Mockup in Perspective
 12. Creating a Product Mockup in Perspective Lesson overview In this lesson, you ll learn how to do the following: Understand perspective drawing. Use grid presets. Adjust the perspective grid. Draw and
The Toolbars submenu selects or deselects the following toolbars, below shows you how to display the Measuring Toolbar: Scale X in Y
 The Measurement Toolbars Menu The Toolbars submenu selects or deselects the following toolbars, below shows you how to display the Measuring Toolbar: As it looks on the tool bar, below Arrow End Style
CADPIPE Industrial Pipe. Tutorial
 CADPIPE Industrial Pipe Tutorial Introduction This Tutorial is a brief introduction to the power of CADPIPE 3D DESIGN. We will show you a few key features and the general procedures for creating 3D piping
SigCal32 User s Guide Version 3.0
 SigCal User s Guide . . SigCal32 User s Guide Version 3.0 Copyright 1999 TDT. All rights reserved. No part of this manual may be reproduced or transmitted in any form or by any means, electronic or mechanical,
Panaray 402 Series II TECHNICAL DATA SHEET. loudspeaker. Key Features. Product Overview. Technical Specifications
 Key Features Articulated Array design provides wide 120 x 60 coverage to deliver voice and music reproduction over a broad dispersion area Four Bose 4.5" (114 mm) full-range drivers for unsurpassed natural
OCV 6. Product Description. Features. Applications
 Product Description Tannoy OCV Series pendant loudspeakers deliver the renowned acoustic performance and exceptional value of Tannoy s CVS Series in-ceiling products in an architecturally sensitive, self-contained,
Evaluation Chapter by CADArtifex
 The premium provider of learning products and solutions www.cadartifex.com EVALUATION CHAPTER 2 Drawing Sketches with SOLIDWORKS In this chapter: Invoking the Part Modeling Environment Invoking the Sketching
not overpower the audience just below and in front of the array.
 SPECIFICATIONS SSE LA Description Designed for use in permanent professional installations in churches, theaters, auditoriums, gyms and theme parks, the SSE LA is a dual-radius dius curved line array that
Training Guide 1 Basic Construction Overview. (v1.1)
") Training Guide 1 Basic Construction Overview (v1.1) Contents Training Guide 1 Basic Construction Overview... 1 Creating a new project... 3 Entering Measurements... 6 Adding the Walls... 10 Inserting Doors
Training Guide 1 Basic Construction Overview (v1.1) Contents Training Guide 1 Basic Construction Overview... 1 Creating a new project... 3 Entering Measurements... 6 Adding the Walls... 10 Inserting Doors
TeleTrader FlashChart
 TeleTrader FlashChart Symbols and Chart Settings With TeleTrader FlashChart you can display several symbols (for example indices, securities or currency pairs) in an interactive chart. You can also add
LIGHT-SCENE ENGINE MANAGER GUIDE
 ambx LIGHT-SCENE ENGINE MANAGER GUIDE 20/05/2014 15:31 1 ambx Light-Scene Engine Manager The ambx Light-Scene Engine Manager is the installation and configuration software tool for use with ambx Light-Scene
TPC Desktop Series. Drawing Learning Guide
 TPC Desktop Series Drawing Learning Guide 1/14 NOTICE The information in this document is subject to change without notice. TRAVERSE PC. Inc. assumes no responsibility for any errors that may appear in
1. Setup Output mode. 2. Using a Fixed tile size
 Tutorial Tiling Software version: Asanti 1.0 Document version: February 17, 2014 This tutorial demonstrates how to use tiling with Asanti. Tiling can only be executed on a system where Acrobat Pro X or
Getting Started Guide
 SOLIDWORKS Getting Started Guide SOLIDWORKS Electrical FIRST Robotics Edition Alexander Ouellet 1/2/2015 Table of Contents INTRODUCTION... 1 What is SOLIDWORKS Electrical?... Error! Bookmark not defined.
MC3 Motion Control System Shutter Stream Quickstart
 MC3 Motion Control System Shutter Stream Quickstart Revised 7/6/2016 Carousel USA 6370 N. Irwindale Rd. Irwindale, CA 91702 www.carousel-usa.com Proprietary Information Carousel USA has proprietary rights
Landscaping Tutorial. Chapter 5:
 Chapter 5: Landscaping Tutorial This tutorial was written to help you learn how to use Home Designer Landscape and Deck s Terrain tools. In this tutorial, you will learn how to add elevation information
Getting Started with Qucs
 Getting Started with Qucs Graham Edge University of Toronto After downloading Qucs, installing it, and running for the first time you should see a window that looks something like this: The large yellow
SolidWorks 95 User s Guide
 SolidWorks 95 User s Guide Disclaimer: The following User Guide was extracted from SolidWorks 95 Help files and was not originally distributed in this format. All content 1995, SolidWorks Corporation Contents
SCRAPENDIPITY Designs. Electric Quilt 7 Tutorial. Building a Quilt
 Electric Quilt 7 Tutorial Building a Quilt When you start Electric Quilt up, you will see this screen. Type the name of your quilt and hit OK Now we need to make sure we have the correct layout. Go to
Page 21 GRAPHING OBJECTIVES:
 Page 21 GRAPHING OBJECTIVES: 1. To learn how to present data in graphical form manually (paper-and-pencil) and using computer software. 2. To learn how to interpret graphical data by, a. determining the
CAD Orientation (Mechanical and Architectural CAD)
") Design and Drafting Description This is an introductory computer aided design (CAD) activity designed to give students the foundational skills required to complete future lessons. Students will learn all
Design and Drafting Description This is an introductory computer aided design (CAD) activity designed to give students the foundational skills required to complete future lessons. Students will learn all
QUICK TIPS GETTING STARTED
 GETTING STARTED - Open the GenoPro program on your desktop and Press F to open the Family Wizard - Add the couple s information and then add children here by double clicking on the lines in the Children
GEO/EVS 425/525 Unit 3 Composite Images and The ERDAS Imagine Map Composer
 GEO/EVS 425/525 Unit 3 Composite Images and The ERDAS Imagine Map Composer This unit involves two parts, both of which will enable you to present data more clearly than you might have thought possible.
ScanArray Overview. Principle of Operation. Instrument Components
 ScanArray Overview The GSI Lumonics ScanArrayÒ Microarray Analysis System is a scanning laser confocal fluorescence microscope that is used to determine the fluorescence intensity of a two-dimensional
Module 1C: Adding Dovetail Seams to Curved Edges on A Flat Sheet-Metal Piece
 1 Module 1C: Adding Dovetail Seams to Curved Edges on A Flat Sheet-Metal Piece In this Module, we will explore the method of adding dovetail seams to curved edges such as the circumferential edge of a
Photoshop Elements Hints by Steve Miller
 2015 Elements 13 A brief tutorial for basic photo file processing To begin, click on the Elements 13 icon, click on Photo Editor in the first box that appears. We will not be discussing the Organizer portion
Use of the LTI Viewer and MUX Block in Simulink
 Use of the LTI Viewer and MUX Block in Simulink INTRODUCTION The Input-Output ports in Simulink can be used in a model to access the LTI Viewer. This enables the user to display information about the magnitude
ideamaker Manual
 ideamaker Manual Using ideamaker... 2 1 Basic information... 2 1.1 What is ideamaker?... 2 1.2 Where to download ideamaker?... 2 2 Install ideamaker... 3 3 Let s Print!... 6 4 How to use ideamaker?...
AutoCAD 2D. Table of Contents. Lesson 1 Getting Started
 AutoCAD 2D Lesson 1 Getting Started Pre-reqs/Technical Skills Basic computer use Expectations Read lesson material Implement steps in software while reading through lesson material Complete quiz on Blackboard
Sensors and Scatterplots Activity Excel Worksheet
 Name: Date: Sensors and Scatterplots Activity Excel Worksheet Directions Using our class datasheets, we will analyze additional scatterplots, using Microsoft Excel to make those plots. To get started,
Solidworks tutorial. 3d sketch project. A u t h o r : M. G h a s e m i. C o n t a c t u s : i n f s o l i d w o r k s a d v i s o r.
 Solidworks tutorial 3d sketch project A u t h o r : M. G h a s e m i C o n t a c t u s : i n f o @ s o l i d w o r k s a d v i s o r. c o m we will create this frame during the tutorial : In this tutorial
XLA 3200 Line Array Loudspeakers
 XLA 3200 Line Array Loudspeakers LBC 3200/00, LBC 3201/00, LBC 3210/00 en Product information and installation manual, please see www.boschsecurity.com XLA 3200 Line Array Loudspeakers Table of Contents
Floorplanner Editor Manual
 Editor Manual Floorplanner Editor Manual 1 Overview 2 Canvas a 2D view b View Settings 3 3D view a Orbital and walkthrough mode b How to navigate c Adding cameras d Scenery image e Create a render 4 Sidebar
1 Sketching. Introduction
 1 Sketching Introduction Sketching is arguably one of the more difficult techniques to master in NX, but it is well-worth the effort. A single sketch can capture a tremendous amount of design intent, and
Getting Started with. Vectorworks Architect
 Getting Started with Vectorworks Architect Table of Contents Introduction...2 Section 1: Program Installation and Setup...6 Installing the Vectorworks Architect Program...6 Exercise 1: Launching the Program
Scaffolding Software iscaf - Design v New Features. December 2015
 Scaffolding Software iscaf - Design v 6.50 December 2015 2010-2015 iscaf - Design : 6.5 (December, 2015) Patch Upgrades This is our new method to deliver quick incremental upgrades to our clients without
GEO/EVS 425/525 Unit 2 Composing a Map in Final Form
 GEO/EVS 425/525 Unit 2 Composing a Map in Final Form The Map Composer is the main mechanism by which the final drafts of images are sent to the printer. Its use requires that images be readable within