Supplement. Getting to Know Your ArtixScan F2. ArtixScan F2 features, scenarios, and information
|
|
|
- Magnus Kelley Charles
- 5 years ago
- Views:
Transcription

1 Supplement ArtixScan F2 features, scenarios, and information Getting to Know Your ArtixScan F2 The ArtixScan F2 is a combined flatbed and film scanner for 35mm, 6-cm, and 4"x5" film formats that also offers additional functionality to scan reflective art or prints as large as 8.5" x 14". It features 4800 x 9600 dpi optical resolution, 4.2 maximum optical density, and a Hi-Speed USB interface for the fast and plug-and-play connectivity ability. The ArtixScan F2 is equipped with Microtek's patented Emulsion Direct Imaging Technology (E.D.I.T.) for delivering distortion-free images in transparency scanning. The scanner also features ColoRescue one-touch color restoration for both photos and film. Contents Getting to Know Your ArtixScan F Features of the ArtixScan F Taking a Closer Look... 3 Unlocking the Scanner... 4 Positioning Your Originals... 5 Using the Glass Holder... 7 Using the Other Film Holders... 8 A. Using the 35mm Slide Holder... 9 B. Using the 35mm Filmstrip Holder C. Using the 6 x 22-cm (120) Film Holder D. Using the 4" x 5" Film Holder Scanning Scenarios For PC Users Using ScanWizard Pro A. Scanning Photos B. Scanning Positive Film Copyright 2013 Microtek International, Inc. I B, September 2013 C. Scanning Negative Film D. Scanning Photos (or Film) Applied with Auto Focus For Mac Users Using ScanPotter A. Scanning Photos B. Scanning Film Using the Microtek Scanner ICC Profiler (MSP) MSP and IT8 Calibration Data Installation Calibration Target Positioning the Target Calibration Setup Calibration and Profiling Loading a Profile Specifications / System Requirements FCC Compliance Statement... 37
2 Features of the ArtixScan F2 The ArtixScan F2 comes with several important features, including the following: Energy-saving LED light source: Adopting LEDs as the light source, when the scanner is detected by the system, there are no requirements for any warm-up time before carrying out the scan, which boots your productivity and reduces energy costs amazingly. With its stable performance, the image quality will remain consistent even after used for a certain period of time. Microtek's Emulsion Direct Imaging Technology (E.D.I.T.): This is a patented glassless scanning system built into the lower bay of Microtek s dual media scanners, allowing the scanner CCD to directly read the emulsion side of the film during scanning without any interfering pane of glass. This effectively eliminates problems associated with normal glass transparency scanning like Newton Rings, resulting in distortion-free images. Auto Focus: An image improvement feature introduced to Microtek flatbeds, Auto Focus allows the scanner to change the focus position on images through the movement of the CCD, resulting in better image quality for a chosen area of the scan. Auto Focus is activated by default when the scanner is on but can be switched off manually before the final scan is carried out. The results of Auto Focus can be best seen when used with uneven, creased photos and film. Microtek's ColoRescue TM system: With ColoRescue, the ArtixScan F2 restores faded colors in photos and film, bringing hues back to their original luster and brilliance for more vibrant images. ColoRescue's one-click, automatic color recovery process is simple and straightforward, involving no learning curve or hassle. Microtek ScanWizard Pro scanning software (PC): This is an advanced scanner controller program that provides many powerful, professional-level features for scanning. ScanWizard Pro includes the Microtek Scanner ICC Profiler (MSP) program, which allows users to calibrate the scanner and generate the appropriate ICC color profile to ensure color consistency and accuracy during the scanning process. ScanWizard Pro also features two color spaces, allowing users to work in the Native CMYK / RGB mode, as well as in the intuitive LCH (Lightness, Chroma, Hue) mode. ScanPotter scanning software (Mac): ScanPotter is a professional and exclusive scanner software designed for the Mac system which is still under development. It may not come with your scanner package. Microtek will provide it to you as soon as possible when it is ready. 2 ArtixScan F2 Supplement
3 Taking a Closer Look Scanner lid Glass surface (Upper scan bed) Vertical ruler Horizontal ruler Power button Power indicator (green) Reflective Ready indicator (amber) Transparency Ready indicator (amber) Power connector Hi-Speed USB port (1) ArtixScan F2 Supplement 3
4 Unlocking the Scanner Before you can operate the scanner, you will need to unlock the scanner. To unlock the scanner, follow the steps below: 1. Remove the yellow Step 3 sticker from your scanner. 2. Look for the unlocking screw at the bottom of the scanner. 3. Using a screwdriver, push and turn the locking screw counterclockwise to the unlock position. When successfully unlocked, the screw will push out a little, protruding slightly from the bottom of the scanner. Shipping the Scanner If you have to transport the scanner, you will need to lock the scanner back. Follow the steps below: 1. Turn off the scanner if your scanner is on. 2. Turn the scanner back on. The scanner s carriage will move to the standby position in 5 minutes. 3. When the indicators on the front of your scanner stop blinking, use a screwdriver, and then push and turn the locking screw clockwise to the locked position. When the screw has been tightened, this indicates that your scanner is locked. 4. Turn off your scanner. The scanner is now ready for transport. 4 ArtixScan F2 Supplement
5 Positioning Your Originals Positioning Reflective Originals This procedure applies when you use the upper scan bed of the ArtixScan F2 to scan reflective materials such as photos and prints. 1. Open the scanner lid. 2. Place the original to be scanned face down on the scanner glass bed, towards the front of the scanner. Center the top of the original along the horizontal ruler on the scanner. Note: To scan a book or thick materials/documents, lift the scanner lid out of its hinge sockets high enough to create room between the originals and the lid. 3. Lower the scanner lid. ArtixScan F2 Supplement 5
6 Positioning Transparent Film This procedure applies when you use the lower scan bed of the ArtixScan F2. There are two ways to scan transparent film: A. By using the Glass Holder to scan non-standard-size transparent film. Glass Holder Vinyl strip Calibration strip Important: When using the Main Holder or the Glass Holder, make sure you use the correct side up when inserting the holders into the scanner. The correct side up is the side showing the holder labels facing up. Make sure that the calibration strip on the holders are kept clear and free of obstruction at all times; no material should ever be placed on this area. Also, make sure the calibration strip faces the front of the scanner when you insert the holders into the lower compartment of the ArtixScan F2. B. By using the Main Holder, which is used together with individual film holders to scan standard-size transparent film, such as 35mm slides, 35mm filmstrips, 6 x 4.5- cm, 6 x 6-cm, 6 x 7-cm, 6 x 9-cm, 6 x 17-cm, 6 x 22-cm, or 4" x 5" films. 35mm slides Holder Main Holder Calibration strip 6 ArtixScan F2 Supplement
7 Using the Glass Holder The Glass Holder is used to scan non-standard-size transparencies. 1. Place the film face down on top of the glass surface of the holder. Orient Glass Holder with "Glass Holder" label facing up 2. Secure the transparency to the glass by using the vinyl strips provided with your scanner. Keep calibration strip clear and free of any obstruction 3. Insert the holder all the way into the transparency bay (the drawer or lower compartment) of the scanner. Note: The Glass Holder requires regular cleaning. To clean, use mild glass cleaning solution, and wipe the glass plate gently with lint-free, lens-cleaning cloth to prevent leaving fiber residue. ArtixScan F2 Supplement 7
8 Using the Other Film Holders The other Film Holders are used together with the Main Holder to scan standard-size film. For instance, use the 4" x 5" Film Holder to scan 4" x 5" film, or use the 35mm Filmstrip Holder to scan 35mm filmstrips. The use of the individual film holders is explained in the succeeding pages of the manual. 35mm Slide Holder 35mm Filmstrip Holder 6 x 22-cm (120) Film Holder 4 x 5 Film Holder Main Holder 8 ArtixScan F2 Supplement
9 A. Using the 35mm Slide Holder The 35mm Slide Holder can hold a maximum of 12 mounted slides at a time. 1. Place the individual 35mm slide to be scanned into the 35mm Slide Holder, as indicated in the graphic below. The shiny base of the 35mm slide should be facing down. 2. Put the 35mm Slider Holder into the Main Holder. Make sure that the red arrow marks on both the 35mm Slide Holder and the Main Holder are pointing to each other when the holders are put together 3. Insert the whole assembly into the transparency bay (the drawer or lower compartment) of the scanner. ArtixScan F2 Supplement 9
10 B. Using the 35mm Filmstrip Holder The 35mm Filmstrip Holder can hold 4 strips of film that each consists of six frames. A total of four 35mm Filmstrip Holders is included in your scanner package. 1. Place the 35mm filmstrip to be scanned into the 35mm Filmstrip Holder, as indicated in the graphic below. The shiny base of the 35mm filmstrip should be facing down. 2. Put the 35mm Filmstrip Holder into the Main Holder. Make sure that the red arrow marks on both the 35mm Filmstrip Holder and the Main Holder are pointing to each other when the holders are put together 3. Insert the whole assembly into the transparency bay of the scanner. 10 ArtixScan F2 Supplement
11 C. Using the 6 x 22-cm (120) Film Holder The 6 x 22-cm (120) Film Holder can hold up to four pieces of 6 x 4.5-cm film, 2 pieces of 6 x 9-cm film, or a single piece of 6 x 17-cm film. 1. Place the film to be scanned into the 6 x 22-cm (120) Film Holder, as indicated in the graphic below. The shiny base of the film should be facing down. a) Push on the side to open the lid. b) Place the film face down into the holder. c) Pull down the side to close the lid. 2. Put the 6 x 22-cm (120) Film Holder into the Main Holder. Make sure that the red arrow marks on both the 6 x 22-cm Film Holder and the Main Holder are pointing to each other when the holders are put together 3. Insert the whole assembly into the transparency bay of the scanner. ArtixScan F2 Supplement 11
12 D. Using the 4" x 5" Film Holder The 4" x 5" Film Holder can hold two pieces of 4" x 5" film at a time. 1. Place the 4" x 5" film to be scanned inside the 4" x 5" Film Holder, as indicated in the graphic below. The shiny base of the 4" x 5" film should be facing down. a) Push on the side to open the lid. b) Place the film face down into the holder. c) Pull down the side to close the lid. 2. Put the 4" x 5" Film Holder into the Main Holder. Make sure that the red arrow marks on both the 4" x 5" Film Holder and the Main Holder are pointing to each other when the holders are put together 3. Insert the whole assembly into the transparency bay of the scanner. 12 ArtixScan F2 Supplement
13 Scanning Scenarios The following pages provide various scenarios for scanning with the ArtixScan F2, including the following: For PC Users Using ScanWizard Pro, Scanning photos: This scenario can also be your first scan in order to familiarize yourself with scanning basics. Scanning positive film: This scenario details the steps for scanning positive film, such as 35mm mounted slides. Scanning negative film: This scenario details the steps for scanning negative film, such as 35mm filmstrips, 6 x 4.5-cm, 6 x 6-cm, 6 x 7-cm, 6 x 9-cm, 6 x 17-cm film, and 4" x 5" film. Scanning materials applied with the Auto Focus function: This scenario details the steps for applying the Auto Focus function to a selected area of the image to be scanned, in order to improve that area of the image. For Mac Users Using ScanPotter, Scanning photos: This scenario details the steps for scanning photos. Scanning film: This scenario details the steps for scanning film. ArtixScan F2 Supplement 13
14 For PC Users Using ScanWizard Pro A. Scanning Photos 1. Raise the scanner lid, and place the photo to be scanned face down on the scanner glass bed, towards the front of the scanner. Center the top of the photo along the horizontal ruler on the scanner. 2. Launch ScanWizard Pro either as a standalone by clicking on the program icon, or by using the File-Import or File-Acquire command from your image-editing program (such as Adobe Photoshop). The first time you launch ScanWizard Pro, you will be prompted to perform color calibration for your scanner. Allows you to specify how often you wish to be prompted to calibrate the scanner. The default setting is 14 days - Click the Skip button to exit the Calibration Reminder window. Clicking the Skip button allows you to use the factory default ICC profile for your scanner. Note: If your scanner does not include IT8 calibration targets, disregard the Calibration reminder window whenever it appears, and click the Skip button always. - Click the Calibrate button to run the Microtek Scanner ICC Profiler (MSP) program to perform color calibration and to customize the ICC profile for your scanner. After finishing with calibration, relaunch ScanWizard Pro. Note: The MSP program should be installed before you perform color calibration for your scanner. For details on how to install the MSP program and how to use it to calibrate the scanner, refer to section of the manual titled Using the Microtek Scanner ICC Profiler (MSP). 14 ArtixScan F2 Supplement

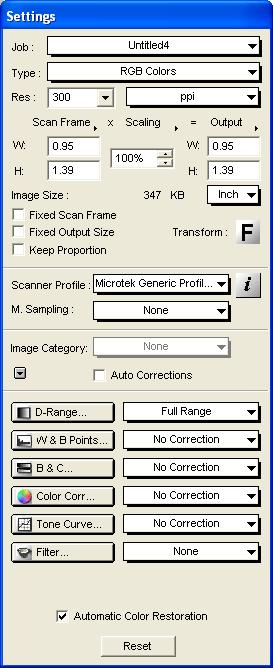
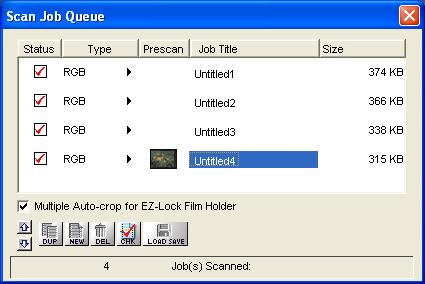
15 Next, you will be prompted to set up color matching for your scanner. If you are not sure about what to do, simply click the OK button to accept the settings. You can always change the settings at a later time. For more information, see the Color Matching Setup section in the ScanWizard Pro Reference Manual in the Microtek Software CD/DVD. Pertains to how your monitor displays color, relative to the RGB Destination color space Color Matching features Improves the contrast and saturation of an image 3. Go to the Preview window of ScanWizard Pro, and choose Reflective from the Scan Material menu. 4. Optional: If calibration has been performed, go to the Settings window in ScanWizard Pro. Choose the profile you have just created in the Input Profile / Scanner Profile menu. 5. Click the Overview button to perform a preliminary scan of the image, which will appear in the Preview window. 6. Select the Scan Frame tool from the Toolbar in the Preview window, and choose the area to be scanned by dragging a rectangle around it. You will see a flashing frame (marquee) around the selected area. 7. Click the Prescan button to display a detailed image area selected via the Scan Frame tool. A thumbnail of the image appears as well in the Scan Job Queue window. 8. Specify your scanning requirements in the Settings window. a) Select a desired image type. b) Select a desired resolution. c) Adjust the scan frame settings if necessary. 9. Adjust image quality if necessary, using the Advanced Image Correction (AIC) tools. 10. If the colors in your photo are faded and needed restoring, check the Automatic Color Restoration box in the Settings window. ArtixScan F2 Supplement 15
16 11. Click the Scan (or Batch ) button in the Preview window to start scanning. If ScanWizard Pro was launched from an application program, the image is then delivered to your application, where the image can be saved, printed, or edited. If ScanWizard Pro was launched in stand-alone mode, you will be prompted to specify the file attributes for the scanned image after the Scan or Batch button is pressed, such as entering the file name, specifying a folder name of your own, etc. When you have completed the settings, press the Done/Save button, and the scanner will automatically scan and save your image based on your settings. 16 ArtixScan F2 Supplement

17 ArtixScan F2 Supplement 17
. 3.")
18 B. Scanning Positive Film 1. Insert the holder with the positive film into the transparency bay of the scanner. Make sure that nothing is on the scanner glass surface. 2. Launch ScanWizard Pro either as a standalone by clicking on the program icon, or by using the File-Import or File-Acquire command from your image-editing program (such as Adobe Photoshop). 3. Go to the Preview window and choose Positive / Positive Film from the Scan Material menu. If this is your first time to scan transparent media, you will be prompted to perform color calibration for your scanner. A Calibration Reminder window appears. Allows you to specify how often you wish to be prompted to calibrate the scanner. The default setting is 14 days - Click the Skip button to exit the Calibration Reminder window. Clicking the Skip button allows you to use the factory default ICC profile for your scanner. Note: If your scanner does not include IT8 calibration targets, disregard the Calibration reminder window whenever it appears, and click the Skip button always. - Click the Calibrate button to run the Microtek Scanner ICC Profiler (MSP) program to perform color calibration and to customize the ICC profile for your scanner. After finishing with calibration, relaunch ScanWizard Pro. Note: The MSP program should be installed before you perform color calibration for your scanner. For details on how to install the MSP program and how to use it to calibrate the scanner, refer to section of the manual titled Using the Microtek Scanner ICC Profiler (MSP). 18 ArtixScan F2 Supplement
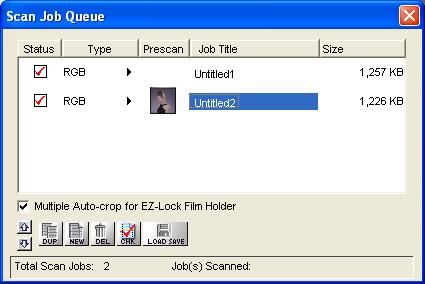
19 4. Optional: If calibration has been performed, go to the Settings window in ScanWizard Pro. Choose the profile you have just created in the Input Profile / Scanner Profile menu. 5. Click the Overview button to perform a preliminary scan of your original. 6. Select the Scan Frame tool from the Toolbar in the Preview window, and choose the area to be scanned by dragging a rectangle around it. You will see a flashing frame (marquee) around the selected area. 7. Click the Prescan button to display a detailed image area selected via the Scan Frame tool. A thumbnail of the image appears as well in the Scan Job Queue window. 8. Specify your scanning requirements in the Settings window. a) Select a desired image type. b) Select a desired resolution. c) Adjust the scan frame settings if necessary. 9. Adjust image quality if necessary, using the Advanced Image Correction (AIC) tools. 10. If the colors in your film are faded and need restoring, check the Automatic Color Restoration box in the Settings window. 11. Click the Scan (or Batch ) button in the Preview window to start scanning. If ScanWizard Pro was launched from an application program, the image is then delivered to your application, where the image can be saved, printed, or edited. If ScanWizard Pro was launched in stand-alone mode, you will be prompted to specify the file attributes for the scanned image after the Scan or Batch button is pressed, such as entering the file name, specifying a folder name of your own, etc. When you have completed the settings, press the Done/Save button, and the scanner will automatically scan and save your image based on your settings. ArtixScan F2 Supplement 19

20 20 ArtixScan F2 Supplement
. 3.")
21 C. Scanning Negative Film 1. Insert the holder with the negative film into the transparency bay of the scanner. Make sure that nothing is on the scanner glass surface. 2. Launch ScanWizard Pro either as a standalone by clicking on the program icon, or by using the File-Import or File-Acquire command from your image-editing program (such as Adobe Photoshop). 3. Go to the Preview window and choose Negative / Negative Film from the Scan Material menu. 4. Click the Overview button to perform a preliminary scan of your original. 5. Select the Scan Frame tool from the Toolbar in the Preview window, and choose the area to be scanned by dragging a rectangle around it. You will see a flashing frame (marquee) around the selected area. 6. Click the Prescan button to display a detailed image. A thumbnail of the image appears as well in the Scan Job Queue window. 7. In the Negative Scan Settings window, you can specify options related to your scanned negative film. Follow the steps below. a) In the Negative Scan Settings window, choose the Film Brand, Film Type, and ISO settings that match your film. b) The settings for the negative film you selected are applied to the prescan image, and the adjusted image is displayed in the Preview window. c) You can save the selected negative film settings into the Preset drop-down menu for easy access in the future. For more details on how to control settings for negative film scanning, see the section Negative Scan Settings Window in the ScanWizard Pro Reference Manual in the Microtek Software CD/DVD. ArtixScan F2 Supplement 21
22 8. Specify your scanning requirements in the Settings window. a) Select a desired image type. b) Select a desired resolution. c) Adjust the scan frame settings if necessary. 9. Adjust image quality if necessary, using the Advanced Image Correction (AIC) tools. 10. If the colors in your film are faded and need restoring, check the Automatic Color Restoration box in the Settings window. 11. Click the Scan (or Batch ) button in the Preview window to start scanning. If ScanWizard Pro was launched from an application program, the image is then delivered to your application, where the image can be saved, printed, or edited. If ScanWizard Pro was launched in stand-alone mode, you will be prompted to specify the file attributes for the scanned image after the Scan or Batch button is pressed, such as entering the file name, specifying a folder name of your own, etc. When you have completed the settings, press the Done/Save button, and the scanner will automatically scan and save your image based on your settings. 22 ArtixScan F2 Supplement

23 ArtixScan F2 Supplement 23
 enabled in the Toolbar if the Auto Focus function is checked in the More Preferences window.")

24 D. Scanning Originals Applied with Auto Focus 1. Follow steps 1 to 3 (or 4) in the previous scanning scenarios to place photos or film, and to launch ScanWizard Pro. You will see the Auto Focus tool ( ) enabled in the Toolbar if the Auto Focus function is checked in the More Preferences window. If the Auto Focus tool is disabled ( ) in the Toolbar, go the Preferences menu, and check the Auto Focus in the More Preferences window to enable it. Check the Auto Focus option to enable the AF function. 2. Click the Overview button to perform a preliminary scan of the image. 3. Select the Scan Frame tool from the Toolbar, and choose the area to be scanned by dragging a rectangle around it. You will see a flashing frame (marquee) around the selected area. Scan Frame tool Auto Focus tool Scan frame (enclosed by dotted lines) 24 ArtixScan F2 Supplement

25 4. Apply the AF function to the image, use either of the ways below: Apply the AF function to the whole scan frame. Click the Auto Focus tool in the Toolbar. Move the mouse cursor to the scan frame, then click and drag the AF frame to cover the scan frame. The AF frame will be bordered in red and labeled with the tag AF. In this case, the AF frame and the scan frame are overlapping around the entire image, and display in the Preview window. Scan frame (enclosed by dotted lines) AF frame (bordered in red and labeled with the tag AF ) Apply the AF function to a specific area of the scan frame. Click the Auto Focus tool in the Toolbar. Move the mouse cursor to the scan frame, then click and drag the AF frame to desired size/area in the scan frame to which the AF function will be applied. The AF frame will be bordered in red lines and labeled with the tag AF. Note: The AF frame works only in the area defined by the Scan Frame tool. Scan frame (enclosed by dotted lines) AF frame (bordered in red and labeled with the tag AF ) 5. Click the Prescan button in the Preview window to display a detailed image area selected by the Scan Frame tool. 6. If necessary, follow steps 8 to 10 (or 11) in the previous scanning scenarios to define scan settings for your image. 7. Click the Scan (or Batch ) button in the Preview window to start scanning. ArtixScan F2 Supplement 25


26 26 ArtixScan F2 Supplement
27 For MAC Users Using ScanPotter A. Scanning Photos 1. Raise the scanner lid, and place the photo to be scanned face down on the scanner glass bed, towards the front of the scanner. Center the top of the photo along the horizontal ruler on the scanner. 2. Launch ScanPotter either as a stand-alone by clicking on the program icon, or by selecting it from the application folder in your Mac OS X system. 3. Choose Reflective from the Scan Source options menu for scanning photos. 4. Specify your scanning requirements in the Scanner Settings column. a) Select the appropriate image type (e.g., RGB Color) in the Color Type as your image output type. - Select Color to scan the image in color. - Select Grayscale to scan the image in grayscale. - Select Black & White to scan the image in black-and-white. b) Select a desired resolution in the Resolution for your output image. c) Select Automatic Detection or a desired dimension in the Scan Frame as your preview image size. 5. Click the Preview button to perform a preliminary scan of the image in the Preview window. 6. If necessary, resize the scan frame (floating dotted rectangle) around the image by dragging on the square spots on the edge or on the corner of the scan frame to determine the final size of the actual scan. 7. If necessary, specify file settings for your output image files, using the options offered in the File Saving Settings column. 8. If necessary, click the Image Settings button to switch to a window in which you can select a preset image effect to the image directly or adjust image quality manually by using the additional image correction tools. 9. Click the Scan button to start scanning. ArtixScan F2 Supplement 27

 and additional image")

28 Click the Scan Settings button to switch back to the default control panel of ScanPotter Click the Image Settings button to switch to a window where contains a composite display of nine-image-effects (Filter column) and additional image correction tools (Additional Adjustment column) for your scanned image. Preview window Scan frame (enclosed by dotted lines) 28 ArtixScan F2 Supplement
29 B. Scanning Film 1. Insert the holder with the loaded film into the transparency bay of the scanner. Make sure that nothing is on the scanner glass surface. 2. Launch ScanPotter either as a stand-alone by clicking on the program icon, or by selecting it from the application folder in your Mac OS X system. 3. In the Scan Source drop-down menu, depending on the film type you are using, choose either Negative Film for scanning negatives or Positive Film for scanning transparencies and slides. 4. Specify your scanning requirements in the Scanner Settings column. a) Select the appropriate image type (e.g., RGB Color) in the Color Type as your image output type. - Select Color to scan the image in color. - Select Grayscale to scan the image in grayscale. - Select Black & White to scan the image in black-and-white. b) Select a desired resolution in the Resolution for your output image. c) Select Automatic Detection in the Scan Frame to perform multiple auto-crop preview of the film loaded onto the scanner. 5. Click the Preview button to perform a preliminary scan of the image in the Preview window. You will see multiple scan frames that have been automatically cropped in the Preview window. Multiple scan frames will be numbered sequentially and tagged with the number (e.g., 1, 2) at the top-left corner of each frame indicates that the image has been scanned. Delete the unwanted scan frames by clicking the X at the top-right corner of the scan frame if you want to. 6. If necessary, resize the scan frame (floating dotted rectangle) around the image by dragging on the square spots on the edge or on the corner of the scan frame to determine the final size of the actual scan. 7. If necessary, specify file settings for your output image files, using the options offered in the File Saving Settings column. 8. If necessary, click the Image Settings button to switch to a window in which you can select a preset image effect to the image directly or adjust image quality manually by using the additional image correction tools. 9. Click the Scan button to start scanning. ArtixScan F2 Supplement 29


30 Selected scan frame (enclosed by dotted lines) Click the Scan Settings button to switch back to the default control panel of ScanPotter Click the Image Settings button to switch to a window where contains a composite display of nine-image-effects (Filter column) and additional image correction tools (Additional Adjustment column) for your scanned image. Preview window Multiple scan frames (bordered in dotted lines and tagged with the number (e.g., 1, 2) at the top-left corner of the scan frame) 30 ArtixScan F2 Supplement
31 Using the Microtek Scanner ICC Profiler (MSP) Note: This chapter is only for the PC users who have installed the Microtek's MSP utility, and use the IT8 color targets to generate scanner ICC profiles. The Microtek Scanner ICC Profiler (MSP) is a scanner calibration and profiling utility program designed exclusively for Microtek scanners. Used together with the color calibration target, the ICC Profiler determines the color attributes of your scanner accurately, then generates an ICC profile tailored exclusively for the scanner that you are using under ScanWizard Pro. MSP and IT8 Calibration Data Installation Before installing MSP, ScanWizard Pro needs to be installed on your system. This will ensure that the MSP utility will install and function properly. To install MSP, take note of the following: For PC: Place the Microtek Software CD/DVD into a drive, then double click the MSP installer icon. Follow the on-screen instructions to install and you will be prompted to insert the IT8 Calibration Data CD included in your software kit. Insert the IT8 Calibration Data CD to ensure that the MSP utility will have the latest color profile targets to reference. Then the MSP installation is complete. Calibration Target Two calibration targets (industry-standard IT8 color targets) are included with the SilverFast Ai Studio software kit : a Reflective target (IT8, size 10 x 15-cm ) to calibrate the upper scan bed for scanning photos; a Transparency target (IT8, size 6 x 7-cm) to calibrate the lower scan bed for scanning film. The calibration targets are very delicate and must be handled carefully. Take note of the following: Gently remove targets from their respective protective sleeves and avoid touching the target image surface. When not in use, keep targets in their sleeves and keep away from light and heat. Note: To keep the colors in your scanner consistent, you should perform color calibration on a regular basis. Professional photographers, graphic designers or others who require extremely precise color may wish to calibrate the scanner every time it is used. ArtixScan F2 Supplement 31

 Film Holder; orientation of the target is critical.")
32 Positioning the Target Proper positioning of the target on the scanner is important for successful calibration. Incorrect positioning of the target will result in an unsuccessful calibration. A. Positioning the Reflective Target Place the reflective target face down on the scanner glass bed, making sure that the top end of the target is positioned toward the scanner's front panel, with its edge firmly against the scanner's top ruler. Orientation of the target is critical; make sure that the top end of the target is positioned toward the front of the scanner. B. Positioning the Transparent Target 1. Place the transparent target face down into the 6 x 22-cm (120) Film Holder; orientation of the target is critical. Make sure that the side of the target (with the barcode) lies towards the front of the scanner. Refer to the section C. Using the 6 x 22-cm (120) Film Holder of this manual to load the film. 2. Place the holder with transparent target into the Main Holder, then put this assembly in the transparency bay of the scanner. Orientation of the target is critical; make sure that the side of the target (with the barcode) lies towards the front of the scanner where the barcode is positioned at the bottom-left corner. 32 ArtixScan F2 Supplement
 from the drop-down list that matches your target.")
 button.")
33 Calibration Setup With the target properly positioned on the scanner, turn on your scanner and let it warm up for about five minutes. Launch the MSP program; the MSP main window appears. A D B C A. Choose the scanner model that you are calibrating. B. Choose the correct target media. If you are calibrating the reflective target, select Reflective. Otherwise, select Positive. C. Select the date code and target type (or reference number) from the drop-down list that matches your target. You can verify this information by looking at the left and right corners of the target s bottom margin. If the desired data file is not present in the drop-down menu, install the IT8 Calibration Data to update the target profiles in your system. D. When all the settings are done, click the Start (or Start Profiling) button. The calibration window will appear, and an initial preview of the target is performed. ArtixScan F2 Supplement 33
.")


. Align the cursor with the small upper-right registration mark.")
34 Calibration and Profiling After the Preview, you are now ready to complete calibration and create a profile for your scanner. 1. Scan the target. To do this, select the entire target by dragging a frame over it, and then click the Next>> button. 2. Align the registration marks of the target with your cursor (see inset at bottom of page). 3. Click the Create Profile button (or Finish button) to create the scanner ICC profile. At the end of the profiling process, a dialog box appears, prompting you to enter a profile name and description. Aligning the Registration Marks A. Upper-left registration mark B. Upper-right registration mark C. Bottom-right registration mark Move the cursor to the target image area; the pointer will change to a horizontally flipped L mark ( ). Align the cursor with the small upperleft registration mark. After the upper left mark is aligned, the upper right part of the target image is displayed, and an instruction dialog box prompts you to align the upper right registration mark. Move the cursor to the target image area; the pointer will change to a normal L mark ( ). Align the cursor with the small upper-right registration mark. After the upper right mark is aligned, the lower right part of the target image is displayed, and an instruction dialog box prompts you to align the bottom-right registration mark. Move the cursor to the target image area; the pointer will change to a vertically flipped L mark ( ). Align the cursor with the small bottomright registration mark. 34 ArtixScan F2 Supplement


35 Loading a Profile Once the profile has been produced, follow the steps below to load the profile you just created. 1. Launch ScanWizard Pro. 2. In the Preview window, click the Scan Material icon. Select the Reflective option for reflective materials; select the Positive or Positive Film option for transparencies and slides. 3. From the Settings window, click on the Scanner Profile/Input Profile list box, and select the profile you have just created. ArtixScan F2 Supplement 35
36 Specifications Image Sensor Scanning Modes Light Source Optical Density CCD Color, grayscale, and black-and-white in a single scanning pass True 48-bit color (approx. 281 x colors) 16-bit grayscale (approx. 65,536 shades of gray) LED 4.2 Dmax Scanning Area Reflective: Max. 8.5" x 14" (216 mm x 356 mm) Min. 0.5" x 0.5" (12.7 mm x 12.7 mm) Transparent: Max. 8" x 10" (203 mm x 254 mm) Min. 0.5" x 0.5" (12.7 mm x 12.7 mm) Resolution Optical: 4800 dpi x 9600 dpi Interface Hi-Speed USB (USB 2.0) Dimensions (L x W x H) 22.3" x 15.2" x 6.12" (567 mm x 385 mm x 157 mm) Weight 26.4 lbs (12 kg) Voltage AC 100V to 240V, Hz, A Power Consumption 95 W (Max.) Environment Operating Temperature: 41 F to 104 F (5 C to 40 C) Relative Humidity: 20% to 85% System Requirements General Requirements CD/DVD-ROM drive (for installing software) Color display with 24-bit color output capability 512 MB RAM or more PC and compatibles Pentium IV PC or higher with Hi-Speed USB (USB 2.0) port Microsoft Windows XP, Vista or Windows 7 Macintosh Intel-Based Mac computer with built-in USB port Mac OS X 10.6 through ArtixScan F2 Supplement Important Specifications, software bundles, and accessories are subject to change without notice. Not responsible for typographic errors.
37 FCC Compliance Statement This equipment (Model: MRS-4800F2) has been tested and found to comply with the limits for a Class B digital device, pursuant to Part 15 of the FCC rules. These limits are designed to provide reasonable protection against harmful interference in a residential installation. This equipment generates, uses and can radiate radio frequency energy and, if not installed and used in accordance with the instructions, may cause harmful interference to radio communications. However, there is no guarantee that interference will not occur in a particular installation. If this equipment does cause harmful interference to radio or television reception, which can be determined by turning the equipment off and on, the user is encouraged to try to correct the interference by one or more of the following measures: Reorient or relocate the receiving antenna. Increase the separation between the equipment and receiver. Connect the equipment into an outlet on a circuit different from that to which the receiver is connected. Consult the dealer or an experienced radio/tv technician for help. Note: A shielded Hi-Speed USB interface cable with ferrite core installed on the scanner connector and must be used with this equipment. Caution: Changes or modifications not expressly approved by the manufacturer responsible for compliance could void the user's authority to operate the equipment. This device complies with Part 15 of the FCC Rules. Operation is subject to the following two conditions: (1) This device may not cause harmful interference, and (2) this device must accept any interference received, including interference that may cause undesired operation. ArtixScan F2 Supplement 37
Supplement PRO. Getting to Know Your ScanMaker i800 Plus. ScanMaker i800 Plus features, scenarios, and information
 ScanMaker i800 Plus features, scenarios, and information Supplement PRO Getting to Know Your ScanMaker i800 Plus The ScanMaker i800 Plus is a high-resolution, high-performance scanner for reflective and
Supplement. ScanMaker i280 features, scenarios, and information. Getting to Know Your ScanMaker i280
 Supplement ScanMaker i280 features, scenarios, and information Getting to Know Your ScanMaker i280 The ScanMaker i280 is a high resolution scanner for reflective scanning. It features 4800 x 9600 dpi,
Supplement. ScanMaker s480/s380 features, scenarios, and information. Getting to Know Your ScanMaker s480/s380
 Supplement ScanMaker s480/s380 features, scenarios, and information Getting to Know Your ScanMaker s480/s380 The ScanMaker s480/s380 is a high-performance scanner with the versatility to scan photos and
Supplement. ScanMaker s450/s350 features, scenarios, and information. Getting to Know Your ScanMaker s450/s350
 Supplement ScanMaker s450/s350 features, scenarios, and information Getting to Know Your ScanMaker s450/s350 The ScanMaker s450/s350 high-performance scanner with the versatility to scan photos and film.
Microtek ArtixScan 1800f Installation and Operation Manual
 Microtek ArtixScan 1800f Installation and Operation Manual Copyright 2002 by Microtek International, Inc. All rights reserved. Trademarks Microtek, ArtixScan TM, and ScanWizard TM Pro are trademarks or
Start Here. Installing your Microtek ScanMaker 9800XL Plus PC:
 Start Here Installing your Microtek ScanMaker 98XL Plus Step : Unpack Contents. Optional package items depend on the scanner configuration that you purchased. Unpack your scanner package and check for
Start Here. Installing your Microtek ScanMaker i280
 Start Here Installing your Microtek ScanMaker i280 Step 1: Unpack Contents Unpack your scanner package and check for major components. 1. ScanMaker i280 scanner 2. Hi-Speed USB cable 3. Software CDs/DVDs
Start Here. Unpack Contents. Install Software. Installing your Microtek Bio-5000 Plus
 Start Here Installing your Microtek Bio-5000 Plus Unpack Contents Unpack your scanner package and check for major components. 1. Bio-5000 Plus scanner 2. Hi-Speed USB cable LEAK-FREE GLASS HOLDER This
Start Here. Unpack Contents. Install Software
 Start Here Installing your Microtek ArtixScan DI 5230/5240/5250/5260 & ArtixScan TS 540T Unpack Contents Unpack your scanner package and check for major components. 1. Scanner 2. Hi-Speed USB cable 3.
PC: A. Place the Microtek CD-ROM into the CD- ROM drive. B. Follow the on-screen instructions to install the driver and software.
 Start Here Installing your Microtek ScanMaker s450/s350 Step 1: Unpack Contents Unpack your scanner package and check for major components. 1 1. Scanner with built-in transparency adapter 2. Software CD
Document Imaging Scanner XT3500. User's Manual.
 Document Imaging Scanner XT3500 User's Manual www.microtek.com Preface Copyright Copyright 2013, Microtek International, Inc., all rights reserved. This document may not be reproduced or copied in any
XT5830 HS XT5820 HS XT5810 HS
 Document Imaging Scanner XT5830 HS XT5820 HS XT5810 HS User's Manual www.microtek.com Preface Copyright Copyright 2015, Microtek International, Inc., all rights reserved. This document may not be reproduced
User Manual. For MAC
 User Manual For MAC A3 Scanner with The TWAIN Driver (For Macintosh) English User Manual Contents Preface Chapter One Setting Up the Scanner 1 System Requirements... 1 Unpacking the Scanner... 2 The Scanner
Instruction Manual. for Media Monkey. 1
 TM TM Instruction Manual for Media Monkey www.audioaperemote.com 1 Congratulations on acquiring your fine Audio Ape product Let s dive right in, getting up and running is a snap. Here are the components:
Document Imaging Scanner
 Document Imaging Scanner ArtixScanDI 4020 Plus ArtixScanDI 2020 Plus User's Manual www.microtek.com Preface Copyright Copyright 2013, Microtek International, Inc., all rights reserved. This document may
ScanPotter. Reference Manual
 ScanPotter Reference Manual Copyright 2014 by Microtek International, Inc. All rights reserved. Trademarks Microtek, ScanMaker, ArtixScan, ScanWizard, ScanPotter and ColoRescue are trademarks or registered
Document Imaging Scanner. ArtixScanDI 2015c. User's Manual.
 Document Imaging Scanner ArtixScanDI 2015c User's Manual www.microtek.com Preface Copyright Copyright 2013, Microtek International, Inc., all rights reserved. This document may not be reproduced or copied
Combo Scanner. User Manual
 Combo Scanner User Manual I. Unpack the Combo Scanner Backlight Holder Combo Scanner Business card Fixture Photo/Business Card Holder User Manual Quick Installation Guide Note This Combo Scanner supports
CyberView X5 MF ENGLISH
 CyberView X5 MF User s Manual 1 FEDERAL COMMUNICATIONS COMMISSION (FCC) STATEMENT TABLE OF CONTENS This Equipment has been tested and found to comply with the limits for a class B digital device, pursuant
2014 by Microtek International, Inc. All rights reserved.
 2014 by Microtek International, Inc. All rights reserved. Microtek and ScanWizard are trademarks of Microtek International, Inc. Windows is a registered trademark of Microsoft Corporation. All other products
Quick Start Guide. Table of Contents
 Quick Start Guide Please read this guide before operating this scanner. After you finish reading this guide, store it in a safe place for future reference. Table of Contents Package Contents... 1 Using
Quick Start Guide. Table of Contents
 Quick Start Guide Please read this guide before operating this scanner. After you finish reading this guide, store it in a safe place for future reference. Table of Contents Package Contents...1 Using
ENGLISH CyberView X5 SF X5 SF User s Manual Manual
 CyberView User s X5 SF Manual 1 FEDERAL COMMUNICATIONS COMMISSION (FCC) STATEMENT TABLE OF CONTENTS This Equipment has been tested and found to comply with the limits for a class B digital device, pursuant
FCC Notice (U.S.A. Only)
") Quick Start Guide Please read this guide before operating this scanner. After you finish reading this guide, store it in a safe place for future reference. Table of Contents Package Contents... 1 Scanning
Quick Start Guide Please read this guide before operating this scanner. After you finish reading this guide, store it in a safe place for future reference. Table of Contents Package Contents... 1 Scanning
Visioneer OneTouch Scanner. Installation Guide FOR WINDOWS
 Visioneer OneTouch Scanner Installation Guide FOR WINDOWS TABLE OF CONTENTS i TABLE OF CONTENTS Getting Started with your new Scanner....................... 1 Step 1: Installing the Scanner Software.......................
A3 Size Flatbed Accessory for Kodak or Alaris Scanners
 A3 Size Flatbed Accessory for Kodak or Alaris Scanners User s Guide A-61793 5K7032 Safety User precautions Only use the scanner and power supply indoors in a dry location. Make sure the electrical power
Quick Start Guide. Setup and Scanning. Try the Additional Features. English
 English Quick Start Guide Be sure to install the software programs before connecting the scanner to the computer! Setup and Scanning Check the Package Contents p.3 Install the Software Windows Macintosh
WELCOME WHAT S IN THE BOX
 WELCOME Congratulations on purchasing your Visioneer PaperPort flatbed scanner. With your scanner, you can quickly scan paper documents and color photos to place their electronic images on your computer.
Contents. Nikon Scan for Windows. Scanner Control Software and TWAIN Source. Reference Manual. Overview Before You Begin.
 Contents Overview Before You Begin System Requirements Software Installation Basic Operations Scanner Control Software and TWAIN Source Nikon Scan for Windows Reference Manual The Scan Window Opening the
CRUX II/BTGPS USER GUIDE. Model:D1598
 CRUX II/BTGPS USER GUIDE Model:D1598 0 Federal Communication Commission Interference Statement This equipment has been tested and found to comply with the limits for a Class B digital device, pursuant
Guidance on Using Scanning Software: Part 5. Epson Scan
 Guidance on Using Scanning Software: Part 5. Epson Scan Version of 4/29/2012 Epson Scan comes with Epson scanners and has simple manual adjustments, but requires vigilance to control the default settings
Quick Start Guide. Setup and Scanning. Try the Additional Features. English
 English Quick Start Guide Be sure to install the software programs before connecting the scanner to the computer! Setup and Scanning Check the Package Contents p.3 Install the Software Windows Macintosh
Kigamo Scanback which fits in your view camera in place of conventional film.
 What's included Kigamo Scanback which fits in your view camera in place of conventional film. SCSI Cable to connect your Scanback to the host computer. A 3-meter SCSI cable is standard. Kigamo also has
Microtek ScanWizard Pro Reference Manual. For Mac OS X
 Microtek ScanWizard Pro Reference Manual For Mac OS X Copyright 2002 by Microtek International, Inc. All rights reserved. Trademarks Microtek, Aritx TM, and ScanWizard TM Pro are trademarks or registered
E. D. I. T. What is E.D.I.T.? Traditional vs. New Scanning Route
 E. D. I. T. A New Milestone in Film Scanning Emulsion Direct Imaging Technology What is E.D.I.T.? E.D.I.T. stands for Emulsion Direct Imaging Technology. As in drum scanning, E.D.I.T. enables a scanner
Quick Start Guide. Setup and Scanning. Try the Additional Features. English
 English Quick Start Guide Be sure to install the software programs before connecting the scanner to the computer! Setup and Scanning Check the Package Contents p.3 Install the Software Windows Macintosh
Visioneer OneTouch 5820 Scanner Installation Guide FOR WINDOWS
 Visioneer OneTouch 5820 Scanner Installation Guide FOR WINDOWS COPYRIGHT INFORMATION Copyright 2001 Visioneer, Inc. Reproduction, adaptation, or translation without prior written permission is prohibited,
Nikon COOLSCAN V ED Major Features
 Nikon COOLSCAN V ED Major Features 4,000-dpi true optical-resolution scanning, 14-bit A/D converter featuring 16-/8-bit output for clear, colorful images Exclusive Scanner Nikkor ED high-performance lens
S101v2 Webcam with adjustable focus
 S101v2 Webcam with adjustable focus User Manual Kodak and the Kodak trade dress are trademarks of Eastman Kodak Company used under license. 2010 Sakar International, Inc. All rights reserved. WINDOWS and
Monaco ColorWorks User Guide
 Monaco ColorWorks User Guide Monaco ColorWorks User Guide Printed in the U.S.A. 2003 Monaco Systems, Inc. All rights reserved. This document contains proprietary information of Monaco Systems, Inc. No
English QT V01 CANON INC PRINTED IN CHINA
 English Quick Start Guide English Please read this guide before operating this scanner. After you finish reading this guide, store it in a safe place for future reference. Table of Contents Package Contents...
S100 Webcam. User s Manual
 S100 Webcam User s Manual Kodak and the Kodak trade dress are trademarks of Eastman Kodak Company used under license. 2009 Sakar International, Inc. All rights reserved. WINDOWS and the WINDOWS logo are
CC200 USER S MANUAL. MANUAL NO. CC200m-UM-151 CH 1. PRIOR TO USE INDEX CH 3. CRAFT ROBO CONTROLLER PREFACE. Appendix A. Standard Specifications
 CC200 USER S MANUAL MANUAL NO. CC200m-UM-151 PREFACE Thank you for purchasing the Craft ROBO CC200. Based on cutting-plotter technology developed by Graphtec over many years, CC200 provides outstanding
Document Imaging Scanner. Advantage. SmartSource. User's Manual.
 Document Imaging Scanner SmartSource Advantage User's Manual www.digitalcheck.com Preface Copyright This document may not be reproduced or copied in any way, stored electronically, or translated into any
Radio Link Starter Kit
 Radio Link Starter Kit Installation Manual BARTLETT Instrument Co. 1032 Avenue H Fort Madison, IA 52627 319-372-8366 www.bartinst.com Table of Contents Radio Link Starter Kit Manual... 3 System Requirements...
Document Imaging Scanner. ArtixScanDI 2125c. User's Manual.
 Document Imaging Scanner ArtixScanDI 2125c User's Manual www.microtek.com Preface Copyright Copyright 2013, Microtek International, Inc., all rights reserved. This document may not be reproduced or copied
Microtek ScanWizard Pro Reference Manual. for Windows
 Microtek ScanWizard Pro Reference Manual for Windows i Copyright 2001 by Microtek International, Inc. All rights reserved. Trademarks Microtek, Artix TM, and ScanWizard TM Pro are trademarks or registered
Radio Link Starter Kit
 Radio Link Starter Kit Installation Manual BARTLETT Instrument Co. 1032 Avenue H Fort Madison, IA 52627 319-372-8366 www.bartinst.com Table of Contents Radio Link Starter Kit Manual... 3 System Requirements...
!! Select Professional Mode. !! Click on Other then Select Scratch.
 SCANNING BASICS FOR EPSON SCANNERS When using EpsonScan software with any of the Epson flatbed scanners in Labs 1, 2, 3 or 4, the following steps must be followed in order to properly save files. Select
23070 / Digital Camera Owner s Manual
 23070 / 23072 Digital Camera Owner s Manual 2007 Sakar International, Inc. All rights reserved. 2007 Crayola Windows and the Windows logo are registered trademarks of Microsoft Corporation. All other trademarks
Scanner Parts. Scanner Specifications. General. Mechanical. Epson Perfection V200 Photo. P Power/ ] Start button Status light. { Copy button.
![Scanner Parts. Scanner Specifications. General. Mechanical. Epson Perfection V200 Photo. P Power/ ] Start button Status light. { Copy button.](/thumbs/73/68379766.jpg "Scanner Parts. Scanner Specifications. General. Mechanical. Epson Perfection V200 Photo. P Power/ ] Start button Status light. { Copy button.") Scanner Parts { Copy button Scan to E-mail button a b P Power/ ] Start button Status light c e d a Scan to PDF button Film holder Scanner Specifications General Scanner type Flatbed color Photoelectric
Scanner Parts { Copy button Scan to E-mail button a b P Power/ ] Start button Status light c e d a Scan to PDF button Film holder Scanner Specifications General Scanner type Flatbed color Photoelectric
HP Designjet HD Scanner and T1200 HD Multifunction Printer
 HP Designjet HD Scanner and T1200 HD Multifunction Printer Introductory information USB 2.0 high-speed certified Introductory Information Other sources of information The User s Guide for your scanner
English User's Guide
 User's Guide Imacon Flextight 343 2 2003 Imacon A/S. All rights reserved. Imacon Flextight 343 User's Guide, Part No 70030009, revision B. The information in this manual is furnished for informational
The ideal K-12 science microscope solution. User Guide. for use with the Nova5000
 The ideal K-12 science microscope solution User Guide for use with the Nova5000 NovaScope User Guide Information in this document is subject to change without notice. 2009 Fourier Systems Ltd. All rights
Table of Contents. 1. Precautions Preparation.. 5
 0 Table of Contents EN 1. Precautions..... 2 2. Preparation.. 5 l Standard Accessories... 5 l Parts Names.. 6 3. Install The Software... 7 l Install the Software in Windows..... 7 l Install the Software
Visioneer OneTouch 7300 Scanner FOR USB CONNECTION. Installation Guide
 Visioneer OneTouch 7300 Scanner FOR USB CONNECTION Installation Guide COPYRIGHT INFORMATION Copyright 2003 Visioneer, Inc. Reproduction, adaptation, or translation without prior written permission is prohibited,
The new Konica Minolta DiMAGE Scan Dual IV film scanner
 The new Konica Minolta DiMAGE Scan Dual IV film scanner Mississauga, Ontario, January 7 th, 2004: Konica Minolta Camera, Inc. introduces the DiMAGE Scan Dual IV film scanner as a successor model of their
USB Scanner USER GUIDE
 USB Scanner USER GUIDE The TWAIN Dialog Box Appendices 2 Copyright Information All rights reserved. No part of this publication may be reproduced, transmitted, stored in a retrieval system, or translated
For customers in Canada This Class B digital apparatus meets all requirements of the Canadian Interference-Causing Equipment Regulations.
 User manual For customers in North and South America For customers in USA This device complies with Part 15 of the FCC rules. Operation is subject to the following two conditions: (1) This device may not
Visioneer OneTouch 9420 Photo Scanner User's Guide
 Visioneer OneTouch 9420 Photo Scanner User's Guide for Windows Visioneer OneTouch 9420 USB Scanner User s Guide FOR WINDOWS COPYRIGHT INFORMATION Copyright 2007 Visioneer, Inc. Reproduction, adaptation,
Nikon SUPER COOLSCAN 5000 ED Major Features
 Nikon SUPER COOLSCAN 5000 ED Major Features 4,000-dpi true optical-resolution scanning, 16-bit A/D converter featuring 16-/8-bit output for crisp, color-true images Exclusive Scanner Nikkor ED high-performance
Epson Scanner (Expressions Photo) Basic Directions:
 Basic Directions:") Epson Scanner (Expressions 10000 Photo) Basic Directions: Position document face down in the upper Right corner. (Orientation changes with Mode: For Professional mode, turn 90 Clockwise) Launch Photoshop
Epson Scanner (Expressions 10000 Photo) Basic Directions: Position document face down in the upper Right corner. (Orientation changes with Mode: For Professional mode, turn 90 Clockwise) Launch Photoshop
Visioneer OneTouch 5600 Scanner Installation Guide FOR WINDOWS
 Visioneer OneTouch 5600 Scanner Installation Guide FOR WINDOWS COPYRIGHT INFORMATION Copyright 2000 Visioneer, Inc., a wholly owned subsidiary of Primax Electronics LTD. Reproduction, adaptation, or translation
ONYX Deskset HD. Portable Video Magnifier User s Guide. Freedom Scientific, Inc Revision A
 ONYX Deskset HD Portable Video Magnifier User s Guide Freedom Scientific, Inc. www.freedomscientific.com 440829-001 Revision A PUBLISHED BY Freedom Scientific 11800 31 st Court North St. Petersburg, Florida
SCANNING IMAGES - USER S GUIDE. Scanning Images with Epson Smart Panel and PhotoShop [for Epson 1670 scanners]
![SCANNING IMAGES - USER S GUIDE. Scanning Images with Epson Smart Panel and PhotoShop [for Epson 1670 scanners]](/thumbs/89/98942649.jpg "SCANNING IMAGES - USER S GUIDE. Scanning Images with Epson Smart Panel and PhotoShop [for Epson 1670 scanners]") University of Arizona Information Commons Training 1 SCANNING IMAGES - USER S GUIDE Scanning Images with Epson Smart Panel and PhotoShop [for Epson 1670 scanners] p.2 Introduction and Overview Differences
University of Arizona Information Commons Training 1 SCANNING IMAGES - USER S GUIDE Scanning Images with Epson Smart Panel and PhotoShop [for Epson 1670 scanners] p.2 Introduction and Overview Differences
ScanGear CS-U 5.6. for CanoScan FB1210U Color Scanner. User s Guide
 ScanGear CS-U 5.6 for CanoScan FB1210U Color Scanner User s Guide Copyright Notice Copyright 2000 Canon Inc. This manual is copyrighted with all rights reserved. Under the copyright laws, this manual may
ScanGear CS-U 5.3 for CanoScan FB630U/FB636U Color Image Scanner User s Guide
 ScanGear CS-U 5.3 for CanoScan FB630U/FB636U Color Image Scanner User s Guide Copyright Notice 1999 Canon Inc. This manual is copyrighted with all rights reserved. Under the copyright laws, this manual
DOCUMENT SCANNER INSTRUCTIONS. Space. Backup. Count Only. New File. Scanner. Feeding Option Manual Auto Semi-Auto
 E FILM F Scanner A Space Count Only New File Feeding Option Manual Auto Semi-Auto Backup DOCUMENT SCANNER INSTRUCTIONS NOTICE q Copyright 2001 by CANON ELECTRONICS INC. All rights reserved. No part of
Document Imaging Scanner
 Document Imaging Scanner ArtixScanDI 6240S ArtixScanDI 6250S ArtixScanDI 6260S ArtixScanTS 630S User's Manual www.microtek.com Preface Copyright Copyright 2014, Microtek International, Inc., all rights
For customers in USA This device complies with Part 15 of the FCC rules. Operation is subject to the following two conditions:
 User manual For customers in North and South America For customers in USA This device complies with Part 15 of the FCC rules. Operation is subject to the following two conditions: (1) This device may not
Color Graphics Scanner. User s Guide
 Color Graphics Scanner User s Guide Copyright Notice All rights reserved. No part of this publication may be reproduced, stored in a retrieval system, or transmitted in any form or by any means, electronic,
Magic Wand Portable Scanner with Auto-Feed Dock. PDSDK-ST470-VP-BX2 User Manual
 Magic Wand Portable Scanner with Auto-Feed Dock PDSDK-ST470-VP-BX2 User Manual Table of Contents 1. KEY FEATURES... 2 2. FUNCTIONAL PARTS... 2 3. EXPLANATION OF THE STATUS ICONS... 4 4. GETTING STARTED...
Image and Data Acquisition
 Image and Data Acquisition LCP Image Acquisition Procedures This section provides guidelines for scanning images that will be added to the LCP image archive. By scanning the image, we obtain a digital
INSTRUCTION MANUAL. IBRit - rf1 - usb PC - Station for wireless Data transmission. M e s s t e c h n i k. Messtechnik GmbH & Co.
 M e s s t e c h n i k INSTRUCTION MANUAL PC - Station for wireless Data transmission Document No. : D1F604 001 Version : April 2006 Copyright : IBR Messtechnik GmbH & Co. KG Contents 1. Introduction 1.1
COLOR EXAMPLES BEFORE YOU BEGIN. Tone-curve corrections. Before installing the DiMAGE Scan Utility. Digital ROC - Reconstruction Of Color
 E SOFTWARE MANUAL COLOR EXAMPLES Tone-curve corrections By selecting individual color channels on the tone curve, adjustments to the overall color of an image can be made. In this example, the image is
English Getting Started
 Getting Started with Flextight and FlexColor Getting Started with Flextight and FlexColor 2 2001 Imacon A/S. All rights reserved., Part No XXXXXXXX, revision X.X The information in this manual is furnished
Wireless TFT LCD Monitor
 Wireless TFT LCD Monitor Description Screen Ratio: 16 : 9 Resolution: 800*RGB*480 TV: PAL / NTCS Voltage: 10--28V Rated Capacity: 5W Brightness: 450cd/m2 Contrast: 450:1 Operate temperature: -20~65 Display
Digital Color Printer
 3-858-635-12 (1) Digital Color Printer Operating Instructions Before operating the unit, please read this manual thoroughly and retain it for future reference. This PRINTER is designed to use PRINT PACK
Document Imaging Scanner. FileScan 3125c. User's Manual.
 Document Imaging Scanner FileScan 3125c User's Manual www.microtek.com Preface Copyright Copyright 2013, Microtek International, Inc., all rights reserved. This document may not be reproduced or copied
Visioneer OneTouch 8600 Scanner FOR USB OR PARALLEL PORT CONNECTION. Installation Guide
 Visioneer OneTouch 8600 Scanner FOR USB OR PARALLEL PORT CONNECTION Installation Guide COPYRIGHT INFORMATION Copyright 1999 Visioneer, Inc., a wholly owned subsidiary of Primax Electronics LTD. Reproduction,
A Total Solution For Herbarium Specimen Digitization and Archive Management
 ObjectScan 1600 A Total Solution For Herbarium Specimen Digitization and Archive Management On-top scan design protects fragile plant specimen 1,600-dpi color CCD provides high-resolution image Adjustable
Table of Contents -1-
 -0- Table of Contents EN 1. Precaution... 2 2. Preparation... 5 Standard Accessories... 5 Part Names... 6 Installing the Battery Pack... 8 Charging the Battery Pack... 9 3. Place Film/ Slide Into The Holder...
EPSON GT Scanner Parts. Scanner Specifications. Maximum document size
 Scanner Parts Operate button Start button Scanner Specifications General Scanner type Photoelectric device Effective pixels Color depth READY light SCSI interface (50-pin) SCSI interface (68-pin) SCSI
Professional Desktop Scanner User s Manual. (PC version) English
 English") Professional Desktop Scanner User s Manual (PC version) English MiraScan main screen Combo Boxes (page 13) Menu Bar (page 9) Tool Bar (page 24) Job List and Command Buttons (page 22) Preview Area (page
Professional Desktop Scanner User s Manual (PC version) English MiraScan main screen Combo Boxes (page 13) Menu Bar (page 9) Tool Bar (page 24) Job List and Command Buttons (page 22) Preview Area (page
TM Quick Start Guide
 TM Quick Start Guide Contacting Pazzles By Phone In the US: 866-729-9537 International: +1-208-922-3558 Phone Hours: Mon - Fri, 9am - 5pm Mountain Time By Email Customer Service: Technical Support: Sales:
Family HD Webcam F101
 Family HD Webcam F101 User Manual Kodak and the Kodak trade dress are trademarks of Eastman Kodak Company used under license. 2010 Sakar International, Inc. All rights reserved. WINDOWS and the WINDOWS
Avision AV610 Document Scanner. User s Manual
 Avision AV610 Document Scanner User s Manual Installing the Machine Completing Your First Scan Editing Your Images Using the Buttons AV610 User s Manual 1 The Federal Communication Commission Statement
Meterbuen South Grant St., Suite 750 DK-2740 Skovlunde San Mateo, CA 94402
 March, 1998 ScanView. All rights reserved. No part of this publication may be copied or in any other way reproduced, nor may it be stored in a retrieval system, without the prior written permission of
Table of Contents -1-
 -0- Table of Contents EN 1. Precaution... 2 2. Preparation... 5 Standard Accessories... 5 Part Names... 6 Installing the Battery Pack... 8 Charging the Battery Pack... 9 3. Place Film / Slide Into The
2500 Series All-In-One
 2500 Series All-In-One Getting Started December 2006 www.lexmark.com Lexmark and Lexmark with diamond design are trademarks of Lexmark International, Inc., registered in the United States and/or other
Installation Usage & Maintenance
 Installation Usage & Maintenance Trademarks 2008 Plustek Inc. All rights are reserved. No portion of this document may be reproduced without permission. All trademarks and brand names mentioned in this
Adobe Photoshop PS2, Part 3
 Adobe Photoshop PS2, Part 3 Basic Photo Corrections This guide steps you through the process of acquiring, resizing, and retouching a photo intended for posting on the Web as well as for a print layout.
H-A006. Dimâge Scan Dual II 1
 E 9224-2886-11 H-A006 Dimâge Scan Dual II 1 Thank you for purchasing the Minolta Dimâge Scan Dual2. The Dimâge Scan Dual2 AF-2820U is a dual format film scanner capable of scanning 35mm and, with the optional
Table of Contents -1-
 -0- Table of Contents EN 1. Precautions. 2 2. Preparation.. 5 Standard Accessories.. 5 Parts Names.. 6 3. Install The Driver and Software 7 Install the Driver 7 Install the Software.. 8 4. Place Film/Slide
Copyright Notice. Trademarks
 Copyright Notice All rights reserved. No part of this publication may be reproduced, stored in a retrieval system, or transmitted in any form or by any means, electronic, mechanical, photocopying, recording,
W i n d o w s. ScanGear CS-S 4.3 for CanoScan FB1200S Color Image Scanner. User's Guide
 f o r W i n d o w s ScanGear CS-S 4.3 for CanoScan FB1200S Color Image Scanner User's Guide How to Make Best Use of the Manuals 2 When you open the box Printed Manual CanoScan FB1200S Quick Start Guide
Table of Contents -1-
 -0- Table of Contents 1. Precautions. 2 2. Preparation.. 5 Standard Accessories.. 5 Parts Names.. 6 3. Install The Driver and Software 7 Install the Driver 7 Install the Software.. 8 4. Place Film/Slide
M a c i n t o s h. Canon Plug-in Module CS-U 3.9 for CanoScan D660U Color Image Scanner. User's Guide
 f o r M a c i n t o s h Canon Plug-in Module CS-U 3.9 for CanoScan D660U Color Image Scanner User's Guide How to Make Best Use of the Manuals When you open the box Printed Manual CanoScan D660U Getting
Nikon Scan 4 Reference Manual
 Nikon Scan 4 Reference Manual Read This First...2 11 Introduction... 2 5 Scanning Basics...6 Getting Started...7 10 Elements of Nikon Scan...11 The Scan Window...12 29 The Tool Chest... 30 76 Preferences...77
ISCapture User Guide. advanced CCD imaging. Opticstar
 advanced CCD imaging Opticstar I We always check the accuracy of the information in our promotional material. However, due to the continuous process of product development and improvement it is possible