Advanced Photoshop Tutorial: RTVF Chairs
|
|
|
- Patricia Myra Little
- 5 years ago
- Views:
Transcription
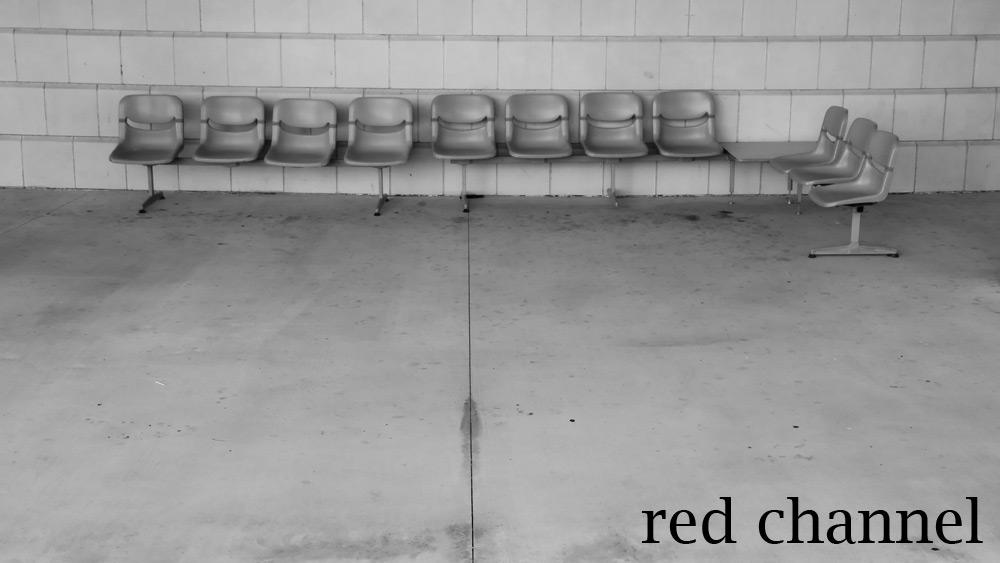
1 Advanced Photoshop Tutorial: RTVF Chairs Jeremy Moore; January 31, 2007 Original Image To get some techie info out of the way, the image for this tutorial was taken hand-held with a Panasonic Lumix-LX2 in RAW format; ISO 100; 1/40 sec; f/5.6. Above is the straight capture from the camera; these are a row of seats outside of the RTVF building on the UNT campus which have always visually interested me. The RAW capture of the scene is interesting, but I think we can make it a bit more striking.
2 Going Black and White Our first step is to make the image black and white which we will NOT do by going Image > Mode > Grayscale, but will instead use the three different channels (red, green, and blue) and the channel mixer. My usual method is to use the ImageFactory's Convert to BW Pro, but since you have to buy this photoshop plug-in I'll instead do the conversion with in-photoshop tools which can do the same thing. Channel Mixer Our first step is to look at each of the color channels and decide which channels get us closer to our pre-imagined image. I imagine this scene in gritty black and white. A slower way would be to click on the "Channels" tab in the "Layers" palette, but I prefer to work much quicker by hitting Ctrl+1 for the red channel, Ctrl+2 for the green channel, and Ctrl+3 for the blue channel; Ctrl+` (or ~, it's to the left of the number "1" on the keyboard in the upper-left corner) will show all of the channels again, i.e. full color. Usually the red channel is the one I prefer based on appearance and the blue channel is the one to avoid as it usually has the most digital noise.

3
 set to monochrome with 68% and throw in 32% of green.")
4 This time the blue channel looks to have the gritty feeling I'm going for so we'll use Photoshop's Channel Mixer (Image > Adjust > Channel Mixer) set to monochrome with 68% and throw in 32% of green. This is really just a matter of

5 playing and finding something that approximates the direction you want to move in as we will fine-tune everything later. Here's our black and white image, but this is far from final. When I'm not having to type out everything I'm doing this only takes about a minute and only 15 seconds when using the ImageFactory plug-in. Curves Since I'm wanting to make this image gritty the first step is to up the contrast using curves. Why curves and not levels, or *shudder* Brightness/Contrast? Because with curves we can not only make gradual and sloping adjustments at any point, but we can also pick and choose the specific tone we want to modify by Ctrl+Right Clicking on the tone when the Curves dialog is open.
 and go back, if we work with adjustment layers then we can use Masks, Layer")
6 Curves can be found under Image > Adjust > Curves, but WE won't be finding them there, we will find them under Layer > Adjustment Layers > Curves. If you use the Curves found under the Image menu then you're altering the base image and while you can Undo (Ctrl+Z) and go back, if we work with adjustment layers then we can use Masks, Layer Opacity, and return to fiddle with our curve at any time. So I'm going to go into curves, pick a light tone in the chairs and a dark tone and place them where they are the most aesthetically pleasing by altering the shape of the curve up or down as needed.

7 The resultant image is much darker in the upper area near the chairs, but the lower area still lacks the punch we re looking for so we ll create a second adjustment curve above the first one for this lower area.

8 Using Masks Our resulting image is WAAAAAY too dark in the upper area around the chairs so we will mask off the entire curve by clicking on the Mask option shown below and then filling it with black using the paint bucket tool.

, the contrast back in.")
9 As you can see above, when we fill the mask black, thereby masking out everything the curves adjustment layer did, we have returned the image to looking like it did after just one curve adjustment layer. The next step is to go back and literally paint, using the paintbrush tool set to a low opacity and flow rate (I like to start with the brush set to around 6-12% for both opacity and flow rate), the contrast back in. This time around our color
10 picker is set to white so we are slowly rubbing away at the black mask obscuring our curves adjustment layer. All of the painting is done towards the bottom of the image as we only want to pump up the contrast of the concrete in the lower half of the photograph. Dodging and Burning Now we re getting somewhere! This image is really starting to get closer to what I want, but the bottom is still a little too light in color in comparison to the chairs so we will create a new layer (Layer > New > Layer ), choose for the mode to be Soft Light, and have it Fill with Soft-Light-neutral color (50% gray)


11 On this layer we can now paint with our paintbrush still set to low percentages of opacity and flow rate. This time if you paint with the color set to black you will be burning, or darkening the image, and if you paint with the white you are dodging, or lightening the image. You can see below where I painted on the image. If you notice, I actually painted the foreground near black to make it match the concrete which was under the overhand and therefore in shade. I also painted the edges of the frame a little darker to draw the eye in towards the chairs.

12 Finally, I painted with white and dodged ever so slightly underneath the chairs to make the detail beneath them was visible. Glowing Blacks Now I want to do something which I would do on images with this feel when printing in the darkroom while enlarging onto silver gelatin paper: make the blacks diffuse out and glow! In the darkroom you could do this by holding a diffuser (tissue paper worked really well!) underneath the enlarger lens during the exposure, but in photoshop we can do it with 3 steps: 1. Create a duplicate layer of our image with the image mode set to Multiply, 2. Blur this layer using Gaussian Blur (Filters > Blur > Gaussian Blur), and 3. Lower the opacity until our image looks like we want it to.

13 As can be seen from the screenshot above, I set my Gaussian Blur layer to opacity of 15%. When Gaussian Blurring your image you want to blur it enough that the blacks start bleeding, but not so much that you lose a lot of definition in your tones. As an example, for images shot with a 6-8 megapixel camera you will be aiming for a blur of around 15%; if you are recreating my steps using the web image, you ll want to use under 5% of Gaussian Blur.

14 Noise The image is now almost there, but it is missing a little bit of bite so we will add some noise to the image to really punch it up a bit. The first step is to create another new layer that is set to Soft Light and filled in with 50% gray just like we did above. The reason we use a Soft Light mode on our new layer is that it restricts the noise to just the darker tones and leaves our highlight nice and crisp. Adding Noise (Filters > Noise > Add Noise ) is just like Gaussian Blurring in that you have to decide the amount based on the image and the image size. I will usually use around 5% for web images and around 8-12% for images from a 6-8 megapixel camera, the settings will also be set to monochromatic noise (we don t
15 want the noise to be a random assortment of colors) and the distribution as Gaussian which is random and more closely approximates film grain. Final Image Here we have a comparison between our original photo and our final b&w image.
Basic Digital Dark Room
 Basic Digital Dark Room When I took a good photograph I almost always trying to improve it using Photoshop: exposure, depth of field, black and white, duotones, blur and sharpness or even replace washed
Black and White using Photoshop
 Topics to be covered: Methods for B&W conversion Improving the image Toning Printer color management Black and White using Photoshop Various ways to get to B&W Adobe Raw Converter (ACR) in from Bridge
EXTREME CONTRAST PHOTO EFFECT
 EXTREME CONTRAST PHOTO EFFECT In this Photoshop tutorial, we re going to learn how to use layers, layer blend modes, some noise, a little sharpening, and a simple adjustment layer to easily give a photo
POLAROID EMULATION INCREASED CONTRAST, SATURATION & CLARITY
 POLAROID EMULATION The Polaroid SX-70 Camera was a sensational tool. It took photographs in real time. But just the color balance of the film and they way it developed had a unique look. Here are some
Creating Pastel Images and other effects in Photoshop
 Creating Pastel Images and other effects in Photoshop Martin Addison 2015 Creating pastel images Page 1 Martin Addison FRPS Using White Layers in Photoshop 1. Create a new empty Layer 2. Edit> Fill 3.
Contents: Bibliography:
 ( 2 ) Contents: Sizing an Image...4 RAW File Conversion...4 Selection Tools...5 Colour Range...5 Quick Mask...6 Extract Tool...7 Adding a Layer Style...7 Adjustment Layer...8 Adding a gradient to an Adjustment
Add Photoshop Masks and Adjustments to RAW Images
 Add Photoshop Masks and Adjustments to RAW Images Contributor: Seán Duggan n Specialty: Fine Art Primary Tool Used: Photoshop Masks The adjustments you make in Camera Raw are global in nature, meaning
Adobe Photoshop. Levels
 How to correct color Once you ve opened an image in Photoshop, you may want to adjust color quality or light levels, convert it to black and white, or correct color or lens distortions. This can improve
Using Photoshop Elements
 Using Photoshop Elements Created By: Rick Williams August 2004 Table of Contents Photoshop Element Tools...Page 1 Tool Descriptions... Page 3 Starting Photoshop Elements... Page 7 Resizing an Image...
IMAGE CORRECTION. You can find this and more information with video tutorials at
 IMAGE CORRECTION You can find this and more information with video tutorials at http://www.adobe.com/support/photoshop/ P H O T O S H O P T O O L S CLONE STAMP TOOL The Clone Stamp tool paints one part
WORN, TORN PHOTO EDGES EFFECT
 Photo Effects: CC - Worn, Torn Photo Edges Effect WORN, TORN PHOTO EDGES EFFECT In this Photoshop tutorial, we ll learn how to take the normally sharp, straight edges of an image and make them look all
Painting Special Effects on Photographs
 TUTORIAL 7 Painting Special Effects on Photographs In this tutorial you will learn how to transform a photo into a striking color composition with paintbrushes, masks, blending modes, color, and paper
Retouching Portraits in Photoshop
 Retouching Portraits in Photoshop I Removing Blemishes When removing blemishes, acne or other imperfections on the skin, our goal is to maintain as much of the original skin texture as possible. That way,
Darkroom Effects. Solarization. Bleach Bypass
 Darkroom Effects Solarization A popular technique with surrealists like May Ray, solarization is achieved in the darkroom by exposing a developing image to a flash of light. Darkroom solarization is difficult
DD IMAGES PHOTOSHOP TUTORIAL 7
 Page1 DD IMAGES PHOTOSHOP TUTORIAL 7 Converting a colour image to B&W The DEREK DOAR METHOD This Tutorial will show you my way of converting colour images to Black & White, using RGB Channel Mixer and
The Layer Blend Modes drop-down box in the top left corner of the Layers palette.
 Photoshop s Five Essential Blend Modes For Photo Editing When it comes to learning Photoshop, believe it or not, there's really only a handful of things you absolutely, positively need to know. Sure, Photoshop
The original image. As I said, we ll be looking at a few different variations on the effect. Here s the first one we ll be working towards:
 DIGITAL PIXEL EFFECT In this Photoshop tutorial, we re going to look at how to create a digital pixel effect, which is often used in ads that sell anything to do with digital. We re going to first pixelate
Select your Image in Bridge. Make sure you are opening the RAW version of your image file!
 CO 3403: Photographic Communication Steps for Non-Destructive Image Adjustments in Photoshop Use the application Bridge to preview your images and open your files with Camera Raw Review the information
Photo One Digital Photo Shoots and Edits
 Photo One Digital Photo Shoots and Edits You will submit photo shoots, unedited and you will submit selected edited images. The shoots will be explained first and the edits will be explained later on this
An Introduction to Layers, Masks and Channels in Photoshop
 An Introduction to Layers, Masks and Channels in Photoshop Roy Killen, GMAPS, EFIAP, GMPSA (c) 2017 Roy Killen Layers, Masks and Channels Page 1 Two approaches to image editing When images are edited in
How to Control Tone and Contrast in BW Conversion
 How to Control Tone and Contrast in BW Conversion This article explains how to select and manipulate tone and contrast compositions in conversion of a color image into a black and white image, and how
2.0 4 Easy Ways to Delete Background to Transparent with GIMP. 2.1 Using GIMP to Delete Background to Transparent
 1.0 Introduction As JPG files don't support transparency, when you open a JPG image in GIMP with the purpose of making the background transparent. The first thing you must to do is Add Alpha Channel. It
Challenge Image: Blur the Background
 Challenge Image: Blur the Background Challenge Image: Blur the Background In this lesson, we re going to work on a challenge image that was submitted by a Masters Academy member. The image features a little
CREATE A BURNT EDGE EFFECT
 CREATE A BURNT EDGE EFFECT One of the all-time classic effects in Photoshop is the burnt edge, and there s lots of different ways to create it, but in this Adobe Photoshop tutorial, we re going to look
DD IMAGES PHOTOSHOP TUTORIAL 13 USING MULTIPLE LEVELS ADJUSTMENT LAYERS, TO LIGHTEN, DARKEN OR ADJUST THE CONTRAST OF AN IMAGE
 Page1 DD IMAGES PHOTOSHOP TUTORIAL 13 USING MULTIPLE LEVELS ADJUSTMENT LAYERS, TO LIGHTEN, DARKEN OR ADJUST THE CONTRAST OF AN IMAGE This method involves the creation of 3 separate LEVELS Adjustment layers.
HISTOGRAMS. These notes are a basic introduction to using histograms to guide image capture and image processing.
 HISTOGRAMS Roy Killen, APSEM, EFIAP, GMPSA These notes are a basic introduction to using histograms to guide image capture and image processing. What are histograms? Histograms are graphs that show what
An Introduction to Photoshop 6. Photoshop. retouching applications. images, Lightweight version: Photoshop Elements
 An Introduction to Photoshop 6 Gustav Taxén gustavt@nada.kth.se 2D1640 Grafik och Interaktionsprogrammering VT 2006 Photoshop One of the world s best known image retouching applications Current version
Translating the Actual into a Digital Photographic Language Working in Grayscale
 Translating the Actual into a Digital Photographic Language Working in Grayscale Overview Photographs are informed by considered and intentional choices. These choices are suggested by a need or desire
Introduction to Layers in Photoshop. Layers palette
 Layers: Are an essential element of Photoshop and a tool of every digital darkroom. Allow you to optimize one part of your photograph without affecting other parts. Allow an Undo of everything from minor
Black (and White) Magic
 Magic") Black (and White) Magic Close your eyes, take a deep breath, and imagine a future where you no longer shoot both color and black and white images. Instead, you capture only color. Then, following the shoot,
Black (and White) Magic Close your eyes, take a deep breath, and imagine a future where you no longer shoot both color and black and white images. Instead, you capture only color. Then, following the shoot,
This tutorial will show you how to use artistic grunge overlays to transform your photos into works of art.
 ARTISTIC GRUNGE OVERLAYS For all photo editing software that supports PNG files If you have any questions, please feel free to contact me at kim@photosbykimhill.com. This tutorial will show you how to
From Advanced pixel blending
 1 From www.studio.adobe.com Blending pixel layers in Adobe Photoshop CS2 lets you do things that you simply can t do by adjusting a single image. One situation where we blend pixel layers is when we want
Photoshop CC Editing Images
 Photoshop CC Editing Images Rotate a Canvas A canvas can be rotated 90 degrees Clockwise, 90 degrees Counter Clockwise, or rotated 180 degrees. Navigate to the Image Menu, select Image Rotation and then
By Washan Najat Nawi
 By Washan Najat Nawi how to get started how to use the interface how to modify images with basic editing skills Adobe Photoshop: is a popular image-editing software. Two general usage of Photoshop Creating
Tablet overrides: overrides current settings for opacity and size based on pen pressure.
 Photoshop 1 Painting Eye Dropper Tool Samples a color from an image source and makes it the foreground color. Brush Tool Paints brush strokes with anti-aliased (smooth) edges. Brush Presets Quickly access
Master digital black and white conversion with our Photoshop plug-in. Black & White Studio plug-in - Tutorial
 Master digital black and white conversion with our Photoshop plug-in This Photoshop plug-in turns Photoshop into a digital darkroom for black and white. Use the light sensitivity of films (Tri-X, etc)
Luminosity Masks Program Notes Gateway Camera Club January 2017
 Luminosity Masks Program Notes Gateway Camera Club January 2017 What are Luminosity Masks : Luminosity Masks are a way of making advanced selections in Photoshop Selections are based on Luminosity - how
Selective Editing in Camera Raw 5
 Selective Editing in Camera Raw 5 The editing tools that you saw in the last chapter are global editing tools. That is, they affect all parts of the image. So, when you choose to, for example, brighten
Using Adobe Photoshop
 Using Adobe Photoshop 6 One of the most useful features of applications like Photoshop is the ability to work with layers. allow you to have several pieces of images in the same file, which can be arranged
Using Adobe Photoshop
 Using Adobe Photoshop 8 In the last section we looked at adjusting colours to improve your image. In this section we ll look at various ways of touching up your images to fix problems with the images or
Page 1 of 9. Blending Multiple Exposures The Manual Way to HDR (High Dynamic Range) TJ Avery 7-Feb-2008
 TJ Avery 7-Feb-2008") Page 1 of 9 Blending Multiple Exposures The Manual Way to HDR (High Dynamic Range) TJ Avery 7-Feb-2008 The Problem Many natural landscape photographs will contain a range of light that exceeds what can
Page 1 of 9 Blending Multiple Exposures The Manual Way to HDR (High Dynamic Range) TJ Avery 7-Feb-2008 The Problem Many natural landscape photographs will contain a range of light that exceeds what can
Turning Photograph Into Cartoon-Style Picture. Digital Media I West High School Susan M. Raymond
 Turning Photograph Into Cartoon-Style Picture Digital Media I West High School Susan M. Raymond Part 1: Creating Outline Wondering how those guys on the internet turn photograph into a nice cartoon-style
B&W Photos from Colour:
 Quick and Dirty Methods for PS, PS Elements and Canon Software 8/1/2007 New Westminster Photography Club Derek Carlin New Westminster Photography Club Page 1 Introduction This is a very brief article on
Exploring Photoshop Tutorial
 Exploring Photoshop Tutorial Objective: In this tutorial we will create a poster composed of three distinct elements: a Bokeh, an image and title text. The Bokeh is an effect which is sometimes seen in
Sharpening is an essential final step before output. But sometimes, you don t want to
 Sharpening is an essential final step before output. But sometimes, you don t want to sharpen your entire image equally. Skin tones, clouds, noisy areas - it s best to apply less sharpening to these areas,
Lesson 16 Text, Layer Effects, & Filters
 Lesson 16 Text, Layer Effects, & Filters Digital Media I Susan M. Raymond West High School In this tutorial, you will: Create a Type Layer Add and Format Type within a Type Layer Apply Layer Effects Apply
ADOBE PHOTOSHOP CS TUTORIAL
 ADOBE PHOTOSHOP CS TUTORIAL A D O B E P H O T O S H O P C S Adobe Photoshop CS is a popular image editing software that provides a work environment consistent with Adobe Illustrator, Adobe InDesign, Adobe
A Basic Guide to Photoshop Adjustment Layers
 A Basic Guide to Photoshop Adjustment Layers Photoshop has a Panel named Adjustments, based on the Adjustment Layers of previous versions. These adjustments can be used for non-destructive editing, can
Creating a Contrast Mask. Text and images Copyright (C) 2002 Eric R. Jeschke and may not be used without permission of the author.
 2002 Eric R. Jeschke and may not be used without permission of the author.") Creating a Contrast Mask Text and images Copyright (C) 2002 Eric R. Jeschke and may not be used without permission of the author. Intention In this tutorial I'll show you how to do create a contrast mask
Creating a Contrast Mask Text and images Copyright (C) 2002 Eric R. Jeschke and may not be used without permission of the author. Intention In this tutorial I'll show you how to do create a contrast mask
HDR with Smart Objects
 HDR with Smart Objects March 2006 HDR with Smart Objects The article could be easily called Shoot once, Use it twice, because this article explains how to use a single RAW file to get most data out of
A quick note: We hope that you will find something from the Tips and Tricks that will add a little pizazz to your yearbook pages!
 A quick note: The following pages are tips and tricks for Basic Photoshop users. You may notice that some instructions indicate that non-awpc fonts were used, and that some colors were created using the
Winter Card.
 Winter Card Used images: http://www.cgtextures.com/texview.php?id=24321&phpsessid=95e8e8290894cc5194898 e16d1dddb4c http://www.cgtextures.com/texview.php?id=14285&phpsessid=95e8e8290894cc5194898 e16d1dddb4c
copyright B. Moose Peterson / WRP 2012
 Where does the viewer s eye go first in your photograph? More importantly, where do YOU want the viewer s eye to look first in your print? These are very important questions and the answers directly affect
OLD FASHIONED HAND TINTED EFFECT
 OLD FASHIONED HAND TINTED EFFECT In this Photoshop tutorial, we re going to learn how to easily create an old-fashioned, hand-tinted photo effect. All it takes is an adjustment layer, a layer blend mode,
PHOTO 11: INTRODUCTION TO DIGITAL IMAGING
 PHOTO 11: INTRODUCTION TO DIGITAL IMAGING Instructor: Sue Leith Exam Review On your camera, what are the following and what are they used for? WB matches the color temperature of light ISO - The sensitivity
Master digital black and white conversion with our Photoshop plug-in. Black & White Studio plug-in - Tutorial
 Master digital black and white conversion with our Photoshop plug-in This Photoshop plug-in turns Photoshop into a digital darkroom for black and white. Use the light sensitivity of films (Tri-X, etc)
Project 8: Nice Close-Up
 ps7ie_p08_b.qxd 11/18/02 3:25 PM Page 74 ps7ie_p08_b.qxd 11/18/02 3:25 PM Page 75 Photoshop 7 Image Effects In this project, work with a picture that was taken at an angle for effect. Correct and crop
Enhanced Eyes. Here's the image I'll be working with (glamour eyes photo from Shutterstock): Here's what the eyes will look like when we're done:
: Here's what the eyes will look like when we're done:") Enhanced Eyes Here's the image I'll be working with (glamour eyes photo from Shutterstock): The original image. Here's what the eyes will look like when we're done: The final effect. Here's a close-up
Enhanced Eyes Here's the image I'll be working with (glamour eyes photo from Shutterstock): The original image. Here's what the eyes will look like when we're done: The final effect. Here's a close-up
Pacific New Media David Ulrich
 Pacific New Media David Ulrich pacimage@maui.net www.creativeguide.com 808.721.2862 Digital Imaging Workflow in Adobe Photoshop All color and tonal correction editing should be done in a non-destructive
Unit 7 : Image Painting, Editing and Layers
 Unit 7 : Image Painting, Editing and Layers Introduction This Unit describes about various painting tools; such as selection, cropping and measuring tools, retouching, drawing and type tools, Navigation
Building - Image*After Bokeh - Regularjane Landscape 1 - Anders Bjerré Pedersen Landscape 2 - author Sundstrom(nickname)
") Click to enlarge the image. Used images: Download Moon shape(image created with the Photoshop tools) Icicles - Sergei Furtcev Cloud 1(Ruslan Olinchuk), Cloud 2(Image*After), Cloud 3(Sergei Perov) Stars
Click to enlarge the image. Used images: Download Moon shape(image created with the Photoshop tools) Icicles - Sergei Furtcev Cloud 1(Ruslan Olinchuk), Cloud 2(Image*After), Cloud 3(Sergei Perov) Stars
prepared by Allison Hwang for T. Purdy 2011
 There are many ways to create material textures in Photoshop. In addition to using primarily the blending tool, you can also use filters to create textures. In this tutorial, the objective is to create
XXXX - MAKING A FLYER BOOKLET COVER 1 N/08/08
 INTRODUCTION TO GRAPHICS Making a flyer booklet cover Information Sheet No. XXXX Create a new document with these settings. Note that you will be using 300 dpi because this will be made for print. Keepit
GETTING STARTED MAKING A NEW DOCUMENT
 Accessed with permission from http://web.ics.purdue.edu/~agenad/help/photoshop.html GETTING STARTED MAKING A NEW DOCUMENT To get a new document started, simply choose new from the File menu. You'll get
Photoshop Techniques Digital Enhancement
 Photoshop Techniques Digital Enhancement A tremendous range of enhancement techniques are available to anyone shooting astrophotographs if they have access to a computer and can digitize their images.
Fantasy Cartography with Adobe Photoshop: Adapted for Gimp
 Fantasy Cartography with Adobe Photoshop: Adapted for Gimp By Megan Wiseman 2010 This is a written tutorial, adapted for Gimp 2.6.8, based on Butch Curry s video tutorial series Fantasy Cartography with
Make a Trendy Double Exposure Effect in Adobe Photoshop by Yulia Sokolova6 days ago
 Make a Trendy Double Exposure Effect in Adobe Photoshop by Yulia Sokolova6 days ago Difficulty:IntermediateLength:LongLanguages: Photo ManipulationAdobe PhotoshopPhoto EffectsDouble ExposureClipping Mask
Using Adobe Photoshop
 Using Adobe Photoshop 4 Colour is important in most art forms. For example, a painter needs to know how to select and mix colours to produce the right tones in a picture. A Photographer needs to understand
A Basic Guide to Photoshop CS Adjustment Layers
 A Basic Guide to Photoshop CS Adjustment Layers Alvaro Guzman Photoshop CS4 has a new Panel named Adjustments, based on the Adjustment Layers of previous versions. These adjustments can be used for non-destructive
Camera Raw software is included as a plug-in with Adobe Photoshop and also adds some functions to Adobe Bridge.
 Editing Images in Camera RAW Camera Raw software is included as a plug-in with Adobe Photoshop and also adds some functions to Adobe Bridge. Camera Raw gives each of these applications the ability to import
Black & White and colouring with GIMP
 Black & White and colouring with GIMP Alberto García Briz Black and white with channels in GIMP (21/02/2012) One of the most useful ways to convert a picture to black and white is the channel mix technique.
Easily Smooth And Soften Skin In A Photo With Photoshop
 Easily Smooth And Soften Skin In A Photo With Photoshop Written by Steve Patterson OPEN THE START FILE BY RIGHT CLICKING THE.JPG FILE AND CHOOSING OPEN WITH ADOBE PHOTOSHOP. SAVE AS: X_lastname_firstname_Smooth_Soft
photokaboom Learn Photography Home About Privacy, Etc. Ask Jim SarasotaPhotoLessons.com Menus Black-and-white Digital Photography
 1 of 12 3/28/2019, 5:53 PM photokaboom Learn Photography Home About Privacy, Etc. Ask Jim SarasotaPhotoLessons.com Menus 1 - Why Black-and-white? 2 - Is Color Present in a BW Photograph? 3 - Camera Set
METAL TEXT EFFECT. Step 1: Create A New Document. Step 2: Fill The Background With Black
 METAL TEXT EFFECT In this text effects tutorial, we ll learn how to easily create metal text, a popular effect widely used in video games and movie posters! It may seem like there s a lot of steps involved,
Akron Camera Club: Brandon Spannbauer. October 24, 2012
 Fundamental Photoshop: Layers Akron Camera Club: Brandon Spannbauer October 24, 2012 Overview Layers Adjustment Layer Layers allow for total control over an image by allowing non-destructive edits Layers
Maine Day in May. 54 Chapter 2: Painterly Techniques for Non-Painters
 Maine Day in May 54 Chapter 2: Painterly Techniques for Non-Painters Simplifying a Photograph to Achieve a Hand-Rendered Result Excerpted from Beyond Digital Photography: Transforming Photos into Fine
Stone Creek Textiles. Layers! part 1
 Stone Creek Textiles Layers! part 1 This tutorial is all about working with layers. This, to my mind, is one of the two critical areas to master in order to work creatively with Photoshop Elements. So,
In this Adobe Photoshop tutorial, we re going to look at a way to give a photo a more ghostly appearance.
 GHOSTING AN IMAGE In this Adobe Photoshop tutorial, we re going to look at a way to give a photo a more ghostly appearance. I m a fan of horror films, but I admit I m a bit shallow in that I usually just
Inverted Colors Photo Effect With Photoshop
 Inverted Colors Photo Effect With Photoshop Written by Steve Patterson. In this Photoshop Effects tutorial, we re going to look at how to invert the colors in an image to create interesting photo effects.
Learning Photo Retouching techniques the simple way
 Learning Photo Retouching techniques the simple way Table of Contents About the Workshop... i Workshop Objectives... i Getting Started... 1 Photoshop Workspace... 1 Setting up the Preferences... 2 Retouching
Combine Black-and-White and Color
 Combine Black-and-White and Color Contributor: Seán Duggan n Specialty: Fine Art Primary Tool Used: Smart Objects Combining color and black-and-white in the same image is a technique that has been around
PHOTOSHOP INVERTED COLORS PHOTO EFFECT
 Photo Effects: Photoshop Inverted Colors Photo Effect PHOTOSHOP INVERTED COLORS PHOTO EFFECT Most people would agree that taking a stroll through the forest can be very calming and peaceful, with all of
Using Adobe Photoshop
 Using Adobe Photoshop 8 In the last section we looked at adjusting colours to improve your image. In this section we ll look at various ways of touching up your images to fix problems with the images or
Photoshop Elements 3 Filters
 Photoshop Elements 3 Filters Many photographers with SLR cameras (digital or film) attach filters, such as the one shown at the right, to the front of their lenses to protect them from dust and scratches.
32 Float v2 Quick Start Guide. AUTHORED BY ANTHONY HERNANDEZ - (415)
") 32 Float v2 Quick Start Guide 32 Float V2 Trademark/Copyright Information Copyright 2011 by United Color Technologies, LLC. All rights reserved. Unified Color Technologies, BeyondRGB, and HDR Float are
32 Float v2 Quick Start Guide 32 Float V2 Trademark/Copyright Information Copyright 2011 by United Color Technologies, LLC. All rights reserved. Unified Color Technologies, BeyondRGB, and HDR Float are
The original image. The final effect. The Layers palette showing the original photo on the Background layer.
 Photo Effects: Gritty, Overprocessed Photo Effect GRITTY, Overprocessed Photo Effect In this Photoshop photo effects tutorial, we re going to look at how to give a photo a gritty, overprocessed look to
ADDING A RAINBOW TO A PHOTOGRAPH
 ADDING A RAINBOW TO A PHOTOGRAPH This assignment will cover how to add a simple rainbow (or if you want to go crazy, a double rainbow) to any photograph. This will give us some great work with gradients,
Line Art Directions. Link to line art coloring pages. Ctrl + Click to access the link. Coloring pages - Coloring Book
 Line Art Directions Link to line art coloring pages Ctrl + Click to access the link Coloring pages - Coloring Book www.coloring-book.info/coloring/ More than 5.000 printable coloring sheets. Free coloring
Adobe Photoshop CC 2018 Tutorial
 Adobe Photoshop CC 2018 Tutorial GETTING STARTED Adobe Photoshop CC 2018 is a popular image editing software that provides a work environment consistent with Adobe Illustrator, Adobe InDesign, Adobe Photoshop,
> color scheme painting
 > color scheme painting > objective(s): Students will create a highly accurate brush overlay painting of a closely cropped image of their eye using only colors within a specific selected color scheme,
How to Make Instagram Filters in Photoshop: Earlybird
 How to Make Instagram Filters in Photoshop: Earlybird JANUARY 9, 2013 BY MELANIE MAYNE Cell phone cameras and apps like Instagram have made it possible for anyone to practice and enjoy the art of Photography.
 create, don t steal PhotoshopCAFE.com
 DIGITAL ECLIPSE. Eclipse photos courtesy of Fred Espanak 1998
 If you ve ever experienced a total solar eclipse, then you know that film truly cannot capture the entire visual experience. Many have tried, using complex darkroom printing techniques, but now Adobe Photoshop
Name the layer you rotated in step 3 Stripe and lower the opacity to 43%.
 Step 1 Open Photoshop and create a new file 1085 649 pixels. Fill the layer with a bright blue color (#0095db) by pressing Shift + F5. This will be the background for our pop art scene. Step 2 Let s create
Using Curves and Histograms
 Written by Jonathan Sachs Copyright 1996-2003 Digital Light & Color Introduction Although many of the operations, tools, and terms used in digital image manipulation have direct equivalents in conventional
Improving digital images with the GNU Image Manipulation Program PHOTO FIX
 Improving digital images with the GNU Image Manipulation Program PHOTO FIX is great for fixing digital images. We ll show you how to correct washed-out or underexposed images and white balance. BY GAURAV
GETTING STARTED. 0 P a g e B a s i c s o f A d o b e P h o t o s h o p A g a P r i v a t e I n s t i t u t e f o r c o m p u t e r s c i e n c e
 GETTING STARTED 0 P a g e B a s i c s o f A d o b e P h o t o s h o p Adobe Photoshop: is a popular image editing software that provides a work environment consistent with Adobe Illustrator, Adobe InDesign,
Kent Messamore 3/6/2010
 Post Processing Kent Messamore 3/6/2010 What we will cover Post Processing Photoshop, Lightroom, Elements, and others JPEG or RAW Photoshop Elements Workflow Organization, Create, share Photoshop Elements
Varis PhotoMedia Tutorials
 Varis PhotoMedia Tutorials 2004, Lee Varis Welcome This tutorial has been prepared for the photographer who is striving to learn digital imaging. I make an effort to supply current information about digital
PASS4TEST. IT Certification Guaranteed, The Easy Way! We offer free update service for one year
 PASS4TEST IT Certification Guaranteed, The Easy Way! \ We offer free update service for one year Exam : 9A0-125 Title : Adobe Photoshop Lightroom 2 ACE Exam Vendors : Adobe Version : DEMO Get Latest &