Creating Photomask files for use with Laser Cut alignment system William Zuleger
|
|
|
- Eleanore Thompson
- 5 years ago
- Views:
Transcription
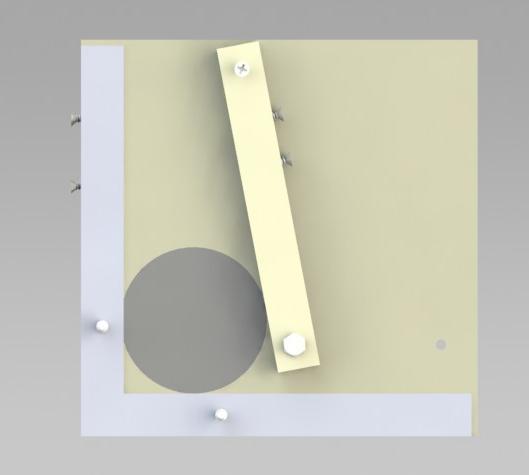
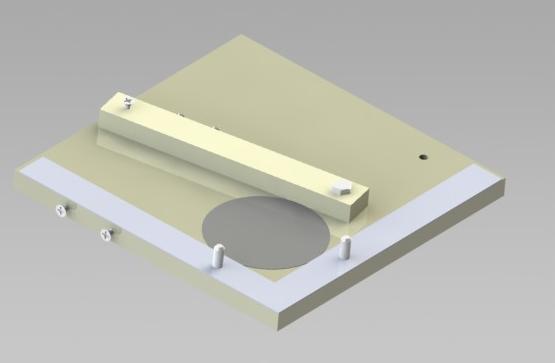
1 Appendix Creating Photomask files for use with Laser Cut alignment system William Zuleger Greetings Student, This document will guide you through the steps needed to create a photomask design suitable for cutting with the laser and use with the mask alignment platform. The general steps to a successful photomask are feature design, mask design, and cutting out the masks with the laser. Finally some helpful tips and tricks are included at the end. Step 1. Feature Design When designing features, it is important to keep in mind the limitations from print resolution and in the lithography process. In general keep feature sizes above 75µm thick, and keep in mind that corners tend to round off. Also, when a feature must be continuous with a layer above, be sure to keep in mind that a 250µm displacement is common from layer to layer. When you are satisfied with the feature design, group all the layers together to ensure that they remain correctly aligned when transferred to the print document. As a rule of thumb, don t separate feature layers until the last step. Step 2. Mask design Once the feature design is complete add the features to the PhotomaskTemplate.ai file. This file has 5 layers; TO CUT- The shape the laser will cut to fit the masks to the platform, This layer also includes blue guides which reflect the walls of the alignment platform which places the mask in the correct position relative to the cut. DO NOT alter this layer. Total Cut- The TO CUT layer copied 4 times. It is this layer that is ultimately sent to the laser for cutting. Guides- Layer may be used to center feature designs to the mask MaskLayer1 and MaskLayer2- An alignment marker is included in these layers. Markers and circular mask objects are locked to prevent translation, and must be unlocked to be selected. Copy your features group to Layer1 and position and duplicate them to your liking. Use the Guides to find exact center and quadrants. When the features are set in the correct spot, you can separate features into Layer1 and Layer2. Do this by ungrouping the features, selecting your layer 2 features, clicking on Layer2, and then right click anywhere on the canvas and select Arrange>Send to Current Layer. Check that you have done this correctly by turning on and off the layer 1 visibility. The next step is to duplicate and position MaskLayer1, MaskLayer2 and TO CUT in to the correct spot (where Total Cut is placed). Do this by selecting MaskLayer1, MaskLayer2, and TO CUT (be sure layer is unlocked). Use the Object>Translate>Move tool, select 4in horizontal and click copy. There should now be a copy of your mask to the right of the original. Now the newly copied layers should still be selected. Use the Move tool again at -5in, and then again -4in. Lock the TO CUT layer (should be identical to Total Cut). The last step is to delete the MaskLayer1 shapes on the right hand side and the Mask Layer2 on the left hand. Your mask is now ready for printing. Step 3. Cutting out the masks with the laser Begin by making sure the laser has the correct focus by attaching the manual focusing widget to the laser, selecting focus mode, and using the up and down arrows until the tip of the focusing widget is just touching the base, then select reset.
2 The printed masks you receive will not be on standard 8.5x11 sheets and some adjustments must be made to the CutTemplate.eps document so the laser cuts in the correct spot. This is done by running a trial run on paper and comparing the displacement of where the laser cut with the photomask, and adjusting the CutTemplate file. For the paper trials the Laser print settings should be 5% power, 100% speed and max frequency. Also be sure to make sure auto focus is off, vector is checked, and the document size is 9.5x12. Run the trial cut on paper, measure what adjustments need to be made, adjust the file and save it under a new name to preserve the original. Run another trial on paper to be sure that the cut is in the correct place. When your satisfied cut the masks out on 20% power, 50% speed and full frequency. Photomasks are now ready for use with the alignment platform. Tips and Tricks in Adobe Illustrator Can t select a layer? Make sure its unlocked. The Black arrow selects entire objects, the white arrow selects lines and anchors. Hold down Shift to add to selections. Use the o shaped button on the layers palate to the right of the layer name to select all features associated with that layer. This is a simple way to select multiple layers. Locked layers and Invisible layers can t be selected. Use Smart Guides (View>Smart Guides) to snap features into place. Trouble aligning layer features with one another? Select both features and us the align to key object in the dropout menu under the alignment palate. The un-bolded feature will align to the bolded one. Click which feature you want bolded. BE ORGANIZED. Name your layers and objects. Use grouping. Want to make a hole in an object? Select the solid and the hole inside and right click> make compound path and voila.
3
4
5
6
7
8
9

10 One of the Target/Crosshair samples (middle). 5 of these were made at different locations on a silicon wafer to measure accuracy of the designed photomask aligner.

11 Bottom Left Target Image- Accuracy is um Bottom Right Target Image- Accuracy is um


12 Middle Image Smallest- Accuracy is um Top Left Smallest-Accuracy is um

13 Top Right Smallest-Accuracy is um Using all 5 of the smallest target/crosshair accuracy measurements, an average accuracy of um ± um was found.
Cricut Design Space App for ipad User Manual
 Cricut Design Space App for ipad User Manual Cricut Explore design-and-cut system From inspiration to creation in just a few taps! Cricut Design Space App for ipad 1. ipad Setup A. Setting up the app B.
BUILD 3 Tri-Color Candy Corn
 BUILD 3 Tri-Color Candy Corn 1. Go to www.tinkercad.com and SIGN UP for a free account then Sign In 2. Select the Create new design button to open the editing screen 3. Select Properties from the Design
Drawing with precision
 Drawing with precision Welcome to Corel DESIGNER, a comprehensive vector-based drawing application for creating technical graphics. Precision is essential in creating technical graphics. This tutorial
Adobe Photoshop CC 2018 Tutorial
 Adobe Photoshop CC 2018 Tutorial GETTING STARTED Adobe Photoshop CC 2018 is a popular image editing software that provides a work environment consistent with Adobe Illustrator, Adobe InDesign, Adobe Photoshop,
Adobe Photoshop CS5 Tutorial
 Adobe Photoshop CS5 Tutorial GETTING STARTED Adobe Photoshop CS5 is a popular image editing software that provides a work environment consistent with Adobe Illustrator, Adobe InDesign, Adobe Photoshop
Quilt Pro 6 Lesson Quilt in a Quilt
 Quilt Pro 6 Lesson Quilt in a Quilt Quilt in a Quilt The Inner Quilt This quilt is a very complex design. We will cover a unique technique not covered in the manual. While any one can master the techniques
Creating Digital Illustrations for Your Research Workshop IV Illustration Demo Part II
 Creating Digital Illustrations for Your Research Workshop IV Illustration Demo Part II Final Figure Workshop IV Components Topics & Techniques covered How to randomly transform a group of individual shapes.
Photoshop CS6 automatically places a crop box and handles around the image. Click and drag the handles to resize the crop box.
 CROPPING IMAGES In Photoshop CS6 One of the great new features in Photoshop CS6 is the improved and enhanced Crop Tool. If you ve been using earlier versions of Photoshop to crop your photos, you ll find
How To Create a Stylish Skull Based Vector Illustration
 How To Create a Stylish Skull Based Vector Illustration The skull and crossed pistons mark is a popular adaption of the tradition skull and crossbones symbol and is commonly seen in motorcycle culture,
Tinker Tuesday Project - Fabric Engraving
 Tinker Tuesday Project - Fabric Engraving 1. Open CorelDRAW and create a new document. On the toolbar on the left side of the screen, select the Basic Shapes tool icon. This will allow you to create simple
Introduction to Layers
 Introduction to Layers By Anna Castano A layer is an image or text that is piled on top of another. There are many things you can do with layer and it is easy to understand how it works. Through the introduction
Converting your patterns into a digital PDF By: BurdaStyle
 Converting your patterns into a digital PDF By: BurdaStyle http://www.burdastyle.com/techniques/converting-your-patterns-into-a-digital-pdf Here is a great way for you to be able to share your patterns
Photoshop CC 2018 Essential Skills
 Photoshop CC 2018 Essential Skills Adobe Photoshop Creative Cloud 2018 University Information Technology Services Learning Technology, Training, Audiovisual and Outreach Copyright 2018 KSU Division of
1. Reference Guide and Glossary
 1. Reference Guide and Glossary Design Panel New Click the New Icon at any time to create a new project from scratch. Projects Browse, select, and cut projects from the Projects Tab. This includes your
ADD A REALISTIC WATER REFLECTION
 ADD A REALISTIC WATER REFLECTION In this Photoshop photo effects tutorial, we re going to learn how to easily add a realistic water reflection to any photo. It s a very easy effect to create and you can
12. Creating a Product Mockup in Perspective
 12. Creating a Product Mockup in Perspective Lesson overview In this lesson, you ll learn how to do the following: Understand perspective drawing. Use grid presets. Adjust the perspective grid. Draw and
Photoshop CC Editing Images
 Photoshop CC Editing Images Rotate a Canvas A canvas can be rotated 90 degrees Clockwise, 90 degrees Counter Clockwise, or rotated 180 degrees. Navigate to the Image Menu, select Image Rotation and then
Bruker Dimension Icon AFM Quick User s Guide
 Bruker Dimension Icon AFM Quick User s Guide March 3, 2015 GLA Contacts Jingjing Jiang (jjiang2@caltech.edu 626-616-6357) Xinghao Zhou (xzzhou@caltech.edu 626-375-0855) Bruker Tech Support (AFMSupport@bruker-nano.com
Vectorworks / MiniCAD Tutorials
 Vectorworks / MiniCAD Tutorials Tutorial 1: Construct a simple model of a little house Tutorial 2: Construct a 4 view Orthographic drawing of the Model These tutorials are available as Adobe Acrobat 4
Note: Adjustment layers are available only in Photo Explosion Deluxe.
 164 PHOTO EXPLOSION USER MANUAL Understanding Layers Layers keep different regions of an image separate from one another, such as separating text from the background, and shapes from text. Use the Layers
ADOBE PHOTOSHOP CS TUTORIAL
 ADOBE PHOTOSHOP CS TUTORIAL A D O B E P H O T O S H O P C S Adobe Photoshop CS is a popular image editing software that provides a work environment consistent with Adobe Illustrator, Adobe InDesign, Adobe
MODULE 1 IMAGE TRACE AND BASIC MANIPULATION IN ADOBE ILLUSTRATOR. The Art and Business of Surface Pattern Design
 The Art and Business of Surface Pattern Design MODULE 1 IMAGE TRACE AND BASIC MANIPULATION IN ADOBE ILLUSTRATOR The Art and Business of Surface Pattern Design 1 Hi everybody and welcome to our Make it
Color Correction and Enhancement
 10 Approach to Color Correction 151 Color Correction and Enhancement The primary purpose of Photoshop is to act as a digital darkroom where images can be corrected, enhanced, and refined. How do you know
Principles and Applications of Microfluidic Devices AutoCAD Design Lab - COMSOL import ready
 Principles and Applications of Microfluidic Devices AutoCAD Design Lab - COMSOL import ready Part I. Introduction AutoCAD is a computer drawing package that can allow you to define physical structures
Chapter 8. Working with Transparency, Effects, and Graphic Styles and Recoloring Artwork Delmar, Cengage Learning
 Chapter 8 Working with Transparency, Effects, and Graphic Styles and Recoloring Artwork 2011 Delmar, Cengage Learning Objectives Use the Transparency panel and the Color Picker Recolor artwork Apply effects
GETTING STARTED MAKING A NEW DOCUMENT
 Accessed with permission from http://web.ics.purdue.edu/~agenad/help/photoshop.html GETTING STARTED MAKING A NEW DOCUMENT To get a new document started, simply choose new from the File menu. You'll get
The Revolve Feature and Assembly Modeling
 The Revolve Feature and Assembly Modeling PTC Clock Page 52 PTC Contents Introduction... 54 The Revolve Feature... 55 Creating a revolved feature...57 Creating face details... 58 Using Text... 61 Assembling
Axioscan - Startup. 1. Turn on the Axioscan (button to the left) and turn on the computer. 2. Log on and start the ZEN Blue software from the desktop
 and turn on the computer. 2. Log on and start the ZEN Blue software from the desktop") Axioscan - Startup 1. Turn on the Axioscan (button to the left) and turn on the computer 2. Log on and start the ZEN Blue software from the desktop 3. Press ZEN slidescan and Start System 4. Start by changing
Axioscan - Startup 1. Turn on the Axioscan (button to the left) and turn on the computer 2. Log on and start the ZEN Blue software from the desktop 3. Press ZEN slidescan and Start System 4. Start by changing
The original photo. The final result.
 giving a photo painted edges In this Adobe Photoshop tutorial, we re going to combine a couple of different effects. First, we ll give the photo easy-tocreate painted edges, and then we ll make it look
Bruker Dimension Icon AFM Quick User s Guide
 Bruker Dimension Icon AFM Quick User s Guide August 8 2014 GLA Contacts Jingjing Jiang (jjiang2@caltech.edu 626-616-6357) Xinghao Zhou (xzzhou@caltech.edu 626-375-0855) Bruker Tech Support (AFMSupport@bruker-nano.com
Movie Merchandising. Movie Poster. Open the Poster Background.psd file. Open the Cloud.jpg file.
 Movie Poster Open the Poster Background.psd file. Open the Cloud.jpg file. Movie Merchandising Choose Image>Adjustments>Desaturate to make it a grayscale image. Select the Move tool in the Toolbar and
Standard Operating Procedure of Atomic Force Microscope (Anasys afm+)
") Standard Operating Procedure of Atomic Force Microscope (Anasys afm+) The Anasys Instruments afm+ system incorporates an Atomic Force Microscope which can scan the sample in the contact mode and generate
Standard Operating Procedure of Atomic Force Microscope (Anasys afm+) The Anasys Instruments afm+ system incorporates an Atomic Force Microscope which can scan the sample in the contact mode and generate
04. Two Player Pong. 04.Two Player Pong
 04.Two Player Pong One of the most basic and classic computer games of all time is Pong. Originally released by Atari in 1972 it was a commercial hit and it is also the perfect game for anyone starting
Drawing the Red Christmas Bell
 Vector 3D Christmas Bells Thinking of drawing some Christmas bells for this Christmas? Read this illustrator tutorial to learn how to draw 5 different styles of vector Christmas bells using the 3D Revolve
Exercise01: Circle Grid Obj. 2 Learn duplication and constrain Obj. 4 Learn Basics of Layers
 01: Make new document Details: 8 x 8 02: Set Guides & Grid Preferences Details: Grid style=lines, line=.5, sub=1 03: Draw first diagonal line Details: Start with the longest line 1st. 04: Duplicate first
Preparing your artwork for clear Zipper Pulls using Illustrator
 Preparing your artwork for clear Zipper Pulls using Illustrator This tutorial contains everything you need to know about creating your own, printed clear acrylic zipper pulls. Including how to format your
GCC LaserPro Laser-cutter
 2/9/17 p. 1/10 Overview Reads Adobe Illustrator files Can cut: along a vector path (for lines, contours, etc) in a raster pattern (for filled areas) Can cut a variety of materials Examples: mat board,
User Manual for HoloStudio M4 2.5 with HoloMonitor M4. Phase Holographic Imaging
 User Manual for HoloStudio M4 2.5 with HoloMonitor M4 Phase Holographic Imaging 1 2 HoloStudio M4 2.5 Software instruction manual 2013 Phase Holographic Imaging AB 3 Contact us: Phase Holographic Imaging
Epilog Laser Cutter Moira Gannon Denson, MA Allison Steele, MAT
 Epilog Laser Cutter Moira Gannon Denson, MA Allison Steele, MAT What is It? The Epilog laser cutter uses a high powered laser to make precision cuts in a variety of materials, from paper and wood to acrylic
Tinker Tuesday Project - Wood Book Covers
 Tinker Tuesday Project - Wood Book Covers 1. On the laser engraver computer, click on the folder icon on the task bar. Then, select Thaw Space and open the document titled Living Hinge Template. 2. Measure
In this project you ll learn how to create a game, in which you have to match up coloured dots with the correct part of the controller.
 Catch the Dots Introduction In this project you ll learn how to create a game, in which you have to match up coloured dots with the correct part of the controller. Step 1: Creating a controller Let s start
MYGRAPHICSLAB: ADOBE ILLUSTRATOR CS6
 REFINE STROKES MYGRAPHICSLAB: ADOBE ILLUSTRATOR CS6 IN THIS LESSON, YOU WILL LEARN THAT: Defining the features of generated strokes is an important skill for creating illustrations Strokes can have: Different
Generations Automatic Stand-Alone Lace By Bernie Griffith Generations Software
 We are going to create an open Italian lace. Generations software products provide advanced image processing features allowing for the creation of stand-alone lace with just a few simple techniques. A
User Manual. This User Manual will guide you through the steps to set up your Spike and take measurements.
 User Manual (of Spike ios version 1.14.6 and Android version 1.7.2) This User Manual will guide you through the steps to set up your Spike and take measurements. 1 Mounting Your Spike 5 2 Installing the
MYGRAPHICSLAB: ADOBE ILLUSTRATOR CS6
 DRAW MYGRAPHICSLAB: ADOBE ILLUSTRATOR CS6 IN THIS LESSON, YOU WILL LEARN TO: Set Pen tool stroke and fill Draw line segments with the Pen tool Draw curves with the Pen tool Create open and closed paths
Figure 1 The Raith 150 TWO
 RAITH 150 TWO SOP Figure 1 The Raith 150 TWO LOCATION: Raith 150 TWO room, Lithography area, NanoFab PRIMARY TRAINER: SECONDARY TRAINER: 1. OVERVIEW The Raith 150 TWO is an ultra high resolution, low voltage
MIRROR IMAGING. Author: San Jewry LET S GET STARTED. Level: Beginner+ Download: None Version: 1.5
 Author: San Jewry Level: Beginner+ Download: None Version: 1.5 In this tutorial, you will learn how to create a mirror image of your work. Both sides will look exactly the same no matter how much you tweak
USER GUIDE EDIT OBJECTS
 USER GUIDE EDIT OBJECTS COPYRIGHT Copyright 2016. Wilcom Pty Ltd, Wilcom International Pty Ltd. All Rights reserved. No parts of this publication or the accompanying software may be copied or distributed,
The original image. Let s get started! The final rainbow effect. The photo sits on the Background layer in the Layers panel.
 Add A Realistic Rainbow To A Photo In this Photoshop photo effects tutorial, we ll learn how to easily add a rainbow, and even a double rainbow, to a photo! As we ll see, Photoshop ships with a ready-made
After completing this lesson, you will be able to:
 LEARNING OBJECTIVES After completing this lesson, you will be able to: 1. Create a Circle using 6 different methods. 2. Create a Rectangle with width, chamfers, fillets and rotation. 3. Set Grids and Increment
Geometric Functions. The color channel toolbar buttons are disabled.
 Introduction to Geometric Transformations Geometric Functions The geometric transformation commands are used to shift, rotate, scale, and align images. For quick rotation by 90 or mirroring of an image,
33-2 Satellite Takeoff Tutorial--Flat Roof Satellite Takeoff Tutorial--Flat Roof
 33-2 Satellite Takeoff Tutorial--Flat Roof Satellite Takeoff Tutorial--Flat Roof A RoofLogic Digitizer license upgrades RoofCAD so that you have the ability to digitize paper plans, electronic plans and
Illustrator. Graphics in Illustrator. Martin Constable February 17, RMIT Vietnam
 Illustrator Graphics in Illustrator Martin Constable February 17, 2018 RMIT Vietnam Introduction Introduction Illustrator s Interface The Tools and Control panel The Pen Tool Stroke/Fill The Selection
ADDING RAIN TO A PHOTO
 ADDING RAIN TO A PHOTO Most of us would prefer to avoid being caught in the rain if possible, especially if we have our cameras with us. But what if you re one of a large number of people who enjoy taking
Beginner s Guide to SolidWorks Alejandro Reyes, MSME Certified SolidWorks Professional and Instructor SDC PUBLICATIONS
 Beginner s Guide to SolidWorks 2008 Alejandro Reyes, MSME Certified SolidWorks Professional and Instructor SDC PUBLICATIONS Schroff Development Corporation www.schroff.com www.schroff-europe.com Part Modeling
ARCHICAD Introduction Tutorial
 Starting a New Project ARCHICAD Introduction Tutorial 1. Double-click the Archicad Icon from the desktop 2. Click on the Grey Warning/Information box when it appears on the screen. 3. Click on the Create
To-Do List: Initial steps upon opening an.ai document that has been exported from ArcMap
 To-Do List: Initial steps upon opening an.ai document that has been exported from ArcMap 1. Update labels. 2. Release all clipping masks and delete the mask. 3. Ungroup all items. 4. Update font sizes.
Lightroom- Creative Cloud Tips with NIK
 Lightroom- Creative Cloud Tips with NIK Motion Sequence Make several images in your camera on burst mode without following the subject. Let them move past your field. It is best to use a tripod, but not
7.0 - MAKING A PEN FIXTURE FOR ENGRAVING PENS
 7.0 - MAKING A PEN FIXTURE FOR ENGRAVING PENS Material required: Acrylic, 9 by 9 by ¼ Difficulty Level: Advanced Engraving wood (or painted metal) pens is a task particularly well suited for laser engraving.
ADOBE ILLUSTRATOR CS3. Chapter 5 Working With Layers
 ADOBE ILLUSTRATOR CS3 Chapter 5 Working With Layers Chapter Objectives Create and modify layers Manipulate layered artwork Work with layered artwork Create a clipping set Chapter 5 2 Create and Modify
DISCO DICING SAW SOP. April 2014 INTRODUCTION
 DISCO DICING SAW SOP April 2014 INTRODUCTION The DISCO Dicing saw is an essential piece of equipment that allows cleanroom users to divide up their processed wafers into individual chips. The dicing saw
Adobe Photoshop CC update: May 2013
 Adobe Photoshop CC update: May 2013 Welcome to the latest Adobe Photoshop CC bulletin update. This is provided free to ensure everyone can be kept upto-date with the latest changes that have taken place
WORD ART - CHANGING LETTERING SPACING
 CHANGING LETTERING SIZE Enter single letters or words and use the icon to rescale the motif. When the Maintaining Proportions (lock) icon is outlined in white, the design will be resized proportionately.
INTERMEDIATE PHOTOSHOP: FAMILY PHOTOS
 INTERMEDIATE PHOTOSHOP: FAMILY PHOTOS What is Photoshop Elements? Photoshop Elements is a streamlined version of Adobe Photoshop CC. Despite missing some more advanced features, it is a robust piece of
ADOBE ILLUSTRATOR / ADOBE PHOTOSHOP
 INDEX > A-Z ADOBE ILLUSTRATOR / ADOBE PHOTOSHOP A C E Align Panel 8, 19, 131 Anchor Points 22 Add 22, 47 Average and Join 30 Delete 22 Convert 22, 48 Stray Anchor Points 30, 42 Anti-alias 175 Anti-alias
4) Click on Load Point Cloud to load the.czp file from Scene. Open Intersection_Demo.czp
 Click on Load Point Cloud to load the.czp file from Scene. Open Intersection_Demo.czp") Intersection 2D Demo 1) Open the Crash Zone or Crime Zone diagram program. 2) Click on to open the CZ Point Cloud tool. 3) Click on 3D/Cloud Preferences. a) Set the Cloud File Units (Feet or Meters). b)
Intersection 2D Demo 1) Open the Crash Zone or Crime Zone diagram program. 2) Click on to open the CZ Point Cloud tool. 3) Click on 3D/Cloud Preferences. a) Set the Cloud File Units (Feet or Meters). b)
Step 1: Open A Photo To Place Inside Your Text
 Place A Photo Or Image In Text In Photoshop In this Photoshop tutorial, we re going to learn how to place a photo or image inside text, a very popular thing to do in Photoshop, and also a very easy thing
Introduction to 3D Printing. Activity 1: Design a keychain using computer-aided design software
 Introduction to 3D Printing Activity 1: Design a keychain using computer-aided design software 1 In this activity we ll design a keychain name tag and learn the fundamentals of computer-aided design, the
COURSE UNIT 3. Plan Creation. Messerli EliteCAD Version
 Messerli EliteCAD Version 13 27.09.2013 COURSE UNIT 3 Plan Creation Switzerland: Austria: Germany: Messerli Informatik AG Messerli Informatik GmbH Messerli Informatik GmbH Pfadackerstrasse 6 Hamoderstraße
Photo Within A Photo - Photoshop
 Photo Within A Photo - Photoshop Here s the image I ll be starting with: The original image. And here s what the final "photo within a photo" effect will look like: The final result. Let s get started!
GIMP WEB 2.0 ICONS. Web 2.0 Icons: Paperclip Completed Project
 GIMP WEB 2.0 ICONS WEB 2.0 ICONS: PAPERCLIP OPEN GIMP or Web 2.0 Icons: Paperclip Completed Project Step 1: To begin a new GIMP project, from the Menu Bar, select File New. At the Create a New Image dialog
Drawing Rules for Photomask Generation.
 Drawing Rules for Photomask Generation. Created by Steve DiBartolomeo Modified by John Dingley, JD Photo-Tools Ltd Introduction This note gives general guidance on setting data up for photomask generation
NOTES FOR SKETCHUP 'LASER' OPTION - MISSENDEN OCTOBER 2013
 NOTES FOR SKETCHUP 'LASER' OPTION - MISSENDEN OCTOBER 2013 These notes were written for the course members on the weekend 'Laser' course at Missenden Abbey in October 2013. We had available an HPC Laser
EXERCISE 1: CREATE LINE SPARKLINES
 EXERCISE 1: CREATE LINE SPARKLINES In this exercise you ll create line sparklines. Then you ll convert the line type to the column type. Part 1: Create the sparklines Before you start, notice that the
Part 1- Fundamental Functions
 Part 1- Fundamental Functions Note: Alt+Tab will allow you to move between programs in the docker. Shift+Tab removes right pallets Tab removes all pallets Ctrl+1= centers art board Ctrl + 0= fill window
ADDING FIREWORKS TO A PHOTO
 ADDING FIREWORKS TO A PHOTO In this Photoshop tutorial, we re going to learn how to add fireworks to a photo. What you ll need is a photo of fireworks and the photo you want to add the fireworks to (preferably
DIGITAL ECLIPSE. Eclipse photos courtesy of Fred Espanak 1998
 If you ve ever experienced a total solar eclipse, then you know that film truly cannot capture the entire visual experience. Many have tried, using complex darkroom printing techniques, but now Adobe Photoshop
AVANTUS TRAINING PTE LTD
 [AICS6]: Adobe Illustrator CS6 Length Delivery Method : 2 Days : Instructor-led (Classroom) Course Outline Module 1: Looking at the Work Area Section 1: About Adobe Illustrator CS6 What is Adobe Illustrator
[INTERMEDIATE 3D MODELING IN TINKERCAD]
![[INTERMEDIATE 3D MODELING IN TINKERCAD]](/thumbs/72/67480326.jpg "[INTERMEDIATE 3D MODELING IN TINKERCAD]") [INTERMEDIATE 3D MODELING IN TINKERCAD] WHAT IS ADVANCED 3D MODELING? The basics of 3D modeling will only get you so far; in order to model more complex and unique items you ll need to learn how to use
[INTERMEDIATE 3D MODELING IN TINKERCAD] WHAT IS ADVANCED 3D MODELING? The basics of 3D modeling will only get you so far; in order to model more complex and unique items you ll need to learn how to use
Adobe PhotoShop Elements
 Adobe PhotoShop Elements North Lake College DCCCD 2006 1 When you open Adobe PhotoShop Elements, you will see this welcome screen. You can open any of the specialized areas. We will talk about 4 of them:
Getting Started with. Vectorworks Architect
 Getting Started with Vectorworks Architect Table of Contents Introduction...2 Section 1: Program Installation and Setup...6 Installing the Vectorworks Architect Program...6 Exercise 1: Launching the Program
House Design Tutorial
 House Design Tutorial This House Design Tutorial shows you how to get started on a design project. The tutorials that follow continue with the same plan. When you are finished, you will have created a
Making Selections: 3 Ways to isolate an area in an image: Layer Mask : Mask the part of the layer you don t want to be visible
 3 Ways to isolate an area in an image: Layer Mask : Mask the part of the layer you don t want to be visible Eraser Tool: Erase the areas of an image or layer you don t want to be visible Make a Selection:
CHANGING THE MEASURING UNIT
 SMART SECURE Embroidery motifs are programmed either with or without securing stitches. The machine recognizes when no securing stitches are programmed and adds some. If securing stitches are not wanted,
Silhouette Connect Layout... 4 The Preview Window... 5 Undo/Redo... 5 Navigational Zoom Tools... 5 Cut Options... 6
 user s manual Table of Contents Introduction... 3 Sending Designs to Silhouette Connect... 3 Sending a Design to Silhouette Connect from Adobe Illustrator... 3 Sending a Design to Silhouette Connect from
11 Advanced Layer Techniques
 11 Advanced Layer Techniques After you ve learned basic layer techniques, you can create more complex effects in your artwork using layer masks, path groups, filters, adjustment layers, and more style
Tapped Hole on Curved Surface
 Finding a reliable method to place holes (tapped or otherwise) on a curved surface has perplexed many new users over the years. Four methods come readily to mind when pondering the situation. They include:
Appendix B: Autocad Booklet YR 9 REFERENCE BOOKLET ORTHOGRAPHIC PROJECTION
 Appendix B: Autocad Booklet YR 9 REFERENCE BOOKLET ORTHOGRAPHIC PROJECTION To load Autocad: AUTOCAD 2000 S DRAWING SCREEN Click the start button Click on Programs Click on technology Click Autocad 2000
Architecture 2012 Fundamentals
 Autodesk Revit Architecture 2012 Fundamentals Supplemental Files SDC PUBLICATIONS Schroff Development Corporation Better Textbooks. Lower Prices. www.sdcpublications.com Tutorial files on enclosed CD Visit
Installing Brackets to Minimize Distortion in Your SMART Board 685ix Interactive Whiteboard System s Projected Image
 UX60-RFK-685 Installing Brackets to Minimize Distortion in Your SMART Board 685ix Interactive Whiteboard System s Projected Image Follow these instructions to install brackets on your SMART Board 685ix
Exploring Photoshop Tutorial
 Exploring Photoshop Tutorial Objective: In this tutorial we will create a poster composed of three distinct elements: a Bokeh, an image and title text. The Bokeh is an effect which is sometimes seen in
Toothbrush Holder. A drawing of the sheet metal part will also be created.
 Prerequisite Knowledge Previous knowledge of the following commands is required to complete this lesson; Sketch (Line, Centerline, Circle, Add Relations, Smart Dimension,), Extrude Boss/Base, and Edit
SUSS Mask Aligner. Purpose: To expose photoresist on a wafer using a photomask
 SUSS Mask Aligner Purpose: To expose photoresist on a wafer using a photomask Overview This SOP will go over how to use the machine for basic exposures. This will include commonly used controls and frequently
Learning Adobe FireWorks CS5
 Module 1 Contents Chapter 1: Introduction to FireWorks Starting the Document...1-1 Screen Modes...1-3 Bitmap and Vector Tools...1-4 Bitmap Tools... 1-4 Vector Tools... 1-6 Filling Shapes...1-8 Importing
Tinker Tuesday Project - Drinking Glasses
 Tinker Tuesday Project - Drinking Glasses 1. Open CorelDRAW and create a new document. Near the top left corner of the screen, click File, and then click Import on the resulting menu. Select an image from
All Creative Suite Design documents are saved in the same way. Click the Save or Save As (if saving for the first time) command on the File menu to
 command on the File menu to") 1 The Application bar is new in the CS4 applications. It combines the menu bar with control buttons that allow you to perform tasks such as arranging multiple documents or changing the workspace view.
1 The Application bar is new in the CS4 applications. It combines the menu bar with control buttons that allow you to perform tasks such as arranging multiple documents or changing the workspace view.
Chapter 9 Organization Charts, Flow Diagrams, and More
 Draw Guide Chapter 9 Organization Charts, Flow Diagrams, and More This PDF is designed to be read onscreen, two pages at a time. If you want to print a copy, your PDF viewer should have an option for printing
By Washan Najat Nawi
 By Washan Najat Nawi how to get started how to use the interface how to modify images with basic editing skills Adobe Photoshop: is a popular image-editing software. Two general usage of Photoshop Creating
PUZZLE EFFECTS 2D Photoshop actions For Photoshop CC, CS6, CS5, CS4
 PUZZLE EFFECTS 2D Photoshop actions For Photoshop CC, CS6, CS5, CS4 User Guide CONTENTS 1. THE BASICS... 1 1.1. About the actions... 1 1.2. How the actions are organized... 1 1.3. The Classic effects (examples)...
QUICK-START FOR UNIVERSAL VLS 4.6 LASER! FRESH 21 SEPTEMBER 2017
 QUICK-START FOR UNIVERSAL VLS 4.6 LASER! FRESH 21 SEPTEMBER 2017 The laser is quite safe to use, but it is powerful; using it requires your full caution, attention and respect. Some rules of the road: