EZ Lock Octa Quick Softbox. Guide
|
|
|
- Molly Wilkerson
- 5 years ago
- Views:
Transcription


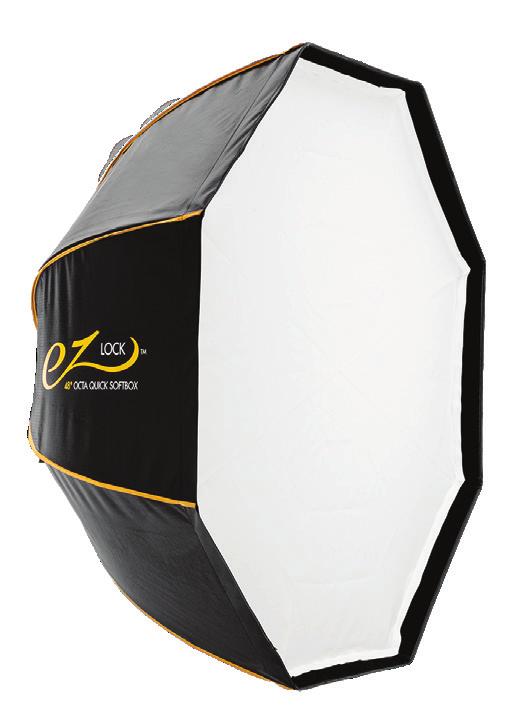
1 EZ Lock Octa Quick Softbox Guide
2 Introduction Glow EZ Lock Octa Quick Softbox sports a dynamic eight-sided deep parabolic shape featuring flattering, soft and rich color lighting with all the great advantages of the softbox/umbrella quality with an unbeatable safe and sure EZ positive and lock system. No more clumsy construction, fumbling with flex resistant rods or struggling in frustration for careful alignment of speedring holes. The 8-ribbed softbox opens up and closes down, umbrella style. The self-catch EZ Lock surrounds a thick center shaft, providing a comfortable place for your fingers to push-lock the mechanism open, and a generously sized release to close the softbox painlessly. The quick-to-setup umbrella-like assembly has all the advantages of a metallic magnum style reflector without the delicate nature. This collapsible unit was borne for the road or studio, with sturdy aluminum support rods for structural stability and extraordinary fabric strength. The Glow EZ Lock Octa Quick Softbox sets the standard for portable light control for people and subjects. 2 GlowLightControl.com
3 Precautions Please study this guide and store for future reference. The materials used in this product are not waterproof or flame resistant. Care must be taken to avoid damage. Attach strobes with modeling lamps following the recommended bulb wattage limits. Store in a cool and dry environment. The EZ Lock Octa Quick Softbox and diffusers can be hand cleaned with cold water and mild detergent. Air dry. Handle this Octa Quick Softbox with care when opening and closing. Be especially diligent when closing, to hold onto the Softbox. The EZ Lock mechanism releases with force. Make sure the unit is intact, and there are no missing parts. All photos in the manual cover all EZ Lock Octa Quick Softbox varieties and are for illustrative purposes only. INCLUDES: Glow EZ Lock Octa Quick Softbox External Diffuser Internal Diffuser Eggcrate Grid Reversible Deflector Disk Storage Bag Bowens Mount Speedring Adapter (insert Size 130mm) 3 GlowLightControl.com


4 Setup Instructions 1. Remove the EZ Lock Octa Quick Softbox from the carrying case. 2. Rest the back of the Octa Quick Softbox, the Bowens speedring, on a flat surface and gently spread out the aluminum rods that support the silvered fabric material. 3. Grasp the aluminum EZ Lock mechanism that is suspended above the center cage hub. 4. Press down on the EZ Lock ring to slide it down to mate with the hub of the rod spokes, until it seats firmly. The EZ Lock automatically latches in, pressed against the center post of the hub. 5. The Octa Quick Softbox is now fully opened and correctly constructed. Unzip the slit on the side of the softbox, reach inside, and grasp the speedring insert and the softbox firmly. Align the mount to mate with your flash and lock into place according to the flash manufacturer s instructions, or replace the adapter to match the strobe of choice from the wide variety of Glow 130mm speedring inserts. Optional Steps 6. Attach the deflector disc. This step must be accomplished after the Octa Quick Softbox is assembled and EZ Locked. The softest effect is reached with the disk in position. The disk is reversible to achieve a variety of properties. A. Hold the disk concave profile up to control the center hotspot and spread the light about the softbox. By reversing the deflector disk and changing the position of placement on the shaft, the light spread is customizable. B. Screw in the hub extension rod onto the center hub. C. Place the deflector disk on the extension and screw in the retaining bolt on the center shaft. D. The light bounces off the inner curved deflector disk and flood the walls of the outer bowl of the Octa Quick Softbox, resulting in a broad spread of softer indirect light. 4 GlowLightControl.com


5 Optional Steps You can flip the deflector disk convex side out, creating an alternate light distribution. E. For ease of access to the Deflector Disk after the Octa Quick Softbox is complete or in use, a zippered slit opens to reveal the assembly. Now, you can change the orientation or remove it completely. Close the zipper to keep the light in the softbox. 7. Attach the inner diffuser. The inner layer can be used with or without the deflector disk. The more diffusion, the less dramatic the Octa Quick Softbox wrap. The fabric snaps onto the interior elastic tabs that are on each rod spoke. 8. Attach the outer diffuser. Join the outer diffusion fabric to the Velcro strips that line the inner perimeter of the softbox. Again, the deflector disk, as well as the inner diffuser, can be used together to maximize the softness of the flash. A. Unfold the diffusion material and align the diffuser s corners with the outside junctions of the opened Octa Quick Softbox. B. Press the strips firmly to seal off light leaks. 5 GlowLightControl.com


6 Optional Steps 9. Attach the Eggcrate Grid. The grid attaches using the Velcro touch sensitive strips running along the inside edge of the bowl. A. Align the shape carefully to match the perimeter shape for the strongest feathering. B. Press the surfaces firmly to seal the grid for spill control and drama. 10. Close r up! A. Remove any diffusers that are attached. B. Reach into the center of the hub and hold onto the EZ Lock knob. C. Press the wide side button into the center while holding the softbox firmly. The EZ Lock mechanism is released, and the structure relaxes. D. Complete the closure by bringing the spokes and sections together, as if closing an umbrella. Bind the closed softbox with the Velcro strap, slip the bundle into the zippered case and call it a day. 6 GlowLightControl.com


7 Optional Beauty Dish Adapter Insert Ring Speedring Mount Adapter Insert The EZ Lock octa quick softbox includes an installed 130mm Bowens mount insert for use on Bowens mount strobes. To change the insert ring to fit onto a different flash mount: 1. Stretch the fabric in the rear of the softbox to reveal one of the tab screws. 2. Unscrew that one entirely and set it aside. You only need to loosen the two adjoining screws enough for the insert to slip out of the tabs. 3. Remove it and replace the insert with your mount version. 4. Put to removed screw back into place and tighten all the screws. 130mm SPECIFICATIONS Materials Reinforced Fabric, Aluminum Rods, Aluminum Ring Finish Silver interior, black matte exterior, custom trim Mount Interchangeable Bowens speedring supplied (Insert Size 130mm) Sections 8 Removable Front Diffusor Yes Removable Interior Baffle Yes Accepts Grids Yes (included) Speedring 130mm insert Specifications GLSBEZ25OCTA GLSBEZ36OCTA GLSBEZ48OCTA Diameter open 25 / 63.5cm 36 / 91.5cm 44 / 112cm Depth open / 30cm / 49cm 26 / 66cm Weight 1lb 3.5oz / 552g 2lb 1.5oz / 952g 2lb 12oz / 1.25kg Dimensions closed 15x6 /38x15.3cm 25x6 /63.5x15.3cm 34x6 /86.4x15.3cm No accessories are included in the weights or measurements 7 GlowLightControl.com
8 GLOW ONE YEAR LIMITED USA WARRANTY Glow warrants to the original purchaser that your Glow product shall be free from defects in material and workmanship for the period of two (2) years from the date of purchase (or delivery as may be required in certain jurisdictions), or thirty (30) days after replacement, whichever comes later. Glow s entire liability and your exclusive remedy for any breach of warranty shall be, at Glow s option, to repair or replace the hardware, provided that the hardware be returned to the point of purchase or such other place as Glow may direct with a copy of the sales receipt or dated itemized receipt. Glow may, at its option, replace your product, offer to provide a functionally equivalent product, or repair any product with new, refurbished or used parts as long as such parts comply with the product s technical specifications. Any replacement hardware product will be warranted for the remainder of the original warranty period or thirty (30) days, whichever is longer, or for any additional period that may be applicable in your jurisdiction. If the product has been discontinued, the warranty provider reserves the right to replace it with a model of equivalent quality and function. This warranty does not cover problems or damage resulting from accident, abuse, misapplication, or any unauthorized repair, modification or disassembly, improper operation or maintenance, normal wear and tear, or usage not in accordance with product instructions or connection to improper voltage supply, use of consumables, such as replacement batteries, not supplied by Glow, except where such restriction is prohibited by applicable law. Except where prohibited by applicable law, this warranty is nontransferable and is limited to the original purchaser and the country in which the product was purchased. This warranty gives you specific legal rights, and you may also have other rights, including a longer warranty duration that may vary under local laws. To start a warranty claim contact the Glow Customer Service Department to obtain a return merchandise authorization ( RMA ) number, and return the defective product to Glow, along with the RMA number and proof of purchase. Question about our product line? Need Product Support? We are proud of our products and celebrate our customers. We are with you, from product selection to everyday use. Be secure with your purchase and reach us as you need. us: brands@adorama.com Call: Address: Adorama Brands, 42 West 18th Street, New York, NY You can always contact us at BRANDS@ADORAMA.COM for personal technical support. Our website contains a wide range of Support and FAQ pages with valuable technical assistance. GLOW is a registered trademark of ADORAMA CAMERA Adorama Camera, Corp. All Rights Reserved. 8 GlowLightControl.com
EZ Lock Deep Parabolic Softbox. Guide
 EZ Lock Deep Parabolic Softbox Guide Introduction Glow EZ Lock Deep Parabolic Softbox is an ingenious, portable version of the light modifier famous for stunning fashion and portraiture images showcasing
Folding Beauty Dish. Guide
 Folding Beauty Dish Guide Introduction The Glow Folding Beauty Dish is a light modifier that provides extra large beauty light advantages with strobes, monolights, and most LED lights. The collapsible,
VE-TTLHX32. Hexoval Softbox 32. for Venture TTL 600 Ws Monolight INSTRUCTIONS
 VE-TTLHX32 Hexoval Softbox 32 for Venture TTL 600 Ws Monolight INSTRUCTIONS Introduction Thank you for choosing Impact. The Impact VE-TTLHX32 is a 32 hexoval softbox for the Venture TTL monolight. The
Whitebox INSTRUCTIONS
 Whitebox INSTRUCTIONS Introduction Congratulations on your purchase of an Angler Whitebox Octagonal Softbox! Angler softboxes are designed to control and soften light for your specific photographic needs.
SPEED RING USER MANUAL SR-OCFF
 SPEED RING USER MANUAL SR-OCFF INTRODUCTION Thank you for choosing Raya. The Raya SR-OCFF Speed Ring is designed exclusively to mount the Raya OC-OSB80 32 or Impact FF- OSB60 24 Octa Softboxes to the Raya
PBSB-2436 Parabox Softbox INSTRUCTIONS
 PBSB-2436 Parabox Softbox 24 36 INSTRUCTIONS Precautions Please read and follow these instructions, and keep this manual in a safe place. Not for use with tungsten, halogen, or other high-heat light sources.
EASY FOLD SOFTBOX SET EFS
 EASY FOLD SOFTBOX SET EFS INTRODUCTION Thank you for choosing the Raya Easy Fold Softbox Set. This set enables you to securely mount flashes of all sizes to a softbox using its adjustable shoe mount, even
Quikbox Micro Softbox INSTRUCTIONS
 Quikbox Micro Softbox INSTRUCTIONS 1 Introduction Thank you for choosing the Impact Quikbox Micro On-Camera Softbox. This convenient 9 9 in. light modifier slips onto an on-camera flash in seconds, transforming
Luxbanx Duo Softbox InStructIonS 1
 Luxbanx Duo Softbox Instructions 1 Introduction 2 Thank you for choosing the Impact Luxbanx Duo softbox. All Luxbanx softboxes are designed to control and soften light for your specific photographic needs.
OLED-55 USER MANUAL OCTALUX LED. OctaLux LED - USER MANUAL 1
 OLED-55 OCTALUX LED USER MANUAL OctaLux LED - USER MANUAL 1 OctaLux LED INTRODUCTION Thank you for choosing Genaray. The OctaLux LED Light Softbox produces bright, soft, and consistent light that s designed
AND. Quick Start Guide
 AND Quick Start Guide Apollo Quick setup and long-lasting results Built on an umbrella frame Quick set up and teardown Fits virtually any studio light Pairs perfect with speedlites Warranty: 1-year (details
Fresnel Spot S-Mount Attachment INSTRUCTIONS
 Fresnel Spot S-Mount Attachment 10 40 INSTRUCTIONS Introduction Thank you for choosing Impact. The Impact LM-FSA1040 is an innovative light-shaping tool that is compatible with studio strobes or LEDs with
Luxbanx Grid for Softbox INSTRUCTIONS
 Luxbanx Grid for Softbox INSTRUCTIONS Introduction Thank you for choosing this Impact Luxbanx Grid. Luxbanx grids provide more light control for Luxbanx softboxes by producing a narrower beam of light
MW-C WALL MOUNT ADAPTER. For MD-ASL15W and MD-BSL15W Monitor Mounts. User Manual
 MW-C WALL MOUNT ADAPTER For MD-ASL15W and MD-BSL15W Monitor Mounts User Manual Thank you for choosing Gabor. The Gabor MW-C is a dedicated wall mount for the MD-ASL15W (single display) and MD-BSL15W (dual
FM-3250 / FIXED WALL MOUNT. For Flat Panel Screens. User Manual
 FM-3250 / FIXED WALL MOUNT For 32-50 Flat Panel Screens User Manual Thank you for choosing Gabor. Thank you for choosing Gabor s fixed flat panel screen wall mount. This heavy-duty wall mount has been
FSM / FULL SWING WALL MOUNT. For Flat Panel Screens. User Manual
 FSM- 3760 / FULL SWING WALL MOUNT For 37-60 Flat Panel Screens User Manual Thank you for choosing Gabor. Thank you for choosing Gabor s full swing flat panel screen wall mount. This heavy-duty wall mount
Sailcloth Fabric Replacement Top and Doors with Tinted Side and Rear Curtains Installation Instructions
 Sailcloth Fabric Replacement Top and Doors with Tinted Side and Rear Curtains Installation Instructions TM For: Wrangler / TJ 2003 - Current Part Number: 79129 Inc. This product is only designed for the
UNIVERSAL DIFFUSER SERIES USER GUIDE
 UNIVERSAL DIFFUSER SERIES USER GUIDE 2 INTRODUCTION GENERAL INFORMATION Thank you for choosing a component of the Vello Universal Diffuser Series. Our diffusers and accessories extend the functionality
Sailcloth Fabric Replacement Top and Doors Installation Instructions
 Sailcloth Fabric Replacement Top and Doors Installation Instructions For: Wrangler/TJ 1997-2002 Part Number: 79121 This product is only designed for the vehicles listed above. DO NOT INSTALL THIS PRODUCT
Installation Instructions Replacement Top (Part # ) Unlimited (4 Door) Replacement Top (Part # ) JK (2 Door)
 Unlimited (4 Door) Replacement Top (Part # ) JK (2 Door)") NOTE: Read entire instructions thoroughly before installing this product. It is recommended to install this Top when temperatures are above 70 degrees. The top can contract and stretch an inch or more.
NOTE: Read entire instructions thoroughly before installing this product. It is recommended to install this Top when temperatures are above 70 degrees. The top can contract and stretch an inch or more.
Manual Carton Closing Staplers
 Operator s Manual Manual Carton Closing Staplers SHB00-A Item No. 6400 -/8" Crown Carton Closing Stapler 5/8" and /4" (5mm and 8mm) Ask for Genuine INTERCHANGE A58 and A4 Staples SHB50-C Item No. 640 -/4"
TSM / FULL MOTION WALL MOUNT. For Flat Panel Screens. User Manual
 TSM- 1327 / FULL MOTION WALL MOUNT For 13-27 Flat Panel Screens User Manual Thank you for choosing Gabor. Thank you for choosing Gabor s full motion flat panel screen wall mount. This heavy-duty wall mount
Installation Instructions Trektop NX
 Installation Instructions Trektop NX Vehicle Application: Jeep Wrangler Unlimited TJD 2004 2006 Part Number: 56821 www.bestop.com - We re here to help! Visit our web site and click on Ask a Question. Click
Installation Instructions Sailcloth Replace-a-top
 Installation Instructions Sailcloth Replace-a-top Upper Door Skins Not Included Vehicle Application Jeep Wrangler TJ 2003-2006 Tinted Glass Windows Part Number: 79141 www.bestop.com - We re here to help!
AcuteB Head. User s Guide
 User s Guide SAFETY PRECAUTIONS! Read and follow all safety instructions below carefully to avoid injuries or damages! Make sure that this user manual always accompanies equipment! Profoto products are
Be sure any accessory used will fit with the soft upper doors before installing. Not all accessories will be compatible.
 Company Name: Spike Power Sports Vehicle Name: Polaris General 2P Product Description: Soft Upper Doors Part Number: 58-1600 Revision: R01 09/19/2018 Contents: 655 Elm Ridge Ave, Canal Fulton OH, 44614
INSTALLATION INSTRUCTIONS ROLLER SHADES
 INSTALLATION INSTRUCTIONS ROLLER SHADES Tools Required: Tape measure, pencil, drill, drill bits, screw driver, step stool or ladder. Note: use a 5/64 drill bit to pre-drill the screw holes (for attachment
Installation Instructions Fabric Replacement Top Upper Door Skins Not Included
 Installation Instructions Fabric Replacement Top Upper Door Skins Not Included Vehicle Application Jeep Wrangler TJ 1997 and 2002 Clear Glass Windows Part Number: 51127 Jeep Wrangler TJ 1997 and 2002 Tinted
INSTALLATION MANUAL SONANCE SOUNDBARS SB46 M AND SB46 L. Introduction. Box Contents. Wall Mount Installations
 INSTALLATION MANUAL SONANCE SOUNDBARS SB46 M AND SB46 L Introduction Thank you for purchasing the Sonance Soundbar SB46 M or SB46 L. When properly installed your new Soundbar will give you years of entertainment
UPPER DOOR KIT P/N
 UPPER DOOR KIT P/N 2879946 Application RZR XP4 1000 Before you begin, read these instructions twice and check to be sure all parts and tools are accounted for. Please retain these installation instructions
Fabric Replacement Top and Doors
 Fabric Replacement Top and Doors Installation Instructions For: Wrangler/TJ 1997 and Newer Part Number: 51131 WARNING This product is designed to enhance the appearance of the vehicle and to shield the
PORTROD WALL MOUNTED HEIGHT ROD
 PORTROD WALL MOUNTED HEIGHT ROD USER INSTRUCTIONS P/N UMPORTROD Rev 1-052112 1 PORTROD Thank you for your purchase of this Health o meter Professional product. Please read this manual carefully, and keep
Stop! Read This Important Information.
 Stop! Read This Important Information. Stop, Do Not Proceed, Read This This door replacement kit is designed for the replacement of doors on a Supertop ONLY! This door will not work on any other style
Replay Top with Tinted Side and Rear Windows Installation Instructions For: Jeep Wrangler (TJ) Part Number: 51141
 Part Number: 51141") Replay Top with Tinted Side and Rear Windows Installation Instructions For: Jeep Wrangler (TJ) 2003 2006 Part Number: 51141 Table of Contents FABRIC REPLACEMENT TOP PARTS LIST... PAGE 2 FABRIC REPLACEMENT
Replay Top with Tinted Side and Rear Windows Installation Instructions For: Jeep Wrangler (TJ) 2003 2006 Part Number: 51141 Table of Contents FABRIC REPLACEMENT TOP PARTS LIST... PAGE 2 FABRIC REPLACEMENT
Replay Top w/ Tinted Side and Rear Windows and Upper Door Skins Installation Instructions For: Jeep Wrangler (TJ) Part Number: 51197
 Part Number: 51197") Replay Top w/ Tinted Side and Rear Windows and Upper Door Skins Installation Instructions For: Jeep Wrangler (TJ) 1997 2002 Part Number: 51197 Table of Contents FABRIC REPLACEMENT TOP PARTS LIST... PAGE
Replay Top w/ Tinted Side and Rear Windows and Upper Door Skins Installation Instructions For: Jeep Wrangler (TJ) 1997 2002 Part Number: 51197 Table of Contents FABRIC REPLACEMENT TOP PARTS LIST... PAGE
Models 2230 and 2240
 Models 2230 and 2240 Overview... 2 Tools Needed... 2 Hardware...3 Assembly... 4-13 Installation... 14 Drawer Removal... 15 Operation... 15 Maintenance... 15 Accessories... 16 Limited Warranty... 16 Perform
FSM / FULL SWING WALL MOUNT. For Flat Panel Screens. User Manual
 FSM- 2742 / FULL SWING WALL MOUNT For 27-42 Flat Panel Screens User Manual Thank you for choosing Gabor. Thank you for choosing Gabor s full swing flat panel screen wall mount. This heavy-duty wall mount
M ACS Instructions
 APPLICABLE MODELS: Nissan Frontier 2005 and up short bed with Utili-Trak mounting rails PACKAGE CONTENTS 00-0060-M-01-1205 ACS Instructions Leitner Designs 25675 Taladro Circle Unit E Mission Viejo, CA
Half Door Installation Instructions
 Half Door Installation Instructions For: CJ5 (1955-1975), CJ6 (All), M38-A1 (1955-1971) Part Number: 53025 Congratulations on your purchasing decision. Bestop designed these Doors to give you years of
Radiant 3000F Video Light (Cat. No. 6052)
") Fantasea Line Radiant 3000F Video Light (Cat. No. 6052) Instruction Manual 1 TABLE OF CONTENTS TABLE OF CONTENTS... 2 DISCLAIMER... 3 INTRODUCTION... 3 GENERAL INFORMATION... 3 SPECIFICATIONS... 4 INCLUDED
Fantasea Line Radiant 3000F Video Light (Cat. No. 6052) Instruction Manual 1 TABLE OF CONTENTS TABLE OF CONTENTS... 2 DISCLAIMER... 3 INTRODUCTION... 3 GENERAL INFORMATION... 3 SPECIFICATIONS... 4 INCLUDED
Radiant Pro 2500 Video Light (Cat. No. 6047)
") Fantasea Line Radiant Pro 2500 Video Light (Cat. No. 6047) Instruction Manual 1 TABLE OF CONTENTS TABLE OF CONTENTS... 2 DISCLAIMER... 3 INTRODUCTION... 3 GENERAL INFORMATION... 3 SPECIFICATIONS... 4 INCLUDED
Fantasea Line Radiant Pro 2500 Video Light (Cat. No. 6047) Instruction Manual 1 TABLE OF CONTENTS TABLE OF CONTENTS... 2 DISCLAIMER... 3 INTRODUCTION... 3 GENERAL INFORMATION... 3 SPECIFICATIONS... 4 INCLUDED
SP2 CONTINUOUS LIGHT KIT
 SP2 CONTINUOUS LIGHT KIT Model: 2816 SP2 Light Kit ASSEMBLY AND USER MANUAL SP2 CONTINUOUS LIGHT KIT Congratulations on purchasing the best solution for photo studio lighting on a budget. This kit is perfect
Top Mount. See Installation 2 on page 2
 INSTALLATION INSTRUCTIONS TOILET SEAT Thank you for selecting American Standard the benchmark of fine quality for over 00 years. To ensure this product is installed properly, please read these instructions
LifeGear G1 /HOME GYM ITEM NO.: 63100
 LifeGear G1 /HOME GYM ITEM NO.: 63100 OWNER S MANUAL IMPORTANT: Read all instructions carefully before using this product. Retain this owner s manual for future reference. The specifications of this product
AKZ13 13 OC Cantilever. Assembly and Operation Guide
 AKZ13 13 OC Cantilever Assembly and Operation Guide Thank you for your purchase of Treasure Garden s AKZ13 Cantilever Umbrella. Please remove all contents from the package, inspect and review checklist.
INSTALLATION INSTRUCTIONS
 INSTALLATION INSTRUCTIONS BRONCO FAST TRAC TOP PART #331-210 BRONCO 1966-1977 Thank you for purchasing Specialty s Convertible Top for your Bronco. It has been designed for great fit and long wear. Please
QuikBalance. Collapsible 18% Gray Panel INSTRUCTIONS
 QuikBalance Collapsible 18% Gray Panel INSTRUCTIONS 1 Introduction Thank you for choosing the Impact QuikBalance Collapsible 18% Gray Panel. This versatile, portable, easy-to-use photographic tool makes
LM600 Landmark Permanent Blind
 LM600 Landmark Permanent Blind Get parts online at www.huntriversedge.com P/N: 23033 REV1: 02/23/16 2016 RETI All Rights Reserved INTRODUCTION Landmark Permanent Blinds are engineered with you the hunter
Basic Spring Motor Roller Shades
 Basic Spring Motor Roller Shades ATTENTION!!! READ CAREFULLY! This shade has a reliable long-lasting Spring Motor. The Spring Motor must have proper tension in order to function as intended. Handling in
INSTALLATION INSTRUCTIONS Scout II - Fast Trac PART #
 INSTALLATION INSTRUCTIONS Scout II - Fast Trac PART #442-210 Thank you for purchasing Specialty s Convertible Top for your Scout vehicle. It has been designed for great fit and long wear. Please read and
Dual Arm Tilt LCD Mount
 Installation Manual model # 51324 M o u n t i n g S y s t e m s Dual Arm Tilt LCD Mount Fits Displays 13 to 32 Supports Up to 50 lbs (23 kgs) Projection from Wall from 3 to 17 Meets VESA Standards 50/75/100,
THANK YOU FOR PURCHASING OUR STUDIO RTA CREATION STATION
 THANK YOU FOR PURCHASING OUR STUDIO RTA MODEL# 20672 IF YOU REQUIRE ANY ASSISTANCE WITH ASSEMBLY, PARTS, OR INFORMATION ON OTHER PRODUCTS, PLEASE VISIT OUR WEBSITE: www.studiorta.com OR CALL OR WRITE THE
lighting your creativity HONEY BADGER 320Ws Digital Flash Instruction Manual
 lighting your creativity HONEY BADGER 320Ws Digital Flash Instruction Manual www.interfitphotographic.com Honey Badger 320 Digital Flash What s cool about the Honey Badger? The Honey Badger is the perfect
Models 2030 and 2040
 Models 2030 and 2040 Overview... 2 Tools Needed... 2 Hardware... 2 Assembly... 3-8 Installation... 9 Operation... 9 Maintenance... 10 Accessories... 10 Limited Warranty... 10 Document # 101290 0607 Printed
Installation Instructions Yamaha Rhino Soft Cab Enclosure
 Installation Instructions Yamaha Rhino Soft Cab Enclosure Vehicle Application Yamaha Rhino 2008 Current Part Number: 20301 www.bestoputv.com - We re here to help! Visit our web site and click on Ask a
Mortising Attachment
 Mortising Attachment Owner s Manual WARNING: Read carefully and understand all ASSEMBLY AND OPERATION INSTRUCTIONS before operating. Failure to follow the safety rules and other basic safety precautions
INSTALLATION INSTRUCTIONS JEEP SCRAMBLER FAST TRAC TOP PART #108-21X
 INSTALLATION INSTRUCTIONS JEEP SCRAMBLER FAST TRAC TOP PART #108-21X Thank you for purchasing Specialty s Convertible Top for your Jeep vehicle. It has been designed for great fit and long wear. Please
CAUTION: WEIGHT ON THIS PRODUCT SHOULD NOT EXCEED 136KG / 300LBS.
 OWNER S MANUAL Thank you for choosing the Sit N Cycle. We take great pride in producing this quality product and hope it will provide many hours of quality exercise to make you feel better, look better
738 SERIES PIVOT SHOWER DOOR
 INSTALLATION INSTRUCTIONS 738 SERIES PIVOT SHOWER DOOR Copyright Alumax Bath Enclosures 1997. All rights reserved. Page 1 of 8 LIMITED WARRANTY AND REMEDY Alumax Bath Enclosures warrants to its dealers,
!ATTENTION: READ BEFORE ASSEMBLING/OPERATING! ASSEMBLY & PACKING INSTRUCTIONS FOR THE MULTICHAIR 4000tx
 !ATTENTION: READ BEFORE ASSEMBLING/OPERATING! ASSEMBLY & PACKING INSTRUCTIONS FOR THE MULTICHAIR 4000tx multichair 4000Tx!ATTENTION: READ BEFORE ASSEMBLING/OPERATING! November 2016 ASSEMBLY INSTRUCTIONS!ATTENTION:
4-Door EXO-Top Roof Rack System
 Page 1/31 4-Door EXO-Top Roof Rack System 13516.02! WARNING The EXO-Top Roof Rack System is rated to a dynamic 300 lb, evenly distributed load. Further loading could result in serious injury or death.
YOUR LIFE. YOUR FIRE. Ortal Curved & Islands Fireplaces Installation Manual. Ortal USA - Version: 1.3 November, 2017 SKU: KPMANCIRISLUS17B
 YOUR LIFE. YOUR FIRE. Ortal Curved & Islands Fireplaces Installation Manual Ortal USA - Version: 1.3 November, 2017 SKU: KPMANCIRISLUS17B [THIS ISTALLATION MANUAL INCLUDES ASSEMBLY INSTRUCTIONS FOR THESE
YOUR LIFE. YOUR FIRE. Ortal Curved & Islands Fireplaces User s Manual
 YOUR LIFE. YOUR FIRE. Ortal Curved & Islands Fireplaces User s Manual [USA Fireplace Models [THIS ISTALLATION MANUAL INCLUDES ASSEMBLY INSTRUCTIONS FOR THESE MODELS: STAND ALONE 7565 CURVED TUNNEL DOUBLE
Installation Manual. Tamarack Solar Products. Top of Pole Mount Edition v1.01. For models:
 Mount Installation Manual 2016 Edition v1.01 For models: UNI-TP/06 UNI-TP/06LL UNI-TP/08 UNI-TP/08LL UNI-TP/10 UNI-TP/10LL UNI-TP/12 UNI-TP/12LL UNI-TP02-MAN Table of Contents 1 Introduction 1 2 Customer
TIRADE MMXI SOCCER TABLE
 TIRADE MMXI SOCCER TABLE Replacement Parts Order direct at or call our Customer Service department at (800) 225-7593 8 am to 4:30 pm Central Standard Time Publication 64-0908 Rev D August 2014 UPC Code
room essentials >> assembly instructions Nightstand DCPI # (Black Woodgrain)
") room essentials Nightstand DCPI # 249-05 - 0101 (Black Woodgrain) DCPI # 249-05 - 0104 (Espresso) DCPI # 249-05 - 0107 (Natural) DCPI # 249-05 - 0110 (White) >> assembly instructions 92331 F ROOM ESSENTIALS
room essentials Nightstand DCPI # 249-05 - 0101 (Black Woodgrain) DCPI # 249-05 - 0104 (Espresso) DCPI # 249-05 - 0107 (Natural) DCPI # 249-05 - 0110 (White) >> assembly instructions 92331 F ROOM ESSENTIALS
3 Emergency Breakaway Coupling
 SM64227 July 2008 Applicable addition manuals: N/A Aerospace Group Conveyance Systems Division Carter Ground Fueling Maintenance & Repair Manual 3 Emergency Breakaway Coupling Model 64227 Table of Contents
CFC Series Cable Replacement Kit. for CFP Series Carbon Fiber Boom Poles. Owner s Manual
 CFC Series Cable Replacement Kit for CFP Series Carbon Fiber Boom Poles Owner s Manual TA (mini XLR) connector Right-angle XLR connector Nylon line Coiled XLR cable. mm hex key Tip strain relief Introduction
RUSH G1 MECHANICAL KEYBOARD PRODUCT MANUAL V.14
 RUSH G1 MECHANICAL KEYBOARD V.14 SOFTWARE INSTALLATION DOWNLOAD SOFTWARE INSTALLER From: http://download.fnatic.com RUN THE INSTALLER ACCEPT POP UPS If you are prompted by any pop ups during the installation,
room essentials >> assembly instructions Drawer dresser w/ door Video instruction as Help to assembly, scan the QR code and see the video.
 room essentials 4 Drawer dresser w/ door DPCI # 249-05-0418 (Black Woodgrain) DPCI # 249-05-0419 (Virginia Walnut) >> assembly instructions 92380 Video instruction as Help to assembly, scan the QR code
Models 2130 and 2140
 Models 2130 and 2140 Overview... 2 Tools Needed... 2 Hardware... 2 Assembly... 3-10 Installation...11 Operation... 11 Maintenance... 12 Accessories...12 Limited Warranty... 12 Printed in USA 2007 Perform
Models 2130 and 2140
 Models 2130 and 2140 Overview... 2 Tools Needed... 2 Hardware... 2 Assembly... 3-10 Installation...11 Operation... 11 Maintenance... 12 Accessories...12 Limited Warranty... 12 Perform the following sequence
RAMPAGE P R O D U C T S. BRONCO ZIPPER FASTRACK TOP PART #984xx BRONCO TOOLS REQUIRED
 RAMPAGE P R O D U C T S 84 (+/- 1/4 ) BRONCO ZIPPER FASTRACK TOP PART #984xx BRONCO 1966-1977 TOOLS REQUIRED 3/8 WRENCH 7/16 WRENCH ½ WRENCH #2 PHILLIPS SCREWDRIVER 1/8 DRILL BIT 9/64 DRILL BIT 5/32 DRILL
INSTALLATION INSTRUCTIONS Super Scout PART #
 INSTALLATION INSTRUCTIONS Super Scout 71-80 PART #443-010 Thank you for purchasing Specialty s Convertible Top for your Scout vehicle. It has been designed for great fit and long wear. Please read and
the slim retracting clothesline product manual
 &6 the slim retracting clothesline product manual for 4 and 6-line models HLS0046_4-6 line_owners Manual_v6.indd 1 2 Introduction Congratulations Congratulations on the purchase of your new Hills slim
P4263TP. Installation Guide. Low-Profile Tilting Portrait Mount for Flat-Panels
 Low-Profile Tilting Portrait Mount for Flat-Panels 1321 S. State College Blvd., Fullerton, CA 92831 USA Weight Limit Maximum Flat Panel Weight: 175 lbs. Warning Statements THE WALL STRUCTURE MUST BE CAPABLE
UPPER DOOR KIT P/N APPLICATION BEFORE YOU BEGIN ITEMS MARKED (*) ARE INCLUDED IN HARDWARE KIT PN P/N Rev 01 07/14 Page 1 of 6
 ARE INCLUDED IN HARDWARE KIT PN P/N Rev 01 07/14 Page 1 of 6") UPPER DOOR KIT P/N 2880609 APPLICATION RZR 900 BEFORE YOU BEGIN Read these instructions thoroughly and make sure all parts and tools are accounted for. Please retain these installation instructions for
UPPER DOOR KIT P/N 2880609 APPLICATION RZR 900 BEFORE YOU BEGIN Read these instructions thoroughly and make sure all parts and tools are accounted for. Please retain these installation instructions for
ASPEN OUTDOOR TABLE TENNIS
 ASPEN OUTDOOR TABLE TENNIS Replacement Parts Order direct at or call our Customer Service department at (800) 225-7593 8 am to :30 pm Central Standard Time January 201 UPC Code 7-19265-51830-3 Staple your
SAVE THESE INSTRUCTIONS
 SAVE THESE INSTRUCTIONS SONOMA 10.5 FT CANTILEVER UMBRELLA ASSEMBLY INSTRUCTIONS ASSEMBLE ON A FLAT, PROTECTED SURFACE. PART LIST FIGURE QUANTITY DESCRIPTION A LOWER BRACKET B UPPER BRACKET C BASE POLE
Installation Instructions Factory Style Bow Kit
 INSTALLATION TIME Installation Instructions Factory Style Bow Kit SKILL LEVEL Vehicle Application: Jeep Wrangler JK 2 Door 2007 Current Part Number: 55000 Compatible with original equipment soft tops,
OPERATOR S MANUAL Model 58B Prefeed / Dereeler
 110 Fairgrounds Drive P.O. Box 188 Manlius, NY 13104-0188 USA 315.682.9176 FAX: 315.682.9160 OPERATOR S MANUAL Model 58B Prefeed / Dereeler PRODUCTION WIRE PROCESSING EQUIPMENT Website: www.carpentermfg.com
Your Super Simple Guide to Setting Up Your
 Your Super Simple Guide to Setting Up Your Canopy Desk Product Number: NAH006c About Canopy Furniture Lot Number: Date Purchased: / / Decorating your home should be fun and easy. The classic styles of
AG19 10 OC Cantilever. Assembly and Operation Guide
 AG19 10 OC Cantilever Assembly and Operation Guide Thank you for your purchase of Treasure Garden s AG19 Cantilever Umbrella. Please remove all contents from the package, inspect and review checklist.
OPERATOR S MANUAL Model 77E Pneumatic Cable Stripper
 110 Fairgrounds Drive P.O. Box 188 Manlius, NY 13104-0188 USA 315.682.9176 FAX: 315.682.9160 OPERATOR S MANUAL Model 77E Pneumatic Cable Stripper PRODUCTION WIRE PROCESSING EQUIPMENT Website: www.carpentermfg.com
10-PIECE. Garage Storage Set OWNER'S MANUAL. Patent pending
 10-PIECE Garage Storage Set OWNER'S MANUAL Patent pending IMPORTANT When you open the cartons, carefully check the units and make sure there IS NO damage. If you have any problems with the units or with
Flat Sheer Shade owner's handbook
 Flat Sheer Shade owner's handbook INSTALLATION INSTRUCTIONS Step 1. Check Package Contents Mounting hardware kit includes the following: Part a.mounting Brackets Quantity 2 for shades up to 45 wide 3 for
Tilting Flat Panel Wall Mount Installation Guide
 Tilting Flat Panel Wall Mount Installation Guide Model: A580TM Easy installation Built-in level for easy positioning Safety bolts lock the TV on the mount Easy to adjust tilt angles: +5 to -15 degrees
SS/SW3230RTA Assembly Instructions Ready to Assemble Multimedia Lectern
 650 Anthony Trail, Suite D, Northbrook, IL 60062 Phone: (800)267-5486 Fax: (800)267-5489 www.ampli.com - info@ampli.com SS/SW3230RTA Assembly Instructions Ready to Assemble Multimedia Lectern Thank you
X-PT 5. English. Printed: Doc-Nr: PUB / / 000 / 00
 X-PT 5 English 1 Overview of the items available 1.1 Technical description English 1 Item Description Length Weight A Pole tool 2.16 m (7 ft) 2.1 kg (4.63 lb) B Pole tool 1.55 m (5 ft) 1.8 kg (3.97 lb)
4-Piece Table Tennis Table
 Item# 45-6074 4-Piece Table Tennis Table Please keep this instruction manual for future reference If you have any problems with your new product, please contact Triumph Sports USA at 1-866-815-4173, or
Installation Instructions:
 NOTE: Carefully read entire instructions thoroughly before attempting to install this part. (SB76904) Parts Included Qty 94-241CA001 Front Upright: Drvr 1 94-241CA002 Front Upright: Pass 1 94-241CA003
INSTALLATION INSTRUCTIONS CJ-5 M38A PART # With Doors
 INSTALLATION INSTRUCTIONS CJ-5 M38A1 1955-1975 PART #109-011 With Doors Thank you for purchasing Specialty s Convertible Top for your Jeep vehicle. It has been designed for great fit and long wear. Please
Installation Instructions Cage Kit JK Unlimited (4-Dr) Part # 76902
 Part # 76902") Please read instructions entirely before installing this product. Drilling is required to install this part. Parts Included Qty Parts Included Qty Driver Front Upright 1 Pass Side Drill Template (7289)
Please read instructions entirely before installing this product. Drilling is required to install this part. Parts Included Qty Parts Included Qty Driver Front Upright 1 Pass Side Drill Template (7289)
User guide ProRing. For other languages visit:
 User guide ProRing For other languages visit: /support 2 Thank you for choosing Profoto. Follow the instructions in this booklet to use your new product. 3 Thanks for showing us your confidence by investing
THANK YOU FOR PURCHASING OUR STUDIO RTA PROJECT STATION
 THANK YOU FOR PURCHASING OUR STUDIO RTA MODEL# 50040 BLACK/MAPLE, 50042 PEWTER/CHERRY IF YOU REQUIRE ANY ASSISTANCE WITH ASSEMBLY, PARTS, OR INFORMATION ON OTHER PRODUCTS, PLEASE VISIT OUR WEBSITE: www.studiorta.com
impact VC-500LR Monolight INSTRUCTIONS
 impact lighting equipment and accessories VC-500LR Monolight INSTRUCTIONS Congratulations on your purchase of the Impact VC-500LR Monolight. We feel that it will contribute much to your photographic skill
300C6 CONTINUOUS HINGE SEMI-FRAMELESS DOOR KIT
 300C6 CONTINUOUS HINGE SEMI-FRAMELESS DOOR KIT LIMITED WARRANTY AND REMEDY Alumax Bath Enclosures warrants to its dealers, customers, and all subsequent purchasers and users, that the products supplied
AUC Cell Assembly Torque Stand. User Manual
 AUC Cell Assembly Torque Stand User Manual WARRANTY Spin Analytical Inc., warrants this product to be defect free in both material and workmanship for 90 days from the date of shipment. Labor services
MAINSTREET 36 INCH TABLE SOCCER
 Mainstreet 36 Inch Table Soccer MAINSTREET 36 INCH TABLE SOCCER Replacement Parts Order direct at or call our Customer Service department at (800) 5-7593 8 am to 4:30 pm Central Standard Time September
S E L E C T I O N. Arm Curl. User manual
 S E L E C T I O N T H E S T R E N G T H E V O L U T I O N User manual The identification plate of the and manufacturer, affixed behind the seat, gives the following details: A Name and address of the manufacturer