THE MAKING OF SUPER MODEL. Portraiture
|
|
|
- George Davidson
- 5 years ago
- Views:
Transcription
1 THE MAKING OF SUPER MODEL Portraiture
2 Mrs. Gilder will be photographing each of you. Why? Because, she s fast. That is why.
3 She will then place your image onto the student resource file, R Why, so that only the school can have access to this. You will download, once done, Mrs. Gilder will erase this.
4 Mrs. Gilder will officially stop talking about herself in the 3 rd person.
5 I ll use a beauty box set up for the girls and a beauty box set up with black gobos for the boys. Next you will use PS to turn yourselves into supermodels.
6 Steps towards photo-fantastyland perfection.
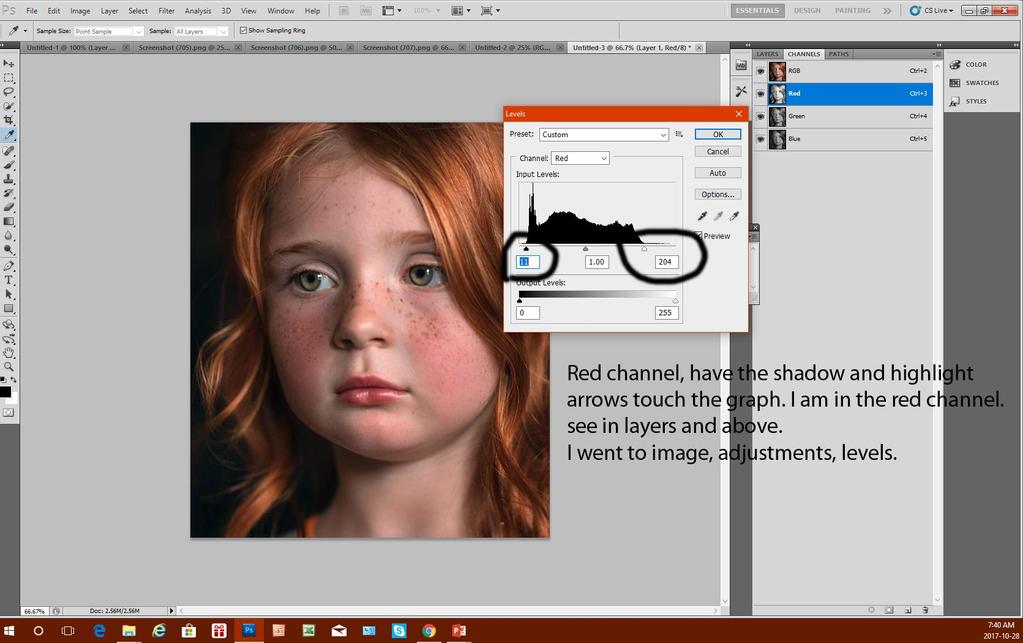
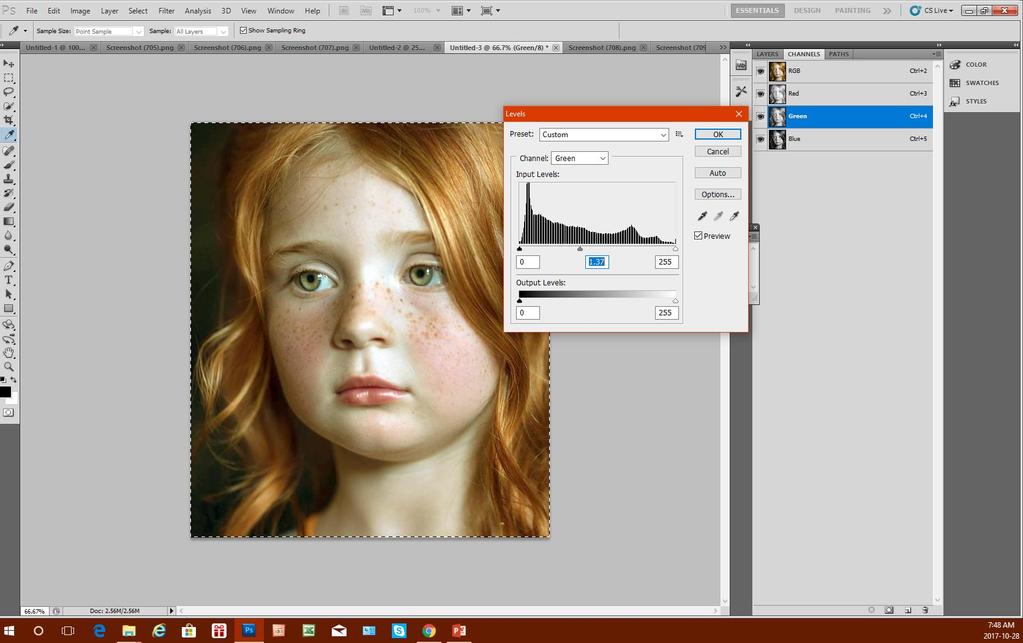
7 Window, layers. Have that show up. Pick channels. You want your image to stand out and can manipulate the red/green and blue. Re level each color. This will get you perfect results. But boring results. Do that first.
8
9
10 Final Image remember to flatten image. Original to the left, new one to the right.

11 But, now, let s really play mwa ha ha. I wanted to warm up her skin tones, so moved the middle sliders all over the place. Added green.
12
13
14
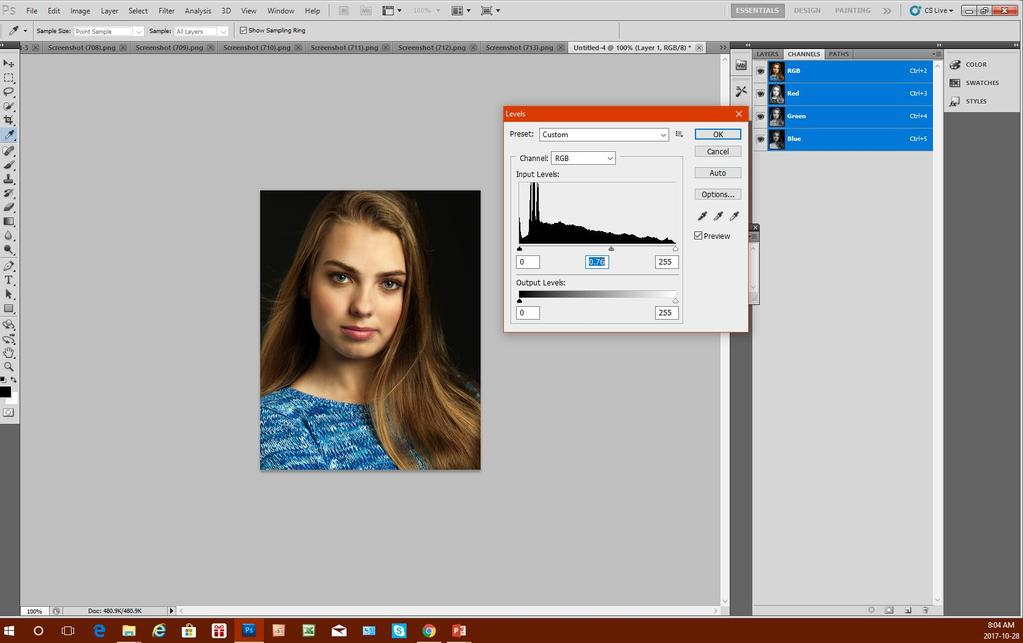
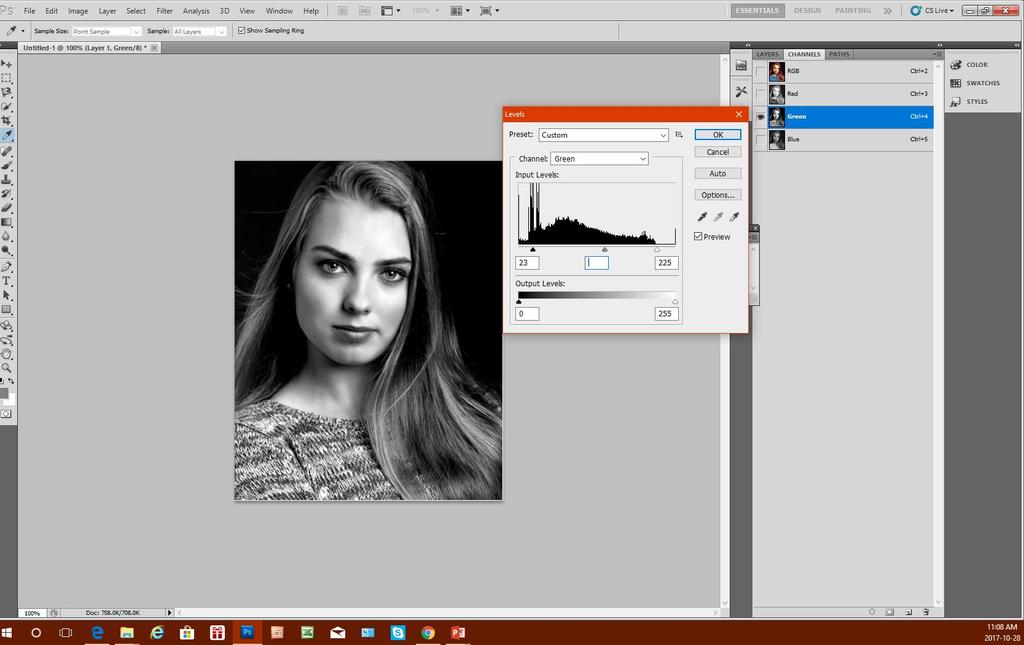
15 Now do overall levels.
16 End result after darkening midtones
17 But, I m not a child and have skin imperfections Oh no!
18 we can correct that too!!!

19 Shoot RAW ALWAYS Shirt a mess, hair a mess, either open or close the mouth, not in between. LOOK CLOSELY, HER MOUTH IS SLIGHTLY OPEN. ODD, VERY ODD.

20 Clothing off. See wrinkle on side. Hair okay clone out bad wind curl up top, could clone from other photo with better hair. Eyes okay. Neck strained. Odd finger nail polish, best to crop out.
21 Skin Enhancements Again, shoot RAW. Open in PS. Play with contrast and reduce clarity a touch, unless you shot with a long lens and low f stop. I shot 85mm, F 3.5 or so. 85 is okay. But not great. Should have shot 200 mm to flatten the face, reduce nose, widen and enlarge eyes.

22 RAW section Lose some detail through luminance. But don t go overboard.

23 RAW section If you didn t shoot long lens, mimic long lens. This actually makes the person look better without completely changing their features. Short lens gives a horse like appearance to all models. Don t overdo as you will get that alien like high forehead look. Which doesn t market models well.

24 Next Open Image. Recrop to rid odd edges due to changing your lens through RAW. Model portfolio size is normally 9x12 inches. Top is bulky, adds weight, arms are odd. Noting odd hair issue up top. Clone that out.

25 Bandage out imperfections. Duplicate layer in case you make a mistake. Clone out bottom part of under eye skin. But don t clone it all, otherwise you get this weird plastic look. Change opacity to 60%, yes, take it from the cheek below. Note cosmetic ads, pores under the eyes are not a reality, but are found in cosmetic ads. THESE ARE NO LONGER HUMAN. Note blue area, I didn t touch. She needs to look SOMEWHAT human. Left the moles that is her face, but bandaged out her pimples.

26 Go into layer>duplicate layer. Go into window>layers to get the layers window to show up. In layers window, change normal to overlay.

27 Keep the pointer onto the background copy, then press control I on a PC, learn how to invert this on an apple. Sorry, I have a PC.

28 Go into filter, other, high pass. Stay around 5-10 pixels, the older the person the higher the number. This is a young person, so am sticking to around 8.5
29 Okay it. Filter, Gaussian blur, and pick something between 0-5. This is inverted so the higher you go the more in focus. She s a young kid so going with 5 out of 5. Okay it. No photo for this, pretty straight forward. Next step on next page.
, you")
30 Add a layer mask. On a pc go with alt click while the arrow is on the first layer (the greyish one), you will get a black mask. Make sure in the swatches that the first one is white.

31 Pick a brush and paint over the skin. What will happen is the soft part under this will come forward. Click and paint. The black mask on the side will show you what you just painted. Then go into levels and change the levels up to bring in contrast. Image/adjustments/levels.

32 Needing to go softer? Use diffuse glow. Click onto the 2 nd swatch, see red at bottom. Choose color picker, pick the lightest part of the forehead. Go lighter even, just not porcelain.
33 Go into filters/distort/diffuse glow. Leave the levels as follows, grain, 0, you don t need grain, glow amount 1, otherwise you get all 80 s, clear amount the lower you go the more you get. A young person with skin you just fixed? Stay around 14 or 13. Older with tons of shine? Go to 9 or 10. Male? Don t bother. As for going porcelain? No. It isn t 1984 Yes, I know, eyeliner is horrific. Play in levels to look more fashion oriented.
34

35 Hair too dark after levels? Go into image, adjustments, highlights and shadows to correct that.
36 Final
37 Fashion Photography It s 1.5 hours of hair and makeup. It s 30 minutes of lighting based on face shape. No cheekbones? Butterfly lighting. Bad skin? Flat lighting. Great skin and cheekbones? Rembrandt for the NY market, for Canada? Flattish lighting. Then, 1-2 hours of photoshop minimum. Then darken the results in levels to make it appear that hey, this is what the person looks like. Ummm no, I don t think so

38 NY VS. Canada Skin tones. Guess which is which?

39 CHANGE YOURSELF TO B/W GO INTO IMAGE/ADJUSTMENTS/B -W AND PLAY WITH EACH ARROW TO GET THE EFFECT YOU ARE WANTING.
40
41 Then redid levels to look like fashion not beauty fashion. Fashion is darker and has more contrast
42 Rubrics A B C D Detail in the blacks and whites. Skin softening done well, looks somewhat natural. Most detail found in the blacks and whites. Skin softening done well, looks somewhat natural. Some detail missing, levels overdone or not done enough. Skin softening done doesn t look as natural. Overdone or underdone. Excellent tonal range. Great tonal range. Okay tonal range. Image has excellent contrast. Final image quality looks like something one would see in a NY Model agency. Imperfections gone and not obvious. Image has good contrast. Final image quality looks like something one would see in a magazine. Imperfections gone some help needed to Image has okay contrast. Final image quality is good. Imperfections needed a lot of Not done.
43 Keep it as you will become rockstars with cd covers next
Retouching Portraits in Photoshop
 Retouching Portraits in Photoshop I Removing Blemishes When removing blemishes, acne or other imperfections on the skin, our goal is to maintain as much of the original skin texture as possible. That way,
POLAROID EMULATION INCREASED CONTRAST, SATURATION & CLARITY
 POLAROID EMULATION The Polaroid SX-70 Camera was a sensational tool. It took photographs in real time. But just the color balance of the film and they way it developed had a unique look. Here are some
Module All You Ever Need to Know About The Displace Filter
 Module 02-05 All You Ever Need to Know About The Displace Filter 02-05 All You Ever Need to Know About The Displace Filter [00:00:00] In this video, we're going to talk about the Displace Filter in Photoshop.
Post-Processing/Editing Page 1
 All images need a little something to help re-create or re-imagine what you think a particular image should look like. Whether it is adding a digital gradient to a sky to help saturate and deepen the colours
Challenge Image: Blur the Background
 Challenge Image: Blur the Background Challenge Image: Blur the Background In this lesson, we re going to work on a challenge image that was submitted by a Masters Academy member. The image features a little
Realistic Skin Smoothing
 TIP SHEET #7 Realistic Skin Smoothing I think it s fair to say when it comes to retouching techniques, the number of different ways to smooth skin is seemingly endless. From blurring techniques through
Creating Pastel Images and other effects in Photoshop
 Creating Pastel Images and other effects in Photoshop Martin Addison 2015 Creating pastel images Page 1 Martin Addison FRPS Using White Layers in Photoshop 1. Create a new empty Layer 2. Edit> Fill 3.
Retouching and Restoring Images
 Beauty Retouching Open the Woman.psd file. Retouching and Restoring Images When retouching images first evaluate the faults that need to be eliminated vs. the ones that need to be minimized. First we will
Adobe Photoshop cs. Advanced Retouching. Julieanne Kost
 Julieanne Kost www.adobe.com www.adobeevangelists.com Adobe Photoshop cs Advanced Retouching There are several essential tools and techniques for retouching images of people, and one underlying secret:
Create a Beautiful Abstract Portrait in Photoshop - Psd Premium Tutorial
 Create a Beautiful Abstract Portrait in Photoshop - Psd Premium Tutorial By: Wojciech Pijecki In this tutorial we will combine several stock images to create an artistic, abstract portrait of a woman.
DAZ Productions - 3D Models, 3D Content, and 3D Software
 Página 1 de 26 Postwork made Easy Author: mizgriz Step 1: Preparing the image. Step 2: Get your glow on. Step 3: And now for something completely (not) different... Step 4: Hue and Saturate Step 5: About
Photoshop: Manipulating Photos
 Photoshop: Manipulating Photos All Labs must be uploaded to the University s web server and permissions set properly. In this lab we will be manipulating photos using a very small subset of all of Photoshop
IMAGE CORRECTION. You can find this and more information with video tutorials at
 IMAGE CORRECTION You can find this and more information with video tutorials at http://www.adobe.com/support/photoshop/ P H O T O S H O P T O O L S CLONE STAMP TOOL The Clone Stamp tool paints one part
Photo Retouch. We will start with the boring image on the top and get to the shining one on the bottom:
 Photo Retouch In this tutorial we will explore a few simple techniques to improve a digital photo using GIMP. Among other, we will make use of a couple of new features introduced in the new GIMP 2.4, the
Easily Smooth And Soften Skin In A Photo With Photoshop
 Easily Smooth And Soften Skin In A Photo With Photoshop Written by Steve Patterson OPEN THE START FILE BY RIGHT CLICKING THE.JPG FILE AND CHOOSING OPEN WITH ADOBE PHOTOSHOP. SAVE AS: X_lastname_firstname_Smooth_Soft
Photoshop Elements 3 Filters
 Photoshop Elements 3 Filters Many photographers with SLR cameras (digital or film) attach filters, such as the one shown at the right, to the front of their lenses to protect them from dust and scratches.
Extreme Makeovers: Photoshop Retouching Techniques
 Extreme Makeovers: Table of Contents About the Workshop... 1 Workshop Objectives... 1 Getting Started... 1 Photoshop Workspace... 1 Retouching Tools... 2 General Steps... 2 Resolution and image size...
Learning Photo Retouching techniques the simple way
 Learning Photo Retouching techniques the simple way Table of Contents About the Workshop... i Workshop Objectives... i Getting Started... 1 Photoshop Workspace... 1 Setting up the Preferences... 2 Retouching
Tutorial Another Rainy Day
 For this tutorial I wanted to take people through the process that I go through when painting buildings. In this tutorial I will be showing you how to paint A Rainy Day in four easy to follow steps...
Your texture pattern may be slightly different, but should now resemble the sample shown here to the right.
 YOU RE BUSTED! For this project you are going to make a statue of your bust. First you will need to have a classmate take your picture, or use the built in computer camera. The statue you re going to make
Contents: Bibliography:
 ( 2 ) Contents: Sizing an Image...4 RAW File Conversion...4 Selection Tools...5 Colour Range...5 Quick Mask...6 Extract Tool...7 Adding a Layer Style...7 Adjustment Layer...8 Adding a gradient to an Adjustment
Painting Special Effects on Photographs
 TUTORIAL 7 Painting Special Effects on Photographs In this tutorial you will learn how to transform a photo into a striking color composition with paintbrushes, masks, blending modes, color, and paper
Assignment Project Due & Critique 3.18 Retouching Photo Due 3.4
 Portraits Assignment Project Due & Critique 3.18 Retouching Photo Due 3.4 For this project, you will be exploring the subject of portraits with three different objectives. 1. In the style of Arnold Newman:
Introduction to Photoshop Elements
 John W. Jacobs Technology Center 450 Exton Square Parkway Exton, PA 19341 610.280.2666 ccljtc@ccls.org www.ccls.org Facebook.com/ChesterCountyLibrary Introduction to Photoshop Elements Chester County Library
Digital Painting from Poser Renders
 Página 1 de 12 Digital Painting from Poser Renders Author: momodot Printable Version Step 1: Setting-up Step 2: "Drawing" Step 3: Simplify Step 4: "Painting" Step 5: Glaze Step 6: Flatten Step 7: Texture
Advanced Photoshop Tutorial: RTVF Chairs
 Advanced Photoshop Tutorial: RTVF Chairs Jeremy Moore; January 31, 2007 Original Image To get some techie info out of the way, the image for this tutorial was taken hand-held with a Panasonic Lumix-LX2
The Arcane & Mystical Knowledge
 The Arcane & Mystical Knowledge Sharpening: What is it? Enhancement of local contrast that produces the appearance of greater definition and clarity (accutance). Where areas of different luminance values
Improve your photos and rescue old pictures
 PSPRO REVISTED Nov 5 2007 Page 1 of 7 Improve your photos and rescue old pictures This guide gives tips on how you can use Paint Shop5 and similar free graphic programmes to improve your photos. It doesn
Turning Photograph Into Cartoon-Style Picture. Digital Media I West High School Susan M. Raymond
 Turning Photograph Into Cartoon-Style Picture Digital Media I West High School Susan M. Raymond Part 1: Creating Outline Wondering how those guys on the internet turn photograph into a nice cartoon-style
Photoshop Blending Modes
 Photoshop Blending Modes https://photoshoptrainingchannel.com/blending-modes-explained/#when-blend-modes-added For those mathematically inclined. https://photoblogstop.com/photoshop/photoshop-blend-modes-
Na'vi from Avatar Movie
 Na'vi from Avatar Movie Prep Open Photoshop. Go to Photoshop>Preferences>Performance. Where is says "History && Cache" Change the history states to "200". Chances are you will mess up A LOT and you want
Photoshop Elements Hints by Steve Miller
 2015 Elements 13 A brief tutorial for basic photo file processing To begin, click on the Elements 13 icon, click on Photo Editor in the first box that appears. We will not be discussing the Organizer portion
Varis PhotoMedia Tutorials
 Varis PhotoMedia Tutorials 2004, Lee Varis Welcome This tutorial has been prepared for the photographer who is striving to learn digital imaging. I make an effort to supply current information about digital
HDR Show & Tell Image / Workflow Review Session. Dave Curtin Nassau County Camera Club October 3 rd, 2016
 HDR Show & Tell Image / Workflow Review Session Dave Curtin Nassau County Camera Club October 3 rd, 2016 Capturing Realistic HDR Images Topics: HDR Review (Brief Summary from HDR Presentation Parts: 1
Selective Editing in Camera Raw 5
 Selective Editing in Camera Raw 5 The editing tools that you saw in the last chapter are global editing tools. That is, they affect all parts of the image. So, when you choose to, for example, brighten
Camera Raw software is included as a plug-in with Adobe Photoshop and also adds some functions to Adobe Bridge.
 Editing Images in Camera RAW Camera Raw software is included as a plug-in with Adobe Photoshop and also adds some functions to Adobe Bridge. Camera Raw gives each of these applications the ability to import
How to Create Fake Shadows
 TIP SHEET #8 How to Create Fake Shadows As well as the colour, it s the shadows in a picture that help to give it mood and atmosphere so in this tutorial I want to show you how you can add in extra shadows.
15 Photoshop Tips. Changing Photoshop rulers from inches to picas
 5 Photoshop Tips Changing Photoshop rulers from inches to picas What s the difference between inches and picas? a 6x inch RGB JPEG file is.9 MB a 6x pica RGB JPEG file is. MB a 6x inch RGB TIFF file is.
Pacific New Media David Ulrich
 Pacific New Media David Ulrich pacimage@maui.net www.creativeguide.com 808.721.2862 Sharpening and Noise Reduction in Adobe Photoshop One of the limitations of digital capture devices and digital chips
PRIMARY LIGHTING PATTERNS OF CLASSIC PORTRAITURE
 PRIMARY LIGHTING PATTERNS OF CLASSIC PORTRAITURE http://www.portraitlighting.net/patternsb.htm http://www.digital-photo-secrets.com/tip/2627/frontlight-vs-side-light-vs-back-light/ This section contains
Lighting a Portrait. Sarah Parks. Sarah Parks 1
 Lighting a Portrait Sarah Parks Sarah Parks http://drawingartinstrution.com 1 Introduction There are many interesting ways to light a subject for portrait painting. Certain lighting will elicit different
Pacific New Media David Ulrich
 Pacific New Media David Ulrich pacimage@maui.net www.creativeguide.com 808.721.2862 Digital Imaging Workflow in Adobe Photoshop All color and tonal correction editing should be done in a non-destructive
Example 10: Restoring a Very Yellowed B & W Snapshot
 Example 10: Restoring a Very Yellowed B & W Snapshot Fig. 11-10a This photograph is so badly yellowed that it s diffi cult to tell which parts of the image have faded and which have been lost entirely.
Step-by-step processing in Photoshop
 Step-by-step processing in Photoshop (Barry Pearson, 02 April 2010; version 4). For probably about 90% of photographs I intend to display to other people, I use the following method in Photoshop. The Photoshop
A Basic Guide to Photoshop CS Adjustment Layers
 A Basic Guide to Photoshop CS Adjustment Layers Alvaro Guzman Photoshop CS4 has a new Panel named Adjustments, based on the Adjustment Layers of previous versions. These adjustments can be used for non-destructive
The toolbar in Pixlr Editor always appears on the left-hand side, although you can drag it anywhere you like.
 The toolbar in Pixlr Editor always appears on the left-hand side, although you can drag it anywhere you like. Crop (Shortcut: C) Reframe your entire canvas to a desired size and remove everything else.
Maine Day in May. 54 Chapter 2: Painterly Techniques for Non-Painters
 Maine Day in May 54 Chapter 2: Painterly Techniques for Non-Painters Simplifying a Photograph to Achieve a Hand-Rendered Result Excerpted from Beyond Digital Photography: Transforming Photos into Fine
Adobe Photoshop. How To Get Started With Adobe InDesign CC: 10 Things Beginners Want To Know How To Do TO START: 1) ZOOM, MOVE, RETOUCH (05:11)
 ZOOM, MOVE, RETOUCH (05:11)") Adobe Photoshop How To Get Started With Adobe InDesign CC: 10 Things Beginners Want To Know How To Do Video By Terry White Tutorial Sheet by Juliet Davis TO START: Open the tutorial in YouTube, download
Adobe Photoshop How To Get Started With Adobe InDesign CC: 10 Things Beginners Want To Know How To Do Video By Terry White Tutorial Sheet by Juliet Davis TO START: Open the tutorial in YouTube, download
Photoshop CC Editing Images
 Photoshop CC Editing Images Rotate a Canvas A canvas can be rotated 90 degrees Clockwise, 90 degrees Counter Clockwise, or rotated 180 degrees. Navigate to the Image Menu, select Image Rotation and then
Photoshop: Manipulating Photos
 Photoshop: Manipulating Photos All Labs must be uploaded to the University s web server and permissions set properly. In this lab we will be manipulating photos using a very small subset of all of Photoshop
Central Photography Photoshop Tutorial. Color Splash. 1. Open Photoshop. 2. Go to File>Open (Command O).
.") 1. Open Photoshop. 2. Go to File>Open (Command O). 1 3. Navigate to your file, select it and open it. 2 4. Fix your photo. If it s too light, darken it. If it s too dark, lighten it. To do that, add a
1. Open Photoshop. 2. Go to File>Open (Command O). 1 3. Navigate to your file, select it and open it. 2 4. Fix your photo. If it s too light, darken it. If it s too dark, lighten it. To do that, add a
Using Adobe Photoshop
 Using Adobe Photoshop 8 In the last section we looked at adjusting colours to improve your image. In this section we ll look at various ways of touching up your images to fix problems with the images or
Painting A Complete Portrait
 Week 6 So this is it, the final week of the course. We have learnt all the theory we need to know and we have painted all the individual parts of the face. Now it's time we put all our knowledge together
How to Control Tone and Contrast in BW Conversion
 How to Control Tone and Contrast in BW Conversion This article explains how to select and manipulate tone and contrast compositions in conversion of a color image into a black and white image, and how
Sharpening is an essential final step before output. But sometimes, you don t want to
 Sharpening is an essential final step before output. But sometimes, you don t want to sharpen your entire image equally. Skin tones, clouds, noisy areas - it s best to apply less sharpening to these areas,
By Washan Najat Nawi
 By Washan Najat Nawi how to get started how to use the interface how to modify images with basic editing skills Adobe Photoshop: is a popular image-editing software. Two general usage of Photoshop Creating
Lesson 16 Text, Layer Effects, & Filters
 Lesson 16 Text, Layer Effects, & Filters Digital Media I Susan M. Raymond West High School In this tutorial, you will: Create a Type Layer Add and Format Type within a Type Layer Apply Layer Effects Apply
Photography Feb. 26 th March 8
 Photography Feb. 26 th March 8 Oh, we have a lot to do! Pinhole negative to positive and mounting. Aperture exercise understanding depth of field. Film photography if everything is completely done. Group
Types of Mask. Layer masks
 Photoshop Layer Mask Features Non destructive (does not delete pixels) until applied Uses brush tool which is configurable Can be added to any layer (except Background unless double click to unlock) including
Photoshop: Manipulating Photos
 Photoshop: Manipulating Photos All Labs must be uploaded to the University s web server and permissions set properly. In this lab we will be manipulating photos using a very small subset of all of Photoshop
PS958 - SHARPENING WORKFLOW 1 N/08/08
 INTRODUCTION TO GRAPHICS Sharpening Workflow Information Sheet No. PS958 Sharpening is a critical step in digital imaging, yet few people are satisfied with the results. Research conducted for a commercial
Name the layer you rotated in step 3 Stripe and lower the opacity to 43%.
 Step 1 Open Photoshop and create a new file 1085 649 pixels. Fill the layer with a bright blue color (#0095db) by pressing Shift + F5. This will be the background for our pop art scene. Step 2 Let s create
With the paper layer selected, select the lock transparent pixels box. An icon of a lock should now appear in the paper layer
 Eye In Hand Project This project is going to entail placing the eyeball you made in your last project in the middle of your hand. The goal is to make it look like it s popping out of the skin and to make
CS 547 Digital Imaging Lecture 2
 CS 547 Digital Imaging Lecture 2 Basic Photo Corrections & Retouching and Repairing Selection Tools Rectangular marquee tool Use to select rectangular images Elliptical Marque Tool Use to select elliptical
Black and White Photoshop Conversion Techniques
 Black and White Photoshop Conversion Techniques Andrew Gibson on Jan 27th 2011 Final Product What You'll Be Creating A quick glance through any photography or fashion magazine, or at the photos on social
The Future. of History
 The Future Non-Linear History option allows you to undo a state and try a new version of the image while the previous states remain available for reference (Figure 2). of History The Photoshop 5.0 History
Using Adobe Photoshop
 Using Adobe Photoshop 8 In the last section we looked at adjusting colours to improve your image. In this section we ll look at various ways of touching up your images to fix problems with the images or
Cute Gooey Blob Photoshop Tutorial
 Download the PSD Cute 3D Character.zip 22.11 MB Download from Website (http://photoshoptutorials.ws/downloads/psd/cute 3D Character.zip) Cute Gooey Blob Photoshop Tutorial Step 1 Create a new document
Adobe PhotoShop Elements
 Adobe PhotoShop Elements North Lake College DCCCD 2006 1 When you open Adobe PhotoShop Elements, you will see this welcome screen. You can open any of the specialized areas. We will talk about 4 of them:
Adobe Photoshop CS5 Tutorial
 Adobe Photoshop CS5 Tutorial GETTING STARTED Adobe Photoshop CS5 is a popular image editing software that provides a work environment consistent with Adobe Illustrator, Adobe InDesign, Adobe Photoshop
Beauty Box Video. Smooth skintones in video footage. for After Effects, Final Cut Pro, Premiere Pro.
 Smooth skintones in video footage. BEFORE AFTER Beauty Box Video for After Effects, Final Cut Pro, Premiere Pro Digital Anarchy Smart tools for creative minds www.digitalanarchy.com Beauty Box Video: Table
Commercial Art 1 Photoshop Study Guide. 8) How is on-screen image resolution measured? PPI - Pixels Per Inch
 How is on-screen image resolution measured? PPI - Pixels Per Inch") Commercial Art 1 Photoshop Study Guide To help prepare you for the Photoshop test, be sure you can answer the following questions: 1) What are the three things should you do when you first open a Photoshop
Commercial Art 1 Photoshop Study Guide To help prepare you for the Photoshop test, be sure you can answer the following questions: 1) What are the three things should you do when you first open a Photoshop
How to blur a background in Photoshop CS3, Elements 9 or later By Steve Zimic
 This is a technique I developed which allows blurring of the background without any bleeding of the main subject into the background. This technique does require a working knowledge of the various selection
The Five Basic Portrait-Lighting Setups
 The Five Basic Portrait-Lighting Setups By Bill Hurter Published by Amherst Media Paramount. Loop. Rembrandt. Split. Rim. Bill Hurter provides light-by-light instructions and diagrams to show you how to
Adobe Lightroom CC Tutorial
 Adobe Lightroom CC Tutorial GETTING STARTED Adobe Lightroom CC is a photo editing program which can be used to manipulate and edit large quantities of photos at once. It has great exporting and metadata
Inverted Colors Photo Effect With Photoshop
 Inverted Colors Photo Effect With Photoshop Written by Steve Patterson. In this Photoshop Effects tutorial, we re going to look at how to invert the colors in an image to create interesting photo effects.
How can images be manipulated to represent an animal?
 Roboanimal This lesson will explore the concept of natural objects when combined with manmade objects. You will be choosing an animal or natural being to digitally manipulate into a total manmade creature.
Stretching Your Photons
 Stretching Your Photons Advanced Imaging Conference November 10-12, 2006 San Jose, California by R. Jay GaBany www.cosmotography.com 2006 Please do not reproduce or distribute without permission. We work
Unit 7 : Image Painting, Editing and Layers
 Unit 7 : Image Painting, Editing and Layers Introduction This Unit describes about various painting tools; such as selection, cropping and measuring tools, retouching, drawing and type tools, Navigation
Photoshop CC: Essentials
 Photoshop CC: Essentials Summary Workspace Overview... 2 Exercise Files... 2 Selection Tools... 3 Select All, Deselect, And Reselect... 3 Adding, Subtracting, and Intersecting... 3 Working with Layers...
HISTOGRAMS. These notes are a basic introduction to using histograms to guide image capture and image processing.
 HISTOGRAMS Roy Killen, APSEM, EFIAP, GMPSA These notes are a basic introduction to using histograms to guide image capture and image processing. What are histograms? Histograms are graphs that show what
Mullingar Camera Club Basic introduction to Digital Printing using Photoshop CC.
 Mullingar Camera Club Basic introduction to Digital Printing using Photoshop CC. Table of Contents Course aims: 1 Course presentation notes: 1 Introducing Photoshop: 1 Adjusting the Brightness or Contrast
Luminosity Masks Program Notes Gateway Camera Club January 2017
 Luminosity Masks Program Notes Gateway Camera Club January 2017 What are Luminosity Masks : Luminosity Masks are a way of making advanced selections in Photoshop Selections are based on Luminosity - how
Combine Black-and-White and Color
 Combine Black-and-White and Color Contributor: Seán Duggan n Specialty: Fine Art Primary Tool Used: Smart Objects Combining color and black-and-white in the same image is a technique that has been around
SIMPLE POP ART EFFECT
 SIMPLE POP ART EFFECT In this Photoshop tutorial, we re going to see how to turn a photo into a simple 1950 s and 60 s pop art-style effect. If you can make a selection with the Lasso tool and you understand
Adobe Photoshop PS2, Part 3
 Adobe Photoshop PS2, Part 3 Basic Photo Corrections This guide steps you through the process of acquiring, resizing, and retouching a photo intended for posting on the Web as well as for a print layout.
Adobe Photoshop. Levels
 How to correct color Once you ve opened an image in Photoshop, you may want to adjust color quality or light levels, convert it to black and white, or correct color or lens distortions. This can improve
A Basic Guide to Photoshop Adjustment Layers
 A Basic Guide to Photoshop Adjustment Layers Photoshop has a Panel named Adjustments, based on the Adjustment Layers of previous versions. These adjustments can be used for non-destructive editing, can
Color in a Monochromatic World
 Color in a Monochromatic World We take a black and white photo and turn it into a color one. Let s get started! CAPONATA STUDIOS Color in a Monochromatic World We take a black and white photo and turn
Kent Messamore 3/6/2010
 Post Processing Kent Messamore 3/6/2010 What we will cover Post Processing Photoshop, Lightroom, Elements, and others JPEG or RAW Photoshop Elements Workflow Organization, Create, share Photoshop Elements
Color Correction and Enhancement
 10 Approach to Color Correction 151 Color Correction and Enhancement The primary purpose of Photoshop is to act as a digital darkroom where images can be corrected, enhanced, and refined. How do you know
ELEMENTS AND PRINCIPLES OF DESIGN. Grade 12
 ELEMENTS AND PRINCIPLES OF DESIGN Grade 12 CENTERED This is what many beginner photographers do. You are no longer a beginner. Do this some of the time, but not often. This works why? Discuss with a neighbour
Varis PhotoMedia Tutorials
 Varis PhotoMedia Tutorials 2002, Lee Varis Welcome This tutorial has been prepared for the photographer who is striving to learn digital imaging. I make an effort to supply current information about digital
Editing Using Photoshop CS5
 The Photoshop CS4 Editing Workspace - shown is the document (image) window, ToolBox, Info, Navigator, History, Adjustments and Layers Palettes, Windows Menus and Options Bar (on top). USING THE LAYERS
Using Adobe Photoshop
 Using Adobe Photoshop 6 One of the most useful features of applications like Photoshop is the ability to work with layers. allow you to have several pieces of images in the same file, which can be arranged
UNDERSTANDING LAYER MASKS IN PHOTOSHOP
 UNDERSTANDING LAYER MASKS IN PHOTOSHOP In this Adobe Photoshop tutorial, we re going to look at one of the most essential features in all of Photoshop - layer masks. We ll cover exactly what layer masks
Portraiture Creating and Editing. Aaron Taylor Aaron Taylor Photography LLC
 Portraiture Creating and Editing Aaron Taylor Aaron Taylor Photography LLC Who Am I? Owner of Aaron Taylor Photography LLC Family portraits Seniors Weddings and events Business and social media Headshots
Example 4: A Faded E-1 Slide
 Fig. 10-4-a This is a 50- year-old Ektachrome (E- 1) slide. It s lost a great deal of cyan dye and has developed an overall red stain. In addition, it has a bad case of the measles there are yellowish
Composite Master Class Blend two images together to create a seamless collage
 Composite Master Class Blend two images together to create a seamless collage By Liz Ness Whether it s a custom senior photo, an album cover, or a basic digital collage, combining two or more images to
Teach Yourself Adobe Photoshop Topic 9: Photo Retouching Part 2
 http://www.gerrykruyer.com Teach Yourself Adobe Photoshop Topic 9: Photo Retouching Part 2 In the last week s lesson, you repaired damaged areas of an image, removed unwanted parts of an image, cloned