Camera Modes. Understanding DSLR Camera Shooting Modes
|
|
|
- Sibyl McCoy
- 5 years ago
- Views:
Transcription

1 Camera Modes Understanding DSLR Camera Shooting Modes A digital camera comes with a selection of Automatic camera modes. These are pre- programmed settings that allow you to choose the optimum shutter speed and aperture value for the photograph you want to take. They are useful when you are starting out. Familiarize yourself with the settings and get comfortable with them; and remember that every camera has slightly variable preset modes. The following are the most common: 1. Auto Mode Automatic Exposure is when the camera chooses the optimum shutter speed, aperture, ISO and flash settings for your shot. All you need to do is point and shoot. This can be good if you have no idea of what settings to choose and also when you need to shoot quickly. The shot here is perfectly exposed as the day is well lit, though auto- exposure may struggle in situations where the light is uneven, and it tends to trigger the flash even when it s not necessary. 2. Portrait Mode Portrait mode will think that there is a subject in the foreground of the frame and choose a shallow depth of field in order to keep the human subject in focus but the background blurred. If the camera reads the scene as dark, it will add fill- in flash. Fill- in flash is useful in sunny conditions too, when the sun casts a harsh shadow. Portrait mode generally works best in well lit conditions.

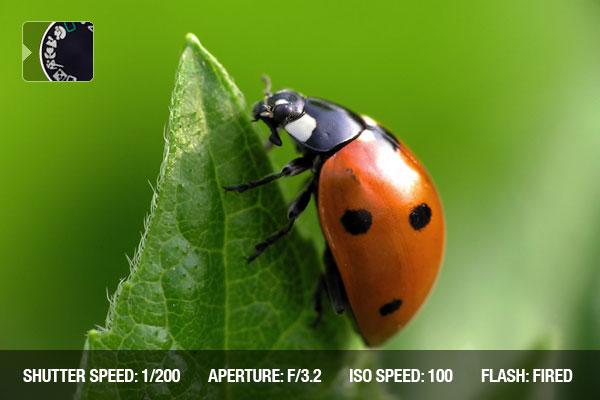
2 3. Macro Mode

3 Macro mode is very useful to take a photograph of an image smaller than your hand. Remember that macro mode will not give you super close up images; for this you will need a macro lens. Macro mode will work best in bright conditions and will choose a shallow depth of field to focus on the subject. Therefore, if light is low, use a tripod. Your focusing also has to be more careful when taking a macro image. This is because when you use a shallow depth of field, you give yourself a smaller margin for error. 4. Landscape Mode Landscape mode usually uses a small aperture (high f/number) to create a well focused image from the foreground into the distance (on old style cameras, the setting was infinity represented by a sideways figure 8). Landscape mode tends to suit a wide lens, and again works well if the scene is well lit. It will use flash if it reads the foreground as too dark, but you can manually turn this off. 5. Sports Mode Because sports are fast paced activities, sports mode will give you a high shutter speed of at least 1/500 1/1000 of a second. With a high shutter speed to freeze movement, this works best on a bright day. Sports mode can work well alongside continuous shooting mode, where images are taken consecutively the result is a number of shots capturing action in mid air.

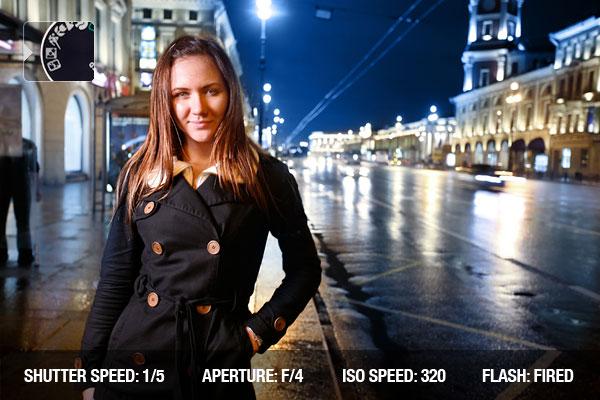
4 6. Night Portrait Mode
5 In the night portrait mode, the camera will try to balance the darkness of the background with the need to light the subject in the foreground. The aperture will have to be fairly wide to allow enough light in to capture the background and keep the subject in focus, but at the same time flash is necessary to illuminate the person and avoid blur. Sometimes the night portrait mode will double flash, creating an unusual double exposure look Advanced Camera Modes On most DSLR cameras, there will also be the letter modes M (Manual): Manual allows the photographer to change every single setting AV (Aperture- Priority): Aperture- Priority allows the photographer to set the aperture value and the camera automatically sets the correct shutter speed. Uses portraits, event photography TV or S (Shutter- Priority): TV lets the photographer choose the shutter speed first (for example when shooting sports) and the camera automatically sets the correct aperture. P (Programmed Auto): P- Program mode is similar to Auto mode - the shutter and aperture settings are determined by the camera, but the photographer can adjust the shooting and image- recording functions such as ISO and exposure compensation.

6 Metering and Exposure Why is this so important? So you can accurately represent the image by capturing all the details, colours, shadows and textures. I m sure by now that you ve taken an improperly exposed photograph while experimenting with your camera, and have seen the loss of image information in the highlights. Unfortunately with digital photography once you ve over- exposed an image, that image information is gone forever. So ignore this at your own peril, or watch your skill flourish. Center- Weighted Metering In this mode, the camera measures the light information originating from the middle of the viewfinder (it also absorbs image data from the rest of the frame, but the computer gives that light less importance). This setting causes the camera to focus on the subject in the middle of the frame and isn t too influenced by any excessively dark or light backgrounds or sides of the frame. This setting is ideal for when your subject is in the centre of the frame, for instance, a portrait, your sleeping cat, or your broken headlight after an accident.

7 Spot Metering Mode When you look through the lens of a DSLR there are typically a series of focus points and/or centre- ing marks; these are small, sometimes selectable areas within the frame from which the camera then samples light to determine the exposure the spot. Any light that falls out of the designated spot is effectively ignored during the exposure value calculation. This setting is ideal for when the subject is small within the frame or the lighting on background objects competes with the main subject and you need to zero in on what has captured your eye. Many cameras allow the user to choose which mark is the spot, thus giving you more flexibility and control. Partial Metering Mode Partial Metering is a camera- metering mode in which the metering is weighted at the center of the viewfinder (unlike center- weighted in which the camera averages the exposure based on the reading at the center). You can think of Partial Metering as expanded spot metering, because the area that is metered is specific, but not tiny (roughly 10% of the viewfinder versus 2.3% of the viewfinder for spot metering mode). Partial metering is best used when your subject is overly backlit and you want to get a quality exposure of the subject. Partial metering will enable correct exposure of your subject, however the background will be over- exposed. Partial metering will enable you to more specifically control the exposure in a particular region of the photograph.


8 Multi- Zone Metering Mode
9 Multi- zone metering (also called Matrix, Evaluative metering) is the generic default setting in which the TTL meter uses light from all points in the frame and then the camera makes an approximation as to what s most important when calculating the exposure value. The effectiveness of the matrix in question has a lot to do with the internal computer and how many matrix points are present (for example 6- point or 9- point matrix). This basic setting is the most non- discriminating and therefore is most useful in situations where the lighting is most uniform like a landscape and there aren t any excessive highlights or dark pockets that could trick the sensor. Recommended Settings First examine the picture through the viewfinder. If it looks evenly lit, use the evaluative or Multi Zone metering mode. If the person or subject to be photographed has a bright light source like the sun behind them, use centre- weighted average metering mode. If your subject is the most significant part of the picture, use spot metering mode - also referred to as partial mode. Just ensure that you aim the metering mode icon in the centre of your camera s viewfinder- at your subject.

10 White Balance Understanding White Balance in Digital Photography White balance (WB) is considered as one of the most important settings of a digital camera. Let s consider a scenario where you want to capture the beauty of sea waves hitting the shore with an overcast sky at the background. Sounds interesting? Well, if you don t use the correct white balance setting of your digital camera, you may get a picture with colours different from the actual ones. Therefore, in order to produce a beautifully exposed image with true to life colours, you must learn to effectively use the white balance setting of your digital camera. Color Temperature To understand the concept of White Balance, you need to first understand the concept of colour temperature. Colour temperature is a characteristic of visible light. It provides a method of describing these characteristics and is measured in Kelvin (K). A light having higher colour temperature will have more blue light or larger Kelvin value as compared to lower light, which has a smaller Kelvin value. The following table shows the colour temperature of various sources of light How does the Light Affect the Color? You may have noticed some photos turn out with an orange/yellow cast if shot under tungsten lighting or a bluish cast if shot under fluorescent lights. This occurs because each source of light possesses a different colour temperature. A digital camera can measure the colours in the red, green, and blue light of the spectrum, as reflected to its sensors.
 without adjusting the digital camera for white balance produces the dull orange shade as it spreads the biased light.")
11 In a photo taken under the midday sun there is the whole spectrum of light (which makes up white sunlight). Under these conditions, the colours in an image appear nearest to the true colours. An image taken under tungsten bulb (a normal household incandescent bulb) without adjusting the digital camera for white balance produces the dull orange shade as it spreads the biased light. Similarly, an image taken under the fluorescent lighting produces a brighter bluish cast. However, it is possible to shift the colour in the desirable direction, provided you have a good understanding of your digital camera and its settings. Why Adjust the White Balance? Since different sources of light have different colour hues, a picture taken with a normal white balance under artificial lighting conditions transmits the low heat to the camera s sensor. This light touches the red bits of the spectrum, which results into dull yellow or orange shades in the picture. Though the human eyes can automatically adjust to different lights and colour temperatures to sense right colour, a camera needs to be adjusted to different lights for accurate colour

12 reproduction. By adjusting the white balance setting of your digital camera, you can alter the required light or temperature to produce the most accurate colors in a digital image. Preset White Balance Settings Auto The Auto setting helps in adjusting the white balance automatically according to the different lighting conditions, but you can try other modes to get better results. Tungsten This mode is used for light under a little bulb like tungsten, and it is often used while shooting indoors. The tungsten setting of the digital camera cools down the color temperature in photos. Fluorescent This mode is used for getting brighter and warmer shots while compensating for cool shade of fluorescent light. Daylight This mode is for the normal day light setting, while shooting outdoors. Many cameras do not have the Daylight mode. Cloudy This mode is ideal for while shooting on a cloudy day. This is because it warms up the subject and surroundings and allows you to capture better shots. Flash The flash mode is required when there is inadequate lighting available. This mode helps pick the right White Balance under low light conditions. Shade A shaded location generally produces cooler or bluer pictures, hence you need to warm up the surroundings while shooting shaded objects.
13 Manual White Balance You can also adjust your digital camera manually by setting a white object as the reference point. This is done to guide the camera how white the object would look in a particular shot. It is advisable to manually adjust the white balance when taking a picture to compensate for the changing lighting conditions. As the daylight changes during early morning and late evening hours, the varied light intensity is easily perceived by the camera. Therefore, you need to correct the white balance regularly while shooting during these times of the day. To manually set the white balance in your image, you first point your camera at a pure white object, set the exposure and focus. Now, activate the white balance on the object by pressing the button. It may take few seconds for the camera to perceive the shot, but it will this colour setting until the next white balance is performed. Conclusion Light and Motion Photography s take We have included this brief explanation of white balance for your reference. In reality, if you shoot in a RAW format, just use AWB which will be accurate over 95% of the time. If you do need to change white balance (either to correct colour or for creative reasons), this can be corrected in digital processing (RAW editor).
.")

14 Exposure the ISO, Aperture and Shutter Speed Triangle A photograph's exposure determines how light or dark an image will appear when it's been captured by your camera. Believe it or not, this is determined by just three camera settings: aperture, ISO and shutter speed (the "exposure triangle"). Mastering their use is an essential part of developing an intuition for photography. UNDERSTANDING EXPOSURE - HARVESTING LIGHT Achieving the correct exposure is a lot like collecting rain in a bucket. While the rate of rainfall is uncontrollable, three factors remain under your control: the bucket's width, the duration you leave it in the rain, and the quantity of rain you want to collect. You just need to ensure you don't collect too little ("underexposed"), but that you also don't collect too much ("overexposed"). The key is that there are many different combinations of width, time and quantity that will achieve this. For example, for the same quantity of water, you can get away with less time in the rain if you pick a bucket that's really wide. Alternatively, for the same duration left in the rain, a really narrow bucket can be used as long as you plan on getting by with less water. In photography, the exposure settings of aperture, shutter speed and ISO speed are analogous to the width, time and quantity discussed above (respectively). Furthermore, just as the rate of rainfall was beyond your control above, so too is natural light for a photographer. However can control how much light we harvest and in what manner or fashion.


15 EXPOSURE TRIANGLE: APERTURE, ISO & SHUTTER SPEED Each setting controls exposure differently: Aperture: controls the area over which light can enter your camera Shutter speed: controls the duration of the exposure ISO speed: controls the sensitivity of your camera's sensor to a given amount of light One can therefore use many combinations of the above three settings to achieve the same exposure. The key, however, is knowing which trade- offs to make, since each setting also influences other image properties. For example, aperture affects depth of field, shutter speed affects motion blur and ISO speed affects image noise. SHUTTER SPEED A camera's shutter determines when the camera sensor will be open or closed to incoming light from the camera lens. The shutter speed specifically refers to how long this light is permitted to enter the camera. "Shutter speed" and "exposure time" refer to the same concept, where a faster shutter speed means a shorter exposure time. By the Numbers. Shutter speed's influence on exposure is perhaps the simplest of the three camera settings: it correlates exactly 1:1 with the amount of light entering the camera. For example, when the exposure time doubles the amount of light entering the camera doubles. It's also the setting that has the widest range of possibilities:

16 Shutter Speed Typical Examples seconds Specialty night and low- light photos on a tripod To add a silky look to flowing water 2-1/2 second Landscape photos on a tripod for enhanced depth of field To add motion blur to the background of a moving subject 1/2 to 1/30 second Carefully taken hand- held photos with stabilization 1/50-1/100 second Typical hand- held photos without substantial zoom To freeze everyday sports/action subject movement 1/250-1/500 second Hand- held photos with substantial zoom (telephoto lens) 1/1000-1/4000 second To freeze extremely fast, up- close subject motion How it Appears. Shutter speed is a powerful tool for freezing or exaggerating the appearance of motion: Slow Shutter Speed (1.3 sec)

17 Fast Shutter Speed (1/1000) With waterfalls and other creative shots, motion blur is sometimes desirable, but for most other shots this is avoided. Therefore all one usually cares about with shutter speed is whether it results in a sharp photo either by freezing movement or because the shot can be taken hand- held without camera shake. How do you know which shutter speed will provide a sharp hand- held shot? With digital cameras, the best way to find out is to just experiment and look at the results on your camera's rear LCD screen (at full zoom). If a properly focused photo comes out blurred, then you'll usually need to either increase the shutter speed, keep your hands steadier or use a camera tripod. APERTURE SETTING A camera's aperture setting controls the area over which light can pass through your camera lens. It is specified in terms of an f- stop value, which can at times be counterintuitive, because the area of the opening increases as the f- stop decreases. In photographer slang, when someone says they are "stopping down" or "opening up" their lens, they are referring to increasing and decreasing the f- stop value, respectively.
18 By the Numbers. Every time the f- stop value halves, the light- collecting area quadruples. There's a formula for this, but most photographers just memorize the f- stop numbers that correspond to each doubling/halving of light: Aperture Setting Relative Light Example Shutter Speed f/22 1X 16 seconds f/16 2X 8 seconds f/11 4X 4 seconds f/8.0 8X 2 seconds f/5.6 16X 1 second f/4.0 32X 1/2 second f/2.8 64X 1/4 second f/ X 1/8 second f/ X 1/15 second The above aperture and shutter speed combinations all result in the same exposure. Note: Shutter speed values are not always possible in increments of exactly double or half another shutter speed, but they're always close enough that the difference is negligible. The above f- stop numbers are all standard options in any camera, although most also allow finer adjustments of 1/2 or 1/3 stops, such as f/3.2 and f/6.3. The range of values may also vary from camera to camera (or lens to lens). For example, a compact camera might have an available range of f/2.8 to f/8.0, whereas a digital SLR camera might have a range of f/1.4 to f/32 with a portrait lens. A narrow aperture range usually isn't a big problem, but a greater range does provide for more creative flexibility. Technical Note: With many lenses, their light- gathering ability is also affected by their transmission efficiency, although this is almost always much less of a factor than aperture. It's also beyond the photographer's control. Differences in transmission efficiency are typically more pronounced with extreme zoom ranges. For example, Canon's mm f/4l IS lens gathers perhaps ~10-40% less light at f/4 than Canon's similar mm f/2.8l lens at f/4 (depending on the focal length). How it Appears. A camera's aperture setting is what determines a photo's depth of field (the range of distance over which objects appear in sharp focus). Lower f- stop values correlate with a shallower depth of field:


19 Wide Aperture f/2.8 - low f- stop number - shallow depth of field Narrow Aperture f/22 - high f- stop number - large depth of field


20 ISO SPEED The ISO speed determines how sensitive the camera is to incoming light. Similar to shutter speed, it also correlates 1:1 with how much the exposure increases or decreases. However, unlike aperture and shutter speed, a lower ISO speed is almost always desirable, since higher ISO speeds dramatically increase image noise. As a result, ISO speed is usually only increased from its minimum value if the desired aperture and shutter speed aren't otherwise obtainable. Low ISO Speed (low image noise) High ISO Speed (high image noise)
21 Image noise is also known as "film grain" in traditional film photography Common ISO speeds include 100, 200, 400 and 800, although many cameras also permit lower or higher values. With compact cameras, an ISO speed in the range of generally produces acceptably low image noise, whereas with digital SLR cameras, a range of up to 6400 (or higher) is often acceptable, particularly with the newer sensors. As Landscape Photographers, the reason we carry a tripod around everywhere is so that we can shoot almost exclusively at ISO 100 for best possible image quality. We don t have to worry about camera shake at lower shutter speeds, and so we don t need to shoot at higher ISOs.

22 Understanding Histograms in Photography Histograms can be found in almost all image editing software. Almost all- current digital can display histograms as well some even live as you shoot using your LCD screen. The Histogram is a vital tool in understanding exposure and dynamic range. General Understanding A histogram is a graphical representation of the tonal values of your image. In other words, it shows the amount of tones of particular brightness found in your photograph ranging from black (0% brightness) to white (100% brightness). As shown in the image above, dark tones are displayed on the left side of the histogram. As you move rightward, tones get lighter. The middle portion of the histogram represents midtones, which are neither dark nor light. Vertical axis of a histogram displays the amount of tones of that particular lightness. Histogram is exposure- dependent, but is also affected by tone curve and other setting.
 occurs if the graph is touching the right side of histogram.")
23 Shadow and Highlight Clipping If a certain portion of the histogram is touching either edge, it will indicate loss of detail, also called clipping. Highlight clipping (areas that are completely white and absent detail) occurs if the graph is touching the right side of histogram. Shadow clipping (areas that are completely black and absent detail) occurs if the graph is touching the left side of histogram. Either case can be often fixed by altering exposure settings. However, you must remember that it all depends on the scene. For example, if there s sun in your image, it is only natural it will be so bright completely white, in fact that highlight clipping will occur. If you want to see whether there is any clipping as you photograph, engage histogram in your camera as you review images. Each camera is different Nikon cameras, for example, usually require you to press navigator keys up or down a couple of times in review mode before the correct settings come up. Canon DSLR cameras have live histograms that react to scene in real time. To engage live histogram, you will need to use the LCD screen of your camera to photograph instead of optical viewfinder (Live View mode). Should you notice any highlight or shadow clipping, alter your exposure accordingly: to save shadow detail, make images brighter by dialing in positive exposure compensation value (+0.3 or +0.7, for example); to save highlight detail, make images darker by dialing negative exposure compensation value (- 0.3 or - 0.7, for example). Exposure compensation is usually set using +/- button on your camera. If shooting manually, just change ISO, aperture or shutter speed accordingly. There will be occasions even if you do change exposure to prevent clipping, that you won t be able to prevent clipping in the one image. For example in the below image, to prevent highlight clipping, I reduced the exposure. However this resulted in shadow clipping. In other words, the dynamic range for the camera sensor is insufficient to capture the dynamic range of the scene you are photographing. There are many solutions to this, including


24 blending bracketed images of different exposures, as well as using graduated neutral density filters. Color Channels Histograms usually display information for three primary colors red, green and blue and are known as RGB histograms. Such is the histogram shown above. You will notice that it consists of several diagrams marked with different colors. Three of these diagrams represent red, green and blue color channels accordingly. Gray diagram shows where all three channels overlap.

25 Histogram and Exposure Some are used to seeing histograms as graphical representations of exposure. Quite a few photographers are thus used to evaluating exposure based on histograms alone and state them as either good or bad. Usually, a good histogram would render most tones in the middle portion of the graph, and no or few tones would be found at the extreme edges. A bad histogram would have tones at the very edges of the graph, which would basically mean either underexposure to the point of lost shadow detail (shadow clipping), or overexposure to the point of lost highlight detail (highlight clipping), or even both in a single image. - Underexposure The first copy shows an underexposed photograph (too dark). As you can see, most of the image lacks any sort of bright detail. Histogram clearly shows a strong shift to the left side with most tones in the shadow range, and some are even clipped (completely black).
26 - Overexposure The following image is overexposed (too light). Many tones are very bright and there are basically no darker tones. A large portion of the image is blown- out (completely white) and bears no detail at all. As you can see, the histogram confirms that the image is much too bright it is shifted strongly to the right. You can see a small amount of midtones displayed in the histogram. They represent the coat, which, in real life, is black. The tones of my coat should be shown at the left side of the histogram as shadows in a well- exposed image. Let s see if that is true by looking at the following image. It is exposed correctly and bears a much broader tone distribution with most of them found in the midtone section of the histogram.
27 - Correct Exposure In this image s histogram can see, there are barely any tones at the extreme left- side of the histogram, where blacks are shown, which means there is no detail lost in shadows. Then we see it spike as mentioned earlier, this portion of the histogram shows the tones of the black coat. It is sufficiently dark, yet still bears enough detail. Note that the spike ends with blue channel it represents the tones of my scarf. Moving leftward, we see a decrease in the amount of lighter- than- my- coat tones. Clearly, if we examine the photograph, the coat is more or less the darkest element of the photograph. Any other portion of the image is significantly lighter. Then we see our histogram spike up quickly again. These values represent the background, which is moderately bright and takes up the biggest portion of this particular photograph. Histogram confirms this. Gradually, as the tones get lighter, their amount decreases that s where information about the lightness of the face and sky is represented. Both these areas are small, but noticeably lighter than the background. Finally, we end up with a small amount of highlights. We can find them in the lightest portions of the sky. Should you Set Exposure using Histogram? Based on these samples, a good histogram one with most tones stored in the middle portion does in fact indicate correct exposure. Does that mean histogram can indeed be used to judge exposure? Not quite. Let s examine one more example with a completely different histogram to the good one shown earlier. It is a product shot of a couple of earrings.

28 As you can see, histogram is shifted heavily towards the right where bright tones are represented. If you were to judge the exposure of this particular photograph based on the histogram alone, you would probably say it is overexposed considerably. There is barely any sign of midtones, let alone shadows. However, would you say that the image above is not exposed properly? Should I alter my exposure settings and aim for the good histogram, this photograph would be much too dark. A simple conclusion can be drawn, then: the histogram is not necessarily good for evaluating your exposure. The correctness of it depends on too many factors, not the last of which is your vision as well as the scene you are photographing. Histogram merely shows you the amount of tones of various brightness levels in your image, and nothing more. It can be used to discover whether you have clipped any highlight or shadow detail at specific exposure settings. You can use it as a guide to avoid such loss of detail as you take pictures, and that is where histogram excels. As long as you keep that in mind, in general, there is no good or bad histogram. Conclusion Some photographers make a habit of glancing at histogram on the back of their camera LCD screen after each shot mostly to check whether there are any tones at the extreme edges that would indicate loss of detail in dark or light areas. We feel that this is a good practice that takes little time. Learning how to read the histogram can be invaluable. This is particularly true with night photography, when the camera s LCD is bright and maybe the only light, your
29 pupils are dilated and the exposure of course will look good. Check the histogram as it may tell a different story.


30 DEPTH OF FIELD Depth of field refers to the range of distance that appears acceptably sharp. It varies depending on camera type, aperture and focusing distance, although print size and viewing distance can also influence our perception of depth of field. The depth of field does not abruptly change from sharp to unsharp, but instead occurs as a gradual transition. In fact, everything immediately in front of or in back of the focusing distance begins to lose sharpness even if this is not perceived by our eyes or by the resolution of the camera. CIRCLE OF CONFUSION Since there is no critical point of transition, a more rigorous term called the "circle of confusion" is used to define how much a point needs to be blurred in order to be perceived as unsharp. When the circle of confusion becomes perceptible to our eyes, this region is said to be outside the depth of field and thus no longer "acceptably sharp." The circle of confusion

31 above has been exaggerated for clarity; in reality this would be only a tiny fraction of the camera sensor's area. When does the circle of confusion become perceptible to our eyes? An acceptably sharp circle of confusion is loosely defined as one which would go unnoticed when enlarged to a standard 8x10 inch print, and observed from a standard viewing distance of about 1 foot. At this viewing distance and print size, camera manufacturers assume a circle of confusion is negligible if no larger than 0.01 inches (when enlarged). As a result, camera manufacturers use the 0.01 inch standard when providing lens depth of field markers (shown below for f/22 on a 50mm lens). In reality, a person with 20/20 vision or better can distinguish features 1/3 this size, and so the circle of confusion has to be even smaller than this to achieve acceptable sharpness throughout. A different maximum circle of confusion also applies for each print size and viewing distance combination. In the earlier example of blurred dots, the circle of confusion is actually smaller than the resolution of your screen for the two dots on either side of the focal point, and so these are considered within the depth of field. Alternatively, the depth of field can be based on when the circle of confusion becomes larger than the size of your digital camera's pixels. Note that depth of field only sets a maximum value for the circle of confusion, and does not describe what happens to regions once they become out of focus. These regions are also called "bokeh," from Japanese (pronounced bo- ké). Two images with identical depth of field may have significantly different bokeh, as this depends on the shape of the lens diaphragm. In reality, the circle of confusion is usually not actually a circle, but is only approximated as such when it is very small. When it becomes large, most lenses will render it as a polygonal shape with 5-8 sides. CONTROLLING DEPTH OF FIELD Although print size and viewing distance influence how large the circle of confusion appears to our eyes, aperture and focusing distance distance are the two main factors that determine how big the circle of confusion will be on your camera's sensor. Larger apertures (smaller F- stop number) and closer focusing distances produce a shallower depth of field. The following test maintains the same focus distance, but changes the aperture setting:
 CLARIFICATION: FOCAL LENGTH AND DEPTH OF FIELD Note that focal length has not been listed as influencing depth of field,")

 Focus Distance (m)")
32 f/8.0 f/5.6 f/2.8 Images taken with a 200 mm lens (320 mm field of view on a 35 mm camera) CLARIFICATION: FOCAL LENGTH AND DEPTH OF FIELD Note that focal length has not been listed as influencing depth of field, contrary to popular belief. Even though telephoto lenses appear to create a much shallower depth of field, this is mainly because they are often used to magnify the subject when one is unable to get closer. If the subject occupies the same fraction of the image (constant magnification) for both a telephoto and a wide angle lens, the total depth of field is virtually* constant with focal length! This would of course require you to either get much closer with a wide angle lens or much further with a telephoto lens, as demonstrated in the following chart: Focal Length (mm) Focus Distance (m) Depth of Field (m) Note: Depth of field calculations are at f/4.0 on a camera with a 1.6X crop factor, using a circle of confusion of mm. Note how there is indeed a subtle change for the smallest focal lengths. This is a real effect, but is negligible compared to both aperture and focusing distance. Even though the total depth of field is virtually constant, the fraction of the depth of field which is in front of and behind the focus distance does change with focal length, as demonstrated below:
33 Distribution of the Depth of Field Focal Length (mm) Rear Front % 29.8 % % 39.9 % % 46.0 % % 48.0 % % 49.0 % % 49.5 % This exposes a limitation of the traditional DoF concept: it only accounts for the total DoF and not its distribution around the focal plane, even though both may contribute to the perception of sharpness. Note how a wide angle lens provides a more gradually fading DoF behind the focal plane than in front, which is important for traditional landscape photographs. Longer focal lengths may also appear to have a shallower depth of field because they enlarge the background relative to the foreground (due to their narrower angle of view). This can make an out of focus background look even more out of focus because its blur has become enlarged. However, this is another concept entirely, since depth of field only describes the sharp region of a photo not the blurred regions. On the other hand, when standing in the same place and focusing on a subject at the same distance, a longer focal length lens will have a shallower depth of field (even though the pictures will frame the subject entirely differently). This is more representative of everyday use, but is an effect due to higher magnification, not focal length. Depth of field also appears shallower for SLR cameras than for compact digital cameras, because SLR cameras require a longer focal length to achieve the same field of view (see the tutorial on digital camera sensor sizes for more on this topic). *Technical Note: We describe depth of field as being virtually constant because there are limiting cases where this does not hold true. For focal distances resulting in high magnification, or very near the hyperfocal distance, wide angle lenses may provide a greater DoF than telephoto lenses. On the other hand, at high magnification the traditional DoF calculation becomes inaccurate due to another factor: pupil magnification. This reduces the DoF advantage for most wide angle lenses, and increases it for telephoto and macro lenses. At the other limiting case, near the hyperfocal distance, the increase in DoF arises because the wide angle lens has a greater rear DoF, and can thus more easily attain critical sharpness at infinity. CALCULATING DEPTH OF FIELD In order to calculate the depth of field, one needs to first decide on an appropriate value for the maximum allowable circle of confusion. This is based on both the camera type (sensor or film size), and on the viewing distance / print size combination. Needless to say, knowing what this will be ahead of time often isn't straightforward. Try out the depth of field calculator tool to help you find this for your specific situation.


34 DEPTH OF FOCUS & APERTURE VISUALIZATION Another implication of the circle of confusion is the concept of depth of focus (also called the "focus spread"). It differs from depth of field because it describes the distance over which light is focused at the camera's sensor, as opposed to the subject: Diagram depicting depth of focus versus camera aperture. The purple lines comprising the edge of each shaded region represent the extreme angles at which light could potentially enter the aperture. The interior of the purple shaded regions represents all other possible angles. The key concept is this: when an object is in focus, light rays originating from that point converge at a point on the camera's sensor. If the light rays hit the sensor at slightly different locations (arriving at a disc instead of a point), then this object will be rendered as out of focus and increasingly so depending on how far apart the light rays are. OTHER NOTES Why not just use the smallest aperture (largest number) to achieve the best possible depth of field? Other than the fact that this may require prohibitively long shutter speeds without a camera tripod, too small of an aperture softens the image by creating a larger circle of confusion (or "Airy disk") due to an effect called diffraction even within the plane of focus. Diffraction quickly becomes more of a limiting factor than depth of field as the aperture gets smaller. Despite their extreme depth of field, this is also why "pinhole cameras" have limited resolution. For macro photography (high magnification), the depth of field is actually influenced by another factor: pupil magnification. This is equal to one for lenses which are internally symmetric, although for wide angle and telephoto lenses this is greater or less than one, respectively. A greater depth of field is achieved (than would be ordinarily calculated) for a pupil magnification less than one, whereas the pupil magnification does not change the calculation when it is equal to one. The problem is that the pupil magnification is usually not provided by lens manufacturers, and one can only roughly estimate it visually.
35 References and Acknowledgements: 1. photographylife.com 2. cambridgeincolour.com availablelightimages.com
Topic 6 - Optics Depth of Field and Circle Of Confusion
 Topic 6 - Optics Depth of Field and Circle Of Confusion Learning Outcomes In this lesson, we will learn all about depth of field and a concept known as the Circle of Confusion. By the end of this lesson,
CAMERA BASICS. Stops of light
 CAMERA BASICS Stops of light A stop of light isn t a quantifiable measurement it s a relative measurement. A stop of light is defined as a doubling or halving of any quantity of light. The word stop is
Camera Exposure Modes
 What is Exposure? Exposure refers to how bright or dark your photo is. This is affected by the amount of light that is recorded by your camera s sensor. A properly exposed photo should typically resemble
aperture, shutter speed
 CUDGEGONG C A M E R A C L U B aperture, shutter speed and ISO exposure When you think of the craft or art of photography, you must immediately think of exposure. Exposure is a critical element that determines
Improve Your Photography by using Simple Camera Settings and Techniques
 Improve Your Photography by using Simple Camera Settings and Techniques Francis J Pullen 2012 +44 (0)7768 364 567 images@francispullen.co.uk www.francispullen.co.uk Introduction Digital Cameras offer tremendous
Photography Help Sheets
 Photography Help Sheets Phone: 01233 771915 Web: www.bigcatsanctuary.org Using your Digital SLR What is Exposure? Exposure is basically the process of recording light onto your digital sensor (or film).
Introduction to camera usage. The universal manual controls of most cameras
 Introduction to camera usage A camera in its barest form is simply a light tight container that utilizes a lens with iris, a shutter that has variable speeds, and contains a sensitive piece of media, either
FOCUS, EXPOSURE (& METERING) BVCC May 2018
 BVCC May 2018") FOCUS, EXPOSURE (& METERING) BVCC May 2018 SUMMARY Metering in digital cameras. Metering modes. Exposure, quick recap. Exposure settings and modes. Focus system(s) and camera controls. Challenges & Experiments.
FOCUS, EXPOSURE (& METERING) BVCC May 2018 SUMMARY Metering in digital cameras. Metering modes. Exposure, quick recap. Exposure settings and modes. Focus system(s) and camera controls. Challenges & Experiments.
Love Your Camera (Introduction to D-SLR)
") Love Your Camera (Introduction to D-SLR) Photography Workshops and Tours in New York City Phone: (646) 736-3231 Email: info@rememberforever.co Web: www.rememberforever.co Copyright 2009-2013 - Remember
Love Your Camera (Introduction to D-SLR) Photography Workshops and Tours in New York City Phone: (646) 736-3231 Email: info@rememberforever.co Web: www.rememberforever.co Copyright 2009-2013 - Remember
L I F E L O N G L E A R N I N G C O L L A B O R AT I V E - FA L L S N A P I X : P H O T O G R A P H Y
 L I F E L O N G L E A R N I N G C O L L A B O R AT I V E - F A L L 2 0 1 8 SNAPIX: PHOTOGRAPHY SNAPIX OVERVIEW Introductions Course Overview 2 classes on technical training 3 photo shoots Other classes
A Beginner s Guide To Exposure
 A Beginner s Guide To Exposure What is exposure? A Beginner s Guide to Exposure What is exposure? According to Wikipedia: In photography, exposure is the amount of light per unit area (the image plane
ONE OF THE MOST IMPORTANT SETTINGS ON YOUR CAMERA!
 Chapter 4-Exposure ONE OF THE MOST IMPORTANT SETTINGS ON YOUR CAMERA! Exposure Basics The amount of light reaching the film or digital sensor. Each digital image requires a specific amount of light to
These aren t just cameras
 Roger Easley 2016 These aren t just cameras These are computers. Your camera is a specialized computer Creates files of data Has memory Has a screen display Has menus of options for you to navigate Your
Failure is a crucial part of the creative process. Authentic success arrives only after we have mastered failing better. George Bernard Shaw
 PHOTOGRAPHY 101 All photographers have their own vision, their own artistic sense of the world. Unless you re trying to satisfy a client in a work for hire situation, the pictures you make should please
Digital camera modes explained: choose the best shooting mode for your subject
 Digital camera modes explained: choose the best shooting mode for your subject On most DSLRs, the Mode dial is split into three sections: Scene modes (for doing point-and-shoot photography in specific
OUTDOOR PORTRAITURE WORKSHOP
 OUTDOOR PORTRAITURE WORKSHOP SECOND EDITION Copyright Bryan A. Thompson, 2012 bryan@rollaphoto.com Goals The goals of this workshop are to present various techniques for creating portraits in an outdoor
Moving Beyond Automatic Mode
 Moving Beyond Automatic Mode When most people start digital photography, they almost always leave the camera on Automatic Mode This makes all the decisions for them and they believe this will give the
High Dynamic Range Photography
 JUNE 13, 2018 ADVANCED High Dynamic Range Photography Featuring TONY SWEET Tony Sweet D3, AF-S NIKKOR 14-24mm f/2.8g ED. f/22, ISO 200, aperture priority, Matrix metering. Basically there are two reasons
PTC School of Photography. Beginning Course Class 2 - Exposure
 PTC School of Photography Beginning Course Class 2 - Exposure Today s Topics: What is Exposure Shutter Speed for Exposure Shutter Speed for Motion Aperture for Exposure Aperture for Depth of Field Exposure
Mastering Y our Your Digital Camera
 Mastering Your Digital Camera The Exposure Triangle The ISO setting on your camera defines how sensitive it is to light. Normally ISO 100 is the least sensitive setting on your camera and as the ISO numbers
Know Your Digital Camera
 Know Your Digital Camera With Matt Guarnera Sponsored by Topics To Be Covered Understanding the language of cameras. Technical terms used to describe digital camera features will be clarified. Using special
Presented by Craig Stocks Arts by Craig Stocks Arts
 Presented by Craig Stocks Arts www.craigstocksarts.com 2010 by Craig Stocks Arts Basic camera settings for point and shoot cameras (resolution, quality) Resolution - how much can you enlarge a picture?
PHOTOGRAPHER S GUIDE TO THE PANASONIC LUMIX LX7
 PHOTOGRAPHER S GUIDE TO THE PANASONIC LUMIX LX7 In Intelligent Auto, Creative Control, and Scene shooting modes, ISO is set to Auto and the ISO button has no effect for controlling this setting. You also
Understanding Histograms
 Information copied from Understanding Histograms http://www.luminous-landscape.com/tutorials/understanding-series/understanding-histograms.shtml Possibly the most useful tool available in digital photography
!"#$%&'!( The exposure is achieved by the proper combination of light intensity (aperture) and duration of light (shutter speed) entering the camera.!
 and duration of light (shutter speed) entering the camera.!") The term exposure refers to the amount of light required to properly expose an image to achieve the desired amount of detail in all areas of the image.! The exposure is achieved by the proper combination
The term exposure refers to the amount of light required to properly expose an image to achieve the desired amount of detail in all areas of the image.! The exposure is achieved by the proper combination
So far, I have discussed setting up the camera for
 Chapter 3: The Shooting Modes So far, I have discussed setting up the camera for quick shots, relying on features such as Auto mode for taking pictures with settings controlled mostly by the camera s automation.
6.098 Digital and Computational Photography Advanced Computational Photography. Bill Freeman Frédo Durand MIT - EECS
 6.098 Digital and Computational Photography 6.882 Advanced Computational Photography Bill Freeman Frédo Durand MIT - EECS Administrivia PSet 1 is out Due Thursday February 23 Digital SLR initiation? During
Presented to you today by the Fort Collins Digital Camera Club
 Presented to you today by the Fort Collins Digital Camera Club www.fcdcc.com Photography: February 19, 2011 Fort Collins Digital Camera Club 2 Film Photography: Photography using light sensitive chemicals
1. This paper contains 45 multiple-choice-questions (MCQ) in 6 pages. 2. All questions carry equal marks. 3. You can take 1 hour for answering.
 in 6 pages. 2. All questions carry equal marks. 3. You can take 1 hour for answering.") UNIVERSITY OF MORATUWA, SRI LANKA FACULTY OF ENGINEERING END OF SEMESTER EXAMINATION 2007/2008 (Held in Aug 2008) B.Sc. ENGINEERING LEVEL 2, JUNE TERM DE 2290 PHOTOGRAPHY Answer ALL questions in the answer
UNIVERSITY OF MORATUWA, SRI LANKA FACULTY OF ENGINEERING END OF SEMESTER EXAMINATION 2007/2008 (Held in Aug 2008) B.Sc. ENGINEERING LEVEL 2, JUNE TERM DE 2290 PHOTOGRAPHY Answer ALL questions in the answer
CHAPTER 7 - HISTOGRAMS
 CHAPTER 7 - HISTOGRAMS In the field, the histogram is the single most important tool you use to evaluate image exposure. With the histogram, you can be certain that your image has no important areas that
Funded from the Scottish Hydro Gordonbush Community Fund. Metering exposure
 Funded from the Scottish Hydro Gordonbush Community Fund Metering exposure We have looked at the three components of exposure: Shutter speed time light allowed in. Aperture size of hole through which light
DSLR Essentials: Class Notes
 DSLR Essentials: Class Notes The digital SLR has seen a surge in popularity in recent years. Many are enjoying the superior photographic experiences provided by these feature packed cameras. Interchangeable
by Don Dement DPCA 3 Dec 2012
 by Don Dement DPCA 3 Dec 2012 Basic tips for setup and handling Exposure modes and light metering Shooting to the right to minimize noise 11/17/2012 Don Dement 2012 2 Many DSLRs have caught up to compacts
To start there are three key properties that you need to understand: ISO (sensitivity)
") Some Photo Fundamentals Photography is at once relatively simple and technically confusing at the same time. The camera is basically a black box with a hole in its side camera comes from camera obscura,
Some Photo Fundamentals Photography is at once relatively simple and technically confusing at the same time. The camera is basically a black box with a hole in its side camera comes from camera obscura,
Aperture. The lens opening that allows more, or less light onto the sensor formed by a diaphragm inside the actual lens.
 PHOTOGRAPHY TERMS: AE - Auto Exposure. When the camera is set to this mode, it will automatically set all the required modes for the light conditions. I.e. Shutter speed, aperture and white balance. The
Elements of Exposure
 Elements of Exposure Exposure refers to the amount of light and the duration of time that light is allowed to expose film or a digital-imaging sensor. Exposure is controlled by f-stop, shutter speed, and
Objective: to give you some understanding of why you might push more than just the big shiny silver button...
 Objective: to give you some understanding of why you might push more than just the big shiny silver button... Why am I making this presentation? Simply put: to share understanding What will we cover? Aperture
Flash Points: The Control of Light
 OCTOBER 4, 2018 ADVANCED Flash Points: The Control of Light Three key elements in using photography lighting equipment Featuring LINDSAY SILVERMAN The Nikon Creative Lighting System is built around the
TAKING GREAT PICTURES. A Modest Introduction
 TAKING GREAT PICTURES A Modest Introduction 1 HOW TO CHOOSE THE RIGHT CAMERA EQUIPMENT 2 THE REALLY CONFUSING CAMERA MARKET Hundreds of models are now available Canon alone has 41 models 28 compacts and
ISO 200 1/500 sec. f/11 82mm lens
 4 ISO 200 1/500 sec. f/11 82mm lens The Creative Zone Taking Your Photography to the Next Level The Creative zone is the name given by Canon to the shooting modes that offer you the greatest amount of
Aperture, Shutter Speed and ISO
 Aperture, Shutter Speed and ISO Before you start your journey to becoming a Rockstar Concert Photographer, you need to master the basics of photography. In this lecture I ll explain the 3 parameters aperture,
As can be seen in the example pictures below showing over exposure (too much light) to under exposure (too little light):
 to under exposure (too little light):") Hopefully after we are done with this you will resist any temptations you may have to use the automatic settings provided by your camera. Once you understand exposure, especially f-stops and shutter speeds,
Hopefully after we are done with this you will resist any temptations you may have to use the automatic settings provided by your camera. Once you understand exposure, especially f-stops and shutter speeds,
Camera Triage. Portrait Mode
 Camera Triage So, you have a fancy new DSLR camera? You re really excited! It probably cost a small fortune. It s gotta be good, right? It better be good, right? Maybe you re having a ton of fun with your
TAKING GREAT PICTURES. A Modest Introduction
 TAKING GREAT PICTURES A Modest Introduction HOW TO CHOOSE THE RIGHT CAMERA EQUIPMENT WE ARE NOW LIVING THROUGH THE GOLDEN AGE OF PHOTOGRAPHY Rapid innovation gives us much better cameras and photo software...
Quick Tips for Taking Better Portraits
 JANUARY 5, 2019 BEGINNER Quick Tips for Taking Better Portraits Suggested Lens choices, exposure settings and focus modes Featuring GARY SMALL D300, AF-S NIKKOR 24-85mm f/2.8-4d IF lens, 1/30 sec., f/2.8,
Photography Basics. Exposure
 Photography Basics Exposure Impact Voice Transformation Creativity Narrative Composition Use of colour / tonality Depth of Field Use of Light Basics Focus Technical Exposure Courtesy of Bob Ryan Depth
Glossary of Terms (Basic Photography)
") Glossary of Terms (Basic ) Ambient Light The available light completely surrounding a subject. Light already existing in an indoor or outdoor setting that is not caused by any illumination supplied by
Glossary of Terms (Basic ) Ambient Light The available light completely surrounding a subject. Light already existing in an indoor or outdoor setting that is not caused by any illumination supplied by
Autofocus Problems The Camera Lens
 NEWHorenstein.04.Lens.32-55 3/11/05 11:53 AM Page 36 36 4 The Camera Lens Autofocus Problems Autofocus can be a powerful aid when it works, but frustrating when it doesn t. And there are some situations
DIGITAL PHOTOGRAPHY CAMERA MANUAL
 DIGITAL PHOTOGRAPHY CAMERA MANUAL TABLE OF CONTENTS KNOW YOUR CAMERA...1 SETTINGS SHUTTER SPEED...2 WHITE BALANCE...3 ISO SPEED...4 APERTURE...5 DEPTH OF FIELD...6 WORKING WITH LIGHT CAMERA SETUP...7 LIGHTING
Your objective: maximum control, maximum manageability
 Your objective: maximum control, maximum manageability Know how the light works Know how photography works Know the camera you re using Making the most of what you have to work with. ISO This is the first
Understanding and Using Dynamic Range. Eagle River Camera Club October 2, 2014
 Understanding and Using Dynamic Range Eagle River Camera Club October 2, 2014 Dynamic Range Simplified Definition The number of exposure stops between the lightest usable white and the darkest useable
Introduction to Digital Photography
 Introduction to Digital Photography with Nick Davison Photography is The mastering of the technical aspects of the camera combined with, The artistic vision and creative know how to produce an interesting
Understanding Your Camera 2: UUU200
 Understanding Your Camera 2: UUU200 Your 2 Understanding Camera Your Understanding Camera 2 Exposure & Metering Metering & Exposure Objective Objective After completing this class, the student will have
Until now, I have discussed the basics of setting
 Chapter 3: Shooting Modes for Still Images Until now, I have discussed the basics of setting up the camera for quick shots, using Intelligent Auto mode to take pictures with settings controlled mostly
Intro to Digital SLR and ILC Photography Week 1 The Camera Body
 Intro to Digital SLR and ILC Photography Week 1 The Camera Body Instructor: Roger Buchanan Class notes are available at www.thenerdworks.com Course Outline: Week 1 Camera Body; Week 2 Lenses; Week 3 Accessories,
mastering manual week one
 THE PURPOSE OF THIS WORKSHOP IS TO PUT THE POWER AND CONTROL OF THE CAMERA INTO YOUR OWN HANDS. When we shoot in automatic, we are at the mercy of the camera s judgment and decisions. Learning the techniques
However, it is always a good idea to get familiar with the exposure settings of your camera.
 296 Tips & tricks for digital photography Light Light is the element of photography. In other words, photos are simply light captured from the world around us. This is why bad lighting and exposure are
Working with your Camera
 Topic 6 White Balance Learning Outcomes In this topic, you will learn about the role of white balance in your photography and what this means for you when working with colour on your DSLR. Light Light
Basic Camera Craft. Roy Killen, GMAPS, EFIAP, MPSA. (c) 2016 Roy Killen Basic Camera Craft, Page 1
 2016 Roy Killen Basic Camera Craft, Page 1") Basic Camera Craft Roy Killen, GMAPS, EFIAP, MPSA (c) 2016 Roy Killen Basic Camera Craft, Page 1 Basic Camera Craft Whether you use a camera that cost $100 or one that cost $10,000, you need to be able
Basic Camera Craft Roy Killen, GMAPS, EFIAP, MPSA (c) 2016 Roy Killen Basic Camera Craft, Page 1 Basic Camera Craft Whether you use a camera that cost $100 or one that cost $10,000, you need to be able
Portraiture. Landscape. Still Life. Macro. Suggested Galleries: Wildlife. National Portrait Gallery. Architecture. Photographers Gallery.
 + + A - Level Photography provides students with opportunities to develop personal responses to ideas, observations, experiences, environments and cultures through practical, critical and contextual forms
Defocus Control on the Nikon 105mm f/2d AF DC-
 Seite 1 von 7 In the last number of days I have been getting very many hits to this page. I have (yet) no bandwidth restrictions on this site, but please do not click on larger images than you need to
SPOT METERING. Copyright Hairy Goat Ltd 2015 Ä
 How to fine tune your exposure with spot metering Metering is often something that leads to great confusion in newbie photographers (and often in more experienced ones, too). Basically, metering refers
Capturing God s Creation Through The Lens An Adult Discipleship Course at Grace January 2013
 Capturing God s Creation Through The Lens An Adult Discipleship Course at Grace January 2013 Donald Jin donjin@comcast.net Course Overview Jan 6 Setting The Foundation Introduction and overview Understanding
Lesson 1 Course Notes
 4 Week Online Photography Course An Introduction to Digital Photography A Guide to Getting the Best from Your Digital Camera Lesson 1 Course Notes By David Taylor Click Here to Book Course PAGE 2 Introduction
Get the Shot! Photography + Instagram Workshop September 21, 2013 BlogPodium. Saturday, 21 September, 13
 Get the Shot! Photography + Instagram Workshop September 21, 2013 BlogPodium Part One: Taking your camera off manual Technical details Common problems and how to fix them Practice Ways to make your photos
AF Area Mode. Face Priority
 Chapter 4: The Shooting Menu 71 AF Area Mode This next option on the second screen of the Shooting menu gives you several options for controlling how the autofocus frame is set up when the camera is in
This has given you a good introduction to the world of photography, however there are other important and fundamental camera functions and skills
 THE DSLR CAMERA Before we Begin For those of you who have studied photography the chances are that in most cases you have been using a digital compact camera. This has probably involved you turning the
Aperture & ƒ/stop Worksheet
 Tools and Program Needed: Digital C. Computer USB Drive Bridge PhotoShop Name: Manipulating Depth-of-Field Aperture & stop Worksheet The aperture setting (AV on the dial) is a setting to control the amount
A Digital Camera Glossary. Ashley Rodriguez, Charlie Serrano, Luis Martinez, Anderson Guatemala PERIOD 6
 A Digital Camera Glossary Ashley Rodriguez, Charlie Serrano, Luis Martinez, Anderson Guatemala PERIOD 6 A digital Camera Glossary Ivan Encinias, Sebastian Limas, Amir Cal Ivan encinias Image sensor A silicon
PHOTOTUTOR.com.au Share the Knowledge
 CAMERA BASICS BY MICHAEL SMYTH This tutorial is designed to introduce new photographers to the basics of cameras and camera operation. WHAT IS A CAMERA A BOX WITH A HOLE AND SOME LIGHT SENSITIVE MATERIAL
1 / 9
 WWW.RICHIEHUG.COM 1 / 9 A Beginner's Guide to Digital Photography Version 1.2 By Richie Hug November 24, 2016. Most people owning a digital camera have never used other settings than just the AUTO mode.
Intro to Photography. Yearbook Mrs. Townsend
 Intro to Photography Yearbook Mrs. Townsend To begin with Photography is about telling a story. Good photographers use an image to make a point without words. People remember pictures of events long after
A BEGINNER S GUIDE TO PHOTOGRAPHY CHEATSHEET
 A BEGINNER S GUIDE TO PHOTOGRAPHY Cameras are complicated. It took me a ton of trial and error before I started to capture some pretty spectacular images. This cheatsheet is the reference guide I wish
Capturing Realistic HDR Images. Dave Curtin Nassau County Camera Club February 24 th, 2016
 Capturing Realistic HDR Images Dave Curtin Nassau County Camera Club February 24 th, 2016 Capturing Realistic HDR Images Topics: What is HDR? In Camera. Post-Processing. Sample Workflow. Q & A. Capturing
DSLR Cameras have a wide variety of lenses that can be used.
 Chapter 8-Lenses DSLR Cameras have a wide variety of lenses that can be used. The camera lens is very important in making great photographs. It controls what the sensor sees, how much of the scene is included,
One Week to Better Photography
 One Week to Better Photography Glossary Adobe Bridge Useful application packaged with Adobe Photoshop that previews, organizes and renames digital image files and creates digital contact sheets Adobe Photoshop
Using Your Camera's Settings: Program Mode, Shutter Speed, and More
 Using Your Camera's Settings: Program Mode, Shutter Speed, and More Here's how to get the most from Program mode and use an online digital SLR simulator to learn how shutter speed, aperture, and other
This histogram represents the +½ stop exposure from the bracket illustrated on the first page.
 Washtenaw Community College Digital M edia Arts Photo http://courses.wccnet.edu/~donw Don W erthm ann GM300BB 973-3586 donw@wccnet.edu Exposure Strategies for Digital Capture Regardless of the media choice
Digital Matrix User s Guide
 Digital Matrix User s Guide Dear Legacy2Digital Customers: Our hope is that you fully enjoy using your modified manual focus Nikon or third party lens on your DSLR camera and that our conversion meets
To do this, the lens itself had to be set to viewing mode so light passed through just as it does when making the
 CHAPTER 4 - EXPOSURE In the last chapter, we mentioned fast shutter speeds and moderate apertures. Shutter speed and aperture are 2 of only 3 settings that are required to make a photographic exposure.
9/19/16. A Closer Look. Danae Wolfe. What We ll Cover. Basics of photography & your camera. Technical. Macro & close-up techniques.
 A Closer Look Danae Wolfe What We ll Cover Basics of photography & your camera Technical Macro & close-up techniques Creative 1 What is Photography? Photography: the art, science, & practice of creating
Camera Features and Functions
 Camera Features and Functions Robert Nowland KPAC DSLR 2015 MENUS AND SETUP Setting up your new camera After unpacking your camera, put your battery on change while you take time to read your manual. Much
Lens Aperture. South Pasadena High School Final Exam Study Guide- 1 st Semester Photo ½. Study Guide Topics that will be on the Final Exam
 South Pasadena High School Final Exam Study Guide- 1 st Semester Photo ½ Study Guide Topics that will be on the Final Exam The Rule of Thirds Depth of Field Lens and its properties Aperture and F-Stop
Understanding Auto ISO
 FEBRUARY 16, 2018 BEGINNER Understanding Auto ISO Changing ISO on the fly Featuring DIANE BERKENFELD Diane Berkenfeld COOLPIX P510, 1/1000 sec., f/3.1, ISO 100, matrix metering, program. A photographic
Chapter 6-Existing Light Photography
 Chapter 6-Existing Light Photography All of these images were taken with available light. Painting with light-using available light Photography that includes artificial light which naturally exists in
Aperture Priority Mode
 Chapter 3: Shooting Modes for Still Images 23 The Program Shift function is available only in Program mode; it works as follows. Once you have aimed the camera at your subject, the camera displays its
Name Digital Imaging I Chapters 9 12 Review Material
 Name Digital Imaging I Chapters 9 12 Review Material Chapter 9 Filters A filter is a glass or plastic lens attachment that you put on the front of your lens to protect the lens or alter the image as you
Cover Story SOUMYA MAITRA. photographer, photoshop, or, even the model...it s all about The Light.
 Cover Story SOUMYA MAITRA IIt s t nott th the camera, iit s t nott th the llens, it it s nott th the photographer, photoshop, or, even the model...it s all about The Light. I N today s digital world, most
By Mark Schutzer Coast Division Meet June 2013 Copies of this presentation can be found at
 Model lph Photography h By Mark Schutzer Coast Division Meet June 2013 Copies of this presentation can be found at http://www.markschutzer.com com Model Photography Clinic Overview This clinic will discuss
Suggested FL-36/50 Flash Setups By English Bob
 Suggested FL-36/50 Flash Setups By English Bob Over a period of time I've experimented extensively with the E system and its flash capabilities and put together suggested flash setups for various situations.
Photographing Waterfalls
 Photographing Waterfalls Developed and presented by Harry O Connor oconnorhj@yahoo.com July 26, 2017* All photos by Harry O Connor * Based on May 2012 topic Introduction Waterfall photographs are landscapes
Using Auto FP High-Speed Sync to Illuminate Fast Sports Action
 Using Auto FP High-Speed Sync to Illuminate Fast Sports Action by Today s sports photographer not only needs to capture the action, but oftentimes produce a unique feature image for a client. Using Nikon
ADELAIDE HILLS PHOTOGRAPHY CLUB COFFEE BREAK 22 APRIL 2015 MACRO PHOTOGRAPHY
 ADELAIDE HILLS PHOTOGRAPHY CLUB COFFEE BREAK 22 APRIL 2015 MACRO PHOTOGRAPHY WHAT IS MACRO? Depends on who you talk to. Most definitions regard macro as meaning life size on your image sensor. So, on a
PHOTOGRAPHY Mohamed Nuzrath [MBCS]
![PHOTOGRAPHY Mohamed Nuzrath [MBCS]](/thumbs/80/82228500.jpg "PHOTOGRAPHY Mohamed Nuzrath [MBCS]") PHOTOGRAPHY Mohamed Nuzrath [MBCS] Coordinator HND IT / Senior Lecturer IT BCAS Kandy Campus Freelance Photographer Freelance Web/Software Developer PHOTOGRAPHY PHOTO - Light GRAPHY Drawing PHOTOGRAPHY
PHOTOGRAPHY Mohamed Nuzrath [MBCS] Coordinator HND IT / Senior Lecturer IT BCAS Kandy Campus Freelance Photographer Freelance Web/Software Developer PHOTOGRAPHY PHOTO - Light GRAPHY Drawing PHOTOGRAPHY
By Mark Schutzer PCR Regional Convention, Fremont, CA April 2009 Copies of this presentation can be found at
 Model lph Photography h By Mark Schutzer PCR Regional Convention, Fremont, CA April 2009 Copies of this presentation can be found at http://www.markschutzer.com com Model Photography Clinic Overview This
PHIL MORGAN PHOTOGRAPHY
 Including: Creative shooting Manual mode Editing PHIL MORGAN PHOTOGRAPHY A free e-book to help you get the most from your camera. Many photographers begin with the naïve idea of instantly making money
 Home Search Gallery How-To Books Links Workshops About Contact The Zone System 2006 KenRockwell.com INTRODUCTION Zones are levels of light and dark. A Zone System is a system by which you understand and
Seniors Photography Workshop
 Seniors Photography Workshop Some images stand out from the crowd & make viewers say WOW! Today we will look at how you can give your images that WOW Factor.. So let s think about what makes an
Digital 1! Course Notes.
 Digital 1 Course Notes Anatomy of a DSLR Light' Enters' Camera 1. Lenshood: Used to control additional light entering the lens. 2. UV filter that is purchased separately from the lens. Screws onto the
FC-2500 Quick Reference Guide
 P O S I T I O N I N G S Y S T E M S FC-2500 Quick Reference Guide Part Number 7010-0910 Rev A Copyright Topcon Positioning Systems, Inc. October, 2008 All contents in this manual are copyrighted by Topcon.