PIXELMATOR FOR IPAD HELP
|
|
|
- Imogene Robbins
- 5 years ago
- Views:
Transcription
1 PIXELMATOR FOR IPAD HELP Yves Cornil
2 Pixelmator. Pixelmator Get started Pixelmator at a glance... 4 Create or open an image Basic gestures... 7 Tap... 7 Scroll and swipe... 7 Drag... 8 Pinch open to zoom in... 9 Pinch closed to zoom out... 9 Undo and redo changes Undo and redo actions Use Handoff with Pixelmator Retouch and adjust colors Retouch Distort Distort an image Distort using gestures Adjust colors Apply effects Apply an effect Paint, smudge and erase Paint Paint on an image or blank canvas Smudge Erase Choose colors Add images, text and shapes Objects overview Add an object Add and edit images Add an image Add and edit shapes Add a shape Adjust the features of a shape Add, edit, and format text Create a new text box Select words or paragraphs Place the insertion point Copy and paste text Change text appearance Set the alignment and spacing Change an object's appearance Arrange, resize, rotate and align Arrange and lock objects Rearrange objects Lock and unlock objects Pixelmator For ipad Help
3 Resize, rotate, or flip an object Resize an object Rotate a shape, text box, or image Flip a shape, text box, or an image Crop and straighten images Crop and straighten an image Change image size Set an image size and orientation Advanced features Selection tools Create a selection Refine a selection Layers Create layers Duplicate layers Show or hide layers Cut or copy and paste layers Delete layers Apply a layer style Group and ungroup layers Lock layer transparency Blending modes Apply a blending mode to layers and objects Manage images Organize images into folders Create a folder Remove an image from a folder Rename a folder Sort images by name or date Duplicate or rename an image Rename an image Duplicate an image Delete an image Delete an image Share and print images Use icloud with Pixelmator Set up Pixelmator to use icloud Send a copy of an image Send a copy Print an image Print an image Open an image in another app Open your image in another app More help us Pixelmator Support Community Pixelmator For ipad Help 3


4 Pixelmator at a glance Get started. Pixelmator makes it easy to create, edit, and enhance your pictures. You can begin with photos from your collection, use one of the beautifully designed templates, or start with a blank canvas. Then start creating: choose any of the editing tools to paint, retouch, distort, adjust colors, add effects, crop, and rotate. Also, you can easily add more photos, shapes, and text. If you don't know where to start, pick one of the templates. Each template comes with predesigned styles coordinated sets of colors, borders, effects, and so on. Just add your photos, or if you feel more creative, you can modify the template however you like. Outil formater. 4 Pixelmator For ipad Help


5 Outil formater. When you tap an option in the Tools popover, you enter an editing mode. For example, when you tap "Paint and Erase," you enter the painting mode. The painting mode shows the tools for painting and erasing. To try another mode, tap Done and choose another option from the Tools popover. The Format option in the Tools popover displays style controls to customize the selected object s appearance however you like. Pixelmator For ipad Help 5
, or have a predesigned set of elements for creating an image composition a layout, placeholder images, text, and so on.")
6 Create or open an image. Pixelmator comes with predesigned templates. A template can be basic (a blank canvas in landscape or portrait format), or have a predesigned set of elements for creating an image composition a layout, placeholder images, text, and so on. Placeholders give you an idea of what an image created with the template might look like when you use it. After you choose a template, you can add your own content, including text, photos, shapes, and more. You can also use Pixelmator to open and edit images created with Adobe Photoshop with layers, as well as images in JPEG, PNG, PDF, and TIFF file formats. 6 Pixelmator For ipad Help
7 Basic gestures Finger gestures are crucial to using Pixelmator on your ipad. These are the gestures you need to know: Tap Using one finger, quickly and firmly touch the screen, then lift your finger. Use this gesture to select an object or activate a button. By tapping on a toolbar or layers bar, you can quickly hide them to enter the full screen. Scroll and swipe Slide one finger up and down or side to side on the screen to move the content within the screen or within a window. This action allows you to see items that are currently beyond the edges of the screen or more options within a window. Scroll quickly by swiping one finger rapidly across the screen. Pixelmator For ipad Help 7
8 Drag Drag your fingers on the screen to pan, brush, retouch, select, move, rotate, and resize objects. To move an object, touch and hold your finger on the object, then drag it to where you want it. To resize an object, tap it, then drag the selection handles to resize it. To rotate an object, touch and hold the object with two fingers, then turn your hand in the direction you want to rotate an object. After you start rotation, you can continue by dragging with a single finger. Use both hands if it's easier. To pan the canvas, touch and drag the canvas with one finger when nothing is selected. When something is selected, use two fingers. 8 Pixelmator For ipad Help
9 Pinch open to zoom in Place two fingers on the screen and spread them apart. This action allows you to see an element of your image close up. Pinch open quickly to immediately increase the image size to 200%. If you want an in-between size, pinch open more slowly. An indicator displays the current image magnification as you pinch. Pinch closed to zoom out Place two fingers on the screen and bring them together. This action allows you to see more items on the screen. Pinch closed quickly to immediately reduce the image size to fit the screen. If you want an in-between size, pinch closed more slowly. An indicator displays the current image magnification as you pinch. Pixelmator For ipad Help 9
10 Undo and redo changes You can undo any changes and redo them if you change your mind. Undo and redo actions. To undo the last action, tap Undo on the left side of the toolbar. Tap Undo multiple times to undo all your recent actions. To redo the last action you undid, tap and hold Undo, then tap Redo. Use Handoff with Pixelmator When your Mac and ios devices are near each other, you can use Handoff to pass an image you re working on from one to the other. For example, if you re working on Pixelmator image on your iphone and are near your Mac, you can pick up the image on your Mac and finish it there. Handoff requires: OS X Yosemite, or later on a Mac ios 8, or later on an ios device The same icloud account and Apple ID on both systems Bluetooth 4 (Bluetooth LE) on both systems When Handoff is set up, you see a Handoff icon in the Dock on your Mac, or in the bottom-left corner of your device s lock screen. You set up Handoff in System Preferences on the Mac and in Settings on your ios device. 10 Pixelmator For ipad Help


11 Retouch and adjust colors Retouch You can use retouching tools to improve specific parts of an image. For example, you could remove dust spots and blemishes, lighten or darken areas, increase color strength, and more. To retouch, simply choose a tool and paint over the image areas. Zoom in or out of an image to see how much of the photo is changed by a stroke. Distort Distorting images can help you correct image imperfections, or you can simply have fun distorting images in multiple ways, like slightly twisting an element, adding an artistic touch, or even completely distorting the entire image. Pixelmator comes with several distortion tools: Warp, Bump, Pinch, Twirl Left, Twirl Right, and Restore which helps you restore image areas that previously were distorted. To distort, simply choose a tool and paint, or touch and hold the image areas. Pinch to zoom out to distort larger image areas, or zoom in distort smaller image areas. Pixelmator For ipad Help 11
12 Distort an image 1. Tap (outil pinceau), and then tap Distort. 2. Tap any of the distorting tools, and do the following: a. Paint over the image areas you want to distort. b. Touch and hold image areas you want to distort. 3. Choose another tool by tapping the tool's title in the top-right of the toolbar. To restore distorted areas, choose Restore Tool and paint over the image. Distort using gestures When you are in the Distort mode, touch and hold two fingers on the screen until the distortion circle appears, the distance between the fingers describes the radius for distortion area. Then, do any of the following: Pinch open to bulge selected area; Pinch close to pinch the image contents inwards the selected area; Drag the circle across the canvas to warp image contents creating a smeared effect; Turn your hand right or left to create a twirl effect. Tip: Zoom out to distort larger image areas, or zoom in distort smaller image areas. 12 Pixelmator For ipad Help
13 Adjust colors Easily improve image colors using color adjustment tools. You can apply one of the predesigned color presets with a coordinated set of adjustments, or you can adjust colors using the sliders and histograms. Before making any color adjustments, it's a good idea to remove any flaws such as dust spots, blemishes, and scratches from the image with retouching tools. Adjust image colors Pixelmator For ipad Help 13
14 1. Tap (outil pinceau), and then tap Adjust Colors. 2. Tap one of the predesigned color adjustment thumbnails, or do one of the following: Drag Levels sliders to set the tonal values of shadows, mid-tones, and highlights in an image. They are useful for adjusting the brightness of an image and for color correction. Drag Brightness, Contrast, and Saturation sliders to make simple adjustments to the tonal range of an image. Drag Color Balance sliders to change the overall mix of colors in an image. Drag Curves handles to adjust the overall tonal and color range in an image. Tip: You can also correct colors to only a portion of an image. Select the area using any of the selection tools before correcting colors. 14 Pixelmator For ipad Help
. 1. Tap (outil pinceau), and then tap Adjust Colors. 2. Scroll to see White Balance. 3.")

15 Correct white balance You can adjust white balance (quickly adjust overall color cast) and compensate for a photo taken in poor lighting conditions (under fluorescent lights, for example). 1. Tap (outil pinceau), and then tap Adjust Colors. 2. Scroll to see White Balance. 3. Tap the Eyedropper, then drag across the canvas to set a custom white balance: drag the Eyedropper to a part of the photo that should be white or neutral gray. 4. Tap Done. After choosing a white balance option, you can drag the Temperature and Tint sliders to fine tune the image colors. Pixelmator For ipad Help 15


16 Apply effects Add gorgeous effects like Blur, Vignette, Vintage, Black & White, Light Leak, Bokeh, Miniaturize, and many more, or even combine different effects for unique, near-effortless artistic creations and see the stunning results real time. 16 Pixelmator For ipad Help

17 You control effects like Light Leak, Bokeh, Miniaturize, Focus, Bump, Pinch, and Kaleidoscope with a rope by dragging it on the canvas. You can see how the image changes as you drag. You control the Blur, Sharpen, Vignette, and Noise by spinning a wheel to see how the image changes. Pixelmator For ipad Help 17

18 Apply an effect 1. Tap (outil pinceau), and then tap Add Effects. 2. Tap the effect thumbnail at the bottom to preview and apply an effect. To apply: Blur, Sharpen, and Noise effects use the wheel to control the intensity of the effect or change colors. The more you spin the wheel the stronger the effect is applied. Vintage and Black & White effects tap any of the effect presets. Light Leak and Bokeh effects tap the effect preset and use the rope to control the effect look. Miniaturize and Focus effects use the rope and slider at the bottom to control the effect strength. Bump, Pinch, and Kaleidoscope effects drag the rope to control distortion. Hue and Saturation effect you use the color wheel, and the color tabs at the bottom as well as brightness and saturation. Tip: You can also apply an effect to only a portion of an image. Select the area using any of the selection tools before applying an effect. 18 Pixelmator For ipad Help

19 Vintage (retro). Pixelmator For ipad Help 19
, and then tap Paint and Erase. 2. Drag your finger on the canvas to start painting. 3.")
20 Paint, smudge and erase Paint You can paint as you would on traditional canvas using lots of predefined brush presets, from realistic to stylized, in all sizes and shapes. Choose your favorite brushes and start painting. Paint on an image or blank canvas 1. Tap (outil pinceau), and then tap Paint and Erase. 2. Drag your finger on the canvas to start painting. 3. Tap the brush title in the toolbar and choose another brush from the Pencil, Crayon, Marker, Ink, Paintbrush, Spray, Smudge, and Watercolor brush collections. 4. Tap the numbers next to the brush title in the toolbar to adjust the brush tip size and opacity. 5. Tap the color well to choose colors. 20 Pixelmator For ipad Help


21 Smudge You can create fine artistic effects with the Smudge brush. You can choose various smudge brush textures and control the smudge strength, so when you paint the smearing effect is stronger or weaker. Erase Using the eraser brush, you can erase parts of an image or painting. The eraser has various brush textures to blend the areas erased smoothly into the picture. Pixelmator For ipad Help 21


22 Choose colors Choose colors with the Color pane. It has a color picker to choose colors from the image, a color well, and color swatches carefully arranged into color palettes. To bring up the Color pane, just tap the color well in the toolbar. Add a color swatch to the Color popover 1. Tap the color well in the toolbar. 2. Choose a color. 3. Swipe left through the color palettes until you see empty swatches. 4. Tap the add button. 22 Pixelmator For ipad Help
 to open it). Add an object 1. Tap (outil +), then tap the button for the type of the object you want to add.")
23 Add images, text and shapes Objects overview An object is an item you place on your canvas. Photos, shapes, and text boxes are examples of objects. You can change their appearance using the tools in the Tools pane (tap (outil pinceau) to open it). Add an object 1. Tap (outil +), then tap the button for the type of the object you want to add. Swipe left or right to see more style options for objects like text and shapes. 2. Tap an object to add it, then drag it to where you want to place it in the image. 3. To change the appearance of the object, select the object (blue selection handles appear when it's selected) and tap (outil pinceau). Add and edit images You can easily create image compositions by combining several images into one. Easily add images from your Camera Roll, Photo Stream, Shared Photos, or take a photo right that moment and add it to your composition. After you add an image you can resize it, move it around, and edit it just like any other image. Add an image 1. Tap (outil +), then tap (outil appareil photo). 2. Tap an album, then tap a photo to add it. 3. Drag the image to where you want it on the canvas. 4. If necessary, resize the image by dragging any of the handles (the blue round handles around the image border). 5. Tap (outil pinceau), then tap Format to add a custom border, shadow, reflection, and more. To delete an image, tap it, then tap Delete. Pixelmator For ipad Help 23

24 Add and edit shapes Add and edit shapes just as easy as an image. After you add a shape to an image, you can customize the shape in a number of ways. For example, you can change the standard five-point star into a twenty-point starburst, adjust how rounded the corners of a square are, and more. Add a shape 1. Tap (outil +), then tap (outil carré noir). 2. Tap a shape to add it. Swipe right or left to see more shape styles. 3. Drag the shape to where you want it one the canvas. 4. If necessary, resize the shape by dragging any handle (the blue round handles around the shape). To remove a shape, tap it, then tap Delete. 24 Pixelmator For ipad Help

25 Pixelmator For ipad Help 25


26 Adjust the features of a shape You can change the features of a predrawn shape in specific ways. 1. Tap the shape, then do any of the following: Reshape the corners of a rounded square: Drag the green handle toward a corner to sharpen it, or away from a corner to make it more round. Change the proportions of a single or double arrow: Drag the green handle up or down to change the width of the tail, drag left or right to resize the arrowhead. Change the look of quote bubble: Drag the upper green handle to adjust how square or rounded the shape s corners are. Drag the handle at the intersection of the shape s tale and body inward or outward to make shape s tail thicker or thinner. Drag the handle at the top of the tail to make shape s tail longer or shorter. 26 Pixelmator For ipad Help


27 Change the number of points in a star: Drag the outer green handle clockwise or counterclockwise to add or remove points. Drag the inner green handle toward the center of the star to make the points longer and narrower, or drag the handle away from the center to make the points shorter or wider. Change the number of sides in a polygon: Drag the green handle clockwise or counterclockwise to adjust the number of sides. Pixelmator For ipad Help 27

.")
28 Add, edit, and format text Add a word, phrase, or caption and easily make it look beautiful. With just a few taps, choose font, size, colors, apply a style, and more. You can add text boxes to your composition, or if you're using a template with placeholder text, select the placeholder text, then type your own text including its font, size, and alignment. Create a new text box 1. Tap +, then tap T. 2. Tap one of the predesigned text styles (you can change how the text looks later). 3. Double-tap the placeholder text, then enter your own. 4. Drag the text box to where you want it on the canvas. 5. If necessary, resize the text box by dragging any of the handles (blue round handles around the border). To remove a text box, tap it, then tap Delete. Select words or paragraphs Select a word: Double-tap it. Select a range of text: Double-tap a word, then drag the selection handles to choose a range of text. Select text and its formatting marks: Double-tap a word, then move the selection handles beyond the current text. The selection includes the entire paragraph and its formatting marks ("invisibles"). You can drag the selection handles up or down to include or exclude paragraphs from the selection. Place the insertion point 28 Pixelmator For ipad Help

29 After you select text, you can place an insertion point in it. 1. Double-tap a text box to select a word within it. 2. Touch and hold within a line of text until magnifying glass appears. 3. Drag your finger over text until the insertion point is where you want it, then lift your finger. Copy and paste text 1. Select text, then tap Copy. 2. Place the insertion point where you want to paste text, or select some text to paste over, then tap Paste. Change text appearance You can change how text looks by changing its font, character style (bold or italic, for example), size, and color. 1. Select text, then tap (outil pinceau). 2. Tap (outils B, I, U, etc.), then use the controls to change text. Pixelmator For ipad Help 29
, then use controls to adjust text alignment and line spacing.")

30 Set the alignment and spacing 1. Select text, then tap (outil pinceau). 2. Tap (outil pinceau), then use controls to adjust text alignment and line spacing. Change an object's appearance You can change an object's appearance by modifying its borders, fill color, shadow, and more. These options are called Styles, and are located in the Style pane within the Tools popover. 30 Pixelmator For ipad Help

31 Arrange, resize, rotate and align Arrange and lock objects You can overlap objects and then move items individually higher (forward) or lower (backward) in the stack. You can also group multiple items so that you can move, resize, or rotate them as a single unit. To avoid inadvertently moving, modifying, or deleting an object, you can lock it. Rearrange objects 1. Tap an element you want to rearrange. 2. Tap (outil pinceau), then tap Format > Arrange. 3. In the Arrange pane drag the Move to Back/Front slider. Moving slider to the right will place the element on top of the others, while moving to the left will place the object behind others. Note: The slider works only if you have overlapping elements. The slider grid displays how many elements are overlapping and where your current selected element is. Lock and unlock objects After you lock an object, you can't move, delete, or modify it in any way until you unlock it. 1. Select one or more objects, then tap (outil pinceau). 2. Tap Format, then tap Arrange and tap Lock. Pixelmator For ipad Help 31
32 Resize, rotate, or flip an object You can resize, rotate, and flip any object in your composition. Resize an object Resize objects using the blue handles that appear. To make the element smaller, drag the handles inwards, to make the element larger drag the handles outwards. For more precision, you can use the Arrange pane within Tools popover. To bring up the Arrange pane: 1. Tap (outil pinceau), then tap Format > Arrange. 2. Tap Size, which is located just below Move to Back/Front slider. 3. Adjust the element width and height. Turn on Constrain Proportions if you want to keep the current proportions of an element. Tip: It s recommended to keep Constrain Proportions when resizing an image, so you don t distort it. Rotate a shape, text box, or image To rotate an element at any angle, tap an element, place two fingers on it, then turn your hand in the direction you want to rotate the element. After you start rotation, you can continue by dragging with a single finger. A guide appears to indicate the angle of rotation. To rotate element at a very precise angle use the Rotate slider: 1. Tap (outil pinceau), then tap Format > Arrange. 2. Drag the Rotate slider, or quickly rotate an element 90 left or right by tapping the appropriate titles in the popover. Flip a shape, text box, or an image 1. Tap an object, then tap (outil pinceau). 2. Tap Arrange, then tap Flip Vertically or Flip Horizontally. Crop and straighten images With the crop tool you can easily change image size and straighten an image at the same time. Crop and straighten an image 1. Tap (outil pinceau), then tap Crop. 2. To crop an image drag the crop handles at the corners. Move the crop area around if needed. 3. To straighten an image, touch and hold it with two fingers, then turn your hand in the direction you want to rotate an image. 32 Pixelmator For ipad Help
, or")

33 Change image size Most Pixelmator templates are created for standard paper sizes in portrait (vertical), or landscape (horizontal) orientation. If you need a different image size, you can change it. Pixelmator For ipad Help 33
 in the toolbar, then tap Image")


34 Set an image size and orientation 1. Tap (roue crantée paramètres) in the toolbar, then tap Image Setup. 2. Tap image dimensions at the bottom, use the controls to adjust image size. 3. Tap Rotate at the bottom, to rotate the image left or right, or flip the image vertically or horizontally. 4. Tap Apply to return to the main window. 34 Pixelmator For ipad Help

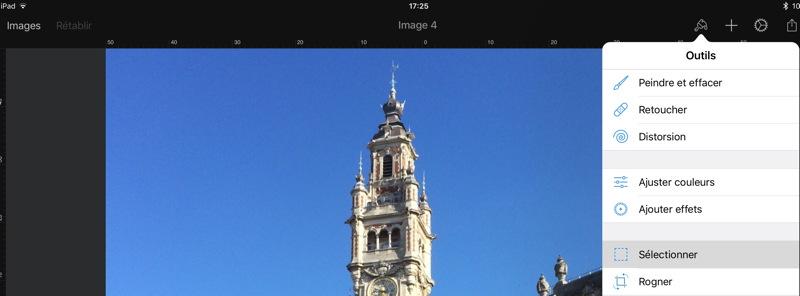
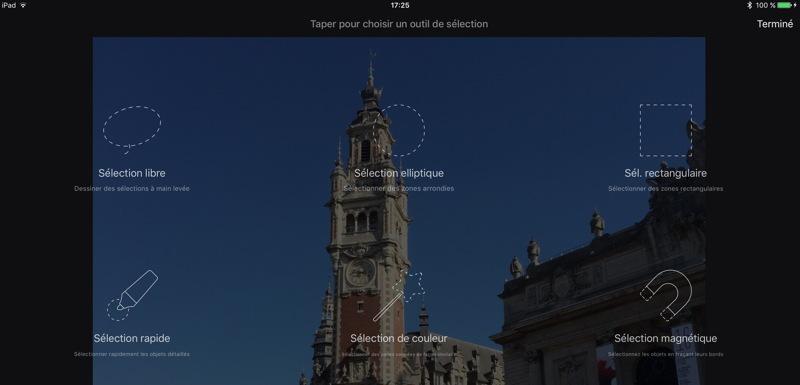
35 Advanced features. Selection tools Selections are a great help when you want to work in a specific image area, while not altering any of the area around it. In many regards, a selection is a lot like a stencil. You basically are enabling yourself to paint only in one area while the rest of your image is left unaffected. For example, you can select an object in an image, make color adjustments to it while the background around is left untouched. Every selection tool has its own method for selecting pixels. For example, the rectangular selection is ideal for selecting squares and rectangular shapes, whereas the elliptical selection is best for circles and ovals. Create a selection 1. Tap (outil pinceau), then tap Select. 2. Tap to choose a selection tool. 3. Drag to create a selection: The Free Selection tool draws a selection freely. The Elliptical Selection draws rounded selections. The Rectangular Selection draws rounded selections. The Magic Wand selection tool selects similarly colored areas as you drag. Paint Selection tool select similar color and texture areas as you paint. 4. Drag the selection handles to resize. 5. When you finish the selection, you can add to or subtract from existing selection. To do that, tap Add to, or Subtract from in the toolbar. Draw a selection. 6. When finished selecting, tap Done. Tip: Pinch close to zoom in for more precise selections. Pixelmator For ipad Help 35
36 36 Pixelmator For ipad Help

37 Refine a selection Once you've finished selecting, you can refine the selection you've just made. 1. Tap Refine in the toolbar to adjust the selection's edges. 2. Drag the Softness sliders to adjust. 3. When finished, tap Done. Layers Pixelmator is a layer-based image editor. Layers are the basis for non-destructive image editing. They are like sheets stacked one on top of the other. Transparent areas on a layer let you see the layers below, and the final appearance of the pictures depends on their order. In Pixelmator, you can create new layers from photos, selections, or your FaceTime camera. Objects like shapes and text are also layers. To work with layers, you should have the layers bar visible. Swipe right the left edge of your screen to view the layers bar. Create layers or 1. Tap (outil +). 2. Tap the type of the layer you want to add. 1. In the layer bar, swipe down and tap the + to quickly add a transparent layer. Duplicate layers Tap the layer in the layers bar, then tap Duplicate. Show or hide layers Tap the layer in the layers bar, then tap Show or Hide Pixelmator For ipad Help 37

38 Cut or copy and paste layers 1. Tap the layer in the layers bar, then tap cut, or copy. 2. Tap another layer, then tap Paste. Delete layers Tap a layer, then tap Delete. Apply a layer style 1. Tap a layer, then tap Style. 2. Use the Opacity, Blending, Fill, Stroke, Shadow, or Reflection options to change the layer appearance. 38 Pixelmator For ipad Help
, then tap Format. 3. Tap to select Arrange pane and tap to turn on Lock Alpha.")
39 Group and ungroup layers 1. Tap the layer and drag onto another. 2. Tap another layer and drag into a group. To ungroup layers, simply drag the layer out of the group. Lock layer transparency 1. Tap the layer in the layers bar. 2. Tap (outil pinceau), then tap Format. 3. Tap to select Arrange pane and tap to turn on Lock Alpha. Blending modes Blending modes are used with layers, painting, retouching and fill tools. The blending mode determines how a layer or a color blends with the pixels in the layers underneath, making it lighter, darker, or a different color. Blending modes with painting tools can be used to achieve special effects, to make photo improvements, or retouch photos. By default, the blending mode is set to normal, making the brush strokes paint traditionally over the image. Other blending modes offer a wide variety of different interactions. Apply a blending mode to layers and objects 1. Tap the layer in the Layers bar. 2. Tap again to view the layer options, tap Style. 3. Tap Blending to change the blending mode. Pixelmator For ipad Help 39
40 Manage images Organize images into folders You can group images into folders to keep them organized. Create a folder 1. In the image manager, tap Edit. 2. Tap and hold an image until it appears to lift off the screen, then drag it on top of another image you want in the same folder. 3. Type a name, then tap Done on the keyboard. 4. Tap Done in the toolbar, then tap anywhere outside of the folder to close it. You can add more images to an existing folder. Tap Edit, then drag image to the folder. Remove an image from a folder 1. Tap the folder to open it. 2. Tap and hold the image until it appears to lift off the screen, then drag it anywhere outside of the folder. 3. Tap Done. Rename a folder Tap the name of the folder, delete the existing name, then type a new one. To quickly delete the current name, tap the x in the text field. Sort images by name or date In the image manager, scroll down to show the Date and Name buttons, then tap one. Duplicate or rename an image Pixelmator periodically saves your image as you work so you don t need to save your work manually. A new image is saved with a placeholder name such as Image 1 when you close it, but you can change the name at any time. Rename an image 1. In the image manager, tap an image's title. 2. Delete the existing name, type a new one, then tap Done. To quickly delete the current name, tap the x in the text field. 40 Pixelmator For ipad Help
41 Duplicate an image 1. In the image manager, tap Edit. 2. Tap one or more images you want to duplicate. To deselect an image, tap it again. 3. Tap +, then if you selected more than one image, tap Duplicate Images. Duplicated images appear with the word copy appended to their names Delete an image Deleting an image removes it permanently from your device, and you can t undo the action. Delete an image 1. In the image manager, tap Edit. 2. Tap one or more images you want to delete. 3. To deselect an image, tap it again. 4. Tap (poubelle), then tap Delete Image. Pixelmator For ipad Help 41
42 Share and print images. Use icloud with Pixelmator icloud stores your images and keeps them up-to-date on your devices so that you always have the most current versions at hand, no matter which device you used to make your latest edits. Set up Pixelmator to use icloud To use icloud, you must sign in with your Apple ID in Settings, and make sure icloud is turned on in Pixelmator. 1. Tap Settings on your Home screen, then tap icloud. 2. Sign in to your account using your Apple ID, or request a new Apple ID and then sign in. 3. Tap icloud Drive (or Documents & Data) and turn it on. 4. In the list of apps, turn on Pixelmator. This setting allows Pixelmator to store documents in icloud. 5. On the left side of Settings, scroll down and tap Pixelmator. 6. Turn on Use icloud. When icloud is turned off on this device, edits you make or new images that you create aren t saved to icloud, and new or changed images from other devices or from your computer aren t available in Pixelmator on this Here are a few things to keep in mind about using icloud to manage your image across devices: If you edit and close an image when you re not connected to the Internet, an upward-pointing arrow appears in the images thumbnail. The next time you connect to the Internet, the edited image is saved to icloud. If you edit an image on more than one device before saving any of the versions to icloud, the edited image will conflict. To avoid conflicts, make sure your edits are always saved to icloud before editing the same image on another device. If you do get a conflict, you can choose to preserve any or all of the images that you edited. If you delete an image, it s deleted from icloud and from Pixelmator on all your devices. If you organize your images into folders on one device, the title is changed on all your devices. Send a copy of an image You can send a copy of an image via , AirDrop, or Messages. Recipients can open and modify it however they want on their own computers and devices, but their changes don t affect the original image or any other copies of the image. You can send a copy while the image is open or from the image manager. 42 Pixelmator For ipad Help
. 3. Tap a format. If you re not sure where your recipient has Pixelmator, choose JPEG, PNG, or Photoshop. 4.")
43 Send a copy 1. Do one of the following: If the document is open: Tap, then tap Send a Copy. If the document is closed: Tap in the image manager, then tap the image you want to share. 2. Tap an option: Message, Mail, or AirDrop (if your device supports it). 3. Tap a format. If you re not sure where your recipient has Pixelmator, choose JPEG, PNG, or Photoshop. 4. Provide any requested information (an address if you re sending an , for example). For AirDrop, the recipient must accept your document before it s sent. Print an image You can print an image from a printer you set up to work with your ios device. To learn about setting up a printer, see instructions in the user guide of your ios device. These instructions assume that your printer is already set up to work with your device. Print an image 1. Tap (outil partage), then tap Send a Copy. 2. Tap Print and specify print options. 3. If no printer is selected, tap Select Printer. Your ipad automatically searches for any nearby AirPrint printers. 4. Tap Print. Open an image in another app Once you finished editing an image and want to send an image to another app, or you re in the middle of editing and there s another app that can help you to fine tune the image, you can open that image in another app without even leaving Pixelmator. Open your image in another app 1. Tap (partage), then tap Open in Another App. 2. Tap a file format (you see only formats supported by the apps installed on your device). Tap the app to open an image. A copy of an image is sent to another app. Note: The list of available apps depends on the file format selected. Pixelmator For ipad Help 43
44 More help us If you have any questions about using Pixelmator for ipad, please us at Pixelmator Support Community Discuss ideas, share tips and solutions, request features, or share tutorials with fellow Pixelmator users. Join the community. Yves Cornil, Microsoft MVP, CILAC s animator ( La Madeleine) Pixelmator For ipad Help
Photoshop CC Editing Images
 Photoshop CC Editing Images Rotate a Canvas A canvas can be rotated 90 degrees Clockwise, 90 degrees Counter Clockwise, or rotated 180 degrees. Navigate to the Image Menu, select Image Rotation and then
Adobe PhotoShop Elements
 Adobe PhotoShop Elements North Lake College DCCCD 2006 1 When you open Adobe PhotoShop Elements, you will see this welcome screen. You can open any of the specialized areas. We will talk about 4 of them:
Photo Editing in Mac and ipad and iphone
 Page 1 Photo Editing in Mac and ipad and iphone Switching to Edit mode in Photos for Mac To edit a photo you ll first need to double-click its thumbnail to open it for viewing, and then click the Edit
Extreme Makeovers: Photoshop Retouching Techniques
 Extreme Makeovers: Table of Contents About the Workshop... 1 Workshop Objectives... 1 Getting Started... 1 Photoshop Workspace... 1 Retouching Tools... 2 General Steps... 2 Resolution and image size...
Adobe Photoshop CC 2018 Tutorial
 Adobe Photoshop CC 2018 Tutorial GETTING STARTED Adobe Photoshop CC 2018 is a popular image editing software that provides a work environment consistent with Adobe Illustrator, Adobe InDesign, Adobe Photoshop,
Texts and Resources: Assessments: Freefoto.com Group Photo Projects
 Effective Date: 2009-10 Name of Course: Digital Photography Grade Level: 9-12 Department: Industrial Technology and Engineering Length of Course: 30 cycles Instructional Time: 180 days Period Per Cycle:
Autodesk. SketchBook Mobile
 Autodesk SketchBook Mobile Copyrights and Trademarks Autodesk SketchBook Mobile (2.0.2) 2013 Autodesk, Inc. All Rights Reserved. Except as otherwise permitted by Autodesk, Inc., this publication, or parts
Copyrights and Trademarks
 Mobile Copyrights and Trademarks Autodesk SketchBook Mobile (2.0) 2012 Autodesk, Inc. All Rights Reserved. Except as otherwise permitted by Autodesk, Inc., this publication, or parts thereof, may not be
Introduction to Photoshop
 Introduction to Photoshop Instructional Services at KU Libraries A Division of Information Services www.lib.ku.edu/instruction Abstract: This course covers the basics of Photoshop, including common tools
Cricut Design Space App for ipad User Manual
 Cricut Design Space App for ipad User Manual Cricut Explore design-and-cut system From inspiration to creation in just a few taps! Cricut Design Space App for ipad 1. ipad Setup A. Setting up the app B.
Adobe Photoshop CS5 Tutorial
 Adobe Photoshop CS5 Tutorial GETTING STARTED Adobe Photoshop CS5 is a popular image editing software that provides a work environment consistent with Adobe Illustrator, Adobe InDesign, Adobe Photoshop
ADOBE PHOTOSHOP CS TUTORIAL
 ADOBE PHOTOSHOP CS TUTORIAL A D O B E P H O T O S H O P C S Adobe Photoshop CS is a popular image editing software that provides a work environment consistent with Adobe Illustrator, Adobe InDesign, Adobe
Using Photoshop Elements
 Using Photoshop Elements Created By: Rick Williams August 2004 Table of Contents Photoshop Element Tools...Page 1 Tool Descriptions... Page 3 Starting Photoshop Elements... Page 7 Resizing an Image...
Downloaded From : Working with Photoshop 7.0
 Adobe Photoshop 1. Introduction What is Adobe Photoshop? Adobe Photoshop is a web designing software used for giving effects and filters to an image to make it more appealing and attractive. Brought out
Photoshop CC 2018 Essential Skills
 Photoshop CC 2018 Essential Skills Adobe Photoshop Creative Cloud 2018 University Information Technology Services Learning Technology, Training, Audiovisual and Outreach Copyright 2018 KSU Division of
Unit 7 : Image Painting, Editing and Layers
 Unit 7 : Image Painting, Editing and Layers Introduction This Unit describes about various painting tools; such as selection, cropping and measuring tools, retouching, drawing and type tools, Navigation
GETTING STARTED. 0 P a g e B a s i c s o f A d o b e P h o t o s h o p A g a P r i v a t e I n s t i t u t e f o r c o m p u t e r s c i e n c e
 GETTING STARTED 0 P a g e B a s i c s o f A d o b e P h o t o s h o p Adobe Photoshop: is a popular image editing software that provides a work environment consistent with Adobe Illustrator, Adobe InDesign,
ArcSoft PhotoImpression Table of Contents:
 ArcSoft PhotoImpression Table of Contents: 1. Welcome to PhotoImpression 2. Highlights of PhotoImpression 3. System Requirements 4. Installing PhotoImpression 5. Working with PhotoImpression Getting Started
The Tools and How They Work
 Pixlr Editor Tools This chapter looks at the broad set of tools at your disposal in Pixlr Editor. Here s what you ll learn: The Tool s Purpose and Function: Each tool s purpose and how it functions is
Learning Photo Retouching techniques the simple way
 Learning Photo Retouching techniques the simple way Table of Contents About the Workshop... i Workshop Objectives... i Getting Started... 1 Photoshop Workspace... 1 Setting up the Preferences... 2 Retouching
By Washan Najat Nawi
 By Washan Najat Nawi how to get started how to use the interface how to modify images with basic editing skills Adobe Photoshop: is a popular image-editing software. Two general usage of Photoshop Creating
A quick note: We hope that you will find something from the Tips and Tricks that will add a little pizazz to your yearbook pages!
 A quick note: The following pages are tips and tricks for Basic Photoshop users. You may notice that some instructions indicate that non-awpc fonts were used, and that some colors were created using the
Corel PHOTO-PAINT BERNINA Page 1 DL
 Corel PHOTO-PAINT 2018 BERNINA Page 1 Corel PHOTO-PAINT Corel PHOTO-PAINT is part of BERNINA Embroidery Software and gives users many tools for editing photos or bitmap artwork. Corel PHOTO- PAINT can
Overview of Photoshop Elements workspace
 Overview of Photoshop Elements workspace When you open Photoshop Elements, the Welcome screen offers you two options (Figure 1): The Organize button opens the Organizer. In the Organizer you organize and
Learning Adobe Photoshop CS6
 Module 1 Contents Chapter 1: Introduction to Photoshop Loading Photoshop...1-1 The Tools Panel...1-2 Using the Tools...1-3 The Panel Group...1-5 Layers...1-6 Loading a Sample File...1-6 Looking at the
Autodesk SketchBook Pro
 Autodesk SketchBook Pro Contents SketchBook Pro for Android Sketching... 5 For users of the SketchBook Pro for Galaxy Note... 5 S Pen menu... 6 Easy Clip... 6 Clutch... 6 Toolbar... 7 Information toolbar...
Adobe Photoshop. Levels
 How to correct color Once you ve opened an image in Photoshop, you may want to adjust color quality or light levels, convert it to black and white, or correct color or lens distortions. This can improve
Camera & Photos Apps ios10
 2017 Class Camera & Photos Apps ios10 iphone and ipad 1 Camera iphone also has filter options Live Photos, iphone 6s, 7 and ipad Pro Grid HDR - High Dynamic Range Timer Flash Switch Cameras Exposure Adjust
How to Image Editor. Enhance. Effects. Frames. Overlays. Stickers
 How to Image Editor Included in your NewZapp account is a powerful Image Editor capable of extraordinary things! To access the editor simple navigate to the Images panel, choose or upload an image to edit
Make the Most of Your ipad s Camera Class Handouts
 Make the Most of Your ipad s Camera Class Handouts Presented by: Ashlee Tominey Adult Services Librarian atominey@clpl.org (815) 526-5152 Not sure of your ipad model? You can identify your ipad model at
Key Terms. Where is it Located Start > All Programs > Adobe Design Premium CS5> Adobe Photoshop CS5. Description
 Adobe Adobe Creative Suite (CS) is collection of video editing, graphic design, and web developing applications made by Adobe Systems. It includes Photoshop, InDesign, and Acrobat among other programs.
HOW TO CREATE A SUPER SHINY PENCIL ICON
 HOW TO CREATE A SUPER SHINY PENCIL ICON Tutorial from http://psd.tutsplus.com/ Compiled by INTRODUCTION The Pencil is one of the visual metaphors most used to express creativity. In this tutorial,
Adobe Photoshop CS5 Layers and Masks
 Adobe Photoshop CS5 Layers and Masks Email: training@health.ufl.edu Web Page: http://training.health.ufl.edu Adobe Photoshop CS5: Layers and Masks 2.0 Hours The workshop will cover creating and manipulating
Photoshop CC: Essentials
 Photoshop CC: Essentials Summary Workspace Overview... 2 Exercise Files... 2 Selection Tools... 3 Select All, Deselect, And Reselect... 3 Adding, Subtracting, and Intersecting... 3 Working with Layers...
CATEGORY SKILL SET REF. TASK ITEM
 ECDL / ICDL Image Editing This module sets out essential concepts and skills relating to the ability to understand the main concepts underlying digital images and to use an image editing application to
Using Adobe Photoshop
 Using Adobe Photoshop 6 One of the most useful features of applications like Photoshop is the ability to work with layers. allow you to have several pieces of images in the same file, which can be arranged
Movie Merchandising. Movie Poster. Open the Poster Background.psd file. Open the Cloud.jpg file.
 Movie Poster Open the Poster Background.psd file. Open the Cloud.jpg file. Movie Merchandising Choose Image>Adjustments>Desaturate to make it a grayscale image. Select the Move tool in the Toolbar and
Add items to an existing album. While viewing photo thumbnails, tap Select, select items, tap Add To, then select the album.
 If you use icloud Photo Library, all your photos in icloud are in the All Photos album (see icloud Photo Library). Otherwise, you see the Camera Roll album, which includes photos and videos you took with
Adobe Photoshop. How To Get Started With Adobe InDesign CC: 10 Things Beginners Want To Know How To Do TO START: 1) ZOOM, MOVE, RETOUCH (05:11)
 ZOOM, MOVE, RETOUCH (05:11)") Adobe Photoshop How To Get Started With Adobe InDesign CC: 10 Things Beginners Want To Know How To Do Video By Terry White Tutorial Sheet by Juliet Davis TO START: Open the tutorial in YouTube, download
Adobe Photoshop How To Get Started With Adobe InDesign CC: 10 Things Beginners Want To Know How To Do Video By Terry White Tutorial Sheet by Juliet Davis TO START: Open the tutorial in YouTube, download
Introduction to Photoshop: Basic Editing & Prepare Images for the Web
 Introduction to Photoshop: Basic Editing & Prepare Images for the Web 1 LEARNING OBJECTIVES Basic tools in Photoshop & Use of Bridge Prepare images for print and web use TOPICS COVERED Photoshop Interface
Editing Using Photoshop CS5
 The Photoshop CS4 Editing Workspace - shown is the document (image) window, ToolBox, Info, Navigator, History, Adjustments and Layers Palettes, Windows Menus and Options Bar (on top). USING THE LAYERS
Exploring Photoshop Tutorial
 Exploring Photoshop Tutorial Objective: In this tutorial we will create a poster composed of three distinct elements: a Bokeh, an image and title text. The Bokeh is an effect which is sometimes seen in
Photoshop Elements Hints by Steve Miller
 2015 Elements 13 A brief tutorial for basic photo file processing To begin, click on the Elements 13 icon, click on Photo Editor in the first box that appears. We will not be discussing the Organizer portion
PHOTOSHOP BASICS: VINTAGE PHOTO FIXES
 PHOTOSHOP BASICS: VINTAGE PHOTO FIXES Course Topics: Photo Adjustments Photo Editing Tools Layers What is Photoshop Elements? Photoshop Elements is a streamlined version of Adobe Photoshop CC. Despite
Photoshop 1. click Create.
 Photoshop 1 Step 1: Create a new file Open Adobe Photoshop. Create a new file: File->New On the right side, create a new file of size 600x600 pixels at a resolution of 300 pixels per inch. Name the file
5 Masks and Channels
 5 Masks and Channels Adobe Photoshop uses masks to isolate and manipulate specific parts of an image. A mask is like a stencil. The cutout portion of the mask can be altered, but the area surrounding the
Contents: Bibliography:
 ( 2 ) Contents: Sizing an Image...4 RAW File Conversion...4 Selection Tools...5 Colour Range...5 Quick Mask...6 Extract Tool...7 Adding a Layer Style...7 Adjustment Layer...8 Adding a gradient to an Adjustment
Photoshop CS2. Step by Step Instructions Using Layers. Adobe. About Layers:
 About Layers: Layers allow you to work on one element of an image without disturbing the others. Think of layers as sheets of acetate stacked one on top of the other. You can see through transparent areas
1. Reference Guide and Glossary
 1. Reference Guide and Glossary Design Panel New Click the New Icon at any time to create a new project from scratch. Projects Browse, select, and cut projects from the Projects Tab. This includes your
Photoshop: a Beginner s course. by: Charina Ong Centre for Development of Teaching and Learning National University of Singapore
 Photoshop: a Beginner s course by: Charina Ong Centre for Development of Teaching and Learning National University of Singapore Table of Contents About the Workshop... 1 Prerequisites... 1 Workshop Objectives...
Make Watercolor and Marker Style Portraits with Illustrator
 Make Watercolor and Marker Style Portraits with Illustrator Save Preview Resources Portrait by Lillian Bertram (Creative Commons Share Alike used here with permission) Step 1: Set up your Illustrator document
Tablet overrides: overrides current settings for opacity and size based on pen pressure.
 Photoshop 1 Painting Eye Dropper Tool Samples a color from an image source and makes it the foreground color. Brush Tool Paints brush strokes with anti-aliased (smooth) edges. Brush Presets Quickly access
FLAMING HOT FIRE TEXT
 FLAMING HOT FIRE TEXT In this Photoshop text effects tutorial, we re going to learn how to create a fire text effect, engulfing our letters in burning hot flames. We ll be using Photoshop s powerful Liquify
Camera Raw software is included as a plug-in with Adobe Photoshop and also adds some functions to Adobe Bridge.
 Editing Images in Camera RAW Camera Raw software is included as a plug-in with Adobe Photoshop and also adds some functions to Adobe Bridge. Camera Raw gives each of these applications the ability to import
Transparency and blending modes
 Transparency and blending modes About transparency Transparency is such an integral part of Illustrator that it s possible to add transparency to your artwork without realizing it. You can add transparency
Photoshop Elements. Lecturer: Ivan Renesto. Course description and objectives. Audience. Prerequisites. Duration
 Photoshop Elements Lecturer: Ivan Renesto Course description and objectives Course objective is to provide the basic knowledge to use a selection of the most advanced tools for editing and managing image
XXXX - ILLUSTRATING FROM SKETCHES IN PHOTOSHOP 1 N/08/08
 INTRODUCTION TO GRAPHICS Illustrating from sketches in Photoshop Information Sheet No. XXXX Creating illustrations from existing photography is an excellent method to create bold and sharp works of art
Create new drawing. Select Collection. Manage graphs. Collection Name. Graphs preview
 Create new drawing Select Collection Collection Name Manage graphs Graphs preview Duplicate selection Move selection Delete selection Select All drawings Exit Share selection Selected graphs Add new Collection
Introduction to Adobe Photoshop 5.0
 Introduction to Adobe Photoshop 5.0 Fall 2000 Prepared by Soumaia Ahmed Al Ayyat Adobe Photoshop is a powerful, professional image-processing tool. It processes a variety of image formats. The quality
University Libraries ScanPro 3000 Microfilm Scanner
 University Libraries ScanPro 3000 Microfilm Scanner Help Guide Table of Contents Getting Started 3 Loading the Film 4-5 Viewing Your Film 6-7 Motorized Roll Film Control 6 Crop Box 7 Using the Toolbar
All Creative Suite Design documents are saved in the same way. Click the Save or Save As (if saving for the first time) command on the File menu to
 command on the File menu to") 1 The Application bar is new in the CS4 applications. It combines the menu bar with control buttons that allow you to perform tasks such as arranging multiple documents or changing the workspace view.
1 The Application bar is new in the CS4 applications. It combines the menu bar with control buttons that allow you to perform tasks such as arranging multiple documents or changing the workspace view.
Learn More about TechnoPhotoshop SAMPLE
 Learn More about TechnoPhotoshop Session 2 Filtering Fun In this session, students are introduced to Photoshop photo editing software. To start, they learn about the program environment. Afterwards, they
Morpholio Quick Tips TracePro. Morpholio for Business 2018
 m Morpholio Quick Tips TracePro Morpholio for Business 2018 m Morpholio Quick Tips TracePro 01: Hand Gestures 02: Apple Pencil 03: Start a New Drawing 04: Setting The Scale 05: Project Settings 06: Setting
Sunglass Selfi Illustration
 Sunglass Selfi Illustration www.orchardviewcolor.com theresa@orchardviewcolor.com @tjsorchard Mobile App Illustration with Adobe Capture & Adobe Draw In this hands on creative lab you will illustrate a
15 Photoshop Tips. Changing Photoshop rulers from inches to picas
 5 Photoshop Tips Changing Photoshop rulers from inches to picas What s the difference between inches and picas? a 6x inch RGB JPEG file is.9 MB a 6x pica RGB JPEG file is. MB a 6x inch RGB TIFF file is.
Digital Design and Communication Teaching (DiDACT) University of Sheffield Department of Landscape. Adobe Photoshop CS5 INTRODUCTION WORKSHOPS
 University of Sheffield Department of Landscape. Adobe Photoshop CS5 INTRODUCTION WORKSHOPS") Adobe INTRODUCTION WORKSHOPS WORKSHOP 1 - what is Photoshop + what does it do? Outcomes: What is Photoshop? Opening, importing and creating images. Basic knowledge of Photoshop tools. Examples of work.
Adobe INTRODUCTION WORKSHOPS WORKSHOP 1 - what is Photoshop + what does it do? Outcomes: What is Photoshop? Opening, importing and creating images. Basic knowledge of Photoshop tools. Examples of work.
SketchBook for Galaxy
 SketchBook for Galaxy Copyrights and Trademarks SketchBook for Galaxy v.3.2 2015 Autodesk, Inc. All Rights Reserved. Except as otherwise permitted by Autodesk, Inc., this publication, or parts thereof,
Photo One Digital Photo Shoots and Edits
 Photo One Digital Photo Shoots and Edits You will submit photo shoots, unedited and you will submit selected edited images. The shoots will be explained first and the edits will be explained later on this
ADOBE VISUAL COMMUNICATION USING PHOTOSHOP CS5 Curriculum/Certification Mapping in MyGraphicsLab
 ADOBE VISUAL COMMUNICATION USING PHOTOSHOP CS5 Curriculum/Certification Mapping in MyGraphicsLab OBJECTIVES- 1.0 Setting Project Requirement 1.1 Identify the purpose, audience, and audience needs for preparing
RETRO User guide RETRO. Photoshop actions. For PS CC, CS6, CS5, CS4. User Guide
 RETRO Photoshop actions For PS CC, CS6, CS5, CS4 User Guide CONTENTS 1. THE BASICS... 1 1.1. About the effects... 1 1.2. How the actions are organized... 1 1.3. Installing the actions in Photoshop... 2
The original image. Let s get started! The final rainbow effect. The photo sits on the Background layer in the Layers panel.
 Add A Realistic Rainbow To A Photo In this Photoshop photo effects tutorial, we ll learn how to easily add a rainbow, and even a double rainbow, to a photo! As we ll see, Photoshop ships with a ready-made
Introduction.
 Introduction At Photobooks Express, it s our aim to go that extra mile to deliver excellent service, products and quality. Our fresh, dynamic and flexible culture enables us to stand above the rest and
iphoto Objective Course Outline
 iphoto Objective In this class participants will learn how iphoto creates a photo center for photo organization by using rolls and albums. Participants will also learn the built-in editing tools. Participants
BOOK BUILDING. for beginners. Lightroom Tutorial by Mark Galer
 BOOK BUILDING for beginners Lightroom Tutorial by Mark Galer Contents Part One: Preparing the Book Part Two: Page Layout Design Ideas Create a Collection Choose your Images Sequence your Images Title your
Start or stop video recording. Camera/ Video switch
 Camera 9 At a glance If you have an ipad 2 or later, you can take both still photos and videos. In addition to the isight camera on the back, there s a FaceTime camera on the front for FaceTime calls and
Overview: Getting to Know the Work Area Design and Print Module 1 of 20
 Adobe Train the Teacher modules written and edited by the T3 curriculum team. Janet Davis Abigail Rudner Steve Tatum Chris Faust Lesson overview: This module provides a basic overview of the workspace,
Adobe Photoshop CC Part 1: The Basics
 CALIFORNIA STATE UNIVERSITY, LOS ANGELES INFORMATION TECHNOLOGY SERVICES Adobe Photoshop CC Part 1: The Basics Summer 2015, Version 1.0 Table of Contents Introduction...2 New Features of Photoshop CC...2
Creating Pastel Images and other effects in Photoshop
 Creating Pastel Images and other effects in Photoshop Martin Addison 2015 Creating pastel images Page 1 Martin Addison FRPS Using White Layers in Photoshop 1. Create a new empty Layer 2. Edit> Fill 3.
The toolbar in Pixlr Editor always appears on the left-hand side, although you can drag it anywhere you like.
 The toolbar in Pixlr Editor always appears on the left-hand side, although you can drag it anywhere you like. Crop (Shortcut: C) Reframe your entire canvas to a desired size and remove everything else.
Contents Foreword 1 Feedback 2 Legal information 3 Getting started 4 Installing the correct Capture One version 4 Changing the version type 5 Getting
 Contents Foreword 1 Feedback 2 Legal information 3 Getting started 4 Installing the correct Capture One version 4 Changing the version type 5 Getting to know Capture One Pro 6 The Grand Overview 6 The
iphoto Getting Started Get to know iphoto and learn how to import and organize your photos, and create a photo slideshow and book.
 iphoto Getting Started Get to know iphoto and learn how to import and organize your photos, and create a photo slideshow and book. 1 Contents Chapter 1 3 Welcome to iphoto 3 What You ll Learn 4 Before
Adobe Photoshop CS 6 Level I. Topics: Toolbars Workspace Panels Camera Raw Image Adjustment
 Adobe Photoshop CS 6 Level I Topics: Toolbars Workspace Panels Camera Raw Image Adjustment Chapter 1 Toolbars Selections By default, Photoshop gives you a set of tools on the left called the Toolbar or
Rendering a perspective drawing using Adobe Photoshop
 Rendering a perspective drawing using Adobe Photoshop This hand-out will take you through the steps to render a perspective line drawing using Adobe Photoshop. The first important element in this process
Photoshop: Manipulating Photos
 Photoshop: Manipulating Photos All Labs must be uploaded to the University s web server and permissions set properly. In this lab we will be manipulating photos using a very small subset of all of Photoshop
Photoshop Basics. Mark Wallace. snapfactory
 Photoshop Basics Mark Wallace snapfactory Session One Photoshop Basics 1 Introducing Photoshop Adobe Photoshop CS3 is a powerful image editing application. In addition to basic image editing it provides
11 Advanced Layer Techniques
 11 Advanced Layer Techniques After you ve learned basic layer techniques, you can create more complex effects in your artwork using layer masks, path groups, filters, adjustment layers, and more style
photoshop filters kelly ludwig assistant professor
 photoshop filters kelly ludwig assistant professor sharpening images reducing noise correcting distortions in images practical filters There are over 100 filters that ship with Photoshop and they're all
PHOTOSHOP & ILLUSTRATOR BOOTCAMP
 FALL 2014 - ELIZABETH LIN PHOTOSHOP & ILLUSTRATOR BOOTCAMP ILLUSTRATOR ALIGNMENT To access the alignment panel, go to Window -> Align. You should see a panel like the one below. This panel allows you to
IMAGE CORRECTION. You can find this and more information with video tutorials at
 IMAGE CORRECTION You can find this and more information with video tutorials at http://www.adobe.com/support/photoshop/ P H O T O S H O P T O O L S CLONE STAMP TOOL The Clone Stamp tool paints one part
Professional RAW Editor for ios and icloud Photo Library (v2.0)
") Professional RAW Editor for ios and icloud Photo Library (v2.0) INTRODUCTION Thank you for downloading RAW Power. RAW Power is the first RAW editor for ios 11 that can read and modify the ios Photo Library
Professional RAW Editor for ios and icloud Photo Library (v2.0) INTRODUCTION Thank you for downloading RAW Power. RAW Power is the first RAW editor for ios 11 that can read and modify the ios Photo Library
Photoshop Elements for Genealogists Part 1
 Photoshop Elements for Genealogists Part 1 By Barry J. Ewell Topics Covered Photoshop Elements Workspace Exploring the Tools Quick Fix Preview Photoshop Elements Workspace Workspace File Edit Image Enhance
Morpholio Quick Tips TracePro. Morpholio for Business 2017
 m Morpholio Quick Tips TracePro Morpholio for Business 2017 m Morpholio Quick Tips TracePro 00: Hand Gestures 01: Start a New Drawing 02: Set Your Scale 03: Set Your Pens 04: Layer Controls 05: Perspective,
Organizing artwork on layers
 3 Layer Basics Both Adobe Photoshop and Adobe ImageReady let you isolate different parts of an image on layers. Each layer can then be edited as discrete artwork, allowing unlimited flexibility in composing
ITEC185 INTRODUCTION TO DIGITAL MEDIA
 1 ITEC185 INTRODUCTION TO DIGITAL MEDIA ADOBE PHOTOSHOP ITEC185 - Introduction to Digital Media ITEC185 - Introduction to Digital Media 2 What is Adobe Photoshop? Photoshop is the leading professional
Using Adobe Photoshop
 Using Adobe Photoshop 4 Colour is important in most art forms. For example, a painter needs to know how to select and mix colours to produce the right tones in a picture. A Photographer needs to understand
NMC Second Life Educator s Skills Series: How to Make a T-Shirt
 NMC Second Life Educator s Skills Series: How to Make a T-Shirt Creating a t-shirt is a great way to welcome guests or students to Second Life and create school/event spirit. This article of clothing could
Autodesk SketchBook 3.2
 Autodesk SketchBook 3.2 Copyrights and Trademarks Autodesk SketchBook 3.2 2015 Autodesk, Inc. All Rights Reserved. Except as otherwise permitted by Autodesk, Inc., this publication, or parts thereof, may
Recitation 2 Introduction to Photoshop
 Recitation 2 Introduction to Photoshop What is Adobe Photoshop? Adobe Photoshop is a tool for creating digital graphics either by starting with a scanned photograph or artwork or by creating the graphics
Getting Started. 1. Double click on the eye con. 2. Single click on File, then new, then OK. Click here.
 Getting Started 1. Double click on the eye con. 2. Single click on File, then new, then OK. Click here. What is Photoshop? Photoshop is a program that lets you make pictures. You can put away your markers
Retouching Portraits in Photoshop
 Retouching Portraits in Photoshop I Removing Blemishes When removing blemishes, acne or other imperfections on the skin, our goal is to maintain as much of the original skin texture as possible. That way,