Welcome. Camera & GPS Set-up
|
|
|
- Darren Austin
- 5 years ago
- Views:
Transcription
1
2 Table of Contents Camera & GPS Set-up... 1 Initializing the GPS...2 Compass/Heading...2 Distance...3 Tips to get the most out of your Camera...3 GPS-Photo Link Setup: Registration...3 Program Screens... 5 Select Photos... 5 GPS Data...6 Time Sync... 7 Data Entry/Photo Edit...8 Output Options Web output...11 Watermark Google Earth Heading/Distance Misc Processing Viewing Output after leaving GPL GPS-Photo Link ArcView 8.x/9.x Extension Using ArcView Extension without plug-in Frequently Asked Questions (inc. Transfer License) 19 NOTE: Your disk also includes a PowerPoint introduction and help files for your information. Help files include more detailed descriptions and screen shots. This file is also available and updated on our website i
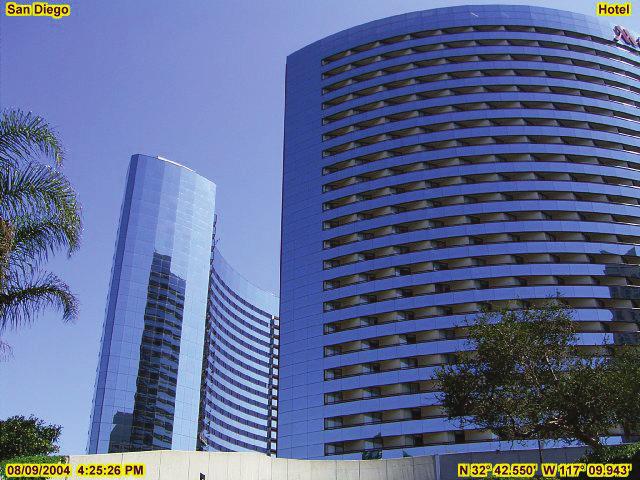
3 Welcome Thank you for your purchase of the GPS-Photo Link Ricoh Edition, Ricoh 500SE digital camera and GPS! We are sure you will find this to be a great business tool. Information from this guide and additional information may be found in the help files on the GPS-Photo Link CD or online at Camera & GPS Set-up Detailed instructions for using the Ricoh 500SeE with GPS are included in the camera s instructions beginning on page 180. This booklet highlights basic instructions most frequently used by photographers. Begin by unpacking the battery and charger, and charge the battery completely before use by following the simple instructions included in the box. Once the battery is fully charged, insert it into the battery slot located on the side of the camera. The battery label should face the front of the camera upon insertion. Turn the dial on top of the camera to the camera icon. Press the green power button. If you have a GPS attached make sure the green light comes on. The first time you use your GPS you will need to initialize it. See instructions on the next page. NOTE: The camera can also use standard AA batteries but it s not recommended. The camera will get its best performance by using the rechargeable battery included or other rechargeable NiMH AA batteries. 1
4 Initializing the GPS It may take minutes for the GPS to get its first fix. This is called initializing the GPS. To initialize your GPS, turn the camera on and leave it outside or on the edge of an open window. The GPS will search for its location and beep when it is done. After this first initialization, a fix will be obtained relatively quickly (usually less than 1 minute). If you travel a great distance (i.e. cross country) you may need to reinitialize the GPS. Compass/ Heading GPS-Photo Link can indicate the heading of the photo in addition to its location. The heading information can come from one of 4 places: a Compass/GPS module attached to the Ricoh 500SE, an attached GPS without compass, information manually entered into the Ricoh camera s memo field, or it can be manually entered into GPS-Photo Link post processing. 1. If you have a Compass/GPS module attached to your Ricoh 500SE the heading will automatically be linked to your photo. Remember to calibrate the compass before use to ensure accuracy. Calibration instructions are available online at Support.php. Allow the position to settle before taking the photo. 2. To determine heading using a GPS, GPS-Photo Link calculates heading assuming a straight line from the last several points. Therefore, to calculate heading, walk toward the object in a straight line for approximately 10 feet, then stop and take the photo. 3. If you have an external compass or know the direction you are facing when you take the photo, you may enter the heading into the Ricoh Camera's memo field instead. If you use any of these methods make sure to indicate GPS or Compass on the Heading/Distance tab in GPS- Photo Link (in the Output Options section). 4. During Data Entry you can manually enter the heading. See Data Entry section of this manual. 2
5 Distance GPS-Photo Link can indicate the distance to the object of each photo by entering the distance in a memo field on the Ricoh camera or by using a Laser Rangefinder connected to the camera via Bluetooth (The laser will transmit the information to the camera. See the online help file for directions). A distance is required to enable the pie piece (2d) and cone shaped (3d) output (in either ARCGIS (shape files) or Google Earth output). See Heading/Distance instructions pg. 14. Tips to get the most out of your Camera/GPS Save time by keeping a continuous GPS fix by setting the Auto Power Off on the camera to 30 minutes or the off position. To do this, press the round Menu/OK button. Scroll to Setup tab then tab down to Auto Power Off, and adjust the function to 30 minutes or off. If you do not take this step, the camera and GPS will turn off after 1 minute, forcing the GPS to reacquire the satellites when powered back on. Check your work! After photos are taken, press the Review Button on the camera to preview them. The latitude/ longitude will be displayed, which is a great way to check the coordinates and make sure it is working the way you expect. GPS-Photo Link Set-up Registration GPS-Photo Link is designed to run on one computer at a time. To activate your software, begin by inserting the disc into the CD-ROM drive, installation will start automatically. When it is done, select Run and the program will begin by showing you the Activation screen. When you first install the software it becomes available in trial mode. If you select OK the software will be begin in 3

6 trial mode. This version will run for 15 days with limited features including only processing 10 photos and adding watermarks to each photo. There are two ways to activate the software. The preferred method is by selecting the Activate via Internet button and typing in your 16 digit activation number provided to you at the time of purchase (look at your invoice or at the sticker on the DVD case.) If you are unable to use the internet - you may call or Geospatial Experts to unlock your license manually: (303) :30 5:00 Mountain Time How it works: You will click the register off-line button. When you do a screen called "Provide Authorization Request Code will appear. Indicate the "request type" for what you are want to do (activate your license for the first time, extend an evaluation or reactivate a license that has already been used. Once the correct Request Type is entered, copy the number that appears at the bottom of the screen (Authorization request Code). Please or call us with this code AND the 16 digit serial number you received upon purchase. We will NOTE: To transfer your license to another computer see the instructions in the FAQ section of this booklet. 4

7 use these numbers to create an off-line activation code. You will enter the code we create into the box below and click OK to activate the software. Program Screens Select Photos Identify the location of photos you wish to process in the box on the left called Photo Source. There are three options: Camera Folder - Downloads the photos from your camera (e.g. from a memory card inserted into the computer or an SD card reader). Existing Folder - Identifies photos that are in the default Photo Root folder. Most of the time these will be photos you have already bprocessed with GPS- Photo Link. Use this option if you wish to re-process photos or to process photos that you downloaded to this folder earlier. This screen also allows you to view output created in prior sessions. Any Folder - Will process photos from any directory on your computer. All photos will be saved to the same folder as the originals. Photo Root Folder indicates where processed photos (output) will be saved. The New Folder shows the name for the specific folder that will be created within the root folder for these saved photos. Click Next to proceed. 5

8 GPS Data When using the Ricoh 500SE, the GPS data is already embedded in the photos. Use GPS Data in Photo imports the data that was saved as part of the photo. This is the only setting available in the Ricoh Edition of the software. The Professional Edition of GPS-Photo Link allows you to use GPS data from the Ricoh camera or other data source. It features two additional ways to get the GPS data: Download - Reads the data directly from a Garmin GPS, Magellan GPS, or the GPS Datalogger. Use GPS Data in File - Imports GPS data that was saved by another program (or reusing data stored by downloading from a device), click on the browse button to find the file with your GPS data. Time Zone - In this field, indicate the time zone your camera was set to when you took the photos. Datum/Position Format - Select Datum - Opens the NOTE: If you select data from a GPX file, you will be asked whether you want to use track logs or waypoints. 6

9 Select Datum dialog to choose which datum to use. Some datum selections require you to select a region from the drop-down list. If your input data is not in WGS-84, select the datum here, then check "Disable WGS-84...". This will cause GPS-Photo Link to not convert the incoming data to the output datum. Click OK then select how you want data displayed (e.g. Lat/Lon, State Plane, HARN, UTM, etc.) Click Next to proceed Time Sync If you are using the Ricoh camera with GPS attached when you take photos (as an attachment or via Bluetooth or WiFi), this screen allows you to adjust the Time Zone of the output. Click Next to proceed. If you are using a different camera or if you indicated the GPS data was coming from a source other than the GPS Data in File, you will need to synchronize time between the GPS and camera. Detailed instructions can be found online at Use the online help referencing GPL-Standard Edition. Matching the digital photos to the GPS location is done by synchronizing the Camera and GPS time. Method of Time Synchronization: Use photo of the GPS receiver will allow you to enter the time from a photo of the GPS screen (See Camera Setup). 7
10 Manually enter GPS-Camera time if you know the difference between the GPS time and the camera time. GPS-Photo Link will match each photo with the GPS point with the time closest to the time of the photo. You may wish to specify how close the times need to be in order to match the photo (i.e. if you are flying, you will want a very small interval, and if you are standing still for several minutes, you may use a longer interval). Matching: Photos are matched to GPS position using one of the following methods: Match to nearest GPS point Interpolate Match to closest point Before or After Click Next to proceed Data Entry/ Photo Edit The data entry portion of this screen is divided into two data entry parts. The top left portion applies to all the photos. The lower portion is only for photo selected. Title - Select to have a title appear on all photos (i.e. "Copyright 2001, ABC Inc." or "Park Photos"). Datum - Select to have the datum displayed on all photos. Photo Comment - Each photo can have a comment. After a comment is entered for one photo, the comment will be available for use in other photos via the drop down list box. Load From File - The comment list displayed can be customized by creating a text file. Click on Load From File, select the file with the comments. Direction If you gathered direction data when you took the photo, this box will be automatically populated (See Taking Pictures). If the box is blank, you may manually enter the direction the camera was facing when the photo 8

11 was taken. The direction abbreviations can be customized by editing the compass.txt file. Internal Comment - This comment will not appear on the watermark, only in the text file and ESRI shape file output. Manual Lat/Lon - Allows the editing of the photos computed lat/lon or the ability to manually enter a lat/lon. Photo Editing This part of the screen (upper right) allows you to preview each photo and do some basic photo editing: Select photo from the list at the left. Change brightness, contrast and rotation as desired (described below). Select Reset to return the values to the default. These attributes will be applied only to the watermarked photo (the original file is left untouched). Brightness/Contrast - Use these controls if the photo cannot be seen very well (this will affect the watermarked photo). Rotate Left/Rotate Right - Rotates image, used for viewing photos if camera was tilted when taking the photo. 9

12 Fit image to screen - Select to fit the whole photo in the screen. Uncheck to view photo in actual size. Use the scroll bars to view other portions of the photo. Click OK when finished to proceed. Output Options GPS-Photo Link allows you to create many types of output. Different output styles are indicated in the check-boxes on the lower left and include: Watermarked photos (_tag.jpg files) Web pages (.html files) Text output (.csv file to use in spreadsheets) GPS Exchange (.gpx to use with multiple programs including Garmin s MapSource) Google Earth (.kml to launch Google Earth) Word Report (.doc file to use in Microsoft Word) ESRI shape files (.shp file for ARC GIS products) After selecting the types of output you want using the checkboxes in the lower left, use the Tabs to determine the format of your output. 10
13 Tabs include: Web Output Watermarks Google Heading/Distance Misc Options on each of these tabs are discussed in that order. Web Output Background Maps - GPS-Photo Link automatically downloads background maps for your web page if you check the box beside Show Background Maps. Map Source - Allows you to select which internet maps to download; choose from public Tiger maps, USGS Topos, USGS Aerial Images or USGS High Res Urban Photos. Show overview maps - Creates an overview map, showing where all the photos were taken. Download map images to local file - Select this option to download the map images in the output folder instead of linking to them. This allows the creation of stand-alone HTML pages that do not need an internet connection to view. It also allows the map images to be used in ArcGIS (a world file is created for each map). Use Icon on Maps - Allows you to select the icon you would like to show where photos were taken. You may choose from the standard icons or select your own icon using the Icon File button. Icons may be.jpg, bitmap or.gif files. If you select the arrow or airplane icon, it will automatically rotate the symbol to point in the direction indicated for each photo on the Data Entry screen. Web Page Options Link to Internet Map Sites - This option will enable links to MapQuest, TopoZone, Lost Outdoors and Terra Server on the web page. Link to original photo - Select to link the original photo 11
14 in the web page output, so that if you click on the watermarked photo, the original photo will be shown. Output Attributes Table - Includes a table showing attributes of each photo. Use web page file templates - Uses HTML templates for web output. See Using HTML Templates in the help file. File Renaming Options -You may change the format to rename the watermarked photo, associated web pages and original photo using different time/date patterns, comments, or memos associated with your photos. This may make specific photos easier to find. NOTE: If you process the photos and the background maps are blank, it means that no maps are available for your coordinates at this site. Choose a different map source and reprocess the photos. Watermark The options on this screen allow you to manipulate what will be displayed on the processed photos as a watermark on the photo itself or outside the photo as a label underneath. You may adjust the color of the labels, create a halo or other highlight, or adjust the size of the text. You may also indicate what information to display on the photos. For each item you include, you may select the placement of that item on the photo. Two lines at the top and two at the bottom of each photo are available. If you choose to include your logo (up to two), you must indicate the location of that file on your computer. GPS-Photo Link will import the logo as is. You may then adjust the logo to be more transparent if desired. Finally, you may choose to resize the photo and determine the quality for the watermarked photo. NOTE: If you wish to include your logo on the photos, make sure the file is the correct size for the photos before importing it. 12
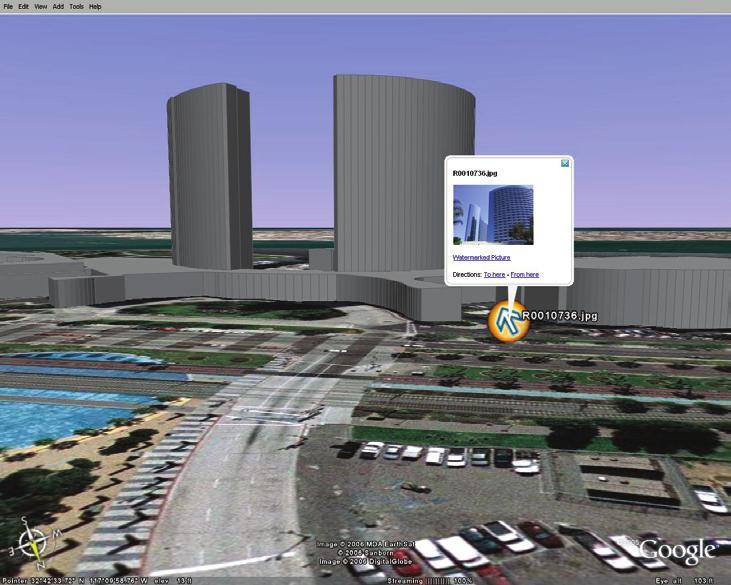
15 Google Earth GPS-Photo Link automatically imports your photos and track logs into Google Earth. This screen allows you to select how your data will be displayed in Google Earth. Icon Options - Select the icon that will represent your photo in Google Earth. You may use a thumbnail of the photo itself or choose an icon from the drop down menu. If you choose an arrow or an airplane, GPS-Photo Link will automatically rotate the symbol to face the heading indicated for each photo on the Data Entry screen. You may also determine the size of the icons. Google Earth includes a label associated with the icon. Use the Label drop down list to determine how your icons will be labeled. When you click on an icon in Google Earth a description box appears. You can determine what information to include by checking boxes in the View in Description Box section of GPS-Photo Link. Output Options allows you to include track logs in Google Earth along with the photos. Google Earth can display information in 3d. Because GPS coordinates are less reliable for elevation, you may wish to select Lock Points to Ground if your photos were taken from the ground (not Aerial photography). Show Field of View - Allows you to display the area included in the photo. A default width will be assigned. The area can be shown in 2d (pie piece shape) or 3d (cone shape). The heading and distance used for this option must be adjusted using the Heading/Distance tab. That will determine the length and direction of the shape. NOTE: To use the Google Earth output you must first download Google Earth to your computer. Go to earth.google.com/downloads.html. Google Earth is free, however upgrades are available for purchase. 13
16 Heading/Distance Heading shows the direction that the camera was facing when the photo was taken. The heading may be determined in 1 of 3 ways: GPS or Compass - If you collected heading information at the time the photo was taken, that information was included in the photo and should have appeared on the Data Entry screen automatically. Selecting this option will use that information display heading in the output. Memo - You may have noted your heading as a memo field when the data was collected. Selecting this option will retrieve that data from the memo field and use it to position the icon. Use the drop down box to indicate which memo field contains heading information. Use for all - Allows you to indicate a particular direction that will apply to all photos. Use this option only if all photos were taken facing the same direction. Indicate that heading as degrees in the box. Distance to object - Indicates the distance between the camera and the object of the photo. If you collected distance data with the Ricoh camera, choose the method you used (See Taking Photos in set-up for instructions). Laser - If you used a Laser to determine distance, and you used a Bluetooth or other device to send that data to your GPS, PDA or camera, choose this button. Memo - If you captured distance data as a memo field select this option and indicate which memo field to use. Manual - If you did not capture distance when you took the photo, you may estimate your distance to all objects with this option. The distance you select will determine the length of the pie piece or cone used in the HTML, shape file or Google Earth. The same distance will be used for all photos. Calculate new position - Allows you to place the icon at the location of the object based on the heading and distance information entered above (normally the icon is placed where 14

17 the photo was taken). Heading Options - Allows you to shift all headings right or left by the degrees you indicate. This option should only be used in cases where all photos are taken facing a different direction than you are traveling. Example - If you are taking photos out of the right window of a car or airplane, then use this option to shift all directions to the right. Miscellaneous This page allows you to format fields that are used in many forms of output including Lat/Lon, time, and date. It also allows you to determine the size of the thumbnails created. Processing Once you have finished selecting options, click the Finish button. You will see a screen with a progress bar during processing. Once the photos are processed, a screen will appear that shows how many photos were linked to a Lat/Lon position. If no photos were linked, the notice will be in red. Click Browse Output Folder to open Windows Explorer to the output directory. Click View Web Page to launch internet browser to display the web (HTML) output. Click Google Earth to launch Google Earth browser and display your photos. Click Continue to return to the first wizard screen. Click Exit to leave GPS-Photo Link. 15

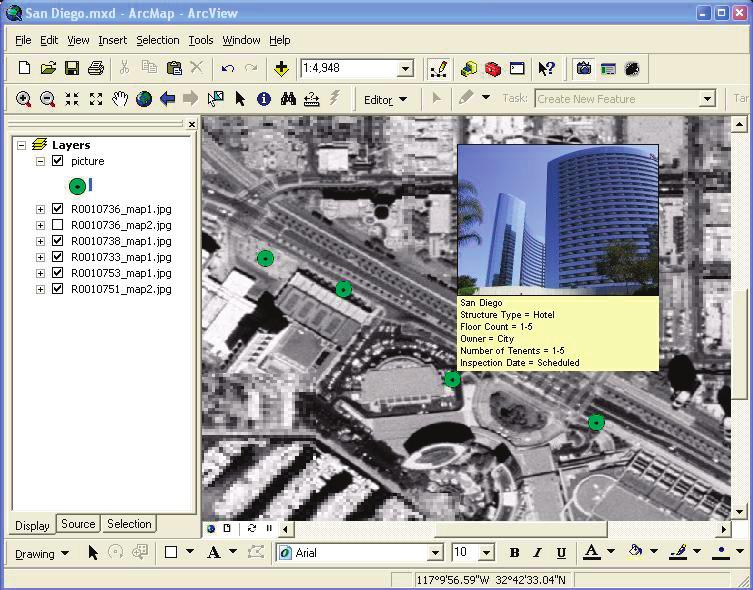
18 View Output after leaving GPS-Photo Link After leaving this screen, you may view your output by returning to the Select Photos screen and choosing Existing Folder. At the bottom of that screen you will see buttons that allow you to open output previously created for the selected Photo Root Folder. You may also browse to the folder where the photos are stored and open the index.htm to view webpages, or *.kml file to view Google Earth output. GPS-Photo Link ArcView 8.x/9.x Extension This extension for ArcView 8.x/9.x will allow the hot linking of photos, automatically loading background images (aerial photos and topo maps), and loading photos as layers. It also allows the processing of photos from the Ricoh camera directly in ArcMap. You can create Shape files or Personal GeoDatabases. Once GPS-Photo Link is installed on your PC, a new "GPS- Photo Link" toolbar should be available in ArcView. It has three buttons: View Picture, Setup, and Process Photos. If the toolbar is not visible, select "Tools" then "Customize" from the ArcMap menu, and select "GPS-Photo Link". 16
19 View Photos Button (left side of toolbar) Select the GPS-Photo Link tool (Camera icon) Hover over a point, and the thumbnail photo will popup Click on a point in the picture.shp theme, the watermarked photo will then be displayed Right-click on a point in the picture.shp theme, and a popup menu will appear: Change Symbol - Allows you to change the picture symbol, and to rotate the symbol. Load Picture as Layer - Loads the photo as a theme in ArcMap, useful for use in layouts. Load Background Image - Loads a downloaded background image, such as an aerial photo or topo map. Must have "Web Pages (HTML)" output and "Download map images to local file" selected when processing photos. Load Large Background Image - Loads a downloaded background image, at a larger scale. Show Web Page - Launches the web page associated with the photo. Setup - Runs the options dialog. Edit - Allows you to view the comments and memos Setup Button (middle of toolbar) This icon allows you to determine what is displayed in the thumbnail view and whether the watermarked or original photo is displayed when you select a point. Process Photos Button (right of toolbar): launches an ArcGIS Plug-In. This essentially runs GPS-Photo Link from within ArcView. Select the Process Photos Button 1. In the dialog, click Photo Directory to specify the directory where the Ricoh photos are stored. 2. Select "Create Watermarks" to have watermark photos created (Click "Options" for watermarking options and the following screen will appear). 17
 there are 4 options: None - Do not use a heading. Laser - Use heading from the GPS or a GPS with compass.")
20 3. Select the Datum and position format. 4. Select either "Shape File" or Personal Geodatabase. 5. Click "Create and Load Layer" to process the photos. 6. Click Layer Options to bring up this dialog: Heading: (Picture Direction) there are 4 options: None - Do not use a heading. Laser - Use heading from the GPS or a GPS with compass. Memo - Use a memo field to specify heading. Manual - Manually type in a heading. Distance to Object: there are 4 options: None - Do not use a distance. Laser - Use distance from the Laser Rangefinder. Memo - Use a memo field to specify distance. Manual - Manually type in a distance. Picture Symbol : Select the style, color, and size for the picture symbol. Select "Rotate" to rotate the symbol based on heading. Layer Options: Default Picture Layer - Create a layer of picture points. Create Field of View Layer showing direction and 18
21 distance to object. This will create a layer of "wedges" using the camera s field of view (how much the camera can see horizontally), along with the distance and heading. See the example below: Calculate a new position from heading and distance - This option will calculate the objects actual position based on the heading and distance from the camera position. It is most useful when used with a Laser Rangefinder. Using ArcView Extension without Plug-in If you choose to run GPS-Photo Link outside of ArcView, you can still import the shape files into ArcView and use the extension. To import the shape files, click Add Data, then locate the GPS-Photo Link file "picture.shp" in the directory under the Photo Root Folder, which defaults to: \Program Files\GPS-Photo Link\Photos Frequently Asked Questions Should I turn on my camera s clock so that it shows on the display? No! The date and time are stored internally in the image file. GPS-Photo Link has many more options for watermarking than what are built into digital cameras. However, you should set your camera s clock to be near the actual time. Cameras with clocks that are months or years off sometimes have difficulty linking to coordinates. I want to record the location of the object, not the location where the picture was taken. How can I do this? GPS Lock Feature The Ricoh 500SE now supports a GPS lock feature. To obtain the coordinates of the object being photographed rather than the camera itself: 1. Press the left arrow button on the camera and the 19
22 current GPS position will lock. 2. Walk back and take photos. The GPS coordinates stored will be of the position of the object, not the camera. 3. Remember to press the left arrow button again to unlock the GPS position. If using an external GPS (Trimble, Garmin, etc.), place it next to the object, then step back and take a picture. The picture will be linked to the coordinates of the GPS at the time it is taken. If the object is distant, use a laser range finder with Bluetooth to record the distance to the object. This will be stored as a memo associated with the photo. Can I use GPS-Photo Link with aerial photography? Yes, in fact we have many customers who do just that. One of them was featured in the ArcUser magazine. Visit: I m trying to get a satellite fix but it is taking a long time. Why? It may take up to 15 minutes for the GPS to get its first fix. This is what we call initializing the GPS. To initialize the camera, turn the camera on and leave it outside or on the edge of an open window. Since it is new and has never been used in your location, it takes some time to locate the satellites. The camera will sound a series of beeps when it locates the satellites. After initializing, it will obtain a fix relatively quickly. I didn t get a memory card at the time of my purchase. How many pictures will the Ricoh 500SE camera hold without one? The Ricoh 500SE camera has an internal 8 MB/SD memory card. This translates to approximately 5 full sized pictures. The 512 MB card we sell holds 320 pictures and the 1 GB holds 640 pictures. 20
23 How do I unlock the software? See instructions on Page 3 of this booklet. Can I transfer my license to another computer? Yes! You can easily transfer the license to another computer without contacting GeoSpatial Experts. While running GPS-Photo Link click the About button and Registration on the screen that pops up. Next select the Transfer License option and follow the instructions. To use this option you need to be connected to the Internet. When you transfer the license it checks in your number on our server making it available for another computer to unlock. You can use the same 16 digit serial number to unlock the software from any computer. NOTE: You may not transfer the software off one computer and back on to the same computer on the same day. You will have to wait until the next day or call GeoSpatial Experts for assistance. If you do not have internet access you may call or GeoSpatial Experts and we can assist you. We will need to know the 16 digit serial number associated with your software. How many pictures can I process at once and how long will it take? GPL can process hundreds of photos at once. It takes around 1 second for each photo, depending on computer speed and size of the photo in mega pixels. What happens to the original photo? The original photo remains untouched by GPL. We hope you enjoy using GPS-Photo Link! If you have questions or comments please us at Info@GeoSpatialExperts.com. 21
GIS Module GMS 7.0 TUTORIALS. 1 Introduction. 1.1 Contents
 GMS 7.0 TUTORIALS 1 Introduction The GIS module can be used to display data from a GIS database directly in GMS without having to convert that data to GMS data types. Native GMS data such as grids and
v. 8.0 GMS 8.0 Tutorial GIS Module Shapefile import, display, and conversion Prerequisite Tutorials None Time minutes
 v. 8.0 GMS 8.0 Tutorial Shapefile import, display, and conversion Objectives Learn how to import and display shapefiles with and without ArcObjects. Convert the shapefiles to GMS feature objects. Prerequisite
Go Daddy Online Photo Filer
 Getting Started and User Guide Discover an easier way to share, print and manage your photos online! Online Photo Filer gives you an online photo album site for sharing photos, as well as easy-to-use editing
DIGITAL CAMERA. Quick Start Guide
 En DIGITAL CAMERA Quick Start Guide Table of Contents pg. 1 Check the package contents pp. 2 11 Take Pictures Step 1 Charge the batteries...pg. 2 Step 2 Attach the camera strap...pg. 3 Step 3 Insert the
Objectives Learn how to import and display shapefiles in GMS. Learn how to convert the shapefiles to GMS feature objects. Required Components
 v. 10.3 GMS 10.3 Tutorial Importing, displaying, and converting shapefiles Objectives Learn how to import and display shapefiles in GMS. Learn how to convert the shapefiles to GMS feature objects. Prerequisite
Objectives Learn how to import and display shapefiles with and without ArcObjects. Learn how to convert the shapefiles to GMS feature objects.
 v. 10.1 GMS 10.1 Tutorial Importing, displaying, and converting shapefiles Objectives Learn how to import and display shapefiles with and without ArcObjects. Learn how to convert the shapefiles to GMS
iphoto Getting Started Get to know iphoto and learn how to import and organize your photos, and create a photo slideshow and book.
 iphoto Getting Started Get to know iphoto and learn how to import and organize your photos, and create a photo slideshow and book. 1 Contents Chapter 1 3 Welcome to iphoto 3 What You ll Learn 4 Before
Nikon View DX for Macintosh
 Contents Browser Software for Nikon D1 Digital Cameras Nikon View DX for Macintosh Reference Manual Overview Setting up the Camera as a Drive Mounting the Camera Camera Drive Settings Unmounting the Camera
Kodiak Corporate Administration Tool
 AT&T Business Mobility Kodiak Corporate Administration Tool User Guide Release 8.3 Table of Contents Introduction and Key Features 2 Getting Started 2 Navigate the Corporate Administration Tool 2 Manage
User Guide V10 SP1 Addendum
 Alibre Design User Guide V10 SP1 Addendum Copyrights Information in this document is subject to change without notice. The software described in this document is furnished under a license agreement or
IRISYS ISI Series Imager Report Writing Software
 IRISYS ISI 4604 4000 Series Imager Report Writing Software User Manual InfraRed Integrated Systems Ltd Park Circle, Tithe Barn Way Swan Valley Northampton NN4 9BG Tel: (0) 1604 594200 Fax: (0) 1604 594210
Introduction to: Microsoft Photo Story 3. for Windows. Brevard County, Florida
 Introduction to: Microsoft Photo Story 3 for Windows Brevard County, Florida 1 Table of Contents Introduction... 3 Downloading Photo Story 3... 4 Adding Pictures to Your PC... 7 Launching Photo Story 3...
Chapter 4 Adding and Formatting Pictures
 Impress Guide Chapter 4 Adding and Formatting Pictures OpenOffice.org Copyright This document is Copyright 2007 by its contributors as listed in the section titled Authors. You can distribute it and/or
Lesson 4: Inserting and Modifying Clip Art and Photos
 CNET tech sites: Price comparisons Product reviews Tech news Downloads Site map Home Your Courses Your Profile Logout FAQ Contact Us About Lesson 4: Inserting and Modifying Clip Art and Photos PowerPoint
ROTATING SYSTEM T-12, T-20, T-50, T- 150 USER MANUAL
 ROTATING SYSTEM T-12, T-20, T-50, T- 150 USER MANUAL v. 1.11 released 12.02.2016 Table of contents Introduction to the Rotating System device 3 Device components 4 Technical characteristics 4 Compatibility
House Design Tutorial
 Chapter 2: House Design Tutorial This House Design Tutorial shows you how to get started on a design project. The tutorials that follow continue with the same plan. When we are finished, we will have created
1 ImageBrowser Software User Guide 5.1
 1 ImageBrowser Software User Guide 5.1 Table of Contents (1/2) Chapter 1 What is ImageBrowser? Chapter 2 What Can ImageBrowser Do?... 5 Guide to the ImageBrowser Windows... 6 Downloading and Printing Images
ARC HYDRO GROUNDWATER TUTORIALS
 ARC HYDRO GROUNDWATER TUTORIALS Subsurface Analyst Creating ArcMap cross sections from existing cross section images Arc Hydro Groundwater (AHGW) is a geodatabase design for representing groundwater datasets
Digital Photo Guide. Version 8
 Digital Photo Guide Version 8 Simsol Photo Guide 1 Simsol s Digital Photo Guide Contents Simsol s Digital Photo Guide Contents 1 Setting Up Your Camera to Take a Good Photo 2 Importing Digital Photos into
Copyright Notice. Trademarks
 Copyright Notice All rights reserved. No part of this publication may be reproduced, stored in a retrieval system, or transmitted in any form or by any means, electronic, mechanical, photocopying, recording,
v Introduction Images Import images in a variety of formats and register the images to a coordinate projection WMS Tutorials Time minutes
 v. 10.1 WMS 10.1 Tutorial Import images in a variety of formats and register the images to a coordinate projection Objectives Import various types of image files from different sources. Learn how to work
rino 600 series quick start manual
 rino 600 series quick start manual Getting Started Keys warning See the Important Safety and Product Information guide in the product box for product warnings and other important information. When using
Submittals Quick Reference Guide
 This topic provides a reference for the Project Center Submittals activity center. Purpose The Submittals activity center in Newforma Contract Management enables you to effectively log submittals and track
inphoto ID PS Automatic ID photography With Canon PowerShot camera User Guide
 inphoto ID PS Automatic ID photography With Canon PowerShot camera User Guide 2018 Akond company Phone/fax: +7(812)384-6430 Cell: +7(921)757-8319 e-mail: info@akond.net akondsales@gmail.com http://www.akond.net
1. What is SENSE Batch
 1. What is SENSE Batch 1.1. Introduction SENSE Batch is processing software for thermal images and sequences. It is a modern software which automates repetitive tasks with thermal images. The most important
EDUCATION GIS CONFERENCE Geoprocessing with ArcGIS Pro. Rudy Prosser GISP CTT+ Instructor, Esri
 EDUCATION GIS CONFERENCE Geoprocessing with ArcGIS Pro Rudy Prosser GISP CTT+ Instructor, Esri Maintenance What is geoprocessing? Geoprocessing is - a framework and set of tools for processing geographic
Wahl HSI3000 Series Imager Report Writer Software
 Wahl HSI3000 Series Imager Report Writer Software User Manual WD1024 Rev A 04/18/08 Palmer Wahl Instrumentation Group 234 Old Weaverville Road Asheville, NC 28804 Phone: (828) 658-3131 Fax: (828) 658-0728
Minolta Scanner Plugin
 Minolta Scanner Plugin For a list of Minolta digitizers and Geomagic software products with which this plugin is compatible, see Release Notes for Geomagic Minolta Plugin 7.6.0.3. Copyright 2005, Raindrop
SKF TKTI. Thermal Camera Software. Instructions for use
 SKF TKTI Thermal Camera Software Instructions for use Table of contents 1. Introduction...4 1.1 Installing and starting the Software... 5 2. Usage Notes...6 3. Image Properties...7 3.1 Loading images
CHAPTER1: QUICK START...3 CAMERA INSTALLATION... 3 SOFTWARE AND DRIVER INSTALLATION... 3 START TCAPTURE...4 TCAPTURE PARAMETER SETTINGS... 5 CHAPTER2:
 Image acquisition, managing and processing software TCapture Instruction Manual Key to the Instruction Manual TC is shortened name used for TCapture. Help Refer to [Help] >> [About TCapture] menu for software
Operating Manual. (Version 3.10)
") Operating Manual (Version 3.10) Thank you for purchasing this PENTAX Digital Camera. This is the manual for PENTAX PHOTO Browser 3 and PENTAX PHOTO Laboratory 3 software for your Windows PC or Macintosh
Operating Manual (Version 3.10) Thank you for purchasing this PENTAX Digital Camera. This is the manual for PENTAX PHOTO Browser 3 and PENTAX PHOTO Laboratory 3 software for your Windows PC or Macintosh
MINIMUM SYSTEM REQUIREMENTS
 Quick Start Guide Copyright 2000-2012 Frontline Test Equipment, Inc. All rights reserved. You may not reproduce, transmit, or store on magnetic media any part of this publication in any way without prior
WEB I/O. Wireless On/Off Control USER MANUAL
 Wireless On/Off Control Technical Support: Email: support@encomwireless.com Toll Free: 1 800 617 3487 Worldwide: (403) 230 1122 Fax: (403) 276 9575 Web: www.encomwireless.com Warnings and Precautions Warnings
Impress Guide. Chapter 4 Adding and Formatting Pictures
 Impress Guide Chapter 4 Adding and Formatting Pictures Copyright This document is Copyright 2005 2012 by its contributors as listed below. You may distribute it and/or modify it under the terms of either
Impress Guide Chapter 4 Adding and Formatting Pictures
 Impress Guide Chapter 4 Adding and Formatting Pictures This PDF is designed to be read onscreen, two pages at a time. If you want to print a copy, your PDF viewer should have an option for printing two
ModelBuilder Getting Started
 2013 Esri International User Conference July 8 12, 2013 San Diego, California Technical Workshop ModelBuilder Getting Started Matt Kennedy Esri UC2013. Technical Workshop. Agenda Geoprocessing overview
Getting Started Guide
 SOLIDWORKS Getting Started Guide SOLIDWORKS Electrical FIRST Robotics Edition Alexander Ouellet 1/2/2015 Table of Contents INTRODUCTION... 1 What is SOLIDWORKS Electrical?... Error! Bookmark not defined.
inphoto ID Canon camera control software Automatic ID photography User Guide
 inphoto ID Canon camera control software Automatic ID photography User Guide 2008 Akond company 197342, Russia, St.-Petersburg, Serdobolskaya, 65A Phone/fax: +7(812)600-6918 Cell: +7(921)757-8319 e-mail:
Getting Started. with Easy Blue Print
 Getting Started with Easy Blue Print User Interface Overview Easy Blue Print is a simple drawing program that will allow you to create professional-looking 2D floor plan drawings. This guide covers the
The screen pictures shown in this manual may differ depending on the type of computer or camera used.
 Operating Manual Thank you for purchasing the PENTAX Digital Camera. This is the manual for PENTAX PHOTO Browser 3 and PENTAX PHOTO Laboratory 3 software for your Windows PC or Macintosh for enjoying images
House Design Tutorial
 House Design Tutorial This House Design Tutorial shows you how to get started on a design project. The tutorials that follow continue with the same plan. When you are finished, you will have created a
Copyright 2014 SOTA Imaging. All rights reserved. The CLIOSOFT software includes the following parts copyrighted by other parties:
 2.0 User Manual Copyright 2014 SOTA Imaging. All rights reserved. This manual and the software described herein are protected by copyright laws and international copyright treaties, as well as other intellectual
The ideal K-12 science microscope solution. User Guide. for use with the Nova5000
 The ideal K-12 science microscope solution User Guide for use with the Nova5000 NovaScope User Guide Information in this document is subject to change without notice. 2009 Fourier Systems Ltd. All rights
Operating Manual. (Version 3.5)
") Operating Manual (Version 3.5) Thank you for purchasing this PENTAX Digital Camera. This is the manual for PENTAX PHOTO Browser 3 and PENTAX PHOTO Laboratory 3 software for your Windows PC or Macintosh
Operating Manual (Version 3.5) Thank you for purchasing this PENTAX Digital Camera. This is the manual for PENTAX PHOTO Browser 3 and PENTAX PHOTO Laboratory 3 software for your Windows PC or Macintosh
MEASURE Evaluation. Global Positioning System Toolkit
 Global Positioning System Toolkit Global Positioning System Toolkit This tool was made possible by support from the U.S. Agency for International Development (USAID) under terms of Cooperative Agreement
Nikon D7100 Camera Kit. -Checklist and Operations Manual-
 Airborne Digital Reconnaissance System (ADRS) Nikon D7100 Camera Kit -Checklist and Operations Manual- V4.2 October 21, 2014 National Headquarters, Civil Air Patrol 2 1.0 Equipment Pre-Mission Check 1.1
First English edition for Ulead COOL 360 version 1.0, February 1999.
 First English edition for Ulead COOL 360 version 1.0, February 1999. 1992-1999 Ulead Systems, Inc. All rights reserved. No part of this publication may be reproduced or transmitted in any form or by any
SAQA. How to Submit an Online Entry. Art by Mary Kay Fosnacht
 SAQA KS MO OK How to Submit an Online Entry Art by Mary Kay Fosnacht Registration Process Locate and read the Prospectus Open the Registration Form Preview 1. About the Artist 2. About the Art 3. Upload
ScanGear CS-U 5.6. for CanoScan FB1210U Color Scanner. User s Guide
 ScanGear CS-U 5.6 for CanoScan FB1210U Color Scanner User s Guide Copyright Notice Copyright 2000 Canon Inc. This manual is copyrighted with all rights reserved. Under the copyright laws, this manual may
DIGITAL CAMERA. Quick Start Guide
 En DIGITAL CAMERA Quick Start Guide Table of Contents pg. 1 Check the package contents pp. 2 15 Take pictures Step 1 Charge the batteries...pg. 2 Step 2 Attach the camera strap...pg. 3 Step 3 Insert the
User Manual Veterinary
 Veterinary Acquisition and diagnostic software Doc No.: Rev 1.0.1 Aug 2013 Part No.: CR-FPM-04-022-EN-S 3DISC, FireCR, Quantor and the 3D Cube are trademarks of 3D Imaging & Simulations Corp, South Korea,
Projects Connector User Guide
 Version 4.3 11/2/2017 Copyright 2013, 2017, Oracle and/or its affiliates. All rights reserved. This software and related documentation are provided under a license agreement containing restrictions on
Operating Manual (Version 3.6)
") e_kb464_pc_84percent.book Page 1 Monday, September 29, 2008 2:00 PM Operating Manual (Version 3.6) e_kb464_pc_84percent.book Page 2 Monday, September 29, 2008 2:00 PM Thank you for purchasing this PENTAX
e_kb464_pc_84percent.book Page 1 Monday, September 29, 2008 2:00 PM Operating Manual (Version 3.6) e_kb464_pc_84percent.book Page 2 Monday, September 29, 2008 2:00 PM Thank you for purchasing this PENTAX
EOS 80D (W) Wireless Function Instruction Manual ENGLISH INSTRUCTION MANUAL
 Wireless Function Instruction Manual ENGLISH INSTRUCTION MANUAL") EOS 80D (W) Wireless Function Instruction Manual ENGLISH INSTRUCTION MANUAL Introduction What You Can Do Using the Wireless Functions This camera s wireless functions let you perform a range of tasks wirelessly,
EOS 80D (W) Wireless Function Instruction Manual ENGLISH INSTRUCTION MANUAL Introduction What You Can Do Using the Wireless Functions This camera s wireless functions let you perform a range of tasks wirelessly,
Inserting and Creating ImagesChapter1:
 Inserting and Creating ImagesChapter1: Chapter 1 In this chapter, you learn to work with raster images, including inserting and managing existing images and creating new ones. By scanning paper drawings
House Design Tutorial
 Chapter 2: House Design Tutorial This House Design Tutorial shows you how to get started on a design project. The tutorials that follow continue with the same plan. When you are finished, you will have
User Guide. Version 1.4. Copyright Favor Software. Revised:
 User Guide Version 1.4 Copyright 2009-2012 Favor Software Revised: 2012.02.06 Table of Contents Introduction... 4 Installation on Windows... 5 Installation on Macintosh... 6 Registering Intwined Pattern
Chief Architect Home Designer Architectural User s Guide
 Chief Architect Home Designer Architectural 2014 User s Guide Chief Architect, Inc. 6500 N. Mineral Dr. Coeur d Alene, Idaho 83815 www.homedesignersoftware.com 1990 2012 by Chief Architect, Inc. All rights
Table of Contents. Creating Your First Project 4. Enhancing Your Slides 8. Adding Interactivity 12. Recording a Software Simulation 19
 Table of Contents Creating Your First Project 4 Enhancing Your Slides 8 Adding Interactivity 12 Recording a Software Simulation 19 Inserting a Quiz 24 Publishing Your Course 32 More Great Features to Learn
ExpoM - ELF User Manual
 ExpoM - ELF User Manual Version 1.4 ExpoM - ELF User Manual Contents 1 Description... 4 2 Case and Interfaces... 4 2.1 Overview... 4 2.2 Multi-color LED... 5 3 Using ExpoM - ELF... 6 3.1 Starting a Measurement...
Photos PowerView. Photos PowerView. Configure WinTOTAL s compression
 Photos PowerView The Photos PowerView is your one stop shop for placing digital images on your photo pages. In this one screen, you can access digital cameras, read files from the integrated database,
The GPS Classroom. Jared Covili
 The GPS Classroom Jared Covili 1/17/06 2 The GPS Classroom Jared Covili jcovili@media.utah.edu (801) 585-5667 The GPS Classroom is a 2-day course that provides participants with the basic knowledge of
House Design Tutorial
 House Design Tutorial This House Design Tutorial shows you how to get started on a design project. The tutorials that follow continue with the same plan. When you are finished, you will have created a
FLIR Tools for PC 7/21/2016
 FLIR Tools for PC 7/21/2016 1 2 Tools+ is an upgrade that adds the ability to create Microsoft Word templates and reports, create radiometric panorama images, and record sequences from compatible USB and
Hydraulics and Floodplain Modeling Managing HEC-RAS Cross Sections
 WMS 10.1 Tutorial Hydraulics and Floodplain Modeling Managing HEC-RAS Cross Sections Modify cross sections in an HEC-RAS model to use surveyed cross section data v. 10.1 Objectives Build a basic HEC-RAS
ISCapture User Guide. advanced CCD imaging. Opticstar
 advanced CCD imaging Opticstar I We always check the accuracy of the information in our promotional material. However, due to the continuous process of product development and improvement it is possible
ArcGIS 9 Using ArcGIS StreetMap
 ArcGIS 9 Using ArcGIS StreetMap Copyright 2001 2004 ESRI All Rights Reserved. Printed in the United States of America. The information contained in this document is the exclusive property of ESRI. This
Windows INSTRUCTION MANUAL
 Windows E INSTRUCTION MANUAL Contents About This Manual... 3 Main Features and Structure... 4 Operation Flow... 5 System Requirements... 8 Supported Image Formats... 8 1 Installing the Software... 1-1
Chief Architect Home Designer Professional User s Guide
 Chief Architect Home Designer Professional 2019 User s Guide Chief Architect, Inc. 6500 N. Mineral Dr. Coeur d Alene, Idaho 83815 HomeDesignerSoftware.com 1990 2018 by Chief Architect, Inc. All rights
Hydraulics and Floodplain Modeling Managing HEC-RAS Cross Sections
 v. 9.1 WMS 9.1 Tutorial Hydraulics and Floodplain Modeling Managing HEC-RAS Cross Sections Modify cross sections in an HEC-RAS model to use surveyed cross section data Objectives Build a basic HEC-RAS
S100 Webcam. User s Manual
 S100 Webcam User s Manual Kodak and the Kodak trade dress are trademarks of Eastman Kodak Company used under license. 2009 Sakar International, Inc. All rights reserved. WINDOWS and the WINDOWS logo are
Line and polygon features can be created via on-screen digitizing.
 This module explains how GPS works, sources of error, and error correction using real time or post processing differential correction. Cost and accuracy of different grades of GPS units are also part of
User s Guide for Macintosh OS 8.6 and 9
 User s Guide for Macintosh OS 8.6 and 9 September 2000 www.kodak.com/go/homeprinting Edition: September 2000 The following paragraph does not apply to any country where such provisions are inconsistent
Image optimization guide
 Image Optimization guide for Image Submittal Images can play a crucial role in the successful execution of a book project by enhancing the text and giving the reader insight into your story. Although your
Brightness and Contrast Control Reference Guide
 innovation Series Scanners Brightness and Contrast Control Reference Guide A-61506 Part No. 9E3722 CAT No. 137 0337 Using the Brightness and Contrast Control This Reference Guide provides information and
Context-Aware Planning and Verification
 7 CHAPTER This chapter describes a number of tools and configurations that can be used to enhance the location accuracy of elements (clients, tags, rogue clients, and rogue access points) within an indoor
Operation Guide 3452
 MA1804-EA Contents Before Getting Started... Button Operations Mode Overview Charging the Watch Solar Charging Charging with the Charger Charging Time Guidelines Checking the Charge Level Power Saving
OzE Field Modules. OzE School. Quick reference pages OzE Main Opening Screen OzE Process Data OzE Order Entry OzE Preview School Promotion Checklist
 1 OzE Field Modules OzE School Quick reference pages OzE Main Opening Screen OzE Process Data OzE Order Entry OzE Preview School Promotion Checklist OzESchool System Features Field unit for preparing all
Chief Architect X8 User s Guide
 Chief Architect X8 User s Guide Professional Design & Drafting Software Chief Architect, Inc. 6500 N. Mineral Dr. Coeur d Alene, Idaho 83815 chiefarchitect.com 1990 2015 by Chief Architect, Inc. All rights
User Manual. This User Manual will guide you through the steps to set up your Spike and take measurements.
 User Manual (of Spike ios version 1.14.6 and Android version 1.7.2) This User Manual will guide you through the steps to set up your Spike and take measurements. 1 Mounting Your Spike 5 2 Installing the
User Guide. Version 1.2. Copyright Favor Software. Revised:
 User Guide Version 1.2 Copyright 2009-2010 Favor Software Revised: 2010.05.18 Table of Contents Introduction...4 Installation on Windows...5 Installation on Macintosh...6 Registering Intwined Pattern Studio...7
33-2 Satellite Takeoff Tutorial--Flat Roof Satellite Takeoff Tutorial--Flat Roof
 33-2 Satellite Takeoff Tutorial--Flat Roof Satellite Takeoff Tutorial--Flat Roof A RoofLogic Digitizer license upgrades RoofCAD so that you have the ability to digitize paper plans, electronic plans and
September CoroCAM 6D. Camera Operation Training. Copyright 2012
 CoroCAM 6D Camera Operation Training September 2012 CoroCAM 6D Body Rubber cover on SD Card slot & USB port Lens Cap retention loop Charging port, video & audio output, audio input Laser pointer CoroCAM
CHAPTER 18 DOCUMENT IMAGING MODULE 18.0 OVERVIEW 18.1 REQUIREMENTS AND INSTALLATION Special Requirements Mapping Network Drive
 EXTENDED SERVICE OPTIONS CHAPTER 18 18.0 OVERVIEW Collection agencies frequently require the ability to save documents related to collection efforts. For example, agencies doing commercial collections
House Design Tutorial
 Chapter 2: House Design Tutorial This House Design Tutorial shows you how to get started on a design project. The tutorials that follow continue with the same plan. When you are finished, you will have
Document history Date Doc version Ifx version Editor Change
 Document history Date Doc version Ifx version Editor Change Jan 2008 2 5.21.0300 HV Nov 2015 2.1 5.60.0400 JW Update for 5.60.0400 Inclusion of Epiphan Image Capture Nov 2017 2.2 5.70.0100 JW Update for
9/2/2013 Excellent ID. Operational Manual eskan SADL handheld scanner
 9/2/2013 Excellent ID Operational Manual eskan SADL handheld scanner Thank You! We are grateful you chose Excellent ID for your SADL scanner needs. We believe this easy-to-use scanner will provide dependable
in ArcMap By Mike Price, Entrada/San Juan, Inc.
 Interactively Create and Apply Logarithmic Legends in ArcMap By Mike Price, Entrada/San Juan, Inc. This exercise uses the dataset for Battle Mountain, Nevada, that was used in previous exercises. The Geochemistry
Optika ISview. Image acquisition and processing software. Instruction Manual
 Optika ISview Image acquisition and processing software Instruction Manual Key to the Instruction Manual IS is shortened name used for OptikaISview Square brackets are used to indicate items such as menu
Chief Architect Home Designer Architectural User s Guide
 Chief Architect Home Designer Architectural 2017 User s Guide Chief Architect, Inc. 6500 N. Mineral Dr. Coeur d Alene, Idaho 83815 www.homedesignersoftware.com 1990 2016 by Chief Architect, Inc. All rights
Scanning Setup Guide for TWAIN Datasource
 Scanning Setup Guide for TWAIN Datasource Starting the Scan Validation Tool... 2 The Scan Validation Tool dialog box... 3 Using the TWAIN Datasource... 4 How do I begin?... 5 Selecting Image settings...
inphoto ID SLR Automatic ID photography With Canon SLR camera User Guide
 inphoto ID SLR Automatic ID photography With Canon SLR camera User Guide 2014 Akond company Phone/fax: +7(812)384-6430 Cell: +7(921)757-8319 e-mail: info@akond.net akondsales@gmail.com http://www.akond.net
Nikon D7000 Camera Kit
 Nikon D7000 Camera Kit -Checklist and Operations Manual- July 31, 2013 SRQ Composite Squadron, FLWG, Civil Air Patrol Page 1 of 30 1.0 Equipment Pre-Mission Check 1.1 Open the camera case and verify the
OPERATION MANUAL MIMAKI ENGINEERING CO., LTD.
 OPERATION MANUAL MIMAKI ENGINEERING CO., LTD. http://www.mimaki.co.jp/ E-mail:traiding@mimaki.co.jp D200674 About FineCut for CorelDRAW Thank you very much for purchasing a product of Mimaki. FineCut,
ID Photo Processor. Batch photo processing. User Guide
 ID Photo Processor Batch photo processing User Guide 2015 Akond company 197342, Russia, St.-Petersburg, Serdobolskaya, 65a Phone/fax: +7(812)384-6430 Cell: +7(921)757-8319 e-mail: info@akond.net http://www.akond.net
This document contains work instructions related to utilizing the dental imaging application, XrayVision version 4.0.
 Apteryx Inc. 313 S. High St. Suite 200 Akron, OH 44308 330-376-0889 voice 330-376-0788 fax sales@apteryx.com www.apteryx.com XrayVision Quick Start User Manual Abstract Abstract Abstract This document
HOW CAN A GPS HELP? WHY A GPS? HOW DOES A GPS WORK?
 HOW CAN A GPS HELP? WHY A GPS? HOW DOES A GPS WORK? WHO INVENTED GPS? About The GPS Satellites There are 24-32 different satellites in space 2005 They orbit the Earth every 12 hours in 6 different planes
Silhouette Connect Layout... 4 The Preview Window... 5 Undo/Redo... 5 Navigational Zoom Tools... 5 Cut Options... 6
 user s manual Table of Contents Introduction... 3 Sending Designs to Silhouette Connect... 3 Sending a Design to Silhouette Connect from Adobe Illustrator... 3 Sending a Design to Silhouette Connect from
Version 4.2 For WINDOWS
 SIGMA Photo Pro User Guide Companion Processing Software for SIGMA Digital Cameras Version 4.2 For WINDOWS I M P O R T A N T : Please Read Before You Start Thank you very much for purchasing this SIGMA
FE-150/X-730 FE-160/X-735
 DIGITAL CAMERA FE-150/X-730 FE-160/X-735 Advanced Manual Detailed explanations of all the functions for getting the most out of your camera. Thank you for purchasing an Olympus digital camera. Before you