Light & Process: onone Software Photography & Post-Processing from Start to Finish. Published by Nicolesy, Inc.
|
|
|
- Doreen Hicks
- 5 years ago
- Views:
Transcription

1
2 Light & Process: onone Software Photography & Post-Processing from Start to Finish Published by Nicolesy, Inc. Copyright 2014 Nicole S. Young, All Rights Reserved Written by: Nicole S. Young Layout and Design: Nicole S. Young Copyeditor: Linda Laflamme Cover Photo: Nicole S. Young Author Photo: dav.d Notice of Rights All rights reserved. No part of this book may be reproduced, stored in a retrieval system, or transmitted in any form or by any means without the prior written permission of the publisher, except in the case of brief quotations embodied in critical articles or reviews. Liability The information in this book is distributed on an As-Is basis, without warranty. Neither the author, the publisher, nor the companies owned by the author shall have any liability to any person or entity with respect to any loss or damage caused by or alleged to be caused directly or indirectly by the instruction contained in this book or by the websites or products described in it. Trademarks Adobe Photoshop and Adobe Photoshop Lightroom are either registered trademarks or trademarks of Adobe Systems Incorporated in the United States and/or other countries. All other trademarks are the property of their respective owners. Many of the designations used by manufacturers and sellers to distinguish their products are claimed as trademarks. Where those designations appear in this book, and Nicolesy, Inc. was aware of a trademark claim, the designations appear as requested by the owner of the trademark. All other product names and services identified throughout this book are used in editorial fashion only and for the benefit of such companies with no intention or infringement of the trademark. No such use, or the use of any trade name, is intended to convey endorsement or other affiliation with this book. ISBN-13: ISBN-10:
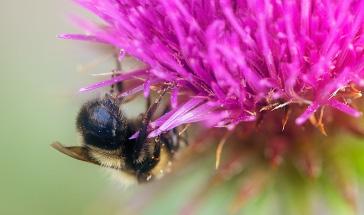
3 TABLE OF CONTENTS Introduction Misty Waters Photography & Setup 1. Shark Fin Cove...3 Photography & Setup Workflow & Processing 2. The Family Photographer...30 Photography & Setup Workflow & Processing 3. Fibonacci Fern Photography & Setup Workflow & Processing 4. Silver Sunset Photography & Setup Workflow & Processing 5. Panther Creek Photography & Setup Workflow & Processing Workflow & Processing 7. Puppy Portrait Photography & Setup Workflow & Processing 8. The Petroglyph Trail Photography & Setup Workflow & Processing 9. Bumblebee Photography & Setup Workflow & Processing 10. Punalu u Beach Photography & Setup Workflow & Processing Conclusion Glossary Table of Contents


4 Table of Contents
5 INTRODUCTION Photography is an interesting form of art. We oftentimes want to keep our photographs as authentic as possible, yet without even realizing it, we re already altering the reality of the scene in front of us with the decisions we make with our gear. The type of camera, lens, and accessories we use all play a part in sculpting our vision and recording it in digital form. Then, we pull that photo into our computers and continue the creative process of color and tonal correction, stylization with textures and filters, or maybe even altering the pixels to change the photograph completely from one thing to another. The truth is that we cannot be photographers without our tools, and these tools also include the post-processing software used to refine and fine-tune each image. Perfecting a photograph in-camera is just the beginning, for we should always start with something beautiful. Software, such as Adobe Photoshop Lightroom and onone Software s Perfect Photo Suite 8, are just a small fraction of the possible programs that we can use to bring that image to its true potential and create a finished product. I wrote this ebook to share my stories, techniques, and sometimes just my bare-bone thoughts while making photographs from start to finish. My goal is to ignite inspiration in each of you, cause a few light bulbs to light up over your heads, and possibly create an ah-ha! moment in the process. Who Is This ebook for? My intention while writing this ebook was to make it approachable to all levels of photographers. If I had to place a label on it I would have to go with intermediate; anyone from beginner to advanced users, however, will gain insights from this book. I do my best to describe what I am doing so that it is easy to understand. (If you need further explanation of certain camera or photography terms, you ll find a glossary in the last few pages of the book.) What Will I Learn? The Light & Process ebook series is not so much a how to create a photograph series, as a how I created a photograph series. This particular ebook is no exception. Within each chapter, you will get a 1 Introduction

6 behind-the-scenes glimpse as to how and why I created one unique photo. I share the gear I used, exposure settings, and in some cases the precise GPS location data for that particular photograph. Then, I take that photo to the next level by showing you how I enhanced the image in post-processing software. Do I Need Specific Equipment and Software? Absolutely not! If you plan on walking through the post-processing steps to follow along, then it is not a bad thing to have the same software I use (or at least a similar version of it). The processing techniques used in this ebook, however, translate to post-processing with nearly any software, just as the photography tips work with any type of camera equipment. I ultimately hope that each of you will gain your own insight and inspiration from following along with my creative process from start to finish, and then use the tools you have to make your own amazing and unique pieces of art. For your reference, these are the tools I will be using in this ebook: Adobe Photoshop Lightroom 5 onone Software s Perfect Photo Suite 8 Adobe Photoshop CC Nicole S. Young Photographer & Author 2 Introduction


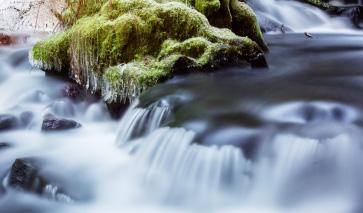
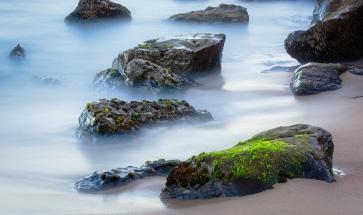
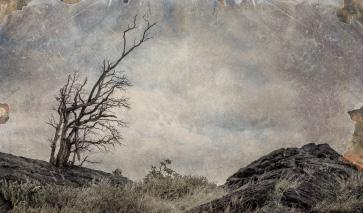
7 CHAPTER 1 SHARK FIN COVE When I photograph a coastline, I prefer getting right up to the water. I think that rocky, steep coastlines are absolutely beautiful, but I don t particularly enjoy photographing them as much as I enjoy getting right next to the water to make a sandy shoreline the focal point of the image. So when I came upon this cove off the coast of Santa Cruz, I couldn t resist hiking the trail down to the sand. Once I got there, I had the place all to myself no people, but absolutely no clouds in the sky to speak of either. I was really hoping for a gorgeous sunset with this beautiful rock formation as my foreground, but I was out of luck. It didn t get me down, however, and I stayed until just before sunset and came out with a beautiful image. Ultimately, I knew that I had the post-processing skills to turn an empty sky into a cloudfilled paradise.
8 Photography & Setup Camera Gear & Equipment Camera: Canon 5D Mark III Lens: TS-E 24mm f/3.5l II Tripod Gear: Really Right Stuff TVC 24L Tripod Really Right Stuff BH-40 Ballhead Really Right Stuff B5D3-L L-Plate Accessories: Canon RS-80N3 Remote Switch (cable release) Exposure Settings Date and Time: October 19, 2013 at 6:18 pm GPS Coordinates: N W Exposure Mode: Aperture Priority Aperture: f/11 Shutter Speed: 1/45 sec ISO: 100 Focal Length: 24mm 4

9 5 My Chapter camera 1: gear Shark and Fin setup. Cove Photographed with an iphone.

10 A This is one of the first compositions I started with, but I did not like the light in this setup. Canon 5D Mark III, TS-E 24mm f/3.5l II lens, 1/60 sec at f/11. ISO 100 Concept & Photography I arrived at the cove with a few other photographers. I had never been to this spot before, and was excited to actually see the giant shark-fin rock I d heard so much about. While the other photographers busied themselves along the top of the cliff, I found the path and scurried down towards the cove to shoot right alongside the coastline at water level. The area was small, so there was not a lot of flexibility for composition. I was glad to have the entire place all to myself! I started by testing out possible compositions: If I photographed straight towards the water could I capture the entire cove with one shot? I could, but I d be shooting directly into the sun. Because there were no clouds in the sky, the light, in my opinion, was not very pleasing (Figure A). 6


11 B C I also photographed some vertical compositions but ended up preferring a horizontal framing. Canon 5D Mark III, TS-E 24mm f/3.5l II lens, 1/10 sec at f/11, ISO 100 Then I moved down closer to the water to see what the rock formation looked like with the light draping across it from the front. I tested out a few types of framing, including some verticals (Figures B and C). Eventually I found that a horizontal composition with the water being the prominent part of the scene was the best way to go. I really liked the way that the shark fin rock was reflected into the sand, plus the sun s glow was warm and added radiance and a beautiful light effect to the overall image. I began photographing the scene as bracketed exposures for possible processing using HDR, and continued experimenting with various compositions (Figure D, next page). Because I was shooting away from the sun for my final composition, however, the light evened out and bracketing was no longer necessary. I took several shots with the surf at different positions, giving me lots of options to work with while post-processing. 7
12 D I started out photographing this scene with bracketed intervals, but quickly realized that the light was acceptable with just one shot. Canon 5D Mark III, TS-E 24mm f/3.5l II lens, f/11 at ISO 100; 1/1000 sec, 1/350 sec, 1/125 sec, 1/15 sec, 1/6 sec, and 0.5 sec While photographing this scene, I wasn t entirely sure if this photo would ever see the light of day. I envisioned a dramatic sky over the water, but this part of California is known for clear blue skies, not consistent cloud cover. During the summer I noticed maybe two or three good skies worth photographing. Of course, those were never days when I was out with my camera and, as you can see from my images, certainly not the day I went to Shark Fin Cove. The shot with the empty blue sky was nice, but not what I was envisioning when I set out. By replacing the sky in post-processing, however, I could improve the hand nature dealt me and create a beautiful well-rounded image (Figure E). I always prefer to have my photos look great in-camera, but there s nothing wrong with a little post-processing to spruce up an already gorgeous photograph. 8
13 E This shows the image out of camera (top) versus after adding a sky and processing in onone Software. Canon 5D Mark III, TS-E 24mm f/3.5l II lens, 1/45 sec at f/11, ISO 100 9

14 Workflow & Processing This image is great as-is, but, like most photographs, could use little refinement. Also, because there were no clouds in the sky, I definitely want to drop a new sky in as well. For this project, my toolbox includes Adobe Photoshop Lightroom 5 and three modules from onone Software s Perfect Photo Suite: Perfect Layers, Perfect Mask, and Perfect Enhance to finish things off. 10


15 1 Step 1 I m going to start with this image in the Develop module inside of Lightroom. The first thing I need to do is remove the person on the top of the cliff. To do this, I zoom in to view the image at 100% and select the Spot Removal tool. Then, I click the person and re-adjust the corrected area until it blends well. 11


16 2 Step 2 Next, I move to the Basic panel and adjust the white balance. I set the Temperature slider to and the Tint slider to


17 3 Step 3 I want to make some changes to the Tone settings to brighten the image. Specifically, I set: Exposure: +0.45, Contrast: +30, Highlights: 21,, Shadows: +41, Whites: 34, Blacks:


18 4 Step 4 Now I m ready to bring the image into onone Software to do some masking. I choose File > Plug-in Extras > Perfect Photo Suite 8 to open the image into Perfect Layers, allowing me to bring the photo into the other modules of the suite. 14


19 5 Step 5 The main image is in Perfect Layers, and ultimately I would like to replace the sky with a new one. Before I can do any masking, however, I need to have a new sky in the image so that I can see my progress. I return to Lightroom, choose a replacement sky from my library, (top image) and again choose File > Plug-in Extras > Perfect Photo Suite 8. This opens my selected sky as a new tab inside of Perfect Layers (bottom image). 15


20 6 Step 6 I need both of these images in the same document, so I must copy the sky into the main photo. In the sky photo, I choose Layer > Copy Layer. Then, I go to the main photo and choose Layer > Paste Layer. Perfect Layers adds the sky image as a new layer in the main photo s Layers panel. I need the sky image to be the bottom layer in my document, so I drag it below the main image. 16

21 7 Step 7 Now I m ready to start masking. I m going to use Perfect Mask to remove the blue sky from my main image, so I first make sure that the correct layer is selected in the Layers panel (the photo of Shark Fin Cove) and then I click the MASK button at the top-right of the window. 17


22 8 Step 8 Once in Perfect Mask, I make sure that the Drop Brush is selected. This is a great tool to use with simple skies like this, because it samples from the colors you brush over and removes the sky by masking out only those colors. I simply click and drag the cursor over a small portion of the sky, and the software quickly removes the entire blue sky from the scene. 18

23 9 Step 9 A little bit of cleanup still is necessary, because the Drop Brush left a small halo of sky around the edges of the rocks. To fix this I m going to use the Chisel tool, which will chisel away the edges of the mask one pixel at a time. First, I double-click the Chisel tool in the toolbar to remove a one-pixel border around the entire mask all at once. Then, with the Chisel tool still selected, I zoom in close to the edges and brush the tool over areas that still need some cleanup. I m finished with the image in Perfect Mask, so I click the APPLY button on the bottom-right to bring the photo back into Perfect Layers. 19

24 10 Step Once I m back in Perfect Layers, I realize that I want to change the sky and replace it with another one. So, I click on the sky in the Layers panel, return to Lightroom, and select a new sky from my library. Then, I choose File > Plug-in Extras > Perfect Photo Suite 8 to bring in the new sky as a separate tab in Perfect Layers. To get this sky into the main document, I choose Layer > Copy Layer, then I click the tab for the main image and choose Layer > Paste Layer. Now I have a new sky in my document.

25 11 Step 11 Next I select the Transform tool to move the new sky to resize it and move it higher so that I can see more of the color and texture in the clouds. When I m satisfied with the sky s position, I click Apply at the top of the screen. 21

26 12 Step 12 I notice a sensor spot in my new sky layer, so to fix it I select the Retouch Brush from the toolbar. Brushing over the small blemish in the layer removes it neatly. 22


27 13 Step 13 Next I need to add the new sky to the reflection at the bottom of the image. (I also delete the other sky image from the Layers panel to keep things tidy.) I start by duplicating the sky layer (Layer > Duplicate), and then I drag it up in the Layers panel to be the top-most layer. Then I select the Transform tool and flip the sky by dragging the top dot of the transform box down to the bottom of the image. 23


28 14 Step 14 Now I need to mask the reflected sky so that it appears only in the reflected areas of the image. I invert the mask (Mask > Invert), then I select the Masking Brush and paint in the reflected sky areas of the image. 24

29 15 Step 15 Now I need to blend the reflected sky in with the rest of the image: In the Layers panel, I change the Blending mode to Soft Light for this layer. 25


 and")
30 16 Step 16 Next, I need to change the color of the reflected sky at the bottom of the image. To do this, I duplicate the top layer (the reflected sky) and change the Blending mode to Color. 26


31 17 Step 17 I m done adding the new sky, so to finish with this image I m going to use Perfect Enhance to polish it off with some color and tone adjustments. Before I do that, however, I need to create a merged layer with my entire composite image: I choose Layer > New Stamped Layer to add a brand-new composite layer to the top of my Layers panel. Then, I click ENHANCE at the top of the screen. 27

32 18 Finishing Touches In Perfect Enhance, I make the following adjustments in the Quick Fixes panel: Brightness: +1, Contrast: +2, Vibrance: +1, Vignette: 2 When I finish, I click APPLY to bring the image back into Perfect Layers, and then I save my final image before closing the program. 28

33 Canon 5D Mark III Canon 24mm f/3.5l II TS-E lens ISO 100 at f/11 1/45 sec
SUPERFAST PORTRAIT RETOUCH SPEND LESS TIME MAKING YOUR CLIENTS LOOK AWESOME UNDER THE LOUPE DESIGN MAKEOVER
 THE ADOBE PHOTOSHOP HOW-T0 MAGAZINE MARCH 2014 Create wedding photo albums using templates or from scratch DESIGN MAKEOVER Improving Lightroom efficiency for your photographic workflow UNDER THE LOUPE
How I did it by Chris Axe. Special thanks to Kim Walker
 How I did it by Chris Axe Special thanks to Kim Walker Story of this image This photo was taken in Garrapata State Park at the very first gate as you head south. It took about 15 minutes to figure out
Using The Nik Collection Plug-ins In Lightroom And Photoshop. Dan Lenardon
 Using The Nik Collection Plug-ins In Lightroom And Photoshop Dan Lenardon What Are We Going To Cover Today? A Brief Overview Of The Nik Collection By Google How To Use Nik From Within Lightroom How To
Step 1: taking the perfect shot
 HDR MY WAY On demand of many people who like my way of making high dynamic range images from one single RAW file, I hereby present what I think is the best way to do it. For others that may very well not
Movie 7. Merge to HDR Pro
 Movie 7 Merge to HDR Pro 1 Merge to HDR Pro When shooting photographs with the intention of using Merge to HDR Pro to merge them I suggest you choose an easy subject to shoot first and follow the advice
LANDSCAPE PHOTOGRAPHY TECHNIQUES, COMPOSITION, AND PROCESSING
 LANDSCAPE PHOTOGRAPHY TECHNIQUES, COMPOSITION, AND PROCESSING Tom Price LANDSCAPE PHOTOGRAPHY TIPS AND TRICKS Wide angle lens desirable 16-18 mm good focal length for APC-C sensor Telephoto also produce
PHIL MORGAN PHOTOGRAPHY
 Including: Creative shooting Manual mode Editing PHIL MORGAN PHOTOGRAPHY A free e-book to help you get the most from your camera. Many photographers begin with the naïve idea of instantly making money
Luminescence of Nature Press Jason P. Odell, Ph.D.
 Luminescence of Nature Press Jason P. Odell, Ph.D. This page left blank to facilitate double-sided printing Title Page Mastering Luminosity Masks A Photoshop User s Guide First Edition 2016 Published in
Chapter 6-Existing Light Photography
 Chapter 6-Existing Light Photography All of these images were taken with available light. Painting with light-using available light Photography that includes artificial light which naturally exists in
Introduction to HDR Photography with Brian McPhee
 Introduction to HDR Photography with Brian McPhee What is HDR Photography? What is HDR Photography? HDR stands for High Dynamic Range What is HDR Photography? HDR stands for High Dynamic Range It is a
Sincerely, Blake Rudis
 1 Thanks a lot for your purchase! If you are reading this it shows that you truly care about your photos and are ready to take them to levels you could only dream of! I have been doing HDR for 5 years.
Essential Post Processing
 Essential Post Processing By Ian Cran Preamble Getting to grips with Photoshop and Lightroom could be described in three stages. One is always learning and going through stages but there are three main
Lightroom CC. Welcome to Joshua Tree Workshops. Astro & Landscape Lightroom Workflow w/presets
 Welcome to My approach to teaching is to offer small workshops which allow you to explore and discover our amazing planet, while learning photography and timelapse techniques. Astro & Landscape Lightroom
32 Float v3 Quick Start Guide. AUTHORED BY ANTHONY HERNANDEZ (415)
") 32 Float v3 Quick Start Guide 32 Float v3 Trademark/Copyright Information Copyright 2013 by United Color Technologies, LLC. All rights reserved. Unified Color Technologies, BeyondRGB, and HDR Expose are
32 Float v3 Quick Start Guide 32 Float v3 Trademark/Copyright Information Copyright 2013 by United Color Technologies, LLC. All rights reserved. Unified Color Technologies, BeyondRGB, and HDR Expose are
Photoshop CC Editing Images
 Photoshop CC Editing Images Rotate a Canvas A canvas can be rotated 90 degrees Clockwise, 90 degrees Counter Clockwise, or rotated 180 degrees. Navigate to the Image Menu, select Image Rotation and then
Creating Stitched Panoramas
 Creating Stitched Panoramas Here are the topics that we ll cover 1. What is a stitched panorama? 2. What equipment will I need? 3. What settings & techniques do I use? 4. How do I stitch my images together
Dusk to Dawn: Adam Woodworth Takes the Nikon D5 into Darkness
 MAY 10, 2018 ADVANCED Dusk to Dawn: Adam Woodworth Takes the Nikon D5 into Darkness Featuring ADAM WOODWORTH Sometimes it s more about the journey than the photo, theorizes landscape astrophotographer
PHOTOSHOP TUTORIAL: DIGITAL DARKROOM TECHNIQUES
 PHOTOSHOP TUTORIAL: DIGITAL DARKROOM TECHNIQUES STEP BY STEP TRAINING Learn by doing step by step exercises. Includes downloadable class files that work on Mac & PC. EDITION 1 Copyright Info Published
MELBOURN & DISTRICT PHOTOGRAPHIC CLUB
 MELBOURN & DISTRICT PHOTOGRAPHIC CLUB REPLACING SKIES (There are several ways to replace the sky from one image into another image). This Guidance shows just one way to do it although depending on the
Advanced Diploma in. Photoshop. Summary Notes
 Advanced Diploma in Photoshop Summary Notes Suggested Set Up Workspace: Essentials or Custom Recommended: Ctrl Shift U Ctrl + T Menu Ctrl + I Ctrl + J Desaturate Free Transform Filter options Invert Duplicate
HIGH DYNAMIC RANGE IMAGING Nancy Clements Beasley, March 22, 2011
 HIGH DYNAMIC RANGE IMAGING Nancy Clements Beasley, March 22, 2011 First - What Is Dynamic Range? Dynamic range is essentially about Luminance the range of brightness levels in a scene o From the darkest
Thank you for spending your evening with me! Truly enjoyed chatting and sharing image blending.. :)
") easymail Webmail :: Texture Blending Notes 1 of 2 9/4/2016 8:38 PM Subject From To Date Texture Blending Notes Denise Silva Denise Silva 2016-09-02 8:10 am Texture
easymail Webmail :: Texture Blending Notes 1 of 2 9/4/2016 8:38 PM Subject From To Date Texture Blending Notes Denise Silva Denise Silva 2016-09-02 8:10 am Texture
How to combine images in Photoshop
 How to combine images in Photoshop In Photoshop, you can use multiple layers to combine images, but there are two other ways to create a single image from mulitple images. Create a panoramic image with
Ian Barber Photography
 1 Ian Barber Photography Sharpen & Diffuse Photoshop Extension Panel June 2014 By Ian Barber 2 Ian Barber Photography Introduction The Sharpening and Diffuse Photoshop panel gives you easy access to various
PLANT + SHOOT GARDENER S PHOTOGRAPHY SERIES (GPS) GET GREAT GARDEN PHOTOS ON A CLOUDY DAY
 GET GREAT GARDEN PHOTOS ON A CLOUDY DAY") PLANT + SHOOT GARDENER S PHOTOGRAPHY SERIES (GPS) GET GREAT GARDEN PHOTOS ON A CLOUDY DAY GARDENER S PHOTOGRAPHY SERIES (GPS) GET GREAT GARDEN PHOTOS ON A CLOUDY DAY Copyright 2017 Tonya Peele. All rights
PLANT + SHOOT GARDENER S PHOTOGRAPHY SERIES (GPS) GET GREAT GARDEN PHOTOS ON A CLOUDY DAY GARDENER S PHOTOGRAPHY SERIES (GPS) GET GREAT GARDEN PHOTOS ON A CLOUDY DAY Copyright 2017 Tonya Peele. All rights
Photoshop Elements 3 Panoramas
 Photoshop Elements 3 Panoramas One of the good things about digital photographs and image editing programs is that they allow us to stitch two or three photographs together to create one long panoramic
Impact With Smartphone Photography. Smartphone Camera Handling. A Smartphone for Serious Photography?
 A Smartphone for Serious Photography? DSLR technically superior but photo quality depends on technical skill, creative vision Smartphone cameras can produce remarkable pictures always at ready After all
5 TIPS TO IMPROVE YOUR WILDLIFE
 5 TIPS TO IMPROVE YOUR WILDLIFE PHOTOGRAPHY TRENTSIZEMORE INTRODUCTION A great image will immediately grab a viewer s attention and keep it as they start reading into the deeper meaning. With millions
Page 1 of 9. Blending Multiple Exposures The Manual Way to HDR (High Dynamic Range) TJ Avery 7-Feb-2008
 TJ Avery 7-Feb-2008") Page 1 of 9 Blending Multiple Exposures The Manual Way to HDR (High Dynamic Range) TJ Avery 7-Feb-2008 The Problem Many natural landscape photographs will contain a range of light that exceeds what can
Page 1 of 9 Blending Multiple Exposures The Manual Way to HDR (High Dynamic Range) TJ Avery 7-Feb-2008 The Problem Many natural landscape photographs will contain a range of light that exceeds what can
How to capture the best HDR shots.
 What is HDR? How to capture the best HDR shots. Processing HDR. Noise reduction. Conversion to monochrome. Enhancing room textures through local area sharpening. Standard shot What is HDR? HDR shot What
Mullingar Camera Club Basic introduction to Digital Printing using Photoshop CC.
 Mullingar Camera Club Basic introduction to Digital Printing using Photoshop CC. Table of Contents Course aims: 1 Course presentation notes: 1 Introducing Photoshop: 1 Adjusting the Brightness or Contrast
Basics of Photographing Star Trails
 Basics of Photographing Star Trails By Rick Graves November 15, 2016 1 What are Star Trails? Night sky images with foreground elements that show the passage of time and the motion of the stars 2 Which
Lightroom- Creative Cloud Tips with NIK
 Lightroom- Creative Cloud Tips with NIK Motion Sequence Make several images in your camera on burst mode without following the subject. Let them move past your field. It is best to use a tripod, but not
Very High Dynamic Range Photography
 Very High Dynamic Range Photography Night photography with Moons & Lights November 24, 2917 Guy Huntley The Complete Photographer Meetup The Preprocessing & The Postprocessing Manual Bracketing Camera
Histograms and Tone Curves
 Histograms and Tone Curves We present an overview to explain Digital photography essentials behind Histograms, Tone Curves, and a powerful new slider feature called the TAT tool (Targeted Assessment Tool)
Selective Editing in Camera Raw 5
 Selective Editing in Camera Raw 5 The editing tools that you saw in the last chapter are global editing tools. That is, they affect all parts of the image. So, when you choose to, for example, brighten
Capturing Realistic HDR Images. Dave Curtin Nassau County Camera Club February 24 th, 2016
 Capturing Realistic HDR Images Dave Curtin Nassau County Camera Club February 24 th, 2016 Capturing Realistic HDR Images Topics: What is HDR? In Camera. Post-Processing. Sample Workflow. Q & A. Capturing
CHAPTER 7 - HISTOGRAMS
 CHAPTER 7 - HISTOGRAMS In the field, the histogram is the single most important tool you use to evaluate image exposure. With the histogram, you can be certain that your image has no important areas that
From Advanced pixel blending
 1 From www.studio.adobe.com Blending pixel layers in Adobe Photoshop CS2 lets you do things that you simply can t do by adjusting a single image. One situation where we blend pixel layers is when we want
Photoshop Elements Hints by Steve Miller
 2015 Elements 13 A brief tutorial for basic photo file processing To begin, click on the Elements 13 icon, click on Photo Editor in the first box that appears. We will not be discussing the Organizer portion
The Beginner's Photography Guide PDF
 The Beginner's Photography Guide PDF In contrast to the jargon-filled manuals that come with most digital cameras, The Beginner's Photography Guide presents step-by-step digital slr camera basics, while
Blue Hour and HDR Tutorial by John Strung
 Blue Hour and HDR Tutorial by John Strung the Blue Hour is a wonderful time of night when photography can yield images of intense blue colours. Blue Hour is a bit of a misnomer for two reasons. There are
Module 1 Lighting. Lesson 1 Light, Your First Decision. What s the first thing you should think about when choosing a location?
 Module 1 Lighting Lesson 1 Light, Your First Decision What s the first thing you should think about when choosing a location? We want to be: -Centered Photographers Three priorities for choosing light
Topaz Labs DeNoise 3 Review By Dennis Goulet. The Problem
 Topaz Labs DeNoise 3 Review By Dennis Goulet The Problem As grain was the nemesis of clean images in film photography, electronic noise in digitally captured images can be a problem in making photographs
32 Float v2 Quick Start Guide. AUTHORED BY ANTHONY HERNANDEZ - (415)
") 32 Float v2 Quick Start Guide 32 Float V2 Trademark/Copyright Information Copyright 2011 by United Color Technologies, LLC. All rights reserved. Unified Color Technologies, BeyondRGB, and HDR Float are
32 Float v2 Quick Start Guide 32 Float V2 Trademark/Copyright Information Copyright 2011 by United Color Technologies, LLC. All rights reserved. Unified Color Technologies, BeyondRGB, and HDR Float are
Produce stunning. Pro photographer Chris Humphreys guides you through HDR and how to create captivating natural-looking images
 Masterclass: In association with Produce stunning HDR images Pro photographer Chris Humphreys guides you through HDR and how to create captivating natural-looking images 8 digital photographer 45 masterclass4produce
Equipment list. Tripod. Plenty of Batteries or external battery source. Camera. Good High ISO performance. Bulb Mode. Raw
 Equipment list Tripod Plenty of Batteries or external battery source Camera Good High ISO performance Bulb Mode Raw Long Exposure noise reduction Intervalometer either in camera or external Live view Equipment
01 High-Key SIMPLE SOULFUL SENSATIONAL CHILDRENS PHOTOGRAPHY. Black-and-White Children s Portraiture
 SIMPLE SOULFUL SENSATIONAL CHILDRENS PHOTOGRAPHY SHOOTING BEAUTIFUL IMAGERY WITH NATURAL LIGHT 01 High-Key Black-and-White Children s Portraiture dennisguichardphotography High-impact Architectural Photography
PHOTOGRAPHY: MINI-SYMPOSIUM
 PHOTOGRAPHY: MINI-SYMPOSIUM In Adobe Lightroom Loren Nelson www.naturalphotographyjackson.com Welcome and introductions Overview of general problems in photography Avoiding image blahs Focus / sharpness
Contents: Bibliography:
 ( 2 ) Contents: Sizing an Image...4 RAW File Conversion...4 Selection Tools...5 Colour Range...5 Quick Mask...6 Extract Tool...7 Adding a Layer Style...7 Adjustment Layer...8 Adding a gradient to an Adjustment
Retouching and Restoring Images
 Beauty Retouching Open the Woman.psd file. Retouching and Restoring Images When retouching images first evaluate the faults that need to be eliminated vs. the ones that need to be minimized. First we will
Failure is a crucial part of the creative process. Authentic success arrives only after we have mastered failing better. George Bernard Shaw
 PHOTOGRAPHY 101 All photographers have their own vision, their own artistic sense of the world. Unless you re trying to satisfy a client in a work for hire situation, the pictures you make should please
Atmospheric dawn landscapes
 Skills Dawn Photography Masterclass Your guide Jeff Morgan Discover the PhotoPlus method for Atmospheric dawn landscapes Make the most of misty winter mornings by using your Canon camera and Photoshop
Camera Exposure Modes
 What is Exposure? Exposure refers to how bright or dark your photo is. This is affected by the amount of light that is recorded by your camera s sensor. A properly exposed photo should typically resemble
Extending Exposure with HDR 307. When to Shoot HDR
 Extending Exposure with HDR 307 When to Shoot HDR In many scenes, the dynamic range of contrast from the deep shadows to the bright highlights exceeds the capabilities of image sensors to capture all the
Combine Black-and-White and Color
 Combine Black-and-White and Color Contributor: Seán Duggan n Specialty: Fine Art Primary Tool Used: Smart Objects Combining color and black-and-white in the same image is a technique that has been around
silent seat ecourse & ebook
 silent seat ecourse & ebook Heyyyy!!! Welcome to learn manual mode, a momtographer crash course. I am seriously so excited to help you take your camera out of auto and into manual and start getting those
Photographing Waterfalls
 Photographing Waterfalls Developed and presented by Harry O Connor oconnorhj@yahoo.com May 3, 2010 All photos by Harry O Connor Introduction Waterfall photographs are landscapes Typical landscape considerations
PHOTOSHOP LIGHTROOM 5
 PHOTOSHOP LIGHTROOM 5 INTRODUCTION This material is primarily targetted at the new and intermediate photographers in our club. You have captured an image and used the various factors when taking this image:
Luminosity Masks Program Notes Gateway Camera Club January 2017
 Luminosity Masks Program Notes Gateway Camera Club January 2017 What are Luminosity Masks : Luminosity Masks are a way of making advanced selections in Photoshop Selections are based on Luminosity - how
Travel & Landscapes. Introduction
 Introduction Landscape photography captures the natural environment, but can also include man made features within that environment. A striking and breathtaking landscape image will appeal to all our senses
SHAW ACADEMY NOTES. Ultimate Photography Program
 SHAW ACADEMY NOTES Ultimate Photography Program What is a Raw file? RAW is simply a file type, like a JPEG. But, where a JPEG photo is considered a photograph, a RAW is a digital negative, an image that
FOCUS, EXPOSURE (& METERING) BVCC May 2018
 BVCC May 2018") FOCUS, EXPOSURE (& METERING) BVCC May 2018 SUMMARY Metering in digital cameras. Metering modes. Exposure, quick recap. Exposure settings and modes. Focus system(s) and camera controls. Challenges & Experiments.
FOCUS, EXPOSURE (& METERING) BVCC May 2018 SUMMARY Metering in digital cameras. Metering modes. Exposure, quick recap. Exposure settings and modes. Focus system(s) and camera controls. Challenges & Experiments.
capture food & drink Capture Your Holidays with Katrina Kennedy It wouldn t be the holidays without yummy cookies,
 Capture Your Holidays with Katrina Kennedy LESSON 5 capture food & drink All images and lesson content 2014 Katrina Kennedy. All rights reserved. LESSON 5 OBJECTIVES: At the end of this lesson you will
Rubbing your Nikon RAW file the Right Way
 Rubbing your Nikon RAW file the Right Way You can ignore reality, but you can t ignore the consequences of ignoring reality. Ayn Rand If you are a Nikon shooter, you will get the best result from processing
CHAPTER 12 - HIGH DYNAMIC RANGE IMAGES
 CHAPTER 12 - HIGH DYNAMIC RANGE IMAGES The most common exposure problem a nature photographer faces is a scene dynamic range that exceeds the capability of the sensor. We will see this in the histogram
7 Easy Tactics for Better Coastal Landscape Photography
 7 Easy Tactics for Better Coastal Landscape Photography Coastal landscapes can be an incredibly satisfying subject for landscape photographers and can result in some stunning images. Besides abiding by
Lightroom Classic CC and Lightroom CC Updates
 Lightroom Classic CC and Lightroom CC Updates Information about the latest December 2017 Lightroom system updates This December Adobe have released updates for the entire Lightroom CC ecosystem, including
The Magazine for Photographers November 2016
 The Magazine for Photographers The Magazine for Photographers CONTENTS NOVEMBER 4 Panning and Zooming in Lightroom 16 Photoshop Tool Presets 23 Step by Step: Pencil Shading Effect 32 Batch Renaming 46
mastering manual week one
 THE PURPOSE OF THIS WORKSHOP IS TO PUT THE POWER AND CONTROL OF THE CAMERA INTO YOUR OWN HANDS. When we shoot in automatic, we are at the mercy of the camera s judgment and decisions. Learning the techniques
Tablet overrides: overrides current settings for opacity and size based on pen pressure.
 Photoshop 1 Painting Eye Dropper Tool Samples a color from an image source and makes it the foreground color. Brush Tool Paints brush strokes with anti-aliased (smooth) edges. Brush Presets Quickly access
Pacific New Media David Ulrich
 Pacific New Media David Ulrich pacimage@maui.net www.creativeguide.com 808.721.2862 Sharpening and Noise Reduction in Adobe Photoshop One of the limitations of digital capture devices and digital chips
Maine Day in May. 54 Chapter 2: Painterly Techniques for Non-Painters
 Maine Day in May 54 Chapter 2: Painterly Techniques for Non-Painters Simplifying a Photograph to Achieve a Hand-Rendered Result Excerpted from Beyond Digital Photography: Transforming Photos into Fine
Photoshop Cs5 Hdr Manually Set Ev
 Photoshop Cs5 Hdr Manually Set Ev And while HDR techniques can accommodate a wide range of brightnesses, the end shows nine images made with the Canon 5D set on MANUAL exposure. Then it's time to let Photoshop
A taste for landscapes
 A taste for landscapes NEPG workshop October 2012 Colin White 1 Main ingredients 1. Light 2. Composition 3. Kit 4. Post production 2 Light Hue, direction, dynamic range Time of day - around sunrise or
AF Area Mode. Face Priority
 Chapter 4: The Shooting Menu 71 AF Area Mode This next option on the second screen of the Shooting menu gives you several options for controlling how the autofocus frame is set up when the camera is in
The Magazine for Photographers August 2016
 The Magazine for Photographers The Magazine for Photographers CONTENTS AUGUST 4 Color Tinting in Photoshop 17 Circular Polarizer Tips 29 Step by Step: Mirror Image 37 Export Settings 54 (Not So) Smart
Photographing Waterfalls
 Photographing Waterfalls Developed and presented by Harry O Connor oconnorhj@yahoo.com July 26, 2017* All photos by Harry O Connor * Based on May 2012 topic Introduction Waterfall photographs are landscapes
capture outside Capture Your Holidays with Katrina Kennedy It s cold outside! I m sitting At the end of this lesson you will be able to:
 Capture Your Holidays with Katrina Kennedy LESSON 6 capture outside LESSON 6 OBJECTIVES: At the end of this lesson you will be able to: Photograph outdoor light displays. Expose correctly in a snowy scene.
Challenge Image: Blur the Background
 Challenge Image: Blur the Background Challenge Image: Blur the Background In this lesson, we re going to work on a challenge image that was submitted by a Masters Academy member. The image features a little
Buxton & District U3A Digital Photography Beginners Group Lesson 5: Simple Editing. 5 November 2013
 U3A Group Lesson 5: Simple Editing 5 November 2013 Programme Buxton & District 19 September Exploring your camera 1 October You ve taken some pictures now what? (Viewing pictures; filing on your computer)
PASS4TEST. IT Certification Guaranteed, The Easy Way! We offer free update service for one year
 PASS4TEST IT Certification Guaranteed, The Easy Way! \ We offer free update service for one year Exam : 9A0-125 Title : Adobe Photoshop Lightroom 2 ACE Exam Vendors : Adobe Version : DEMO Get Latest &
Photo Editing in Mac and ipad and iphone
 Page 1 Photo Editing in Mac and ipad and iphone Switching to Edit mode in Photos for Mac To edit a photo you ll first need to double-click its thumbnail to open it for viewing, and then click the Edit
Photomatix Light 1.0 User Manual
 Photomatix Light 1.0 User Manual Table of Contents Introduction... iii Section 1: HDR...1 1.1 Taking Photos for HDR...2 1.1.1 Setting Up Your Camera...2 1.1.2 Taking the Photos...3 Section 2: Using Photomatix
Realistic Skin Smoothing
 TIP SHEET #7 Realistic Skin Smoothing I think it s fair to say when it comes to retouching techniques, the number of different ways to smooth skin is seemingly endless. From blurring techniques through
The Basics. Introducing PaintShop Pro X4 CHAPTER 1. What s Covered in this Chapter
 CHAPTER 1 The Basics Introducing PaintShop Pro X4 What s Covered in this Chapter This chapter explains what PaintShop Pro X4 can do and how it works. If you re new to the program, I d strongly recommend
DIGITAL PHOTOGRAPHY FOR OBJECT DOCUMENTATION GOOD, BETTER, BEST
 DIGITAL PHOTOGRAPHY FOR OBJECT DOCUMENTATION GOOD, BETTER, BEST INTRODUCTION This document will introduce participants in the techniques and procedures of collection documentation without the necessity
from what someone else does. I don t think there is a right and wrong way to get these shots
 Tips for Photographing Wildflowers Connie Cassinetto May 2017 Paintbrush, ISO 400, 1/160, f/11. www.cassinettophotos.com Photographing wildflowers can be frustrating at times. It seems that every time
Select your Image in Bridge. Make sure you are opening the RAW version of your image file!
 CO 3403: Photographic Communication Steps for Non-Destructive Image Adjustments in Photoshop Use the application Bridge to preview your images and open your files with Camera Raw Review the information
Basic Digital Photography
 EXAM INFORMATION Items 60 Points 66 Prerequisites NONE Grade Level 10-12 Course Length ONE SEMESTER DESCRIPTION This course is and introduction to the field of commercial photography. This course will
METERING FOR A BETTER PHOTOGRAPH
 METERING FOR A BETTER PHOTOGRAPH By Janet Steyer 2 8 15 INTRODUCTION This program is geared toward the photographer who has a camera with manual controls. Most of this information is based on the controls
David Busch's Canon Powershot G12 Guide To Digital Photography (David Busch's Digital Photography Guides) Free Ebooks PDF
 Free Ebooks PDF") David Busch's Canon Powershot G12 Guide To Digital Photography (David Busch's Digital Photography Guides) Free Ebooks PDF The Canon PowerShot G12 is the most advanced pocket-sized digital camera Canon
David Busch's Canon Powershot G12 Guide To Digital Photography (David Busch's Digital Photography Guides) Free Ebooks PDF The Canon PowerShot G12 is the most advanced pocket-sized digital camera Canon
Color Correction and Enhancement
 10 Approach to Color Correction 151 Color Correction and Enhancement The primary purpose of Photoshop is to act as a digital darkroom where images can be corrected, enhanced, and refined. How do you know
4 PHOTOSHOP SPECIAL EFFECTS HACKS FROM SCOTT KELBY
 4 PHOTOSHOP SPECIAL EFFECTS HACKS FROM SCOTT KELBY You can do some pretty cool stuff in Photoshop, with most tiny tweaks taking no time at all. However, for some of us (myself included) it s hard to know
HDR Show & Tell Image / Workflow Review Session. Dave Curtin Nassau County Camera Club October 3 rd, 2016
 HDR Show & Tell Image / Workflow Review Session Dave Curtin Nassau County Camera Club October 3 rd, 2016 Capturing Realistic HDR Images Topics: HDR Review (Brief Summary from HDR Presentation Parts: 1
HDR ~ The Possibilities
 HDR ~ The Possibilities Dooleys Camera Club 14th March 2014!1 HDR - The Possibilities Steve Mullarkey email: stevemul@ozemail.com.au website: http://www.stevemul.com.au/! A PDF copy of this presentation
Post-Processing/Editing Page 1
 All images need a little something to help re-create or re-imagine what you think a particular image should look like. Whether it is adding a digital gradient to a sky to help saturate and deepen the colours
Filters for the digital age
 Chapter 9-Filters Filters for the digital age What is a filter? Filters are simple lens attachments that screw into or fit over the front of a lens to alter the light coming through the lens. Filters
inphoto ID Canon and Olympus camera control software Automatic ID photography User Guide
 inphoto ID Canon and Olympus camera control software Automatic ID photography User Guide 2006 Akond company 197342, Russia, St.-Petersburg, Serdobolskaya, 65a Phone/fax: +7(812)600-6918 Cell: +7(921)757-8319
Movie 3. Basic Camera Raw workflow
 Movie 3 Basic Camera Raw workflow 1 The tone adjustment controls The tone adjustment controls allow you to make adjustments to the highlight and shadow clipping points as well as the overall tone balance