icorrect EditLab Pro 5.0 User Guide
|
|
|
- Vivian Cox
- 6 years ago
- Views:
Transcription
1 09/18/ :46 PM icorrect EditLab Pro 5.0 User Guide Contents 1. Introduction 2. Installation 3. Getting Started a. Help b. Color Editing Tools c. SmartColor Mode d. Preview Image e. Preferences f. More Controls 4. Color Balance Tool a. Using Neutrals b. Using Sliders 5. Black Point / White Point Tool a. SmartColor Button b. Dragging the Handles c. Selecting From the Image 6. Brightness / Contrast / Saturation Tool 7. Hue Selective Edit Tool a. Setting the "Before" Handles b. Editing the Active Hue c. Using the Built-in Memory Colors d. Toning 8. Sharpening and Noise Removal 9. Using the Color Edit a. Editing the Color of the Image b. Editing an ICC Input Profile c. Saving the Edit as an ICC Input Profile d. Saving the Edit as a ColorCircuit File 10. Automating Using Photoshop Actions In addition to providing direct links from the table of contents above, we have also provided a small navigation control to allow you to select pages in the User Guide: Page 1 of 2

2 09/18/ :46 PM Note: This HTML User Guide is cross-platform. That is, if you view it with a browser running on a Windows computer, the User Guide describes the Windows version of EditLab. Conversely, if you view it with a browser on a Macintosh, the Guide describes the Macintosh version. The differences are primarily related to the user interface appearance, but there are a few differences in the text also. You are now running a Macintosh browser. Note: All images in this User Guide have been prepared for viewing on an srgb display, which is close to what is typically found on a PC. If your monitor is not set up to this standard, or if you are viewing on an LCD display, the colors in the images may appear to be a little off. Click here to adjust your monitor closer to the srgb standard. PictoColor Corporation 151 West Burnsville Parkway Suite 200 Burnsville, MN USA Copyright PictoColor Corporation. All Rights Reserved. Support Contact Us FAQ Site: Top of Page Page 2 of 2
3 09/18/ :46 PM 1. Introduction icorrect EditLab Pro is professional color correction and color management software that combines icorrect color technology with image processing and automated workflow and batch processing features to make digital photo correction extremely fast and easy. icorrect EditLab Pro makes global color corrections based on: an automatic analysis of your image, analysis of certain reference or "memory" colors that you identify in your image, interactive dialog control settings, and Photoshop's color management setup. EditLab works in "SmartColor" mode (a mode that intelligently sets the editing controls based on the color content of the image), in manual mode, or in a combination of the two. Many of the tools and much of the philosophy behind EditLab are the result of the observation that almost everyone knows what certain colors should look like. When an image is viewed, it is surprising how easily color errors are seen, even by people untrained in this discipline. For example, everyone knows that snow is white (neutral) and what skin, foliage, and sky blue should look like. If an image shows a person's face that is bright red, the observer knows that the color is wrong, even though he may never have seen the actual person in the image. These common reference or "memory" colors form the basis of EditLab's approach to improving the color of an image. EditLab's tools include: color balance, black/gray/white point selection, brightness/contrast/saturation controls, and hue selective editing. In many production environments, color management, using ICC device profiles, is rapidly becoming the preferred method of producing color-accurate digital images. While this may be the best way to control color reproduction in many situations, it isn't always possible. There are large classes of digital images of unknown pedigree. It is not possible to use device profiles to relate the colors in these images to any device-independent reference because the profiles do not exist and cannot be made after the fact. For example, you may not have any information about how images on a stock photography CD-ROM were acquired. EditLab can be used to quickly and easily correct uncalibrated images such as these, transforming them into a calibrated color space. icorrect EditLab Pro's automated workflow features include: Page 1 of 4
4 09/18/ :46 PM Photoshop Actions - Record color corrections as Photoshop Actions for fast batch processing Save ICC profile - Color correction parameters may be saved as an ICC input profile for application to similar images in an ICC workflow. Save Custom Settings - Specific color correction parameters may be saved for application to images taken under similar conditions. Custom Settings - Apply selected custom settings to an image. Additional color correction may be applied to the image without affecting the Custom Setting. Previous Settings - Color correction parameters are applied to an image based on color corrections made to the previous image. Four Ways to Use EditLab icorrect EditLab Pro has a very powerful tool set for creating a color correction function. Although this is a great way to fix a particular color problem, this power can be leveraged even further in the way in which the color correction function is used. EditLab can operate in any of four main modes: Edit Image - The color edit may be applied to the image itself, in one of two ways. You may preview each image, which gives you the opportunity to refine the edit tool settings before saving the image, providing a nice way to color correct several images, each having a different color problem. Alternatively, you can record a Photoshop Action and then use Photoshop's Batch Processing to apply the selected edit to a set of images. In either case, there are several helpful variations on how the initial edit tool settings are determined: The color edit of the Previous corrected image may be applied to the current image. If you are previewing each image, additional color corrections may be made, and the modified color correction parameters become the new "Previous Settings". This mode is helpful when a set of images have similar, if not identical, color problems. Custom Settings may be applied to the current image. A color edit can be saved in a Custom Settings file at any time for subsequent use on other images, and any number of Custom Settings may be saved. If you are previewing each image, additional color corrections may be made, without modifying the Custom Settings that will be used when the next image is edited. This mode is helpful when a set of images have similar color problems, and it provides the added flexibility of allowing slight modifications that may differ for each image, without changing the starting point. SmartColor settings may be applied to the current image. This mode will apply a different correction to each image, based on an analysis of that image. You can customize which edit tools SmartColor sets by specifying SmartColor Preferences. If you are previewing each image, additional color corrections may be made. Create Profile - The color edit may be saved as an ICC input profile which may be assigned to any number of other images, in an ICC workflow. In this mode, you can create ICC profiles by eye, without the use of color charts or instruments. Edit Profile - The color edit may be applied to an existing ICC input profile. In this mode, EditLab is an ICC input profile editor. Create ColorCircuit - The color edit may be saved as a ColorCircuit file, which may later be applied to large numbers of other images using the ColorCircuitQ application program. Chapters 4 through 7 describe EditLab's color editing tools, which will be used regardless of the mode in which EditLab is run. Once these editing skills have been developed, you will then learn in chapter 9 how they may be applied to each of the four modes. Chapter 8 describes EditLab's sharpening and noise removal tools, which apply only when editing images. Page 2 of 4
5 09/18/ :46 PM Very Important Photoshop Setup Information! icorrect EditLab Pro will always correct the color of an image to Photoshop's currently selected RGB working space. Therefore, it is critical that you have Photoshop set up in a way that allows icorrect EditLab to perform properly. Here is a checklist: 1. Calibrate your monitor and load its profile as the system profile. The manner in which you do this depends on both the platform you are on and the operating system version you are running. Your monitor profile affects the way in which colors are displayed in Photoshop, and also in icorrect EditLab. If your monitor profile is bad, colors will not look right. 2. Select a "normal" RGB working space in Photoshop. Normal working spaces are theoretical in nature and have certain "nice" properties, for example, a neutral color by definition has its red, green and blues values equal to each other. 3. Never select your monitor profile as your RGB working space. Monitor profiles generally do not have the "nice" properties discussed above that theoretical working spaces should have. Incidentally, Adobe also recommends against using your monitor profile as a working space. 4. If your image has an embedded profile, convert it to the working space before using icorrect EditLab Pro. This may be done when the image is first opened, or it may be done with Photoshop's "Image > Mode > Convert to Profile " command. 5. If your image has no embedded profile, assign the working space profile before using icorrect EditLab Pro. This may be done when the image is first opened, or it may be done with Photoshop's "Image > Mode > Assign Profile " command. Photoshop's working space is selected with its "Color Settings" dialog for versions 6,7, CS and CS2, or with the "Color Settings / RGB Setup" dialog box with version 5 (also check the "Display Using Monitor Compensation" checkbox). If you are running an even earlier version of Photoshop, be sure that the settings in the Monitor Setup dialog box accurately describe your monitor. Once you are properly set up, icorrect EditLab will correct your image to Photoshop's working color space (Photoshop 5.0 and later) or to the color space defined by the Monitor Setup parameters (Photoshop version 4 and earlier). Here is a suggested Color Settings set up that will help make sure your image properly ends up in the working space (shown for Photoshop CS2): Page 3 of 4

6 09/18/ :46 PM If you are using the plug-in with an application other than Photoshop, you should be aware that not all applications provide the same color management setup information that Photoshop provides. If icorrect EditLab cannot get this information about color settings from your application, it will correct the image into a generic Trinitron monitor color space of gamma 1.8. PictoColor Corporation 151 West Burnsville Parkway Suite 200 Burnsville, MN USA Copyright PictoColor Corporation. All Rights Reserved. Support Contact Us FAQ Site: Top of Page Page 4 of 4

7 09/18/ :47 PM 2. Installation icorrect EditLab Pro is a plug-in. That means it cannot be run on your computer by itself. Instead, it must be run from within another program (called a host program) that has been specifically designed to support Adobe Photoshop Filter plug-ins. Because of the somewhat unusual characteristics of plug-in software, the installation process involves two steps: Running the Installer Program The installer places the plug-in and its support files onto your hard drive. Copying the Plug-in File The plug-in file created in the above step must then be copied (or installed) into the host program. Detailed installation instructions may be found online here. Once the plug-in has been properly installed, it may be used by launching Photoshop, opening an RGB image, and then selecting EditLab from Photoshop's Filters menu: Page 1 of 2
8 09/18/ :47 PM PictoColor Corporation 151 West Burnsville Parkway Suite 200 Burnsville, MN USA Copyright PictoColor Corporation. All Rights Reserved. Support Contact Us FAQ Site: Top of Page Page 2 of 2
9 09/18/ :47 PM 3. Getting Started This section contains miscellaneous overview information that will help you get the very most out of icorrect EditLab Pro. Color Editing Tools SmartColor Mode Help Here you will learn about the various help resources available to you for EditLab. This is an overview of the four main editing tools. You will find an explanation of the very helpful SmartColor Mode. Preview Image This page explains how to use the Preview image for viewing, zooming and numeric color display. Preferences Here is a description of EditLab's preferences which affect performance, window size and user feedback. More Controls The remainder of EditLab's general controls are discussed here. PictoColor Corporation 151 West Burnsville Parkway Suite 200 Burnsville, MN USA Copyright PictoColor Corporation. All Rights Reserved. Support Contact Us FAQ Site: Top of Page Page 1 of 1
10 09/18/ :47 PM 3a. Getting Started: Help In addition to this User Guide, help is available from several other sources: 1. Built-in Help may be found by clicking on EditLab's Help buttons. The upper Help button (which is located outside the tool panel) displays general information about using the plug-in. The lower button (which is located inside the tool panel) displays information that is relevant to the currently selected edit tool. 2. Our Frequently Asked Questions site contains answers to many common problems. You will find this at 3. Technical Support is available via at Contact Us. PictoColor Corporation 151 West Burnsville Parkway Suite 200 Burnsville, MN USA Copyright PictoColor Corporation. All Rights Reserved. Support Contact Us FAQ Site: Top of Page Page 1 of 1
11 09/18/ :48 PM 3b. Getting Started: Color Editing Tools EditLab has four color editing tools, arranged into a particular sequence. Graphically, the tools are shown in the window on tabs at the top of the edit tool panel: Each of the four editing tools is activated by clicking on its tab. From left to right we have: Color balance, which is used to remove global color casts. Black, gray and white point selection, which is used to alter the range of the tones. Global brightness, contrast and saturation controls which are used to redistribute the tone values between black and white, and between neutral and fully saturated colors. Hue selective edits, which provide brightness, saturation and hue controls which are constrained to user defined hue regions. The particular order of these tools allows a systematic method of color correction that reduces the amount of interaction among them. For example, if the image has a global color cast, we should fix that problem first before performing hue selective edits. If we did the hue selective edits first, we would find that color balancing would alter the hue that was specified for the hue selective edit. We would end up going back and forth between the two tools. The logical progression of the editing tools is this: 1. Remove any color cast with the color balance tool, even though there may be other problems remaining. Once the balance has been fixed, none of the other three editing tools can ruin it, no matter how they are used. 2. After balancing, we progress to setting the black and white points. This usually (but not necessarily) pushes the blacks to darker values and stretches the whites to lighter values. The color balance from the previous step is not affected by this tool. When we have set the black and white points, our image is color balanced and covers the desired tone range at black and white. The distribution of tones between black and white may be changed with the gray point, and further modified with the next tool. 3. The brightness, contrast and saturation tool is used to redistribute the tones between full black and full white, and increase or decrease the saturation of non-neutral colors. This tool does not affect color balance, nor does it affect the black and white points. Page 1 of 2
12 09/18/ :48 PM 4. After using these first three tools, the gray scale is correct in terms of balance, range and tone distribution. With that out of the way, we can zero in on any necessary corrections to the non-neutral colors. The hue selective editing tool is used for this purpose. Again note that this tool cannot alter the color balance, black point, white point or tone distribution, so the work you accomplished with the first three tools is protected. Although the sequence of editing tools is fixed, you are certainly free to perform the editing operations in whatever order you choose. Because of the observation that each tool cannot affect any tools to its left, it is strongly recommended that you make the first pass through the tools from left to right, reserving the right to go back and make smaller refinements, if needed. If you do go back (moving from right to left), you will probably want to temporarily disable SmartColor Mode. Otherwise, controls that you have already set in tools to the right of the current tool will be changed to automatic settings, as described in the next section. PictoColor Corporation 151 West Burnsville Parkway Suite 200 Burnsville, MN USA Copyright PictoColor Corporation. All Rights Reserved. Support Contact Us FAQ Site: Top of Page Page 2 of 2
13 09/18/ :48 PM 3c. Getting Started: SmartColor Mode A good thing about icorrect EditLab Pro is that it has many controls, allowing you to make very sophisticated color edits. The down side of this is that all of these controls must be set to proper values in order to make the correction, and that takes time. In order to give you the benefit of the editing power without the tedium of setting all the controls, we have implemented a "SmartColor" mode which does much of the work for you. It is enabled with the SmartColor Mode checkbox: When SmartColor mode is enabled, the image is analyzed and most of the controls for all tools are intelligently set to values that will be good for that particular image. This leaves you with the much smaller job of making minor adjustments to any of the controls as you see fit (or even if you see fit). You will find this feature to be very helpful in getting the best color correction in the shortest time. Although you are allowed to turn SmartColor Mode off, you will probably want to always leave it on. Its initial state may be controlled using the Start With preference. You can further customize SmartColor's behavior, defining which controls it sets, as described in the SmartColor Prefs section of this User Guide. Since SmartColor mode analyzes each image individually, the settings it finds will be customized to the image itself. This is especially helpful when dealing with many images having different types of color problems. Also note that SmartColor mode works in real-time with your manual adjustments. For example, when you manually adjust the Black Point, you affect not just the black point, but also the brightness and saturation of the image. So while you are making the Black Point adjustment, SmartColor mode is constantly recalculating the proper Brightness and Saturation settings to track right along with you. When operating in this manner, the SmartColor mode is making adjustments to all editing tools to the right of the tool you are adjusting. It does not change the settings of the current tool or any to its left. You will also see SmartColor buttons located inside each tool panel, as well as a SmartColor button outside the tool panel: Clicking any of these buttons will cause settings to be recalculated for the image. All settings are recalculated when the master button is clicked, whereas only those for the currently selected tool are recalculated when the button inside the tool panel is clicked. This is useful for cases where you decided to make a manual adjustment, Page 1 of 2
14 09/18/ :48 PM but then changed your mind. Note: The SmartColor feature is designed to be a helper to augment your own skills. It is not intended to provide a complete, automatic color correction. PictoColor Corporation 151 West Burnsville Parkway Suite 200 Burnsville, MN USA Copyright PictoColor Corporation. All Rights Reserved. Support Contact Us FAQ Site: Top of Page Page 2 of 2
15 09/18/ :48 PM 3d. Getting Started: Preview Image The left side of the EditLab window is used to display the preview image. The Preview checkbox is used to control whether the preview image is displayed before or after edits: Initially, the checkbox is checked, and the preview image displays the effects of the current color corrections. To compare this corrected image with the original image, you can move the EditLab window aside to uncover the original image in Photoshop, or more conveniently, you may uncheck the Preview checkbox to display the uncorrected image within the EditLab's own window. You may find it useful to check and uncheck the Preview image checkbox, watching the preview image toggle back and forth between the corrected and uncorrected versions. Note that the preview image cannot display the effects of sharpening and noise removal unless you are zoomed in, because unlike color corrections, these effects depend on the resolution of the image. When you are zoomed in, depending on the size of your window and the processing capabilities of your computer, sharpening and especially noise removal may cause a noticeable delay in updating the preview. If this is objectionable on your system, you can uncheck the Preview Sharpening and/or Preview Noise Removal checkboxes in the Preferences window. Sharpening and Noise Removal can always be previewed in the Sharpen / Noise Removal setup window. Zooming may be used to magnify the preview image to a 1:1 pixel view. If you hold down the Option key, the Zoom In cursor will be displayed in the middle of a Zoom box, representing the area to be enlarged: Page 1 of 4

16 09/18/ :48 PM To display the new view, drag the center of the Zoom box over the image area you wish to magnify, then click on the mouse. If the Zoom In cursor does not appear, that means one of two things: a) that the image you are editing is small enough to entirely fit in the Preview panel at 1:1, or b) that there is not enough memory available to support the zooming feature. You can zoom back out to the original view by again holding down the Option key and clicking anywhere in the image area. Scrolling a zoomed image is done by holding down the Control key while dragging on the Preview image. The "hand" cursor indicates that scrolling will occur: Numeric pixel values in the preview image may be examined using the mouse. The displays below the edit tool panel show the pixel values for the color under the cursor. This feature is only present if you have enabled the Show Pixel Values checkbox in the preferences window. HSB (hue, saturation and brightness) values are initially displayed, but if you prefer to see RGB (red, green and blue) pixel values, you can click anywhere in the pixel value display area to switch to RGB values. Clicking a third time switches to CMYK (cyan, magenta, yellow, black). Further clicks start this cycle over again. Page 2 of 4
17 09/18/ :48 PM Note that the CMYK display shows the values you would obtain if you convert your RGB image to CMYK in Photoshop. The values are determined from Photoshop's CMYK Color Settings. icorrect EditLab cannot be used on CMYK images, only RGB images. Each color component is shown in two forms, separated by a slash character. The number on the left is the color before edits (corresponding to the image displayed when the Preview checkbox is not checked) and the number on the right of the slash is the color after edits have been applied (corresponding to the image displayed when the Preview checkbox is checked). The cursor may be set to display average values by clicking the eyedropper icon to the left of the digital displays. As you click on the icon it will alternate among these three icons, which correspond to a single pixel sample, a 3 3 pixel area average, and a 5 5 pixel area average: The eyedropper sampling size affects only the numeric RGB, HSB or CMYK display. It is not used when clicking image colors in the various editing tools (a different technique is used which will be explained later). You can also set up to two color samplers to monitor color values from fixed locations. These will be updated as you change slider settings, etc., but only if you have enabled the Show Pixel Values checkbox and the Preview Live Sliders checkbox in the Preferences window. To set a color sampler, hold down the Shift key while you click on the image. After setting a sampler, you can move it to a new location by shift-clicking on it and dragging it. To delete a color sample, shift-click on it and drag it off the image. Normally, you will probably want to view the net result of all of the edit tools together, but there may be times that you want to see only what the current tool is doing. Clicking the down arrow at the bottom of the tool panel will extend the tool panel to include the Preview checkbox and the pixel readouts, indicating that the preview image and readouts reflect only the effects of the current tool. Page 3 of 4

18 09/18/ :48 PM An up arrow appears that can be clicked to return to the smaller tool panel, where the preview image and pixel readouts reflect the combined effects of all of the editing tools. PictoColor Corporation 151 West Burnsville Parkway Suite 200 Burnsville, MN USA Copyright PictoColor Corporation. All Rights Reserved. Support Contact Us FAQ Site: Top of Page Page 4 of 4

19 09/18/ :49 PM 3e. Getting Started: Preferences Clicking the Preferences button will display the Preferences dialog box: EditLab has many features that may be controlled via its preferences. Some of these can save you a lot of work, so learning about them can be a very worthwhile investment of your time. Below we will go through each of these controls in order, to see how EditLab's behavior is affected. EditLab Mode Start With Page 1 of 8


20 09/18/ :49 PM SmartColor Preferences Load Custom Settings Preview: Live Sliders, Sharpening, Noise Removal Show Sampled Region Show Pixel Values Show Brightness/Contrast Curve Control Show Neutrals/Sliders Pop-up Menu Show Start Up Guide Use Largest Possible Window Restore Defaults As mentioned in the Introduction, EditLab's color correction can be directed to any of four purposes, and the first preference control indicates which of these four to use: The selection made affects the appearance and behavior of the lower right button of EditLab's main window, which in turn, affects how the color correction is used. Each of the four modes is explained in Chapter 9. The Start With menu establishes how EditLab will determine its starting color control settings: If you start with SmartColor, then SmartColor Mode will be enabled, which is then used to determine the initial color correction settings according to an analysis of the current image. If you select any of the other three "Start with" options, SmartColor Mode will be disabled. If you start with Previous Settings, then the settings for the color correction tools are recalled from the previous image that was corrected. If you start with Custom Settings, then the custom settings that have been loaded with Load Custom Settings are used. If you start with Reset, all color correction tool controls will be set to values that do not change the image (i.e. "null" values). SmartColor Preferences SmartColor can be customized with the SmartColor preferences which are viewed by clicking the SmartColor Prefs button: Page 2 of 8


21 09/18/ :49 PM The SmartColor Preferences controls are divided into two main categories. The first set defines how SmartColor works: Each of these checkboxes determines whether the corresponding edit tool will be affected when SmartColor Mode is enabled or a SmartColor button is clicked. By default, all of the checkboxes are checked, and all of the corresponding tools are set by SmartColor. There may be times that you want to selectively turn off parts of SmartColor. For example, if you know that you never work with Linear images, you can uncheck the Linear SmartColor preference so that SmartColor will never mistakenly identify a dark image as a linear image. Or, if you find that you typically need to adjust the Saturation that SmartColor sets, you may find it easier to simply turn off the Saturation component of SmartColor. However, you can also fine tune SmartColor Saturation without turning it off, as described below. The Preferred Saturation menu influences the Saturation level that is set by the SmartColor Saturation correction. The settings range from 0 (None; a black and white image) to 100 (Maximum; a very colorful image), with 80 being the default. SmartColor Saturation will analyze your image and set the Saturation control to a value that will either reduce or increase the saturation of your image to match your preferred saturation level. Note that the visual effect that this control has on your image is influenced by your choice of working space. If you change EditLab's working space, you may also need to adjust this Preferred Saturation preference also. The second set of controls in this window defines how Memory Color buttons work. Page 3 of 8
22 09/18/ :49 PM Each of these checkboxes determines whether the corresponding control in the Hue Selective edit tool panel will be affected when a Memory Color button is clicked. By default, all of the checkboxes are checked, and all of the corresponding tools are set. These preferences allow you to selectively turn off parts of the Memory Color. For example, if you find that you typically need to adjust the Saturation that the Memory Color sets, you may find it easier to simply turn off the Saturation component of the Memory Color button. Note that this does not change the Memory Color definition, but determines which parts of the definition are actually used. The process used to fine tune a Memory Color definition or create a new one is described here. The Restore Defaults button at the bottom of the window will set all preferences in the window to the factory default values, that is, the values that were present when EditLab was first installed. The OK button in the SmartColor Preferences window must be clicked in order for these new settings to take effect. The Load Custom Settings... button is used to load the settings that will be applied when the Start with Custom Settings preference has been selected, and when the Custom buttons in the main EditLab window are clicked. You will be asked to locate the file that contains the Custom Settings that you want to load. Page 4 of 8

23 09/18/ :49 PM Custom Settings files are saved using the Save Custom... button in the main EditLab window. Any number of custom settings files can be saved. Shortcut Tip: In EditLab's main window, you can load custom settings and immediately apply them by holding down the Option key while clicking the master Custom button. This is equivalent to opening the Preferences window, clicking the Load Custom Settings button, selecting a custom settings file, clicking OK to return to the main EditLab window, and then clicking the master Custom button. The three Preview checkboxes influence the responsiveness of the controls throughout EditLab. If you find that the controls are too sluggish, you may want to experiment with these settings that trade off feedback for speed. The responsiveness will depend on many factors, such as the speed of your computer, the amount of memory available to EditLab and the size of the EditLab window. When the Preview Live Sliders checkbox is checked, the preview image is updated with every movement of the mouse as you adjust a slider. If you have a fast enough computer, this makes it easy to find the optimal slider setting, but on a slower computer, you may find it confusing and frustrating if the updating of the display doesn't keep up with your mouse movements. Updating the preview involves a lot of calculations, especially if the master SmartColor checkbox is checked, since new automatic settings are also recalculated for each change in the slider value. When the Preview Page 5 of 8
24 09/18/ :49 PM Sliders checkbox is unchecked, you can freely move a slider, but the image is not updated until you release the mouse button. When the Preview Sharpening checkbox is checked, if sharpening is being applied to the image, it is previewed whenever you are zoomed in. When the Preview Noise Removal checkbox is checked, if noise is being removed from the image, it is previewed whenever you are zoomed in. This is described further in the Preview Image section. When the Show Sampled Region checkbox is checked, a brief visual feedback is given of the actual pixels sampled when you click on the image: This is discussed in more detail in the section describing the Neutral Color Balance tool. This "flashing" gives you some feedback about what is happening during color correction. If you find this distracting, simply turn the option off by unchecking the checkbox. When the Show Pixel Values checkbox is checked, EditLab will enable the display of numeric pixel values in its main window, as was described here. When the Show Brightness/Contrast Curve Control checkbox is checked, EditLab will display a control in the Brightness / Contrast / Saturation tool panel that allows the tone curve to be graphically displayed, as described here. Page 6 of 8
25 09/18/ :49 PM When the Show Neutrals/Sliders Pop-up Menu checkbox is checked, EditLab will place a pop-up menu in the Neutral Balance tool panel that allows color balance to be achieved using sliders, in addition to clicking on neutral colors in the image, as described here. The Show Start Up Guide checkbox controls whether or not the Start Up Guide window is displayed when EditLab is launched. The Start Up Guide is designed to give the first-time user a little extra help getting started. Once you are familiar with EditLab, you will probably want to disable this feature. The Use Largest Possible Window checkbox indicates how the EditLab window will be sized the next time the plug-in is run. A bit of explanation is needed here. Unlike a normal stand-alone application, it is not possible for a plug-in to have a window that may be resized while the plug-in is actually running. So in order to provide a different window size, you must indicate how this should be done next time. Moreover, note that the larger you make EditLab's window, the more memory EditLab needs. And EditLab's zooming feature increases its memory needs still further. So the name of the game is trading window size against available memory and the ability to zoom. Let's see how this is done. If the Use Largest Possible Window checkbox is unchecked, the EditLab window will be a fixed size that will fit on a display that meets EditLab's minimum system display requirements ( pixels). If under this setup, there is not enough memory for EditLab to run, image zooming will be temporarily disabled in an attempt to have enough memory to run at all. If the Use Largest Possible Window checkbox is checked, the EditLab window will be the largest size that will fit on your display. If under this setup, there is not enough memory for EditLab to run, the window size will be made just enough smaller so that it will run. If the resulting window size found this way is the minimum size, image zooming may be temporarily disabled if needed to have enough to run at all. Finally, the Restore Defaults button will set all preferences in the window to the factory default values, that is, the values that were present when EditLab was first installed. The OK button in the Preferences window must be clicked in order for the new settings to take effect. Page 7 of 8
26 09/18/ :49 PM PictoColor Corporation 151 West Burnsville Parkway Suite 200 Burnsville, MN USA Copyright PictoColor Corporation. All Rights Reserved. Support Contact Us FAQ Site: Top of Page Page 8 of 8

27 09/18/ :49 PM 3f. Getting Started: More Controls In the lower right corner of the window is a cluster of items: The Linear checkbox is a special control that is intended to be used for specific situations only. Most users will not use it at all. This control is displayed only for 16-bit per channel images, and should be used only if you know that the image data is linear (i.e. from a gamma = 1.0 source). Images of this type may be produced by certain high end scanners, digital cameras and scan backs. A linear image, when viewed uncorrected on a monitor, will typically look very dark. If you know that your image is linear, the Linear checkbox will do a better job correcting it than using just the global Brightness control. SmartColor will attempt to determine whether 16-bit per channel images are linear, so if you know that you will not be working with linear images, you may want disable this feature of SmartColor by unchecking the Linear checkbox in the SmartColor Preferences window. Clicking the Preferences... button will open the Preferences window. Clicking the Undo button will undo the last correction that was made, whether it resulted from changing a slider, clicking SmartColor or Reset, or sampling a neutral pixel for color balance. When the master SmartColor Mode checkbox is checked, automatic corrections are determined and kept current for all of the edit tools, as described earlier in the SmartColor Mode section of this User Guide. The initial state of this checkbox is determined by the Start With preference. If you uncheck the checkbox, all of the current settings remain unchanged (whether they were set automatically or not). Unchecking the checkbox simply turns off the automatic updating of settings from that point on. If the SmartColor Mode checkbox is rechecked, automatic updating is re-enabled, and automatic settings are immediately updated based on the currently active edit tool. That is, if the Black/White Point tool is currently active, the automatic Brightness/Contrast and Hue Selective settings are recalculated. If you want to use SmartColor without having the settings kept current for you as you work, you can turn off Page 1 of 3
28 09/18/ :49 PM SmartColor Mode, and click the SmartColor button when you want to apply automatic corrections. Note that there is also a SmartColor button inside the edit tool panel. This button will only calculate settings for the controls in the current edit tool panel, and will affect the settings of the other three tools only if the master SmartColor checkbox is checked. You can further customize SmartColor's behavior, as described in the SmartColor Prefs section of this User Guide. Clicking the Prev button will uncheck the SmartColor Mode checkbox, and will set all edit parameters to the values that were used on the previous image. Clicking the Custom button will uncheck the SmartColor Mode checkbox, and will set all edit parameters to the values that were loaded with the Load Custom Settings... button in the Preferences window. If custom settings have not been loaded, the Custom button will be equivalent to the Reset button. Shortcut Tip:You can load custom settings and immediately apply them by holding down the Option key while clicking the Custom button. This is equivalent to opening the Preferences window, clicking the Load Custom Settings button, selecting a custom settings file, clicking OK to return to the main EditLab window, and then clicking the master Custom button. You can save the current color correction in a parameter file at any time, using the Save Custom... button. Clicking the Reset button will also uncheck the SmartColor Mode checkbox, and will set all color correction parameters to values that effectively turn the edit off completely. Note that there are also SmartColor, Prev, Custom and Reset buttons inside the edit tool panel. These buttons will modify the selected edit tool, and will affect the settings of the other three tools only if the master SmartColor Mode checkbox is checked. Check the Sharpen checkbox to apply unsharp masking to the image. Check the Remove Noise checkbox to apply an adaptive noise removal filter to the image. Click the Setup... button to open the Sharpen / Remove Noise setup window, from which you can set parameters that control the strength of these effects. Although they are not color correction tools, it can be helpful to apply sharpening and noise removal in combination with color correction, such as in a case where noise in an image is exaggerated by a color transformation. Note that SmartColor and Reset do not affect sharpening and noise removal. If you typically sharpen your images, you can turn sharpening on and it will stay on until you explicity turn it off by unchecking the checkbox, or by loading previous or custom settings in which sharpening was disabled. If you click Cancel, you will close the image without change. The next image in the Queue will be opened automatically. The last button, located in the lower right corner, is used to apply the completed color edit in the manner stated on the button. If you recall, EditLab can operate in any of four different modes: Edits the color of the current image. Edits an ICC input profile. Creates an ICC input profile. Creates a ColorCircuit file. The current mode is determined by the Preferences. However, if you hold down the Option key while you Page 2 of 3
29 09/18/ :49 PM repeatedly click this button, the modes are cycled through a convenient way to change modes without visiting the preferences panel. These four modes are described in detail in Chapter 9. Let's now proceed to the use of each specific edit tool. PictoColor Corporation 151 West Burnsville Parkway Suite 200 Burnsville, MN USA Copyright PictoColor Corporation. All Rights Reserved. Support Contact Us FAQ Site: Top of Page Page 3 of 3
30 09/18/ :54 PM 4. Color Balance Tool The first edit tool is Color Balance. This tool is used to adjust the color balance of the image. The color balance tool has been implemented with two different user interfaces, each of which will be described shortly. We call the two methods Clicking Neutral Objects and Using Sliders. The one that is best for you will depend on your image and your personal preferences. Note that only one of these methods may be used on an image they will not work in combination with each other, and when you switch from one method to the other, any existing color balance edits are undone. Also note that the Using Sliders method is only available if you have enabled the Show Neutrals/Sliders Pop-up Menu checkbox in the preferences window. For most users and most images, the Clicking Neutral Objects method is far quicker, easier and more accurate. Clicking Neutral Objects You color balance with this method by simply clicking on neutral objects in your image. Using Sliders With this method, color balance is achieved by moving sliders. Neutral Preferences: By default, EditLab will aim for a neutral with equal red, green and blue values, that is, with a saturation of zero. If you prefer a warmer or cooler neutral, click the Preferences... button in the color balance tool panel. EditLab's color selection window will be displayed, allowing you select your preferred neutral. EditLab will aim for your customized target neutral definition until you define a different one, or until you load custom or previous settings that define a different one. Page 1 of 2

31 09/18/ :54 PM PictoColor Corporation 151 West Burnsville Parkway Suite 200 Burnsville, MN USA Copyright PictoColor Corporation. All Rights Reserved. Support Contact Us FAQ Site: Top of Page Page 2 of 2
32 09/18/ :54 PM 4a. Color Balance Tool: Clicking Neutral Objects The basic idea of the Neutrals method of color balancing is that you simply point and click on objects in the image that you know should be neutral. If you stop and think about it, most images have built-in grayscales, hidden in the objects in the scene. Here are some examples of common neutral objects: paper, clothing, automobile tires, teeth, eyes (whites and pupils), clouds, white painted objects like houses or cars, black painted objects, asphalt, tree bark, snow and many others. Often, a single neutral object will have many tones, due to illumination variations. For example, the folds in a white shirt will show many different tones of the base white fabric. The Neutrals method allows a continuous color balance correction across all tones. This means that it can easily handle "cross-overs," for example, an image whose dark colors have a green cast and whose light colors have a red cast. The tool panel shows a simplified, five-step summary of the type of color cast your image has. Although this display shows only five regions (for the sake of clarity), the underlying color balance correction is continuous across all tones. Color balancing using Neutrals is very easy. Simply select Neutrals from the pop-up menu at the top of the color balance tool panel, and then click on objects in the preview image that should be neutral. Every time you click on the picture, an entire region of adjacent, similarly colored pixels will be used collectively to determine the color cast. This region is shown momentarily as a brief "flash" of a blue overlay (if you have the "Show Sampled Region" preference enabled): Page 1 of 3

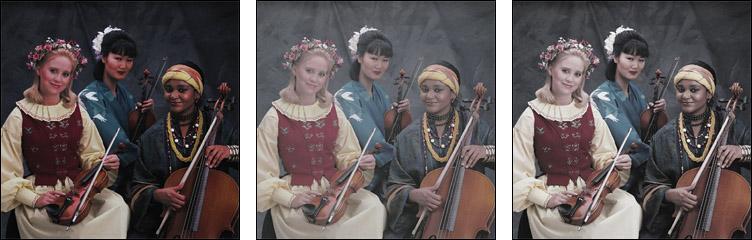
33 09/18/ :54 PM This means you don't need to select very many neutral objects, but you should make an effort to point at different tones, from black to white and some tones in between. If the master SmartColor Mode checkbox has been checked, some color balance correction will have been done for you already. The automatic correction influences the darkest and lightest colors in the image more than the midtones, so you may want to be sure to mark some neutral midtones if you can. (Note that the SmartColor Preferences settings control whether SmartColor will affect the color balance.) You may also find that by zooming and scrolling, more precise neutral selection is possible, especially on small or thin objects. In our sample image, the background is assumed to be shades of gray. We will click in a few places, including lighter and darker samples. Two of the musicians have black hair, and the center musician's robe has white birds on it. Since these should also be made neutral, we'll click on these colors as well. After every click of the mouse, the Color Balance panel and the preview image are updated to show the current color correction. If the master SmartColor Mode checkbox is checked, each click also recomputes the automatic settings for the edit tools that follow (black/white, brightness/contrast, hue selective). We see here that for our example, we have a slight blue cast in the highlights which passes through cyan on its way to green in the shadow tones. This displayed grayscale has inset squares to visually show the color cast that exists in the original image. Beneath each square is a general indicator of the color of the cast (R = red, G = green, B = blue, C = cyan, M = magenta, Y = yellow). The strength of the cast is also shown, expressed in saturation units. Zero means dead neutral; larger numbers indicate a more pronounced color cast. This is the color cast that is removed by the color balance tool. Note that these numbers are always with respect to a neutral with equal red, green and blue values. If you have Page 2 of 3
34 09/18/ :54 PM used the Color Balance Preferences button to define a custom target neutral, it does not affect these values. If you click something non-neutral by mistake, click the Undo button. To undo all of the color balance edits, click the color balance Reset button, which is found inside the lower right corner of the tool panel. After resetting the color balance tool, you can click the color balance SmartColor button to redo the automatic color balance correction. You will probably find the Neutrals method of color balancing to be easier, faster and more accurate than the Sliders method. In fact, the Neutrals method can accurately color balance an image literally in seconds, once you get the hang of it. PictoColor Corporation 151 West Burnsville Parkway Suite 200 Burnsville, MN USA Copyright PictoColor Corporation. All Rights Reserved. Support Contact Us FAQ Site: Top of Page Page 3 of 3
, or if you wish to introduce a certain color cast to")
35 09/18/ :55 PM 4b. Color Balance Tool: Using Sliders If you need to edit an image that doesn't contain any colors that should be neutral (a rather unlikely scenario), or if you wish to introduce a certain color cast to your image, you will need to use the Sliders method of color balancing. Three sliders are used to control the color balance: cyan/red, magenta/green, and yellow/blue. The sliders are initialized to zero, which leaves the original unchanged. Note that the SmartColor color balance can only be applied in Neutrals mode. Move the first slider to the left to increase cyan, or to the right to increase red. (Since adding red is the same as removing cyan, it is impossible to control red and cyan independently; likewise for magenta/green and yellow/blue.) As you adjust a slider you will see the effect in the Preview image. Based on the appearance, make further adjustments as necessary. Here we have introduced a cast into the image: If you find that the sliders do not respond quickly enough, you can change their behavior using the Preview Live Sliders checkbox which is described in the Preferences section of this User Guide. When you are happy with the slider settings, do not return to the Neutrals method of color balancing. If you do, your color balance slider settings will be undone. Page 1 of 2
36 09/18/ :55 PM PictoColor Corporation 151 West Burnsville Parkway Suite 200 Burnsville, MN USA Copyright PictoColor Corporation. All Rights Reserved. Support Contact Us FAQ Site: Top of Page Page 2 of 2
37 09/18/ :55 PM 5. Black Point / White Point Tool The next color edit tool is used to set the black, white and gray points which define the lightness range of the image: You will use this tool to indicate the values that you want to be perfect black and perfect white. Usually, but not always, this will involve pushing the dark tones in your image down to darker values and pulling the light tones up to lighter values. When the black or white point is changed, the gray point will automatically change too, so that the distribution of tones between black and white doesn't change. If you want to change the distribution of tones, you can change the gray point, making midtones either lighter or darker. The Black / White Point panel shows a histogram of the tones found in the color balanced image. This histogram may be helpful in deciding what the best black, white and gray points might be. There are three ways of specifying the black, white and gray points. These methods may be used in any combination. SmartColor Button This will automatically find good settings in most cases. Dragging the Handles You may also drag the triangular black, white and gray point handles to specific values. Selecting From the Image You may select your black, white and gray points directly from your image. PictoColor Corporation 151 West Burnsville Parkway Suite 200 Burnsville, MN USA Copyright PictoColor Corporation. All Rights Reserved. Support Contact Us FAQ Site: Top of Page Page 1 of 1
38 09/18/ :55 PM 5a. Black Point / White Point Tool: SmartColor Button If you click the SmartColor button, the histogram handles will automatically be set to values that seem appropriate for the image. This will produce good results in most cases, and is quick and easy to do. If the master SmartColor Mode checkbox is checked, this will already have been done. (Note that the SmartColor Preferences settings control whether SmartColor will set the black, gray and white points.) PictoColor Corporation 151 West Burnsville Parkway Suite 200 Burnsville, MN USA Copyright PictoColor Corporation. All Rights Reserved. Support Contact Us FAQ Site: Top of Page Page 1 of 1


39 09/18/ :56 PM 5b. Black Point / White Point Tool: Dragging the Handles The histogram handles may be dragged to any value. Setting the black point below 0% will lighten the blacks. Setting it to greater than 0% will darken the blacks. Similarly, the white point handle may be set to greater than or less than 100% to darken or lighten the whites. Show Clipping: If you hold the Option key down while you drag the black or white point handle, the preview will be displayed in a special mode that shows any clipping that will occur in the highlights and shadows. As you move the black or white point handles, the gray point handle will move as well, remaining at the same position relative to the black and white points. This is because the gray point specifies the brightness of midtones with respect to the black and white points. To leave the range of shadows and highlights unchanged, the gray Page 1 of 2
40 09/18/ :56 PM point handle must remain halfway between the black and white point handles. If your image needs midtone correction, moving the gray point handle closer to the black point will lighten midtones, expanding the shadow range and compressing the highlight range. Moving the gray point handle closer to the white point will darken midtones, expanding the highlight range and compressing the shadow range. PictoColor Corporation 151 West Burnsville Parkway Suite 200 Burnsville, MN USA Copyright PictoColor Corporation. All Rights Reserved. Support Contact Us FAQ Site: Top of Page Page 2 of 2

41 09/18/ :56 PM 5c. Black Point / White Point Tool: Selecting From the Image You may also select the black, white and/or gray point directly from an image by pointing and clicking. EditLab will automatically determine if the color you mark is to be the black, white or gray point, by seeing if it is a dark, light or midtone color. The cursor appearance indicates which it is: Clicking the Reset button within the edit tool panel will set the black point to zero, the gray point to 50 and the white point to 100 (the values that cause the lightness range to remain unchanged). Note that if the master SmartColor Mode checkbox is enabled, whenever the black, white or gray point is changed, the controls in the Brightness/Contrast/Saturation and Hue Selective tool panels will be automatically recomputed based on an analysis of the newly corrected image. Page 1 of 2
42 09/18/ :56 PM PictoColor Corporation 151 West Burnsville Parkway Suite 200 Burnsville, MN USA Copyright PictoColor Corporation. All Rights Reserved. Support Contact Us FAQ Site: Top of Page Page 2 of 2

43 09/18/ :10 PM 6. Brightness / Contrast / Saturation Tool Next in line is the Brightness/Contrast/Saturation tool. The Global Brightness and Contrast sliders may be used to redistribute the tones between the selected black and white points. The Shadows slider allows you to brighten or darken the shadows without affecting highlights, while the Highlights slider allows you to brighten or darken the highlights without affecting shadows. The Saturation slider may be used to increase or decrease the saturation of all non-neutral colors. The sliders are simple to use. You just make a judgement call as to whether you want more or less brightness, contrast and/or saturation. Adjust the sliders to the right for more, or to the left for less, as illustrated below: Brightness Contrast Saturation Page 1 of 4

44 09/18/ :10 PM Page 2 of 4


45 09/18/ :10 PM As you adjust a slider you will see the effect in the Preview image. Based on the appearance, make further adjustments as necessary. If you find that the sliders do not respond quickly enough, you can change their behavior using the Preview Live Sliders checkbox which is described in the Preferences section of this User Guide. Clicking the SmartColor button will automatically determine settings for the Global Brightness and Saturation sliders. (There is no automatic shadow, highlight or contrast correction.) If the master SmartColor Mode checkbox is checked, this will already have been done for you, providing a good starting point for further adjustments, if necessary. (Note that the SmartColor Preferences settings control whether SmartColor will affect these settings.) The SmartColor Brightness uses a center-weighted metering system, much like you might find on a good 35mm SLR camera. The SmartColor Saturation aims to achieve the saturation level you have set as the Preferred Saturation in the preferences window. See the Preferences section of this User Guide if you wish to change this aim value. If you click the small arrow to the left of the Brightness and Contrast sliders, you will see a small graph indicating the shape of the curve produced by the combined brightness and contrast settings: Page 3 of 4
46 09/18/ :10 PM This feature will only be available if you have enabled the Show Brightness/Contrast Curve Control checkbox in the preferences window. This graph is for viewing purposes only. You cannot use it to manipulate the curve shape. Click the arrow a second time to remove the graph. Note that if the master SmartColor Mode checkbox is checked, adjusting any slider causes each of the subsequent controls in this panel, as well as those in the Hue Selective tool panel to be automatically recomputed, based on an analysis of the newly corrected image. Clicking the Reset button will remove all brightness, contrast and saturation edits. PictoColor Corporation 151 West Burnsville Parkway Suite 200 Burnsville, MN USA Copyright PictoColor Corporation. All Rights Reserved. Support Contact Us FAQ Site: Top of Page Page 4 of 4


47 09/18/ :57 PM 7. Hue Selective Edit Tool The final editing tool allows color adjustments to be made on a hue selective basis. This means that hue, saturation and brightness changes may be made to certain hues without affecting other hues or the grayscale. A hue ring is used to select hues and also to specify hue changes. Sliders are used to alter brightness and saturation of the selected hue. Memory color buttons are used to automatically set hue, brightness and saturation values for built-in colors (Skin, Foliage, Blue sky) or user defined colors. The hue ring has six pairs of handles. We will refer to the handles on the inside of the ring as Before handles, and the handles on the outside of the ring as After handles. The handles behave like radio button controls, in that only one pair of handles is active at a time. The active pair of handles is designated by a black dot on the active Before handle. The hue values that are displayed at the center of the hue wheel correspond to the active Before and After handles. Page 1 of 2

48 09/18/ :57 PM Hue values are specified as angles between 0 and 359 degrees, where 0 is red. As the angle increases counter clockwise, the hue changes gradually to yellow, then green, cyan, blue, magenta and back to red: The location of the hue handles determines the range of hues affected by each hue edit. You may position these handles wherever you wish. Then for each pair of hue handles, you may adjust the hue, brightness and saturation. The adjustment for any given hue handle will have its strongest effect at the hue handle and its effect will fall off to zero by the time it reaches the handles of its immediate neighbors on either side. Setting the "Before" Handles Editing the Active Hue Using the Built-in Memory Colors Hue handles serve two purposes: identifying hues you wish to edit, and becoming "fences" to limit the range of hue edits. You may adjust the hue, brightness and saturation of the active hue. EditLab has built-in corrections for skin, foliage and sky. You may also customize these special colors, or add some of your own. Toning Toning applies a global cast for effects like sepia tone. It can be used in combination with hue selective edits for special effects. PictoColor Corporation 151 West Burnsville Parkway Suite 200 Burnsville, MN USA Copyright PictoColor Corporation. All Rights Reserved. Support Contact Us FAQ Site: Top of Page Page 2 of 2

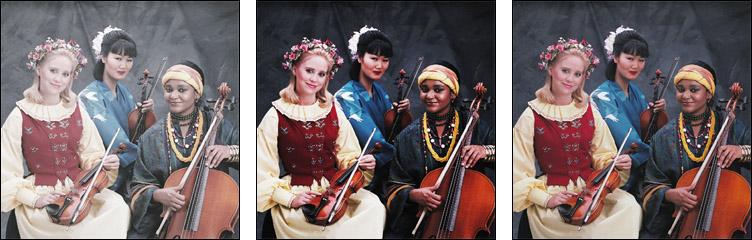
49 09/18/ :57 PM 7a. Hue Selective Edit Tool: Setting the "Before" Handles The first thing you should do is position the Before hue handles. You may want to set handles at specific hues you want to edit. You may also want to set handles as "fences" to limit the range of effect of a neighboring hue edit. There are three ways of setting Before hue handles. The SmartColor button may be used to quickly set all six handles to the most prominent hues in the image. If there are fewer than six such hues present, any remaining handles will be placed in large gaps, to limit the range of influence of any given handle. This will already have been done if the master SmartColor Mode checkbox is checked. For our sample image, four handles have been positioned to correspond with hues in the image: the yellow blouse and red vest of the first musician, the blue robe of the center musician, and the instruments. The remaining two handles have been positioned midway between handles to serve as fences. The second way of setting a Before handle is to drag it to the desired location. To position a handle that isn't already active, activate it first by clicking on its Before handle. Then click again to drag it to a new position. The third way of setting a Before handle is simply to click on something in the image. You may notice that as you move the cursor over the image, a small line is continually drawn on the hue ring showing the hue of the pixel you are pointing at. (This line is not drawn if you are pointing at a color that is near neutral because hue becomes undefined as you approach the neutral colors.) Page 1 of 2

50 09/18/ :57 PM When you click on the image, the hue of the color you are pointing to is calculated and the Before handle closest to it on the hue wheel is activated and moved to this position. You may notice that the Before hue that is calculated does not necessarily exactly match the hue of the pixel that you clicked on. This is because every time you click on the picture, an entire region of adjacent similar pixels are used to determine the hue for the handle (similar to the way that adjacent pixels contribute to Neutral clicks, as described in the Color Balance section of this user guide). Note that setting the Before hue handles does absolutely nothing towards changing any colors (unless an edit has already been applied to this hue handle or either of its immediate neighbors the topic of the next section). By setting these handles, you are indicating which hues are of interest for hue selective editing hues that you wish to alter as well as hues you wish to remain fixed. PictoColor Corporation 151 West Burnsville Parkway Suite 200 Burnsville, MN USA Copyright PictoColor Corporation. All Rights Reserved. Support Contact Us FAQ Site: Top of Page Page 2 of 2

51 09/18/ :01 PM 7b. Hue Selective Edit Tool: Editing the Active Hue To change the hue of colors in the image, activate the pair of handles that is closest to the hue of the colors that you want to change. The easiest way to do this is by clicking on that color in the image, but you can also do this by clicking on the Before or After handle. The hue can then be modified by dragging its After handle on the hue ring. As you drag the handle, the new hue angle is displayed numerically inside the hue ring, next to the Before hue, and the preview image is updated. The brightness and saturation of colors within the active hue range may also be altered. This is done by moving the sliders. As you move the saturation slider to the right of zero, you will increase the saturation. Moving to the left will decrease it. Moving all the way to the left will completely drain all color from the hue range. Brightness can also be modified in a similar fashion. Moving the brightness slider to the right lightens a color, while moving it to the left darkens it. These adjustments have their maximum effect at the active hue, and drop off to nothing at the neighboring hue handles as well as at the neutral axis. This means that no matter what you do with the hue selective edit tool, you Page 1 of 2

52 09/18/ :01 PM will not affect the grayscale. If you find that the handles are sluggish and do not respond quickly enough, you can change their behavior using the Preview Live Sliders checkbox which is described in the Preferences section of this User Guide. Here is our example, showing the effects of making the robe of the center musician a little more purple, more saturated and darker: Notice that other hues in the image are not affected, such as the red vest and the yellow blouse. The neutral balance of the background is also preserved. PictoColor Corporation 151 West Burnsville Parkway Suite 200 Burnsville, MN USA Copyright PictoColor Corporation. All Rights Reserved. Support Contact Us FAQ Site: Top of Page Page 2 of 2

53 09/18/ :01 PM 7c. Hue Selective Edit Tool: Using the Built-in Memory Colors EditLab has six user defined memory colors, referenced via the six small buttons at the upper right of the tool panel: Each memory color has several attributes associated with it: A name, for example "Skin". A single-character button label, for example S. A color definition. EditLab installs with three predefined memory colors: Skin, Foliage and Blue sky. The remaining three are undefined. You may remove or modify the predefined colors at any time. (Don't worry, you can restore these default definitions if you change your mind later.) By moving the cursor over the buttons (without clicking), you can see the full name of the memory color along with a swatch of its color definition: Page 1 of 4

54 09/18/ :01 PM Using the Memory Color Definitions If your image contains objects whose color corresponds with one of your memory color definitions, EditLab can adjust the color so that it more closely matches the definition. This is done by first clicking on one or more samples of the color in your image, and then clicking on the proper memory color button. EditLab will adjust the hue (the "After" handle), brightness and saturation in such a way that brings the color as close as possible to the definition. Note that you can customize this behavior of the Memory Color buttons, much as you can customize SmartColor operation, using the SmartColor Preferences. For example, it is possible to specify that the memory color buttons will adjust the hue and brightness, leaving the saturation unchanged. The memory color buttons will not be active unless you have clicked on a color in the image that corresponds to the active hue handle. When you have selected a color from the image, a correction can be determined based on the current color and the built-in correct color definition. As with all of the other automatic settings, if you aren't happy with the result, you can always fine tune the settings with the handles and sliders. So to use the memory color feature to correct skin tones, simply click on a few skin tones in the image and then click the S button. That's it. This will automatically set the After hue handle and the Brightness and Saturation sliders (assuming all three are enabled in the SmartColor Preferences) to values that produce the correct skin tone color. Page 2 of 4

55 09/18/ :01 PM As you click on areas in your image, you should try to mark on relatively large areas of representative color. For example, when marking skin tones it is better to mark on a smooth section of a forehead, neck or chin than on a highly made up cheekbone, a bright highlight resulting from a flash, or a small area between the eyes. You may also find that by zooming and scrolling, more precise color selection is possible, especially on small or thin objects. Clicking the Reset button within the tool panel will remove all hue selective edits, and evenly distribute the hue handles around the hue ring. Customizing the Memory Color Definitions Clicking a memory color button while holding down the Option key opens a dialog allowing you to edit the attributes of the color: This is the means by which memory color definitions are added and modified, as described here. Modifying a Memory Color Definition If you find that you consistently need to make the same type of adjustment after using a memory color, you may want to customize EditLab's understanding of what the color should be. For example, if you prefer skin tones to be a bit more saturated than EditLab produces, you may alter the definition so that EditLab will produce more saturated skin tones next time. Here is how you do this. 1. Click on one or more skin tones in the image. 2. Set the hue (using the "After" handle), brightness and saturation to values that produce the skin tone that you prefer. 3. Click the S button while holding down the Option key. 4. Click the Set from Hue Handle button to replace the definition with the new one. 5. Click OK. Creating a New Memory Color Definition Page 3 of 4
56 09/18/ :01 PM A new memory color definition may be made in a similar fashion: 1. Click on one or more color samples in the image. 2. Set the brightness and saturation sliders, and the hue handle to values that produce the color you want. 3. Click an undefined button while holding down the Option key. 4. Click the Set from Hue Handle button to establish the color definition. 5. Provide a Name (up to 20-characters) and a single-character button Label. 6. Click OK. Saving and Loading Memory Color Definitions You may save a memory color definition into an external file by clicking the Save button. This may be useful if you accumulate more than six definitions, which is the limit that may be used in EditLab at any one time. Similarly, memory color definitions may be loaded from an external file by clicking the Load button. This will replace the current color definition (if any) with the definition found in the file. This is the way that you can restore the factory default memory color definitions for skin, foliage and blue sky (these external files are provided by the EditLab installer). Removing Memory Color Definitions Click the Clear button to remove the memory color definition. PictoColor Corporation 151 West Burnsville Parkway Suite 200 Burnsville, MN USA Copyright PictoColor Corporation. All Rights Reserved. Support Contact Us FAQ Site: Top of Page Page 4 of 4


57 09/18/ :02 PM 7d. Hue Selective Edit Tool: Toning Toning refers to the process of adding color to a black and white photograph. The Toning checkbox behaves differently than the other controls in the hue selective tool panel, in that it adds color globally and its effect is most noticeable in neutral colors. Toning is included with the hue selective tools, because these tools can be powerful when used in combination. To use toning in the customary way, you would first desaturate every hue handle, and then check the Toning checkbox and select a toning color. EditLab's color selection window will be displayed, allowing you to choose a color, and the preview image will be updated as you experiment with different selections. At this point, although the original color has been removed from the image, you can still perform hue selective edits based on the original hues. So, for example, you can adjust the lightness levels of different hue handles to achieve better distinction between similar areas in the image. Depending on the distribution of hues in the image, you may also be able to achieve special effects, by increasing the saturation of some hues and not others, as seen in these examples: Page 1 of 3

58 09/18/ :02 PM The original image is on the left. The second image is the result of desaturating each hue and adding a sepia tone. In the third image, the blue hue handle was brightened and the green one was darkened, resulting in better discrimination between the tones in the sweater. For the fourth image, the saturation of the blue, green and yellow handles was increased. Auto Black and White Conversion: If you click the B/W button, it will quickly set every hue to minimum saturation. Auto Sepia Tone: If you click the Sepia button, it will set every hue to minimum saturation, and set the toning color to a standard sepia tone. These buttons are shortcuts that set multiple controls for you. You can then fine tune any of the settings. You can also customize the meaning of these buttons. If you hold down the Option key when you click the B/W button, EditLab's color selection window will be displayed, allowing you to associate a toning color with the B/W button. So, for example, if you prefer a warmer grayscale, you can select a reddish tone, and then the next time you use the B/W button, a reddish tone will be applied after the conversion to grayscale. If you hold down the Option key when you click the Sepia button, you can select a different toning color to associate with the Sepia button. Selecting a Color The same window is used to select colors for several purposes in EditLab: selecting a tone color, customizing the Sepia and B/W buttons, and selecting a neutral preference. In each of these cases, the color is used across the lightness range of the image, so the current color selection is displayed as a gradient. Page 2 of 3

59 09/18/ :02 PM You can use the three sliders to add or subtract red, green and/or blue from the current color selection. If you click the Color Picker button, you can use a standard color picker to choose a color. You may save a color definition into an external file by clicking the Save button. Similarly, color definitions may be loaded from an external file by clicking the Load button. This will replace the current color definition with the definition found in the file. Clicking the Restore Defaults button will restore the factory default value for the current color, that is, the values that were present when EditLab was first installed. Click the OK button to save the new color, or Cancel to return to the main EditLab window without change. PictoColor Corporation 151 West Burnsville Parkway Suite 200 Burnsville, MN USA Copyright PictoColor Corporation. All Rights Reserved. Support Contact Us FAQ Site: Top of Page Page 3 of 3
60 09/18/ :02 PM 8. Sharpening and Noise Removal icorrect EditLab Pro includes two image processing tools that go beyond color correction: sharpening and noise removal. Note that these tools are only available when EditLab is set up to edit images. ICC profiles and ColorCircuits are used strictly for color transformations, so sharpening and noise removal are not applicable. With EditLab, you can apply sharpening and noise removal in combination with color correction. This is especially helpful in cases where noise in an image is exaggerated by a color transformation. Noise is commonly introduced into images by digital cameras and scanners during the digitization process. Applying a color correction to remove color distortions typically "stretches" the color space, which tends to make any noise even more noticeable. Check the Sharpen checkbox to apply unsharp masking to the image. Check the Remove Noise checkbox to apply an adaptive noise removal filter to the image. Note that the preview image cannot display the effects of sharpening and noise removal unless you are zoomed in because unlike color corrections, these effects depend on the resolution of the image. You must also have checked the Preview Sharpening and/or Preview Noise Removal checkboxes in the Preferences window. This kind of image processing may cause a noticeable delay in updating the preview. If you find it objectionable, uncheck those preferences and use the Sharpen / Noise Removal setup window to preview these effects. Click the Setup... button to open the Sharpen / Remove Noise setup window, from which you can set parameters that control the strength of these effects: Page 1 of 4

61 09/18/ :02 PM The sharpen controls are displayed only when the Sharpen checkbox in the main window has been checked, and the noise removal controls are displayed only when the Remove Noise checkbox in the main window has been checked. Since sharpening can also make noise more pronounced, if you will be applying both effects, it is usually beneficial to set them up and preview them together. The image in the upper right is a thumbnail of your complete image and is used for navigation purposes. The marquee you see on it represents that portion of the image which appears in the view to the left. You may drag the marquee to pan around the image. The image on the left is a close-up view of a smaller portion of the full image, displayed after noise removal, color correction and sharpening. You may zoom the image by clicking the + and - buttons. You may pan around the image by using the mouse to drag other portions of the image into view. Note that as you are panning around the image, it is displayed without noise removal and sharpening until you release the mouse button. Similarly, as you adjust the slider controls, the image is not updated until you release the mouse button. The Sharpen Strength slider value can range from 1 (very weak) to 24 (very strong). Page 2 of 4


62 09/18/ :02 PM The noise removal controls are grouped as Red Chrominance and Blue Chrominance. The effect of the red chrominance controls is seen primarily in the red channel of the image, although it does have some small influence in green and blue. Similarly, the blue chrominance controls affect the blue channel most strongly, but also change red and green by smaller amounts. Properly set up, these controls can do wonders towards removing unwanted noise without destroying fine image detail. Improperly set up, they can ruin your image. Therefore, it is important that you take the time to carefully set these parameters. Our experience to date has shown that once the proper settings have been found for an image from a given camera or scanner, these settings will work for other images that come from that specific device. In other words, you should not need to adjust these parameters on an image-by-image basis. With experience, you will develop your own techniques for setting these controls, but here is one method that seems to work well. Start by setting all four sliders to their maximum values. These maximum settings will probably result in problem areas in your image, such as corners being "rounded off", and loss of other color detail. This can be seen in the neckline in the image on the left: Explore your image, looking for such problems. Then reduce the parameter values until the problems just disappear. Adjust the blue chrominance values first, followed by red chrominance. As a general rule, you should use the largest threshold and radius that does not change the overall tone of any region. The goal is to remove the noise without changing the overall tone. We have found that "typical" values (if there are such things) are radius of 4 to 8 and threshold of around 16. Clicking the Restore Defaults button will set all the controls in the window to the factory default values, that is, the values that were present when EditLab was first installed. Click the OK button to save the new settings, or Cancel to return to the main EditLab window without changing Page 3 of 4
63 09/18/ :02 PM them. PictoColor Corporation 151 West Burnsville Parkway Suite 200 Burnsville, MN USA Copyright PictoColor Corporation. All Rights Reserved. Support Contact Us FAQ Site: Top of Page Page 4 of 4

64 09/18/ :02 PM 9. Using the Edit The previous chapters have taught the skills for creating a color correction function. Now it is time to use that function. There are four choices available, each of which will be discussed on the pages that follow: Editing the Image The edit is used to color correct the current image only. Editing a Profile The edit is used to edit an existing ICC input profile. Creating a Profile The edit is used to create an ICC input profile. Creating a ColorCircuit The edit is used to create a ColorCircuit for use with ColorCircuitQ. The choice among these four is made using the Preferences. Shortcut Tip: In EditLab's main window, you can cycle through the four modes by holding down the Option key while clicking the button in the lower right corner. Shortcut Tip: In EditLab's main window, if you hold down the Control key while clicking the "Edit Profile ", "Create Profile " or "Create ColorCircuit " button (but not the "Edit Image" button), control will return to EditLab afterwards. This allows you to "use" the same edit in more than one way, if you want. Select the desired mode before proceeding. Each of the following pages will assume the EditLab has been placed into that mode. Page 1 of 2
65 09/18/ :02 PM PictoColor Corporation 151 West Burnsville Parkway Suite 200 Burnsville, MN USA Copyright PictoColor Corporation. All Rights Reserved. Support Contact Us FAQ Site: Top of Page Page 2 of 2
66 09/18/ :03 PM 9a. Using the Edit: Editing the Image Applying the color edit to the current image is as easy as clicking the "Edit Image" button. This will cause the original image to be processed, and EditLab's window will close. Important Note: In order for EditLab to work properly, the image must be in the current RGB working space. Using an assigned profile instead of the working space will not work! If your image has an embedded profile, you should first convert to the working space before using EditLab. PictoColor Corporation 151 West Burnsville Parkway Suite 200 Burnsville, MN USA Copyright PictoColor Corporation. All Rights Reserved. Support Contact Us FAQ Site: Top of Page Page 1 of 1
67 09/18/ :03 PM 9b. Using the Edit: Editing a Profile When using EditLab as a profile editor, you must be a little careful how things are handled, both before and after using EditLab. Here is a step-by-step procedure. 1. Open your image in Photoshop The image that you use should come from the source associated with the profile you intend to edit. For example, if you are going to edit a digital camera profile, the image should be from that same camera, shot under the same conditions for which the profile is valid. When the image is opened, you must assign the profile and then convert to your RGB working space. If you are not sure how to do this, you will find detailed instructions here. It is very important that this process is done properly! 2. Run EditLab Use EditLab to make whatever changes you like. You may wish to enter a name in the "ICC Name" field. A General Note on Profile Naming: When an application displays the "name" of an ICC profile (for example, in a pop-up menu of profiles), it often uses the profile's Profile Description Tag, which is a description found inside the profile file. This means that the file name given to the ICC profile might not be used an observation that may surprise you. Therefore, if you rename the ICC profile file at a later time, you may not see that change reflected in applications which use the internal Profile Description Tag instead. You are given the opportunity in EditLab to enter whatever text you want for the internal Profile Description Tag: Anything you type in this field will be placed into the Profile Description Tag inside the ICC profile. If you leave this field blank, EditLab will automatically insert the name you give to the ICC profile (without its extension). Click the "Edit Profile " button. 3. Open the ICC Profile Page 1 of 3

68 09/18/ :03 PM You will be asked to locate the profile to which you want the edit applied. You should select the same profile that was assigned to the image in step 1 above. Note that EditLab can only edit input profiles, such as used with scanners or digital cameras. 4. Save the Edited ICC Profile You will then be asked to provide a name and location for the edited profile. You may overwrite the original profile if you want, but we recommend that you save it under a new name. Page 2 of 3

69 09/18/ :03 PM Note about overwriting the original profile: If you have left the "ICC Name" field empty, then the Profile Description Tag of the original profile is left unchanged. If you have entered something into this field, it is used as the Profile Description Tag, replacing whatever was in the original profile. 5. Using the Edited ICC Profile You use the edited profile by assigning it to images in the same way that was used in step 1. If you want to use it with the image that is currently open (which was used with EditLab to create the edit), you must first close the image (without saving) and then reopen it as described in step 1, but this time assign the edited profile. PictoColor Corporation 151 West Burnsville Parkway Suite 200 Burnsville, MN USA Copyright PictoColor Corporation. All Rights Reserved. Support Contact Us FAQ Site: Top of Page Page 3 of 3
70 09/18/ :03 PM 9c. Using the Edit: Creating a Profile When using EditLab to create an ICC profile, you are actually saving the color correction function into an ICC input profile in such a way that when the profile is assigned to an image, the same correction occurs. As we have just learned with profile editing, one must be careful when working with ICC profiles in general. Here is a stepby-step procedure for saving an edit as an ICC profile: 1. Open your image in Photoshop In order for EditLab to work properly for creating profiles, the image must be in the current RGB working space. Using an assigned profile instead of the working space will not work! If your image has an embedded profile, you should first convert to the working space before using EditLab. 2. Run EditLab Use EditLab to make whatever changes you like. You may wish to enter a name in the "ICC Name" field. A General Note on Profile Naming: When an application displays the "name" of an ICC profile (for example, in a pop-up menu of profiles), it often uses the profile's Profile Description Tag, which is a description found inside the profile file. This means that the file name given to the ICC profile might not be used an observation that may surprise you. Therefore, if you rename the ICC profile file at a later time, you may not see that change reflected in applications which use the internal Profile Description Tag instead. You are given the opportunity in EditLab to enter whatever text you want for the internal Profile Description Tag: Anything you type in this field will be placed into the Profile Description Tag inside the ICC profile. If you leave this field blank, EditLab will automatically insert the name you give to the ICC profile (without its extension). Click the "Create Profile " button. 3. Save the Edit as an ICC Profile Page 1 of 2

71 09/18/ :03 PM You will be asked to provide a name and location for the profile. 4. Using the ICC Profile You use the profile by assigning it to images when you open them in Photoshop. PictoColor Corporation 151 West Burnsville Parkway Suite 200 Burnsville, MN USA Copyright PictoColor Corporation. All Rights Reserved. Support Contact Us FAQ Site: Top of Page Page 2 of 2

72 09/18/ :03 PM 9d. Using the Edit: Creating a ColorCircuit Saving the color edit as a ColorCircuit allows you to use it for processing large numbers of other image through the exact same color transformation. This can be a real time saver if you have many images that suffer from the same color problem. The ColorCircuit file is a data file containing a fixed color conversion. It may be used with Pictographics' ColorCircuitQ program for batch processing. For use on Windows, the ColorCircuit file name must have a ".cc" file name extension (this extension is automatically given to ColorCircuit files made with the Windows version of EditLab). On the Macintosh there are no file naming restrictions, but the file type signature must be 'CLci' (this signature is automatically given to ColorCircuit files made with the Macintosh version of EditLab). Page 1 of 2
73 09/18/ :03 PM PictoColor Corporation 151 West Burnsville Parkway Suite 200 Burnsville, MN USA Copyright PictoColor Corporation. All Rights Reserved. Support Contact Us FAQ Site: Top of Page Page 2 of 2

74 09/18/ :04 PM 10. Automating EditLab When combined with Photoshop Actions, EditLab may be used in very productive workflows. Photoshop's Batch and Droplets both build upon the concept of the Action, so we will look more closely at the processes of recording and playing Actions. Recording EditLab Into An Action 1. Create a New Action Select New Action from the Actions palette menu (or use the icon indicated by the red arrow): 2. Start Recording Give your action a name and click the Record button. Page 1 of 4


75 09/18/ :04 PM 3. Run EditLab Run the EditLab plug-in, performing whatever correction you want. 4. Stop Recording Stop recording the action by selecting "Stop Recording" from the Action palette menu: Playing An EditLab Action 1. Set the Desired Modal Control Enable or disable the modal control for the action. When enabled, EditLab's window will appear when the action is run, causing it to pause for user interaction. When disabled, EditLab will run without a window and without pausing. Page 2 of 4


76 09/18/ :04 PM 2. Play the Action Select "Play" from the Action palette menu: Note: The behavior of EditLab depends upon the RGB working space selection. If you play an EditLab action when the current working space is different from the working space that was in effect when the action was recorded, then the color correction behavior will be different. In such cases where the behavior may be different because of a working space change, EditLab will issue a warning, allowing you to decide if you want to proceed or not: Page 3 of 4

77 09/18/ :04 PM How EditLab Behaves When Played As An Action All of EditLab's settings and preferences are recorded into the action. When the action is played back, all of this recorded information is used by EditLab, causing EditLab's current settings and preferences to be overwritten. So playing a recorded action may also change your preferences. If you leave your "Start With" preference set to "SmartColor" when the action is recorded, then each time you play back the action, the image is intelligently analyzed and the color correction is adapted to the content of the image. This means that each image will likely get a different color correction from the same recorded action. If you leave your "Start With" preference set to "Previous Settings" when the action is recorded, then the same, fixed color correction will be applied to every image. Similarly, if you leave your "Start With" preference set to "Custom Settings" when the action is recorded, then that fixed color correction will be applied to every image. In these modes, EditLab is not adaptive, and therefore the color correction does not depend on the color content of the images. When run as an action, EditLab always runs in "Edit Image" mode, regardless of how you set the mode. PictoColor Corporation 151 West Burnsville Parkway Suite 200 Burnsville, MN USA Copyright PictoColor Corporation. All Rights Reserved. Support Contact Us FAQ Site: Top of Page Page 4 of 4
Color and More. Color basics
 Color and More In this lesson, you'll evaluate an image in terms of its overall tonal range (lightness, darkness, and contrast), its overall balance of color, and its overall appearance for areas that
Guidance on Using Scanning Software: Part 5. Epson Scan
 Guidance on Using Scanning Software: Part 5. Epson Scan Version of 4/29/2012 Epson Scan comes with Epson scanners and has simple manual adjustments, but requires vigilance to control the default settings
ScanGear CS-U 5.3 for CanoScan FB630U/FB636U Color Image Scanner User s Guide
 ScanGear CS-U 5.3 for CanoScan FB630U/FB636U Color Image Scanner User s Guide Copyright Notice 1999 Canon Inc. This manual is copyrighted with all rights reserved. Under the copyright laws, this manual
Reference Manual Version 1.1
 Reference Manual Version 1.1 Copyright 2001-2002, Digital Light & Color All Rights Reserved Introduction Color Mechanic is a selective color correction plug-in for Photoshop from Digital Light & Color.
Select your Image in Bridge. Make sure you are opening the RAW version of your image file!
 CO 3403: Photographic Communication Steps for Non-Destructive Image Adjustments in Photoshop Use the application Bridge to preview your images and open your files with Camera Raw Review the information
Using Adobe Photoshop
 Using Adobe Photoshop 4 Colour is important in most art forms. For example, a painter needs to know how to select and mix colours to produce the right tones in a picture. A Photographer needs to understand
MY ASTROPHOTOGRAPHY WORKFLOW Scott J. Davis June 21, 2012
 Table of Contents Image Acquisition Types 2 Image Acquisition Exposure 3 Image Acquisition Some Extra Notes 4 Stacking Setup 5 Stacking 7 Preparing for Post Processing 8 Preparing your Photoshop File 9
Camera Raw software is included as a plug-in with Adobe Photoshop and also adds some functions to Adobe Bridge.
 Editing Images in Camera RAW Camera Raw software is included as a plug-in with Adobe Photoshop and also adds some functions to Adobe Bridge. Camera Raw gives each of these applications the ability to import
A Basic Guide to Photoshop Adjustment Layers
 A Basic Guide to Photoshop Adjustment Layers Photoshop has a Panel named Adjustments, based on the Adjustment Layers of previous versions. These adjustments can be used for non-destructive editing, can
ScanGear CS-U 5.6. for CanoScan FB1210U Color Scanner. User s Guide
 ScanGear CS-U 5.6 for CanoScan FB1210U Color Scanner User s Guide Copyright Notice Copyright 2000 Canon Inc. This manual is copyrighted with all rights reserved. Under the copyright laws, this manual may
Color Correction and Enhancement
 10 Approach to Color Correction 151 Color Correction and Enhancement The primary purpose of Photoshop is to act as a digital darkroom where images can be corrected, enhanced, and refined. How do you know
A Basic Guide to Photoshop CS Adjustment Layers
 A Basic Guide to Photoshop CS Adjustment Layers Alvaro Guzman Photoshop CS4 has a new Panel named Adjustments, based on the Adjustment Layers of previous versions. These adjustments can be used for non-destructive
Black and White using Photoshop
 Topics to be covered: Methods for B&W conversion Improving the image Toning Printer color management Black and White using Photoshop Various ways to get to B&W Adobe Raw Converter (ACR) in from Bridge
User s Guide. Windows Lucis Pro Plug-in for Photoshop and Photoshop Elements
 User s Guide Windows Lucis Pro 6.1.1 Plug-in for Photoshop and Photoshop Elements The information contained in this manual is subject to change without notice. Microtechnics shall not be liable for errors
Contents. Nikon Scan for Windows. Scanner Control Software and TWAIN Source. Reference Manual. Overview Before You Begin.
 Contents Overview Before You Begin System Requirements Software Installation Basic Operations Scanner Control Software and TWAIN Source Nikon Scan for Windows Reference Manual The Scan Window Opening the
Monaco ColorWorks User Guide
 Monaco ColorWorks User Guide Monaco ColorWorks User Guide Printed in the U.S.A. 2003 Monaco Systems, Inc. All rights reserved. This document contains proprietary information of Monaco Systems, Inc. No
Adobe Photoshop Chapter 5 Study Questions /50 Total Points
 Name: Class: Date: Adobe Photoshop Chapter 5 Study Questions /50 Total Points True/False Indicate whether the statement is true or false. 1. Bitmapped images are resolution-independent, maintaining their
Adobe Photoshop PS2, Part 3
 Adobe Photoshop PS2, Part 3 Basic Photo Corrections This guide steps you through the process of acquiring, resizing, and retouching a photo intended for posting on the Web as well as for a print layout.
M a c i n t o s h. Canon Plug-in Module CS-U 3.9 for CanoScan D660U Color Image Scanner. User's Guide
 f o r M a c i n t o s h Canon Plug-in Module CS-U 3.9 for CanoScan D660U Color Image Scanner User's Guide How to Make Best Use of the Manuals When you open the box Printed Manual CanoScan D660U Getting
KODAK DIGITAL ROC Professional Plug-In 2.1
 KODAK DIGITAL ROC Professional Plug-In 2.1 Installing Kodak's DIGITAL ROC Professional Plug-In If you have not downloaded and installed DIGITAL ROC Professional, go to: http://www.asf.com/download/ Download
Color Management User Guide
 Color Management User Guide Edition July 2001 Phase One A/S Roskildevej 39 DK-2000 Frederiksberg Denmark Tel +45 36 46 01 11 Fax +45 36 46 02 22 Phase One U.S. 24 Woodbine Ave Northport, New York 11768
Copyright Notice. Trademarks
 Copyright Notice All rights reserved. No part of this publication may be reproduced, stored in a retrieval system, or transmitted in any form or by any means, electronic, mechanical, photocopying, recording,
INSTRUCTION MANUAL MM-A209
 E INSTRUCTION MANUAL 9222-7300-11 MM-A209 2 BEFORE YOU BEGIN Before installing the DiMAGE Viewer software, read the data-transfer section in the camera manual. This section details how to connect the camera
2. Picture Window Tutorial
 2. Picture Window Tutorial Copyright (c) Ken Deitcher, 1999 Original image Final image To get you started using Picture Window we present two short tutorials. Basic Image Editing This tutorial covers basic
Photoshop CC Editing Images
 Photoshop CC Editing Images Rotate a Canvas A canvas can be rotated 90 degrees Clockwise, 90 degrees Counter Clockwise, or rotated 180 degrees. Navigate to the Image Menu, select Image Rotation and then
ScanGear CS-U 6.0. for CanoScan D646U Color Scanner. User s Guide
 ScanGear CS-U 6.0 for CanoScan D646U Color Scanner User s Guide Copyright Notice Copyright 2000 Canon Inc. This manual is copyrighted with all rights reserved. Under the copyright laws, this manual may
(RGB images only) Ctrl-click (Windows) or Command-click (Mac OS) a pixel in the image.
 Ctrl-click (Windows) or Command-click (Mac OS) a pixel in the image.") PHOTOSHOP TOOLS USING CURVES: To adjust tonality with Curves, do one of the following: Choose Image > Adjustments > Curves. Choose Layer > New Adjustment Layer > Curves. Click OK in the New Layer dialog
PHOTOSHOP TOOLS USING CURVES: To adjust tonality with Curves, do one of the following: Choose Image > Adjustments > Curves. Choose Layer > New Adjustment Layer > Curves. Click OK in the New Layer dialog
Adobe Studio on Adobe Photoshop CS2 Enhance scientific and medical images. 2 Hide the original layer.
 1 Adobe Studio on Adobe Photoshop CS2 Light, shadow and detail interact in wild and mysterious ways in microscopic photography, posing special challenges for the researcher and educator. With Adobe Photoshop
In order to manage and correct color photos, you need to understand a few
 In This Chapter 1 Understanding Color Getting the essentials of managing color Speaking the language of color Mixing three hues into millions of colors Choosing the right color mode for your image Switching
Mullingar Camera Club Basic introduction to Digital Printing using Photoshop CC.
 Mullingar Camera Club Basic introduction to Digital Printing using Photoshop CC. Table of Contents Course aims: 1 Course presentation notes: 1 Introducing Photoshop: 1 Adjusting the Brightness or Contrast
Lightroom System April 2018 Updates
 Lightroom System April 2018 Updates This April Adobe updated Lightroom Classic CC. This included a major update to profiles, making profile looks more prominent. Some essential interface tweaks and also
Adobe Photoshop CS5 Tutorial
 Adobe Photoshop CS5 Tutorial GETTING STARTED Adobe Photoshop CS5 is a popular image editing software that provides a work environment consistent with Adobe Illustrator, Adobe InDesign, Adobe Photoshop
Portrait Professional User Manual
 Portrait Professional User Manual Version 9 Anthropics Technology Ltd www.portraitprofessional.com Contents 3 Table of Contents Part I Getting Started 6 1 Quick Start... Guide 6 2 Top Tips... For Best
5. SilverFast Tools Tools SilverFast Manual. 5. SilverFast Tools Image Auto-Adjust (Auto-Gradation) 114
 114") Chapter 5 Tools 5. SilverFast Tools 5. SilverFast Tools 106 5.1 Image Auto-Adjust (Auto-Gradation) 114 5.2 Highlight / Shadow Tool 123 5.3 The Histogram 133 5.4 Gradation Dialogue 147 5.5 Global Colour
Chapter 5 Tools 5. SilverFast Tools 5. SilverFast Tools 106 5.1 Image Auto-Adjust (Auto-Gradation) 114 5.2 Highlight / Shadow Tool 123 5.3 The Histogram 133 5.4 Gradation Dialogue 147 5.5 Global Colour
Visioneer OneTouch Scanner. Installation Guide FOR WINDOWS
 Visioneer OneTouch Scanner Installation Guide FOR WINDOWS TABLE OF CONTENTS i TABLE OF CONTENTS Getting Started with your new Scanner....................... 1 Step 1: Installing the Scanner Software.......................
Photoshop Elements for Genealogists Part 1
 Photoshop Elements for Genealogists Part 1 By Barry J. Ewell Topics Covered Photoshop Elements Workspace Exploring the Tools Quick Fix Preview Photoshop Elements Workspace Workspace File Edit Image Enhance
19 Setting Up Your Monitor for Color Management
 19 Setting Up Your Monitor for Color Management The most basic requirement for color management is to calibrate your monitor and create an ICC profile for it. Applications that support color management
ScanGear CS-U 5.8. for CanoScan D660U Color Scanner. User s Guide
 ScanGear CS-U 5.8 for CanoScan D660U Color Scanner User s Guide Copyright Notice Copyright 2000 Canon Inc. This manual is copyrighted with all rights reserved. Under the copyright laws, this manual may
TOPAZ LENS EFFECTS QUICK START GUIDE
 TOPAZ LENS EFFECTS QUICK START GUIDE Introduction Topaz Lens Effects is designed to give you the power to direct and focus your viewer s eyes where you want them. With Lens Effects, you get advanced technology
Scanning Setup Guide for TWAIN Datasource
 Scanning Setup Guide for TWAIN Datasource Starting the Scan Validation Tool... 2 The Scan Validation Tool dialog box... 3 Using the TWAIN Datasource... 4 How do I begin?... 5 Selecting Image settings...
English Getting Started
 Getting Started with Flextight and FlexColor Getting Started with Flextight and FlexColor 2 2001 Imacon A/S. All rights reserved., Part No XXXXXXXX, revision X.X The information in this manual is furnished
Adobe Photoshop CC 2018 Tutorial
 Adobe Photoshop CC 2018 Tutorial GETTING STARTED Adobe Photoshop CC 2018 is a popular image editing software that provides a work environment consistent with Adobe Illustrator, Adobe InDesign, Adobe Photoshop,
Software Reference. FlexColor 3.0 for Flextight Scanners. by imacon
 Software Reference FlexColor 3.0 for Flextight Scanners by imacon 2 2001 Imacon A/S. All rights reserved., revision X-X. The information in this manual is furnished for informational use only, is subject
Selective Editing in Camera Raw 5
 Selective Editing in Camera Raw 5 The editing tools that you saw in the last chapter are global editing tools. That is, they affect all parts of the image. So, when you choose to, for example, brighten
How to use advanced color techniques
 Adobe Photoshop CS5 Extended Project 6 guide How to use advanced color techniques In Adobe Photoshop CS5, you can adjust an image s colors in a variety of ways. Using the techniques described in this guide,
HISTOGRAMS. These notes are a basic introduction to using histograms to guide image capture and image processing.
 HISTOGRAMS Roy Killen, APSEM, EFIAP, GMPSA These notes are a basic introduction to using histograms to guide image capture and image processing. What are histograms? Histograms are graphs that show what
40 Digital Photo Retouching Techniques COPYRIGHTED MATERIAL
 40 Digital Photo Retouching Techniques COPYRIGHTED MATERIAL C h a p t e r Correcting Contrast If you are a photography enthusiast, you know that light is the defining factor in photography. You probably
Add Rays Of Sunlight To A Photo With Photoshop
 Add Rays Of Sunlight To A Photo With Photoshop Written by Steve Patterson. In this photo effects tutorial, we'll learn how to easily add rays of sunlight to an image, a great way to make an already beautiful
Using the Advanced Sharpen Transformation
 Using the Advanced Sharpen Transformation Written by Jonathan Sachs Revised 10 Aug 2014 Copyright 2002-2014 Digital Light & Color Introduction Picture Window Pro s Advanced Sharpen transformation is a
Preparing Images For Print
 Preparing Images For Print The aim of this tutorial is to offer various methods in preparing your photographs for printing. Sometimes the processing a printer does is not as good as Adobe Photoshop, so
Software Reference. FlexColor 4.0 for Camera Backs. by Hasselblad Imacon
 Software Reference FlexColor 4.0 for Camera Backs by Hasselblad Imacon 2 2004 Hasselblad A/S. All rights reserved., Part No 70030035 revision 1.0. The information in this manual is furnished for informational
Adobe Photoshop. Levels
 How to correct color Once you ve opened an image in Photoshop, you may want to adjust color quality or light levels, convert it to black and white, or correct color or lens distortions. This can improve
Color Correction with Curves
 Lecture 02 wk 07 with Curves Channels o Photoshop uses Channels to provide access to the different color components of an image. o In most cases, an image is composed of one or more 8-bit channels. o Channels
Neat Image. User guide. To make images look better. Document version 4.2, January 10, Copyright by ABSoft. All rights reserved.
 To make images look better. User guide Document version 4.2, January 10, 2005 Table of contents 1. Introduction...3 1.1. Overview...3 1.2. Features...3 1.3. Requirements...4 2. Key concepts...5 2.1. What
NOISEWARE 4 USER'S GUIDE PROFESSIONAL AND STANDARD PLUG-IN BY IMAGENOMIC
 NOISEWARE 4 PROFESSIONAL AND STANDARD PLUG-IN USER'S GUIDE BY IMAGENOMIC 2006 Updated October 31, 2006 Contact Imagenomic at http://www.imagenomic.com/contact Copyright 2004-2006 Imagenomic, LLC. All rights
Guidance on Using Scanning Software: Part 6. Canon ScanGear
 Guidance on Using Scanning Software: Part 6. Canon ScanGear Version of 12/23/2012 The Canon ScanGear software that comes with Canon scanners has significant limitations for archival scanning. The documentation
Viewing Landsat TM images with Adobe Photoshop
 Viewing Landsat TM images with Adobe Photoshop Reformatting images into GeoTIFF format Of the several formats in which Landsat TM data are available, only a few formats (primarily TIFF or GeoTIFF) can
basiccolor cockpit Manual
 Manual Inhalt 1. Preface...5 2. ICC Profiles... 8 3. Rendering Intents... 12 4. Starting cockpit...14 4.1. The Collection Window...15 4.2. Viewer... 16 4.3. Image Controls...17 4.3.1. Information...17
32 Float v3 Quick Start Guide. AUTHORED BY ANTHONY HERNANDEZ (415)
") 32 Float v3 Quick Start Guide 32 Float v3 Trademark/Copyright Information Copyright 2013 by United Color Technologies, LLC. All rights reserved. Unified Color Technologies, BeyondRGB, and HDR Expose are
32 Float v3 Quick Start Guide 32 Float v3 Trademark/Copyright Information Copyright 2013 by United Color Technologies, LLC. All rights reserved. Unified Color Technologies, BeyondRGB, and HDR Expose are
ADOBE PHOTOSHOP CS TUTORIAL
 ADOBE PHOTOSHOP CS TUTORIAL A D O B E P H O T O S H O P C S Adobe Photoshop CS is a popular image editing software that provides a work environment consistent with Adobe Illustrator, Adobe InDesign, Adobe
NOISEWARE 5 USER'S GUIDE PLUG-IN BY IMAGENOMIC
 NOISEWARE 5 PLUG-IN USER'S GUIDE BY IMAGENOMIC 2012 Updated May 17, 2012 Contact Imagenomic at http://www.imagenomic.com/contact Copyright 2004-2012 Imagenomic, LLC. All rights reserved 2 TABLE OF CONTENTS
Master digital black and white conversion with our Photoshop plug-in. Black & White Studio plug-in - Tutorial
 Master digital black and white conversion with our Photoshop plug-in This Photoshop plug-in turns Photoshop into a digital darkroom for black and white. Use the light sensitivity of films (Tri-X, etc)
5 Masks and Channels
 5 Masks and Channels Adobe Photoshop uses masks to isolate and manipulate specific parts of an image. A mask is like a stencil. The cutout portion of the mask can be altered, but the area surrounding the
User Guide Part Number HTM082 Revision F
 User Guide Part Number HTM082 Revision F Imaging that makes a difference. Copyright 1996 Howtek, Inc. All rights reserved. No part of this publication may be reproduced, read or stored in a retrieval system,
Digital Design and Communication Teaching (DiDACT) University of Sheffield Department of Landscape. Adobe Photoshop CS5 INTRODUCTION WORKSHOPS
 University of Sheffield Department of Landscape. Adobe Photoshop CS5 INTRODUCTION WORKSHOPS") Adobe INTRODUCTION WORKSHOPS WORKSHOP 1 - what is Photoshop + what does it do? Outcomes: What is Photoshop? Opening, importing and creating images. Basic knowledge of Photoshop tools. Examples of work.
Adobe INTRODUCTION WORKSHOPS WORKSHOP 1 - what is Photoshop + what does it do? Outcomes: What is Photoshop? Opening, importing and creating images. Basic knowledge of Photoshop tools. Examples of work.
Nikon View DX for Macintosh
 Contents Browser Software for Nikon D1 Digital Cameras Nikon View DX for Macintosh Reference Manual Overview Setting up the Camera as a Drive Mounting the Camera Camera Drive Settings Unmounting the Camera
Reference Guide. Color Image Scanner
 Color Image Scanner All rights reserved. No part of this publication may be reproduced, stored in a retrieval system, or transmitted in any form or by any means, electronic, mechanical, photocopying, recording,
ImagesPlus Basic Interface Operation
 ImagesPlus Basic Interface Operation The basic interface operation menu options are located on the File, View, Open Images, Open Operators, and Help main menus. File Menu New The New command creates a
Photoshop Techniques Digital Enhancement
 Photoshop Techniques Digital Enhancement A tremendous range of enhancement techniques are available to anyone shooting astrophotographs if they have access to a computer and can digitize their images.
Correction Techniques
 10 Advanced Color Correction Techniques Learning Objectives After completing this chapter, you will be able to: Explain how a computer monitor displays color. Describe how color is created in the printing
Creating a FlexColor Custom Setup Tutorial
 Creating a FlexColor Custom Setup Tutorial As I began to think about preparing this tutorial I realized it began with the philosophy of scanning with FlexColor. At the time Imacon created the Flextight
XXXX - ILLUSTRATING FROM SKETCHES IN PHOTOSHOP 1 N/08/08
 INTRODUCTION TO GRAPHICS Illustrating from sketches in Photoshop Information Sheet No. XXXX Creating illustrations from existing photography is an excellent method to create bold and sharp works of art
Extended Studies - Intro to Adobe Photoshop
 Working with Curves Curves are the Swiss Army knife of Photoshop. They re great for adjusting both the contrast and color balance of an image in one window. They can lighten and darken areas without selections
v nik Sharpener Pro 2.0 User Guide å nik multimedia, Inc.
 v2.03-050405 nik Sharpener Pro 2.0 User Guide å nik multimedia, Inc. II Table of Contents Minimum Requirements and Installation Filters...I Windows Operating System...I Macintosh Operating System...I Selective
Version 4.2 For WINDOWS
 SIGMA Photo Pro User Guide Companion Processing Software for SIGMA Digital Cameras Version 4.2 For WINDOWS I M P O R T A N T : Please Read Before You Start Thank you very much for purchasing this SIGMA
TOPAZ Vivacity V1.3. User s Guide. Topaz Labs LLC. Copyright 2005 Topaz Labs LLC. All rights reserved.
 TOPAZ Vivacity V1.3 User s Guide Topaz Labs LLC www.topazlabs.com Copyright 2005 Topaz Labs LLC. All rights reserved. TABLE OF CONTENTS Introduction 2 Before You Start 3 Suppress Image Noises 6 Reduce
Workspace. Workspace
 Workspace Workspace AKVIS SmartMask is a plug-in to a photo editor. To call AKVIS SmartMask plugin, select the command Filter > AKVIS > SmartMask in Adobe Photoshop ; in Corel (Jasc) Paint Shop Pro it
Adobe Lightroom CC Tutorial
 Adobe Lightroom CC Tutorial GETTING STARTED Adobe Lightroom CC is a photo editing program which can be used to manipulate and edit large quantities of photos at once. It has great exporting and metadata
Brightness and Contrast Control Reference Guide
 innovation Series Scanners Brightness and Contrast Control Reference Guide A-61506 Part No. 9E3722 CAT No. 137 0337 Using the Brightness and Contrast Control This Reference Guide provides information and
Using Photoshop Elements
 Using Photoshop Elements Created By: Rick Williams August 2004 Table of Contents Photoshop Element Tools...Page 1 Tool Descriptions... Page 3 Starting Photoshop Elements... Page 7 Resizing an Image...
Photomatix Pro 3.1 User Manual
 Introduction Photomatix Pro 3.1 User Manual Photomatix Pro User Manual Introduction Table of Contents Section 1: Taking photos for HDR... 1 1.1 Camera set up... 1 1.2 Selecting the exposures... 3 1.3 Taking
INSTRUCTION MANUAL 2.3
 GB INSTRUCTION MANUAL 2.3 Become a member of Konica Minolta Photo World today, free of charge, and enter the fascinating world of Konica Minolta photography. The ultimate gateway to knowledge for photo-fans:
What s New in Capture NX
 What s New in Capture NX Thank you for downloading the latest version of Capture NX, with support for Picture Controls and other new features. Please note the following changes to the manual. En Camera
How to use advanced color techniques
 How to use advanced color techniques In Adobe Photoshop, you can adjust an image s colors in a variety of ways. Using the techniques described in this guide, you can take the raw material of your image
W i n d o w s. ScanGear CS-S 4.3 for CanoScan FB1200S Color Image Scanner. User's Guide
 f o r W i n d o w s ScanGear CS-S 4.3 for CanoScan FB1200S Color Image Scanner User's Guide How to Make Best Use of the Manuals 2 When you open the box Printed Manual CanoScan FB1200S Quick Start Guide
FastARTIST 1.5/FastRIP 9.0 New Features Quick Reference Guide
 FastARTIST 1.5/FastRIP 9.0 New Features Quick Reference Guide November 1, 2006 Ver 1.9 As of October 2006, all FastARTIST users are eligible for the free 1.5 upgrade. This upgrade also includes FastRIP
Digital Imaging - Photoshop
 Digital Imaging - Photoshop A digital image is a computer representation of a photograph. It is composed of a grid of tiny squares called pixels (picture elements). Each pixel has a position on the grid
WORKING WITH COLOR Monitor Placement Place the monitor at roughly right angles to a window. Place the monitor at least several feet from any window
 WORKING WITH COLOR In order to work consistently with color printing, you need to calibrate both your monitor and your printer. The basic steps for doing so are listed below. This is really a minimum approach;
ScanPotter. Reference Manual
 ScanPotter Reference Manual Copyright 2014 by Microtek International, Inc. All rights reserved. Trademarks Microtek, ScanMaker, ArtixScan, ScanWizard, ScanPotter and ColoRescue are trademarks or registered
Improve your photos and rescue old pictures
 PSPRO REVISTED Nov 5 2007 Page 1 of 7 Improve your photos and rescue old pictures This guide gives tips on how you can use Paint Shop5 and similar free graphic programmes to improve your photos. It doesn
ADOBE PHOTOSHOP CS 3 QUICK REFERENCE
 ADOBE PHOTOSHOP CS 3 QUICK REFERENCE INTRODUCTION Adobe PhotoShop CS 3 is a powerful software environment for editing, manipulating and creating images and other graphics. This reference guide provides
Unit 7 : Image Painting, Editing and Layers
 Unit 7 : Image Painting, Editing and Layers Introduction This Unit describes about various painting tools; such as selection, cropping and measuring tools, retouching, drawing and type tools, Navigation
Master digital black and white conversion with our Photoshop plug-in. Black & White Studio plug-in - Tutorial
 Master digital black and white conversion with our Photoshop plug-in This Photoshop plug-in turns Photoshop into a digital darkroom for black and white. Use the light sensitivity of films (Tri-X, etc)
COLOR EXAMPLES BEFORE YOU BEGIN. Tone-curve corrections. Before installing the DiMAGE Scan Utility. Digital ROC - Reconstruction Of Color
 E SOFTWARE MANUAL COLOR EXAMPLES Tone-curve corrections By selecting individual color channels on the tone curve, adjustments to the overall color of an image can be made. In this example, the image is
Settings Preview The paper illustration shows how the original will be laid out on a sheet of paper.
 Main tab The Main tab allows you to create a basic print setup in accordance with the media type. Unless special printing is required, normal printing can be performed just by setting the items on this
The student will: download an image from the Internet; and use Photoshop to straighten, crop, enhance, and resize a digital image.
 Basic Photoshop Overview: Photoshop is one of the most common computer programs used to work with digital images. In this lesson, students use Photoshop to enhance a photo of Brevig Mission School, so
Using Curves and Histograms
 Written by Jonathan Sachs Copyright 1996-2003 Digital Light & Color Introduction Although many of the operations, tools, and terms used in digital image manipulation have direct equivalents in conventional
GETTING STARTED. 0 P a g e B a s i c s o f A d o b e P h o t o s h o p A g a P r i v a t e I n s t i t u t e f o r c o m p u t e r s c i e n c e
 GETTING STARTED 0 P a g e B a s i c s o f A d o b e P h o t o s h o p Adobe Photoshop: is a popular image editing software that provides a work environment consistent with Adobe Illustrator, Adobe InDesign,
Advanced Masking Tutorial
 Complete Digital Photography Seventh Edition Advanced Masking Tutorial by Ben Long In this tutorial, we re going to look at some more advanced masking concepts. This particular example is not a technique
Color Balancing Techniques
 Written by Jonathan Sachs Copyright 1996-2007 Digital Light & Color Introduction Color balancing refers to the process of removing an overall color bias from an image. For example, if an image appears