IMG0H CCD user manual. Version V1.5
|
|
|
- Violet Baldwin
- 6 years ago
- Views:
Transcription
1 IMG0H CCD user manual Version V1.5
2 CONTENT SAFETY PRECAUTIONS... 1 STANDARD EQUIPMENT... 2 Accessories Sold Separately... 3 Camera Interface... 4 Camera Software Installation... 5 DC201 Input Voltage Range... 5 Service Temperature and Humidity of Camera... 5 How to avoid CCD sensor moisture in high humidity environments... 5 Notes about Long term use camera and Remote Observatory... 5 About controlling for BLOOMING... 6 Clean the surface of CCD chip and the glass window... 6 Setting GAIN and EXP... 6 IMG0H mechanical dimensions... 7 Simple usage... 8 MaxIm DL Image Measure...12 IMG0H CCD Image Calibration...13 Guiding by using IMG0H (for astronomic photography) Parameter... 17
3 Welcome to take the QHYCCD product. Before using the camera please read this manual carefully. IMG0H is designed for industrial test, biographical test, laboratory image and so on, it is high sensitive. The sample depth is 14 bit(monochrome) / 42 bit(color version), the light range of one pixel is IMG0H s CCD is the SONY Exview 1/4 inch frame. It is progressive, the QE is 68%. Exview technology improves the shape of microlens on the CCD, to increase the sensitivity under the near infrared band ( nm). IMG0H builds in the TEC, to decrease the hot noise. It also possess the low speed read out mode, this mode increase the SNR of the image, so IMG0H is also suit for using in dark environment. IMG0H possesses the high-speed USB2.0 port to transfer the data between CCD camera and computer. It can export the 14bit no compressive RAW images. IMG0H s capture FPS is very high, the expose time of single frame is very short, so it could capture a lot of frames in a short time. IMG0H is suit for planet or moon photography. IMG0H possesses the guide port, the protocol is ST-4, using a RJ11 6pin guide cable to connect it with equatorial mount. SAFETY PRECAUTIONS The CCD chip and cooling system are more fragile than a small or medium sized CCD. Take extra care when transporting and storing the device. Any significant impacts may damage your equipment. Keep clear with the radiator. Connection Sequence: (1) Connect USB cable from camera to PC (2) Connect 9-pin cable from camera to DC201 (3) Connect 12V power to DC201. Internal diameter of connection to DC201 is 2.1mm. The inner of the plug is positive, the outer of the plug is cathode. If the polarity is wrong, the DC201 may be damaged. Note the computer and the AC/DC adapter is earth grounding well. The computer s grounding and the AC/DC adapter s must be the same. Otherwise, if the computer or the AC/DC adapter get creepage, the USB port will be easily damaged. If the grounding couldn t be assured, the computer s shell and the cathode of the AC/DC adapter s must be connect with a wire. 1


4 STANDARD EQUIPMENT IMG0H CCD camera USB cable IMG0H DC201 DC adapter 2


5 9pin power supply cable Accessories Sold Separately Accessories Sold Separately is sold by zones V AC to 12V DC Adapter Full Air proof box with electric heating silicon gel 3
6 Camera Interface Glass filter window Camera Part Front C mount inner screw Guiding Port or control signal output port USB port 4 9pin power supply port
7 Camera Software Installation Run the driver install program. Connect the IMG0H with the computer. Do not connect the 9pin cable now. System will find new device. Wait till installation finished(in XP select No -> Next Step -> Install automaticly. Use 9pin power cable connect DC201 and IMG0H. Please note the side with EMC ring should connect to DC201. Connect DC201 with 12V input. The LED of DC201(+15,-15.+5) should be on. Run the EZPlantary program choose camera-scan camera, now the IMG0H will be on, click one resolution, the realtime image will show. There are 4 LEDs in the camera, if the guiding port is in use, they will be on, otherwise they are off. DC201 Input Voltage Range The DC201 requires a regulated 12V input. The normal input range is 11V-13V. If you exceed 13V common when you are using an external battery, the higher voltage will reduce the life of the TEC and Fan. If you exceed 13V, please limit the maximum power of your Cooling Settings. The power of the IMG0H is 10W if the TEC is on, so the power supply should be 12V and exceeds 2A. Service Temperature and Humidity of Camera Service Temperature of this camera is from -20C/-4F to +30C/86F. Relative Humidity amount is from 0% to 90%. How to avoid CCD sensor moisture in high humidity environments In certain environments, when the temperature of the camera drop below the dew-point, dew or ice may form on the camera. This is simply a law of nature. However, ice and/or dew which form on the surface of CCD chip or optic window will impact your images. If dew or ice forms on the surface of CCD, the water can flow onto the electric board, which leads to short circuit or data corruption. It is critical that you avoid dew or ice formation during operation on the CCD chip. However, the TEC s power of IMG0H is low, the dew hardly appear. If the dew appear on the glass window, you must stop IMG0H working immediately. If the dew appear on CCD chip, it means the camera is not airproof. You should open the camera in a dry environment, wait for the chip dry, and seal the camera. Note: the camera must be opened in a dry environment, if the air contain water, it maybe appears dew again. Notes about Long term use camera and Remote Observatory If you have to keep the camera working for a long time or the camera is working in a remote observatory, please note the safe notice, and we recommend that you consult your area dealer for more details. 5
8 Note: Don t supply power to the CCD for several days or even weeks if possible. Use a power controller to control 12V input or AC input. About controlling for BLOOMING IMG0H CCD chip have the -110dB anti-overflow foundation. Generally, the overflow is blocked. But it is possible to overflow for shooting very bright target. So if it is controllable, it must avoid photo the very bright target. Clean the surface of CCD chip and the glass window If dust coats the surface of the CCD-it will impact the your images and possible create dust donuts and other artifacts. If there is only a small amount of dust, we suggest just using flat fields calibration to remove them. How to clean the glass window? 1. Get off the len 2. Use the air-blowing to clean the glass window. If the dust is tightness, use the cleaner for DSLR to clean. Note: do not use the lens paper, because the filter covers coating, the lens paper will easily damage it. How to clean the CCD chip? 1. Open the camera in a dry enviroment 2. Use the air-blowing to clean the glass window. If the dust is tightness, use the cleaner for DSLR to clean. 3. Seal the camera in a dry environment. Note: It must be seal in a dry environment, because if the air contain water, the camera maybe get dew when using. Setting GAIN and EXP User can setting QHYCCD s gain and expose time. GAIN is the gain of the ADC s amplifier, the range is EXP is the expose time for one frame. Good setting will get good dynamic range. 6
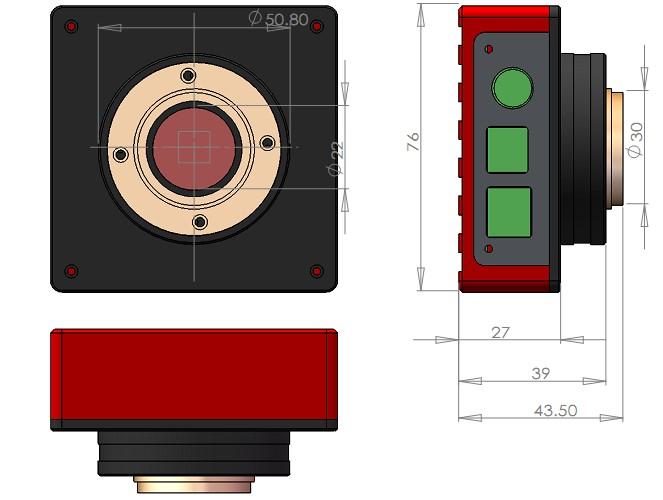

9 IMG0H mechanical dimensions 7
 Select Camera-Scan Camera, if the IMG0H is shown, select IMG0H directly, and select a suitable resolution. The resolution is lower, the FPS is higher.")
10 Simple usage Although many softwares support IMG0H, EZPlantary is the suggestion. You can use EZPlantary to examine the IMG0H. 1. EZPlantary (1) Connect the IMG0H and the computer. (2) Run EZPlantary.exe (3) Select Camera-Scan Camera, if the IMG0H is shown, select IMG0H directly, and select a suitable resolution. The resolution is lower, the FPS is higher. User should choose a suitable one by real fact. (4) After setting, the realtime image will show. (5) Adjust the GAIN and the EXP, the image will be realtime. (6) If using the color version of IMG0H, adjust the Color Balance. Generally, the camera couldn t show the right color of the original object s color. So it s necessary to adjust the Color Balance. We can adjust the R, G, B channels separately, calibrate the right color. The range of adjusting is If you adjust one channel, the color of the channel will be increased. a) Adjust the White Balance by manual: The method is the most precision and universal. Before adjusting, you should put a white paper in the head of the lens, the paper should fill full in the image. Watch the Histogram in the software, you could see the RGB channels are not superposition. Adjust the Color Balance, when the RGB channels get superposition, the white balance is perfect. b) c) Global White Balance: Click the Global WB button, it will auto adjust the white balance. Spot White Balance: In some condition, global white balance could not calibrate correctly. For example, the red color is in a large part of the image, when you use global white balance, it will adjust the red color to gray, thus the white balance is wrong. In order to avoid it, the software supply the Spot White Balance. Click the Spot WB button, the button will turn blue, and the mouse will change to a little hand. Move the mouse to the image, click the white ( or gray ) part for original object, the software will compute the white balance. (7) Adjust the lens in focus. (8) Capture the non-compressed video: Click File-Video Record Options, set the record options. Note: The FIT format is used in RAW (Mono) mode. After setting, click REC button to record video. 8
 mode.")
 Other options: a) Favorite-Show TimeStamp: Show TimeStamp on")
11 (9) Capture the single image: Click File-Snap Options, set the snap options. Note: The FIT format is used in RAW (Mono) mode. After setting, click Snap button to capture the single image. (10) Other options: a) Favorite-Show TimeStamp: Show TimeStamp on the image. 9


12 b) c) Favorite-Show OSD: Show OSD on the image. Favorite-High Priority Disk Write: This item will increase the priority on writing files into disk. The function is improved for the computer which has less video memory. It could decrease the display FPS 10
 mode uses no Bayer Pattern, the image is monochrome. Camera Setup-14bit Image: Choose this item will capture the 14bit image.")
13 d) e) f) g) h) i) j) k) 2. to make sure the writing file speed. Camera Setup-Color/Mono: Different camera uses different Bayer Pattern. We should choose the right Bayer Pattern to get the right color. Note: The RAW (Mono) mode uses no Bayer Pattern, the image is monochrome. Camera Setup-14bit Image: Choose this item will capture the 14bit image. Note: With this item, the image is monochrome, the format is FIT, and the read speed is low speed. Camera Setup-High Speed Readout: Choose this item will use the high speed read out. It will cost more system resources, and increase the noises. Camera Setup-SDRAM bypass: Choose this item will not use the SDRAM. If use the SDRAM, capturing will more continuous, and the FPS will be higher, but the noise will increase at the same time, the image will appear the stripe, especially in the dark environment. Camera Setup-Camera Fine Tone: Open the Fine Tone windows, adjust the CCD Timing and the ADC Timing to improve the SNR. The first two adjustment of ADC Timing is the most useful. When adjusting, cover the CCD camera, set the gain to a high number, adjust the CCD Timing and the ADC Timing to improve the SNR. Screen Zoom: Adjust the zoom ratio. Language Select the language. Help Show help and about message. MaxIm DL ASCOM Connection (1) Download the newest ASCOM software in (2) Install the ASCOM platform software. (3) Install the IMG0H driver and the ASCOM plug-in for IMG0H. (4) Run MaxIm DL, click the camera control button, in Setup window, click Setup Camera-Camera Model-ASCOM-Advanced-IMG1S/2S StarSenseSci-Properties, in the properties window, set the gain and the offset and so on. Click OK to back the Camera Control window, click the Connect button. (5) In the Camera Control window, choose the Expose window. (6) Choose Find Star, set the expose time in the Second textbox. 11

14 (7) (8) (9) (10) (11) 3. Click the Option-No Calibration. Set the bin mode. For IMG0H, the X=1 and Y=1. Click Start button to start capture. After capture, the image will show. Adjust the Screen Stretch simply to get a suitable image. After capture, the image is the RAW format, it is monochrome. In MaxIm DL, choose Color-Convert Color, set the OFFSET X=0, Y=0, choose Generic RGB in Select Camera. Watch the result in the preview window. If the color is not right, change the OFFSET and the type of camera. AstroART ASCOM Connection (1) Download the newest ASCOM software in (2) Install the ASCOM platform software. (3) Install the IMG0H driver and the ASCOM plug-in for IMG0H. (4) After install AART3.0, install AART4.0 update. Copy the piccdgui.dll into the AART directory, the piccdgui.dll could be downloaded from the AART website. (5) Run AstroART, Choose Plug-in-CCD Camera. In the Setup window, choose Imaging/GuideCamera as ASCOM, click SETUP button, choose IMG1S/2S StarSenseSci. Click the Properties button, set the GAIN and the OFFSET. (6) If IMG0H connects successfully, AART will show the temperature window, set the Target number. (7) Set bin mode in the Setting window of CCD control window. (8) Set the expose time in the CCD control window. Click START to capture. (9) In the 1*1 bin mode, in order to get the colorful image, you should choose color-ccd Color Synthesis. Select RGB image and suitable X Y OFFSET to get it. MaxIm DL Image Measure The FIT images could be measured in MaxIm DL. Run MaxIm DL, choose View-Screen Stretch, or click button, to show Screen Stretch window. Adjust the little triangles, the image s luminance will be changed. Note: The Screen Stretch tool only changes the image s screen luminance, the original image s luminance could not be changed. Choose View-Information Window, or click, to open the Information window. The mouse across the image will change to a 3-concentric circles. In the Information window, choose the Mode Aperture first, now you can see some information. 12

15 1. Cursor Aperture mode shows statistics on the area under the circular cursor as the mouse is moved around the image. The current Cursor position and inner and outer radii are shown at the top. The Pixel value directly under the cursor is also shown. 2. The following measurements are made only within the aperture (inner circle): the Maximum, Minimum, Median, Average, and standard deviation (Std Dev). (1) Pixel: Show the pixel luminance in the center. (2) Maximum: Show the brightest pixel s luminance. (3) Minimum: Show the darkest pixel s luminance. (4) Median: Show the median of the pixel s luminance in the inner circle. (5) Average: Show the average of the pixel s luminance in the inner circle. (6) Std Dev: Show the standard deviation of the pixel s luminance in the inner circle. 3. The following measurements are made inside the aperture after first subtracting the average value in the annulus (between the middle and outer circles). (1) Magnitude: As calibrated using the Calibrate button. (For astronomy). (2) Intensity: Sum of all pixels within aperture less background. (3) SNR: SNR is calculated as the ratio of intensity to the standard deviation of the background times the square root of the number of pixels. 4. The following measurements are made using only the background annulus (between the middle and outer circles) (1) Bgd Avg: Show the average of the background luminance. (2) Bgd Dev: Show the deviation of the background luminance. If you want to see more information, please watch the MaxIm DL user manual. IMG0H CCD Image Calibration Image calibration means to calibrate the CCD with a BIAS field, a DARK field and a FLAT field. You can completely remove thermal noise of the CCD through proper calibration. Additionally, you can obtain better image highlights. You can remove dark spots which are caused by dust on the surface of the CCD. Image calibration is a critical step for serious astronomical photography. In order to obtain accurate calibration information, you need to use the IMG0H temperature controller. CCD should be set in fixed temperature state. And temperature should remain the same when shooting. The Calibration Principle of CCD Image: Calibrated image=[(l-b)-(d-b)]/(f-b)=(l-d)/(f-b) 13


16 There, L is the actual shooting image, D represents the Dark Frame images, B represents BIAS image and F means the FLAT image. 1. Capture BIAS Image BIAS image means exposure time of images is Zero. You need avoiding any light to enter into CCD Sensor when you shoot image. So you have to cover the lens cap of camera. Set Exposure Time to 0, and then use the low speed to shoot many (10-50 sheets) BIAS image. Save and overlap them.use the function of average overlapping, do not match with position to get one BIAS Master image. Save this image. Partial Cropped BIAS Image B 2. Capture DARK Image DARK Image means the image which of the exposure time is the same as the time it took officially. You have to avoid any light enter into CCD sensor. Therefore you have to cover the lens lid. The exposure time should be set the same with shooting time.and then use the low speed and mode 1 * 1 to shoot about (10-50 sheets) BIAS image. Save and overlay these images to form a Dark Master image. Save the image. Partial Cropped DARK Image (D) 14

17 DARK image which be calibrated by BIAS Field D-B 3. Capture FLAT Image FLAT image can be used to rectify the problem of the center light but the edge dark which caused by the vignette of optical system. It also can be corrected the problem due to some small dust on the CCD sensor glass surface. Flat-field calibration method is this: you need uniform luminous lightbox. The lightbox will be placed in front of the telescope. You would set the appropriate exposure time, then continuous shoot frame flat-field images. Save and overlay these images to form a FLAT Master image, save the image. To obtain an accurate flat-field calibration, Please note the following matters: You have to take immediately flat-field images before the shooting or after finishing shooting. Like do this in order to avoid dismantling the device, dust on CCD surface and vibration of CCD cause the change of location. The scope of exposure is better for 30% of the maximum dynamic range, which means you have gotten pixel of flatfield image. Images of BIAS Master, DARK Master and FLAT Master will be calibration data as image post-processing of the captured images. Guiding by using IMG0H (for astronomic photography) IMG0H contains a guiding spot, it can be used as a guiding CCD with ASCOM. IMG0H uses 1*1 bin and normal download speed default. 1. Guiding by using IMG0H in MaxIm DL (1) Download the newest ASCOM software in (2) Install the ASCOM platform software. (3) Install the IMG0H driver and the ASCOM plug-in for IMG0H. (4) Connect IMG0H and computer with the guide cable. (5) Run MaxIm DL, click the camera control button, generally, it uses Camera2 to guide. In the camera2 s Setup window, click Setup Camera-Camera Model-ASCOM-Advanced-IMG0H/L/X StarSenseSci -Properties, in the properties window, set the gain and the offset and so on. Click OK to back the Camera 15


18 (6) (7) (8) (9) (10) (11) (12) (13) (14) (15) (16) (17) 2. (1) (2) (3) (4) Control window, click the Connect button. In the Camera Control window, choose the Guide option group. Set expose time in Seconds textbox. The unit is second. Click Settings, open the Guider Settings window, choose Settings-Exposure Settings-Reset, reset the image area to the largest. Click OK. Choose Expose option group, click Start button to take an image. Adjust the Screen Stretch tool to adjust the luminance. Click the Setting button again, open the Guider Setting window, select an area in the image, the area is the guide area you will use. Choose Expose option group, click the Start button to take an image. The image is the selected area. Find a star in the image, select it by dragging. Click Calibrate button, to calibrate the equatorial mount. After calibration, choose Options-No Calibration. Choose Track option group, click Start button to start guiding. When guiding, the 4 LEDs on the back of IMG0H will on, they are the 4 guiding directions. You can watch the guiding curves by clicking the graph button. Guiding by using IMG0H in PHD Download the newest ASCOM software in Install the ASCOM platform software. Install the IMG0H driver and the ASCOM plug-in for IMG0H. Connect IMG0H and computer with the guide cable. (5) Run PHD, choose Connect to Camera ( )-ASCOM v5 camera, click OK to watch ASCOM Camera Chooser window, choose IMG0H/L/X StarSenseSci, then click Properties button, set GAIN and so on. Click OK to come back. (6) Choose Mount-On Camera, then click Connect to telescope ( (7) Click ) button. button, start exposing. At the right of the button, you can change the expose time with the Pull- Down Menu, and adjust the screen luminance with the Screen Gamma slider. (8) Find a star in the realtime video, click it, PHD will choose the star by a green square frame. (9) Click to start guiding. When guiding, the 4 LEDs on the back of IMG0H will on, they are the 4 guiding directions. (10) You can watch the guiding curves by choosing Tools-Enable Graph. 16
19 Parameter IMG0H CCD Camera Parameter CCD sensor CCD size Effective Image Area Effective pixel Pixel size CCD readout Type Full Well Peak QE Anti Blooming Gate Capture Download Speed Readout speed Readout Noise ADC ADC (color version) Cooling Maximum Delta T Power Input voltage Interface Weight (Camera body only, without DC201 and cables) Camera size Trigger (optional) SONY Super EXVIEW HAD CCD ICX618 1/4inch 4.46mm*3.80mm 659* μm*5.6μm Progressive Scan 35Ke68% Yes, -110dB 640*480 8bit 640*480 14bit 500*300 8bit 24Mpixel/s (high speed) 12Mpixel/s (low speed) Typical 8e14bit 42bit (14bit*R G B) single stage TEC 30 degree below ambient 10W DC12V (Input to DC201 adapter) Safe Range (11V-13.5V) Industrial C-mount NIKON & CANON lens adapter optional 267g See mechanical dimensions Trigger input port 1 Expose signal output port 1 Guide signal output port 1 Spectral Sensitivity Characteristics (excludes lens characteristics and light source characteristics) 17
QHY367C. User s Manual Rev. 1.3
 User s Manual Rev. 1.3 This document is an online document. You may save this PDF file or print it out. QHYCCD reserves the right to change this user manual without prior notice. Package Contents please
QHY174M COLDMOS Astronomy Camera Manual. 01 Software Installation
 QHY174M COLDMOS Astronomy Camera Manual 01 Software Installation 1. Download and install ASCOM platform from the link below http://ascom-standards.org/downloads/index.htm 2. Download and install the System
CHAPTER1: QUICK START...3 CAMERA INSTALLATION... 3 SOFTWARE AND DRIVER INSTALLATION... 3 START TCAPTURE...4 TCAPTURE PARAMETER SETTINGS... 5 CHAPTER2:
 Image acquisition, managing and processing software TCapture Instruction Manual Key to the Instruction Manual TC is shortened name used for TCapture. Help Refer to [Help] >> [About TCapture] menu for software
Kigamo Scanback which fits in your view camera in place of conventional film.
 What's included Kigamo Scanback which fits in your view camera in place of conventional film. SCSI Cable to connect your Scanback to the host computer. A 3-meter SCSI cable is standard. Kigamo also has
ZEISS Axiocam 503 color Your 3 Megapixel Microscope Camera for Fast Image Acquisition Fast, in True Color and Regular Field of View
 Product Information Version 1.0 ZEISS Axiocam 503 color Your 3 Megapixel Microscope Camera for Fast Image Acquisition Fast, in True Color and Regular Field of View ZEISS Axiocam 503 color Sensor Model
GXCapture 8.1 Instruction Manual
 GT Vision image acquisition, managing and processing software GXCapture 8.1 Instruction Manual Contents of the Instruction Manual GXC is the shortened name used for GXCapture Square brackets are used to
pco.edge 4.2 LT 0.8 electrons 2048 x 2048 pixel 40 fps up to :1 up to 82 % pco. low noise high resolution high speed high dynamic range
 edge 4.2 LT scientific CMOS camera high resolution 2048 x 2048 pixel low noise 0.8 electrons USB 3.0 small form factor high dynamic range up to 37 500:1 high speed 40 fps high quantum efficiency up to
QHYCCD New Product Announcement
 QHYCCD New 1 QHY128C 35mm Format 24 Megapixels QHY367C 35mm Format 36 Megapixels Ultra High Performance Ultra Low Read Noise and Dark Current Unique Thermal Noise Reduction Technology Zero Amplifier Glow
Optika ISview. Image acquisition and processing software. Instruction Manual
 Optika ISview Image acquisition and processing software Instruction Manual Key to the Instruction Manual IS is shortened name used for OptikaISview Square brackets are used to indicate items such as menu
CCD User s Guide SBIG ST7E CCD camera and Macintosh ibook control computer with Meade flip mirror assembly mounted on LX200
 Massachusetts Institute of Technology Department of Earth, Atmospheric, and Planetary Sciences Handout 8 /week of 2002 March 18 12.409 Hands-On Astronomy, Spring 2002 CCD User s Guide SBIG ST7E CCD camera
Real-color High Sensitivity Scientific Camera
 Real-color High Sensitivity Scientific Camera For the first time with true color The Best Choice for Both Brightfield and Fluorescence Imaging Hi-SPEED CERTIFIED 6.5μm x 6.5μm pixel scmos color sensor
Real-color High Sensitivity Scientific Camera. For the first time with true color ISO9001
 Real-color High Sensitivity Scientific Camera For the first time with true color ISO9001 The Best Choice for Both Brightfield and Fluorescence Imaging Hi-SPEED CERTIFIED 6.5μm x 6.5μm pixel scmos color
Luna 0.4B user s manual.
 Luna 0.4B user s manual. You have just purchased a Luna Camera, thank you very much for choosing a Lunático product. Lunático Astronomía hopes the camera will fulfil your expectations. Manual Luna 0.4
Specifications Summary 1. Array Size (pixels) Pixel Size. Sensor Size. Pixel Well Depth (typical) 95,000 e - 89,000 e -
 Pixel Size. Sensor Size. Pixel Well Depth (typical) 95,000 e - 89,000 e -") Apogee Alta Series System Features 1 High Resolution Sensor 1.0 Megapixel sensor with 13 mm pixels delivers a large field of view with high resolution. Programmable TE cooling down to 50 o C below ambient
Apogee Alta Series System Features 1 High Resolution Sensor 1.0 Megapixel sensor with 13 mm pixels delivers a large field of view with high resolution. Programmable TE cooling down to 50 o C below ambient
ZEISS Axiocam 512 color Your 12 Megapixel Microscope Camera for Imaging of Large Sample Areas Fast, in True Color, and High Resolution
 Product Information Version 1.0 ZEISS Axiocam 512 color Your 12 Megapixel Microscope Camera for Imaging of Large Sample Areas Fast, in True Color, and High Resolution ZEISS Axiocam 512 color Sensor Model
Operating Manual Supplement for Model ST-4000XCM
 Operating Manual Supplement for Model ST-4000XCM Santa Barbara Instrument Group 147A Castilian Drive Santa Barbara, CA 93117 USA Phone (805) 571-7244 Fax (805) 571-1147 Web: www.sbig.com E-mail: sbig@sbig.com
Your Complete Astro Photography Solution
 Your Complete Astro Photography Solution Some of this course will be classroom based. There will be practical work in the observatory and also some of the work will be done during the night. Our course
Astrophotography. An intro to night sky photography
 Astrophotography An intro to night sky photography Agenda Hardware Some myths exposed Image Acquisition Calibration Hardware Cameras, Lenses and Mounts Cameras for Astro-imaging Point and Shoot Limited
MY ASTROPHOTOGRAPHY WORKFLOW Scott J. Davis June 21, 2012
 Table of Contents Image Acquisition Types 2 Image Acquisition Exposure 3 Image Acquisition Some Extra Notes 4 Stacking Setup 5 Stacking 7 Preparing for Post Processing 8 Preparing your Photoshop File 9
We recommend downloading the latest core installer for our software from our website. This can be found at:
 Dusk Getting Started Installing the Software We recommend downloading the latest core installer for our software from our website. This can be found at: https://www.atik-cameras.com/downloads/ Locate and
Orion StarShoot G3 Deep Space Imaging Cameras
 instruction Manual Orion StarShoot G3 Deep Space Imaging Cameras Color #53082, Monochrome #53083 Providing Exceptional Consumer Optical Products Since 1975 Customer Support: www.oriontelescopes.com/contactus
Using the USB2.0 camera and guider interface
 Using the USB2.0 camera and guider interface The USB2.0 interface is an updated replacement for the original Starlight Xpress USB1.1 unit, released in 2001. Its main function is to provide a USB2 compatible
Data Sheet SMX-160 Series USB2.0 Cameras
 Data Sheet SMX-160 Series USB2.0 Cameras SMX-160 Series USB2.0 Cameras Data Sheet Revision 3.0 Copyright 2001-2010 Sumix Corporation 4005 Avenida de la Plata, Suite 201 Oceanside, CA, 92056 Tel.: (877)233-3385;
NexImage USER S MANUAL. Model # 93708, # # 95518, # ENGLISH
 NexImage USER S MANUAL Model # 93708, # 93711 # 95518, # 95519 ENGLISH Congratulations on your purchase of the Celestron NexImage Solar System imaging camera. Your NexImage camera comes with the following:
The DSI for Autostar Suite
 An Introduction To DSI Imaging John E. Hoot President Software Systems Consulting 1 The DSI for Autostar Suite Meade Autostar Suite Not Just A Project, A Mission John E. Hoot System Architect 2 1 DSI -
NexImage Burst USER S MANUAL Model # 95518, # ENGLISH
 NexImage Burst USER S MANUAL Model # 95518, # 95519 ENGLISH Congratulations on your purchase of the Celestron NexImage Burst Solar System imaging camera. Your NexImage camera comes with the following:
[Mallincam Universe User Manual] MALLINCAM UNIVERSE. Universe User Manual. [Version 1.0] Michael Burns Rock Mallin
![[Mallincam Universe User Manual] MALLINCAM UNIVERSE. Universe User Manual. [Version 1.0] Michael Burns Rock Mallin](/thumbs/86/93521861.jpg "[Mallincam Universe User Manual] MALLINCAM UNIVERSE. Universe User Manual. [Version 1.0] Michael Burns Rock Mallin") MALLINCAM UNIVERSE Revision Sheet [Version 1.0] Michael Burns Rock Mallin [Mallincam Universe User Manual] This document will quickly introduce you to the wonders of the MallinCam Universe Camera. It will
MALLINCAM UNIVERSE Revision Sheet [Version 1.0] Michael Burns Rock Mallin [Mallincam Universe User Manual] This document will quickly introduce you to the wonders of the MallinCam Universe Camera. It will
Reference and User Manual May, 2015 revision - 3
 Reference and User Manual May, 2015 revision - 3 Innovations Foresight 2015 - Powered by Alcor System 1 For any improvement and suggestions, please contact customerservice@innovationsforesight.com Some
ROTATING SYSTEM T-12, T-20, T-50, T- 150 USER MANUAL
 ROTATING SYSTEM T-12, T-20, T-50, T- 150 USER MANUAL v. 1.11 released 12.02.2016 Table of contents Introduction to the Rotating System device 3 Device components 4 Technical characteristics 4 Compatibility
SYNGUIDER USER'S MANUAL
 SYNGUIDER USER'S MANUAL GETTING STARTED PREPARING THE SYNGUIDER BASIC OPERATIONS OPERATION UNDER THE NIGHT SKY SPECIFICATIONS 1 3 4 9 15 060613V1 Thank you for choosing the SynGuider. The SynGuider can
Camera Test Protocol. Introduction TABLE OF CONTENTS. Camera Test Protocol Technical Note Technical Note
 Technical Note CMOS, EMCCD AND CCD CAMERAS FOR LIFE SCIENCES Camera Test Protocol Introduction The detector is one of the most important components of any microscope system. Accurate detector readings
ToupSky Cameras Quick-guide
 ToupSky Cameras Quick-guide ToupSky is a capture and processing software offered by Touptek, the original manufacturer of the Toupcamera series. These are video cameras that offer live image capture for
Astroimaging Setup and Operation. S. Douglas Holland
 Outline: 1. Mount 2. Telescope 3. Cameras 4. Balance Mount 5. Acclimation 6. Cabling & Computer 7. Polar Alignment 8. CWD Position 9. 4 Star Align 10. Camera Control Software 11. Focus 12. Install Guide
OEM Low Cost CCD Cameras
 OEM Low Cost OEM Imaging Solutions Apogee is a proven supplier of OEM imaging solutions. We can provide a modified version of any of our standard models or a completely new design to your requirements.
PL-131 / AG-131 COOLAIR
 Opticstar PL-131 / AG-131 COOLAIR High Speed Video Cameras Setup Guide Microsoft Windows (64-bit & 32-bit) XP/Vista/7 OPTICSTAR Opticstar PL-131 series. Ä Opticstar Ltd, 2010. CAUTION! 1. Please read and
INTRODUCTION TO CCD IMAGING
 ASTR 1030 Astronomy Lab 85 Intro to CCD Imaging INTRODUCTION TO CCD IMAGING SYNOPSIS: In this lab we will learn about some of the advantages of CCD cameras for use in astronomy and how to process an image.
ISCapture User Guide. advanced CCD imaging. Opticstar
 advanced CCD imaging Opticstar I We always check the accuracy of the information in our promotional material. However, due to the continuous process of product development and improvement it is possible
KoPa Scanner. User's Manual A99. Ver 1.0. SHENZHEN OSTEC OPTO-ELECTRONIC TECHNOLOGY CO.,LTD.
 KoPa Scanner A99 User's Manual Ver 1.0 SHENZHEN OSTEC OPTO-ELECTRONIC TECHNOLOGY CO.,LTD. http://www.ostec.com.cn Content Chapter 1 Start... 1 1.1 Safety Warnings and Precautions... 1 1.2 Installation
Foreword. Welcome to the MallinCam Universe!
 Foreword Welcome to the MallinCam Universe! The new MallinCam Universe represents years of research and design to develop a color astronomical CCD camera that is capable of live constant refresh to provide
Image Processing for Comets
 Image Processing for Comets Page 1 2.5 Surface Today, there are sensors of 768 x 512 pixels up to 8176 x 6132 pixels ( 49,1 mm x 36,8 mm), that's bigger than the old 35mm film. The size of the chip determines
Lightroom CC. Welcome to Joshua Tree Workshops. Astro & Landscape Lightroom Workflow w/presets
 Welcome to My approach to teaching is to offer small workshops which allow you to explore and discover our amazing planet, while learning photography and timelapse techniques. Astro & Landscape Lightroom
A Stony Brook Student s Guide to Using CCDSoft By Stephanie Zajac Last Updated: 3 February 2012
 A Stony Brook Student s Guide to Using CCDSoft By Stephanie Zajac Last Updated: 3 February 2012 This document is meant to serve as a quick start guide to using CCDSoft to take data using the Mt. Stony
4.5.1 Mirroring Gain/Offset Registers GPIO CMV Snapshot Control... 14
 Thank you for choosing the MityCAM-C8000 from Critical Link. The MityCAM-C8000 MityViewer Quick Start Guide will guide you through the software installation process and the steps to acquire your first
On the Bench: QHY-10 Craig Stark
 On the Bench: QHY-10 Craig Stark Note, this was originally published on Cloudy Nights, 6/16/2012 As many readers likely know, I m the author of Nebulosity 3 a program designed to let you capture and process
INSTRUCTION MANUAL # Providing Exceptional Consumer Optical Products Since Customer Support (800)
") INSTRUCTION MANUAL Orion StarShoot Deep Space Color Imaging Camera #52065 Providing Exceptional Consumer Optical Products Since 1975 Customer Support (800) 676-1343 E-mail: support@telescope.com Corporate
INSTRUCTION MANUAL Orion StarShoot Deep Space Color Imaging Camera #52065 Providing Exceptional Consumer Optical Products Since 1975 Customer Support (800) 676-1343 E-mail: support@telescope.com Corporate
Fein. High Sensitivity Microscope Camera with Advanced Software 3DCxM20-20 Megapixels
 Fein High Sensitivity Microscope Camera with Advanced Software 3DCxM20-20 Megapixels 3DCxM20 Camera Features High Sensitivity Camera This microscopy camera was designed with high sensitivity and ultra
A CCDSoft -compatible camera plug-in for Canon DSLR cameras.
 A CCDSoft -compatible camera plug-in for Canon DSLR cameras. Version 2-1 - 11-Aug-08 Copyright This program and documentation are copyright Darren Hutchinson 2005, 2006. This program and documentation
User Guide for TWAIN / DirectX interface for GRYPHAX USB 3.0 cameras
 User Guide for TWAIN / DirectX interface for GRYPHAX USB 3.0 cameras The TWAIN & DirectX driver for PROGRES GRYPHAX USB 3.0 cameras enables user to operate with TWAIN and DirectX supported 3 rd party software
Astrofotografie > Camera's > Guider camera's > QHY 5L II Mono guider and planetary camera usb2. QHY 5L II Mono guider and planetary camera usb2
 Model: QHY_QHY5L-IIm Artikel: Fabrikant: QHY you want a tiny camera for both planetary and autoguiding. The QHY5L-II is the best choice for you. After the success of QHY5 guiding camera(2006-2012), QHYCCD
CCD Characteristics Lab
 CCD Characteristics Lab Observational Astronomy 6/6/07 1 Introduction In this laboratory exercise, you will be using the Hirsch Observatory s CCD camera, a Santa Barbara Instruments Group (SBIG) ST-8E.
Proudly serving laboratories worldwide since 1979 SPECIFICATIONS
 www.ietltd.com Proudly serving laboratories worldwide since 1979 SPECIFICATIONS Scan RDI Specifications System Components Main analytical console Laser Module CRT Printer Data Manager Motorized stage (option)
Image Processing Tutorial Basic Concepts
 Image Processing Tutorial Basic Concepts CCDWare Publishing http://www.ccdware.com 2005 CCDWare Publishing Table of Contents Introduction... 3 Starting CCDStack... 4 Creating Calibration Frames... 5 Create
ImagesPlus Basic Interface Operation
 ImagesPlus Basic Interface Operation The basic interface operation menu options are located on the File, View, Open Images, Open Operators, and Help main menus. File Menu New The New command creates a
Operating Instructions Pocket Pictor For use with Pocket Pc s
 Introduction Operating Instructions Pocket Pictor For use with Pocket Pc s The compact size and low power consumption of Pocket PC s make them ideal for use in the field. Pocket Pictor is designed for
Imaging Photometer and Colorimeter
 W E B R I N G Q U A L I T Y T O L I G H T. /XPL&DP Imaging Photometer and Colorimeter Two models available (photometer and colorimetry camera) 1280 x 1000 pixels resolution Measuring range 0.02 to 200,000
User Guide of ISCapture
 User Guide of ISCapture For Windows2000/XP/Vista(32bit/64bit)/Win7(32bit/64bit) Xintu Photonics Co., Ltd. Version: 2.6 I All the users of Xintu please kindly note that the information and references in
QSC13212D Hi-Resolution CCD Color Camera With 2.8 to 12MM Varifocal Lens And Built-in On Screen Display
 QSC13212D Hi-Resolution CCD Color Camera With 2.8 to 12MM Varifocal Lens And Built-in On Screen Display OPERATION MANUAL Product Manual Thank you for purchasing our products. Please read the manual carefully
AgilEye Manual Version 2.0 February 28, 2007
 AgilEye Manual Version 2.0 February 28, 2007 1717 Louisiana NE Suite 202 Albuquerque, NM 87110 (505) 268-4742 support@agiloptics.com 2 (505) 268-4742 v. 2.0 February 07, 2007 3 Introduction AgilEye Wavefront
SkyRaider DS2.3 PLUS User Manual SKYRAIDER DS2.3 PLUS. [Version 3.3] Michael Burns Rock Mallin
![SkyRaider DS2.3 PLUS User Manual SKYRAIDER DS2.3 PLUS. [Version 3.3] Michael Burns Rock Mallin](/thumbs/83/87275884.jpg "SkyRaider DS2.3 PLUS User Manual SKYRAIDER DS2.3 PLUS. [Version 3.3] Michael Burns Rock Mallin") SKYRAIDER DS2.3 PLUS Revision Sheet [Version 3.3] Michael Burns Rock Mallin [SkyRaider DS2.3 PLUS User Manual] This document will quickly introduce you to the wonders of the MallinCam SkyRaider DS2.3 PLUS
SKYRAIDER DS2.3 PLUS Revision Sheet [Version 3.3] Michael Burns Rock Mallin [SkyRaider DS2.3 PLUS User Manual] This document will quickly introduce you to the wonders of the MallinCam SkyRaider DS2.3 PLUS
The Interfit S1. AC/DC Powered TTL/HSS Flash. Instruction Manual.
 The Interfit S1 AC/DC Powered TTL/HSS Flash Instruction Manual www.interfitphotographic.com Interfit S1 Battery Powered TTL/HSS Flash Unit What s cool about the Interfit S1? The S1 is the world s first
Orion StarShoot Autoguider PRO
 Orion StarShoot Autoguider PRO #52031 Providing Exceptional Consumer Optical Products Since 1975 Customer Support: www.oriontelescopes.com/contactus Corporate Offices: 89 Hangar Way, Watsonville CA 95076
Scientific Image Processing System Photometry tool
 Scientific Image Processing System Photometry tool Pavel Cagas http://www.tcmt.org/ What is SIPS? SIPS abbreviation means Scientific Image Processing System The software package evolved from a tool to
Photometry. Variable Star Photometry
 Variable Star Photometry Photometry One of the most basic of astronomical analysis is photometry, or the monitoring of the light output of an astronomical object. Many stars, be they in binaries, interacting,
Sony PXW-FS7 Guide. October 2016 v4
 Sony PXW-FS7 Guide 1 Contents Page 3 Layout and Buttons (Left) Page 4 Layout back and lens Page 5 Layout and Buttons (Viewfinder, grip remote control and eye piece) Page 6 Attaching the Eye Piece Page
262 The Astrophotography Manual. Templates
 262 The Astrophotography Manual Templates I really didn t foresee the Internet. But then, neither did the computer industry. Not that that tells us very much of course the computer industry didn t even
SkyRaider DS2.3 PLUS User Manual SKYRAIDER DS2.3 PLUS. [Version 3.4] Michael Burns Rock Mallin
![SkyRaider DS2.3 PLUS User Manual SKYRAIDER DS2.3 PLUS. [Version 3.4] Michael Burns Rock Mallin](/thumbs/95/124402897.jpg "SkyRaider DS2.3 PLUS User Manual SKYRAIDER DS2.3 PLUS. [Version 3.4] Michael Burns Rock Mallin") SKYRAIDER DS2.3 PLUS Revision Sheet [Version 3.4] Michael Burns Rock Mallin [SkyRaider DS2.3 PLUS User Manual] This document will quickly introduce you to the wonders of the MallinCam SkyRaider DS2.3 PLUS
SKYRAIDER DS2.3 PLUS Revision Sheet [Version 3.4] Michael Burns Rock Mallin [SkyRaider DS2.3 PLUS User Manual] This document will quickly introduce you to the wonders of the MallinCam SkyRaider DS2.3 PLUS
CHROMACAL User Guide (v 1.1) User Guide
 User Guide") CHROMACAL User Guide (v 1.1) User Guide User Guide Notice Hello and welcome to the User Guide for the Datacolor CHROMACAL Color Calibration System for Optical Microscopy, a cross-platform solution that
CHROMACAL User Guide (v 1.1) User Guide User Guide Notice Hello and welcome to the User Guide for the Datacolor CHROMACAL Color Calibration System for Optical Microscopy, a cross-platform solution that
CHARGE-COUPLED DEVICE (CCD)
") CHARGE-COUPLED DEVICE (CCD) Definition A charge-coupled device (CCD) is an analog shift register, enabling analog signals, usually light, manipulation - for example, conversion into a digital value that
CHARGE-COUPLED DEVICE (CCD) Definition A charge-coupled device (CCD) is an analog shift register, enabling analog signals, usually light, manipulation - for example, conversion into a digital value that
User s Manual. For correct usage please read these instructions carefully and keeps in a safe place for future reference!
 User s Manual For correct usage please read these instructions carefully and keeps in a safe place for future reference! Contents 1: Safety precautions... 2 2: Package contents... 3 3: Description of parts...
Basics of Photographing Star Trails
 Basics of Photographing Star Trails By Rick Graves November 15, 2016 1 What are Star Trails? Night sky images with foreground elements that show the passage of time and the motion of the stars 2 Which
Errata to First Printing 1 2nd Edition of of The Handbook of Astronomical Image Processing
 Errata to First Printing 1 nd Edition of of The Handbook of Astronomical Image Processing 1. Page 47: In nd line of paragraph. Following Equ..17, change 4 to 14. Text should read as follows: The dark frame
The Noise about Noise
 The Noise about Noise I have found that few topics in astrophotography cause as much confusion as noise and proper exposure. In this column I will attempt to present some of the theory that goes into determining
inphoto ID Canon and Olympus camera control software Automatic ID photography User Guide
 inphoto ID Canon and Olympus camera control software Automatic ID photography User Guide 2006 Akond company 197342, Russia, St.-Petersburg, Serdobolskaya, 65a Phone/fax: +7(812)600-6918 Cell: +7(921)757-8319
Handbook for the Starlight Xpress AO unit Issue 1 21/8/2005 Handbook for the Starlight Xpress SXV-AO unit
 Handbook for the Starlight Xpress SXV-AO unit Thank you for purchasing an SXV-AO active optics unit. This device should give you much improved guiding accuracy with almost any telescope and mount. Please
USB Line Camera 8M. Coptonix GmbH
 USB Line Camera 8M Coptonix GmbH Luxemburger Str. 31 D 13353 Berlin Phone: +49 (0)30 61 74 12 48 Fax: +49 (0)30 61 74 12 47 www.coptonix.com support@coptonix.com 2 The USB Line Camera 8M is an easy to
MIF ZEISS LSM510 CONFOCAL USER PROTOCOL
 MIF ZEISS LSM510 CONFOCAL USER PROTOCOL START-UP Turn on the Mercury Bulb Power Supply (if needed). Power-on the Control Box. Turn on the computer. Open the LSM 510 software. Choose Scan New Images and
What an Observational Astronomer needs to know!
 What an Observational Astronomer needs to know! IRAF:Photometry D. Hatzidimitriou Masters course on Methods of Observations and Analysis in Astronomy Basic concepts Counts how are they related to the actual
ISIS A beginner s guide
 ISIS A beginner s guide Conceived of and written by Christian Buil, ISIS is a powerful astronomical spectral processing application that can appear daunting to first time users. While designed as a comprehensive
An Introduction to Histograms in Photography
 An Introduction to Histograms in Photography Histograms are a graphical representation of all the pixels that make up an image, and are plotted by 'Luminance' or brightness. Every pixel, regardless of
Presented by Jerry Hubbell Lake of the Woods Observatory (MPC I24) President, Rappahannock Astronomy Club
 President, Rappahannock Astronomy Club") Presented by Jerry Hubbell Lake of the Woods Observatory (MPC I24) President, Rappahannock Astronomy Club ENGINEERING A FIBER-FED FED SPECTROMETER FOR ASTRONOMICAL USE Objectives Discuss the engineering
Presented by Jerry Hubbell Lake of the Woods Observatory (MPC I24) President, Rappahannock Astronomy Club ENGINEERING A FIBER-FED FED SPECTROMETER FOR ASTRONOMICAL USE Objectives Discuss the engineering
1 ImageBrowser Software User Guide 5.1
 1 ImageBrowser Software User Guide 5.1 Table of Contents (1/2) Chapter 1 What is ImageBrowser? Chapter 2 What Can ImageBrowser Do?... 5 Guide to the ImageBrowser Windows... 6 Downloading and Printing Images
Equinox Image. SBIG Control Manual. Microprojects Equinox Image 1.3 July Equinox Image 1
 Equinox Image SBIG Control Manual Microprojects Equinox Image 1.3 July 2007 Equinox Image 1 Contents Copyright... 4 Registration... 4 Contacting Microprojects... 4 Introduction... 5 This Manual... 5 Initial
NanEye GS NanEye GS Stereo. Camera System
 NanEye GS NanEye GS Stereo Revision History: Version Date Modifications Author 1.0.1 29/05/13 Document creation Duarte Goncalves 1.0.2 05/12/14 Updated Document Fátima Gouveia 1.0.3 12/12/14 Added NanEye
<Motion Panorama> 180 Vertical : 2160 x 9600 Horizontal : 9600 x Vertical : 2160 x 6400 Horizontal : 6400 x 1440
 FUJIFILM X-T10 Spec Sheet Model name FUJIFILM X-T10 Number of effective pixels 16.3 million pixels Image sensor 23.6mm x 15.6mm (APS-C) X-Trans CMOS II with primary color filter Total number of pixels:
Revision History. VX GigE series. Version Date Description
 Revision History Version Date Description 1.0 2012-07-25 Draft 1.1 2012-10-04 Corrected specifications Added Acquisition Control Modified Specifications Modified Camera Features Added Exposure Auto, Gain
How to capture the best HDR shots.
 What is HDR? How to capture the best HDR shots. Processing HDR. Noise reduction. Conversion to monochrome. Enhancing room textures through local area sharpening. Standard shot What is HDR? HDR shot What
Handbook for the SX SuperStar high resolution guide camera
 Handbook for the SX SuperStar high resolution guide camera Thank you for purchasing a Starlight Xpress SuperStar guide camera. We hope that you will be very pleased with the performance of this product.
inphoto ID Canon camera control software Automatic ID photography User Guide
 inphoto ID Canon camera control software Automatic ID photography User Guide 2008 Akond company 197342, Russia, St.-Petersburg, Serdobolskaya, 65A Phone/fax: +7(812)600-6918 Cell: +7(921)757-8319 e-mail:
For customers in Canada This Class B digital apparatus meets all requirements of the Canadian Interference-Causing Equipment Regulations.
 User manual For customers in North and South America For customers in USA This device complies with Part 15 of the FCC rules. Operation is subject to the following two conditions: (1) This device may not
QHY8 modification Temperature control
 QHY8 modification Temperature control by Nicolaj Haarup Starworks Observatory, Denmark March 4 th, 2009 Introduction The QHY8 One Shot color CCD from QHY is a splendid camera with 6 Mega pixels. The camera
Advanced Camera and Image Sensor Technology. Steve Kinney Imaging Professional Camera Link Chairman
 Advanced Camera and Image Sensor Technology Steve Kinney Imaging Professional Camera Link Chairman Content Physical model of a camera Definition of various parameters for EMVA1288 EMVA1288 and image quality
Digital camera. Sensor. Memory card. Circuit board
 Digital camera Circuit board Memory card Sensor Detector element (pixel). Typical size: 2-5 m square Typical number: 5-20M Pixel = Photogate Photon + Thin film electrode (semi-transparent) Depletion volume
[Mallincam HD-10 User Manual] MALLINCAM HD-10. HD-10 User Manual. [Version 1.0] Michael Burns Rock Mallin
![[Mallincam HD-10 User Manual] MALLINCAM HD-10. HD-10 User Manual. [Version 1.0] Michael Burns Rock Mallin](/thumbs/90/103499737.jpg "[Mallincam HD-10 User Manual] MALLINCAM HD-10. HD-10 User Manual. [Version 1.0] Michael Burns Rock Mallin") MALLINCAM HD-10 Revision Sheet [Version 1.0] Michael Burns Rock Mallin [Mallincam HD-10 User Manual] This document will quickly introduce you to the wonders of the MallinCam HD-10 Camera. We will include
MALLINCAM HD-10 Revision Sheet [Version 1.0] Michael Burns Rock Mallin [Mallincam HD-10 User Manual] This document will quickly introduce you to the wonders of the MallinCam HD-10 Camera. We will include
Ch. 1 - Installation Guidelines
 Ch. 1 - Installation Guidelines Table of Contents Ch. 1 - Installation Guidelines Introduction... 8 The Image-Pro Driver Interface... 8 Installing the SPOT Image-Pro Driver... 8 Image-Pro Driver Supplement
Welcome 1. Precaution
 Table of Contents EN Precaution....2 Preparation.. 4 Standard accessories....4 Parts Names & Functions...5 Computer System requirements.... 6 Technical Specifications 7 Install the software.. 7 Start Microscope.8
Brightfield Microscopy and Image Acquisition on Spotcam1. by Ryan Taylor/Nancy Kleene Last modified 10/02/05 by Birgit Ehmer
 Brightfield Microscopy and Image Acquisition on Spotcam1 by Ryan Taylor/Nancy Kleene Last modified 10/02/05 by Birgit Ehmer Log onto the computer. Enter your username and password to log onto the server.
MC3 Motion Control System Shutter Stream Quickstart
 MC3 Motion Control System Shutter Stream Quickstart Revised 7/6/2016 Carousel USA 6370 N. Irwindale Rd. Irwindale, CA 91702 www.carousel-usa.com Proprietary Information Carousel USA has proprietary rights
This has given you a good introduction to the world of photography, however there are other important and fundamental camera functions and skills
 THE DSLR CAMERA Before we Begin For those of you who have studied photography the chances are that in most cases you have been using a digital compact camera. This has probably involved you turning the
Equinox Image. SBIG Control Manual. Microprojects Equinox Image September Equinox Image 1
 Equinox Image SBIG Control Manual Microprojects Equinox Image 1.11.2 September 2010 Equinox Image 1 Contents Copyright... 4 Registration... 4 Contacting Microprojects... 4 Introduction... 5 This Manual...
X-ray Spectroscopy Laboratory Suresh Sivanandam Dunlap Institute for Astronomy & Astrophysics, University of Toronto
 X-ray Spectroscopy Laboratory Suresh Sivanandam, 1 Introduction & Objectives At X-ray, ultraviolet, optical and infrared wavelengths most astronomical instruments employ the photoelectric effect to convert