Introductions. Introduction. Introduction. Introduction 10/18/2014. Instructor Scott Campbell
|
|
|
- Francine Hicks
- 6 years ago
- Views:
Transcription


1 Introductions Instructor Scott Campbell Name /Title/Years of Service Department / Dept Size Experience with Photography What are your Responsibilities with Evidence and Crime Scene photography What do you want out of this class Guidelines & Best Practices For current Guidelines and Best Practices utilize the website for The International Association for Identification (theiai.org) SWGIT Guidelines (Scientific Working Group on Imaging Technology) Some of the information available Equipment Image capture, processing, archiving & authentication Photography of latent, tire and footwear impressions Introduction Crime scene photography tells a story to those who were not present at the scene. Provides visual preservation of the scene, location and condition of evidence, and creates a permanent record Aids in the reconstruction of events Refreshes the memory of investigators and witnesses Introduction Ensures accurate representation of the evidence for a thorough investigation and successful prosecution of the case. Documents the location and condition of evidence Photographs can help make or break a case. Introduction Remember, prosecutors, judges, juror s, witnesses and victim s families may view the photographs you take. Your work is not only a reflection upon your department, but a reflection upon you. Photos should always be fair and accurate so they can be used in court 1


2 Why do you need to spend so much time learning photography? Not every scene will require you to: Dust for prints Collect blood or DNA Cast shoe or tire impressions Collect other trace evidence However, all scenes require quality photographs before any processing occurs!!!!! Can t I just use the camera s automatic setting? Quality modern camera equipment will produce very good photos most of the time. However, you can take better photos yourself if you understand basic principles and make manual adjustments. The camera doesn t know what your goal is and can produce a photo that is too light, too dark or out of focus. Camera was on automatic image too dark Camera on automatic may not expose properly creating either a too dark, or too light image By using the camera s meter, you can decide the proper exposure and adjust for it What creates this shadow? Has this happened to you? The objects of interest are on the table but are blurry & dark due to the default setting in the camera. The focus sensor picked up the closest object instead. 2


3 This was corrected by simply locking the focus sensor on the object of interest by pressing the shutter halfway, then re-composing and capturing the image What is needed to create proper exposure? ISO Noise Proper Exposure Shutter Speed Motion Blur Depth of Field Aperture Body Nomenclature Memory card slot cover Located on the side of the camera, allows you to place digital media into camera. Keep closed to prevent dirt and moisture out. Use caution when inserting your digital media into the slot to prevent damage to the metal contacts that are inside, and always have camera turned off. Contact points Damaged CF Memory Card Diopter Body Nomenclature Auto Exposure/ Auto Focus Lock Command Dial Single or Continuous Shooting Mode Body Nomenclature Playback Viewfinder Multi Selector Menu ISO/Thumbnail Monitor Delete White Balance/ Help/Protect Image Quality 3
 Menu White Balance/ Help/Protect ISO/Thumbnail Image Quality Flash Mode")


4 Single or Continuous Shooting Mode Body Nomenclature Playback Menu Body Nomenclature Zoom/Thumbnail/ Zoom Playback/Help (Optical vs Digital) Menu White Balance/ Help/Protect ISO/Thumbnail Image Quality Flash Mode Self-Timer Macro Playback Flash Lamp Indicates Ready Status Multi Selector Delete Auto/Scene/ Movie Body Functions Body Functions Hot Shoe / PC Socket Hot shoe is on top of camera PC socket is usually on the side or front of camera body Self Timer Pentaprism is a five-sided optical glass element that reflects light Mirror Directly behind the end of the lens that attaches to the camera body. Covers the shutter or sensor and allows camera user to see through the eye piece and look directly through the lens for a what you see is what you get. Body Functions Shutter Traditional type was a curtain made of cloth. Modern cameras use blades made of aluminum alloy, carbon fiber or titanium that blocks the light that comes through the lens. The shutter opens and closes at a preset amount of time called shutter speed. Usually found at the back of the camera, just in front of the film. With digital, you may have an electronically controlled shutter or a combination of mechanical shutter and electronic sensor that turns on for a specific amount of time. Body Functions - Image Sensor Size Film has been replaced by a microchip with microscopic transistors. Millions of transistors create the chip that is the image sensor. The larger the sensor, the better the quality. As the sensor is made smaller, a multiplier is used to replicate a normal (cropped) view or normal perspective. APS-C is multiplied by approx 1.5x. 4


 35mm lens with APS-C smaller sensor If you")


5 Field of view/perspective Full size sensor vs. Smaller digital sensor 35mm or higher end on most of the DSLRs DSLR 50mm lens with Full Frame camera In order to replicate a normal view or perspective, a full frame camera would use a 50mm lens as shown above With a digital camera that has a smaller sensor, you would use about a 35mm lens as shown below. 35mm x (close to 50mm) 35mm lens with APS-C smaller sensor If you don t compensate for the smaller sensor, you will have a cropped effect 50mm lens with Full Frame camera 50mm lens with smaller sensor. Notice the cropped, or enlarged image Body Functions Camera modes Different cameras have different modes available Scenes (could be programs for action or portraits indicated by icons of a runner or woman s face) Shutter Priority Aperture Priority Manual Automatic Program Body Functions Lens Release Button Focus Auto Manual 5

 Measured in millimeters Wide angle Digital APS-C less than 35mm Normal")


6 Lens Functions Lens Serves to focus light rays / image so it is crisp and clear on the sensor. Focal Length (affected by the size of the camera s sensor) The smaller the sensor, the more magnification (crop) Measured in millimeters Wide angle Digital APS-C less than 35mm Normal Digital 35mm (Full frame DSLR, then 50mm) Telephoto Digital APS-C greater than 35mm Zoom multiple focal lengths incorporated into same lens mm With most point and shoot cameras it s not easy to figure out what focal length the lens is set at Lens Functions Focal length can distort normal perspective 24 mm lens 50 mm lens 200 mm lens Lens Designations & Controls Focal Length Settings mm Manual Focus Adjustment Auto/Manual Focus Selection Zoom Focus Lowest F-Stop Settings available with this lens, 18mm, 70mm Zoom Adjustment Vibration Reduction Known as VR, IS, OS Auto Focus vs. Manual Focus Auto focus works well and quickly in bright areas In limited lighting, the camera may not let you take the photo if the camera can t focus Manual focus will generally be best for close up work and especially where limited light is available Manual also works well for moving objects if you can pre-focus on an area then take the photo as the person or object moves into the area, such as surveillance and sporting events Common types of flash memory cards for digital cameras: Compact Flash Secure Digital (SD) xd-picture Card Size of memory Memory Stick 6
 of your camera, the quality of image, and file size you choose.")


 1/125 th (indicated by the number 125, or")
7 How many photos can a card hold? Memory cards come in different storage capacities, ranging from 8MB all the way up to 64GB and beyond. How many digital photos the card can store depends on the resolution (megapixels) of your camera, the quality of image, and file size you choose. The higher the resolution or megapixels, the larger the file size and the more memory each photo uses. Many SOP s recommend using the highest quality images for crime scene and evidence such as RAW Some labs require RAW files for comparison work Otherwise use higher quality JPEG images In addition to resolution, the capacity also depends on the combination of image quality and image size Using a 1 GB card in a 6.1 megapixel Nikon D50 camera, the following chart indicates the photo capacity Printed image size: Large Medium Small 15 x x x5 RAW 135 N/A N/A JPEG Fine JPEG Norm JPEG Basic RAW + Basic 119 N/A N/A The combination of image quality and image size can be selected in the menu or external buttons Exposure compensation Causes camera to under or over expose your subject to match lighting conditions Exposure Compensation EV -2 EV -1 EV 0 EV +1 EV +2 Shutter Speed The AMOUNT of TIME the shutter is open or the digital sensor is on, allowing light to strike the sensor Combined with aperture & ISO for proper exposure Generally measured in fractions of a second 1/60 th (indicated by the number 60, or 1/60) 1/125 th (indicated by the number 125, or 1/125) May be seconds or even several minutes long 1 second (usually indicated by 1 or different color) 30 seconds (usually indicated by 30 ) Bulb is used for time longer than 30 seconds 7


8 Shutter Speed Controls Motion Fast shutter speeds freeze motion Bullet being shot from a gun Race car stopped on the track Sporting events Slow shutter speeds blur motion Car s taillights shown at night as a long red streak behind the car Shutter Speed On bright sunny days, you have the chance to overexpose your photos, or wash them out In order to reduce the amount of light getting to the digital sensor, use a faster shutter speed Change from 1/60 or 1/125 of a second, to a faster speed of 1/500 or even 1/1000 th of a second Flash Synchronization Speed Generally about 1/60 th Second May be higher depending on camera (1/125, 1/250) Too fast of a shutter speed can cause part of the photograph to be cut off Shutter Speed Slower shutter speed allows more light (exposure) F4 F8 May be set by a dial or combination of buttons and/or dials 60 actually means 1/60 th of a second Shutter speeds will be displayed in the control panel, viewfinder, on the monitor or a combination of these 1/125 1/60 F16 F22 1/30 1/15 Shutter Speed 1/60 Camera held still, But too slow for vehicle Shutter Speed 1/250 Camera and vehicle movement 8


9 Shutter Speed 1/250 Camera panned with vehicle Shutter Speed 1/1000 Camera hand held Standard Full Shutter Speed Stops 1/2000 1/1000 1/500 1/250 1/125 1/60 1/30 1/15 1/8 1/4 1/2 Tripod suggested below this speed indicates full seconds Speeds continue up to Bulb after 30 Shutter Speed shown on camera Some speeds can get confusing between 1/8 second and 2 seconds /8 1/6 1/5 1/4 1/3 1/2.5 1/2 1/1.6 1/ Seconds.166 Seconds.20 Seconds.25 Seconds.33 Seconds.4 Seconds.5 Seconds.625 Seconds.77 Seconds 1.0 Seconds 1.33 Seconds 1.6 Seconds 2.0 Seconds Aperture F/stops A specific sized hole that is controlled w/in the camera lens Allows a specific amount of light through the lens to the sensor The larger the opening, the more light gets in Controls Depth of field 9


10 Larger opening (lower number) allows more light F4 F16 F8 F22 Depth of Field The area of the photograph before and after the point of focus that is clear and sharp Controlled by the aperture The larger the opening, the less depth of field The smaller the opening, the greater depth of field It becomes more critical on close up photography such as fingerprints on a curved surface such as a light bulb or door knob F-4.8 Depth of Field The point of focus can also affect the depth of field Balance depth by using the rule of thirds which means to focus one third of the way through the scene F-8 F-16 The closer to the object, the more important depth of field becomes Close up of fingerprint on light bulb F-4.8 F-40 F-5.6 F-36 10


 to allow the proper amount of light to strike the")
11 Film/Digital Sensitivity ISO Film speed or the digital equivalent Film speed/iso is the sensitivity to light The lower the ISO number, the less sensitive to light The higher the ISO number, the more sensitive to light 100 speed film is less sensitive to light and needs MORE light to be properly exposed than does 200 speed film The more sensitive to light, the more grainy it gets, generally lowering quality ISO 100 produces better quality than ISO 1600 ISO Changes: How Much Does It Affect Quality ISO 200 ISO 1600 ISO 200 ISO 400 ISO 200 ISO Second Shutter No Flash ISO 800 ISO 1600 ISO 800 ISO 1600 Changing ISO settings External buttons Menu selection What is the Sum of the Equation? Exposure! Exposure is the combination of shutter speed, ISO and aperture (F-Stop) to allow the proper amount of light to strike the sensor. This is needed to properly record what you see for later reproduction 11


12 Exposure Determined by Through The Lens metering or TTL In camera (TTL) metering is accomplished by using the meter you see inside the camera s view finder (or on the monitor) to adjust exposure May be a series of vertical or horizontal lines with a + or at opposite ends. May be a series of numbers such.3,.7, 1.0, 1.3 etc. with a + or - on the side or bottom of the view finder. Control Panel, Viewfinder or Monitor Metering Camera may have different metering modes Overall or Matrix Meters % of the scene Center weighted Meters about 10-30% of the center of the frame Spot Meters about 1-9% of the frame Manual Camera operator moves to about one foot away from object of photography and sets the f/stop and/or shutter speed Then moves away, composes and takes photos at that setting Can be used to obtain proper exposure in darkened areas Canon Metering Modes Evaluative: All around averaging Partial: Good for backlighting Spot: Specific small area Center-weighted: Metered at center then averaged Metering can be adjusted with an external button or in the menu Nikon Canon 12


13 Where s the gun? There it is! Camera used with automatic setting is fooled by the light sky in the background and creates a dark subject. Instead, use the camera s meter to sense the area in the shadows for proper exposure 13


 Fluorescent (approx.")
 Cloudy or Shade (6500-8000 Kelvin) Flash")


14 Some cameras have histograms viewed on the rear monitor Dark tones on left Light tones on right missing Some cameras will have only a brightness histogram shown in white. Others will have a histogram for each of the red, green and blue color channels Information available about the captured image during review or playback Metadata or shooting data and Highlights White Balance Computer generated settings to compensate for lighting conditions Incandescent (approx Kelvin) Fluorescent (approx Kelvin) Sunlight noon (approx Kelvin) Cloudy or Shade ( Kelvin) Flash Custom (preset) Light Temperature Different sources of light have different light temperature Measured in degrees Kelvin Warmer temperatures are orange Cooler are blue White Balance Incandescent Bulb Auto Setting Incandescent Bulb Fluorescent Setting Incandescent Bulb Incandescent Setting Incandescent Bulb Custom Setting 14


15 Flash Dedicated Is camera brand, make, model specific Provides automatic exposure functions by communicating with the camera to find distance from subject and calculate amount of light for proper exposure. Can need specific equipment such as flash synchronization cord Generally more versatile but can be more expensive Non-Dedicated Is brand generic and usually less expensive Works with most camera s May have to adjust settings manually Nikon SB-900 Flash Modes Front-Curtain Sync: used for most situations. In P and A modes, shutter will be set automatically between 1/250 and 1/60. Slow Sync: used with slow shutter speeds up to 30 seconds. Captures both subject and background at low light. Rear-Curtain Sync: Flash fires just before shutter closes. Red-Eye Reduction: Flash pre-flashes before main flash. Red-Eye w/slow Sync: Combines both. Flash The further an object is from the flash, the less light the object will receive to be properly exposed Light intensity drops off very quickly 15


16 Flash Technique Best if flash is off camera The angle of incidence is equal to the angle of reflection. If slightly angled, there is little or no glare or wash out reflection in the photograph. Bounce flash can also be used. Flash Technique Bounce May bounce off of ceiling, wall, floor, any object Must allow for one stop correction Light fall off occurs due to the distance that the light has to travel. You will probably have to adjust by an F-Stop and or increase the power of the flash Direct - can result in wash out Flash Technique Diffused A translucent filter is placed over the flash to diffuse or break up the light and give it a softer look Fill Flash Used to add light to shadows 16


17 No Flash used Fill Flash Fill Flash No Flash, Just Over-Exposed Flash Compensation Flash power/output can be adjusted Adjusting Flash Power Levels Adjusting Flash Power Levels Adjusting Standard TTL exposure usually by 1/3 stops Adjusting Manual mode exposure Menu 17
 Rotate the sector dial by 1/3 steps up to +3.")
 Press the OK button to set 4) To cancel, turn the selector back to 0.")


18 Adjusting Flash Power Levels Nikon SB-900 TTL 1) Press the Function button to highlight the Flash Output level 2) Rotate the sector dial by 1/3 steps up to +3.0 or down to ) Press the OK button to set 4) To cancel, turn the selector back to 0. It will not return just by turning it off. Adjusting Standard TTL exposure usually by 1/3 stops Flash Technique Impression Evidence Use flash at different angles/heights 3 Dimensional footwear and tire impressions generally require from 0 to 45 degrees of angle The deeper the impression, the higher the angle Take multiple photos with low, medium and high flash positions from all four sides Can be used for tool impressions, latent prints, bite marks and injuries More detail just by moving the flash position 3 Dimensional Footwear Flash directly above impression 3 Dimensional Footwear Flash from bottom 18
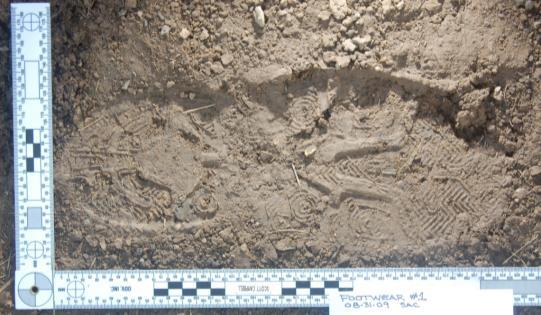
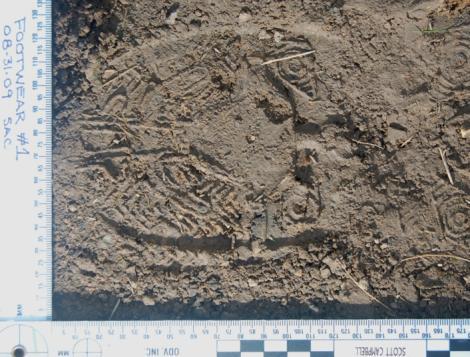

19 3 Dimensional Footwear Flash from top Heal section Front of shoe impression Camera set up How to create shade 19


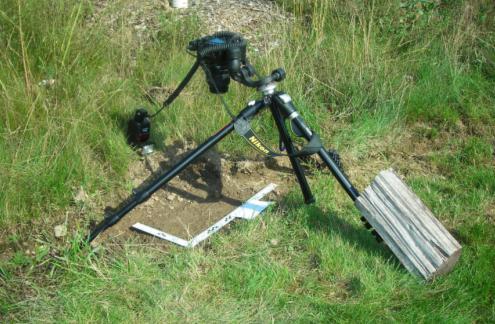
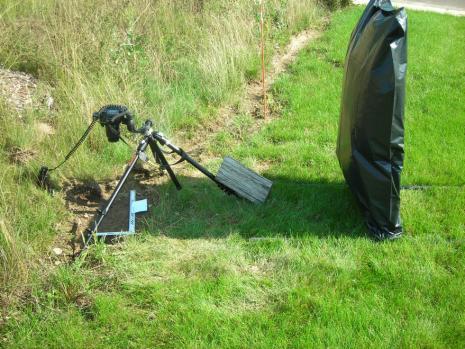
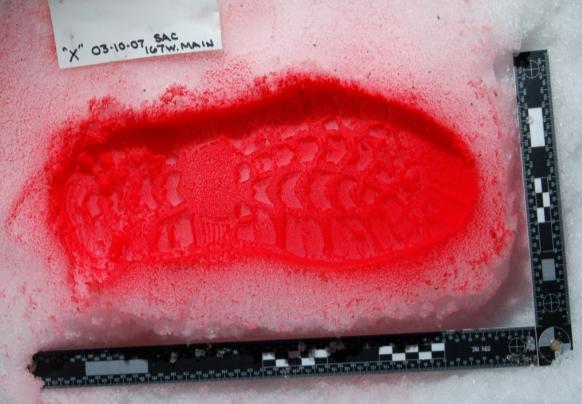
20 Scale must be at the correct depth Camera set up Camera back parallel to the impression tread Fill the frame with impression and scale Scale placed at same depth as tread Add label/document impression information Use highest quality settings such as RAW Use a normal lens such as 35mm or 50mm Use flash from all four sides and three different heights: low, medium and high Some equipment that can make it easier Some equipment that can make it easier 2 Dimensional Footwear Flash directly above impression 2 Dimensional Footwear Flash at very low angle from right 20


21 2 Dimensional Footwear - EDL 2 Dimensional Footwear Add Golf Ball Marker 2 Dimensional Footwear Notice shadow From marker Photos through glass Position camera and flash on glass 21


22 Use of a polarizer filter Bottom photos are better with no glare from flash Time Exposure Equipment needed Camera Digital media Lens Shutter release cable (optional) or remote Tripod Procedure Focus 1/3 of the way through the scene Take a metered reading and take a photograph as such Next, take photographs of varying time lengths. Good rule of thumb is 15, 30, 60 seconds Time may vary depending on lighting May need more or less time 2.5 Seconds 5 Seconds All photos shot at ISO 200/F-5.6/18mm lens. 10 Seconds Scene using flash Time Photography F4.8/120 sec/iso


23 Time Exposure Fluorescent photography Same basic equipment and procedure Times will vary Use small f/stops I.e.: f/11 or f/16 Use a scale that does not wash out, but shows in the photograph Forensic light source Normal flash photography Forensic light source Photo with Microblue w/o filter Forensic light source Photo with Microblue w/ filter Exposure: 20 F


24 Forensic light source Normal flash photography Forensic light source Photo with Microblue w/o filter Forensic light source Urine with Microblue Exposure: 13 F-7.1 Normal flash photography RSAI Forensic light source Photo with Microblue w/ filter 10 second exposure 24


25 Fluorescent powder F5.6/ISO 200/5 seconds Time Exposure Luminol Same basic Time Exposure set up Exposures greatly vary depending on strength of glow from the suspected blood and how much you can cause it to fluoresce without diluting the sample Photograph in normal light with and without a scale Use caution and protective gear when using any luminol type chemicals Use larger (more open) f/stops to gather more light You may need to increase the ISO setting Luminol Luminol Time Exposure TV screens, monitors or even cell phones. 1/80th second 1/20th second Painting with Light Procedure Focus 1/3 of the way through scene Set flash at highest power setting Use a partner if possible Set camera to bulb setting to lock shutter open The person with the flash signals the camera operator to lock open the shutter. The flash operator then holds the flash away from their body and at a slight angle away from the camera and into the scene. The flash is then manually discharged about every fifteen to twenty feet for the length of the scene. DO NOT flash back at the camera The same procedure is then performed, only the flash operator comes back toward the camera on the opposite side of the scene 25


26 Single flash used with ISO 400, F-5.6, 1/60 second ISO 400, F-8, 80 seconds painted with multiple flashes Painting with Light ISO 400, F-8, 30 seconds painted with multiple flashes Scales Proper scales MUST be used for comparisons by the crime lab Used for fingerprints Tool marks Foot and tire impressions Bite marks Blood spatter 26


27 Use accurate scales Placards/Evidence Markers Numbered or lettered scene markers Used to show items of evidence in the scene May be tent markers Cones Paper cups if necessary All placards should face the same direction in order to be viewed from the same direction Good Lay out markers in a logical order Bad 27
 of evidence Additional when needed: Macro Photo examination quality Fields of View/Scene Shots Overall Photograph")


28 Fields of View/Scene Photos Use the Rule of Three Overall Photos (orientation) establishes location Medium Photos (relationship) relationship of evidence to location and other evidence Close Up Photos (identification) of evidence Additional when needed: Macro Photo examination quality Fields of View/Scene Shots Overall Photograph Shows a general overall view of the scene from the investigator s view starting in proper event sequence May be used to show a witness viewpoint and confirm or deny their eye witness account. Wide angle lens can be used if needed Overlap photos of walls, ceilings and floors to stitch or connect them together later Fields of View Medium Shows more detail of the scene and items while still being able to place them within the scene Close up Shows great detail of specific items, not able to place it in the scene by the photograph alone Macro Shows very fine details of wounds, tools, tool marks, impressions, fingerprints, bite marks Scale required for comparison work 28


29 Medium Photograph Shows more detail of the scene and items within the scene Over-lapping of photos needed to show relationship of different pieces of evidence and their locations With and w/o scene marker if appropriate Close up Photograph Shows great detail of specific items, but not able to place item in the scene by the photograph alone Most likely with scene placard / marker Shows object of interest in great detail Accurate scale required for comparison work Latent, footwear and tire impressions Tool and bite mark impressions Blood pattern evidence Any small evidence to indicate actual size 29


30 VIN Through Glass may shoot flash through the glass or put flash inside the windshield and point down Close up - Macro Film plane should be parallel to object being photographed Must be done for proper comparison by crime lab Effective use of flash techniques is very important for macro work Camera should be steady, a tripod helps Depth of field is very shallow Must correct for this Correct this by using a smaller f/stop f/11, f/16, f/22 Macro photo of latent Latent on knife blade Serious Accident Photos Take photos down all sides of vehicles and at each corner. Use a 35mm lens for APS-C digital sensor or 50mm for full size to replicate what the eye would see 30

31 In addition to taking medium and close ups, take over-all towards scene and 8 directions away from scene. For night photos open the F-stop up (smaller number such as F-4 or F-2) Accident Scene Scene location identifiers Street signs Major identifiers Landmarks buildings When taking photos from an eyewitness point of view, take photos from the witness to the scene and from the scene back to the witness. Accident Scene Contributing factors to accident Snow / ice Anything that blocks vision of drivers Drug or alcohol usage Roadway signage Evidence of speed Length of scene Accident Scene Accident evidence Gouges / scrapes Skid / yaw marks Roadway signage Seatbelt usage Interior damage or operation Interior contents Seat / Steering wheel positions Yaw Anatomy Treat injury photos just like any other evidence Photograph a sequence using all three views such as: Person overall view Face and upper body with injury to elbow Elbow injury with and without scale Knees and Elbows can look the same with only a close up photo Use caution so you don t over-expose or wash out with flash too close or too much power 31


32 Flash positioning and power settings can make a difference with bruises. Shin, calf, arm or? Draping The use of draping will allow you to take photographs of injuries near intimate parts of the body w/o exposing those parts. Explain to the victim what photos you will be taking and why they are needed Have hospital staff drape victim using a clean hospital bed sheet It s a good idea to have a witness present such as someone from the hospital staff while photos are taken Archiving Images Crime scene photos are evidence A standard operating procedure (SOP) should be used or established to ensure consistent integrity of photographic evidence SOP should spell out who takes the photos, by who and how the images are uploaded or burned, and responsibility for storage and retention Images should be archived or saved in a combination of locations such as CD, DVD, Hard Drive, Records Management System, etc. 32
33 Documentation on the CD face CD-R One Original and one Back-Up CD-R can be created for each assignment. Burn each onto a CD or DVD and label each properly. ORIGINAL OR BACK-UP CAD# IR# BURGLARY J.D. Only approved Sharpie CD/DVD markers should be used 700MB/80min Other info that can be added: CAD Number, Incident Number, Type of Case, Your Initials Permanent markers and adhesive labels can deteriorate data on CD s. Only use markers designated safe for CD/DVD surfaces Only a thin layer of acrylic or plastic separates the label, or top surface, from the aluminum which contains your data Polycarbonate plastic body of a CD-R Label Aluminum Laser reads from the bottom through the polycarbonate plastic Dye 1.2mm Photographic ID Card Typically should be the first or last shot in the series of photos Best if card is pre-made It is used to establish a connection/chain of evidence of the photos to your scene Also helps if the photos or CD gets misplaced Photographic ID Card ID Cards could show (whatever works best for your department) Agency name Photographer Case number Time Date Media card number Location / Address Case Type POLICE DEPARTMENT NAME PHOTOGRAPHIC RECORD SHEET Sample LOCATION: DATE: / / TIME: TYPE OF INCIDENT: PHOTOGRAPHER: CAMERA BODY: FLASH CARD: Records Photographic log Record specific information about each photo (could include): Address and/or location within the scene Camera, lens, and flash used or not used Photo or frame number Describe item photographed, distance from camera and direction camera is pointing Date, time Any other information deemed appropriate by your department You should document every photo!!! 33

34 Records Photographic log Can assist those who review the photos to understand what your intent was, or for those that must use the photo evidence for reconstruction such as fire scenes, accident scenes or blood patterns Remember, you can t always collect all evidence from your scene such as a tire skid mark. It would be important to know which vehicle it came from, what direction it was going, and the sequence if more than one mark exists. Sample Photography Safety Issues Safety Safe from suspects and crowds Make sure you re-clear the house after patrol has done so Blood borne pathogens Structurally sound Especially in cases of fire Photography Safety Issues Traffic General building construction Animals Downed wires / electrical hazards Equipment Care Rain / Snow Use 1 or 2 gallon zip lock bag to cover the camera and lens or flash Cut holes for lens and operate camera from opening in the bag Digital equipment is much more sensitive to moisture than manual film cameras so use an umbrella or improvise with rain gear or a large piece of cardboard held overhead Pro s Digital Able to see work immediately other jurisdictions Able to manipulate (correct mistakes) Cost savings and environmentally friendly Con s Able to manipulate Must have STRICT chain of custody Quality - Enlargements may not be as clear as film Comparisons by crime lab are not always possible Use uncompressed or lowest ratio of compression possible 34


35 Digital Terminology Zoom Optical Enlarges or magnifies using the lens Better option than digital zoom Digital Software (electronically enhanced) enlargement of picture Distorts image causing poor quality How large is the blood spot? Hit & Run Accident Scene Center of Striking Vehicle 35


36 WDK-710 OR WCK-710 What does the black arrow indicate? Which photo shows the right side next to the auto better? Open the F- Stop and increase flash power manually. TTL Manual settings 36


37 When done manually, the results are much better! Remember These So you don t end up one of these 37
PowerPoint is available on-line ecampus.matc.edu/policetraining. Introductions. IAI Benefits continued
 Milwaukee Area Technical College Instructor Scott Campbell scott@ronsmithandassociates.com 07-11-17 PowerPoint is available on-line ecampus.matc.edu/policetraining Required Equipment: Students need to
Lighting Techniques 18 The Color of Light 21 SAMPLE
 Advanced Evidence Photography Contents Table of Contents General Photographic Principles. 2 Camera Operation 2 Selecting a Lens 2 Focusing 3 Depth of Field 4 Controlling Exposure 6 Reciprocity 7 ISO Speed
Intro to Digital SLR and ILC Photography Week 1 The Camera Body
 Intro to Digital SLR and ILC Photography Week 1 The Camera Body Instructor: Roger Buchanan Class notes are available at www.thenerdworks.com Course Outline: Week 1 Camera Body; Week 2 Lenses; Week 3 Accessories,
Presented to you today by the Fort Collins Digital Camera Club
 Presented to you today by the Fort Collins Digital Camera Club www.fcdcc.com Photography: February 19, 2011 Fort Collins Digital Camera Club 2 Film Photography: Photography using light sensitive chemicals
TAKING GREAT PICTURES. A Modest Introduction
 TAKING GREAT PICTURES A Modest Introduction HOW TO CHOOSE THE RIGHT CAMERA EQUIPMENT WE ARE NOW LIVING THROUGH THE GOLDEN AGE OF PHOTOGRAPHY Rapid innovation gives us much better cameras and photo software...
DSLR Essentials: Class Notes
 DSLR Essentials: Class Notes The digital SLR has seen a surge in popularity in recent years. Many are enjoying the superior photographic experiences provided by these feature packed cameras. Interchangeable
ONE OF THE MOST IMPORTANT SETTINGS ON YOUR CAMERA!
 Chapter 4-Exposure ONE OF THE MOST IMPORTANT SETTINGS ON YOUR CAMERA! Exposure Basics The amount of light reaching the film or digital sensor. Each digital image requires a specific amount of light to
Introduction to camera usage. The universal manual controls of most cameras
 Introduction to camera usage A camera in its barest form is simply a light tight container that utilizes a lens with iris, a shutter that has variable speeds, and contains a sensitive piece of media, either
TAKING GREAT PICTURES. A Modest Introduction
 TAKING GREAT PICTURES A Modest Introduction 1 HOW TO CHOOSE THE RIGHT CAMERA EQUIPMENT 2 THE REALLY CONFUSING CAMERA MARKET Hundreds of models are now available Canon alone has 41 models 28 compacts and
CAMERA BASICS. Stops of light
 CAMERA BASICS Stops of light A stop of light isn t a quantifiable measurement it s a relative measurement. A stop of light is defined as a doubling or halving of any quantity of light. The word stop is
Mastering Y our Your Digital Camera
 Mastering Your Digital Camera The Exposure Triangle The ISO setting on your camera defines how sensitive it is to light. Normally ISO 100 is the least sensitive setting on your camera and as the ISO numbers
Chapter 11-Shooting Action
 Chapter 11-Shooting Action Interpreting Action There are three basic ways of interpreting action in a still photograph: Stopping action (42) Blurring movement Combining both in the same image Any
DIGITAL PHOTOGRAPHY FOR OBJECT DOCUMENTATION GOOD, BETTER, BEST
 DIGITAL PHOTOGRAPHY FOR OBJECT DOCUMENTATION GOOD, BETTER, BEST INTRODUCTION This document will introduce participants in the techniques and procedures of collection documentation without the necessity
A Beginner s Guide To Exposure
 A Beginner s Guide To Exposure What is exposure? A Beginner s Guide to Exposure What is exposure? According to Wikipedia: In photography, exposure is the amount of light per unit area (the image plane
FOCUS, EXPOSURE (& METERING) BVCC May 2018
 BVCC May 2018") FOCUS, EXPOSURE (& METERING) BVCC May 2018 SUMMARY Metering in digital cameras. Metering modes. Exposure, quick recap. Exposure settings and modes. Focus system(s) and camera controls. Challenges & Experiments.
FOCUS, EXPOSURE (& METERING) BVCC May 2018 SUMMARY Metering in digital cameras. Metering modes. Exposure, quick recap. Exposure settings and modes. Focus system(s) and camera controls. Challenges & Experiments.
CTE BASIC DIGITAL PHOTOGRAPHY STUDY GUIDE
 CTE BASIC DIGITAL PHOTOGRAPHY STUDY GUIDE VOCABULARY Histogram a graph of all tones in an image Image/adjust (hue/saturation, brightness/contrast) hue: color name (like green), saturation: how opaque (rich
Presented by Craig Stocks Arts by Craig Stocks Arts
 Presented by Craig Stocks Arts www.craigstocksarts.com 2010 by Craig Stocks Arts Basic camera settings for point and shoot cameras (resolution, quality) Resolution - how much can you enlarge a picture?
Elements of Exposure
 Elements of Exposure Exposure refers to the amount of light and the duration of time that light is allowed to expose film or a digital-imaging sensor. Exposure is controlled by f-stop, shutter speed, and
FUNDAMENTALS OF DIGITAL PHOTOGRAPHY FOR FIRE INVESTIGATORS
 FUNDAMENTALS OF DIGITAL PHOTOGRAPHY FOR FIRE INVESTIGATORS Ryan M Cox, B.Sc. FPET, CFEI, CFI, CFPS Kodiak Fire & Safety Consulting, USA ABSTRACT A photograph is worth 1000 words is a saying that is believed
Camera controls. Aperture Priority, Shutter Priority & Manual
 Camera controls Aperture Priority, Shutter Priority & Manual Aperture Priority In aperture priority mode, the camera automatically selects the shutter speed while you select the f-stop, f remember the
To start there are three key properties that you need to understand: ISO (sensitivity)
") Some Photo Fundamentals Photography is at once relatively simple and technically confusing at the same time. The camera is basically a black box with a hole in its side camera comes from camera obscura,
Some Photo Fundamentals Photography is at once relatively simple and technically confusing at the same time. The camera is basically a black box with a hole in its side camera comes from camera obscura,
DIGITAL PHOTOGRAPHY CAMERA MANUAL
 DIGITAL PHOTOGRAPHY CAMERA MANUAL TABLE OF CONTENTS KNOW YOUR CAMERA...1 SETTINGS SHUTTER SPEED...2 WHITE BALANCE...3 ISO SPEED...4 APERTURE...5 DEPTH OF FIELD...6 WORKING WITH LIGHT CAMERA SETUP...7 LIGHTING
AF Area Mode. Face Priority
 Chapter 4: The Shooting Menu 71 AF Area Mode This next option on the second screen of the Shooting menu gives you several options for controlling how the autofocus frame is set up when the camera is in
Aperture & Shutter Speed Review
 Aperture & Shutter Speed Review Light Meters Your camera s light meter measures the available light in a scene. It does so by averaging all of the reflected light in the image to find 18% gray. By metering
This has given you a good introduction to the world of photography, however there are other important and fundamental camera functions and skills
 THE DSLR CAMERA Before we Begin For those of you who have studied photography the chances are that in most cases you have been using a digital compact camera. This has probably involved you turning the
Understanding the Controls and Settings on your Digital Camera
 Understanding the Controls and Settings on your Digital Camera This is a brief guide to the basic controls and settings on a modern DSLR or bridge camera. It cannot possibly cover all the settings and
Digital camera modes explained: choose the best shooting mode for your subject
 Digital camera modes explained: choose the best shooting mode for your subject On most DSLRs, the Mode dial is split into three sections: Scene modes (for doing point-and-shoot photography in specific
E-520. Built-in image stabiliser for all lenses. Comfortable Live View thanks to high speed contrast AF** 100% D-SLR quality
 E-520 Built-in image stabiliser for all lenses Excellent dust reduction system Professional functions 10 Megapixel Live MOS sensor Comfortable Live View thanks to high speed contrast AF** 100% D-SLR quality
These aren t just cameras
 Roger Easley 2016 These aren t just cameras These are computers. Your camera is a specialized computer Creates files of data Has memory Has a screen display Has menus of options for you to navigate Your
Get the Shot! Photography + Instagram Workshop September 21, 2013 BlogPodium. Saturday, 21 September, 13
 Get the Shot! Photography + Instagram Workshop September 21, 2013 BlogPodium Part One: Taking your camera off manual Technical details Common problems and how to fix them Practice Ways to make your photos
On Camera Flash. Daniel Foley
 On Camera Flash Daniel Foley Topics How does E-TTL Flash Work? General Flash Points E-TTL Flash and different Program Modes Flash Techniques Diffuser Options Get the most out of E-TTL How I approach Flash
One Week to Better Photography
 One Week to Better Photography Glossary Adobe Bridge Useful application packaged with Adobe Photoshop that previews, organizes and renames digital image files and creates digital contact sheets Adobe Photoshop
Aperture & Shutter Speed Review
 Aperture & Shutter Speed Review Light Meters Your camera s light meter measures the available light in a scene. It does so by averaging all of the reflected light in the image to find 18% gray. By metering
Photography Help Sheets
 Photography Help Sheets Phone: 01233 771915 Web: www.bigcatsanctuary.org Using your Digital SLR What is Exposure? Exposure is basically the process of recording light onto your digital sensor (or film).
BASIC IMAGE RECORDING
 BASIC IMAGE RECORDING BASIC IMAGE RECORDING This section describes the basic procedure for recording an image. Recording an Image Aiming the Camera Use both hands to hold the camera still when shooting
As can be seen in the example pictures below showing over exposure (too much light) to under exposure (too little light):
 to under exposure (too little light):") Hopefully after we are done with this you will resist any temptations you may have to use the automatic settings provided by your camera. Once you understand exposure, especially f-stops and shutter speeds,
Hopefully after we are done with this you will resist any temptations you may have to use the automatic settings provided by your camera. Once you understand exposure, especially f-stops and shutter speeds,
aperture, shutter speed
 CUDGEGONG C A M E R A C L U B aperture, shutter speed and ISO exposure When you think of the craft or art of photography, you must immediately think of exposure. Exposure is a critical element that determines
BASIC IMAGE RECORDING
 BASIC IMAGE RECORDING BASIC IMAGE RECORDING This section describes the basic procedure for recording an image. Recording a Simple Snapshot The camera s Program AE Mode (P Mode) is for simple snapshots.
Investigative Photography. SESHA Northern California Oct. 04, Jonathan Jacobi, CSP UL EHS Sustainability
 Investigative Photography SESHA Northern California Oct. 04, 2017 Jonathan Jacobi, CSP UL EHS Sustainability UL and the UL logo are trademarks of UL LLC 2013 Benefits of Photography Refresh memories Describe
Dust reduction filter. Live View
 E P2 Art Filters, Multi Exposure, Multi aspect Tiltable, high contrast and high resolution electronic viewfinder* Accessory Port High Speed 12.3 Megapixel Live MOS sensor High performance built in Real
or, How do I get this thing to do what I want? Copyright 2016 Paul Fisher
 or, How do I get this thing to do what I want? Copyright 2016 Paul Fisher So just what are the basic camera operations we re going to discuss? Set up. How do you have your camera configured ISO setting
Failure is a crucial part of the creative process. Authentic success arrives only after we have mastered failing better. George Bernard Shaw
 PHOTOGRAPHY 101 All photographers have their own vision, their own artistic sense of the world. Unless you re trying to satisfy a client in a work for hire situation, the pictures you make should please
Camera Triage. Portrait Mode
 Camera Triage So, you have a fancy new DSLR camera? You re really excited! It probably cost a small fortune. It s gotta be good, right? It better be good, right? Maybe you re having a ton of fun with your
This chapter covers the key components of the Nikon
 Exploring the Nikon D300 1 C H A P T E R This chapter covers the key components of the Nikon D300. These are the features that are most readily accessible because they are situated on the outside of the
Film Cameras Digital SLR Cameras Point and Shoot Bridge Compact Mirror less
 Film Cameras Digital SLR Cameras Point and Shoot Bridge Compact Mirror less Portraits Landscapes Macro Sports Wildlife Architecture Fashion Live Music Travel Street Weddings Kids Food CAMERA SENSOR
Improve Your Photography by using Simple Camera Settings and Techniques
 Improve Your Photography by using Simple Camera Settings and Techniques Francis J Pullen 2012 +44 (0)7768 364 567 images@francispullen.co.uk www.francispullen.co.uk Introduction Digital Cameras offer tremendous
Take Control of Your Camera
 Take Control of Your Camera With all of the technology packed into our cameras, it is easy to hand over control & blame our equipment when our images don t meet our expectations.. In this workshop we will
1. This paper contains 45 multiple-choice-questions (MCQ) in 6 pages. 2. All questions carry equal marks. 3. You can take 1 hour for answering.
 in 6 pages. 2. All questions carry equal marks. 3. You can take 1 hour for answering.") UNIVERSITY OF MORATUWA, SRI LANKA FACULTY OF ENGINEERING END OF SEMESTER EXAMINATION 2007/2008 (Held in Aug 2008) B.Sc. ENGINEERING LEVEL 2, JUNE TERM DE 2290 PHOTOGRAPHY Answer ALL questions in the answer
UNIVERSITY OF MORATUWA, SRI LANKA FACULTY OF ENGINEERING END OF SEMESTER EXAMINATION 2007/2008 (Held in Aug 2008) B.Sc. ENGINEERING LEVEL 2, JUNE TERM DE 2290 PHOTOGRAPHY Answer ALL questions in the answer
Chapter 2-Digital Components
 Chapter 2-Digital Components What Makes Digital Cameras Work? This is how the D-SLR (Digital Single Lens Reflex) Camera works. The sensor This is the light sensitive part of your camera There are two basic
So far, I have discussed setting up the camera for
 Chapter 3: The Shooting Modes So far, I have discussed setting up the camera for quick shots, relying on features such as Auto mode for taking pictures with settings controlled mostly by the camera s automation.
The Pro Masterpiece with world's fastest AF* and built-in IS.
 E-30 Art Filters, Multi Exposure, Wireless flash, Multiaspect Fully biaxial high-speed 11 point AF system High Speed 12.3 Megapixel Live MOS sensor Live View with multi-angle LCD 5fps sequential shooting
Aperture & Shutter Speed. Review
 Aperture & Shutter Speed Review Light Meters Your camera s light meter measures the available light in a scene. It does so by averaging all of the reflected light in the image to find 18% gray. By metering
Quick Tips for Taking Better Portraits
 JANUARY 5, 2019 BEGINNER Quick Tips for Taking Better Portraits Suggested Lens choices, exposure settings and focus modes Featuring GARY SMALL D300, AF-S NIKKOR 24-85mm f/2.8-4d IF lens, 1/30 sec., f/2.8,
OUTDOOR PORTRAITURE WORKSHOP
 OUTDOOR PORTRAITURE WORKSHOP SECOND EDITION Copyright Bryan A. Thompson, 2012 bryan@rollaphoto.com Goals The goals of this workshop are to present various techniques for creating portraits in an outdoor
Working Notes Section One - Better Photos
 Working Notes Section One - Better Photos These notes are written to complement the material presented in the Nikon School of Photography Section One seminar rather than as stand-alone text. While the
Camera Features and Functions
 Camera Features and Functions Robert Nowland KPAC DSLR 2015 MENUS AND SETUP Setting up your new camera After unpacking your camera, put your battery on change while you take time to read your manual. Much
TENT APPLICATION GUIDE
 TENT APPLICATION GUIDE ALZO 100 TENT KIT USER GUIDE 1. OVERVIEW 2. Tent Kit Lighting Theory 3. Background Paper vs. Cloth 4. ALZO 100 Tent Kit with Point and Shoot Cameras 5. Fixing color problems 6. Using
Technical Guide Technical Guide
 Technical Guide Technical Guide Introduction This Technical Guide details the principal techniques used to create two of the more technically advanced photographs in the D800/D800E catalog. Enjoy this
for Canon/ Nikon digital SLR cameras INSTRUCTION MANUAL
 for Canon/ Nikon digital SLR cameras INSTRUCTION MANUAL Thank you for purchasing a Nissin product Before using this flash unit, please read this instruction manual and refer your camera owner s manual
Camera Exposure Modes
 What is Exposure? Exposure refers to how bright or dark your photo is. This is affected by the amount of light that is recorded by your camera s sensor. A properly exposed photo should typically resemble
Technical Guide for Radio-Controlled Advanced Wireless Lighting
 Technical Guide for Radio-Controlled Advanced Wireless Lighting En Table of Contents An Introduction to Radio AWL 1 When to Use Radio AWL... 2 Benefits of Radio AWL 5 Compact Equipment... 5 Flexible Lighting...
Capturing God s Creation Through The Lens. Session 3 From Snap Shots to Great Shots January 20, 2013 Donald Jin
 Capturing God s Creation Through The Lens Session 3 From Snap Shots to Great Shots January 20, 2013 Donald Jin donjin@comcast.net Course Overview Jan 6 Setting The Foundation Jan 13 Building Your Craft
Chapter 6-Existing Light Photography
 Chapter 6-Existing Light Photography All of these images were taken with available light. Painting with light-using available light Photography that includes artificial light which naturally exists in
9/19/16. A Closer Look. Danae Wolfe. What We ll Cover. Basics of photography & your camera. Technical. Macro & close-up techniques.
 A Closer Look Danae Wolfe What We ll Cover Basics of photography & your camera Technical Macro & close-up techniques Creative 1 What is Photography? Photography: the art, science, & practice of creating
Photography Basics. Exposure
 Photography Basics Exposure Impact Voice Transformation Creativity Narrative Composition Use of colour / tonality Depth of Field Use of Light Basics Focus Technical Exposure Courtesy of Bob Ryan Depth
Dust reduction filter. Live View
 E P1 14-42mm Kit Art Filters, Multi Exposure, Multi aspect High performance built in image stabiliser Real time effect monitoring Multiple exposure function with LCD monitor display of current view on
Aperture. The lens opening that allows more, or less light onto the sensor formed by a diaphragm inside the actual lens.
 PHOTOGRAPHY TERMS: AE - Auto Exposure. When the camera is set to this mode, it will automatically set all the required modes for the light conditions. I.e. Shutter speed, aperture and white balance. The
Table of Contents. 1. High-Resolution Images with the D800E Aperture and Complex Subjects Color Aliasing and Moiré...
 Technical Guide Introduction This Technical Guide details the principal techniques used to create two of the more technically advanced photographs in the D800/D800E brochure. Take this opportunity to admire
Nikon Launches All-New, Advanced Nikon 1 V2 And Speedlight SB-N7. 24/10/2012 Share
 Nikon Launches All-New, Advanced Nikon 1 V2 And Speedlight SB-N7 24/10/2012 Share Email TOKYO - Nikon Corporation released the Nikon 1 V2 today, the latest addition to its popular Nikon 1 V series of advanced
<Motion Panorama> 180 Vertical : 2160 x 9600 Horizontal : 9600 x Vertical : 2160 x 6400 Horizontal : 6400 x 1440
 FUJIFILM X-T10 Spec Sheet Model name FUJIFILM X-T10 Number of effective pixels 16.3 million pixels Image sensor 23.6mm x 15.6mm (APS-C) X-Trans CMOS II with primary color filter Total number of pixels:
Specifications for Fujifilm FinePix F850EXR 16MP Digital Camera
 Specifications for Fujifilm FinePix F850EXR 16MP Digital Camera Model name FinePix F850EXR Number of effective pixels 16.0 million pixels Image sensor 1/2-inch EXR CMOS with primary color filter Storage
Love Your Camera (Introduction to D-SLR)
") Love Your Camera (Introduction to D-SLR) Photography Workshops and Tours in New York City Phone: (646) 736-3231 Email: info@rememberforever.co Web: www.rememberforever.co Copyright 2009-2013 - Remember
Love Your Camera (Introduction to D-SLR) Photography Workshops and Tours in New York City Phone: (646) 736-3231 Email: info@rememberforever.co Web: www.rememberforever.co Copyright 2009-2013 - Remember
Introductory Photography
 Introductory Photography Basic concepts + Tips & Tricks Ken Goldman Apple Pi General Meeting 26 June 2010 Kenneth R. Goldman 1 The Flow General Thoughts Cameras Composition Miscellaneous Tips & Tricks
Know Your Digital Camera
 Know Your Digital Camera With Matt Guarnera Sponsored by Topics To Be Covered Understanding the language of cameras. Technical terms used to describe digital camera features will be clarified. Using special
Understanding Your Camera 2: UUU200
 Understanding Your Camera 2: UUU200 Your 2 Understanding Camera Your Understanding Camera 2 Exposure & Metering Metering & Exposure Objective Objective After completing this class, the student will have
Flash Photography. Ron Zabel June 27, 2018 Grimsby Photo Group
 Flash Photography Ron Zabel June 27, 2018 Grimsby Photo Group My First Camera Flash Agenda Flash definition Scope of Presentation Why Use Flashes? Flash Picture Exposure Elements Methods of Firing Flashes
Flash Photography. Malcolm Fackender
 Flash Photography Malcolm Fackender Speedlights (Flashes) Many of us will already have one or more speedlights (flashes) in our camera bag. Speedlights are small portable devices that can be used at home
About Me. Randolph Community College Two year degree in Portrait and Studio Management Portraits, Wedding, Events Landscapes with boats - favorite
 About Me Randolph Community College Two year degree in Portrait and Studio Management Portraits, Wedding, Events Landscapes with boats - favorite Things Forgotten Check camera settings before each session
Your objective: maximum control, maximum manageability
 Your objective: maximum control, maximum manageability Know how the light works Know how photography works Know the camera you re using Making the most of what you have to work with. ISO This is the first
Kent Messamore. What is a Camera & How do I use it?
 Kent Messamore What is a Camera & How do I use it? Digital Photography JKM 8/21/2014 Enhanced Images 2 JKM 8/21/2014 Enhanced Images 3 JKM 8/21/2014 Enhanced Images 4 JKM 8/21/2014 Enhanced Images 5 JKM
Specifications for Fujifilm FinePix S MP Digital Camera
 Specifications for Fujifilm FinePix S8200 16.2MP Digital Camera Model name FinePix S8200, S8300 Number of effective pixels *1 16.2 million pixels Image sensor 1/2.3-inch CMOS with primary color filter
Objective: to give you some understanding of why you might push more than just the big shiny silver button...
 Objective: to give you some understanding of why you might push more than just the big shiny silver button... Why am I making this presentation? Simply put: to share understanding What will we cover? Aperture
1 This chapter covers the key components of the Nikon
 Exploring the Nikon D5000 1 C H A P T E R This chapter covers the key components of the Nikon D5000. These are the features that are most readily accessible because they are situated on the outside of
E-420. Exceptional ease of use. 100% D-SLR quality. 10 Megapixel Live MOS sensor Shadow Adjustment Technology
 E-420 World's most compact D- SLR* Comfortable viewing with Autofocus Live View 6.9cm / 2.7'' HyperCrystal II LCD Face Detection for perfectly focused and exposed faces Exceptional ease of use 100% D-SLR
ADELAIDE HILLS PHOTOGRAPHY CLUB COFFEE BREAK 22 APRIL 2015 MACRO PHOTOGRAPHY
 ADELAIDE HILLS PHOTOGRAPHY CLUB COFFEE BREAK 22 APRIL 2015 MACRO PHOTOGRAPHY WHAT IS MACRO? Depends on who you talk to. Most definitions regard macro as meaning life size on your image sensor. So, on a
by Don Dement DPCA 3 Dec 2012
 by Don Dement DPCA 3 Dec 2012 Basic tips for setup and handling Exposure modes and light metering Shooting to the right to minimize noise 11/17/2012 Don Dement 2012 2 Many DSLRs have caught up to compacts
OTHER RECORDING FUNCTIONS
 OTHER RECORDING FUNCTIONS This chapter describes the other powerful features and functions that are available for recording. Exposure Compensation (EV Shift) Exposure compensation lets you change the exposure
3D Capture. Using Fujifilm 3D Camera. Copyright Apis Footwear
 3D Capture Using Fujifilm 3D Camera Copyright 201 3 Apis Footwear Assembly and Settings 1. Assembly If your camera came without the projector attached, then you need to do it yourself. First remove the
Inspiration strikes. VS-210 FLASH. User s Manual
 Inspiration strikes. VS-210 FLASH User s Manual Copyright 2015 Gradus Group. Bolt and other names of Bolt products are trademarks of Gradus Group. Other product and corporate names mentioned herein are
Glossary of Terms (Basic Photography)
") Glossary of Terms (Basic ) Ambient Light The available light completely surrounding a subject. Light already existing in an indoor or outdoor setting that is not caused by any illumination supplied by
Glossary of Terms (Basic ) Ambient Light The available light completely surrounding a subject. Light already existing in an indoor or outdoor setting that is not caused by any illumination supplied by
Digital 1! Course Notes.
 Digital 1 Course Notes Anatomy of a DSLR Light' Enters' Camera 1. Lenshood: Used to control additional light entering the lens. 2. UV filter that is purchased separately from the lens. Screws onto the
A Digital Camera Glossary. Ashley Rodriguez, Charlie Serrano, Luis Martinez, Anderson Guatemala PERIOD 6
 A Digital Camera Glossary Ashley Rodriguez, Charlie Serrano, Luis Martinez, Anderson Guatemala PERIOD 6 A digital Camera Glossary Ivan Encinias, Sebastian Limas, Amir Cal Ivan encinias Image sensor A silicon
LITESTAGE USER'S GUIDE
 LITESTAGE USER'S GUIDE Note: This is a general user's guide for all of the Litestage models. Equipment shown is not included on all models. For more information on additional equipment and accessories,
Exposure settings & Lens choices
 Exposure settings & Lens choices Graham Relf Tynemouth Photographic Society September 2018 www.tynemouthps.org We will look at the 3 variables available for manual control of digital photos: Exposure time/duration,
Exploring the Nikon D3200
 C HAP T E R 1 AL Exploring the Nikon D3200 T CO PY RI GH TE D MA TE RI he Nikon D3200 is an amazing piece of machinery. It has features and specifications that surpass the top-end professional camera models
Winston C Hall Tuner Photography
 D4s Custom Banks Settings Shooting and Custom Setting Menus Created by: Winston C Hall Tuner Photography 714 D4s Shooting and Custom Settings Banks This guide is an outline of my recommendations for the
Introduction to Digital Photography
 Introduction to Digital Photography with Nick Davison Photography is The mastering of the technical aspects of the camera combined with, The artistic vision and creative know how to produce an interesting
Ricoh XR Speedlite 300P
 Ricoh XR Speedlite 300P Posted 1-4-04 This manual is for reference and historical purposes, all rights reserved. This page is copyright by mike@butkus. M. Butkus, NJ. This page may not be sold or distributed
Drive Mode. Details for each of these Drive Mode settings are discussed below.
 Chapter 4: Shooting Menu 67 When you highlight this option and press the Center button, a menu appears at the left of the screen as shown in Figure 4-20, with 9 choices represented by icons: Single Shooting,
Exploring the Nikon D5300
 CHAPTER 1 Exploring the Nikon D5300 Nikon s 5000 series of cameras occupy a special niche within the Nikon line of cameras. The D5300 is the only camera in Nikon s current lineup to feature the articulating