Capture One PRO Online Help
|
|
|
- Vincent Riley
- 6 years ago
- Views:
Transcription
1 Capture One PRO Online Help
2 Capture One PRO Online Help
3 Table of Contents 1. System Requirements Installation How to Install Capture One Software Standard Folders Created During Installation How to Uninstall Capture One Software How to Activate a License How to Activate a License Automatically How to Activate a License Manually Getting Started Software Basics Creating a New Session Importing Images White Balancing Images Fine Tuning Exposure, Contrast and Saturation Focusing and Sharpening Image Processing Batch Processing How to Set Up the Hardware Installing the PCI IEEE-1394 Card Setting Up the Phase One Equipment Understanding the LED Indicator Lights Working With Other Photographic Equipment Main Window Overview Main Window Folder Browser Window Capture Collection Window Preview Window Function Tabs Menus and Toolbar Reference Tools Reference Cropping and Rotation How to Crop Images How to Rotate Images by Preset Amounts How to Rotate Images Arbitrarily How to Rotate Images by Fixed Amounts Organizing Images Sessions: Organizing Files How to Create a New Session How to Automatically Name and Number Capture Files Selecting and Editing Images Exploring Folders Working with Thumbnails Working with Previews Comparing Multiple Images Capture Capturing Tethered How to Capture Images White Balancing Images How to White Balance Images White Balance Tool Fields Exposure Evaluation Exposure Tool Fields Focus and Sharpness How to Focus and Sharpen Images Focus Tool Fields iii
4 Capture One PRO Online Help 10. Processing Images Processing Images How to Process Images Working with Multiple Outputs Process Tool Fields Batch Processing Color Management Working with Color Management A Guide to Color Management Settings Selecting the Color Management workflow Using Other ICC Profiles The Color Editor Local Color Adjustment Global Color Adjustments Color Editor Inspector Supported Meta Data and IPTC Fields Phase One Canon Nikon Olympus Pentax Fuji Konica Minolta IPTC Information Editor Special Features Demoirize Plug-in Stitching Images How to Stitch Images Together Lens Cast Calibration Preferences Process Settings Capture Options and camera settings Power and Portability Miscellaneous Settings Save Options Exposure Evaluation Preview Cache Keyboard Shortcuts Tips and Tricks Tips on Daily Usage of Capture One Optimizing white balance Saving disk space by deleting previews work file naming convention Reusing your white balance settings Calibrating fixed lenses Lens cast calibration with image stitching Good sharpening Creating your own cropping dimensions Opening images into another application Undoing rotations Activating Capture One software Creating a contact sheet Dynamic range from RAW Troubleshooting I want to completely delete Capture One and all drivers from my machine How do I recover items from the trash? Troubleshooting and Feedback iv
5 Chapter 1. System Requirements Phase One recommends the following minimum hardware set up: Pentium III minimum. Pentium 4 preferred. 512 MB of RAM minimum. 1GB or more preferred Operating system: Windows 2000/P Ports: FireWire or USB depending on the camera used Note Multiprocessing: Capture One software supports multiprocessing. This means that when installed on dual processor platforms image processing time is considerably reduced. 1
6 Chapter 2. Installation This section describes how to install the Capture One software. How to uninstall the software is also described. 1. How to Install Capture One Software Capture One software includes an easy-to-use installer that will install all the software you need to run the application on your computer. To install the software follow the procedure below: 1. Either load the Capture One CD into the CD drive, or download the application from the Phase One Website 2. The software installer will start automatically, if it does not, or, if you downloaded the application, double-click SetupC1.exe 3. After reading the on-screen instructions, click Next to continue the installation 4. Follow the on-screen instructions to complete the installation Note If you need to stop the installation, click the Cancel button 2. Standard Folders Created During Installation The installer creates a folder on your hard disk called Capture One PRO. As well as the application, this folder contains release notes, and, if Installed from a CD-ROM, it also contains an Extras folder. During installation three standard folders will be created on your hard disk: Captures: This is the default folder where the raw capture images taken with a camera are stored. You can create new folders to organize your raw capture files on the hard disk. Previews: The application automatically creates a low resolution (approximately 3-5 MB, depending on the digital camera used) preview image to use for color and tonal adjustments. All preview files are stored in this Previews folder. If any files are deleted from here the program will automatically generate new previews the next time the application is started. If any previews cannot be seen, the click the Refresh button to refresh the screen capture. Tip You can save a lot of disk space by periodically deleting unused items from the Previews folder in C:\Program Files\Phase One\Capture One PRO. Images: By default processed images will be placed in this folder. You can easily browse through all folders using the application's file browser function. To access the browser click on the black arrow to the left of the capture collection tabs. 3. How to Uninstall Capture One Software To uninstall the application, double click on the uninstall application UNWISE.EE and follow the on screen dialog. 2

7 Installation Note The uninstall application is located inside the Capture One application's folder 4. How to Activate a License Use of the Capture One application is controlled by a license key. Without a valid license key, which you have activated, you will not be able to operate the application beyond its 30 day trial period. For instructions on how to activate your license key, see the sections, below How to Activate a License Automatically If your computer is connected to the Internet and you want to activate your license automatically, follow the procedure, below: 1. Open the application and select License activation from the Help menu. 2. The License Activation dialog box (see illustration, below) will be displayed 3. Select Online Activation 4. Enter the Product Key enclosed in the software box 5. Click the Get Registration Key button 3

8 Installation 6. Click Activate License to complete the license activation. Note After clicking Activate License your software will have to be restarted for the activation to work How to Activate a License Manually If your computer is not connected to the Internet, and you want to activate your license manually, follow the procedure, below: 1. Open the application and select License activation from the Help menu. 2. The License Activation dialog box (see illustration, below) will be displayed 3. Select Manual Activation. 4. Enter the Product Key enclosed in the software box. 5. Click the Get Registration Key button. 6. Select Manual Activation and write down the Registration key that is displayed. 7. From a computer that is connected to the Internet, go to 8. Have your Registration Key ready, click Activate Software in the menu and follow the instructions on the site. Once the process is complete you'll have the activation key to activate your copy of Capture One. 4
9 Installation Note Make a note of your activation key. Either by writing it down, or by taking a screen capture. Important Save a copy of your activation key, your product key and your log in information in a safe place. You may need them again in the future. 9. Enter your Activation Key in the Manual Activation dialog box, then click the Activate License button to complete the license activation. Note After clicking Activate license your software will have to be restarted for the activation to work. 5
10 Chapter 3. Getting Started This section provides you with some basic general concepts and instructions that will help you to start working with the application as quickly as possible. However, to get a more detailed understanding of the application: what it is capable of and how you can use it to achieve what you want to when working with images, you will need to refer to the other more detailed sections that this online help is comprised of. 1. Software Basics This section will give you a brief introduction to the application's interface and its main functional areas. The following sections will provide a more detailed description of what these functional areas are and how to use them. The application's main window is made up of four functional areas. In the illustration, below, these areas have been higlighted using colored frames. These areas are: Menu and toolbars The thumbnail window. The thumbnail window displays information about your capture files and is used to select images. When an image in the thumbnail window has been selected it becomes the application's focus. The preview window. The preview window displays image(s) selected from the thumbnail window. The preview image(s) is updated in real time to show you the effect of changes that you have made to the image. The functional tabs. Clicking the different tabs makes then active. In this example the Focus tab is active. 6

11 Getting Started 1.1. Creating a New Session To create a new session, follow the procedure, below: 1. Click on the Open/Create new session button. 2. The Open/Create new Session dialog box will be displayed, see illustration, below. 3. Type the name for your new session in the Session field. Note You can also choose to name the session based on an existing session by selecting one using the Existing sessions: selection box. 7

12 Getting Started 4. If appropriate use the other buttons in the dialog box to choose different locations for the session on the hard disk. 5. When you have completed entering the information for the new session, click Open. 6. A new session will now be created. Note When you create a capture folder in this way, it is automatically set as the current capture folder and capture files that are captured when tethered to Capture One are named based on the session name - in this case Beach Portrait Importing Images After creating a session, the next step in a typical workflow is to add the image files to it that you want to work with. There are two ways of doing this: 1. Connect a card reader to your computer and insert your Flash TM or Microdrive TM card. When you do this, a Phase One Media Reader window (see illustration, below) will automatically open. You can choose to have your files renamed as they are imported by checking the Rename captures check box and typing the name you want to use in the field next to it. Note If you choose not to rename captures, then the images will retain their names as generated by the camera that they were shot with. 2. Click on the Browse files icon needs to be viewed. (see illustration, below) then select the folder with the image that 8

13 Getting Started 1.3. White Balancing Images To white balance images follow the procedure, below: 1. From the capture window, select an image that contains either a gray card a neutral white or grey area. 2. If it is not already selected, click on the White Balance tab. 3. Using the cursor, click the color picker on the gray card's neutral gray area in the image being displayed in the preview window. Tip If your image does not contain a satisfactory gray area, you should shoot the image again and include a QP or MacBeth card in the scene. Alternatively, use the If selected display on the white balance tab. While moving the eye dropper around the image, the left window will indicate whether the area is suitable for white balancing, by saying If selected (Good) or not suited, by saying If selected (poor). The window on the right will show what the area will look like if the current position is used for white balancing the image: 9
14 Getting Started Suitable for White Balancing Not Suitable for White Balancing 4. The selected image will now be white balanced. This white balance can be used to balance other images and/or applied as a capture balance to new images if you are capturing tethered to the computer Fine Tuning Exposure, Contrast and Saturation Select the Exposure tab. The Exposure tab will be displayed, see illustration, below. Use the EC and CC sliders to adjust the image. Use the Color saturation slider to increase or decrease the images' saturation. If you prefer to work with levels or curves, you can alternate between the two using the Levels and Curve tabs. The two preview windows Raw RGB and Destination display the current RGB values of the RAW files and as they will be when output into the selected output color space, respectively. 10
15 Getting Started 1.5. Focusing and Sharpening Focusing is the process of checking focus and applying sharpening settings to an image. To check focus and sharpness, follow the procedure below: 1. Using the cursor, select an area of the image to work with from the preview window. 2. Zoom in and out using the Zoom slider. 3. Adjust the images' sharpness using the sliders available. Tip The Amount is typically set around 100 for ink jet, for offset printing. Threshold is used to define how many of the surrounding pixels are affected. Typically a noisy image will have a higher threshold set, perhaps A clean image will need a very low threshold of 2-4. Keep checking the image in the focus window. For a web image, the image should look correct on screen. For an image to be printed in a magazine or book, the preview should ideally look slightly over-sharp on screen. 11
16 Getting Started 4. When you are satisfied with the adjustments made, click the images. Note button to apply them to the selected The area shown in the focus window can be moved either by moving the focus in the preview window, or by panning in the focus window Image Processing To process images, follow the procedure below: 1. Using the mouse, select the image you wish to work with and then select the Process tab. 2. Configure all of the appropriate settings. For detailed information on the options available and how to use them, see Section 1.3, Process Tool Fields. 3. Click the Process Batch icon at the bottom of the Process tab. 4. Processing of your images will start. All selected captures will be processed according to the settings in the process panel and in the processing preferences. Images are being stored in your selected Processed folder with the individual file names. While images are being processed a progress bar will be displayed at the bottom of the Process tabs. Note For information on how to cancel processing of an image or stop processing a series of images, see Section 1.3, Process Tool Fields Batch Processing Batch processing is used for processing more than one image at a time - it comes in handy when you want to process several images in a similar manner. Select the Process tab. Using the Batch Editor (see illustration, below) you can manage the creation and processing of batches of images. The processing will start as soon as you add an image to the batch but can be stopped and re-run at any time. Use the add button to add images (selected in the capture view) to the batch. The Batch processing starts automatically when an image is added. Use the process batch button if you want to start the process manually. 12
17 Getting Started 2. How to Set Up the Hardware Use the remove button to remove an image from the batch after selecting it from the batch list. Use the stop process button to bring the processing of images to a halt. You can always start the processing again with the process batch button as explained above. This section describes what has to be done to set up the hardware if you are going to be shooting tethered. Note This section only applies to photographers shooting tethered with a Phase One camera back. Note Your computer must have a minimum of 1GB RAM Installing the PCI IEEE-1394 Card The Phase One camera back is connected to the computer via an IEEE 1394 connection. This extremely fast connection does not have many of the limitations of the SCSI technology previously used in older digital cameras. If necessary, the cable length can be extended using Phase One Power Conditioners to move the camera further from the computer. To install a PCI IEEE-1394, follow the procedure, below: Note Whilst this procedure will work in most cases, it is important that you have read and understood the user information (manual, online help, etc.) for your own computer, before carrying out this installation. 1. Shut down and un-plug the computer. 2. Remove the computer's cover to get access to its motherboard. 3. Choose an empty PCI slot and remove the screw and cover. 4. Gently place the card into the slot with the 1394 connectors facing through the opening. 5. Exert a firm downward pressure straight down on the card whilst rocking it slightly until it is firmly seated in the slot. 6. Replace the screw to hold the card in place. 7. Replace the computer's cover, then restart it Setting Up the Phase One Equipment In addition to setting up the computer, the camera also has to be set up for working with the Phase One camera back. To set up the Phase One Equipment, follow the procedure, below: 13
18 Getting Started 1. A Ground Glass Mask is included. This must be installed in the viewfinder to ensure correct framing. Remove the camera viewfinder and focusing screen (refer to the camera user's manual for detailed instructions). Insert the Ground Glass Mask and replace the viewing screen and the viewfinder. 2. Connect the Phase One camera back to the camera or mounting plate. Important Ensure that the back is firmly connected to the camera before releasing it. The small screw on the top of the Phase One camera back H series can be tightened with the screwdriver supplied to prevent it from being accidentally removed. Phase One's P series camera backs are equipped with a locking mechanism. 3. Connect the supplied Sync Cable from the lens' flash sync to either the connector on the Phase One camera back marked "C" or the Mamiya Mounting plate. This is the same for Phase One's H and P series camera backs. 4. If a motorized camera is used, connect the included Motor Cable to the connector on the right hand side of the back, marked "M". This is the same for Phase One's H and P series camera backs. 5. If a Mamiya RZ67 Pro II is used, connect the mounting plate to the camera and then connect the cable from the mounting plate to the connector on the front of the Mamiya. Ensure that the cable is connected and locked properly; the latching mechanism will be on the bottom. 6. If flash is used, connect the Flash Sync Cable (not included) from the strobes to the connector on the right side of the camera back, marked "F". This is the same for Phase One's H and P series camera backs. 7. Connect one end of the IEEE 1394 cables (included) to any one of the empty ports on the newly installed card, or the built-in port. Connect the other end to the back of the Phase One camera back. These cables can only be inserted one way and may require a little pressure to insert. Note For the Mamiya RZ the camera must be set to take multiple exposures in order to use the Phase One camera back. The multiple exposure selector (M) is combined with the film back revolve switch (R) Understanding the LED Indicator Lights LED Indicators lights: On the back of the Phase One camera back are two sets of LED indicator lights. A red and green light on the left and a red and green light on the right. The left and right pairs are identical and should always display the same thing. These lights indicate the camera back status. The list below describes what the status lights indicate: Green Lights Steadily On: this means that the Phase One camera back is receiving power and is ready to capture images. Green Lights Flickering: after capturing an image the green lights will flicker on and off while transferring the image to the computer. Both Red and Green Lights Steadily On: if the camera is not shut down properly, or an error occurs both sets of lights may stay lit. If this happens, shut down the Capture One software, unplug the camera back, wait ten seconds, then reconnect the camera. No Lights On: if the camera is properly plugged in and receiving power and there are no lights on, the camera back has shut down or may be damaged. Unplug all connectors, inspect all cables for 14
19 Getting Started damage, examine the IEEE 1394 card (if in use) for proper installation and reconnect everything. If the problem persists, contact your Phase One dealer for assistance Working With Other Photographic Equipment While the Phase One camera back has been made as compatible as possible with photographic equipment, there are a few issues to be aware of: When using the Phase One P20/P25 camera back with a Hasselblad 555ELD, the release button on the front of the Hasselblad needs to be in the "DIGI" position. If the camera back is turned around to support landscape or portrait mode (depending on the CCD placement in the back) the release button needs to be in "FILM" position. When using the Phase One camera back on a view camera, use "Two Shot Mode". This means that the shutter release is activated twice. To shoot an image, release the shutter, reset it, and shoot another frame. The first shot 'wakes' the camera up, and the second is the actual exposure. Alternatively pressing the Capture button in the preview window will wake the camera up and then the shutter can be fired once to take a photo. The camera will remain 'awake' for 5 seconds or until the next capture. When used on a Mamiya RZ67 Pro II the selector on the right side of the camera body must be in the "M" position. The Phase One camera back fully conforms to ISO Standard for Photographic Strobe Systems; unfortunately, not all strobe manufacturers comply with this standard. Check with the manufacturer of your strobe system to prevent damage to the Phase One camera back. 15

20 Chapter 4. Main Window Overview 1. Main Window The application's main window is comprised of four functionally separate areas, which support the workflow used when capturing, adjusting and processing images Folder Browser Window The folder browser window (see illustration, below) is used to locate and organize the images that you want to work on. It has four buttons, which have the following functions. Refreshes the browser view. Use this if you've just created a new folder and it doesn't show up in the folder browser. Adds a folder as a permanent capture collection. This means that even after closing and reopening Capture One, the folder will be available as separate tab. Creates a new folder in the folder browser - that is, on your actual file system. Reorganizes the windows and put the folder browser underneath the capture collection - you can toggle this back by clicking the button again after the windows have shifted place. 16
21 Main Window Overview 1.2. Capture Collection Window The capture collection window (see image, below) is actually a list of capture folders. Each tab is a capture folder, capture folders can be added or removed from the view. All captures in a folder are displayed as thumbnail views. In addition to the view of the image itself, the capture name, capture id, and date (when available) will also be displayed next to each image. Just above the capture collection window is a capture naming field. The name in this field is used as default name for the next capture. If it is blank the name will default to the camera back's serial number when shooting tethered with a Phase One camera back Preview Window The preview window (see illustration, below) displays the currently selected capture file. The window automatically expands to display the largest possible preview. If you collapse the Capture Collection window and/or the Folder Explorer window, the preview automatically enlarges to fill the screen. 17
 represent the main stages and operations of the")
22 Main Window Overview 1.4. Function Tabs The function tabs (see illustration, below) represent the main stages and operations of the workflow. There are five tool tabs: Capture White Balance Exposure Focus Process 18

23 Main Window Overview 1.5. Menus and Toolbar Reference The application's menu and toolbar allow you to select tools and carry out operations when working with your images. 2. Tools Reference This section contains a detailed description of the application's tools. All tool buttons are equipped with "Tool Tips" - when you place the mouse over a button, a note will pop up that briefly describes what the button does, and, if applicable, show you the keyboard shortcut: The Eyedropper tool is used to read the RGB or CMYK values of a particular area of an image. The area measured by the tool is 3x3 pixels. The Zoom tool is used to zoom in (magnify) an image. Click on the preview image to zoom in. Hold down the Alt key at the same time as using the zoom tool to zoom out again Remember, the preview image is only a low resolution image and will quickly pixelate when enlarged. Click the arrow to 19

24 Main Window Overview the right to access a zoom slider appears (see illustration, below), which also allows you to zoom in and out. Using the Rotation tool you can rotate images by a fixed 90º left or right. To rotate images by an arbitrary rotation use the rotation cursor tool, see illustration below. Using the rotation cursor tool you can adjust the image's rotation by aligning a horizontal or vertical line (which you draw) with a line in the image. The rotation of the image will be adjusted to be parallel to the line you drew. Using the Cropping tool you can crop an image so that any unwanted parts of the image will be removed. Click and drag the mouse so that a box is drawn surrounding the area of the image to be selected. Then release the mouse button. The rectangular box, which now surrounds part of the image, can be adjusted in size and position. There are points at the corners of this box, that can be clicked and dragged, to change size and position. When turned on, the Crop Mask Tool will mask the area of the preview image that is outside the selected crop area. Right-clicking the crop tool opens a new Tool settings menu (see illustration, below), which you can use to select the color and opacity of the crop mask to be set. This tool is a useful feature when showing images on-screen, as the cropped area is clearly shown. The Exposure Warning tool quickly shows which areas of the image are either overexposed or under- 20
25 Main Window Overview exposed. The exposure tool is analogous to Photoshop's Gamut Warning tool. When the exposure warning tool is activated a colored mask will be applied to the image showing which areas of the image are above or below a set exposure value. Right-clicking on the tool icon gives access to the Tool Settings box in which tool parameters can be adjusted. In general, if the exposure warning is shown over a large area of the selected image, it indicates that the exposure level may need to be adjusted. Highlight areas are more critical than shadows. Preserve highlight detail by not allowing values greater than 240. Selecting the Gray Scale button selects that the preview is shown in gray scale. This does not affect the processed file. Selecting the Simulate Sharpening settings button displays the preview of the image using the specified Unsharp Mask (USM) settings. To alter the USM settings open the Preferences/Miscellaneous Settings dialog box. The name Unsharp Mask (USM) can be misleading. Using this tool actually gives an apparent increase in image sharpness by enhancing the edge differences between pixels of different colors. When applied, the software evaluates the contrast differences between pixels and either enhances the difference or not, based on setting made in the preferences. USM has two settings: Amount: the amount of change is entered here as a percentage. The higher the setting, the higher the degree of sharpening that will be applied. Threshold: the threshold level controls at what level the sharpening will begin. At the default 0 setting, the sharpening amount is applied to every pixel. As you adjust the setting upwards, you change the level at which the sharpening will begin. Use the Zoom-to-fit button to set the preview window so that the image will always zoom by the appropriate amount to fit the preview window. Use the Hide/Show Function Tabs button to maximize your view of the image in the preview window. Clicking the button once minimizes the function tabs and maximizes the preview window. Clicking it again works the other way around: it expands the function tabs and reduces the size of the preview window. 21
26 Main Window Overview 3. Cropping and Rotation Using the application's cropping and rotation functions allows you to crop your images to the appropriate size and rotate them to apply the orientation that you want in your final picture. Images can be cropped at any stage in the workflow How to Crop Images To crop images follow the procedure below: 1. Select the cropping tool by clicking the cropping button Note on the toolbar. To select a preset aspect ratio, click the selection arrow next to the cropping button. 2. The aspect ratio dialog box (see illustration, below) will be displayed. 3. Choose the aspect ratio that you want to work with. 4. Click and drag to dimension the crop box on the image that you want to crop in the preview pane. Note A crop from one image can be applied to all selected images. After marking up the crop, go to the Process tab and click the Apply to current selection of captures button bring up the Apply Settings dialog box:. This will 22

27 Main Window Overview Tick the Only settings from current tab to limit the settings that are applied to just the crop and not any other changes you have made to the captured image How to Rotate Images by Preset Amounts To rotate images by preset amounts follow the procedure, below: 1. Select the image which you want to rotate by clicking on its thumbnail image. 2. To rotate the image left or right by 90 degrees by clicking or respectively. Note Images can also be rotated directly from the capture collection window by selecting an image, right clicking on it and then choosing Rotate from the displayed menu How to Rotate Images Arbitrarily To rotate images based on an arbitrary line follow the procedure, below: 1. Select the image which you want to rotate by clicking on its thumbnail image. 2. Click on the Arbitrary Rotation tool. The preview will expand to a maximized view of the image. 3. Click and drag on the image to draw a line (as shown in illustration, below). 4. The image will rotate to be parallel with the drawn line. 23

28 Main Window Overview 5. Clicking the rotation cursor tool again will apply the rotation to the image and return you to the application view, as it was before using the rotation tool How to Rotate Images by Fixed Amounts To rotate images based by fixed amounts follow the procedure, below: 1. Select the image which you want to rotate by clicking on its thumbnail image. 2. Click on the Arbitrary Rotation tool. 24
29 Main Window Overview The preview will expand to a maximized view of the image. 3. Rotate the image by entering the degrees of rotation that you want to apply in the cursor tool's Image Rotation Tip field. If you are unhappy with the rotations you have performed on an image, Inserting a value of 0 in the Rotation Tool's free text area returns the image to its original rotation. 4. Clicking the rotation cursor tool again will apply the rotation to the image and return you to the application view as it was before using the rotation tool. 25
30 Chapter 5. Organizing Images 1. Sessions: Organizing Files Sessions are used to organize your image files. Different sessions can be created and configured differently to closely match the specific requirements of the task that you are working on. Organizing your image files in a logical way at the capture stage is likely to save you time during the processing of these images. For example, if you go to the beach to photograph for a catalogue you can create one capture collection folder called Beach Portraits in advance. Note Image names can be altered at all times by clicking on the capture name fields at the bottom of each thumbnail How to Create a New Session To create a new session, follow the procedure, below: 1. Click on the Open/Create new session button. 2. The Open/Create new Session dialog box will be displayed, see illustration, below. 3. Type the name for your new session in the Session: field. Note You can also choose to name the session based on an existing session by selecting one from the Existing sessions selection box. 4. If appropriate use the other buttons in the dialog box to choose different locations for the session on the hard disk. 5. When you have completed entering the information for the new session, click Open. 6. A new session will now be created. 26
31 Organizing Images Note When you create a capture folder in this way, it is automatically set as the current capture folder and files captured tethered to the computer are named based on the session name - in this case Beach Portrait. All processed capture files are stored in a sub folder called Develops in your installation folder, for example C:\Program Files\Capture One\Captures\Beach Portrait\Develops, which is automatically created when you check the box Process capture inside folder "Develops" in the Open/Create new Session dialog box, see illustration, above. The name can be altered at any time during shooting, or more folders can be added. You can enter a name in the Session field of the capture collection window. All subsequent images captured tethered will now be named based on what you entered How to Automatically Name and Number Capture Files To automatically name and number files as you capture them, follow the procedure, below: 1. Open the preferences window by clicking File>Preferences, or pressing ALT-P together. 2. The Preferences window will be displayed. 3. Click the Capture output tab, the tab's contents will be displayed, see illustration, below: 27

32 Organizing Images 4. Enter a number in the Delimiter field (up to a maximum of 6 digits). 5. Check the Always include number check box and a sample of the naming and numbering will appear. 6. Click OK. 7. All your new captures will now be named based on the values that you have entered. 2. Selecting and Editing Images For ease of use the Capture One application's main window is split into three functionally different areas. These are: Capture Collection, which displays thumbnail images of the capture files. Preview window, which displays a preview of the selected capture file. Function tabs with tools for capturing, validation and image adjustments. The following sections explain how, working in these areas and using the functionality that they provide, you will be able to select and edit your images to achieve the results you want. 28
 will be displayed.")
33 Organizing Images 2.1. Exploring Folders In the capture collection panel you can view and work with your capture files. To open a file browser window, click the arrow button to the left of the capture folder. A file browser window (see illustration, below) will be displayed. To close the file browser, click the arrow button again Working with Thumbnails The thumbnail area (see illustration, below) displays thumbnail views of the images in the current capture folder. Thumbnail sizes can be changed by using the can be sorted by capture name or date. Clicking sorting options. button at the top of the window. Thumbnails in the thumbnail window toggles between the two File Tagging: tagged thumbnails in the capture collection have a check mark in their upper left hand corner. Images are tagged by first selecting them from the capture collection and then clicking the tag button. Deleting Images: images can be deleted by selecting them and pressing the Delete key on the keyboard. Alternatively, drag and drop the selected thumbnails into the Trash folder. You can also select multiple captures using Ctrl + click and then deleting the group of images as described above. Trashed images will be stored in the trash can until they are permanently deleted from there by selecting the trash can and then clicking the button. If you need to recover images that have been trashed by mistake, drag the capture out of the trash and back into a capture collection folder. Note Once the trash has been emptied the captures will be permanently deleted. Capture Information: the additional text information to the right of the thumbnails can be toggled on and off by using the thumbnail information button. This will display extra information about the capture 29
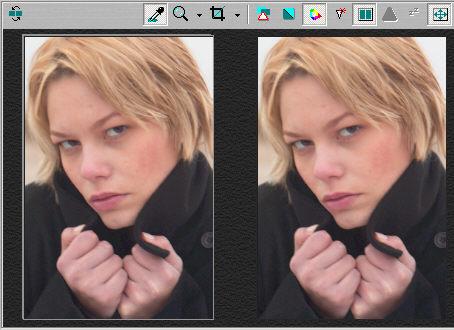
34 Organizing Images image, some of which is meta data. For example, the Capture ID, Capture time, and EIF information: ISO, Exposure time, Aperture etc. For a complete display of all available meta data, right click on the image and select Show Information from the menu that is displayed. Add Annotations: you can enter some additional information about the capture images by right clicking an image in the capture collection. This opens the Capture Annotations dialog box into which you can add the notes that you want to have associated with the file Working with Previews The preview window provides you with a detailed and scalable preview of either a single selected image or two images, which can be displayed next to each other to allow comparisons to be made between them. To select an image to be previewed, click on its thumbnail in the Capture Collection window. You can change the zoom applied to the preview image to make a more detailed examination of it easier. See Section 2, Tools Reference for information on how to use the zoom tool. You can expand the preview area by minimizing the function tabs display. See Section 2, Tools Reference for information on how to do this Comparing Multiple Images In the preview window, two captures can be compared side by side (see illustration, below). This is done by clicking the side by side icon on the toolbar. The main purpose of side by side evaluation is to make it easy to select the best capture from a range of almost identical capture files. To switch the position of the images that you are comparing, click the switch position button. 30
35 Organizing Images 31
36 Chapter 6. Capture 1. Capturing Tethered When you are capturing images while tethered to a computer and with the capture selected, the Capture One PRO application will display: Information about the images being captured. Current settings. Status of the system. When capturing tethered, exposure can be evaluated in the Exposure evaluation histogram at the top of the panel. Note Remember to include a grey card in one of the captures for white balance calibration How to Capture Images When you have finished setting up the capture settings you are ready to start capturing images. To begin capturing images, follow the procedure below: 1. Turn on the camera and set it up for RAW capture (Quality must be set to RAW). Note The camera's white point is overruled by the White Balance set in the Capture One software (certain DSLR and P series Phase One cameras only). 2. Connect the camera to the computer through an IEEE 1394 (FireWire) or USB cable. 3. If you are shooting tethered (with one of the cameras supported by the application) make sure that the DSLR software drivers that come with the camera are installed on the computer. 4. Open the File menu, and select Reconnect Camera to detect the camera. Note Phase One digital backs connect automatically. If another camera model is connected and the software recognizes it the camera status will state that the camera is connected. 5. You are ready to shoot directly into the Capture One application. 6. To capture images when shooting tethered with Phase One camera backs, either click the Capture button, or push the capture button on the camera that you have connected to the application. 32
37 Chapter 7. White Balancing Images The White Balance tool is used to make white balance adjustments to your captured images. Working with Capture One this is a simple and easy process using a gray card or selecting a neutral gray area to adjust the balance of your images. In addition, you can make manual adjustments to images if needed. 1. How to White Balance Images To white balance images follow the procedure below: 1. From the capture window, select an image that contains a gray card or a neutral gray area. 2. If it is not already selected, click on the White Balance tab. 3. Using the cursor, click the color picker on the neutral gray area in the image being displayed in the preview window. Tip If your image does not contain a satisfactory gray area, you should shoot the image again and include a QP or MacBeth card in the scene. Alternatively, use the If selected display on the white balance tab. While moving the eye dropper around the image, the left window will indicate whether the area is suitable for white balancing, by saying If selected (Good) or not suited, by saying If selected (poor). The window on the right will show what the area will look like if the current position is used for white balancing the image: Suitable for White Balancing Not Suitable for White Balancing 4. The selected image will now be white balanced. This white balance can be used to balance other images and/or applied as a capture balance to new images if you are capturing tethered to a computer. Tip To avoid re-doing the same white balance settings for every new image, Capture One allows you to store your own white balance settings and reuse them on other images. Here's how you do it: 1. Adjust the white balance settings to your liking. 2. Click the Save White Balance button. This will bring up the Save As dialog: 33
38 White Balancing Images 3. Enter the name for your settings and click the Add button. 4. Now you can reuse your white balance settings by selecting them from the drop down menu in the white balance tool: 2. White Balance Tool Fields The White Balance Tool contains the following fields: Use this button to apply the selected white balance setting to all future captures. Use the button to reset the color balance to the last saved value. Any color balance adjustments that you have made to the image will be lost. Use the button to reset the color balance to that of the original shot. Use this button to have the application calculate and apply a suitable white balance. Use this button to apply the selected white balance, ICC Profiles or Lens Cast calibrations to the current selection of captures. When this button is clicked a dialog box (see illustration, below) will be displayed. 34

39 White Balancing Images The left window will show you where the eye dropper tool is situated in the image, and the right hand window shows how the image will look if you use this spot to adjust the white balance. Check out the tip in Section 1, How to White Balance Images for details. Use this slider to change your image to be "cooler" or "warmer". Use this slider to change the tint toward green or magenta Use this wheel to change the color of your image by dragging the center "x" in the direction of the color you would like to add. The hue and saturation bars next to the wheel allows you to fine tune the color once you have placed the "x" where you want it. Use this selector to browse for a Lens Cast Calibration file to apply to the selected capture. Check out Section 1.5, Calibrating fixed lenses for an explanation of how to create and load calibration files. 35

40 Chapter 8. Exposure Evaluation The exposure tool is used to evaluate and, if necessary adjust an image based on its exposure. It provides a visual, histogram based, illustration of the exposure of a selected image. Based on this, or working to predetermined settings, the exposure characteristics of an image can be adjusted. The exposure tool uses an RGB color readout in both the Raw files (the raw images) and in the Destination (which reflects how it will be in the processed image). You can obtain precise values for any point on the image by resting the cursor on it - mouse around and you'll see the RGB value changing in the upper right hand corner of the window: Knowing the precise values of any part of the image gives you full control over the printing process. Printers and printing processes all have individual characteristics. Adjusting exposure levels helps to ensure a predictable, high quality result matching your specific output needs. 1. Exposure Tool Fields The Exposure tab (see illustration, below) contains the following fields: Film standard selection box: use this selection box to choose which film curve is applied Film Standard: this is the default film curve Film extra shadow: this curve applies slightly more detail to the shadow areas of an image Film outdoor: this curve is especially suitable for use in outdoor daylight. The curve is designed to gain data in the high light areas whilst still maintaining contrast. Linear response: exact linear response will transfer the Image as it was taken with the camera, without the application applying any filtering or adjustments. This is especially useful for scientific photography and very high contrast scenery. EC: Exposure compensation. Allows you to correct the images' exposure if you have taken an image that is to dark or to light (under or over exposed respectively). CC: Contrast compensation. Allows you to increase or decrease the contrast of a image. Use this button to autocorrect the exposure in your image. Capture One will use proprietary algorithms 36
41 Exposure Evaluation to try to estimate the best exposure correction for you. Use this button to reset highlight and shadow levels. Use this button to reset all curves and levels. Use this button to load exposure settings. Use this button to save exposure settings. Use this button to apply any adjustments made to all the images selected in the capture collection. Levels: displays a histogram of the image's levels. Points in the histogram are plotted on a scale from 0 to 255. A completely black pixel has a value of 0 whilst at the opposite end of the scale a completely white pixel has a value of 255. It is important not to overexpose an image (clipping); if you see any of the Red, Green or Blue (RGB) values approaching overexposure (a value of 255) you need to adjust the exposure level. Keep image highlights (areas that should record as white with detail, and not as a specular reflection) between 225 and 255. Curve: use this display to adjust the image's exposure levels. An image curve is a graph that reflects the original image data (-axis) and the output or developed data (Y-axis). Dark tones are placed to the left, while the light colors are placed on the right. The default curve is a straight line. By clicking on the displayed curve, you can add an adjustment handle (displayed as a circle). Click and drag these to adjust the curve. In this way you can adjust and control every tone in the image. Note The Curve control may have a huge impact on the result and it should be used with caution. Note Click on the Apply to Selection selected in the capture collection. button to apply any adjustments made to all the images Preserve Balance: when selected ensures that all three color channels are adjusted simultaneously. If this box is not checked, you can control each color channel separately using the Red, Green and Blue channels. Raw RGB: displays a preview of the image, before any adjustments have been applied to it.the preview is based on a selection of the preview images made using the cursor picker. Destination: displays a preview of the image, after any adjustments have been applied to it. The preview is based on a selection of the preview images made using the cursor picker. Color Saturation: used to set the saturation level of the image, which shows how much color is applied. 37

42 Exposure Evaluation 38
43 Chapter 9. Focus and Sharpness The Focus Tool is used to assess and make adjustments to an image based on its focus and USM (unsharp mask) sharpness settings. The tool's focus window displays a fully processed version of the image, which you can then use to assess any adjustments that you have made to the image. Using the sharpening will actually increase sharpness by enhancing the edge differences between pixels of different colors. When applied, the software evaluates the contrast differences between pixels and these are either enhanced or omitted based on the settings applied. 1. How to Focus and Sharpen Images To check focus and adjust sharpness, follow the procedure below: 1. Using cursor, select an area of the image to work with from the preview window. 2. Zoom in and out using the Zoom slider. 3. Adjust the image's sharpness using the settings and sliders available. 4. When you are satisfied with the adjustments made, click the Note button to apply them. The area shown in the focus window can be moved either by moving the focus in the preview window, or by dragging in the focus window. 2. Focus Tool Fields The Focus tab (see illustration, below) contains the following fields: Use this button to automatically update focus window. Use this button to show the focus in gray scale.this does not affect the developed file, it just makes it easier to see the focus preview. Use this to change the size of the focus view between small, medium and large. Use this button to apply the adjustments made to selected images. Focus Window: (the representation of the image between the buttons and the Zoom slider). Zoom: use this slider to zoom into or out from the selected image. Method: use this selection box to choose from the preset methods. Amount: use this slider to adjust the amount of sharpening applied to the image. The default value is 35. Threshold: use this slider to adjust the threshold value above which adjustments will be made. The default value is 3. 39

44 Focus and Sharpness Note If you would like to see your sharpening settings on the preview image you can enable or disable it by clicking the Simulate sharpening settings button on the toolbar. 40
45 Chapter 10. Processing Images 1. Processing Images Having completed your adjustments and generated images within the application that you are satisfied with, the final stage of the workflow is to process the images. The process panel is used to organize the output at the end of your workflow. Using the process tool, you can choose a destination folder and select multiple variations of selected images. For example, you may need a large image and a web image version of each image. Using the process tool, these can be generated simultaneously. Images captured by a Phase One camera back are stored as Phase One Raw capture files. Images from supported DSLR cameras also have to be in their native raw format. Only raw files can be processed by the Phase One Capture One application. To process the images, click the Process Batch icon at the bottom of the panel. All settings in the process panel are stored as default settings and can be reused or changed at any time How to Process Images When you have made the adjustments you wish to apply to your images (see Section 1.3, Process Tool Fields for details), it's time to start processing them into the output formats. To process one or more images, follow this procedure: 1. Select the image(s) you wish to process from the thumbnail window. 2. Select the Process tab. 3. Click the Add button to add the selected image(s) to the batch processing queue. The processing starts automatically when images are added, but if you have halted the process, you can run the processing again by clicking the Process Batch button again. While images are being processed a progress bar will be displayed at the bottom of the Process tabs. Note For information on how to cancel processing of an image or stop processing a series of images, see Section 1.3, Process Tool Fields Working with Multiple Outputs Using the application's multiple outputs feature allows you to output the same images to multiple destination files simultaneously. To produce multiple outputs from the same image you have to enter the output parameters on the image tabs: Image 1, Image 2 and Image 3. After clicking the tab (it has to be enabled by checking Enable output) you will be able to access and fill out the output parameter fields on each tab. The same image can now be set up to be processed with different sizes, resolutions, file formats and compressions: 41
46 Processing Images After setting up the output parameter, the images are added to the processing batch. Images can be named in the Image title field. Naming images at this stage will make it easier to find and identify the photos later. If no name is assigned, the application names images automatically, based on selected preferences Process Tool Fields The Process tab (see illustration, below) contain the following fields: Enable output: use this check box to enable the Image tabs used to process multiple outputs simultaneously. Scaling%: using Scaling% you can set the desired output size and resolution for the image or crop. Width and Height : these are the actual measurements of the processed file(s), taking into account the scaling made with the Scaling% controls. The size can be measured in either pixels (px), inches, centimeters or millimeters. Which units are used are selected using the selection box. Typing in the size fields will adjust the crop to the new size and therefore change the actual file crop. If you want to scale the size to a specific size use the Scaling% control. Resolution: using the Resolution field you can set the final image resolution. Resolution can be set in pixels per inch, pixels per millimeter or pixels per centimeter. File format: use this field to choose the output format that you want. The formats available are: TIFF JPEG-High JPEG-Medium JPEG-Low Bit Depth: use this field to select the bit depth that you want the processed image(s) to have. Note This field is only available when the TIFF file format has been selected. File size: these two fields indicate the size of the processed image and the amount of free disk space remaining on the destination media. Color Management workflow: use this field to select the color management profile that you want to apply to the images as they are processed. The following options are available: Embed Camera Profile: use this profile to have the application automatically embed the selected ICC camera profile in the processed TIFF file. The embedded profile then serves as a conversion table that can be used by other applications, for example, Adobe Photoshop. Convert to Generic Grayscale: embeds a generic gray scale profile in the processed TIFF or JPEG file. Convert to Destination automatically embeds the selected ICC destination profile in the processed TIFF file. The application will convert the image on-the-fly to the default workspace or to CMYK. To use color management effectively, the profiles of the camera, monitor and destination must be defined. If all three devices are not correctly specified there is a risk that the final image will not correspond to the captured image. The Capture One software installs basic profiles for a number of supported Camera backs as well as generic monitor profiles and a wide selection of destination profiles for print, web or proofing purposes. 42
 will be opened in the application you have associated with the file type you are producing, once the processing is done:")
47 Processing Images Batch Editor: use this field for managing the batch processing of images. Tip By ticking the Automatically open processed images checkbox, the image(s) will be opened in the application you have associated with the file type you are producing, once the processing is done: Most likely the associated application is Adobe Photoshop. Warning Do not enable this feature if you're processing a large amount of images, as your computer might freeze up. 2. Batch Processing Using the Batch Editor field and icons on the Process tab (see illustration, below) you can manage the creation and processing of batches of images. A number of images can be added to the batch and then, when all of the images that need to be developed have been added to the list, the batch can be processed. use the develop button to process an individual image and to automatically process images selected in the thumbnail view use the add button to add images (selected in the capture view) to the batch without processing them. 43

48 Processing Images use the remove button to remove selected images from the batch. use the process batch button to start the processing of the image batch that you have created. use the stop processing batch button to cancel the processing of images in a batch. use the view processed image button to access and view a list of the most recently processed images. use the set image folder button to cancel select where the application should store the developed images. use the browse current folder button to browse the folder that is currently set as the image folder where processed images from the batch will be stored. 44

49 Chapter 11. Color Management The Capture One application is designed to work as part of an ICC color management workflow. The camera, monitor and printer are specified in the Capture One application, and the processed image will be customized for that specific input and output configuration. This section describes how to use the application's color management functions to achieve the results that you want. 1. Working with Color Management Capture One uses color management with ICC profiles to ensure correct colors all the way from image capture to final image. This means that when working on a properly setup system the image you see on the monitor will look exactly like the final image. An ICC profile is a description of how a device sees, displays and prints colors. When working with ICC color management in Capture One an ICC profile for the camera and the monitor has to be specified. Optional ICC profiles for other outputs (destinations) can be specified at any time. By default, Capture One installs ICC profiles for all the supported cameras as well as a wide selection of destination profiles for printing, web publishing, and proofing purposes A Guide to Color Management Settings The Color Management Settings dialog box (see illustration, below) allows you to manage your color management settings. To access this dialog box, right click the color management button toolbar. on the Camera Product: Select your camera to define which input profile should be your default for that camera. Camera Profile: The Flash Camera profile is selected by default. Select the appropriate profile from: Flash, Tungsten, Outdoor, Daylight or Portrait. 45
50 Color Management Note Only Capture One PRO provides CMYK output - one of the many advantages of Capture One PRO over Capture One LE and Capture One SE. Output destination (Working Space): Select the profile for your screen output. Web Destination: Embeds the selected web destination profile in the processed TIFF or JPEG file. The application converts the image to the default workspace or to CMYK on-the-fly. Proof Destination: Embeds the selected proof destination profile in the processed TIFF or JPEG file. The application converts the image to the default workspace or to CMYK on-the-fly. Monitor Profile: A default monitor profile can be selected. To enable the monitor profile selection check the Unlock Monitor profile selection menu box Selecting the Color Management workflow When setting up ICC profiles select from the Process tab/color Management workflow (see illustration, below) you have the following options: Convert to Destination: Automatically embeds the selected ICC destination profile in the processed TIFF file. The application will convert the image on-the-fly to the default workspace or to CMYK. Embed Camera Profile: When selected the image is not converted by any ICC profiles. Instead the camera profile is embedded into the final image. Even when only embedding the camera profile an application like Photoshop will still be able to show and handle the image with the correct colors. The benefit of using Embed Camera Profile is that the original image date is untouched and the number of color conversions that the image needs to undergo can be minimized. Convert to Generic Grayscale: embeds a generic gray scale profile in the processed TIFF or JPEG file. Convert to Web Destination: Embeds the selected web destination profile in the processed TIFF or JPEG file. The application converts the image to the default workspace or to CMYK on-the-fly. Convert to Proof Destination: Embeds the selected proof destination profile in the processed TIFF or JPEG file. The application converts the image to the default workspace or to CMYK on-the-fly. Note To use Color Management effectively, the profiles of the camera, monitor and destination must be defined. If all three devices are not correctly specified there is a risk that the final image will not correspond to the captured image. All of these must also be properly calibrated. The Capture One application installs basic profiles for Phase One Camera Backs as well as generic monitor profiles and a wide selection of destination profiles for print, web or proofing purposes. 46


51 Color Management 1.3. Using Other ICC Profiles It is possible to create your own ICC profile and import it into the Capture One application. For Windows 2000, place the desired profile in the Color folder under C:\WinNT\System32\SpoolDrivers. For Windows P it must be placed under C:\WINDOWS\System32\Spool\Drivers. Restart the application and the new profile will appear in the Preferences pop-up menu. Using third-party software, customized printer or monitor profiles can be made and installed. This gives greater color management control of the workflow environment. The smoothness slider makes color adjustments smoother. By enhancing the smoothness a red color correction will slightly affect neighboring colors like magenta and yellow as well. 2. The Color Editor The Color Editor is accessed from the Workflow menu. The purpose of the tool is to provide you with the option of adjusting predefined camera profiles to fit individual color requirements. The Color Editor works with Phase One's predefined camera profiles. To start the Color Editor, select the image you want to adjust the profile on and select Color Editor from the Workflow menu (see illustration, below). Selecting The Master Profile: open the Color Editor tool from the Workflow menu, and select the profile you wish the adjust from the Master profile selection field. Making Color Adjustments: all adjustments are made to a copy of the original profile. The Capture One software automatically copies the master profile to avoid unintended overwriting of an original profile. Use Save As to store the adjusted profile under a new name once all corrections have been carried out. All new profiles are added to, and can be selected from the camera profile drop-down box in the Color Management dialogue box. New profiles are added to, and can be selected from the ICC Profile field in the Capture Panel, or in the Color Management preferences. 47
, highly specific colors can be pinpointed and selected directly from the image in the image window.")
52 Color Management 2.1. Local Color Adjustment Using the color wheel in the Color Editor window (see illustration, below), highly specific colors can be pinpointed and selected directly from the image in the image window. The Smoothness slider makes color adjustments smoother, that is, by enhancing the smoothness a red color correction will slightly affect neighboring colors like magenta and yellow as well.the dot controls in the color wheel are used to adjust precisely what colors are affected by the corrections made. Moving the black dot in the center will move the selected area. Moving the white dots in the outer boundary of the area will increase or decrease the color coverage of the selection. Hue rotation, Saturation and Lightness adjustments can be verified immediately on the screen. The color wheel is a graphic illustration of the colors that are affected by the adjustments you are about to make. By pulling the handles of the color wheel or the smoothness slider the area of affected color is expanded or minimized Global Color Adjustments If you prefer to adjust all colors simultaneously you can do so by adding a global color adjustment to the list Color Editor Inspector Profile adjustments should be carried out with care as there is always a risk of creating a profile that will do more harm than good. In order to avoid this occurring, the Color Editor includes an inspection tool that can help you verify the characteristics of the profile before you save it and begin to use it. Click the icon to open a Color Edit Inspector window with an image where the colors affected by the adjustments are displayed. 48

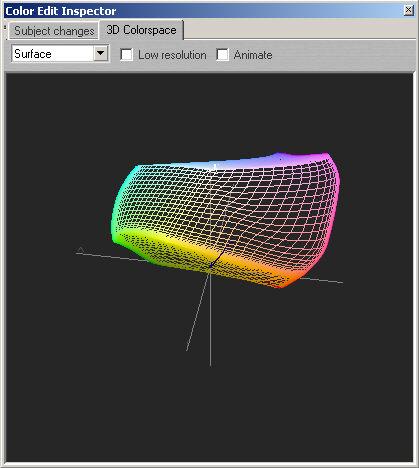
53 Color Management The Subject changes tab (see illustration, below ) is where the colors affected by the adjustments are displayed. Colorized difference shows a monochrome image that displays color corrected areas with colored highlights. Absolute difference shows a completely black image where only the color corrected areas are visible. The 3D Color Space (see illustration, below) provides a graphic illustration of the profile's color space. The color space illustration gives a clear indication of whether or not the profile is suitable for use in a professional color management workflow. A smooth and even color space indicates that the profile is acceptable and vice versa. 49
54 Color Management 50
55 Chapter 12. Supported Meta Data and IPTC Fields The charts in the following sections list Capture One's support for meta data based on camera model. An "" means that the meta data field is supported, while "" means that the field is not supported for the model in question. 1. Phase One MetaData Phase One P 25 cameras: Tethered M645, C645, H645 Camera: P 25 Untethered M645, C645, H645 P 20 Tethered M645, C645 P 25 tethered H101 P 20 Untethered P 25 Hass V tethered P 20 Hass V tethered M645, and untethered and untethered C645, H645 Camera Model Camera Serial Number Camera Firmware Version Camera Owner Lens Exposure: Shutter Speed Aperture Max Aperture Exposure Program Exposure Mode Flash Mode Metering Mode Drive Mode/ Self Timer Exposure Compensation 51
56 Flash Compensation ISO Speed Rating Focal Length Auto Focus Mode White Balance Setting Subject Distance Range Subject Distance File: File Size x x x Image Serial Number Creation Date Image Dimension image Quality Copyright 2. Canon MetaData G2 G3 G5 Pro 1 30D 60D 300D 10D 20D 1D MKII 1Ds MKII 1Ds 1D Canon cameras: Camera: Camera Model Camera Serial Number Camera Firmware 52 Supported Meta Data and IPTC Fields
57 Version Camera Owner Lens Exposure: Shutter Speed Aperture Max Aperture Exposure Program Exposure Mode Flash Mode Metering Mode Drive Mode/ Self Timer Exposure Compensation Flash Compensation ISO Speed Rating Focal Length 53 Supported Meta Data and IPTC Fields
58 Auto Focus Mode White Balance Setting Color Space Subject Distance Range Subject Distance File: File Size Image Serial Number Creation Date Image Dimension image Quality Copyright 3. Nikon MetaData D70 D100 D2H D1H D1 Nikon cameras: Camera: Camera Model Camera Serial Number 54 Supported Meta Data and IPTC Fields
59 Supported Meta Data and IPTC Fields Camera Firmware Version Camera Owner Lens Exposure: Shutter Speed Aperture Max Aperture Exposure Program Exposure Mode Flash Mode Metering Mode Drive Mode/ Self Timer Exposure Compensation Flash Compensation ISO Speed Rating Focal Length Auto Focus Mode Color Space White Balance Setting Subject Distance Range Subject Distance File: File Size Image Serial Number Creation Date Image Dimension image Quality Copyright 4. Olympus MetaData 55
60 Supported Meta Data and IPTC Fields Olympus cameras: E-1 E-10 E-20 C 8080 Camera: Camera Model Camera Serial Number Camera Firmware Version Camera Owner Lens Exposure: Shutter Speed Aperture Max Aperture Exposure Program Exposure Mode Flash Mode Metering Mode Drive Mode/ Self Timer Exposure Compensation Flash Compensation ISO Speed Rating Focal Length Auto Focus Mode Color Space White Balance Setting Subject Distance Range Subject Distance File: File Size Image Serial Number Creation Date Image Dimension image Quality 56
61 Supported Meta Data and IPTC Fields Copyright 5. Pentax MetaData Pentax camera: *istd Camera: Camera Model Camera Serial Number Camera Firmware Version Camera Owner Lens Exposure: Shutter Speed Aperture Max Aperture Exposure Program Exposure Mode Flash Mode Metering Mode Drive Mode/ Self Timer Exposure Compensation Flash Compensation ISO Speed Rating Focal Length Auto Focus Mode White Balance Setting Subject Distance Range Subject Distance File: File Size Image Serial Number Creation Date Image Dimension image Quality Copyright 6. Fuji MetaData Fuji cameras: S3 S2 57
62 Supported Meta Data and IPTC Fields Camera: Camera Model Camera Serial Number Camera Firmware Version Camera Owner Lens Exposure: Shutter Speed Aperture Max Aperture Exposure Program Exposure Mode Flash Mode Metering Mode Drive Mode/ Self Timer Exposure Compensation Flash Compensation ISO Speed Rating Focal Length Auto Focus Mode White Balance Setting Subject Distance Range Subject Distance File: File Size Image Serial Number Creation Date Image Dimension image Quality Copyright 7. Konica Minolta MetaData Konica Minolta cameras: Maxxum 7D, Dynax 7D, Alfa 7 A2 A1 Camera: Camera Model Camera Serial Number 58
63 Supported Meta Data and IPTC Fields Camera Firmware Version Camera Owner Lens Exposure: Shutter Speed Aperture Max Aperture Exposure Program Exposure Mode Flash Mode Metering Mode Drive Mode/ Self Timer Exposure Compensation Flash Compensation ISO Speed Rating Focal Length Auto Focus Mode White Balance Setting Subject Distance Range Subject Distance File: File Size Image Serial Number Creation Date Image Dimension image Quality Copyright 8. IPTC Information Editor The IPTC Editor is accessed from the Collection menu. IPTC information is a kind of meta data that can be added to hidden fields in your files. The fields are available both in capture files and in processed files, where it is transferred to when the image is processed. Use the button if you wish to merge in an existing set of IPTC information clears all values. 59
64 Supported Meta Data and IPTC Fields saves the template. undoes changes made. applies the settings to all selected captures. 60

65 Chapter 13. Special Features This section describes the special utility functions that the Capture One application provides. 1. Demoirize Plug-in The Phase One Demoirize plug-in for Adobe Photoshop allows the removal of moiré patterns from images by means of three different filtering modes: Advanced, Unicolor Textiles and Skin and Hair. The plug-in is enclosed on the CD-ROM and will be placed in Adobe Photoshop's plug-ins folder when installing Capture One the application. The Demoirize plug-in window is divided into two separate previews: Original Image, which displays the image before correction and Corrected Image, which displays the image after correction: Using Advanced Mode on Skin and Hair: for skin and hair surfaces the optimal settings for the advanced filter would be to position the Quality/Speed slider at Speed and the Pattern Size slider lose to Small. Note Large color moiré areas in hair may require a larger pattern size setting. Using Advanced Mode on Textiles: on textile the optimal settings for the advanced filter would be to position the Quality/Speed slider towards Speed, or in an intermediate position. Then move the Pattern Size slider to the smallest possible setting. In many cases the masking of unicolored, or nearly unicolored areas, may be carried out less accurately with the advanced filter compared to the Unicolor textiles filter. Since masking depends very much on the type of image, it is recommended that you test different masking and filter settings. Advanced Mode: is a new filter tool. It is also the default mode of the Demoirize plug-in. In advanced mode the filter estimates colors by means of the Quality/Speed slider and the Pattern Size slider. Often the color moiré is visible by multiple red/green or blue/yellow areas of discoloration. These areas of discoloration are seen as bands or stripes. The larger the band or stripe, the larger the pattern size setting should be. 61

66 Special Features Pattern Size: the best way of finding the optimal pattern size is by setting the Quality/Speed slider to Speed while moving the Pattern Size slider towards Large. While moving the slider the effects of corrections are seen on the screen. Selecting a larger than necessary pattern size will not generally enhance the result. A circular arrow icon, that turns, indicates that the Demoirize filter is currently calculating image data. Quality/Speed: when large areas of moiré stripes and bands are present the Quality/Speed slider should be set towards Quality, at the cost of Speed. Use the Quality setting when details smaller that the selected pattern size should be less affected by the filtering. 2. Stitching Images Capture One has the ability to stitch two or three images together to assemble one big TIFF or JPEG file. (You must use Phase One cameras backs files inorder to do this). Using the Phase One FlexAdaptor on a large format camera, it is possible to precisely take two or three images (depending on the camera back) and stitch them together with the FlexAdaptor Stitch Processing function found in the Workflow menu How to Stitch Images Together To stitch images together, follow the procedure below: 1. Select the images that you want to stitch together in the thumbnail window. 2. Select Workflow>FlexAdaptor Stitch Processing. 3. The FlexAdaptor Stitch Developer window will be displayed. See illustration, below: 4. If the images are not correctly positioned (from left to right) use the switch position button swap them around. to 62
67 Special Features 5. If the overlap is not correct, select a more appropriate type from the Overlap selection field. 6. Fill out the Image title field 7. When you are satisfied with the settings that you have applied, click the Process button. 8. The images will be processed and a larger, single "stitched" image will be produced. 3. Lens Cast Calibration To learn how Capture One can help you calibrate fixed lenses, please read Section 1.5, Calibrating fixed lenses. 63
68 Chapter 14. Preferences The application preferences for Capture One PRO are accessed from the File > Preferences menu or by holding down ALT+P. 1. Process Settings Field description for the Process settings tab (see illustration below): Naming This is where the way the file is processed from Capture One is set up. When processing, the default naming can be set to a certain name and the files will use that name when they are processed. The TIFF and JPEG file extension can be changed if needed. We recommend that they stay at.tif and.jpeg If you place something in the name delimiter box it will appear after the default name. Once you have set the name in the default name box you must check the box use capture name as default name. If you want the file to include the last 5 digits of the capture number check the box. You can also choose include 3 digits for duplicated file names by checking that box off. By checking off the include capture information in TIFF caption, and include Meta data information the information will appear in the processed file. The thumbnails can be embed in the processed TIFF by checking off the box. Processing Settings Checking Do NOT rotate the image will keep the image from rotating when the file is processed. Disable Sharpening will not allow any sharpening to be added to the processed file. Using the banding suppression slider allows adjustment to the banding which is the lack of shades of lightness in the file. Noise suppression allows the noise level in the images to be adjusted. 64
: Naming Convention Naming convention delimiter allows a to be added after the name and before the digits.")
69 Preferences 2. Capture Options Field description for the Capture Options tab (see illustration below): Naming Convention Naming convention delimiter allows a to be added after the name and before the digits. The up and down arrow keys allows the amount of digits to be added to the file name. Suffix allows a suffix to be added to the name. Check the allows include number box if a number should appear with the file name. Check use the cameras capture counter if you would like to use that instead of the local counter. 65

70 Preferences Batch Rename Check the offset value for batch rename if you want the files to be off set by a certain amount. Check the offset value for batch rename if you want the files to be off set by a certain amount. The check box process immediately will process the file as soon as the file is taken. Recognition If DB capture file have been saved with extensions other than.cap,,capture,.tif,.tiff one of the options must be selected without file extension or with incorrect file extensions. Note If these options are enabled capture file handling may slow down. This only effects Phase One camera backs. 66
: You can choose from the following: Automatic Capture one will read the correct orientation")
71 Preferences and camera settings Field description for the 1394 and Camera settings tab (see illustration below): You can choose from the following: Automatic Capture one will read the correct orientation from the camera and rotate the file in the correct way. Force to landscape will make all images rotate to landscape. Force to portrait + 90 degrees will make all images rotate to portrait clock wise. Force to portrait - 90 degrees will make all images rotate to portrait counter clock wise. Note Selecting the capture orientation manually is only recommended on camera systems where the orientation can not be determined automatically by the camera. 67

72 Preferences 4. Power and Portability Field description for the Power and Portability tab (see illustration below): When Camera battery indicator is checked the battery type can be choose. The options are 12V lead acid or 2x 7.2V lithium- ion power module. Battery type NOTE: When the camera is powered from other sources than Phase One Portable kit the battery indicator is only updated after each capture has been completed. Check use F11 for ISO change instead of host capture. This allows the hot key of F11 to be used for ISO change. 5. Miscellaneous Settings Field description for the Miscellaneous Settings tab (see illustration below): Default Sharpening Soft or standard method of sharpening can be selected. Soft look will soften the sharpening of the image and standard will not. 68
73 Preferences Amount: allows the amount of sharpening that needs to be applied to the images to be adjusted by using the slider. Theshold: allows the amount of theshold that needs to be applied with the amount of sharpening to the images. Default Color Saturation Automatically open processed images Sound Settings The default color saturation can be modified by using the slider to add or subtract the default saturation of an image. To automatically open processed images check the box. Then you have the choose of opening with the.tif associated application which will open the file with what software that is on the computer that will open a.tif file. The second option is to open the image to a selected application which can be browsed to by clicking on the choose button. The path of the application will be displayed below the choose button. Allows a sound to be set for camera is ready, capture is received and camera or host reaches low power. By clicking the browse button you can select the sound option of choose. If there is a need to scroll through numerous images and keep the same focus point while scrolling the remember the setting for automatic focus update should be set. Hide focus orientation frame automatically will make the square showing were the focus point was selected not show up. Render background in solid gray allows the background skin of the software shade of gray to be changed. Enable Jpeg browsing allows Jpegs to show up in the software. 69

74 Preferences 6. Save Options Field description for the Save Options tab (see illustration below): Save on exit allows will save everything when the application is shut down. Save when changing collection save everything when there is a change from on collection to another collection. Save when changing images save everything when there is a change from on image to another image. Save every amount of images will save changes made during that duration of time. Note Excessive saving can degrade performance of other operations. 70

75 Preferences 7. Exposure Evaluation This is where you provide the settings for over and under exposure warnings. 71
: Get info button shows the information of the preview cache like how much space it is using and the associated")
76 Preferences 8. Preview Cache Field description for the Preview Cache tab (see illustration below): Get info button shows the information of the preview cache like how much space it is using and the associated amount of RAW files. Choosing a folder for previews to be stored in allows the folder to be changed in case the previews need to be shared. Automatically cleaning up the preview cache is recommend to have set at when a preview has not been accessed for the specified number of day to be 5 to 10 days. This will help the performance of the computer. Clean up the preview cache now allow the Previews to be cleaned up through the button instead of finding the folder and emptying it. 72
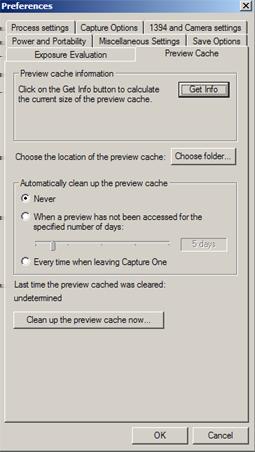
77 Preferences 73
78 Chapter 15. Keyboard Shortcuts The following table describes the interfaces' keyboard shortcuts: Description Capture One Help (This user guide) Capture Tab Exposure Tab Focus Tab Develop Tab Shift focus to the collection part of the window Tab to the previous function tab Exposure warning tool (toggle on and off) Maximize preview window Full screen mode Toggle Landscape - Portrait view Move Highlighted Images (captures) to Move To Folder. Move Highlighted Images (captures) to Trash Collection. Delete highlighted images Add selected image(s) to batch Select ALL ( Capture Collection) or in (Batch queue) F1 Alt - C Ctrl - E Alt - F Ctrl - D F2 F3 F5 F9 F7 F8 Backspace Deleted Ctrl + Delete Insert Ctrl + A Shortcut 74
79 Chapter 16. Tips and Tricks 1. Tips on Daily Usage of Capture One 1.1. Optimizing white balance Tip If your image does not contain a satisfactory gray area, you should shoot the image again and include a QP or MacBeth card in the scene. Alternatively, use the If selected display on the white balance tab. While moving the eye dropper around the image, the left window will indicate whether the area is suitable for white balancing, by saying If selected (Good) or not suited, by saying If selected (poor). The window on the right will show what the area will look like if the current position is used for white balancing the image: Suitable for White Balancing Not Suitable for White Balancing 1.2. Saving disk space by deleting previews Tip You can save a lot of disk space by periodically deleting unused items from the Previews folder in C:\Program Files\Phase One\Capture One PRO. You can read more about the different folders installed by Capture One in Section 2, Standard Folders Created During Installation work file naming convention Tip The.work files are named according to the following scheme: UID_[M]_[S]_[C]_[T] An example could be: UID_Canon EOS-1D_00003E74_002000_ work, broken down like this: [M] [S] [C] [T] Description Camera model Serial number of the sensor Capture number assigned by camera Timestamp in the format yyyymmddhhmmss Example Canon EOS-1D 00003E (Which would mean that the image 75
 1.4. Reusing your white balance settings Tip To avoid re-doing the same white balance settings for every new image, Capture One allows you to store your own white balance settings and reuse")
80 Tips and Tricks Description Example was captured at August 5th 2002 at 5:46:45 PM) 1.4. Reusing your white balance settings Tip To avoid re-doing the same white balance settings for every new image, Capture One allows you to store your own white balance settings and reuse them on other images. Here's how you do it: 1. Adjust the white balance settings to your liking. 2. Click the Save White Balance button. This will bring up the Save As dialog: 3. Enter the name for your settings and click the Add button. 4. Now you can reuse your white balance settings by selecting them from the drop down menu in the white balance tool: For more details about white balancing, check out Chapter 7, White Balancing Images Calibrating fixed lenses Tip Lens cast is a result of the CCD being exposed to light from a very sharp angle and will typically occur as a green cast in or corner of the image, stretching into a magenta cast in the opposite corner. Lens cast may occur when using Phase One H 25 with wide angle lenses like Horseman Digiflex II, Hasselblad Flexbody or Hasselblad 905SWC or on other large format cameras with different tilt or swing settings. On a medium format camera lens cast is very rare if using fixed lenses from 60 mm to 120 mm. To avoid lens cast, follow this procedure: 76

81 Tips and Tricks 1. Put a calibration plate in front of the lens - as close as possible - and capture. To ensure correct exposure you might have to open a few f-stops in very light conditions or put more light directly on the plate in dark setups. 2. Select the thumbnail of the captured image in Capture One and click on the White Balance tab. in the tool. Now you'll see a section called Lens Cast Correction: 3. Click the Generate... button to save the calibration file - this calls up the Save As... dialog: 77

82 Tips and Tricks 4. Now you can select the saved calibration file by browsing for it: 5. Check the Apply LCC for next Captures checkbox to apply the selected calibration for the next series you shoot: 6. After saving your calibration file, you can delete the image used to create the LCC file. Note If you tilt the camera, zoom or in any other way change the way the light will enter the lens, you need to create a new calibration file. If you're working with large format or stitched images, you should check out Section 1.6, Lens cast calibration with image stitching. 78
83 Tips and Tricks 1.6. Lens cast calibration with image stitching Tip When working with large format and stitched images, you must use a different lens cast calibration file for each image in the aggregated image: 1. Create a calibration file along with each image you shoot and apply the calibration files to the images. (See Section 1.5, Calibrating fixed lenses for details on how to create calibration files and apply them to images). 2. To ease the white balancing you can apply the same settings to all images by selecting them all and clicking the Apply to Selected Captures button:. This brings up the following dialog: 3. Check the RGB, Sat/Hue and Kelvin/tone checkbox and click Apply Good sharpening When working with the Focus Tool you need to adjust the Amount and Threshold sliders. Here are a couple of hints to good practice: Tip The Amount is typically set around 100 for ink jet, for offset printing. Threshold is used to define how many of the surrounding pixels are affected. Typically a noisy image will have a higher threshold set, perhaps A clean image will need a very low threshold of 2-4. Keep checking the image in the focus window. For a web image, the image should look correct on screen. For an image to be printed in a magazine or book, the preview should ideally look slightly over-sharp on screen. 79

84 Tips and Tricks Read more about focus and sharpening in Chapter 9, Focus and Sharpness Creating your own cropping dimensions Tip Capture One lets you create your own custom cropping dimensions that you can reuse in the future. Here's how you create a new cropping menu item with your own dimensions: 1. Right click the crop icon and the following menu pops up: 2. Fill in the constraints for your crop, enter a name for it and click the Save button: 3. Now you'll see your new cropping in the selection list of available crops: 80

85 Tips and Tricks 1.9. Opening images into another application When processing images you can enable Capture One to open the processed images immediately in your preferred application, other than Capture One. Tip By ticking the Automatically open processed images checkbox, the image(s) will be opened in the application you have associated with the file type you are producing, once the processing is done: Most likely the associated application is Adobe Photoshop. Warning Do not enable this feature if you're processing a large amount of images, as your computer might freeze up. You can read more about processing your images in Chapter 10, Processing Images Undoing rotations Tip If you are unhappy with the rotations you have performed on an image, Inserting a value of 0 in the Rotation Tool's free text area returns the image to its original rotation. Read all about cropping and rotating in Section 3, Cropping and Rotation Activating Capture One software Tip To activate a license for your copy of Capture One, follow the instructions on how to activate a license. 81

86 Tips and Tricks Creating a contact sheet Tip Capture One lets you quickly create a contact sheet for clients to preview: 1. From the capture collection, select one of the images you wish to add to the contact sheet. 2. Apply any adjustments to the image - little is usually needed for a preview version, like auto adjusting the image in the exposure tool. 3. Now select the rest of the images for the contact sheet by holding down the Ctrl button as you click once on each image you wish to select. 4. From the Collection menu, select QuickProof... This will bring up the following dialog: 5. If you have applied cropping to the first image you selected, you should check the Use image crop checkbox. If you want the previews to be aggregated in an HTML page ready for publishing on the Web, check the Create HTML index checkbox. The rest of the options are pretty self-explanatory. 82
87 Tips and Tricks 6. Click the Process button and your contacts will now be created in the Destination folder Dynamic range from RAW Tip One of the major limitations of most DSLR cameras is the blowing out of highlight details in high contrast situations. The solution to the problem in a film workflow was to shoot two frames, one exposed for highlights and one for shadows. By combining them after scanning, the best possible result could be achieved although with the associated risks of image misregistration. RAW offers the ability to achieve the same result by simply outputting two versions of the same file with exposure compensation or curves applied to the second output to give a darker image. Achieving this effective increase in dynamic range is very straightforward: 1. Capture the image, taking care to expose for the highlights and ensure that they are not overexposed. On output, create two files, one with normal exposure and named with the suffix top and the second, where the exposure compensation control and contrast slider have been used to enhance the shadow detail with the original file name. 2. After processing as TIFF files, open both in Adobe Photoshop. Select the Move Tool. Drag the top file onto the other image while holding down the SHIFT key. The images should be perfectly aligned. 3. Go to Layer > Add Layer Mask > Reveal all. Reset default colors to black and white and then click on the rectangular Mask icon on the top layer in the layers palette. Use a paintbrush set on 10% opacity to paint away the shadows on the top layer to reveal more detail from the lower layer. Black paints away the top layer, white paints it back in. 4. Once satisfied with the result, right click on the layer mask and select Apply Layer Mask. Flatten the image and you are done. 2. Troubleshooting 2.1. I want to completely delete Capture One and all drivers from my machine Tip If you want to remove everything installed by Capture One, follow this procedure: Warning Make sure you have backed up all images you wish to keep, as this procedure whipes out everything, including images. 1. Remove Capture One with the Add/Remove Programs control panel (In Windows P you call up a list of control panels from the start menu). 2. Manually delete the folder C:\Program Files\Phase One (assuming you have installed Capture One in the standard location). 83

. This brings up the \"Registry Editor\": 8.")
88 Tips and Tricks 3. Hold down the Windows key and push "r" on the keyboard. 4. In the window that pop up, type in "cmd" and click OK: 5. Now a black window pops up and you have to enter a few commands directly in this window. Enter the following commands and end each one with hitting enter/return on the keyboard: del %windir%\system32\drivers\p1c1394.sys del %Windir%\INF\p1c1394.inf 6. Close the black window. 7. Open the Run window again by bolding down the Windows key and pushing "r". This time you type in "regedit" (without the quotes). This brings up the "Registry Editor": 8. Delete the following two folders by right clicking them and selecting "Delete": Hkey_current_ user\software\phase One Heky_local_machine\System\CurrentControlSet\Services\P1C
89 Tips and Tricks 9. Restart your computer and all traces of Capture One should be gone How do I recover items from the trash? Tip If you've moved an image to the trash but want to bring it back into play, simply go to the Trash pane of the collection window and drag the image from there to the collection tab you wish to place it in. 85

90 Chapter 17. Troubleshooting and Feedback Phase One Support: if you experience technical problems while working with the Phase One Capture One application, try visiting our Phase One Support area on our corporate web at: Here you will find links to our official support forum and the Phase One Knowledge Base with searchable articles on troubleshooting and known issues. Providing Feedback: Phase One values your feedback on our software. The easiest way for you to send us your thoughts is by selecting the Capture One > Provide feedback... menu item from the Capture One menu. You can also manually send an to: We read all feedback carefully, but please note that we cannot respond to the comments you send to this account. 86
Color and More. Color basics
 Color and More In this lesson, you'll evaluate an image in terms of its overall tonal range (lightness, darkness, and contrast), its overall balance of color, and its overall appearance for areas that
Windows INSTRUCTION MANUAL
 Windows E INSTRUCTION MANUAL Contents About This Manual... 3 Main Features and Structure... 4 Operation Flow... 5 System Requirements... 8 Supported Image Formats... 8 1 Installing the Software... 1-1
Contents Foreword 1 Feedback 2 Legal information 3 Getting started 4 Installing the correct Capture One version 4 Changing the version type 5 Getting
 Contents Foreword 1 Feedback 2 Legal information 3 Getting started 4 Installing the correct Capture One version 4 Changing the version type 5 Getting to know Capture One Pro 6 The Grand Overview 6 The
Picture Style Editor Ver Instruction Manual
 ENGLISH Picture Style File Creating Software Picture Style Editor Ver. 1.15 Instruction Manual Content of this Instruction Manual PSE stands for Picture Style Editor. indicates the selection procedure
Nikon View DX for Macintosh
 Contents Browser Software for Nikon D1 Digital Cameras Nikon View DX for Macintosh Reference Manual Overview Setting up the Camera as a Drive Mounting the Camera Camera Drive Settings Unmounting the Camera
Picture Style Editor Ver Instruction Manual
 ENGLISH Picture Style File Creating Software Picture Style Editor Ver. 1.18 Instruction Manual Content of this Instruction Manual PSE stands for Picture Style Editor. In this manual, the windows used in
Software Reference. FlexColor 4.0 for Camera Backs. by Hasselblad Imacon
 Software Reference FlexColor 4.0 for Camera Backs by Hasselblad Imacon 2 2004 Hasselblad A/S. All rights reserved., Part No 70030035 revision 1.0. The information in this manual is furnished for informational
It makes sense to read this section first if new to Silkypix... How to Handle SILKYPIX Perfectly Silkypix Pro PDF Contents Page Index
 It makes sense to read this section first if new to Silkypix... How to Handle SILKYPIX Perfectly...145 Silkypix Pro PDF Contents Page Index 0. 0.Overview and Introduction...9 0.1. Section Names...9 0.1.1.
Luma User s Guide. Mosaic Imaging 873 Great Road P.O. Box 299 Stow, MA
 Luma User s Guide Mosaic Imaging 873 Great Road P.O. Box 299 Stow, MA 01775-0299 978-461-0110 www.mosaicimaging.com Luma User s Guide Luma Studio Software V1.7 Notice of Rights All rights reserved. This
Version 4.2 For WINDOWS
 SIGMA Photo Pro User Guide Companion Processing Software for SIGMA Digital Cameras Version 4.2 For WINDOWS I M P O R T A N T : Please Read Before You Start Thank you very much for purchasing this SIGMA
LightPhase User Guide
 LightPhase User Guide Edition July 2001 Phase One A/S Roskildevej 39 DK-2000 Frederiksberg Denmark Tel +45 36 46 01 11 Fax +45 36 46 02 22 Phase One U.S. 24 Woodbine Ave Northport, New York 11768 USA Tel
Picture Style Editor Ver Instruction Manual
 ENGLISH Picture Style File Creating Software Picture Style Editor Ver. 1.12 Instruction Manual Content of this Instruction Manual PSE is used for Picture Style Editor. In this manual, the windows used
Companion Processing Software for SIGMA Digital Cameras. Version 4.1 For Macintosh
 SIGMA Photo Pro User Guide Companion Processing Software for SIGMA Digital Cameras Version 4.1 For Macintosh I M P O R T A N T : Please Read Before You Start Thank you very much for purchasing this SIGMA
Capture One 4 is designed with an easy workflow in mind, and the simplified new user interface leaves more of the screen area to your images.
 Capture One 4.6 release notes Introduction Newly architected Capture One 4 allows photographers to enhance and develop RAW digital files with excellent color and detail reproduction. Providing best possible
The ideal K-12 science microscope solution. User Guide. for use with the Nova5000
 The ideal K-12 science microscope solution User Guide for use with the Nova5000 NovaScope User Guide Information in this document is subject to change without notice. 2009 Fourier Systems Ltd. All rights
Photoshop CC Editing Images
 Photoshop CC Editing Images Rotate a Canvas A canvas can be rotated 90 degrees Clockwise, 90 degrees Counter Clockwise, or rotated 180 degrees. Navigate to the Image Menu, select Image Rotation and then
Select your Image in Bridge. Make sure you are opening the RAW version of your image file!
 CO 3403: Photographic Communication Steps for Non-Destructive Image Adjustments in Photoshop Use the application Bridge to preview your images and open your files with Camera Raw Review the information
Visioneer OneTouch Scanner. Installation Guide FOR WINDOWS
 Visioneer OneTouch Scanner Installation Guide FOR WINDOWS TABLE OF CONTENTS i TABLE OF CONTENTS Getting Started with your new Scanner....................... 1 Step 1: Installing the Scanner Software.......................
PHOTOSHOP: 3.3 CAMERA RAW
 1 PHOTOSHOP: 3.3 CAMERA RAW Raw image files are uncompressed images that contain all the information of the photo. Raw images give you flexibility in editing and allow you to achieve a better look because
Guidance on Using Scanning Software: Part 5. Epson Scan
 Guidance on Using Scanning Software: Part 5. Epson Scan Version of 4/29/2012 Epson Scan comes with Epson scanners and has simple manual adjustments, but requires vigilance to control the default settings
Software Reference. FlexColor 3.0 for Flextight Scanners. by imacon
 Software Reference FlexColor 3.0 for Flextight Scanners by imacon 2 2001 Imacon A/S. All rights reserved., revision X-X. The information in this manual is furnished for informational use only, is subject
Adobe Photoshop. Levels
 How to correct color Once you ve opened an image in Photoshop, you may want to adjust color quality or light levels, convert it to black and white, or correct color or lens distortions. This can improve
Monaco ColorWorks User Guide
 Monaco ColorWorks User Guide Monaco ColorWorks User Guide Printed in the U.S.A. 2003 Monaco Systems, Inc. All rights reserved. This document contains proprietary information of Monaco Systems, Inc. No
Lightroom CC. Welcome to Joshua Tree Workshops. Astro & Landscape Lightroom Workflow w/presets
 Welcome to My approach to teaching is to offer small workshops which allow you to explore and discover our amazing planet, while learning photography and timelapse techniques. Astro & Landscape Lightroom
ScanGear CS-U 5.6. for CanoScan FB1210U Color Scanner. User s Guide
 ScanGear CS-U 5.6 for CanoScan FB1210U Color Scanner User s Guide Copyright Notice Copyright 2000 Canon Inc. This manual is copyrighted with all rights reserved. Under the copyright laws, this manual may
NOISEWARE 5 USER'S GUIDE PLUG-IN BY IMAGENOMIC
 NOISEWARE 5 PLUG-IN USER'S GUIDE BY IMAGENOMIC 2012 Updated May 17, 2012 Contact Imagenomic at http://www.imagenomic.com/contact Copyright 2004-2012 Imagenomic, LLC. All rights reserved 2 TABLE OF CONTENTS
The 2 in 1 Grey White Balance Colour Card. user guide.
 The 2 in 1 Grey White Balance Colour Card user guide www.greywhitebalancecolourcard.co.uk Contents 01 Introduction 05 02 System requirements 06 03 Download and installation 07 04 Getting started 08 Creating
1 ImageBrowser Software User Guide 5.1
 1 ImageBrowser Software User Guide 5.1 Table of Contents (1/2) Chapter 1 What is ImageBrowser? Chapter 2 What Can ImageBrowser Do?... 5 Guide to the ImageBrowser Windows... 6 Downloading and Printing Images
Photoshop Elements Hints by Steve Miller
 2015 Elements 13 A brief tutorial for basic photo file processing To begin, click on the Elements 13 icon, click on Photo Editor in the first box that appears. We will not be discussing the Organizer portion
Software & Computers DxO Optics Pro 5.3; Raw Converter & Image Enhancer With Auto Or Manual Transmission By Howard Millard March, 2009
 Software & Computers DxO Optics Pro 5.3; Raw Converter & Image Enhancer With Auto Or Manual Transmission By Howard Millard March, 2009 Whether you shoot raw or JPEG, whether you re on the Windows or Mac
ScanGear CS-U 6.0. for CanoScan D646U Color Scanner. User s Guide
 ScanGear CS-U 6.0 for CanoScan D646U Color Scanner User s Guide Copyright Notice Copyright 2000 Canon Inc. This manual is copyrighted with all rights reserved. Under the copyright laws, this manual may
Mullingar Camera Club Basic introduction to Digital Printing using Photoshop CC.
 Mullingar Camera Club Basic introduction to Digital Printing using Photoshop CC. Table of Contents Course aims: 1 Course presentation notes: 1 Introducing Photoshop: 1 Adjusting the Brightness or Contrast
For customers in Canada This Class B digital apparatus meets all requirements of the Canadian Interference-Causing Equipment Regulations.
 User manual For customers in North and South America For customers in USA This device complies with Part 15 of the FCC rules. Operation is subject to the following two conditions: (1) This device may not
INSTRUCTION MANUAL MM-A209
 E INSTRUCTION MANUAL 9222-7300-11 MM-A209 2 BEFORE YOU BEGIN Before installing the DiMAGE Viewer software, read the data-transfer section in the camera manual. This section details how to connect the camera
High Dynamic Range (HDR) photography is a combination of a specialized image capture technique and image processing.
 photography is a combination of a specialized image capture technique and image processing.") Introduction High Dynamic Range (HDR) photography is a combination of a specialized image capture technique and image processing. Photomatix Pro's HDR imaging processes combine several Low Dynamic Range
Introduction High Dynamic Range (HDR) photography is a combination of a specialized image capture technique and image processing. Photomatix Pro's HDR imaging processes combine several Low Dynamic Range
Contents. Nikon Scan for Windows. Scanner Control Software and TWAIN Source. Reference Manual. Overview Before You Begin.
 Contents Overview Before You Begin System Requirements Software Installation Basic Operations Scanner Control Software and TWAIN Source Nikon Scan for Windows Reference Manual The Scan Window Opening the
Extreme Makeovers: Photoshop Retouching Techniques
 Extreme Makeovers: Table of Contents About the Workshop... 1 Workshop Objectives... 1 Getting Started... 1 Photoshop Workspace... 1 Retouching Tools... 2 General Steps... 2 Resolution and image size...
Photoshop Techniques Digital Enhancement
 Photoshop Techniques Digital Enhancement A tremendous range of enhancement techniques are available to anyone shooting astrophotographs if they have access to a computer and can digitize their images.
ImagesPlus Basic Interface Operation
 ImagesPlus Basic Interface Operation The basic interface operation menu options are located on the File, View, Open Images, Open Operators, and Help main menus. File Menu New The New command creates a
For customers in USA This device complies with Part 15 of the FCC rules. Operation is subject to the following two conditions:
 User manual For customers in North and South America For customers in USA This device complies with Part 15 of the FCC rules. Operation is subject to the following two conditions: (1) This device may not
Kigamo Scanback which fits in your view camera in place of conventional film.
 What's included Kigamo Scanback which fits in your view camera in place of conventional film. SCSI Cable to connect your Scanback to the host computer. A 3-meter SCSI cable is standard. Kigamo also has
MC3 Motion Control System Shutter Stream Quickstart
 MC3 Motion Control System Shutter Stream Quickstart Revised 7/6/2016 Carousel USA 6370 N. Irwindale Rd. Irwindale, CA 91702 www.carousel-usa.com Proprietary Information Carousel USA has proprietary rights
Lightroom Classic CC and Lightroom CC Updates
 Lightroom Classic CC and Lightroom CC Updates Information about the latest December 2017 Lightroom system updates This December Adobe have released updates for the entire Lightroom CC ecosystem, including
Capture One. User Guide CULTURAL HERITAGE
 Capture One User Guide CULTURAL HERITAGE Table of content Introduction 3 Getting a trial version of Capture One Cultural Heritage 3 Activation 3 Workspaces 4 Auto Crop 5 Apply Auto Crop to multiple images
Panoramas and the Info Palette By: Martin Kesselman 5/25/09
 Panoramas and the Info Palette By: Martin Kesselman 5/25/09 Any time you have a color you would like to copy exactly, use the info palette. When cropping to achieve a particular size, it is useful to use
Color Correction and Enhancement
 10 Approach to Color Correction 151 Color Correction and Enhancement The primary purpose of Photoshop is to act as a digital darkroom where images can be corrected, enhanced, and refined. How do you know
Contents STARTUP MICROSCOPE CONTROLS CAMERA CONTROLS SOFTWARE CONTROLS EXPOSURE AND CONTRAST MONOCHROME IMAGE HANDLING
 Operations Guide Contents STARTUP MICROSCOPE CONTROLS CAMERA CONTROLS SOFTWARE CONTROLS EXPOSURE AND CONTRAST MONOCHROME IMAGE HANDLING Nikon Eclipse 90i Operations Guide STARTUP Startup Powering Up Fluorescence
ScanGear CS-U 5.8. for CanoScan D660U Color Scanner. User s Guide
 ScanGear CS-U 5.8 for CanoScan D660U Color Scanner User s Guide Copyright Notice Copyright 2000 Canon Inc. This manual is copyrighted with all rights reserved. Under the copyright laws, this manual may
Processing RAW files in ACR Roy Killen, APSEM, EFIAP, GMPSA
 Processing RAW files in ACR Roy Killen, APSEM, EFIAP, GMPSA (c) 2017 Roy Killen RAW Page 1 Processing RAW files What are RAW files? Most digital cameras save files to memory cards in one of two basic formats
OzE Field Modules. OzE School. Quick reference pages OzE Main Opening Screen OzE Process Data OzE Order Entry OzE Preview School Promotion Checklist
 1 OzE Field Modules OzE School Quick reference pages OzE Main Opening Screen OzE Process Data OzE Order Entry OzE Preview School Promotion Checklist OzESchool System Features Field unit for preparing all
Adobe Photoshop CC 2018 Tutorial
 Adobe Photoshop CC 2018 Tutorial GETTING STARTED Adobe Photoshop CC 2018 is a popular image editing software that provides a work environment consistent with Adobe Illustrator, Adobe InDesign, Adobe Photoshop,
M a c i n t o s h. Canon Plug-in Module CS-U 3.9 for CanoScan D660U Color Image Scanner. User's Guide
 f o r M a c i n t o s h Canon Plug-in Module CS-U 3.9 for CanoScan D660U Color Image Scanner User's Guide How to Make Best Use of the Manuals When you open the box Printed Manual CanoScan D660U Getting
Scanning Procedure Using SilverFast Ai Software (6.6.1r2b) 1
 1") last modified 6.16.2015 Scanning Procedure Using SilverFast Ai Software (6.6.1r2b) 1 PREP In scanner notebook, fill out Incoming Checklist column on a Scanner Equipment Checklist sheet. Use flash drive
last modified 6.16.2015 Scanning Procedure Using SilverFast Ai Software (6.6.1r2b) 1 PREP In scanner notebook, fill out Incoming Checklist column on a Scanner Equipment Checklist sheet. Use flash drive
Camera Raw software is included as a plug-in with Adobe Photoshop and also adds some functions to Adobe Bridge.
 Editing Images in Camera RAW Camera Raw software is included as a plug-in with Adobe Photoshop and also adds some functions to Adobe Bridge. Camera Raw gives each of these applications the ability to import
Software Guide for Windows ZoomBrowser EX PhotoStitch
 Software Guide for Windows ZoomBrowser EX PhotoStitch Special Features Transfer Images and Movies Insert Text ABC Save Still Images From Movies Edit Movies A Print Images Back Up to a CD Attach Images
Using Adobe Photoshop
 Using Adobe Photoshop 4 Colour is important in most art forms. For example, a painter needs to know how to select and mix colours to produce the right tones in a picture. A Photographer needs to understand
A Basic Guide to Photoshop Adjustment Layers
 A Basic Guide to Photoshop Adjustment Layers Photoshop has a Panel named Adjustments, based on the Adjustment Layers of previous versions. These adjustments can be used for non-destructive editing, can
32 Float v2 Quick Start Guide. AUTHORED BY ANTHONY HERNANDEZ - (415)
") 32 Float v2 Quick Start Guide 32 Float V2 Trademark/Copyright Information Copyright 2011 by United Color Technologies, LLC. All rights reserved. Unified Color Technologies, BeyondRGB, and HDR Float are
32 Float v2 Quick Start Guide 32 Float V2 Trademark/Copyright Information Copyright 2011 by United Color Technologies, LLC. All rights reserved. Unified Color Technologies, BeyondRGB, and HDR Float are
Lightroom System April 2018 Updates
 Lightroom System April 2018 Updates This April Adobe updated Lightroom Classic CC. This included a major update to profiles, making profile looks more prominent. Some essential interface tweaks and also
PowerPhase FX + User Guide
 PowerPhase FX + User Guide Edition July 2002 Phase One A/S Roskildevej 39 DK-2000 Frederiksberg Denmark Tel +45 36 46 01 11 Fax +45 36 46 02 22 Phase One 24 Woodbine Ave Northport, New York 11768 USA Tel
Capture One Release Notes
 Capture One 6.2.2 Release Notes Introduction Capture One 6 is a raw converter and workflow software which enables photographers to reduce the time and effort required to deliver stunning ready- to- use
By Washan Najat Nawi
 By Washan Najat Nawi how to get started how to use the interface how to modify images with basic editing skills Adobe Photoshop: is a popular image-editing software. Two general usage of Photoshop Creating
Workflow for Betterlight Imaging
 Workflow for Betterlight Imaging [1] Startup Check that camera lens shutter is fully open Check lens is set to F stop 11 (change by manually adjusting lens aperture ring) Check Infrared (IR) Absorbing
Essential Post Processing
 Essential Post Processing By Ian Cran Preamble Getting to grips with Photoshop and Lightroom could be described in three stages. One is always learning and going through stages but there are three main
Photoshop CC: Essentials
 Photoshop CC: Essentials Summary Workspace Overview... 2 Exercise Files... 2 Selection Tools... 3 Select All, Deselect, And Reselect... 3 Adding, Subtracting, and Intersecting... 3 Working with Layers...
Chroma Mask. Manual. Chroma Mask. Manual
 Chroma Mask Chroma Mask Tooltips If you let your mouse hover above a specific feature in our software, a tooltip about this feature will appear. Load Image Here an image is loaded which has been shot in
ISCapture User Guide. advanced CCD imaging. Opticstar
 advanced CCD imaging Opticstar I We always check the accuracy of the information in our promotional material. However, due to the continuous process of product development and improvement it is possible
Photoshop Elements for Genealogists Part 1
 Photoshop Elements for Genealogists Part 1 By Barry J. Ewell Topics Covered Photoshop Elements Workspace Exploring the Tools Quick Fix Preview Photoshop Elements Workspace Workspace File Edit Image Enhance
Editing your digital images:
 Editing your digital images: 1 By Garry Sankowsky zodpub@rainforestmagic.com.au All images taken with a digital camera need to be edited. You will usually get software with your camera that can do at least
Copyright Digital Film Tools, LLC All Rights Reserved
 2 About this Guide ABOUT THIS GUIDE This User Guide is a reference for the Rays plug-in made for Adobe Photoshop, Adobe Photoshop Lightroom, Adobe Photoshop Elements and Apple Aperture. You can read from
Combine Black-and-White and Color
 Combine Black-and-White and Color Contributor: Seán Duggan n Specialty: Fine Art Primary Tool Used: Smart Objects Combining color and black-and-white in the same image is a technique that has been around
An Introduction to Histograms in Photography
 An Introduction to Histograms in Photography Histograms are a graphical representation of all the pixels that make up an image, and are plotted by 'Luminance' or brightness. Every pixel, regardless of
v nik Sharpener Pro 2.0 User Guide å nik multimedia, Inc.
 v2.03-050405 nik Sharpener Pro 2.0 User Guide å nik multimedia, Inc. II Table of Contents Minimum Requirements and Installation Filters...I Windows Operating System...I Macintosh Operating System...I Selective
PHOTOTUTOR.com.au Share the Knowledge
 THE DIGITAL WORKFLOW BY MICHAEL SMYTH This tutorial is designed to outline the necessary steps from digital capture, image editing and creating a final print. FIRSTLY, BE AWARE OF WHAT CAN AND CAN T BE
Digital Design and Communication Teaching (DiDACT) University of Sheffield Department of Landscape. Adobe Photoshop CS5 INTRODUCTION WORKSHOPS
 University of Sheffield Department of Landscape. Adobe Photoshop CS5 INTRODUCTION WORKSHOPS") Adobe INTRODUCTION WORKSHOPS WORKSHOP 1 - what is Photoshop + what does it do? Outcomes: What is Photoshop? Opening, importing and creating images. Basic knowledge of Photoshop tools. Examples of work.
Adobe INTRODUCTION WORKSHOPS WORKSHOP 1 - what is Photoshop + what does it do? Outcomes: What is Photoshop? Opening, importing and creating images. Basic knowledge of Photoshop tools. Examples of work.
icorrect EditLab Pro 5.0 User Guide
 http://www.pictocolor.com/userguides/icorrecteditlabpro50/index.html 09/18/2007 01:46 PM icorrect EditLab Pro 5.0 User Guide Contents 1. Introduction 2. Installation 3. Getting Started a. Help b. Color
CHAPTER1: QUICK START...3 CAMERA INSTALLATION... 3 SOFTWARE AND DRIVER INSTALLATION... 3 START TCAPTURE...4 TCAPTURE PARAMETER SETTINGS... 5 CHAPTER2:
 Image acquisition, managing and processing software TCapture Instruction Manual Key to the Instruction Manual TC is shortened name used for TCapture. Help Refer to [Help] >> [About TCapture] menu for software
AKVIS Enhancer. AKVIS Enhancer
 AKVIS Enhancer AKVIS Enhancer AKVIS Enhancer is a tool for revealing details on a picture. Enhancer allows detecting details from underexposed, overexposed and mid tone areas of a photo without manipulating
32 Float v3 Quick Start Guide. AUTHORED BY ANTHONY HERNANDEZ (415)
") 32 Float v3 Quick Start Guide 32 Float v3 Trademark/Copyright Information Copyright 2013 by United Color Technologies, LLC. All rights reserved. Unified Color Technologies, BeyondRGB, and HDR Expose are
32 Float v3 Quick Start Guide 32 Float v3 Trademark/Copyright Information Copyright 2013 by United Color Technologies, LLC. All rights reserved. Unified Color Technologies, BeyondRGB, and HDR Expose are
ROTATING SYSTEM T-12, T-20, T-50, T- 150 USER MANUAL
 ROTATING SYSTEM T-12, T-20, T-50, T- 150 USER MANUAL v. 1.11 released 12.02.2016 Table of contents Introduction to the Rotating System device 3 Device components 4 Technical characteristics 4 Compatibility
INSTRUCTION MANUAL 2.3
 GB INSTRUCTION MANUAL 2.3 Become a member of Konica Minolta Photo World today, free of charge, and enter the fascinating world of Konica Minolta photography. The ultimate gateway to knowledge for photo-fans:
Shutter Stream 360 Software V 5.0 User Guide
 Shutter Stream 360 Software V 5.0 User Guide Getting started video: https://youtu.be/-vbj0ai9sd0 *IMPORTANT You must follow these steps before starting: 1. Registering the Software: After installing the
iphoto Objective Course Outline
 iphoto Objective In this class participants will learn how iphoto creates a photo center for photo organization by using rolls and albums. Participants will also learn the built-in editing tools. Participants
Apple Photos Quick Start Guide
 Apple Photos Quick Start Guide Photos is Apple s replacement for iphoto. It is a photograph organizational tool that allows users to view and make basic changes to photos, create slideshows, albums, photo
Capture One 4 is designed with an easy workflow in mind, and the simplified new user interface leaves more of the screen area to your images.
 Capture One 4.8.2 release notes Introduction Newly architected Capture One 4 allows photographers to enhance and develop RAW digital files with excellent color and detail reproduction. Providing best possible
DIGITAL CAMERA. Quick Start Guide
 En DIGITAL CAMERA Quick Start Guide Table of Contents pg. 1 Check the package contents pp. 2 15 Take pictures Step 1 Charge the batteries...pg. 2 Step 2 Attach the camera strap...pg. 3 Step 3 Insert the
Shutter Stream Software V 5.0 User Guide
 Shutter Stream Software V 5.0 User Guide Getting started video: https://youtu.be/-vbj0ai9sd0 *IMPORTANT You must follow these steps before starting: 1. Registering the Software: After installing the software
Machinery HDR Effects 3
 1 Machinery HDR Effects 3 MACHINERY HDR is a photo editor that utilizes HDR technology. You do not need to be an expert to achieve dazzling effects even from a single image saved in JPG format! MACHINERY
The screen pictures shown in this manual may differ depending on the type of computer or camera used.
 Operating Manual Thank you for purchasing the PENTAX Digital Camera. This is the manual for PENTAX PHOTO Browser 3 and PENTAX PHOTO Laboratory 3 software for your Windows PC or Macintosh for enjoying images
Sense. 3D scanning application for Intel RealSense 3D Cameras. Capture your world in 3D. User Guide. Original Instructions
 Sense 3D scanning application for Intel RealSense 3D Cameras Capture your world in 3D User Guide Original Instructions TABLE OF CONTENTS 1 INTRODUCTION.... 3 COPYRIGHT.... 3 2 SENSE SOFTWARE SETUP....
Adobe Photoshop CS5 Tutorial
 Adobe Photoshop CS5 Tutorial GETTING STARTED Adobe Photoshop CS5 is a popular image editing software that provides a work environment consistent with Adobe Illustrator, Adobe InDesign, Adobe Photoshop
Aperture. The lens opening that allows more, or less light onto the sensor formed by a diaphragm inside the actual lens.
 PHOTOGRAPHY TERMS: AE - Auto Exposure. When the camera is set to this mode, it will automatically set all the required modes for the light conditions. I.e. Shutter speed, aperture and white balance. The
Operating Manual. (Version 3.5)
") Operating Manual (Version 3.5) Thank you for purchasing this PENTAX Digital Camera. This is the manual for PENTAX PHOTO Browser 3 and PENTAX PHOTO Laboratory 3 software for your Windows PC or Macintosh
Operating Manual (Version 3.5) Thank you for purchasing this PENTAX Digital Camera. This is the manual for PENTAX PHOTO Browser 3 and PENTAX PHOTO Laboratory 3 software for your Windows PC or Macintosh
Mask Integrator. Manual. Mask Integrator. Manual
 Mask Integrator Mask Integrator Tooltips If you let your mouse hover above a specific feature in our software, a tooltip about this feature will appear. Load Image Load the image with the standard lighting
Rubbing your Nikon RAW file the Right Way
 Rubbing your Nikon RAW file the Right Way You can ignore reality, but you can t ignore the consequences of ignoring reality. Ayn Rand If you are a Nikon shooter, you will get the best result from processing
Contents Navigating in This Document DMC 2 Camera Features Taking Pictures Typical Pic
 DMC 2 Online User Guide Contents Navigating in This Document................. 7 DMC 2 Camera Features................... 9 Taking Pictures..................... 12 Typical Picture-Taking Sequence......................
Operating Manual. (Version 3.10)
") Operating Manual (Version 3.10) Thank you for purchasing this PENTAX Digital Camera. This is the manual for PENTAX PHOTO Browser 3 and PENTAX PHOTO Laboratory 3 software for your Windows PC or Macintosh
Operating Manual (Version 3.10) Thank you for purchasing this PENTAX Digital Camera. This is the manual for PENTAX PHOTO Browser 3 and PENTAX PHOTO Laboratory 3 software for your Windows PC or Macintosh
The Photographer s Guide to Capture NX. Supplement One. by Jason P. Odell, Ph.D.
 The Photographer s Guide to Capture NX Supplement One by Jason P. Odell, Ph.D. The Photographer s Guide to Capture NX Supplement One First Edition 2007 Published in the United States by Luminescence of
The Magazine for Photographers November 2016
 The Magazine for Photographers The Magazine for Photographers CONTENTS NOVEMBER 4 Panning and Zooming in Lightroom 16 Photoshop Tool Presets 23 Step by Step: Pencil Shading Effect 32 Batch Renaming 46
User Guide for TWAIN / DirectX interface for GRYPHAX USB 3.0 cameras
 User Guide for TWAIN / DirectX interface for GRYPHAX USB 3.0 cameras The TWAIN & DirectX driver for PROGRES GRYPHAX USB 3.0 cameras enables user to operate with TWAIN and DirectX supported 3 rd party software