Understanding and using filters in photography. by Adam Jacobs
|
|
|
- Diane Copeland
- 6 years ago
- Views:
Transcription

1 Understanding and using filters in photography by Adam Jacobs
![[ Introduction ] [ What are filters?](/docs-images/76/74349480/images/2-0.jpg "] Filter has become a buzzword in photography thanks to fast, easy to use and popular photo-editing apps like Instagram and Snapchat where a myriad of effects can quickly be applied to a raw image to")
2 [ Introduction ] [ What are filters? ] Filter has become a buzzword in photography thanks to fast, easy to use and popular photo-editing apps like Instagram and Snapchat where a myriad of effects can quickly be applied to a raw image to enhance and change it to achieve a desired effect. In fact, many argue that tools like Lightroom, Photoshop and other proprietary computer software, can now simulate the behavior of a lens filter, making them redundant in the digital age. However, this could not be further from the truth. Camera lens filters, in their many forms, have been around for a lot longer than an increasing over-reliance on computer software. They are able to produce creative and corrective effects to photographs and still have an important place in modern photography. By modifying the type or intensity of light entering a lens, the effects produced by lens filters are nearly impossible to replicate or reproduce using digital manipulation. In fact, many filters actually help achieve even better results that can then be enhanced once you work on an image on the computer. Subsequently, filters are still extremely popular in photography as well as in the fields of cinematography and video making. Further, unlike some other pieces of gear, filters are small, light and portable so they don t take up too much valuable space in a camera bag considering the enormous effects that they can produce on photographs. They are also equally useful whether you are shooting using a film or digital camera; users of a DSLR, mirrorless, drone or other camera system can all take advantage of what filters have to offer. Moreover, given the variety of creative and correctional effects that filters produce, they are also extremely popular amongst all genres of photography - they are frequently used by landscape, portrait, macro, architectural, wedding and fine-art photographers to name a few. THE EFFECTS PRODUCED BY LENS FILTERS ARE NEARLY IMPOSSIBLE TO REPLICATE OR REPRODUCE USING DIGITAL MANIPULATION 2

3 Whilst all filters protect the valuable glass of a lens, their primary purpose is to improve the quality of photographs and allow photographers to be more creative and artistic. Depending on the filter you choose to use, this will be in subtle or more obvious ways. Regardless, filters allow you to be more experimental with your photography, have more fun and achieve effects that are usually incredibly difficult to replicate in post- production. This book will help you understand what different types of filters exist, when and how to use them and their various benefits. It is my hope that after reading it, you will have the knowledge and confidence to experiment and explore these much overlooked, widely misunderstood but, in my opinion, indispensable photographic tools. Given their ease of use and remarkable impact on your imagery, filters should become an essential component of every photographer s camera bag. Once reading this book, I think you will find it hard to disagree. As this book is being produced in conjunction with Manfrotto, I am going to mainly focus on the Manfrotto Lens Filter Suite and the incorporated revolutionary Xume System. Manfrotto s selection of lens filters covers a broad array of different types and sizes of filters. The main filter types that the suite contains are UV, Circular Polarizing and Neutral Density filters. I will be looking at the unique advantages of each one of these filters in turn throughout the book. Each individual filter comes ready to use with a neat, lightweight and easily accessible plastic carrying case to keep them safe and more importantly, dust and scratch free. However, firstly let s take a look at the innovative Xume system and what makes it so advantageous compared to traditional filter attachments. A photo showing the artistic effects that a filter is able to produce. 3
![[ The Xume System ] What is the Xume system? What does it consist of? 3 Manfrotto FILTER There are different ways to attach a filter to a lens.](/docs-images/76/74349480/images/4-0.jpg "This ensures that you don t miss that essential shot when out in the field. Conventional filter systems involve a filter being screwed onto the front of a lens.")
4 [ The Xume System ] What is the Xume system? What does it consist of? 3 Manfrotto FILTER There are different ways to attach a filter to a lens. This ensures that you don t miss that essential shot when out in the field. Conventional filter systems involve a filter being screwed onto the front of a lens. However, they can be fiddly, time consuming and frustrating to use. I am often in situations when I am in tricky shooting conditions whether in a snowstorm, pouring rain, out in the middle of deserts, in a mountain range or near splashing water. These are all environments where high winds, lots of dust and other damaging weather elements can wreak havoc - definitely not conditions where I want to be spending precious time fumbling around changing a filter. The quicker a filter can therefore be applied the better to avoid potentially damaging valuable glass on my lens and ruining the picture I m trying to take. The Xume System solves this by innovatively using magnets to speed up workflow and completely change the way that filters attach to a lens. Using the system, filters can be quickly snapped on and off the front of the lens with no hassle rather than having to stress about screwing filters on and off, avoiding fumbling around and worrying about whether they are properly secured. So let s take a look at exactly what the system comprises of and how it works: It is made up of three main elements: 1 A LENS ADPATER 2 A FILTER HOLDER 3 THE FILTER ITSELF 2 FILTER HOLDER To be applied on your filter LENS CAP Attaches on the Manfrotto Xume lens adapter to protect your lens (selected sizes only) 1 LENS ADAPTER To be applied on your lens 4


5 Filter Manfrotto Xume Filter Holder Manfrotto Xume Lens Adapter Magnetic attachment Manfrotto Xume Lens Cap (selected sizes only) Camera Lens Camera Lens The setup is incredibly straightforward and only needs to be done once for each one of your lenses and filters. For example, lets imagine, you have one lens with multiple different types of filters - UV, Circular Polarizers, Neutral Density; more to come on exactly what these are and what they do later. Firstly, you apply the lens adpater that has an integrated magnet to your lens and then attach a filter holder to each one of the filters. As the lens adpater is magnetic and the filter holder contains a small but strong magnet, the two pieces simply snap together. The sturdy and strong magnetic system ensures the filters won t fall off but still maintains a sleek and unobtrusive profile on your lens. This helps ensure no damage is done to your equipment while in your bag or when applying different filters; wear and tear, cross-threading or jamming is common with conventional systems. This is less likely to occur with the Xume system as there are no additional moving parts and it is simply a magnetic connection. Even better, the initial set up can be done in the comfort of your home or studio without the need to do it when you re out and about in the field where damage is more likely to occur. The Manfrotto Xume system is compatible with filters of any type whether Circular Polarizers (CP), Neutral Density (ND) or Ultraviolet (UV) filters allowing you to quickly change the type of photograph you want to take without wasting any time; once set up, filters of any type or size quickly snap on or off the lens. The Manfrotto XUME system also cleverly allows you to magnetically snap your lens cap onto your lens when teamed up with an adpater or using Xume s own dedicated cap. For ease of use, I would also recommend buying lens adapters and filter holders for all of your lenses and filters so you have a fully integrated system to help speed up your workflow. 5
6 [ Never miss the shot ] It is also enormously advantageous to speed up applying filters to a lens as taking time screwing on a filter can mean missing the crucial shot. This could be trying to capture gorgeous golden light, a stunning sunset or having a family member, friend, model or pet become inpatient whilst you struggle to change from one filter to another - it s sometimes impossible to go back and photograph that moment again. However, the innovative Manfrotto Xume system means you no longer have to waste time and risk missing that perfect shot. The magnetic system means that filters simply snap on and off the front of the lens, Xume frees you up to focus on capturing moments before they disappear, adding speed to your workflow. Whether you are on location in a freezing cold climate where hands are cold and gear is difficult to handle or in a dusty desert where damage can easily be done to equipment, being able to quickly and easily snap a filter rather than have to screw each one on individually in a fiddly way is hugely advantageous. This makes the whole process of using filters far more fluid and less tedious and fiddly. THE XUME SYSTEM SAVES YOU TIME SCREWING AROUND WHEN APPLYING LENS FILTERS. BY USING MAGNETS IT STREAMLINES THE PROCESS OF APPLYING A FILTER TO A LENS. Quickly change the type of photo you take As filters allow for extra creativity, the Manfrotto Lens Filter Suite and Xume System mean I can quickly change the effect I want to create on photographs whilst on location. This means rapidly switching filters using the system involves no hassle to change the type of photograph I want to take. The advantage of being able to quickly change from one filter type to the other cannot be understated. I can minimize the risk of elements such as water droplets or dust getting on my lens whilst being able to rapidly change the creative appearance of the final photograph by rapidly snapping on different types of filters i.e. UV to Circular Polarizer to Neutral Density. Later in this book, we will explore what the different filter types in Manfrotto s Filter Suite actually do to a photograph when applied to a lens. Quite simply, the Xume System saves you time screwing around when applying lens filters. By using magnets it streamlines the process of applying a filter to a lens, meaning when you are out in the field you can concentrate on making better and more creative photographs rather than wasting time fiddling with filters. As mentioned the ultra-thin Manfrotto s Xume System works with the full Lens Filter Suite incorporating all the different filter types. However, let s begin by looking at Ultraviolet (UV) filters to assess their advantages and why I believe they should be an integral part of a photographer s kit. 6

7 UV Filters 7
![[ UV filters ] Ultraviolet (UV) filters are an extremely common type of camera filter and are relatively inexpensive to purchase.](/docs-images/76/74349480/images/8-0.jpg "Despite being arguably the most basic of camera filters, they are one of the most popular camera accessories sold.")
8 [ UV filters ] Ultraviolet (UV) filters are an extremely common type of camera filter and are relatively inexpensive to purchase. Despite being arguably the most basic of camera filters, they are one of the most popular camera accessories sold. As you can see, they are totally clear to look through to the human eye with no colouring, tinting or opaqueness. Therefore, although they do have some visual effects on photographs a UV filters primary use, and the reason they are so popular, is that they protect the front element of a lens from anything that could cause damage. Manfrotto offers three levels of UV filters within their lens suite: the Essential, Advanced and Professional. The advantages of each are outlined below: [ ESSENTIAL UV FILTER ] Ideal filter for blocking UV light and reducing haziness, blurring and blue casting with eight anti-reflection and water-repellant coating layers. [ ADVANCED UV FILTER ] A slightly more advanced filter for blocking UV light to reduce haziness, blurring and blue casting with twelve anti-reflection and water-repellant coating layers. [ PROFESSIONAL PROTECT FILTER ] The professional UV filter with a unique anti-static coating to protect your lens and reduce haziness, blurring and blue casting. 8
![[ Protection for your lens ] Having a UV filter permanently on a lens provides an extra layer of protection from the elements.](/docs-images/76/74349480/images/9-0.jpg "This stops dirt, smears, dust, moisture and scratches causing damage to the front element. It is obviously preferable for these to occur and gather on the filter rather than the actual lens.")
9 [ Protection for your lens ] Having a UV filter permanently on a lens provides an extra layer of protection from the elements. This stops dirt, smears, dust, moisture and scratches causing damage to the front element. It is obviously preferable for these to occur and gather on the filter rather than the actual lens. These smears and damages can also happen if you are photographing a pet or young child close up, who could reach out and touch your lens leaving fingerprints or smudge marks. All of these can compromise the quality of your images and leave you spending hours in Photoshop cleaning up the final photographs. These smudges and marks are especially noticeable when photographing backlit subjects where flare and light will make every speck on your lens extra visible. As the filter can easily be removed with the Xume System, it makes cleaning a breeze and the UV filter extremely easy to maintain. You simply snap the UV filter off and then remove moisture, dust and these other troublesome elements with a cleaning cloth or lens brush and then snap it back on. As this can be done so quickly when on location, you can avoid the otherwise inevitable compromising of the quality of your photographs from troublesome elements. Economically, having a UV filter on each one of your lenses also makes a lot of sense. In a worse case scenario, where damage is irreparable whether from deep scratches, a lens being dropped, damage occurring in a bag or a lens being totally shattered by careless handling, replacing a broken filter is a lot cheaper than having to buy an entirely new expensive lens. It is also far less hassle than filing an insurance claim From personal experience, I have had cameras drop off tripods from people tripping over them both in studio and on location. There is usually a heart stopping moment where I ve heard a horrible smash and presumed that my expensive lens has shattered beyond repair. In every single case, I have been relieved to pick up the lens, carefully remove my protective UV filter and see what appeared to be a destroyed front element is in fact just a damaged filter and my lens is perfectly intact underneath. I can then remove the broken filter and simply replace it with a new one. For me, this is a strong enough reason alone to have a UV filter on every one of my lenses before I even begin explaining the advantageous effects they can have on images. Therefore, I d advise buying a high quality UV filter for each one of your lenses and keep it permanently attached. As you can see here the filter may have smashed but the lens underneath is perfectly intact. 9
10 [ What is UV light and how does it affect a photograph? ] As a UV filter is completely clear it will have no effect on the amount of visible light entering your camera and so won t affect the brightness, overall exposure or contrast of your image. However, despite the fact that a UV filter appears totally transparent, it does affect the visible look of photographs in other ways in addition to acting as a lens protector as previously mentioned. Gamma rays X-rays To explain this, I briefly have to delve into a bit of science. As humans, we see the world around us in a spectrum of light throughout the colours of the rainbow red, orange, yellow, green, blue, indigo and violet. This range of light that we can visibly see is measured in nanometers (nm). The colours of the rainbow sit between 390nm to 750nm in terms of electromagnetic wavelengths of light. Infrared, which is a familiar photographic term, sits below the red end of this spectrum (approximately 750nm-1nm). However, what we are interested here is Ultraviolet (UV) light. This is invisible to the human eye and resides above the blue end of the spectrum (10nm-390nm). Although we cannot see it, this UV light has an impact on the photographs that we take. ALTHOUGH WE CANNOT SEE IT, THIS UV LIGHT HAS AN IMPACT ON THE PHOTOGRAPHS THAT WE TAKE. Ultra violet Visible light Infrared When photographing outside UV light is always around us and visually manifests itself in the form of haze in our pictures. However, the amount of UV light that is present is amplified in certain situations. For example, when you re in the mountains the higher the altitude, the more UV light that will be present. Bodies of water such as a lake, sea or snow reflect UV light. Therefore, the closer you are to these, the more UV light there will be. Moreover, UV levels are also higher in cities and large, dense urban areas where reflective glass, metal skyscrapers and buildings work to amplify UV rays. All of these increased UV levels lead to higher levels of haze in a photograph. The result of this haze manifests itself as a loss of detail, blurring and overall damage to image quality. Obviously if possible we want to try and avoid this. This is where a UV filter can help. Radio wared 10
![[ How does a UV filter help an image? ] A UV filter although completely clear, blocks ultraviolet light from entering a lens and reaching a camera s sensor.](/docs-images/76/74349480/images/11-0.jpg "As mentioned, this UV light is invisible to our eyes. But, what impact does blocking this UV light from reaching the camera sensor have on a photograph?")

 may appear almost identical when placed alongside each other.")
11 [ How does a UV filter help an image? ] A UV filter although completely clear, blocks ultraviolet light from entering a lens and reaching a camera s sensor. As mentioned, this UV light is invisible to our eyes. But, what impact does blocking this UV light from reaching the camera sensor have on a photograph? Firstly, it can filter out unwanted moisture-related haze caused by UV light therefore preserving detail and sharpness. This detail can often not be brushed back in using post-production software if it is not originally captured in the photograph. Therefore, using a UV filter where areas of UV light are higher can result in sharper photographs. These two photographs (the first without a UV, the second with one applied) may appear almost identical when placed alongside each other. However, look at the difference in the sharpness on the clock face with the one taken with the UV filter and without. Without UV Filter With UV Filter 11


12 Here you can clearly see how the UV filter removes the blue tint in the shadows of this photograph. Secondly, as well as helping sharpness by filtering UV light, a UV filter helps lessen a phenomenon known as blue casting. Daylight photos often possess a blue-ish colour cast especially in the shadows. By absorbing a significant part of the Ultraviolet rays, a UV filter helps eliminate this blueishness, producing a more accurate representation of the actual scene. This saves time correcting this colour cast in Photoshop. This blue casting is especially noticeable if you are shooting with a film camera but regularly appears when shooting with modern digital cameras. I also often notice the ability of a UV filter to fix this blue casting effect in areas with large patches of snow, where UV light is strong, as shown in these two examples. Without UV filter With UV filter 12

13 THEREFORE YOU ARE GUARANTEED THAT YOU WILL NOT ONLY PROTECT YOUR VALUABLE LENSES, BUT ALSO HAVE A POSITIVE EFFECT ON YOUR PHOTOGRAPHS. This sunset photograph was taken with a UV filter resulting in the reduction of haze whilst up in the mountains and a sharper overall image. 13

14 Circular Polarizers 14
![[ Circular Polarizers (CPs) ] Another type of filter offered in the Manfrotto Filter Suite that is fully compatible with the Xume system are Circular Polarizing Filters, also commonly known as CP](/docs-images/76/74349480/images/15-0.jpg "filters, or sometimes simply referred to as Polarizers. Unlike a UV filter, a Circular Polarizer is not totally clear to look through.")
15 [ Circular Polarizers (CPs) ] Another type of filter offered in the Manfrotto Filter Suite that is fully compatible with the Xume system are Circular Polarizing Filters, also commonly known as CP filters, or sometimes simply referred to as Polarizers. Unlike a UV filter, a Circular Polarizer is not totally clear to look through. Instead, it is translucent with a grey-like tone appearance and blocks certain types of light that are reflected towards your camera at certain angles from reaching the camera s sensor. By filtering out a specific type of light, a CP filter affects the brightness of the exposure and will always darken the overall photograph. This is usually by a reduction of two to three f stops of light. Therefore, certain camera adjustments need to be made to compensate for this loss of light to ensure that your photograph will not be under-exposed. I usually just push up my ISO to offset the slight loss of light once the filter is snapped on. As with the UV filters, the Manfrotto Filter Suite provides Circular Polarizer filters in all of the standard sizes. This ensures that there is a CP filter to fit on any of your lenses and regardless of your camera type. As with all the filters in the suite, it fits whether you shoot with a Canon, Nikon, Sony, Leica, Panasonic or Fuji camera to name a few. There are three different types of CP filters in each size depending on your needs. These are outlined below: [ ESSENTIAL CPL ] The Essential Circular Polarizer has two coating layers and is water repellent. [ ADVANCED CPL ] The advanced Circular Polarizer with 68.1% of light transmission and is multi-coated glass with water, oil and scratch resistant features. [ PROFESSIONAL CPL ] The ultimate Professional Circular Polarizer with 90% of light transmission and multi-coated glass with a unique anti-static coating for superior protection. 15
![[ How does a Circular Polarizer work? ] A Circular Polarizer (CP) filter blocks certain light waves reaching the lens which have been directly reflected towards the camera at specific angles.](/docs-images/76/74349480/images/16-0.jpg "Unlike other filters, a CP involves a certain amount of adjustability and has a rotating ring that you can manually control.")


16 [ How does a Circular Polarizer work? ] A Circular Polarizer (CP) filter blocks certain light waves reaching the lens which have been directly reflected towards the camera at specific angles. Unlike other filters, a CP involves a certain amount of adjustability and has a rotating ring that you can manually control. This ring, when rotated, blocks specific light waves from entering the lens and subsequently reaching the camera s sensor. Given that the angle of light being filtered is important, so is your position to the sun to determine how light will be filtered and the resultant effect on the image. The strength of the effect of the filter (amount of polarization) varies greatly depending on the position of the sun, time of day and season. For example, you can change the angle that is filtered by moving your position in relation to the sun. The strongest polarizing effect is always achieved when you are perpendicular, (90 degrees), to the way that the sun is facing. The simplest way to calculate this is to form a pistol shape with your thumb and index finger and then point your index finger directly at the sun. If you then rotate your thumb clockwise or counter-clockwise whilst keeping your index finger pointing at the sun, you will be able to figure out which parts of the sky will have the maximum level of polarization - it will always be where your thumb is pointing. This is because your thumb will always be at 90 degrees from the sun. This is a good tip to use on location to ensure that you always know where in your photograph the maximum level of polarization will occur. For example, at midday when the sun is directly above you, the sky will be polarized horizontally and evenly in all directions. Earlier or later in the day when the sun is lower, the sky will be polarized more vertically. As previously mentioned, by rotating the ring on a CP filter you can change the amount of polarization being achieved. A great way to see the different strength of polarization occurring is to turn the ring whilst your camera is set in Live View mode. This will allow you to view the difference in real time on your camera s LCD screen. However, this is not always possible as when out it is sometimes too bright to see the LCD screen clearly. In these instances, you can also see the different strength of polarization changing by peering directly through the viewfinder as you rotate the ring on the CP filter. The further you turn the ring, the more polarization will occur and the greater the effect on your photograph. So, what exactly does a CP filter do to your photos, how is it useful and why should it be such an important part of your kit? In these three photographs, by looking at the changes in the saturation of the blue in the sky and the difference in contrast between each image you can clearly see how rotating the ring on the filter changes the strength of polarization that occurs. Further, these three photographs also show the difference in the strength of polarization that can be achieved by turning the ring on the CP filter. 16


17 [ What does a Circular Polarizer do? ] Increases Saturation One of the most obvious benefits of a CP filter is that it creates more colorful and vivid images by cutting out certain light reflections making skies look bluer, richer and deeper whilst subsequently allowing clouds to appear more pronounced. You can clearly see in these two photographs how adding a CP has boosted the saturation of the sky allowing the booming clouds to stand out a lot more. 17

18 However, a CP filter does so much more than just boost colours in the sky - applying the filter adds more pop to the whole image. Trees appear greener, flowers more vibrant and foliage more lush - all the colours of the natural world appear more intense using a CP filter. This is especially noticeable on clear, sunny days where levels of polarization are distinct. The whole landscape becomes illuminated in a totally different way by cutting glare. For example, when you achieve an optimal level of polarization by turning the ring on the filter to the right point, you will clearly see colours change to be stronger, contrast be boosted and the scene in front of you pop as you peer through your viewfinder. Therefore, by decreasing unwanted reflections, both saturation and vibrancy are increased, allowing natural colours to show through with a greater depth, boldness and vivacity resulting in more striking and powerful photos. These two photographs clearly show the difference in saturation when using a CP filter and not. As you can see the filter makes the landscape darker but boosts all of the colours both in the sky and trees and enhances the contrast and clarity of the image. 18


19 Furthermore, as well as making colours richer, CP filters also enhance contrast and depth within a photograph. This can be clearly seen in these examples below. Without CP Looking Through CP Huge Difference in Contrast and depth when using a CP. 19


20 CP FILTERS ARE ALSO HELPFUL IN REDUCING ATMOSPHERIC HAZE IN PHOTOGRAPHS ESPECIALLY WHEN SHOOTING OBJECTS IN THE DISTANCE SUCH AS MOUNTAINS OR CITYSCAPES. MOREOVER, BY REDUCING GLARE THE FILTER CAN ALSO HELP IMPROVE EXPOSURES BY PREVENTING PHOTOGRAPHS APPEARING TO LOOK WASHED OUT, FURTHER ENABLING COLOURS TO BE BOLDER AND CONTRAST MORE INTENSE. This photo taken at Glacier Point, one of the highest points in Yosemite National Park, shows the effect of the filter when looking at the iconic Half Dome mountain face. You can clearly see the added boldness, deepness and richness of colour that the filter provides as opposed to the washed out look when not looking through the filter. Also, notice the effect the CP filter has on reducing the atmospheric haze on the mountains making the rock face through the filter appear much clearer and sharper. Interestingly, the shapeof the mountain Half Dome is what inspired the brand North Face logo. 20


21 As computer software is now so powerful in manipulating images, many argue that the colour boost achieved by a CP filter can be added in post-production. However, I am a firm believer in getting things right in camera rather than relying on software. A polarizer is recording the detail of the rich colours that sit behind the reflections of what the filter cuts out. Therefore, there is no way to go back and re-insert these details in Photoshop - they would have been invisible without the CP Filter if the camera had not recorded them in the first place. It is hard to argue that you can match the richness in colour achieved using the filter on a computer, not to mention its effect on reducing reflections and haze. Subsequently, the more you shoot with a CP filter and understand how the polarization works, it becomes increasingly apparent how, by simply screwing this small, lightweight filter onto your lens, you can add a whole extra dimension to your shots. Depending on your taste and how much you want the polarizing effect, the filter can really make images jump off the screen or page when printed; it almost feels like cheating when looking at the vividness and deepness in colour that the filter adds and the overall improved aesthetic given to an image. Therefore, the way in which a CP filter can boost saturation and increase contrast by reducing reflections is just one of the reasons why they are so popular with landscape photographers who want to make their photographs more eye-catching. Once you start using a CP filter you will soon realize that unwanted reflections are everywhere and are also especially noticeable on bright, sunny days. The CP filter does a great job of removing these and in the process making tones appear far richer. Lets take a look at this in a bit more detail I really enjoy shooting with a polarizer in an overcast environment such as a wood or forest where there are wet rocks, vegetation and water. This is because the filter cuts all of the unwanted reflections off these surfaces. It therefore brings dynamism and vibrancy to my photos and boosts the saturation to such an extent that I often have to dial back the saturation from the photo with the filter when I get back to my computer! Further, if you look at the green moss on the rocks in these two photographs, it is another clear example of how the CP filter, by removing the glare and reflections from the wet rocks, provides better depth and clarity whilst helping the natural colours to shine through far more vividly. 21

22 Removing unwanted reflections - Water A Circular Polarizing filter is an extremely useful and powerful photographic tool both creatively and correctively in improving photographs. Essentially, the filter cuts out unwanted reflections, harsh sunlight and glare and changes the way that your camera sees light. As well as boosting saturation and enhancing contrast, by suppressing reflections a polarizer produces some other effects. Notice in these before and after photographs how the CP filter has removed the glare from the water as well as reducing the highlights off the rock whilst boosting the saturation in the trees. For example, a CP filters cuts glare and reflections from non-metallic surfaces such as water and glass. The use of the filter is especially popular when shooting bodies of water. When it s bright outside, the sun causes glare and unwanted reflections. This means water can be difficult to photograph or you cannot capture wildlife sitting below a surface - we do not always have the luxury of shooting at golden hour or when the sun is at a lower, more desirable angle. Moreover, the ability to remove undesirable reflections in post-production is time consuming and often impossible to replicate. Therefore, using a CP filter is handy as glare and distracting reflections from a river or lake can be suppressed or in some cases almost totally removed. This allows the water to inherit a more translucent, crystal-clear appearance - the filter can make a reflective lake, appear almost like glass, whilst still allowing colours in the photograph to show through with greater saturation. 22


23 As is clear from this before and after example, adding a CP filter has not only boosted the saturation of the blue in the sky and the green of the foliage but, it has removed all of the reflections from the lake providing it with a more crystal, translucent effect. This means you can see more clearly what is sitting below the surface. Behind the scenes, t taking the camera along with the Manfrotto 190Go tripod, out low. 23


, the effect of the filter on removing the water")
24 This photograph of Lake Tahoe was taken using a CP filter. The use of the filter removed the glare off the lake. This meant it inherited a glassy complexion you can see how the water looks almost crystal clear. In these identical photographs (one with and without a CP filter), the effect of the filter on removing the water reflections is obvious allowing you to clearly see to the bottom 24

25 THEREFORE, IF WATER IS A FAVOURITE SUBJECT TO SHOOT, THEN I CANNOT OVER EMPHASISE ENOUGH THE IMPORTANCE OF A CP FILTER. BY REMOVING ALL THE DISTRACTING GLARE AND REFLECTIONS, YOU WILL ADD UNPARALLELED DRAMA, ORIGINALITY AND CREATIVITY TO YOUR IMAGES THAT IS NEAR IMPOSSIBLE TO REPLICATE IN POST-PRODUCTION. 25


26 Shooting through windows As well as shooting water, another common use for a CP filter is for removing reflections and cutting back on glare when shooting through or towards windows or other non-metallic surfaces. Therefore, a great use of a polarizer is if you are shooting out of a car, train window or photographing something in a shop window or glass case. The use of the filter can help draw attention to objects that sit behind a window, as too many reflections can be distracting. These reflections can also be really irritating to try and get rid of in the digital darkroom. If you can eliminate them when taking your original photo using a CP filter, it will save a lot of time, aggravation and Photoshop know how. You can also start to be creative and artistic by manually controlling the amount of polarization you choose to apply by turning the ring to your desired amount. If used correctly it can often be impossible to tell that you have shot your subject through a window when using a polarizer. As you can see in these two photographs of this building, you can see how the CP filter cuts glare and reflection of light on the windows. 26


27 The same is true of these photographs of bottles sitting on a bar shelf. They were photographed through a window during intense sunlight in the middle of the day. It is clear how the CP filter has cut glare and suppressed the undesirable reflections this brings more emphasis to the bottles. Also, notice how the filter has helped to boost the saturation and enhance the contrast of the actual liquid inside the bottles. For example, as you can see in these before and after photographs of the same shop windows, a CP filter has all but eliminated the distracting reflections allowing you to see more easily inside the store windows what is on display. 27
 is it provides your lens with an extra layer of protection from dust, water, fingerprints and other things that could damage")

28 BY CUTTING OUT MOST OF THE REFLECTED LIGHT, A CP FILTER INSTANTLY ENHANCES COLOUR SATURATION, INCREASES CONTRAST, REDUCES HAZE AND REMOVES UNWANTED REFLECTIONS. Lastly, an added benefit of a Circular Polarizing filter (like any filter) is it provides your lens with an extra layer of protection from dust, water, fingerprints and other things that could damage your lens or cause blemishes on photos. It also means that should you drop your camera or it falls off a tripod it is far better to scratch, damage or even smash a filter than the expensive glass behind it! The filter can easily be replaced without a huge expense - the same cannot be said for the lens. Therefore, a Circular Polarizing filter should be an indispensable part of any photographer s kit, especially if you shoot landscapes. Once attached to the front of the lens, it transforms a lifeless and bland scene to something bold, bright and colourful. By cutting out most of the reflected light, a CP filter instantly enhances colour saturation, increases contrast, reduces haze and removes unwanted reflections. In my opinion, it is a must have filter as its effects are near impossible to replicate using post-production software; if attempted it would take a lot of time which I think would be much better spent out shooting and enjoying making great photographs! 28

29 Neutral Density Filters 29
![[ Neutral Density Filters (NDs) ] As photographers, we are often chasing the light, always seeking the best type and most amount of light to shoot with.](/docs-images/76/74349480/images/30-0.jpg "When finding ourselves in dimly lit areas, we are always looking for more light to create better photographs.")
30 [ Neutral Density Filters (NDs) ] As photographers, we are often chasing the light, always seeking the best type and most amount of light to shoot with. When finding ourselves in dimly lit areas, we are always looking for more light to create better photographs. This can be by using lenses with larger apertures, expensive off camera lights, or high end camera sensors that can now withstand high ISO levels without creating lots of digital noise. It may therefore seem an odd question as to why we would ever want a tool that actually cuts light? This is exactly what ND filters do and they are actually massively useful in their various forms. Let s begin by exploring what they actually are and how they work. Here is an example of an ND8 filter blocking three stops of light from a scene. 30
31 [ NDs What are they? ] Neutral Density Filters, commonly referred to as an ND filter are my favourite type of filters and are always in my bag for their versatility of use, ability to control light and the drama, moodiness and creativity that they add to images. They are easy to use, come in a variety of different types and sizes and are especially popular with landscape photographers. ND filters evenly block light from entering the lens and reaching the camera s sensor without changing the colour of the overall scene. Essentially, the difference in each ND filter lies in its opacity. Given that some are darker or more opaque than others, they each affect the extent to which light is blocked (or filtered ) from entering the lens and reaching the camera s sensor. For example an ND filter cutting nine stops of light is much darker and more opaque to the eye than one that only filters three stops. In other words, the first lets less light reach the sensor than the latter. ND filters usually come in different grades or densities marked by the different amount of light that they filtrate (measured by a reduction in f stop), which designates how much light is being blocked from entering the camera. The Manfrotto Filter Suite provides three different types of ND Filters. All of them have an oil and water repellant coating for easy daily maintenance and to help ensure that photographs do not become easily spoilt. The three ND filters in the suite are outlined below and are listed in a descending order by their increasing opacity and the amount of light that they cut from reaching the camera s sensor: [ MANFROTTO ND8 FILTER ] Replicates a 3f stop reduction in light [ MANFROTTO ND64 FILTER ] Replicates a 6f stop reduction in light [ MANFROTTO ND500 FILTER ] Replicates 9f stop reduction in light Each of these separate ND filters have their separate merits and uses dependent on the lighting situation you are in, the scene in front of you and how creative you want to be. Interestingly though, ND filters are neutral in tone and block incoming light uniformly unlike a Circular Polarizing or UV Filter. Therefore, they have no effect on the overall colour, saturation, contrast, or sharpness of an image. This is why part of the filters name is neutral. The filter has no effect on reducing reflections or boosting saturation like a CP. Instead, an ND filter is all about affecting the brightness of your photograph. Essentially, it darkens your photographs to varying levels depending on which Neutral Density filter you decide to use. So what do these little grey, semi-transparent filters actually do? As previously mentioned, many people nowadays argue that Photoshop or other proprietary software can recreate the use of filters. However, below I am going to outline the advantages of using an ND filter and the amazing effects that can be achieved straight out of the camera. An ND filter is most commonly used to filter or block unwanted light from reaching a camera s sensor. A good analogy to help understand how they work is to consider how when going out on a bright, sunny day you would take a cap or sunglasses to shield bright, unwanted light from reaching your eyes. Similarly, you can use an ND filter in front of the lens when it is too bright, like a pair of sunglasses for our eyes, to lessen the amount of light that reaches a camera s sensor. Another way to think of this is that an ND filter turns down the volume of light entering the lens when there is too much unwanted light. Consequently, they allow photographers to more easily control the desired exposure of an image and use combinations of shutter speeds, apertures and ISO settings that would otherwise result in overexposed photographs. Thus, the most common use of an ND filter is to enable the use of slower shutter speeds that would otherwise be impossible in bright conditions - without having the filter applied the photograph would be far too bright as the slower shutter speed would let in too much light. In essence, an ND filter means you can manipulate time. This has a number of creative and artistic advantageous. 31
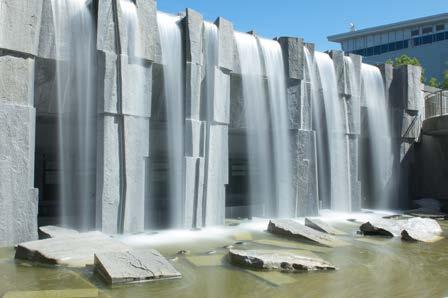
![[ What are they used for? Longer shutter speeds ] USING AN ND FILTER TO FACILITATE LONGER SHUTTER SPEEDS IS OFTEN USED WHEN PHOTOGRAPHING WATERFALLS OR BODIES OF MOVING WATER.](/docs-images/76/74349480/images/32-0.jpg "Therefore as mentioned, by far the most common use for an ND filter is that they allow the use of longer shutter speeds in bright shooting situations that would otherwise result in over-exposed")
32 [ What are they used for? Longer shutter speeds ] USING AN ND FILTER TO FACILITATE LONGER SHUTTER SPEEDS IS OFTEN USED WHEN PHOTOGRAPHING WATERFALLS OR BODIES OF MOVING WATER. Therefore as mentioned, by far the most common use for an ND filter is that they allow the use of longer shutter speeds in bright shooting situations that would otherwise result in over-exposed photographs. This is because they trick the camera to think a scene is darker than it is by blocking the amount of light entering through the lens. Using longer shutter speeds can have a huge amount of creative effects on photographs. Whether providing a turbulent body of water with a soft and silky appearance, emphasizing motion in clouds or blurring waves or foliage, the photographic opportunities to enhance a picture using slowshutter speed photography are enormous. In fact, I could dedicate a whole chapter entirely to long exposure photography. Drama can be added to a photograph where there is anything that is moving whether that be water, clouds, people, foliage and so on. Essentially, ND filters allow you to produce effects in situations that would otherwise be impossible because the photograph without the filter would be too bright. This makes them incredibly popular and an essential tool for landscape photographers to add motion, energy, dynamism and creativity to their shots. Using an ND filter to facilitate longer shutter speeds is often used when photographing waterfalls or bodies of moving water. Slowing down the shutter speed makes the water appear softer and smoother, providing it with a feeling of flow and sense of movement rather than it appearing static in the frame - it also adds an extra layer of artistry to the photograph, which cannot be added in post production. What s great is you can get this effect without being in a national park. Many urban parks have fountains and little waterfalls that you can play around with. In broad daylight ND filters (especially the ND64 and ND500) allow you to use long shutter speeds to achieve magical effects. 32

33 You can clearly see from these before and after photographs of waterfalls how slowing down the shutter speed with an ND filter produces a far more interesting, creative and inventive photograph than the comparable photo without the ND filter applied which looks pretty stagnant and boring in comparison. These were all taken using the ND500 filter in very bright sunlight. This filter was necessary to achieve the long shutter speed required but meant I had to pre-focus before, as it is too opaque to do so once it is on the lens. 33


34 Some photos with and without ND filters. 34


35 I particularly like turning photographs shot with ND filters into black and white to heighten the drama that the filter produces. For example, this photograph taken in Yosemite National Park at midday in harsh bright sunlight was taken using a slow shutter speed in combination with an ND500 filter that blocked out 9 f stops of light. As the ND500 sits at the extreme end of the scale for ND filters it produces theatric, dramatic and eye-catching images for example, transforming this pretty mundane stream of water into a far more interesting exposure. Other examples of black and white photography using ND filters. 35


36 THE PARTICULAR ND FILTER THAT YOU CHOOSE TO APPLY DEPENDS ON THE AMOUNT OF MOTION THAT YOU WISH TO ADD TO THE WATER AND HOW BRIGHT IT IS WHERE YOU ARE PHOTOGRAPHING. THIS WILL DETERMINE HOW MUCH LIGHT YOU HAVE TO CUT WITH THE SPECIFIC ND FILTER TO ACHIEVE THE SHUTTER SPEED YOU WISH TO USE. For example, in this photograph I used the least opaque ND8 filter as I only wanted to slow the water of the Pacific Ocean down a little bit, allowing details to still show through and meaning I could emphasize the reflection of the sun on the beach. The use of the filter also just took the intensity of the sun down enough to help bring out the richness of the colours in the sunset. This photo was shot with an ND64 with a shutter speed of 10 seconds - you can see the waves have begun to go soft and smooth but I wanted to maintain some detail so I did not lose the beautiful reflections of the palm trees and cove in the rocks in the water For example, these three photographs illustrate the difference between choosing what type of ND to use depending on what effect you want to create. This photo was taken with the far denser and darker ND500. This was because I wanted to use a far longer exposure time of 30 seconds to completely soften the ocean to a magical mist as well as producing streaking clouds and picking up the gorgeous sunset colours. 36

37 THE ND64 FILTER ALLOWED FOR A 30 SECOND EXPOSURE TO BE USED IN THIS SHOT BRINGING ENERGY AND MOVEMENT TO THE WATER DESPITE BEING SHOT IN BRIGHT DAYLIGHT. THIS MEANT I COULD USE A LONGER SHUTTER SPEED TO ACHIEVE THE DESIRED EFFECT WHILST BEING ABLE TO CONTROL THE EXPOSURE AND PREVENT THE PHOTOGRAPH BEING OVER-EXPOSED. 37


38 As previously mentioned, it is not just water where slower shutter speeds come in useful. In these two photographs, you can clearly see how the ND500 filter has been used to allow for a much longer shutter speed to specifically alter the look of the clouds. With the filter applied, they become more streaky in the frame, have motion and appear softer. This is another very popular use of an ND filter. 38

39 THE SAME EFFECT WAS PRODUCED WITH THE SAME ND64 FILTER AT TWILIGHT ON THIS BEACH IN SOUTHERN CALIFORNIA REDUCING A STRONG, MOVING SEA TO NOTHING MORE THAN A GENTLE, SURREAL MIST. 39

40 Here, an ND64 filter with 6f stops of light reduction helped reduce a raging Pacific Ocean to a calm, mystical mist in bright daylight producing surreal, magical results. 40

![[ Shallower depth of field ] Another use for an ND filter is that you can use a large aperture (small f stop number) in bright conditions to highlight a key subject by making the foreground or](/docs-images/76/74349480/images/41-1.jpg "background out of focus without over-exposing the photograph. This ensures that you can create a shallower depth of field and beautiful blur (bokeh) in bright, harsh daylight.")
41 ANOTHER USE FOR AN ND FILTER IS THAT YOU CAN USE A LARGE APERTURE IN BRIGHT CONDITIONS TO HIGHLIGHT A KEY SUBJECT BY MAKING THE FOREGROUND OR BACKGROUND OUT OF FOCUS WITHOUT OVER-EXPOSING THE PHOTOGRAPH. [ Shallower depth of field ] Another use for an ND filter is that you can use a large aperture (small f stop number) in bright conditions to highlight a key subject by making the foreground or background out of focus without over-exposing the photograph. This ensures that you can create a shallower depth of field and beautiful blur (bokeh) in bright, harsh daylight. For example, if I was shooting a subject in bright, sunlight and wanted to isolate my subject with a blurred background and used a very fast shutter speed, the lowest possible ISO and large aperture to create a shallow depth of field, my resultant photograph would often be too bright and unusable. In order to correct my exposure, I would have to reduce the size of my aperture. This would mean losing the blurred background. Closing up the aperture hole gives me a greater depth of field, not as much blur and I would no longer be able to isolate my subject and get the creative effect that I was after. However, by using an ND filter that cuts light through the lens, the camera thinks it is darker than it really is as less light is reaching the sensor. I am therefore able to open the aperture up as wide as necessary. I like to stay in the f/ range in these cases ensuring I get that beautiful background blur effect no matter how bright the sun. This means the subject I am shooting pops out of the frame. 41


42 NDS ARE VERY POPULAR WITH PORTRAIT AND WILDLIFE PHOTOGRAPHERS WHO WANT TO MAKE THEIR SUBJECTS STAND OUT FROM THE BACKGROUND. Therefore, NDs are very popular with portrait and wildlife photographers who want to make their subjects stand out from the background but, do not have the choice or luxury of exactly where and when in the day they shoot - they are often stuck in harsh, unfavorable sunlight. They can therefore use the quick and easy solution of applying an ND filter to achieve the desired shot - this is just not possible to reproduce using proprietary computer software. Further, the filter is also incredibly popular with videographers who often use shutter speeds of around 1/60th second to ensure movement looks natural but also want to achieve a background blur. Without an ND filter It is impossible to achieve this shallow depth of field everything would be almost completely over-exposed and appear white in the frame in normal, bright daylight as the aperture has to be wide open to create the blur. 42


43 ND filters are also useful when I want to use flash and my shutter speed is limited to the sync speed of the strobe i.e. 1/250th second. If shooting outside in bright sunlight, even with my ISO dialed right down if I am shooting with a wide-open aperture to achieve a blurred background, shutter speed is limited because of my flash s sync speed and will be too slow, let in too much light and therefore render the final picture over exposed. By simply adding an ND filter, keeping the shutter speed at the maximum that my flash will allow, in this case 1/250th, I am able to have a better control over the exposure and precisely balance the ambient light with the light from the flash. This results in a perfectly lit photograph whilst still maintaining the background blur. This ensures the subject stands out. Without the ND filter, balancing the light using flash would have been near impossible, with the photograph being wildly over-exposed if I wanted to maintain a shallow depth of field. WITHOUT THE ND FILTER, BALANCING THE LIGHT USING FLASH WOULD HAVE BEEN NEAR IMPOSSIBLE. Thus, as ND filters block light, they are perfect to use when larger apertures are required on a bright day to create a shallow depth of field without having to worry about over-exposing your image. Therefore, whether you are photographing, people, pets or still life an ND filter is an incredibly handy piece of kit to have to hand. In these instances, by adding an ND64 filter, I was able to take my exposure from 1/250th at f/16 to 1/250th at f/2.8 by cutting six stops worth of light and create a more balanced exposure, isolate the subjects and create a beautiful background blur. 43
![[ Removing moving objects and people ] ND filters are worthwhile tools for getting rid of moving objects that you don t want to appear in your frame.](/docs-images/76/74349480/images/44-0.jpg "For example, they are often used by event shooters who will use one when shooting set up shots of a venue for a corporate event or wedding and are pushed for time and need to get empty shots of the")
, these moving people")
44 [ Removing moving objects and people ] ND filters are worthwhile tools for getting rid of moving objects that you don t want to appear in your frame. For example, they are often used by event shooters who will use one when shooting set up shots of a venue for a corporate event or wedding and are pushed for time and need to get empty shots of the reception room but, have the problem of waiters, florists and planners rushing around. By placing the camera firmly on a tripod, decreasing the ISO, taking down the aperture to the smallest that a lens allows and using a long shutter speed (lets say 30 seconds), these moving people will almost magically disappear. This will save countless hours in post-production. The same technique can be used when shooting any form of interior space. What s great is that this technique is not limited to indoor use. It can also be used outdoors in landscapes, busy public spaces and anywhere where you wish to remove moving things from your frame and create a cleaner scene. It is therefore really popular in busy city shots or hectic, bustling tourist places where you want the photograph to appear like there are far fewer people than are actually there in reality. If it is just the odd person walking through the frame close to the camera or when you want to remove fast moving traffic, a few seconds for your shutter speed should be fine to make it look like they are not there. However, in very busy, urban areas you will need to use much longer exposures to achieve the same effect. This is because when using extremely slow shutter speeds, anything that moves fast through the frame during the period when the shutter is up, will not be seen. However, in many cases using a shutter speed of 30 seconds or longer (if you are using a remote) will result in an over-exposed image. It is in these situations where an ND filter is vital to prevent over-exposure. The filter ensures you can use a longer shutter speed to blur or ghost out the people without the photograph being too bright. Here, I have used an ND for this effect to make the usually busy Union Square in San Francisco (as you can see) look as if it s completely empty. 44

45 You have to be patient with this technique and it may take a few tries for you to completely remove people or achieve the blurred effect. In order for people to disappear, they have to be moving during your thirtysecond exposure. If someone decides to stand still during your long exposure they will still show up as you can see! In most cases, to remove moving things I use the ND64 filter. This is because it s just about clear enough where I can still focus through the lens and it provides approximately 6f stops worth of reduction, allowing a significant slow down in shutter speed to blur out and essentially remove anything or anyone that may be annoyingly in the frame. However, if slower shutter speeds are required and I risk over-exposing the photograph I switch to the darker ND500 filter. As mentioned, knowing which Neutral Density Filter to use comes with practice and experimentation. For more extreme creative effects and if shooting in very bright daylight when I want to use a much slower shutter speed, I tend to veer towards the more opaque filters (ND500) as they mean I can achieve much longer shutter speeds that enhance the drama whilst still keeping a really small aperture. I therefore still maintain a good depth of field and preserve detail in my images. However, usually when shooting portraits with shallow depth of fields, I prefer the less dense ND8 or ND64 as they allow me to focus with greater ease and I usually don t need to block as much light as I don t require such slow shutter speeds. Lastly, like the UV and CP filter, Neutral Density filters provide protection for lenses from moisture, dust and other elements that can cause damage and are much easier to replace should they get destroyed than the lens itself. WHAT S GREAT IS THAT THIS TECHNIQUE IS NOT LIMITED TO INDOOR USE. IT CAN ALSO BE USED OUTDOORS IN LANDSCAPES, BUSY PUBLIC SPACES AND ANYWHERE WHERE YOU WISH TO REMOVE MOVING THINGS FROM YOUR FRAME AND CREATE A CLEANER SCENE. 45
![[ How to use ND Filters ] Some practical tips When using an ND filter you will usually be using slower shutter speeds to add creativity and originality to images.](/docs-images/76/74349480/images/46-0.jpg "It is therefore essential that you set up your camera securely on a good, sturdy tripod.")
46 [ How to use ND Filters ] Some practical tips When using an ND filter you will usually be using slower shutter speeds to add creativity and originality to images. It is therefore essential that you set up your camera securely on a good, sturdy tripod. I use the Manfrotto 055, Manfrotto 190Go or the Gitzo Mountaineer to help keep my camera steady and avoid blur in my photographs. I also set both the correct exposure I wish to use and compose the frame prior to screwing on the filter. This is because once the filter is applied (especially the more opaque ND64 or ND500 filters) the whole scene will appear much darker when looking through the viewfinder, which makes composing tricky. You will also want to manually focus before applying the darker filters, as your camera will have difficulty focusing manually once they are on - you won t be able to see clearly (it will be too dark). The camera s autofocus will also struggle once the filter is applied for the same reason. A good trick is to autofocus before, lock it in and then apply the filter. Once fitted, depending on how many stops of light the filter cuts out, you can then adjust your camera settings accordingly by manually counting the stops the ND has filtered and work out the appropriate shutter speed to use. Alternatively, I often use an ND calculator app. There are quite a few of them on the market but I like PhotoPills - it has a good interface and is not complicated. I would recommend using an app such as this to help work out the correct settings to achieve the optimal exposure. However, there is nothing wrong with experimenting with settings on your own, especially in the age of digital - we have the luxury of shooting for free and being experimental often yields the most creative results. Another handy tip to remember is when using a slow shutter speed, especially greater than a couple of seconds, use a self-timer or ideally a remote shutter release in bulb mode. This will help to eliminate any movement and minimize vibration when taking the shot. Furthermore, if your lens has a Vibration Reduction (VR) or Image Stabilization (IR) feature, turn this off if the camera is on a tripod. This is because this feature works by producing a tiny shake that actually counters handshake by producing a tiny vibration; this is great when shooting handheld. However, obviously as trembling hands are not an issue when using a tripod, this tiny wobble can actually cause photographs to not be pin sharp when a camera is fixed on a tripod. Therefore, using a cable release and turning VR/IR off will result in far sharper images. Also, always try to keep your ISO as low as possible as this will reduce noise that is more noticeable when using longer shutter speeds. If you are shooting in bright sunlight, you also want to do everything possible to block residual light. Therefore, I recommend using a cap or plug or even tape up the viewfinder when shooting long exposures to prevent light leakage that could damage the shot. It is also a good idea to manually set your white balance so that it is consistent throughout all the shots you take whilst out on location - if needs be this can be corrected later. Lastly, set your camera to manual to give yourself complete control over shutter speed and aperture and always shoot in RAW rather than JPEG for optimal image quality and post-processing flexibility. Therefore, ND filters in their various strengths are incredibly useful tools for blocking light and give photographers more control over exposures. ND filters enable the use of slower shutter speeds or larger apertures without photographs becoming over-exposed. Being able to use slow shutter speeds in situations that would otherwise be impossible adds surreal, magical and dramatic effects, whilst blocking light to allow larger apertures helps controls depth of field. These are the basic, critical and vital part of Manfrotto s Filter Suite. 46
Topic 6 - Lens Filters: A Detailed Look
 Getting more from your Camera Topic 6 - Lens Filters: A Detailed Look Learning Outcomes In this lesson, we will take a detailed look at lens filters and study the effects of a variety of types of filter
DSLR FOCUS MODES. Single/ One shot Area Continuous/ AI Servo Manual
 DSLR FOCUS MODES Single/ One shot Area Continuous/ AI Servo Manual Single Area Focus Mode The Single Area AF, also known as AF-S for Nikon or One shot AF for Canon. A pretty straightforward way to acquire
Name Digital Imaging I Chapters 9 12 Review Material
 Name Digital Imaging I Chapters 9 12 Review Material Chapter 9 Filters A filter is a glass or plastic lens attachment that you put on the front of your lens to protect the lens or alter the image as you
EDITION 2017/2018 FILTERS CATALOGUE
 EDITION 2017/2018 FILTERS CATALOGUE DHG FILTERS UV FILTERS & POLARIZING FILTERS NEUTRAL DENSITY FILTERS SPECIAL EFFECT FILTERS ACHROMATIC CLOSE-UP LENS 03 04 06 08 09 DIGILINE FILTERS UV FILTERS & POLARIZING
CINEMA FILTERS. nisifilters.com.au nisifilters.co.nz
 Since our beginning over ten years ago, NiSi has devoted itself to the research and development of filters. Today, NiSi is at the forefront of optical technology. They combine the highest quality glass
Polarizers, how they work, when to use them, how to use them...
 Polarizers, how they work, when to use them, how to use them... Author's Note: This is a slightly updated version of an article on Polarization that Singh-Ray asked me to write several years ago. During
TENT APPLICATION GUIDE
 TENT APPLICATION GUIDE ALZO 100 TENT KIT USER GUIDE 1. OVERVIEW 2. Tent Kit Lighting Theory 3. Background Paper vs. Cloth 4. ALZO 100 Tent Kit with Point and Shoot Cameras 5. Fixing color problems 6. Using
COURSE NAME: PHOTOGRAPHY AND AUDIO VISUAL PRODUCTION (VOCATIONAL) FOR UNDER GRADUATE (FIRST YEAR) PAPER TITLE: BASIC PHOTOGRAPHIC
 FOR UNDER GRADUATE (FIRST YEAR) PAPER TITLE: BASIC PHOTOGRAPHIC") COURSE NAME: PHOTOGRAPHY AND AUDIO VISUAL PRODUCTION (VOCATIONAL) FOR UNDER GRADUATE (FIRST YEAR) PAPER TITLE: BASIC PHOTOGRAPHIC UNIT - 4 : CAMERA CONTROLS - 4 TOPIC: LENS HOOD AND FILTERS OBJECTIVES
COURSE NAME: PHOTOGRAPHY AND AUDIO VISUAL PRODUCTION (VOCATIONAL) FOR UNDER GRADUATE (FIRST YEAR) PAPER TITLE: BASIC PHOTOGRAPHIC UNIT - 4 : CAMERA CONTROLS - 4 TOPIC: LENS HOOD AND FILTERS OBJECTIVES
sunpak picturesplus filters
 a lifetime of better pictures guaranteed! sunpak picturesplus filters see us in a new light for film cameras digital cameras camcorders cine cameras introducing sunpak picturesplus filters Our trusted
Autumn. Get Ready For Autumn. Technique eguide. Get Ready For
 Get Ready For Autumn Blink and you may have missed it, but our summer is behind us again and we re back into the short days and long nights of autumn. For photography however, the arrival of autumn means
BLACK CAT PHOTOGRAPHIC RULES-OF- THUMB
 Page 1 of 5 BLACK CAT PHOTOGRAPHIC RULES-OF- THUMB These 50+ photo-cyber-tips are meant to be shared and passed along. Rules-of-thumb are a kind of tool. They help identify a problem or situation. They
PHIL MORGAN PHOTOGRAPHY
 Including: Creative shooting Manual mode Editing PHIL MORGAN PHOTOGRAPHY A free e-book to help you get the most from your camera. Many photographers begin with the naïve idea of instantly making money
High Speed Sync: A Flash Technique To Add a Pro Touch to Your Photographs
 DECEMBER 6, 2017 ADVANCED High Speed Sync: A Flash Technique To Add a Pro Touch to Your Photographs Featuring KEVIN KUBOTA Kevin Kubota Kevin needed a fast shutter speed to balance the scene's ambient
DIGITAL PHOTOGRAPHY FOR OBJECT DOCUMENTATION GOOD, BETTER, BEST
 DIGITAL PHOTOGRAPHY FOR OBJECT DOCUMENTATION GOOD, BETTER, BEST INTRODUCTION This document will introduce participants in the techniques and procedures of collection documentation without the necessity
A Beginner s Guide To Exposure
 A Beginner s Guide To Exposure What is exposure? A Beginner s Guide to Exposure What is exposure? According to Wikipedia: In photography, exposure is the amount of light per unit area (the image plane
Advanced Photography. Topic 3 - Exposure: Flash Photography Tricks
 Topic 3 - Exposure: Flash Photography Tricks Learning Outcomes In this lesson, we will learn about a number of ways (e.g. bouncing the light, the TTL mode, high-speed sync, using gels) in which we can
Digital camera modes explained: choose the best shooting mode for your subject
 Digital camera modes explained: choose the best shooting mode for your subject On most DSLRs, the Mode dial is split into three sections: Scene modes (for doing point-and-shoot photography in specific
Camera Triage. Portrait Mode
 Camera Triage So, you have a fancy new DSLR camera? You re really excited! It probably cost a small fortune. It s gotta be good, right? It better be good, right? Maybe you re having a ton of fun with your
Flash Photography. Malcolm Fackender
 Flash Photography Malcolm Fackender Speedlights (Flashes) Many of us will already have one or more speedlights (flashes) in our camera bag. Speedlights are small portable devices that can be used at home
DIGITAL INFRARED PHOTOGRAPHY By Steve Zimic
 DIGITAL INFRARED PHOTOGRAPHY By Steve Zimic If you're looking to break outside the box so to speak, infrared imaging may be just the ticket. It does take a bit of practice to learn what types of scenes
Filters. We will look at 4 of the most common types of the photographic filter
 Using Filters 1 Filters We will look at 4 of the most common types of the photographic filter Protection / UV / Skylight Polarising Graduated Neutral Density Filter Neutral Density Filter Dark Glass 2
Produce stunning. Pro photographer Chris Humphreys guides you through HDR and how to create captivating natural-looking images
 Masterclass: In association with Produce stunning HDR images Pro photographer Chris Humphreys guides you through HDR and how to create captivating natural-looking images 8 digital photographer 45 masterclass4produce
Cover Story SOUMYA MAITRA. photographer, photoshop, or, even the model...it s all about The Light.
 Cover Story SOUMYA MAITRA IIt s t nott th the camera, iit s t nott th the llens, it it s nott th the photographer, photoshop, or, even the model...it s all about The Light. I N today s digital world, most
Introduction to camera usage. The universal manual controls of most cameras
 Introduction to camera usage A camera in its barest form is simply a light tight container that utilizes a lens with iris, a shutter that has variable speeds, and contains a sensitive piece of media, either
CAMERA BASICS. Stops of light
 CAMERA BASICS Stops of light A stop of light isn t a quantifiable measurement it s a relative measurement. A stop of light is defined as a doubling or halving of any quantity of light. The word stop is
FOCUS, EXPOSURE (& METERING) BVCC May 2018
 BVCC May 2018") FOCUS, EXPOSURE (& METERING) BVCC May 2018 SUMMARY Metering in digital cameras. Metering modes. Exposure, quick recap. Exposure settings and modes. Focus system(s) and camera controls. Challenges & Experiments.
FOCUS, EXPOSURE (& METERING) BVCC May 2018 SUMMARY Metering in digital cameras. Metering modes. Exposure, quick recap. Exposure settings and modes. Focus system(s) and camera controls. Challenges & Experiments.
OUTDOOR PORTRAITURE WORKSHOP
 OUTDOOR PORTRAITURE WORKSHOP SECOND EDITION Copyright Bryan A. Thompson, 2012 bryan@rollaphoto.com Goals The goals of this workshop are to present various techniques for creating portraits in an outdoor
To start there are three key properties that you need to understand: ISO (sensitivity)
") Some Photo Fundamentals Photography is at once relatively simple and technically confusing at the same time. The camera is basically a black box with a hole in its side camera comes from camera obscura,
Some Photo Fundamentals Photography is at once relatively simple and technically confusing at the same time. The camera is basically a black box with a hole in its side camera comes from camera obscura,
DIGITAL PHOTOGRAPHY CAMERA MANUAL
 DIGITAL PHOTOGRAPHY CAMERA MANUAL TABLE OF CONTENTS KNOW YOUR CAMERA...1 SETTINGS SHUTTER SPEED...2 WHITE BALANCE...3 ISO SPEED...4 APERTURE...5 DEPTH OF FIELD...6 WORKING WITH LIGHT CAMERA SETUP...7 LIGHTING
Photographing Waterfalls
 Photographing Waterfalls Developed and presented by Harry O Connor oconnorhj@yahoo.com July 26, 2017* All photos by Harry O Connor * Based on May 2012 topic Introduction Waterfall photographs are landscapes
Photographing Marquetry Revisited Again By Dave Peck
 Photographing Marquetry Revisited Again By Dave Peck This article was originally published in a fall 1996 issue of Marquetry Society of America. It was revised for the Spring 2009 issue of the American
Until now, I have discussed the basics of setting
 Chapter 3: Shooting Modes for Still Images Until now, I have discussed the basics of setting up the camera for quick shots, using Intelligent Auto mode to take pictures with settings controlled mostly
Moving Beyond Automatic Mode
 Moving Beyond Automatic Mode When most people start digital photography, they almost always leave the camera on Automatic Mode This makes all the decisions for them and they believe this will give the
USING MOTION IN LANDSCAPES
 Photzy USING MOTION IN LANDSCAPES Quick Guide Written by David Veldman USING MOTION IN LANDSCAPES // PHOTZY.COM 1 DYNAMIC IMAGES Many people I talk with assume that landscape photography is easy. After
Capturing Realistic HDR Images. Dave Curtin Nassau County Camera Club February 24 th, 2016
 Capturing Realistic HDR Images Dave Curtin Nassau County Camera Club February 24 th, 2016 Capturing Realistic HDR Images Topics: What is HDR? In Camera. Post-Processing. Sample Workflow. Q & A. Capturing
PHOTOGRAPHING THE ELEMENTS
 PHOTOGRAPHING THE ELEMENTS PHIL MORGAN FOR SOUTH WEST STORM CHASERS CONTENTS: The basics of exposure: Page 3 ISO: Page 3 Aperture (with examples): Pages 4-7 Shutter speed: Pages 8-9 Exposure overview:
Aperture Priority Mode
 Chapter 3: Shooting Modes for Still Images 23 The Program Shift function is available only in Program mode; it works as follows. Once you have aimed the camera at your subject, the camera displays its
Sunrise and Sunset Photography
 Sunrise and Sunset Photography Ben Weeks, November 2010 Sunrise. It happens every day, 365 days a year, yet the vast majority of these solar ascents will go by completely unnoticed by most of us. At the
A collection of example photos SB-900
 A collection of example photos SB-900 This booklet introduces techniques, example photos and an overview of flash shooting capabilities possible when shooting with an SB-900. En Selecting suitable illumination
Travel & Landscapes. Introduction
 Introduction Landscape photography captures the natural environment, but can also include man made features within that environment. A striking and breathtaking landscape image will appeal to all our senses
ELB 500 TTL. Focus on the stories you want to share. TTL in all simplicity
 ELB 500 TTL Focus on the stories you want to share. TTL in all simplicity 1 The Elinchrom ELB 500 TTL is a unit designed to ease the photographer s life. It s effortless to use, compact and lightweight
Tips for Digital Photographers
 Introduction to In my Tips for Digital Photographers outlining shutter speed and f-stop settings we discuss how these two settings are a basis for good creative photography. Shutter speed combined with
Improve Your Photography by using Simple Camera Settings and Techniques
 Improve Your Photography by using Simple Camera Settings and Techniques Francis J Pullen 2012 +44 (0)7768 364 567 images@francispullen.co.uk www.francispullen.co.uk Introduction Digital Cameras offer tremendous
About Me. Randolph Community College Two year degree in Portrait and Studio Management Portraits, Wedding, Events Landscapes with boats - favorite
 About Me Randolph Community College Two year degree in Portrait and Studio Management Portraits, Wedding, Events Landscapes with boats - favorite Things Forgotten Check camera settings before each session
FIM FUNDAMENTALS OF FILMMAKING CINEMATOGRAPHY
 Color Temperature and Filters SCHOOL OF FILMMAKING 1533 S. Main Street Winston-Salem, North Carolina 27127 FIM 1801 - FUNDAMENTALS OF FILMMAKING CINEMATOGRAPHY So what is color temperature and why is it
Photomanual TGJ-3MI. By: Madi Glew
 Photomanual TGJ-3MI By: Madi Glew i Table of Contents Getting to know Your Camera... 1 Shutter Speed... 3 White Balance... 4 Depth of Field... 5 Aperture Settings... 7 ISO (Film Speed)... 9 3-Point Portrait
21 Go-to Shooting Settings
 21 Go-to Shooting Settings JOSHUA DUNLOP Train Your Photography Instinct The purpose of this guide is to hand you the settings you need to start taking the control back from your camera. If you can memorise
LOVED BY PROS. MADE FOR YOU. e - pl2
 LOVED BY PROS. MADE FOR YOU. > shooting great pictures has never been so easy. e - pl2 SOMe perfection is DeBAtABle. SOMe is not. In a way we didn t even design your E-PL2. You did. Because this is what
mastering manual week one
 THE PURPOSE OF THIS WORKSHOP IS TO PUT THE POWER AND CONTROL OF THE CAMERA INTO YOUR OWN HANDS. When we shoot in automatic, we are at the mercy of the camera s judgment and decisions. Learning the techniques
USING LENSES A Guide to Getting the Most From Your Glass
 USING LENSES A Guide to Getting the Most From Your Glass DAN BAILEY A Guide to Using Lenses Lenses are your camera s eyes to the world and they determine the overall look of your imagery more than any
Weather & Time of Day
 Weather & Time of Day Here is another page with my blether where I will try to share my thoughts how weather and time of the day may affect the photograph and, of course, how to use it in expressing mood
Landscape Photography
 Landscape Photography Francis J Pullen Photography 2015 Landscape photography requires a considered approach, and like fine wine or food, should not be rushed. You may even want scout out the desired location
Eastman Camera Club Feb. 21, 2008 PHOTOGRAPHING WATER. Taking pictures of lakes, rivers, streams, and waterfalls.
 Eastman Camera Club Feb. 21, 2008 PHOTOGRAPHING WATER Taking pictures of lakes, rivers, streams, and waterfalls. Some Questions to Consider When Photographing Water Artistic Questions Do you want to blur
Photo Workshop. Make better pictures on your trip Photo tips from Oceanwide Expeditions
 Photo Workshop Make better pictures on your trip Photo tips from Oceanwide Expeditions Protect your gear During your trip in the Arctic or Antarctic you and your camera equipment will be exposed to a variety
FORMATT HITECH LTD THE INTEGRATED SYSTEM FOR ALL FORMATS
 FORMATT HITECH LTD THE INTEGRATED SYSTEM FOR ALL FORMATS FORMATT HITECH LTD Unit 23 Aberaman Park Industrial Estate Aberdare CF44 6DA Tel: +44 (0) 1685 870979 Fax: +44 (0) 1685 877007 Website: www.formatt.co.uk
Presented to you today by the Fort Collins Digital Camera Club
 Presented to you today by the Fort Collins Digital Camera Club www.fcdcc.com Photography: February 19, 2011 Fort Collins Digital Camera Club 2 Film Photography: Photography using light sensitive chemicals
USING SHADOWS TO ENHANCE COMPOSITION
 Photzy USING SHADOWS TO ENHANCE COMPOSITION Quick Guide Written by David Veldman Picture by David Veldman TO ENHANCE COMPOSITION // PHOTZY.COM USING SHADOWS 1 INTRODUCING SHADOWS Shooting is all about
LANDSCAPE PHOTOGRAPHY TECHNIQUES, COMPOSITION, AND PROCESSING
 LANDSCAPE PHOTOGRAPHY TECHNIQUES, COMPOSITION, AND PROCESSING Tom Price LANDSCAPE PHOTOGRAPHY TIPS AND TRICKS Wide angle lens desirable 16-18 mm good focal length for APC-C sensor Telephoto also produce
Love Your Camera (Introduction to D-SLR)
") Love Your Camera (Introduction to D-SLR) Photography Workshops and Tours in New York City Phone: (646) 736-3231 Email: info@rememberforever.co Web: www.rememberforever.co Copyright 2009-2013 - Remember
Love Your Camera (Introduction to D-SLR) Photography Workshops and Tours in New York City Phone: (646) 736-3231 Email: info@rememberforever.co Web: www.rememberforever.co Copyright 2009-2013 - Remember
Infrared Photography. John Caplis. Joyce Harman Harmany in Nature
 Infrared Photography John Caplis & Joyce Harman Harmany in Nature www.harmanyinnature.com www.savingdarkskies.com Why do infrared photography? Infrared photography offers many unique creative choices you
Making the right lens choice All images Paul Hazell
 Making the right lens choice All images Paul Hazell Aperture and focal length The two terms to make sure you understand when choosing a photographic lens for an SLR are the maximum aperture and the focal
The. of Light. You Should Understand as a Photographer. Written By: Jason Row
 The Characteristics of Light You Should Understand as a Photographer Written By: Jason Row 02 CONTENTS The Characteristics of Light You Should Understand as a Photographer >> p.03 Light and Shade >> p.04
Chapter 6-Existing Light Photography
 Chapter 6-Existing Light Photography All of these images were taken with available light. Painting with light-using available light Photography that includes artificial light which naturally exists in
Photographing the Seasons. Spring
 Photographing the Seasons Ralph Russo and Jim Wildeman This program will provide ideas and projects to help you make pictures that capture the essence of each season. Although each season provides very
Wave or particle? Light has. Wavelength Frequency Velocity
 Shedding Some Light Wave or particle? Light has Wavelength Frequency Velocity Wavelengths and Frequencies The colours of the visible light spectrum Colour Wavelength interval Frequency interval Red ~ 700
To do this, the lens itself had to be set to viewing mode so light passed through just as it does when making the
 CHAPTER 4 - EXPOSURE In the last chapter, we mentioned fast shutter speeds and moderate apertures. Shutter speed and aperture are 2 of only 3 settings that are required to make a photographic exposure.
TAKING GREAT PICTURES. A Modest Introduction
 TAKING GREAT PICTURES A Modest Introduction HOW TO CHOOSE THE RIGHT CAMERA EQUIPMENT WE ARE NOW LIVING THROUGH THE GOLDEN AGE OF PHOTOGRAPHY Rapid innovation gives us much better cameras and photo software...
HOW TO CREATE DAZZLING HIGH KEY PHOTOGRAPHY
 Photzy HOW TO CREATE DAZZLING HIGH KEY PHOTOGRAPHY Quick Guide by Stacey Hill HOW TO CREATE DAZZLING HIGH KEY PHOTOGRAPHY // PHOTZY.COM 1 My journey into high key photography started with a dandelion,
Field Production Workshop Handout
 Field Production Workshop Handout Objectives: Fundamental Camera Theory & Operation Type of Camera we use (Though these fundamentals can be applied to most video cameras with slightly different operation)
loss of detail in highlights and shadows (noise reduction)
") Introduction Have you printed your images and felt they lacked a little extra punch? Have you worked on your images only to find that you have created strange little halos and lines, but you re not sure
Introduction Have you printed your images and felt they lacked a little extra punch? Have you worked on your images only to find that you have created strange little halos and lines, but you re not sure
Failure is a crucial part of the creative process. Authentic success arrives only after we have mastered failing better. George Bernard Shaw
 PHOTOGRAPHY 101 All photographers have their own vision, their own artistic sense of the world. Unless you re trying to satisfy a client in a work for hire situation, the pictures you make should please
Intro to Digital Compositions: Week One Physical Design
 Instructor: Roger Buchanan Intro to Digital Compositions: Week One Physical Design Your notes are available at: www.thenerdworks.com Please be sure to charge your camera battery, and bring spares if possible.
The Essential Guide To Photography With EOS Cameras. Written by Nina Bailey. Especially for Canon EOS cameras
 The Essential Guide To Photography With EOS Cameras Written by Nina Bailey Especially for Canon EOS cameras Introduction 2 PR ED EV ITI IEW O N Written, designed and images by Nina Bailey www.eos-magazine.com/ebooks/es/
Aperture. The lens opening that allows more, or less light onto the sensor formed by a diaphragm inside the actual lens.
 PHOTOGRAPHY TERMS: AE - Auto Exposure. When the camera is set to this mode, it will automatically set all the required modes for the light conditions. I.e. Shutter speed, aperture and white balance. The
Filters for the digital age
 Chapter 9-Filters Filters for the digital age What is a filter? Filters are simple lens attachments that screw into or fit over the front of a lens to alter the light coming through the lens. Filters
CLAY BLACKMORE S POSING GUIDE
 CLAY BLACKMORE S POSING GUIDE BROUGHT TO YOU BY: Clay Blackmore, a Canon Explorer of Light, is recognized as a leading portrait and event photographer. Many professional photographers follow his tips on
However, it is always a good idea to get familiar with the exposure settings of your camera.
 296 Tips & tricks for digital photography Light Light is the element of photography. In other words, photos are simply light captured from the world around us. This is why bad lighting and exposure are
SPOT METERING. Copyright Hairy Goat Ltd 2015 Ä
 How to fine tune your exposure with spot metering Metering is often something that leads to great confusion in newbie photographers (and often in more experienced ones, too). Basically, metering refers
Photo Effects & Corrections with PhotoFiltre
 Photo Effects & Corrections with PhotoFiltre P 330 / 1 Fix Colour Problems and Apply Stylish Effects to Your Photos in Seconds with This Free Software If you re keen on digital photography, you probably
Basic Camera Craft. Roy Killen, GMAPS, EFIAP, MPSA. (c) 2016 Roy Killen Basic Camera Craft, Page 1
 2016 Roy Killen Basic Camera Craft, Page 1") Basic Camera Craft Roy Killen, GMAPS, EFIAP, MPSA (c) 2016 Roy Killen Basic Camera Craft, Page 1 Basic Camera Craft Whether you use a camera that cost $100 or one that cost $10,000, you need to be able
Basic Camera Craft Roy Killen, GMAPS, EFIAP, MPSA (c) 2016 Roy Killen Basic Camera Craft, Page 1 Basic Camera Craft Whether you use a camera that cost $100 or one that cost $10,000, you need to be able
Introduction To Photography
 Introduction To Photography THETIPS STORYTELLING POWER OF PHOTOGRAPHY FOR TAKING BETTER PHOTOS WITH YOUR PHONE What is photography? Photography is a tool that allow us to share inspiring and important
THE PHOTOGRAPHER S GUIDE TO DEPTH OF FIELD
 THE PHOTOGRAPHER S GUIDE TO DEPTH OF FIELD A Light Stalking Short Guide Cover Image Credit: Thomas Rey WHAT IS DEPTH OF FIELD? P hotography can be a simple form of art but at the core is a complex set
Architectural Photography. Urban Landscapes
 Architectural Photography Urban Landscapes Who uses architectural photos? Designers needing to capture inspiration Firms needing to represent their work to future clients Stylists who use these trends
Educate me! Education Images as Stock. By Andrea Gingerich. As Benjamin Franklin once said, An investment in knowledge pays the best interest.
 Educate me! S E Q U O I A CBREAKFAST L U B STOCK CLUB PREMIUM CHALLENGE #40 By Andrea Gingerich As Benjamin Franklin once said, An investment in knowledge pays the best interest. The same rule applies
1 / 9
 WWW.RICHIEHUG.COM 1 / 9 A Beginner's Guide to Digital Photography Version 1.2 By Richie Hug November 24, 2016. Most people owning a digital camera have never used other settings than just the AUTO mode.
Photographing Art By Mark Pemberton March 26, 2009
 Photographing Art By Mark Pemberton March 26, 2009 Introduction Almost all artists need to photograph their artwork at some time or another. Usually this is for the purpose of creating a portfolio of their
The A Button. Filter Button
 90 Photographer s Guide to the Leica D-Lux (Typ 109) except Manual exposure mode. You will see the effects of the adjustment on the camera s display as you turn the dial. In Chapter 4, I discussed the
Color Temperature Color temperature is distinctly different from color and also it is different from the warm/cold contrast described earlier.
 Color Temperature Color temperature is distinctly different from color and also it is different from the warm/cold contrast described earlier. Color temperature describes the actual temperature of a black
The Basic SLR
 The Basic SLR ISO Aperture Shutter Speed Aperture The lens lets in light. The aperture is located in the lens and is a set of leaf like piece of metal that can change the size of the hole that lets in
ACTION AND PEOPLE PHOTOGRAPHY
 ACTION AND PEOPLE PHOTOGRAPHY These notes are written to complement the material presented in the Nikon School of Photography Action and People Photography class. Helpful websites: Nikon USA Nikon Learn
Term 1 Study Guide for Digital Photography
 Name: Period Term 1 Study Guide for Digital Photography History: 1. The first type of camera was a camera obscura. 2. took the world s first permanent camera image. 3. invented film and the prototype of
Mastering Y our Your Digital Camera
 Mastering Your Digital Camera The Exposure Triangle The ISO setting on your camera defines how sensitive it is to light. Normally ISO 100 is the least sensitive setting on your camera and as the ISO numbers
A taste for landscapes
 A taste for landscapes NEPG workshop October 2012 Colin White 1 Main ingredients 1. Light 2. Composition 3. Kit 4. Post production 2 Light Hue, direction, dynamic range Time of day - around sunrise or
How to Photograph Your 3D Artwork. An Introduction
 How to Photograph Your 3D Artwork An Introduction 1 Why do Artists Photograph Their Artwork? Artists generally want photograph their work for some or all of the following - Digital Submission, Presentations,
Film Cameras Digital SLR Cameras Point and Shoot Bridge Compact Mirror less
 Film Cameras Digital SLR Cameras Point and Shoot Bridge Compact Mirror less Portraits Landscapes Macro Sports Wildlife Architecture Fashion Live Music Travel Street Weddings Kids Food CAMERA SENSOR
HDR and Beyond Seeing is believing! by Gavin Phillips
 HDR and Beyond Seeing is believing! by Gavin Phillips What is High Dynamic Range Imaging? (HDR) HDR is when you take 3-5 or 7 photos at different exposure settings, and then merge them into a single image
5 TIPS TO IMPROVE YOUR WILDLIFE
 5 TIPS TO IMPROVE YOUR WILDLIFE PHOTOGRAPHY TRENTSIZEMORE INTRODUCTION A great image will immediately grab a viewer s attention and keep it as they start reading into the deeper meaning. With millions
EXPOSURE TIPS. Camera shake causing blurry pictures
 EXPOSURE TIPS Camera shake causing blurry pictures Hold your camera steady Digital cameras are usually held away from the body to view the LCD screen to compose the picture. This is less steady than the
Your objective: maximum control, maximum manageability
 Your objective: maximum control, maximum manageability Know how the light works Know how photography works Know the camera you re using Making the most of what you have to work with. ISO This is the first
Photography for the Lighting Designer
 Photography for the Lighting Designer Lighting designers not only have the challenge of creating emotion, space, motion, and a pretty image but we also have the challenge of selling our services to the