University of Minnesota Nano Fabrication Center Standard Operating Procedure Equipment Name:
|
|
|
- Kenneth Hubbard
- 6 years ago
- Views:
Transcription
1 Equipment Name: Coral Name: Nanoimprinter Revision Number: 1.1 Model: NX-B200 Revisionist: M. Fisher Location: Bay 4 Date: 2/12/ Description Nanonex NX-B200 nanoimprinter is another method of transfer a pattern to a wafer with good resolution. This nanoimprinter is designed for thermal and photo-curable nanoimprint lithography (NIL). For more information see 2 Safety a 3 Restrictions/Requirements a No samples greater 75mm in diameter. b 4 Required Facilities a 120 V/30A b Nitrogen c Compressed Air d Vacuum pump exhaust 5 Definitions a Nanoimprint lithography (NIL) 6 Setup a None 7 Specifications a Maximum pressure 500 psi b Maximum temperature 250 C c Imprint resist Thermal resist -NX-1025, Two part UV resist NX-3022 and NX-2010 d Maximum substrate and mold size 75mm. 8 Operating Instructions a Log in to coral b Turn on the key switch. c Open drawer d Remove top film holder e Remove wafers. f Place the smaller diameter thin film (bottom) on the wafer holder. Make sure the film covers the large inner hole and extends to the edge of the eight small holes as shown in figure 4-4. The film must be flat with no wrinkles or cuts, replace film if film is defective. g Place the mask (mold) and wafer (substrate) in the center of the wafer holder, see figure 4-5 h Place the larger diameter thin film on the Top Film Ring Holder. The film is held in place by eight magnets, located as shown in Fig 4-6. The magnets must be placed over the pins on the bottom side of the top film holder (see figure 4-6). Again the film needs to be flat with no wrinkles or cuts, replace if the film is defective 1

2 i j University of Minnesota Nano Fabrication Center Place the Top Film Ring Holder onto the wafer holder, see figure 4-7. Align the cut out notches on the holder with the guide pins on the wafer chuck, see figure 4-8. The magnet side of the holder faces down, you should be able to read This side up (see figure 4-8), if you do not, STOP. Change the top film holder to make it correct. Gently push the drawer into the chamber until there is an audible click. Figure 4-4 A small plastic thin film is placed on the wafer holder. Figure 4-5 Mask and wafer are placed on the wafer holder k When placing your mask (mold) and wafer (substrate) on the center of the bottom film, be sure to cover the thermocouple with your mask (mold) and wafer (substrate) to get better temperature control. See figure 4-4. If pieces are used the support wires will need to keep the mold and substrate in place (see figure 4-4). 2

3 l To replace the top film, remove all magnets from the top film ring holder, place them on a wipe separated by a large distance, so that the magnets will not sick together. Remove a top film from the package label new top film on top of the machine, put the old film in a package marked old top film. Put the new film equal distance from all the posts; replace the all magnets, making sure that the film is flat. 3

4 m When positioning the top film holder on the guides pins make sure that you can read THIS SIDE UP, if you place the top film in the drawer upside down, major damage can occur with the machine. n 9 Imprinting a Log on to the computer using user ID user and password user_1234. b Open control program by double clicking on the NX- B200 v3.7 all_users icon on computer desktop. c Click Users Log in ( a in figure 4-9), enter user ID- user and Password user_1234, and click OK to log onto the system. If for some reason, you don t want to log in, just click EXIT in the log in pop up menu. The program will terminate. 4
 h Modify the recipe if needed and save in your directory. i Click OK.")
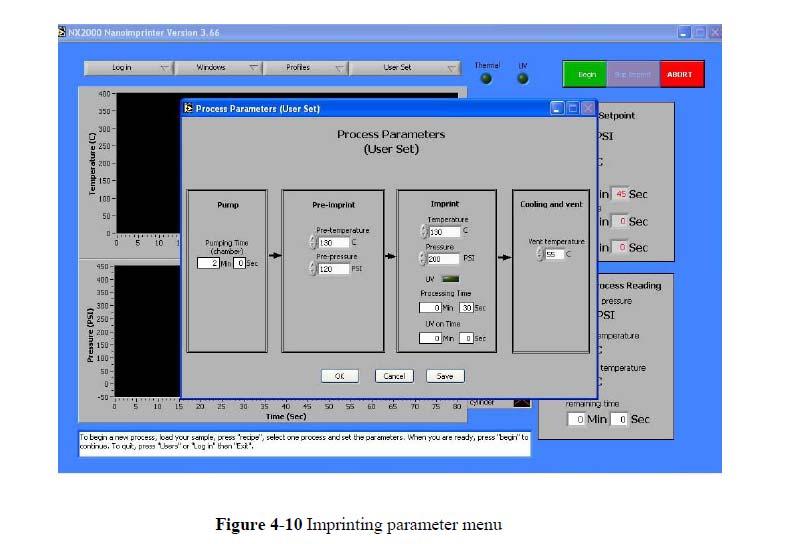
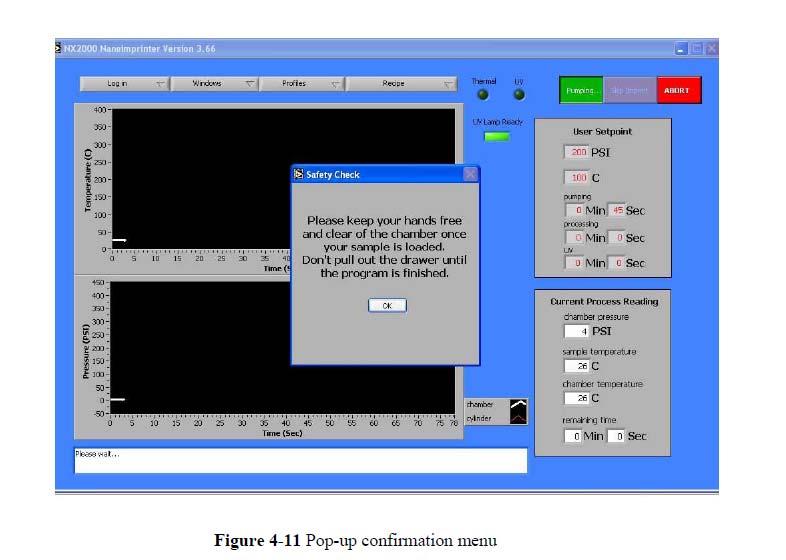
5 Figure 4-9 NX-B200 v3.65 menu d Click load recipe ( b in figure 4-9) e Open File f Go to folder NX-B200 recipes. g Load a basic recipe- highlight a recipe, click open (Process parameters load fixed window will open) h Modify the recipe if needed and save in your directory. i Click OK. j To begin imprint click green Begin button ( c in figure 4-9). k Click OK button in the pop-up menu (figure 4-11), the chamber closes automatically and the vacuum pump starts to pump the chamber. WARNING!!! From this point on DO NOT pull out the drawer until the program is finished and the chamber has stopped moving. When user-set pumping time expires, the imprinting process begins automatically. During the process, temperature and pressure inside the chamber are monitored in real-time and displayed on the monitor (figure 4-12). 5
6 6

7 l When imprinting is finished, the chamber vents and opens automatically. The status indicator at the bottom of the screen shows To begin a new run. The operator can open the drawer and remove the sample at this time. Warning!! Use Caution before handling Top Film Holder maybe hot after high temperature imprint, allow the holder to cool before handling. m Repeat Step j through l for next imprint run. n After finishing all imprint runs, click Login Exit to exit the program. o During imprint, you can click the skip imprint button ( a in figure 4-13) to skip current imprint and directly go to cooling of sample. p At any time the operator can abort the process by clicking the red abort ( d in figure 4-9) in the upper right of the screen. After pressing the abort button in the software, the operator should wait for ~ 1 minute, and then follow the screen instructions to continue. Also, an emergency stop may be executed by pressing the red Emergency button on the small box underneath the monitor. After an emergency stop, the operator must contact NFC staff to reset the machine. 7

8 q Shut Down. r Switch control key to OFF position. s Exit the NX-B200 software. t Log off the system. u 10 Removing your mold from your wafer a Place your mold and substrate on a wipe, mold up. b Working from the flat or an edge, separate the mold and substrate with a razor blade and force an air jet between the two surfaces. This may need to be done for a few locations on the mold. Do not damage the mold with the razor blade. c Cleaning the NXR-1025 resist off the mold- use acetone and IPA spray the surface thoroughly with each, then blow dry. d 11 Pattern Transfer a Using the STS etcher and the STS etcher and program O2NIL50W etch the residual layer. Etch rate ~800 A/min for NXR-1025 b Transfer your pattern using the correct etch program for your process 12 Making a Mold a Using either the Raith e-beam writer to write a 3 diameter or less, or the Cannon stepper to create a 4 wafer and cut it down to 3 diameter or use standard lithography to create a mold. b Apply a release layer to the mold. 8
HEX02 EMBOSSING SYSTEM
 HEX02 EMBOSSING SYSTEM LOCATION: Hot Embossing Area PRIMARY TRAINER: 1. Scott Munro (2-4826, smunro@ualberta.ca) OVERVIEW The hot embosser is available to users who require polymer mold fabrication. This
FEI Quanta 200 ESEM Basic instructions
 FEI Quanta 200 ESEM Basic instructions Desktop and then start the UI. If the computer has restarted and you need to login, Username: supervisor and Password: supervisor Log-in to the Microscope using the
Heidelberg µpg 101 Laser Writer
 Heidelberg µpg 101 Laser Writer Standard Operating Procedure Revision: 3.0 Last Updated: Aug.1/2012, Revised by Nathanael Sieb Overview This document will provide a detailed operation procedure of the
DISCO DICING SAW SOP. April 2014 INTRODUCTION
 DISCO DICING SAW SOP April 2014 INTRODUCTION The DISCO Dicing saw is an essential piece of equipment that allows cleanroom users to divide up their processed wafers into individual chips. The dicing saw
Micro Automation- Model 1006 Dicing Saw Instructions. Serial # Rev 2 ( R.DeVito) Location Chase 1
 Location Chase 1") Micro Automation- Model 1006 Dicing Saw Instructions Serial # Rev 2 (12-23-05 R.DeVito) Location Chase 1 Dicing Saw Instructions (Revised 8/9/03 - K.J) 1. On the Log Sheet sign in, including Name and Date.
Micro Automation- Model 1006 Dicing Saw Instructions Serial # Rev 2 (12-23-05 R.DeVito) Location Chase 1 Dicing Saw Instructions (Revised 8/9/03 - K.J) 1. On the Log Sheet sign in, including Name and Date.
Standard Operating Manual
 Standard Operating Manual Buehler EcoMet TM 300 Polisher Version 1.0 Page 1 of 19 Contents 1. Picture and Location 2. Process Capabilities 2.1 Cleanliness Standard 2.2 Possible Polishing Materials 2.3
Basic Users Manual for Tecnai-F20 TEM
 Basic Users Manual for Tecnai-F20 TEM NB: This document contains my personal notes on the operating procedure of the Tecnai F20 and may be used as a rough guide for those new to the microscope. It may
Major Fabrication Steps in MOS Process Flow
 Major Fabrication Steps in MOS Process Flow UV light Mask oxygen Silicon dioxide photoresist exposed photoresist oxide Silicon substrate Oxidation (Field oxide) Photoresist Coating Mask-Wafer Alignment
JEOL JEM-1400 Transmission Electron Microscope Operating Instructions
 JEOL JEM-1400 Transmission Electron Microscope Operating Instructions Anti-contamination device Objective aperture Objective aperture translation knobs Specimen holder Pump/air switch Left hand control
JSM 6060 LV SCANNING ELECTRON MICROSCOPE STANDARD OPERATING PROCEDURES
 JSM 6060 LV SCANNING ELECTRON MICROSCOPE STANDARD OPERATING PROCEDURES RULES All users must go through a series of standard operation procedure training. For more information contact: Longlong Liao Teaching
Figure 1 The Raith 150 TWO
 RAITH 150 TWO SOP Figure 1 The Raith 150 TWO LOCATION: Raith 150 TWO room, Lithography area, NanoFab PRIMARY TRAINER: SECONDARY TRAINER: 1. OVERVIEW The Raith 150 TWO is an ultra high resolution, low voltage
PANalytical X pert Pro Gazing Incidence X-ray Reflectivity User Manual (Version: )
") University of Minnesota College of Science and Engineering Characterization Facility PANalytical X pert Pro Gazing Incidence X-ray Reflectivity User Manual (Version: 2012.10.17) The following instructions
University of Minnesota College of Science and Engineering Characterization Facility PANalytical X pert Pro Gazing Incidence X-ray Reflectivity User Manual (Version: 2012.10.17) The following instructions
Film Holder Accessories
 Page 1 of 9 Film Holder Accessories For Cary 1/3/4/5/100/300/400/500/500i/4000/5000/6000i/Deep UV Part numbers: Cary 100/300-0010048500; Cary 400/500/500i/4000/5000/6000i - 0210125400 Contents This document
Basic P-XRD instructions for Operating the Instrument
 Basic P-XRD instructions for Operating the Instrument Instrument Parts Incident Beam Optics (left arm) 1) X-ray source (Cu) i. Rest settings: 45 kv, 20mA ii. Run settings: 45 kv, 40mA 2) Monochromator
JEOL 6700 User Manual 05/18/2009
 JEOL 6700 User Manual 05/18/2009 LOG IN to your session on the computer to the right of the microscope. Starting Conditions 1. Click the button and read the Penning Gauge to ensure that the microscope
Nanoscale Fabrication & Characterization Facility. Raith e-line EBL Users Guide (updated:aug 2 nd, 2017)
") Nanoscale Fabrication & Characterization Facility Raith e-line EBL Users Guide (updated:aug 2 nd, 2017) Overview: The Raith e-line EBL system is designed to write features with critical dimensions as small
Nanoscale Fabrication & Characterization Facility Raith e-line EBL Users Guide (updated:aug 2 nd, 2017) Overview: The Raith e-line EBL system is designed to write features with critical dimensions as small
Vinyl Cutter Instruction Manual
 Vinyl Cutter Instruction Manual 1 Product Inventory Inventory Here is a list of items you will receive with your vinyl cutter: Product components (Fig.1-4): 1x Cutter head unit complete with motor, plastic
1.1. Log on to the TUMI system (you cannot proceed further until this is done).
.") FEI DB235 SEM mode operation Nicholas G. Rudawski ngr@ufl.edu (805) 252-4916 1. Sample loading 1.1. Log on to the TUMI system (you cannot proceed further until this is done). 1.2. The FIB software (xp)
FEI DB235 SEM mode operation Nicholas G. Rudawski ngr@ufl.edu (805) 252-4916 1. Sample loading 1.1. Log on to the TUMI system (you cannot proceed further until this is done). 1.2. The FIB software (xp)
MicroPG 101 Pattern Generator Standard Operating Procedure Draft v.0.2
 Tool owner: Roman Akhmechet, romana@princeton.edu, x 8-0468 Backup: David Barth, dbarth@princeton.edu MicroPG 101 Pattern Generator Standard Operating Procedure Draft v.0.2 QUICK GUIDE PROCEDURE OVERVIEW
CNC Using the FlexiCam CNC and HMI Software. Guldbergsgade 29N, P0 E: T:
 CNC Using the FlexiCam CNC and HMI Software Guldbergsgade 29N, P0 E: makerlab@kea.dk T: +46 46 03 90 This grey box is the NC controller. Let s start by turning the red switch to the ON position, then press
Standard Operating Procedure
 Standard Operating Procedure Nanosurf Atomic Force Microscopy Operation Facility NCCRD Nanotechnology Center for Collaborative Research and Development Department of Chemistry and Engineering Physics The
General Help. Last revised: Winter When I try to print something on the computer, it appears to work, but nothing comes out of the printer.
 General Help Last revised: Winter 2015 Problem Solution When I try to print something on the computer, it appears to work, but nothing comes out of the printer. See the next item. When I try to print something
RAITH e-line OPERATING INSTRUCTIONS
 RAITH e-line OPERATING INSTRUCTIONS 1) LOADING A SAMPLE a. Start the system i. On the Column PC (Right side monitor [R]), select the SmartSEM icon to on the desktop to begin the column software. ii. On
Quick Reference Guide
 Quick Reference Guide Table of Contents Defoamer - Composite Blocks...1 Zirlux FC2...1 Milling a Restoration...2 Tool Gauges and Warnings...3 Automatic Tool Changer...4 Maintenance Reminders...5 Clean/Refill
Standard Operating Procedure for the Amray 1810 Scanning Electron Microscope Version: 29 NOVEMBER 2014
 Standard Operating Procedure for the Amray 1810 Scanning Electron Microscope Version: 29 NOVEMBER 2014 1. Utility Requirements a. System power is supplied by two 120 VAC/20 A circuits. When doing maintenance
Maintenance Manual for Auto Lab
 Version 1.1 9/30/2012 Maintenance Manual for Auto Lab Lubricate X axis There are two locations for lubrication at the back side of the gantry as shown in the below picture. The left one (from the backside
5. Carefully remove the printer from the lower boxed foam support and place it on a solid, level base where it will be used
 PROJET 1200 QUICKSTART GUIDE Before you get started you will need: Lint-free paper towels A pair of nitrile gloves Saftety glasses OPENING YOUR PROJET 1200 NOTE: Make sure you save all of your packaging
OPTICAL LITHOGRAPHY USING LASERWRITER LW405
 OPTICAL LITHOGRAPHY USING LASERWRITER LW405 Tool identifier: LaserWriter LW405 SYSTEM OWNER/OPERATOR AKHIL KUMAR ARATHY MENON CONTACT DETAILS akhilatnik@ee.iitb.ac.in arathymenoniit@gmail.com arathy_menon@iitb.ac.in
Semiconductor Manufacturing Technology. Semiconductor Manufacturing Technology. Photolithography: Resist Development and Advanced Lithography
 Semiconductor Manufacturing Technology Michael Quirk & Julian Serda October 2001 by Prentice Hall Chapter 15 Photolithography: Resist Development and Advanced Lithography Eight Basic Steps of Photolithography
Obducat NIL 6. Nanoimprinting with NRF s NIL 6
 Obducat NIL 6 Substrates: pieces to 6 inch, hard or soft Thermal cure with PMMA, MR I 7010 etc Alignment to about 3 microns Temperature to 300 HC Pressure 15 to 80 bars Resolution < 50 nm possible Up to
Fire CR Calibration Guide
 1 Fire CR Calibration Guide This reference guide will guide you through the steps to complete the calibration for the Fire CR.. Getting Started: 1. Click on the Opal Icon on the Desktop. Figure 1 2. Once
KMPR 1010 Process for Glass Wafers
 KMPR 1010 Process for Glass Wafers KMPR 1010 Steps Protocol Step System Condition Note Plasma Cleaning PVA Tepla Ion 10 5 mins Run OmniCoat Receipt Dehydration Any Heat Plate 150 C, 5 mins HMDS Coating
New Roman Shades WARNING. Installation Operation Care. Retractable Cord Lifting System
 CHILD SAFETY Warning WARNING For more safety information call 1-888-501-8364 in the U.S. or 1-866-662-0666 in Canada. Young children can wrap cords around their necks and STRANGLE. Always keep cords out
Development of Nanoimprint Mold Using JBX-9300FS
 Development of Nanoimprint Mold Using JBX-9300FS Morihisa Hoga, Mikio Ishikawa, Naoko Kuwahara Tadahiko Takikawa and Shiho Sasaki Dai Nippon Printing Co., Ltd Research & Development Center Electronic Device
TEM SAMPLE-PREPARATION PROCEDURES FOR THIN-FILM MATERIALS
 TEM SAMPLE-PREPARATION PROCEDURES FOR THIN-FILM MATERIALS Initial Set-Up: Heat up a hot plate to around 150-200 C Plan view Mounting/Grinding/Dimpling/Polishing: 1) Cleave a square-ish piece of sample.
JEOL 6500 User Manual
 LOG IN to your session on the computer to the left of the microscope. Starting Conditions 1. Press Ctrl-Alt-Del and log on to the microscope computer. Click on JEOL PC SEM 6500 icon. Click yes if message
Operating Checklist for using the Scanning Electron Microscope, JEOL JSM 6400.
 Smith College August 2005 Operating Checklist for using the Scanning Electron Microscope, JEOL JSM 6400. CONTENT, page no. Pre-Check, 1 Specimen Insertion, 1 Startup, 2 Filament Saturation, 2 Beam Alignment,
Quick Start Guide. Contents
 1 Quick Start Guide Contents Powering on the Machine Login/Password Entry Jaw Set Up High Security Cut by Code High Security Jaw Set Up Edge Cut Cut by Code Edge Cut Cut by Decode Cutter Replacement Tracer
CUTTING SAMPLES WITH THE BUEHLER PETROTHIN: USER GUIDE
 Cutting Sample with the Buehler PetroThin CUTTING SAMPLES WITH THE BUEHLER PETROTHIN: USER GUIDE Author: Reviewer(s): Management Approval (Name, Title, Date): Audience: E. Fisher Origination date: 4/29/2013
F400 QUICK-START GUIDE
 F400 QUICK-START GUIDE PLEASE READ THIS DOCUMENT BEFORE OPERATING YOUR PRINTER Revision 10-1/31/18 Page 1 Table of Contents 1. Introduction... 3 2. What s in the Box... 3 3. Unboxing Your F400... 4 4.
Operating Checklist for using the Scanning Electron. Microscope, JEOL JSM 6400.
 Smith College August 2009 Operating Checklist for using the Scanning Electron Microscope, JEOL JSM 6400. CONTENT, page no. Pre-Check 1 Startup 1 Specimen Insertion 2 Filament Saturation 2 Beam Alignment
Installing the 3 Indexer: PRS Standard Tools
 888-680-4466 ShopBotTools.com Installing the 3 Indexer: PRS Standard Tools Copyright 2016 ShopBot Tools, Inc. page 1 Copyright 2016 ShopBot Tools, Inc. page 2 Table of Contents Route Cable into Box...5
Instructions for Tecnai a brief start up manual
 Instructions for Tecnai a brief start up manual Version 3.0, 8.12.2015 Manual of Tecnai 12 transmission electron microscope located at Aalto University's Nanomicroscopy Center. More information of Nanomicroscopy
SEM Training Notebook
 SEM Training Notebook Lab Manager: Dr. Perry Cheung MSE Fee-For-Service Facility Materials Science and Engineering University of California, Riverside December 21, 2017 (rev. 3.4) 1 Before you begin Complete
Please follow these instructions for use of the Philips CM100 TEM. Adopted from website below.
 Please follow these instructions for use of the Philips CM100 TEM. Adopted from website below. http://staff.washington.edu/wpchan/if/cm100_inst.shtml Instructions for the Philips CM100 TEM and peripherals
VIPER 4 TOOL SERVICE MANUAL
 VIPER 4 TOOL SERVICE MANUAL 11.14.2014 INTRODUCTION 1 The Model VIPER 4 troubleshooting/service manual has been developed to assist ITW CCNA field sales and distributor field/service personnel in servicing
Using the Hitachi 3400-N VP-SEM
 Using the Hitachi 3400-N VP-SEM Opening the Chamber to Load Specimens (This may also be done later using the software) 1. Click the AIR button on the front of the machine: 2. Wait a few minutes until you
Version SmartPTT Enterprise. Web Client User Guide
 Version 9.3.1 July 2018 Contents Contents 1 Introduction 3 2 SmartPTT Web Client Interface 4 3 Logging in and Changing User 6 4 7 4.1 Making and Receiving Voice Calls 8 4.2 Sending Messages 11 4.3 Finding
Cressington 108 Auto/SE Sputter Coater Standard Operating Procedures (S.O.P)
") Cressington 108 Auto/SE Sputter Coater Standard Operating Procedures (S.O.P) The Cressington sputter system is designed for only one purpose which is the deposition of gold onto a sample to reduce charging
Cressington 108 Auto/SE Sputter Coater Standard Operating Procedures (S.O.P) The Cressington sputter system is designed for only one purpose which is the deposition of gold onto a sample to reduce charging
Instructions for Making On-Line Reservations for Microscopes in NB11-204
 Instructions for Making On-Line Reservations for Microscopes in NB11-204 1. Log into Mail using Mail.swmed.edu 2. Log in using your university id and password. 3. Click the Calendar Tab at the top right
Black 22 Cyan 10 Magenta 10 Yellow 10
 Installation Instructions: Filled Epson 860 CFS Procedure: 1. Fill Cartridges with Ink Get a place to work where you can spill a little ink and not ruin anything. Spread some newspapers down and have plenty
Adhesive Application & Laminating System
 U S E R S G U I D E 1255 Adhesive Application & Laminating System The XM1255 is an economical and easy to use document finishing system. This versatile and non-electric system has been designed to laminate
IENG 475 Computer-Controlled Manufacturing Systems 2/7/2017. Lab 03: Manual Milling and Turning Operations
 I. Purpose Lab 03: Manual Milling and Turning Operations A.) B.) C.) D.) Provide an overview of safety considerations for the CNC Mill Provide manual experience using the laboratory s CNC Mill Provide
Operating the Hitachi 7100 Transmission Electron Microscope Electron Microscopy Core, University of Utah
 Operating the Hitachi 7100 Transmission Electron Microscope Electron Microscopy Core, University of Utah Follow the procedures below when you use the Hitachi 7100 TEM. Starting Session 1. Turn on the cold
PRINTING SETUP with OMEGA ENLARGER
 PRINTING SETUP with OMEGA ENLARGER Follow this procedure when beginning a work session in the Darkroom. Use this page as an actual checklist as you prepare to work. Get a key from the Monitor in the Cage
SOP: EDAX Eagle III Microspot XRF
 SOP: EDAX Eagle III Microspot XRF Page 1 of 6 SOP: EDAX Eagle III Microspot XRF 1. Scope 1.1 This document describes the standard operating procedure (SOP) for the EDAX Eagle III Microspot XRF. This X-ray
SEM Training Notebook
 SEM Training Notebook Lab Manager: Dr. Perry Cheung MSE Fee-For-Service Facility Materials Science and Engineering University of California, Riverside March 8, 2018 (rev. 3.5) 1 Before you begin Complete
Problem/Procedure Description. Requirements. Problem/Procedure Solution. How-To Document. Updated on: 11/13/2008 By:Christopher Ware
 Problem/Procedure Description Performing maintenance on 95s, 95sII and H100 Requirements Ball Bearing Grease (LPKF P/N 106976) Tri-Flow Teflon lubricant aerosol. 3-in-1 Multi-purpose Oil Electronic Component
FEI Tecnai G 2 F20 Operating Procedures
 FEI Tecnai G 2 F20 Operating Procedures 1. Startup (1) Sign-up in the microscope log-sheet. Please ensure you have written an account number for billing. (2) Log in to the computer: Login to your account
PRINTING ON YOUR IPAD
 PRINTING ON YOUR IPAD TABLE OF CONTENTS I don t have Papercut on my ipad... 1 I can t see any printers when trying to print... 2 The Papercut app wants me to sign in... 3 Can I print double sided?... 4
Adhesive Application & Laminating System
 U S E R S G U I D E Adhesive Application & Laminating System The XM2500 is an economical and easy to use document finishing system. This versatile and non-electric system has been designed to laminate
Standard Operating Manual
 Standard Operating Manual NanoFactor NVG-200A Silicon Grinder Version 1.1 Page 1 of 18 Contents 1. Picture and Location 2. Process Capabilities 2.1 Cleanliness Standard 2.2 Possible Grinding Materials
EXPERIMENT # 3: Oxidation and Etching Tuesday 2/3/98 and 2/5/98 Thursday 2/10/98 and 2/12/98
 EXPERIMENT # 3: Oxidation and Etching Tuesday 2/3/98 and 2/5/98 Thursday 2/10/98 and 2/12/98 Experiment # 3: Oxidation of silicon - Oxide etching and Resist stripping Measurement of oxide thickness using
Etching Small Samples and the Effects of Using a Carrier Wafer STS ICP-RIE
 Etching Small Samples and the Effects of Using a Carrier Wafer STS ICP-RIE This note is a brief description of the effects of bonding pieces to a carrier wafer during the etch process on the STS ICP-RIE.
AutoSeal FD 2002/FD 2032 FE 2002/FE 2032 OPERATOR MANUAL FIRST EDITION
 AutoSeal FD 2002/FD 2032 FE 2002/FE 2032 10/2012 OPERATOR MANUAL FIRST EDITION TABLE OF CONTENTS SUBJECT PAGE DESCRIPTION 1 SPECIFICATIONS 1 UNPACKING 2 2000/2032 Components 2 Optional Conveyor Components
Powder X-Ray Diffraction Alignment Procedure
 FLORIDA STATE UNIVERSITY Powder X-Ray Diffraction Alignment Procedure Procedure for aligning Rigaku Ultima III w/ Mercury CCD using Scintillation Detector for calibration 2013-14 Thayumanasamy Somasundaram
Guide to Operating the Bruker FT-IR Microscope I. Basic Spectrum Acquisition with Vertex 70
 Guide to Operating the Bruker FT-IR Microscope I. Basic Spectrum Acquisition with Vertex 70 Susheng Tan, Ph.D. NanoScale Fabrication and Characterization Facility, University of Pittsburgh SB60 Benedum
SUSS Mask Aligner. Purpose: To expose photoresist on a wafer using a photomask
 SUSS Mask Aligner Purpose: To expose photoresist on a wafer using a photomask Overview This SOP will go over how to use the machine for basic exposures. This will include commonly used controls and frequently
User Operation of JEOL 1200 EX II
 **Log onto Computer** Open item program Start Up Procedure User Operation of JEOL 1200 EX II 1. If scope is not running, locate an electron microscopy technician (EMT) to find out why not. 2. Turn up brightness
RENISHAW INVIA RAMAN SPECTROMETER
 STANDARD OPERATING PROCEDURE: RENISHAW INVIA RAMAN SPECTROMETER Purpose of this Instrument: The Renishaw invia Raman Spectrometer is an instrument used to analyze the Raman scattered light from samples
1. Preliminary sample preparation
 FEI Helios NanoLab 600 standard operating procedure Nicholas G. Rudawski ngr@ufl.edu (352) 392 3077 (office) (805) 252-4916 (cell) Last updated: 03/02/18 What this document provides: an overview of basic
AutoSeal FD 2006IL / FE 2006IL
 AutoSeal FD 2006IL / FE 2006IL FI / FJ Series 06/2018 OPERATOR MANUAL First Edition TABLE OF CONTENTS DESCRIPTION 1 SPECIFICATIONS 1 UNPACKING 1 SETUP 2 Sealer Alignment Base Setup 2 Sealer Setup 2-4
APPLICATION. General Instructions. Maintenance and Cleaning. Removal. Shelf Life, Storage and Shipping. 2 Product Bulletin ixc
 APPLICATION Note: For graphics larger than poster size, we recommend contacting a professional graphics installer for assistance. General Instructions Please review the General Instructions and Method:
Basic Operating Instructions for Strata Dual Beam 235 FIB/SEM
 Basic Operating Instructions for Strata Dual Beam 235 FIB/SEM Warning Always adjust your specimen height before closing the chamber door to make sure your specimen will not hit the bottom of the lens;
Ocean Optics R-2000 Raman Spectrometer Setup and Operating Instructions Arlen Viste and Deanna Donohoue April 2000 Update 2003, DEW
 Ocean Optics R-2000 Raman Spectrometer Setup and Operating Instructions Arlen Viste and Deanna Donohoue April 2000 Update 2003, DEW References Raman Systems R-2000 Operating Manual, Version 1.6, Ocean
Zeiss AxioImager.Z2 Brightfield Protocol
 Zeiss AxioImager.Z2 Brightfield Protocol 1) System Startup Please note put sign-up policy. You must inform the facility at least 24 hours beforehand if you can t come; otherwise, you will receive a charge
HP Color LaserJet CP3525 Series Manage and maintain
 Load paper and print media Load Tray 1 1 Open Tray 1. CAUTION: To avoid jams, never add or remove paper from Tray 1 during printing. 2 Fold out the tray extension to support the paper and set the side
SHUFFLE KING 8. User manual. 1 to 8 deck shuffler.
 SHUFFLE KING 8 1 to 8 deck shuffler User manual www.casinoshuffler.com The product is in conformity with requirements of the EMC Directive 2004/108/EC, with reference to electromagnetic compatibility.
University of MN, Minnesota Nano Center Standard Operating Procedure
 Equipment Name: Atomic Force Microscope Badger name: afm DI5000 PAN Revisionist Paul Kimani Model: Dimension 5000 Date: October 6, 2017 Location: Bay 1 PAN Revision: 1 A. Description i. Enhanced Motorized
For rapid-prototyping and production of low volume, low cost plastic objects.
 3D Printer Standard Operating Procedure Jonathan M. Cabot 10 January 2016 For rapid-prototyping and production of low volume, low cost plastic objects. 1.0 Material Requirements 1.1 Equipment needed for
User's Manual. For the latest information on this machine (including manuals), see the DGSHAPE Corporation website (
, see the DGSHAPE Corporation website (") User's Manual For the latest information on this machine (including manuals), see the DGSHAPE Corporation website (http:// www.dgshape.com/). Thank you very much for purchasing this product. To ensure
User's Manual For the latest information on this machine (including manuals), see the DGSHAPE Corporation website (http:// www.dgshape.com/). Thank you very much for purchasing this product. To ensure
LSM 800 Confocal Microscope Standard Operation Protocol
 LSM 800 Confocal Microscope Standard Operation Protocol Turning on the system 1. Switch on the Main switch (labeled 1 and 2 ) mounted on the wall. 2. Turn the Laser Key (labeled 3 ) 90 clockwise for power
TEMScripts Auto Image Measurement (Pattern) Manual. TEMScripts LLC. Last updated: 12/5/2016
 Manual. TEMScripts LLC. Last updated: 12/5/2016") TEMScripts Auto Image Measurement (Pattern) Manual TEMScripts LLC. Last updated: 2/5/206 Close Digital Micrograph TS EasyMetro Installation Copy following files to \\Gatan\DigitalMicrograph\PlugIns (normally
TEMScripts Auto Image Measurement (Pattern) Manual TEMScripts LLC. Last updated: 2/5/206 Close Digital Micrograph TS EasyMetro Installation Copy following files to \\Gatan\DigitalMicrograph\PlugIns (normally
F410 QUICK-START GUIDE
 F410 QUICK-START GUIDE PLEASE READ THIS DOCUMENT BEFORE OPERATING YOUR PRINTER Revision 3-5/4/18 Page 1 1. Table of Contents 1. Table of Contents... 2 1. Introduction & Getting Support... 3 2. What s in
Operating Procedures for MICROCT1 Nikon XTH 225 ST
 Operating Procedures for MICROCT1 Nikon XTH 225 ST Ensuring System is Ready (go through to ensure all windows and tasks below have been completed either by you or someone else prior to mounting and scanning
ENSC 470/894 Lab 3 Version 6.0 (Nov. 19, 2015)
") ENSC 470/894 Lab 3 Version 6.0 (Nov. 19, 2015) Purpose The purpose of the lab is (i) To measure the spot size and profile of the He-Ne laser beam and a laser pointer laser beam. (ii) To create a beam expander
ENSC 470/894 Lab 3 Version 6.0 (Nov. 19, 2015) Purpose The purpose of the lab is (i) To measure the spot size and profile of the He-Ne laser beam and a laser pointer laser beam. (ii) To create a beam expander
Xyron Professional 2500 Laminating System
 Xyron Professional 2500 Laminating System Instruction Manual Provided By http://www.mybinding.com http://www.mybindingblog.com U S E R S G U I D E 2500 Adhesive Application & Laminating System The XM2500
Epson Stylus Pro QUICK REFERENCE GUIDE
 Epson Stylus Pro 11880 QUICK REFERENCE GUIDE Printer Parts Front Roll paper spindle Roll paper cover Roll paper holder Left ink bay Paper lever Control panel Ink bay lights Ink cover button Right ink bay
Installing a 3 Indexer: Desktop Tools
 888-680-4466 ShopBotTools.com Installing a 3 Indexer: Desktop Tools built after October, 2012 Copyright 2016 ShopBot Tools, Inc. page 1 Copyright 2016 ShopBot Tools, Inc. page 2 Table of Contents Overview...5
ES-400/ES-500W/ES-500WR User's Guide
 ES-400/ES-500W/ES-500WR User's Guide Contents ES-400/ES-500W/ES-500WR User's Guide... 7 Scanner Basics... 8 Scanner Parts Locations... 8 Scanner Parts... 8 Scanner Buttons and Lights... 11 User Replaceable
Signet 2610 Process Optical Dissolved Oxygen Sensor
 Signet 2610 Process Optical Dissolved Oxygen Sensor *3-2610.090* 3-2610.090 Rev. A 04/12 English Operator's Manual Introduction System Description Your new RDO Pro is a rugged, reliable sensor designed
A process for, and optical performance of, a low cost Wire Grid Polarizer
 1.0 Introduction A process for, and optical performance of, a low cost Wire Grid Polarizer M.P.C.Watts, M. Little, E. Egan, A. Hochbaum, Chad Jones, S. Stephansen Agoura Technology Low angle shadowed deposition
Lindberg/Blue 3-Zone Thermal Oxidation/Anneal Furnace (Model STF55366) Operating Instructions
 Operating Instructions") Lindberg/Blue 3-Zone Thermal Oxidation/Anneal Furnace (Model STF55366) Operating Instructions This tool is to be used by authorized personnel only. For training & consultation contact: Manager, Omid Mahdavi,
Lindberg/Blue 3-Zone Thermal Oxidation/Anneal Furnace (Model STF55366) Operating Instructions This tool is to be used by authorized personnel only. For training & consultation contact: Manager, Omid Mahdavi,
EXPERIMENT # 3: Oxidation and Etching Week of 1/31/05 and 2/7/05
 EXPERIMENT # 3: Oxidation and Etching Week of 1/31/05 and 2/7/05 Experiment # 3: Oxidation of silicon - Oxide etching and Resist stripping Measurement of oxide thickness using different methods The purpose
Table of Contents. Chapter 1: Software Installation...1. Chapter 2: Running the Software II. Daily Practical Operation...10
 Product Manual Table of Contents Chapter 1: Software Installation.................................1 Chapter 2: Running the Software............................... 2 I. The Initial Defining in Lock Management
Thread Painting. First Flowers
 Thread Painting First Flowers Supply List 1. Background fabric (1) 8 x10 piece of blue batik or tone-on-tone 2. Stabilizer (2) 8 x8 pieces of clear water soluble stabilizer film such as 4X by Superior
UV-Vis-NIR Spectrophotometer Quick Start Guide
 UV-Vis-NIR Spectrophotometer Quick Start Guide The following instructions are provided as a Quick Start Guide for powering up, running measurements, and shutting down the Lambda 950 UV-Vis Spectrophotometer.
Applications Engineering Notes
 Applications Engineering Notes Document Title Document Number 24 Fiber MTP Brand Connector Installation Onto Multimode or Single-mode 3.0 mm and 3.6 mm Jacketed Round Cable With Stranded or Bundled Loose
Intro to 3D Printing. Anatomy of the Printer. Intro to 3D Printing & Certification imagine create learn grow
 Intro to 3D Printing 3D printing is a process of additive manufacture, this is where layers upon layers of material are built up to create a three dimensional object from a digital design. The 3D printer
CHA ELECTRON BEAM EVAPORATOR SYSTEM OPERATING MANUAL Version: 2.0 August 2016
 CHA ELECTRON BEAM EVAPORATOR SYSTEM OPERATING MANUAL Version: 2.0 August 2016 UNIVERSITY OF TEXAS AT ARLINGTON Nanotechnology Research Center TABLE OF CONTENTS 1.0 DESCRIPTION.... 3 2.0 SAFETY....... 3