John Worley. Instructors Notes. Improving our Digital Photographs Session 1
|
|
|
- Erik Payne
- 6 years ago
- Views:
Transcription

1 Instructors Notes Slide actions are described in these notes as well as additional comments and information: <C> = Click on Slide Advance button. Actions follow the symbol and are enclosed in parentheses. Improving our Digital Photographs Session 1 Photography is both a bit of a science and a bit of an art. <C> (Red text on glass ball appears. Black text appears after 1 second) Read new text as it appears. The science side is understanding what we thought we saw and capturing that image. The art side is recognizing the feeling you want the photo to evoke and capturing that image. Notes: This photo was taken at the Chihouly Art Glass exhibit at the Dallas Arboretum in October of The flowers provide a visual base to the photo and provide scale for the glass balls. (No, they aren t marbles. They re that big!) Without the text, the photo is not well balanced. The large ball is too near the edge and (sort of like gravity with a teeter-totter) the eye us drawn to the heavier area. Additionally, the large ball falls on the Rule of Thirds line. This draws the eye to it also, providing a great backdrop for the important text. The dark leaves in the upper right add visual weight (in the form of a negative space) to the left side. Placing the white text there helps balance the overall image. 1
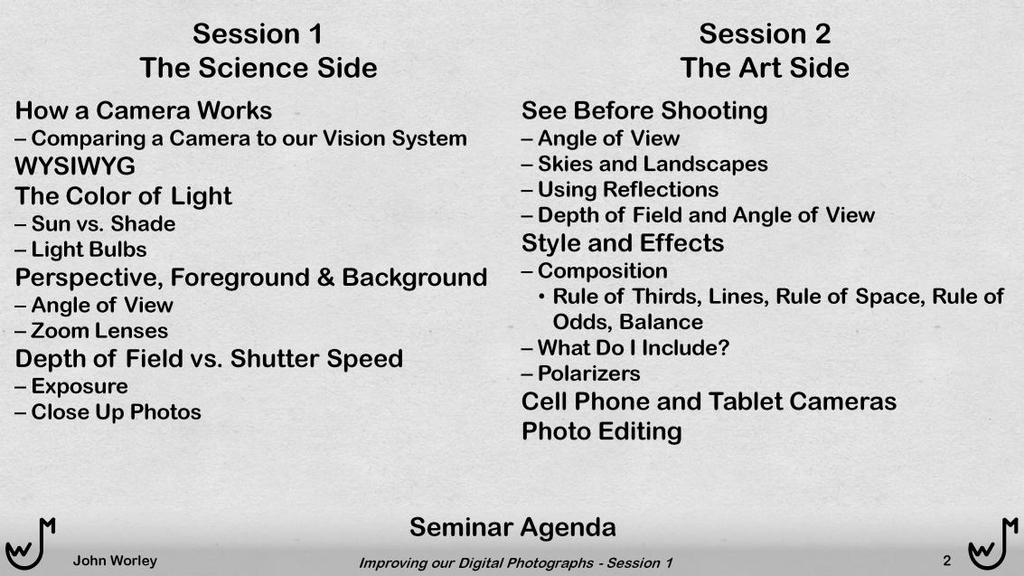
2 2

3 I group photos into 1 of 4 categories, depending on what I expect to capture with the image. The category allows me to concentrate on the aspects important for that type of photo. The first aspect to consider is the camera settings like resolution. In my case, I have plenty of memory in my camera and download images regularly. Therefore I set my camera for the highest resolution and image quality. That results in the largest file size with the fewest images possible available to be stored. However, many people using cell phone and small cameras keep all photos on them to show. Using less resolution and image quality will make much smaller files size and allow many more images to be stored, and the quality loss will not be noticeable on the device screen. In this case, I recommend switching to better settings if you think that some of the next images might be downloaded. In most cases, the automatic settings for focusing, color balance, and exposure are fine. However, for what I call Forensic photos, we want to capture details accurately and we might need to control the camera s color balance, exposure, and even focus and f-stop. Also for Forensic photos, to accurately capture the image, we want to pay close attention to our perspective, the location and type of the light source, and the composition of the photo. For Photos That Tell a Story, we are trying to capture the feelings we felt when we first saw the scene. We want to highlight the subject while looking for ways to minimize any distractions. This is where Art Theory will be useful. The key to these photos is to be very observant and use your imagination to capture a great image. As these image have a good chance they will be shared as prints or on a PC, using higher resolution and quality is probably best. 3

4 Most of the photos that we take are Record shots capturing a moment in time to remind us of a happy time whenever we later see the photo. Forensic accuracy is generally not required a little color shift, a little error in visual perspective, or even being a little too bright or dark doesn t ruin the image for us (as long as the problems are not too distracting). Using medium resolution and JPEG quality give a small file size, allowing us to fit more images on our camera or phone. However, as the other types of photos are best taken with the highest setting, if memory space allows, it would be easier to leave the highest setting rather than remembering to reset things later. Generally, the full automatic settings for focus, aperture, shutter speed, color balance, and ISO will be fine for Record shots. This minimizes the technical thinking required, allowing us to concentrate on the artistry in the image. Look carefully and move around to remove any distractions and consider how much of the area to include to set the lens zoom. The final category is Artistic photos. We might want to capture the beauty of the sunlight on and through a flower or the emotion of an event; we might use it as the desktop background on our PC or make a print for the hallway wall. The image of the mesas in the upper right was taken to use to make a quilt pattern, edited on my PC to create the line drawing below it. High resolution and JPEG quality are more important than a small file size. Accurate colors are very important, so we might need to play with the camera color balance setting. Generally, we want a very simple image so nothing distracts from the subject or emotion. The depth of field, point of focus, angle of view, and even shutter speed must be considered. Or am I too technical to think artistically? 4

5 We will begin with a few minutes on how a camera works, how our vision works, and how those two things interact with each other. But first, a few memories of cameras from my past: Upper left photo left to right: My parent s old camera oh do I remember facing the sun, trying not to squint. Two cameras that I collected My first Pocket 110 camera with an electronic flash I added. I had a 2X Tele-converter to clip over the lens. I kept one Flashcube for emergencies and found I could use the flash extender with a used Flashcube to get a slower shutter speed for lower light conditions. Upper right photo: Some of the filters I still have from my SLR film camera days. Lower photo right to left: My Nikon Pronea S a SLR camera that used the same lenses as my big SLRs, but uses the APS film (about the size of the old 110 film, but with a recording strip to store camera settings to improved developing and printing). The memory card from my first digital camera. Remember when 128 MB was a LOT of memory? My second digital camera Canon A70. I also got an attachment that allowed filters to be screwed directly to the camera and I got a 3X Tele-converter that screwed on also. My first SLR film camera Nikormat FT3 and electronic flash for that camera ( middle rear). 5
, the wave speed slows down.")
6 Ф 1 Ф 2 Ф 1 Apparent Path Actual Path A Little Theory Light radiates from a source in waves, like ripples on a pond when you toss in a rock. The direction of travel is perpendicular to the wave crests. When light waves cross from air to any material (water, glass, etc.), the wave speed slows down. The slower wave speed results in the wave crests getting closer together inside the material as shown in the figure at the left. The offset in the optical path as our brain assumes the light ray is straight results in an optical illusion. The basic principles of how a lens creates an image can be demonstrated from the discussion above. An image is formed when light rays are forced to converge (focus), as shown on the slide. The lens provides this effect. The figure at the left shows a simplified diagram of the very top a lens. Invert this for the bottom half, and you see the basics. (Actually, a lens is a smooth curve rather than flat as shown in this example.) The distance from the lens to the image increases as the object is closer to the lens. Object Image Object Object Object 6
 and closes more in brighter light (to block some light to prevent overloading the retina).")
7 The camera lens has a sheet with a variable sized opening between the lens and the sensor. The iris in our eyes opens more in lower light (to let more light in) and closes more in brighter light (to block some light to prevent overloading the retina). The camera iris is often used for the same purpose. However, the diameter of the iris also controls how much of an area (in front of and behind the point of focus) is in good focus. A large diameter iris (lets in more light in lower light situations, but) gives only a small region of good focus around the point of focus. A small diameter iris (blocks more light in brighter light situations, but) results in a large region of good focus around the point of focus. Areas beyond this region of good focus range from nearly in focus to completely blurred. If the background is distracting, choosing a large iris (low f-stop number) will reduce the Depth of Field, forcing the distracting background out of focus. 7

8 The camera has a curtain assembly (shutter) that can open and close very fast and stay open as short or long as needed. A fast shutter speed helps freeze motion and reduce blur due to camera shake, but requires a bright scene to get enough light to the sensor while the shutter is open for a good exposure. The camera ISO setting controls the sensor sensitivity to light like ASA100 and ASA400 speed film. A high ISO setting allows a lower light scene to be photographed with a faster shutter speed and/or smaller iris (more depth of field), but can result in a grainy image (like ASA400 speed film). A low ISO setting requires a bright scene or slow shutter speed for a correct exposure, but provides a grain-free image. A very fast shutter speed is needed to try to capture the image of a hummingbird. In the shade of the Colorado forest using Automatic settings, the camera chose a slow shutter speed, resulting in a blurred image. To truly capture the wings of a hummingbird requires a shutter speed even faster than my camera allowed. Professionals usually use a very fast electronic flash unit. 8

9 The brightness of the recorded image is determined by these 3 factors: f-stop, Shutter Speed, and ISO setting. These controls interact so that increasing one while decreasing another can result in the same exposure but different Depth of Field and Shutter Speed. Cameras have preset shooting modes for certain situations. The Sports Mode uses a fast shutter speed, usually requiring a larger Iris (low f-stop number), resulting in a shallower Depth of Field. Portrait Mode uses a shallow Depth of Field to highlight the face and alters the 9

10 Most cameras have a menu options controlling Image Resolution and JPEG Quality. Using lower settings will reduce file size considerably at a tradeoff of a more fuzzy image. Neither the visible distortion nor the file size reduction is really linear, so it is a bit of a trial and error to find an acceptable tradeoff between small files and visible distortion. Unless the number of pictures that can be stored is a problem, I suggest using the highest quality. Resolution is the number of Picture Element (Pixels or dots) per square inch - the graininess of the image. Higher Resolution images can be enlarged more than lower ones and still look good. In the top row of photos, the low resolution image is acceptable at low magnification. I took the same photo at high, medium, and low resolution. Notice the image quality difference as the small area is enlarged. What if you found something of interest (perhaps a butterfly the size of one of the leaves) in the image and you wanted to enlarge that area? You would want to have the high resolution image to work with. This is also true in editing images. If you save an image in low resolution (for a smaller file size) and then increase the image to a higher resolution, the image will be fuzzy (and the file will not be as large as the original. This fuzziness will also show up if you start with a taken photo with a low resolution and increase the resolution with a photo editor. If possible, always take photos at the highest resolution. And Always save the original image file somewhere and work on a copy of it. JPEG Quality is a figure that represents the amount of file size compression used (100% = no compression = large file size; 10% = lots of compression = very small file size) Lower JPEG Quality artifacts show up as brighter and darker fringing (sort of like a target) around areas with a lot of contrast difference (bright to dark transitions) and blockiness in areas where colors slowly change. 10
 and an adjustable lens to fine tune the image Sensor to capture the image and transfer it to memory")
11 In many respects, a camera simulates our own vision system. After all, the camera is trying to capture the image that we think we see. Both our vision system and a camera consists of: Fixed lens (element to do most of the focusing) and an adjustable lens to fine tune the image Sensor to capture the image and transfer it to memory for processing Adjustable aperture that opens and closes some to control how much light reaches the sensor A camera sensor has light receptors evenly spaced across the field of view. The light receptors on the retina in our eye are very densely packed in the very center. This HD Spot (as I call it) allows us to concentrate our attention in a small detail area and still pay reasonable attention elsewhere in the field of view Your brain automatically commands your eyes to center your vision on whatever it decides to concentrate upon. That area is seen with much more detail than the rest of the field of view. This visual separation can block us from noticing elements of the image that can be distracting to a different viewer. You need to be aware of the effect of this HD Spot and look around the frame for distractions after you identify the subject. It sounds obvious to note, but we have 2 eyes and (most of) our cameras only have 1 eye. Our brain uses the angle between the lines of sights of our eyes as they focus on an object to estimate the distance to that object depth perception. This also provides us with a degree of visual separation between the subject and the rest of the scene that might not be captured by the camera. 11
 to use. Or on some cameras, we can manually focus it ourselves. Neither of these options are convenient or fast to accomplish.")
12 Our vision system focuses on the object in our HD Spot. A camera s autofocus feature will focus on object that are in one or more of the fixed areas around the frame. On many cameras, using menus, we can select which spot(s) to use. Or on some cameras, we can manually focus it ourselves. Neither of these options are convenient or fast to accomplish. It will take some forethought to set up the shot. Cameras have a similar automatic exposure system. The sensor (and internal computer) can open or close more the iris, open the shutter longer or shorter, or adjust the sensor sensitivity. The primary difference is that (using menus or controls) we can intentionally overexpose or underexpose the image. The pupils of our eyes automatically open or close more to get enough light to the retina without letting in too much and causing damage. In dim light, the pupil opens up more to let in more light. As we noted earlier. The larger pupil has less depth of field. It is often difficult to find an object as we scan around a darkened room. In this case, we usually squint our eyes. This smaller effective opening increases our depth of field. We are trading off a little less light for more depth of field. Besides the pupil opening and closing, the fluid in our eyes darkens in bright light and clears again in low light. This process takes a few moments, causing eyestrain as we enter a bright area. Also, when we enter a dark area, we can t see much until the fluid clears again. 12
.")
13 Both the sensors in our eyes (called Cones on the retina) and in a camera are made of individual light sensors; and these sensors come as red, green, and blue receivers. Each sensor is sensitive to a range of colors. We have more green sensors than the red and blue ones. This allows us to see more details in greens (leaves, grass, etc.). Cameras have 2 green sensors for each red and blue in a set of 4. Some women have 4 color sensor types 2 different green sensors. They can recognize more detail in greens that the rest of us; and also images on TVs and PCs appear less realistic to them than the rest of us. (They are used to more green detail than the 1 green can create.) Our color sensors do not work well in very low light. We have a fourth type of sensor (call Rods) that only works in low light. They are most sensitive to the yellow color of moonlight and are more dense along the edge of our field of view. Our brain uses certain color clues to adjust the colors that (we think) we see to reduce distractions as we move between light sources. Outdoors in the sun, a white ball looks white; in the shade, it looks slightly blue; indoors under incandescent light, it looks slightly yellow; and under fluorescents, it appears slightly green. However we do not see those color changes. Without Color Balance Correction, a camera will indeed capture those color differences. Cameras have a variety of color correction settings. This color correction in our brain is just one of many Image Processing shortcuts our brain employs regularly. These shortcuts allow us to recognize the image and take any actions required very fast ( fight or flight ). Other shortcuts range from recognizing what shape or perspective that is there (and making us believe that is what we see) to noting only (what it decides are) the most important aspects of the image (and having us ignore the details ). The camera will capture those details that our brain ignored. 13

14 Signs are generally intended to inform or warn us. All of these photos except the bee were taken on a fall vacation touring the national parks in Colorado, Utah, Arizona, and New Mexico a few years ago. The bee was on a tree in my front yard. We are going to look at a series of photos that represent what we saw compared to the image we took. On a computer, we use the term WYSIWYG (wiz ee wig) = What You See Is What You Get. 14

15 Optical Illusions are based on the Image Processing shortcuts our brain employs. So this is a good place for us to begin our quest to understand what we thought we saw and capture that image. 15

16 When I looked at the Iris and the 2 quilts, at the time they appeared to me like the top photos. The sun was out in a blue sky with only a couple of clouds for both of the top photos. I took the photos below them a few minutes later as the sun was hid behind a small, dark cloud. Notice the difference in the color balance. No difference was obvious at the time. In the top photos, direct yellow sunlight as well as blue skylight illuminated the area and the yellow and blue balanced to provide white light. In the bottom photos, the small, dark cloud blocked the direct yellow sunlight and the area was illuminated by only the blue skylight. The blue light canceled the yellows in the flower and the quilt. The white garage door (behind the quilts) has a blue tint. Even the green leaves (behind the flowers) have a blue-green tint. This blue-yellow shift (sun vs. shade) is easily corrected with most photo editing programs. (Of course, it is a lot easier when you can hold the laptop next to the garage door to match the color.) 16
, and the imaged ends up too dark. Most older cameras use the Average Metering.")
17 These photos all have exposure problems, and represent a very common issue for photographers. In the left photos, most of the area is white snow and sky. The camera meter will either: Try to make the average brightness of the scene middle grey (like grey shirt cardboard), and the imaged ends up too dark. Most older cameras use the Average Metering. Or try to make the average of the darkest and whitest areas average to middle grey. The image will still be too dark, but not as much so. Most newer cameras use the Matrix Metering. The quilt photos were all taken in Fully Automatic mode with Flash. In the 2 quilt photos in the center, the black quilt caused the camera to brighten the image while the white quilt caused the camera to darken image. Note the difference in brightness of the backdrop curtains in the bottom pair of photos. The quilt photos on the right are a simple mistake. In the bottom photo, my thumb was covering the flash and the camera didn t have enough light. 17
.")
18 These photos represent our excitement to capture an image causing us to miss some distractions. In the top left photo, I rotated the image slightly and covered the light pole with a piece of sky (to simulate what I saw actually, what I didn t see). In the top right photo, I copied areas of the grass to cover the car and street that my student missed. 18

19 Another shortcut our brain takes is with perspective. The part farther away appears smaller. When you look at a quilt, your brain knows it is rectangular, so it ignores the taper in the bottom photo. Unless you force yourself to compare the quilt edges with the camera frame, you don t notice that you are off center. In the right photos, you tend to ignore the perspective issue caused by fact that the building roof angles back and away to the left. The most obvious choice is to level the roof (bottom photo) rather than making the windmill vertical (top photo). 19

20 There are times that Fully Automatic needs a little help. In the forest, the shade forced a slow shutter speed. (I might question my camera s design here. I feel that it should have increased the ISO some so the shutter speed wouldn t be so slow.) Even though I wanted to stay as Automatic as possible, I increased the ISO to the highest setting possible while I chose a low f-stop number (large aperture with a small Depth of Field) so that the shutter speed would be the highest possible. If you want to freeze a hummingbird s wings in flight, it takes a shutter speed faster than almost any camera made. The bright light on the redbud tree forced a high f-stop number (small aperture with a large Depth of Field), resulting in the background becoming a distraction. Instead of forcing a low f-stop number to minimize the background, I could have put Neutral Density filters (dark glass) in front of the lens to force a high f-stop number. 20

21 The left pairs of photos are related to the use of the camera flash. A student brought me the bottom photo, asking where the shadow came from. The location of the flash relative to the lens on the camera. (This will be explained later.) Obviously you won t see the location of any flash shadows before the shot, but you can predict them and try to hide them. The close-up of the quilting shows the different effect that side light provides to show texture. The front flash shot shows no texture. (This will also be explained later.) Think about what you might do with the photo before you take it. Common photo print sizes are narrower than most cameras, so the left and/or right sides get cropped. In this case, you shouldn t zoom in so close to allow room to crop for the print. Wide-screen displays are wider than most cameras, so the top and/or bottom gets cropped rather than the left and/or right. 21

22 Autofocus can sometimes be a headache. The camera has fixed locations around the image where it will focus. Without a manual focus capability, it can be like a game of cat and mouse to get the image you want. This camera had no manual focus capability. I wasn t acquainted enough to search through the menus to find how to select only a single focus location around the image. So I tried the press the shutter halfway down, recompose the image, and press the rest of the way down approach. It was a new camera and a very fine difference between halfway down and fully down requiring a lot more practice than I had. So I got about 10 photos focused on the background for each photo focused on the flower of interest. (What a pain!) 22

23 Light sources come in many colors and tints. Under a blue sky in the sun, the colors are true. Under an overcast sky, the colors are also true. Under a blue sky in the shade, the colors are bluish. Under an incandescent light, the colors are yellowish. Under a fluorescent light, the colors are greenish. 23

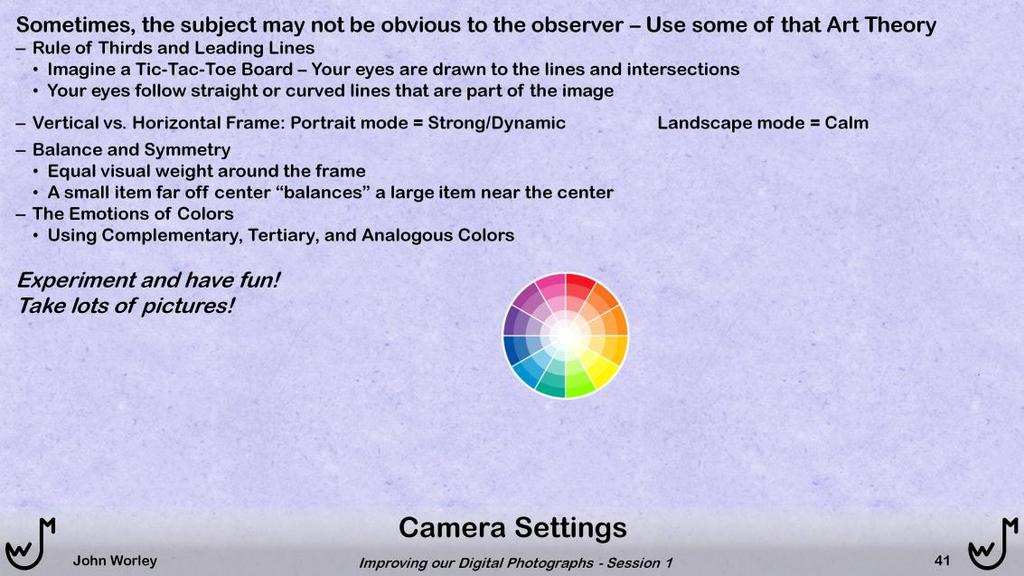
24 The light leaving the sun is white it contains equal amounts of all colors. When reaches the earth s atmosphere, the sunlight strikes ozone atoms in the upper levels. Some of that sunlight is reflected off the atoms and bounces around the sky. Due to the size of the ozone atoms, mostly blue light is affected. We see the blue light bouncing around an therefore the sky looks blue. In photos from the Moon and Mars, the sky is black (and stars are even visible) due to the lack of atmosphere to bounce light around. When blue is removed from white light, the remaining light appears yellow. Therefore, direct sunlight looks yellow. So, objects illuminated by both direct sunlight and skylight will photograph with true (or almost true) colors. Shaded objects are missing the direct yellow sunlight and will photograph with a bluish tint. This is demonstrated in the photos of the goose. A shaded area of the tile was selected (left). I brightened that area to the same level as the rest of the tile (center), showing the bluish tint. I added yellow (right), showing the bluish tint is gone. The bottom example shows a similar process with a flash photo. The shadow created by the location of the flash relative to the witch s hat, is selected (left) and brightened to match the rest of the backdrop (center). Notice the yellow tint. With the shadow area created by the hat blocking the flash, that area was illuminated by the ambient room incandescent (yellowish) light. These color shifts will be captured in our photos. Most can be corrected with Photo Editing software, if necessary. Cameras have a variety of color correction selections available in the White Balance settings. 24

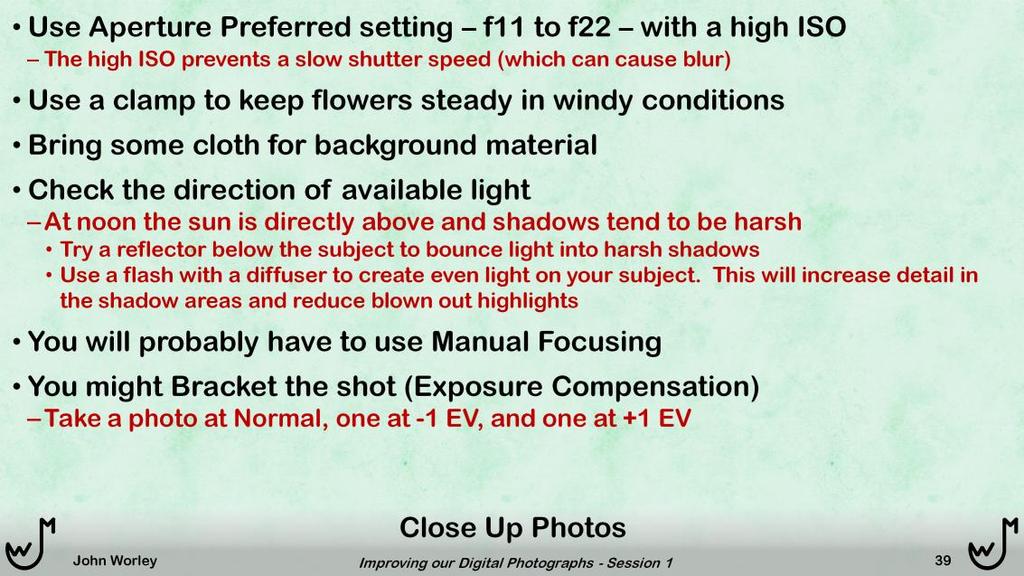
25 Color issues like on the last slide are, as noted, easily fixed on the PC or with the camera s settings. However, all too often, the various areas of the scene are illuminated by different light sources. These are much more difficult to fix, and generally some tradeoffs will have to be made. The drawings at the bottom represent the light spectrum for the various sources. (The background color shown for each source is an exaggeration of the actual color.) In the top row of quilt photos, the camera flash illuminated the quilt and backdrop, but the ambient room lights illuminated the ceiling. You can see some lights with a bluish tint probably quartz, some with a yellowish tint incandescent, and some with a greenish tint fluorescent. The camera flash provided a good color representation for the quilts. These images were cropped down to show just the quilts for presentation. The photo in the center has a section in full sun (too bright in this exposure), part sun (brightness about right and fair color), part shade (brightness about right but slightly bluish), and deep shade (dark, of course, but quite bluish). There is not (simple) way to correct the problems. Using fill flash (flash set at less than full strength, used to provide a little light into the shaded areas) or using a large white or foil reflector to add sunlight to the shaded areas are perhaps the best way to handle a situation like this if you want to go to the trouble. The photo in the lower left shows the color shift among the same type of trees up close and in the distance. The trees on the hillside in the distance have a definite bluish/violet tint as compared to the foreground tree. (Think purple mountain s majesty.) Light that comes from the distant trees bounces off of the atmosphere between there and here. While sunlight reflects off ozone atoms, making the blue sky. The atmosphere down here affects the purples and blues mostly. 25

26 The Killdeer image is a digital photo of a 8 x10 print. I laid the print on the living room floor, under the incandescent lights, and took the left digital photo. The original on the floor looked normal at the time. I downloaded the image and used a photo editor to correct the yellow tint. The editor told me to click on a gray area and it would correct everything. I had nothing gray so I clicked on the white rings around the collar. True gray has equal amounts of red, blue, and green. The editor looks at those values and alters the entire image to make those colors equal on the selected spot. Both black and white are grays. White has almost 100% of each color while black has almost 0% of each color. If the chosen spot was too white, the editor would have had more problems. A friend had taken the quilt picture at a Quilt Show (under fluorescent lights without flash) and was disappointed when she saw the color problems, primarily the lavender. She asked me if I could fix it. I had her give me a small piece of leftover lavender material. On close inspection, the whites looked fine, the face looked fine, and the colors in the needlework squares looked fine. Only the lavender off. (That is a common problem under fluorescent lights.) All attempts to correct the overall color balance resulted in problems in the whites and skin tones. Using my photo editor, I could tell it to choose all spots that were that particular (incorrect) lavender color and leave all the other spots alone. I then adjusted the red-green-blue balance for that color until it was correct. Remember, the problems were not obvious to the human eye at the time. Yes, if you looked at the image on the camera display, you would probably see the problems if you could enlarge it enough. 26

27 The angles involved in a photo wide angle to telephoto, distance to subject, etc. have a huge impact on the captured image. Unlike color balance, these are things that you can see before you take the photo. 27

28 Earlier, I noted that the perspective issues of not being square on to the subject are most often image processed to correct what we see. After all, we know that quilts are rectangular, so our brain ignores the tapering. If we concentrate, perhaps lining the edge of the quilt with the edge of the frame of the viewfinder, we will see that it tapers and isn t square. If we are off left, the top and bottom taper down to the right and vice versa for off right. If we are below center, the left and right taper down to the top and vice versa for above center. I am not saying to take every photo square on. However, when taking a Forensic Photo, you do probably want to be square on. I took the photo of the Columbine in front of the waterfall years ago with my first digital camera a point and shoot where the viewfinder was separate from the regular lens and sensor. Even the display didn t show the image after taking the photo. I lined the Columbine up in front of the dark spot to the left of the waterfall. But, the distance between the viewfinder and regular lens taken in conjunction with the Columbine being very close, led to the perspective error. I ended up with the right image. The left image was created by copying the flower and sections of the waterfall edge separately and carefully pasting them into the areas that I wanted them. The flower photos across the bottom show how different angles can change the photo. The translucence of the flower petals against the blue sky background provides good colors to affect our feelings. The tree branch background provides a sense of depth and presence. The head on rose photo has too much glare as well as shadow with no sense of depth. Either of the side views (the same rose cluster, by the way) avoid the contrast problems and provides a sense of depth and presence. 28

29 We saw these witch doll photos earlier. Here is where the flash shadow came from. In the landscape mode, the flash is above the lens. Shadows are formed below and behind objects. In this example, the only place for shadows to be seen are below the rim of the hat. In portrait mode, the camera is rotated on its side and the flash is beside the lens. Shadows are formed on the other side and behind objects. In this mode, shadows can be seen all along the opposite side of the doll. The front lighting from a camera flash is good for color rendition but it has several problems: It can hide any texture on the surface. It can glare off reflective surfaces. Red-eye is a form of glare off the blood veins in our eyes. Texture, like the puffy quilting, is much more visible when side lighted. In this case, a sky light in the ceiling above and to the left of the quilt provided the side light. This day had a clear blue sky, so the Note that the top-left of the little ghosts are bright and the bottom right are shadowed. If you don t have a skylight, a true color work lamp can be used. Finally, I included the full image (bottom right) to show how much detail can be seen, even from many feet away. The enlargement (side light) was cropped from this photo. Why do we get so close when we want to capture detail? 29

30 When taking a photo, most of us stand in one location and use the zoom lens to crop down to the area that we want. On this slide and the next, we will learn a few things about that habit. In each of these sets of photos, I stood in one location as I zoomed for the photos. The top left photo is with the lens at about the normal position and the top right photo is with the lens in the telephoto position. The bottom left photo is with the lens in the wide angle position and the bottom right photo is with the lens at about the normal position again. The center images are the areas noted by the yellow rectangle enlarged. Notice that when the center images are compared to the right images, that very little difference can be seen. Staying in the same location and using a zoom lens is (almost) the same as cropping and enlarging the image on a PC. The only real difference is in the number of pixels left. The center images above have considerably less resolution than the right images. But unless you plan to make a very large print, in all likelihood you won t see the difference. Many cell phone and tablet cameras and some less expensive point and shoot cameras do not have an optical zoom where the zooming is accomplished by moving some of the lens elements. These camera use Digital Zoom. (Some cameras have both, but each with limited range.) Optical Zoom uses all of the sensor area, maintaining full resolution. Digital Zoom uses a smaller area of the sensor when zoomed. This is the same as I did by cropping and enlarging the image on a PC. The zoomed image has less resolution and can appear grainy as compared to the unzoomed image. If you only have Digital Zoom, don t overuse it. You usually have better results cropping and enlarging the image on a PC. 30

31 On the previous slide, I stood in one location and used the zoom. On this slice, I moved forward and backward while I zoomed to keep the subject the same size. For the normal view in the left center, I chose a comfortable distance and set the lens to the normal setting. I noted how much of the field of view was taken up by the subject flowers. For the top photos, I moved closer to the subject and zoomed out to wide angle to fill the same amount of the field of view as the normal. Notice how the background has wider angle view. For the bottom view, I moved further back from the subject and zoomed in to telephoto to fill the same amount of the field of view as the normal. Notice in this case how the background has a narrower angle view. If the background is distracting, I might back up and use a telephoto setting to minimize how much of the background visible. If the background is pleasing, I might move in and use a wide angle setting to somewhat enhance the background. The photos on the right (and the bottom photo is covered by another photo in the above slide) show the same effect (moving and zooming) on a foreground object. 31
32 32

33 <C> An automatic camera can adjust the shutter speed, f-stop, and ISO setting to get the exposure that it determines to be correct. <C> The range of brightness from very dark to very bright situations is a huge range. No single control has that much range, so the camera uses a predetermined algorithm to decide what value to use. <C> If you go off fully automatic and set one of those settings to a particular value, the camera will (try to) adjust the other two controls to reach the exposure that it determines to be correct. <C> This table shows combinations of settings that result in the same exposure and notes the effect of each. <C> The bottom three photos were taken in rapid succession. The left photo used spot metering, using the side of the hill. Grass and leaves are middle gray green in that the brightness is the same as the camera wants to use. The center photo used center-weighted metering and the inclusion of some sky made the camera darken the image to reach it s preferred value. The right photo uses Matrix metering, checking the brightness in several zones around the frame, looking at bright spots and dark spots to determine exposure. (Don t assume that matrix metering will always work well.) <C> The metering method in a camera looks at whatever area selected (spot, center-weighted, matrix, etc.) and sets the controls to get Zone 5. 33

34 As we just noted, the camera will try to make the scene to be Zone 5 (middle gray). The upper-right rose, in front of a neutral background results in a good exposure on automatic. <C> The bottom-right pair of photos shows the result of a dark background. In order to make the overall scene Zone 5, the scene was brightened resulting in a dark gray background and overexposed rose. <C> The bottom-left pair of photos shows the results of a light background. In order to make the overall scene Zone 5, the scene was darkened resulting in a light gray background and underexposed the rose. Both can be fixed with a Photo Editor, but using the Exposure Compensation control can allow you to correct the exposure in the camera if you can estimate the needed correction. 34
 has the least area in focus (Depth of Field).")
35 In the example photos at the top, the area marked by the green rectangle is in good focus and the area marked by the red rectangles are in near focus. The larger aperture (smallest f-stop number) has the least area in focus (Depth of Field). Note that cameras preview with the aperture fully open, giving the brightest image for us to see, with the least Depth of Field to facilitate focusing. <C> The aperture or f-stop determines the range of area in front of and behind the focus point will be in focus. As seen, everything in that range is in focus, allowing us to preset the focus. The chart shows the near and far limits of good focus for two apertures focused a varying distances. Notice that more area behind the focus point is in good focus than in front. And note that at the narrow aperture (large f-stop number) has a point (marked by the green line) where everything behind the focus point and half the distance in front of the focus point are in good focus. There is no real need to focus beyond this Hyperfocal distance. <C> If you choose a f-stop that results in a slow shutter speed, you may need to adjust the ISO setting for a fast enough shutter speed to reduce blur from your shaking. <C> Generally a shutter speed of 1/125 second or faster will minimize blur fro m shaking. If your camera has a Vibration Resistant (or Vibration Compensating) lens, the shutter speed can be half that value or less. 35
 reduces the Depth of Field, forcing the background out of focus. <C> The middle pair of images show the effect of low light on shutter speed.")
36 The top pair of images show the effect of f-stop on a scene. The bright sunlight resulted in a small aperture (large f-stop number) with a large Depth of Field, and the background becomes distracting. Forcing a large aperture (low f-stop number) reduces the Depth of Field, forcing the background out of focus. <C> The middle pair of images show the effect of low light on shutter speed. The dark forest resulted in a slow shutter speed, even at the largest aperture. Setting the ISO to the fastest value resulted in a much faster shutter speed. Almost fast enough to freeze the wings. I must add that the fast ISO setting can result in a slightly grainy image. <C> The bottom pair of images show the result of intentionally forcing a slow shutter speed on moving water. Even on automatic, holding dark filters in front of the lens will slow the shutter speed. 36

37 The top-left photo was taken with a point and shoot digital camera from about four feet away. <C> The bottom-left photo is an enlargement. Stepping back and zooming in resulted in a narrower angle of view, with just enough background to give a good sense of presence in the tree. <C> The right pair of images are the result of moving in, using a wider angle lens, giving less Depth of Field, forcing the background well out of focus. <C> In those right images, the caterpillar is parallel to the lens, so it is easy to get the entire caterpillar in focus. The bottom-center photo head on (I hope do you know which end is the front?) shows how small the Depth of Field really is. 37

38 The small Depth of Field in close ups makes focusing difficult. A tripod can help those of us who can t help rocking back and forth. And often in auto focus mode, the camera can just see saw in an d out trying to focus. <C> Find an angle where the subject is parallel to the face of the lens. <C> The top-right image was taken from about three feet away, zoomed in, and has significantly more Depth of Field than the center-right image taken from maybe a foot away. <C> The bottom-right pair of images also show the shallow Depth of Field in close ups. I was on fully automatic and could not get the near and far flowers in focus at the same time. I should have forced a small aperture (large f-stop number). <C> The bottom-left pair of images show how I use the shallow Depth of Field in close ups to keep the viewer in the frame. The out of focus top edge makes the eye move back down. 38
39 39
40 40
41 41

42 We started with the question as to whether we could trust what we (think we) see. In order to speed things up as much as possible, we really only see the what our brain perceives as significant and fills in the rest of the details itself. This can lead to many of the Optical Illusions. Birds do not represent a threat (except to Alfred Hitchcock), so we typically glance over them. It takes a lot of study to see all of the birds. 42
CAMERA BASICS. Stops of light
 CAMERA BASICS Stops of light A stop of light isn t a quantifiable measurement it s a relative measurement. A stop of light is defined as a doubling or halving of any quantity of light. The word stop is
These aren t just cameras
 Roger Easley 2016 These aren t just cameras These are computers. Your camera is a specialized computer Creates files of data Has memory Has a screen display Has menus of options for you to navigate Your
Introduction to camera usage. The universal manual controls of most cameras
 Introduction to camera usage A camera in its barest form is simply a light tight container that utilizes a lens with iris, a shutter that has variable speeds, and contains a sensitive piece of media, either
Photography Help Sheets
 Photography Help Sheets Phone: 01233 771915 Web: www.bigcatsanctuary.org Using your Digital SLR What is Exposure? Exposure is basically the process of recording light onto your digital sensor (or film).
A Beginner s Guide To Exposure
 A Beginner s Guide To Exposure What is exposure? A Beginner s Guide to Exposure What is exposure? According to Wikipedia: In photography, exposure is the amount of light per unit area (the image plane
TAKING GREAT PICTURES. A Modest Introduction
 TAKING GREAT PICTURES A Modest Introduction HOW TO CHOOSE THE RIGHT CAMERA EQUIPMENT WE ARE NOW LIVING THROUGH THE GOLDEN AGE OF PHOTOGRAPHY Rapid innovation gives us much better cameras and photo software...
Failure is a crucial part of the creative process. Authentic success arrives only after we have mastered failing better. George Bernard Shaw
 PHOTOGRAPHY 101 All photographers have their own vision, their own artistic sense of the world. Unless you re trying to satisfy a client in a work for hire situation, the pictures you make should please
Understanding and Using Dynamic Range. Eagle River Camera Club October 2, 2014
 Understanding and Using Dynamic Range Eagle River Camera Club October 2, 2014 Dynamic Range Simplified Definition The number of exposure stops between the lightest usable white and the darkest useable
About Me. Randolph Community College Two year degree in Portrait and Studio Management Portraits, Wedding, Events Landscapes with boats - favorite
 About Me Randolph Community College Two year degree in Portrait and Studio Management Portraits, Wedding, Events Landscapes with boats - favorite Things Forgotten Check camera settings before each session
So far, I have discussed setting up the camera for
 Chapter 3: The Shooting Modes So far, I have discussed setting up the camera for quick shots, relying on features such as Auto mode for taking pictures with settings controlled mostly by the camera s automation.
TAKING GREAT PICTURES. A Modest Introduction
 TAKING GREAT PICTURES A Modest Introduction 1 HOW TO CHOOSE THE RIGHT CAMERA EQUIPMENT 2 THE REALLY CONFUSING CAMERA MARKET Hundreds of models are now available Canon alone has 41 models 28 compacts and
ACTION AND PEOPLE PHOTOGRAPHY
 ACTION AND PEOPLE PHOTOGRAPHY These notes are written to complement the material presented in the Nikon School of Photography Action and People Photography class. Helpful websites: Nikon USA Nikon Learn
Presented to you today by the Fort Collins Digital Camera Club
 Presented to you today by the Fort Collins Digital Camera Club www.fcdcc.com Photography: February 19, 2011 Fort Collins Digital Camera Club 2 Film Photography: Photography using light sensitive chemicals
Exposure settings & Lens choices
 Exposure settings & Lens choices Graham Relf Tynemouth Photographic Society September 2018 www.tynemouthps.org We will look at the 3 variables available for manual control of digital photos: Exposure time/duration,
Presented by Craig Stocks Arts by Craig Stocks Arts
 Presented by Craig Stocks Arts www.craigstocksarts.com 2010 by Craig Stocks Arts Basic camera settings for point and shoot cameras (resolution, quality) Resolution - how much can you enlarge a picture?
OUTDOOR PORTRAITURE WORKSHOP
 OUTDOOR PORTRAITURE WORKSHOP SECOND EDITION Copyright Bryan A. Thompson, 2012 bryan@rollaphoto.com Goals The goals of this workshop are to present various techniques for creating portraits in an outdoor
FOCUS, EXPOSURE (& METERING) BVCC May 2018
 BVCC May 2018") FOCUS, EXPOSURE (& METERING) BVCC May 2018 SUMMARY Metering in digital cameras. Metering modes. Exposure, quick recap. Exposure settings and modes. Focus system(s) and camera controls. Challenges & Experiments.
FOCUS, EXPOSURE (& METERING) BVCC May 2018 SUMMARY Metering in digital cameras. Metering modes. Exposure, quick recap. Exposure settings and modes. Focus system(s) and camera controls. Challenges & Experiments.
Photography Basics. Exposure
 Photography Basics Exposure Impact Voice Transformation Creativity Narrative Composition Use of colour / tonality Depth of Field Use of Light Basics Focus Technical Exposure Courtesy of Bob Ryan Depth
Intro to Photography. Yearbook Mrs. Townsend
 Intro to Photography Yearbook Mrs. Townsend To begin with Photography is about telling a story. Good photographers use an image to make a point without words. People remember pictures of events long after
AF Area Mode. Face Priority
 Chapter 4: The Shooting Menu 71 AF Area Mode This next option on the second screen of the Shooting menu gives you several options for controlling how the autofocus frame is set up when the camera is in
Autofocus Problems The Camera Lens
 NEWHorenstein.04.Lens.32-55 3/11/05 11:53 AM Page 36 36 4 The Camera Lens Autofocus Problems Autofocus can be a powerful aid when it works, but frustrating when it doesn t. And there are some situations
Name Digital Imaging I Chapters 9 12 Review Material
 Name Digital Imaging I Chapters 9 12 Review Material Chapter 9 Filters A filter is a glass or plastic lens attachment that you put on the front of your lens to protect the lens or alter the image as you
Buxton & District U3A Digital Photography Beginners Group
 U3A Group Lesson 7: Controlling exposure / focal length / perspective / composition for a better picture & Taking Pictures of people 3 December 2013 Programme Buxton & District 19 September Exploring your
Love Your Camera (Introduction to D-SLR)
") Love Your Camera (Introduction to D-SLR) Photography Workshops and Tours in New York City Phone: (646) 736-3231 Email: info@rememberforever.co Web: www.rememberforever.co Copyright 2009-2013 - Remember
Love Your Camera (Introduction to D-SLR) Photography Workshops and Tours in New York City Phone: (646) 736-3231 Email: info@rememberforever.co Web: www.rememberforever.co Copyright 2009-2013 - Remember
Know Your Digital Camera
 Know Your Digital Camera With Matt Guarnera Sponsored by Topics To Be Covered Understanding the language of cameras. Technical terms used to describe digital camera features will be clarified. Using special
Introductory Photography
 Introductory Photography Basic concepts + Tips & Tricks Ken Goldman Apple Pi General Meeting 26 June 2010 Kenneth R. Goldman 1 The Flow General Thoughts Cameras Composition Miscellaneous Tips & Tricks
Elements of Exposure
 Elements of Exposure Exposure refers to the amount of light and the duration of time that light is allowed to expose film or a digital-imaging sensor. Exposure is controlled by f-stop, shutter speed, and
or, How do I get this thing to do what I want? Copyright 2016 Paul Fisher
 or, How do I get this thing to do what I want? Copyright 2016 Paul Fisher So just what are the basic camera operations we re going to discuss? Set up. How do you have your camera configured ISO setting
DSLR Essentials: Class Notes
 DSLR Essentials: Class Notes The digital SLR has seen a surge in popularity in recent years. Many are enjoying the superior photographic experiences provided by these feature packed cameras. Interchangeable
DIGITAL PHOTOGRAPHY CAMERA MANUAL
 DIGITAL PHOTOGRAPHY CAMERA MANUAL TABLE OF CONTENTS KNOW YOUR CAMERA...1 SETTINGS SHUTTER SPEED...2 WHITE BALANCE...3 ISO SPEED...4 APERTURE...5 DEPTH OF FIELD...6 WORKING WITH LIGHT CAMERA SETUP...7 LIGHTING
Intro to Digital SLR and ILC Photography Week 1 The Camera Body
 Intro to Digital SLR and ILC Photography Week 1 The Camera Body Instructor: Roger Buchanan Class notes are available at www.thenerdworks.com Course Outline: Week 1 Camera Body; Week 2 Lenses; Week 3 Accessories,
Digital camera modes explained: choose the best shooting mode for your subject
 Digital camera modes explained: choose the best shooting mode for your subject On most DSLRs, the Mode dial is split into three sections: Scene modes (for doing point-and-shoot photography in specific
USING LENSES A Guide to Getting the Most From Your Glass
 USING LENSES A Guide to Getting the Most From Your Glass DAN BAILEY A Guide to Using Lenses Lenses are your camera s eyes to the world and they determine the overall look of your imagery more than any
Autumn. Get Ready For Autumn. Technique eguide. Get Ready For
 Get Ready For Autumn Blink and you may have missed it, but our summer is behind us again and we re back into the short days and long nights of autumn. For photography however, the arrival of autumn means
Until now, I have discussed the basics of setting
 Chapter 3: Shooting Modes for Still Images Until now, I have discussed the basics of setting up the camera for quick shots, using Intelligent Auto mode to take pictures with settings controlled mostly
Chapter 11-Shooting Action
 Chapter 11-Shooting Action Interpreting Action There are three basic ways of interpreting action in a still photograph: Stopping action (42) Blurring movement Combining both in the same image Any
To do this, the lens itself had to be set to viewing mode so light passed through just as it does when making the
 CHAPTER 4 - EXPOSURE In the last chapter, we mentioned fast shutter speeds and moderate apertures. Shutter speed and aperture are 2 of only 3 settings that are required to make a photographic exposure.
SPOT METERING. Copyright Hairy Goat Ltd 2015 Ä
 How to fine tune your exposure with spot metering Metering is often something that leads to great confusion in newbie photographers (and often in more experienced ones, too). Basically, metering refers
Lesson 1 Course Notes
 4 Week Online Photography Course An Introduction to Digital Photography A Guide to Getting the Best from Your Digital Camera Lesson 1 Course Notes By David Taylor Click Here to Book Course PAGE 2 Introduction
METERING FOR A BETTER PHOTOGRAPH
 METERING FOR A BETTER PHOTOGRAPH By Janet Steyer 2 8 15 INTRODUCTION This program is geared toward the photographer who has a camera with manual controls. Most of this information is based on the controls
One Week to Better Photography
 One Week to Better Photography Glossary Adobe Bridge Useful application packaged with Adobe Photoshop that previews, organizes and renames digital image files and creates digital contact sheets Adobe Photoshop
Photographer... and you can too.
 Izzy Learned to be a Photographer... and you can too. A story about photography basics by Bruce Philpott My granddaughter, Izzy, was visiting us when she was eleven years old and she looked at a photo
Capturing God s Creation Through The Lens An Adult Discipleship Course at Grace January 2013
 Capturing God s Creation Through The Lens An Adult Discipleship Course at Grace January 2013 Donald Jin donjin@comcast.net Course Overview Jan 6 Setting The Foundation Introduction and overview Understanding
Photographing Waterfalls
 Photographing Waterfalls Developed and presented by Harry O Connor oconnorhj@yahoo.com July 26, 2017* All photos by Harry O Connor * Based on May 2012 topic Introduction Waterfall photographs are landscapes
Quick Tips for Taking Better Portraits
 JANUARY 5, 2019 BEGINNER Quick Tips for Taking Better Portraits Suggested Lens choices, exposure settings and focus modes Featuring GARY SMALL D300, AF-S NIKKOR 24-85mm f/2.8-4d IF lens, 1/30 sec., f/2.8,
DSLR FOCUS MODES. Single/ One shot Area Continuous/ AI Servo Manual
 DSLR FOCUS MODES Single/ One shot Area Continuous/ AI Servo Manual Single Area Focus Mode The Single Area AF, also known as AF-S for Nikon or One shot AF for Canon. A pretty straightforward way to acquire
Communication Graphics Basic Vocabulary
 Communication Graphics Basic Vocabulary Aperture: The size of the lens opening through which light passes, commonly known as f-stop. The aperture controls the volume of light that is allowed to reach the
PHIL MORGAN PHOTOGRAPHY
 Including: Creative shooting Manual mode Editing PHIL MORGAN PHOTOGRAPHY A free e-book to help you get the most from your camera. Many photographers begin with the naïve idea of instantly making money
By Mark Schutzer Coast Division Meet June 2013 Copies of this presentation can be found at
 Model lph Photography h By Mark Schutzer Coast Division Meet June 2013 Copies of this presentation can be found at http://www.markschutzer.com com Model Photography Clinic Overview This clinic will discuss
A Digital Camera Glossary. Ashley Rodriguez, Charlie Serrano, Luis Martinez, Anderson Guatemala PERIOD 6
 A Digital Camera Glossary Ashley Rodriguez, Charlie Serrano, Luis Martinez, Anderson Guatemala PERIOD 6 A digital Camera Glossary Ivan Encinias, Sebastian Limas, Amir Cal Ivan encinias Image sensor A silicon
By Mark Schutzer PCR Regional Convention, Fremont, CA April 2009 Copies of this presentation can be found at
 Model lph Photography h By Mark Schutzer PCR Regional Convention, Fremont, CA April 2009 Copies of this presentation can be found at http://www.markschutzer.com com Model Photography Clinic Overview This
Technical Guide Technical Guide
 Technical Guide Technical Guide Introduction This Technical Guide details the principal techniques used to create two of the more technically advanced photographs in the D800/D800E catalog. Enjoy this
PHOTOGRAPHING THE ELEMENTS
 PHOTOGRAPHING THE ELEMENTS PHIL MORGAN FOR SOUTH WEST STORM CHASERS CONTENTS: The basics of exposure: Page 3 ISO: Page 3 Aperture (with examples): Pages 4-7 Shutter speed: Pages 8-9 Exposure overview:
Glossary of Terms (Basic Photography)
") Glossary of Terms (Basic ) Ambient Light The available light completely surrounding a subject. Light already existing in an indoor or outdoor setting that is not caused by any illumination supplied by
Glossary of Terms (Basic ) Ambient Light The available light completely surrounding a subject. Light already existing in an indoor or outdoor setting that is not caused by any illumination supplied by
Introduction to Digital Photography
 Introduction to Digital Photography with Nick Davison Photography is The mastering of the technical aspects of the camera combined with, The artistic vision and creative know how to produce an interesting
Mastering Y our Your Digital Camera
 Mastering Your Digital Camera The Exposure Triangle The ISO setting on your camera defines how sensitive it is to light. Normally ISO 100 is the least sensitive setting on your camera and as the ISO numbers
UNDERSTANDING MACRO PHOTOGRAPHY
 VITAL UNDERSTANDING MACRO PHOTOGRAPHY Beyond the Basics Mahmood Anwar Understanding macro photography There are so many things in our world you want to get close to and photograph. Find out how to set
ISO 200 1/500 sec. f/11 82mm lens
 4 ISO 200 1/500 sec. f/11 82mm lens The Creative Zone Taking Your Photography to the Next Level The Creative zone is the name given by Canon to the shooting modes that offer you the greatest amount of
Table of Contents. 1. High-Resolution Images with the D800E Aperture and Complex Subjects Color Aliasing and Moiré...
 Technical Guide Introduction This Technical Guide details the principal techniques used to create two of the more technically advanced photographs in the D800/D800E brochure. Take this opportunity to admire
ONE OF THE MOST IMPORTANT SETTINGS ON YOUR CAMERA!
 Chapter 4-Exposure ONE OF THE MOST IMPORTANT SETTINGS ON YOUR CAMERA! Exposure Basics The amount of light reaching the film or digital sensor. Each digital image requires a specific amount of light to
Creating Stitched Panoramas
 Creating Stitched Panoramas Here are the topics that we ll cover 1. What is a stitched panorama? 2. What equipment will I need? 3. What settings & techniques do I use? 4. How do I stitch my images together
Using Your Camera's Settings: Program Mode, Shutter Speed, and More
 Using Your Camera's Settings: Program Mode, Shutter Speed, and More Here's how to get the most from Program mode and use an online digital SLR simulator to learn how shutter speed, aperture, and other
PHOTOGRAPHY Mohamed Nuzrath [MBCS]
![PHOTOGRAPHY Mohamed Nuzrath [MBCS]](/thumbs/80/82228500.jpg "PHOTOGRAPHY Mohamed Nuzrath [MBCS]") PHOTOGRAPHY Mohamed Nuzrath [MBCS] Coordinator HND IT / Senior Lecturer IT BCAS Kandy Campus Freelance Photographer Freelance Web/Software Developer PHOTOGRAPHY PHOTO - Light GRAPHY Drawing PHOTOGRAPHY
PHOTOGRAPHY Mohamed Nuzrath [MBCS] Coordinator HND IT / Senior Lecturer IT BCAS Kandy Campus Freelance Photographer Freelance Web/Software Developer PHOTOGRAPHY PHOTO - Light GRAPHY Drawing PHOTOGRAPHY
Understanding Auto ISO
 FEBRUARY 16, 2018 BEGINNER Understanding Auto ISO Changing ISO on the fly Featuring DIANE BERKENFELD Diane Berkenfeld COOLPIX P510, 1/1000 sec., f/3.1, ISO 100, matrix metering, program. A photographic
Shutter Speed. Introduction. Lesson Four. A quick refresher:
 Introduction Last week we introduced the concept of the Exposure Triangle and the goal to achieve correct exposure in our images, in other words...the image has enough light to best show off our subject
Understanding the Controls and Settings on your Digital Camera
 Understanding the Controls and Settings on your Digital Camera This is a brief guide to the basic controls and settings on a modern DSLR or bridge camera. It cannot possibly cover all the settings and
Troop 61 Self-Teaching Guide to Photography Merit Badge
 Troop 61 Self-Teaching Guide to Photography Merit Badge Scout Name: Date: Adapted from: Kodak Self-Teaching Guide to Picture-Taking Scout Name: Date: Init Date 1. Take and paste pictures into your booklet
Camera Triage. Portrait Mode
 Camera Triage So, you have a fancy new DSLR camera? You re really excited! It probably cost a small fortune. It s gotta be good, right? It better be good, right? Maybe you re having a ton of fun with your
CTE BASIC DIGITAL PHOTOGRAPHY STUDY GUIDE
 CTE BASIC DIGITAL PHOTOGRAPHY STUDY GUIDE VOCABULARY Histogram a graph of all tones in an image Image/adjust (hue/saturation, brightness/contrast) hue: color name (like green), saturation: how opaque (rich
Digital 1! Course Notes.
 Digital 1 Course Notes Anatomy of a DSLR Light' Enters' Camera 1. Lenshood: Used to control additional light entering the lens. 2. UV filter that is purchased separately from the lens. Screws onto the
TAKING BETTER PHOTOS ON ANY DEVICE
 TAKING BETTER PHOTOS ON ANY DEVICE Sarah Dudik Public Information & Marketing HOW TO TAKE BETTER PHOTOGRAPHS The device you use isn t as important as how you are looking through it Any device can be used
As can be seen in the example pictures below showing over exposure (too much light) to under exposure (too little light):
 to under exposure (too little light):") Hopefully after we are done with this you will resist any temptations you may have to use the automatic settings provided by your camera. Once you understand exposure, especially f-stops and shutter speeds,
Hopefully after we are done with this you will resist any temptations you may have to use the automatic settings provided by your camera. Once you understand exposure, especially f-stops and shutter speeds,
Aperture. The lens opening that allows more, or less light onto the sensor formed by a diaphragm inside the actual lens.
 PHOTOGRAPHY TERMS: AE - Auto Exposure. When the camera is set to this mode, it will automatically set all the required modes for the light conditions. I.e. Shutter speed, aperture and white balance. The
Basic Camera Craft. Roy Killen, GMAPS, EFIAP, MPSA. (c) 2016 Roy Killen Basic Camera Craft, Page 1
 2016 Roy Killen Basic Camera Craft, Page 1") Basic Camera Craft Roy Killen, GMAPS, EFIAP, MPSA (c) 2016 Roy Killen Basic Camera Craft, Page 1 Basic Camera Craft Whether you use a camera that cost $100 or one that cost $10,000, you need to be able
Basic Camera Craft Roy Killen, GMAPS, EFIAP, MPSA (c) 2016 Roy Killen Basic Camera Craft, Page 1 Basic Camera Craft Whether you use a camera that cost $100 or one that cost $10,000, you need to be able
To start there are three key properties that you need to understand: ISO (sensitivity)
") Some Photo Fundamentals Photography is at once relatively simple and technically confusing at the same time. The camera is basically a black box with a hole in its side camera comes from camera obscura,
Some Photo Fundamentals Photography is at once relatively simple and technically confusing at the same time. The camera is basically a black box with a hole in its side camera comes from camera obscura,
How This Works: Aperture size is counted in f- stops. i.e. those little numbers engraved on the lens barrel like:
 Aperture Aperture is the lens opening inside a lens. The size of the diaphragm opening in a camera lens REGULATES amount of light passes through onto the sensor inside the camera. Aperture size is counted
BLACK CAT PHOTOGRAPHIC RULES-OF- THUMB
 Page 1 of 5 BLACK CAT PHOTOGRAPHIC RULES-OF- THUMB These 50+ photo-cyber-tips are meant to be shared and passed along. Rules-of-thumb are a kind of tool. They help identify a problem or situation. They
capture the tree Capture Your Holidays with Katrina Kennedy
 Capture Your Holidays with Katrina Kennedy LESSON 2 capture the tree LESSON 2 OBJECTIVES: At the end of this lesson you will be able to: Create a photo of your Christmas tree using a slow shutter speed.
Dusk Photography. The Blue 15 minutes. Presented to Charlottesville Camera Club June 29, 2011 Deb Snelson 2011
 Dusk Photography The Blue 15 minutes Presented to Charlottesville Camera Club June 29, 2011 Deb Snelson 2011 It s All about When Gorgeous Blue sky Only lasts about 15 minutes Cannot be seen by the naked
The Unsharp Mask. A region in which there are pixels of one color on one side and another color on another side is an edge.
 GIMP More Improvements The Unsharp Mask Unless you have a really expensive digital camera (thousands of dollars) or have your camera set to sharpen the image automatically, you will find that images from
Topic 6 - Optics Depth of Field and Circle Of Confusion
 Topic 6 - Optics Depth of Field and Circle Of Confusion Learning Outcomes In this lesson, we will learn all about depth of field and a concept known as the Circle of Confusion. By the end of this lesson,
Infrared Photography. John Caplis. Joyce Harman Harmany in Nature
 Infrared Photography John Caplis & Joyce Harman Harmany in Nature www.harmanyinnature.com www.savingdarkskies.com Why do infrared photography? Infrared photography offers many unique creative choices you
Photography for the Lighting Designer
 Photography for the Lighting Designer Lighting designers not only have the challenge of creating emotion, space, motion, and a pretty image but we also have the challenge of selling our services to the
CHAPTER 7 - HISTOGRAMS
 CHAPTER 7 - HISTOGRAMS In the field, the histogram is the single most important tool you use to evaluate image exposure. With the histogram, you can be certain that your image has no important areas that
Improving Your Basic Photography
 Improving Your Basic Photography Steve Dell Tonight s Topics Camera Styles & Types Camera Selection Tips Shooting Tips Shooting Techniques Shooting Triumphs 1 2 Camera Styles & Types Point & Shoot (P&S)
Exposure John M. Setzler, Jr. All Rights Reserved. Liberty And Justice 2003 John M. Setzler, Jr.
 Exposure 2003 John M. Setzler, Jr. All Rights Reserved john@setzler.net www.setzler.net Liberty And Justice 2003 John M. Setzler, Jr. - a - Note from the Author: This document was created for use on the
Capturing God s Creation Through The Lens. Session 3 From Snap Shots to Great Shots January 20, 2013 Donald Jin
 Capturing God s Creation Through The Lens Session 3 From Snap Shots to Great Shots January 20, 2013 Donald Jin donjin@comcast.net Course Overview Jan 6 Setting The Foundation Jan 13 Building Your Craft
Shooting Manual. Set your shooting mode to M
 Shooting Manual WHY Shooting Manual Set your shooting mode to M Shooting Manual 3 variables that determine your exposure: 1. ISO 2. Aperture 3. Shutter Speed Shooting Manual 1. ISO The camera s general
L I F E L O N G L E A R N I N G C O L L A B O R AT I V E - FA L L S N A P I X : P H O T O G R A P H Y
 L I F E L O N G L E A R N I N G C O L L A B O R AT I V E - F A L L 2 0 1 8 SNAPIX: PHOTOGRAPHY SNAPIX OVERVIEW Introductions Course Overview 2 classes on technical training 3 photo shoots Other classes
Each of the three aspects of the triangle relate to light and how it enters and interacts with the camera.
 Learning about Exposure - The Exposure Triangle Bryan Peterson has written a book titled Understanding Exposure which is worth a read if you re wanting to venture out of the Auto mode on your digital camera
1. This paper contains 45 multiple-choice-questions (MCQ) in 6 pages. 2. All questions carry equal marks. 3. You can take 1 hour for answering.
 in 6 pages. 2. All questions carry equal marks. 3. You can take 1 hour for answering.") UNIVERSITY OF MORATUWA, SRI LANKA FACULTY OF ENGINEERING END OF SEMESTER EXAMINATION 2007/2008 (Held in Aug 2008) B.Sc. ENGINEERING LEVEL 2, JUNE TERM DE 2290 PHOTOGRAPHY Answer ALL questions in the answer
UNIVERSITY OF MORATUWA, SRI LANKA FACULTY OF ENGINEERING END OF SEMESTER EXAMINATION 2007/2008 (Held in Aug 2008) B.Sc. ENGINEERING LEVEL 2, JUNE TERM DE 2290 PHOTOGRAPHY Answer ALL questions in the answer
Photoshop Elements 3 Filters
 Photoshop Elements 3 Filters Many photographers with SLR cameras (digital or film) attach filters, such as the one shown at the right, to the front of their lenses to protect them from dust and scratches.
Improve Your Photography by using Simple Camera Settings and Techniques
 Improve Your Photography by using Simple Camera Settings and Techniques Francis J Pullen 2012 +44 (0)7768 364 567 images@francispullen.co.uk www.francispullen.co.uk Introduction Digital Cameras offer tremendous
Capturing Realistic HDR Images. Dave Curtin Nassau County Camera Club February 24 th, 2016
 Capturing Realistic HDR Images Dave Curtin Nassau County Camera Club February 24 th, 2016 Capturing Realistic HDR Images Topics: What is HDR? In Camera. Post-Processing. Sample Workflow. Q & A. Capturing
Lenses and Focal Length
 Task 2 Lenses and Focal Length During this task we will be exploring how a change in lens focal length can alter the way that the image is recorded on the film. To gain a better understanding before you
Chapter 6-Existing Light Photography
 Chapter 6-Existing Light Photography All of these images were taken with available light. Painting with light-using available light Photography that includes artificial light which naturally exists in
Camera Exposure Modes
 What is Exposure? Exposure refers to how bright or dark your photo is. This is affected by the amount of light that is recorded by your camera s sensor. A properly exposed photo should typically resemble
Beyond the Basic Camera Settings
 Beyond the Basic Camera Settings ISO: the measure of a digital camera s sensitivity to light APERTURE: the size of the opening in the lens when a picture is taken SHUTTER SPEED: the amount of time that
10 TOP TIPS TO INSTANTLY IMPROVE YOUR NATURE PHOTOS
 10 TOP TIPS TO INSTANTLY IMPROVE YOUR NATURE PHOTOS THINK OUTSIDE THE BOX 1 Don t be afraid to break some rules and experiment. Nature photography doesn t need to follow the traditional methods that you
loss of detail in highlights and shadows (noise reduction)
") Introduction Have you printed your images and felt they lacked a little extra punch? Have you worked on your images only to find that you have created strange little halos and lines, but you re not sure
Introduction Have you printed your images and felt they lacked a little extra punch? Have you worked on your images only to find that you have created strange little halos and lines, but you re not sure