Tudor Webasto Sun Roofs
|
|
|
- Janis Bond
- 6 years ago
- Views:
Transcription
1 Tudor Webasto Sun Roofs The Tudor Webasto Sun Roof has been a market leader for more than 25 years. Originally developed in West Germany, it is now exclusively manufactured in Great Britain. With the demise of the convertible car, sun roofs have increasingly gained popularity throughout the world. This publication has been prepared exclusively for customers and franchise holders of Tudor Webasto and should assist them with the proper execution of the conversion. Whilst the quality of the components supplied by us if fully guaranteed it is, nevertheless, the quality of the workmanship by the ultimate convertor that will ensure complete customer satisfaction. It is with this aim in mind that this publication has been prepared. It must be made quite clear, however, that nothing can take the place of a proper training course at one of our Fitting Stations and that the guidance given in these notes is to be looked upon as an aide-memoire only.
2 CONTENTS SECTION PAGE 1. Preparation 1 2. Installing the Frame 1 3. Fitting the Brackets 8 4. Fitting the Roof Kit Assembling the Top Cover Assembling Internal Sliding Parts Retrimming the Headlining Completing the Installation Optional Equipment Finishing-off the Conversion Maintenance 37

3 Sun Roof Kit Components
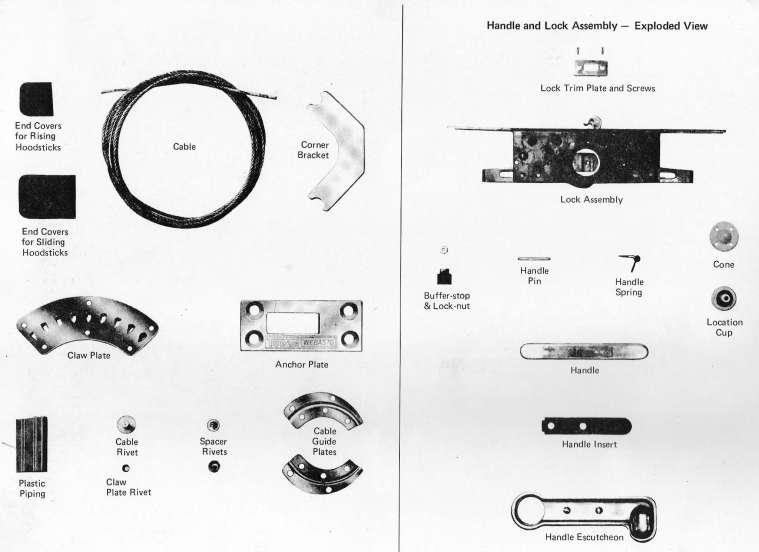
4

. b.")
5 1. PREPARATION a. Disconnect the battery. b. Remove seats, carpets and any other easily moveable interior items. c. Protect rear seat squab, floor and door treads by covering the sheets of suitable material. d. Cover steering wheel and dashboard. e. Cover console and gear lever with purpose-made plywood boxes. f. Drop headlining. Remove any anti-drum material from the roof panel and if necessary remove any metal cross-piece. 2. INSTALLING THE FRAME a. Ensure that the correct frame is available for the make and model of vehicle (see Tudor Webasto Fitting List). b. Locate the frame on the outside of the car roof at the prescribed distance from the windscreen rubber, and centralise between the side gutters by careful measurement. If in any doubt as to the correct location of the frame relative to the windscreen rubber, judge it according to the location of the sun visors; make sure that the front list pocket seam in the headlining will not coincide with the vertical face of the front frame member when retrimmed. If brackets are to be used in the conversion, the front ones can be offered up to provide an additional guide to frame location. c. Mark the opening with a felt-tip pen, allowing a margin of 25mm inboard of the front frame member. Mark a line 25mm outboard of the inner edges of both side trim boards. Mark along the leading edge of the rear trim board, thus allowing an overhang of metal of about 25mm of final adjustment. d. In the case of a glass fibre-bodied car, the aperture must e marked so that the edge will lie flush with the frame all round; at the sides it must not protrude over the rebate. Photograph 1 & 2 Photograph 1 Photograph 2 1


6 c. Using a cold chisel, cut a hole in the centre of the opening to insert metal cutting tool and remove all the marked area. In the case of a glass-fibre car, use a power jig saw. Photographs 3 & 4 Photograph 3 d. Offer frame to underside of car roof, and locate firmly by inserting four jacks or wooden props, one at each corner, from the car floor to the frame so that the frame is held tight against the roof panel. It may be necessary to chamfer the top of the frame with a plane or Surform, taking care not to remove any timber from the inside edge. e. Re-check the measurements before making the final cut. 2 Photograph 4

.")
7 f. Mark the roof panel with a gauge for the final cut. The gauge for marking the sides and back should leave about 6mm of metal for turning down into channel rebate and across the back bar. Photograph 5. Photograph 5 g. Mark corners of opening for steel corner brackets. (This applies only to steel-bodied cars). The front edge should be cut with the frame in position the metal being cut level with the front bar. Photograph 6 3 Photograph 6


8 h. Remove the frame and cut the roof to the gauge marks. Photographs 7 & 8 Photograph 7 4 Photograph 8


9 j. Using a rotary wire brush, clean paint from outside and inside of all four corners, ensuring that on top no more than 7mm of paint is removed in order that the channels and finishers will cover the treated area. Photograph 9 k. Stop weld the corner brackets thoroughly to underside of roof panel. This strengthens the corners and prevents any chance of the car roof panel cracking Photographs 10 & 11 Photograph 10 5 Photograph 9 Photograph 11


10 l. Re-position frame with jacks or props as before. Gauge and mark a drilling line no more than 5mm outboard of metal turn-down line to allow maximum coverage by channels and finishers on the gauge lines. Note double row of screws at rear and only. Photographs 12 & 13 m. Screw the frame in place using 19mm x 6 countersunk Posi-Driv Parker-alon self tapping screws, spaced 25mm between centres, and adequately countersunk into the roof panel. Photograph 12 Photograph 13 6


11 n. When the frame has been screwed in place, turn down the metal on the back and sides, finishing off the sides with a metal chasing tool to allow the channels an easy fit. Clean the top edge with a file if necessary. Photographs 14, 15, 16 & 17. Photograph 14 Photograph 15 Photograph 16 Photograph 17 7


12 3. FITTING THE BRACKETS. e. Reinforcing brackets are specified for most cars please refer to Tudor Webasto Fitting List, and check that the correct bracket set is available f. Offer the brackets up in position, and if necessary adjust them to fit by hammering on an anvil. When they are a good fit, cover their top surfaces with off-cuts of vinyl or foam to prevent squeaking. Photograph 18 8 Photograph 19

.")
13 g. Cramp brackets in position, drill and use a generous number of rivets to fasten rigidly to the frame and bodywork. (Remember to protect the car s paintwork by inserting pads under the G-cramps). Photographs 18, 19, 20 & 21 Photograph 20 Photograph 21 9


14 4. FITTING THE ROOF KIT a. Screw a strip of hardboard 25mm wide across the top of the car, level with the front edge of the rear frame member. Photographs 22 & 23 Photograph 22 Photograph 23 10


15 b. Use an air-line to clean off all debris from the roof area. Surround the aperture with wide masking tape to protect the paintwork when fitting the kid components. Photograph 24 c. Chamfer underside ends of the locking bar 50mm inwards and approximately 3mm deep on the outboard edge tapering to nothing inboard, to ensure clearance between the locking bar and the trim board when covered with headlining material etc. Re-check when fitted. Photograph 24 Photograph 25 Photograph 25 11


16 d. Shape the ends of the sliding hoodsticks to a smooth contour. Photograph 26. Photograph Photograph 27


17 e. Using a hammer as necessary, shape the back plate so that when clamped in position it fits the car roof contour snugly. Take care to shape this place accurately to avoid indentation of the roof panel when clamped Screw the back plate in position when satisfactorily shaped. Photograph 27, 28 & 29. Photograph 28 Photograph 29 13


18 f. File any sharp corners from the channels. Photograph 30 g. Position the left hand channel and finisher, taking care to leave clearance for three thicknesses of headlining material behind lip of finisher. Drill fixing holes for the channel and finisher, and screw them in place. The screw at the right hand end of this finisher must be no more than 7mm long, to avoid fouling the action of the locking hook. Photograph 30 Photograph Photograph 31


19 h. Position right hand channel and finisher. Mark the finisher and cut to appropriate length for a neat butt joint with the left finisher. Drill fixing holes and screw right channel and finisher in place. Screw anchor plate and cups in position to ensure clearance. Using a tape measure, check that the channels are parallel with one another over their whole length to ensure that the sliding components will slide freely. Photographs 32, 33 & 34 Photograph Photograph 32 Photograph 34


20 j. Lock the locking bar into the front of the frame; clamp the sliding feet in position on each side ensuring that the leather pads abut on the inboard vertical faces of the channels. Drill screw holes and screw the feet to the bar. Check that the locking bar slides freely backwards and forwards, then adjust the rubber buffers to provide a firm and even locking action. k. Clamp the front plate centrally to the locking bar, with the rear edges aligned together; drill and screw in place. Photographs 36 & 37 Photograph 36 Photograph 35 Photograph 37 16


21 l. Insert sliding hoodsticks in channels, and adjust to curvature of back plate. Ensure that they slide freely. When satisfactory, tighten screws on underside. Photographs 38 & 39 m. Shape the rising hoodsticks to curvature as above. n. Screw a backstop, such as a hexagonal nut, in each channel at a point 20mm forward of the rear bar. This will prevent kinking of the hood cables caused by excessive rearward travel of the sliding components. p. Check all round to ensure that all components are fitting, sliding and locking satisfactorily as appropriate, and that all holes are drilled. q. Remove all the kit components from the car, taking great care no t to scratch the polished surfaces of the finishers and channels. Photograph Photograph 39


22 5. ASSEMBLING THE TOP COVER a. Insert cable through outermost hole in the front plate and turn a few times to make a loop for a rivet. Photograph 40 b. Insert rivet through underside of plate to hold cable loop, and hammer flat on top of plate. Photograph 40 Photograph Photograph 41


23 c. Lay front plate, bottom up, in position on hooding, with cables pulled tight against ends of stitching; centre of front edge of plate should lie on marked line. Pull hooding to allow 8-10mm clearance between this line and outboard ends of front edge of plate. Photographs 42 & 45 d. Apply adhesive to underside of front plate and to hooding. Photograph 42 Photographs 43 & Photograph 43
Interior CHAPTER 21. Phantom Roadster Instruction Manual 273
 CHAPTER 21 Interior When you get to this chapter you are now starting on the finish that will make your car one that will be complete your hard work. This chapter will cover the installation of the door
Tech Sheet. T4 Interior conversion kit how to - fitting instructions. 1. Rear seat belts. 2.
 Page 1 of 8 T4 Interior conversion kit how to - fitting instructions Thank you for purchasing our T4 interior conversion kit. This kit will enable you to convert any SWB left hand loading door T4 into
Jeep Cherokee Door XJ Set Part # Revision J
 Jeep Cherokee 84-96 4 Door XJ Set Part # 10911 Revision J 6-5-06 Step 1: Prior to Installation: A) Fit: Verify the fit of the flares to vehicle. (Some filing, sanding, or cutting may be necessary to ensure
Dura-Lock Roof System
 DLR-14 Dura-Lock Roof System Assembly and Installation Instructions Read the instructions before starting the job. They explain the steps required to produce a finished product that will meet factory specifications.
10 Octagon Cedar Gazebo Assembly Instructions
 10 Octagon Cedar Gazebo Assembly Instructions Toll Free: 866.768.8465 Hours: 9-5 Monday-Friday EST www.homeplacestructures.com Package ships as shown revised 06/22/09 10 Cedar Gazebo Assembly Instructions
PAT installation of a Sun Dome over a in-ground
 PAT. 3766573 Installation of Sun Domes for in-ground pool GENERAL INSTRUCTIONS: STEP 1. Read thru the entire instructional materials before beginning any installation. You will find that the installation
-1- Coach Instructions.
 -1- Coach Instructions. Insert the bogie pivot pins through the bottom of the coach body ensuring the dimples fit into the recesses. Glue the.06 x.25 short strips each side of the pivot head, bridge the
TOYOTA MOTOR EUROPE CA Products Division Tel : Fax :
 TOYOTA MOTOR EUROPE CA Products Division Tel : + 32 2 745 26 77 Fax : + 33 2 745 26 99 Ordering part numbers Comments Part Numbers Wooden floor one hatch PZ449-D3C42-11 one hatch with carpet PZ449-D3C42-01
Ford Ranger / Bronco II Set Part # Rev B 5-04
 Ford Ranger / Bronco II Set Part # 21008 Rev B 5-04 Step 1: Prior to Installation: A) Fit: Verify the fit of the flares to vehicle. (Some filing, sanding, or cutting may be necessary to ensure proper fit).
Ford Pick Up Rear leaf Spring Kit Installation Instructions
 1948-1956 Ford Pick Up Rear leaf Spring Kit Installation Instructions 1-800-984-6259 www.totalcostinvolved.com Parts 48 inch leaf (2) springs (4) U-bolts 3/8-24 x l 1/4bolts (16) & nuts (2) 1/2-20 x 4
Pocket Door Kit PD1 / PD2 Installation Instructions. Kit Contents.
 Pocket Door Kit PD1 / PD2 Installation Instructions Kit Contents. 1, Create Rough Opening In Stud Wall Construct rough opening ensuring all sides are square and level. Rough opening should be; Height =
Jeep Cherokee 4-Door XJ Set Part # Rev
 Jeep Cherokee 4-Door XJ Set Part # 10911 Rev-14 04-05-10 Step 1: Prior to Installation: A) Bushwacker only approves installing the flares according to these written instructions with the hardware provided.
Shed Assembly Instructions
 Shed Kit Contents The shed kit includes all the parts needed to assemble your shed except for tools and fasteners such as screws and nails. The various pieces are pre-cut and many are marked to indicate
Dubnium 11 Installation Instructions & Parts List
 Dubnium 11 Installation Instructions & Parts List Illustration Dubnium, H1 Handle Right Hand: Open Out Page 1 of 25 IMPORTANT This shower screen / enclosure must be installed by suitably qualified individuals.
Before fitting door, check opening size and squareness of timber frame. The door is made smaller to give correct clearance within the frame.
 Slideaway Single & Maximizer Door Gear INSTALLATION INSTRUCTIONS 11 This garage door has been designed to be as as easy as possible to use, service and automate when installed correctly. Please therefore
CUT OUT FLARES INSTALLATION INSTRUCTIONS FOR 20017, 20018, F100-F150 F250-F350 P.U. & BRONCO CUT OUTS
 20017 04/22/03 REV-A CUT OUT FLARES INSTALLATION INSTRUCTIONS FOR 20017, 20018, F100-F150 F250-F350 P.U. & BRONCO CUT OUTS Tools Required for Installation: (A) 3/16 Drill Bit (B) Pop-Rivet Gun (C) Air
SLIDING MECHANISM TROLLEY CATCH TROLLEY ASSEMBLY FLOOR GUIDE
 Set A Set B P7001 Standard Kit FITTING INSTRUCTIONS For use with 44mm thick doors only For Single and Double doors IF INSTALLING A TOUCH LATCH, PLEASE READ THE CORRESPONDING FITTING INSTRUCTIONS FIRST
SLIDING MECHANISM TROLLEY CATCH TROLLEY ASSEMBLY FLOOR GUIDE
 Set A Set B PFD30 SG Fire Door Kit FITTING INSTRUCTIONS For use with 44mm thick doors only For Single and Double doors SUGGESTED TOOLS DRILL G-CLAMP TAPE MEASURE (Image for reference only) HACKSAW POCKET
IF INSTALLING ANY OF THE PORTMAN SELF CLOSING SYSTEMS, PLEASE READ THE CORRESPONDING FITTING INSTRUCTIONS SUPPLIED WITH THE CLOSING SYSTEM FIRST
 Set A Set B PFD60 Fire Door Kit FITTING INSTRUCTIONS IF INSTALLING ANY OF THE PORTMAN SELF CLOSING SYSTEMS, PLEASE READ THE CORRESPONDING FITTING INSTRUCTIONS SUPPLIED WITH THE CLOSING SYSTEM FIRST SUGGESTED
Curium 19.4H Installation Instructions & Parts List
 Curium 19.4H Installation Instructions & Parts List Illustration Curium 19.4H Right Hand Page 1 of 21 30/06/2016 Revision 1.0 IMPORTANT This shower screen / enclosure must be installed by suitably qualified
G. Building the Cab, Cab Roof and Cab Boiler Extension Page 14 and Backhead.
 G. Building the Cab, Cab Roof and Cab Boiler Extension Page 14 and Backhead. Cab. In order to ensure that the cab and tender would actually look right, as what often appears on a drawing is not always
The Festival Assembly Instructions
 The Festival Assembly Instructions Toll Free: 866.768.8465 Hours: 9-5 Monday-Friday EST www.homeplacestructures.com Package ships as shown CONTACT INFORMATION: HomePlace Structures 301 Commerce Drive New
Frameless Inline Door With Return QCI5263
 INSTALLATION INSTRUCTIONS Frameless Inline Door With Return QCI5263 WALL MOUNT HINGES FRAMELESS DOOR / PANEL / RETURN PANEL QCI5263 REV. 0 Page 1 Certified 06/17/2016 Parts List with wall mount hinges
Set Part # Rev
 Set Part # 21007 Rev-3 06-06-11 Step 1: Prior to Installation: A) Bushwacker only approves installing the flares according to these written instructions with the hardware provided. WARNING: Failure to
Oval Vinyl Gazebo. Assembly Manual
 Oval Vinyl Gazebo Assembly Manual Gazebo Assembly Thank you for your purchase of this Gazebo. This manual is designed to simplify the assembly process, however we strongly recommend having an experienced
CRYSTEEL S. this manual must be included with the vehicle after completing the installation.
 Website: www.tbei.com E-mail: sales@tbei.com CRYSTEEL S Grain Tipper mounting and operating instructions this manual must be included with the vehicle after completing the installation. Web Site E-Mail
SLIDING MECHANISM TROLLEY CATCH TROLLEY ASSEMBLY FLOOR GUIDE
 Set A Set B PFD30 Fire Door Kit FITTING INSTRUCTIONS For use with 44mm thick doors only For Single and Double doors IF INSTALLING A TOUCH LATCH, PLEASE READ THE CORRESPONDING FITTING INSTRUCTIONS FIRST
Included in Hardware Kit. Jeep Cut-Out Fender Flare Set of 4 Set Part # Rev STEP 1 PRIOR TO INSTALLATION
 Jeep Cut-Out Fender Flare Set of 4 Set Part #10926-07 Rev-01 09-11-12 STEP 1 PRIOR TO INSTALLATION A) Bushwacker only approves installing the flares according to these written instructions with the hardware
CONSTRUCTION GUIDE 27ft Wide and 30ft Wide SHEEP HOUSE
 The Outside, Inside CONSTRUCTION GUIDE 27ft Wide and 30ft Wide SHEEP HOUSE Thank you for purchasing a Premier Sheep House. Please take the time to carefully read through this Construction Guide before
Competition Engineering 8 Point Roll Bar (94-04 Mustang)
") Competition Engineering 8 Point Roll Bar (94-04 Mustang) Required tools: Socket set / Hand tools Welder of choice Welding blankets Welding safety gear Heat gun Putty knife Bar notching tool Adjustable
Competition Engineering 8 Point Roll Bar (94-04 Mustang) Required tools: Socket set / Hand tools Welder of choice Welding blankets Welding safety gear Heat gun Putty knife Bar notching tool Adjustable
NISSAN T30 X-TRAIL WITH SUNROOF CARGO BARRIER FITTING INSTRUCTION PART NO YEARS OF MANUFACTURE MAY 2002 ONWARDS.
 NISSAN T30 X-TRAIL WITH SUNROOF CARGO BARRIER FITTING INSTRUCTION PART NO 405500 YEARS OF MANUFACTURE MAY 2002 ONWARDS. Page 1 of 6 This Cargo Barrier is a single position barrier located behind the 2nd
Curium 19H Installation Instructions & Parts List
 Curium 19H Installation Instructions & Parts List Illustration Curium 19H Right Hand Page 1 of 15 01/07/2016 Revision 2.1 IMPORTANT This shower screen / enclosure must be installed by suitably qualified
SwingSafe Swing-Away Mailbox Support Diagram
 SwingSafe Swing-Away Mailbox Support Diagram Wood Mounting Plates Top Arm (B) Muffler Clamps (A) Carriage Bolts and Nuts Bottom Arm 4-Foot U-Channel Post USPS Recommended 42-44 Height Ground Slope Hex
Traditional Undermount: S Method (Undermount):
:") TOOLS REQUIRED 15.1 TOOLS REQUIRED The installation of Corian shape product must be a precise and exacting process to ensure that a good fit is always created. Using the correct tools is essential. In
TOOLS REQUIRED 15.1 TOOLS REQUIRED The installation of Corian shape product must be a precise and exacting process to ensure that a good fit is always created. Using the correct tools is essential. In
Cut-Out Fender Flares Rear Pair. Jeep. Included in Hardware Kit:
 Jeep Cut-Out Fender Flares Rear Pair STEP 1 PRIOR TO INSTALLATION A) Bushwacker only approves installing the fl ares according to these written instructions with the hardware provided. WARNING: Failure
Radon 07 Installation Instructions & Parts List
 Radon 07 Installation Instructions & Parts List Illustration Radon 07, H1 Handle Right Hand: Open Out 14/06/2016 Revision 1.1 Page 1 of 21 IMPORTANT This shower screen / enclosure must be installed by
CONSTRUCTION GUIDE 21ft Wide and 24ft Wide SHEEP HOUSE
 The Outside, Inside CONSTRUCTION GUIDE 21ft Wide and 24ft Wide SHEEP HOUSE Thank you for purchasing a Premier Sheep House. Please take the time to carefully read through this Construction Guide before
Jeep. Cut-Out Fender Flares Set of 4. Included in Hardware Kit: Set Part # Rev-8 06/29/16 STEP 1 PRIOR TO INSTALLATION
 STEP 1 PRIOR TO INSTALLATION A) Bushwacker only approves installing the flares according to these written instructions with the hardware provided. WARNING: Failure to install according to these instructions
SLIDING MECHANISM TROLLEY CATCH TROLLEY ASSEMBLY FLOOR GUIDE
 Set A Set B P7001 Standard Kit Glass Door FITTING INSTRUCTIONS SUGGESTED TOOLS DRILL MITRE/CHOP SAW TAPE MEASURE (Image for reference only) HACKSAW POCKER DOOR KIT SHORT / LONG Z SECTION LONG Z SECTION
Installation for Full Size Polaris Ranger Crew Doors
 Installation for Full Size Polaris Ranger Crew Doors Order of Installation: Heater Doors Wiper on to Windshield Windshield Top & Back Panel Note: Most of the steps in these instructions need to be repeated
The following instructions will guide you through the installation of your new vinyl railing.
 Installation Guide St. James Vinyl T-Rail Tools Required Protective eye glasses 3/8 x 3 Concrete Anchors/Fasteners (for Tape measure concrete installations) Variable speed drill/screwdriver Philips Driver
BMW E46 Coupe 3dr MP Bolt in (BMW Race Days Only) Roll Cage (B045) Fitting Instructions
 Roll Cage (B045) Fitting Instructions") BMW E46 Coupe 3dr MP Bolt in (BMW Race Days Only) Roll Cage (B045) Fitting Instructions Unwrap the mounting points/ends of the roll cage and unpack the individual fitting kits. Try to leave wrapping on
BMW E46 Coupe 3dr MP Bolt in (BMW Race Days Only) Roll Cage (B045) Fitting Instructions Unwrap the mounting points/ends of the roll cage and unpack the individual fitting kits. Try to leave wrapping on
General Prisoner Transport Install Instructions PT-2-INST
 General Prisoner Transport Install Instructions PT-2-INST 50 or 60 high x 80, 100 & 120 inch long / Double Compartment Inserts Also refer to PT-A-3XX instructions for vehicle specific mounting measurements
ATTENTION: PLEASE READ AND UNDERSTAND ALL INSTRUCTIONS AND WARNINGS BEFORE ASSEMBLING, INSTALLING OR USING THIS PRODUCT.
 VAN STORAGE SOLUTIONS FOR THE WAY YOU WORK TM INSTALLATION MANUAL BULKHEAD Model Number 96101-3-01 ATTENTION: PLEASE READ AND UNDERSTAND ALL INSTRUCTIONS AND WARNINGS BEFORE ASSEMBLING, INSTALLING OR USING
Gallium 03 Installation Instructions & Parts List
 Gallium 03 Installation Instructions & Parts List Illustration Gallium 03, H1 Handle Left Hand: Open Out 04/05/2016 Revision 1.1 Page 1 of 19 IMPORTANT This shower screen / enclosure must be installed
Please read these instructions all the way through before starting, since the order of work is important.
 Due to the many differing vehicles to which Safety Devices roll cages can be fitted, these instructions are of a general nature and not specific to your vehicle. Important Note Roll bars and/or front cages
Vinyl Gazebo Instructions
 P a g e 1 Vinyl Gazebo Instructions 10 Vinyl Gazebo Shown Thank you for the purchase of your New Gazebo. Depending on the size of your Gazebo, installation can usually be completed in 1 to 2 days. These
12. Wings, Flaps, Ailerons and Struts
 12. Wings, Flaps, Ailerons and Struts Fit Aileron Hinges Reference: Drawing 20270K2 Photo 12.1 Parts Required: 2007092 Aileron LS 200809N Aileron RS 2001394 Hinge 3/16 A1 (4) 2001694 Hinge Pin (4) PH0059N
Aluminum Clad Wood Window 1/2 Reinforced Field Mulling and Stacking Supplement
 Aluminum Clad Wood Window 1/2 Reinforced Field Mulling and Stacking Supplement 1 Aluminum Clad Wood Window 1/2 Reinforced Field Mulling and Stacking Supplement The following instructions are a supplement
GROWING BETTER THROUGH DESIGN. 6ft Lean-To LEAN-TO. Assembly Instructions 04/02
 GROWING BETTER THROUGH DESIGN 6ft Lean-To LEAN-TO Assembly Instructions 04/02 6ft Lean-To Greenhouse Base Plan Introduction/Tools/Contents / / Contents This is a copy of our Lean-To greenhouse base plan.
Greenhouse Assembly Instructions
 Greenhouse Assembly Instructions Our Help Line provides support and advice to customers of Summer Garden Buildings after ordering. For advice before you buy you can phone us free 7 days a week on 0800
INSTALLATION INSTRUCTIONS FOR & Chevy CUT OUT FLARE
 40009 7/10/03 REV-A INSTALLATION INSTRUCTIONS FOR 40009 & 40010 Chevy CUT OUT FLARE TOOLS REQUIRED FOR INSTALLATION: Drill Motor Pop Rivet Gun Flat File Hair Dryer or Heat Gun Sawzall Jack and Jack Stands
TOOL LIST FOR TAILGATE HIDDEN LATCH & LINK ASSY FOR FORD FLARESIDE TRUCKS
 TOOL LIST FOR TAILGATE HIDDEN LATCH & LINK ASSY FOR 53-87 FORD FLARESIDE TRUCKS Vise Grip Clamps C-clamps Sharpie Marker Ball Peen Hammer Center Punch 3/8 or 1/2 Drill 5/32, 7/32, 9/32, and 3/8 Drill Bits
INSTALLATION INSTRUCTIONS FOR FRONT CASTING DECK RAIL Ranger
 INSTALLATION INSTRUCTIONS FOR FRONT CASTING DECK RAIL Ranger TOOLS REQUIRED FOR INSTALLATION: Drill motor, (1) 5/16 inch drill bit, (1) 13/64 drill bit, (1) 3/16 inch hex wrench (1) 3/32 inch hex wrench.
TITGEMEYER Tf1673GB(0517)1. GETO City Body Kit with a self-supporting base and without a base Assembly Instructions
1. GETO City Body Kit with a self-supporting base and without a base Assembly Instructions") TITGEMEYER Tf1673GB(0517)1 with a self-supporting base and without a base All rights reserved. The technical data quoted in this catalogue, performance descrip - tions, recommendations and instructions
TITGEMEYER Tf1673GB(0517)1 with a self-supporting base and without a base All rights reserved. The technical data quoted in this catalogue, performance descrip - tions, recommendations and instructions
ENGINEERING STRENGTH INSTAL L AT I O N M A NUAL OUR STRENGTH IS OUR STRENGTH
 ENGINEERING STRENGTH INSTAL L AT I O N M A NUAL OUR STRENGTH IS OUR STRENGTH RAFTER PREPERATION RAFTER PREPARATION A FRAME PREPERATION AND ASSEMBLY A FRAME PREPARATION AND ASSEMBLY... Open boxes, remove
Privacy Wall Glass Selections - Polished Edge Slider Door
 Privacy Wall Glass Selections - Polished Edge Slider Door 3/6" HEX BIT PUTTY KNIFE #2 ACR BIT SUCTION CUP HOLDERS DOOR LEAF: Satin Tempered Clear Tempered LOCTITE 425 SIDE LIGHT ETCHED GLASS STYLES: Satin
Gardman Lean-to Greenhouse Assembly Instructions
 Page 1 Gardman Lean-to Greenhouse Assembly Instructions Our Help Line provides support and advice to customers of Summer Garden Buildings after ordering. For advice before you buy you can phone us free
JEEP JK ( 3 DOOR ) SLIMLINE II - FULL TRAY EXTREME RACK KIT
 SLIMLINE II - FULL TRAY EXTREME RACK KIT") JEEP JK ( 3 DOOR ) SLIMLINE II - FULL TRAY EXTREME RACK KIT FAJK004 / KRJW016T INSTALL TIME: 2 Hours NOTE: Your Jeep JK (3 Door) Extreme Roof Rack Kit consists of four boxes. (1) the Tray, (2) the Roll
JEEP JK ( 3 DOOR ) SLIMLINE II - FULL TRAY EXTREME RACK KIT FAJK004 / KRJW016T INSTALL TIME: 2 Hours NOTE: Your Jeep JK (3 Door) Extreme Roof Rack Kit consists of four boxes. (1) the Tray, (2) the Roll
Bi-Pass And Bi-Fold Sliders
 Bi-Passs and Bi-Fold Sliders Installation Guide Bi-Pass And Bi-Fold Sliders Tools required: Hand Drill Counter Sink Drill BitSet #8 Philips Screw Driver Measuring Tape Level What s Included: Panels with
Potting Store Assembly Instructions
 Before assembly We recommend that time is taken to read the instructions before starting assembly, then follow the easy step by step guide. The instruction sheet is only a guide to the assembly. Certain
Installation instructions, accessories. Rails. Volvo Car Corporation Gothenburg, Sweden. Instruction No Version Part. No
 Instruction No Version Part. No. 8685942 1.0 Rails J8401014 Page 1 / 9 Equipment A0000162 A0000161 J8401006 Page 2 / 9 INTRODUCTION Read through all of the instructions before starting installation. Notifications
Method of Build 1. Fire. Sound
 Method of Build 1 General Viso Fire & Acoustic in the solid form differs from most other systems as it can be erected using 12.5mm & 15.0mm boards within the same Aluminium framework. Also hidden fix board
Installation Instructions For Slider Casement Air Conditioners
 Installation Instructions For Slider Casement Air Conditioners NOTE: These instructions describe installation in a typical wood framed window with a wood SLIDE-BY sash, or installation in a metal CASEMENT
Installation Guide. Evolve bi-fold. 8. Door restrictor- optional p9. 1. Before you start p2. 9. Adjustment. 2. Measuring and surveying p2
 Evolve bi-fold Installation Guide 1. Before you start p2 8. Door restrictor- optional p9 2. Measuring and surveying p2 3. Configuration details p4 4. Installation p5 5. Glazing p5 6. Glazing packer details
Building Instructions Diva cabin boat
 Building Instructions Diva cabin boat Order no. 3093/00 aero-naut Modellbau Stuttgarterstr. 18-22 D-72766 Reutlingen / Germany http://www.aero-naut.com 1 For pictured building instructions please see the
JEEP JK ( 5 DOOR ) SLIMLINE II - FULL TRAY EXTREME RACK KIT
 SLIMLINE II - FULL TRAY EXTREME RACK KIT") JEEP JK ( 5 DOOR ) SLIMLINE II - FULL TRAY EXTREME RACK KIT FAJK001 / KRJW014T INSTALL TIME: 2.5 Hours NOTE: Your Jeep JK (5 Door) Extreme Roof Rack Kit consists of four boxes. (1) the Tray, (2) the Roll
JEEP JK ( 5 DOOR ) SLIMLINE II - FULL TRAY EXTREME RACK KIT FAJK001 / KRJW014T INSTALL TIME: 2.5 Hours NOTE: Your Jeep JK (5 Door) Extreme Roof Rack Kit consists of four boxes. (1) the Tray, (2) the Roll
Method of Build 1. General
 Method of Build 1 General GLAZED ELEVATIONS Viso Double Glazed in glazed form differs from many other systems as the vertical joints can have Viso dry joints or the unique HIDDEN mullion post between glazed
Isuzu D-Max Part Numbers Black Polished
 SB007 Sports Bar Fitting Instructions Isuzu D-Max 0 Part Numbers - 55000 - Black - 5000 - Polished Installation Time: 0 min (Approximately) PLEASE KEEP INSTRUCTIONS IN GLOVE BOX FOR FURTHER USE RECOMMENDED
Fitting the Roof Lining of a Traction Avant
 Fitting the Roof Lining of a Traction Avant The roof of the Traction Avant is lined with cloth like most of the cars of that era. The types and colours of the cloth have evolved over time, but the principle
Assembly Instructions 10 X 10 Aluminum Frame Building
 Assembly Instructions 10 X 10 Aluminum Frame Building 27 97 9 8 47 36 74 52 10 10 X 10 Square Building W/ Dome Includes: The Steel Entry Door with a Dead Bolt Lock assembly and Aluminum Door Frame. Metal
STYLE BAR & TONNEAU COVER INSTALLATION
 STYLE BAR & TONNEAU COVER INSTALLATION INSTALLATION MANUAL: 2005 to '09 Mustang P/N: 10-8002-C12071B Saleen Performance, Inc. 1225 East Maple Rd., MI 48083 800-888-8945 www.saleen.com 1 IF YOU ARE NOT
`48-`56 Ford Pickup Rear leaf Spring Kit Installation Instructions Tech Line:
 `48-`56 Ford Pickup Rear leaf Spring Kit Installation Instructions Tech Line: 1-855-693-1259 www.totalcostinvolved.com CHECK ALL PARTS INCLUDED IN THIS KIT TO THE PARTS LIST BEFORE INSTALLING THE KIT.
Assembly Instructions
 10' and 12' Octagon Cedar Gazebo Assembly Instructions Toll Free: 866.768.8465 Hours: 9-5 Monday-Friday EST www.homeplacestructures.com Package ships as shown revised 06/20/09 Cedar Gazebo Assembly Instructions
Frameless Inline Door QCI5254
 INSTALLATION INSTRUCTIONS Frameless Inline Door QCI5254 FRAMELESS DOOR / PANEL QCI5254 REV. 0 Page 1 Cer fied 06/16/2016 Parts List with wall mount hinges *Quanes may vary QCI5254 REV. 0 Page 2 Cer fied
IMPORTANT: WILL NOT FIT COUNTRYMAN MODELS
 Part #1410-0102-07 2 3 1 IMPORTANT: WILL NOT FIT COUNTRYMAN MODELS Apply masking tape around the bottom grille opening and across the bottom of the upper facto ry grille.. Open the hood and remove the
Installation Instructions
 Installation Instructions Targa Top Restoration Kit Porsche 911 1965-1992 About Us: ClassicCarCarpets develops, manufactures and markets premium quality carpet sets for classic cars. Our handcrafted carpet
(2) 25mm x 20mm x 5mm Adhesive Backed Foam Pads. 100mm x 50mm x 1.0mm Adhesive Backed Foam. (2) Spacer Plates. Passenger/Right Side Frame Mounting
 25mm x 20mm x 5mm Adhesive Backed Foam Pads. 100mm x 50mm x 1.0mm Adhesive Backed Foam. (2) Spacer Plates. Passenger/Right Side Frame Mounting") PARTS LIST: 1 Grille Guard 10 12mm Lock Washers 1 Driver/Left Frame Mounting 16 12mm x 32mm OD x 3mm Flat Washers 1 Passenger/Right Frame Mounting 8 12mm Hex Nuts 1 Driver/Left Side Top Support 2 10-1.50mm
PARTS LIST: 1 Grille Guard 10 12mm Lock Washers 1 Driver/Left Frame Mounting 16 12mm x 32mm OD x 3mm Flat Washers 1 Passenger/Right Frame Mounting 8 12mm Hex Nuts 1 Driver/Left Side Top Support 2 10-1.50mm
All Terrain Flares 2014 Chevy Silverado
 Page 1/8 Components: 1. Front Flares (2) 2. Rear Flares (2) Tools required: - Utility knife - #2 Phillips driver - Socket wrench - 13 mm Socket - 6 mm Allen Wrench - T-15 Torx bit - Trim Removal Tool -
PINEHAVEN SHEDS Assembly Instructions FOR LEAN-TO SHEDS
 PINEHAVEN SHEDS Assembly Instructions FOR LEAN-TO SHEDS GARDEN PRODUCTS www.pinehavensheds.co.nz 5/16 hex drive bit, By asking about our products at your nearest DIY or gardening store www.pinehavensheds.co.nz
GMC Cut-Out Fender Flares Set of 4
 GMC Cut-Out Fender Flares Set of 4 STEP 1 PRIOR TO INSTALLATION A) Bushwacker only approves installing the fl ares according to these written instructions with the hardware provided. WARNING: Failure to
PetSafe Cat Windoor. Installation Guide. Please read this entire guide before beginning
 PetSafe Cat Windoor Installation Guide Please read this entire guide before beginning Thank you for choosing PetSafe. Our mission is to be the most trusted brand in the pet ownership experience. We want
7x --Tailstock Cam Lock
 7x --Tailstock Cam Lock By Magic Brian magicbrian40@yahoo.com Probably the most pleasing mod to have, but often not done through lack of milling facility s This version does NOT require a mill. MATERIALS
Please read the instructions completely BEFORE starting this project.
 Please read the instructions completely BEFORE starting this project. Rhodes Race Cars 10 Point Roll Cages are not designed for use in vehicles where the stock floor has been removed. Check your sanctioning
WATSON RACING 4- & 6-POINT ROLL BAR Mustang Coupe p/n WR-BOLTINCAGE p/n WR-BOLTINCAGE6PT
 WATSON RACING 4- & 6-POINT ROLL BAR 2005-2014 Mustang Coupe p/n WR-BOLTINCAGE p/n WR-BOLTINCAGE6PT The Watson Racing 4-Point & 6-Point Roll Bars were designed for superior strength while allowing for installation
MGB V8 Roadster restoration project Report 136
 20 th May 2017. CARPET & TRIM FITTING continued I carried on with fitting the sill carpets first. The upstand that the door seal rubber fits to is just the height of the seal. Therefore, there is not a
RTS518 - Rhino Heavy Duty 2 & 3 Crossbar System Hyundai iload, imax, i800, H-1.
 RTS518 - Rhino Heavy Duty 2 & 3 Crossbar System Hyundai iload, imax, i800, H-1. NOTE: Please read these instructions carefully prior to installation. Check the contents of kit before commencing fitment
Laminate Cabinet Installation Instructions
 Laminate Cabinet Installation Instructions www.easygaragestorage.com/installation How To Use These Instructions Thank you for your purchase! Please read each step of this manual thoroughly to ensure proper
INSTALLATION MANUAL 32273/1205 C C-403 GB - F - D - NL - ES - I - S - SLO
 INSTALLATION MANUAL 32273/1205 C-402 - C-403 GB - F - D - NL - ES - I - S - SLO 1A 1B ENGLISH GENERAL INFORMATION The Cassette toilet is available in 2 types: C-402 Cassette toilet with built-in water
Installation instructions, accessories. TV receiver, digital
 Installation instructions, accessories Instruction No 30756561 Version 1.1 5 Part. No. 30756181, 30756569 TV receiver, digital Volvo Car Corporation TV receiver, digital- 30756561 - V1.1 Page 1 / 36 Equipment
Octagon Vinyl Gazebo Assembly Instructions For 10 & 12 Models
 Octagon Vinyl Gazebo Assembly Instructions For 10 & 12 Models Toll Free: 866.768.8465 Hours: 9-5 Monday-Friday EST www.homeplacestructures.com Package ships as shown revised 04/29/09 Vinyl Gazebo Assembly
Toyota Tacoma Extended Cab/Standard Cab Set Part # Rev
 Toyota Tacoma Extended Cab/Standard Cab Set Part # 31919 Rev-7 06-23-10 Step 1: Prior to Installation: A) Bushwacker only approves installing the flares according to these written instructions with the
PARTS INCLUDED IN FIXED STAIR CABLE RAIL KIT:
 175 SERIES FIXED STAIR CABLE RAIL - INSTALLATION INSTRUCTIONS PARTS INCLUDED IN FIXED STAIR CABLE RAIL KIT: FIXED STAIR TOP RAIL (1) A FIXED STAIR BOTTOM RAIL (1) B D UPPER SADDLE BRACKET (1) C BRACKET
FIXED PANEL SLIDER QCI5241
 INSTALLATION INSTRUCTIONS FIXED PANEL SLIDER QCI5241 FRAMELESS PANEL / DOOR / PANEL FRAMELESS DOOR / PANEL QCI5241 REV. 0 Page 1 Certified 06/16/2016 Parts List *Quantities may vary QCI5241 REV. 0 Page
Entrance Cabinet Plans
 Entrance Cabinet Plans www.andrewharriswoodwork.com Page 1 of 19 Introduction I have tried to ensure all steps are covered in these plans but if you find any errors in the plans or have a question then
INSTALLATION GUIDE. 1. Overview. 2. Measuring. 3. Tools & fixings you will need B C. Opening Width. Opening Height
 INSTALLATION GUIDE Please take a few minutes to read through this guide before getting started. 1. Overview A Typical Sliding Wardrobe Door Layout A Frame - Top Liner (optional) B Top Track C Frame - Strike
Xenon 05 Installation Instructions & Parts List
 Xenon 05 Installation Instructions & Parts List Illustration Xenon 05, H1 Handle Left Hand: Open Out 26/05/2016 Revision 2.1 Page 1 of 19 IMPORTANT This shower screen / enclosure must be installed by suitably
Installation Instructions
 READ BEFORE INSTALLING UNIT For Slider Casement Air Conditioners To avoid risk of personal injury, property damage, or product damage due to the weight of this device and sharp edges that may be exposed:
Installation Instructions
 Supafold Slide Aside System Three Fold Room Divider Installation Instructions Distinctive Doors Ltd Supafold Slide Aside Internal Folding System IMPORTANT: Before proceeding with the installation, and
FRAMELESS DOOR / PANEL WITH WALL MOUNT HINGES QCI5274
 FRAMELESS DOOR / PANEL WITH WALL MOUNT HINGES QCI5274 QCI0274 QCI5274 REV. Rev. 1 0 Page Page 1 1 Date Certified: Certified 06/16/2016 10/01/10 Parts List with wall mount hinges ITEM NO. Part # DESCRIPTION