Photographing Turkey Run: A Guide to Nature Photography
|
|
|
- Ashley Walters
- 6 years ago
- Views:
Transcription
1 Purdue University Purdue e-pubs Photographing Turkey Run Purdue University Press Supplementary Content Photographing Turkey Run: A Guide to Nature Photography Daniel P. Shepardson Purdue University, dshep@purdue.edu Follow this and additional works at: Recommended Citation Shepardson, Daniel P., "Photographing Turkey Run: A Guide to Nature Photography" (2016). Photographing Turkey Run. Paper 1. This document has been made available through Purdue e-pubs, a service of the Purdue University Libraries. Please contact epubs@purdue.edu for additional information.

2 PHOTOGRAPHING TURKEY RUN
3
4 PHOTOGRAPHING TURKEY RUN A Guide to Nature Photography Daniel P. Shepardson Produced by Purdue University Libraries Scholarly Publishing Services Distributed by Purdue University Press
5 Copyright 2016 by Daniel P. Shepardson. All rights reserved. Print ISBN: Electronic ISBN: Photographing Turkey Run: A Guide to Nature Photography is produced by Purdue University Libraries Scholarly Publishing Services and distributed by Purdue University Press. This is supplementary content for use in conjunction with Daniel P. Shepardson s A Place Called Turkey Run: A Celebration of Indiana s Second State Park in Photographs and Words (Purdue University Press, 2016). The book may be purchased through the publisher s website,
6 Dedication To my parents, Mary and Phil, who instilled in me an appreciation for all places wild. And to Susan Britsch, a good friend, colleague, and companion, who provided suggestions and edits for formatting and writing this book. Finally, to Turkey Run, for providing me the opportunity to hike, explore, and photograph nature.
7
8 About the Author Daniel P. Shepardson is a professor of geoenvironmental and science education at Purdue University. He holds a joint appointment in the Department of Curriculum and Instruction and the Department of Earth, Atmospheric, and Planetary Sciences. Shepardson is a nationally recognized nature photographer and author. He teaches introductory environmental science and environmental education courses at Purdue. He received his PhD in science education from the University of Iowa and both his MSEd in science education and BS in wildlife science from Utah State University. Shepardson is an avid nature lover, who spends his free time hiking and photographing nature in Indiana s state parks and local nature preserves. He spends several weeks every summer in Yellowstone and Glacier National Parks.
9
10 Introduction, x Aperture: Sharpness and Focus, 2 Contents Shutter Speed: Capturing Movement, 4 Depth of Field: Area of Focus, 7 Light: Friend and Foe, 10 Composition: The Rule of Thirds, 12 Composition: Line and Shape, 14 Composition: Photostitching, 16 HDR: High-Dynamic Range, 18 Up Close: Extension Tubes, 20 Focal Length: Wide-Angle versus Telephoto, 22 Planning and Luck: Taking Advantage of the Situation, 24 Seeing Nature: Telling a Story, 26 Conclusion: The Power and Importance of Nature Photography, 32
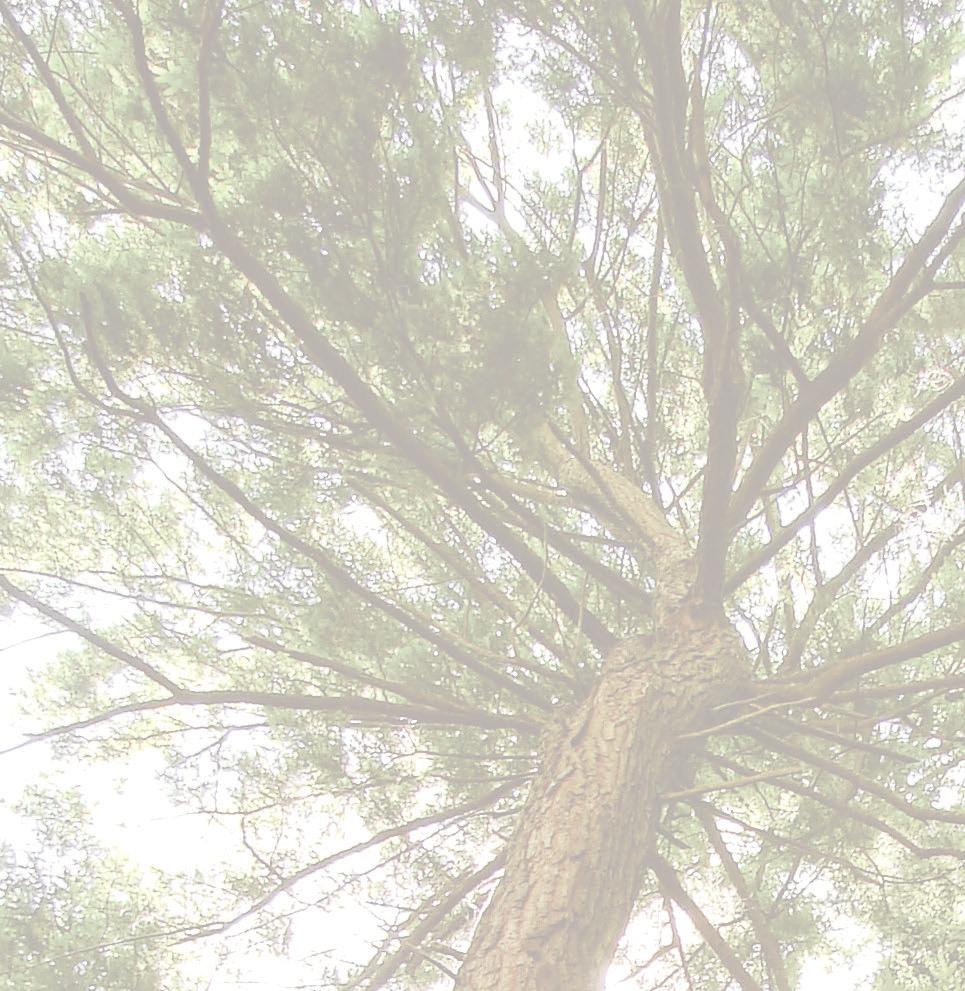
11 INTRODUCTION Turkey Run State Park, and the many other state parks and natural areas in Indiana, provide the nature lovers and photographers unique places to experience and photograph nature. With the advancement of digital cameras, many of us now have opportunities to photograph nature and share our experiences with others. Yet, there is a difference between taking a photograph and composing one: there is a degree of knowledge and skill to composing a captivating photograph of nature. The tips and techniques that follow are designed to provide a basic understanding about how to photograph nature and to improve the photographs you take. I followed these techniques in composing the photographs that appear in my book, A Place Called Turkey Run. Photographing nature is about seeing nature in a new way. It s about seeing lines and shapes, and contexts and relationships, and it s about using light. It s also about having x
12 and using the right equipment. To this end, I always hike with a camera pack that contains a mm wide-angled lens, a mm telephoto lens, neutral-density filters, and a cable release, in addition to extra batteries, cards, and lens cleaner. I hike with my Sony A77 mounted with an mm lens, and I find this to be a good all-purpose lens. I make every effort to use a tripod to reduce camera shake, and I often use a circular polarizing filter to reduce glare and reflection, and to enhance color. All of my lenses are protected with an ultraviolet (UV) filter that also saturates colors by blocking reflected light. I switch between aperture priority and shutter priority depending on the shot, and I almost always bracket shoot, capturing three images at the same time: properly exposed, underexposed, and overexposed. The best times of day to photograph nature are dawn and dusk, when the light is softer and warmer, and the angle of the sunlight creates shadows that add contrast to the scene. Unfortunately, we are not always able to shoot at dawn or dusk, and must learn to cope with midday light, which is harder and cooler. How we compose our shot makes a difference at any time of the day, but it is especially significant during midday light. I have also found that overcast days are the best for photographing fall colors and spring wildflowers, as the rich and vibrant colors of the leaves and xi
13 flowers and the texture of the foliage appear more vivid. Most important is practicing getting out and shooting. With digital cameras we can shoot many images with little expense and learn from our mistakes. We have all been disappointed by our photographs, but by following and practicing these simple techniques, we can greatly enhance the quality of our images. Daniel P. Shepardson xii
14
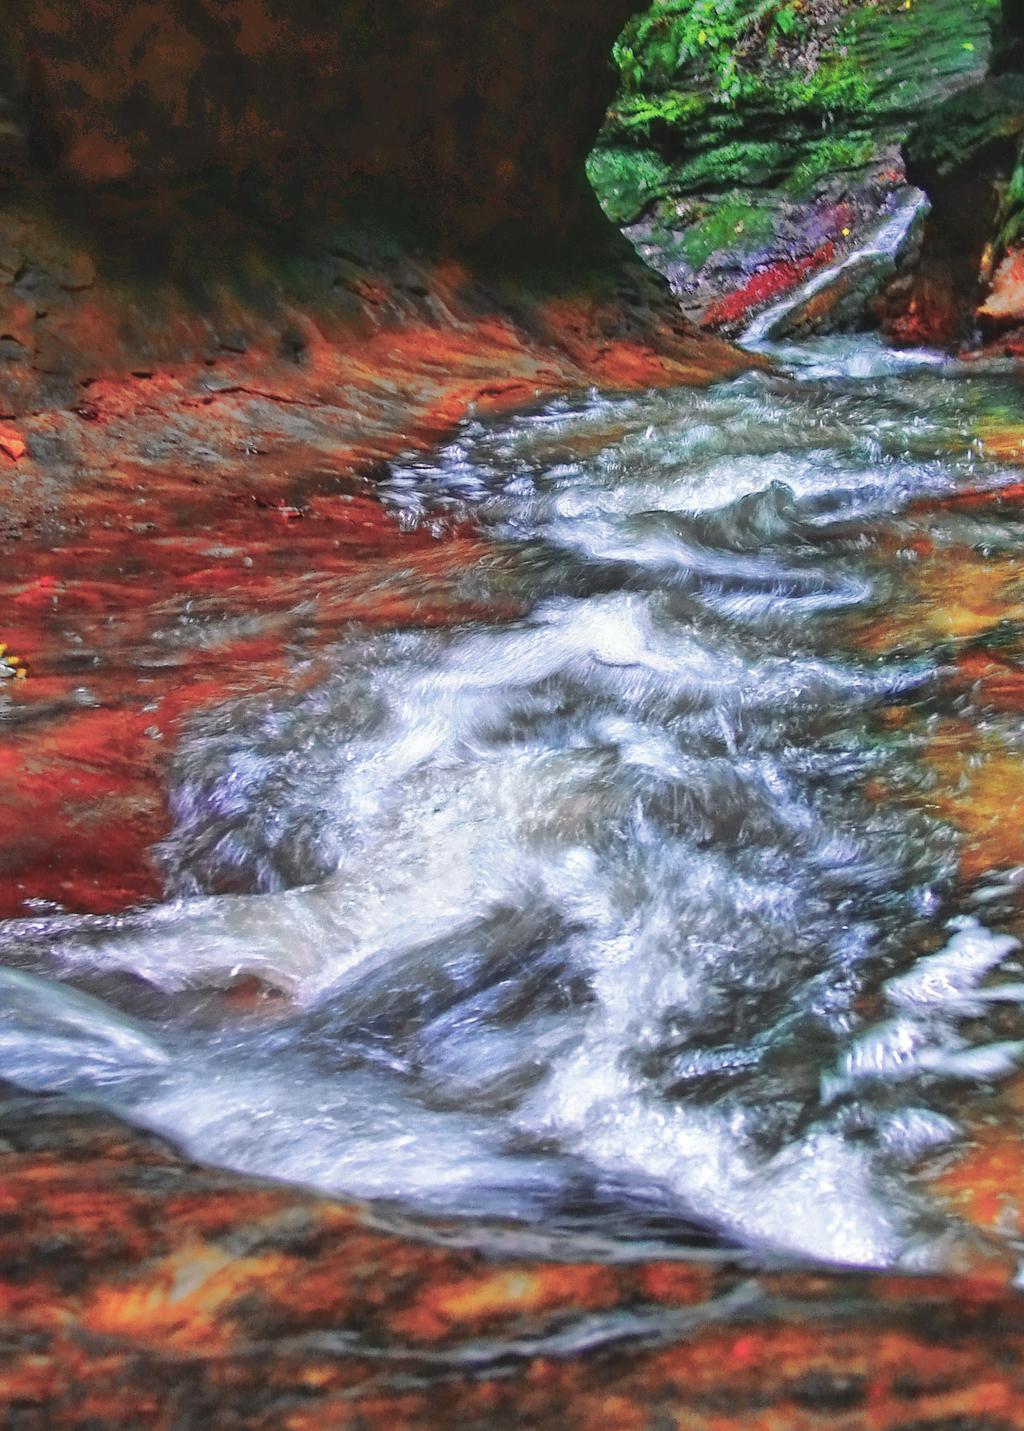
15 APERTURE Sharpness and Focus The aperture, or f - stop, determines the size of the lens opening, which controls the amount of light entering the camera. The larger the f-stop, the smaller the lens opening. The f- stop number is actually a fraction, which is why a larger f- stop means a smaller lens opening. Thus, an aperture of f /2 lets more light enter the camera than an aperture of f /22. In addition to controlling the amount of light that enters the camera, the aperture setting also determines the depth of field, or the area of the photograph that is in focus. The larger the f- stop (smaller opening), the greater the depth of field. The aperture setting also affects sharpness, or the degree of detail displayed in the image. In general, images are sharper when taken at aperture settings between f /8 and f /16; I often consider f /11 the sweet spot. Thus, if you want sharper images, you sacrifice depth of field, and vice versa. The other factors that come into play are the focal length of the lens and the distance between the camera and the subject, which will be discussed later. I took this image after a rain event. The wet sandstone reflected the sunlight, giving the scene a green-gold glow. 2

16 f /11, 10 sec, 30 mm I wanted to capture the detail of the sandstone, so I set the aperture at f /11 for maximum sharpness and focused on the midpoint in the image. The narrower depth of field softened the background. I also used a slow shutter speed, 10 sec, which smooths the flowing water, giving the little waterfalls a glow. On your next photo hike, use a tripod and shoot the same subject using different f- stops. I often take photographs of the same scene at different f- stops to see how depth of field changes the look of the image. 3
17 SHUTTER SPEED Capturing Movement Shutter speed determines the length of time the shutter is open, allowing light to enter the camera. Shutter speed is important because it determines the amount of motion captured in the image. The faster the shutter speed, the less motion captured, and the more frozen in time and space the subject appears. Slower shutter speeds capture more movement, the trace of the subject in time and space. This of course blurs the moving object, which may be good or bad, depending on the effect you are going for. A tripod is a must when shooting at slow shutter speeds to avoid camera shake. One factor to consider when photographing flowing water is the speed and turbulence of the water. The slower the flow of water, the longer the shutter speed needed to capture its movement. Another factor to consider is the amount of available light, as this influences which aperture setting you choose. In bright light situations, there is the potential to overexpose the image at slow shutter speeds. To compensate for this, I use a circular polarizing and/or a neutral-density filter. These reduce the amount of light entering the camera, allowing you to shoot at slower shutter speeds without overexposing the image. 4

18 f /8, 5 sec, 20 mm
19 The circular polarizer also reduces reflection or surface glare. To capture the water s movement in this image, I took several shots at different shutter speeds. At 1 sec the water s movement was not visible, and at 10 sec the image was slightly overexposed. Because I used a circular polarizing filter, I was able to use an aperture setting of f /8 and a shutter speed of 5 sec. I have photographed grasses, leaves, flowers, and snow blowing in the wind at slow shutter speeds. On your next hike, experiment with photographing moving objects at different shutter speeds. 6
20 DEPTH OF FIELD Area of Focus D epth of field is the area of the photograph that is in focus. This area of focus is determined by (1) aperture or f- stop, (2) the focal length of the lens, and (3) the distance between the camera and the subject. As previously mentioned, the smaller the aperture, the greater the depth of field. At the same time, depth of field decreases as the focal length of the lens increases. The trade-off here is that you gain magnification but lose depth of field. For example, the previous image was taken at a focal length of 20 mm. This provided a greater depth of field, allowing the entire image to be in focus. The trillium plant image here was taken at a focal length of 200 mm. This magnified the foregrounded trillium and compressed the depth of field. The depth of field also decreases the closer you are to your subject, regardless of the focal length of the lens. Again, you are trading magnification for depth of field. To take the trillium image, I positioned myself as close to the foregrounded trillium as possible in order to compress the depth of field. The combination of the focal length of the lens and the distance from the subject allowed me to blur the background. This simplified the background and accentuated the main trillium. 7
21 It also allowed me to set the aperture at f /11 so that I could maximize sharpness. In addition, I positioned the camera to take advantage of the sun s backlighting, giving the red petals a glow. Experiment with depth of field on your next hike. Photograph the same subject at different distances, keeping your aperture setting and lens focal length constant to see how depth of field changes. Or change focal length, keeping aperture and distance the same. 8

22 f /11, 1/200 sec, 200 mm 9
23 LIGHT Friend and Foe Light is both a friend and a foe to the nature photographer. It makes or breaks an image. Its direction, character, and color temperature affect how the subject is illuminated and perceived. Direction refers to frontlighting, sidelighting, and backlighting. Light s character is related to its source. Is it direct sunlight or soft, diffused sunlight (overcast sky)? Light has color, which is influenced by the time of day and meteorological conditions. Early morning and evening light are warmer (with an orange to red color), whereas afternoon light is cool (blue) in color. Finally, light changes, and as it changes, so does the appearance of the subject. What makes this image of Wedge Rock appealing is the lighting and the dusting of snow, which reflects the sunlight. I was fortunate to take this photograph early one foggy morning after a light fall of spring snow. The early morning light was from the back side of Wedge Rock, which brought out the shape and texture of the sandstone. The foggy background diffuses the light, creating a glow that allows the shape of Wedge Rock to stand out. The dusting of snow reflects light, creating shadows and adding to the three-dimensional feel of the 10

24 f /11, 1/60 sec, 35 mm image. To determine the exposure, I metered Wedge Rock (i.e., measured the reflection of light on the sandstone), to ensure that it would be properly exposed and that the background would be slightly overexposed, to give a glow. Because I wanted to bring out as much detail as possible in Wedge Rock, I set the aperture at f /11, aiming for sharpness versus depth of field. Explore how light changes nature by photographing the same subject under different lighting conditions. I have spent countless hours over the years just waiting for the lighting to change, a cloud to pass, so that I could get a better photograph. 11
25 COMPOSITION The Rule of Thirds The rule of thirds is an effective technique for composing nature photographs, and it is the one technique I consistently apply when framing my shots. As you view the scene through the camera, divide the image into thirds both vertically and horizontally. The points where the vertical and horizontal lines intersect represent the sweet spots. It is more pleasing to the eye if your subject touches these sweet spots or lies along one of the vertical or horizontal lines. This moves the subject away from the center of the image, which usually makes it more visually pleasing. To compose this image, I aligned the foregrounded beech trees along the vertical line and aligned the top of the ravine along the horizontal line. This placed the sweet spot on the beech trees and decentered them, making the image more striking. The eye also prefers images with odd-numbered subjects or asymmetrical compositions. For example, I composed the trillium image to contain three of the plants. The rule of thirds is a general guideline, and of course there are always exceptions to the rule. On your next hike, photograph the same subject, placing it along different vertical and horizontal lines and sweet 12

26 f /11, 1/50 sec, 22 mm spots in order to see how it affects the image. How does the placement of the horizon along the lower and upper horizontal lines change the look of your image? 13
27 COMPOSITION Line and Shape simple composition technique is to use leading lines A in nature to guide the viewer s eye through the image. I am always looking for these kinds of lines or shapes in nature as I frame my shots. Next to the rule of thirds, it is the most common technique I use. In general, straight diagonal lines convey action, and curved lines are more relaxing. Curved lines make the eye take longer to travel through the image, giving the sense of a journey. Here, the three groups of lines draw the eye through the image, intersecting in the end and giving closure. You feel as if you are walking through the canyon. It took me some time to find the right camera position to capture the convergence of the curved lines of the sandstone walls and the curved line formed by the creek bed and canyon floor. This required a wide-angle lens (10 mm) in order to place the camera close to the sandstone face and to capture the breadth of the scene, providing depth of field. To ensure depth of field, I used an aperture setting of f /22. The combination of focal length and aperture setting ensured that the image would be in focus. In addition to the leading lines, the image is divided into three shapes: 14

28 f /22, 13 sec, 10 mm two shapes created by the canyon walls and one created by the canyon floor; these also merge, bringing closure to the image. As you compose your next nature photograph, look for natural lines and shapes and use these to frame your shot. Then, change your perspective, switching the orientation of the lines and shapes to see how that affects your image, and where they lead the eye. 15
29 COMPOSITION Photostitching Photostitching is the process of combining multiple images to produce a single, panoramic image. This process has become easy to do with the improvement of photographic software. Although photostitching is commonly used to create landscape panoramas, I also use it to zoom in on natural phenomena to capture more detail. This process increases the size and resolution of the final image. This photograph of ferns growing on a sandstone ledge is a photostitched image: it was made by combining three overlapping images. I wanted to capture the detail of the sandstone ledge and ferns, so I zoomed in on the scene; however, by zooming in I lost the horizontal breadth of the ledge. Thus, I decided to take three zoomed-in images and photostitch them to capture the detail of the scene. I have found that when making a photostitched image, it is best to overlap each image by one-third. I try to find an identifiable marker that I use to guide me in overlapping each image. I have also found that, as you frame the subject, it is beneficial to leave an area around the image for postproduction cropping, just in case the images don t align perfectly. It is essential to use a tripod and move parallel to 16

30 f /20, 4 sec, 40 mm the subject. It is also critical that you use the same exposure settings and lens focal length. A consistent light source is helpful, and a stable subject is a must any movement will blur the final image. Longer focal lengths work better as there is less vignetting and distortion, making it easier for the photographic software to stitch the images. Although this image is a horizontal stitch, you can also stitch images vertically. There are a number of photographs in my book, A Place Called Turkey Run, that are photostitches. On your next hike, start looking at nature in parts and think about how you can stitch them together to make a whole. 17
31 HDR High-Dynamic Range Most modern cameras have a high-dynamic range (HDR) setting. This setting allows the nature photographer to compensate for wide ranges in brightness and shadows in the scene. The camera takes three images at different exposures and overlays the correctly exposed image (as set by the photographer) with the bright areas of the underexposed image and the dark areas of the overexposed image, creating one image that compensates for the ranges in brightness and contrast. This creates a photo with rich gradations, as seen here. The HDR setting allowed me to bring out the details and color of the foregrounded leaves without underexposing them. It also underexposed the bright sky, preventing the upper leaves from being washed out (overexposed). Because the shutter is released three times to create one image, a tripod is a must. Any motion in the camera or subject will blur the final image. This is different from bracket shooting in which the camera takes three consecutive images, each at a different exposure: the correctly exposed image, the underexposed image, and the overexposed image. I find the HDR setting to be advantageous when shooting in narrow canyons or in forest environments 18

32 f /11, 1/60 sec, 18 mm where the trees block the sunlight, creating wide ranges in light and shadows on the forest floor. If you have an HDR setting, photograph your subject or scene using HDR and compare it to one taken using a normal shooting mode. 19
33 UP CLOSE Extension Tubes To get up close and personal with nature I often use extension tubes. Extension tubes are placed between the lens and the camera, which moves the lens away from the sensor, allowing you take close-up shots. Extension tubes usually come in a set of three rings; for example, 12 mm, 20 mm, and 36 mm (the length will vary by brand). They may be used individually or in any combination to obtain the desired magnification. Two things to consider when using extension tubes are depth of field and lighting. As you add extension tubes, you decrease the depth of field and the amount of light that reaches the camera s sensor; thus, you have to open up the aperture or increase the shutter speed in order to properly expose the image. To take this close-up of Virginia bluebells, I used a 20 mm extension and a 300 mm focal length. This allowed me to position the camera close to the flower so that I could capture the detail of the stamens, its yellow anthers and white filaments. A light yellow dusting of pollen is also visible on the blue petal. By getting closer, I was able to eliminate unwanted and distracting details, simplifying the image. A tripod is a must for close-up work, as camera shake will blur the image. If you have extension 20

34 f /10, 1/50 sec, 300 mm tubes, use them on your next hike to get up close to nature. I have used them to photograph insects on leaves and flowers, buds, mosses, and mushrooms. 21
35 FOCAL LENGTH Wide-Angle versus Telephoto When deciding which lens to use, there are two questions to ask: (1) do you want magnification? or (2) do you want depth of field? The greater the focal length of the lens, the greater the magnification, which decreases the depth of field and the area captured by the sensor. A telephoto lens compresses space, moving the foreground and background into the same plane; thus, they appear closer together, as in the trillium photograph. Telephoto lenses also have a narrower angle of view, which allows you to crop out distractions. To capture the confined space of the Punch Bowl, I used a wide-angle lens, 22 mm. This allowed me to capture the depth of the canyon, backgrounding the Punch Bowl and foregrounding the icicles. Framing the shot with the canyon walls adds an element of intimacy and draws the eye into the image. Because I wanted a degree of sharpness, I went with an aperture of f /8, requiring a shutter speed of 1/60 sec. On your next hike, practice shooting with different focal lengths to see how it impacts the image and changes the composition. I often photograph the same subject using different focal lengths, in the end selecting the image 22

36 f /8, 1/60 sec, 22 mm that is more pleasing to the eye. Something to consider is whether or not you want to show your subject in context. If so, use a wide-angle lens. If not, use a telephoto lens. 23
37 PLANNING AND LUCK Taking Advantage of the Situation T aking good nature photographs goes beyond composing the shot. It involves planning the hike for the purpose of photographing a particular aspect of nature. Although it is about being in the right spot at the right time, there is also a little luck involved, along with the ability to take advantage of the situation. For example, although I planned to photograph Wedge Rock on one of my March hikes, I could not have predicted the spring dusting of snow. I was lucky in that sense, taking advantage of the snow, fog, and light to capture the images of Wedge Rock shown in A Place Called Turkey Run. At the same time, I know that if I want to photograph Virginia bluebells, I need to hike the park s floodplains and bottomlands in April. So, in this sense, it is about being in the right spot at the right time. I often plan my hikes with an intent to photograph a particular aspect of nature based on the time and place to take advantage of the quality and direction of the sunlight. This does not mean that I pass up a good shot, though, which is why I always hike with my camera pack. This image of the Punch Bowl illustrates taking advantage of the situation. I had just photographed the Punch Bowl from the 24

38 f /11, 1/13 sec, 16 mm canyon floor and hiked to the rim to photograph the falls from there. Because of the temperature difference from the bottom to the top of the Punch Bowl, my lens fogged over as I removed the lens cap. At first I was going to clean the lens, but then I decided to take advantage of the soft focus and ghostly feel created by the fogged lens. I also shot the image at a relatively slow shutter speed, 1/13 sec, to capture the movement of the water. The wide-angle lens (16 mm) allowed me to include the path of the flowing water from top to bottom. The point is, plan your photo hikes, but remain flexible to take advantage of the situation. 25
39 SEEING NATURE Telling a Story T o me, photographing nature is about being immersed in nature. It is about seeing nature from different perspectives, under different environmental conditions, and over time. It is about telling a story, whether about a place called Turkey Run or a landform such as Wedge Rock. To take these images of Wedge Rock, I took the time to get to know it, to experience it under different lighting conditions and from different perspectives. I always take my time photographing the site, moving around it, photographing it from different locations and angles, under different lighting, and in different weather conditions and seasons over time. On your next photo hike, be sure to take your time photographing nature spend some time seeing and reading nature and thinking about the shot. The image on the following page was taken from beneath Wedge Rock with a wide-angle lens in March, before the trees leafed out. This allowed the sunlight to penetrate the scene, giving a glow to the background. The image on page 28 was also taken in March, after a dusting of spring snow. 26

40 f /22, 3.2 sec, 10 mm In May, light reflected upwards created an orange glow from the underside of Wedge Rock (image on page 29). The image on page 30 was taken in October just as the leaves turned yellow and started to fall to the ground, contrasting with the green, moss-covered sandstone. 27
41 28 f /11, 1/60 sec, 18 mm

42 f /11, 1/8 sec, 18 mm 29

43 30 f /11, 1/8 sec, 24 mm


44 f /22, 3.2 sec, 10 mm f /11, 1/60 sec, 18 mm f /11, 1/8 sec, 18 mm f /11, 1/8 sec, 24 mm These four images of Wedge Rock provide four different perspectives, variations that work thematically to create a motif. Plan your next photo hike to focus on a theme, to tell a story. 31
45 CONCLUSION The Power and Importance of Nature Photography My goal as a nature photographer and environmental educator is to use the photographic image to celebrate and honor nature, to help others see, understand, and appreciate the natural world, and to instill in people a desire to preserve and protect our environment. Thus, for me, nature photography is more than taking good photographs of nature it is about using the image to learn about our natural world, to create a natural legacy, and to promote the preservation and protection of our natural world, not only for future generations, but also for the existence of nature in its own right. Turkey Run and the other state parks and natural areas of Indiana preserve and protect an assortment of amazing landforms and landscapes, beautiful scenery, and abundant and diverse forms of life. By photographing these special places, we preserve our experiences, enrich our memories, and document their natural heritage. The photographs we take and share give meaning to nature, and are visually effective in helping others understand and appreciate the natural world. The power of the photographic image to 32

46 f /11, 1/125 sec, 75 mm convey a visual perception of nature draws from the inherent appeal and popularity that individuals have toward photographs. 33
47 Good photographic images make visible the features, events, scenes, and spaces of our natural world. The images depict landforms, weather events, lighting conditions, and the plants and animals that make up the natural landscape. They capture and display wildlife and plants in their natural settings, highlighting the behaviors of wildlife and the structures of plants, and the spatial arrangement and openness of the landscape. Line, shape, texture, color, and value structure are important elements used in taking photographs that represent nature. Through the use of macro and telephoto lenses, nature can be captured up close or from afar. The camera and lens are tools for developing a sense of place for understanding our natural surroundings and our place within. The techniques presented in this book are effective in composing good nature photographs; however, there are always exceptions to the rules, and they are not always foolproof. In addition, there are other techniques not covered in this book, such as framing the subject and fill flash, to name two. And of course, one must practice to master these techniques. I often take practice hikes where I challenge myself to use a particular technique or lens to take my photographs. For example, I may only take photographs that involve lines and shapes, or I may only use a wide-angle lens. This forces me not only to 34

48 f /11, 1/125 sec, 135 mm practice, but also to see nature in a different way. Finally, you must also learn to see and work with nature as you compose the image. The more you know about the natural world, the more nature you will see through the lens. Following the techniques described in this book, along with practice, will enable you to take better nature photographs. It will also allow you to better represent and present nature to others, and empower others to appreciate and protect our natural world. 35
49
Failure is a crucial part of the creative process. Authentic success arrives only after we have mastered failing better. George Bernard Shaw
 PHOTOGRAPHY 101 All photographers have their own vision, their own artistic sense of the world. Unless you re trying to satisfy a client in a work for hire situation, the pictures you make should please
Autumn. Get Ready For Autumn. Technique eguide. Get Ready For
 Get Ready For Autumn Blink and you may have missed it, but our summer is behind us again and we re back into the short days and long nights of autumn. For photography however, the arrival of autumn means
Intro to Photography. Yearbook Mrs. Townsend
 Intro to Photography Yearbook Mrs. Townsend To begin with Photography is about telling a story. Good photographers use an image to make a point without words. People remember pictures of events long after
The "Art" of Daylily Photography
 by Jerry Gantar With another daylily season just weeks away this seems like a perfect time to share some helpful tips and techniques for photographing daylilies. We ll discuss the best times for taking
Landscape Photography
 Landscape Photography Francis J Pullen Photography 2015 Landscape photography requires a considered approach, and like fine wine or food, should not be rushed. You may even want scout out the desired location
Name Digital Imaging I Chapters 9 12 Review Material
 Name Digital Imaging I Chapters 9 12 Review Material Chapter 9 Filters A filter is a glass or plastic lens attachment that you put on the front of your lens to protect the lens or alter the image as you
CAMERA BASICS. Stops of light
 CAMERA BASICS Stops of light A stop of light isn t a quantifiable measurement it s a relative measurement. A stop of light is defined as a doubling or halving of any quantity of light. The word stop is
Topic 6 - Lens Filters: A Detailed Look
 Getting more from your Camera Topic 6 - Lens Filters: A Detailed Look Learning Outcomes In this lesson, we will take a detailed look at lens filters and study the effects of a variety of types of filter
Communication Graphics Basic Vocabulary
 Communication Graphics Basic Vocabulary Aperture: The size of the lens opening through which light passes, commonly known as f-stop. The aperture controls the volume of light that is allowed to reach the
A Beginner s Guide To Exposure
 A Beginner s Guide To Exposure What is exposure? A Beginner s Guide to Exposure What is exposure? According to Wikipedia: In photography, exposure is the amount of light per unit area (the image plane
sunpak picturesplus filters
 a lifetime of better pictures guaranteed! sunpak picturesplus filters see us in a new light for film cameras digital cameras camcorders cine cameras introducing sunpak picturesplus filters Our trusted
TAKING GREAT PICTURES. A Modest Introduction
 TAKING GREAT PICTURES A Modest Introduction HOW TO CHOOSE THE RIGHT CAMERA EQUIPMENT WE ARE NOW LIVING THROUGH THE GOLDEN AGE OF PHOTOGRAPHY Rapid innovation gives us much better cameras and photo software...
Photographing Waterfalls
 Photographing Waterfalls Developed and presented by Harry O Connor oconnorhj@yahoo.com May 3, 2010 All photos by Harry O Connor Introduction Waterfall photographs are landscapes Typical landscape considerations
Intro to Digital Compositions: Week One Physical Design
 Instructor: Roger Buchanan Intro to Digital Compositions: Week One Physical Design Your notes are available at: www.thenerdworks.com Please be sure to charge your camera battery, and bring spares if possible.
Photographing the Seasons. Spring
 Photographing the Seasons Ralph Russo and Jim Wildeman This program will provide ideas and projects to help you make pictures that capture the essence of each season. Although each season provides very
CHAPTER 7 - HISTOGRAMS
 CHAPTER 7 - HISTOGRAMS In the field, the histogram is the single most important tool you use to evaluate image exposure. With the histogram, you can be certain that your image has no important areas that
Weather & Time of Day
 Weather & Time of Day Here is another page with my blether where I will try to share my thoughts how weather and time of the day may affect the photograph and, of course, how to use it in expressing mood
USING LENSES A Guide to Getting the Most From Your Glass
 USING LENSES A Guide to Getting the Most From Your Glass DAN BAILEY A Guide to Using Lenses Lenses are your camera s eyes to the world and they determine the overall look of your imagery more than any
Photographing Waterfalls
 Photographing Waterfalls Developed and presented by Harry O Connor oconnorhj@yahoo.com July 26, 2017* All photos by Harry O Connor * Based on May 2012 topic Introduction Waterfall photographs are landscapes
Polarizers, how they work, when to use them, how to use them...
 Polarizers, how they work, when to use them, how to use them... Author's Note: This is a slightly updated version of an article on Polarization that Singh-Ray asked me to write several years ago. During
kewhatyou see? ISBN
 Li kewhatyou see? Buyt hebookat t hefocalbookst or e Ni kon D90 Di gi t al Camer agui de Hi l z ISBN 9780240811895 The Light 11_K81189_Ch03.indd 187 1/19/2009 12:20:50 PM HILZ-1 9780240811895 00010 11_K81189_Ch03.indd
Nature Photography. Why Bother With Nature Photography?
 Nature Photography Why Bother With Nature Photography? Today Some Fundamentals Birds and Wildlife Insects: Butterflies, Dragonflies, Bugs Landscapes Flowers and Plants Fundamentals: Tech Stuff Underlying
OUTDOOR PORTRAITURE WORKSHOP
 OUTDOOR PORTRAITURE WORKSHOP SECOND EDITION Copyright Bryan A. Thompson, 2012 bryan@rollaphoto.com Goals The goals of this workshop are to present various techniques for creating portraits in an outdoor
H Photography Judging Leader s Guide
 2019-2020 4-H Photography Judging Leader s Guide The photography judging contest is an opportunity for 4-H photography project members to demonstrate the skills and knowledge they have learned in the photography
Lighting Techniques 18 The Color of Light 21 SAMPLE
 Advanced Evidence Photography Contents Table of Contents General Photographic Principles. 2 Camera Operation 2 Selecting a Lens 2 Focusing 3 Depth of Field 4 Controlling Exposure 6 Reciprocity 7 ISO Speed
Aperture Explained. helping you to better understand your digital SLR camera SLR PHOTOGRAPHY GUIDE
 Aperture Explained helping you to better understand your digital SLR camera SLR PHOTOGRAPHY GUIDE WELCOME 1 helping you to better understand your digital SLR camera. This 4 part series will cover Aperture,
One Week to Better Photography
 One Week to Better Photography Glossary Adobe Bridge Useful application packaged with Adobe Photoshop that previews, organizes and renames digital image files and creates digital contact sheets Adobe Photoshop
PLANT + SHOOT GARDENER S PHOTOGRAPHY SERIES (GPS) GET GREAT GARDEN PHOTOS ON A CLOUDY DAY
 GET GREAT GARDEN PHOTOS ON A CLOUDY DAY") PLANT + SHOOT GARDENER S PHOTOGRAPHY SERIES (GPS) GET GREAT GARDEN PHOTOS ON A CLOUDY DAY GARDENER S PHOTOGRAPHY SERIES (GPS) GET GREAT GARDEN PHOTOS ON A CLOUDY DAY Copyright 2017 Tonya Peele. All rights
PLANT + SHOOT GARDENER S PHOTOGRAPHY SERIES (GPS) GET GREAT GARDEN PHOTOS ON A CLOUDY DAY GARDENER S PHOTOGRAPHY SERIES (GPS) GET GREAT GARDEN PHOTOS ON A CLOUDY DAY Copyright 2017 Tonya Peele. All rights
1. This paper contains 45 multiple-choice-questions (MCQ) in 6 pages. 2. All questions carry equal marks. 3. You can take 1 hour for answering.
 in 6 pages. 2. All questions carry equal marks. 3. You can take 1 hour for answering.") UNIVERSITY OF MORATUWA, SRI LANKA FACULTY OF ENGINEERING END OF SEMESTER EXAMINATION 2007/2008 (Held in Aug 2008) B.Sc. ENGINEERING LEVEL 2, JUNE TERM DE 2290 PHOTOGRAPHY Answer ALL questions in the answer
UNIVERSITY OF MORATUWA, SRI LANKA FACULTY OF ENGINEERING END OF SEMESTER EXAMINATION 2007/2008 (Held in Aug 2008) B.Sc. ENGINEERING LEVEL 2, JUNE TERM DE 2290 PHOTOGRAPHY Answer ALL questions in the answer
Photo Workshop. Make better pictures on your trip Photo tips from Oceanwide Expeditions
 Photo Workshop Make better pictures on your trip Photo tips from Oceanwide Expeditions Protect your gear During your trip in the Arctic or Antarctic you and your camera equipment will be exposed to a variety
Photographing the Night Sky
 JANUARY 20, 2018 ADVANCED Photographing the Night Sky Featuring STEVE HEINER, DIANA ROBINSON, PETE SALOUTOS & DEBORAH SANDIDGE Deborah Sandidge Nikon D3, 16mm lens, 30 sec., f/2.8. Image is one of a series
Outline for Tutorials: Strobes and Underwater Photography
 Outline for Tutorials: Strobes and Underwater Photography I - Strobes Conquering the Water Column Water column - depth plus distance from camera to subject; presents challenges with color, contrast, and
TENT APPLICATION GUIDE
 TENT APPLICATION GUIDE ALZO 100 TENT KIT USER GUIDE 1. OVERVIEW 2. Tent Kit Lighting Theory 3. Background Paper vs. Cloth 4. ALZO 100 Tent Kit with Point and Shoot Cameras 5. Fixing color problems 6. Using
Introduction to camera usage. The universal manual controls of most cameras
 Introduction to camera usage A camera in its barest form is simply a light tight container that utilizes a lens with iris, a shutter that has variable speeds, and contains a sensitive piece of media, either
Creating Stitched Panoramas
 Creating Stitched Panoramas Here are the topics that we ll cover 1. What is a stitched panorama? 2. What equipment will I need? 3. What settings & techniques do I use? 4. How do I stitch my images together
TAKING GREAT PICTURES. A Modest Introduction
 TAKING GREAT PICTURES A Modest Introduction 1 HOW TO CHOOSE THE RIGHT CAMERA EQUIPMENT 2 THE REALLY CONFUSING CAMERA MARKET Hundreds of models are now available Canon alone has 41 models 28 compacts and
Fig. 1 Overview of Smart Phone Shooting
 1. INTRODUCTION While major motion pictures might not be filming with smart phones, having a video camera that fits in your pocket gives budding cinematographers a chance to get excited about shooting
Intro to Digital SLR and ILC Photography Week 1 The Camera Body
 Intro to Digital SLR and ILC Photography Week 1 The Camera Body Instructor: Roger Buchanan Class notes are available at www.thenerdworks.com Course Outline: Week 1 Camera Body; Week 2 Lenses; Week 3 Accessories,
10 Tips for Shooting Autumn Foliage
 FEBRUARY 22, 2019 INTERMEDIATE 10 Tips for Shooting Autumn Foliage A Checklist for Great Fall Color Photos Featuring ROD PLANCK D3S, AF-S NIKKOR 70-200mm f/2.8g ED VR II, 1/250 second, f/16, ISO 560, aperture
PHOTOGRAPHING THE LUNAR ECLIPSE
 1/29/18 PHOTOGRAPHING THE LUNAR ECLIPSE NICK SINNOTT CHICAGO PHOTOGRAPHY CLASSES PREPARATION TIMING AND FINDING LOCATION https://www.timeanddate.com/moon/phases/ - Dates of Lunar Phases 1 PREPARATION TIMING
Until now, I have discussed the basics of setting
 Chapter 3: Shooting Modes for Still Images Until now, I have discussed the basics of setting up the camera for quick shots, using Intelligent Auto mode to take pictures with settings controlled mostly
LANDSCAPE PHOTOGRAPHY TIPS JOE COSENTINO & 1SONNY PORTACIO
 LANDSCAPE PHOTOGRAPHY TIPS JOE COSENTINO & 1SONNY PORTACIO Landscapes: Some tips as you get started. When approaching an area, be observant, scan the scene, and ask yourself some key questions: Are there
1. Any wide view of a physical space. a. Panorama c. Landscape e. Panning b. Grayscale d. Aperture
 Match the words below with the correct definition. 1. Any wide view of a physical space. a. Panorama c. Landscape e. Panning b. Grayscale d. Aperture 2. Light sensitivity of your camera s sensor. a. Flash
IMAGES OF MOVING SUBJECTS
 IMAGES OF MOVING SUBJECTS Capturing images of a scene where one or more subjects are in motion Charles Ginsburgh - Fotoclave 2017 (November 4 th, 2017 ) As you view these Images, think about What the Story
Camera controls. Aperture Priority, Shutter Priority & Manual
 Camera controls Aperture Priority, Shutter Priority & Manual Aperture Priority In aperture priority mode, the camera automatically selects the shutter speed while you select the f-stop, f remember the
Elements of Exposure
 Elements of Exposure Exposure refers to the amount of light and the duration of time that light is allowed to expose film or a digital-imaging sensor. Exposure is controlled by f-stop, shutter speed, and
from what someone else does. I don t think there is a right and wrong way to get these shots
 Tips for Photographing Wildflowers Connie Cassinetto May 2017 Paintbrush, ISO 400, 1/160, f/11. www.cassinettophotos.com Photographing wildflowers can be frustrating at times. It seems that every time
Chapter 6-Existing Light Photography
 Chapter 6-Existing Light Photography All of these images were taken with available light. Painting with light-using available light Photography that includes artificial light which naturally exists in
VITAL LANDSCAPE TECHNIQUES. Beyond the Basics Mahmood Anwar
 VITAL LANDSCAPE TECHNIQUES Beyond the Basics Mahmood Anwar Architecture and landscape photography techniques Composing landscape and architecture photos Nature, landscape and architecture photos can be
Tower. Richard Meston. Reikan Photography 1. Sunrise at the Tower Park Water Tower
 Tower Sunrise at the Tower Park Water Tower Richard Meston Reikan Photography http://www.reikanphotography.co.uk 1 Contact / Feedback Information Rich Meston, Reikan Photography http://www.reikanphotography.co.uk
PHOTOGRAPHING THE ELEMENTS
 PHOTOGRAPHING THE ELEMENTS PHIL MORGAN FOR SOUTH WEST STORM CHASERS CONTENTS: The basics of exposure: Page 3 ISO: Page 3 Aperture (with examples): Pages 4-7 Shutter speed: Pages 8-9 Exposure overview:
A taste for landscapes
 A taste for landscapes NEPG workshop October 2012 Colin White 1 Main ingredients 1. Light 2. Composition 3. Kit 4. Post production 2 Light Hue, direction, dynamic range Time of day - around sunrise or
DSLR Cameras have a wide variety of lenses that can be used.
 Chapter 8-Lenses DSLR Cameras have a wide variety of lenses that can be used. The camera lens is very important in making great photographs. It controls what the sensor sees, how much of the scene is included,
DIGITAL PHOTOGRAPHY FOR OBJECT DOCUMENTATION GOOD, BETTER, BEST
 DIGITAL PHOTOGRAPHY FOR OBJECT DOCUMENTATION GOOD, BETTER, BEST INTRODUCTION This document will introduce participants in the techniques and procedures of collection documentation without the necessity
Travel Photography & Advanced Photographic Techniques
 Travel Photography & Advanced Photographic Techniques Presented by Tallahassee Senior Center Volunteer Instructor: Dr. Mike Francis Email: drmikef@comcast.net Website: http://www.maf1.com/dcc 2006-2016
Digital camera modes explained: choose the best shooting mode for your subject
 Digital camera modes explained: choose the best shooting mode for your subject On most DSLRs, the Mode dial is split into three sections: Scene modes (for doing point-and-shoot photography in specific
Eastman Camera Club Feb. 21, 2008 PHOTOGRAPHING WATER. Taking pictures of lakes, rivers, streams, and waterfalls.
 Eastman Camera Club Feb. 21, 2008 PHOTOGRAPHING WATER Taking pictures of lakes, rivers, streams, and waterfalls. Some Questions to Consider When Photographing Water Artistic Questions Do you want to blur
Shooting Manual. Set your shooting mode to M
 Shooting Manual WHY Shooting Manual Set your shooting mode to M Shooting Manual 3 variables that determine your exposure: 1. ISO 2. Aperture 3. Shutter Speed Shooting Manual 1. ISO The camera s general
Travel & Landscapes. Introduction
 Introduction Landscape photography captures the natural environment, but can also include man made features within that environment. A striking and breathtaking landscape image will appeal to all our senses
aperture, shutter speed
 CUDGEGONG C A M E R A C L U B aperture, shutter speed and ISO exposure When you think of the craft or art of photography, you must immediately think of exposure. Exposure is a critical element that determines
Seniors Photography Workshop
 Seniors Photography Workshop Some images stand out from the crowd & make viewers say WOW! Today we will look at how you can give your images that WOW Factor.. So let s think about what makes an
Aperture. The lens opening that allows more, or less light onto the sensor formed by a diaphragm inside the actual lens.
 PHOTOGRAPHY TERMS: AE - Auto Exposure. When the camera is set to this mode, it will automatically set all the required modes for the light conditions. I.e. Shutter speed, aperture and white balance. The
Kent Messamore 3/12/2010
 Photo Composition Kent Messamore 3/12/2010 Composition Choosing a Subject Quality of Light Framing the Image Depth of Field Backgrounds and Foregrounds Viewpoint Leading Lines Contrasts Patterns Negative
How to take photographs
 SCHOOL PROMOTIONS UNIT How to take photographs A quick guide to help you set up and take great photos of the students and activities at your high school Contents Glossary 4-5 Composition 4 Equipment 4
Class 1- Black & White
 2011 State Fair Photography Judging Class 1- Black & White Place the four photos here & size for short dimension to 2 1 2 3 4 Select class Class 1 Class 2 Class 3 Class 4 Class 5 Class 6 Black & White
A BEGINNER S GUIDE TO PHOTOGRAPHY CHEATSHEET
 A BEGINNER S GUIDE TO PHOTOGRAPHY Cameras are complicated. It took me a ton of trial and error before I started to capture some pretty spectacular images. This cheatsheet is the reference guide I wish
by Don Dement DPCA 3 Dec 2012
 by Don Dement DPCA 3 Dec 2012 Basic tips for setup and handling Exposure modes and light metering Shooting to the right to minimize noise 11/17/2012 Don Dement 2012 2 Many DSLRs have caught up to compacts
How to Photograph Fireworks
 How to Photograph Fireworks Whether you're celebrating Independence Day, Guy Fawkes Day, or Diwali, it's always tempting to take pictures of the fireworks exploding in air. After all, a good firework show
Troop 61 Self-Teaching Guide to Photography Merit Badge
 Troop 61 Self-Teaching Guide to Photography Merit Badge Scout Name: Date: Adapted from: Kodak Self-Teaching Guide to Picture-Taking Scout Name: Date: Init Date 1. Take and paste pictures into your booklet
Wave or particle? Light has. Wavelength Frequency Velocity
 Shedding Some Light Wave or particle? Light has Wavelength Frequency Velocity Wavelengths and Frequencies The colours of the visible light spectrum Colour Wavelength interval Frequency interval Red ~ 700
Improving Your Basic Photography
 Improving Your Basic Photography Steve Dell Tonight s Topics Camera Styles & Types Camera Selection Tips Shooting Tips Shooting Techniques Shooting Triumphs 1 2 Camera Styles & Types Point & Shoot (P&S)
Mastering Y our Your Digital Camera
 Mastering Your Digital Camera The Exposure Triangle The ISO setting on your camera defines how sensitive it is to light. Normally ISO 100 is the least sensitive setting on your camera and as the ISO numbers
Eileen Donelan. What s in my Camera Bag? Minimum Camera Macro Lens Cable Release Tripod
 Close Up Photography Creating Artistic Floral Images Eileen Donelan Equipment Choices for Close Up Work What s in my Camera Bag? Minimum Camera Macro Lens Cable Release Tripod Additional Light Reflector
JULY 6, Creating A Long Exposure Look Without The Wait or ND Filter
 JULY 6, 2018 INTERMEDIATE Creating A Long Exposure Look Without The Wait or ND Filter Featuring NIKON AMBASSADOR MOOSE PETERSON Water has a life, rhythm and romance which, when trying to capture it in
How to Photograph Desert Plants and Flowers
 How to Photograph Desert Plants and Flowers Item Type Article Authors West, Joanne Publisher University of Arizona (Tucson, AZ) Journal Desert Plants Rights Copyright Arizona Board of Regents. The University
Aperture: Circular hole in front of or within a lens that restricts the amount of light passing through the lens to the photographic material.
 Aperture: Circular hole in front of or within a lens that restricts the amount of light passing through the lens to the photographic material. Backlighting: When light is coming from behind the subject,
mastering manual week one
 THE PURPOSE OF THIS WORKSHOP IS TO PUT THE POWER AND CONTROL OF THE CAMERA INTO YOUR OWN HANDS. When we shoot in automatic, we are at the mercy of the camera s judgment and decisions. Learning the techniques
Present. Architecture
 Present Cary Photographic Artists Architecture A Mastering the Art of Photography Topic Developed by Sterling E. Stevens September 20, 2012 Note 1: All notes are on the final page Agenda Useful equipment
H Photography Judging Leader s Guide
 2017-2018 4-H Photography Judging Leader s Guide The photography judging contest is an opportunity for 4-H photography project members to demonstrate the skills and knowledge they have learned in the photography
! 1! Digital Photography! 2! 1!
 ! 1! Digital Photography! 2! 1! Summary of results! Field of view at a distance of 5 meters Focal length! 20mm! 55mm! 200mm! Field of view! 6 meters! 2.2 meters! 0.6 meters! 3! 4! 2! ! 5! Which Lens?!
TABLETOP WORKSHOP. Janet Steyer
 QUALITIES OF LIGHT There are 6 qualities of light. TABLETOP WORKSHOP Janet Steyer 03-19-05 The first 3 QUALITIES OF LIGHT can be measured. They can also be manipulated after a photograph is taken. You
Presented by Craig Stocks Arts by Craig Stocks Arts
 Presented by Craig Stocks Arts www.craigstocksarts.com 2010 by Craig Stocks Arts Basic camera settings for point and shoot cameras (resolution, quality) Resolution - how much can you enlarge a picture?
Blue Hour and HDR Tutorial by John Strung
 Blue Hour and HDR Tutorial by John Strung the Blue Hour is a wonderful time of night when photography can yield images of intense blue colours. Blue Hour is a bit of a misnomer for two reasons. There are
TAKING BETTER PHOTOS ON ANY DEVICE
 TAKING BETTER PHOTOS ON ANY DEVICE Sarah Dudik Public Information & Marketing HOW TO TAKE BETTER PHOTOGRAPHS The device you use isn t as important as how you are looking through it Any device can be used
Improve Your Photography by using Simple Camera Settings and Techniques
 Improve Your Photography by using Simple Camera Settings and Techniques Francis J Pullen 2012 +44 (0)7768 364 567 images@francispullen.co.uk www.francispullen.co.uk Introduction Digital Cameras offer tremendous
Macro and Close-up Photography
 Photo by Daniel Schwen Macro and Close-up Photography Digital Photography DeCal 2010 Nathan Yan Kellen Freeman Some slides adapted from Zexi Eric Yan What Is Macro Photography? Macro commonly refers to
To start there are three key properties that you need to understand: ISO (sensitivity)
") Some Photo Fundamentals Photography is at once relatively simple and technically confusing at the same time. The camera is basically a black box with a hole in its side camera comes from camera obscura,
Some Photo Fundamentals Photography is at once relatively simple and technically confusing at the same time. The camera is basically a black box with a hole in its side camera comes from camera obscura,
Understanding and Using Dynamic Range. Eagle River Camera Club October 2, 2014
 Understanding and Using Dynamic Range Eagle River Camera Club October 2, 2014 Dynamic Range Simplified Definition The number of exposure stops between the lightest usable white and the darkest useable
On Camera Flash. Daniel Foley
 On Camera Flash Daniel Foley Topics How does E-TTL Flash Work? General Flash Points E-TTL Flash and different Program Modes Flash Techniques Diffuser Options Get the most out of E-TTL How I approach Flash
Tips for Digital Photographers
 Introduction to In my Tips for Digital Photographers outlining shutter speed and f-stop settings we discuss how these two settings are a basis for good creative photography. Shutter speed combined with
Understanding Focal Length
 JANUARY 19, 2018 BEGINNER Understanding Focal Length Featuring DIANE BERKENFELD, DAVE BLACK, MIKE CORRADO & LINDSAY SILVERMAN Focal length, usually represented in millimeters (mm), is the basic description
TIPS FOR CREATIVE AUTUMN PHOTOGRAPHY
 TIPS FOR CREATIVE AUTUMN PHOTOGRAPHY by Chris O Donnell, www.creativeraw.com Autumn is, by far, my favorite season to photograph. The first piece of foliage signals the beginning of an ethereal journey
Capturing Realistic HDR Images. Dave Curtin Nassau County Camera Club February 24 th, 2016
 Capturing Realistic HDR Images Dave Curtin Nassau County Camera Club February 24 th, 2016 Capturing Realistic HDR Images Topics: What is HDR? In Camera. Post-Processing. Sample Workflow. Q & A. Capturing
The Basic SLR
 The Basic SLR ISO Aperture Shutter Speed Aperture The lens lets in light. The aperture is located in the lens and is a set of leaf like piece of metal that can change the size of the hole that lets in
Camera Exposure Modes
 What is Exposure? Exposure refers to how bright or dark your photo is. This is affected by the amount of light that is recorded by your camera s sensor. A properly exposed photo should typically resemble
However, it is always a good idea to get familiar with the exposure settings of your camera.
 296 Tips & tricks for digital photography Light Light is the element of photography. In other words, photos are simply light captured from the world around us. This is why bad lighting and exposure are
DSLR Essentials: Class Notes
 DSLR Essentials: Class Notes The digital SLR has seen a surge in popularity in recent years. Many are enjoying the superior photographic experiences provided by these feature packed cameras. Interchangeable
DIGITAL PHOTOGRAPHY CAMERA MANUAL
 DIGITAL PHOTOGRAPHY CAMERA MANUAL TABLE OF CONTENTS KNOW YOUR CAMERA...1 SETTINGS SHUTTER SPEED...2 WHITE BALANCE...3 ISO SPEED...4 APERTURE...5 DEPTH OF FIELD...6 WORKING WITH LIGHT CAMERA SETUP...7 LIGHTING
Presented to you today by the Fort Collins Digital Camera Club
 Presented to you today by the Fort Collins Digital Camera Club www.fcdcc.com Photography: February 19, 2011 Fort Collins Digital Camera Club 2 Film Photography: Photography using light sensitive chemicals
Photographing your dog running towards you.
 Photographing your dog running towards you. There is a reason that I didn t start off with action. You need a strong foundation in the other aspects of photography. The guidelines here are based on the