Copyrights and Trademarks. Autodesk Pixlr. Trademarks. Disclaimer. Published by: Autodesk, Inc.
|
|
|
- Scot Dickerson
- 6 years ago
- Views:
Transcription

1

2 Copyrights and Trademarks Autodesk Pixlr 2015 Autodesk, Inc. All Rights Reserved. Except as otherwise permitted by Autodesk, Inc., this publication, or parts thereof, may not be reproduced in any form, by any method, for any purpose. Certain materials included in this publication are reprinted with the permission of the copyright holder. Trademarks Except as otherwise permitted by Autodesk, Inc., this publication, or parts thereof, may not be reproduced in any form, by any method, for any purpose. The following are registered trademarks or trademarks of Autodesk, Inc., and/or its subsidiaries and/or affiliates in the USA and other countries: Autodesk Pixlr, Pixlr, Pixlr Editor, and Pixlr-o-matic. All other brand names, product names or trademarks belong to their respective holders. Disclaimer THIS PUBLICATION AND THE INFORMATION CONTAINED HEREIN IS MADE AVAILABLE BY AUTODESK, INC. AS IS. AUTODESK, INC. DISCLAIMS ALL WARRANTIES, EITHER EXPRESS OR IMPLIED, INCLUDING BUT NOT LIMITED TO ANY IMPLIED WARRANTIES OF MERCHANTABILITY OR FITNESS FOR A PARTICULAR PURPOSE REGARDING THESE MATERIALS. Published by: Autodesk, Inc. 111 McInnis Parkway San Rafael, CA 94903, USA

3 Contents Copyrights and Trademarks 2 Autodesk Pixlr 2 Trademarks 2 Disclaimer 2 Published by: 2 Welcome to Autodesk Pixlr 4 Introduction 5 Give me the basics 6 camera - aka Pixlr Live 6 photos and fresh 6 collage 7 Editing Tools 8 vibrance 9 history 10 double exposure 11 stylize 12 sharpen 12 smooth 12 red-eye 12 brighten 13 focal 13 heal 14 splash 15 crop 16 rotate 17 autofix 17 color 17 autocontrast 18 blur 19 Limited time effects packs 19 Effects 20 Borders 20 Overlay 21 Stickers 22 Type 23 Sharing, saving, settings, and support 24 Sharing/saving my image 25 Settings 26 Default save size 26 Default save folder 26 Camera mode 26 Approve data collection 26 Log out of Facebook/Log out of Twitter 26 More apps from Pixlr 26 Visit pixlr.com 26 Legal/Privacy 26 Blending 27 How do I lighten double exposed image? 28 How do I make an added image look like it s part of the original photo? 29 Membership 30 What is the difference between the versions? 31 Essentials membership 31 How do I sign up? 31 Support 32

4 Welcome to Autodesk Pixlr Pixlr is a fun and powerful photo editor that lets you quickly crop, rotate, and fine-tune any picture, all in a completely ad-free experience. Choose from over 2 million combinations of free effects, overlays, and borders to further personalize your image. It is built for anyone who takes pictures and wants to do such things as edit images to be shared through Facebook and Twitter. Pixlr runs on mobile devices, as well as on Windows and Mac systems. Autodesk Pixlr as brand will now extend to what was Pixlr Express as of version 2.5. If you want to use Pixlr on your computer through the web or try another Pixlr app, we have these other image tools and utilities, some of which are cloud-based: Pixlr Editor is a full-featured web photo editor, that opens directly in your browser, no download, no wait and 100% free. It contains lots of the features you normally see in desktop applications, just a click away. Jump in and start using this tool, no registration required and loads in matter of seconds. Pixlr-o-matic is a fun and simple photography/ darkroom Android and ios app that makes it easy to quickly add style to your photos using effects, overlays, and borders. Whether you are looking to get a retro, grunge, clean, or stylish look, Pixlr-o-matic makes it easy in just three simple steps. With over 2 million editing combinations to choose from, you will never be out of new styles that make your photos look spectacular.
5 What s New
 and autocontrast. Compare the before and after of your awesome photos with our new compare tool.")
6 Here s what s new for this release: Google Chromecast support - cast Pixlr from your phone or tablet to your TV. Now available for everyone - double exposure (formerly known as add image) and autocontrast. Compare the before and after of your awesome photos with our new compare tool. Save or share your images, easier and quicker, with a single tap. For you Instagram enthusiasts, before sharing, we ve framed your pictures, making them square, without cropping them. Added opacity adjustment to stylize. Fixed the occasional the heal tool issue that caused the app to unexpectedly quit. Fixed the zooming in and out issue when working on a specific photo in collage. Editted image Original seen with Compare
7 Introduction


8 Give me the basics When you launch the app, if there s a new pack campaign, you will see it advertised. You can open an image from your photos, use the newest one on your device, take an image with your camera, or use collage to pick individual image. camera - aka Pixlr Live Tap camera to take a picture and enter Pixlr Live. When in this mode, the following icons ( for effects and for overlays) appear on the screen. Tap them to enter that mode, then swipe the screen left or right until you find the effect/overlay you want. These appear over your live image, instantly. If you decide not to choose an effect or overlay, just swipe through the options, until it is removed. To remove both, tap the in the top left corner. Tap to snap the pic, then either to keep the image or not to. If you kept the image, Pixlr opens for you to use. For Android users, to always open Pixlr in Pixlr Live mode, in your settings, ensure Camera mode is enabled. photos and fresh Tap photos to load an image from your photo gallery or another place on your device. Tap fresh to load the last image taken with your camera.


9 collage Tap collage. Select a layout, set the spacing between frames, roundness of frame corners, the proportions of the frames, and frame color. Tap layout, swipe through and select the layout you want. Tap spacing, then drag the slider to set the width of the frame. Tap roundness, then drag the slider to set the roundness of the interior corners of the frames. Tap proportions to set the size of the frames. Tap background to set the color of the frame. To load an image for ios users 1. Tap collage. 2. Tap inside a frame to load an image and make it active. 3. Tap-drag an image to reposition it. 4. Pinch an image to zoom out or expand your fingers to zoom in. NOTE If you want to edit the image, tap edit to apply various Pixlr effects. Tap replace to select a different image for the frame.


10 To load an image for Android users 1. Tap Collage, the photos you want to use, then Done. 2. Once you ve used the various collage tools, tap-drag an image to reposition it. 3. Pinch an image to zoom out or expand your fingers to zoom in. NOTE If you want to edit the image, tap Edit to apply various Pixlr effects. If you want to change the image, tap Replace. When done, tap Finish to return to the collage tools.

11 Once you have loaded an image, you can check out the UI and get started. Here s a run-down of the tools at your disposal. Along the top is the menu with sign in, a news feed, and tips, plus the compare, undo, redo, cancel and saving options. Along the bottom is your editing tools.

12 Editing Tools

13 Adjustment Tools Use the adjustment tools to make changes to your image, from removing red-eye to creating a double exposure. Below, you will find a description for each tool and examples of what they can do. vibrance Use the slider to make colors either pop or look more subdued. Original image Decreased vibrance Increased vibrance


14 history brush Since an effect is applied to the full image, use history brush to remove the effect from parts of the image or add it back to others. Original image Select an effect and apply it to your image. Tap history brush and adjust brush size. Effect applied Tap brush and brush over wherever you want to remove the effect. Tap erase and brush over wherever you need to add the effect back. Effect removed in with history brush


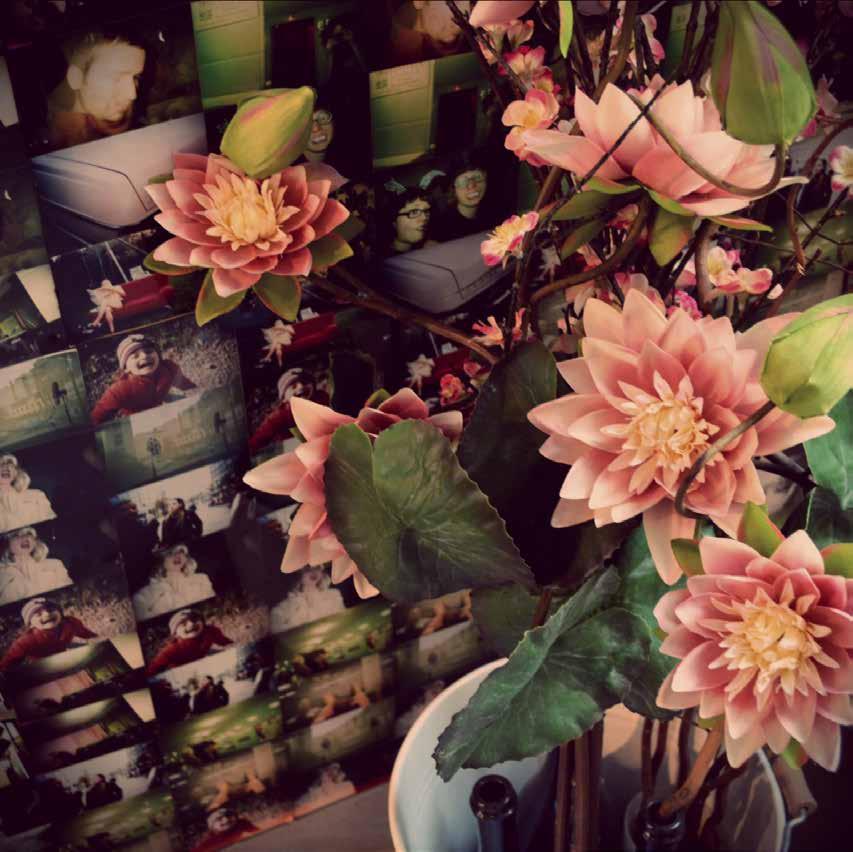
15 double exposure With this tool, you can merge two images together. Import an outside image, position it over the original, resize it, and change the transparency, so that it blends in better with the original image. Apply a blend mode to control how the image blends with the original. Tap double exposure and select an image. Now, it looks like these guys are checking out Niagara Falls from the window of their hotel. To resize the image, do either of the following: With two fingers, pinch to make the image smaller or expand your fingers to make it larger. With one finger, tap-drag either of the handles on the box. To make the image look like part of the original image: Change the opacity of the image. Tap blend and select a blend mode to determine how the images are combined. For more information, see Blending.


16 stylize Transform your image to look like a pencil drawing, silk screen, poster, lithograph, and much more. smooth If your image is pixelated, you can soften it to give it a smoother and more unified look. Adjust the amount and tap. Before After Use fade to control how stylized your image will be. Before After sharpen Make blurry or fuzzy images crisper. Adjust the amount and radius, then tap. TIP If you want part of the image to remain crisp and sharp, use the history brush after to remove any smoothing. red-eye Remove red-eye from any image. Tap the eye, then. Before After Before After


17 brighten Use brighten to whiten teeth and lighten dark spots to draw attention to them. focal Play with focal blur to focus on a specific part of your image. Before After To paint over an area an brighten it, select brush, then brush size and set the brush, and whitening to set how bright the change will be. If you brighten something by mistake, use erase and paint over the area, or to start over, tap reset. Without focal blur After When finished, tap.


18 heal Remove spots, lighten shaded areas, and reduce shine. Blemishes, lens specs, dark undereye circles, even wrinkles can be corrected. Before After To darken an area, select brush, then size and set the brush size, then tap shine. To lighten an area, select shade and brush over the area. To make spot corrections, select spot and brush over the area. TIP Try using these options in combination. When finished, tap.


19 splash Select splash to isolate a color or range of colors in your image and change the rest of the image to black and white. Tap-drag over the color your want. Before splash After To change the amount of color you see, move the tolerance slider to the right for more color or left for less. To add color to areas, tap brush and brush over them. To remove color from an area, tap erase and brush over the area. Tap to apply the effect or to cancel it.
")


20 crop Before After Finished image (autofix, autocontrast, & focal blur) To move the grid into position, tap-drag within the grid. To resize the box, do either of the following: With two fingers, pinch to make the box smaller or expand your fingers to make it larger. With one finger, tap-drag on the frame of the box.


21 rotate Is one of your images not quite straight? Is the horizon on an angle and you want to correct that? Use rotate. autofix Take any image, whether the color is slightly off, it s too dark, what have you, and use autofix to improve it. Before After To control the angle of rotation, use angle. A grid appears over the image to help you line things up. To rotate the image in 90 degree increments, use rotate. To flip the image, use either vertical or horizontal. Before color Change the hue, saturation, or lightness of an image. After When finished, tap. Before After


22 autocontrast Instantly improve the contrast of any image with the touch of a button. Autocontrast will subtly fix issues with shadows and lighting. Before Contrast Autoconstrast Image created by John Bavaro in SketchBook contrast Before After Fix issues with shadows by lightening these areas and pulling out hidden details. For images that are too light, it darkens them to pull out more detail.


23 blur Make an image appear out of focus or use blur in conjunction with then brush over the areas you want in focus. history brush to blur the entire image, Before Blurred Blurred and history brush Limited time packs From time-to-time, you will see a new pack appear in the tool bar along the bottom of your device. These packs are available to Essentials members. To get them, sign up to become an Essentials member. See How do I sign up?.


24 Effects Apply effects to create vintage black and white or sepia toned images, make subtle changes to colors, and/or instantly create new layouts. Borders Add a border from a variety of categories to frame your image. Before After Before After Use fade to control the strength of an effect. Tap to apply the effect or to cancel it. Use fade to set the transparency of a border. Use horizontal, vertical, and rotate to position a border. Essentials members get additional packs.


25 Overlay Apply an image or effect over top of your image. Choose from bokeh, chemical burns, flames, and many more to alter the feel of your image. Before After Use fade to set the transparency of an overlay. Use horizontal, vertical, and rotate to position an overlay. Essentials members get additional packs.


26 Stickers A huge assortment of stickers from over 10 categories are available for enhancing your image. Select a sticker. Swipe to the left or right to see more. Before With one finger, drag the sticker into position. With one finger, tap-drag the top handle to rotate the sticker. To resize the sticker, do either of the following: During With two fingers, pinch to make the sticker smaller or expand your fingers to make it larger. With one finger, tap-drag either of the handles on the box. Tap fade and drag the slider to make the sticker more transparent. This can help make a sticker look like it s part of the original image. After Essentials members get additional packs.


27 Type Use type to add text to your image. Pick from a variety of typefaces, scale and reposition the text, and even change the color. Select a typeface. Swipe to the left or right to see more. With one finger, drag the type box into position. Tap within the type box and enter your text. Tap color and select a color. To grab a color from your image, tap select, then tap the color in your image. With two fingers, pinch to make your text smaller or expand your fingers to make it larger. Tap apply to keep your changes or cancel to start over.

. Remove your finger from to see your final image.")

28 Compare After making changes to an image, you may want to compare the original image and final. Use the compare tool for this. For ios users, at the top of your screen and to the right of menu, tap-hold to see the before (original image). Remove your finger from to see your final image. For Android users, after you make a change to your image, but before tapping Apply, Compare appears in the top left corner. Tap-hold to see the before (original image). Remove your finger from to see your final image. ios Android

29 Sharing, saving, settings, and support


30 Sharing/saving my image After creating something really cool, you may want to share it. With the , Instagram, Facebook, and Twitter options, pick your method. For ios users, at the top right of your screen, are tap done. For Android users, tap Finish. To share your image, select one of the social media options, such as Instagram, Facebook, or Twitter. To save the image at its current size, tap Save Image to save to your camera roll. For Android users, the image is saved to your default save folder. To change where images are saved, see Default save folder. To change the size of an image, tap Resize Image. For Android users, once you have selected Save Image, you can select the size of the image and tap OK to change the size of the image. For ios users, in the next window, select a size and tap Save. The image is saved to your camera roll. TIP To set the default size of a saved image, see Default save size.

31 Settings For Android users, in the top left corner of the startup screen, tap access your Pixlr settings. to Default save size Tap this option and set the size your image is saved as: Small, Medium, Max, or Custom. When saving an image, you can also select a size and tap Keep as default to set the default size of saved images from within the app. Default save folder The name of the default folder where you can find your saved Pixlr images is displayed below this option. By default, images are saved to your Pixlr folder. To change this, tap the folder and navigate to the one you want. Tap OK. Camera mode When this option is selected, you automatically enter Pixlr Live whenever you open the app. You will be in camera mode, ready to take pics. The following icons ( for effects and for overlays) appear on the screen. Tap them to enter that mode, then swipe the screen until you find the effect/ overlay you want. These appear over your live image, instantly. If you decide not to choose an effect or overlay, just swipe through the options until it is removed. To remove both, tap the in the top left corner. Tap to snap the pic, then either to keep the image or not to. If you kept the image, Pixlr opens for you to use. Approve data collection When checked, you agree to the collection of usage data. For more information, tap Legal/Privacy (the last option in Settings).

32 Log out of Facebook/Log out of Twitter Tap these to sign out of these social sharing sites. More apps from Pixlr Tap this option to access information on the other Pixlr apps. Visit pixlr.com Tap this option to go to the Pixlr site to read the blog, support content, or docs, and checkout the latest tutorials. Legal/Privacy Tap this option for information on our legal and privacy policies. NOTE ios users see this content when they tap.

33 Blending Use blending in the double exposure tool to intelligently blend one image seamlessly into another. All you need to do is import and position the image over the original image, resize it, and adjust the opacity, if necessary.

34 How do I lighten double exposed image? There are a couple blend tools you can use for this: Use lighten to take a double exposure and the image to compare pixels, and displays the lighter of the two. Use screen to produce an overall lightening effect, by providing a softer lightening effect than add. Each pixel on a double exposure is brightened by a value equal to or lesser than the value of pixels in your original image, occupying the same location in the image. This effect is opposite to multiply and similar to projecting multiple photographic slides simultaneously onto a single screen. TIP If the double exposed image uses tints (colors mixed with white), most of the color from the layer below will be obscured. If it uses shades (colors mixed with black), more color from the image shows through. Use add to lighten the overall composition, similar to screen, but more dramatically. Each pixel is brightened by a value equal to or lesser than the value of pixels of the image occupying the same location. TIP If the double exposed image uses tints (colors mixed with white), most of the color from the image below will be obscured. If it uses shades (colors mixed with black), more of the color from the image below to shows through. Use overlay, a mix of multiply and screen, to take dark values, multiply them, and screen light values from the image below. The highlights and shadows of the double exposed image are preserved. The colors from both sources are mixed to reflect the lightness or darkness of the original image. Use soft light, a mix of darken and lighten, to take dark values, multiply them, and screen light values from the image below; however, in this case, the effect is softer and more subtle than overlay. The effect is similar to shining a diffused spotlight on the original image. Use hard light, which is similar to overlay (just more dramatic), to determine the pixel color based on grayscale. More than 50% gray, image pixels are screened. Less than 50% gray, they are multiplied. It is similar to shining a harsh spotlight on the original image. Use difference to subtract the darker pixels of both the double exposed image, and original image from the lighter ones. If the double exposed image contains white, the colors from the original image are displayed. If they contain black, there is no change. Use color dodge (the opposite of color burn - though the results aren t always opposite) to increase contrast by lightening light areas without having any effect on darker ones.

35 How do I make an added image look like it s part of the original photo? One trick is to darken what you re adding to the photo, if the photo is darker. There are a couple blend tools you can use for this: Use darken to take a double exposed image, compare its pixels to the main image, and displays the darker of the two. Use multiply to produce an overall darkening effect. Each pixel is darkened by a value equal to or greater than the value of pixels in your image, occupying that location. It produces a similar effect to combining one or more photographic transparencies together and looking through them. TIP If the double exposed image uses tints (colors mixed with white), more of the color from the image will show through. If it uses shades (colors mixed with black), most of the color from the image is obscured. Use color burn to enhance contrast by applying the colors of the blended layer and base. The intensity of the tones in the blended layer determines the degree of color change: darker colors create a more intense effect. white areas remain the same.

36 Membership

37 What is the difference between the versions? The free edition has tools you need to do basic photo editing and familiarize yourself with the power of Autodesk Pixlr. Essentials membership If you sign up for a free Pixlr account, you unlock Essentials. You get expanded flexibility and power to create amazing images, as well as access to new packs. The first times you log in, NEW will appear where new Essentials tools can be found. How do I sign up? Once you open an image in Pixlr, in the top left corner: for ios users, tap menu, then Sign In. for Android users, tap menu, Sign In and tap New User? Sign Up to sign up and become an Essentials member. In the next window, enter your information and tap Create Account. Pixlr opens and in the top left corner, a circle with your username appears, replacing. How and why do I sign in? If you are on someone else s device or you logged out of Pixlr, tap the icon appears in the top left corner to sign in. If someone else is logged in: 1. Tap menu and select sign out. 2. Tap sign in. Either use a social media provider, such as Facebook, or your Autodesk ID or associated and password and tap Log in. If you previously logged out, tap menu, then sign in. Either use a social media provider, such as Facebook, or your Autodesk ID or associated and password and tap Log in.

38 Support If you want a place where you can see what others are doing with Pixlr, get product information, tutorials, and support, as well as read blog articles, check out From the main page, you will find links to the following places: Products - Find out about all the Pixlr products and how to get them. Tutorials - Find tutorials for all the Pixlr products, access the User Guide, answers to common questions, as well as troubleshooting tips and answers to general questions about Autodesk and Pixlr. Blog - See all the Pic of the Days and get information on how they were created. Support - Find a place to share ideas, give praise, find answers to questions, and report issues.
Autodesk. SketchBook Mobile
 Autodesk SketchBook Mobile Copyrights and Trademarks Autodesk SketchBook Mobile (2.0.2) 2013 Autodesk, Inc. All Rights Reserved. Except as otherwise permitted by Autodesk, Inc., this publication, or parts
Copyrights and Trademarks
 Mobile Copyrights and Trademarks Autodesk SketchBook Mobile (2.0) 2012 Autodesk, Inc. All Rights Reserved. Except as otherwise permitted by Autodesk, Inc., this publication, or parts thereof, may not be
Copyrights and Trademarks
 SketchBook Express Copyrights and Trademarks Autodesk SketchBook Express 2013 Autodesk, Inc. All Rights Reserved. Except as otherwise permitted by Autodesk, Inc., this publication, or parts thereof, may
Android. Tips & Tricks
 Android Tips & Tricks Contents What s New 3 Tips Before You Begin 4 Getting Started 5 Create a canvas 5 Navigating 5 Hide the UI 5 Color 6 Customize the color palette 6 Selecting a color 6 Capturing a
How to Image Editor. Enhance. Effects. Frames. Overlays. Stickers
 How to Image Editor Included in your NewZapp account is a powerful Image Editor capable of extraordinary things! To access the editor simple navigate to the Images panel, choose or upload an image to edit
Check out our website!
 Check out our website! www.nvcc.edu/woodbr idge/computer-lab Contact Us Location: Open Computer Lab Seefeldt Building #336 NOVA Woodbridge Campus Hussna Azamy (OCL Supervisor) Phone: 703-878-5714 E-mail:
Autodesk. SketchBook INK. Tips & Tricks. ios
 Autodesk SketchBook INK Tips & Tricks ios Contents What s New 3 Tips Before You Begin 4 Getting Started 5 Create a canvas 5 Navigating 5 Hide the UI 5 Color 6 Customize the color palette 6 Selecting a
Adobe Photoshop. Levels
 How to correct color Once you ve opened an image in Photoshop, you may want to adjust color quality or light levels, convert it to black and white, or correct color or lens distortions. This can improve
ADOBE PHOTOSHOP CS TUTORIAL
 ADOBE PHOTOSHOP CS TUTORIAL A D O B E P H O T O S H O P C S Adobe Photoshop CS is a popular image editing software that provides a work environment consistent with Adobe Illustrator, Adobe InDesign, Adobe
Autodesk SketchBook Pro
 Autodesk SketchBook Pro Contents SketchBook Pro for Android Sketching... 5 For users of the SketchBook Pro for Galaxy Note... 5 S Pen menu... 6 Easy Clip... 6 Clutch... 6 Toolbar... 7 Information toolbar...
Photoshop CC Editing Images
 Photoshop CC Editing Images Rotate a Canvas A canvas can be rotated 90 degrees Clockwise, 90 degrees Counter Clockwise, or rotated 180 degrees. Navigate to the Image Menu, select Image Rotation and then
Adobe Lightroom CC Tutorial
 Adobe Lightroom CC Tutorial GETTING STARTED Adobe Lightroom CC is a photo editing program which can be used to manipulate and edit large quantities of photos at once. It has great exporting and metadata
This tutorial will show you how to use artistic grunge overlays to transform your photos into works of art.
 ARTISTIC GRUNGE OVERLAYS For all photo editing software that supports PNG files If you have any questions, please feel free to contact me at kim@photosbykimhill.com. This tutorial will show you how to
How to Make Instagram Filters in Photoshop: Earlybird
 How to Make Instagram Filters in Photoshop: Earlybird JANUARY 9, 2013 BY MELANIE MAYNE Cell phone cameras and apps like Instagram have made it possible for anyone to practice and enjoy the art of Photography.
Adobe Photoshop CS5 Tutorial
 Adobe Photoshop CS5 Tutorial GETTING STARTED Adobe Photoshop CS5 is a popular image editing software that provides a work environment consistent with Adobe Illustrator, Adobe InDesign, Adobe Photoshop
Adobe Photoshop. How To Get Started With Adobe InDesign CC: 10 Things Beginners Want To Know How To Do TO START: 1) ZOOM, MOVE, RETOUCH (05:11)
 ZOOM, MOVE, RETOUCH (05:11)") Adobe Photoshop How To Get Started With Adobe InDesign CC: 10 Things Beginners Want To Know How To Do Video By Terry White Tutorial Sheet by Juliet Davis TO START: Open the tutorial in YouTube, download
Adobe Photoshop How To Get Started With Adobe InDesign CC: 10 Things Beginners Want To Know How To Do Video By Terry White Tutorial Sheet by Juliet Davis TO START: Open the tutorial in YouTube, download
By Washan Najat Nawi
 By Washan Najat Nawi how to get started how to use the interface how to modify images with basic editing skills Adobe Photoshop: is a popular image-editing software. Two general usage of Photoshop Creating
A quick note: We hope that you will find something from the Tips and Tricks that will add a little pizazz to your yearbook pages!
 A quick note: The following pages are tips and tricks for Basic Photoshop users. You may notice that some instructions indicate that non-awpc fonts were used, and that some colors were created using the
Tablet overrides: overrides current settings for opacity and size based on pen pressure.
 Photoshop 1 Painting Eye Dropper Tool Samples a color from an image source and makes it the foreground color. Brush Tool Paints brush strokes with anti-aliased (smooth) edges. Brush Presets Quickly access
Adobe PhotoShop Elements
 Adobe PhotoShop Elements North Lake College DCCCD 2006 1 When you open Adobe PhotoShop Elements, you will see this welcome screen. You can open any of the specialized areas. We will talk about 4 of them:
Extreme Makeovers: Photoshop Retouching Techniques
 Extreme Makeovers: Table of Contents About the Workshop... 1 Workshop Objectives... 1 Getting Started... 1 Photoshop Workspace... 1 Retouching Tools... 2 General Steps... 2 Resolution and image size...
Using Photoshop Elements
 Using Photoshop Elements Created By: Rick Williams August 2004 Table of Contents Photoshop Element Tools...Page 1 Tool Descriptions... Page 3 Starting Photoshop Elements... Page 7 Resizing an Image...
Photo Editing in Mac and ipad and iphone
 Page 1 Photo Editing in Mac and ipad and iphone Switching to Edit mode in Photos for Mac To edit a photo you ll first need to double-click its thumbnail to open it for viewing, and then click the Edit
Adobe Photoshop CC 2018 Tutorial
 Adobe Photoshop CC 2018 Tutorial GETTING STARTED Adobe Photoshop CC 2018 is a popular image editing software that provides a work environment consistent with Adobe Illustrator, Adobe InDesign, Adobe Photoshop,
Photoshop Elements Hints by Steve Miller
 2015 Elements 13 A brief tutorial for basic photo file processing To begin, click on the Elements 13 icon, click on Photo Editor in the first box that appears. We will not be discussing the Organizer portion
Mullingar Camera Club Basic introduction to Digital Printing using Photoshop CC.
 Mullingar Camera Club Basic introduction to Digital Printing using Photoshop CC. Table of Contents Course aims: 1 Course presentation notes: 1 Introducing Photoshop: 1 Adjusting the Brightness or Contrast
SketchBook Express V6.2
 SketchBook Express V6.2 Line and Shape tools Resize a brush Change your view Move, rotate, or scale a selected area How do I use layers? Tool selection Tool summary Save location options Reset Preferences
Lightroom Classic CC and Lightroom CC Updates
 Lightroom Classic CC and Lightroom CC Updates Information about the latest December 2017 Lightroom system updates This December Adobe have released updates for the entire Lightroom CC ecosystem, including
Using Adobe Photoshop
 Using Adobe Photoshop 6 One of the most useful features of applications like Photoshop is the ability to work with layers. allow you to have several pieces of images in the same file, which can be arranged
IMAGE CORRECTION. You can find this and more information with video tutorials at
 IMAGE CORRECTION You can find this and more information with video tutorials at http://www.adobe.com/support/photoshop/ P H O T O S H O P T O O L S CLONE STAMP TOOL The Clone Stamp tool paints one part
Transparency and blending modes
 Transparency and blending modes About transparency Transparency is such an integral part of Illustrator that it s possible to add transparency to your artwork without realizing it. You can add transparency
Retouching Portraits in Photoshop
 Retouching Portraits in Photoshop I Removing Blemishes When removing blemishes, acne or other imperfections on the skin, our goal is to maintain as much of the original skin texture as possible. That way,
The Tools and How They Work
 Pixlr Editor Tools This chapter looks at the broad set of tools at your disposal in Pixlr Editor. Here s what you ll learn: The Tool s Purpose and Function: Each tool s purpose and how it functions is
The toolbar in Pixlr Editor always appears on the left-hand side, although you can drag it anywhere you like.
 The toolbar in Pixlr Editor always appears on the left-hand side, although you can drag it anywhere you like. Crop (Shortcut: C) Reframe your entire canvas to a desired size and remove everything else.
For customers in USA This device complies with Part 15 of the FCC rules. Operation is subject to the following two conditions:
 User manual For customers in North and South America For customers in USA This device complies with Part 15 of the FCC rules. Operation is subject to the following two conditions: (1) This device may not
GETTING STARTED. 0 P a g e B a s i c s o f A d o b e P h o t o s h o p A g a P r i v a t e I n s t i t u t e f o r c o m p u t e r s c i e n c e
 GETTING STARTED 0 P a g e B a s i c s o f A d o b e P h o t o s h o p Adobe Photoshop: is a popular image editing software that provides a work environment consistent with Adobe Illustrator, Adobe InDesign,
Unit 7 : Image Painting, Editing and Layers
 Unit 7 : Image Painting, Editing and Layers Introduction This Unit describes about various painting tools; such as selection, cropping and measuring tools, retouching, drawing and type tools, Navigation
Exploring Photoshop Tutorial
 Exploring Photoshop Tutorial Objective: In this tutorial we will create a poster composed of three distinct elements: a Bokeh, an image and title text. The Bokeh is an effect which is sometimes seen in
Using Adobe Photoshop
 Using Adobe Photoshop 8 In the last section we looked at adjusting colours to improve your image. In this section we ll look at various ways of touching up your images to fix problems with the images or
photoshop filters kelly ludwig assistant professor
 photoshop filters kelly ludwig assistant professor sharpening images reducing noise correcting distortions in images practical filters There are over 100 filters that ship with Photoshop and they're all
Tutorial: Correcting images
 Welcome to Corel PHOTO-PAINT, a powerful tool for editing photos and creating bitmaps. In this tutorial, you'll learn how to perform basic image corrections to a scanned photo. This is what the image looks
EXTREME CONTRAST PHOTO EFFECT
 EXTREME CONTRAST PHOTO EFFECT In this Photoshop tutorial, we re going to learn how to use layers, layer blend modes, some noise, a little sharpening, and a simple adjustment layer to easily give a photo
Photoshop: Manipulating Photos
 Photoshop: Manipulating Photos All Labs must be uploaded to the University s web server and permissions set properly. In this lab we will be manipulating photos using a very small subset of all of Photoshop
Photoshop CC: Essentials
 Photoshop CC: Essentials Summary Workspace Overview... 2 Exercise Files... 2 Selection Tools... 3 Select All, Deselect, And Reselect... 3 Adding, Subtracting, and Intersecting... 3 Working with Layers...
Project 8: Nice Close-Up
 ps7ie_p08_b.qxd 11/18/02 3:25 PM Page 74 ps7ie_p08_b.qxd 11/18/02 3:25 PM Page 75 Photoshop 7 Image Effects In this project, work with a picture that was taken at an angle for effect. Correct and crop
Photoshop Blending Modes
 Photoshop Blending Modes https://photoshoptrainingchannel.com/blending-modes-explained/#when-blend-modes-added For those mathematically inclined. https://photoblogstop.com/photoshop/photoshop-blend-modes-
OzE Field Modules. OzE School. Quick reference pages OzE Main Opening Screen OzE Process Data OzE Order Entry OzE Preview School Promotion Checklist
 1 OzE Field Modules OzE School Quick reference pages OzE Main Opening Screen OzE Process Data OzE Order Entry OzE Preview School Promotion Checklist OzESchool System Features Field unit for preparing all
The Main Screen. Viewing Area - show the photos that were selected in the Source List.
 iphoto 11 The Main Screen Source List - This is where the Library, Events and Albums are identified. It is the place where photos can be organized and accessed. The Source List can also contain the slideshows,
ArcSoft PhotoImpression Table of Contents:
 ArcSoft PhotoImpression Table of Contents: 1. Welcome to PhotoImpression 2. Highlights of PhotoImpression 3. System Requirements 4. Installing PhotoImpression 5. Working with PhotoImpression Getting Started
How to Join Instagram
 How to Join Instagram Instagram is a growing social network based on still images and short videos. It is used on phones but you can watch Instagram videos and leave comments at http://instagram.com. Here
Introduction to Photoshop Elements
 John W. Jacobs Technology Center 450 Exton Square Parkway Exton, PA 19341 610.280.2666 ccljtc@ccls.org www.ccls.org Facebook.com/ChesterCountyLibrary Introduction to Photoshop Elements Chester County Library
Challenge Image: Blur the Background
 Challenge Image: Blur the Background Challenge Image: Blur the Background In this lesson, we re going to work on a challenge image that was submitted by a Masters Academy member. The image features a little
Improve your photos and rescue old pictures
 PSPRO REVISTED Nov 5 2007 Page 1 of 7 Improve your photos and rescue old pictures This guide gives tips on how you can use Paint Shop5 and similar free graphic programmes to improve your photos. It doesn
Color Correction and Enhancement
 10 Approach to Color Correction 151 Color Correction and Enhancement The primary purpose of Photoshop is to act as a digital darkroom where images can be corrected, enhanced, and refined. How do you know
PHOTOSHOP TUTORIAL: DIGITAL DARKROOM TECHNIQUES
 PHOTOSHOP TUTORIAL: DIGITAL DARKROOM TECHNIQUES STEP BY STEP TRAINING Learn by doing step by step exercises. Includes downloadable class files that work on Mac & PC. EDITION 1 Copyright Info Published
Introduction to Photoshop: Basic Editing & Prepare Images for the Web
 Introduction to Photoshop: Basic Editing & Prepare Images for the Web 1 LEARNING OBJECTIVES Basic tools in Photoshop & Use of Bridge Prepare images for print and web use TOPICS COVERED Photoshop Interface
Instructions: Editing a Photo Using Picasa 2. Allison Way and Charlie Windham ENG 313 February 27, 2008
 Instructions: Editing a Photo Using Picasa 2 Allison Way and Charlie Windham ENG 313 February 27, 2008 ABOUT THIS PICASA 2 MANUAL This manual tells you how to edit any photo using a free and downloadable
Photo/Image Controls
 Table of Contents Introduction... 2 Using Image Controls... 2 Using the Image Editor... 3 19 July 2017 TIP-2017-092 1 Introduction The Edge s photo controls now include image editing options. This document
32 Float v2 Quick Start Guide. AUTHORED BY ANTHONY HERNANDEZ - (415)
") 32 Float v2 Quick Start Guide 32 Float V2 Trademark/Copyright Information Copyright 2011 by United Color Technologies, LLC. All rights reserved. Unified Color Technologies, BeyondRGB, and HDR Float are
32 Float v2 Quick Start Guide 32 Float V2 Trademark/Copyright Information Copyright 2011 by United Color Technologies, LLC. All rights reserved. Unified Color Technologies, BeyondRGB, and HDR Float are
SketchBook for Galaxy
 SketchBook for Galaxy Copyrights and Trademarks SketchBook for Galaxy v.3.2 2015 Autodesk, Inc. All Rights Reserved. Except as otherwise permitted by Autodesk, Inc., this publication, or parts thereof,
Learning Photo Retouching techniques the simple way
 Learning Photo Retouching techniques the simple way Table of Contents About the Workshop... i Workshop Objectives... i Getting Started... 1 Photoshop Workspace... 1 Setting up the Preferences... 2 Retouching
Photo Effects & Corrections with PhotoFiltre
 Photo Effects & Corrections with PhotoFiltre P 330 / 1 Fix Colour Problems and Apply Stylish Effects to Your Photos in Seconds with This Free Software If you re keen on digital photography, you probably
Advanced Diploma in. Photoshop. Summary Notes
 Advanced Diploma in Photoshop Summary Notes Suggested Set Up Workspace: Essentials or Custom Recommended: Ctrl Shift U Ctrl + T Menu Ctrl + I Ctrl + J Desaturate Free Transform Filter options Invert Duplicate
CREATE A BURNT EDGE EFFECT
 CREATE A BURNT EDGE EFFECT One of the all-time classic effects in Photoshop is the burnt edge, and there s lots of different ways to create it, but in this Adobe Photoshop tutorial, we re going to look
PHOTOSHOP & ILLUSTRATOR BOOTCAMP
 FALL 2014 - ELIZABETH LIN PHOTOSHOP & ILLUSTRATOR BOOTCAMP ILLUSTRATOR ALIGNMENT To access the alignment panel, go to Window -> Align. You should see a panel like the one below. This panel allows you to
Sunglass Selfi Illustration
 Sunglass Selfi Illustration www.orchardviewcolor.com theresa@orchardviewcolor.com @tjsorchard Mobile App Illustration with Adobe Capture & Adobe Draw In this hands on creative lab you will illustrate a
This tutorial will show you how to change your images into a cool dirty grunge design, which could be used for posters, prints, CD covers, etc.
 This tutorial will show you how to change your images into a cool dirty grunge design, which could be used for posters, prints, CD covers, etc.today We ll be making this: STEP 1: Open a new document in
Lesson 16 Text, Layer Effects, & Filters
 Lesson 16 Text, Layer Effects, & Filters Digital Media I Susan M. Raymond West High School In this tutorial, you will: Create a Type Layer Add and Format Type within a Type Layer Apply Layer Effects Apply
Teach Yourself Adobe Photoshop Topic 9: Photo Retouching Part 2
 http://www.gerrykruyer.com Teach Yourself Adobe Photoshop Topic 9: Photo Retouching Part 2 In the last week s lesson, you repaired damaged areas of an image, removed unwanted parts of an image, cloned
Digital Design and Communication Teaching (DiDACT) University of Sheffield Department of Landscape. Adobe Photoshop CS5 INTRODUCTION WORKSHOPS
 University of Sheffield Department of Landscape. Adobe Photoshop CS5 INTRODUCTION WORKSHOPS") Adobe INTRODUCTION WORKSHOPS WORKSHOP 1 - what is Photoshop + what does it do? Outcomes: What is Photoshop? Opening, importing and creating images. Basic knowledge of Photoshop tools. Examples of work.
Adobe INTRODUCTION WORKSHOPS WORKSHOP 1 - what is Photoshop + what does it do? Outcomes: What is Photoshop? Opening, importing and creating images. Basic knowledge of Photoshop tools. Examples of work.
PASS4TEST. IT Certification Guaranteed, The Easy Way! We offer free update service for one year
 PASS4TEST IT Certification Guaranteed, The Easy Way! \ We offer free update service for one year Exam : 9A0-125 Title : Adobe Photoshop Lightroom 2 ACE Exam Vendors : Adobe Version : DEMO Get Latest &
Using Adobe Photoshop
 Using Adobe Photoshop 8 In the last section we looked at adjusting colours to improve your image. In this section we ll look at various ways of touching up your images to fix problems with the images or
Contents: Bibliography:
 ( 2 ) Contents: Sizing an Image...4 RAW File Conversion...4 Selection Tools...5 Colour Range...5 Quick Mask...6 Extract Tool...7 Adding a Layer Style...7 Adjustment Layer...8 Adding a gradient to an Adjustment
Step 1. Facebook Twitter Google+ Find us on Facebook. Vectortuts+ How to Create a Curious Owl in Illustrator CS4 Vectortuts+
 Joomla developers needed - Long term potential in India Copywriter Email Campaigns Wordpress Creative design Social media in UK More Freelance Jobs... Facebook Twitter Google+ Find us on Facebook Step
For customers in Canada This Class B digital apparatus meets all requirements of the Canadian Interference-Causing Equipment Regulations.
 User manual For customers in North and South America For customers in USA This device complies with Part 15 of the FCC rules. Operation is subject to the following two conditions: (1) This device may not
Pacific New Media David Ulrich
 Pacific New Media David Ulrich pacimage@maui.net www.creativeguide.com 808.721.2862 Digital Imaging Workflow in Adobe Photoshop All color and tonal correction editing should be done in a non-destructive
Easily Smooth And Soften Skin In A Photo With Photoshop
 Easily Smooth And Soften Skin In A Photo With Photoshop Written by Steve Patterson OPEN THE START FILE BY RIGHT CLICKING THE.JPG FILE AND CHOOSING OPEN WITH ADOBE PHOTOSHOP. SAVE AS: X_lastname_firstname_Smooth_Soft
The Layer Blend Modes drop-down box in the top left corner of the Layers palette.
 Photoshop s Five Essential Blend Modes For Photo Editing When it comes to learning Photoshop, believe it or not, there's really only a handful of things you absolutely, positively need to know. Sure, Photoshop
Impact With Smartphone Photography. Smartphone Camera Handling. A Smartphone for Serious Photography?
 A Smartphone for Serious Photography? DSLR technically superior but photo quality depends on technical skill, creative vision Smartphone cameras can produce remarkable pictures always at ready After all
PHOTOSHOP DESIGN EFFECTS FOR INTERMEDIATE TO ADVANCED USERS
 PHOTOSHOP DESIGN EFFECTS FOR INTERMEDIATE TO ADVANCED USERS Copyright 2012, National Seminars Training Introduction This class is all about design effects in Adobe Photoshop. For example, let s say that
2. Picture Window Tutorial
 2. Picture Window Tutorial Copyright (c) Ken Deitcher, 1999 Original image Final image To get you started using Picture Window we present two short tutorials. Basic Image Editing This tutorial covers basic
Introduction to Photoshop
 Introduction to Photoshop Instructional Services at KU Libraries A Division of Information Services www.lib.ku.edu/instruction Abstract: This course covers the basics of Photoshop, including common tools
Photoshop Elements for Genealogists Part 1
 Photoshop Elements for Genealogists Part 1 By Barry J. Ewell Topics Covered Photoshop Elements Workspace Exploring the Tools Quick Fix Preview Photoshop Elements Workspace Workspace File Edit Image Enhance
Photoshop: Manipulating Photos
 Photoshop: Manipulating Photos All Labs must be uploaded to the University s web server and permissions set properly. In this lab we will be manipulating photos using a very small subset of all of Photoshop
Creating Pastel Images and other effects in Photoshop
 Creating Pastel Images and other effects in Photoshop Martin Addison 2015 Creating pastel images Page 1 Martin Addison FRPS Using White Layers in Photoshop 1. Create a new empty Layer 2. Edit> Fill 3.
Professional RAW Editor for ios and icloud Photo Library (v2.0)
") Professional RAW Editor for ios and icloud Photo Library (v2.0) INTRODUCTION Thank you for downloading RAW Power. RAW Power is the first RAW editor for ios 11 that can read and modify the ios Photo Library
Professional RAW Editor for ios and icloud Photo Library (v2.0) INTRODUCTION Thank you for downloading RAW Power. RAW Power is the first RAW editor for ios 11 that can read and modify the ios Photo Library
Autodesk SketchBook 3.2
 Autodesk SketchBook 3.2 Copyrights and Trademarks Autodesk SketchBook 3.2 2015 Autodesk, Inc. All Rights Reserved. Except as otherwise permitted by Autodesk, Inc., this publication, or parts thereof, may
PhotoFiltre. Reverse foreground/background colors. Background & foreground colors. Set default foreground/background colors. Color choice palette
 PhotoFiltre BASIC TOOLS PALETTE Background & foreground colors Reverse foreground/background colors Set default foreground/background colors Color choice palette Toggle through color choice palettes Selection
COLORIZING IMAGES WITH GRADIENT MAPS
 COLORIZING IMAGES WITH GRADIENT MAPS In this Photoshop tutorial, we ll learn how to add complex colorizing effects to images using custom gradients! Specifically, we ll look at the Gradient Map image adjustment
Movie Merchandising. Movie Poster. Open the Poster Background.psd file. Open the Cloud.jpg file.
 Movie Poster Open the Poster Background.psd file. Open the Cloud.jpg file. Movie Merchandising Choose Image>Adjustments>Desaturate to make it a grayscale image. Select the Move tool in the Toolbar and
CS 547 Digital Imaging Lecture 2
 CS 547 Digital Imaging Lecture 2 Basic Photo Corrections & Retouching and Repairing Selection Tools Rectangular marquee tool Use to select rectangular images Elliptical Marque Tool Use to select elliptical
FLAMING HOT FIRE TEXT
 FLAMING HOT FIRE TEXT In this Photoshop text effects tutorial, we re going to learn how to create a fire text effect, engulfing our letters in burning hot flames. We ll be using Photoshop s powerful Liquify
Camera Raw software is included as a plug-in with Adobe Photoshop and also adds some functions to Adobe Bridge.
 Editing Images in Camera RAW Camera Raw software is included as a plug-in with Adobe Photoshop and also adds some functions to Adobe Bridge. Camera Raw gives each of these applications the ability to import
Autodesk SketchBook Pro. English
 Autodesk SketchBook Pro English Contents What s New 4 Introduction 5 Sketching 5 Clutch and corner tools 5 Toolbar 6 Gestures 7 Palm Rest 9 Zoom into and out of the canvas 9 Reposition the canvas 10 Brush
Color and More. Color basics
 Color and More In this lesson, you'll evaluate an image in terms of its overall tonal range (lightness, darkness, and contrast), its overall balance of color, and its overall appearance for areas that
Photoshop CC 2018 Essential Skills
 Photoshop CC 2018 Essential Skills Adobe Photoshop Creative Cloud 2018 University Information Technology Services Learning Technology, Training, Audiovisual and Outreach Copyright 2018 KSU Division of
32 Float v3 Quick Start Guide. AUTHORED BY ANTHONY HERNANDEZ (415)
") 32 Float v3 Quick Start Guide 32 Float v3 Trademark/Copyright Information Copyright 2013 by United Color Technologies, LLC. All rights reserved. Unified Color Technologies, BeyondRGB, and HDR Expose are
32 Float v3 Quick Start Guide 32 Float v3 Trademark/Copyright Information Copyright 2013 by United Color Technologies, LLC. All rights reserved. Unified Color Technologies, BeyondRGB, and HDR Expose are
Photoshop. Part 1. A few tips and hints before we get started.
 Photoshop Part 1 A few tips and hints before we get started. In focus: In this class, we will work with digital and scanned images. The better the original picture, the easier it will be for you to get
15 Photoshop Tips. Changing Photoshop rulers from inches to picas
 5 Photoshop Tips Changing Photoshop rulers from inches to picas What s the difference between inches and picas? a 6x inch RGB JPEG file is.9 MB a 6x pica RGB JPEG file is. MB a 6x inch RGB TIFF file is.
5 Minute Photoshop Edit for Underwater Photographers
 5 Minute Photoshop Edit for Underwater Photographers Posted by Scuba Tech Philippines Many divers don t have the luxury of using underwater strobes to provide effective directional lighting for their underwater