The Photographer s Guide to Capture NX. Supplement One. by Jason P. Odell, Ph.D.
|
|
|
- Phillip Warren
- 6 years ago
- Views:
Transcription

1 The Photographer s Guide to Capture NX Supplement One by Jason P. Odell, Ph.D.
2 The Photographer s Guide to Capture NX Supplement One First Edition 2007 Published in the United States by Luminescence of Nature Press Colorado Springs, CO Jason P. Odell All rights reserved. No part of this book may be reproduced or transmitted in any form or by any means without written permission by the publisher, with the exception that owners of this e-book are permitted to print a single copy for personal use. All photos by and Jason P. Odell, unless otherwise specified. Trademarks All terms in this book that are known to be trademarks or service marks have been appropriately capitalized. Nikon, Nikkor, NEF, Nikon Capture, and Capture NX are registered trademarks of Nikon Corporation, Japan. U point and Nik are trademarks of Nik Software, Inc. Photoshop is a registered trademark of Adobe Systems, Inc. Windows is a registered trademark of Microsoft, Corp. Disclaimer This book is not sponsored by Nikon Corporation. It is intended to provide information about Capture NX software. Every effort has been made to make the information contained in this book as reliable as possible, but no warranty of fitness is implied. The author and publisher shall not be responsible in any way for any damages or loss of data arising from the information contained in this book. ii
3 Preface When I sat down to write The Photographer s Guide to Capture NX, my intention was to provide a functional guide that would supplement the Capture NX manual. Since the original ebook was released, I ve had dozens of suggestions for improvements and additions to the Guide. This supplement is intended to offer a few new bits of wisdom and includes some ideas that were omitted from the original book. The goal of any photographer should be producing photographs that are pleasing to the photographer and his or her audience. The power of digital photography can be misleading. Many photographers, myself included, shot transparency film and had their processing done by an outside lab. If we wanted to change color palettes, we had to change emulsion types. For example, Fujichrome Velvia produced strongly saturated reds and very blocked-up shadows. If I were shooting portraits, I d choose a different type of film. Before I switched to digital photography, I didn t really worry about post-processing. I had a batch of slides, some were kept, others were discarded. Sure, I could enhance my images digitally by scanning the slides, but the primary image (the film) was the limiting factor to image quality. Digital photography puts photographers in the position of having to be a jack of all trades. We can either allow our camera to process our images for us (JPEG workflow), or choose to become our own photo processing lab (RAW workflow). Most photographers I know understand that post-processing is a necessary component of quality digital images, but most of them don t want to spend hours in front of their computer trying to produce a quality product. Since when did a photographer also have to be a computer expert? Hopefully, The Photographer s Guide to Capture NX helps you with your processing workflow. When utilized properly, Capture NX can produce outstanding images in virtually no time at all. -Jason P. Odell Colorado Springs, Colorado 2007 iii
4 Table of Contents Preface iii Improving Workflow with Settings Files 1 Loading Settings Presets 2 Applying Presets to an Image 3 Combining Settings to Streamline Workflow 5 Streamlining Workflow I: Single Images 7 Streamlining Workflow II: Batch Processing 9 Correcting Fisheye Images 11 Removing Dust Spots from Backgrounds 13 Creating a Polarizer Effect on Skies 15 Setting White and Black Control Points 17 Neutral Control Points 19 Improving Capture NX Performance 21 iv
5 v
6 The Photographer s Guide to Capture NX Improving Workflow with Settings Files Creating and using settings presets is the single biggest time-saver I can think of when using Capture NX. Settings files can be applied to open files to build up the Edit List, or they can be applied to files in a batch operation from the File Browser window. To create a useful settings file, it is important to make sure that the order of the Edit Steps in the preset is correct. The Extras folder that comes with this book contains several basic settings presets, including capture sharpening and Base Adjustments. In this section, we ll take a closer look at how to build a workflow framework out of several settings files, starting with the ones I ve provided. Open the file badlands-landscape.nef from the Sample Images folder that came with the book. If you purchased the downloadable ebook, you ll need to download the images from the user s area of my website, using the password information contained in the readme document that came with the book. If you haven t done so already, load the custom settings files into NX. From the Edit List, click the Batch Icon and choose Options from the pull-down menu. The Settings Options box opens. At the bottom of the Settings Options box, click Add. Then, navigate to the Settings files folder that came with the ebook, and select the Settings File(s) you wish to add, and click OK. If you are working from the ebook CD-ROM, you ll need to copy the Extras folder to your computer first. Repeat the process for all the settings in the Base_Adjustments, LCH_ settings, and Capture_Sharpen folders. The settings will be added to the list in the Settings Options dialog box. Checkmarks next to a settings file name mean that particular file will appear in the Batch contextual menu when you click Load Settings. Click OK to close the Settings Options Dialog box.


7 Supplement One Loading Settings Presets 1. Click the Batch Icon from the Edit List and choose Options. 2. Click Add from the Settings Options dialog box. 3. Choose the settings files you wish to add and click Open. The names are added to the Settings Options list. Click OK when you are done.

8 The Photographer s Guide to Capture NX Applying Presets to an Image With the custom presets loaded, you re ready to work on the image. Since this is a landscape, we ll be using the landscapespecific presets. These settings files are based on the Landscape Recipe in the Guide. 1. Set the Base Adjustment defaults. Click the Batch Icon in the Edit list and choose Load Settings to view the contextual menu. From the contextual list, select Landscape-Base. 2. If the warning dialog box appears, click Overwrite Base Adjustments, and click OK. 3. The Base Adjustments are now all applied to the image. Open the Camera Settings Tab to see what changed.


9 Supplement One 4. Next, apply global adjustments. Click Load Settings from the Batch tool in the Edit List, and choose Landscape-LCH. This preset gives a contrast boost and a saturation boost, similar to the Velvia Settings recipe. An LCH Editor Step should now be added to your Edit List. At this point, you are free to add local adjustments if needed, and perform capture sharpening. It is a good idea to save your NEF once you ve added the basic adjustments.


10 The Photographer s Guide to Capture NX Combining Settings to Streamline Workflow In the previous example, we set up our image for success by applying two specific presets; a Base Adjustments preset and an LCH step for global light and color. In my workflow, this gives me a very good starting point for most of my landscape images. Now, let s create a new settings preset for landscapes and put it to use in our workflow. After you have applied the Landscape-Base and Landscape-LCH settings files to the image, you can make a combined settings file that applies BOTH steps at once. 1. Shift-click on the Base Adjustments and LCH step in the Edit List to select them. 2. Right-click on the Edit Steps and choose Save Settings.

11 Supplement One 3. In the Save Settings dialog, enter a name for your new settings file, and click OK. 4. Your new settings file contains the Base Adjustments and LCH steps, and can be applied all at once. Creating combination settings presets is a great way to speed up postprocessing. Why spend time moving the LCH chroma sliders on each image, when you can use a preset and apply a consistent effect with a single click?
12 The Photographer s Guide to Capture NX Streamlining Workflow I: Single Images Once you ve created a Master settings preset for the type of image you have, it is easy to get all the basic maneuvers done in one fell swoop. Here s how I process a landscape shot. 1. Open the file badlandslandscape.nef from the Sample Images folder. 2. Click the Batch Icon in the Edit List, and choose Landscape Master (or whatever you called your combined settings file from the previous example). 3. If the Base Adjustments Alert dialog appears, click Overwrite Base Adjustments and then click OK. 4. Perform any local adjustments as necessary. In this case, I added a color control point to increase the brightness of the trees in the foreground. 5. Apply capture sharpening using the preset appropriate to your camera. In this case, I used a D2X, so I chose the D2X preset. Again, you can overwrite


13 Supplement One the Base Adjustments. Remember, sharpen LAST! 6. I ll now create a new Version of the NEF. Click the Version icon in the Edit List, and select New Version. Name this version Master, and click OK. 7. Save your NEF. This becomes the master file that you can use for all other versions of your image.


14 The Photographer s Guide to Capture NX Streamlining Workflow II: Batch Processing In this example, we ll use our master settings preset to apply Base Adjustments and global light and color adjustments from the File Browser. 1. Open a folder that contains the images you wish to batch process in the File Browser. 2. Click on the image(s) you wish to batch process so that they are highlighted. 3. From the Batch Icon in the File Browser, choose your master Settings File. 4. If you get an Alert dialog, choose Replace Current Settings and click OK. 5. The batch dialog opens. Choose whether to save the files with new names (optional) or in a new directory, but make sure you enable the option to save the files as NEFs. 6. Click Start to run the batch job. It will take a little while, but when it is all over, all your files will be set up with the proper

15 Supplement One recipe settings and you can make your final adjustments, like control points and sharpening as needed. Note: I have even made a master settings file that includes capture sharpening as the last step. This way, I can apply everything I usually need to my images quickly and then decide later if they need local adjustments. 10


16 The Photographer s Guide to Capture NX Correcting Fisheye Images Capture NX has a builtin ability to de-fish images taken with the 10.5mm f/2.8 DX fisheye Nikkor lens. Images produced with this lens have a 180 angle of view, and exhibit pronounced distortions at the edges of the frame. If you want to convert an image taken with the 10.5mm DX fisheye lens, the procedure is simple. 1. Open the image fisheye.nef from the Sample Images folder on the ebook CD, or download it from the users area of my website. 2. Expand the Base Adjustments tab, and click the triangle next to Lens Adjustments to open it. 3. Click the circle next to Fisheye Lens. 4. It is a good idea to make sure Auto Color Aberration control is also enabled, as fisheye lenses tend to produce a fair bit of color fringing. 11

17 Supplement One Notes about de-fishing: When you de-fish an image, the resulting image has two major changes. First, notice that the angle of view is greatly reduced. Second, there is pronounced softness in the corners of the de-fished image. The softness is the result of the distortion required to linearize the fisheye image. The de-fished image. Note the reduced angle of view as compared to the original, at left. In my opinion, de-fishing an image is something that is no match in quality for using a rectilinear wideangle lens, but it is useful in a pinch if you don t have another super-wide lens handy. Also note that the de-fish feature will not work with other fisheye Nikkor lenses. 12

18 The Photographer s Guide to Capture NX Removing Dust Spots from Backgrounds Sometimes, a speck of dust manages to find its way onto your sensor. Most of the time, dust specks are not visible on our images unless they are very large or you are shooting at a very small aperture. Although there is no clone tool in Capture NX (at least not as of this writing), you can get rid of minor spots on clean, smooth backgrounds such as skies using the colorize tool. 1. Open the image dust. nef from the Sample Images folder. Base Adjustments and global light/color adjustments have already been made. Always treat dust removal as a local adjustment. 2. Click the plus selection brush. A new colorize Edit Step will be added to the Edit List. 3. Double-click the selection brush tool to bring up the brush options dialog. Make sure the opacity is set to 100% and 13

 selection brush, paint over the dust spot.")


19 Supplement One the brush hardness is set to 0%, and click OK. 4. In the colorize options palette, click the eyedropper next to the color indicator. Place the eyedropper on the area of the background near the dust spot and click the mouse. 5. Using the (+) selection brush, paint over the dust spot. It is usually easiest to make the brush size the same as the dust speck, and click once on the image. 6. Complete your workflow by sharpening and saving. Notes about dust: The best solution for removing dust is to keep your camera s sensor clean. I use the dust removal tools available at Copper Hill Images. Not only do they work, but they are also affordable. If your images have a serious dust problem, the clone tool in Photoshop is the post-processing method of choice. 14

20 The Photographer s Guide to Capture NX Creating a Polarizer Effect on Skies The one filter I always try to bring with me on a shoot is a circular polarizer. Polarizing filters are excellent at producing contrast in skies, reducing haze from landscapes, and also reduce the glare from foliage and water. While removing glare is not feasible in postprocessing, you can use Color Control Points to quickly add a polarizing effect to skies. 1. Open the file badlandslandscape.nef from the Sample Images folder. 2. Place a color control point on the sky in the middle of the image. Increase the control point radius by moving the control slider. Then, set the brightness to -20% by moving the slider to the left. Increase the contrast to +20% by moving the slider to the right. 15

21 Supplement One 3. Place a second control point on the hills just below the horizon line. Increase the radius of this point to cover the lower half of the image. Increase the contrast slider by moving it to the right slightly. A value of +20 is usually enough. 4. Finish off the image with sharpening as needed. 16


22 The Photographer s Guide to Capture NX Setting White and Black Control Points Capture NX offers several ways of setting the overall white and black points in an image. I usually use either Levels/Curves or the LCH editor to set the overall white and black points. However, the white, black and neutral control points does offer an alternative that deserves a brief explanation. The biggest difference between using a control point to set white or black point in the image and setting the black/white point in Levels and Curves is that you can change the intensity of the effect when you use a control point. 1. Open the image wagon.nef from the Sample Images folder. 2. Expand the Photo Info window to reveal the image histogram. Click the Double Threshold checkbox. 17

23 Supplement One 3. Drag the triangle on the left of the histogram to the right until you can see a few black pixels appear in the image. You may need to zoom in on the image to see the black pixels. 4. Click the black control point eyedropper, and place a control point on the black pixels. 5. You can repeat the process for the white point control point if you desire, only this time, drag the triangle on the right side of the histogram to the left until you see a white pixel appear. 6. Deselect the Double Threshold checkbox. 7. You can adjust the intensity of the white and black points by dragging the sliders in the control point. The black and white point sliders will not affect color cast because they operate in the luminosity channel. 18

24 The Photographer s Guide to Capture NX Neutral Control Points If your image has areas of neutral gray in it, you can use one or more neutral control points to remove unwanted color casts. I personally try to set my neutral area with the white balance control, but this is another option that can be used for fine-tuning color casts. Neutral control points are also very useful on JPEG images where you cannot control white balance manually. 1. Click the neutral control point eyedropper to select it. 2. Click on the image in an area that you wish to render as neutral gray. A B/ W/N Control Point is added to the Edit list. 3. Repeat on other areas of the image, if desired. 4. The neutral control point has three sliders (R, G, B), which you can use to modify color casts. Important Note: Unlike white balance settings, which you can copy and 19

25 Supplement One paste between images, control points are plastic. If you paste a control point from one image onto another image, it will use the image data from the new image to calculate the change to the image. Therefore, a well-placed neutral point on one image can create a real mess if it is copied and placed on a second image! 20
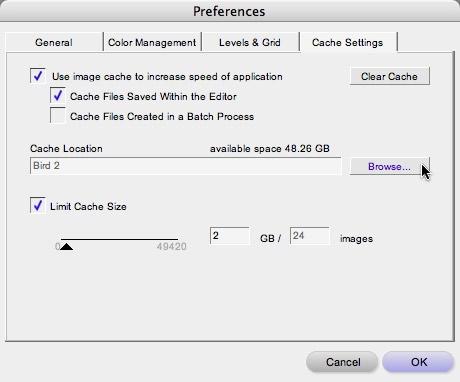
26 The Photographer s Guide to Capture NX Improving Capture NX Performance The most common question I am asked about Capture NX is how come Capture NX runs slowly on my computer? Before I offer a few tips on improving the performance of Capture NX, it is important to keep in mind a few important differences between Capture NX and other editing programs. First of all, in contrast with other RAW converters, Capture NX reads and applies all the incamera settings embedded in your NEF, including things like Color Mode. Other software products only read the sensor data and the white balance information, meaning they have less data to process. Second, Capture NX allows you to make local changes to your image while still in RAW mode, which is much more taxing to a computer system than working on an RGB bitmap image. For a comparison, try opening a JPEG file in Capture NX and see how much faster it runs! Lastly, Capture NX does not use sidecar files to store changes to NEFs. If you change a parameter in a NEF, Capture NX will not only write those changes into the NEF file, but also generate a new embedded JPEG preview that reflects the updated file. That being said, here are some ways to improve the way Capture NX runs. 1. Install more RAM. 2GB of RAM is the point where you will start to see a major improvement in performance. If you have less than 1GB of RAM, consider this option first. 2. Use a second hard drive to store NX temp files. Your computer can only transfer so much data at any given time to a single hard drive. Utilizing a second hard drive for your cache files mitigates this potential performance bottleneck. Capture NX uses two cache systems. The Temporary Data directory is used to store information about the image you are currently editing, improving application performance. The thumbnail cache is used by the File Browser to speed up the display of image thumbnails. Open the Capture NX preferences dialog and set the directory for Temp files and Cache files to a folder on a separate hard drive by clicking the Browse button. 3. Remember that minimum system requirements are just that-- a minimum. Having the minimum system just means that Capture NX will run, not that it will run well. 21

27 Supplement One 22
Acknowledgements About this book Other Goodies Included with this Book Resources for Nikon Photographers. Part I: Capture NX2 2. Why Capture NX2?
 The Photographer s Guide to Capture NX2 Contents Acknowledgements About this book Other Goodies Included with this Book Resources for Nikon Photographers x xi xii xiii Part I: Capture NX2 2 Why Capture
A quick overview of the basics of my workflow in. Those gaps in Photoshop s Histogram indicate missing information.
 Another Photoshop tutorial by Bruce Philpott Copyright 2007 Bruce Philpott A quick overview of the basics of my workflow in Adobe Camera Raw This short tutorial certainly won t cover everything about Adobe
What s New in Capture NX
 What s New in Capture NX Thank you for downloading the latest version of Capture NX, with support for Picture Controls and other new features. Please note the following changes to the manual. En Camera
Editing your digital images:
 Editing your digital images: 1 By Garry Sankowsky zodpub@rainforestmagic.com.au All images taken with a digital camera need to be edited. You will usually get software with your camera that can do at least
Capture NX-D Reference Manual for Version 1.5.0
 Capture NX-D Reference Manual for Version 1.5.0 Introduction What Capture NX-D Can Do for You... 2 Image Adjustments... 4 The Capture NX-D Window... 5 Palettes... 6 The Toolbar... 8 The Status Bar...10
Lightroom CC. Welcome to Joshua Tree Workshops. Astro & Landscape Lightroom Workflow w/presets
 Welcome to My approach to teaching is to offer small workshops which allow you to explore and discover our amazing planet, while learning photography and timelapse techniques. Astro & Landscape Lightroom
Adobe Photoshop. Levels
 How to correct color Once you ve opened an image in Photoshop, you may want to adjust color quality or light levels, convert it to black and white, or correct color or lens distortions. This can improve
Rubbing your Nikon RAW file the Right Way
 Rubbing your Nikon RAW file the Right Way You can ignore reality, but you can t ignore the consequences of ignoring reality. Ayn Rand If you are a Nikon shooter, you will get the best result from processing
Contents Foreword 1 Feedback 2 Legal information 3 Getting started 4 Installing the correct Capture One version 4 Changing the version type 5 Getting
 Contents Foreword 1 Feedback 2 Legal information 3 Getting started 4 Installing the correct Capture One version 4 Changing the version type 5 Getting to know Capture One Pro 6 The Grand Overview 6 The
Windows INSTRUCTION MANUAL
 Windows E INSTRUCTION MANUAL Contents About This Manual... 3 Main Features and Structure... 4 Operation Flow... 5 System Requirements... 8 Supported Image Formats... 8 1 Installing the Software... 1-1
Capture NX-D Reference Manual for Version 1.4.6
 Capture NX-D Reference Manual for Version 1.4.6 Introduction What Capture NX-D Can Do for You... 2 Hiding Changes Made in Capture NX/Capture NX 2... 4 The Capture NX-D Window... 5 Palettes... 6 The Toolbar...
Movie 7. Merge to HDR Pro
 Movie 7 Merge to HDR Pro 1 Merge to HDR Pro When shooting photographs with the intention of using Merge to HDR Pro to merge them I suggest you choose an easy subject to shoot first and follow the advice
Transforming Your Photographs with Photoshop
 Transforming Your Photographs with Photoshop Jesús Ramirez PhotoshopTrainingChannel.com Contents Introduction 2 About the Instructor 2 Lab Project Files 2 Lab Objectives 2 Lab Description 2 Removing Distracting
In the past year or so, just about everyone I know has gone out and purchased
 In This Chapter Having some fun with your digital camera Getting out and shooting Chapter 1 Jumping Right In Transferring images from your camera to your computer Opening images in Photoshop Printing and
Combine Black-and-White and Color
 Combine Black-and-White and Color Contributor: Seán Duggan n Specialty: Fine Art Primary Tool Used: Smart Objects Combining color and black-and-white in the same image is a technique that has been around
Software & Computers DxO Optics Pro 5.3; Raw Converter & Image Enhancer With Auto Or Manual Transmission By Howard Millard March, 2009
 Software & Computers DxO Optics Pro 5.3; Raw Converter & Image Enhancer With Auto Or Manual Transmission By Howard Millard March, 2009 Whether you shoot raw or JPEG, whether you re on the Windows or Mac
Professional Photographic Tools. Quick Start Guide
 Professional Photographic Tools Quick Start Guide The Complete Collection provides the most powerful an phers workflows. From capture to print, the Complete C for Adobe Photoshop and Apple Aperture together
Black and White using Photoshop
 Topics to be covered: Methods for B&W conversion Improving the image Toning Printer color management Black and White using Photoshop Various ways to get to B&W Adobe Raw Converter (ACR) in from Bridge
Capture NX-D Reference Manual for Version 1.4.0
 Capture NX-D Reference Manual for Version 1.4.0 Introduction What Capture NX-D Can Do for You... 2 Hiding Changes Made in Capture NX/Capture NX 2... 4 The Capture NX-D Window... 5 Palettes... 6 The Toolbar...
copyright B. Moose Peterson / WRP 2012
 Where does the viewer s eye go first in your photograph? More importantly, where do YOU want the viewer s eye to look first in your print? These are very important questions and the answers directly affect
Camera Raw software is included as a plug-in with Adobe Photoshop and also adds some functions to Adobe Bridge.
 Editing Images in Camera RAW Camera Raw software is included as a plug-in with Adobe Photoshop and also adds some functions to Adobe Bridge. Camera Raw gives each of these applications the ability to import
Extreme Makeovers: Photoshop Retouching Techniques
 Extreme Makeovers: Table of Contents About the Workshop... 1 Workshop Objectives... 1 Getting Started... 1 Photoshop Workspace... 1 Retouching Tools... 2 General Steps... 2 Resolution and image size...
Guidance on Using Scanning Software: Part 5. Epson Scan
 Guidance on Using Scanning Software: Part 5. Epson Scan Version of 4/29/2012 Epson Scan comes with Epson scanners and has simple manual adjustments, but requires vigilance to control the default settings
32 Float v3 Quick Start Guide. AUTHORED BY ANTHONY HERNANDEZ (415)
") 32 Float v3 Quick Start Guide 32 Float v3 Trademark/Copyright Information Copyright 2013 by United Color Technologies, LLC. All rights reserved. Unified Color Technologies, BeyondRGB, and HDR Expose are
32 Float v3 Quick Start Guide 32 Float v3 Trademark/Copyright Information Copyright 2013 by United Color Technologies, LLC. All rights reserved. Unified Color Technologies, BeyondRGB, and HDR Expose are
Picture Style Editor Ver Instruction Manual
 ENGLISH Picture Style File Creating Software Picture Style Editor Ver. 1.18 Instruction Manual Content of this Instruction Manual PSE stands for Picture Style Editor. In this manual, the windows used in
Recitation 2 Introduction to Photoshop
 Recitation 2 Introduction to Photoshop What is Adobe Photoshop? Adobe Photoshop is a tool for creating digital graphics either by starting with a scanned photograph or artwork or by creating the graphics
32 Float v2 Quick Start Guide. AUTHORED BY ANTHONY HERNANDEZ - (415)
") 32 Float v2 Quick Start Guide 32 Float V2 Trademark/Copyright Information Copyright 2011 by United Color Technologies, LLC. All rights reserved. Unified Color Technologies, BeyondRGB, and HDR Float are
32 Float v2 Quick Start Guide 32 Float V2 Trademark/Copyright Information Copyright 2011 by United Color Technologies, LLC. All rights reserved. Unified Color Technologies, BeyondRGB, and HDR Float are
Pacific New Media David Ulrich
 Pacific New Media David Ulrich pacimage@maui.net www.creativeguide.com 808.721.2862 Digital Imaging Workflow in Adobe Photoshop All color and tonal correction editing should be done in a non-destructive
Essential Post Processing
 Essential Post Processing By Ian Cran Preamble Getting to grips with Photoshop and Lightroom could be described in three stages. One is always learning and going through stages but there are three main
Picture Style Editor Ver Instruction Manual
 ENGLISH Picture Style File Creating Software Picture Style Editor Ver. 1.15 Instruction Manual Content of this Instruction Manual PSE stands for Picture Style Editor. indicates the selection procedure
Photoshop Techniques Digital Enhancement
 Photoshop Techniques Digital Enhancement A tremendous range of enhancement techniques are available to anyone shooting astrophotographs if they have access to a computer and can digitize their images.
SHAW ACADEMY NOTES. Ultimate Photography Program
 SHAW ACADEMY NOTES Ultimate Photography Program What is a Raw file? RAW is simply a file type, like a JPEG. But, where a JPEG photo is considered a photograph, a RAW is a digital negative, an image that
Teach Yourself Adobe Photoshop Topic 9: Photo Retouching Part 2
 http://www.gerrykruyer.com Teach Yourself Adobe Photoshop Topic 9: Photo Retouching Part 2 In the last week s lesson, you repaired damaged areas of an image, removed unwanted parts of an image, cloned
Processing RAW files in ACR Roy Killen, APSEM, EFIAP, GMPSA
 Processing RAW files in ACR Roy Killen, APSEM, EFIAP, GMPSA (c) 2017 Roy Killen RAW Page 1 Processing RAW files What are RAW files? Most digital cameras save files to memory cards in one of two basic formats
Color Correction and Enhancement
 10 Approach to Color Correction 151 Color Correction and Enhancement The primary purpose of Photoshop is to act as a digital darkroom where images can be corrected, enhanced, and refined. How do you know
Photoshop Elements for Genealogists Part 1
 Photoshop Elements for Genealogists Part 1 By Barry J. Ewell Topics Covered Photoshop Elements Workspace Exploring the Tools Quick Fix Preview Photoshop Elements Workspace Workspace File Edit Image Enhance
Painting Special Effects on Photographs
 TUTORIAL 7 Painting Special Effects on Photographs In this tutorial you will learn how to transform a photo into a striking color composition with paintbrushes, masks, blending modes, color, and paper
Adobe Lightroom CC Tutorial
 Adobe Lightroom CC Tutorial GETTING STARTED Adobe Lightroom CC is a photo editing program which can be used to manipulate and edit large quantities of photos at once. It has great exporting and metadata
Picture Style Editor Ver Instruction Manual
 ENGLISH Picture Style File Creating Software Picture Style Editor Ver. 1.12 Instruction Manual Content of this Instruction Manual PSE is used for Picture Style Editor. In this manual, the windows used
Lightroom System April 2018 Updates
 Lightroom System April 2018 Updates This April Adobe updated Lightroom Classic CC. This included a major update to profiles, making profile looks more prominent. Some essential interface tweaks and also
2. Picture Window Tutorial
 2. Picture Window Tutorial Copyright (c) Ken Deitcher, 1999 Original image Final image To get you started using Picture Window we present two short tutorials. Basic Image Editing This tutorial covers basic
INTERMEDIATE PHOTOSHOP: FAMILY PHOTOS
 INTERMEDIATE PHOTOSHOP: FAMILY PHOTOS What is Photoshop Elements? Photoshop Elements is a streamlined version of Adobe Photoshop CC. Despite missing some more advanced features, it is a robust piece of
How to create beautiful B&W images with Adobe Photoshop Elements 12
 How to create beautiful B&W images with Adobe Photoshop Elements 12 Whether it s an Instagram snap or a film portrait, black and white photography is never out of style. Today, there are a number of ways
Teton Technique C H A P T E R 3
 C H A P T E R 3 Teton Technique TRY IT AT HOME: TetonTechnique.psd SIT BACK AND WATCH: TetonTechnique.mov Ladies and gentlemen, girls and boys of all ages, welcome to the Grand Teton National Park. But
HDR Darkroom 2 Pro User Manual
 HDR Darkroom 2 Pro User Manual Everimaging Ltd 1 / 28 www.everimaging.com Content: 1. Introduction... 3 1.1 A Brief Introduction to HDR Photography... 3 1.2 Introduction to HDR Darkroom 2 Pro... 5 2. HDR
It makes sense to read this section first if new to Silkypix... How to Handle SILKYPIX Perfectly Silkypix Pro PDF Contents Page Index
 It makes sense to read this section first if new to Silkypix... How to Handle SILKYPIX Perfectly...145 Silkypix Pro PDF Contents Page Index 0. 0.Overview and Introduction...9 0.1. Section Names...9 0.1.1.
The A6000 is one of Sony's best selling mirrorless cameras, even with its successor
 Introduction The A6000 is one of Sony's best selling mirrorless cameras, even with its successor the A6300 now in the market. The compact E-mount camera is a diminutive powerhouse, with its 24mp sensor
Contents. Introduction
 Contents Introduction 1. Overview 1-1. Glossary 8 1-2. Menus 11 File Menu 11 Edit Menu 15 Image Menu 19 Layer Menu 20 Select Menu 23 Filter Menu 25 View Menu 26 Window Menu 27 1-3. Tool Bar 28 Selection
POLAROID EMULATION INCREASED CONTRAST, SATURATION & CLARITY
 POLAROID EMULATION The Polaroid SX-70 Camera was a sensational tool. It took photographs in real time. But just the color balance of the film and they way it developed had a unique look. Here are some
Visioneer OneTouch Scanner. Installation Guide FOR WINDOWS
 Visioneer OneTouch Scanner Installation Guide FOR WINDOWS TABLE OF CONTENTS i TABLE OF CONTENTS Getting Started with your new Scanner....................... 1 Step 1: Installing the Scanner Software.......................
Luminescence of Nature Press Jason P. Odell, Ph.D.
 Luminescence of Nature Press Jason P. Odell, Ph.D. This page left blank to facilitate double-sided printing Title Page Mastering Luminosity Masks A Photoshop User s Guide First Edition 2016 Published in
From Advanced pixel blending
 1 From www.studio.adobe.com Blending pixel layers in Adobe Photoshop CS2 lets you do things that you simply can t do by adjusting a single image. One situation where we blend pixel layers is when we want
Learning Photo Retouching techniques the simple way
 Learning Photo Retouching techniques the simple way Table of Contents About the Workshop... i Workshop Objectives... i Getting Started... 1 Photoshop Workspace... 1 Setting up the Preferences... 2 Retouching
Basic Digital Dark Room
 Basic Digital Dark Room When I took a good photograph I almost always trying to improve it using Photoshop: exposure, depth of field, black and white, duotones, blur and sharpness or even replace washed
Nikon View DX for Macintosh
 Contents Browser Software for Nikon D1 Digital Cameras Nikon View DX for Macintosh Reference Manual Overview Setting up the Camera as a Drive Mounting the Camera Camera Drive Settings Unmounting the Camera
Using Adobe Photoshop
 Using Adobe Photoshop 6 One of the most useful features of applications like Photoshop is the ability to work with layers. allow you to have several pieces of images in the same file, which can be arranged
Contents: Bibliography:
 ( 2 ) Contents: Sizing an Image...4 RAW File Conversion...4 Selection Tools...5 Colour Range...5 Quick Mask...6 Extract Tool...7 Adding a Layer Style...7 Adjustment Layer...8 Adding a gradient to an Adjustment
Using the Advanced Sharpen Transformation
 Using the Advanced Sharpen Transformation Written by Jonathan Sachs Revised 10 Aug 2014 Copyright 2002-2014 Digital Light & Color Introduction Picture Window Pro s Advanced Sharpen transformation is a
Batch Processing Converting images in a folder to JPEG
 Batch Processing Converting images in a folder to JPEG Request I would like to convert multiple RAW images (NEF files) to JPEG images all at once Response You can use a Batch Process to convert all RAW
Photoshop Elements Hints by Steve Miller
 2015 Elements 13 A brief tutorial for basic photo file processing To begin, click on the Elements 13 icon, click on Photo Editor in the first box that appears. We will not be discussing the Organizer portion
Sharpening is an essential final step before output. But sometimes, you don t want to
 Sharpening is an essential final step before output. But sometimes, you don t want to sharpen your entire image equally. Skin tones, clouds, noisy areas - it s best to apply less sharpening to these areas,
Photoshop CC Editing Images
 Photoshop CC Editing Images Rotate a Canvas A canvas can be rotated 90 degrees Clockwise, 90 degrees Counter Clockwise, or rotated 180 degrees. Navigate to the Image Menu, select Image Rotation and then
Digital Design and Communication Teaching (DiDACT) University of Sheffield Department of Landscape. Adobe Photoshop CS5 INTRODUCTION WORKSHOPS
 University of Sheffield Department of Landscape. Adobe Photoshop CS5 INTRODUCTION WORKSHOPS") Adobe INTRODUCTION WORKSHOPS WORKSHOP 1 - what is Photoshop + what does it do? Outcomes: What is Photoshop? Opening, importing and creating images. Basic knowledge of Photoshop tools. Examples of work.
Adobe INTRODUCTION WORKSHOPS WORKSHOP 1 - what is Photoshop + what does it do? Outcomes: What is Photoshop? Opening, importing and creating images. Basic knowledge of Photoshop tools. Examples of work.
Kent Messamore 3/6/2010
 Post Processing Kent Messamore 3/6/2010 What we will cover Post Processing Photoshop, Lightroom, Elements, and others JPEG or RAW Photoshop Elements Workflow Organization, Create, share Photoshop Elements
The original image. Let s get started! The final effect.
 Non-Destructive Infrared Glow Effect In this Photoshop tutorial, we ll learn how to quickly and easily add a dream-like infrared glow effect to an image, and we ll do it non-destructively using Smart Filters
Using Photoshop Elements
 Using Photoshop Elements Created By: Rick Williams August 2004 Table of Contents Photoshop Element Tools...Page 1 Tool Descriptions... Page 3 Starting Photoshop Elements... Page 7 Resizing an Image...
The student will: download an image from the Internet; and use Photoshop to straighten, crop, enhance, and resize a digital image.
 Basic Photoshop Overview: Photoshop is one of the most common computer programs used to work with digital images. In this lesson, students use Photoshop to enhance a photo of Brevig Mission School, so
Topaz Labs DeNoise 3 Review By Dennis Goulet. The Problem
 Topaz Labs DeNoise 3 Review By Dennis Goulet The Problem As grain was the nemesis of clean images in film photography, electronic noise in digitally captured images can be a problem in making photographs
Challenge Image: Blur the Background
 Challenge Image: Blur the Background Challenge Image: Blur the Background In this lesson, we re going to work on a challenge image that was submitted by a Masters Academy member. The image features a little
Add Photoshop Masks and Adjustments to RAW Images
 Add Photoshop Masks and Adjustments to RAW Images Contributor: Seán Duggan n Specialty: Fine Art Primary Tool Used: Photoshop Masks The adjustments you make in Camera Raw are global in nature, meaning
Creating Stitched Panoramas
 Creating Stitched Panoramas Here are the topics that we ll cover 1. What is a stitched panorama? 2. What equipment will I need? 3. What settings & techniques do I use? 4. How do I stitch my images together
PHOTOSHOP TUTORIAL: DIGITAL DARKROOM TECHNIQUES
 PHOTOSHOP TUTORIAL: DIGITAL DARKROOM TECHNIQUES STEP BY STEP TRAINING Learn by doing step by step exercises. Includes downloadable class files that work on Mac & PC. EDITION 1 Copyright Info Published
Adobe PhotoShop Elements
 Adobe PhotoShop Elements North Lake College DCCCD 2006 1 When you open Adobe PhotoShop Elements, you will see this welcome screen. You can open any of the specialized areas. We will talk about 4 of them:
THE ORGANIZER 12 THE EDITOR 17 ORGANIZING YOUR WORKFLOW 19 CREATING A NEW DOCUMENT 22 RESIZING AN IMAGE 25 MAKING A SELECTION 27
 Contents 1 PHOTOSHOP ELEMENTS ESSENTIALS 10 2 PHOTO OPTIMIZING 46 INTRODUCTION 8 THE ORGANIZER 12 SEPARATING SCANNED IMAGES 48 THE EDITOR 17 CROPPING WITH CUSTOM SHAPES 50 ORGANIZING YOUR WORKFLOW 19 CROPPING
Select your Image in Bridge. Make sure you are opening the RAW version of your image file!
 CO 3403: Photographic Communication Steps for Non-Destructive Image Adjustments in Photoshop Use the application Bridge to preview your images and open your files with Camera Raw Review the information
METAL TEXT EFFECT. Step 1: Create A New Document. Step 2: Fill The Background With Black
 METAL TEXT EFFECT In this text effects tutorial, we ll learn how to easily create metal text, a popular effect widely used in video games and movie posters! It may seem like there s a lot of steps involved,
Creating a FlexColor Custom Setup Tutorial
 Creating a FlexColor Custom Setup Tutorial As I began to think about preparing this tutorial I realized it began with the philosophy of scanning with FlexColor. At the time Imacon created the Flextight
Using Adobe Photoshop
 Using Adobe Photoshop 4 Colour is important in most art forms. For example, a painter needs to know how to select and mix colours to produce the right tones in a picture. A Photographer needs to understand
BOOK BUILDING. for beginners. Lightroom Tutorial by Mark Galer
 BOOK BUILDING for beginners Lightroom Tutorial by Mark Galer Contents Part One: Preparing the Book Part Two: Page Layout Design Ideas Create a Collection Choose your Images Sequence your Images Title your
ADOBE PHOTOSHOP CS 3 QUICK REFERENCE
 ADOBE PHOTOSHOP CS 3 QUICK REFERENCE INTRODUCTION Adobe PhotoShop CS 3 is a powerful software environment for editing, manipulating and creating images and other graphics. This reference guide provides
Machinery HDR Effects 3
 1 Machinery HDR Effects 3 MACHINERY HDR is a photo editor that utilizes HDR technology. You do not need to be an expert to achieve dazzling effects even from a single image saved in JPG format! MACHINERY
The Magazine for Photographers August 2016
 The Magazine for Photographers The Magazine for Photographers CONTENTS AUGUST 4 Color Tinting in Photoshop 17 Circular Polarizer Tips 29 Step by Step: Mirror Image 37 Export Settings 54 (Not So) Smart
Photoshop CC: Essentials
 Photoshop CC: Essentials Summary Workspace Overview... 2 Exercise Files... 2 Selection Tools... 3 Select All, Deselect, And Reselect... 3 Adding, Subtracting, and Intersecting... 3 Working with Layers...
The original image. The final rainbow effect.
 ADD A realistic rainbow to a photo In this Photoshop photo effects tutorial, we re going to learn how to easily add a rainbow, even a double rainbow, to a photo. Of course, as with most photo effects,
The Magazine for Photographers January 2016
 The Magazine for Photographers The Magazine for Photographers CONTENTS JANUARY 4 Depth of Field Guidelines 12 Catalog Settings in Lightroom 26 Step by Step: Basic Tone for RAW 35 Luminosity Masks in Photoshop
HDR Darkroom 2 User Manual
 HDR Darkroom 2 User Manual Everimaging Ltd. 1 / 22 www.everimaging.com Cotent: 1. Introduction... 3 1.1 A Brief Introduction to HDR Photography... 3 1.2 Introduction to HDR Darkroom 2... 5 2. HDR Darkroom
PHOTOSHOP: 3.3 CAMERA RAW
 1 PHOTOSHOP: 3.3 CAMERA RAW Raw image files are uncompressed images that contain all the information of the photo. Raw images give you flexibility in editing and allow you to achieve a better look because
Adobe Photoshop CS5 Layers and Masks
 Adobe Photoshop CS5 Layers and Masks Email: training@health.ufl.edu Web Page: http://training.health.ufl.edu Adobe Photoshop CS5: Layers and Masks 2.0 Hours The workshop will cover creating and manipulating
Unit 7 : Image Painting, Editing and Layers
 Unit 7 : Image Painting, Editing and Layers Introduction This Unit describes about various painting tools; such as selection, cropping and measuring tools, retouching, drawing and type tools, Navigation
LAB and LAB Actions. By Mike Watson, based on publications by Harold Davis
 LAB and LAB Actions By Mike Watson, based on publications by Harold Davis The goal was to improve my Star Trails images by: 1. Creating more contrast between the stars and the sky 2. Selectively adding
Painting Trees with Jungle 3D
 Painting Trees with Jungle 3D Trees can be as simple or complex as you choose to make them. In their simplest form, they can be painted on one layer. Three layers work better, however. And if you re after
Nikon Capture NX "How To..." Series
 1 of 5 5/15/2007 1:34 PM Nikon Capture NX "How To..." Series Article 18: How to reduce the effects of Chromatic Aberration. Purpose: The "Color Aberration Tool" in Capture NX may be used to reduce or eliminate
40 Digital Photo Retouching Techniques COPYRIGHTED MATERIAL
 40 Digital Photo Retouching Techniques COPYRIGHTED MATERIAL C h a p t e r Correcting Contrast If you are a photography enthusiast, you know that light is the defining factor in photography. You probably
1 (7) Raw Developer Review. Raw Developer Review. Blue Door & Window frame, Barrio Historico. Alain Briot
 Raw Developer Review. Raw Developer Review. Blue Door & Window frame, Barrio Historico. Alain Briot") 1 (7) Raw Developer Review Raw Developer Review Blue Door & Window frame, Barrio Historico by Alain Briot 2 (7) Raw Developer Review Raw Developer Review by Alain Briot 1 - About darkroom practices and
1 (7) Raw Developer Review Raw Developer Review Blue Door & Window frame, Barrio Historico by Alain Briot 2 (7) Raw Developer Review Raw Developer Review by Alain Briot 1 - About darkroom practices and
SAVING, LOADING AND REUSING LAYER STYLES
 SAVING, LOADING AND REUSING LAYER STYLES In this Photoshop tutorial, we re going to learn how to save, load and reuse layer styles! Layer styles are a great way to create fun and interesting photo effects
Maine Day in May. 54 Chapter 2: Painterly Techniques for Non-Painters
 Maine Day in May 54 Chapter 2: Painterly Techniques for Non-Painters Simplifying a Photograph to Achieve a Hand-Rendered Result Excerpted from Beyond Digital Photography: Transforming Photos into Fine
Making the Perfect Turkey Club
 Making the Perfect Turkey Club Despite the title, this isn t a recipe for making a gourmet sandwich. It s actually a recipe for painting advanced tree and foliage structures using Jungle 3D. The sandwich
ADDING RAIN TO A PHOTO
 ADDING RAIN TO A PHOTO Most of us would prefer to avoid being caught in the rain if possible, especially if we have our cameras with us. But what if you re one of a large number of people who enjoy taking
DxO Optics Pro v6.5 User Manual - Windows
 DxO Optics Pro v6.5 User Manual - Windows Table of Contents User guide... 1 Introduction to DxO Optics Pro... 1 About DxO Optics Pro 6.5... 1 What you should know before you begin using DxO Optics Pro...
ADOBE PHOTOSHOP CS TUTORIAL
 ADOBE PHOTOSHOP CS TUTORIAL A D O B E P H O T O S H O P C S Adobe Photoshop CS is a popular image editing software that provides a work environment consistent with Adobe Illustrator, Adobe InDesign, Adobe