Nikon Scan Windows. Contents. TWAIN Driver. User s Manual
|
|
|
- Rosanna Simon
- 6 years ago
- Views:
Transcription
1 Contents TWAIN Driver Nikon Scan Windows User s Manual 1. Overview 2. Before You Begin 2.1 System Requirements 2.2 Software Installation 3. Basic Operations 3.1 Launching and Quitting 3.2 Main Dialog Box 3.3 Basic Scanning 4. Scanning Conditions 4.1 Choosing the Scanner 4.2 Setting the Gamma Value 4.3 Positioning Media 4.4 Ejecting Film (film scanners only) 4.5 Choosing the Media Type 4.6 Crop/Preview Area Buttons and Menu 4.7 Cropping 4.8 Crop Size Controls 4.9 Autofocus (film scanners only) 4.10 Adjust Focus (film scanners only) 4.11 Autoexposure 5. Image Compensation 5.1 Brightness / Threshold 5.2 Contrast 5.3 Color Balance 5.4 Level Display - 1 -
2 6. Gamma Curves 6.1 Viewing the Gamma Curves 6.2 Viewing the Histogram 6.3 Modifying the Gamma Curves 7. Saving and Loading Settings 7.1 Saving Settings 7.2 Deleting Settings 7.3 Recalling Settings 7.4 Exporting Settings 7.5 Importing Settings 7.6 Reset Color Settings 8. Copyright Information and the About Window Appendix A: Features Specific to the LS-20 and LS-1000 A.1 Software Interpolation Appendix B: Features Specific to the LS-4500AF B.1 Film Format B.2 Preview Quality B.3 Final Scan Quality B.4 Sharpening B.5 Make Shading Appendix C: Features Specific to the AX-110 and AX-210 C.1 Main Dialog Box C.2 Using Option Adapters C.3 Software Interpolation C.4 Sharpening Index Cautions The reproduction of all or part of this manual without our permission is prohibited. The information contained in this manual is subject to change without notice. We have made every effort to produce a perfect manual, but should you find any mistakes, we would be grateful if you would kindly let us know. We shall take no responsibility for consequences resulting from the operation of this product, despite the terms mentioned above. Trademark Information IBM and IBM PC/AT are registered trademarks of International Business Machines Corporation MS-DOS and MS-Windows are trademarks of Microsoft Corporation. Adobe and Adobe Photoshop are trademarks of Adobe Systems Incorporated. All other brand or product names mentioned in this manual are the trademarks or registered trademarks of their respective holders.
3 Notice concerning prohibition of copying or reproduction Note that simply being in possession of material which has been copied or reproduced by means of a scanner may be punishable by law. Items prohibited by law from being copied or reproduced Do not copy or reproduce paper money, coins, securities, government bonds, or local government bonds, even if such copies or reproductions are stamped Sample. The copying or reproduction of paper money, coins, or securities which are circulated in a foreign country is prohibited. The copying or reproduction of unused postage stamps or post cards issued by the government without obtaining approval from the government is prohibited. The copying or reproduction of stamps issued by the government and certified documents stipulated by law is prohibited. Cautions on certain copies and reproductions The government has issued cautions on copies or reproductions of securities issued by private companies (shares, bills, checks, gift certificates, etc.), commuter passes, or coupon tickets, except when a minimum of necessary copies are to be provided for business use by a company. Also, do not copy or reproduce passports issued by the government, licenses issued by public agencies and private groups, ID cards, and tickets, such as passes and meal coupons. Comply with copyright notices The copying or reproduction of works such as books, music, paintings, woodcut prints, maps, drawings, movies, and photographs which are copyrighted creative works is prohibited except when it is done for personal use at home or for similar restricted and non-commercial use
4 1. Overview Thank you for purchasing your Nikon scanner. This manual explains how to use Nikon scanners with Nikon Scan Windows for IBM PC/AT or compatible computers. Please read the documentation thoroughly to ensure proper operation and the best results from your scanner. Note for Windows 95 users: The instructions in this manual are based on the Nikon Scan Windows 3.1 version. The dialog boxes of the Windows 95 version differ from those of the Windows 3.1 version. Nikon Scan Windows conforms to the TWAIN scanner interface specification, and provides the following functionality: Nikon Scan Windows supports the AX-110 (ScanTouch 110) and AX-210 (ScanTouch 210) flatbed scanners and the LS-20 (COOLSCAN II), LS-1000 (SUPER COOLSCAN), and LS-4500AF film scanners. The AX-1200 flatbed scanner is not supported by Nikon Scan. Scanners supported by Nikon Scan can be operated by launching the Nikon Scan TWAIN driver from the Nikon Control Windows application provided with this product. Scanners supported by Nikon Scan can also be operated by launching the Nikon Scan TWAIN driver from the acquire menu within other applications compatible with Acquire plug-ins, such as Adobe Photoshop. With the optional AF-10 Auto Document Feeder mounted on the AX-110 or AX-210 or the optional SF-100 Auto Slide Feeder mounted on the LS-1000, images can be automatically and sequentially scanned by launching this software from within the Nikon Control application. Consecutive and automated scanning might also be supported by other imaging applications, but Nikon cannot ensure complete compatibility. Note: The operating procedures for the LS-20 and LS-1000 are identical except that the LS-20 does not support the optional Auto Slide Feeder. Differences between these scanners and the LS-4500AF are described in Appendix A, Features Specific to the LS-20 and LS-1000, and Appendix B, Features Specific to the LS-4500AF. Features specific to the AX-110 and AX-210 are described in Appendix C. Please be sure to read the appropriate appendix for the scanner you are using. Note: The illustrations in this manual are based on the windows and menus displayed when the selected scanner is the LS Depending on the scanner selected, the items displayed in Nikon Scan's Main dialog box and its associated menus may differ slightly from those shown here. Please consult the appropriate appendix for the scanner you are using
5 2. Before You Begin 2.1 System Requirements Nikon Scan Windows 3.1 version To run Nikon Scan Windows 3.1 version, the following minimum hardware and software is required: IBM PC/AT or compatible with i386sx or better MS-DOS 5.0 or later MS-Windows 3.1 or later 8MB or more of RAM 1MB or more of hard disk capacity (a 300MB or larger hard disk is recommended) SCSI board with ASPI driver (Adaptec 1505 and 2940 are recommended.) VGA (640 x 480 pixels) monitor or better Monitor with 16.7M colors, 64K colors, 32K colors, 256 colors, 256 grayscale, 16 grayscale Nikon Scan Windows 95 version To run the Windows 95 version of Nikon Scan, the following minimum hardware and software is required: IBM PC/AT or compatible with i386dx or better MS-Windows 95 8MB or more of RAM 1MB or more of hard disk capacity (a 300MB or larger hard disk is recommended) SCSI board with ASPI (Adaptec 1505 and 2940 are recommended.) VGA (640 x 480) monitor or better 8-bit or more of video card and monitor with 16.7M colors, 64K colors, 32K colors, 256 colors - 5 -
6 2.2 Software Installation The Install disk provided with this product contains the Nikon Scan Windows TWAIN driver and the Nikon Control Windows application. To begin using the Nikon Scan TWAIN driver, you must first install Nikon Scan, as described in the Installation section of the Nikon Control manual provided with this product. Nikon Control is easy-to-use application that acquires images from the scanner via the Nikon Scan Windows TWAIN driver. Use Nikon Control to scan a number of images consecutively with an optional autofeeder attachment fitted to the AX-110 or AX-210 flatbed scanners or to the LS-1000, or use it as your basic scanning application, if you do not have any plug-in compatible software available. The procedures for using Nikon Control are covered in the Nikon Control Windows User s Manual


7 3. Basic Operations Connect the scanner as described in the hardware manual. First turn on any peripheral devices, including your scanner(s), then turn on the PC. If you are using a Nikon film scanner, be sure to always remove the strip film holder from the film slot before turning the scanner on. Refer to the hardware manual provided with the product for details on how to insert and position the media to be scanned. If an SCSI board has not been installed, install one as described in the directions supplied with the board. When installing the SCSI board for the first time, be careful not to set I/O addresses, interrupt numbers, and DMA channels that conflict with the I/O, interrupt and DMA settings of other cards, such as video graphics adapters, and so on. Before installing the SCSI board in the PC, confirm that the PC is powered off. Launching Step 1 Start up Windows 3.1 and launch Nikon Control. After Nikon Control is launched, the following Control palette appears in the Nikon Control window. 3.1 Launching and Quitting The Nikon Scan Windows TWAIN driver can be launched from an imaging application, or from within Nikon Control, as described in detail below


8 Step 2 Select the TWAIN driver by choosing Preference from the File menu. The Nikon Control Preferences window appears
9 Select the required TWAIN driver from the TWAIN Source pop-up menu. The Nikon TWAIN Source window will appear. Step 3 Click the Acquire button on the Control palette, or choose Acquire a single image from the File menu. Acquire - 9 -
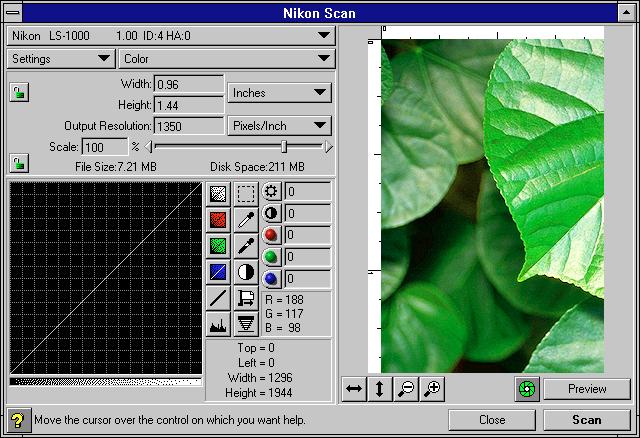
10 Quitting Clicking the Close button in the Nikon TWAIN Source window will return you to Nikon Control, or to your current imaging application. 3.2 Main Dialog Box Nikon Scan will automatically detect which scanners are connected, and display the Main dialog items and menus appropriate for the scanner you select. (The Main dialog box items will vary slightly, depending on the selected scanner.) If multiple Nikon scanners are connected and powered on, first choose the scanner you are going to use from the pop-up menu at the top left corner of the Main dialog box. Only scanners supported by Nikon Scan will be visible in this pop-up menu. HA is an abbreviation for Host Adapter, and the number next to it is the SCSI ID of the scanner. Note: Depending on what devices are actually connected to your computer, the options which will appear in the pop-up menu above may differ from those shown here
11 - 11 -
12 Interactive Help Clicking the Help button at the bottom left of the window activates the Interactive Help function. Passing the cursor over a window item automatically displays appropriate Help text in the message display area. Control Menu The Interactive Help display disappears when the Help button is clicked again. The Control menu offers the following functions; Restore: Move: Size: Maximize: Close: Switch To : About : Restores the Main dialog box to its original size when it has been enlarged with the Maximize command Lets you move the Main dialog box Lets you re-size the Main dialog box Enlarges the Main dialog box to fill the screen Closes the Main dialog box Lets you activate another window Displays the About window
13 3.3 Basic Scanning This section gives a brief description of the standard acquisition procedure after the Main dialog box is displayed. The individual buttons and menus are explained in detail in the following chapters. Choosing the Scanner Nikon Scan will automatically detect which scanners are connected, and display the Main dialog items and menus appropriate for the scanner you select. The Main dialog box items will vary slightly, depending on the selected scanner. If multiple Nikon scanners are connected and powered on, first choose the scanner you are going to use from the pop-up menu at the top left corner of the Main dialog box. Only scanners supported by Nikon Scan will be visible in this pop-up menu. Positioning Media Insert or position the media to be scanned as described in your scanner's hardware manual. Ejecting Film (film scanners only) To eject film, click the button shown below. If you are using the optional SF-100 Auto Slide Feeder with the LS-1000, clicking this button will eject the current slide and set the next one. If you are using the LS-4500AF, you can also eject film by pressing the scanner's Eject button. Media Type Choose the media type to be scanned. Note: Depending on what devices are actually connected to your computer, the options which will appear in the pop-up menu above may differ from those shown here. Note: The above menu may differ depending on the scanner and options used. Please see the appendix appropriate to the scanner you are using
14 Preview Clicking the Preview button starts a preview operation. If the Prescan check box is turned off when a prescan is required, the following indication will appear. Before the preview process begins, a prescan operation will be carried out if the Prescan check box is turned on. Prescan check box This indication appears when a prescan operation has not been carried out In this case you can carry out the prescan operation after the preview is completed by choosing Autoexposure from the Special Capabilities menu. PRESCAN ON PRESCAN OFF Note: Even if the prescan check box is turned on, the LS-4500AF will not conduct a prescan operation if the cropping area has not been changed. Note: Depending on the scanner you have selected, the options which appear in the pop-up menu above may differ from those shown here. Please see the appendix appropriate to the scanner you are using

15 When the preview operation is completed, an image is displayed in the Preview display area. Cropping Using the mouse, click and drag a bounding box to specify a rectangular crop area in the preview image display area. Using the four buttons shown below, the image displayed in the preview area by the preview operation can be flipped vertically or horizontally, and enlarged or reduced


16 Setting Size, Resolution, and Image Adjustment You can change settings such as the resolution, scale, contrast, gamma curve, and other parameters, as required. Scanning When the Scan button is clicked, scanning is carried out in accordance with the settings made, and the acquired image is passed to the imaging application, or to Nikon Control. While scanning is in progress, the following window is displayed. Clicking the Cancel button stops scanning
17 4. Scanning Conditions Except where otherwise noted, the operating procedures covered in the present chapter are identical for all scanners supported by Nikon Scan. Features specific to each model are covered in Appendix A, Features Specific to the LS-20 and LS- 1000, Appendix B, Features Specific to the LS-4500AF, and Appendix C, Features Specific to the AX-110 and AX Choosing the Scanner Nikon Scan will automatically detect which scanners are connected, and display the Main dialog items and menus appropriate for the scanner you select. The Main dialog box items will vary slightly, depending on the selected scanner. If multiple Nikon scanners are connected and powered on, first choose the scanner you are going to use from the pop-up menu at the top left corner of the Main dialog box. Only scanners supported by Nikon Scan will be visible in this pop-up menu. The names and SCSI IDs of the connected scanners are shown in the menu. HA is the abbreviation of Host Adapter, and the number next to it is the ID number of the SCSI board. Note: Depending on what devices are actually connected to your computer, the options which will appear in the pop-up menu above may differ from those shown here

18 4.2 Setting the Gamma Value You can adjust the Monitor Gamma values for red, green, and blue, and the Application Gamma value. When setting the Gamma values, choose Monitor Gamma from the pop-up menu at the top left corner of the Main dialog box. The Gamma window then appears. Meaning of the Buttons Cancel: Discard settings and return to Main dialog box. OK: Save settings and return to Main dialog box


19 Monitor Gamma The Gamma dialog box allows you to adjust the appearance of the preview image within Nikon Scan. Changing these values will not modify the actual image data obtained in a scanning operation. Red Green Gray Blue Setting visually matching densities for each pair of color patches should also result in the display of matching inner and outer gray density patches. However, this may not always be the case, depending on the monitor used. You can adjust the match of the gray patches by changing the RGB gamma settings again. However, if you correct the overall density gradation this way, the RGB color balance may no longer be optimally represented on the monitor. Adjustment range: 0.8 to 3.0 Note: The monitor gamma values entered here are only used to correct for the display of preview images within Nikon Scan. As these parameters are not used to compensate the display of final scanned images by your host application software, nor for other application software, you should adjust the monitor gamma settings for each application you use with Nikon Scan, with the gamma correction tools provided by those applications. Set the gamma values for each of the red, green and blue patches so that the outer and inner rectangles match as closely as possible. Select a value which will make these two areas match in density

20 Application Gamma Application Gamma stores a correction value used to process final scanned image data as it is passed from Nikon Scan to the host application. Adjustment range: 0.8 to 3.0 Note: In the Windows environment, Monitor Gamma is handled within individual applications, rather than globally by the operating system. Adobe Photoshop provides a Calibration dialog (from the Preferences menu) to set a specific Gamma value. To display image data correctly within Photoshop, the image coming from Nikon Scan must first be compensated. The value entered here will process and adjust the image data through the scanner's 8, 10, or 12-bit LUT (look-up-table), taking full advantage of the bit-depth specification of the scanner model connected. 4.3 Positioning Media Insert or position the media to be scanned as described in your scanner's hardware manual. 4.4 Ejecting Film (film scanners only) To eject film, click the button shown below (this button is not displayed when an AX-110 or AX-210 flatbed scanner is selected). If you are using the optional SF-100 Auto Slide Feeder with the LS-1000, clicking this button will eject the current slide and set the next one. Note: With the LS-4500AF, you can also eject film by pressing the scanner's Eject button. After the film eject button has been clicked, a prescan operation will be carried out automatically
21 4.5 Choosing the Media Type Media Type Selection Choose the type of media to be scanned. Note: The above menu may differ depending on the scanner and options used. Please see the appendix appropriate to the scanner you are using. Choose one of the following from the upper part of the Media Type menu. B+W Line Art: To scan black and white binary images Grayscale: To scan grayscale images Color: To scan color images Choose one of the following from the lower part of the Media Type menu. Positive: Negative: To scan positive images To scan negative images Filter Selection With some images good results can be obtained by using a different color filter from the default filter in grayscale scanning, and a filter selection function is provided for this purpose. This function can be used to produce grayscale and B+W Line Art scans, and is useful for dropping out unwanted colors, such as document stains, etc. If you pull down the Media Type menu while holding down the Ctrl key on the keyboard, the filter selection menu will appear at the end of the Media Type menu. Choose the filter you want to use from the menu

22 4.6 Crop/Preview Area Buttons and Menu The preview image acquired after clicking the Preview button is displayed in the crop/preview area. Locating the cursor on the preview area and clicking the righthand button of the mouse brings up the pop-up menu. Using the four buttons below the preview area, or selecting the items in the pop-up menu, the image displayed by the preview operation can be flipped vertically or horizontally, and zoomed in or out. Note: The pop-up menu contains the Monitor Gamma item. This function is identical to that of Monitor Gamma in the pop-up menu at the top left corner of the Main dialog box. For details concerning the Monitor Gamma setting, refer to Section
 is flipped vertically.")

23 Flip The entire preview area display (including any existing crop marquis) is flipped horizontally. The entire preview area display (including any existing crop marquis) is flipped vertically. When the original image is flipped horizontally or vertically, the corresponding Flip button appears to have been pressed, and will remain in a depressed position, as shown below. Clicking the button again restores its original appearance


24 Zoom When the Zoom-in button is clicked or the Zoom In command is chosen, the crop area fills the entire Preview area. After a Zoom-in operation, the original display is restored by clicking the Zoom-out button or choosing the Zoom Out command
25 4.7 Cropping You can use your cursor in the crop/preview area, to set up a new crop, or to move or change the size of the current crop area. Establishing a New Crop After the preview image is displayed, locate the cursor at any starting point on the preview (the top left is shown in the example), and then drag the cursor to another location (bottom right in the example), thus forming a rectangle, which is referred to as 'marquis' of 'marching ants'. Note: Dragging means moving the mouse while holding down the mouse button. The entire preview area can be re-selected by double-clicking anywhere in the preview window. Note: For reasons involving the compression and display of the preview image, there may be a slight difference between the crop area specified on the screen and the area that is actually scanned. When cropping an image, allow sufficient safety margin to ensure that important element are not cropped out
26 Moving the Crop Area To change the position of the crop rectangle, simply locate the cursor so that it is inside the frame and then drag the frame to the desired position. Changing the Size of the Crop Area To change the size of the crop area, drag a side or corner of the crop frame. When a side is dragged, the area will change only in the vertical or horizontal direction. When a corner is dragged, the size of the area will change both vertically and horizontally. Note the type of cursor used for each change

27 4.8 Crop Size Controls These controls let you set the output size, output resolution, and scale. Dimensions The scanned output size can be specified by entering width and height values. If an unacceptable value is entered, it will be displayed in red. When the size is changed by cropping the Preview, the numbers displayed in the size value edit boxes will also change at the same time. The units for width and height can be selected from the pop-up menu. When this selection is changed, the values in the boxes are converted to the equivalent new units. Selection Pixels Inches cm mm Picas Points Unit Pixel Inch Centimeter Milimeter Pica Point Note: If the unit is changed, the ruler and location display also change accordingly
28 Cropping Coordinates The location of the current crop is given by the absolute numerical position of its top and left sides. The distance, in pixels, from the top to the bottom of the crop is displayed as the pixel height, the distance from the left to the right side of the crop as the pixel width. These coordinates are displayed in pixels, regardless of the units selected for Width and Height (and corresponding ruler display) in the size control area. Output Resolution Enter the desired resolution in the Output Resolution field in the dialog box in order to set the output resolution. The resolution specified here refers to the output resolution of the scanned image; enter a value suitable for the final purpose of the scan. If an unacceptable value is entered, it will be shown in red. The units for resolution can be selected from the pop-up menu. When this selection is changed, the value in the box is converted to the new units. Selection Pixels/Inch Pixels/cm Pixels/mm Pixels/Picas Pixels/Point Unit Pixels/Inch Pixels/Centimeter Pixels/Milimeter Pixels/Pica Pixels/Point
29 Scale Scale means the relative scale of the output resolution or size, and input resolution or size. If input and output size and resolution are the same, the scale is 100%. The Scale value can be specified either by entering a value or by dragging the slider with the mouse. If an unacceptable value is entered it will be shown in red. The Scale is always shown as a percentage increase from the original size, to the final scanned size. Modifying the size of the crop rectangle while the width and height aspect ratio is locked will change the Scale value, not the final output width and height values. File Size and Disk Space The file size and amount of free disk space are shown below the Scale. Note: If the file size calculated from the size, resolution, and scale settings is too large to be saved within the available disk space, the value will be highlighted in yellow. Note: You should check the File Size and Disk Space available before starting a final scan. If the required space for a scan exceeds the available space, the file size needed will be displayed in highlighted text. Padlock Icons The width/height aspect can be locked by clicking the padlock icon located to the left of the width and height input boxes (the icon will change from green to red when clicked). If a new value is entered for either width or height when the aspect ratio is locked, the other value will automatically be changed to maintain the specified aspect ratio. The padlock icon to the left of the File Size information item will lock in the file size, permitting the size and resolution to change in proportion to each other without changing the final quantity of scan data the total number of pixels scanned. Locking file size simultaneously locks the width/height aspect ratio
. You can cancel the focus position cursor by clicking the Return to crop button.")
30 4.9 Autofocus (film scanners only) The focus of the image can be adjusted by clicking the Autofocus button shown below (this button is not displayed when an AX-110 or AX-210 flatbed scanner is selected). You can cancel the focus position cursor by clicking the Return to crop button. You can choose a location in the image as the focus position by clicking this button while simultaneously holding down the Ctrl key. If you click the Autofocus button without specifying a focus position, the autofocus position chosen will be either the center of the image, or, if no autofocus position has been specified since the start of the current session, the center of the current crop. Focus position cursor


31 4.10 Adjust Focus (film scanners only) This function allows you to adjust focus to compensate for warping of the film or for differences in the thickness of slide mounts. To use the Adjust Focus function, choose Adjust Focus from the Special Capabilities submenu (the Special Capabilities submenu is located on the pulldown menu at the top left corner of the Main dialog box). The Special Capabilities menu for the AX-110 and AX-210 does not include the Adjust Focus function. When the Adjust Focus function is chosen from the Special Capabilities submenu, the following dialog box appears. Drag the slider or input the desired value, then click the OK button. Note: The values shown at the ends of the slider bar will vary depending on the autofocus position and the scanner model. The autofocus position always has a value of zero. Note: The menu for the LS-4500AF differs from that shown above. See Appendix B
32 4.11 Autoexposure The Autoexposure function can be used to perform a prescan after a preview operation has been completed. If you click the Preview button when the Prescan check box is turned off or while holding down the Ctrl key, the prescan operation will not be carried out. In this case, you can perform a prescan operation after preview by selecting Autoexposure from the Special Capabilities submenu. Note: The pop-up menu shown above is for the LS The corresponding pop-up menus for the LS-4500AF and for the AX-110 and AX-210 are different. Please see the appendix appropriate to the scanner you are using. The prescanning operation begins immediately on your selecting the Autoexposure function from the Special Capabilities submenu
33 5. Image Compensation This chapter explains how to adjust continuous tone brightness, line art threshold, contrast, and color balance. All these settings are made using buttons or text edit boxes. The results of compensation can be checked with a preview scan. The appearance of the Main dialog box varies with the Media Type, as shown below. 5.1 Brightness / Threshold This control is used to set the brightness for a Color or Grayscale image, or the threshold value for a B&W Line Art image. When this button is clicked, a slider bar pops up. The value is set by dragging the slider to the left or right while holding down the mouse button. The same result can be achieved by entering a value directly in the box to the right of the button. Color Grayscale B&W Line Art Note: When a monitor with 32K colors or more is used, the R, G, and B buttons are shown in their respective colors. When the slider is dragged in the plus direction, the images will be brighter and the black point will begin to float above maximum black. When dragged in the minus direction, the images will become darker and dimmer. For a B&W Line Art image, the set value is the threshold value. Brightness adjustment range: -100 to 100 Threshold adjustment range: 0 to
34 5.2 Contrast This control is used to set the contrast for Color or Grayscale images. A contrast setting is not used for B&W Line Art images. 5.3 Color Balance The color balance is adjusted using three controls for Red, Green, and Blue. These three controls only appear when 'Color' has been set for the Media Type. When this button is clicked, a slider bar pops up. The value is set by dragging the slider to the left or right while holding down the mouse button. The same result can be achieved by entering a value directly in the box to the right of the button. When the slider is dragged in the plus direction, the black point and white point input values will be restricted, thus steepening the tone curve and producing punchier images with less gradation subtlety. When dragged in the minus direction, the black output values will be raised and the white point output values lowered, thus flattening the tone curve and producing flatter images with more gradation subtlety. Adjustment range: -100 to 100 When one of these buttons is clicked and held down, a slider bar pops up. The value is set by dragging the slider to the left or right while holding down the mouse button. The same result can be achieved by entering a value directly in the box to the right of the button. You can adjust overall color balance by emphasizing or deemphasizing each of the three primary colors of the scan. Unlike brightness compensation, in which the amount of the Red (R), Green (G), and Blue (B) components in the image are changed simultaneously, affecting the brightness of the image as a whole, color balance adjustment permits individual compensation for each of these colors. Adjustment range: -100 to
35 5.4 Level Display RGB values or CMY percentages at the cursor position are displayed while the cursor is over the crop/preview area. The values can be switched between absolute RGB pixel values (in 8-bit level equivalent) and CMY percentages, by clicking within the boundary surrounding the density display area. For grayscale images, the L (luminance in 8-bit level equivalence) or K (the black density percentage) value at the cursor position is displayed

36 6. Gamma Curves Selective gamma curve editing is essential for the highest-quality scanning. In many cases, the factory default gamma curves will yield excellent results. These default gamma curves are well suited to the widest variety of original media. However, under certain circumstances, you may want to use other gamma curves. 6.1 Viewing the Gamma Curves When the Media Type is Color, four gamma curves are displayed
37 When the Media Type is Grayscale, only one gamma curve is displayed. When the Media Type is set to Color, you can edit one master curve and three primary curves, i.e., for Red, Green, and Blue. When the Media Type is set to 'Grayscale', you can edit a grayscale curve only. Each of the Red, Green and Blue gamma curves is unique. The master curve provides a simple means of adjusting all of the primary curves equally. Thus, you do not have to adjust each primary curve individually. This two-dimensional graph represents the input/output transfer function. The horizontal axis represents the input, or original gamma levels. The vertical axis represents the output, or new gamma levels. A diagonal line connecting the lower-left and upper-right corners would represent a linear transfer function. For example, an input value of 100 would produce an output value of 100. Similarly, an input value of 200 would produce an output value of 200, and so on. A horizontal line running along the bottom border would map all inputs into a zero output, consequently creating a black image. A line beginning at the top left corner, and ending in the bottom right corner, would produce a negative image

38 6.2 Viewing the Histogram At times it may be useful to view the histogram of the preview image. A histogram is a statistical representation of the densities in an image. A histogram will be displayed when the Histogram button is clicked and held. This control is active when either Grayscale or Color is selected as the Media Type in the Main dialog box. The histogram s horizontal axis represents the pixel intensity or brightness, the darker values appearing on the left and the lighter values on the right. The vertical axis is a statistical representation of the number of occurrences of each pixel value over the entire image. The histogram therefore represents a graphical and statistical view of the overall brightness of an image. The histogram will be displayed as long as the button is held down

39 6.3 Modifying the Gamma Curves Modifying the gamma curves is relatively easy, but modifying them correctly is not. While the effects of altering the master curve are straightforward, the relationships between the Red, Green and Blue gamma curves are far more complex, and much more difficult to control. The gamma curves can be modified manually or automatically. The manual mode involves moving points on the gamma curves with the mouse, thereby graphically reshaping the curve. Specifying the Gamma Curve To the right of the graph are four buttons from top to bottom, the Master Curve button, and the Red, Green, and Blue Curve buttons. The Grayscale Curve button appears only when the Media Type is set to Grayscale. Graphically Altering the Gamma Curves The individual gamma curves in the gamma curve window can be manually altered by clicking the mouse at points on the gamma curve and dragging, thus reshaping the curve. Curva maestra Rojo Verde Azul When one of these buttons is clicked, the gamma curve corresponding to that button is selected for editing. This mode is maintained until another button is clicked. You will notice that changes to the shape of the gamma curves will cause corresponding changes to the tonal quality of the displayed image, as seen in the preview window. As the curve is altered, a curve-fitting software algorithm redraws the new curve
40 Forcing the Gamma Curves to Linear To reset curves to a linear state, clicking the Linear button shown below 'forces' whichever gamma curve is active to linear. Ctrl-clicking the Linear button will force all three gamma curves to linear. Choosing the Reset Color Controls command from the Settings menu will force the master, Red, Green, and Blue gamma curves to linear, and brightness and contrast, R, G, and B adjustment values to zero. Setting the Black Point The Black Point represents the darkest point in the image. Since the density range of the original media might exceed the dynamic range of the scanner, the scanner s tonal range needs to be used as efficiently as possible. The Black Point is typically selected so that all values in the image that are darker than this point can be mapped, or converted to black without affecting the quality of the image. For example, suppose that the darkest area within the image, that you know to represent a true black, has a value of 10 in the scanned data. Values 0 9 would be wasted since no pixel in the image would have a value lower than 10. By setting the Black Point to 10, the data would be re-mapped so that a value of 10 from the scanner would produce a 0. All the data values would then be meaningful. To set the Black Point, click the Black Point button

41 After the Black Point button is clicked, position the mouse cursor over the image in the preview window and select a pixel value to be used as the darkest point in the image. Watch the Pixel Value display closely as you move the cursor across the image to enable you to choose the right value to modify. If you are unsure, then zoom in on the area of interest to enhance the detail and increase the accuracy of your selection. The pixel you select will become the new Black Point, or reference point for maximum black (often called dmax, for maximum density ). When the Black Point is selected, the active gamma curve is automatically adjusted to reflect this selection. This tool can be used with any gamma curve, although it is most effective when used with the master gamma curve, as it provides a neutral black point, which is normal for many images. Black Point eyedropper cursor New Black Point When you decide on the pixel you want to use as the Black Point of the image, clicking the mouse forces the gamma curves to use this value as the minimum value in the preview window. Any pixels darker than the black point will be set to the minimum value. The result of this new curve is approximated in the preview window. Observe the increase in contrast, and also the reduced White Point, covered in the next section
42 The Black Point cursor can be restored to its cropping state, from the eyedropper state, by clicking the Return to Crop button. Setting the White Point The White Point represents the lightest point in the image, thus providing a function opposite to that of the Black Point. Like the Black Point, however, selection of a White Point reduces the tonal range of the scanner so as not to waste any of its tonal range on light areas that are not actually present in the original. The White Point is typically selected so that all values in the image that are lighter than this point can be mapped, or converted to white without affecting the quality of the image. To set the White Point, click the White Point button

43 After the White Point button is clicked, position the mouse cursor over the image in the preview window and select a pixel value to be used as the lightest point in the image. Watch the Pixel Value display closely as you move the cursor across the image to enable you to choose the right value to modify. If you are unsure, then zoom in on the area of interest to enhance the detail and increase the accuracy of your selection. The pixel you select will be mapped to the new White Point, or reference point for maximum lightness, (often called dmin, for minimum density ). When the White Point is selected, the active gamma curve is automatically adjusted to reflect this selection. This tool can be used with any gamma curve, although it is most effective when used with the master gamma curve, as it provides a neutral white point, which is normal for many images. New White Point White Point eyedropper cursor When you decide on the pixel you want to use as the White Point of the image, clicking the mouse forces the gamma curves to use this value as the maximum value in the preview window. Any pixels lighter than the White Point will be set to the maximum value. The result of this new curve is approximated in the preview window
44 The White Point cursor can be restored to its cropping state, from the eyedropper state, by clicking the Return to Crop button. Automatic Contrast Adjustment If you prefer, the Nikon Scan TWAIN driver is capable of selecting optimal neutral Black and White Points for you. The Automatic Contrast Adjustment control in the TWAIN driver will usually produce excellent results. Simply click the Contrast Adjust button. The software will analyze the portion of the preview image contained within the cropped region of the preview, and automatically select an optimum Black Point and White Point. The active gamma curves will be modified automatically. Note that this may sometimes lead to undesirable color balance. If for example, the original image is of a predominantly warm toned scene, such as a sunset, then the neutral highlight produced by Autocontrast, or the White point eyedropper, would be too cold for the subject matter of the image
45 7. Saving and Loading Settings Using the Settings pop-up menu, you can save the settings you have made, or load previously saved settings. This may be convenient for repetitive scanning at particular crops and resolutions, or when using a complex gamma correction to improve reproduction. Settings include the following items: Scanner selection, media type, width and height units, width value, height value Aspect and file size locked/unlocked status, output resolution value, magnification value Master, R, G, and B curves, brightness and contrast, R, G, and B adjustment values Orientation, horizontal and vertical flip status, help ON/OFF status, crop area size and location


46 7.1 Saving Settings You can save the current Main dialog box settings in the Settings menu of Nikon Scan. If settings have previously been saved using the entered name, the following dialog box will appear when you click the Save button. When Save is chosen from the Settings menu, the Save Settings window appears to let you name the new settings. If you want to overwrite the previous settings, click the Yes button. If you want to keep the previous settings, click the No button and enter a different name for saving the new settings. If you pull down the Settings menu after performing the save, you will see that the name under which the settings were saved to the system has been added at the end of the menu. If there are a number of settings, the names of all the settings are displayed. When you enter a name and click the Save button, the settings are saved in the system under that name


47 7.2 Deleting Settings You can delete saved settings using Delete Settings function. When Delete is chosen from the Settings menu, the Delete Settings window appears to let you specify the name to be deleted. 7.3 Recalling Settings Settings saved in the system include factory default settings and last session settings as well as user settings. Factory Defaults are set when the product is shipped, and cannot be changed or deleted. Last Session settings are saved automatically when you quit the program. Last Session settings cannot be deleted. You can recall Factory Defaults, Last Session settings, or settings saved with the Save Settings function. These are displayed at the end of the Settings menu. When you choose the settings to be recalled, those settings are immediately loaded into the Main dialog box. To delete the settings, choose the names to be deleted and click the Delete button. You can delete more than one setting at a time. When the settings are deleted, the name displayed at the end of the Settings menu is also deleted. Note: Last Session will not be displayed on the first use after installation

48 7.4 Exporting Settings You can save the current Main dialog box settings to a file using the Export Settings function. Unlike the Save function, which saves settings in the system, the Export Settings function saves them to a file that can be located anywhere you can navigate to using the standard file dialog box. A file to which settings have been saved using the Export Settings function can be read using the Import Settings function. To save the current settings to a file, choose Export from the Settings menu. We recommend that you save your mission critical settings data using Export. The Export Settings window appears when Export is selected. When you click the OK button after specifying the drive and directory to be saved to, and entering the file name, the current settings are saved to that file


49 7.5 Importing Settings Using the Import Settings function, you can read the contents of a file saved with the Export Settings function into the Main dialog box. To read the contents of a file, choose Import from the Settings menu. 7.6 Reset Color Settings You can reset the modified gamma curves and image compensation. The Import Settings window will then appear. Choosing the Reset Color Controls command from the Settings menu will force the master, Red, Green, and Blue gamma curves to linear, and brightness and contrast, R, G, and B adjustment values to zero. When you click the OK button after opening the directory containing the settings and specifying the file, the contents of that file are read


50 8. Copyright Information and the About Window About Window Copyright Information When Copyrights is chosen from the Special Capabilities menu, the Copyrights window appears. When About command is chosen from the Control menu, the About window appears. The Copyrights window disappears when the Cancel button is clicked. The About window disappears when the Close button is clicked
51 Appendix A: Features Specific to the LS-20 and LS-1000 Except that the LS-20 does not support the optional SF-100 Auto Slide Feeder, the operating procedures for the LS-20 and LS-1000 are identical. This following section describes features specific to the LS-20 and LS When Software Interpolation is chosen from the Special Capabilities menu, the Software Interpolation window appears. A.1 Software Interpolation Software Interpolation is used to provide precise image scaling and resolution. You can choose any one of the following from this window. Bilinear: Interpolation with emphasis on accuracy Nearest Neighbor: Interpolation with emphasis on high-speed processing None: No interpolation is performed
52 Appendix B: Features Specific to the LS-4500AF The following sections describe features specific to the LS- 4500AF. B.1 Film Format The film format to be scanned can be chosen from the Media Type menu. Resolution, maximum scanning area, and prescan area are automatically altered to reflect the format selected. Choose any one of the following from the menu above. Lores: Uses the low resolution (1000 x 2000 dpi) optical system Hires: Uses the high resolution (3000 x 3000 dpi) optical system for 35mm film using a single frame holder 4"x5": 4 x 5 film (low resolution) 6x6--9: Film measuring from 6 x 6 to 6 x 9 (low resolution) 6x4.5: 6 x 4.5 film (low resolution) 35mm: 35mm film (high resolution)


53 B.2 Preview Quality Setting Preview Quality allows you to choose whether preview operations are to be performed in high speed or high quality mode. B.3 Final Scan Quality Setting Final Scan Quality allows you to choose whether scanning is to be performed in high speed or high quality mode. Select one of the following from the Preview Quality submenu. Highest Speed: Preview with emphasis on speed Normal: Normal preview Highest Quality: Preview with emphasis on quality Select one of the following from the Final Scan Quality submenu. Highest Speed: Scan with emphasis on speed Normal: Normal scan Highest Quality: Scan with emphasis on quality Under normal circumstances the best choice is Highest Quality
54 B.4 Sharpening It is often necessary to sharpen images prior to reproduction since there are usually losses in definition when going to press. To enhance edge contrast, choose Sharpening from the Special Capabilities menu. The Sharpening window appears. Choose one of the following from the Sharpening window. Sharpen More Sharpen None Blur Blur More
55 B.5 Make Shading After replacing the lamp, you must perform lamp calibration using the Make Shading function before you can operate the scanner (to replace the lamp, follow the directions given in the LS-4500AF hardware manual). You must use this function whenever you replace the lamp. Note: The film holder must be ejected before this function is used, as otherwise lamp calibration will not proceed correctly. The pop-up menu at the top left corner of the Main dialog box includes the Special Capabilities submenu. The Make Shading function is executed immediately on your selecting Make Shading from the Special Capabilities submenu

56 Appendix C: Features Specific to the AX-110 and AX-210 The following sections describe features specific to the AX-110 and AX-210 flatbed scanners. The operating procedures for the two models are identical. C.1 Main Dialog Box The Main Dialog Box for the AX-110 and AX-210 is shown below. Note that the Main dialog box for flatbed scanners does not include an Eject Film or Autofocus button, and that the rulers in the Preview area differ from those shown for film scanners in scale and point of origin

57 C.2 Using Option Adapters When the optional transparency adapter or ADF (Auto Document Feeder) is fitted to the AX-110 or AX-210, a submenu is added to the Media Type Selection menu to enable the option. Using the Transparency Adapter When the optional transparency adapter is fitted to the AX- 110 or AX-210, additional items appear at the bottom of the Media Type pop-up menu. Choose one of the following from the lower part of the Media Type menu. Transparency: To scan transparency images Reflective: To scan reflective images Note: When scanning transparencies with the Media Type set to Negative, the prescan operation will be optimized for the currently selected crop. If a new crop is selected after preview, it may be necessary to carry out the prescan operation again. After changing the crop area, it is recommended that you click the Zoom-in button to conduct a preview with the prescan optimized for the new crop
58 Using the ADF (Auto Document Feeder) When the optional ADF (Auto Document Feeder) is fitted to the AX-110 or AX-210, the ADF submenu appears at the bottom of the Media Type menu. Note: When the AF-10 Auto Document Feeder is attached to your scanner, automated continuous scanning is available with applications supporting continuous acquire, such as Photoshop versions 3.0 or later or EasyPhoto 1.5. Continuous scanning can be initiated by pressing the Crtl button + the Scan button on the main dialog of Nikon Scan. Choose any one of the following from the ADF submenu. ADF Off: Disables the ADF. The document positioned on the document setting glass will be scanned. ADF On US Letter: Enables scanning of letter-sized documents placed on the ADF. ADF On US Legal: Enables scanning of legal-sized documents placed on the ADF


59 C.3 Software Interpolation Software interpolation is used to provide precise image scaling and resolution. The pop-up menu at the top left corner of the Main dialog box includes the Special Capabilities submenu. Choose Software Interpolation from the Special Capabilities submenu. The Software Interpolation window appears. You can choose either of the following from the Software Interpolation window. Bilinear: Interpolation with emphasis on accuracy Nearest Neighbor: Interpolation with emphasis on high-speed processing
Contents. Nikon Scan for Windows. Scanner Control Software and TWAIN Source. Reference Manual. Overview Before You Begin.
 Contents Overview Before You Begin System Requirements Software Installation Basic Operations Scanner Control Software and TWAIN Source Nikon Scan for Windows Reference Manual The Scan Window Opening the
W i n d o w s. ScanGear CS-S 4.3 for CanoScan FB1200S Color Image Scanner. User's Guide
 f o r W i n d o w s ScanGear CS-S 4.3 for CanoScan FB1200S Color Image Scanner User's Guide How to Make Best Use of the Manuals 2 When you open the box Printed Manual CanoScan FB1200S Quick Start Guide
ScanGear CS-U 5.3 for CanoScan FB630U/FB636U Color Image Scanner User s Guide
 ScanGear CS-U 5.3 for CanoScan FB630U/FB636U Color Image Scanner User s Guide Copyright Notice 1999 Canon Inc. This manual is copyrighted with all rights reserved. Under the copyright laws, this manual
ScanGear CS-U 5.6. for CanoScan FB1210U Color Scanner. User s Guide
 ScanGear CS-U 5.6 for CanoScan FB1210U Color Scanner User s Guide Copyright Notice Copyright 2000 Canon Inc. This manual is copyrighted with all rights reserved. Under the copyright laws, this manual may
Reference Guide. Color Image Scanner
 Color Image Scanner All rights reserved. No part of this publication may be reproduced, stored in a retrieval system, or transmitted in any form or by any means, electronic, mechanical, photocopying, recording,
ScanGear CS-U 6.0. for CanoScan D646U Color Scanner. User s Guide
 ScanGear CS-U 6.0 for CanoScan D646U Color Scanner User s Guide Copyright Notice Copyright 2000 Canon Inc. This manual is copyrighted with all rights reserved. Under the copyright laws, this manual may
WELCOME WHAT S IN THE BOX
 WELCOME Congratulations on purchasing your Visioneer PaperPort flatbed scanner. With your scanner, you can quickly scan paper documents and color photos to place their electronic images on your computer.
Color and More. Color basics
 Color and More In this lesson, you'll evaluate an image in terms of its overall tonal range (lightness, darkness, and contrast), its overall balance of color, and its overall appearance for areas that
Guidance on Using Scanning Software: Part 5. Epson Scan
 Guidance on Using Scanning Software: Part 5. Epson Scan Version of 4/29/2012 Epson Scan comes with Epson scanners and has simple manual adjustments, but requires vigilance to control the default settings
ScanGear CS-U 5.8. for CanoScan D660U Color Scanner. User s Guide
 ScanGear CS-U 5.8 for CanoScan D660U Color Scanner User s Guide Copyright Notice Copyright 2000 Canon Inc. This manual is copyrighted with all rights reserved. Under the copyright laws, this manual may
Introduction. Introduction
 Introduction Introduction Thank you for purchasing the Microfilm Scanner 800II. These Instructions describe how to use the ISIS/TWAIN driver software that makes it possible for you to use ISIS-compatible
M a c i n t o s h. Canon Plug-in Module CS-U 3.9 for CanoScan D660U Color Image Scanner. User's Guide
 f o r M a c i n t o s h Canon Plug-in Module CS-U 3.9 for CanoScan D660U Color Image Scanner User's Guide How to Make Best Use of the Manuals When you open the box Printed Manual CanoScan D660U Getting
Adobe Photoshop. Levels
 How to correct color Once you ve opened an image in Photoshop, you may want to adjust color quality or light levels, convert it to black and white, or correct color or lens distortions. This can improve
DOCUMENT SCANNER INSTRUCTIONS. Space. Backup. Count Only. New File. Scanner. Feeding Option Manual Auto Semi-Auto
 E FILM F Scanner A Space Count Only New File Feeding Option Manual Auto Semi-Auto Backup DOCUMENT SCANNER INSTRUCTIONS NOTICE q Copyright 2001 by CANON ELECTRONICS INC. All rights reserved. No part of
Kigamo Scanback which fits in your view camera in place of conventional film.
 What's included Kigamo Scanback which fits in your view camera in place of conventional film. SCSI Cable to connect your Scanback to the host computer. A 3-meter SCSI cable is standard. Kigamo also has
User Guide Part Number HTM082 Revision F
 User Guide Part Number HTM082 Revision F Imaging that makes a difference. Copyright 1996 Howtek, Inc. All rights reserved. No part of this publication may be reproduced, read or stored in a retrieval system,
Nikon View DX for Macintosh
 Contents Browser Software for Nikon D1 Digital Cameras Nikon View DX for Macintosh Reference Manual Overview Setting up the Camera as a Drive Mounting the Camera Camera Drive Settings Unmounting the Camera
INSTRUCTION MANUAL MM-A209
 E INSTRUCTION MANUAL 9222-7300-11 MM-A209 2 BEFORE YOU BEGIN Before installing the DiMAGE Viewer software, read the data-transfer section in the camera manual. This section details how to connect the camera
Scanner Utility for Microsoft Windows Version 9.6. User's Guide
 P3PC-E892-03EN Scanner Utility for Microsoft Windows Version 9.6 User's Guide For Use with Microsoft Windows 98, Windows Me, Windows 2000 and Windows XP Introduction Thank you for purchasing the "Scanner
User Manual. For MAC
 User Manual For MAC A3 Scanner with The TWAIN Driver (For Macintosh) English User Manual Contents Preface Chapter One Setting Up the Scanner 1 System Requirements... 1 Unpacking the Scanner... 2 The Scanner
COLOR EXAMPLES BEFORE YOU BEGIN. Tone-curve corrections. Before installing the DiMAGE Scan Utility. Digital ROC - Reconstruction Of Color
 E SOFTWARE MANUAL COLOR EXAMPLES Tone-curve corrections By selecting individual color channels on the tone curve, adjustments to the overall color of an image can be made. In this example, the image is
Visioneer OneTouch Scanner. Installation Guide FOR WINDOWS
 Visioneer OneTouch Scanner Installation Guide FOR WINDOWS TABLE OF CONTENTS i TABLE OF CONTENTS Getting Started with your new Scanner....................... 1 Step 1: Installing the Scanner Software.......................
Monaco ColorWorks User Guide
 Monaco ColorWorks User Guide Monaco ColorWorks User Guide Printed in the U.S.A. 2003 Monaco Systems, Inc. All rights reserved. This document contains proprietary information of Monaco Systems, Inc. No
Professional Desktop Scanner User s Manual. (PC version) English
 English") Professional Desktop Scanner User s Manual (PC version) English MiraScan main screen Combo Boxes (page 13) Menu Bar (page 9) Tool Bar (page 24) Job List and Command Buttons (page 22) Preview Area (page
Professional Desktop Scanner User s Manual (PC version) English MiraScan main screen Combo Boxes (page 13) Menu Bar (page 9) Tool Bar (page 24) Job List and Command Buttons (page 22) Preview Area (page
Using the TWAIN Datasource
 Using the TWAIN Datasource Starting the Scan Validation Tool... 2 The Scan Validation Tool dialog box... 2 Using the TWAIN Datasource... 4 How do I begin?... 4 Creating a new Setting Shortcut... 5 Changing
English Getting Started
 Getting Started with Flextight and FlexColor Getting Started with Flextight and FlexColor 2 2001 Imacon A/S. All rights reserved., Part No XXXXXXXX, revision X.X The information in this manual is furnished
Using the TWAIN Datasource
 Using the TWAIN Datasource Starting the Scan Validation Tool... 2 The Scan Validation Tool dialog box... 2 Using the TWAIN Datasource... 4 How do I begin?... 4 Creating a new Setting Shortcut... 5 Changing
Scanning Setup Guide for TWAIN Datasource
 Scanning Setup Guide for TWAIN Datasource Starting the Scan Validation Tool... 2 The Scan Validation Tool dialog box... 3 Using the TWAIN Datasource... 4 How do I begin?... 5 Selecting Image settings...
i800 Series Scanners Image Processing Guide User s Guide A-61510
 i800 Series Scanners Image Processing Guide User s Guide A-61510 ISIS is a registered trademark of Pixel Translations, a division of Input Software, Inc. Windows and Windows NT are either registered trademarks
For customers in Canada This Class B digital apparatus meets all requirements of the Canadian Interference-Causing Equipment Regulations.
 User manual For customers in North and South America For customers in USA This device complies with Part 15 of the FCC rules. Operation is subject to the following two conditions: (1) This device may not
For customers in USA This device complies with Part 15 of the FCC rules. Operation is subject to the following two conditions:
 User manual For customers in North and South America For customers in USA This device complies with Part 15 of the FCC rules. Operation is subject to the following two conditions: (1) This device may not
User s Guide. For PhotoShop. Wide Format Scanning Plug-in for Photoshop on Macintosh & Windows Edition
 User s Guide For PhotoShop Wide Format Scanning Plug-in for Photoshop on Macintosh & Windows 2004 Edition Table of Contents 1. Introduction 1-1 1.1 About the Wide Format Scanning Plug-in 1-1 1.2 Installation
PHOTO 11: INTRODUCTION TO DIGITAL IMAGING
 1 PHOTO 11: INTRODUCTION TO DIGITAL IMAGING Instructor: Sue Leith, sleith@csus.edu EXAM REVIEW Computer Components: Hardware - the term used to describe computer equipment -- hard drives, printers, scanners.
Index of Command Functions
 Index of Command Functions version 2.3 Command description [keyboard shortcut]:description including special instructions. Keyboard short for a Windows PC: the Control key AND the shortcut key. For a MacIntosh:
Extended Studies - Intro to Adobe Photoshop
 Working with Curves Curves are the Swiss Army knife of Photoshop. They re great for adjusting both the contrast and color balance of an image in one window. They can lighten and darken areas without selections
5. SilverFast Tools Tools SilverFast Manual. 5. SilverFast Tools Image Auto-Adjust (Auto-Gradation) 114
 114") Chapter 5 Tools 5. SilverFast Tools 5. SilverFast Tools 106 5.1 Image Auto-Adjust (Auto-Gradation) 114 5.2 Highlight / Shadow Tool 123 5.3 The Histogram 133 5.4 Gradation Dialogue 147 5.5 Global Colour
Chapter 5 Tools 5. SilverFast Tools 5. SilverFast Tools 106 5.1 Image Auto-Adjust (Auto-Gradation) 114 5.2 Highlight / Shadow Tool 123 5.3 The Histogram 133 5.4 Gradation Dialogue 147 5.5 Global Colour
Key Terms. Where is it Located Start > All Programs > Adobe Design Premium CS5> Adobe Photoshop CS5. Description
 Adobe Adobe Creative Suite (CS) is collection of video editing, graphic design, and web developing applications made by Adobe Systems. It includes Photoshop, InDesign, and Acrobat among other programs.
Digital Design and Communication Teaching (DiDACT) University of Sheffield Department of Landscape. Adobe Photoshop CS5 INTRODUCTION WORKSHOPS
 University of Sheffield Department of Landscape. Adobe Photoshop CS5 INTRODUCTION WORKSHOPS") Adobe INTRODUCTION WORKSHOPS WORKSHOP 1 - what is Photoshop + what does it do? Outcomes: What is Photoshop? Opening, importing and creating images. Basic knowledge of Photoshop tools. Examples of work.
Adobe INTRODUCTION WORKSHOPS WORKSHOP 1 - what is Photoshop + what does it do? Outcomes: What is Photoshop? Opening, importing and creating images. Basic knowledge of Photoshop tools. Examples of work.
ScanPotter. Reference Manual
 ScanPotter Reference Manual Copyright 2014 by Microtek International, Inc. All rights reserved. Trademarks Microtek, ScanMaker, ArtixScan, ScanWizard, ScanPotter and ColoRescue are trademarks or registered
Using the TWAIN Datasource
 Using the TWAIN Datasource Starting the Scan Validation Tool... 2 The Scan Validation Tool dialog box... 3 Using the TWAIN Datasource... 5 How do I begin?... 5 Changing or creating a Setting Shortcut...
Using Adobe Photoshop to enhance the image quality. Assistant course web site:
 Using Adobe Photoshop to enhance the image quality Assistant course web site: http://www.arches.uga.edu/~skwang/edit6170/course.htm Content Introduction 2 Unit1: Scan images 3 Lesson 1-1: Preparations
6.12. SilverFastJobManager. SilverFast JobManager for Film Scanner. Overview
 SilverFast JobManager for Film Scanner Overview To activate the JobManager, click on JobManager -button in the vertical list of buttons to the left of the large SilverFastAi preview window SilverFastAi
Adobe Photoshop PS2, Part 3
 Adobe Photoshop PS2, Part 3 Basic Photo Corrections This guide steps you through the process of acquiring, resizing, and retouching a photo intended for posting on the Web as well as for a print layout.
Photoshop CC Editing Images
 Photoshop CC Editing Images Rotate a Canvas A canvas can be rotated 90 degrees Clockwise, 90 degrees Counter Clockwise, or rotated 180 degrees. Navigate to the Image Menu, select Image Rotation and then
Quick Start Guide. Setup and Scanning. Try the Additional Features. English
 English Quick Start Guide Be sure to install the software programs before connecting the scanner to the computer! Setup and Scanning Check the Package Contents p.3 Install the Software Windows Macintosh
Scanning Setup Guide for the TWAIN Datasource
 Scanning Setup Guide for the TWAIN Datasource Product overview... 2 Capture system... 2 Starting the Scan Validation Tool... 3 The Scan Validation Tool dialog box... 3 How do I begin?... 5 Selecting Image
H-A006. Dimâge Scan Dual II 1
 E 9224-2886-11 H-A006 Dimâge Scan Dual II 1 Thank you for purchasing the Minolta Dimâge Scan Dual2. The Dimâge Scan Dual2 AF-2820U is a dual format film scanner capable of scanning 35mm and, with the optional
INSTRUCTION MANUAL H-A909
 E INSTRUCTION MANUAL 9224-2885-11 H-A909 Thank you for purchasing the Minolta Dimâge Scan Elite. The Dimâge Scan Elite F-2900 is a dual format film scanner capable of scanning 35mm and with the optional
ImagesPlus Basic Interface Operation
 ImagesPlus Basic Interface Operation The basic interface operation menu options are located on the File, View, Open Images, Open Operators, and Help main menus. File Menu New The New command creates a
Recitation 2 Introduction to Photoshop
 Recitation 2 Introduction to Photoshop What is Adobe Photoshop? Adobe Photoshop is a tool for creating digital graphics either by starting with a scanned photograph or artwork or by creating the graphics
Table of Contents 1. Image processing Measurements System Tools...10
 Introduction Table of Contents 1 An Overview of ScopeImage Advanced...2 Features:...2 Function introduction...3 1. Image processing...3 1.1 Image Import and Export...3 1.1.1 Open image file...3 1.1.2 Import
Adobe Photoshop CC 2018 Tutorial
 Adobe Photoshop CC 2018 Tutorial GETTING STARTED Adobe Photoshop CC 2018 is a popular image editing software that provides a work environment consistent with Adobe Illustrator, Adobe InDesign, Adobe Photoshop,
Adobe Photoshop CS5 Tutorial
 Adobe Photoshop CS5 Tutorial GETTING STARTED Adobe Photoshop CS5 is a popular image editing software that provides a work environment consistent with Adobe Illustrator, Adobe InDesign, Adobe Photoshop
Version 4.2 For WINDOWS
 SIGMA Photo Pro User Guide Companion Processing Software for SIGMA Digital Cameras Version 4.2 For WINDOWS I M P O R T A N T : Please Read Before You Start Thank you very much for purchasing this SIGMA
Extreme Makeovers: Photoshop Retouching Techniques
 Extreme Makeovers: Table of Contents About the Workshop... 1 Workshop Objectives... 1 Getting Started... 1 Photoshop Workspace... 1 Retouching Tools... 2 General Steps... 2 Resolution and image size...
FUJITSU TWAIN 32 Scanner Driver. Scanner Utility for Microsoft Windows Version User's Guide
 P3PC- E417-02EN FUJITSU TWAIN 32 Scanner Driver Scanner Utility for Microsoft Windows Version 9.10 User's Guide For Use with Microsoft Windows 98, Windows Me, Windows 2000 and Windows XP Introduction
Nikon Scan 4 Reference Manual
 Nikon Scan 4 Reference Manual Read This First...2 11 Introduction... 2 5 Scanning Basics...6 Getting Started...7 10 Elements of Nikon Scan...11 The Scan Window...12 29 The Tool Chest... 30 76 Preferences...77
Photoshop CS2. Step by Step Instructions Using Layers. Adobe. About Layers:
 About Layers: Layers allow you to work on one element of an image without disturbing the others. Think of layers as sheets of acetate stacked one on top of the other. You can see through transparent areas
inphoto ID PS Automatic ID photography With Canon PowerShot camera User Guide
 inphoto ID PS Automatic ID photography With Canon PowerShot camera User Guide 2018 Akond company Phone/fax: +7(812)384-6430 Cell: +7(921)757-8319 e-mail: info@akond.net akondsales@gmail.com http://www.akond.net
By Washan Najat Nawi
 By Washan Najat Nawi how to get started how to use the interface how to modify images with basic editing skills Adobe Photoshop: is a popular image-editing software. Two general usage of Photoshop Creating
New Product Information. Minolta Dimâge Scan Multi
 New Product Information Minolta Dimâge Scan Multi High-Speed Multiple-Format Film Scanner MINOLTA is pleased to introduce the Dimâge Scan Multi; a new film scanner for a variety of film formats, including
ADOBE PHOTOSHOP CS TUTORIAL
 ADOBE PHOTOSHOP CS TUTORIAL A D O B E P H O T O S H O P C S Adobe Photoshop CS is a popular image editing software that provides a work environment consistent with Adobe Illustrator, Adobe InDesign, Adobe
Photoshop Elements for Genealogists Part 1
 Photoshop Elements for Genealogists Part 1 By Barry J. Ewell Topics Covered Photoshop Elements Workspace Exploring the Tools Quick Fix Preview Photoshop Elements Workspace Workspace File Edit Image Enhance
Picture Style Editor Ver Instruction Manual
 ENGLISH Picture Style File Creating Software Picture Style Editor Ver. 1.18 Instruction Manual Content of this Instruction Manual PSE stands for Picture Style Editor. In this manual, the windows used in
ENGINEERING CO., LTD.
 Software RIP RasterLinkPro5 IP Reference Guide For UJF Series For JF Series For JFX Series This guide explains about features of RasterLinkPro5 IP for the UV Inkjet printer UJF Series, JF Series and JFX
Recovering highlight detail in over exposed NEF images
 Recovering highlight detail in over exposed NEF images Request I would like to compensate tones in overexposed RAW image, exhibiting a loss of detail in highlight portions. Response Highlight tones can
inphoto ID SLR Automatic ID photography With Canon SLR camera User Guide
 inphoto ID SLR Automatic ID photography With Canon SLR camera User Guide 2014 Akond company Phone/fax: +7(812)384-6430 Cell: +7(921)757-8319 e-mail: info@akond.net akondsales@gmail.com http://www.akond.net
Downloaded From : Working with Photoshop 7.0
 Adobe Photoshop 1. Introduction What is Adobe Photoshop? Adobe Photoshop is a web designing software used for giving effects and filters to an image to make it more appealing and attractive. Brought out
The ideal K-12 science microscope solution. User Guide. for use with the Nova5000
 The ideal K-12 science microscope solution User Guide for use with the Nova5000 NovaScope User Guide Information in this document is subject to change without notice. 2009 Fourier Systems Ltd. All rights
Brightness and Contrast Control Reference Guide
 innovation Series Scanners Brightness and Contrast Control Reference Guide A-61506 Part No. 9E3722 CAT No. 137 0337 Using the Brightness and Contrast Control This Reference Guide provides information and
2014 by Microtek International, Inc. All rights reserved.
 2014 by Microtek International, Inc. All rights reserved. Microtek and ScanWizard are trademarks of Microtek International, Inc. Windows is a registered trademark of Microsoft Corporation. All other products
Using Adobe Photoshop
 Using Adobe Photoshop 4 Colour is important in most art forms. For example, a painter needs to know how to select and mix colours to produce the right tones in a picture. A Photographer needs to understand
Quick Start Guide. Setup and Scanning. Try the Additional Features. English
 English Quick Start Guide Be sure to install the software programs before connecting the scanner to the computer! Setup and Scanning Check the Package Contents p.3 Install the Software Windows Macintosh
Introduction. Introduction
 Introduction Introduction Thank you for purchasing this Canon Microfilm Scanner 800II. These instructions describe how to use the Scanning Utility 800 utility software to import an image projected on the
Tested by the Minolta Corporation 101 Williams Drive Ramsey, New Jersey USA
 Windows Version Thank you for purchasing the Minolta Dimâge Scan Dual. The Dimâge Scan Dual is a dual format film scanner capable of scanning 35mm and, with the optional AD-10 APS Adapter, Advanced Photo
A Basic Guide to Photoshop Adjustment Layers
 A Basic Guide to Photoshop Adjustment Layers Photoshop has a Panel named Adjustments, based on the Adjustment Layers of previous versions. These adjustments can be used for non-destructive editing, can
User s Guide. Windows Lucis Pro Plug-in for Photoshop and Photoshop Elements
 User s Guide Windows Lucis Pro 6.1.1 Plug-in for Photoshop and Photoshop Elements The information contained in this manual is subject to change without notice. Microtechnics shall not be liable for errors
INSTRUCTION MANUAL 2.3
 GB INSTRUCTION MANUAL 2.3 Become a member of Konica Minolta Photo World today, free of charge, and enter the fascinating world of Konica Minolta photography. The ultimate gateway to knowledge for photo-fans:
ScanMate. i920 Scanner. Scanning Setup Guide for TWAIN Applications A-61733
 ScanMate i920 Scanner Scanning Setup Guide for TWAIN Applications A-61733 Scanning Setup Guide for the TWAIN Datasource Starting the Scan Validation Tool... 2 The Scan Validation Tool dialog box... 3 Using
REALGRAIN 2 USER'S GUIDE PLUG-IN BY IMAGENOMIC
 REALGRAIN 2 PLUG-IN USER'S GUIDE BY IMAGENOMIC 2013 Realgrain 2 Plug-in User's Guide Realgrain 2 Plug-in User's Guide Updated July 12, 2013 Contact Imagenomic at http://www.imagenomic.com/contact Copyright
Picture Style Editor Ver Instruction Manual
 ENGLISH Picture Style File Creating Software Picture Style Editor Ver. 1.12 Instruction Manual Content of this Instruction Manual PSE is used for Picture Style Editor. In this manual, the windows used
Supplement. ScanMaker i280 features, scenarios, and information. Getting to Know Your ScanMaker i280
 Supplement ScanMaker i280 features, scenarios, and information Getting to Know Your ScanMaker i280 The ScanMaker i280 is a high resolution scanner for reflective scanning. It features 4800 x 9600 dpi,
SCANNING IMAGES - USER S GUIDE. Scanning Images with Epson Smart Panel and PhotoShop [for Epson 1670 scanners]
![SCANNING IMAGES - USER S GUIDE. Scanning Images with Epson Smart Panel and PhotoShop [for Epson 1670 scanners]](/thumbs/89/98942649.jpg "SCANNING IMAGES - USER S GUIDE. Scanning Images with Epson Smart Panel and PhotoShop [for Epson 1670 scanners]") University of Arizona Information Commons Training 1 SCANNING IMAGES - USER S GUIDE Scanning Images with Epson Smart Panel and PhotoShop [for Epson 1670 scanners] p.2 Introduction and Overview Differences
University of Arizona Information Commons Training 1 SCANNING IMAGES - USER S GUIDE Scanning Images with Epson Smart Panel and PhotoShop [for Epson 1670 scanners] p.2 Introduction and Overview Differences
!! Select Professional Mode. !! Click on Other then Select Scratch.
 SCANNING BASICS FOR EPSON SCANNERS When using EpsonScan software with any of the Epson flatbed scanners in Labs 1, 2, 3 or 4, the following steps must be followed in order to properly save files. Select
Software Reference. FlexColor 3.0 for Flextight Scanners. by imacon
 Software Reference FlexColor 3.0 for Flextight Scanners by imacon 2 2001 Imacon A/S. All rights reserved., revision X-X. The information in this manual is furnished for informational use only, is subject
Digital Imaging - Photoshop
 Digital Imaging - Photoshop A digital image is a computer representation of a photograph. It is composed of a grid of tiny squares called pixels (picture elements). Each pixel has a position on the grid
Using the Advanced Sharpen Transformation
 Using the Advanced Sharpen Transformation Written by Jonathan Sachs Revised 10 Aug 2014 Copyright 2002-2014 Digital Light & Color Introduction Picture Window Pro s Advanced Sharpen transformation is a
USB Scanner USER GUIDE
 USB Scanner USER GUIDE The TWAIN Dialog Box Appendices 2 Copyright Information All rights reserved. No part of this publication may be reproduced, transmitted, stored in a retrieval system, or translated
Supplement. ScanMaker s480/s380 features, scenarios, and information. Getting to Know Your ScanMaker s480/s380
 Supplement ScanMaker s480/s380 features, scenarios, and information Getting to Know Your ScanMaker s480/s380 The ScanMaker s480/s380 is a high-performance scanner with the versatility to scan photos and
ArcSoft PhotoImpression Table of Contents:
 ArcSoft PhotoImpression Table of Contents: 1. Welcome to PhotoImpression 2. Highlights of PhotoImpression 3. System Requirements 4. Installing PhotoImpression 5. Working with PhotoImpression Getting Started
Quick Start Guide. Setup and Scanning. Try the Additional Features. English
 English Quick Start Guide Be sure to install the software programs before connecting the scanner to the computer! Setup and Scanning Check the Package Contents p.3 Install the Software Windows Macintosh
Image Processing Software Option Version 2.5
 P3PC-E037-03ENC2 Image Processing Software Option Version 2.5 USER'S GUIDE Information in this document is subject to change without notice Copyright 2002-2004 PFU LIMITED, All Rights Reserved. i Contents
Viewing Landsat TM images with Adobe Photoshop
 Viewing Landsat TM images with Adobe Photoshop Reformatting images into GeoTIFF format Of the several formats in which Landsat TM data are available, only a few formats (primarily TIFF or GeoTIFF) can
MassArt Studio Foundation: Visual Language Digital Media Cookbook, Fall 2013
 21 / TONAL SCALE 1 In this section we ll be exploring tonal scale and how to adjust it using Photoshop to address common problems such as blown out highlights, murky images lacking contrast or a colorcast
5.4 Gradation Dialogue
 5.4 Gradation Dialogue Gradation Curves Gradation refers to the relationship between input and output. The tonal values of an image are optimised in such a way that the adjustment of highlight / shadow
EPSON GT Scanner Parts. Scanner Specifications. Maximum document size
 Scanner Parts Operate button Start button Scanner Specifications General Scanner type Photoelectric device Effective pixels Color depth READY light SCSI interface (50-pin) SCSI interface (68-pin) SCSI
ID Photo Processor. Batch photo processing. User Guide
 ID Photo Processor Batch photo processing User Guide 2015 Akond company 197342, Russia, St.-Petersburg, Serdobolskaya, 65a Phone/fax: +7(812)384-6430 Cell: +7(921)757-8319 e-mail: info@akond.net http://www.akond.net
A Basic Guide to Photoshop CS Adjustment Layers
 A Basic Guide to Photoshop CS Adjustment Layers Alvaro Guzman Photoshop CS4 has a new Panel named Adjustments, based on the Adjustment Layers of previous versions. These adjustments can be used for non-destructive
GETTING STARTED. 0 P a g e B a s i c s o f A d o b e P h o t o s h o p A g a P r i v a t e I n s t i t u t e f o r c o m p u t e r s c i e n c e
 GETTING STARTED 0 P a g e B a s i c s o f A d o b e P h o t o s h o p Adobe Photoshop: is a popular image editing software that provides a work environment consistent with Adobe Illustrator, Adobe InDesign,
Learning Photo Retouching techniques the simple way
 Learning Photo Retouching techniques the simple way Table of Contents About the Workshop... i Workshop Objectives... i Getting Started... 1 Photoshop Workspace... 1 Setting up the Preferences... 2 Retouching