The Arcane & Mystical Knowledge
|
|
|
- Clifton Carroll
- 6 years ago
- Views:
Transcription


1 The Arcane & Mystical Knowledge
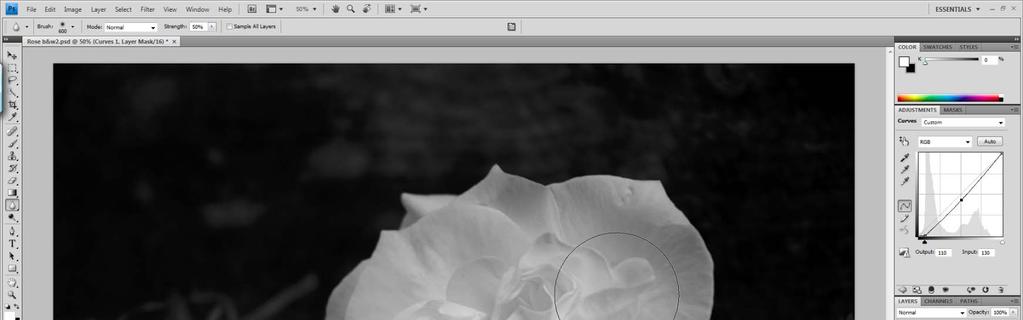
2 Sharpening: What is it? Enhancement of local contrast that produces the appearance of greater definition and clarity (accutance). Where areas of different luminance values abut, sharpening lightens higher values (whites) and darkens lower values (grays).
3 Why do it? Most digital pictures are somewhat soft and require sharpening. Certain output formats may require different levels of sharpening. Caveat If you are shooting JPEGs, remember that your camera is automatically sharpening.
4 Considerations Sharpening methods Stage of workflow Selective sharpening Sharpening side-effects
5 Sharpening Methods Unsharp Mask (USM) High Radius USM High Pass Filter Manual Single channel sharpening LAB sharpening Automated sharpening
6 Sharpening Methods Unsharp Mask (USM)???????????????? OR I thought we wanted to sharpen not unsharpen!!!
7 Sharpening Methods Unsharp Mask (USM) A term brought over from film photography. The back of a glass plate positive was contact copied to a film negative producing a blurred (unsharp) negative. Both the positive and negative were placed in an enlarger. The effect of this was to block out (mask) any blurred (unsharp) areas and to increase contrast at lines between higher and lower luminance (edges).
8 Sharpening Methods Unsharp Mask (USM) Digital USM operates on the same technique. Instead of using a low contrast film negative, the picture editor generates a blurred version of the image. It then compares the original and the blurred version and increases contrast at edges where the difference is greater than a specified amount (threshold).
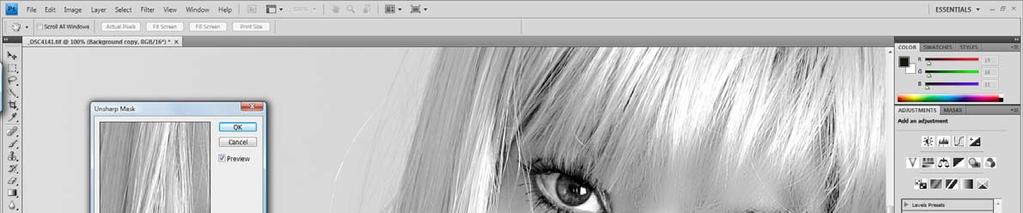
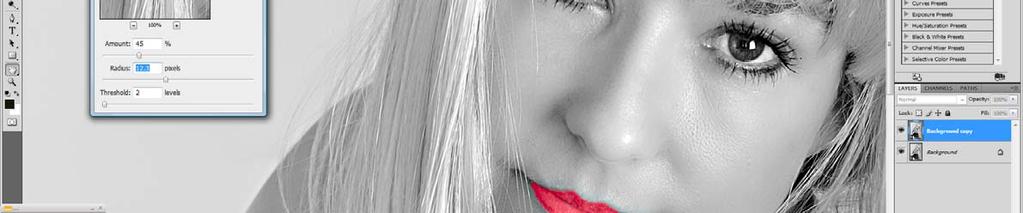
9 Sharpening Methods Unsharp Mask (USM) 3 Parameters Amount Radius Threshold
10 Sharpening Methods Unsharp Mask (USM) 3 Parameters Amount The amount of contrast added to edges. Usually expressed as a percentage. Radius Threshold
11 Sharpening Methods Unsharp Mask (USM) 3 Parameters Amount The amount of contrast added to edges. Usually expressed as a percentage. Radius The number of pixels from an edge that are affected. Threshold
12 Sharpening Methods Unsharp Mask (USM) 3 Parameters Amount The amount of contrast added to edges. Usually expressed as a percentage. Radius The number of pixels from an edge that are affected. Threshold Determines how much difference in luminance there has to be before sharpening is applied. Higher thresholds limit sharpening to edges of greater luminance differences.

13 USM in Photoshop
14 Sharpening Methods Unsharp Mask (USM) 3 Parameters Amount Radius Threshold What values do I use? Depends on the size (# of pixels) of your file. The smaller the size, the greater the effect particularly from the radius adjustment. Depends on your output format. Photos on the web require less sharpening than those to be printed.
15 Sharpening Methods Unsharp Mask (USM) 3 Parameters What values do I use? For a full size 10+ megapixel photo try: Amount 150% to175% Radius 1.5 to 2.0 Threshold 0 to 1
16 Sharpening Methods High Radius USM A variant of USM. Settings: Radius 12 to 20 pixels Threshold 2 to 5 Amount 50% to 75% (but this really doesn t have much of an effect) Tends to sharpen larger elements with lesser or no effect on smaller elements.
17 Sharpening Methods High Radius USM A variant of USM. Settings: Tends to sharpen larger elements with lesser or no effect on smaller elements. Helps separate larger elements from the background. May help control noise.
18 Sharpening Methods High Radius USM A variant of USM. Settings: Tends to sharpen larger elements with lesser or no effect on smaller elements. Helps separate larger elements from the background. May help control noise.
19 Sharpening Methods High Pass Filter Sharpening Uses the High Pass Filter to increase contrast. Tends to work more on planes or surfaces than edges. Acts like High Radius USM in separating objects from the background.
20 Sharpening Methods High Pass Filter Sharpening Steps: Duplicate your layer as a new layer. Apply the High Pass Filter. Filter-Other-High Pass Adjust the High Pass Filter. Change the Blending Mode of the layer to Overlay.
21 HPS: Duplicate Layer

22 HPS: Select the Filter

23 HPS: Apply the Filter

24 HPS: Adjust the Radius

25 HPS: Adjust the Radius 2

26 HPS: Select Overlay
27 HPS: Result
28 HPS: Opacity
29 HPS: Mask
30 Sharpening Methods Manual Remember that any enhancement of contrast (particularly localized) will enhance apparent sharpness: Global contrast adjustment Black point adjustment Dodging and Burning
31 Sharpening Methods Single Channel Sharpening Useful when sharpening is making noise unacceptable. In RGB, mode the photo is a composite of red, green and blue channels. Often, noise may be worse in one channel than the others. You can select one of the other channels and sharpen directly on that channel.
32 Sharpening Methods Single Channel Sharpening Example: You have a landscape shot with a blue sky. After you sharpen the noise in the sky makes it look blotchy. You check the individual channels and find that the noise is almost all in the Blue channel. You can select the Red and/or Green Channel and sharpen avoiding sharpening the noise in the Blue channel.
33 Sharpening Methods Single Channel Sharpening Steps Select Channels Examine the Red, Green & Blue Channels Sharpen the Channel(s) with the least noise.

34 SCS: Select Channels
35 SCS: Examine Red Channel
36 SCS: Examine Blue Channel
37 SCS: Examine Green Channel
38 Sharpening Methods You can apply most sharpening techniques to an individual channel. You can also apply many other adjustments to an individual channel.
39 Sharpening Methods LAB Sharpening Takes advantage of the LAB Color Mode. LAB is an alternative to RGB. Instead of Red, Green & Blue Channels, it has L (Luminance) and two color channels (A & B) Often, noise in the L channel.
40 Sharpening Methods LAB Sharpening Select LAB color mode. Image Mode LAB Select Channels Apply Sharpening to the Lightness Channel

41 LS: Select LAB Mode

42 LS: Select Channels

43 LS: A Channel
44 LS: B Channel
45 LS: Lightness Channel
46 Automated Sharpening There are several programs that perform sharpening for you. Nik Software Sharpener Pro 3 Raw Presharpening Output Sharpening based on output type, printer and paper.
47 When to sharpen Distinguish 2 types of sharpening Raw presharpening Output sharpening
48 When to sharpen Raw Presharpening Remember, a Raw file is unaltered data straight from the sensor. Unlike a JPG, no sharpening, saturation or other enhancements have been applied.
49 When to sharpen Raw Presharpening Initial step in workflow. Application of an unagressive amount of sharpening to give the image the intended appearance on your monitor. Sharpening to taste. Voluntary.
50 When to sharpen Output sharpening Sharpening for your specific output format. Dependent on: Whether image is for web or print. If print, your type of printer. If print, the paper to be used Desired appearance.
51 When to sharpen Output sharpening General hierarchy of sharpening, from least to most Web Prints on glossy paper Prints on matte paper Monochrome prints can generally take more sharpening than color. Portraits require very careful sharpening. Prime candidate for selective sharpening.
52 When to sharpen Output sharpening Remember, sharpening is largely a matter of artistic intent and personal taste.
53 Selective Sharpening Sharpening is VERY important visual cue. So it will have a very strong role in directing the viewer s attention. You want to make sure that your sharpening is helping you direct viewer s attention where you want it. Don t want it working against you. Often, the solution is to sharpen only portions of the photo.
54 Selective Sharpening Methods Sharpening tool Erasing Technique Masking Technique
55 Selective Sharpening Methods Sharpening tool Quickest and easiest Least ability to make adjustments Erasing Technique More complicated but adjustable Masking Technique More complicated but most flexibility
56 SS: Sharpening Tool
57 SS: Sharpening Tool
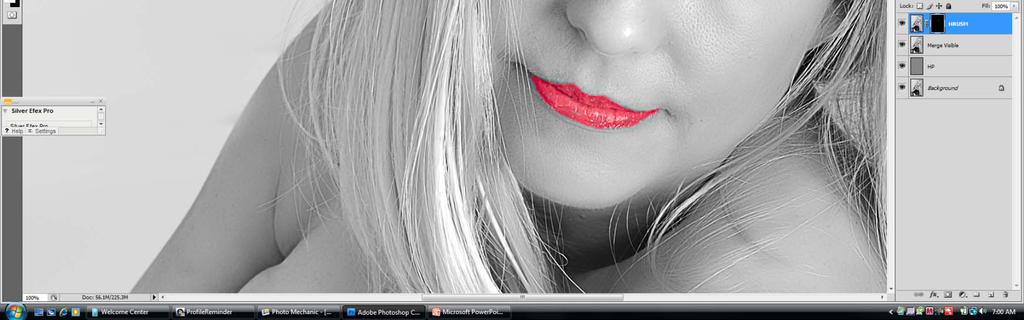
58 SS: Erase Technique Duplicate & Sharpen
59 SS: Erase Technique Erase areas to unsharpen

60 SS: Mask Technique Duplicate & Sharpen


61 SS: Mask Technique Add Layer Mask
62 SS: Mask Technique Use paint brush
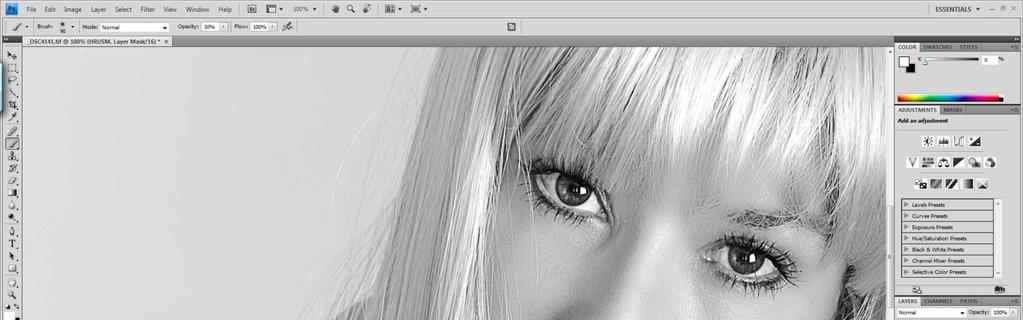
63 SS: Mask Technique Because the sharpening is done on a separate layer, you can adjust the opacity of the layer or blending mode. Opacity allows you to be more aggressive in sharpening but reduce the effect by lowering opacity. Blending mode changing to Luminosity will prevent saturation and color shifts.
64 SS: Mask Technique Because the sharpening is done on a separate layer, you can adjust the opacity of the layer or blending mode. Black conceals, white reveals. Almost infinite flexibility to go back and adjust the mask for the perfect amounts of sharpening in desired areas.
65 SS: Portraits Most times, you do not want to globally sharpen portraits. It will enhance ALL skin imperfections. You will end up with an extremely bad reputation (particularly among women).
66 SS: Portraits Most times, you do not want to globally sharpen portraits. Sharpening Strategy for Portraits: Want to sharpen what the viewers expect should be sharp. Eyes Lips Jewelry Maybe nostrils
67 Portraits: B&W, Curves, Skin Softening

68 Portraits: Global USM
69 Portraits: Global HP
70 Portraits: HRUSM
71 Portraits: The Problem The HP sharpening leaves the skin softer. But the HRUSM makes the eyes and lips pop more. Solution Use the HP sharpening globally, apply the HRUSM selectively to eyes and lips.
72 Portraits: The Solution
73 Before
74 After
75 Side Effects Remember, sharpening involves a contrast enhancement. Enhancing contrast generally results in an increase in saturation. Sharpening generally enhances noise. Oversharpening results in halos.
76 Side Effects For this reason, effects of sharpening should always be evaluated at 100%.
77 Side Effects: Saturation Can be a beneficial side effect providing pop to your photo. BUT What if you have your colors exactly how you want them but still need some sharpening.
78 Side Effects: Saturation Sharpening without saturation effects: Apply sharpening, reduce saturation. Sharpen on a new layer, change blending mode to Luminosity. Sharpen on the Lightness channel in LAB color mode.
79 Side Effects: Noise Strategies to avoid enhancing noise: Review the Red, Green & Blue channels, sharpen on least noisy channel. Sharpen on the Lightness channel in LAB mode. Selectively sharpen, masking out effects in noisy areas. Try High Radius USM or High Pass sharpening rather than USM.

80 Side Effects: Halos
81 Side Effects: Halos

82 Side Effects: Halos
83 Side Effects: Always examine your photo at 100% or more to check for sharpening artifacts. Remember minimal to moderate artifacts at this size may not show up in most prints.
84
SHARPENING: The Arcane & Mystical Knowledge
 SHARPENING: The Arcane & Mystical Knowledge Sharpening: What is it? Why do it? Enhancement of local contrast that produces the appearance of greater definition and clarity (accutance). Where areas of different
copyright B. Moose Peterson / WRP 2012
 Where does the viewer s eye go first in your photograph? More importantly, where do YOU want the viewer s eye to look first in your print? These are very important questions and the answers directly affect
Ian Barber Photography
 1 Ian Barber Photography Sharpen & Diffuse Photoshop Extension Panel June 2014 By Ian Barber 2 Ian Barber Photography Introduction The Sharpening and Diffuse Photoshop panel gives you easy access to various
POLAROID EMULATION INCREASED CONTRAST, SATURATION & CLARITY
 POLAROID EMULATION The Polaroid SX-70 Camera was a sensational tool. It took photographs in real time. But just the color balance of the film and they way it developed had a unique look. Here are some
Sharpening is an essential final step before output. But sometimes, you don t want to
 Sharpening is an essential final step before output. But sometimes, you don t want to sharpen your entire image equally. Skin tones, clouds, noisy areas - it s best to apply less sharpening to these areas,
Kent Messamore 3/6/2010
 Post Processing Kent Messamore 3/6/2010 What we will cover Post Processing Photoshop, Lightroom, Elements, and others JPEG or RAW Photoshop Elements Workflow Organization, Create, share Photoshop Elements
Maine Day in May. 54 Chapter 2: Painterly Techniques for Non-Painters
 Maine Day in May 54 Chapter 2: Painterly Techniques for Non-Painters Simplifying a Photograph to Achieve a Hand-Rendered Result Excerpted from Beyond Digital Photography: Transforming Photos into Fine
in association with Getting to Grips with Printing
 in association with Getting to Grips with Printing Managing Colour Custom profiles - why you should use them Raw files are not colour managed Should I set my camera to srgb or Adobe RGB? What happens
Basic Digital Dark Room
 Basic Digital Dark Room When I took a good photograph I almost always trying to improve it using Photoshop: exposure, depth of field, black and white, duotones, blur and sharpness or even replace washed
loss of detail in highlights and shadows (noise reduction)
") Introduction Have you printed your images and felt they lacked a little extra punch? Have you worked on your images only to find that you have created strange little halos and lines, but you re not sure
Introduction Have you printed your images and felt they lacked a little extra punch? Have you worked on your images only to find that you have created strange little halos and lines, but you re not sure
Pacific New Media David Ulrich
 Pacific New Media David Ulrich pacimage@maui.net www.creativeguide.com 808.721.2862 Digital Imaging Workflow in Adobe Photoshop All color and tonal correction editing should be done in a non-destructive
Pacific New Media David Ulrich
 Pacific New Media David Ulrich pacimage@maui.net www.creativeguide.com 808.721.2862 Sharpening and Noise Reduction in Adobe Photoshop One of the limitations of digital capture devices and digital chips
Contents: Bibliography:
 ( 2 ) Contents: Sizing an Image...4 RAW File Conversion...4 Selection Tools...5 Colour Range...5 Quick Mask...6 Extract Tool...7 Adding a Layer Style...7 Adjustment Layer...8 Adding a gradient to an Adjustment
Mullingar Camera Club Basic introduction to Digital Printing using Photoshop CC.
 Mullingar Camera Club Basic introduction to Digital Printing using Photoshop CC. Table of Contents Course aims: 1 Course presentation notes: 1 Introducing Photoshop: 1 Adjusting the Brightness or Contrast
Acknowledgements About this book Other Goodies Included with this Book Resources for Nikon Photographers. Part I: Capture NX2 2. Why Capture NX2?
 The Photographer s Guide to Capture NX2 Contents Acknowledgements About this book Other Goodies Included with this Book Resources for Nikon Photographers x xi xii xiii Part I: Capture NX2 2 Why Capture
Post-Processing/Editing Page 1
 All images need a little something to help re-create or re-imagine what you think a particular image should look like. Whether it is adding a digital gradient to a sky to help saturate and deepen the colours
Realistic Skin Smoothing
 TIP SHEET #7 Realistic Skin Smoothing I think it s fair to say when it comes to retouching techniques, the number of different ways to smooth skin is seemingly endless. From blurring techniques through
Black and White using Photoshop
 Topics to be covered: Methods for B&W conversion Improving the image Toning Printer color management Black and White using Photoshop Various ways to get to B&W Adobe Raw Converter (ACR) in from Bridge
2Click the Symbol XX
 Adjustment Layers, Channels and Layer Masks 2Click the Symbol XX ( Adjustment Layer ) and choose Channel Mixer. 3Check the box Monochrome and choose the values R=30, G=60, B=10. Thus you ll get a grayscale
PHOTOTUTOR.com.au Share the Knowledge
 THE DIGITAL WORKFLOW BY MICHAEL SMYTH This tutorial is designed to outline the necessary steps from digital capture, image editing and creating a final print. FIRSTLY, BE AWARE OF WHAT CAN AND CAN T BE
How to capture the best HDR shots.
 What is HDR? How to capture the best HDR shots. Processing HDR. Noise reduction. Conversion to monochrome. Enhancing room textures through local area sharpening. Standard shot What is HDR? HDR shot What
Adobe Photoshop cs. Advanced Retouching. Julieanne Kost
 Julieanne Kost www.adobe.com www.adobeevangelists.com Adobe Photoshop cs Advanced Retouching There are several essential tools and techniques for retouching images of people, and one underlying secret:
Creating Pastel Images and other effects in Photoshop
 Creating Pastel Images and other effects in Photoshop Martin Addison 2015 Creating pastel images Page 1 Martin Addison FRPS Using White Layers in Photoshop 1. Create a new empty Layer 2. Edit> Fill 3.
This tutorial will show you how to use artistic grunge overlays to transform your photos into works of art.
 ARTISTIC GRUNGE OVERLAYS For all photo editing software that supports PNG files If you have any questions, please feel free to contact me at kim@photosbykimhill.com. This tutorial will show you how to
Local Adjustment Tools
 PHOTOGRAPHY: TRICKS OF THE TRADE Lightroom CC Local Adjustment Tools Loren Nelson www.naturalphotographyjackson.com Goals for Tricks of the Trade NOT show you the way you should work Demonstrate and discuss
Jim West & Phil Giordano
 Jim West & Phil Giordano Good News Anyone can make a great print! Bad News It is NOT as easy and making a nice image on screen and just hitting the PRINT button! 1. I Don t make prints at all 2. I send
Central Photography Photoshop Tutorial. Color Splash. 1. Open Photoshop. 2. Go to File>Open (Command O).
.") 1. Open Photoshop. 2. Go to File>Open (Command O). 1 3. Navigate to your file, select it and open it. 2 4. Fix your photo. If it s too light, darken it. If it s too dark, lighten it. To do that, add a
1. Open Photoshop. 2. Go to File>Open (Command O). 1 3. Navigate to your file, select it and open it. 2 4. Fix your photo. If it s too light, darken it. If it s too dark, lighten it. To do that, add a
Photoshop Blending Modes
 Photoshop Blending Modes https://photoshoptrainingchannel.com/blending-modes-explained/#when-blend-modes-added For those mathematically inclined. https://photoblogstop.com/photoshop/photoshop-blend-modes-
PHOTOGRAPHY: MINI-SYMPOSIUM
 PHOTOGRAPHY: MINI-SYMPOSIUM In Adobe Lightroom Loren Nelson www.naturalphotographyjackson.com Welcome and introductions Overview of general problems in photography Avoiding image blahs Focus / sharpness
Portraiture Creating and Editing. Aaron Taylor Aaron Taylor Photography LLC
 Portraiture Creating and Editing Aaron Taylor Aaron Taylor Photography LLC Who Am I? Owner of Aaron Taylor Photography LLC Family portraits Seniors Weddings and events Business and social media Headshots
Contents Foreword 1 Feedback 2 Legal information 3 Getting started 4 Installing the correct Capture One version 4 Changing the version type 5 Getting
 Contents Foreword 1 Feedback 2 Legal information 3 Getting started 4 Installing the correct Capture One version 4 Changing the version type 5 Getting to know Capture One Pro 6 The Grand Overview 6 The
Luminosity Masks Program Notes Gateway Camera Club January 2017
 Luminosity Masks Program Notes Gateway Camera Club January 2017 What are Luminosity Masks : Luminosity Masks are a way of making advanced selections in Photoshop Selections are based on Luminosity - how
IMAGE CORRECTION. You can find this and more information with video tutorials at
 IMAGE CORRECTION You can find this and more information with video tutorials at http://www.adobe.com/support/photoshop/ P H O T O S H O P T O O L S CLONE STAMP TOOL The Clone Stamp tool paints one part
R. Jay GaBany Advanced Imaging Conference October 31, 2009
 R. Jay GaBany Advanced Imaging Conference October 31, 2009 Most people have a sweet eye tooth What your eye tooth craves Contrast What your eye tooth craves Contrast What your eye tooth craves Color What
Editing Using Photoshop CS5
 The Photoshop CS4 Editing Workspace - shown is the document (image) window, ToolBox, Info, Navigator, History, Adjustments and Layers Palettes, Windows Menus and Options Bar (on top). USING THE LAYERS
SHAW ACADEMY NOTES. Ultimate Photography Program
 SHAW ACADEMY NOTES Ultimate Photography Program What is a Raw file? RAW is simply a file type, like a JPEG. But, where a JPEG photo is considered a photograph, a RAW is a digital negative, an image that
Black (and White) Magic
 Magic") Black (and White) Magic Close your eyes, take a deep breath, and imagine a future where you no longer shoot both color and black and white images. Instead, you capture only color. Then, following the shoot,
Black (and White) Magic Close your eyes, take a deep breath, and imagine a future where you no longer shoot both color and black and white images. Instead, you capture only color. Then, following the shoot,
What is real? What is art?
 HDCC208N Fall 2018 We ll fix it in post The Digital Darkroom What is real? What is art? We have been discussing this pair of questions at various points this semester, with drawings, paintings, the camera
v nik Sharpener Pro 2.0 User Guide å nik multimedia, Inc.
 v2.03-050405 nik Sharpener Pro 2.0 User Guide å nik multimedia, Inc. II Table of Contents Minimum Requirements and Installation Filters...I Windows Operating System...I Macintosh Operating System...I Selective
Stretching Your Photons
 Stretching Your Photons Advanced Imaging Conference November 10-12, 2006 San Jose, California by R. Jay GaBany www.cosmotography.com 2006 Please do not reproduce or distribute without permission. We work
Learning Photo Retouching techniques the simple way
 Learning Photo Retouching techniques the simple way Table of Contents About the Workshop... i Workshop Objectives... i Getting Started... 1 Photoshop Workspace... 1 Setting up the Preferences... 2 Retouching
Welcome to the Hands-On Working with Digital RAW workshop.
 Welcome to the Hands-On Working with Digital RAW workshop. This workshop starts at 9:30am and finishes in time to leave at 4:30pm Your instructor for today is Roger Buchanan. If at any time you have any
B&W Photos from Colour:
 Quick and Dirty Methods for PS, PS Elements and Canon Software 8/1/2007 New Westminster Photography Club Derek Carlin New Westminster Photography Club Page 1 Introduction This is a very brief article on
PS958 - SHARPENING WORKFLOW 1 N/08/08
 INTRODUCTION TO GRAPHICS Sharpening Workflow Information Sheet No. PS958 Sharpening is a critical step in digital imaging, yet few people are satisfied with the results. Research conducted for a commercial
DOP 2000 Digital Photography Workflow Handbook using Photoshop CS and Raw Converters for the Digital Photography Workflow
 DOP 2000 Digital Photography Workflow Handbook using Photoshop CS and Raw Converters for the Digital Photography Workflow by Bettina and Uwe Steinmueller Copyright 2002-2004 by Bettina and Uwe Steinmueller
Color, Resolution, & Other Image Essentials
 www.gilbertconsulting.com blog.gilbertconsulting.com kgilbert@gilbertconsulting.com Twitter: @gilbertconsult lynda.com/keithgilbert Every Photoshop image consists of three specific attributes: image resolution,
Transforming Your Photographs with Photoshop
 Transforming Your Photographs with Photoshop Jesús Ramirez PhotoshopTrainingChannel.com Contents Introduction 2 About the Instructor 2 Lab Project Files 2 Lab Objectives 2 Lab Description 2 Removing Distracting
Beauty Panel for Photoshop.
 Beauty Panel for Photoshop... About us STÖHR+SAUER has developed a tools panel for beauty retouching in Photoshop for all fans of people photography and provides this panel free of charge "as is" (without
HIGH DYNAMIC RANGE IMAGING Nancy Clements Beasley, March 22, 2011
 HIGH DYNAMIC RANGE IMAGING Nancy Clements Beasley, March 22, 2011 First - What Is Dynamic Range? Dynamic range is essentially about Luminance the range of brightness levels in a scene o From the darkest
IMAGE SHARPENING. Dr Roy Killen EFIAP APSEM GMPSA (C) ROY KILLEN SHARPENING!1
 ROY KILLEN SHARPENING!1") IMAGE SHARPENING Dr Roy Killen EFIAP APSEM GMPSA 2017 (C) ROY KILLEN SHARPENING!1 IMAGE SHARPENING WHAT IS A SHARP IMAGE? 3 GETTING IMAGES SHARP IN CAMERA 3 GENERAL SHARPENING PRINCIPLES 7 SHARPENING WITH
IMAGE SHARPENING Dr Roy Killen EFIAP APSEM GMPSA 2017 (C) ROY KILLEN SHARPENING!1 IMAGE SHARPENING WHAT IS A SHARP IMAGE? 3 GETTING IMAGES SHARP IN CAMERA 3 GENERAL SHARPENING PRINCIPLES 7 SHARPENING WITH
Capturing Realistic HDR Images. Dave Curtin Nassau County Camera Club February 24 th, 2016
 Capturing Realistic HDR Images Dave Curtin Nassau County Camera Club February 24 th, 2016 Capturing Realistic HDR Images Topics: What is HDR? In Camera. Post-Processing. Sample Workflow. Q & A. Capturing
Photoshop Elements 3 Filters
 Photoshop Elements 3 Filters Many photographers with SLR cameras (digital or film) attach filters, such as the one shown at the right, to the front of their lenses to protect them from dust and scratches.
Using the Advanced Sharpen Transformation
 Using the Advanced Sharpen Transformation Written by Jonathan Sachs Revised 10 Aug 2014 Copyright 2002-2014 Digital Light & Color Introduction Picture Window Pro s Advanced Sharpen transformation is a
Teton Photography Group
 Overview general post-processing (editing) workflow for serious photographers Focus on processes more than software Examples using Adobe Lightroom and Photoshop Teton Photography Group January 2016 Emphasis
Printing on the Epson You should save a second.psd or tiff version of your image for printing
 Printing on the Epson 9600 Preparing your image to print You should save a second.psd or tiff version of your image for printing Resizing To observe the image size and resolution of an existing file, you
Extreme Makeovers: Photoshop Retouching Techniques
 Extreme Makeovers: Table of Contents About the Workshop... 1 Workshop Objectives... 1 Getting Started... 1 Photoshop Workspace... 1 Retouching Tools... 2 General Steps... 2 Resolution and image size...
Photoshop Tutorial. Millbrae Camera Club 2008 August 21
 Photoshop Tutorial Millbrae Camera Club 2008 August 21 Introduction Tutorial For this session Speak up if: you have a question I m going too fast or too slow I m not speaking loudly enough you know a better
THE MAKING OF SUPER MODEL. Portraiture
 THE MAKING OF SUPER MODEL Portraiture Mrs. Gilder will be photographing each of you. Why? Because, she s fast. That is why. She will then place your image onto the student resource file, R Why, so that
Photo One Digital Photo Shoots and Edits
 Photo One Digital Photo Shoots and Edits You will submit photo shoots, unedited and you will submit selected edited images. The shoots will be explained first and the edits will be explained later on this
Unit 7 : Image Painting, Editing and Layers
 Unit 7 : Image Painting, Editing and Layers Introduction This Unit describes about various painting tools; such as selection, cropping and measuring tools, retouching, drawing and type tools, Navigation
Advanced Photoshop Tutorial: RTVF Chairs
 Advanced Photoshop Tutorial: RTVF Chairs Jeremy Moore; January 31, 2007 Original Image To get some techie info out of the way, the image for this tutorial was taken hand-held with a Panasonic Lumix-LX2
From Advanced pixel blending
 1 From www.studio.adobe.com Blending pixel layers in Adobe Photoshop CS2 lets you do things that you simply can t do by adjusting a single image. One situation where we blend pixel layers is when we want
Adding Light Beams to a Photo
 Adding Light Beams to a Photo Creating Light Beams (so-called God Rays if you are so inclined) is pretty easy. It requires the use of so ware that can composite layers. So, Lightroom won t work but Photoshop
Assignment Project Due & Critique 3.18 Retouching Photo Due 3.4
 Portraits Assignment Project Due & Critique 3.18 Retouching Photo Due 3.4 For this project, you will be exploring the subject of portraits with three different objectives. 1. In the style of Arnold Newman:
Commercial Art 1 Photoshop Study Guide. 8) How is on-screen image resolution measured? PPI - Pixels Per Inch
 How is on-screen image resolution measured? PPI - Pixels Per Inch") Commercial Art 1 Photoshop Study Guide To help prepare you for the Photoshop test, be sure you can answer the following questions: 1) What are the three things should you do when you first open a Photoshop
Commercial Art 1 Photoshop Study Guide To help prepare you for the Photoshop test, be sure you can answer the following questions: 1) What are the three things should you do when you first open a Photoshop
Star Diffusion Tutorial
 Star Diffusion Tutorial Learn how to add a unique dreamy effect to your photos with this Star Diffusion Photoshop tutorial. This Photoshop effect creates diffusion in the shape of a four-point star and
By Washan Najat Nawi
 By Washan Najat Nawi how to get started how to use the interface how to modify images with basic editing skills Adobe Photoshop: is a popular image-editing software. Two general usage of Photoshop Creating
Creating a Contrast Mask. Text and images Copyright (C) 2002 Eric R. Jeschke and may not be used without permission of the author.
 2002 Eric R. Jeschke and may not be used without permission of the author.") Creating a Contrast Mask Text and images Copyright (C) 2002 Eric R. Jeschke and may not be used without permission of the author. Intention In this tutorial I'll show you how to do create a contrast mask
Creating a Contrast Mask Text and images Copyright (C) 2002 Eric R. Jeschke and may not be used without permission of the author. Intention In this tutorial I'll show you how to do create a contrast mask
Central Photography [INSTAGRAM EFFECTS]
![Central Photography [INSTAGRAM EFFECTS]](/thumbs/96/129260346.jpg "Central Photography [INSTAGRAM EFFECTS]") 1 1. Open Photoshop. 2. Go to File/New (Ctrl+N). 3. Name your file. 4. Set the Width to 11 inches. 2 5. Set the Height to 8.5 inches. 6. Set your Resolution to 200 pixels/inch. 7. Set your Background Contents
1 1. Open Photoshop. 2. Go to File/New (Ctrl+N). 3. Name your file. 4. Set the Width to 11 inches. 2 5. Set the Height to 8.5 inches. 6. Set your Resolution to 200 pixels/inch. 7. Set your Background Contents
Using The Nik Collection Plug-ins In Lightroom And Photoshop. Dan Lenardon
 Using The Nik Collection Plug-ins In Lightroom And Photoshop Dan Lenardon What Are We Going To Cover Today? A Brief Overview Of The Nik Collection By Google How To Use Nik From Within Lightroom How To
Photo Editing Workflow
 Photo Editing Workflow WHY EDITING Modern digital photography is a complex process, which starts with the Photographer s Eye, that is, their observational ability, it continues with photo session preparations,
Thank you for spending your evening with me! Truly enjoyed chatting and sharing image blending.. :)
") easymail Webmail :: Texture Blending Notes 1 of 2 9/4/2016 8:38 PM Subject From To Date Texture Blending Notes Denise Silva Denise Silva 2016-09-02 8:10 am Texture
easymail Webmail :: Texture Blending Notes 1 of 2 9/4/2016 8:38 PM Subject From To Date Texture Blending Notes Denise Silva Denise Silva 2016-09-02 8:10 am Texture
Texts and Resources: Assessments: Freefoto.com Group Photo Projects
 Effective Date: 2009-10 Name of Course: Digital Photography Grade Level: 9-12 Department: Industrial Technology and Engineering Length of Course: 30 cycles Instructional Time: 180 days Period Per Cycle:
Varis PhotoMedia Tutorials
 Varis PhotoMedia Tutorials 2003, Lee Varis Welcome This tutorial has been prepared for the photographer who is striving to learn digital imaging. I make an effort to supply current information about digital
S e a m l e s s C o l l a g e I m a g e
 Some familiarity with the Macintosh and Photoshop 4.0 is very helpful. We also assume you have a previously created, scanned or other image to open. In addition to working with multiple image layers, adding
ADOBE PHOTOSHOP CS TUTORIAL
 ADOBE PHOTOSHOP CS TUTORIAL A D O B E P H O T O S H O P C S Adobe Photoshop CS is a popular image editing software that provides a work environment consistent with Adobe Illustrator, Adobe InDesign, Adobe
HDR is a process for increasing the range of tonal values beyond what a single frame (either film or digital) can produce.
 can produce.") HDR HDR is a process for increasing the range of tonal values beyond what a single frame (either film or digital) can produce. It can be used to create more realistic views, or wild extravagant ones What
HDR HDR is a process for increasing the range of tonal values beyond what a single frame (either film or digital) can produce. It can be used to create more realistic views, or wild extravagant ones What
2.0 A COMPLETE SHARPENING WORKFLOW. for Adobe Photoshop
 2.0 A COMPLETE SHARPENING WORKFLOW for Adobe Photoshop Sharpening has long been one of the most essential but least-understood aspects of digital imaging. PhotoKit SHARPENER 2.0 (PKS 2) provides, not just
Challenge Image: Blur the Background
 Challenge Image: Blur the Background Challenge Image: Blur the Background In this lesson, we re going to work on a challenge image that was submitted by a Masters Academy member. The image features a little
VSCO FILM 01 MANUAL FOR: LIGHTROOM 4 & ADOBE CAMERA RAW 7
 VSCO FILM 01 MANUAL FOR: LIGHTROOM 4 & ADOBE CAMERA RAW 7 VSCO FILM MANUAL INTRODUCTION VSCO Film Pro is a brand new way to emulate film and speed up your workflow in Adobe Lightroom 4 and Camera Raw 7.
A Division of Sun Chemical Corporation. Unsharp Masking How to Make Your Images Pop!
 Unsharp Masking How to Make Your Images Pop! Copyright US INK Volume XL A re your images dull and lack pop? Do you want your pictures to stand off the page more? Well maybe you are not using Unsharp Masking
Varis PhotoMedia Tutorials
 Varis PhotoMedia Tutorials 2004, Lee Varis Welcome This tutorial has been prepared for the photographer who is striving to learn digital imaging. I make an effort to supply current information about digital
Name the layer you rotated in step 3 Stripe and lower the opacity to 43%.
 Step 1 Open Photoshop and create a new file 1085 649 pixels. Fill the layer with a bright blue color (#0095db) by pressing Shift + F5. This will be the background for our pop art scene. Step 2 Let s create
Combine Black-and-White and Color
 Combine Black-and-White and Color Contributor: Seán Duggan n Specialty: Fine Art Primary Tool Used: Smart Objects Combining color and black-and-white in the same image is a technique that has been around
An Introduction to Layers, Masks and Channels in Photoshop
 An Introduction to Layers, Masks and Channels in Photoshop Roy Killen, GMAPS, EFIAP, GMPSA (c) 2017 Roy Killen Layers, Masks and Channels Page 1 Two approaches to image editing When images are edited in
Adobe PhotoShop Elements
 Adobe PhotoShop Elements North Lake College DCCCD 2006 1 When you open Adobe PhotoShop Elements, you will see this welcome screen. You can open any of the specialized areas. We will talk about 4 of them:
A type of wheel or dial on a camera that makes it possible to scroll through setting options by
 Unit 3.2 Page 1 Vocabulary Wednesday, September 30, 2015 4:31 PM aperture back lighting candid photograph color temperature cropping depth of field digital single lens reflex (DSLR) digital zoom focal
Pacific New Media David Ulrich
 Pacific New Media David Ulrich pacimage@maui.net www.creativeguide.com 808.721.2862 Introduction to Adobe Photoshop Definitions: Selections: Methods of isolating parts of an image, allowing you to perform
Using the Dehaze Filter in Photoshop and Lightroom
 Using the Dehaze Filter in Photoshop and Lightroom Roy Killen, EFIAP, GMAPS, MPSA Some captured images have an unwanted hazy or milky appearance. There can be many reasons for this, but typically it occurs
PhotoShop Elements. Lesson 6. Lesson 6 Objectives. Brief Look Into Creative Photoshop Elements. Lesson 6
 PhotoShop Elements Brief Look Into Creative Photoshop Elements Lesson 6 Lesson 6 Brief Look Into Creative Photoshop Elements Homework review. Creating a new art form. Following a recipe / learning technique.
Tablet overrides: overrides current settings for opacity and size based on pen pressure.
 Photoshop 1 Painting Eye Dropper Tool Samples a color from an image source and makes it the foreground color. Brush Tool Paints brush strokes with anti-aliased (smooth) edges. Brush Presets Quickly access
Easily Smooth And Soften Skin In A Photo With Photoshop
 Easily Smooth And Soften Skin In A Photo With Photoshop Written by Steve Patterson OPEN THE START FILE BY RIGHT CLICKING THE.JPG FILE AND CHOOSING OPEN WITH ADOBE PHOTOSHOP. SAVE AS: X_lastname_firstname_Smooth_Soft
DD IMAGES PHOTOSHOP TUTORIAL 7
 Page1 DD IMAGES PHOTOSHOP TUTORIAL 7 Converting a colour image to B&W The DEREK DOAR METHOD This Tutorial will show you my way of converting colour images to Black & White, using RGB Channel Mixer and
Module All You Ever Need to Know About The Displace Filter
 Module 02-05 All You Ever Need to Know About The Displace Filter 02-05 All You Ever Need to Know About The Displace Filter [00:00:00] In this video, we're going to talk about the Displace Filter in Photoshop.
ACA Photoshop CC Exam Prep Questions
 ACA Photoshop CC Exam Prep Questions 1. Which of the following would you do first in order to present initial ideas to a client for their approval and feedback? A. Show the client the final project B.
How to Resize And Sharpen A Digital Image With PhotoShop CC
 How to Resize And Sharpen A Digital Image With PhotoShop CC I will assume that you have done all your editing. You have saved your file as a master copy. I save it as a PSD with all the layers so that
Black & White and colouring with GIMP
 Black & White and colouring with GIMP Alberto García Briz Black and white with channels in GIMP (21/02/2012) One of the most useful ways to convert a picture to black and white is the channel mix technique.
2007 Advanced Imaging Conference
 Color Filtering October 26-28, 2007 San Jose, California by R. Jay GaBany www.cosmotography.com 2007 The role of color This is a personal view R. Jay GaBany, www.cosmotography.com 2 The purpose of color
Camera Raw software is included as a plug-in with Adobe Photoshop and also adds some functions to Adobe Bridge.
 Editing Images in Camera RAW Camera Raw software is included as a plug-in with Adobe Photoshop and also adds some functions to Adobe Bridge. Camera Raw gives each of these applications the ability to import
LANDSCAPE PHOTOGRAPHY TECHNIQUES, COMPOSITION, AND PROCESSING
 LANDSCAPE PHOTOGRAPHY TECHNIQUES, COMPOSITION, AND PROCESSING Tom Price LANDSCAPE PHOTOGRAPHY TIPS AND TRICKS Wide angle lens desirable 16-18 mm good focal length for APC-C sensor Telephoto also produce