With the paper layer selected, select the lock transparent pixels box. An icon of a lock should now appear in the paper layer
|
|
|
- Marion Stewart
- 5 years ago
- Views:
Transcription


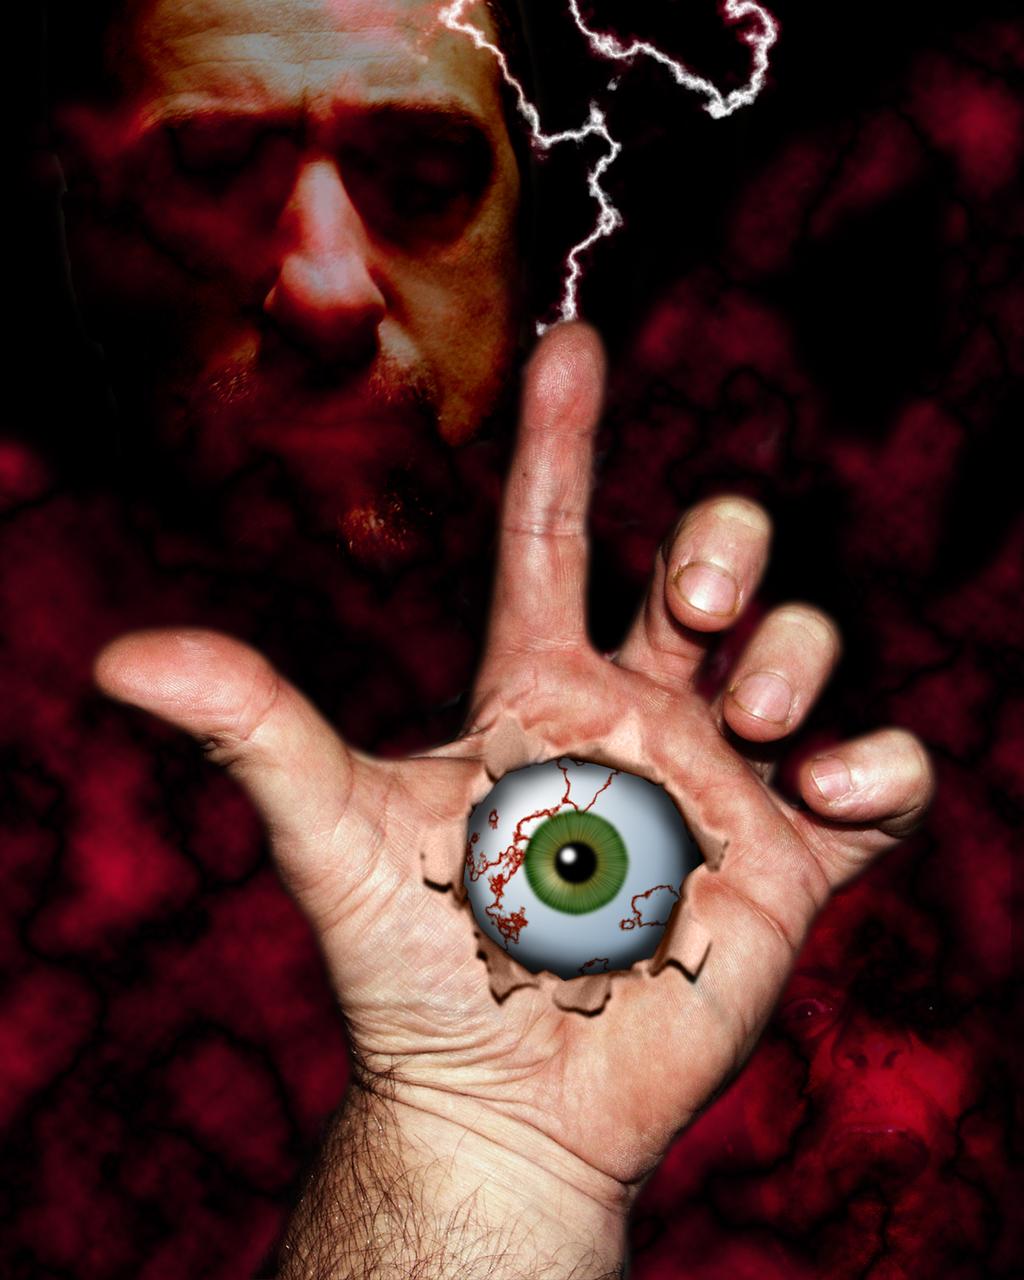
1 Eye In Hand Project This project is going to entail placing the eyeball you made in your last project in the middle of your hand. The goal is to make it look like it s popping out of the skin and to make it look as real as possible. To do this, we are first going to need a picture of your hand. When you take the picture of your hand, have an idea of how you would like the finished project to look and work towards that goal. Position your hand so as to leave plenty of room for the eyeball popping out of its center. I positioned my hand like the one you see below, but you can position yours differently (no inappropriate gestures). As usual, I adjusted the Levels, or Brightness and Contrast to make the picture look clearer, less washed out, etc. The next step is to create a new document. You should know by now that we like to print things out on our desktop printer, so let s once again create an 8 by 10 document. Set the resolution to 150 pixels per inch. Then we ll need to select the hand in the hand picture using whatever methods you feel comfortable with, as long as you make a good clean selection. I made a rough selection using the Polygonal Lasso Tool, drug the rough selection into the new EyeInHand document I created, and then cleaned up the selection. Once again, clean up the hand using whatever methods you prefer, as long as it looks good. I prefer using a Layer Mask to get rid of unwanted areas, and then applying the mask. Though the edges of my hand looked decent, I wasn t willing to settle for mediocrity, so I softened them up a bit. To do this I command-clicked the hand layer to select just the hand. I chose Select > Modify > Contract and typed in 2 to shrink the selection by two pixels. I then chose Select > Feather and typed in 2 to feather the selection by 2 pixels. Next I inverted the selection (Select > Inverse) to select the area outside the hand. To soften the selection (edges of the hand) I chose Filter > Gaussian Blur and typed in radius of 4. If you choose this method, you could adjust the slider to your liking. Another method to soften the edges of your selection would be to manually paint the edges of your hand with the Blur tool, but I find this method to be a bit quicker and one should get used to doing if your going to be a serious Photoshop user. Look at the before and after pictures of the two thumbs to see what a difference this method makes.


2 Next you ll create the area in the palm of the hand where it looks like the eye is popping out of the hand, and the skin from the hand is peeling back so as to reveal the eyeball. To do this I ripped a piece of 8 1/2 by 11 copy paper in half, peeled back a circular area in the center of it, and took a picture of it. As usual, adjust the Levels or Brightness and Contrast. I then made a rough selection with the Lasso tool, dragged it into the EyeInHand project, and positioned it and resized it to my liking. After you have done this, you should have two layers. Rename the layers so that the hand layer is named hand and the paper layer is named paper. Next, erase all the unwanted areas of the paper with a soft edge brush. With the paper layer selected, select the lock transparent pixels box. An icon of a lock should now appear in the paper layer With the eyedropper, sample a color of skin from the hand. Select the paintbrush tool, a soft edge brush and paint the white areas of the paper. Make sure color mode is selected to maintain the lights and shadows with the paper. Then deselect the lock transparent pixels box in the Layer palette. Create a new layer, rename it eyehole, and link it to the paper layer. Then zoom in on the eyehole area in the hand, select the area with the polygonal lasso tool, and fill the area with black

. Make sure the eye layer is selected, and choose Layer > Create Clipping Mask.")


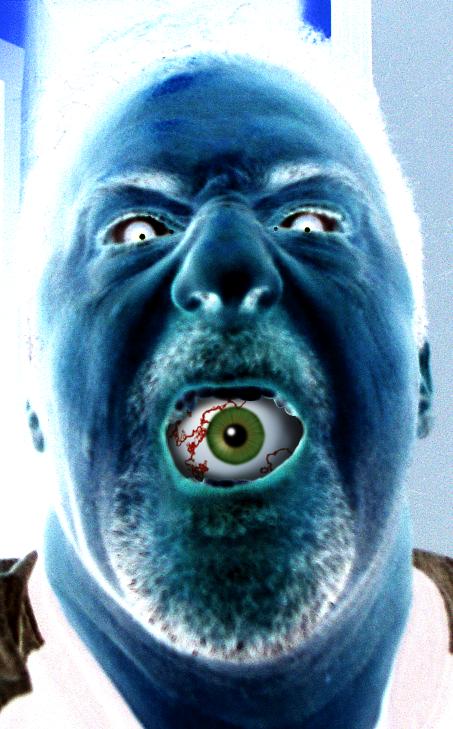
3 Open the Bloodshot Eye document you created for your last project, choose Layer > Merge Visible, then drag the merged eye into the EyeInHand document. Close the Bloodshot Eye project, and DO NOT SAVE THE CHANGES!! Dragging the eye into the hand document will have created a new layer with the eye in it. Rename this layer eye. Deselect the eyehole area if you haven t already done so, and move and resize the eye so that it barely covers the eyehole area that you filled with black. It should look similar to the zoomed in version (below left). Make sure the eye layer is selected, and choose Layer > Create Clipping Mask. Notice how the eye drops into the hole in the hand so that it looks similar to the picture in the middle below. For fun take the move to and move the eye around within the hole. Position it to your liking. Your palette should now look like that below right. Notice the little arrow pointing down in the eye layer. This lets you know eye layer is clipped or masked by the eyehole layer. Only those areas of the eye that fall in the area of the painted pixels of the eyehole layer appear. Cool, huh? For a touch of reality I added a little eye shadow, that is, shadow to the eye using one of my favorite tools, the burn tool. I used a soft edge brush, size 40, with an exposure of 24, highlights for the range, and slowly built up the shadows, getting darker as the eye move back in towards the hand. The last step will be to add a personalized background. To do this, create a new layer, or layers, and move them to the bottom of the layers palette. You will be expected to have all the layers as indicated in the picture above with your background layers for your grade. I personalized my background with a wild cloud pattern and lightning shooting out of the finger. I had planned this all along, which is why I left room enough at the top of the document for the lightning. I also placed faces from other projects into the background and used different blending modes in the layers palette to make them melt into the background. Look at the finished project on the next page. Also look at the Cyclops example, and EyeInMouth example on the very last page of this document. If you finish early you can create similar projects for extra credit.
4

5
Your texture pattern may be slightly different, but should now resemble the sample shown here to the right.
 YOU RE BUSTED! For this project you are going to make a statue of your bust. First you will need to have a classmate take your picture, or use the built in computer camera. The statue you re going to make
Painting Special Effects on Photographs
 TUTORIAL 7 Painting Special Effects on Photographs In this tutorial you will learn how to transform a photo into a striking color composition with paintbrushes, masks, blending modes, color, and paper
Quick Mask Setting Up your Work Environment Setting Up the Quickmask Parameters
 Quick Mask Quickmask gets its name from the fact that as you create your selection area, Photoshop masks that area off, tinting it with a colored mask to show what has been selected. When you're finished
Realistic Skin Smoothing
 TIP SHEET #7 Realistic Skin Smoothing I think it s fair to say when it comes to retouching techniques, the number of different ways to smooth skin is seemingly endless. From blurring techniques through
VERY. Note: You ll need to use the Zoom Tools at the top of your PDF screen to really see my example illustrations.
 VERY This tutorial is written for those of you who ve found or been given some version of Photoshop, and you don t have a clue about how to use it. There are a lot of books out there which will instruct
Extreme Makeovers: Photoshop Retouching Techniques
 Extreme Makeovers: Table of Contents About the Workshop... 1 Workshop Objectives... 1 Getting Started... 1 Photoshop Workspace... 1 Retouching Tools... 2 General Steps... 2 Resolution and image size...
How to blur a background in Photoshop CS3, Elements 9 or later By Steve Zimic
 This is a technique I developed which allows blurring of the background without any bleeding of the main subject into the background. This technique does require a working knowledge of the various selection
How to Create Fake Shadows
 TIP SHEET #8 How to Create Fake Shadows As well as the colour, it s the shadows in a picture that help to give it mood and atmosphere so in this tutorial I want to show you how you can add in extra shadows.
Using Photoshop Elements
 Using Photoshop Elements Created By: Rick Williams August 2004 Table of Contents Photoshop Element Tools...Page 1 Tool Descriptions... Page 3 Starting Photoshop Elements... Page 7 Resizing an Image...
Diploma in Photoshop
 Diploma in Photoshop Photoshop Selection Tools Selection Tools allow us to isolate areas of our image and apply adjustments to these selected areas only. A selection simply isolates one or more parts of
Composite Master Class Blend two images together to create a seamless collage
 Composite Master Class Blend two images together to create a seamless collage By Liz Ness Whether it s a custom senior photo, an album cover, or a basic digital collage, combining two or more images to
Turning Photograph Into Cartoon-Style Picture. Digital Media I West High School Susan M. Raymond
 Turning Photograph Into Cartoon-Style Picture Digital Media I West High School Susan M. Raymond Part 1: Creating Outline Wondering how those guys on the internet turn photograph into a nice cartoon-style
A quick note: We hope that you will find something from the Tips and Tricks that will add a little pizazz to your yearbook pages!
 A quick note: The following pages are tips and tricks for Basic Photoshop users. You may notice that some instructions indicate that non-awpc fonts were used, and that some colors were created using the
IMAGE CORRECTION. You can find this and more information with video tutorials at
 IMAGE CORRECTION You can find this and more information with video tutorials at http://www.adobe.com/support/photoshop/ P H O T O S H O P T O O L S CLONE STAMP TOOL The Clone Stamp tool paints one part
Creating a Watercolor Painting From a Photo. Open the photo you want to appear to be a watercolor painting. I am using the photo below:
 Creating a Watercolor Painting From a Photo Open the photo you want to appear to be a watercolor painting. I am using the photo below: Make any adjustments as needed like cropping the photo before preceding
HOW TO CREATE A SUPER SHINY PENCIL ICON
 HOW TO CREATE A SUPER SHINY PENCIL ICON Tutorial from http://psd.tutsplus.com/ Compiled by INTRODUCTION The Pencil is one of the visual metaphors most used to express creativity. In this tutorial,
How to blend, feather, and smooth
 How to blend, feather, and smooth Quite often, you need to select part of an image to modify it. When you select uniform geometric areas squares, circles, ovals, rectangles you don t need to worry too
Combine Black-and-White and Color
 Combine Black-and-White and Color Contributor: Seán Duggan n Specialty: Fine Art Primary Tool Used: Smart Objects Combining color and black-and-white in the same image is a technique that has been around
S e a m l e s s C o l l a g e I m a g e
 Some familiarity with the Macintosh and Photoshop 4.0 is very helpful. We also assume you have a previously created, scanned or other image to open. In addition to working with multiple image layers, adding
Central Photography Photoshop Tutorial. Color Splash. 1. Open Photoshop. 2. Go to File>Open (Command O).
.") 1. Open Photoshop. 2. Go to File>Open (Command O). 1 3. Navigate to your file, select it and open it. 2 4. Fix your photo. If it s too light, darken it. If it s too dark, lighten it. To do that, add a
1. Open Photoshop. 2. Go to File>Open (Command O). 1 3. Navigate to your file, select it and open it. 2 4. Fix your photo. If it s too light, darken it. If it s too dark, lighten it. To do that, add a
Retouching Portraits in Photoshop
 Retouching Portraits in Photoshop I Removing Blemishes When removing blemishes, acne or other imperfections on the skin, our goal is to maintain as much of the original skin texture as possible. That way,
Color Correction and Enhancement
 10 Approach to Color Correction 151 Color Correction and Enhancement The primary purpose of Photoshop is to act as a digital darkroom where images can be corrected, enhanced, and refined. How do you know
Out of Bounds - Dolphins
 Out of Bounds - Dolphins Let's start by making a copy of our original image layer - This is not essential but it's easier to rectify mistakes. From the menus, select Layer > Duplicate Layer or drag the
Types of Mask. Layer masks
 Photoshop Layer Mask Features Non destructive (does not delete pixels) until applied Uses brush tool which is configurable Can be added to any layer (except Background unless double click to unlock) including
AGENDA. :: Homework Critiques (5 minutes each) :: Photoshop Lesson 3. A-1 Gorgeous! [ COMPOSITE DEMO ] :: 7mins. I. SELECTIONS [ Common Law ]:
![AGENDA. :: Homework Critiques (5 minutes each) :: Photoshop Lesson 3. A-1 Gorgeous! [ COMPOSITE DEMO ] :: 7mins. I. SELECTIONS [ Common Law ]:](/thumbs/93/112781712.jpg "AGENDA. :: Homework Critiques (5 minutes each) :: Photoshop Lesson 3. A-1 Gorgeous! [ COMPOSITE DEMO ] :: 7mins. I. SELECTIONS [ Common Law ]:") CLASS :: 09.24 2018 AGENDA :: Homework Critiques (5 minutes each) A-1 Gorgeous! Upload A-1 Project to Student Folder :: Photoshop Lesson 3 [ COMPOSITE DEMO ] :: 7mins. I. SELECTIONS [ Common Law ]: a.
CLASS :: 09.24 2018 AGENDA :: Homework Critiques (5 minutes each) A-1 Gorgeous! Upload A-1 Project to Student Folder :: Photoshop Lesson 3 [ COMPOSITE DEMO ] :: 7mins. I. SELECTIONS [ Common Law ]: a.
Sharpening is an essential final step before output. But sometimes, you don t want to
 Sharpening is an essential final step before output. But sometimes, you don t want to sharpen your entire image equally. Skin tones, clouds, noisy areas - it s best to apply less sharpening to these areas,
INTRO TO LAYERS (PART 2)
") Adobe Photoshop Elements INTRO TO LAYERS (PART 2) By Dave Cross In Part 1, we talked about the main concept behind layers and why they re so important. Now we ll take it a step further and show how to
Adobe Photoshop Elements INTRO TO LAYERS (PART 2) By Dave Cross In Part 1, we talked about the main concept behind layers and why they re so important. Now we ll take it a step further and show how to
Add Photoshop Masks and Adjustments to RAW Images
 Add Photoshop Masks and Adjustments to RAW Images Contributor: Seán Duggan n Specialty: Fine Art Primary Tool Used: Photoshop Masks The adjustments you make in Camera Raw are global in nature, meaning
One method for removing and replacing the sky in an image
 One method for removing and replacing the sky in an image Reality versus Artistic License I am pretty sure that when Monet painted these they did not reflect reality. What I Look For I look for an image
Adobe Photoshop CS5 Layers and Masks
 Adobe Photoshop CS5 Layers and Masks Email: training@health.ufl.edu Web Page: http://training.health.ufl.edu Adobe Photoshop CS5: Layers and Masks 2.0 Hours The workshop will cover creating and manipulating
Photoshop CC Editing Images
 Photoshop CC Editing Images Rotate a Canvas A canvas can be rotated 90 degrees Clockwise, 90 degrees Counter Clockwise, or rotated 180 degrees. Navigate to the Image Menu, select Image Rotation and then
Photoshop Blending Modes
 Photoshop Blending Modes https://photoshoptrainingchannel.com/blending-modes-explained/#when-blend-modes-added For those mathematically inclined. https://photoblogstop.com/photoshop/photoshop-blend-modes-
HIGH KEY GLOW EFFECT IN PHOTOSHOP
 HIGH KEY GLOW EFFECT IN PHOTOSHOP In this Photoshop tutorial, we ll learn how to create a high key glow effect, which is a fancy way of saying we ll be applying a glow only to the highlights in an image.
Project 8: Nice Close-Up
 ps7ie_p08_b.qxd 11/18/02 3:25 PM Page 74 ps7ie_p08_b.qxd 11/18/02 3:25 PM Page 75 Photoshop 7 Image Effects In this project, work with a picture that was taken at an angle for effect. Correct and crop
Unit 7 : Image Painting, Editing and Layers
 Unit 7 : Image Painting, Editing and Layers Introduction This Unit describes about various painting tools; such as selection, cropping and measuring tools, retouching, drawing and type tools, Navigation
Undress a Giraffe in Photoshop
 Undress a Giraffe in Photoshop By: Alexandra Fomicheva Have you ever wanted to know what a Giraffe looks like without its spots? If so, this tutorial is for you, you pervert! Today, we will demonstrate
Professional Photograph Restoration 50 Points
 Professional Photograph Restoration 50 Points In this tutorial, we'll take an in-depth look at restoring an old torn photograph. Restoring old family photos is something that you can do for your relatives
40 Digital Photo Retouching Techniques COPYRIGHTED MATERIAL
 40 Digital Photo Retouching Techniques COPYRIGHTED MATERIAL C h a p t e r Correcting Contrast If you are a photography enthusiast, you know that light is the defining factor in photography. You probably
Learning Photo Retouching techniques the simple way
 Learning Photo Retouching techniques the simple way Table of Contents About the Workshop... i Workshop Objectives... i Getting Started... 1 Photoshop Workspace... 1 Setting up the Preferences... 2 Retouching
Design a Halloween Pumpkin Wallpaper in Photoshop
 Design a Halloween Pumpkin Wallpaper in Photoshop By: Alvaro Guzman Halloween is near! So let's take a pumpkin image, carve it up, and light it for this coming holiday. You'll learn how to get this nice
Web Graphics Chapter 7 Review
 Web Graphics Chapter 7 Review Name Date 1. The Add Layer Mask button is located on/in the. a. Toolbox b. Layers palette c. Mask palette d. History palette 2. How many color adjustments commands are available
Using layer masks to remove backgrounds with Photoshop CS5 and CS6
 Using layer masks to remove backgrounds with Photoshop CS5 and CS6 Use layer masks to combine these pictures into this You will learn: 1. Layers and layer masks 2. Brushes 3. Layer styles 4. Type tool
Practice: Using Layer Masks
 DIGITAL IMAGING I UNIT 4 1 Practice: Using Layer Masks INTRODUCTION: Layer Masks are a way to hide elements on a layer without erasing them. In that manner, the hidden elements can be re-exposed without
Inverted Colors Photo Effect With Photoshop
 Inverted Colors Photo Effect With Photoshop Written by Steve Patterson. In this Photoshop Effects tutorial, we re going to look at how to invert the colors in an image to create interesting photo effects.
ADD A REALISTIC WATER REFLECTION
 ADD A REALISTIC WATER REFLECTION In this Photoshop photo effects tutorial, we re going to learn how to easily add a realistic water reflection to any photo. It s a very easy effect to create and you can
Making Selections: 3 Ways to isolate an area in an image: Layer Mask : Mask the part of the layer you don t want to be visible
 3 Ways to isolate an area in an image: Layer Mask : Mask the part of the layer you don t want to be visible Eraser Tool: Erase the areas of an image or layer you don t want to be visible Make a Selection:
PhotoFiltre. Reverse foreground/background colors. Background & foreground colors. Set default foreground/background colors. Color choice palette
 PhotoFiltre BASIC TOOLS PALETTE Background & foreground colors Reverse foreground/background colors Set default foreground/background colors Color choice palette Toggle through color choice palettes Selection
PHOTOSHOP INVERTED COLORS PHOTO EFFECT
 Photo Effects: Photoshop Inverted Colors Photo Effect PHOTOSHOP INVERTED COLORS PHOTO EFFECT Most people would agree that taking a stroll through the forest can be very calming and peaceful, with all of
FLAMING HOT FIRE TEXT
 FLAMING HOT FIRE TEXT In this Photoshop text effects tutorial, we re going to learn how to create a fire text effect, engulfing our letters in burning hot flames. We ll be using Photoshop s powerful Liquify
AGENDA :: MULTIMEDIA TOOLS :: CLASS NOTES. :: Homework Critiques (5-7 minutes each) :: Photoshop Lesson 3. A-1 Gorgeous! [ COMPOSITE DEMO ] :: 7mins.
![AGENDA :: MULTIMEDIA TOOLS :: CLASS NOTES. :: Homework Critiques (5-7 minutes each) :: Photoshop Lesson 3. A-1 Gorgeous! [ COMPOSITE DEMO ] :: 7mins.](/thumbs/86/93336476.jpg "AGENDA :: MULTIMEDIA TOOLS :: CLASS NOTES. :: Homework Critiques (5-7 minutes each) :: Photoshop Lesson 3. A-1 Gorgeous! [ COMPOSITE DEMO ] :: 7mins.") CLASS :: 03 02.10 2017 AGENDA :: Homework Critiques (5-7 minutes each) A-1 Gorgeous! Upload A-1 Project to Student Folder :: Photoshop Lesson 3 [ COMPOSITE DEMO ] :: 7mins. I. SELECTIONS [ Common Law ]:
CLASS :: 03 02.10 2017 AGENDA :: Homework Critiques (5-7 minutes each) A-1 Gorgeous! Upload A-1 Project to Student Folder :: Photoshop Lesson 3 [ COMPOSITE DEMO ] :: 7mins. I. SELECTIONS [ Common Law ]:
Adobe Photoshop cs. Advanced Retouching. Julieanne Kost
 Julieanne Kost www.adobe.com www.adobeevangelists.com Adobe Photoshop cs Advanced Retouching There are several essential tools and techniques for retouching images of people, and one underlying secret:
Duplicate Layer 1 by dragging it and dropping it on top of the New Layer icon in the Layer s Palette. You should now have two layers rename the top la
 50 Face Project For this project, you are going to put your face on a coin. The object is to make it look as real as possible. Though you will probably be able to tell your project was computer generated,
Introduction to Photoshop
 Introduction to Photoshop Instructional Services at KU Libraries A Division of Information Services www.lib.ku.edu/instruction Abstract: This course covers the basics of Photoshop, including common tools
Make a Trendy Double Exposure Effect in Adobe Photoshop by Yulia Sokolova6 days ago
 Make a Trendy Double Exposure Effect in Adobe Photoshop by Yulia Sokolova6 days ago Difficulty:IntermediateLength:LongLanguages: Photo ManipulationAdobe PhotoshopPhoto EffectsDouble ExposureClipping Mask
OLD FASHIONED HAND TINTED EFFECT
 OLD FASHIONED HAND TINTED EFFECT In this Photoshop tutorial, we re going to learn how to easily create an old-fashioned, hand-tinted photo effect. All it takes is an adjustment layer, a layer blend mode,
ADOBE PHOTOSHOP CS TUTORIAL
 ADOBE PHOTOSHOP CS TUTORIAL A D O B E P H O T O S H O P C S Adobe Photoshop CS is a popular image editing software that provides a work environment consistent with Adobe Illustrator, Adobe InDesign, Adobe
Lesson 16 Text, Layer Effects, & Filters
 Lesson 16 Text, Layer Effects, & Filters Digital Media I Susan M. Raymond West High School In this tutorial, you will: Create a Type Layer Add and Format Type within a Type Layer Apply Layer Effects Apply
Using Adobe Photoshop
 Using Adobe Photoshop 6 One of the most useful features of applications like Photoshop is the ability to work with layers. allow you to have several pieces of images in the same file, which can be arranged
Name the layer you rotated in step 3 Stripe and lower the opacity to 43%.
 Step 1 Open Photoshop and create a new file 1085 649 pixels. Fill the layer with a bright blue color (#0095db) by pressing Shift + F5. This will be the background for our pop art scene. Step 2 Let s create
Photoshop: Manipulating Photos
 Photoshop: Manipulating Photos All Labs must be uploaded to the University s web server and permissions set properly. In this lab we will be manipulating photos using a very small subset of all of Photoshop
Darkroom Effects. Solarization. Bleach Bypass
 Darkroom Effects Solarization A popular technique with surrealists like May Ray, solarization is achieved in the darkroom by exposing a developing image to a flash of light. Darkroom solarization is difficult
Downloaded From : Working with Photoshop 7.0
 Adobe Photoshop 1. Introduction What is Adobe Photoshop? Adobe Photoshop is a web designing software used for giving effects and filters to an image to make it more appealing and attractive. Brought out
L AY E R S A N D M A S K S
 Layers is one of the most used elements in PhotoShop. They allow you to work on an image without disturbing the others. A layer is simply one image stacked on top of another. It builds from the bottom
10 Creating Special Effects
 10 Creating Special Effects The huge assortment of filters available for Adobe Photoshop lets you transform ordinary images into extraordinary digital artwork. You can select filters that simulate a traditional
INTERMEDIATE PHOTOSHOP: FAMILY PHOTOS
 INTERMEDIATE PHOTOSHOP: FAMILY PHOTOS What is Photoshop Elements? Photoshop Elements is a streamlined version of Adobe Photoshop CC. Despite missing some more advanced features, it is a robust piece of
Photoshop: Manipulating Photos
 Photoshop: Manipulating Photos All Labs must be uploaded to the University s web server and permissions set properly. In this lab we will be manipulating photos using a very small subset of all of Photoshop
HDR with Smart Objects
 HDR with Smart Objects March 2006 HDR with Smart Objects The article could be easily called Shoot once, Use it twice, because this article explains how to use a single RAW file to get most data out of
Distorting with Displace
 chapter 5 Distorting with Displace During my years lecturing around the world, I ve heard many complaints that Photoshop lacks the capability to bend or distort images along user-defined curves. It just
Adobe PhotoShop Elements
 Adobe PhotoShop Elements North Lake College DCCCD 2006 1 When you open Adobe PhotoShop Elements, you will see this welcome screen. You can open any of the specialized areas. We will talk about 4 of them:
PROFESSIONAL PHOTOGRAPH RESTORATION WORKFLOW
 PROFESSIONAL PHOTOGRAPH RESTORATION WORKFLOW Tutorial from http://psd.tutsplus.com/ Compiled by INTRODUCTION In this tutorial, we'll take an in-depth look at restoring an old torn photograph.
By Washan Najat Nawi
 By Washan Najat Nawi how to get started how to use the interface how to modify images with basic editing skills Adobe Photoshop: is a popular image-editing software. Two general usage of Photoshop Creating
Challenge Image: Blur the Background
 Challenge Image: Blur the Background Challenge Image: Blur the Background In this lesson, we re going to work on a challenge image that was submitted by a Masters Academy member. The image features a little
Compositing. Compositing is the art of combining two or more distinct elements to create a sense of seamlessness or a feeling of belonging.
 Compositing Compositing is the art of combining two or more distinct elements to create a sense of seamlessness or a feeling of belonging. Selection Tools In the simplest terms, selections help us to cut
Adobe Photoshop CC 2018 Tutorial
 Adobe Photoshop CC 2018 Tutorial GETTING STARTED Adobe Photoshop CC 2018 is a popular image editing software that provides a work environment consistent with Adobe Illustrator, Adobe InDesign, Adobe Photoshop,
Module All You Ever Need to Know About The Displace Filter
 Module 02-05 All You Ever Need to Know About The Displace Filter 02-05 All You Ever Need to Know About The Displace Filter [00:00:00] In this video, we're going to talk about the Displace Filter in Photoshop.
Texts and Resources: Assessments: Freefoto.com Group Photo Projects
 Effective Date: 2009-10 Name of Course: Digital Photography Grade Level: 9-12 Department: Industrial Technology and Engineering Length of Course: 30 cycles Instructional Time: 180 days Period Per Cycle:
photoshop filters kelly ludwig assistant professor
 photoshop filters kelly ludwig assistant professor sharpening images reducing noise correcting distortions in images practical filters There are over 100 filters that ship with Photoshop and they're all
Creating a cast shadow
 Creating a cast shadow (use your Magnify tool to see these layers palettes!) Just a note before you go to the trouble of creating a cast shadow from scratch: If your subject already has a cast shadow before
Making Digital POSiTiVES & Negatives for Contact Printing Sandra C. Davis
 Making Digital POSiTiVES & Negatives for Contact Printing 2005-13 Sandra C. Davis Suggested reading: Making Digital Negatives for Contact Printing by Dan Burkholder, Twin Palms Press, and The Inkjet Negative
Tablet overrides: overrides current settings for opacity and size based on pen pressure.
 Photoshop 1 Painting Eye Dropper Tool Samples a color from an image source and makes it the foreground color. Brush Tool Paints brush strokes with anti-aliased (smooth) edges. Brush Presets Quickly access
A lthough it may not seem so at first
 Photoshop Selections by Jeff The Wizard of Draws Bucchino www.wizardofdraws.com A lthough it may not seem so at first glance, learning to use Photoshop is largely about making selections. Knowing how to
Using Adobe Photoshop to enhance the image quality. Assistant course web site:
 Using Adobe Photoshop to enhance the image quality Assistant course web site: http://www.arches.uga.edu/~skwang/edit6170/course.htm Content Introduction 2 Unit1: Scan images 3 Lesson 1-1: Preparations
Lab 7. CSE 3, Summer In this lab we will learn how to manipulate images and create animations in Photoshop.
 Lab 7 CSE 3, Summer 2010 In this lab we will learn how to manipulate images and create animations in Photoshop. Photoshop is an extremely powerful program. (And an extremely expensive one! The full version
Photoshop Elements 7.0
 Photoshop Elements 7.0 Photoshop Elements is a powerful software package that lets you create or edit pictures and images. Photoshop works on the principles of layers. Think about an image as a number
Car Ad Photoshop Tutorial Miss Van Lenten Tools: Paint brush, Eraser, Quick Selection/Magic Wand, Quick Mask, Layer Mask
 Car Ad Photoshop Tutorial Miss Van Lenten Tools: Paint brush, Eraser, Quick Selection/Magic Wand, Quick Mask, Layer Mask Part One: Google image search for a car of your choosing. Make sure you go to tools
Photoshop 1. click Create.
 Photoshop 1 Step 1: Create a new file Open Adobe Photoshop. Create a new file: File->New On the right side, create a new file of size 600x600 pixels at a resolution of 300 pixels per inch. Name the file
All Creative Suite Design documents are saved in the same way. Click the Save or Save As (if saving for the first time) command on the File menu to
 command on the File menu to") 1 The Application bar is new in the CS4 applications. It combines the menu bar with control buttons that allow you to perform tasks such as arranging multiple documents or changing the workspace view.
1 The Application bar is new in the CS4 applications. It combines the menu bar with control buttons that allow you to perform tasks such as arranging multiple documents or changing the workspace view.
Colorful Glowing Mask Photoshop Tutorial Photoshop TUTfactory The best Photoshop tutorials in one place
 Step 1: To start, create new canvas sized at 994 1312 pixels, and fill it with black. Next, create a new layer, and go to Filter->Render->Clouds. Duplicate this layer, and then merge the two layers. Set
Adobe Photoshop. How To Get Started With Adobe InDesign CC: 10 Things Beginners Want To Know How To Do TO START: 1) ZOOM, MOVE, RETOUCH (05:11)
 ZOOM, MOVE, RETOUCH (05:11)") Adobe Photoshop How To Get Started With Adobe InDesign CC: 10 Things Beginners Want To Know How To Do Video By Terry White Tutorial Sheet by Juliet Davis TO START: Open the tutorial in YouTube, download
Adobe Photoshop How To Get Started With Adobe InDesign CC: 10 Things Beginners Want To Know How To Do Video By Terry White Tutorial Sheet by Juliet Davis TO START: Open the tutorial in YouTube, download
Getting Started. 1. Double click on the eye con. 2. Single click on File, then new, then OK. Click here.
 Getting Started 1. Double click on the eye con. 2. Single click on File, then new, then OK. Click here. What is Photoshop? Photoshop is a program that lets you make pictures. You can put away your markers
Adobe Photoshop CS5 ACE
 Adobe Photoshop CS5 ACE Number: A9A0-150 Passing Score: 800 Time Limit: 120 min File Version: 1.0 Sections 1. Selection Tools Exam A QUESTION 1 John creates a circular selection with Elliptical Marquee
Ascension's Atlas Tutorial in GIMP
 Ascension's Atlas Tutorial in GIMP What follows is, as near as I can make it, an approximation in gimp of Ascension s Photoshop Atlas Style tutorial. Only the techniques used are in this version, so I
Figure 9.10 This shows the File Scripts menu, where there is now a new script item called Delete All Empty layers.
 Layers Layers play an essential role in all aspects of Photoshop work. Whether you are designing a Web page layout or editing a photograph, working with layers lets you keep the various elements in a design
ITEC185 INTRODUCTION TO DIGITAL MEDIA
 1 ITEC185 INTRODUCTION TO DIGITAL MEDIA ADOBE PHOTOSHOP ITEC185 - Introduction to Digital Media ITEC185 - Introduction to Digital Media 2 What is Adobe Photoshop? Photoshop is the leading professional
GETTING STARTED. 0 P a g e B a s i c s o f A d o b e P h o t o s h o p A g a P r i v a t e I n s t i t u t e f o r c o m p u t e r s c i e n c e
 GETTING STARTED 0 P a g e B a s i c s o f A d o b e P h o t o s h o p Adobe Photoshop: is a popular image editing software that provides a work environment consistent with Adobe Illustrator, Adobe InDesign,
5 Masks and Channels
 5 Masks and Channels Adobe Photoshop uses masks to isolate and manipulate specific parts of an image. A mask is like a stencil. The cutout portion of the mask can be altered, but the area surrounding the
Fireworks Bitmap Graphics Hands on practice notes. Basic Panels to note in Fireworks (Review)
") Fireworks Bitmap Graphics Hands on practice notes Topics of discussion 1. Saving files in Fireworks (PNG formats) - Review 2. Basic Panels Tool, Property, Layer & Optimize - Overview 3. Selection/Editing
Fireworks Bitmap Graphics Hands on practice notes Topics of discussion 1. Saving files in Fireworks (PNG formats) - Review 2. Basic Panels Tool, Property, Layer & Optimize - Overview 3. Selection/Editing
22B / NONDESTRUCTIVE EDITING - QUICK MASKS 1
 22B / NONDESTRUCTIVE EDITING - QUICK MASKS 1 The following sections will deal with photoshop more as an artists studio and not just as an extension of photography. You will work more with layers and using
Teton Technique C H A P T E R 3
 C H A P T E R 3 Teton Technique TRY IT AT HOME: TetonTechnique.psd SIT BACK AND WATCH: TetonTechnique.mov Ladies and gentlemen, girls and boys of all ages, welcome to the Grand Teton National Park. But
Creating Pastel Images and other effects in Photoshop
 Creating Pastel Images and other effects in Photoshop Martin Addison 2015 Creating pastel images Page 1 Martin Addison FRPS Using White Layers in Photoshop 1. Create a new empty Layer 2. Edit> Fill 3.