Ensure that you have downloaded all the dataset files from your course Resources, and that they are extracted to the route of your C: drive.
|
|
|
- Jocelin Phillips
- 5 years ago
- Views:
Transcription


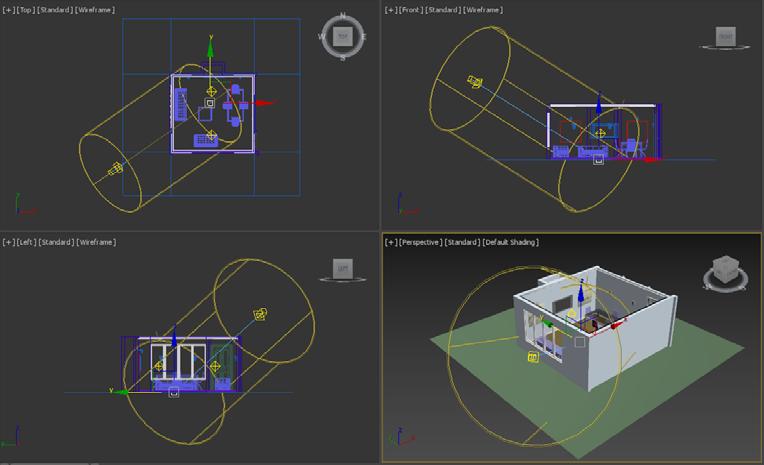
1 Lights and Cameras Before you begin Ensure that you have downloaded all the dataset files from your course Resources, and that they are extracted to the route of your C: drive. In this exercise, you will create a Flange from various parametric objects by combining a number of Boolean tool Operands. 1. Open the file Lights and Cameras.max. The basic scene consists of a small room, containing some furniture. The ceiling object is hidden for now. 2. Go to the Create panel and in the Lights tab choose the Standard light list. In the Object Type rollout select Omni. 3. In the Top viewport click and place the Omni light near the center of the room. 1


2 4. Right Mouse Button (RMB) click on the Select and Move tool and apply the following Absolute:World values: The Omni light is placed to one side of the room. 5. With the Omni still selected, go to the Modify panel and in the General Parameters rollout apply the following: Shadows: On. Shadow Type: Ray Traced Shadows 6. In the Intensity/Color/Attenuation rollout set the following Multiplier and Far Attenuation values: 2


3 7. Click on the color swatch next to the Multiplier spinner and in the Color Selector set the following RGB color values: This will give the Omni light a slight yellowish tint. 8. Hold the Shift key and move the Omni light in the Y-axis to create an Instance clone. Position the new Omni light at the following Absolute:World coordinates: Two identical Omni lights are now placed in the room. 9. Activate the Perspective viewport and press F9 to Render the scene. 3


4 10. From the Lights menu, select the Target Direct light. 11. In the Front viewport, click to position the light above and to the left of the room, and drag the target towards the center of the room. 12. Select the Direct Light object and position at the following Absolute:World coordinates: 4


5 13. Select the lights Target object and position: 5


6 14. With the Target Direct light selected go to the Modify panel and in the General Parameters rollout apply the following: 15. In the Intensity/Color/Attenuation rollout set parameters to match below: 16. In the Directional Parameters set the following: 6

7 17. At any time feel free to Render (F9) the scene to see the current state of lighting effects. In this particular lighting setup, the Omni lights are only acting as fill lights, so as to add additional ambient light into the room. They are not representing lights objects that are placed in the scene. Currently they are casting unwanted shadows. 18. Select one of the Onmi lights and in the General Parameters rollout disable the Shadow option. The shadows cast by these lights are removed. 19. In the Top view, place a Free Spot near the light shade bracket object. Use the other viewports to help position the Spot just inside the light shade object. 7

8 20. In the General Parameters rollout set the following, making sure to apply the Targeted option: 21. In the Intensity/Color/Attenuation rollout, set the following: 22. In the Spotlight Parameters set the following: 8


9 23. Select the spotlight Target object and in the Left viewport move it back slightly past the wall so that the spotlight points towards the wall mounted painting. 24. Select both the Spot and its Target. Create an Instance clone and position it at the second light shade above the other picture. 25. Unhide the Ceiling object. 9


10 26. On the Create panel, go to the Cameras tab, and select the Target tool. 27. In the Top viewport, click to place the camera object near the lower right corner of the room, and drag to position the target towards the opposite wall. 28. Select the Camera object and position: 10

11 29. Then select the camera Target object and position: 30. Make the Perspective viewport active and press C to switch to the new Camera View. The Field of View is a little narrow. 31. Select the Camera object and in the Modify panel set the FOV parameter to 65 degrees. 11


12 32. Render (F9) the scene. Whilst the lighting in the room is beginning to look OK, outside the environment is completely black, and not consistent with the direct sun light cast through the window. 12


13 33. From the Rendering pull-down menu choose the Environment (8) option. 34. The Environment and Effects dialog appears. In the Common Parameters rollout, select the Environment Map (None) button. 35. In the Material/Map browser choose the Bitmap option, and select OK. 36. Navigate to the dataset files from your course Resources, and select the image file EnvironmentMap.jpg. 13
")

14 37. With the Environment and Effects dialog still active, open the Compact Material Editor (M). Drag the Environment Map button into an available material Sample window, and in the Instance (Copy) dialog choose Instance and click OK. 38. In the Coordinates rollout of the Bitmap parameters, change the Mapping type to Screen, and set the Offset V value to Render (F9) the Camera view. 14


15 The environment outside the window appears more realistic. The final rendered image aspect ratio could do with some improvement. 40. Open the Render Settings (F10) dialog. In the Output Size area set the Custom size to Width: 800 and Height:

16 41. Render (F9) the scene. Feel free to further develop the scene lighting and materials. Add and position additional lights, and experiment further with Multiplier, Attenuation, and Color values to create various lighting moods. 16
REVIT - RENDERING & DRAWINGS
 TUTORIAL L-15: REVIT - RENDERING & DRAWINGS This Tutorial explains how to complete renderings and drawings of the bridge project within the School of Architecture model built during previous tutorials.
Motion Blur with Mental Ray
 Motion Blur with Mental Ray In this tutorial we are going to take a look at the settings and what they do for us in using Motion Blur with the Mental Ray renderer that comes with 3D Studio. For this little
Exterior vs Interior Exterior Sunlight. Mostly direct light. Indirect light important Interior Both direct and indirect.
 Week 5 Lighting Lighting Concepts Direct vs Indirect Direct Light (strikes surface directly) Indirect Light (reflected from another surface) Exterior vs Interior Exterior Sunlight. Mostly direct light.
Teach Yourself Adobe Photoshop Topic 9: Photo Retouching Part 2
 http://www.gerrykruyer.com Teach Yourself Adobe Photoshop Topic 9: Photo Retouching Part 2 In the last week s lesson, you repaired damaged areas of an image, removed unwanted parts of an image, cloned
Chapter 6 Title Blocks
 Chapter 6 Title Blocks In previous exercises, every drawing started by creating a number of layers. This is time consuming and unnecessary. In this exercise, we will start a drawing by defining layers
How to create a cove for cove lighting in DIALux In this tutorial you will learn how to make a cove similar to the one in the following image
 How to create a cove for cove lighting in DIALux In this tutorial you will learn how to make a cove similar to the one in the following image The cove dimension will be 4 meter by 5 meter and the other
Batch Processing Converting images in a folder to JPEG
 Batch Processing Converting images in a folder to JPEG Request I would like to convert multiple RAW images (NEF files) to JPEG images all at once Response You can use a Batch Process to convert all RAW
How to Create Website Banners
 How to Create Website Banners In the following instructions you will be creating banners in Adobe Photoshop Elements 6.0, using different images and fonts. The instructions will consist of finding images,
Oz-iTRAIN. Cadsoft Australia and New Zealand. Envisioneer Render Settings. rendering in Envisioneer.
 Oz-iTRAIN Cadsoft Australia and New Zealand With appreciation to Robert Harbottle for supplying this paper to assist you with the rendering in Envisioneer. Envisioneer Render Settings To begin the render
Engineering Technology
 Engineering Technology Introduction to Parametric Modelling Engineering Technology 1 See Saw Exercise Part 1 Base Commands used New Part This lesson includes Sketching, Extruded Boss/Base, Hole Wizard,
BIMXplorer v1.3.1 installation instructions and user guide
 BIMXplorer v1.3.1 installation instructions and user guide BIMXplorer is a plugin to Autodesk Revit (2016 and 2017) as well as a standalone viewer application that can import IFC-files or load previously
Pull Down Menu View Toolbar Design Toolbar
 Pro/DESKTOP Interface The instructions in this tutorial refer to the Pro/DESKTOP interface and toolbars. The illustration below describes the main elements of the graphical interface and toolbars. Pull
Using Adobe Photoshop
 Using Adobe Photoshop 4 Colour is important in most art forms. For example, a painter needs to know how to select and mix colours to produce the right tones in a picture. A Photographer needs to understand
Introduction to Autodesk Inventor for F1 in Schools (Australian Version)
") Introduction to Autodesk Inventor for F1 in Schools (Australian Version) F1 in Schools race car In this course you will be introduced to Autodesk Inventor, which is the centerpiece of Autodesk s Digital
Introduction to Autodesk Inventor for F1 in Schools (Australian Version) F1 in Schools race car In this course you will be introduced to Autodesk Inventor, which is the centerpiece of Autodesk s Digital
AUTODESK INVENTOR Trial Projects
 AUTODESK INVENTOR Trial Projects Drawing Creation Create detailed drawings of a collar flange PART 1: CREATING DRAWING VIEWS page: 2 1. 2. 3. Start by clicking the Projects icon in the ribbon. Navigate
SprinterB Quality printing Color Management
 Application Note: #10 Date: June. 07, 2005 SprinterB Quality printing Color Management Table of Contents Introduction...2 SprinterB ICC Profiles...2 PPS RIP, Color Management Settings...3 ICC Profile Creator...5
Exercise 1. Milling a Part with the Lab-Volt CNC Mill EXERCISE OBJECTIVE
 Exercise 1 Milling a Part with the Lab-Volt CNC Mill EXERCISE OBJECTIVE When you have completed this exercise, you will be able to engrave text on square pieces of stock, using the Lab-Volt CNC Mill, model
FLEXLINK DESIGN TOOL VR GUIDE. documentation
 FLEXLINK DESIGN TOOL VR GUIDE User documentation Contents CONTENTS... 1 REQUIREMENTS... 3 SETUP... 4 SUPPORTED FILE TYPES... 5 CONTROLS... 6 EXPERIENCE 3D VIEW... 9 EXPERIENCE VIRTUAL REALITY... 10 Requirements
Kitchen and Bath Design Tutorial
 Kitchen and Bath Design Tutorial This tutorial continues where the Interior Design Tutorial left off. You should save this tutorial using a new name to archive your previous work. The tools and techniques
Select your Image in Bridge. Make sure you are opening the RAW version of your image file!
 CO 3403: Photographic Communication Steps for Non-Destructive Image Adjustments in Photoshop Use the application Bridge to preview your images and open your files with Camera Raw Review the information
04. Two Player Pong. 04.Two Player Pong
 04.Two Player Pong One of the most basic and classic computer games of all time is Pong. Originally released by Atari in 1972 it was a commercial hit and it is also the perfect game for anyone starting
Creating Nice 2D-Diagrams
 UseCase.0046 Creating Nice 2D-Diagrams Keywords: 2D view, z=f(x,y), axis, axes, bitmap, mesh, contour, plot, font size, color lookup table, presentation Description This use case demonstrates how to configure
Materials Tutorial. Chapter 6: Setting Materials Defaults
 Setting Materials Defaults Chapter 6: Materials Tutorial Materials display on the surfaces of objects in 3D views and can make a 3D view appear highly realistic. When applied to most objects, material
How to generate different file formats
 How to generate different file formats Different mediums print, web, and video require different file formats. This guide describes how to generate appropriate file formats for these mediums by using Adobe
Materials Tutorial. Chapter 6: Setting Materials Defaults
 Setting Materials Defaults Chapter 6: Materials Tutorial Materials display on the surfaces of objects in 3D views and can make a 3D view appear highly realistic. When applied to most objects, material
The Basic RAW Image Processing Workflow In PSE 2018
 The Basic RAW Image Processing Workflow In PSE 2018 This tutorial will illustrate the basic workflow or steps that are generally done when a RAW image is edited in PSE 2018. Saving the edited file as part
Three Point Lighting. Overview to lights. An Art of Illusion tutorial..
 Three Point Lighting An Art of Illusion tutorial.. Lights can make your five-minute MyFirstRender look like a masterpiece that must have taken hours. But a bad lighting rig can also make your skillfully
Applied Precast Concrete Detailing
 Applied Precast Concrete Detailing Tekla Structures 11.0 August 30, 2005 Copyright 2005 Tekla Corporation Copyright 2005 Tekla Corporation Applied Precast Concrete Detailing i Copyright 2005 Tekla Corporation
Lightroom Classic CC and Lightroom CC Updates
 Lightroom Classic CC and Lightroom CC Updates Information about the latest December 2017 Lightroom system updates This December Adobe have released updates for the entire Lightroom CC ecosystem, including
Rendering a perspective drawing using Adobe Photoshop
 Rendering a perspective drawing using Adobe Photoshop This hand-out will take you through the steps to render a perspective line drawing using Adobe Photoshop. The first important element in this process
Get the Max out of Your Autodesk Architectural Desktop Drawings in Autodesk VIZ
 11/30/2005-5:00 pm - 6:30 pm Room:S. Hemispheres (Salon 4) [Lab] (Dolphin) Walt Disney World Swan and Dolphin Resort Orlando, Florida Get the Max out of Your Autodesk Architectural Desktop Drawings in
Name: Date Completed: Basic Inventor Skills I
 Name: Date Completed: Basic Inventor Skills I 1. Sketch, dimension and extrude a basic shape i. Select New tab from toolbar. ii. Select Standard.ipt from dialogue box by double clicking on the icon. iii.
ACAD-BAU TUTORIAL For BricsCAD platform
 ACAD-BAU TUTORIAL WWW.ARHINOVA.SI For BricsCAD platform August 06 WORKSPACE ACAD-BAU RIBBON ACAD-BAU CONTROL BAR F ACAD-BAU PALETTES BASIC SETTINGS Use New command and open the template called ACB_International.DWT.
HDR Images in V-Ray. author: Wouter Wynen. brought to you by:
 author: Wouter Wynen brought to you by: 2006 VisMasters. All rights reserved. VisMasters and the VisMasters logo are trademarks of ArchVision, Inc. All other trademarks belong to their respective owners.
Toon Boom Harmony 16.0
 Toon Boom Harmony 16.0 Paint Application Reference Book TOON BOOM ANIMATION INC. 4200 Saint-Laurent, Suite 1020 Montreal, Quebec, Canada H2W 2R2 +1 514 278 8666 contact@toonboom.com toonboom.com Harmony
Chapter 7- Lighting & Cameras
 Chapter 7- Lighting & Cameras Cameras: By default, your scene already has one camera and that is usually all you need, but on occasion you may wish to add more cameras. You add more cameras by hitting
Materials Tutorial. Setting Materials Defaults
 Materials Tutorial Materials display on the surfaces of objects in 3D views and can make a 3D view appear highly realistic. When applied to most objects, material quantities will also be calculated in
BIM - ARCHITECTUAL IMPORTING A SCANNED PLAN
 BIM - ARCHITECTUAL IMPORTING A SCANNED PLAN INTRODUCTION In this section, we will demonstrate importing a plan created in another application. One of the most common starting points for a project is from
Using Adobe Photoshop
 Using Adobe Photoshop 6 One of the most useful features of applications like Photoshop is the ability to work with layers. allow you to have several pieces of images in the same file, which can be arranged
8 Working Drawings in AutoCAD
 8 Working Drawings in AutoCAD Most engineering designs consist of more than a single part. Usually there are a several or many parts that must fit and work together. When we are creating the drawings of
Revit Structure 2012 Basics:
 SUPPLEMENTAL FILES ON CD Revit Structure 2012 Basics: Framing and Documentation Elise Moss autodesk authorized publisher SDC PUBLICATIONS www.sdcpublications.com Schroff Development Corporation Structural
Adobe Photoshop CS5 Tutorial
 Adobe Photoshop CS5 Tutorial GETTING STARTED Adobe Photoshop CS5 is a popular image editing software that provides a work environment consistent with Adobe Illustrator, Adobe InDesign, Adobe Photoshop
Kitchen and Bath Design Tutorial
 Kitchen and Bath Design Tutorial This tutorial continues where the Interior Design Tutorial left off. You should save this tutorial using a new name to archive your previous work. The tools and techniques
This tutorial will guide you through the process of adding basic ambient sound to a Level.
 Tutorial: Adding Ambience to a Level This tutorial will guide you through the process of adding basic ambient sound to a Level. You will learn how to do the following: 1. Organize audio objects with a
Photoshop CC: Essentials
 Photoshop CC: Essentials Summary Workspace Overview... 2 Exercise Files... 2 Selection Tools... 3 Select All, Deselect, And Reselect... 3 Adding, Subtracting, and Intersecting... 3 Working with Layers...
Creating a light studio
 Creating a light studio Chapter 5, Let there be Lights, has tried to show how the different light objects you create in Cinema 4D should be based on lighting setups and techniques that are used in real-world
Applied Steel Detailing Tekla Structures 11.0 Basic Training February 10, 2005
 Tekla Structures 11.0 Basic Training February 10, 2005 Copyright 2005 Tekla Corporation Contents Contents...i 1...3 1.1 AutoConnections...4 1.2 General about the Criteria for Creating Connections...6 1.3
ThermaViz. Operating Manual. The Innovative Two-Wavelength Imaging Pyrometer
 ThermaViz The Innovative Two-Wavelength Imaging Pyrometer Operating Manual The integration of advanced optical diagnostics and intelligent materials processing for temperature measurement and process control.
Training CAD/ Part Designer: Designing with Angled Parts
 Training CAD/ Part Designer: Designing with Angled Parts We have attempted to keep the content of this document complete, accurate and under permanent review. However, due to the continuous development,
We recommend downloading the latest core installer for our software from our website. This can be found at:
 Dusk Getting Started Installing the Software We recommend downloading the latest core installer for our software from our website. This can be found at: https://www.atik-cameras.com/downloads/ Locate and
ADOBE PHOTOSHOP CS TUTORIAL
 ADOBE PHOTOSHOP CS TUTORIAL A D O B E P H O T O S H O P C S Adobe Photoshop CS is a popular image editing software that provides a work environment consistent with Adobe Illustrator, Adobe InDesign, Adobe
1/31/2010 Google's Picture Perfect Picasa
 The Picasa software lets you organize, edit, and upload your photos in quick, easy steps. Download Picasa at http://picasa.google.com You'll be prompted to accept the terms of agreement. Click I Agree.
Chapter 7- Lighting & Cameras
 Cameras: By default, your scene already has one camera and that is usually all you need, but on occasion you may wish to add more cameras. You add more cameras by hitting ShiftA, like creating all other
CC3 and Perspectives A Campaign Cartographer 3/3+ Tutorial. Part 1 - Basics
 CC3 and Perspectives A Campaign Cartographer 3/3+ Tutorial by Joachim de Ravenbel Part 1 - Basics Conventions Throughout this tutorial, I will use a color coding to clearly identify all the keywords: Sheet
Unit 7 : Image Painting, Editing and Layers
 Unit 7 : Image Painting, Editing and Layers Introduction This Unit describes about various painting tools; such as selection, cropping and measuring tools, retouching, drawing and type tools, Navigation
How to use advanced color techniques
 How to use advanced color techniques In Adobe Photoshop, you can adjust an image s colors in a variety of ways. Using the techniques described in this guide, you can take the raw material of your image
Tutorials: Lighting. Design 2010
 Tutorials: Lighting Design 2010 Autodesk 3ds Max Design 2010 Software 2009 Autodesk, Inc. All rights reserved. Except as otherwise permitted by Autodesk, Inc., this publication, or parts thereof, may not
Color Management User Guide
 Color Management User Guide Edition July 2001 Phase One A/S Roskildevej 39 DK-2000 Frederiksberg Denmark Tel +45 36 46 01 11 Fax +45 36 46 02 22 Phase One U.S. 24 Woodbine Ave Northport, New York 11768
House Design Tutorial
 House Design Tutorial This House Design Tutorial shows you how to get started on a design project. The tutorials that follow continue with the same plan. When you are finished, you will have created a
How to use advanced color techniques
 Adobe Photoshop CS5 Extended Project 6 guide How to use advanced color techniques In Adobe Photoshop CS5, you can adjust an image s colors in a variety of ways. Using the techniques described in this guide,
Ribbon (Panels) + Options Bar + Contextual Tabs (tools based on selection)
 + Options Bar + Contextual Tabs (tools based on selection)") Week 11 Revit, Basics Building Information Modeling (BIM) - Parametric 3D Model File Types: Projects RVT (template = RTE) Families - RFA (template = RFT), "Symbols" Layout Workspace - Elevation Markers
Week 11 Revit, Basics Building Information Modeling (BIM) - Parametric 3D Model File Types: Projects RVT (template = RTE) Families - RFA (template = RFT), "Symbols" Layout Workspace - Elevation Markers
MAKING THE FAN HOUSING
 Our goal is to make the following part: 39-245 RAPID PROTOTYPE DESIGN CARNEGIE MELLON UNIVERSITY SPRING 2007 MAKING THE FAN HOUSING This part is made up of two plates joined by a cylinder with holes in
Revit Structure 2014 Basics
 Revit Structure 2014 Basics Framing and Documentation Elise Moss Authorized Author SDC P U B L I C AT I O N S Better Textbooks. Lower Prices. www.sdcpublications.com Powered by TCPDF (www.tcpdf.org) Visit
Quick Start for Autodesk Inventor
 Quick Start for Autodesk Inventor Autodesk Inventor Professional is a 3D mechanical design tool with powerful solid modeling capabilities and an intuitive interface. In this lesson, you use a typical workflow
Step By Step Guide PA Hand This tutorial will take you through the following steps.
 Step By Step Guide PA Hand This tutorial will take you through the following steps. Selecting a projection PA Hand Selecting the IR/detector from the Exposure panel Room Preparation Inviting the Patient
ONYX Color Science Understanding Named Color Matching January 2013
 ONYX Color Science Understanding Named Color Matching January 2013 Named colors in Postscript and PDF workflows (sometimes referred to as spot colors) can be an important part of a printing workflow. Named
Software Manual. Doc ver
 Software Manual Product: Color Planner 4.0 / Stand-alone Language: English Doc ver. 1.13 2 Document History Tekijä Kuvaus Päivämäärä Document Versio Customer Service First release 1.6.2011 1.0 Customer
Tiling. 1. Overlapping tiles with fixed number of tiles. Tutorial
 Tutorial Tiling Software version: Asanti 3.0 Document version: April 3, 2017 This tutorial demonstrates how to use tiling within Asanti. Download the Asanti Sample Files via the Asanti Client (Help > Asanti
Anchor Block Draft Tutorial
 Anchor Block Draft Tutorial In the following tutorial you will create a drawing of the anchor block shown. The tutorial covers such topics as creating: Orthographic views Section views Auxiliary views
Chapter 6- Lighting and Cameras
 Cameras: Chapter 6- Lighting and Cameras By default, your scene already has one camera and that is usually all you need, but on occasion you may wish to add more cameras. You add more cameras by hitting
Pro/E WILDFIRE, week6
 Pro/E WILDFIRE, week6 1. Set working directory 2. File>New>Name is lbrack 3. When you create the part, make sure that the back surface of the vertical plate is on the front datum plane, and the lower surface
Siemens NX11 tutorials. The angled part
 Siemens NX11 tutorials The angled part Adaptation to NX 11 from notes from a seminar Drive-to-trial organized by IBM and GDTech. This tutorial will help you design the mechanical presented in the figure
Studio Light PRO 4.6
 Studio Light PRO 4.6 Professional Character / Studio / Prop Light for Daz Studio 4.6 USER MANUAL Updated March 23 2014 Scene lit with a single Low Rez SLP Magic Sphere and a single Low Rez SLP Angled Area
AutoDesk Inventor: Creating Working Drawings
 AutoDesk Inventor: Creating Working Drawings Inventor allows you to quickly and easily make quality working drawings from your 3D models. This tutorial will walk you through the steps in creating a working
Key Terms. Where is it Located Start > All Programs > Adobe Design Premium CS5> Adobe Photoshop CS5. Description
 Adobe Adobe Creative Suite (CS) is collection of video editing, graphic design, and web developing applications made by Adobe Systems. It includes Photoshop, InDesign, and Acrobat among other programs.
Black and White using Photoshop
 Topics to be covered: Methods for B&W conversion Improving the image Toning Printer color management Black and White using Photoshop Various ways to get to B&W Adobe Raw Converter (ACR) in from Bridge
Adobe Photoshop CC 2018 Tutorial
 Adobe Photoshop CC 2018 Tutorial GETTING STARTED Adobe Photoshop CC 2018 is a popular image editing software that provides a work environment consistent with Adobe Illustrator, Adobe InDesign, Adobe Photoshop,
Movie 10 (Chapter 17 extract) Photomerge
 Photomerge") Movie 10 (Chapter 17 extract) Adobe Photoshop CS for Photographers by Martin Evening, ISBN: 0 240 51942 6 is published by Focal Press, an imprint of Elsevier. The title will be available from early February
Movie 10 (Chapter 17 extract) Adobe Photoshop CS for Photographers by Martin Evening, ISBN: 0 240 51942 6 is published by Focal Press, an imprint of Elsevier. The title will be available from early February
How to use advanced color techniques
 Adobe Photoshop CC Guide How to use advanced color techniques In Adobe Photoshop, you can adjust an image s colors in a variety of ways. Using the techniques described in this guide, you can take the raw
Laser Cutting at CAP Fab Lab
 09/14/2015 Laser Cutting at CAP Fab Lab 1) Cut your material to 18 x 32 or smaller (or 18 x 24 for the smaller laser cutters). 2) Turn on the laser cutter (if it is not already on) by flipping the wall
Ansoft Designer Tutorial ECE 584 October, 2004
 Ansoft Designer Tutorial ECE 584 October, 2004 This tutorial will serve as an introduction to the Ansoft Designer Microwave CAD package by stepping through a simple design problem. Please note that there
An Introduction to Photoshop 6. Photoshop. retouching applications. images, Lightweight version: Photoshop Elements
 An Introduction to Photoshop 6 Gustav Taxén gustavt@nada.kth.se 2D1640 Grafik och Interaktionsprogrammering VT 2006 Photoshop One of the world s best known image retouching applications Current version
Kitchen and Bath Design Tutorial
 Adding Cabinets Chapter 5: Kitchen and Bath Design Tutorial This tutorial continues where the Materials Tutorial left off. You should save this tutorial using a new name to archive your previous work.
Adobe Photoshop CC Part 1: The Basics
 CALIFORNIA STATE UNIVERSITY, LOS ANGELES INFORMATION TECHNOLOGY SERVICES Adobe Photoshop CC Part 1: The Basics Summer 2015, Version 1.0 Table of Contents Introduction...2 New Features of Photoshop CC...2
Kitchen and Bath Design Tutorial
 Kitchen and Bath Design Tutorial This tutorial continues where the Interior Design Tutorial left off. You should save this tutorial using a new name to archive your previous work. The tools and techniques
Instructions: Editing a Photo Using Picasa 2. Allison Way and Charlie Windham ENG 313 February 27, 2008
 Instructions: Editing a Photo Using Picasa 2 Allison Way and Charlie Windham ENG 313 February 27, 2008 ABOUT THIS PICASA 2 MANUAL This manual tells you how to edit any photo using a free and downloadable
Drawing Layouts Paper space & Model Space
 Drawing Layouts Paper space & Model Space Users of Bricscad will have seen the tabs at the bottom left of the drawings area labelled: Model, Layout1, Layout2 but may not know how to use them or what they
Chapter 5 Sectional Views
 Chapter 5 Sectional Views There are a number of different types of sectional views that can be drawn. A few of the more common ones are: full sections, half sections, broken sections, rotated or revolved
For all question related to Photoshop that we cannot address in class, start by looking at the excellent Photoshop help: Help > Photoshop Help.
 AD23300 Electronic Media Studio Prof. Fabian Winkler Fall 2013 Adobe Photoshop CS6 For all question related to Photoshop that we cannot address in class, start by looking at the excellent Photoshop help:
Introduction to AutoCAD 2012
 Page 1 Introduction to AutoCAD 2012 Alf Yarwood Chapter 19 Exercise 1 1. Open AutoCAD 2012 with a double-click on its shortcut icon in the Windows desktop. 2. Open the template acadiso3d.dwt. 3. Change
General Workflow Instructions for capturing 360 images using Theta V, editing in Photoshop, and publishing to Google StreetView
 General Workflow Instructions for capturing 360 images using Theta V, editing in Photoshop, and publishing to Google StreetView This document attempts to give step-by-step instructions for capturing and
All Creative Suite Design documents are saved in the same way. Click the Save or Save As (if saving for the first time) command on the File menu to
 command on the File menu to") 1 The Application bar is new in the CS4 applications. It combines the menu bar with control buttons that allow you to perform tasks such as arranging multiple documents or changing the workspace view.
1 The Application bar is new in the CS4 applications. It combines the menu bar with control buttons that allow you to perform tasks such as arranging multiple documents or changing the workspace view.
Creo Extrude Tutorial 2: Cutting and Adding Material
 Creo Extrude Tutorial 2: Cutting and Adding Material 1. Open Creo Parametric 2. File > Open > extrudeturial (From Creo Extrude Tutorial 1) 3. Cutting Material a. Click Extrude Icon > Select the following
ArbStudio Triggers. Using Both Input & Output Trigger With ArbStudio APPLICATION BRIEF LAB912
 ArbStudio Triggers Using Both Input & Output Trigger With ArbStudio APPLICATION BRIEF LAB912 January 26, 2012 Summary ArbStudio has provision for outputting triggers synchronous with the output waveforms
You can easily print images using the Capture NX print function. Here we will explain the process for printing
 Printing - Print Size Request How do you print images to fit on particular paper sizes. Response You can easily print images using the Capture NX print function. Here we will explain the process for printing
How to create a 24 Bit Bitmap Image for use with the Digital Light Wand in Photoshop (CS4)
") How to create a 24 Bit Bitmap Image for use with the Digital Light Wand in Photoshop (CS4) The goal here is to create a BMP file that you can copy to an SD card for use in the Digital Light Wand. Since
How to create a 24 Bit Bitmap Image for use with the Digital Light Wand in Photoshop (CS4) The goal here is to create a BMP file that you can copy to an SD card for use in the Digital Light Wand. Since
Create a game in which you have to guide a parrot through scrolling pipes to score points.
 Raspberry Pi Projects Flappy Parrot Introduction Create a game in which you have to guide a parrot through scrolling pipes to score points. What you will make Click the green ag to start the game. Press
Quick Cut Outs with Photoshop Brushes
 TIP SHEET #10 Quick Cut Outs with Photoshop Brushes Compositing or rather, the process of selecting and cutting out assets from one picture and realistically adding them into another is an extremely common
A Virtual Environments Editor for Driving Scenes
 A Virtual Environments Editor for Driving Scenes Ronald R. Mourant and Sophia-Katerina Marangos Virtual Environments Laboratory, 334 Snell Engineering Center Northeastern University, Boston, MA 02115 USA