CALIBRATION OF MICROSCOPE EYEPIECE GRATICULE
|
|
|
- Margaret Patterson
- 5 years ago
- Views:
Transcription
1
2
3
4

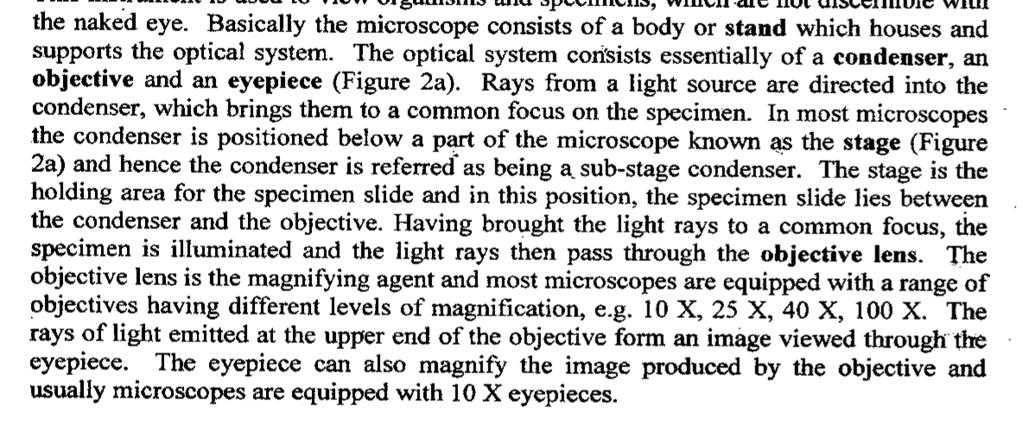
5 CALIBRATION OF MICROSCOPE EYEPIECE GRATICULE A typical eyepiece graticule looks like this: It is 10mm in length and each mm is divided into 10 parts So each small division = 0.1mm = 100µm The eyepiece graticule is located at the primary image of the microscope. So it is in focus with image of the specimen. The specimen is magnified onto the graticule by the magnification of the objective. So, the actual amount of specimen superimposed on the graticule is: 0.1mm Objective magnification Typically this gives the following calibrations (with an eyepiece graticule 10mm in 100 parts): Objective Magnification Each small division Equals (in mm) Each small division Equals in microns (µm) 4x x x x x TO CALIBRATE HOWEVER There may be small differences between one microscope and another. So to be certain of measuring the true distance it is necessary to calibrate the microscope. This is done using a stage micrometer. These have an accurate scale on them on 1mm divided into 100 parts. So each small division on a stage micrometer = 0.01mm = 10µm To calibrate the eyepiece graticule with a particular objective the stage micrometer is viewed through the microscope. The image will look something like the following with a high power objective: 0.1mm of stage micrometer corresponds to 73 small division on the eyepiece graticule. Therefore each eyepiece graticule small division = 0.1mm 73 = mm = 1.4µm Eyepiece graticule 10mm in 100 parts Stage micrometer one tenth of the scale (0.1mm) which is divided into 10 parts of 0.01mm This process should be repeated with each objective. CAUTION Some microscopes have a viewing head with an adjustable interpupillary distance which changes the tube length of the microscope. Usually each eyepiece tube can be focused to adjust the tube length (for parfocality between objectives). When calibrating it is essential to ensure the same settings on the viewing head are used for calibration and subsequent measurements.
6 Microscope Activity On the following pages you will find a copy of a microscope lab I do with my Bio 100 honors students. There have been a few, but not many modifications in this version I have given you. The purposes of this lab are: 1) To familiarize you with different types of microscopes 2) To give you practice in finding live organisms and prepared organisms on the microscope. 3) To teach you how to properly adjust a microscope for contrast and brightness 4) To give you experience in calibrating a microscope and then measuring objects under the microscope. 5) To assure that you feel comfortable using microscopes in your classroom. 6) To demonstrate safety practices for microscope use. 7) To introduce you to some current technology available for projecting microscope images through a TV or data projector. The Lab Rules for microscope use Microscopes are very expensive to replace; therefore, be particularly careful when handling. Follow these simple rules and you can protect your microscope. Use both hands to carry the microscope. Always hold it upright so that the ocular lens does not slip out. Use only clean, dry lens paper to clean dust off of the glass lenses. Do not use wet paper, paper towels, or other materials that may scratch these lenses. The lowest power objective should be in place at both the beginning and end of use. Keep the stage clean and dry to prevent slides from sticking to the stage. When slides stick the mechanical stage will not be able to move the slide around during viewing. This could break the mechanism of the mechanical stage. Do not remove parts of the microscope unless directed to do so by Dr. Firestone. Always replace the microscope to the properly numbered shelf in the microscope cabinet. Report any malfunction to Dr. Firestone IMMEDIATELY. DO NOT simply trade the defective scope for a new one. Try not to get the lenses wet during microscope use. If they do get wet. Wipe them clean with a piece of lens tissue ONLY. Care of slides: Slides and coverslips are glass. Be careful not to cut yourself when using them. Carefully clean slides before you use them, because dust or fingerprints will interfere with your ability to see a specimen. Paper towels may be used to clean slides ONLY. Dispose of broken glass or organic materials as indicated by the instructor. 1
7 Pre-lab Preparation: You should complete the following activities before coming to lab. Read through this entire exercise and make sure you understand what will be happening in lab. Study the diagram of both microscopes and familiarize yourself with the labeled parts, see if you can name them using the terms given in Objective #1 below. Objectives: 1. Be able to identify and use the following parts of the microscope correctly: coarse focus knob fine focus knob mechanical stage stage iris diaphragm ocular lens objective lens condenser lens revolving nosepiece illuminator arm condenser lens condenser lens knob 2. Define the function of the following terms in microscopy resolving power contrast depth of focus field of view parfocal capability micrometer calibration 3. Be able to properly adjust the microscope for proper contrast using three different types of adjustment. 4. Be able when given a slide, coverslip, and specimen to construct a temporary wet mount and focus on the specimen in the center of the field of view, using high power. 5. Be able to determine the approximate size of an object under low power or high power using the ocular micrometer. 6. Be able to determine the compounded magnification of a set of lenses, given the magnification of each separate lens. 7. Be able to properly clean a microscope and keep it in good working order. 8. Understand and be able to name the differences between a compound and a dissecting microscope. 9. List the purposes of a dissecting microscope and recognize situations in which a compound microscope is preferred over a dissecting microscope and vice versa. 2
8 Introduction: Biological study includes the microscopic examination of many organisms. During the course of this semester, we will be examining organisms and parts of organisms that will require the use of the microscope. In this lab you will learn the correct terminology and techniques needed for efficient utilization of the light microscope. In addition to giving you training in proper microscope usage, this exercise will provide an opportunity to practice using a microscope. MICROSCOPE PART FUNCTION Coarse focus knob Fine focus knob Mechanical stage Stage Iris diaphragm Ocular lens Objective lens Condenser lens Revolving nosepiece Illuminator Arm Condenser lens 3

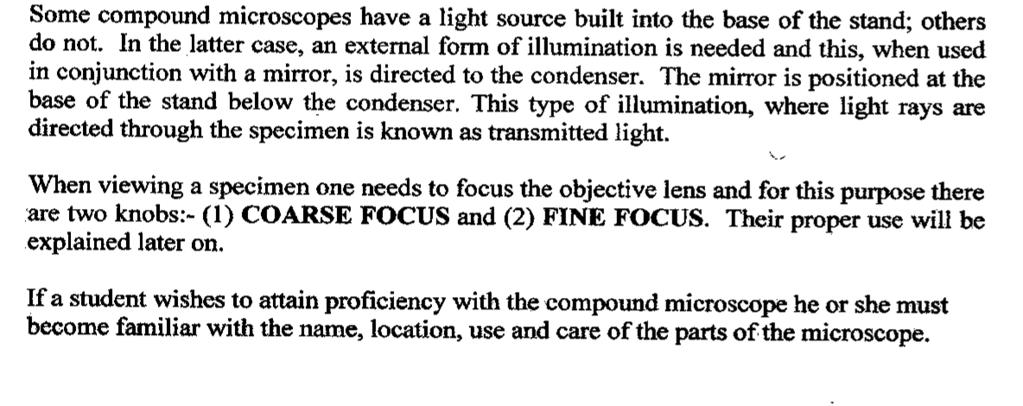
9 Exercise #1 Identifying and describing parts of a light microscope. Label the parts of the microscope below and describe the function of each in the table following: A H B C I D D K M G F K Figure 3.1 Labeled Photograph of Graf Apsco microscope. 4

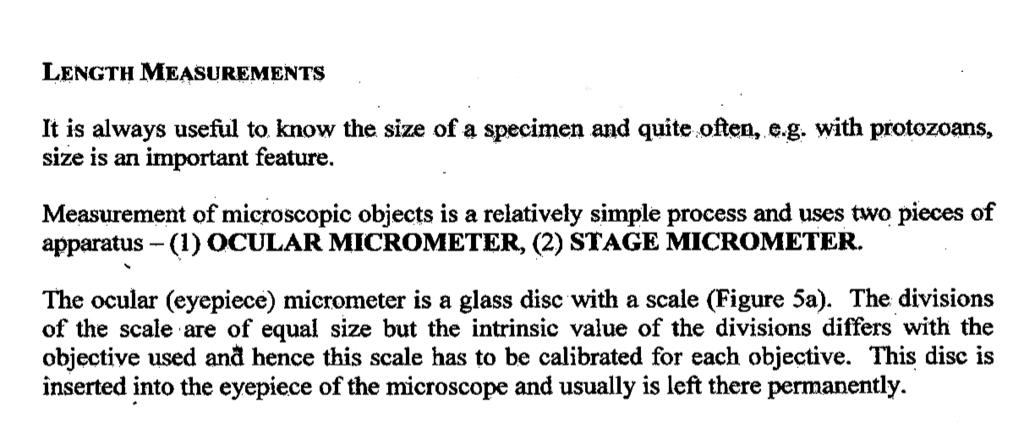
10 EXERCISE #1 PARTS OF THE MICROSCOPE Identifying and describing the parts of a light microscope. Label the parts of the microscope below and describe the function of each in the table following. M Figure 3.2 Diagram of the Swift M400D binocular microscope 5
11 Exercise #2 MAGNIFICATION THROUGH THE MICROSCOPE Your microscope is capable of four powers of magnification, based on the four objective lenses found on your microscope. You have objective lenses of 3x; 10x; 44x or 40x and 100x. Your ocular lens, or eyepiece, has a magnification of 10x. In order to calculate the total magnification when viewing a specimen, you simply multiply the ocular lens magnification by the objective lens magnification. For example, when the shortest, or 3.5x objective, is in place you will be viewing the specimen at a magnification of 35x (3.5 * 10). Calculate the power for each of your objective lenses and list them below: 3.5x objective 35x 10x objective 40 OR 44x objective 100x objective Exercise #3 only properly cleaned microscopes will give proper results. Activity Cleaning and care of your microscope Take a few minutes right now to clean your microscope as best you can so that you will be sure to have a properly functioning microscope. Do the following tasks in order. As it is demonstrated by your instructor, unscrew each objective lens one at a time and carefully wipe the lens with a lens paper. We will ONLY DO THIS ON THE FIRST USE OF THE SEMESTER, after that it will only be done as needed, AFTER OBTAINING PERMISSION TO DO SO FROM THE INSTRUCTOR. Check that the mechanical stage is moving smoothly in both directions. Clean off the stage with a damp paper towel and then dry it off thoroughly Check that the condenser lens is clean by bringing it up as close to the stage as possible and looking through the hole in the stage. Clean it with a dry lens paper ONLY, if necessary. Make sure that the condenser raises and lowers smoothly and stays in position where you leave it without sinking down away from the stage on its own. Check your ocular lens for visible dust or dirt and wipe it off with a clean, dry piece of lens tissue. Report any microscope problems to Dr. Firestone immediately. Exercise # 4 PROPER USE OF THE MICROSCOPE. Before we begin your practice of using the microscope to examine several objects today, you need to understand a few more terms that refer to the microscope and its proper use. In this exercise we will learn these terms and you will learn how to properly clean and care for your microscope. In this exercise we will learn about: how to view and focus on objects under the microscope proper contrast adjustment 6
12 resolving power of the microscope field of view depth of field or depth of focus calibration of your ocular micrometers Part A. Viewing and Focusing: follow along on your microscope as this is discussed Before you attempt to view any specimen through the microscope today, you must learn the correct PROCEDURE FOR VIEWING a slide. This procedure should be followed for every new slide you view. Do all Exercise 4 activities with both the Graf-Apsco and Swift microscopes. Activity 1 First, rotate the low-power objective lens (remember this is the shortest lens) into position directly over the opening in the stage. Next, watch the stage and objective lens from alongside (not through) the microscope and turn the coarse adjustment knob to bring the lens and stage as close together as possible. Based upon your observation of microscope movements, and without having a slide on your stage yet, determine the direction of coarse adjustment knob rotation you should use to move glass away from glass. The remainder of these instructions should be followed explicitly when viewing all slides. Each time you change slides follow the remaining steps from the beginning. Next place a prepared slide of bacteria types on the stage. Center your specimen over the stage aperture (opening). Position the low-power lens over the slide. Make the distance between the specimen and the low-power lens look as small as possible. While looking through the ocular lens, turn the coarse adjustment knob to move the objective lens away from the specimen until a part of the specimen comes into focus. (It may be necessary to also move the slide around a little using the mechanical stage so that you can find the specimen). This may take practice. If you have trouble please ask for help! Center the specimen in the field of view. Switch to high power and sharpen the focus with the fine adjustment knob only. Never use the coarse adjustment knob when viewing slides through the eyepiece. Use only the fine focus knob when using all objectives lenses except the 3.5x or 10x objective lenses. NOTES: Most of these microscopes should be parfocal. This means that when you focus on a specimen under low power, you should be able to see it when you switch to a higher power by just a slight adjustment of the fine focus knob. If you have trouble finding specimens on higher power using just the fine focus, notify the instructor or lab assistant for help! Keep both eyes open even though only one is used in the monocular, compound microscope. After a short while, you can get accustomed to ignoring impressions coming from the free eye. Squinting leads to muscle fatigue. 7
13 Part B. Proper contrast adjustment of the microscope. Adjusting the contrast properly allows you to distinguish better between the object you are observing and the background. There are three potential parts of the microscope that can be used to properly adjust the microscope for proper light and contrast of the specimen. Two of these are available on your microscope. Activity 2 STEP ONE: IRIS DIAPHRAGM ADJUSTMENT. Locate the condenser lens underneath the microscope stage. Locate the knob which moves the lens up and down. Raise the condenser lens as far up toward the stage as it will go. You are now ready to adjust the iris diaphragm. The iris diaphragm regulates the amount of light passing through the stage aperture and specimen. We will first adjust the diaphragm to obtain optimal lighting. With your slide still on the stage, the 10x objective in place, and the light on, remove the ocular lens from you microscope. Look down through the tube of the microscope at the light. As you are looking at the light move the iris diaphragm lever back and forth and see what happens to the light. First close the iris diaphragm down so you see only a pinhole of light. To properly adjust the iris diaphragm, slide the lever until you see the microscope tube just fill evenly with light. STEP TWO: CONDENSER LENS ADJUSTMENT The condenser lens focuses the light up through the stage and onto the specimen. The condenser lens must be properly positioned to obtain maximum contrast when viewing the specimen. PROCEDURE FOR PROPER POSITIONING OF CONDENSER LENS IN BLACK SCOPES Focus on a slide using the 10x objective lens. Use the condenser lens knob to move the condenser lens as close to the stage as possible. While looking through the eyepiece, slowly move the condenser lens away from the stage. As you do this you will see a granular background appear at one point. Continue to move the condenser away slowly just until the graininess disappears. This is the optimum adjustment. PROCEDURE FOR PROPER POSITIONING OF CONDENSER LENS IN SWIFT SCOPES Unlike the black Graf- Apsco scopes the Swift scopes do not show the graininess as described above. The best way to adjust these scopes is to 1) Move the condesor lens all the way up to the stage 2) Look through the scope at a specimen you already have in focus and SLOWLY move the condesor lens down until you get the sharpest view possible. STEP THREE: RHEOSTAT ADJUSTMENT A third possible adjustment for light and contrast is the rheostat on the light source itself. Only the Swift microscopes have a rheostat adjustment available. 8

14 The rheostat controls the amount of current flowing into the bulb. This allows the light to be dimmed or brightened. This can allow the observer yet another means to control the amount of light reaching the specimen and therefore allow a control over contrast. After focusing a specimen on the microscope, move the Rheostat adjustment until you have the best contrast possible. Notice that less light usually gives better contrast. Part C. Resolving power Resolving power is a measure of lens quality. Quality lenses have a high resolving power, which is the capacity to deliver a clear image in fine detail. If a lens has a high magnifying power but a low resolving power, it is of little value. Although the image may be large, it will not be clear enough to show fine detail. Use of a blue filter between the illuminator and the condenser lens helps to increase the resolving power. The higher the resolving power of a lens, the better the lens is at distinguishing two objects from each other when they are close together. Another factor that influences resolving power is the cleanliness of the lenses. Dirt, water, or oil on the lens may scatter light and reduce the effective resolving power of the microscope. Therefore, lenses should always be kept clean. Use only lens paper to clean the lens. Part D. Field of View You have already learned that lenses have different magnifying powers, but it is also important to understand that each lens will have a particular field of view. The field of view is the size of the area that can be seen through the microscope. The larger the magnifying power of an objective lens the smaller the area viewed when looking through the microscope. This is sometimes hard to appreciate since to you the observer the size of the circle of light you see through the ocular lens appear the same for all powers of objective lenses. When you switch from low power to high power, however, you are actually looking at the central portion of what was visible under low power. Therefore, it is important to center the specimen on low power before making the switch to high power. Part E. Depth of field or focus The vertical distance that remains in focus at one time is called the depth of focus. Figure 3.3 below demonstrates how focusing on an object at different depths 1,2, and 3 would produce three different images under the microscope. 1 2 Figure 3.3 What the image would look like if the microscope is focused in at various depths in a three dimensional object. 3 9
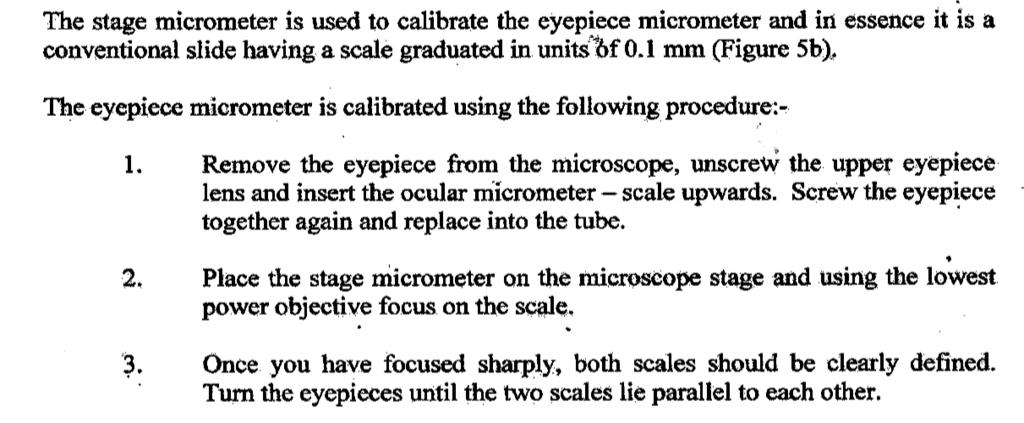
15 Activity 3 Obtain a slide of 3 threads (red, yellow, and blue) which are overlapped on a slide. Using your choice of microscope. Determine the order in which the 3 threads were place on the slide from bottom to top. Bottom Middle Top Part F. Calibration of your ocular micrometer The ocular micrometer provides a means to estimate very closely the size of organisms viewed under the microscope. An ocular micrometer is a small glass disk onto which have been etched lines that are an unknown distance apart ( The distance between lines on the ocular micrometer will represent different distances depending on the total magnification being used) The ocular micrometer is permanently inserted in the eyepiece of the microscope you will be using today. Before the ocular micrometer can be used to measure anything, it must be calibrated against a stage micrometer. A stage micrometer has lines etched at known distances. Both ocular and stage micrometers are fairly expensive (between $50 and $150 each). Therefore, we will be doing this calibration together as an entire class using a microscope with a camera attached. (As a teacher you could do this for your students explain how it works and then simply explain how they can use this to measure objects under the microscope.) In this Bio 405 class you will have the opportunity to do the calibration yourself after a demonstration is given. PROCEDURE FOR CALIBRATING AN OCULAR MICROMETER Refer to Figure3.4 to see how the ocular and stage micrometers are used in calibration as you read the following description of the procedure. Calibration steps: 1. Rotate the eyepiece until the lines of the ocular micrometer are parallel to those on the stage micrometer. 2. Align lines at the left edges by moving the stage micrometer and rotating the ocular lens. 3. Find a place where the ocular lines and the stage lines line up perfectly For an example see Figure 3.4 c. This figure shows ( by the dotted line) that the 22 nd line on the ocular micrometer lines up exactly with the 13 th line on the stage micrometer. 4. On the teacher demonstration using the 3.5x objective lens, count how many spaces on the stage micrometer fit precisely into a given number of spaces on the ocular micrometer. Record the values below: # of ocular spaces # of stage spaces 4. The smallest space on a stage micrometer is equal to 0.01 mm. To calculate the distance between the lines on the ocular micrometer at this magnification power, use the following formula: # ocular spaces (mm/space) = # stage spaces (.01mm/space) 1 ocular space (mm) = (x/y) (.01mm) 5. Calibrate the ocular micrometer for each of the objective lenses on your microscope. 10x lens ocular spaces = stage spaces = 40x or 44x lens ocular spaces = stage spaces = Can you determine the calibration for a 100 power objective lens using the above information? Do it! Show your work. 10

16 a b Ocular Stage Figure 3.4 Both ocular and stage micrometers are needed to calibrate the ocular micrometer. The unknown lines on the ocular micrometer are lined up with the known distance lines on the stage micrometer and then the ocular line distances are calibrated for each objective lens magnification. c Exercise # 5 Practice using the microscope Practice in using the microscope. In this exercise you will have the opportunity to practice using the microscope, preparing wet mount slides, and measuring items with your ocular micrometer. You will examine a leaf from a water plant - Elodea 11


17 Proper Wet-mount slide preparation Coverslip Water Figure 3.4 How to make a wet-mount slide Slide Elodea leaf. Procedure for observing Elodea. Make a wet-mount slide of a piece of an Elodea leaf. 1. Place one Elodea leaf from near the tip of the stem on a slide in a drop of water. 2. Add a coverslip as shown above Try to avoid trapping air bubbles on the leaf surface. 3. Focus on the Elodea cells at scanning (35) power, then at low power and finally at 440 power. 4. With the 44x objective in place, move the fine focus knob up and down to see through the different planes of focus and to examine the entire thickness of a cell. 5. Find a single chloroplast inside one of the leaves and measure its length using your ocular micrometer. Magnification used Number of ocular spaces per chloroplast Actual length of chloroplast. Figure 3.5. Two views of the Elodea leaf under a compound microscope. Left a view at approximately 100x and on the right one cell viewed at approximately x. Cytoplasm Nucleus Cell Wall Cell wall Chloroplast Central vacuole Cytoplasm 12
18 Exercise #6 Dissecting or stereoscopes In this lab you will have 2 types of dissecting microscopes available. Activity 1 Examine both microscopes and identify the following: Ocular lenses objective lenses light source incident vs transmitted light magnification or magnification range available Activity 2 Take the flower provided and dissect it under the Meiji dissecting microscope. Is it easier to use incident, transmitted or both types of light? Draw and label a picture of your flower s structure. Make sure to label all of the following: sepals petals stamens filaments anthers pistil carpels style stigma receptacle 13
Match the microscope structures given in the left column with the statements in the right column that identify or describe them.
 49 Prelab for Name Match the microscope structures given in the left column with the statements in the right column that identify or describe them. Key: a. coarse adjustment knob f. turret or nosepiece
Laboratory Introduction
 Laboratory Introduction There are two basic categories of microscopes: light microscopes and electron microscopes. Light, or optical, microscopes require light waves to provide the illumination while electron
Lab: The Compound Microscope
 Lab: The Compound Microscope Purpose: To learn the parts of the compound microscope and to learn the basic skills needed to use the microscope properly. Materials: Microscope Colored paper Cover slips
Anatomy: Introduction to the Light Microscope
 Anatomy: Introduction to the Light Microscope Background: Microscopes are very important tools in biology. The term microscope can be translated as to view the tiny, because microscopes are used to study
Using a Compound Light Microscope
 Name Class Date Laboratory Skills 5 Using a Compound Light Microscope Introduction Many objects are too small to be seen by the eye alone. They can be seen, however, with the use of an instrument that
MICROSCOPY and CELL STRUCTURE
 MICROSCOPY and CELL STRUCTURE Readings: Review pp. 69-71, and Fig. 4.1 on p. 65 in your text (POHS, 5 th ed.). Introduction: Biologists rely on many different types of microscopic techniques to find out
Basic Microscopy for Plant Biology
 Page 1 of 8 Basic Microscopy for Plant Biology OBJECTIVES After completing this exercise, you should be able to do the following: a. Name the parts of the compound microscope and the functions of each.
Bio 252: Microscopy Study THE COMPOUND MICROSCOPE
 Name: Date: Block: Microscope Number: Bio 252: Microscopy Study THE COMPOUND MICROSCOPE I. Introduction The compound microscope is one of the most important instruments used by biologists today. Through
MICROSCOPY MICROSCOPE TERMINOLOGY
 1 MICROSCOPY Most of the microorganisms that we talk about in this class are too small to be seen with the naked eye. The instruments we will use to visualize these microbes are microscopes. The laboratory
Marine Invertebrate Zoology Microscope Introduction
 Marine Invertebrate Zoology Microscope Introduction Introduction A laboratory tool that has become almost synonymous with biology is the microscope. As an extension of your eyes, the microscope is one
Exercise 2-A MICROSCOPIC TECHNIQUE & EXAMINATION OF MICROORGANISMS
 Exercise 2-A MICROSCOPIC TECHNIQUE & EXAMINATION OF MICROORGANISMS Introduction to Microscopic Technique Microbiology is the science or study of living organisms too small to be seen with the naked eye.
Exercise 2-A MICROSCOPIC TECHNIQUE & EXAMINATION OF MICROORGANISMS
 Exercise 2-A MICROSCOPIC TECHNIQUE & EXAMINATION OF MICROORGANISMS Introduction to Microscopic Technique Microbiology is the science or study of living organisms too small to be seen with the naked eye.
Basic Microscopy. OBJECTIVES After completing this exercise, you should be able to do the following:
 Page 1 of 10 Basic Microscopy OBJECTIVES After completing this exercise, you should be able to do the following: a. Name the parts of the compound microscope and the functions of each. b. Describe how
MICROSCOPE LAB. Resolving Power How well specimen detail is preserved during the magnifying process.
 AP BIOLOGY Cells ACTIVITY #2 MICROSCOPE LAB OBJECTIVES 1. Demonstrate proper care and use of a compound microscope. 2. Identify the parts of the microscope and describe the function of each part. 3. Compare
Microbiology Laboratory 2
 Microbiology Laboratory 2 Microscopy Background Microorganisms are too small to be seen with the naked eye. Thus a microscope is used to magnify objects so they can be observed. A lens consists of one
STRUCTURE OF THE MICROSCOPE
 STRUCTURE OF THE MICROSCOPE Use the word list to label the microscope below: Light Source Coarse adjustment knob Diaphragm Stage Clips Objectives Fine Adjustment Knob Base Stage Stage Clips Arm Revolving
Visual Anatomy ansd Physiology Lab Manual Pig Version 2nd Edition Sarikas TEST BANK
 Visual Anatomy ansd Physiology Lab Manual Pig Version 2nd Edition Sarikas TEST BANK https://testbankreal.com/download/visual-anatomy-ansd-physiology-labmanual-pig-version-2nd-edition-sarikas-test-bank/
Introduction. Instructional Objectives. Materials. Procedure. I. Microscope Parts and Function. Honors Biology
 Honors Biology Introduction to the Microscope Lab Activity This lab was created by Mr. Buckley from Edward Knox High School. Credit is given for this original activity to Mr. Buckley. Introduction "Micro"
LAB ACTIVITY: USING A MICROSCOPE
 Name: Date: Period: Lab Partner(s): LAB ACTIVITY: USING A MICROSCOPE Objectives: Demonstrate the proper use and care of a compound light microscope and stereomicroscope. Focus the compound light microscope
Introduction to the Compound Microscope Cell Structure & Function
 Introduction to the Compound Microscope Cell Structure & Function Revised Fall 2018 Laboratory Safety Lab coat, long pants, closed-toe shoes, safety goggles, and nitrile or latex gloves are required. **You
Lab: Using a Compound Light Microscope
 Name Date Period Lab: Using a Compound Light Microscope Background: Microscopes are very important tools in biology. The term microscope can be translated as to view the tiny, because microscopes are used
Biology 29 Cell Structure and Function Spring, 2009 Springer LABORATORY 1: THE LIGHT MICROSCOPE
 Biology 29 Cell Structure and Function Spring, 2009 Springer LABORATORY 1: THE LIGHT MICROSCOPE Prior to lab: 1) Read these instructions (p 1-6) 2) Go through the online tutorial, the microscopy pre-lab
The microscope is useful in making observations and collecting data in scientific experiments. Microscopy involves three basic concepts:
 AP BIOLOGY Chapter 6 NAME DATE Block MICROSCOPE LAB PART I: COMPOUND MICROSCOPE OBJECTIVES: After completing this exercise you should be able to: Demonstrate proper care and use of a compound microscope.
Microscope (and The Cell) Lab Exercise #1
 Lab Exercise #1") Lab Safety-General No eating or drinking Only registered students allowed in the class Long hair must be tied back Familiarize yourself with the emergency stations Do not mark on the models Inform me of
Lab Safety-General No eating or drinking Only registered students allowed in the class Long hair must be tied back Familiarize yourself with the emergency stations Do not mark on the models Inform me of
The invention of the microscope made it possible for scientists to view and study cells. Cells the basic units of all living organisms.
 The Discovery of Cells The invention of the microscope made it possible for scientists to view and study cells. Cells the basic units of all living organisms. The Cell Theory All living things are made
The microscope is useful in making observations and collecting data in scientific experiments. Microscopy involves three basic concepts:
 Lab #4 Biology 10 BCC Topic: MICROSCOPE LAB PART I: COMPOUND LIGHT MICROSCOPE OBJECTIVES: After completing this exercise you should be able to: Demonstrate proper care and use of a compound microscope.
Care and Use of the Compound Light Microscope
 EXERCISE 2 Care and Use of the Compound Light Microscope Time Estimates for Completing This Lab The activities in this laboratory exercise can be completed in 2 to 2.5 hours. Extra time will be required
Perfecting Microscope Skills
 I. Introduction to the Microscope Perfecting Microscope Skills There are different types of microscopes used by biologists depending on the job they wish to accomplish, including dissecting (or "stereoscopic")
AN INTRODUCTION TO THE MICROSCOPE
 AN INTRODUCTION TO THE MICROSCOPE INTRODUCTION In this exercise you will learn the components and operation of the compound microscope and the dissection microscope. This will be followed by a short exercise
Using a Compound Light Microscope Lab Pre-Lab Assignment
 Name: Block: Due Date: Using a Compound Light Microscope Lab Pre-Lab Assignment Pre-Lab Assignment This assignment must be completed by the next class period in order to be allowed to participate in the
BIOLOGY 1101 LAB 2: MICROSCOPES AND CELLS
 BIOLOGY 1101 LAB 2: MICROSCOPES AND CELLS READING: Please read Chapter 4 in your text book to learn about the history of microscopy and basic cell structure. INTRODUCTION: The microscope is an important
Microscope Review. 1. A compound light microscope is represented in the diagram below.
 Name Microscope Review Date 1. A compound light microscope is represented in the diagram below. 5. The diagram below represents a hydra as viewed with a compound light microscope. If the hydra moves toward
USING THE MICROSCOPE TO OBSERVE CELLS
 USING THE MICROSCOPE TO OBSERVE CELLS *****IMPORTANT!!!!! BEFORE VISITING YOUR LEARNING CENTER TO CARRY OUT THIS LAB ACTIVITY PLEASE READ BELOW Before you visit your Learning Center to use the microscope,
Key Points Refer to How to Use the Compound Light Microscope :
 MODULE 1 Objective 1.2 Lesson B Introduction to the Microscope Using the Light Microscope and Slide Preparation Course Advanced Biotechnology Unit Biotech Basics Essential Question How do scientists view
A BRIEF INTRODUCTION TO MICROSCOPY The two key properties of a microscope that allow you to see microbes are resolution and magnification.
 A BRIEF INTRODUCTION TO MICROSCOPY The two key properties of a microscope that allow you to see microbes are resolution and magnification. Magnification refers to the enlargement of the specimen when seen
SWIFT SERIES M2252DGL MICROSCOPE
 SWIFT SERIES M2252DGL MICROSCOPE The M2252DGL Series is ideal for elementary to high school classrooms. Built to withstand student use, this series has locked-on eyepieces, objectives, illuminator housing
Components of the Microscope
 Swift M3 Microscope The Swift M3 is a versatile microscope designed for both microscopic (high magnification, small field of view) and macroscopic (low magnification, large field of view) applications.
EXERCISE 3 The Microscope
 Instant download and all chapters Solutions Manual Human Anatomy Laboratory Manual with Cat Dissections 7th Edition Marieb Smith https://testbankdata.com/download/solutions-manual-human-anatomy-laboratorymanual-cat-dissections-7th-edition-marieb-smith/
Laboratory 2: Microscopy and Observation of Cells authors: Dr. Ruth Dahlquist-Willard & Michael Kunz
 Laboratory 2: Microscopy and Observation of Cells authors: Dr. Ruth Dahlquist-Willard & Michael Kunz Corresponding Readings: Campbell Ch. 4 BIOL-100L Safety Information: We will be using laboratory glassware
The light microscope
 What is a microscope? The microscope is an essential tool in modern biology. It allows us to view structural details of organs, tissue, and cells not visible to the naked eye. The microscope should always
Swift M10 Series Microscope Use and Care Manual
 Swift M10 Series Microscope Use and Care Manual SWIFT OPTICAL Enduring Quality and Technical Excellence SWIFT M10 SERIES (Non-digital) Your Swift M10 microscope is an instrument of precision, both optically
THE COMPOUND BRIGHTFIELD MICROSCOPE
 THE COMPOUND BRIGHTFIELD MICROSCOPE Microbiology is the study of microscopic organisms that are so small that they are below the limit of vision of the human eye. Bacteria are the smallest of microorganisms
Introduction to Microscopes
 INTRODUCTION TO THE MICROSCOPE Introduction to Microscopes The first microscopes worked by the same basic principle as the ones you will be using in lab. They are light microscopes. Visible light passes
Microscopy Primer. Fig A compound light microscope with important parts labeled.
 BIOL 221 Concepts of Botany Fall 2010 Microscopy Primer A. Introduction: The microscope is a vital scientific tool that will be used often to study plants. We shall begin our studies of plants with a brief
Microscopes & cells. 2. arm. 3. ocular lens. 4. objective lenses. 5. stage. 6. slide clamp. 7. stage controls
 Microscopes & cells Objectives: At the end of this lab you should be able to: o demonstrate the safe and proper handling of a microscope, including carrying a microscope, slide placement, and storage.
used for low power magnification of a sample image is 3 dimensional
 MICROSCOPES One of the most important inventions in the advancement of Biology 1. Simple Microscopes ie. magnifying glass, stereoscope (dissecting scope) have a single lens or a pair of lenses combined
Ocular Lenses. Head. Arm. Objective Lenses. Slide Holder Stage. On / Off Switch. Condenser with Iris Diaphragm. Light Intensity Control
 BIOLOGY 211: HUMAN ANATOMY & PHYSIOLOGY ********************************************************************************************************* USE OF THE LIGHT MICROSCOPE **********************************************************************************************************
Name: Period: Week of: January 21st-25th Root Words In-Class Homework. Picture: -Microscope Notes -Lesson on Focusing the Microscope
 Day 1/21: Monday Biology Week #21 Week of: January 21st-25th Root Words In-Class Homework Word: Definition: As in: - Picture: NO SCHOOL: MLK Day 1/22: Tuesday Word: Definition: As in: - Picture: -Microscope
Name: Date Completed: Class: Lab Minutes: Teacher:
 Name: Date Completed: _ Class: Lab Minutes: _ Teacher: Introduction to the Microscope Lab Activity This lab was created by Mr. Buckley from Edward Knox High School. Credit is given for this original activity
Microscopy. Danil Hammoudi.MD
 Microscopy Danil Hammoudi.MD Care and Handling of the Microscope: A microscope is a delicate piece of equipment and should be treated with care. Use two hands when carrying the microscope. Place one hand
Name Date Block LAB: Exploring Plant & Animal Cells
 Name Date Block LAB: Exploring Plant & Animal Cells Background Information: One of the first scientists to look at cells under a microscope was an English scientist by the name of Robert Hooke. He viewed
Microscope Tutorial. How to use a compound microscope
 Microscope Tutorial How to use a compound microscope Read this first Microscopes are extremely delicate and extremely expensive! You MUST be extremely careful when using the microscope. Always hold the
LAB 1 Introduction to Microscopy
 I. Ubiquity of Microorganisms II. Microscopy LAB 1 Introduction to Microscopy I. UBIQUITY OF MICROORGANISMS Microorganisms are ubiquitous; that is, they are present nearly everywhere. In this lab you will
History of microscopy
 History of microscopy Introduction Structure of microscope Care of microscope Use of microscope Magnification As we already know cells are microscopic. What does this mean? Scientists were able to see
Microscope Skills. Scientific Skills the Microscope!
 Microscope Skills Scientific Skills the Microscope! T. Trimpe 2005 http://sciencespot.net/ Body Tube Ocular lens (Eyepiece) Nosepiece Objectives Stage Clips Diaphragm Light Always carry a microscope with
The Care and Use of the Microscope. Lab Exercise #4
 Lab Safety No eating or drinking!!! Long hair must be tied back Clean up your workstation before you leave! Return all materials to the storage sites Clean glassware and wipe down countertops Follow directions
Zoom Stereo Microscope NYMCS-360 Instruction Manual
 Zoom Stereo Microscope NYMCS-60 Instruction Manual This manual is written for stereo microscope NYMCS-60. To ensure the safety, obtain optimum performance and to familiarize yourself fully with the use
How to Use a Microscope
 How to Use a Microscope Overview Welcome to our unit on microscopes! We re going to learn how to use our microscope to make things appear larger so we can study them more easily. If you ve ever wondered
ML7520 ML7530 DIOPTER ADJUSTMENT RING BINOCULAR BODY, INCLINED 30. (a) Field Iris Control Lever. (c) Filter Slots EYEPIECES, KHW10X
 Field Iris Control Lever. (c) Filter Slots EYEPIECES, KHW10X") JAPAN DIOPTER ADJUSTMENT RING BINOCULAR BODY, INCLINED 30 (a) Field Iris Control Lever (c) Filter Slots EYEPIECES, KHW10X ANALYZER CONTROL LEVER (b) Aperture Iris Control Lever LIGHT SOURCE HOUSING VERTICAL
JAPAN DIOPTER ADJUSTMENT RING BINOCULAR BODY, INCLINED 30 (a) Field Iris Control Lever (c) Filter Slots EYEPIECES, KHW10X ANALYZER CONTROL LEVER (b) Aperture Iris Control Lever LIGHT SOURCE HOUSING VERTICAL
Swift M2252DGL Series Microscope Use and Care Manual
 Swift M2252DGL Series Microscope Use and Care Manual SWIFT OPTICAL Enduring Quality and Technical Excellence 1 Swift Series M2252DGL Microscope The M2252DGL Series is ideal for elementary to high school
What is it? Study the mystery photos and try to identify each one! Have access to a computer?
 Station 1 Solve the Mystery What is it? Study the mystery photos and try to identify each one! They are all common objects that might be found in your home or a classroom. Write your guesses for the mystery
Microscope - Exercise 1
 Microscope - Exercise 1 Objectives -Familiarize parts and functions of the microscope. -Calculate total magnifications. -Determining the Diameter of the field of view for different magnifications. -Estimate
Physiology Honors Interactive Notebook
 0 Foothill Technology High School Physiology Honors Interactive Notebook DEPARTMENT STATEMENT: Students will actively experience science both the concepts and practices of the disciplines. Science requires
1.When an object is sharply focused and the slide is moved towards you, in which direction does the
 image upright or inverted? Name: Date: _ BIOLOGY EXPERIMENT:Class: Using a Compound Light Microscope II: Depth Perception, resolution, field of view MATERIALS: Compound light microscopecolor magazine clipping
Swift M2250 Series Microscope Care and Use Manual
 Swift M2250 Series Microscope Care and Use Manual SWIFT OPTICAL Enduring Quality and Technical Excellence. Swift Series M2250 Microscope The M2250 Series is ideal for elementary to high school classrooms.
Eyepieces KHW10X. Diopter Adjustment Ring. Binocular Body Inclined 30. Binocular Clamp Screw. Analyzer control Lever. Reflected Light Illuminator
 JAPAN Eyepieces KHW10X Diopter Adjustment Ring Binocular Body Inclined 30 Binocular Clamp Screw Analyzer control Lever Reflected Light Illuminator Ball-Bearing Objective Nosepiece Objectives Large Scan
Unit Two Part II MICROSCOPY
 Unit Two Part II MICROSCOPY AVERETT 1 0 /9/2013 1 MICROSCOPES Microscopes are devices that produce magnified images of structures that are too small to see with the unaided eye Humans cannot see objects
Biology Lab #1: Using Microscopes to Observe and Measure Cells
 Biology Lab #1: Using Microscopes to Observe and Measure Cells Make sure you have signed and submitted the CDNIS Safety Contract before you start this experiment! PURPOSE: to review the use of the microscope
1. A laboratory technique is illustrated in the diagram below. Explain why the coverslip is lowered at an angle.
 1. A laboratory technique is illustrated in the diagram below. Explain why the coverslip is lowered at an angle. 2. Base your answer to the following question on Which laboratory procedure is represented
Microscope Labs #1 and #2 e Lab and Hair Lab. Day 1 - e Lab
 Name: Date: Microscope Labs #1 and #2 e Lab and Hair Lab Day 1 - e Lab Purpose: To study the image formed by the microscope Procedure: You may begin once you go to the lab area! A. Preparation of the slide
Swift M3600, M3700 Series Digital & Compound Microscope
 Swift M3600, M3700 Series Digital & Compound Microscope Use and Care Manual SWIFT OPTICAL Enduring Quality and Technical Excellence 2 Eyepiece Head Arm Nosepiece Objective Stage Iris Diaphragm Illuminator
TEKSCOPE MICROSCOPE. Models N2 Series USER S MANUAL
 TEKSCOPE MICROSCOPE Models N2 Series USER S MANUAL Contents Before use 1 1.Nomenclature. 2 2.Operation 4 2-1 Angle of observation.. 4 2-2 Set the specimen slide.. 4 2-3 Set illumination 4 2-4 Adjust focus
MICROSCOPE (3 x 2 hour lesson)
") MICROSCOPE (3 x 2 hour lesson) 1ST WEEK (2 HOUR): PRINCIPLE OF MICROSCOPE AND BASIC QUIZ Principle of microscope Make a simple microscope using two convex lenses to learn the principle of microscope. Identification
MICROSCOPE (3 x 2 hour lesson) 1ST WEEK (2 HOUR): PRINCIPLE OF MICROSCOPE AND BASIC QUIZ Principle of microscope Make a simple microscope using two convex lenses to learn the principle of microscope. Identification
UNIT: THE MICROSCOPE AND CELLULAR DIVERSITY
 Course: Biology Agricultural Science & Technology UNIT: THE MICROSCOPE AND CELLULAR DIVERSITY State Standard: State Objectives: Unit Objectives: A. Learn how to use the compound microscope. B. Learn the
If your worksheet is completed, get a sticker from a helper. You may check your answers and fix anything you missed.
 T. Tomm Updated 2015 http://sciencespot.net/ Images from http://www.tnmanning.com/id150.htm If your worksheet is completed, get a sticker from a helper. You may check your answers and fix anything you
Cells Unit GOALS AND OBJECTIVES. The student will become familiar with the use of the compound microscope.
 Cells Unit GOALS AND OBJECTIVES GOALS The student will become familiar with the use of the compound microscope. The student will become familiar with the basic parts and functions of the cell. OBJECTIVES
PROPER USE OF LAB EQUIPMENT and DATA ANALYSIS SKILLS
 PROPER USE OF LAB EQUIPMENT and DATA ANALYSIS SKILLS Introduction: A good scientist must be able to use scientific tools to make accurate observations. While studying science in this class, you will be
Swift M10D Series Microscope Use and Care Manual
 Swift M10D Series Microscope Use and Care Manual SWIFT OPTICAL Enduring Quality and Technical Excellence SWIFT M10D SERIES (with 3MP built-in digital camera) The Swift M10D microscope is equipped with
What you should have learned from the microscope labs.
 What you should have learned from the microscope labs. Microscope Lab 1 Directionality Items appear backwards and inverted On Stage In Microscope NOT!!!! Microscope Lab 1 More Directionality Items move
Using Microscopes. Life Science: Molecular
 Using Microscopes Life Science: Molecular Light Microscopy: Instrumentation and Principles A light microscope is so named because it uses visible light to produce a magnified image. Compound light microscopes
Protist Microscope Lab
 Name: Block: Due Date: Protist Microscope Lab Pre-Lab Assignment 1. Fill out the table for question #4 on the second page of your lab packet. (You may use the Biology textbook pages R8 and R9 in the back
Microscope Notes. units of life.
 Microscope Notes Microscope an instrument that produces an enlarged image of an object. Biologists use microscopes to study cells, cell parts, and organisms that are too small to be seen with the naked
Lab One: Techniques for Better Microscope Use
 Name BioPreAP/GT Purpose: Lab One: Techniques for Better Microscope Use Part A: Microscope Parts and Functions *Refer to Fig. 1 to refresh your memory on the parts of the microscope. *The objectives are
Seeing in Biology. Resolving Power of Optical Devices. Bio 101 Laboratory 2. Microscope Intro to Cell Cycle Mitosis
 Bio 101 Laboratory 2 Microscope Intro to Cell Cycle Mitosis 1 Seeing in Biology There are many different tools that biologists/anatomists can use to see biological samples at high resolution. Some include:
King Saud University Dept. of Bot. & Microbiology. General Microbiology 140 MIC
 King Saud University Dept. of Bot. & Microbiology General Microbiology 140 MIC Lab coat. Do not wearing the lab coat outside the lab. Gloves. Proper Clothing and closed shoes. Hair should be tied back.
Figure 3.4 Approximate size of various types of cells. ~10 um. Red Blood Cells = mm 1500 um. Width of penny Pearson Education, Inc.
 Figure 3.4 Approximate size of various types of cells. ~10 um Red Blood Cells 1.5mm 1500 um Width of penny = 1500 Figure 4.3 The limits of resolution (and some representative objects within those ranges)
User Manual. Digital Compound Binocular LED Microscope. MicroscopeNet.com
 User Manual Digital Compound Binocular LED Microscope Model MD82ES10 MicroscopeNet.com Table of Contents i. Caution... 1 ii. Care and Maintenance... 2 1. Components Illustration... 3 2. Installation...
Microscopes. A guide to use, general Maintenance, and repair tailored to the Olympus CX-21 microscope
 Microscopes A guide to use, general Maintenance, and repair tailored to the Olympus CX-21 microscope Topics Principles of Operation Diagrams Applications History Safety Operation Preventive Maintenance
Basics of Light Microscopy and Metallography
 ENGR45: Introduction to Materials Spring 2012 Laboratory 8 Basics of Light Microscopy and Metallography In this exercise you will: gain familiarity with the proper use of a research-grade light microscope
Manual for BMS E1 eplan series, compound microscope
 Manual for BMS E1 eplan series, compound microscope The compound microscope allows it to study, at cell level, structures of textures of botanical and zoological nature. (e.g. slides of roots, leaves and
Nikon Ti-E Microscope Manual. Rightmire Hall Ohio State University. Director: Tony Brown Rightmire
 Nikon Ti-E Microscope Manual Rightmire Hall Ohio State University Director: Tony Brown Rightmire 060 292-1205 brown.2302@osu.edu Facility Manager: Paula Monsma Rightmire 062 293-0939 292-1367 monsma.1@osu.edu
Instruction Manual T Binocular Acromat Research Scope T Trinocular Acromat Research Scope
 Research Scope Instruction Manual T-29031 Binocular Acromat Research Scope T-29041 Trinocular Acromat Research Scope T-29032 Binocular Semi-Plan Research Scope T-29042 Trinocular Semi-Plan Research Scope
TABLE OF CONTENTS. Safety notes i. Care and Maintenance. ii. 1. Components Illustration Installation of Components.. 4
 TABLE OF CONTENTS Safety notes i Care and Maintenance. ii 1. Components Illustration... 1 2. Installation of Components.. 4 2.1 Installation Diagram... 4 2.2 Installation Procedures 5 3. Operation...11
Scale. A Microscope s job in life. The Light Microscope. The Compound Microscope 9/24/12. Compound Microscope Anatomy
 The Study of Microbial Structure: Microscopy and Specimen Preparation Scale A Microscope s job in life 1.Magnify 2. Resolve ability to separate or distinguish between two points 3. Contrast How much or
I. The First Microscopes. Microscope Basics. II. The Bright Field Microscope. Confocal Laser Scanning Microscopy. A. The Compound Microscope
 Microscope Basics I. The First Microscopes NGSSS: SC.912.N.2.1 through N.4.2 A. About 1590, two Dutch spectacle makers, Zaccharias Janssen and his son Hans, while experimenting with several lenses in a
OMM300. Inverted Metallurgical Microscope
 OMM300 Inverted Metallurgical Microscope Instruction Manual Please read the instructions carefully before operating CONTENTS Safety 2 Parts List 2 Features 3 Assembly 5 Operation 7 Maintenance 9 Specifications
Biology The Microscope. May 20 1:19 PM. Using a Microscope to Explore the Cell
 Biology 2201 1.2 The Microscope Using a Microscope to Explore the Cell Resolution or Resolving power The ability of the eye, or other instrument, to distinguish between two objects that are close together
REVIEW FOR TEST ON MONDAY
 1. The diagram below shows an ameba moving out of the high-power field of view of a compound microscope in the direction indicated by the arrow. 4. The diagram below represents two cells next to a metric
Ⅰ. Application. Ⅱ. Main Technical Specification. AS1 Biological microscope,which is widely used in medical and
 Ⅰ. Application Objective Eyepiece Monocular Head The Light Above Coarse Adjustment Knob AS1 Biological microscope,which is widely used in medical and hygienic establishments for conventional microscopic
Chapter 2 Alignment C. Robert Bagnell, Jr., Ph.D., 2012
 Chapter 2 Alignment C. Robert Bagnell, Jr., Ph.D., 2012 Figure 2.1 is an image of striated muscle taken with a misaligned microscope and figure 2.2 is with a properly aligned microscope. To the untrained