Ready, Set, GO! HOLIDAY PATTERNS. Using the AccuQuilt GO! FREE. patterns INSIDE. visit accuquilt.com to order call
|
|
|
- James Jacobs
- 5 years ago
- Views:
Transcription


1 Ready, Set, GO! HOLIDAY PATTERNS Using the AccuQuilt GO! 14 FREE patterns INSIDE visit accuquilt.com to order call

2 GO! Hugs and Kisses Bed Runner Finished Size 81" x 27" Fabrics are from the Batik Cotton Blenders Collection by Island Batik GO! Dies Used, Number of Shapes to Cut & Fabric Requirements Fabric Color Shape GO! Dies Used Number of Shapes to Cut Fabric Required Red GO! Signature Block (55356) Cut 5 7½ x width of fabric (WOF) strips. Fanfold into 3 widths. Cut 56 Signature Blocks. Red GO! Strip Cutter-2½" (2" Finished) 6 2½" x WOF strips for (55017 or 55014) binding Pink GO! Signature Block (55356) Cut 4 7½ x WOF strips. Fanfold into 3 widths. Cut White GO! Half Square Triangle-3" Finished Square (55009) 52 Signature Blocks. Cut 6 9 x WOF strips. Fanfold into 4 widths. Cut 216 3" finished half square triangles 1 Yards Yardage 1 Yards 1 Yards Additional Fabrics Needed: Backing Fabric 87" x 33" Batting 87" x 33" 2015 AccuQuilt PQ10432
 and one red signature block as shown. 2.")


 square. Press seams open. Make 52 units. 7.")


3 Sewing Directions: 1. Lay out two white 3 finished half square triangles (HSTs) and one red signature block as shown. 2. Pin and sew together to form a 5 (4½ finished) square. Press seams open. Make 56 units. 3. Lay out four signature block units as shown to form an X block. Pin and sew into two rows. Press seams in alternating directions for each row. 4. Pin and sew the two rows together to complete one X block. Press seam open. Make 14 blocks. 5. Lay out two white 3 finished HSTs and one pink signature block as shown. 6. Pin and sew together to form a 5 (4½ finished) square. Press seams open. Make 52 units. 7. Lay out four signature block units as shown to form an O block. Pin and sew into two rows. Press seams in alternating directions for each row. 8. Pin and sew the two rows together to complete one O block. Press seam open. Make 13 blocks. 9. Lay out the blocks in three rows of nine, using the bed runner diagram as a guide. 10. Pin and sew three rows, each with nine alternating blocks. Press seams in alternating directions for each row. 11. Pin and sew three row units together. Press seams toward the added rows. Quilting and Finishing: 1. Layer batting between bed runner top and backing. 2. Pin or baste layers together. 3. Quilt as desired. 4. Add red fabric binding, mitering corners AccuQuilt PQ10432

4 GO! Sweetheart Wall Hanging Finished Size 27" x 36" Fabrics are from the Color Weave Collection by P&B Textiles GO! Dies Used, Number of Shapes to Cut & Fabric Requirements Fabric Color Shape GO! Dies Used Number of Shapes to Cut Fabric Required NOTE: Apply fusible web to the wrong side of asterisked fabrics following manufacturer s instructions before cutting appliqué shapes. *Red Print GO! Queen of Hearts (55325) 5 Hearts (3"W x 3 15 /16"H) 1/3 Yard Red Print GO! Strip Cutter-1½" (1" Finished) (55024) 4 1½ x width of fabric (WOF) strips; sub cut into 2 23½" border strips and 2 30½" border strips Yardage *Pink Print GO! Queen of Hearts (55325) 5 Hearts (2"W x 2 5 /8"H) 1/4 Yard *Pink Print GO! Rick Rack (55056) 2 2 Rick Rack strips - each 21½" in length. *Green Print GO! Rose of Sharon by Sharon Pederson 18 Leaves (2½ W x 1 1 /16"H) (55045) *Dark Purple GO! Rose of Sharon by Sharon Pederson 4 Roses (3"W x 3"H) Print (55045) *Dark Purple Print Dark Purple Print *Purple Print Purple Print GO! Rick Rack (55056) 2 2 Rick rack strips - each 21½" in length. GO! Strip Cutter-2½" (2" Finished) (55017 or 55014) GO! Rose of Sharon by Sharon Pederson (55045) GO! Strip Cutter-2½" (2" Finished) (55017 or 55014) 4 2½ x WOF for binding 4 Roses (2"W x 2"H) 4 2½ x WOF strips; sub cut into 2 27½" border strips and 2 32½" border strips 4 circles (1") *Cream Print GO! Rose of Sharon by Sharon Pederson (55045) Cream Print GO! Strip Cutter-3½" (3" Finished) (55032) 2 3½" x WOF strips; sub cut into 4 21½" strips White GO! Strip Cutter-6½" (6" Finished) (55086) 2 6½" x WOF strips; sub cut into 3 21½" strips Yardage Fat Eighth 1/2 Yard Yardage Yardage 1/2 Yard Yardage 1/3 Yard Yardage 1/2 Yard 2015 AccuQuilt PQ10433


5 Additional Fabrics Needed: Backing 33 x 42 Batting 33 x 42 Fusible Web 1 Yard Sewing Directions: 1. Fuse and appliqué the hearts, roses, leaves and circles to a white 21½" x 6½" strip as shown. Make two units. 2. Fuse and appliqué the hearts, roses, leaves and circles to a white 21½" x 6½" strip as shown. Make one unit. 3. Center, fuse and appliqué one pink 21½" x 2" rick rack strip to one cream print 21½" x 3½" strip as shown. Make two units. 4. Center, fuse and appliqué dark purple 21½" x 2" rick rack strip to one cream print 21½" x 3½" strip as shown. Make two units. 5. Lay out seven row units, using the wall hanging diagram as a guide. 6. Pin and sew the seven row units together. Press seams toward the added rows. 7. Add red side border strips. Press seams toward border. 8. Add red top and bottom border strips. Press seams toward border. 9. Add purple side border strips. Press seams toward border. 10. Add purple top and bottom border strips. Press seams toward border. Quilting & Finishing: 1. Layer batting between wall hanging top and backing. 2. Pin or baste layers together. 3. Quilt as desired. 4. Add dark purple binding, mitering corners AccuQuilt PQ10433

6 GO! Lovebirds Apron Finished Size 20" x 12" Fabrics are from the Bella Suede Collection by P&B Textiles GO! Dies Used, Number of Shapes to Cut & Fabric Requirements Fabric Color Shape GO! Dies Used Number of Shapes to Cut Fabric Required NOTE: Apply fusible web to the wrong side of asterisked fabrics following manufacturer s instructions before cutting appliqué shapes. All shapes are fused in place except the green print 4½ strips used for apron ties. *Red Print GO! Heart-2", 3", 4" (55029) 1 Heart (3") Fat Eighth or scraps *Pink Print GO! Heart-2", 3", 4" (55029) 2 Hearts (2 ) 1/4 Yard *Pink Print GO! Scallop Border (55417) 2 2 Scallop strips - each 21" in length (trim to fit). *Green Print GO! Strip Cutter-1" (½" Finished) (55052) 1 1" x width of fabric (WOF) strip. Sub cut into 1 21" strip (trim to fit) Green Print GO! Strip Cutter-4½ (4" Finished) (55054) 2 4½ x WOF strips. Sub cut into 2 30" strips. *Blue GO! Birds (55324) 2 Birds with pointed tail (5 5 /16"W x 2 ¾"H) Cut 1 Bird right side up Cut 1 Bird wrong side up *Light Blue GO! Birds (55324) 2 Bird wings (1 13 /16"W x 13/16"H) Cut 1 Bird wing right side up Cut 1 Bird wing wrong side up Yardage 1/3 Yard Yardage Fat Eighth Fat Eighth Additional Fabrics Needed: 1 Premade Kitchen Towel 20 x 27 Fusible Web 2/3 Yard Sewing Directions: 1. With right sides together, fold the towel with 15 on the top side and 12 on the bottom side (the top side will measure 20 x 15 ). Press well leaving a crease. The folded edge will be the top of the apron AccuQuilt PQ10434
7 2. Take the bottom two corners of the top side and fold up 6", this will put the edge 3" from the top fold. Press well leaving a crease. These will be your front pockets. 3. The appliqué pieces will be applied before the pockets are sewn down. Be sure to appliqué through only one layer of towel. You may wish to fuse all pieces in place first, then unfold the towel to appliqué. 4. Center the green print 21" x 1" strip right above the bottom fold, as shown. Trim to fit perfectly. Fuse and appliqué in place. 5. Center the pink print 21" x 2" scallop borders at the top and bottom edges, as shown. Trim to fit perfectly. Fuse and appliqué in place. 6. Lay out the hearts, birds, and bird wings on the center pocket section, using the diagram as a guide. Fuse and appliqué in place. You may choose to hand or machine stitch an eye on each bird. 7. Make the apron ties: With wrong sides together, fold one short end of 4½ x 30" strip in ½" and press. Fold the strip in half lengthwise (wrong sides together) and press. Open up the strip, so you can see your center. Fold the raw edges to the center crease and press. Fold in half lengthwise along the original center crease and press. Topstitch close to the edge on all sides. Make two ties. 8. Insert ½" of the raw edge end of one apron tie in between the top fold of the apron on the left side. Pin in place. Repeat with the other apron tie on the right side. 9. Topstitch along the top folded edge of the apron, down both side edges of the pocket section, and along the bottom fold of the pockets, through all layers. This will secure your ties and pockets in place. 10. Topstitch on either side of the red heart to make three separate pockets. Top Fold (Top of Apron) Bottom Fold (Bottom of Pockets) 3" 6" 3" 2015 AccuQuilt PQ10434
 32 3 finished half square 5/8 yard (55456 or 55009) triangles White GO!")
8 GO! Celebration Table Runner Finished Size 56" x 12" Fabric provided by Hoffman Fabrics Fabric Color GO! Dies Used, Number of Shapes to Cut & Fabric Requirements One Block White Shape GO! Dies Used Number of Shapes to Cut Fabric Required GO! Flying Geese-3½ x 6½ (3 x 6 Finished) 32 3 finished half square 5/8 yard (55456 or 55009) triangles White GO! Flying Geese-3½ x 6½ (3 x 6 Finished) (55456 or 55002) 4 6 finished quarter square triangles Yardage White GO! Square-6½ (6 Finished) (55000) 2 Yardage White GO! Square-3 ½ (3 Finished) (55006) 4 Yardage Blue GO! Strip Cutter-2 ½ (2 Finished) (55014) 4 2½ x WOF strips for binding 1 1/8 yards Blue GO! Flying Geese-3½ x 6½ (3 x 6 Finished) (55456 or 55002) 12 6 finished quarter square triangles Yardage Blue GO! Square-3 ½ (3 Finished) (55006) 8 Yardage Red GO! Strip Cutter-2 ½ (2 Finished) (55014) 2 2½ x WOF strips. Sub cut into 4 12½ sashing strips 1/2 yard Red GO! Flying Geese-3½ x 6½ (3 x 6 Finished) (55456 or 55001) Red GO! Flying Geese-3½ x 6½ (3 x 6 Finished) (55456 or 55002) 8 3 finished half square triangles 4 6 finished quarter square triangles Yardage Yardage Red GO! Square-6½ (6 Finished) (55000) 1 Yardage Additional Fabrics Needed Backing 62 x 18 Batting 62 x AccuQuilt PQ10406
9 Sewing Directions 1. Lay out one blue 6 quarter square triangle (QST) and two white 3 finished half square triangles (HST) as shown. 2. Pin and sew together to form a flying geese unit as shown. Press seams toward the white triangles. Make 8 flying geese units. 3. Pin and sew one blue 3½ square to each end of one flying geese unit. Press seams toward blue squares. Make four combined units. 4. Pin and sew one flying geese unit to each side of one white 6½ square. Press seams toward the square. Make two combined units. 5. Lay out block units. Pin and sew rows together. Press seams open. Make two blocks. 6. Lay out one white 6 finished QST and two red 3 finished HSTs as shown. 7. Pin and sew together to form a flying geese unit. Press seams toward the red triangles. Make four flying geese units. 8. Pin and sew one white 3½ square to each end of one flying geese unit. Press seams toward squares. Make two combined units. 9. Pin and sew one flying geese unit to each side of one red 6½ square. Press seams toward the square. Make one combined unit. 10. Lay out block units. Pin and sew rows together. Press seams open. Make one block. 11. Lay out one red 6 finished QST and two white 3 finished HSTs as shown. 12. Pin and sew together to form a flying geese unit. Press seams toward the HSTs. Make four flying geese units. 13. Lay out one blue 6 finished QST and two white 3 finished HSTs as shown. 14. Pin and sew together to form a flying geese unit. Press seams toward the HSTs. Make four flying geese units. 15. Pin and sew together four flying geese units as shown. Press seams open. Make two combined units. 16. Pin and sew a 2½ sashing strip to both sides of each combined flying geese unit. Press seams toward the sashing strips. Make two blocks AccuQuilt PQ10406

10 17. Pin and sew all five blocks together, using the table runner diagram as a guide. Press seams toward added blocks. Quilting & Finishing 1. Layer batting between table runner top and backing. 2. Pin or baste layers together. 3. Quilt as desired. 4. Add blue binding, mitering corners AccuQuilt PQ10406
11 Confetti Welcome Design by Gina Gempesaw Use with: GO! Big GO! GO! Baby Add a touch of patriotic colors to your wall or table. Project Specifications Skill Level: Confident Beginner Quilt Size: 23½" x 27½" Materials 5 8 yard total scraps assorted red fabrics 5 8 yard total scraps assorted blue fabrics 1½ yards white tonal Backing 29" x 35" Batting 29" x 35" Neutral-color all-purpose thread Quilting thread GO! Dies: GO! Equilateral Triangles-1", 1½", 2½" Sides (¾", 1¼", 2¼" Finished) (55079) Optional: GO! Strip Cutter-1½" (1" Finished) (55024) Optional: GO! Strip Cutter-2¼" (1¾" Finished) (55053) Basic sewing tools and supplies 4. Cut three 2¼" by fabric width white tonal strips for binding. Completing the Quilt Center 1. Arrange and stitch 11 A, 6 B and 4 C triangles into one vertical row referring to Figure 1. Row 1 B A C Die-Cutting Instructions 1. Die-cut a total of 61 (2½") assorted red B triangles individually or by layering scraps. 2. Die-cut a total of 61 (2½") assorted blue C triangles individually or by layering scraps. 3. Cut eight 3½" by fabric width white tonal strips. Fan-fold each strips 5" wide and die-cut 126 (2½") A triangles. Additional Cutting Instructions TIP: Use GO! Strip Cutter 1½" and 2¼" to cut borders, strips and binding. 1. Cut one 2¼" by fabric width white tonal strip; subcut strip into four 2¼" D squares. 2. Cut two 1½" by fabric width white tonal E/Fstrips. Subcut strips into two each 1½" x 20½" E borders and 1½" x 18½" F borders. 3. Cut four 1½" by fabric width white tonal G/H strips. Subcut strips into two each 1½" x 24" H borders and 1½" x 26" G borders. Figure 1 2. Continue to arrange and stitch A, B and C triangles into seven additional rows referring to Figure 2 for number of each piece to use and for placement. Press seams in opposite directions row to row. 3. Stitch rows together as arranged in Figure 2. Press seams in one direction. 4. Draw a line through the centers of the top and bottom triangles as shown by the dotted line in Figure 3. Trim the top Figure Figure 3 1 /4" 2015 AccuQuilt Code PQ
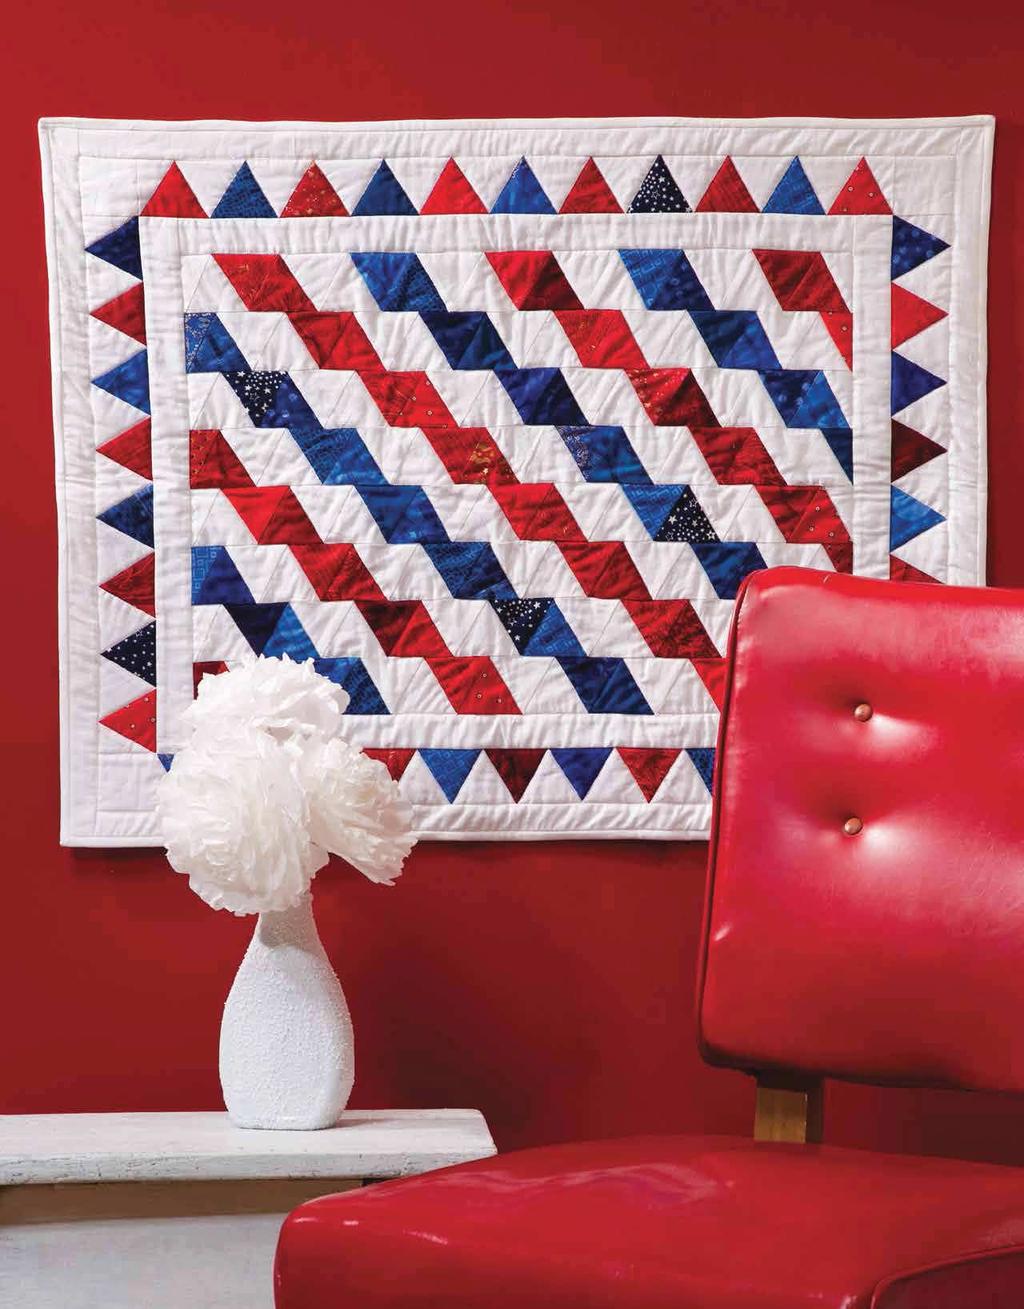
12
13 and bottom ¼" away from the drawn line referring again to Figure 3 to square ends. 5. Stitch E borders to both sides of the pieced center and F borders to top and bottom referring to the Placement Diagram to complete the quilt center. Piecing the Borders 1. Select and stitch nine A and four each B and C triangles together to make a top border as shown in Figure 4. C A B Figure 4 2. Trim end triangles ¼" from triangle center referring to step 3 of Completing the Quilt Center and Figure Repeat to make the right border using 12 A, 5 B and 6 C triangles referring again to Figure 7. Trim end triangles referring to step 2. Completing the Quilt 1. Stitch right and left borders to quilt center as shown in Placement Diagram for orientation. 2. Stitch top and bottom borders to quilt center as shown in Placement Diagram for orientation. 3. Stitch G borders to both sides of quilt and H borders to top and bottom referring to Placement Diagram. 4. Layer and quilt as desired. 5. Use the 2¼" white tonal strips for binding to complete the quilt. C A B Top border D H Figure 5 F 3. Repeat steps 1 and 2 to make a bottom border as shown in Figure 6. Bottom border Figure 6 4. Stitch D squares to both ends of the top and bottom pieced borders; press seams toward D. 5. Select and stitch 12 A, 6 B and 5 C triangles referring to Figure 7 to make the left border. Trim end triangles referring to step 2. Left border G E Right border Figure 7 Confetti Welcome Placement Diagram 23 1 /2" x 27 1 /2" AccuQuilt Code PQ
 (55017 or 55014) FABRIC REQUIREMENTS Fabric 1 (White) 1 yard Fabric 2 (Blue) 1/2 yard Fabric 3 (Striped Fabric) 1/4 yard Fabric 4 4 assorted prints, min. 5\" x 3\" (ea.")
14 GO! Birthday Treats Table Runner Finished Size 14" x 50" Fabric provided by Riley Blake Designs. GO! DIES USED GO! Cupcake (55097) GO! Carefree Alphabet Set (2-Die Set) (55092) GO! Strip Cutter-2-1/2" (2" Finished) (55017 or 55014) FABRIC REQUIREMENTS Fabric 1 (White) 1 yard Fabric 2 (Blue) 1/2 yard Fabric 3 (Striped Fabric) 1/4 yard Fabric 4 4 assorted prints, min. 5" x 3" (ea.) Fabric 5 (Green) 1/2 yard Binding 1/2 yard Fusible web product 1 yard Batting 20" x 60" Backing 1-1/4 yards CUTTING DIRECTIONS NOTE: Apply fusible web to the wrong side of selected fabrics following manufacturer s instructions for appliqué shapes. Fabric 1: Cut /2" x 30-1/2" rectangle Cut 2 6-1/2" x 10-1/2" rectangles Fabric 2: Cut 5 2-1/2" x width of fabric (WOF) strips Sub cut 2 strips into a total of /2" x 2-1/2" rectangles Fabric 3: Cut 4 cupcake bottoms Fabric 4: Cut 4 frosting tops Fabric 5: Cut out the letters for Happy Birthday 2014 AccuQuilt PQ10315i


15 Binding: Cut 4 2-1/2" x WOF strips (Set aside for binding) SEWING DIRECTIONS 1. Lay out one Fabric #1, 10-1/2" x 30-1/2" rectangle, two Fabric #1, 10-1/2" x 6-1/2" rectangles and four Fabric #2, 10-1/2" x 2-1/2" rectangles as shown below. 2. Sew rectangles together. Press seams towards Fabric #2 rectangles. 3. Sew together the three remaining Fabric #2 strips along the short end to make one long strip. 4. Measure the length of your table runner and cut two borders to this length. 5. Pin and sew borders onto the top and bottom of the table runner. Press towards the borders as shown below. 6. Iron fusible web onto the backside of your appliqué fabrics. 7. Cut out four cupcake bottoms, four frosting tops, and letters for HAPPY BIRTHDAY. 8. Fuse cupcakes and letters onto the table runner as shown below. 9. Using a decorative stitch on your machine, stitch around the edges of the appliqué shapes to secure them to the quilt top. QUILTING AND FINISHING 1. Layer quilt top with batting and backing. 2. Pin or baste layers together. 3. Model was custom machine quilted. 4. Add binding, mitering the corners. OPTIONAL BOLSTER PILLOW 1. From backing fabric, cut two 14-1/2" x 30-1/2" rectangles. 2. Along one short side of each rectangle, press under 1" (twice) to form a double hem and topstitch down. 3. Overlap the hemmed sides of the back pieces, so together they measure 14-1/2" x 50-1/2" AccuQuilt PQ10315i

16 GO! Quilted Cats and Bats Wall Hanging Finished Size 15½" x 25½" GO! Dies Used, Number of Shapes to Cut & Fabric Requirements Fabric Color Shape GO! Dies Used Number of Shapes to Cut Fabric Required * NOTE: Apply fusible web to the wrong side of fabrics following manufacturer s instructions before cutting appliqué shapes. Black Print* GO! Cat & Bat (55365) Pre-fuse 2 5¾ x 8 rectangles to cut 2 Cats (Cut 1 cat right side up and Cut 1 cat wrong side up) Gray Print* GO! Cat & Bat (55365) Pre-fuse 2 5¾ x 3½ rectangles to cut 2 Bats Orange Print* GO! Pumpkins (55323) Pre-fuse 1 3¾ x 5 rectangle to cut 1 Tall pumpkin (3 "W x 4½ H) Optional: cut brown stem Gold Print* GO! Circle-2", 3", 5" (55012) Pre-fuse 1 5½ square to cut 1 5 Circle Black* GO! Rick Rack (55056) Pre-fuse 1 2½ x WOF strip to cut 2 2 Rick Rack strips - each 15½ in length Black GO! Strip Cutter-1½" (1" Finished) (55024) Cut 1 1½ x WOF strip Sub cut: 2 15½" x 1½ Black Halloween Print GO! Strip Cutter-2½" (2" Finished) (55017 or 55014) GO! Strip Cutter-4½" (4" Finished) (55054) rectangles 3 2½ x WOF for binding 1 4½ x WOF Sub cut: 2 15½" x 4½ rectangles Fat Eighth Fat Eighth Fat Eighth Fat Eighth Yard Yardage Yardage Yard 2014 AccuQuilt PQ10414
, bats, cats, and pumpkin to the 15½\" x 16\" Halloween print fabric as shown in the block diagram")


17 Additional Fabrics Needed: Halloween Print 15½ x 16" Backing 21½ x 31½ Batting 21½ x 31½ Fusible Web ½ Yard Sewing Directions 1. Fuse and appliqué the circle (moon), bats, cats, and pumpkin to the 15½" x 16" Halloween print fabric as shown in the block diagram (right). 2. Pin and sew one 1½" black strip to the top of the appliqué block. Press seam toward the 1½" strip. 3. Pin and sew one 1½" black strip to the bottom of the appliqué block. Press seam toward the 1½" strip. 4. Fuse and appliqué one 2" black rick rack strip on one 4½" Halloween print strip as shown in the diagram (right). Make two units. 5. Pin and sew one 4½" Halloween print strip with Rick Rack appliqué to the top 1½" black strip. Press seam toward the 4½" Halloween print strip. 6. Pin and sew one 4½" Halloween print strip with Rick Rack appliqué to the bottom 1½" black strip. Press seam toward the 4½" Halloween print strip. Quilting & Finishing 1. Layer batting between the quilt top and backing. 2. Pin or baste layers together. 3. Quilt as desired. 4. Add black binding, mitering corners AccuQuilt PQ10414


 GO! Dove (55350) GO! Cardinal (55351) GO!")
 GO! Square-6 1 2\" (55000) GO! Half Square-3\" Finished Triangle (55009) GO!")
 CUTTING DIRECTIONS Fabric 1: Cut 16 4 7 8\" triangles Cut 18 3\" finished")
 for sashing Sub cut 4 strips into 12 3 1 2\" x 12 1 2\" rectangles Fabric 3: Cut")


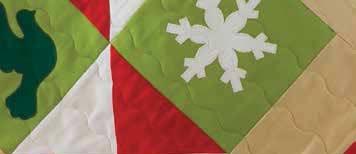
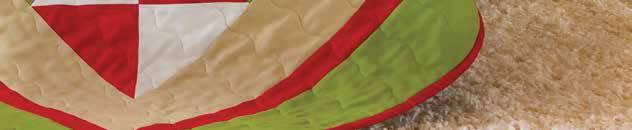
18 1 of 3 GO! Winter s Here Sampler Quilt finished size 57" x 57" finished block size 12" x 12" D A B E F C FABRIC REQUIREMENTS Fabric yard Fabric yards Fabric yards (includes binding) Fabric yards Fabric yard Fabric yard Fabric yard or fat quarter Fabric yard or fat quarter Fusible web 3 4 yard Backing yards Batting 63" x 63" G H I Fabric provided by Benartex Fabrics GO! DIES USED GO! Bird (55352) GO! Dove (55350) GO! Cardinal (55351) GO! Reindeer (55353) GO! Snowflake (55359) GO! Holiday Medley (55043) GO! Square-3 1 2" (55006) GO! Square-4 3 4" (55019) GO! Square-6 1 2" (55000) GO! Half Square-3" Finished Triangle (55009) GO! Triangle-4 7 8" (55002) GO! Strip Cutter-1 1 2" (55024) GO! Strip Cutter-2 1 2" (55014 or 55017) GO! Strip Cutter-3 1 2" (55032) CUTTING DIRECTIONS Fabric 1: Cut " triangles Cut 18 3" finished half square triangles Cut " squares Cut 7 snowflakes Fabric 2: Cut " strips across the width of fabric (WOF) for sashing Sub cut 4 strips into " x " rectangles Fabric 3: Cut " strips across the WOF for binding Cut " strips across the WOF for inner border Cut " triangles Cut 8 3" finished half square triangles Cut 3 holly berries Fabric 4: Cut " strips across the WOF for outer border Cut " squares Cut " square Cut " squares Cut " triangles Fabric 5: Cut " squares Cut 20 3" finished half square triangles Cut 1 dove facing right 2015 AccuQuilt to order call more accuquilt.com Code PQ10192i
19 2 of 3 CUTTING DIRECTIONS Cont. Fabric 6: Cut 30 3" finished half square triangles Cut 1 bird facing right Fabric 7: Cut " square Cut 1 cardinal facing right Cut 2 holly leaves Fabric 8: Cut 1 reindeer facing left Cut 1 twig (cut by hand) SEWING DIRECTIONS NOTE: Press seams toward the darker fabric or for the least bulk or as directed. Block A, C, G and I: 1. Remove paper backing from appliqué shapes. 2. Center one Fabric #1 snowflake on one Fabric #4, 6 1 2" square. Make four. 3. Center one Fabric #7 cardinal, one Fabric #8 reindeer and one Fabric #5 dove each on one Fabric #4, 6 1 2" square. 4. Position one Fabric #8 twig, one Fabric #6 bird, two Fabric #7 holly leaves and three Fabric #3 holly berries on one Fabric #4, 6 1 2" square following quilt diagram. 5. Fuse shapes in place following manufacturer s instructions. 6. Appliqué edges of shapes by hand or machine. 7. Lay out two Fabric #1 and two Fabric #3, 4 7 8" triangles as shown. 8. Pin and sew together into hourglass unit. Press seams clockwise, pinwheeling the center seam intersection. Make eight hourglass units. 9. Lay out two appliquéd Fabric #4, 6 1 2" squares and two hourglass units following quilt diagram. 10. Pin and sew together into four patches to complete Blocks A, C, G, and I. Block B: 1. Lay out two Fabric #6, 3" half square triangles and one Fabric #3, 4 7 8" triangle as shown. 2. Pin and sew together into flying geese unit. Make 12 flying geese units (also used in other blocks). 3. Lay out two Fabric #4 and two Fabric #5, 3 1 2" squares as shown. 4. Pin and sew into one four patch unit. 5. Center one Fabric #1 snowflake on four patch unit. Fuse and appliqué. 6. Pin and sew one Fabric #3 and Fabric #6 flying geese unit to each side of four patch unit to complete block center. 7. Pin and sew one Fabric #5, 3 1 2" square to each end of one Fabric #3 and Fabric #6 flying geese unit. 8. Pin and sew combined square and flying geese unit to top and bottom of block center to complete Block B. Block D: 1. Make four Fabric #1 and Fabric #3, 3" half square triangles as shown. 2. Lay out four Fabric #1 and Fabric #3 half square triangles into a pinwheel as shown. 3. Pin and sew together into a pinwheel unit. Press seams clockwise, pinwheeling the center seam intersection. 4. Pin and sew one Fabric #3 and Fabric #6 flying geese unit to each side of pinwheel unit to complete block center. 5. Pin and sew one Fabric #5, 3 1 2" square to each end of one Fabric #3 and Fabric #6 flying geese unit. 6. Pin and sew combined square and flying geese unit to top and bottom of block center to complete Block D. Block E: 1. Make four Fabric #1 and Fabric #3, 3" half square triangles as shown. 2. Lay out two Fabric #5, 3" half square triangles and one Fabric #4, 4 7 8" triangle as shown. 3. Pin and sew together into flying geese unit. Make four flying geese units. 4. Lay out one Fabric #7 appliquéd 4 3 4" square and four Fabric #1, 3" finished half square triangles as shown. 5. Pin and sew together into a square in a square unit. 6. Pin and sew one Fabric #4 and Fabric #5 flying geese unit to each side of square in a square unit to complete block center. 7. Pin and sew one Fabric #1 and Fabric #3 half square triangle to each end of one Fabric #4 and Fabric #5 flying geese unit. 8. Pin and sew combined square and flying geese unit to top and bottom of block center to complete Block E. Block F: 1. Make two Fabric #1 and Fabric #6, 3" half square triangles as shown. 2. Lay out two Fabric #1 and Fabric #6 half square triangles and two Fabric #1, 3 1 2" squares as shown. 3. Pin and sew together into a bowtie unit. Press seams clockwise, pinwheeling the center seam intersection AccuQuilt to order call more accuquilt.com Code PQ10192i


20 3 of 3 SEWING DIRECTIONS Cont. 4. Pin and sew one Fabric #3 and Fabric #6 flying geese unit to each side of bowtie unit to complete block center. 5. Pin and sew one Fabric #5, 3 1 2" square to each end of one Fabric #3 and Fabric #6 flying geese unit. 6. Pin and sew combined square and flying geese unit to top and bottom of block center to complete Block F. Block H: 1. Make four Fabric #5 and Fabric #6, 3" half square triangles as shown. 2. Lay out two Fabric #5, 3" half square triangles and one Fabric #3, 4 7 8" triangle as shown. 3. Pin and sew together into flying geese unit. Make four flying geese units. 4. Lay out one Fabric #4 appliquéd 4 3 4" square and four Fabric #1, 3" finished half square triangles as shown. 5. Pin and sew together into a square in a square unit. 6. Pin and sew one Fabric #3 and Fabric #5 flying geese unit to each side of square in a square unit to complete block center. 7. Pin and sew one Fabric #5 and Fabric #6 half square triangle to each end of one Fabric #3 and Fabric #5 flying geese unit. 8. Pin and sew combined half square triangle and flying geese unit to top and bottom of block center to complete Block H. 10. Trim selvages off Fabric #4, 3 1 2" strips. Seam together end to end. Press seams open. 11. Cut two 3 1 2" x " rectangles for top and bottom inner borders and two 3 1 2" x " rectangles for side inner borders. 12. Pin and sew one Fabric #4 side outer border rectangle to sides of quilt center. Press seams toward inner border. 13. Pin and sew one Fabric #4 top and bottom outer border rectangle to top and bottom of quilt center. Press seams toward inner border. QUILTING AND FINISHING 1. Layer batting between quilt top and backing. 2. Pin or baste layers together. 3. Model was machine quilted. 4. Add binding, mitering corners. D A B E F C Quilt Construction: 1. Lay out blocks with Fabric #2, 3 1 2" x " horizontal sashing rectangles following quilt diagram. 2. Pin and sew blocks and sashing rectangles together. Press seams toward sashing rectangles. 3. Trim selvages off remaining Fabric #2, 3 1 2" strips. Seam together end to end. Press seams open. 4. Cut four 3 1 2" x " sashing rectangles. 5. Pin and sew Fabric #2 sashing rectangles along vertical edges of sashed block rows following quilt diagram to complete quilt center. Press seams toward sashing. 6. Trim selvages off Fabric #3, 1 1 2" strips. Seam together end to end. Press seams open. 7. Cut two 1 1 2" x " rectangles for top and bottom inner borders and two 1 1 2" x " rectangles for side inner borders. 8. Pin and sew one Fabric #3 side inner border rectangle to each side of quilt center. Press seams toward inner border. 9. Pin and sew one Fabric #3 top and bottom inner border rectangle to top and bottom of quilt center. Press seams toward inner border. G H I 2015 AccuQuilt to order call more accuquilt.com Code PQ10192i


 GO! DIES USED: GO!")
 GO! Star-2\", 3\", 4\" (55028) GO!")
 GO! Triangle-Isosceles-5\"W x 6\"H (55016) GO!")
 GO! Strip Cutter-1\" (55052) GO!")
 GO!")
 Fabric provided by Moda Fabrics CUTTING")


21 1 of 4 GO! Winter Bliss Quilt finished size 49" x 55 1 /2" FABRIC REQUIREMENTS Fabric yards Fabric yards (includes binding) Fabric 3 1 yard Fabric yard Fabric yard Fabric yard Fabric yard Fabric yard Fabric yard Fabric yard Fabric yard Fabric yard Fabric yard Fabric yard Fabric yard Fabric 16 scraps Backing yards Batting 55" x 62" Ornament Hanger (actual size) GO! DIES USED: GO! Holiday Accessories (55321) GO! Sleigh & Snowflakes (55322) GO! Circle-2", 3", 5" (55012) GO! Star-2", 3", 4" (55028) GO! Holiday Medley (55043) GO! Lullaby (55038 ) GO! Round Flower (55007) GO! Triangle-Isosceles-5"W x 6"H (55016) GO! Square-3 1 2" (55006) GO! Square-2" (55022) GO! Value Die (55018 or 55021) GO! Strip Cutter-1" (55052) GO! Strip Cutter-1 3 4" (55083) GO! Strip Cutter-2 1 2" (55014 or 55017) GO! Strip Cutter-3 1 2" (55032) GO! Strip Cutter-6 1 2" (55086) Fabric provided by Moda Fabrics CUTTING DIRECTIONS TIP: Cut larger pieces before cutting smaller shapes. Apply fusible web to wrong side of appliqué fabrics before cutting. Fabric 1: Cut " strips across the width of the fabric (WOF) for outer border Cut " x 33" rectangle Cut " x 33" rectangle Cut 1 6 point star (GO! Round Flower) Cut 1 2" star Cut 1 reindeer facing right Cut 1 bow Cut 5 5 8" circles (GO! Round Flower) Cut 1 large ornament topper 2011 AccuQuilt to order call more accuquilt.com Code PQ10178i
22 2 of 4 CUTTING DIRECTIONS Cont. Fabric 2: Cut " strips across the WOF for binding Cut " strips across the WOF for inner border Cut " x " rectangle Cut 8 holly Cut 1 large ornament topper Cut 2 small ornament toppers Cut 1 3" circle Cut 2 1" circles (GO! Round Flower) Cut 1 sleigh runner facing right TIP: Include part of the bottom of the sleigh to aid in alignment of shapes. Cut 1 reindeer facing right Cut 2 bows Cut " square Sub cut into 1 3" x 3 1 2" rectangle Cut 2 1" x 3 1 2" rectangles TIP: Cut 1" strip. Lay strip across GO! Square-3 1 2" to cut 1" x 3 1 2" rectangles. Cut 2 Isosceles triangles Cut 1 2" star Cut 3 5 8" circles (GO! Round Flower) Cut 2 top hats Cut 1 scarf Cut 1 tree Fabric 3: Cut " x 33" rectangles Cut 36 partial snowflakes with rounded ends for outer border appliqué TIP: Cut 2 1 2" strips. Sub cut strips into 2 1 2" x 5" rectangles. Place rectangles over snowflake blades as shown and cut. Fabric 4: Cut " x 33" rectangles Fabric 5: Cut " x 33" rectangle Cut 2 rattle accents (GO! Lullaby) Cut 2 3" stars Cut 1 2" star Cut 1 sleigh facing right Cut 1 2" circle Cut 1 large ornament crown Cut 2 1" circles Cut 2 bows Cut 18 holly berries ( 1 2" circles) Cut 1 tree Cut 1 5 8" circle (GO! Round Flower) Cut 1 scarf Cut 1 toboggan hat Cut " square Cut 4 3 4" circles (GO! Snowman Accessories) Fabric 6: Cut " x " rectangle Cut " circle (GO! Lullaby) Cut 1 reindeer facing right Cut " square Cut 1 isosceles triangle Cut 1 toboggan hat Cut 1 scarf Cut 1 6 point star (GO! Round Flower) Cut 15 holly berries Fabric 7: Cut 1 3" circle Cut 10 holly (5 pairs) Fabric 8: Cut 1 3" circle Cut " square Sub cut into 1 3" x 3 1 2" rectangle Cut 1 tree Cut 1 isosceles triangle Cut 1 scarf Fabric 9: Cut 1 2" circle Cut 1 3" square Cut 1 1" x 3 1 2" rectangle Cut 1 6 point star (GO! Round Flower) Cut 1 toboggan hat Fabric 10: Cut " square Cut 1 tree Cut 1 2" star 2011 AccuQuilt to order call more accuquilt.com Code PQ10178i
 Cut 1 tree Cut 2 1\" circles Fabric 12: Cut 1 3 1 2\" square Sub cut into 1 3\" x 3 1 2\" rectangle Fabric 13: Cut 1 2\" square Cut 1 2\" star Cut 1 reindeer facing right Cut 1 tree")
23 3 of 4 CUTTING DIRECTIONS Cont. Fabric 11: Cut " square Cut 1 bow Cut 1 scarf Cut 4 3 4" circles (GO! Snowman Accessories) Cut 1 tree Cut 2 1" circles Fabric 12: Cut " square Sub cut into 1 3" x 3 1 2" rectangle Fabric 13: Cut 1 2" square Cut 1 2" star Cut 1 reindeer facing right Cut 1 tree Cut 1 pair mittens Fabric 14: Cut 2 5" circles Cut 5 3" circles Cut 5 2" circles Cut 2 large snowflakes (GO! Snowflakes and Sleigh) Cut 2 small snowflakes (GO! Snowflakes and Sleigh) Cut 1 snowflake (GO! Holiday Medley) TIP: Fuse 6" wide strips of fusible web to wrong side of two 6" x WOF white fabric strips. Peel off backing paper. Fuse to wrong side of second set of two 6" x (WOF) white fabric strips. Fuse 6" wide strips of fusible web to wrong side doubled white fabric. Cut appliqué shapes as directed. This thicker fabric helps prevent shadowing of printed fabrics under white appliqué shapes. Fabric 15: Cut 8 snowman arms Fabric 16: Cut 5 snowman carrot noses SEWING DIRECTIONS Appliqué edges of shapes by hand or machine. It is recommended to position and fuse all 5 appliqué panels before machine appliquéing. Use one color of thread and appliqué all shapes in that color before changing to another thread color. Embroider ornament hangers, eyes, reindeer nose and reindeer reins by hand or machine. Test for removal of any marking tool before use on quilt. Ornament Panel: 1. Lay out shapes on one Fabric #4, 6 1 2" x 33" rectangle following diagram. Sleigh and Reindeer Panel: 1. Lay out shapes on one Fabric #3, 6 1 2" x 33" rectangle following diagram. 2. Position packages behind sleigh shape. Trim off excess packages beyond edge of sleigh. 3. Align runner under edge of sleigh. Holly and Berry Panel: 1. Lay out shapes on one Fabric #5, 3 1 2" x 33" rectangle following diagram. Packages Panel: 1. Lay out shapes on one Fabric #3, 6 1 2" x 33" rectangle following diagram. 2. Position package squares behind bows. Trim off corners of packages beyond edge of bows. General Appliqué Directions: Appliqué background rectangles are 1 2" wider than final size to allow for some take up" during the appliqué process. Remember to allow for extra 1 2" width and seam allowances on panel background fabric when placing shapes. Remove paper backing from appliqué shapes and fuse shapes in place following manufacturer s instructions AccuQuilt to order call more accuquilt.com Code PQ10178i

24 4 of 4 SEWING DIRECTIONS Cont. Snow Family Panel: 1. Pin and sew one Fabric #1, 3 1 2" x 33" rectangle, one Fabric #1, 6 1 2" x 33" rectangle and one Fabric #4, 6 1 2" x 33" rectangle together. Press seams open. 2. Lay out shapes on combined rectangle following diagram. 9. Measure horizontal center of quilt. Trim two outer border strips to this measurement. Fold strip in half and lightly press center. 10. Position, fuse, trim and appliqué eight partial snowflakes on top and bottom outer border strips. 11. Pin and sew top and bottom outer borders to quilt center. Press seams toward inner border. 12. Position, fuse and appliqué holly and berries on corners of outer border. Quilt Center Construction: 1. Trim width of appliqué panels to " wide. 2. Lay out appliqué panels and Fabric #2 and #6, 1 3 4" x " rectangles following quilt diagram. 3. Pin and sew together. Press seams toward 1 3 4" wide rectangles and holly and berry panel. 4. Add Fabric #2, 2 1 2" strips for inner border (sides first, then top and bottom). Press seams toward inner border. QUILTING AND FINISHING 1. Layer batting between quilt top and backing. 2. Pin or baste layers together. 3. Model was machine quilted with stippling in background areas with matching thread. A swirl design was quilted on horizontal narrow rectangles and inner border. Additional quilting outlining shapes was added. 4. Add binding, mitering corners. Outer Border: 1. Trim off selvages from Fabric #1, 6 1 2" outer border strips. Pin and sew together to form one long strip. 2. Measure vertical center of quilt. Trim two outer border strips to this measurement. Fold strip in half and lightly press center. 3. Position 10 Fabric #3 partial snowflakes along raw edge border strip. Align the ball" end of snowflakes along raw edge of border strip as shown. This will position snowflakes to allow for 1 4" seam allowance. Leave 1 4" between balls on ends of snowflakes. There should be 1 4" of border showing beyond last snowflake ball at ends of border strip. 4. Fuse in place, keeping iron fully on border strip. 5. Turn border strip wrong side up on cutting surface. Use a ruler and rotary cutter to trim off snowflake sections beyond raw edge of border strip. Press edges of appliqué along raw edge to securely fuse. 6. Repeat for second side outer border strip. 7. Appliqué edges of snowflakes by hand or machine. 8. Pin and sew side outer borders to quilt center. Press seams toward inner border AccuQuilt to order call more accuquilt.com Code PQ10178i
 (Apply fusible web to the wrong side prior to cutting following the manufacturer s instructions) Shapes to Cut Fabric Required 4 2/3 yard White GO!")
 (55024) 72 1½ x 1½ Squares 1/3 yard Blue Dark Blue GO! Square 8½ (8 Finished) (55058) 2 1 yard Dark Blue GO!")
25 GO! Snowflakes Wall Hanging Finished Size 26" x 26" Fabric Color One Block White GO! Dies Used, Number of Shapes to Cut & Fabric Requirements Shape GO! Dies Used Number of GO! Snowflakes-7 (55450) (Apply fusible web to the wrong side prior to cutting following the manufacturer s instructions) Shapes to Cut Fabric Required 4 2/3 yard White GO! Strip Cutter-1½ (1 Finished) (55024) 72 1½ x 1½ Squares Yardage Medium GO! Square 8½ (8 Finished) (55058) 2 1/3 yard Light Blue Medium GO! Strip Cutter-1½ (1 Finished) (55024) 72 1½ x 1½ Squares 1/3 yard Blue Dark Blue GO! Square 8½ (8 Finished) (55058) 2 1 yard Dark Blue GO! Strip Cutter-3½ (3 Finished) (55032) 3 3½ x WOF Strips Set aside for border Additional Fabrics/Notions Needed Fusible Web Product-1/2 yard Backing 1 yard Binding-1/3 yard Cut 4 2½ x WOF strips (set aside) Batting 30 x 30 Yardage Sewing Directions 1. Pin and sew one medium light blue and one dark blue 8½ square together. Press seams toward the dark blue. Make two half blocks. Pin and sew two half blocks together as shown to complete block. Press seams open AccuQuilt PQ10402


26 2. Lay out 16 white and 16 medium blue 1½ squares as shown. 3. Pin and sew squares into rows. Press seams towards the medium blue. 4. Pin and sew rows together to make one pieced side border. Press seams to one side. Repeat to make a total of two side borders. 5. Lay out 20 white 1½ squares and 20 medium blue 1½ squares as shown. 6. Pin and sew squares into rows pressing seams open. Repeat to make a total of two top/bottom borders. 7. Lay out the two pieced side borders and two pieced top/bottom borders as shown around the center square. 8. Pin and sew pieced side borders onto the center square. Press towards the center square. 9. Pin and sew pieced top/bottom borders onto the center square. Press towards the center square. 10. Pin and sew together the three remaining dark blue strips along the short end to make one long strip. 11. Measure the length of your wall hanging and cut two borders to this length. 12. Pin and sew borders onto the sides of the wall hanging as shown. Press towards the borders. 13. Measure the width of your wall hanging top and cut two borders to this length. 14. Pin and sew borders onto the top and bottom of the wall hanging. 15. Iron fusible web onto the backside of your appliqué fabrics. 16. Cut out four Snowflakes and fuse onto wall hanging as shown. 17. Using a decorative stitch on your machine, stitch around the edges of the appliqué shapes to secure them to the quilt top AccuQuilt PQ10402
27 Quilting & Finishing 1. Layer wall hanging with batting and backing. 2. Pin or baste layers together. 3. Model was custom machine quilted. Optional Pillow 1. From backing fabric cut two 16½ x 26½ rectangles. 2. Along one long side of each rectangle, press under 1 twice to form a double hem and topstitch down. 3. Lay hemmed rectangles right sides together with the pillow top overlapping the hemmed sides of the back pieces. All together measuring 26½ x 26½. 4. Sew around all four sides and turn pillow right side out and insert pillow form through the opening in the back AccuQuilt PQ10402

 GO! Holiday Medley (55043) GO! Holiday Accessories (55321) GO! Sleigh & Snowflakes (55322) GO! Strip Cutter-1 1 2\" (55024) GO!")
 FABRIC REQUIREMENTS Fabric 1 3 8 yard Fabric 2 3 4 yard Fabric 3 2 3 yard (includes binding) Fabric 4 1 4 yard Fabric 5 1 4 yard Fabric 6 1 4 yard Appliqué fabrics use")

28 1 of 2 GO! Santa s Signature Wall Hanging finished size 21" x 34" finished block size 4½" x 4½" CUTTING DIRECTIONS Fabric 1: Cut 12 signature blocks Fabric 2: Cut " x " rectangle across the width of fabric (WOF) Cut " x " rectangle across the WOF Cut " x " rectangles across the WOF GO! DIES USED GO! Signature Block (55356) Fabric provided by Moda Fabrics GO! Half Square-3" Finished Triangle (55009) GO! Holiday Medley (55043) GO! Holiday Accessories (55321) GO! Sleigh & Snowflakes (55322) GO! Strip Cutter-1 1 2" (55024) GO! Strip Cutter-2 1 2" (55014 or 55017) GO! Strip Cutter-3 1 2" (55032) GO! Strip Cutter-6 1 2" (55086) FABRIC REQUIREMENTS Fabric yard Fabric yard Fabric yard (includes binding) Fabric yard Fabric yard Fabric yard Appliqué fabrics use Fabrics 1 6, and scraps or fat quarters Fusible web 1 yard Backing 3 4 yard Batting 27" x 40" Fabric 3: Cut " strips across the WOF for binding Cut " strips across the WOF for inner border Sub cut into " x " rectangles; and " x 9 1 2" rectangles Cut 6 3" finished half square triangles Fabric 4: Cut 6 3" finished half square triangles Fabric 5: Cut 6 3" finished half square triangles Fabric 6: Cut 6 3" finished half square triangles Appliqué fabrics: (all with fusible web backing) Cut 4 reindeer facing right Cut 2 sleighs (one for top half and one for bottom half) Cut 4 holly leaves Cut 7 holly berries (1 is used for reindeer nose) Cut 1 bow Cut " square SEWING DIRECTIONS NOTE: Press seams toward the darker fabric, for the least bulk or as directed. 1. Lay out one signature shape and two Fabric #5, 3" finished half square triangles for one block. 2. Pin and sew one triangle to one signature block shape, right sides together, matching ends as shown. Press seam open. 3. Pin and sew second triangle to signature block shape to complete block AccuQuilt to order call more accuquilt.com Code PQ10186i
29 2 of 2 SEWING DIRECTIONS Cont. 4. Repeat for a total of 12 blocks using two of the same fabric triangles for each block. 5. Hand or machine embroider lettering on signature blocks using quilt diagram as inspiration. A fabric marker could also be used. 6. Lay out blocks for quilt center according to quilt diagram. 7. Pin and sew blocks together to form two rows of six blocks. Press seams open. 8. Pin and sew rows together to form quilt center. Press seams open. 9. Pin and sew one Fabric #3, 1 1 2" x 9 1 2" inner border rectangle to each side of quilt center. Press seams toward inner border. 10. Pin and sew one Fabric #3, 1 1 2" x " inner border rectangle to top and bottom of quilt center. Press seams toward inner border. 11. Pin and sew one Fabric #2, 3 1 2" x " outer border rectangle to top of quilt center. Press seams toward inner border. 12. Remove paper backing from appliqué shapes. 13. Lay out shapes on Fabric #2, 6 1 2" x " outer border rectangle following quilt diagram. 14. Fuse shapes in place following manufacturer s instructions. 15. Appliqué edges of shapes by hand or machine. 16. Add eyes and reins by hand or machine. 17. Pin and sew Fabric #2, 6 1 2" x " appliquéd outer border rectangle to bottom of quilt center. Press seams toward inner border. 18. Pin and sew one Fabric #2, 2 1 2" x " outer border rectangle to each side of quilt center. Press seams toward inner border. 19. Lay out holly and berry shapes on quilt center following quilt diagram. 20. Fuse and appliqué shapes. QUILTING AND FINISHING 1. Layer batting between quilt top and backing. 2. Pin or baste layers together. 3. Model was machine quilted. 4. Add binding, mitering corners AccuQuilt to order call more accuquilt.com Code PQ10186i
 Light blue fabric ¼ yard Green fabric fat quarter Fusible web 1")

 GO!")

30 holiday medley GO! Project Idea Assembly Instructions free project idea holidays to GO! WALL HANGING OR TABLE RUNNER finished size 12" x 46" FABRIC REQUIREMENTS White fabric 1 yard Red fabric 2 3 yard (includes binding) Light blue fabric ¼ yard Green fabric fat quarter Fusible web 1 yard CUTTING DIRECTIONS White Fabric: Cut 4 3½" x 12½" rectangles Cut 9 snowflakes with fusible web backing Cut 48 2" half square finished triangles Red Fabric: Cut 4 2½" strips across the width of fabric for binding Cut 48 2" half square finished triangles Cut 8 holly berries with fusible web backing Light Blue Fabric: Cut 3 6½" x 12½" rectangles Green Fabrics: Cut 12 holly leaves with fusible web backing SEWING DIRECTIONS 1. Pin and sew 48 red and white half square triangles right sides together. Press seams toward red triangles. 2. Pin and sew red and white half square triangles into eight sets of six following orientation in diagram below. holiday medley Use 6" x 12" mat (55112) GO! Dies also used: Strip Cutter-2½" (55017) Half Square-2" Finished Triangle (Die packaged with fabric cutter) 3. Remove paper backings from appliqué shapes. 4. Position three holly leaves and two berries on each white 3½" x 12½" rectangle. Fuse according to manufacturer s instructions. Tip: Use the point of a pin to move small shapes. 5. Position one snowflake centered on each light blue 6½" x 12½" rectangle. Position side snowflakes so straight line is ¼" inside side edges as shown. Trim off excess snowflake shape beyond edge of rectangle. Fuse shapes in place. 6. Machine appliqué edges of shapes with matching thread and a narrow zigzag or narrow satin stitch. 7. Layout sections according to diagram. 8. Pin and sew sections together. Press seam allowances toward rectangles. QUILTING AND FINISHING 1. Layer batting between top and backing. 2. Pin or baste layers together. 3. Machine quilt around appliqué. 4. Add binding, mitering corners AccuQuilt to order call more project accuquilt.com Code PQ4327i


31 GO! Project Idea Assembly Instructions wall hanging Page 1 of 2 GO! holiday medley skinny WALL HANGING finished size 6" x 32" FABRIC REQUIREMENTS Background sky fabric 1 4 yard Background snow, side binding and appliqué snow fabric 3 8 yard Tree appliqué fabrics 5 scraps at least 6" square Red fabric 1 4 yard or fat quarter (includes top and bottom binding) Solid white fabric 1 4 yard or fat quarter Fusible Web 3 4 yard Backing 1 4 yard Batting 10" x 36" CUTTING DIRECTIONS Background Sky Fabric: Cut " x 19" rectangle Background Snow Fabric: Cut " x 10" rectangle Cut " strips for side bindings Cut 6 2" finished half square triangles Note: Cut one each snow appliqué fabric, solid white fabric and two fusible web 6" x 18". Following manufacturer s directions, fuse one fusible web rectangle to the wrong side of snow appliqué fabric. Remove backing paper. Layer and fuse solid white rectangle to wrong side of appliqué snow fabric. Layer and fuse second fusible web rectangle to wrong side of solid white/snow appliqué fabric rectangle. This makes a thicker white fabric that prevents shadowing of the background fabric through the appliqué snowflakes and circles. Cut 3 snowflakes and " circles from prepared fusible fabric Holiday Medley Use 6" x 12" mat (55112) Red Fabric: Cut " x 10" strips for binding Cut 6 2" finished half square triangles Appliqué Fabrics: Cut 5 trees with fusible web backing GO! Dies also used: Strip Cutter-2½" (55017) Half Square-2" Finished Triangle (Die packaged with fabric cutter) SEWING DIRECTIONS 1. Pin and sew six white and red half square triangles right sides together. Press seams toward red triangles. 2. Pin and sew half square triangles into two sets of three following orientation in diagram. Press toward red triangles. 3. Pin and sew background sky and background snow rectangles together along 6 1 2" edge. Press seam open. 4. Remove paper backings from appliqué shapes. 5. Position trees and snowflakes on background rectangle. Lift off top left snowflake (this makes the snowflake underneath much easier to sew around). Fuse remaining shapes according to manufacturer s instructions. Trim off shapes beyond edges of background rectangle. 6. Machine appliqué edges of shapes with matching thread and a narrow zigzag or narrow satin stitch. 7. Position third snowflake and 20 circles on wall hanging. Fuse and appliqué. Trim off excess snowflake. 8. Layout half square triangle sections and wall hanging center according to diagram. 9. Pin and sew sections together. Press seams toward half square triangle sections AccuQuilt to order call more project accuquilt.com Code PQ4485i
32 GO! Project Idea Assembly Instructions wall hanging Page 2 of 2 QUILTING AND FINISHING 1. Layer batting between wall hanging top and backing. 2. Pin or baste layers together. 3. Model was machine quilted outlining appliqué shapes and half square triangles. 4. Fold and press 2 1 2" binding strips in half lengthwise wrong sides together. Pin and sew white binding strips to sides of wall hanging. Press toward binding. Hand sew binding to back of wall hanging covering stitching line, or stitch in the ditch from the front catching back of binding in stitching. Trim binding even with top and bottom edges of wall hanging. 5. Cut two red binding strips 2" longer than width of wall hanging. Press in half lengthwise wrong sides together. Pin one to bottom front of wall hanging, centering across width. Fold binding extensions around to back of wall hanging and pin. Stitch across bottom of wall hanging, stitching across all layers of binding and wall hanging. 6. Press toward binding. Ends of strips should be neat folds. Pin binding to back of wall hanging. Hand stitch in place. 7. Repeat for top edge of wall hanging, adding a hanging sleeve, if desired, before hand stitching binding to back of wall hanging AccuQuilt to order call more project accuquilt.com Code PQ4485i
33 Use with: GO! Big GO! GO! Baby Christmas Candy Apples Designed & Quilted by Sandra L. Hatch Add a little cheer to your holiday table setting this year with this very creative technique. Or change the fabrics to suit any season. Project Specifications Skill Level: Intermediate Runner Size: 43¼" x 15½" Block Size: 6¼" x 4½" Number of Blocks: 27 White Candy Apple 6 1 /4" x 4 1 /2" Block Make 13 Red Candy Apple 6 1 /4" x 4 1 /2" Block Make 14 Materials 24 assorted 1½" x 21" C strips coordinating holiday prints 5 8 yard green holiday print 7 8 yard white holiday print 7 8 yard red holiday print Batting 52" x 23" Backing 52" x 23" Neutral-color all-purpose thread Quilting thread GO! Dies: GO! Apple Core (55036) Optional: GO! Strip Cutter 1½" (1" Finished) (55024) Optional: GO! Strip Cutter-2¼" (1¾" Finished) (55053) Basic quilting tools and supplies Cutting Instructions Tip: Use GO! Strip Cutters 2¼" to cut binding. 1. Cut three 8½" by fabric width strips white holiday print; subcut strips into (26) 4" A rectangles. 2. Cut three 8½" by fabric width strips red holiday print; subcut strips into (28) 4" B rectangles. 3. Cut 2¼" bias strips green holiday print to total 160" when joined for bias binding. Note: Binding must be made from bias strips because of the curved outer edges of the runner. Piecing & Die-Cutting A-C & B-C Units Tip: Use GO! Strip Cutter 1½" to cut C units. 1. Select eight different C strips and join along the 21" length to make a strip set; press seams in one direction. Repeat to make a total of three C strip sets. 2. Subcut the C strip sets made in step 1 into (27) 1½" C units referring to Figure 1. 21" 1 1 /2" Figure 1 3. Select one C unit and sew an A rectangle to each long side to make an A-C unit as shown in Figure 2; press seams toward A. Repeat to make a total of 13 A-C units. Make 13 Make 14 C C A A B B Figure 2 4. Repeat step 3 with the remaining C units and the B rectangles to make 14 B-C units, again referring to Figure AccuQuilt Code PQ
34

35 5. Select and layer three A-C units on the cutter, varying the position of the strips and die-cut the shapes. Repeat with all A-C and B-C units to make a total of 13 A-C and 14 B-C apple core units as shown in Figure 3. Note: If you would like more variety in the apple core units, die-cut the A-C and B-C units individually. 2. Repeat step 1, adding units to make a row containing four A-C and five B-C units as shown in Figure 5; press seams toward the concave side of the units. Repeat to make two rows. BC AC Make 2 Figure 3 Completing the Runner 1. Carefully sew the narrow convex curved end of a B-C unit into the wider concave side of an A-C unit, matching and pinning at center notches and ends and generously between as shown in Figure 4. Figure 4 Figure 5 3. Repeat step 2 to make one row with five A-C units and four B-C units as shown in Figure 6. AC BC Make 1 Figure 6 4. Join the rows referring to the Placement Diagram for positioning; press seams in one direction. 5. Layer, quilt and bind with 2¼" wide green holiday print bias strips. Christmas Candy Apples Placement Diagram 43 1 /4" x 15 1 /2" AccuQuilt Code PQ
BABY QUILTS Using the AccuQuilt GO!
 Ready, Set, GO! BABY QUILTS Using the AccuQuilt GO! 7 FREE patterns INSIDE GO! Talk to the Animals Baby Quilt featuring Riley Blake Designs Fabric GO! Big & GO! Fabric Cutter Friendly 2017 AccuQuilt to
READY. SET. QUICK & EASY PATTERNS
 READY. SET. QUICK & EASY PATTERNS USING THE ACCUQUILT GO! GO! Big and GO! Fabric Cutter Friendly 6 FREE patterns INSIDE GO! X Marks the Spot Baby Quilt featuring Riley Blake Designs Fabrics Download FREE
READY. SET. FAN FAVORITES PATTERNS
 READY. SET. FAN FAVORITES PATTERNS USING THE ACCUQUILT GO! GO! Big and GO! Fabric Cutter Friendly 4 FREE patterns $ 15 Value GO! Talk to the Animals Baby Quilt featuring Riley Blake Designs Fabric Download
Ready, Set, GO! SET YOUR TABLE. Using the AccuQuilt GO! GO! Let s Talk Turkey Placemats
 Ready, Set, GO! SET YOUR TABLE Using the AccuQuilt GO! 8 FREE patterns INSIDE GO! Let s Talk Turkey Placemats GO! Big & GO! Fabric Cutter Friendly 2017 AccuQuilt to order call 888.258.7913 more patterns
MEET THE GO! CUTTERS: 90% faster than rotary cutting
 WHY YOU NEED A FABRIC CUTTER: a better way to cut TM Turn your patterns into quilts faster and more accurately with the AccuQuilt GO! fabric cutting systems. With over 200 piecing and appliqué shapes,
MEET THE GO! CUTTERS: 90% faster than rotary cutting
 WHY YOU NEED A FABRIC CUTTER: a better way to cut TM Turn your patterns into quilts faster and more accurately with the AccuQuilt GO! fabric cutting systems. With over 200 piecing and appliqué shapes,
Sassy Runner. Design by Wendy Sheppard Skill Level: Confident Beginner Number of Blocks: 8 Block Size: 8" x 8" (finished) quiltingtreasures.
 quiltingtreasures.") Approximate Size: 24½" x 42¼" Design by Wendy Sheppard Skill Level: Confident Beginner Number of Blocks: 8 Block Size: 8" x 8" (finished) 1 Studio 8 FABRIC REQUIREMENTS 24194 W 24195 N 24196 S 24196 N
Approximate Size: 24½" x 42¼" Design by Wendy Sheppard Skill Level: Confident Beginner Number of Blocks: 8 Block Size: 8" x 8" (finished) 1 Studio 8 FABRIC REQUIREMENTS 24194 W 24195 N 24196 S 24196 N
GO! Talk To The Animals Baby Quilt Finished Size 41" x 41"
 GO! Talk To The Animals Baby Quilt Finished Size 41" x 41" Fabrics provided by Riley Blake Fabrics GO! Dies Used, Number of Shapes to Cut & Fabric Requirements Fabric Color Shape GO! Dies Used Number of
Fabric and Supplies. Featuring fabrics from the Ellie II collection by Sue Penn for.
 s r e h t a e F Elegant Featuring fabrics from the Ellie II collection by Sue Penn for Finished Quilt Size 50" x 50" Quilt design by Abigail Dolinger for Studioe Fabrics ay Black Colorw Fabric and Supplies
Holidays with Our Homies
 Holidays with Our Homies Featuring Holiday Homies by Tula Pink Celebrate the holidays with Buck the dog, Gus the buck, and Ryan the goose in this whimsical saw tooth star quilt. Collection: Technique:
Sunny Sue Baby Quilt
 Sunny Sue Baby Quilt Designed & Quilted by Julie Weaver Use with: GO! Big GO! GO! Baby Make a nostalgic baby quilt that will surely please a new mother. The Sunbonnet Sue die makes cutting a breeze and
Finished Size: 75"x 75"
 Finished Size: 75"x 75" Finished Size: 75"x 75" Block Size: 1"x1" and 6"x6" Quilters Basics Read instructions before beginning a project. All instructions include a ¼" seam allowance. Press as you go.
GO! Qube 8" Hugs & Kisses Baby Quilt Finished Size: 40" x 40"
 GO! Qube 8" Hugs & Kisses Baby Quilt Finished Size: 40" x 40" For use with GO! Qube Mix & Match 8" Block (55776) Fabrics are from the Cotton Couture Solids and assorted dot prints collections and are provided
Love Grows Here Quilt
 SIZE 67½" X 81½" Pg 1 Finished Size: 67½"x 81½" 26298 H one 24 repeat 2/3 YARD Numbers within gray box = Number of Bolts needed to make 12 kits; based on continuous cuts FABRIC REQUIREMENTS 26299 H 7/8
GO! Qube 8" Twirling Petals Quilt Finished Size: 50" x 50"
 GO! Qube 8" Twirling Petals Quilt Finished Size: 50" x 50" Fabrics are from the Sugar Pie Collection by Lella Boutique and are provided by Moda Fabrics Dies Needed: GO! Qube Mix & Match 8" Block (55776)
Beetles, Bees, and Butterflies
 Beetles, Bees, and Butterflies A Whimsical Row Quilt Designed by Debbie Beckwith Graves 48 ½" x 53" Featuring fabrics from The Happy Garden collection by Courtesy MHS Licensing for Materials Navy Happy
Happy Winter Snowman Quilt
 1 Happy Winter Snowman Quilt This quilt is sure to become a classic addition to your décor at Christmas time. Rows of fun snowmen and loving hearts are highlighted against a deep blue winter sky. The quilt
MEET THE GO! CUTTERS: 90% faster than rotary cutting
 WHY YOU NEED A FABRIC CUTTER: a better way to cut TM Turn your patterns into quilts faster and more accurately with the AccuQuilt GO! fabric cutting systems. With over 200 piecing and appliqué shapes,
Cheri Good Quilt Design s Ribbon Star
 Cheri Good Quilt Design s Ribbon Star Designer: Cheri Good Quilt Designs Ribbon Star Size 56 x 56 #110A Ribbon Star Strip Quilt Supplies Finished quilt size: 56 x 56 Cotton thread to match fabrics Basic
GO! Qube 6" Storm at Sea Throw Quilt Finished Size: 50" x 50"
 GO! Qube 6" Storm at Sea Throw Quilt Finished Size: 50" x 50" For use with GO! Qube Mix & Match 6" Block (55775) Fabrics are provided by Island Batik To make a 6" Block use GO! Qube Mix & Match 6" Block
A SPOOKY SLEEPOVER. This is a free pattern provided by The Red Boot Quilt Company The Red Boot Quilt Company
 A SPOOKY SLEEPOVER The Red Boot Quilt Company The Red Boot Quilt Company A SPOOKY SLEEPOVER Approx. Size 38 1/2in x 57 1/2in BEFORE THE FUN BEGINS Please read all instructions before you begin. Abbreviations.
 Bella! Finished Quilt Size 43" x 43" Featuring fabrics from the Bella Flora collection by Project Fabric Requirements 1550-33... 5 8 Yard 1551-66... 1 8 Yard 1552-33... ½ Yard 1553-33... ½ Yard 1554-33...
Old Glory One Stamp. Alternate Piano Key Border. Morning Glory Designs by Reeze L. Hanson Quilts of Valor Pattern 65 x 79
 Old Glory One Stamp Alternate Piano Key Border Morning Glory Designs by Reeze L. Hanson Quilts of Valor Pattern 65 x 79 Instructions for cutting and piecing Quilt Panel and Border 1 1. Trim the quilt panel
125 th Anniversary Quilt. Celebrating the BERNINA 125 th Anniversary!
 125 th Anniversary Quilt Celebrating the BERNINA 125 th Anniversary! : fabrics Fabric A: 5490M-33 Paisley Gold 1-5/8 yards Fabric B: Binding 5494M-07 1/2 yard Fabric G: 5490-07 highlights only for embroidered
GO! Qube 6" Stained Glass Quilt Finished Size: 42½" x 48½"
 GO! Qube 6" Stained Glass Quilt Finished Size: 4½" x 48½" For use with GO! Qube Mix & Match 6" Block (55775) Fabrics are from Timeless Treasure s Studio Basics Collection To make a 6" Block use GO! Qube
Fox Fun Mug Rug H I J. Figure 1
 one day only DESIGN BY JOANNA WILCZYNSKA Fox Fun Mug Rug Good things come in small packages. Create a cute coaster that may end up on a wall instead. ScRap- FRIENDLY PROJECT SPECIFICATIONS Skill Level:
Figgy Pudding #131. Finished quilt size is 69-1/2 x 69-1/2. Materials Needed:
 #131 Figgy Pudding Finished quilt size is 69-1/2 x 69-1/2 Materials Needed: 10 fat quarters 2-3/4 yards background fabric 1 fat quarter for corner blocks 1 yard border fabric 2/3 yard binding fabric 4-1/2
Sondalo Table Runner
 www.fabriceditions.com Sondalo Table Runner Finished Size: 14½" x 54½" Supp lies Needed 2 Fabric Palette Sondalo Fat Quarter Bundles (18" x 21") (10 different designs) 16" x 56" Low-loft batting 17" x
CHRISTMAS CANDY. Quilt Finished Size: 64" x 80" Block Finished Size: 8" x 8"
 CHRISTMAS CANDY Quilt design and instructions by Wendy Sheppard Specification: Advanced Beginner Quilt Finished Size: 64" x 80" Block Finished Size: 8" x 8" Cutting Instructions: From Fabric A, cut for
Folk-Art Dish Garden
 Folk-Art Dish Garden Designed by Kim Diehl Finished quilt size: 20½" x 24½" Finished center block size: 11½" x 15½" ~ 1 ~ Materials ⅝ yard of tan print #1 for background 1 chubby sixteenth (9" x 11") each
Daily Grind. Designed by: Janet Wecker Frisch. Approximate napkin size: 17 X 17. Approximate quilt size: 61 X 61
 Daily Grind Designed by: Janet Wecker Frisch Approximate quilt size: 6 X 6 Approximate napkin size: 7 X 7 2673 A 2674 A backing 2676 AJ also binding 2676 E Ap r 2672 A on :o ne si ze fit s m os t Approximate
Cat's Night Out. Prepare Templates: Prepare templates as directed on the Template Pages.
 Quilt by Lucy A. Fazely & Michael L. Burns Finished Quilt: 78" x 80-1/2" - Finished Block Size: 6" to 12" Nature's Studio fabrics by Classic Cottons - Style #3644 Fabric Requirements: Based on 44" wide
My Sunflower Garden Quilt 1
 My Sunflower Garden Quilt 1 by Denise Russell Quilt size: 72 x 92 - Pillow size: 20 x 32 Skill Level: Intermediate 49 West 37th Street New York, NY 10018 Tel: 212-686-5194 - Fax: 212-532-3525 Toll Free:
Nature's Studio Checkerboard Flowers
 By Larisa Key Finished Quilt Size: 68" x 79", Finished Block Size: 11" x 11" Classic Cottons Nature's Studio Fabrics - Style #3644 MATERIALS Yardage is based on 42" wide useable fabric 1-7/8 yd. of white
Starstruck Throw. Design by Chris Malone Quilted by Jean McDaniel
 Starstruck Throw esign by hris Malone Quilted by Jean Mcaniel Use with: GO! Big GO! GO! Baby This design allows you to color-coordinate each block for an overall controlled scrappy look. Easy piecing and
GO! Qube 9" Next Door Neighbor Quilt Finished Size: 44" x 44"
 GO! Qube 9" Next Door Neighbor Quilt Finished Size: 44" x 44" Fabrics are provided by Island Batik Dies Needed: GO! Qube Mix & Match 9" Block (777) GO! Quarter Square Triangle-4½" Finished Square (Shape
Butter Churn Berry Blossoms
 Butter Churn Berry Blossoms by Kim Diehl Finished Quilt Size: 201/2" x 201/2" A Free Project Sheet from 1 49 West 37th Street, New York, NY 10018 tel: 212-686-5194 fax: 212-532-3525 Toll-free: 800-294-9495
MEET THE GO! CUTTERS: 90% faster than rotary cutting
 WHY YOU NEED A FABRIC CUTTER: a better way to cut TM Turn your patterns into quilts faster and more accurately with the AccuQuilt GO! fabric cutting systems. With over 200 piecing and appliqué shapes,
Benartex Bows Table Runner A Foundation Pieced Design Skill Level: Beginner
 Benartex Bows Table Runner A Foundation Pieced Design Skill Level: Beginner Designed By Alexandra Henry Sewn By Alexandra Henry http://www.artbyalexa.com Use Pellon Stitch-N-Tear Lite to foundation piece
GO! Qube 6" Rick Rack Flower Throw Quilt Finished Size: 46" x 46"
 GO! Qube 6" Rick Rack Flower Throw Quilt Finished Size: 46" x 46" Fabrics provided by Timeless Treasures For use with GO! Qube Mix & Match 6" Block (55775) and GO! Qube 6" Companion Set Classics (55779)
A SPOOKY SLEEPOVER. The Red Boot Quilt Company
 A SPOOKY SLEEPOVER The Red Boot Quilt Company www.theredbootquiltcompany.com A SPOOKY SLEEPOVER Approx. Size 38 1/2in x 57 1/2in BEFORE THE FUN BEGINS Please read all instructions before you begin. Abbreviations.
Accent on Amish Welcome!
 Quilt Along Accent on Amish Welcome! Designed by The Staff of McCall s Quilting Made and Machine Quilted by Sheryl Martin Skill Level Beginner Finished Quilt Size 44H x 44H Number of Blocks & Finished
Notes - Please wash, dry & iron your fabric before beginning. - Sew all seams with an accurate 1/4 seam allowance. CUTTING INSTRUCTIONS
 Notes - Please wash, dry & iron your fabric before beginning. - Sew all seams with an accurate 1/4 seam allowance. CUTTING INSTRUCTIONS Indicates fabric pattern is directional on strips Fabric A: Horizontal
Handful of Stars. by Kim Diehl. Finished Quilt Size: 621/2" x 621/2" Finished Star Block Size: 8" x 8" A Free Project Sheet from
 Handful of Stars by Kim Diehl Finished Quilt Size: 621/2" x 621/2" Finished Star Block Size: 8" x 8" A Free Project Sheet from 49 West 37th Street, New York, NY 10018 tel: 212-686-5194 fax: 212-532-3525
Spring Rain Bed Runner
 Use with: GO! Big GO! GO! Baby Spring Rain Bed Runner Designed by Vivian Peritts for AccuQuilt As seen in Modern Quilts Unlimited Spring 2016 issue www.accuquilt.com 888.258.7913 2016 AccuQuilt Code PQ11037
Wrap your favorite novel in a quilted cover to protect it and turn heads. It adjusts to fit any size paperback and has a handy bookmark.
 DESIGNED & QUILTED BY CINZIA ALLOCCA Mini Quilt Bookwrap SPECIFICATIONS Skill Level: Confident Beginner Bookwrap Size: 17" x 9" (excluding ties and bookmark) Wrap your favorite novel in a quilted cover
 Flower Festival by Debbie Beckwith Graves 33" x 39" Featuring fabrics from the collection by Materials E30-BUNDLES-081 E60-1412-GRN E60-1414-ORG E60-1415-TURQ (backing) E60-1416-BLU (incl. binding) E60-1416-ORG
Iris Table Topper/Back to Front Binding Tutorial Skill Level: Beginner
 Iris Table per/back to Front Binding Tutorial Skill Level: Beginner Designed by Alexandra Henry Made by Alexandra Henry www.artbyalexa.com This spring table topper will be a welcome addition to any decor.
set; press. Repeat to make 17 strip sets. Cut each strip set into 8 (21/2" x 41/2") B segments as shown in Figure 1.
 B segments as shown in Figure 1.") DESIGN BY SUE HARVEY Posy Patch Frayed edges form the petals in this garden of pastel posies. SPECIFICATIONS Skill Level: Confident Beginner Quilt Size: 56" x 72" Block Size: 8" x 8" Number of Blocks:
DESIGN BY SUE HARVEY Posy Patch Frayed edges form the petals in this garden of pastel posies. SPECIFICATIONS Skill Level: Confident Beginner Quilt Size: 56" x 72" Block Size: 8" x 8" Number of Blocks:
 Fling by Laura Jones 57" x 68" Featuring fabrics from the E60-1439-GRY E60-1440-PUR E60-1441-PUR E60-1442-GRN E60-1443-TURQ E60-1444-PUR E60-1444-GRY (includes binding) collection by Materials 1 Yard 1
Ladybug. Fly Away Home quilt designed by Leigh Headington. Finished quilt: " x " Finished block: 12" square
 Ladybug Fly Away Home quilt designed by Leigh Headington Finished quilt: 64 1 2" x 76 1 2" Finished block: 12" square Fabric Requirements 3/8 yard Dot-C1820 Red 1/4 yard Fun-C3851 Black 1/4 yard Fun-C3851
Acrylic Ruler/Mat Tote Bag
 Acrylic Ruler/Mat Tote Bag Outside Pocket holds 12 1/2' and 16" square up rulers Inside pockets hold 6" x 24" ruler, 6" x 12" ruler, 6" x 6" ruler Plus the inside has pockets for other rulers, notions,
GO! Qube 9" City Life Quilt Finished Quilt Size: 48 1 / 8" x 64" Finished Block Size: 15 5 / 8" x 15 5 / 8"
 GO! Qube 9" City Life Quilt Finished Quilt Size: 48 1 / 8" x 64" Finished Block Size: 15 5 / 8" x 15 5 / 8" Fabrics are from the City Life Collection and are provided by Dear Stella. Dies Needed: GO! Qube
Rosy Cheeks Quilt Finished Quilt Size: 54 ½" x 70 ½"
 Designed by Jocelyn Ueng Rosy Cheeks Quilt Finished Quilt Size: 54 ½" x 70 ½" Quilt Fabric Materials White Tonal Floral* Red Large Rose Floral Red and Black Floral Black Small Floral Black Small Diamonds
THE FLOWER FAIRIES. The Red Boot Quilt Company
 THE FLOWER FAIRIES The Red Boot Quilt Company www.theredbootquiltcompany.com THE FLOWER FAIRIES Approx. Size 62in x 61in BEFORE THE FUN BEGINS Please read all instructions before you begin. Abbreviations.
Terrie Sandelin Miniatures in Minutes (C&T Publishing)
") Terrie Sandelin Miniatures in Minutes (C&T Publishing) http://www.terriesandelin.com Large Notepad, finished size (closed): 9 3/4" by 12 1/4" Small Notepad, finished size (closed): 6 1/2" by 8 3/4" The
Terrie Sandelin Miniatures in Minutes (C&T Publishing) http://www.terriesandelin.com Large Notepad, finished size (closed): 9 3/4" by 12 1/4" Small Notepad, finished size (closed): 6 1/2" by 8 3/4" The
THE FLOWER FAIRIES. This is a free pattern provided by The Red Boot Quilt Company 2017 STRICTLY NOT FOR RESALE OR DISTRIBUTION
 THE FLOWER FAIRIES This is a free pattern provided by The Red Boot Quilt Company 2017 STRICTLY NOT FOR RESALE OR DISTRIBUTION The Red Boot Quilt Company The Red Boot Quilt Company THE FLOWER FAIRIES Approx.
Stars and Stripes. Finished Quilt Size: 65½" x 65½" Finished Block Size: 13" x 13"
 Stars and Stripes Finished Quilt Size: 65½" x 65½" Finished Block Size: 13" x 13" The red-white-and-blue color scheme gets you ready to celebrate all of those patriotic holidays! Materials Yardage is based
P layful Cuties 2 - Nursery Rhymes Quilt
 P layful Cuties 2 - Finished Size: 40 ½" x 46 ½" (102.87cm x 118.11cm) Nursery Rhymes Quilt Fabrics Needed 3 Wishes Fabric Playful Cuties 2 Collection ¾ yd (68.58cm) Gray Dots (13876-Gray) for Piecing
Reflections: Jewel Tones Quilt featuring the Reflections Collection from EBI Fabric Corp.
 Reflections: Jewel Tones Quilt featuring the Reflections Collection from EBI Fabric Corp. Size: 54" x 54" Skill Level: Intermediate Design by Sasha K Studio Fabric Requirements & Cutting Instructions (A)
Project: Midnight Blooms Quilt
 inspired by late bloomers from Designer Kim Diehl (KimDiehl.com) quilt tester: laura boehnke FABRICS are from the Oriental Traditions collection from Robert Kaufman Fabrics (robertkaufman.com). Metallic
LIVE.LOVE.SEW FEATURE BLOCKS B.O.M PROGRAM
 LIVE.LOVE.SEW FEATURE BLOCKS B.O.M PROGRAM FEATURE BLOCKS Congratulations on finishing your twelve Feature Blocks! It has been so much fun sewing along with you all this past year, learning more about
Susannah Bee Quilt. Quilt designed by Terri Butler Finished size is approximately 43" x 60" A DIVISION OF HAMIL GROUP
 Susannah Bee Quilt Quilt designed by Terri Butler Finished size is approximately 43" x 60" A DIVISION OF HAMIL GROUP Quilt designed by Terri Butler Materials and Cutting Note: WOF is width of fabric from
FREE pattern available on our website, pbtex.com. Blast Off quilt by Heidi Pridemore Size: 62 square
 FREE pattern available on our website, pbtex.com Blast Off quilt by Heidi Pridemore Size: 62 square Blast Off Quilt by Heidi Pridemore using the Out of the World fabric collection by Jill McDonald for
GO! Qube 12" Laura s Kitty Quilt Finished Size: 40" x 46"
 GO! Qube 12" Laura s Kitty Quilt Finished Size: 40" x 46" Fabrics are Little House on the Prairie Mansfield & Prairie Icons and provided by Andover Fabrics A charm pack of the Mansfield Collection, 3/4
All a Flutter Table Runner
 SIZE 48½" X 21½" Pg 1 Finished Size: 48½" x 21½" 26358 R FABRIC REQUIREMENTS 26359 P 26359 Q 26360 Q piecing only 1 BOLT 1 BOLT 1 BOLT 1 BOLT 26360 Q backing only 1-5/8 YARDS 26360 R includes binding 5/8
Snowflake Kisses Pillow
 Snowflake Kisses Pillow From the first snow flurry of fall through Valentine s Day this charming snowman will melt your heart. We ve combined embroidery and quilting skills to make a patchwork pillow top.
Project: Spruce It Up Throw
 Designer: karen montgomery Assemble an entire forest of these easy pine trees in no time. They re simply pieced backgrounds topped with fusible appliqué. of Meredith Corporation. Meredith Corporation 2012.
Domino Effect. Quilt 1 by Denise Russell. Skill Level: Advanced Beginner. Quilt size: 61 x 71. Free Project NOT FOR RESALE
 Domino Effect Quilt 1 by Denise Russell Quilt size: 61 x 71 Skill Level: Advanced Beginner Blank Quilting Corporation 49 West 37th Street New York, NY 10018 Tel: 800-294-9495 Fax: 212-679-4578 www.blankquilting.net
Sewing Spools Wall Quilt
 Sewing Spools Wall Quilt Display a four-block wall hanging showcasing thread spool and sewing machine designs in your sewing space. Fabrics are from the Winsome collection by Kim Diehl for Henry Glass
Kimono Collection MATERIALS. Finished quilt size CUTTING
 Kimono Collection Colourful Japanese fabrics take the place of traditional paper in these tiny origami kimonos and a simple nine-patch quilt shows them off to perfection. MATERIALS Nine pieces of assorted
Uses Contempo s Anything Goes collection by Ann Lauer Finished Size: 57 x 57
 2016 Benartex, LLC It s easy to create your own art quilt with Ann Lauer s exciting new Anything Goes collection. Just follow the simple instructions and you ll have a fresh new modern wallhanging, perfect
... Had a Little Lamb
 ... Had a Little Lamb Quilt designed by Sue Harvey & Sandy Boobar of Pine Tree Country Quilts Finished size is approximately 50 x 56 A DIVISION OF HAMIL GROUP Quilt designed by Sue Harvey and Sandy Boobar
 Once Upon a Time Finished Quilt Size 40" x 50" Featuring fabrics from the Once Upon a Time collection by Racoon Illustration for Fabric Requirements Once Upon a Time 7243-55...1 panel 7261-66... 3 8 yard
Bird Watchers. Pecking Order quilt by Debby Kratovil. by Norman Wyatt
 Bird Watchers by Norman Wyatt Pecking Order quilt by Debby Kratovil Quilt size: approximately 35" x 39" Featuring fabrics from the Bird Watchers collection by Norman Wyatt and Suede by P&B Textiles Bird
Hanging out with the Homies
 Hanging out with the Homies Featuring Holiday Homies by Tula Pink Showcase these great fabrics in these fun ornaments just hangin around for the holidays. Collection: Technique: Skill Level: Crafting Time:
Crescendo Pin Wheel Quilt
 Crescendo Pin Wheel Quilt Pinwheel quilts are the perfect example of a quilt pattern inspired by a real object. Whimsical and decorative, pinwheel quilts create gorgeous motifs that any quilter will love.
Growth Chart: Cut this yardage first from your bundle. For the background rectangles cut 3 pieces 9 x 12 1/2 and 2 pieces 9 x 12 1/4.
 Growing Fast, projects 4-6 in 9 months til baby Start with 1 fat quarter bundle of Little One by Robert Kaufman Fabrics which includes 10 fat quarters and 1 bib panel. You will be able to make all 3 projects
Under The S ea Table Runner
 Finished Size: 12" x 48" (30.48cm x 121.92cm) Under The S ea Supp lies Needed B efore you begin 3 Wishes Fabric Under the Sea Collection 1 yd. (91.44cm) 12281-Lt. Blue 3 8 yd. (34.29cm) 12289-Lt. Blue
Winter Memories. Star Quilt. Featuring fabrics from the Winter Memories collection by Whimsies and Wishes for
 Winter Memories Star Quilt Featuring fabrics from the Winter Memories collection by Whimsies and Wishes for Fabric Requirements (A) 2994M-99... (B) Carbon-23*... (C) 2997-11... (D) 2998-11... (E) 2995M-99...
Gypsy Dreams. Quilt 2 by Denise Russell. Skill Level: Intermediate. Quilt size: 57 x 69. Free Project NOT FOR RESALE
 Gypsy Dreams Quilt 2 by Denise Russell Quilt size: 57 x 69 Blank Quilting Corporation 49 West 37th Street New York, NY 10018 Tel: 800-294-9495 Fax: 212-679-4578 www.blankquilting.net Skill Level: Intermediate
Charmed. Finished Size 48 x 60 Finshed Block 9
 Charmed Finished Size 48 x 60 Finshed Block 9 Materials Needed: 3 1/2 yards of the brown floral (8786-9), for blocks and backing 1 1/4 yards of the brown stripe (8792-9) 1 1/4 yards of the pink butterfly
A simple strip-pieced large center block turned on point with triangle corners makes for a quick yet sophisticated wall quilt. seams toward E.
 the man cave DESIGN BY TRICIA LYNN MALONEY A simple strip-pieced large center block turned on point with triangle corners makes for a quick yet sophisticated wall quilt. SPECIFICATIONS Skill Level: Confident
Flying Geese. Size 66" X 76" QTfabrics.com QT Fabrics All rights reserved. Pg 1. Designed by: Wendy Sheppard
 Flying Geese Size 66" X 76" Pg 1 FABRIC REQUIREMENTS 26711 N piecing only 1-1/4 YARDS 26711 N backing only 4-3/4 YARDS 4 BOLTS 26712 A 1/2 YARD 26712 W 1/2 YARD 26713 E 3/8 YARD 26713 G 5/8 YARD 26713
Quilt is 67" x 67". by
 by Quilt is 67" x 67". Quilt is 67" x 67". Cutting Appliqué Background: 1-24" square (This square is oversized and will be trimmed after the block has been appliquéd.) Inner Border: 6-2½" x width of fabric
Quilt designed by Sue Harvey and Sandy Boobar of Pine Tree Country Quilts Yardages and Cutting
 Fowl Play 54" x 60" Quilt designed by Sue Harvey and Sandy Boobar of Pine Tree Country Quilts www.pinetreecountryquilts.com Yardages and Cutting Note: WOF means width of fabric from selvage edge to selvage
Quilt meets Quilts of Valor size requirements.
 Monroe SIZE 60½" x 80½" Designed by Wendy Sheppard for Quilting Treasures Quilt meets Quilts of Valor size requirements. quiltingtreasures.com quiltingtreasures All rights reserved. Pg 1 FABRIC REQUIREMENTS
How to use your GO! Qube with this Pattern
 How to use your GO! Qube with this Pattern Use this chart to find which GO! Qube dies are compatible with the dies listed on the pattern 1 2 3 4 5 6 7 8 Quilt Shape By Number 1 2 3 4 6 7 8 5 GO! Qube Item
Chalkboard Snowman
 Chalkboard Snowman Two versions Featuring fabrics from the Chalkboard Snowman collection by Jennifer Brinley from White Snowflake Border Fabric Requirements Red Snowflake Border Fabric Requirements (A)
Candelabra Quilt. FreeSpirit presents: Candelabra by Verna Mosquera. Skill Level: Intermediate. Finished Size: 55 ½ x 73 ½ (141cm x 186.
 Technique: Piecing, Quilting Candelabra Quilt Skill Level: Intermediate Designed By: Brand: Crafting Time: Verna Mosquera and Kerri Thomson FreeSpirit Fabric Longer Term Inspired by the scariest holiday
S TA C K, SLASH & SASH. Quilting. Quilting 10+ unique projects
 Quilting S TA C K, SLASH & SASH Quilting 10+ unique projects 141355 S TA C K, S L A S H & SASH Quilting Edited by Carolyn S. Vagts 2 Introduction is all about creating uniquely beautiful quilts. Create
Designed by Elise Lea for RK
 JustAND Kisses STARS STRIPES Designed by Elise Lea for RK www.robertkaufman.com Featuring Finished quilt measures: 72 x 82 For questions about this pattern, please email Patterns@RobertKaufman.com. Fabric
BUTTERFLY GARDEN. The Red Boot Quilt Company
 BUTTERFLY GARDEN The Red Boot Quilt Company www.theredbootquiltcompany.com BUTTERFLY GARDEN Approx. Size 89 1/2in length x 92 1/2in width BEFORE THE FUN BEGINS Please read all instructions before you begin.
Photo location courtesy of Judith Batty. McCallsQuilting.com McCall s Quick Quilts 1
 Photo location courtesy of Judith atty. McCallsQuilting.com 017 McCall s Quick Quilts 1 Changing Lanes simple patches of color make this unusual quilt quick & colorful Designed and Sewn by Stephanie Sheridan
Coastal Chic Batiks Collection by Monique Jacobs
 FREE Quilt Pattern 52" x 65" quilt designed by Monique Jacobs Coastal Chic Batiks Collection by Monique Jacobs Coastal Chic Batik Quilt Instructions For best results, read the pattern completely first.
I See Spots Quilt. Want a smaller project? Scale down the quilt to a lap size or simply make a pillow. 80" x 88"
 I See Spots Quilt Create circles or spots without ever cutting a circle! How? Fusible interfacing is the key. Learn how to create this bed-sized quilt with the streamlined process of stitching circles
 Summer Breeze Finished Quilt Size 65" x 65" Featuring fabrics from the Summer Bouquet collection by Page 2 of 6 Materials Additional Materials & Supplies Fabric Requirements 5773-66 (Large Floral) 5774-66
Chelsea. Quilt. quiltingtreasures.com 1. Christine Graf
 Designed By: Wendy Sheppard Specification: Confident Beginner Finished Size: 56" x 69" Finished Block Size: 10" x 10" (total of 12 blocks) 1 Christine Graf FABRIC REQUIREMENTS 23528 EA 24007 Q 24007 R
Starry Scrappy Santa. Tiny 1"-finished squares are easily stitched into a background using a fusible 1" grid.
 DESIGN Y TAMMY CARLSON OF HAPPY HOLLOW DESIGNS Starry Scrappy Santa Tiny 1"-finished squares are easily stitched into a background using a fusible 1" grid. SpEcIFIcatIOnS Skill Level: Intermediate Quilt
SCRAPPY BEARS. The Red Boot Quilt Company
 SCRAPPY BEARS The Red Boot Quilt Company www.theredbootquiltcompany.com SCRAPPY BEARS Approx. size 27 1/2in x 27 1/2in This is a free pattern provided by The Red Boot Quilt Company 2018 STRICTLY NOT FOR