I Fold this page out. Index Page. Bobbin 7. Bobbin case 7, 8 Bobbin thread 8. Buttonholing 20, 21 Carrying case 1 Carrying handle 1.
|
|
|
- Eustace Martin
- 6 years ago
- Views:
Transcription

1 C
2 Work support 1 Bobbin case 7, 8 Bobbin thread 8 Utility/stretch stitch combinations 17 Winding 6 Utility stitches 16 Machine feed 18 Spool of thread 4 Trouble shooting 24, 25 Upper threading 5 Stretch stitches is Thread cutter 9 Thread tensions 10 Needle 18 Needle position 17 Special accessories 23 Special sewing feet 20 Reverse sewing 11 Presser bar lifter 9 Light bulb 22 Oiling 22 Cleaning 22 Slot-threading 4 Straight-stitch needle position 14 Buttonholing 20, 21 Carrying case 1 Carrying handle 1 Sewing feet 2, 19 Sewing mechanism 5 Stitch length 11 Stitch program chart Bobbin 7 Electrical connection 3 Finger-tip stitch buttons, Models 1014 and Finger-tip stitch buttons, Model Finger-tip stitch buttons, Model Finger-tip stitch buttons, Model Foot control 3 Index Page I Fold this page out
 - S 0 a CD")
3 2 N 4 p4_ CD (I) 0 9, 0 CA) - S 0 a CD 0
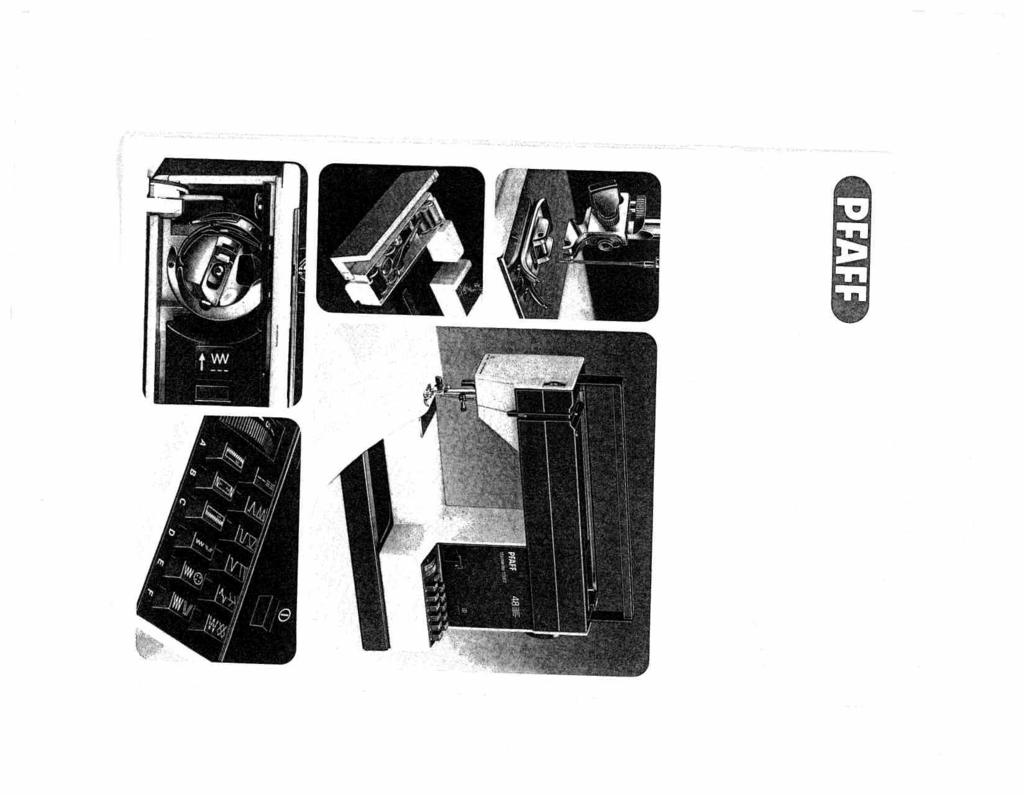
4 J Stop motion knob Master switch Finger tip stitch buttons Machine base sewing foot Take-up lever sewing hook 119 Reverse-feed control 122 Free arm cover, enclosing Presser bar lifter accessory compartment 121 Detachable work support with 120 Base plate Presser bar with thread cutter Threading slots Thread retainer stud Needle holder with set screw Needle thread tension Needle plate Hand wheel Bobbin winder Carrying handle Stitch length control Cover, enclosing hook Sewing foot holder with Spool holder with unreeling disc Parts of your sewing machine Some safety rules I 4 3-ampere fuse has to be fitted. When a 13-ampere plug is used a Please note: coloured in accordance with the mains lead of this appliance may not marked with the letter N or coloured must be connected to the terminal coloured red. which is marked with the letter L or The wires in this mains lead are The wire which is coloured brown marking identifying the terminals in black. correspond with the coloured connected to the terminal which is following code: Valid for United Kingdom only IMPORTANT Blue: Neutral Brown: Live As the colours of the wires in the wire which is coloured blue must be your plug, proceed as follows: The light bulb in the sewing lamp. 3. Be sure to use only a 15-watt a while. bobbin or needle plate, when you when you have to interrupt change needle, sewing foot, cord plug whenever you want to sewing and leave the machine for 2. Make sure you pull out the power needle. clean and oil the machine, or fingers will not be injured by the 1. Be careful when sewing that your
 has two holes at the back. cabinet.")
5 sewing feet, thread and other accessories. The accessory box is used to put away the left (0), and lift it out (P). Then open its lid (Q). Then lift the cover off. arrow. handle to the rear, as indicated by an Removing the carrying case cover i N To lift off the carrying case cover, fold the 1 ) has two holes at the back. cabinet. For this reason, this machine Model 1014 can be placed on a sewing Model 1014 on sewing cabinet (not ill.) N with your left hand (N), swing it out toward Reach under the detachable work support work support ( ) Removing and opening the detachable

6 4 ep:n6 e6p 4oo, bunne 0 OOJ qo1{jspuig OOJ JOddiz 8 oqj Jewuiej 0 100,t ejoquon 8 d 4004 M8iA-JBefQ o U1M89 piepuei N lea! Gu!&as
. Slide R on the electronic foot control serves Position 1 = full top speed control is placed in the machine again as switch 104.")
7 always retained, regardless of sewing speed. Position = half the top speed half. The full piercing power of the needle is to reduce the top speed of the machine to sewing. When you put the machine away, the foot shown in the illustration (N). Slide R on the electronic foot control serves Position 1 = full top speed control is placed in the machine again as switch 104. Your machine is now ready for plug P into the wall outlet. Press master starts sewing. The more the pedal is Push plug 0 into the machine socket and Press down the pedal, and the machine depressed, the faster the machine runs. Electronic foot control Take the foot control out of the machine. Place the foot control under the table. Electrical connection Foot control 3

8 medium unreeling disc. Push the spool of onto the spool pin and place unreeling disc unreeling disc. Push the spool of thread O Large spools of thread: use large unreeling disc 0 in front of the spool. thread onto the spool pin and place Upper threading the spool and draw it into slot N (to the left Raise the sewing foot. Pull the thread from take-up lever must be in their up position. For threading, both the needle and the 4 backwards the carrying handle and fit the winding and for two-needle sewing. Swing P Second spool holder: It is included in the A in front of the spool. accessories and is intended for bobbin N Small spools of thread: use small or of thread facing to right. Load thread reel with diagonal cut for end Placing spool of thread on pin For two-needle sewing, draw one thread into the slot to the left of guide 0 and the right thread guide Q on the needle holder. Then draw it back into slot P and into the take-up lever 113. of guide 0), from below into slot P and Then push a spool of thread onto the spool spool holder on the machine at the right. holder.

9 away from you. winding, tighten the knob again by turning it stop motion knob toward you. After bobbin Hold the hand wheel steady and turn the gage the sewing mechanism. Before you start winding the bobbin, disen other to the righe of the guide. One of the Thread the needle from front to back. threads is then pulled into the right thread Threading the needle on the needle holder. guide, the other into the left thread guide Disengaging the sewing mechanism I 5


10 retainer stud 114. Cut the thread. draw it through guide P and around thread full bobbin toward the left and take it out. slot N. Pull the thread from the spool and matically when the bobbin is full. Push the bobbin on spindle 101 so that pin 0 enters and place a spool of thread on it. Place a the bobbin. The bobbin winder stops auto press down the foot control pedal and wind Fit a second spool holder to the machine bobbin. Push the bobbin toward the right, 6 RI II... LI_.._1.J 4 N Disengage the sewing mechanism (page 5). Winding Then pull the thread toward the bobbin win der and wind a few turns of thread on the

11 long as you keep latch N pulled out. cover 122. Pull out latch N, then lift out the Remove cover 108 or open free arm bobbin case, release the latch and take out Removing bobbin case and bobbin the bobbin. The bobbin cannot fall out as under the spring into eye P. (N). Then draw the thread into slot 0 and so that the thread unreels toward the back Inserting the bobbin 7 Insert the filled bobbin into the bobbin case

12 122. the left and back under the sewing foot. Replace cover 108 or close free arm cover Stud 0 and latch P must be flush. must point upwards. Release the latch. lever is up. Pull the bobbin thread out of onto stud 0 as far as it will go. Cutout N hand wheel 102 toward you until the needle moves down and up again and the take-up Pull up latch P and push the bobbin case Hold the needle thread a little taut. Turn Inserting the bobbin case Drawing up the bobbin thread the needle hole and lay both threads toward 8
 toward you to raise the needle and sewing foot.")
13 Darning position for darning foot only. downwards to cut them. into the cutter slot and pull them machine toward the back. Draw the threads remove the work, turn the hand wheel inserting extra-thick materials. o = The sewing foot is raised further for the take-up lever.) toward you to raise the needle and sewing foot. Pull the work out of the Thread cutter sewing. The sewing foot is lowered for slot. enters notch R at the bottom of its same time push it back sligthly until it Lower the presser bar lifter and at the N The sewing foot is raised. (Before you Lever 115 has four positions: Presser bar lifter 9 at the back of the presser bar. Raise the The thread cutter is an oblique slot located

14 tighter the tension. should be adjusted. O = Regulating screw. correctly, only the upper thread tension Lower tension down freely by the thread. It must not slide your hand upwards lightly. gradually move downwards when you jerk down by its own weight, but should Let the bobbin case with a full bobbin hang The correct lower tension Once the lower tension has been set 10 Q- 4 4 tension too tight. tension too tight. Q = Upper tension too loose or lower R = Lower tension too loose or upper P = Both tensions are correct. right for a tighter tension. Turn it left for a looser tension, or 3 and 5. The higher the number, the setting is in the white range between N = Setting mark. The normal tension Upper tension I j I.

15 11 ibols on push buttons). trol for sewing stretch stitches (red stitch. 0 shows how to set the stitch length k N. the stitch lenght chosen is opposite, the control so that the number indicat 7 from 0 to 6 mm. jes from 0 to 4 mm, on Models 1019 to dicate the stitch length in millimeters On button depressed, the machine sews he numbers on stitch length control 106 Reverse sewing Press button 119. As tong as you keep this jegulating the stitch length todets 1014 and 1015 the stitch length backwards.

16 - A 2-mm zigzag stitch D Elastic triple zigzag stitch, 2 mm the left needle ppsition (see page 17). releasing the pushed buttons and for setting Button B is also used as clearing button for 12 B Straight stitch G Elastic triple straight stitch 5-mm zigzag stitch F Elastic triple zigzag stitch, 5.0 mm 3.5-mm zigzag stitch E Elastic triple zigzag stitch, 3.5 mm A, B, C; Buttons for buttonholing Finger-tip controls on Models 1014 and 1015

17 Finger-tip controls on Model 1019 A, B, C; Buttons for buttonholing Button B is also used as clearing button for releasing the pushed buttons and for setting the left needle position (see page 17). D Elastic triple zigzag stitch, 2 mm 2-mm zigzag stich E Elastic triple zigzag stitch, 3.5 mm 3.5-mm zigzag stitch F Elastic triple zigzag stitch, 5 mm G 5-mm zigzag stitch Elastic triple straight stitch Straight stitch M Honeycomb stitch Elastic stitch 13
. releasing the pushed buttons and for setting Button B is also used as clearing button for 3.")

18 14 5-mm zigzag stitch F Elastic triple zigzag stitch, 5 mm 2-mm zigzag stitch D Elastic triple zigzag stitch, 2 mm the left needle position (see page 17). releasing the pushed buttons and for setting Button B is also used as clearing button for 3.5-mm zigzag stitch A, B, C; Buttons for buttonholing E Elastic triple zigzag stitch, 3.5 mm Elastic stitch M Honeycomb stitch K Overlock stitch Joining stitch I Closed overlock stitch Straight stitch Finger-tip controls on Model 1035 Shell-edge stitch G Elastic triple straight stitch
. o Elastic triple zigzag stitch, 2 mm 3.")
19 15 Finger-tip controls on Model 1037 II 111 n 4 Straight stitch F Elastic triple zigzag stitch, 5 mm G Elastic triple straight stitch E Elastic triple zigzag stitch, 3.5 mm 2-mm zigzag stitch 5-mm zigzag stitch the left needle position (see page 17). o Elastic triple zigzag stitch, 2 mm 3.5-mm zigzag stitch Elastic stitch M Honeycomb stitch Elastic decorative stitch L Feather stitch Shell-edge stitch H Pullover stitch K Overlock stitch \I/I cd releasing the pushed buttons and for setting Joining stitch Button B is also used as clearing button for I Closed overlock stitch A, 8, C; Buttons for buttonholing Blindstitch
 Selecting stretch stitches 16 applications. 26-29.")
20 All zigzag, utility and stretch stitches are or 1 and 6. desired stitch length between 1 and 4 (red symbol). length control to the number indicating the length control as far as it will go Push the desired button and turn the stitch (red symbols) Selecting stretch stitches 16 applications This chart also contains possible listed in the stitch program chart on pages All stitches and stitch combinations are too. halved in width when button G is pressed Push the desired button and turn the stitch (white symbols) Selecting utihty stitches


21 I H C) 4 C?D titch length between 1 and 4. xample if you want to sew an elastic ogether with sewing instructions. For lindstitch, push buttons M and F, select a buttons H and I. Right needle position (on Model 1037): push Central needle position: push button G. jn the chart and at the end of this booklet, Left needle position: push button B. 1he various stitch combinations are shown G Utility-and- stretch-stitch combinations Selecting the needle position for straight stitching

22 Dropping the machine feed Remove cover 108 or free arm cover 122. Open free arm cover 122. Push the drop-feed control toward N. The feed dog is dropped for embroidering, darning, basting etc. For sewing, push the drop-feed control toward 0. Replace cover 108 or close free arm cover Changing the needle Raise the needle bar. Then hold the needle, loosen screw N and pull the needle out downwards. Insert a new System 130/705 H needle (with the flat side of its shank facing toward the back) and push it up as far as it will go. Then tighten screw N. Twin needles with a needle distance of 1.4 mm may be used for zigzag and utility stitch sewing. 18

23 19 make sure stud 0 enters slot P. Place the sewing foot under the sewing foot holder and hold it in place with your left hand. the darning foot. Screw S serves to secure the sewing foot holder on the presser bar. Q are used for attaching an edge guide and button N. When attaching a sewing foot that stud 0 fits in slot P. Hole R and screw To release the sewing foot push the red same time reposition the sewing foot so Changing the sewing foot Lower presser bar lifter 115 and at the

24 adjusted sideways for stitching along the range. Insert the filler cord as follows (P): groove T. The zipper foot can be the upper tension at 3 in the buttonhole groove S then push its front pin into 20 screw V. that it bears against screw X. Tighten against its stop. Release bracket W so and attach the foot so that it rests bracket W toward the back and hold it there. Insert the pin of the foot in hole U P Darning foot. Raise the needle bar. Push right or left zipper chain. O Zipper foot. First insert its rear pin into adjusted by turning screw Q. N Blindstitch foot. Blindstitch guide R is Special sewing feet Use a thin thread for sewing buttonholes. length. This serves to determine the buttonhole As you sew, arrow R moves along scale S. taut and clamp it in front lug Q. Place it over the rear lug of the foot, pull it button C (N). Attach the buttonhole foot. Set range of the stitch length control (0). Press Regulate the stitch density in the buttonhole Buttonhole settings

25 needle. Raise the needle. hole seam the same length as the first. 1 Sew first buttonhole seam. Raise the 2 Push button B and keep it depressed 3 Push button A. Sew the second button until the machine has sewn 4 to 6 bartacking stitches. Raise the needle. Then ward as far as it will go. Pull the bottom of the buttonhole foot for Sewing buttonholes release the button. 5 Sew a few tying stitches. Remove the 6 Cut the buttonhole open. fabric, pull the filler cord taut and trim. release the button. tacking stitches. Raise the needle. Then until the machine has sewn 4 to 6 bar 4 Push button B and keep it depressed 21

26 box and insert it into the slot between face Tilt needle plate 117 up at the back (N) and Take the edge guide out of the accessory 22 pins slide in slots P. Push it up and turn it toward 0. cover and housing and into cutout Q in the take it out. Insert the new bulb so that its the edge guide and hold it there. The light Push the light bulb up, turn it toward N and bulb can now be exchanged. machine. Push the lamp housing down with cover and swing up the carrying handle. power cord plug. Close the hinged top Switch off the machine and pull out the Changing the light bulb take it out (0). Clean the machine feed and then, as shown in the illustration below. drop of oil in the hook raceway now and no maintenance. All you have to do is put a Do not oil the machine because it requires with a soft brush. the parts in the vicinity of the sewing hook Cleaning and oiling position and pull out the edge guide. Let the lamp housing resume its original
27 For sewing plastic materials -J 1 edges For topstitching and For felled seams For finishing raw edges or for joining elastic and soft fabrics (silk jersey, etc.) I. sewing For cording work Part No. Sewing Operation very delicate 91 needle size 70) nfoot Hemmer foot (rolled edge), 2 mm For hemming edges with zigzag stitches Overlock foot fabrics and simultaneonsly overcasting their Eyeletting plate For eyeletting Single-needle cording foot For single-needle cording Shirring foot For shirring valances Felling foot, 6.5 mm Felling foot, 4.5 mm Straight-stitch foot Fringe sewing foot For sewing fringes and for basting. Cording blade (2 ea) (twin needle with mm needle gauge) J Cording foot, 7 grooves for fine cording f (twin needle with mm needle gauge> (Needle size 80, Cording foot, 5 grooves consisting of 1 Cording set Appliqué foot For appliqué work sory The special accessories listed below are intended for special sewing jobs. They can be Special accessories obtained from your dealer.
28 Trouble shooting Needle thread breaks Bobbin case improperly inserted. For any of above reasons. because work is pushed or pulled. Needle not pushed up as far as it will go. Needle bent and strikes needle plate Needle bent. Needle too thin or too thick. 3. Needle breaks thread that has become too dry by excessive storage. Poor-quality or knotty thread used, or Thread tension too strong. Machine threaded improperly. Needle bent or blunt. Needle too thin for thread used. Wrong needle used. Needle not inserted correctly. 1. Machine skips stitches Cause: in as far as it will go. Insert new needle and push it up as far When inserting the bobbin case, push it Only guide the material lightly. Let machine feed the work alone. See Needle and Thread Chart. insert new needle. as it will go. Used only good-quality thread. Regulate thread tensions. See par. 1 above. Select needle according to Needle and Check threading. insert new needle. Insert system 130/705 Rneedle. flat shank side facing toward the back. Push needle up as far as it will go, its Thread Chart. Remedy:
29 4 Cause: Remedy: 4. Seam is not uniform Tension out of adjustment. Thread too thick, knotty or hard. Bobbin thread wound unevenly. Kinks appear on top and bottom of material, 5. Machine feeds irregularly or not at all Lint has accumulated between tooth rows of feed dog. Feed dog dropped. (Drop-feed control is at right.) 6. Machine runs with difficulty Thread ends in hook raceway. Check upper and lower tensions. Use first-class thread only. During bobbin winding, do not hold thread in hand, but pass it through the bobbin tension stud. Thread machine properly and check both tensions. Remove needle plate and clean out lint. Flick drop-feed control to the left. Remove thread ends and put a drop of oil into hook raceway. 7. Fundamental rules Never run a threaded machine unless there is a piece of fabric under the sewing foot. If you have to leave the machine, even for a short while, be sure to switch off the master switch. This is particularly important when children are around.
30 marked stretch, turn the stitch length control toward stretch as far as it will go. lower half, the buttons to be pressed to sew this seam pattern. For all stitch programs Scallop stitch For decorating handkerchiefs, for instance. } 09 Elastic blindstitch Hemming elastic fabrics with invisible stitches. 08 Crown stitch An ornamental seam, e. g. on night gowns. 1019/1035 M+D or sewing ornamental seams on elastic fabrics. Elastic ornamental 07 stitch Inserting patches and darning rips on elastic materials 06 Elastic stitch Inserting patches and darning rips on elastic fabrics. zigzag stitch and mending corsetry. 05 Elastic triple Flat, elastic reinforcing seams, as well as sewing straight stitch under stress. 03 Buttonholes Just push the buttons and the buttonhole is finished. 04 The stitch density can be regulated. Elastic triple Seams exposed to great stress which stretch Buttonholes without turning the fabric. sewing and satin stitching, embroidering, darning etc. 02 Zigzag stitch Edge finishing, appliqué work, inserting lace, button stitching operations on Models Straight stitch All ordinary sewing operations and 6-mm fancy,7jo. Stitch Application C) C) C) I E r+ E<t G H D D E F A B C GDM ED GD c...._ ;_i = L_; CI) \ / 911 II 9 m I I \... I / III III 1F=I 10 9J1 IL9 II Listed in this chart are the stitch program number, the corresponding stitch and, in the Stitch program chart
31 i -., -; \/\ \T\ I - / /\/ /1/ -I/..-i li\ _) 20 Shell-edge stitch, wide Effective edge finish on dainty fabrics. 19 narrow Classical ornamental seam on plain fabrics. Lampshade stitch, 18 Viennese stitch, wide Ornamental seams, e. g. on table cloths. 17 Viennese stitch, narrow Ornamental seams, e. g. on napkins. 16 Lampshade stitch, wide Classical ornamental seam on all plain fabrics. 15 Houndstooth stitch Ornamental seams, e. g. on table linen. 14 Florentine stitch, wide Ornamental seams, e. g. on bed linen. 13 Florentine stitch, narrow For decorating hems e. g. on bed linen. 12 Joint stitch A durable ornamental joining seam. cloth. 1 1 Honeycomb stitch Stitch j Application Sewing on elastic threads or covering seams on terry - D C) 0 0 D F G -c E F G -.% i 1 T T T k > \/\ \l\ -S\ I ii\ I \/\ \i\.-4\ /\/ /1/ n/ I _I _I _J I...- /\/ /1/ I Th I I I -S. 0 0 ii\ L_ -S l/ nd their application are described in more detail in the table below. or all other programs, select the stitch length as desired. The individual stitch programs
32 1035 from 01 to Knurl stitch Ornamental seam on light clothing. 33 Peak stitch 34 Mound stitch Ornamental seam, e. g. on children s napkins. handkerchiefs. A dainty ornamental seam, e. g. on ladies 32 Blindstitch, narrow Hemming lightweight fabrics with invisible stitches. 31 Blindstitch, wide Hemming heavier fabrics with invisible stitches. 27 Overlock stitch, wide 29 Overlock stitch, narrow Dainty border ornamentation. Elastic assembly and edge finishing seams on knitted fabrics. 28 Peacock stitch Festive ornamental seam, e. g. on table linen. 26 Turkish stitch Topstitching patches Pennant stitch Decorative joining seam and sewing on borders. 25 narrow narrow Sewing on dainty lace. Closed overlock stitch, wide Covering folded fabric edges with a fancy seam. Shell-edge stitch, Closed overlock stitch, Ornamental seams, e. g. on girls dresses. 21 Elastic edge stitch Finishing edges that do not fray much. 0. Stitch Application,icj C) C) C) C) C) D D C D _- I# % Ill -// \ i i Th 1E I 4 I i I. -. C) C) C),_- I \/\ I <.. % * j -4 I L UJ %A - -, - I... I,.... K Th T I J %J I/I /i h <. L. i.1 INI \-.J < I-.I %J I/I 4-i Ii < r.j -j I/I / i < L 9..1 INI.J Ii, D G <D L.-i...i l J \J from 01 to from 01 to 15 Sewing machine models and stitch programs: 1014 and 1015 from 01 to 05
33 29 Ornamental seam, e. g. for children s night dresse_) Triangular stitch f 37 Pullover stitch, wide Elastic edge finishing seams on jersey fabrics. 39 Pullover stitch, narrow on pockets. Classical ornamental seam on plain fabrics. 35 Viennese stitch, narrow Ornamental seams, e. g. on table linen Pullover stitch, medium Elastic edge finishing seams on polo shirt fabrics. 40 Feather stitch Decorative cover seams, e. g. on aprons. 42 Snail stitch Ornamental seam, e. g. for bath room utensils. 44 Diagonal stitch 45 Trellis stitch 47 Border stitch Ornamental seam, e. g. for plain-look, Ornamental seam, e. g. for airy ladies dresses. Ornamental seam, e. g. for border ornamentations 43 Loom stitch Ornamental seam, e. g. for country-look dresses. 46 Twig stitch Ornamental seam, e. g. for hiking wear. modern dresses. 41 Dutch stitch Ornamental seam, e. g. on kitchen textiles. lightweight jersey crepe. Elastic edge finishing seams on narrow Lampshade stitch, o o 0 C) C) 7ic. Stitch Application X F I CD rcdtcd CDDCD F. 0 ( C) C) C) C) C) - LI,- 1 u I I,.+. I I <1 L1 JI Jl \lt fl il /11 M \\\ l).ji \ll i k /\\ l fl.. i /jf #1 _, - -., -, 1 IC ) IC ) IC ) IC )l e-. $,XI /\ j N 1 \\j -4, 11 K D I,- K - K D 4....ll XI 7 H in 4.. ii X 7 ll XI i/ J J /\\ At %,/i k4 XI Al - r \\i,.-t III /11 -,, - -, _t -, - <..- il..-ii /
34 PFAFF-HANDELSGESELLSCHAFr für Haushaftnãhmaschinen m. b. H Karlsruhe 41 West-Germany Subject to atterations
803, 806, 807 instruction book 800., 801, 802, Hobbymatic
 A 803, 806, 807 instruction book 800., 801, 802, Hobbymatic I 4 Fold out this page Contents Page Removing the carrying case cover 1 Foot control receptacle 1 Electrical connection 2 Foot control 2 Disengaging
CAUTION- SAVE THESE INSTRUCTIONS This product is for household use, or equivalent.
 Never operate this sewing machine if it has a damaged cord or plug, if it is not working properly, if it has been dropped or damaged, dropped into water. Return this sewing machine to the nearest authorized
TABLE OF CONTENTS ESSENTIAL PARTS UTILITY STITCHES GETTING READY TO SEW DECORATIVE STITCHING CARE OF YOUR MACHINE STITCH PATTERN BASIC SEWING
 Instruction Manual TABLE OF CONTENTS ESSENTIAL PARTS Names of Parts 6 Standard Accessories 7 Dust cover 7 Sewing table 8 Accessory box 8 Free arm Sewing 8 GETTING READY TO SEW Connecting the Power Supply
MAIN PARTS
 MAIN PARTS 7 8 9 10 11 12 13 1 2 3 17 4 5 6 01 02 03 04 05 12 23 34 45 56 13 24 35 46 57 14 25 36 47 58 15 16 26 27 37 38 48 49 59 60 06 07 08 09 10 17 18 28 29 39 40 50 51 61 62 19 30 41 52 63 20 21 31
When using an electrical appliance, basic safety precautions should always be followed, including the following:
 Instruction book IMPORTANT SAFETY INSTRUCTIONS This appliance is not intended for use by persons (including children) with reduced physical, sensory or mental capabilities, or lack of experience and knowledge,
SAVE THESE INSTRUCTIONS
 INSTRUCTION BOOK IMPORTANT SAFETY INSTRUCTIONS When using an electrical appliance, basic safety precautions should always be followed, including the followings: Read all instructions before using this
the needle, the user must take sufficient care to avoid injury and observe the sewing area continuously while sewing.
 / - nstruct0fl maflua 7 the needle, the user must take the light bulb is 15 watts. agent. by anyone but an authorized Pfaff D) The drive belt must never be adjusted B) When leaving the machine, chan C)
SERVICE MANUAL AND PARTSLIST
 SERVICE MANUAL AND PARTSLIST Next 20 CONTENTS WHAT TO DO WHEN... 1~3 SERVICE ACCESS FACE COVER... 4 TOP COVER... 4 BASE COVER... 5 REAR COVER... 6 FRONT COVER... 7 MECHANICAL ADJUSTMENT NEEDLE THREAD TENSION...
SERVICING MANUAL 419S/423S
 SERVICING MANUAL 415 419S/423S TROUBLESHOOTING PROBLEM CAUSE REMEDY REFERENCE 1. SKIPPING 1. NEEDLE IS NOT INSERTED INSERT THE NEEDLE PROPERLY. STITCHES PROPERLY. 2. NEEDLE IS BENT OR WORN. CHANGE THE
pô1e -/C INSTRUCTION MANUAL FOR SEWING MACHINE WHITE
 pô1e -/C -- INSTRUCTION MANUAL I FOR SEWING MACHINE WHITE Retain these numbers for future reference. Model No. Serial No. The Model No. is located on Rating Plate. The Serial No. is located on Bed Plate.
INSTRUCTION MANUAL 2263
 INSTRUCTION MANUAL 2263 TABLE OF CONTENTS Congratulations on the purchase of your new SINGER sewing machine! May we recommend that before you start using your machine, you take time to discover the many
IMPORTANT SAFETY INSTRUCTIONS
 INSTRUCTION BOOK IMPORTANT SAFETY INSTRUCTIONS When using an electrical appliance, basic safety precautions should always be followed, including the following: This sewing machine is designed and manufactured
SAVE THESE INSTRUCTIONS
 INSTRUCTION BOOK IMPORTANT SAFETY INSTRUCTIONS When using an electrical appliance, basic safety precautions should always be followed, including the followings: Read all instructions before using this
11210 INSTRUCTION MANUAL
 11210 INSTRUCTION MANUAL Important Safety Instructions When using an electrical appliance, basic safety precautions should always be followed, including the following: Read all instructions before using
Survey of the machine
 I 7iy ( / the placing of the accessories, please refer to transportea. thread take-up spring Place the machine on the table and remove the the space around the needle. The machine is equipped with a number
SAVE THESE INSTRUCTIONS
 INSTRUCTION MANUAL IMPORTANT SAFETY INSTRUCTIONS This appliance is not intended for use by persons (including children) with reduced physical, sensory or mental capabilities, or lack of experience and
A. Preparing the fabric (not shown):
:") INSERTING ZIPPERS - CENTER INSERTION The zipper can be snapped on to the right or to the left side of the needle so that you can sew close to the zipper. When sewing on the right side of the zipper, attach
INSERTING ZIPPERS - CENTER INSERTION The zipper can be snapped on to the right or to the left side of the needle so that you can sew close to the zipper. When sewing on the right side of the zipper, attach
4300B. /".y, instructions. Z1GoZAG SEWING MACHINE # 4300B
 4300B,r /".y, k instructions Z1GoZAG SEWING MACHINE # 4300B TABLE OF CONTENTS Adjusting for Good Stitches... 24 Adjusting Pressure of Presser Foot... 10 Adjusting Tensions... 12-13 Blind Stitching... 19
BEL0093 Sewing Machine
 4 BEL0093 Sewing Machine THE SCIENCE BEHIND SEWING BEL0093 Sewing Machine 5 4 8 10 9 21 11 12 1 2 14 19 13 23 7 6 5 21 3 17 18 22 15 6 BEL0093 Sewing Machine 16 22 Auto Low Foot Pedal Auto High THE SCIENCE
SERVICE MANUAL MODEL: 13512, 14412, 15312
 SERVICE MANUAL MODEL: 13512, 14412, 15312 CONTENTS TROUBLESHOOTING... 1-3 SERVICE ACCESS (1) FACE COVER, BELT COVER... 4 SERVICE ACCESS (2) BASE PLATE... 5 SERVICE ACCESS (3) FRONT COVER... 6 SERVICE ACCESS
MAINTENANCE. Downloaded from manuals search engine
 MAINTENANCE Changing the needle plate Removal Switch off the main switch Raise the presser foot. Position the needle plate changer (light bulb changer) as shown and press the needle plate up on the right,
Janome. Janome 7312 Instruction Manual. Magnolia 7312 Owners Manual/ User Guide
 Janome Magnolia 732 Instruction Manual IMPORTANT SAFETY INSTRUCTIONS This sewing machine is not a toy. Do not allow children to play with this machine. The machine is not intended for use by children or
STARTED! Get. Let s. Americana Series AMERICAN DENIM Model SA1100 Use This Guide First. Simplicity Sewing Machine Education Helpline:
 Let s Get STARTED! Americana Series AMERICAN DENIM Model SA1100 Use This Guide First To help you get started using your new sewing machine, this booklet shows you, step-by-step, how to thread your machine
SERVICE MANUAL PARTS LIST MODEL: NH40
 SERVICE MANUAL & PARTS LIST MODEL: NH40 CONTENTS What to do when... 1-3 SERVICE ACCESS Face Cover... 4 Bed Cover... 5 Free-arm Cover... 6 Front Cover... 7 Rear Cover... 8 MECHANICAL ADJUSTMENT Presser
SAVE THESE INSTRUCTIONS
 USER S GUIDE E10 This houshold sewing machine is designed to comply with IEC/EN 60335-2-28 and UL1594 IMPORTANT SAFETY INSTRUCTIONS When using an electrical appliance, basic safety precautions should always
Intro to the Sewing Machine
 Intro to the Sewing Machine 1. Bobbin Cover Opens to allow you to put the bobbin and bobbin case in the machine. 2. Stitch Plate Where the seam allowance guidelines are found. Each line is 1/8 apart, beginning
User s Guide. Prelude 350, 370 KEEPING THE WORLD SEWING
 User s Guide Prelude 350, 370 KEEPING THE WORLD SEWING This houshold sewing machine is designed to comply with IEC/EN 60335-2-28 and UL1594 IMPORTANT SAFETY INSTRUCTIONS When using an electrical appliance,
XL5050us_cover. Operation Manual. English XC Printed in China. XC XL5050 (NA03J061) Bk
 Bk") XL00us_cover Operation Manual English 88-8 XC67-0 Printed in China XC67-0 XL00 (NA0J06) Bk XL000us.book Page Tuesday, November, 00 9: AM IMPORTANT SAFETY INSTRUCTIONS When using this machine, basic safety
XL00us_cover Operation Manual English 88-8 XC67-0 Printed in China XC67-0 XL00 (NA0J06) Bk XL000us.book Page Tuesday, November, 00 9: AM IMPORTANT SAFETY INSTRUCTIONS When using this machine, basic safety
INSTRUCTION MANUAL. Attention. COMPUTER SEWING MACHINE HZL-L series
 COMPUTER SEWING MACHINE HZL-L series INSTRUCTION MANUAL EN Attention Please read this instruction manual before using the machine as it contains important operational and safety information. Keep this
This sewing machine is designed and manufactured for household use only. Read all instruction before using this sewing machine.
 Instruction book IMPORTANT SAFETY INSTRUCTIONS This sewing machine is not a toy. Do not allow children to play with this machine. The machine is not intended for use by children or mentally infirm persons
NAMES OF PARTS. 1 Thread guide for bobbin winding 2 Take-up lever. 3 Upper thread tension dial. 4 Face cover. 5 Thread guide for upper threading
 6 Presser foot thumb screw 9 Spool pins (retractable) 8 Shuttle cover 5 Thread guide for upper threading 7 Presser foot 4 Face cover NAMES OF PARTS.r4r : VjN S* ;WWE7-17 16 15 MODEL 860.-.-.- --. :.---.-
CPFAFFD 76 CPFAFP) 77. Instruction Book
 77. Instruction Book") CPFAFFD 76 CPFAFP) 77 Instruction Book 70 40 40 50 80 90 90 Needle and Thread Chart Type of Fabric Thread Needle Type Size Size Point Style Bed linen 80 Fine linen Cotton 40 70 80 Muslin 70 80 Dress fabrics,
CPFAFFD 76 CPFAFP) 77 Instruction Book 70 40 40 50 80 90 90 Needle and Thread Chart Type of Fabric Thread Needle Type Size Size Point Style Bed linen 80 Fine linen Cotton 40 70 80 Muslin 70 80 Dress fabrics,
quilt expression 2048 Quilting - Sew something unique! German Engineering Innovative Design
 quilt expression 2048 Quilting - Sew something unique! German Engineering Innovative Design Quilters have special needs! The quilt expression 2048 fills them all. Sewing convenience of the highest level
Quick Reference Guide to BERNINA Presser Feet, Attachments, and Accessories
 Presser Feet: are Swiss-engineered for precision sewing of specific functions are one-piece metal feet, making them strong and durable are easy to change with one hand, requiring no special tools have
CONTENTS LOCATE AND IDENTIFY THE PARTS... WIND THE BOBBIN... PREPARE YOUR TOP THREAD... STITCH SELECTOR / STITCH LENGTH/STITCH WIDTH CONTROLS...
 SERVICE MANUAL SEWING MACHINE MODEL 385. 15208400 OCTOBER, 2003 CONTENTS LOCATE AND IDENTIFY THE PARTS... WIND THE BOBBIN... PREPARE YOUR TOP THREAD... STITCH SELECTOR / STITCH LENGTH/STITCH WIDTH CONTROLS...
Janome Decor Excel Janome 5024 Instruction Manual. Instruction Manual INSTRUCTION BOOK Owners Manual/ User Guide
 Janome Decor Excel 02 Janome 02 Instruction Manual Instruction Manual INSTRUCTION BOOK IMPORTANT SAFETY INSTRUCTIONS When using an electrical appliance, basic safety precautions should always be followed,
hobby Instruction manual
 hobby 1022 1032 1042 Instruction manual This household sewing machine is designed to comply with IEC/EN 60335-2-28 and UL1594 IMPORTANT SAFETY INSTRUCTIONS When using an electrical appliance, basic safety
Quick Reference Guide to BERNINA Presser Feet, Attachments, and Accessories
 Presser Feet: are precision engineered for specific functions are Swiss-made for the highest quality are one-piece metal feet, making them strong and durable are easy to change with one hand, requiring
S-85SCH
 4411-4423-4432-4443-4452 5511-5523-5532-5554 44S-85SCH Service Manual 104 73 14-26 2014-02-24 CONTENTS 1. Names of principal parts...2 2. Removing methods of external parts 2-1 Sewing table...3 2-2 Face
INTRODUCTION THANK YOU FOR CHOOSING OUR OVERLOCK MACHINE FOR YOUR SAFETY BEFORE YOU USE - 1 -
 INTRODUCTION THANK YOU FOR CHOOSING OUR OVERLOCK MACHINE This overlock machine can stitch dependable seams on all kinds of fabric, both light and heavy, including cotton, wool, rayon, tricot, jersey, and
CPFAFFD 84 CPFAFFD 85 -=- Instruction Book
 CPFAFFD 84 CPFAFFD 85 -=- 1 Instruction Book darning thread 50 70 80 70 80 ses Silk Suitings ond montlings Silk 40 80 90 Foombacks R 130 sk - 50 -- ---- 130 satin ottoman, taffeta, georgette, fobrics ond
User s Guide KEEPING THE WORLD SEWING
 User s Guide KEEPING THE WORLD SEWING This houshold sewing machine is designed to comply with IEC/EN 60335-2-28 and UL1594 IMPORTANT SAFETY INSTRUCTIONS When using an electrical appliance, basic safety
SAVE THESE INSTRUCTIONS This product is for household use, or equivalent.
 IMPORTANT SAFETY INSTRUCTIONS When using an electrical appliance, basic safety precautions should always be followed, including the following. Read all instructions before using this sewing machine. CAUTION-
Simply select and sew!
 Simply select and sew! TM German Engineering! Innovative Design! TM With the original Pfaff Feature! Ultimate Ease High Quality Typical Pfaff Feel the need to sew? The select is ready to go! Once a Pfaff
You're reading an excerpt. Click here to read official TOYOTA SUPER JEANS user guide
 You can read the recommendations in the user guide, the technical guide or the installation guide for TOYOTA SUPER JEANS. You'll find the answers to all your questions on the TOYOTA SUPER JEANS in the
Application. For all types of sewing. Select 29 different needle positions. For seams in tricot and stretch fabric.
 STITCHES A Utility es es for garment sewing and mending. no. name Presser Foot Application 1 Straight, center needle position A For all types of sewing. Select 29 different needle positions. 2 Straight
Getting to know your machine. Application. For seams in tricot and stretch fabrics. For sewing on lace, bands and appliqués.
 Stitches Stitch Stitch no. 1, 2, 3 4, 5, 6 7, 8, 9 10, 11, 12 13 Stitch name Straight Stitch, left center and right needle position Stretch Stitch, left,center and right needle position Reinforced Straight
WHITE SEWING MACHINE CORPORATION WHITE SEWING MACHINE PRODUCTS LTD. Toronto 16, Ontario, Canada
 V -a a; S a a a. a,.. I.. I S. Co Toronto 16, Ontario, Canada CLEVELAND 11, OHIO WHITE SEWING MACHINE PRODUCTS LTD. WHITE SEWING MACHINE CORPORATION tension adjustments, maintenance, or any of the operations
Operation Manual. Sewing Machine. Product Code: 888-X53/X54/X55/X56
 Operation Manual Sewing Machine Product Code: 888-X/X/X/X6 Please visit us at http://solutions.brother.com where you can get product support and answers to frequently asked questions (FAQs). IMPORTANT
Darning plate 31. Sewing embroidery 31. Sewing zippers 30. Sewing buttonholes Blind hem 27. Threading the upper thread 18
 r TABLE OF CONTENTS KNOW YOUR SEWING MACHINE Name of parts 45 Accessories 6-7 the to connect the machine to the power supply 8 How to use the foot control 8 Sewing light 8 Thread and needle chart 9 Changing
4830 & 4832 INSTRUCTION MANUAL
 INSTRUCTION MANUAL Table of contents Important safety instructions Getting to know your machine Principal parts Accessories Connecting the machine Running the machine Choosing and changing the needle Changing
This household sewing machine is designed to comply with IEC/EN and UL1594.
 User s Guide This household sewing machine is designed to comply with IEC/EN 60335-2-28 and UL1594. IMPORTANT SAFETY INSTRUCTIONS When using an electrical appliance, basic safety precautions should always
Table of Contents NAMES OF PARTS 7 GETTING READY TO SEW 10 DECORATIVE STITCHING 48 BASIC SEWING 28 PROGRAMMING PATTERNS AND LETTERS 55
 Instruction Manual Table of Contents NAMES OF PARTS 7 Names of Parts 7 Standard Accessories 8 Extension table 8 Sewing Table and Accessory box 9 Free-arm sewing 9 Stitch overview 9 GETTING READY TO SEW
This household sewing machine is designed to comply with IEC/EN and UL1594.
 Owner s manual This household sewing machine is designed to comply with IEC/EN 60335-2-28 and UL1594. IMPORTANT SAFETY INSTRUCTIONS When using an electrical appliance, basic safety precautions should always
Practicing Basic Machine Operation Sample #1
 Practicing Basic Machine Operation Sample #1 Listed below are various tasks required in basic sewing machine operation. Demonstrate your ability to perform each task by creating a sample. The samples that
1. General. 2. Fundamentals of Machine Operation. The Pfatf 145 is a special-purpose sewing machine equipped with unison feed, smoothly
 I ci 0 0 0 w 0 (0 (0 c) 0) When sewing tightly woven and heavily dressed materials, the sewing speed should be Its permissible top speed is 2,800 s.p.m. It is chiefly used for sewing multiple plies where
HOW TO USE YOUR LONG SHUTTLE MANUAL SEWING MACHINE. 4çJ MODEL NO.768
 NO.768 MODEL 4çJ Ii SEWING MACHINE LONG SHUTTLE MANUAL HOW TO USE YOUR INDEX Zigzag Formation 18 Zigzag Sewing And Pattern Formation 17 Turning a Corner 14 Placement of Needle 4 Picking Up Bobbin Thread
BERNINA. Overlocker Workbook 2
 Overlocker Plus For current BERNINA models 2016 BERNINA of America. Permission granted to copy and distribute in original form only. Content may not be altered or used in any other form or under any other
Simply select & sew! Owner s manual
 TM Simply select & sew! TM Owner s manual This household sewing machine is designed to comply with IEC/EN 60335-2-28 and UL1594. IMPORTANT SAFETY INSTRUCTIONS When using an electrical appliance, basic
SINGER* SEWING MACHINE NO. 27 & 28 VIBRATING SHUTTLE, FOR FAMILY USE
 INSTRUCTIONS FOR USING SINGER* SEWING MACHINE NO. 27 & 28 VIBRATING SHUTTLE, FOR FAMILY USE When requiring Needle, Oil, Parts or Repairs, for your Machine Look for the Red "S" There are Singer Shops in
SAVE THESE INSTRUCTIONS
 INSTRUCTION BOOK IMPORTANT SAFETY INSTRUCTIONS Your sewing machine is designed and constructed only for HOUSEHOLD use. Read all Instructions before using this appliance. DANGER To reduce the risk of electric
2. ACCESSORIES. Zigzag foot Straight foot. machine) Bobbins Denim needle 16 (1 pci. (3 pcs) Ordinary needles 14(2pcs.)
 Bobbins Denim needle 16 (1 pci. (3 pcs) Ordinary needles 14(2pcs.)") 0 0mr -a- 0-I WHITE SEWING MACHINE Record in space provided below the Serial No. and Model No. of this appliance. The Serial No. is located Rear of arm. The Model No. is located Rear of arm. Serial No.
0 0mr -a- 0-I WHITE SEWING MACHINE Record in space provided below the Serial No. and Model No. of this appliance. The Serial No. is located Rear of arm. The Model No. is located Rear of arm. Serial No.
Sample Packet. Directions: Describe the functions of the following basic parts of a sewing machine.
 Sample Packet NAME: Directions: Describe the functions of the following basic parts of a sewing machine. SEWING MACHINE PARTS: Needle stitch plate: Feed dog system: Presser foot: Bobbin case: Spool pin:
INSTRUCTION MANUAL C240
 INSTRUCTION MANUAL C240 This household sewing machine is designed to comply with IEC/EN 60335-2-28 and UL1594. IMPORTANT SAFETY INSTRUCTIONS When using an electrical appliance, basic safety precautions
Owner s manual. The real passion for sewing!
 Owner s manual The real passion for sewing! This household sewing machine is designed to comply with IEC/EN 60335-2-28 and UL1594 IMPORTANT SAFETY INSTRUCTIONS When using an electrical appliance, basic
Perfect Finish. Model ET-1
 Over 1,000 Stitch Functions Select from over 1,000 Stitch Functions. Fulfill your creative dreams with a large selection of decorative stitches, alphabet stitches, and construction stitches. Large Back-Lit
4-H Fabrics & Fashions
 OKLAHOMA COOPERATIVE EXTENSION SERVICE 4-H Fabrics & Fashions Setting Your Stitch Length 1. Stitch, as shown, using six inches to one inch. --------------------------------------------------------------------------------------------------------------------
Instruction Book D1S D2S D3S. Memory Craft 7700 QCP
 Instruction Book DS DS DS APC Autom omatic Plate Co nverter Memory Craft 7700 QCP IMPORTANT SAFETY INSTRUCTIONS This appliance is not intended for use by persons (including children) with reduced physical,
Reinforced seam. Topstitching. Sew continuous reverse. Reinforce seams, clean finish, stretch sewing. Sewing elastic, darning, patching.
 Stitch Overview Utility Stitches Stitch Name Description 1 1 Straight For seaming and toping. Select from 29 different needle positions. 2 2 Stretch triple straight 3 3 Straight reverse 4 Straight basting
INSTRUCTION MANUAL 624?
 INSTRUCTION MANUAL 624? 6142 604 IMPORTANT SAFETY INSTRUCTIONS When using an electrical appliance, basic safety precautions should always be followed, including the following: Read all instructions before
hobbylock 4752 Instruction Manual
 hobbylock 4752 Instruction Manual Parts of the hobbylock 4752 Right needle thread tension (green) Setting screw for presser foot pressure Telescoping thread guide Thread guides Left needle thread tension
This household sewing machine is designed to comply with IEC/EN and UL1594.
 User s Guide This household sewing machine is designed to comply with IEC/EN 60335-2-28 and UL1594. IMPORTANT SAFETY INSTRUCTIONS When using an electrical appliance, basic safety precautions should always
CPFAFFD 94 CPFAFFD 95. Instruction Book
 CPFAFFD 94 CPFAFFD 95 Instruction Book Silver thread -80 70 80 100 130 R 80 Burlap Leather Embroidery thread 30 50 70 Linen 40 110 Linen 40 130 ses 110 l3olr Cotton or linen 40 90 100 Synthetic 50 Cotton
Brother PQ- Series Accessories
 Brother PQ- Series Accessories The PQ-series of high-speed straight stitch machines (1300, 1500 and 1500S) are designed to sew quickly and accurately with a wide variety of fabrics, even combinations of
Presser fee t for general sewing
 Presser fee t for general sewing 5 7 Zigzag foot # 0 This foot is suitable for all utility and decorative stitches with a maximum stitch width of 5.5mm. For straight and zigzag stitching as well as for
SEWING MACHINE MODEL 385, 15358
 SERVICE MANUAL SEWING MACHINE MODEL 385, 15358 BER, 2006 CONTENTS LOCATE AND identify THE PARTS... WiND THE BOBBIN... PREPAREYOURTOPTHREAD... WHAT TO DO WHEN... 1 2 3 4-6 SERVICE ACCESS FACE COVER... BELT
User s Guide KEEPING THE WORLD SEWING
 User s Guide 605 KEEPING THE WORLD SEWING This houshold sewing machine is designed to comply with IEC/EN 60335-2-28 and UL1594 IMPORTANT SAFETY INSTRUCTIONS When using an electrical appliance, basic safety
INSTRUCTION BOOK BUPEFILDCK 634D. W H ITE Sewing machine company
 INSTRUCTION BOOK BUPEFILDCK 634D W H ITE Sewing machine company POLARIZED PLUG CAUTION To reduce the risk of electric shock, this appliance has a polarized plug (one blade is wider than the other). This
Another quality product from. Instruction Manual. Model 9105
 Another quality product from Instruction Manual Model 9105 SYMBOL INSTRUCTIONS Raise needle Raise presser foot Lower presser foot When using an electrical appliance, basic safety should always be followed,
Silver Crest SNM 33 A1. List of contents
 List of contents Silver Crest SNM 33 A1 Guarantee...1 Service number...1 Important safety instructions / Appropriate use...2 Details of the Machine...3 Accessories...3 Fitting the snap-in sewing table...3
Congratulations! * A Trademark of THE SINGER COMPANY Copyright 1987 SINGER SEWING MACHINE COMPANY All Rights Reserved Throughout The World
 \ Congratulations! As the owner of a SINGER* artisan zigzag sewing machine Model 20U, you are about to enter a wonderful new world of sewing! From the moment you begin to sew at your Model 20U, you will
A13 Three Step Zigzag For overcasting, mending, sewing on patches and elastic. Suitable for light and medium weight fabrics.
 Stitches Utility Stitches Stitches for garment sewing and mending. Stitch Stitch description 1, 2, 3 Straight Stitch, left, center and right needle position For all types of sewing. Touch stitch width
Article 1: Introduction to the Elna expressive 920
 Article 1: Introduction to the Elna expressive 920 Elna machines are known for their ease of use, and the Elna expressive 920 is no exception. A range of features are available at your fingertips to make
Press the Elongation button and eight stitches are made 2 to 3 times longer.
 LCD Screen with Stitch Selection Dial Provides clear and easy viewing of stitch settings including the number and image of the selected stitch, stitch length settings and stitch width settings. Block Alphabets
CONTENTS Knowing Your Sewing Machine 2 4. Decorative Stitches Built-in Stitches Buttons and Button Sewing 26 7.
 Brother VX780 CONTENTS 1. Knowing Your Sewing Machine 2 PRINCIPAL PARTS. 2 MACHINE COVER... 3 ACCESSORIES 4 OPERATING YOUR SEWING MACHINE.. 5 Connecting plugs...5 Controlling sewing speed. 5 VARIOUS CONTROLS
This household sewing machine is designed to comply with IEC/EN and UL1594.
 Owner's manual This household sewing machine is designed to comply with IEC/EN 60335-2-28 and UL1594. IMPORTANT SAFETY INSTRUCTIONS When using an electrical appliance, basic safety precautions should always
IMPORTANT SAFETY INSTRUCTIONS
 INSTRUCTION BOOK IMPORTANT SAFETY INSTRUCTIONS This appliance is not intended for use by persons (including children) with reduced physical, sensory or mental capabilities, or lack of experience and knowledge,
CONTENTS. LOCATE AND IDENTIFYTHE PARTS... WlNDTHE BOBBIN... PREPARE YOUR TOP THREAD... WHAT TO DO WH EN...
 SERVICE MANUAL SEWING MACHINE MODEL 385.11206300 MARCH, 2003 CONTENTS LOCATE AND IDENTIFYTHE PARTS... WlNDTHE BOBBIN... PREPARE YOUR TOP THREAD... WHAT TO DO WH EN... 1 2 3 4-6 SERVICE ACCESS FACE COVER...
IMPORTANT SAFETY INSTRUCTIONS
 IMPORTANT SAFETY INSTRUCTIONS When using this machine, basic safety precautions should always be taken, including the following: Read all instructions before using. DANGER To reduce the risk of electric
Top Innovations, Inc. Innovative Products to Make Your Life Easier. Model SP-402 Owner s Manual
 Top Innovations, Inc. Innovative Products to Make Your Life Easier Model SP-402 Owner s Manual THIS IS NOT A TOY! Adult supervision recommended Item contains sharp functional points and small parts Machine
Instruction Manual Item No.: V~, 60Hz, 15W
 rm Free Ang! Sewi Sewing Machine MODEL: JW12 Montgomery Ward Customer Service 1112 7Th Avenue, Monroe, WI 53566 8:00 am to Midnight, Monday through Friday 1 888 557 3848 Instruction Manual Item No.: 724723
OPERATING INSTRUCTiON. fh EbEbyfl D
 71 OPERATING INSTRUCTiON fh EbEbyfl D F. Sewing problems and solutions 20 b. Thread tension adjustment (Normal hemming) 9 g. Roll hemming 12 h. Points to observe during sewing 13 b. Adjusting the stitch
Service Manual 1st Release August 2001
 Service Manual 1st Release August 2001 Contents 1 Foreword 3 Notes on the sewing machine in relation to environment, handling, cleaning and safety 5 Specifications off PFAFF machines 6 Removing the housing
SINGER 591D200A 591D240A 591D303A 591D305A 591C308A. rom the library of: Superior Sewing Machine & Supply LLC 591D300A
 SINGER 591D200A 591D240A 591D300A 591D303A 591D305A 591D308A 591C200A 591C240A 591C300A 591C308A CONTENTS Page Introducingtlie NewSINGER* Sewing Machine Model 591 \ Oiling the Machine 2 Oiling the Puller
Janome 204D Instruction Manual. MODEL 204D. 204D Owners Manual/ User Guide
 Janome 0D Instruction Manual Janome 0D serger Janome 0D Instruction Manual MODEL 0D 0D Owners Manual/ User Guide Janome 0D Instruction Manual IMPORTANT SAFETY INSTRUCTIONS Your sewing machine is designed
IMPORTANT SAFETY INSTRUCTIONS
 USER S GUIDE E10 This household sewing machine is designed to comply with IEC/EN 60335-2-28 and UL1594. IMPORTANT SAFETY INSTRUCTIONS When using an electrical appliance, basic safety precautions should
FREE ARM SEWING MACHINE
 INSTRUCTION MANUAL your creative assistant CELEBRITY 550 FREE ARM SEWING MACHINE Safety instructions Like any other electrical device, a sewing machine can cause serious, even life-threatening injuries.to
INSTRUCTION MANUAL 9970
 INSTRUCTION MANUAL 9970 INSTRUCTION MANUAL This sewing machine is intended for household use. This sewing machine is not intended for use by young children or infirm persons without supervision. IMPORTANT
PARTS LIST MODEL: HDEJ1800
 First Edition: June 0 PARTS LIST 0 8 4 8 8 4 8 0 KEY PARTS NO. NO. DESCRIPTION 0400 Top cover (unit) 00 Top cover (unit) 0000 Top cover 4 40A04 Flip-top sewing instruction panel 000 Hinge rod (right) 00
41P PFAFF HOBBY SERGER
 41P PFAFF HOBBY SERGER ow po On top of it. or damage to machine. threading and sewing. PERFORMANCE CHECKLIST 12 CHANGING NEEDLE 12 CARING FOR YOUR MACHINE 12 JOIN TWO PIECES OF FABRIC 12 DECORATIVE FLATLOCK