Original Recipe. Christmas Traditions Advent Calendar
|
|
|
- Valentine Gilmore
- 6 years ago
- Views:
Transcription
 Each year I find our schedule gets more and more packed as we add in new Christmas Traditions.")

1 Original Recipe Christmas Traditions Advent Calendar It's Christmas in July!!! Hi everyone, it's Melissa from Happy Quilting {happyquiltingmelissa.blogspot.com}. Don't you just love the Christmas season??? So full of joy and magic, and of course, lots and lots to do :) Each year I find our schedule gets more and more packed as we add in new Christmas Traditions. Last year, I sat down on Nov 30th and wrote down a list of all the Christmas joys, traditions, parties, etc that we didn't want to miss out on. Then I looked at the calendar and started plugging things in. It worked out pretty great and took away so much holiday stress and most importantly kept the Christmas Spirit in the home. So this year, I want to keep that same spirit alive but of course, turn it into some quilted goodness. So with that in mind, I came up with the Christmas Traditions Advent Calendar. Each day from Dec 1st to the 24th, you will find a little scroll tucked underneath the flap (or you can do a pocket if you prefer, there are instructions for both). Each morning Mom, Dad, or one of the kids get to pull out the scroll and find out what Christmas Tradition we will do that day. Some are big, (like seeing the lights, building a snowman, or going caroling) and some are small, (like reading a Christmas story, having hot chocolate with marshmallows, or singing our favorite Christmas songs together.) But most importantly, we don't miss out on any of our favorite Christmas Traditions and we keep the holiday spirit in our home all month long :) So would you love to make a Christmas Traditions Advent Calendar?? Well great, just pop on over to Burgundy Buttons where Leah has worked up an adorable Christmas Traditions Advent Calendar Quilt

 The charms with the ovals I did not use,")
 Start by grabbing your green and red charms.")
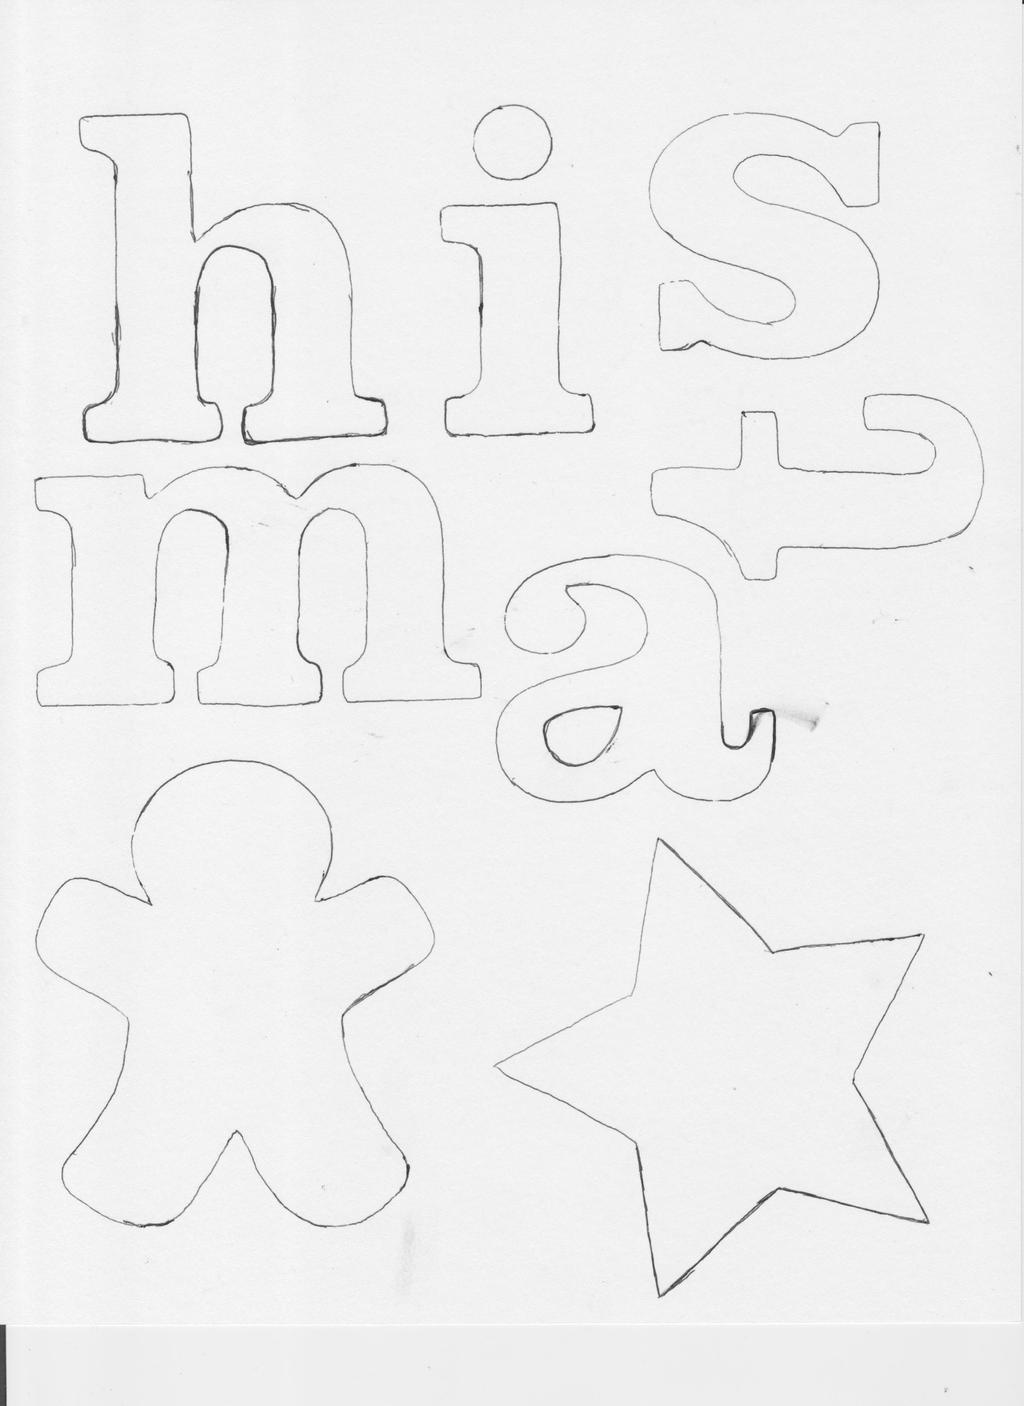
2 Kit just for you :) And as always, at great Burgundy Buttons prices. Hurry, supplies are limited!! { 2 Flurry by Kate Spain Charm Packs 2 White Bella Solids Charm Packs 1/2 Yard of Red Snowflake Print # /2 Yard of Green Snowflake Print # /8 Yard of Blue Snowflake Print #12 1/2 Yard of White Peppermints Print # (binding) 1 Yard of White Christmas Print # (backing) Heat and Bond Lite (some yardage and at least 35 cut 5 x 5 squares) Red and Green ribbon. It is easiest if you sort your charms into color coordinated piles now (that top one of the red pile isn't really "red" but put it with that pile anyway :) The charms with the ovals I did not use, however there are times when you can use them, I just choose to go without them. I will mention it when they can be used. STEP 1 - APPLIQUÉ So obviously, this project has a lot of applique in it :) Start by grabbing your green and red charms. Sort them into two piles of red and two piles of green that are identical to each other (there are 2 charm packs here so you will have some repeat prints in each pile). Set one red and green pile aside to be used later. You now should have 12 green charms and 12 red charms (yes we are still calling that green, blue, and red print a red charm). You need to cut out 24 Christmas appliqué's for the 24 days. Half will be in red and half will be in green - see how well that works out?


 Place a Christmas Image appliqué onto a White Bella Solid Charm square and center it. You can just eyeball this.")

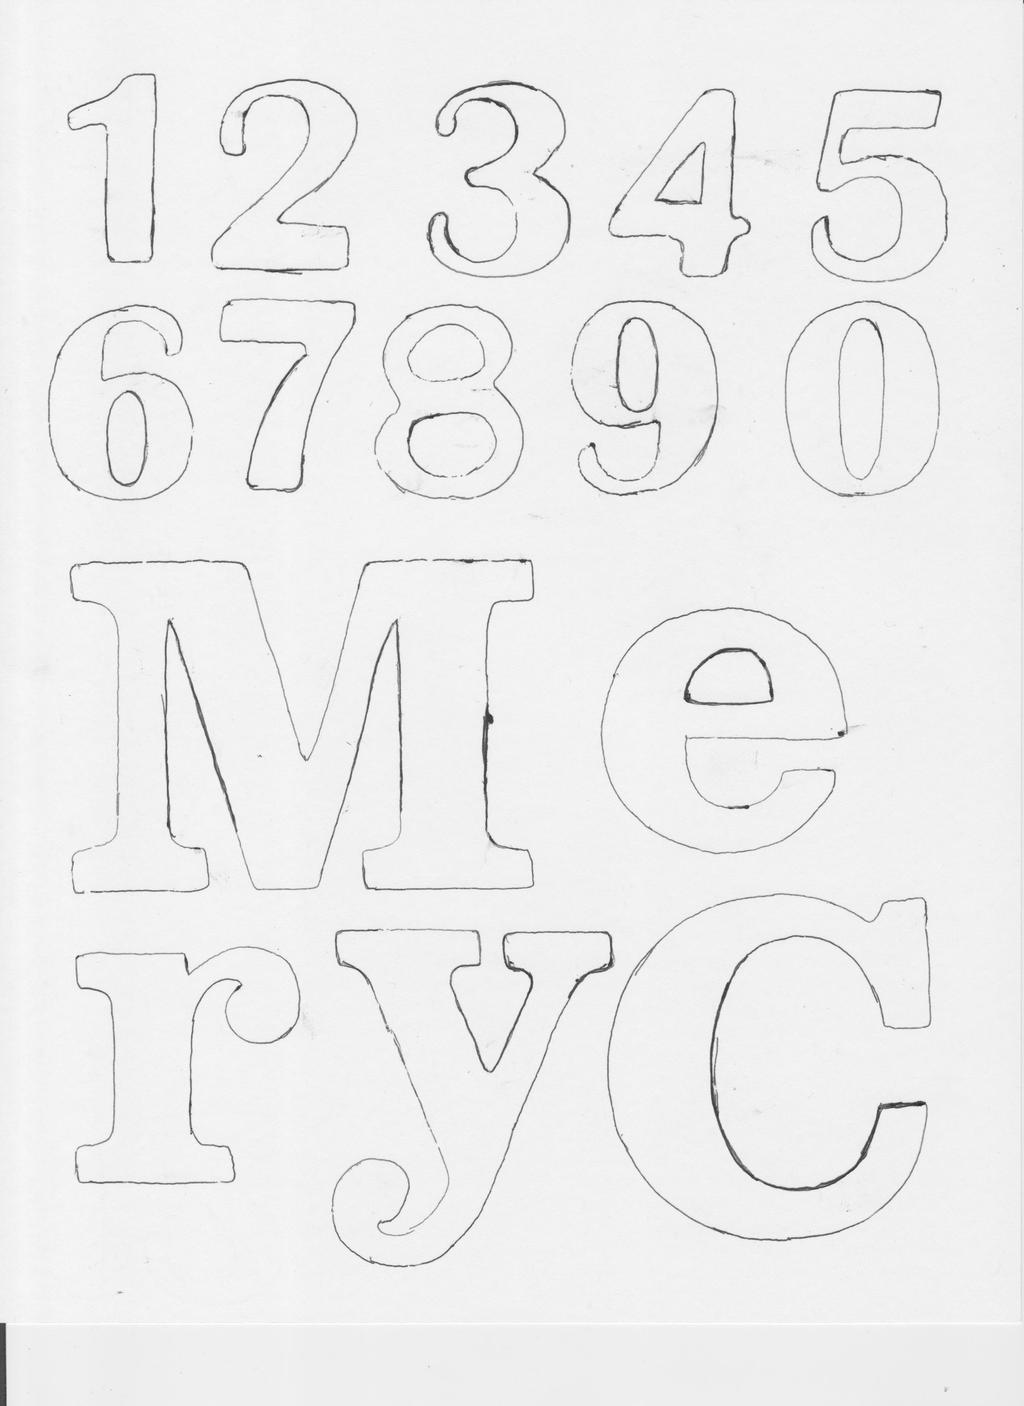
3 Start by placing a square of Heat N Bond (texture side down) onto the wrong side of the fabric of your first charm. Press with iron. Now using the templates at the bottom of this tutorial, draw the image of your appliqué onto the Heat N Bond. Lastly, Cut out the image and remove the paper side of the Heat N Bond. Repeat this process for all 24 charm squares (I did 3 of each Christmas image). Next you want to do the number appliqué. I choose to do these on the Bella Solid Charm squares but if you like, you can do them on the white print flurry squares. It is your choice. We will do the numbers in the same fashion as the Christmas images with one big exception. Use the template from the bottom of this tutorial of the numbers but when you draw the images, make sure you draw the numbers backwards so that when you turn the number over, it will be facing the right direction. You can get 4-5 numbers out of each charm square. You want to cut out the numbers one to twenty-four. Now it's time for a little sewing. I am sure your fingers can use the break from cutting :) Place a Christmas Image appliqué onto a White Bella Solid Charm square and center it. You can just eyeball this. Press the appliqué to fuse it to the charm square. Repeat this process for all 24 Christmas image appliqué's. Now you can move over to your sewing machine. You will want to sew around each Christmas image appliqué to secure it to the charm square. I choose to do a blanket stitch but you are welcome to do a straight stitch for raw edge appliqué or a zig-zag stitch. Whichever you prefer. I also choose black thread to really make these appliqué's pop, but once again, you do what you like :) Repeat for all 24 squares. So now you have your 24 appliqué charm squares and you are ready to number them. I just realized I took this picture before I actually did the blanket stitch, oops :) Now you want to figure your layout before attaching the numbers. I choose to alternate the green and red pattern with that "special" red being day 24. Once you have a layout you like, you are ready to start adding numbers. (Side note... I did my numbers in numerical order but you can mix them up if you prefer)


 Move onto making the backing for the Christmas banner.")

 Once you have everything placed perfectly,")
4 You attach the numbers the same way you did the Christmas Image appliqué's. I found it best when layering the numbers, to completely sew around the first number before ironing on the second. It just made less starting and stopping :) You guessed it, Repeat for all 24. Now you are ready to do the last set of appliqué which is the Merry Christmas banner at the bottom. Using the letters template including in the Printer Friendly Version, cut out the words "Merry Christmas" from the 1/8th of a yard of the blue snowflake print. I didn't take any pictures of this as I figure you are a natural by now :) Move onto making the backing for the Christmas banner. Grab 9 White Bella Solid charm squares and sew them together using a 1/4" seam allowance end to end. Press your seams open on the banner. Now trim off 1 3/4" off of both ends of the banner to get the appropriate size. Now you are ready to place your appliqué. I found it easiest to lay my ruler one inch up from the bottom of my banner as a line to place everything on. (I did have the "y" sink down below, just don't go down to far as you have to sew a 1/4" around this) Once you have everything placed perfectly, press to secure your appliqué. Use your desired method of stitching to secure your appliqué to the banner. Once again, I choose black thread to really make this pop! Oh, and don't worry about those seam lines, you can't see them once this is quilted. And that is the end of the applique!!!
 that matche the Christmas image appliqué of the square you are working on.")

 Now turn your flap or pocket right side out using the hole that was left in the top.")
 and press the entire square. Repeat for all 24. You can now set these aside for a little bit.")

5 STEP 2 - MAKING FLAPS or POCKETS With your appliqué all done, you are ready to move on to making the flaps or pockets for your calendar Start by finding the red or green print charm square (those you set aside earlier) that matche the Christmas image appliqué of the square you are working on. Place the two squares right sides together. Now pin around the edges. Repeat for all 24 charm sets. Now to sewing. Use the following guide for sewing. You are leaving the opening in the top to turn the piece inside out. Once again, you want to be 1/4" from the edge. And make sure to backstitch at the beginning and end so your stitches don't pull out when you turn the entire thing inside out. Repeat for all 24 :) Now turn your flap or pocket right side out using the hole that was left in the top. Make sure to use a pen or small pointed tool to push out all your corners and seams. Repeat for all 24. Tuck the raw edges under at the top (they will fold naturally) and press the entire square. Repeat for all 24. You can now set these aside for a little bit. Aren't they just adorable?! STEP 3 - MAKING ROW PIECES Now you are ready to make the backing that you will be attaching your flaps or pockets to. Start by grabbing 11 charm squares out of your 'blue" pile. This is where I choose to leave out the solid blue and the blue snowflake print from the appliquéd, just a personal choice. You are going to cut the 11 charm square into four 2 1/2' x 2 1/2" squares. Just cut in half vertically and then without moving the pieces, cut in half horizontally. Repeat for all 11 charm squares and then set the squares aside.
 Align the folded edge of your yardage along the 0 horizontal")


6 Now you need to cut the rows to do some strip piecing for the sashing. You will be doing the next 2 sets of instructions for both the red and green yardage :) Align the folded edge of your yardage along the 0 horizontal line on your mat. Align your ruler up along the marks on vertial marks on the top and bottom of your mat and cut a nice straight edge to start with. Now measure over 1 1/2", align your ruler along the top and bottom again and cut a 1 1/2" strip. Without moving your already cut strips, keep moving over 1 1/2" until you have cut nine 1 1/2" strips. Now align your ruler along the horizontal line at the top of your strips to trim off the selvage edge. Repeat for the green. Now for some strip piecing. Strip piecing is a great way to speed things up and save time. Take a green and red strip and place them right sides together. Sew a 1/4" seam all the way down the side of the strip. There is no need to pin, you can just align as you go. If the ends don't come out perfect, no worries :) Just keep feeding strip sets through until all 9 have been sewn. Now clip the threads between sets and press your seams. You can press to one side or open. Lastly, you are going to cut your strip sets into the sashing sizes. Start by trimming a little off the end just so you start with a nice straight line. Now measure over 5" and cut. You will be able to get 8 sashing pieces out of each strip set. You need 66 sashing pieces, so cut 8 out of 8 strip pieces and 2 sashing pieces out of the final 9th strip piece.


 Repeat for all 6 rows (3 sets of the 2 layouts) and then press the rows.")


7 STEP 4 - SEWING ROWS TOGETHER Now that all your pieces are cut, you are ready to put your rows together. First are your border rows. There are 2 layouts for these and you will be doing three rows in each layout. Notice, they look similar but the red and green are opposite. Be careful not to mix them up :) Start by laying the first piece in the row onto the second piece in the row with rights sides together. There really isn't need to pin as you are dealing with such small pieces and no seams but you can if you like. Sew a 1/4" seam along the edge. Continue adding on piece by piece of your row in this fashion until the row is complete. (I found it easiest to stack up my rows so I didn't have to go back and forth a lot :) Repeat for all 6 rows (3 sets of the 2 layouts) and then press the rows. Next you are going to sew the background rows. You will need 4 of these rows. The layout is as follows. The red and green on the ends don't matter here because you can just flip it as needed. You will sew these 4 rows in the same fashion. Lay your first piece of the row onto the second piece with right sides together. Sew a 1/4" seam. Then continue adding on piece by piece until the row is finished. Once again, stacking helps. Repeat for all four rows and then press. Lastly, you need to add the borders onto the Merry Christmas banner. Now before doing this, (if you are doing the same color alteration as me) just double check that your #19 is going to coordinate with this side. Meaning, my #19 is a green print, so I want an inner red border around it. I need to make sure that the row below has a green outer border. Hence the Green strip closest to the M in Merry. (If I totally just confused you just look down at the first picture under step 5 to see what I am talking about). You attach these two row ends the same as you did your other rows. Lay the two pieces onto the edges of the borders with right sides together. Sew a 1/4" seam and then press. Now all your rows are done. You should have 1 Merry Christmas banner, 4 background rows, 3 sashing rows that start in red on top and 3 sashing rows that start with green on top. You with me :) Great, let's move on!!!

 Sew the top together the same way you pieced the rows together.")


8 STEP 5 - SEWING TOP TOGETHER Okay, so now you are ready to layout your top. Once again, double check that your appliqué prints are going to be the opposite color of your inner squares. You can also choose to mix up the color squares if you like, so the top and bottom inner squares are green and the sides of the inner squares are red. It looks great both ways :) Sew the top together the same way you pieced the rows together. Take your first row and lay it on top of your second row with right sides together. Make sure to match each of your seams. This is of prime importance to make sure they come together nice and crisp. Once you have pinned your seams, go ahead and pin along the rest of the row. If you find you have some bulk from lining up those seams, go ahead and slide the bubble down and put in a horizontal pin. This helps to get rid of that bulk but still keep nice crisp seams :) Once you are all pinned, sew 1/4" seam along the pin line, making sure to remove pins as you go. Press. Now just move onto the next row. Lay the third row onto the now sewn together first and second rows with right sides together. Pin, sew, and press. Keep repeating until you have sewn all of your rows together....and here is what you should have!!! A beautiful background just ready for those adorable little flaps or pockets. So lets get to them now!!!

.")


9 STEP 6 - ADDING FLAPS or POCKETS Go ahead and grab all those cute little numbered charms you set aside. Don't they just look adorable all lined up?!! FOR THE FLAP - Go ahead and pin the charm square along the top of the white background square. Sew a line across the top of the square about an 1/8" in. This closes up the hole and secures it to the background. Remember to backstitch at the beginning and end of the line. I choose to do a super small zig-zag stitch here instead of a straight stitch just so that it was anchored well (I know I will have little hands tugging on them). You can do a decorative stitch, straight stitch, whatever you like :) Once again, repeat this process for all 24 Christmas charm squares. FOR THE POCKET - First you need to close up the hole in the top of your charms. Sew a line across the top of each of your 24 charms keeping about an 1/8' from the edge. Once again, you can use a decorative stitch, straight stitch, whatever you like :) Repeat for all 24 squares. Now you are ready to attach the pockets. Align the pocket flap onto the background white solid. Pin along the side edges of the pockets. Now sew a line about 1/8" in (once again, using whatever stitch you like keeping strength of seam in mind) according to the picture below. Remember to backstitch at the beginning and end. Repeat for all 24 squares. And there you have it!!! Your Christmas Traditions Advent Calendar top is done!!! I just love it!!!!!
. Tape your backing down to a flat surface with wrong side up.")


 Oh, and make sure not to sew any of your flaps down.")

10 STEP 7 - FINISHING UP So now the fun part... finishing it up!! First you want to make your quilt sandwich. Grab your yard of backing. Make sure to give it a good press first (this helps to keep bubbles out of the backing). Tape your backing down to a flat surface with wrong side up. Then lay down your piece of batting followed by your Advent Calendar top. Having some tunes for this next part might be nice :) Now onto basting!!! Start in the center and pin moving outward and smoothing as you go. I pinned in each of the blue squares and the center of each of the background white squares. Once your project is all basted, you are ready to quilt it. I really had some fun with the quilting and decided to share but remember, you do what you like. For the sashing I wanted to give a ribbon look. I sewed the top line first and then went back and echoed the line crossing over every once and a while to create the ribbon effect. I used white thread so when I crossed over on the blue squares it wouldn't show up much :) Oh, and make sure not to sew any of your flaps down. They pretty much stay out of the way, but I thought it was worth mentioning :) For the background of the banner I wanted to do something that really made the words pop!! So, nothing pops quite like little pebbling. And I love that it has the added benefit of looking like little snowballs!!! It also really makes those seam lines in the background impossible to see. Lastly, and this is optional, I wanted to repeat the images in quilting in the background squares that are on the front of the flaps or pockets. So using a water-soluble pen and the templates from the appliqué's, I drew the image and then pebble quilted around it to make the image pop :)


11 Once you have your quilting done, you are ready to bind your project. Grab your 1/2" yard of peppermint print and cut it into at least four 2 1/2" strips. Turn those into your binding and attach. If you have never done a binding before there is a great tutorial here to help {modabakeshop.com/2010/08/binding-with-jelly-roll.html} And last, if you are doing the flaps, add a piece of ribbon to the back of each background fabric. Once again, I just used a small zig zag stitch to ensure these were really on well. Now you are ready to write up your Christmas Traditions. For the scrolls I just used squares of paper about 2 x 4, you can use fancy Christmas Paper as well, that would be adorable. Write your traditions, plan your days, and enjoy your Christmas holiday!!! One amazing Christmas Traditions Advent Calendar perfect for keeping your family in the Christmas Spirit all month long!!! The Calendar measures approx. 34" x 40" and will make the perfect addition to your Christmas! Melissa Corry {happyquiltingmelissa.blogspot.com}

12
13
14
Original Recipe. Flying in Squares Quilt by Melissa Corry
 Original Recipe Flying in Squares Quilt by Melissa Corry Hello Moda Bake Shop fans!!! I am so excited to be back today to share a "high flying" tutorial with you all ;) I'm Melissa Corry and I normally
This is an original pattern not intended for sale.
 Hello Moda Bake Shop Friends!! It's Melissa Corry here popping over from Happy Quilting!!! I am super excited to share with you a final Summer Of Solids Quilt tutorial!!! I love making Red, Black, and
Original Recipe. Take It All Tote by Melissa Corry
 Original Recipe Take It All Tote by Melissa Corry Hi everyone!! It's Melissa from Happy Quilting {happyquiltingmelissa.blogspot.com} and I am so excited to get to share another fun-filled tutorial with
STEP 2 - NINE PATCH BLOCKS
 Hello Fellow Moda Bake Shop Friends. It's Melissa from Happy Quilting again and I am so excited to share this new quilt tutorial with you today ;) Last Market I was instantly drawn to the beautiful Ambleside
Original Recipe. Original Recipe can be found at
 Original Recipe Hi Moda Bake Shop Readers!! I'm Melissa Corry from Happy Quilting and I am so excited to be back here at the Moda Bake Shop to share my Read With Me quilt!! This fun twist on a standard
Original Recipe. Snuggly Squares Baby Quilt by Melissa Corry
 Original Recipe Snuggly Squares Baby Quilt by Melissa Corry Hi, my name is Melissa Corry and this is my first Moda Bake Shop tutorial. To say I am excited would be a huge understatement! I am a huge fan
This quilt finishes at 66" x 82". So let's get right to what you need to do to make your own ;)
") Hi Moda Bake Shoppers!!! It's me, Melissa Corry from Happy Quilting and I am thrilled to be bringing you another fun and happy quilt tutorial today ;) I have been a huge fan of Vanessa Christenson's Ombre
Hi Moda Bake Shoppers!!! It's me, Melissa Corry from Happy Quilting and I am thrilled to be bringing you another fun and happy quilt tutorial today ;) I have been a huge fan of Vanessa Christenson's Ombre
know you ve got your little three piece where they re all hooked together. I m going to take my next three piece, make sure that I don t have anything
 Hi, I m Jenny from the MSQC. I have a super fun project for you today. Take a look at these darling little Christmas stockings behind them. Christmas is coming. It s never too early to prepare and this
So once you get your 12 pieces sewn together, that s going to give you the width for your background fabric. And then I went ahead and sewed 8 half ch
 Hi, I m Jenny from the Missouri Star Quilt Company. Every time I do a trunk show, I show this wall hanging. I ve fallen in love with the Dresden, and I show a lot of different Dresden things, and this
Original Recipe. Patriotic Star Pillow by Kim Walus. 4th of July is Coming Soon... Celebrate by Making this Fun Independence Day Project!
 Original Recipe Patriotic Star Pillow by Kim Walus 4th of July is Coming Soon... Celebrate by Making this Fun Independence Day Project! Along with this project I'm introducing a new product called Texture
STEP 2 - FLYING GEESE UNITS
 Hi Moda Bake Shoppers!!! It's me, Melissa Corry from Happy Quilting and I am thrilled to be bringing you a Christmas in July tutorial today ;) I absolutely love everything Joanna at Fig Tree & Co designs
This quilt/project finishes at 23" x 23". So let's get to it!!!
 Hello Moda Bake Shoppers and Happy Holidays!!! Melissa from Happy Quilting here with you today ;) I was so excited to hear that Moda Bake Shop was celebrating this December with a whole month of Mini's
So I m just going to line up my needle on the seam. And mine aren t perfect. And I don t die over it. I just do the best I can. And see you just keep
 Hi I m Jenny from the MSQC. I ve got a really fun project for you today. This is the zig zag runner. This is put together just using charm squares. You can use leftovers or a whole charm. You can make
DIY Christmas Advent Calendar Sewing Tutorial
 DIY Christmas Advent Calendar Sewing Tutorial I love counting down the days until Christmas with my children and seeing the smiles on their faces each morning as they get to check the advent calendar to
Original Recipe. Thanksgiving Advent Calendar by Melissa Mortenson
 Original Recipe Thanksgiving Advent Calendar by Melissa Mortenson Some friends and I have had the idea to make a Thanksgiving Advent Calendar for a few years. When I saw the Gobble Gobble charm pack I
Cheri Good Quilt Design s Ribbon Star
 Cheri Good Quilt Design s Ribbon Star Designer: Cheri Good Quilt Designs Ribbon Star Size 56 x 56 #110A Ribbon Star Strip Quilt Supplies Finished quilt size: 56 x 56 Cotton thread to match fabrics Basic
Original Recipe. 7/11/2014 Original Recipe can be found at
 Original Recipe Happy Christmas in July! I'm Heather from Heather Kojan Quilts. I'm excited to share this tutorial for a super fun Peppermint Swirl Christmas Tree Skirt! Start now and you'll have it done
Pocketfuls of Christmas Door or Wall Tree
 Pocketfuls of Christmas Door or Wall Tree 25 pockets to help count down the days before Christmas! Supply list: Color #1: Color #2: 5/8 yd green for tree and tree stump 1 yd for backing and binding ½ yd
Charmed. Finished Size 48 x 60 Finshed Block 9
 Charmed Finished Size 48 x 60 Finshed Block 9 Materials Needed: 3 1/2 yards of the brown floral (8786-9), for blocks and backing 1 1/4 yards of the brown stripe (8792-9) 1 1/4 yards of the pink butterfly
Original Recipe. Original Recipe can be found at
 Original Recipe Hi There :) It's me, Melissa Corry from Happy Quilting and I am so excited to share my Ring Around Baby Quilt!! I really love the bold prints and colors of Zen Chic's Comma line. They make
Award Ceremony Quilt a free pattern from Anna Maria Horner
 Award Ceremony Quilt a free pattern from Anna Maria Horner Award Ceremony Quilt by Anna Maria Horner My Honor Roll fabric collection is inspired by the idea of being good. The prints themselves took cues
Original Recipe. Sunkissed Squares by KarrieLyne
 Original Recipe Sunkissed Squares by KarrieLyne Guess who, Moda Bake Shoppers? It's me again, KarrieLyne from Freckled Whimsy, bringing you another tutorial! Actually, two tutorials! Woo Hoo!! I'm really
Original Recipe. Original Recipe can be found at
 Original Recipe My name is Erica Jackman and I blog over at Kitchen Table Quilting. I am so happy to be sharing this project with you and I hope that you enjoy this fun little project that brings lots
Original Recipe. Angela s Diaper Bag by Melissa Mortenson
 Original Recipe Angela s Diaper Bag by Melissa Mortenson Hi, my name is Melissa Mortenson and I'm very excited to share the tutorial for this fun diaper bag! It is made from 1 charm pack and 1 layer cake...
Original Recipe. Oh, Christmas Tree Quilt by Amy Rivera
 Original Recipe Oh, Christmas Tree Quilt by Amy Rivera Hi, I'm Amy! Also known to some as Alliekatmom {alliekatmom.blogspot.com}. I am back with my second Recipe for you. I I want to share with you this
Handful of Stars. by Kim Diehl. Finished Quilt Size: 621/2" x 621/2" Finished Star Block Size: 8" x 8" A Free Project Sheet from
 Handful of Stars by Kim Diehl Finished Quilt Size: 621/2" x 621/2" Finished Star Block Size: 8" x 8" A Free Project Sheet from 49 West 37th Street, New York, NY 10018 tel: 212-686-5194 fax: 212-532-3525
This quilt/project finishes at 50" x 58".
 Easy piecing with fabric manipulation! Valentine s Day is one of my favorite holidays, but one I rarely plan for in advance. This year I ve come up with a fresh new spin on a heart block. I use fabric
Original Recipe. Flurries Wall Hanging by Polly Monica
 Original Recipe Flurries Wall Hanging by Polly Monica Hello, again from northern Virginia! I m Polly from Aunt Polly s Porch {auntpollysporch.blogspot.com}, with a fun wall quilt just perfect for your
Original Recipe. Sunkissed Summer Squares by Maria Wallin
 Original Recipe Sunkissed Summer Squares by Maria Wallin Hi everyone! My name is Maria Wallin and I'm so excited about sharing my very first Moda Bake Shop tutorial with you all! =) I still cannot believe
Encircled Throw Quilt Pattern
 Pattern Instructions Encircled Throw Quilt Pattern Geometrics are a favorite with quilters, with circles being a coveted favorite. This charming quilt pattern is designed to work with the Circles Sew Simple
our strips. So it made really good use of this roll up. So we hope you enjoyed this tutorial on the Stair Step block from the MSQC.
 Hi I m Jenny from the MSQC. And I ve got a really fun project for you today. Take a look at this quilt behind me. Isn t this gorgeous? I love these fabrics. I love the blues. It just makes me feel like
a free sewing pattern by
 a free sewing pattern by 2 kitty wallet This project is a fun companion piece to my Kitty Purse pattern. It's a bi-fold wallet with the traditional slots for cards (6) and one for receipts or bills. A
1 Mini Charm Pack {Nest by Lella Boutique} 2 Fat quarters of coordinating fabric (each a different print) 1/4 yard binding fabric
 1/4 yard binding fabric") Hi! It's Kristina from Center Street Quilts and today I'm sharing a fun way to use those darling mini charm packs we all love to collect. The Vinyl Project Pouch is a quick make that you'll love storing
Hi! It's Kristina from Center Street Quilts and today I'm sharing a fun way to use those darling mini charm packs we all love to collect. The Vinyl Project Pouch is a quick make that you'll love storing
Original Recipe. Big Girl Quilt & Pillow by Megan Frock
 Original Recipe Big Girl Quilt & Pillow by Megan Frock Hello all! My name is Megan and I blog at Downtown Housewife {downtownhousewife.typepad.com}. I also work at the fabulous Sew Sweet Quilt Shop with
here and a block, right here. You ll sew this block onto here and you ll put this whole strip across the middle, just like that.
 Hi, it s Jenny from the Missouri Star Quilt Company. Take a look at this great quilt behind me. This is my version of a spool quilt. I love spool quilts and I ve had one in my head for quite a few years
Happy Hot Dogs. 52 x 52 Quilt (8 ½ blocks)
") Happy Hot Dogs By 52 x 52 Quilt (8 ½ blocks) Cut 2 8 ½ strips white flower fabric, cut into 5 8 ½ squares Cut 1 8 ½ strip aqua flower fabric, cut into 4 8 ½ squares Cut 1 8 ½ strip white focal fabric,
Happy Hot Dogs By 52 x 52 Quilt (8 ½ blocks) Cut 2 8 ½ strips white flower fabric, cut into 5 8 ½ squares Cut 1 8 ½ strip aqua flower fabric, cut into 4 8 ½ squares Cut 1 8 ½ strip white focal fabric,
This is an original pattern not intended for sale.
 I enjoy taking classic patterns and giving them a contemporary feel. I ve always admired orange peel quilts, and came up with a design for a lap quilt using two charm packs and machine appliqué. The gentle
Learn a Technique. 1 Mug Rug at a time Includes: applique, quilt as you go, paper piecing, & curved piecing
 Learn a Technique 1 Mug Rug at a time Includes: applique, quilt as you go, paper piecing, & curved piecing Materials Needed: fabric for the apple core apple core template batting 6 X 6 for each mug rug
Select nine fabrics that go nicely together. 1 light, 4 medium, and 4 dark prints.
 Kathy s Version of the Disappearing Nine Patch Quilt 46 ½ x 64 ½ This version uses nine fabrics, is stripped pieced, and has side borders only. As simple as pie to make and yet so warm and cozy. Use the
Original Recipe. Castle Stairs by Kelly Bowser
 Original Recipe Castle Stairs by Kelly Bowser Hi! I'm Kelly from kelbysews {kelbysews.blogspot.com} and today I'm going to share my TWO projects from one jelly roll! When I was experimenting with this
Notes - Please wash, dry & iron your fabric before beginning. - Sew all seams with an accurate 1/4 seam allowance. CUTTING INSTRUCTIONS
 Notes - Please wash, dry & iron your fabric before beginning. - Sew all seams with an accurate 1/4 seam allowance. CUTTING INSTRUCTIONS Indicates fabric pattern is directional on strips Fabric A: Horizontal
Original Recipe. Child s Activity Bag Tutorial by Melissa Stramel
 Original Recipe Child s Activity Bag Tutorial by Melissa Stramel Well, I'm back from Lilac Lane once again. I'm Melissa Ann Stramel. Do your kids have the January blahs? Bake up this easy activity bag
Original Recipe. Charming Hearts Quilt by Quilting in the Rain
 Original Recipe Charming Hearts Quilt by Quilting in the Rain Hi all! : ) This is Jera from {http://www.quiltingintherain.com} and I m excited to be posting my 2nd MBS tutorial! I just LOVE the simplicity
Terrie Sandelin Miniatures in Minutes
 Terrie Sandelin Miniatures in Minutes http://www.terriesandelin.com http://terriesandelin.blogspot.com/ Tumbler Foundation: Tote Bag Finished Foundation: 7" by 7" Approximate size of bag: 12" by 10" by
Original Recipe. Tea Caddy by AnneMarie Chany
 Original Recipe Tea Caddy by AnneMarie Chany Hi there! I am AnneMarie of Gen X Quilters {genxquilters.com} and I've whipped up an adorable little Tea Caddy that is not only functional, but a great way
A SPOOKY SLEEPOVER. This is a free pattern provided by The Red Boot Quilt Company The Red Boot Quilt Company
 A SPOOKY SLEEPOVER The Red Boot Quilt Company The Red Boot Quilt Company A SPOOKY SLEEPOVER Approx. Size 38 1/2in x 57 1/2in BEFORE THE FUN BEGINS Please read all instructions before you begin. Abbreviations.
Original Recipe. Flowers in the Park Table Topper by Susan Allen
 Original Recipe Flowers in the Park Table Topper by Susan Allen Hi! I'm Tilly from The Quilt Asylum {thequiltsasylum.com} and our store owner Susan Allen has had the best time playing in Central Park with
Checkered Baby Quilt
 Checkered Baby Quilt by Deb Gehringer of Monday Morning Designs Hi, I'm Deb Gehringer, the creator behind Monday Morning Designs. If you're a beginner quilter, this baby quilt is a great choice because
Christmas Stocking 1. The finished size is 17.5 long from top of folded cuff to toe, 21.5 unfolded, and 6.5 wide.
 Christmas Stocking 1 The finished size is 17.5 long from top of folded cuff to toe, 21.5 unfolded, and 6.5 wide. For each stocking you ll need: 2 outside pieces 2 lining pieces 2 cuff pieces 1 6 piece
Original Recipe. Prairie Point Christmas by Cara Wilson
 Original Recipe Prairie Point Christmas by Cara Wilson Hey everyone! I'm Cara from CaraQuilts {http://www.caraquilts.blogspot.com} and I'm back with an easy Christmas decoration. Yes, I'm already thinking
Greek Square Table Runner
 Greek Square Table Runner Quilt Finished Size: 70-1/2" x 25-1/2" Block Finished Size: 12" Printing Options: Printer-Friendly Web Page or PDF Fabric Requirements: Dark: 1 yard Medium: 3/4 yard Light: 3/4
2016 Courtesy of Art Gallery Quilts LLC. All Rights Reserved.
 ST YL E NAME 2016 Courtesy of Art Gallery Quilts LLC. All Rights Reserved. CONSTRUCTION Sew all rights sides together with ¼"seam allowance. Arrange the triangles together in rows. QUILT DESIGNED BY AGF
Suite Express. Tree Skirt. Designed by Vanessa Stevens using the Suite Christmas collection by RJR Fabrics. Finished skirt measures 50 diameter
 Suite Express Tree Skirt Designed by Vanessa Stevens using the Suite Christmas collection by RJR Fabrics Finished skirt measures 50 diameter Suite Express Color Card Suite Christmas fabric collection Fabric
3. Press fusible fleece to the wrong side of these exterior pieces, or use batting pieces as interfacing and baste around all edges to hold in place.
 Catch more fun tutorials and patterns on my blog at hungryhippiesews.com or find me sewing away on Instagram @sewhungryhippie. This bag finished is approx 14"H x 18"W x 4" deep 1 Jelly Roll Moda Bella
FREE PROJECT SHEET DESIGNED WITH LOVE BY
 FREE PROJECT SHEET DESIGNED WITH LOVE BY QUILT DESIGNED WITH LOVE BY PAT BRAVO FABRICS DESIGNED BY AGF IN-HOUSE STUDIO AND PAT BRAVO FOR ART GALLERY FABRICS Finished Size: 62 ½ " 57" FABRIC REQUIREMENTS
Gingerbread House + Christmas Tree Potholder Duo
 Gingerbread House + Christmas Tree By Faith Essenburg It s that time of year again when we celebrate family and friends, eat all the yummy treats and actually get excited about snow! This season flys by,
Choose five strips to be used for the pockets. There should be strong contrast between the tree and the pockets.
 Hello Moda bakers! I'm Debora Exum and today we're cooking up a holiday quilt that will bring fun for everyone throughout the holiday season. This quilt offers both fun and function with its colorful tree
Original Recipe. Bricks in Bloom by Tracey Jacobsen
 Original Recipe Bricks in Bloom by Tracey Jacobsen Last July, my brother and sister-in-law adopted my niece Molly. They received a phone call from their adoption agency on Friday, and went to pick up their
CAMELOT FABRICS. 3. Draw a vertical line on the pointed end of each Strap, a tiny bit longer than the diameter of your buttons.
 Other Supplies - 2 buttons in coordinating color - paper printer - basic sewing supplies - sewing machine with buttonhole foot - iron & pressing surface - scissors & fabric shears - measuring tape - fabric
Original Recipe. Original Recipe can be found at
 Original Recipe Hello, again! I m Polly Monica from Aunt Polly's Porch blog. I am so pleased to be back at the Moda Bake Shop with a large mat and ruler tote bag designed just for quilters like you to
Lap Quilt. Project Needs & Notes:
 Lap Quilt Display your favorite embroidery on a homemade lap quilt! This project tutorial demonstrates how to embroider on quilt blocks, then assemble to make your own blanket. Project Needs & Notes: -
Benartex Bows Table Runner A Foundation Pieced Design Skill Level: Beginner
 Benartex Bows Table Runner A Foundation Pieced Design Skill Level: Beginner Designed By Alexandra Henry Sewn By Alexandra Henry http://www.artbyalexa.com Use Pellon Stitch-N-Tear Lite to foundation piece
Sand Surf and Sun. APQS Lethbridge a Ave North Lethbridge Alberta Canada
 Sand Surf and Sun APQS Lethbridge 1253 2a Ave North Lethbridge Alberta Canada 403-942-5333 www.finelyquilted.ca email: info@finelyquilted.ca 1 Fabric requirements: Background Squares 1.4 yards (1.2m) Sashing
Top 5 Favorite Free Sewing Patterns featuring a pattern from our friends at Riley Blake!
 ALLFREESEWING Top 5 Favorite Free Sewing Patterns featuring a pattern from our friends at Riley Blake! 1 Top 5 Favorite Free Sewing Patterns Copyright 2017 by Prime Publishing LLC All rights reserved.
Machine Stitched Cathedral Window Tutorial
 Machine Stitched Cathedral Window Tutorial 1. Here's a picture showing a row that I have already done to give you an idea of where we're going with this. For manageability, it's easiest to work on short
Double Layer Half Apron with Fancy Details
 Published on Sew4Home Double Layer Half Apron with Fancy Details Editor: Liz Johnson Tuesday, 18 July 2017 1:00 With this design, we've packed a whole lot of style into one half apron. To start, why settle
Original Recipe. Original Recipe can be found at
 Original Recipe Hey, there! I'm so glad you've popped in to see what's cookin' at the Moda Bake Shop today! This is my first time here, so let me introduce myself. My name is Julie Cefalu and I share my
THE FLOWER FAIRIES. This is a free pattern provided by The Red Boot Quilt Company 2017 STRICTLY NOT FOR RESALE OR DISTRIBUTION
 THE FLOWER FAIRIES This is a free pattern provided by The Red Boot Quilt Company 2017 STRICTLY NOT FOR RESALE OR DISTRIBUTION The Red Boot Quilt Company The Red Boot Quilt Company THE FLOWER FAIRIES Approx.
Original Recipe. Sweet Silhouettes Wall Hanging and Pillow Slipcovers by April Rosenthal. Original Recipe can be found at
 Original Recipe Sweet Silhouettes Wall Hanging and Pillow Slipcovers by April Rosenthal I'm April Rosenthal from Prairie Grass Patterns {prairiegrasspatterns.com}, and I'm so excited to show you my first
GO! Qube 12" Laura s Kitty Quilt Finished Size: 40" x 46"
 GO! Qube 12" Laura s Kitty Quilt Finished Size: 40" x 46" Fabrics are Little House on the Prairie Mansfield & Prairie Icons and provided by Andover Fabrics A charm pack of the Mansfield Collection, 3/4
Wheelchair Quilts. A guide to make fitted quilts for those in a wheelchair
 Wheelchair Quilts A guide to make fitted quilts for those in a wheelchair Table of Contents Introduction Creating a Template Fitting the Template p. 2 p. 3 p. 5 Sew Blocks or Pattern p. 8 Quilt Top Assembly
Block Lesson #11. Lesson Supplies UPDATED. Preparing the binding strips. Skill Builder BOM BLOCK LESSON #11 NOVEMBER 20, 2013
 UPDATED 1 BLOCK LESSON #11 NOVEMBER 20, 2013 Block Lesson #11 Skill Builder BOM In this lesson you will learn how to join your finished quilted and trimmed quilt blocks together with binding joints to
Original Recipe. Glace Forever Quilt by Nicole Willmore
 Original Recipe Glace Forever Quilt by Nicole Willmore I'm super excited to be posting here again at the Moda Bake Shop; I've really missed it. The name of this quilt is fitting on more ways than one,
Hanging Holiday Helper
 Hanging Holiday Helper Keep all your gift wrap essentials in one place with this Hanging Holiday Helper! Made with large pockets for wrapping paper, bows, ribbon, tape, and scissors, this handydandy caddy
Select 25 Fat Eighths from your bundle for the star points. Make sure they contrast with your background fabric.
 Hi, It's Cathy from meandmymumquilting.blogspot.ca/. I love star blocks, but I hate the y-seam construction that some patterns call for. I would like to share with you an easy way to make this beautiful
Stars and Stripes. Finished Quilt Size: 65½" x 65½" Finished Block Size: 13" x 13"
 Stars and Stripes Finished Quilt Size: 65½" x 65½" Finished Block Size: 13" x 13" The red-white-and-blue color scheme gets you ready to celebrate all of those patriotic holidays! Materials Yardage is based
THE FLOWER FAIRIES. The Red Boot Quilt Company
 THE FLOWER FAIRIES The Red Boot Quilt Company www.theredbootquiltcompany.com THE FLOWER FAIRIES Approx. Size 62in x 61in BEFORE THE FUN BEGINS Please read all instructions before you begin. Abbreviations.
Folk-Art Dish Garden
 Folk-Art Dish Garden Designed by Kim Diehl Finished quilt size: 20½" x 24½" Finished center block size: 11½" x 15½" ~ 1 ~ Materials ⅝ yard of tan print #1 for background 1 chubby sixteenth (9" x 11") each
14745 Carmenita Road, Norwalk, California (800)
") Inside Out 14745 Carmenita Road, Norwalk, California 90650. (800) 450-2030. www.anthologyfabrics.com Fabrics and Yardage Requirements Please read all instructions thoroughly before you begin BA-674 BA-825
Inside Out 14745 Carmenita Road, Norwalk, California 90650. (800) 450-2030. www.anthologyfabrics.com Fabrics and Yardage Requirements Please read all instructions thoroughly before you begin BA-674 BA-825
Rosewater. Sofa Quilt. SIZE 49" x 71" quiltingtreasures.com quiltingtreasures All rights reserved Pg 1. Designed by: Janice Averill
 Rosewater Sofa Quilt SIZE 49" x 71" quiltingtreasures.com quiltingtreasures All rights reserved Pg 1 24596 H 24599 D 24599 G 24599 H 24595 X 24597 P 24598 D KIT REQUIREMENTS 12 Kits 18 Kits 24 Kits Design
Original Recipe. Starry Eyed by Angela Mitchell. Original Recipe can be found at
 Original Recipe Starry Eyed by Angela Mitchell Hi there! I am Angela from {fussycut.blogspot.com} and I am excited to be sharing here at the Moda Bakeshop for the very first time. It is such a fun way
Original Recipe. Let s Go Trippin by Polly Monica
 Original Recipe Let s Go Trippin by Polly Monica Hello again! I m Polly from Aunt Polly s Porch blog {auntpollysporch.blogspot.com} and I m so happy to be sharing my designs again on the Moda Bake Shop!
featuring STARGAZER COLLECTION BY AGF STUDIO Space Trip FREE PATTERN
 featuring STARGAZER COLLECTION BY AGF STUDIO Space Trip FREE PATTERN Space Trip DESIGNED BY FABRICS DESIGNED BY CAP-ST-1106 TWINKLY PHASES CAP-ST-1108 PLANETARIUM CAP-ST-1103 INTERRUPTED SIGNAL CAP-ST-1104
Original Recipe. Option A - 30" x 30" Option B - 12" x 36" Luck of the Irish Table Toppers by Ribbon Candy Quilt Company
 Original Recipe Option A - 30" x 30" Option B - 12" x 36" Luck of the Irish Table Toppers by Ribbon Candy Quilt Company Option A 1 green fat quarter for shamrocks 4 fat quarters for pieced border 3/8 yard
Sher Hastings Designs. Angled Stripes Table Runner PDF Pattern. Finished size: 12 1/2 by 31 inches. So fun, so easy! Makes a great gift!
 Angled Stripes Table Runner PDF Pattern So fun, so easy! Makes a great gift! Finished size: 12 1/2 by 31 inches Sher Hastings Designs Page 1 Introduction: This is so fun and easy! Make them up in holiday
2809 Applique the Easy Way With Patrick Lose
 2809 Applique the Easy Way With Patrick Lose Patrick Lose representing the Warm Company shared a number of his delightful appliqué patterns with America Sews viewers. Patrick is a designer with a number
Personalize An Off-The-Rack Tee
 Published on Sew4Home Personalize An Off-The-Rack Tee Editor: Liz Johnson Friday, 26 June 2015 1:00 Now's the time to stock up on cute summer tees. They're on sale nearly everywhere. We hit the local Target
SMILE AND STAND TALL By Suzan Pons
 SMILE AND STAND TALL By Suzan Pons Size: 44 x 50 Main Fabric: about 40 assorted strips of batik fabric 2 ½ inches x 44 inches Inner Border: about 10 inches of contrasting fabric, WOF Side borders are 1
Blessings Quilt Tutorial
 Blessings Quilt Tutorial Hi everyone! I love fall (even though I know what follows), and when I saw the cute little critters on Perfectly Seasoned by Sandy Gervais for Moda, I had to have them! And the
Fox Fun Mug Rug H I J. Figure 1
 one day only DESIGN BY JOANNA WILCZYNSKA Fox Fun Mug Rug Good things come in small packages. Create a cute coaster that may end up on a wall instead. ScRap- FRIENDLY PROJECT SPECIFICATIONS Skill Level:
 www.studioefabrics.com Holiday Wall Hanging Holiday Wall Hanging featuring fabrics from the Winter Essentials II collection from Finished Quilt Size 46" x 46" Desgined by Carl Hentsch Fabric Requirements
Winner Designs Get a Grip Half Hexie Templates
 Winner Designs Get a Grip Half Hexie Templates No Slipping ~ No Kidding! No more dreaded Y seams! Half Hexies 3 sizes The Half Hexie Get a Grip Template makes it easy to cut multiple layers quickly & accurately.
Main Fabric ¾ yard. Contrast Fabric for handle, sides and bottom (I used decoratorweight for strength and the wider width) ½ yard
 ½ yard") Laptop Bag Tutorial http://laundryontheline.wordpress.com Copyright 2009 Dreams in Seams For home use only. Not to be published, reproduced, used or sold commercially without express permission of Dreams
Laptop Bag Tutorial http://laundryontheline.wordpress.com Copyright 2009 Dreams in Seams For home use only. Not to be published, reproduced, used or sold commercially without express permission of Dreams
Fabric Headband. Shopping List: Two ⅛ yard pieces of contrasting fabric. ⅛ yard of ⅜ wide elastic. All-purpose thread for construction
 Fabric Headband This stylish headband is super easy to make and it s reversible, too! A great way to use up those fabric bits left over from other projects. You can even embellish the fabrics with decorative
Original Recipe. Heart Garden Quilt Tutorial by Ellie Roberts
 Original Recipe Heart Garden Quilt Tutorial by Ellie Roberts Hello everyone! It's Ellie from CraftSewCreate {craftsewcreate.blogspot.com}! To celebrate Valentine's Day I thought I'd bring you a tutorial
A SPOOKY SLEEPOVER. The Red Boot Quilt Company
 A SPOOKY SLEEPOVER The Red Boot Quilt Company www.theredbootquiltcompany.com A SPOOKY SLEEPOVER Approx. Size 38 1/2in x 57 1/2in BEFORE THE FUN BEGINS Please read all instructions before you begin. Abbreviations.
Tea Towel Table Topper
 Tea Towel Table Topper Tea towels come in so many different colors and patterns, that it's a sure bet your tea towel table topper will be truly unique -- especially once you embroider it with designs of
Sassy Runner. Design by Wendy Sheppard Skill Level: Confident Beginner Number of Blocks: 8 Block Size: 8" x 8" (finished) quiltingtreasures.
 quiltingtreasures.") Approximate Size: 24½" x 42¼" Design by Wendy Sheppard Skill Level: Confident Beginner Number of Blocks: 8 Block Size: 8" x 8" (finished) 1 Studio 8 FABRIC REQUIREMENTS 24194 W 24195 N 24196 S 24196 N
Approximate Size: 24½" x 42¼" Design by Wendy Sheppard Skill Level: Confident Beginner Number of Blocks: 8 Block Size: 8" x 8" (finished) 1 Studio 8 FABRIC REQUIREMENTS 24194 W 24195 N 24196 S 24196 N
BUTTERFLY GARDEN. The Red Boot Quilt Company
 BUTTERFLY GARDEN The Red Boot Quilt Company www.theredbootquiltcompany.com BUTTERFLY GARDEN Approx. Size 89 1/2in length x 92 1/2in width BEFORE THE FUN BEGINS Please read all instructions before you begin.
General Information. Step 1 - Cutting. Fabric A - Cut (2) strips at 8-1/2 x WOF Sub-cut into (5) 8-1/2 squares Label Block A.
 strips at 8-1/2 x WOF Sub-cut into (5) 8-1/2 squares Label Block A.") General Information All seams are sewn with a 1/4 seam allowance. Pre-wash and press with spray starch before cutting. WOF = Width of Fabric. LOF = Length of fabric. Press seams open as much as possible
General Information All seams are sewn with a 1/4 seam allowance. Pre-wash and press with spray starch before cutting. WOF = Width of Fabric. LOF = Length of fabric. Press seams open as much as possible