Unit A. Unit B. Wide. Fabric 11. Narrow. Unit C
|
|
|
- Abraham Clarke
- 6 years ago
- Views:
Transcription
1 r

; LOF = length of fabric. Step 1: Cut the Fabrics Fabrics 1-6.")


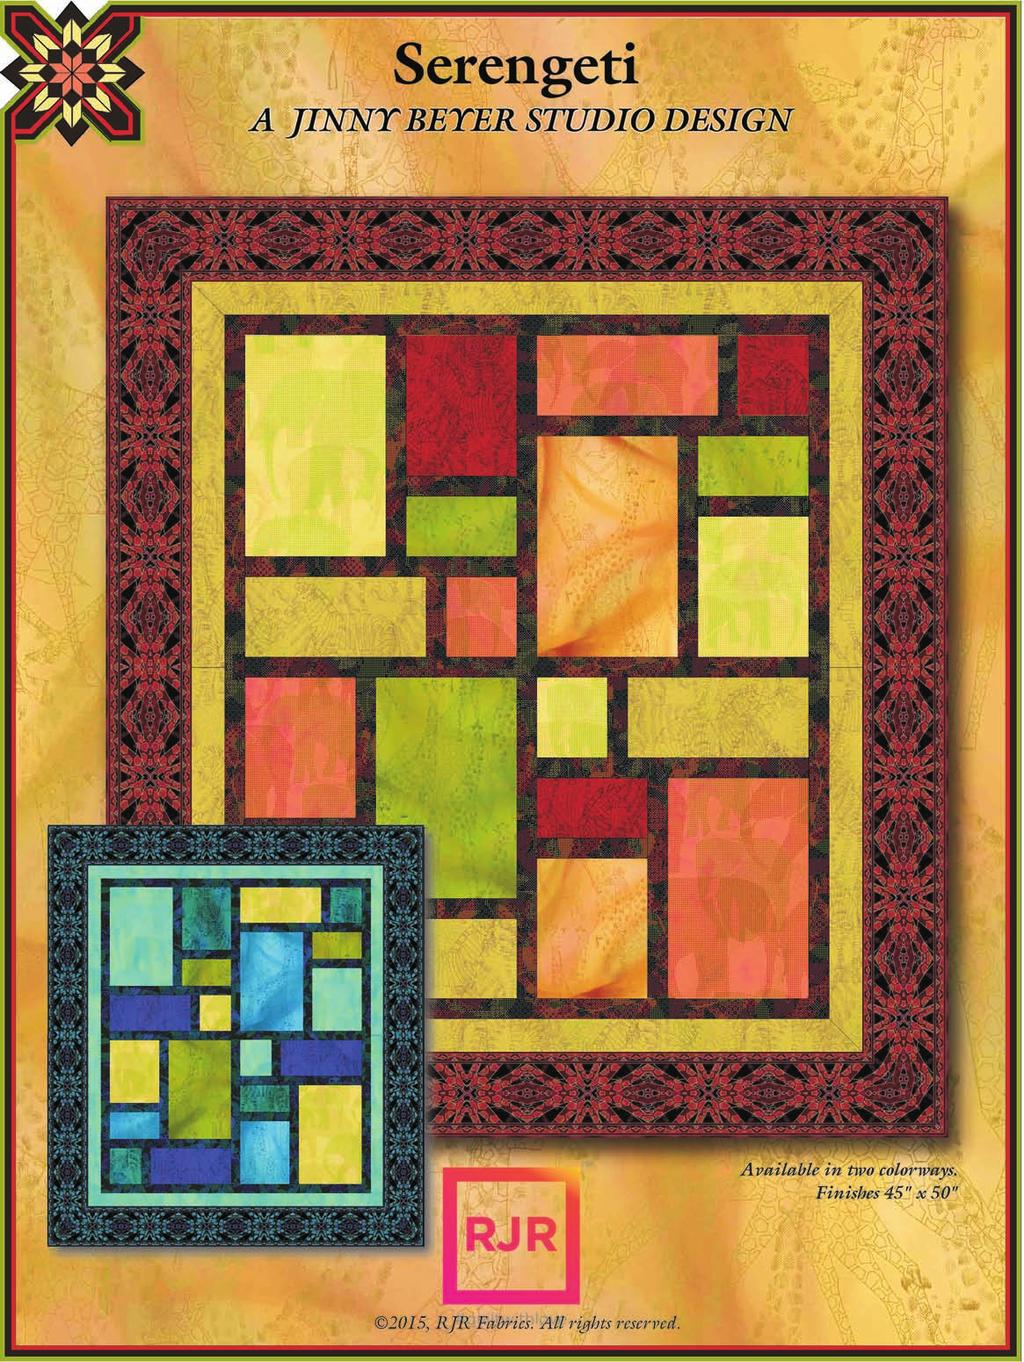
2 Elephants, giraffes and zebras traverse this delightful crib-size quilt measuring 45" x 50". The large patches feature subtle images of friendly African animals, and are easily cut and pieced with basic quiltmaking skills. The borders are cut and sewn using Jinny s no-math method of adding mitered borders. Read the entire pattern before beginning. All seam allowances are ¼". Pattern assumes basic quiltmaking knowledge. Press seams after sewing. WOF = width of fabric (assumes 40"); LOF = length of fabric. Step 1: Cut the Fabrics Fabrics 1-6. Follow the Fabric Requirements & Cutting Guide for your colorway on on page 5 or 6. Take some time to choose which fabric motifs to capture; the fabric requirements are generous to allow some fussy cutting. Fabric 7. Cut four strips 1½" x WOF and reserve for Border 1. For the sashing strips, cut six strips 1½" x WOF then subcut them as follows: From one strip, cut lengths measuring 11½,, and 4½. Repeat for three additional strips. From one strip, cut two lengths measuring 16½". From the remaining strip, cut one length 28½. Reserve the remaining fabric for binding. Fabric 8. Separate the wide and narrow stripes by cutting in the seam allowance area between them, allowing ¼" of seam allowance fabric on both long sides of each stripe. Set aside the narrow stripes for another use. Step 2: Make the Quilt Units Follow the illustrations below to sew the rectangles and sashing together into four units. (Number-letter combinations indicate the fabric-shape.) Take care to orient the rectangles so the animals heads are towards the top of the blocks. 1A 4D 2B 3C 5E 5D Unit A 2E Unit B Wide Seam Allowance 3C Narrow Seam Allowance Seam Allowance Fabric 11 6A 1B Unit C Separate the wide and narrow border print stripes. Reserve two of the wide stripes for the top and bottom borders. From each of the remaining four wide stripes, cut a strip measuring 35" for the side borders. (The side borders must be pieced to allow the fabric design to flow uninterrupted around the quilt corners.) 5B 6C 3A 2E 4D 1


3 1E 4D Unit D Step 4: Add the Borders Add the borders to the quilt, following the instructions for Framing a Rectangular Quilt and Applying Multiple Borders in Adding Borders the Jinny Beyer Way on the following pages. 2C For a video demonstration of the bordering technique, visit 6B 5A Step 5: Quilt & Bind Layer the quilt as follows: backing (wrong side up), batting, quilt top (right side up). Baste the layers together. Quilt as desired. Step 3: Assemble the Quilt Top Follow the illustration below to assemble the units and the remaining sashing strips into the quilt top. When the quilting is completed, trim the backing and batting even with the edges of quilt top. Make binding strips your preferred width (up to 2½" wide) using the reserved Fabric 7, and bind using your favorite binding method or by following the instructions at A 16½" B 28½" C 16½" D 2


4 Adding Borders the Jinny Beyer Way Jinny Beyer s border prints are designed specifically with the quilter in mind. Each fabric has a wide and a narrow stripe which coordinate in both design and color. Both stripes have mirror-image motifs which are essential for perfectly mitered corners. In addition, the two different stripes in the border print are separated by at least a half-inch so that a 1/4" seam allowance is provided for on both sides of the stripes. From selvage to selvage, there are always at least four repeats of each stripe across the fabric so calculating the yardage needed to border a quilt is easy: you need the length of the longest side of the quilt plus an additional half-yard to match design elements and allow for the miters at the corners. For a video demonstration of this bordering technique, visit Framing a Square Quilt 1. Place a strip of the border print across the middle of the quilt, centering a motif from the border at the exact center of the quilt. (Because of minor differences in seam allowances taken and stretching that can occur on bias edges, opposite edges of a quilt often measure slightly differently. Using a measurement taken from the middle of the quilt will help keep the quilt from ruffling at the edges.) 2. To mark the first miter, position a right-angle triangle so that one of the sides of the right angle runs along the bottom edge of the border print. Then carefully move the triangle until the angled side touches the point where the top edge of the border print meets the edge of the quilt. (See arrow in Diagram 1.) Mark, then cut the miter line. (Because the miter is cut right at the edge of the quilt, the seam allowance is already included.) Diagram 1: Mark the miter. 3. Carefully pick up the mitered side of the border strip and lay it on top of the strip on the opposite side of the quilt, right-sides together, placing the top edge of the strip at the edge of the quilt. If necessary, adjust the top strip so that the design motifs on the top and bottom match exactly. If you have centered a motif from the border print in the middle of the quilt, the designs should match at the edges. Cut the second miter. (Using the cut edge as a guide, rather than the triangle, ensures that your design motifs will be an exact match.) 4. Using this first mitered strip as a guide, cut three more identical pieces, making sure that the design on the border print is exactly the same on all four pieces. Diagram 2: Cut three pieces identical to the first. 5. Mark seam intersection dots on the short side of each of your border strips. To find the spot, simply draw a short line 1/4-inch inside the mitered edge and the short edge of the border strip. Mark the dot where the two lines intersect. Do the same for each corner of your quilt. 6. To sew the borders to the quilt, pin the mid-point of one of the border pieces to the middle of one of the edges of the quilt. Next, match and pin the dots on each side of your border with the dots on the quilt corners. Continue pinning the border to the quilt, easing in any fullness. (The edge of the quilt is usually a little wider than the center because of bias edges or seams.) Sew the border to the quilt, starting and stopping at the dots. Sew the mitered seams last, starting from the inside dot. When pinning the edges together, be sure to match the design elements on both pieces. Diagram 3: Correctly cut and sewn borders will have designs that flow around the corners. 3


5 Framing a Rectangular Quilt With rectangles, you cannot always be assured that the designs will automatically match at the corners so you must take an extra step. 1. First, follow steps 1-3 above and cut two identical strips for the short ends of the quilt. The pieces for the other two sides of the quilt must be cut differently: for the corners on all pieces to match, there must be a seam in these long pieces at the exact center of the quilt. 2. Place one of the cut strips on top of a length of the border print stripe, matching the fabric designs. Cut one miter to match the miter on the top strip. Set the top strip aside. Lay the newly cut strip on top of the quilt through the center, aligning one mitered edge with the edge of the quilt. Mark the center of the quilt on the strip as in Diagram 4. Move the strip from the quilt and cut it off ¼" beyond the center mark. Using this cut strip as a guide, cut one more piece identical to it. You also need two strips that are the exact mirror images of these pieces. Using one of the strips you just cut, flip it over and lay it on a Diagram 4: Find and strip of border print, matching the fabric mark the center of the quilt design exactly. (The two strips will be right on the border strip. sides together.) Cut the miter and straight edges to match the top piece. Using the newly cut strip as a guide, cut one more piece. g 3. Sew the seams at the middle of two mirror-imaged strips and attach these borders to the quilt as in Steps 5 and 6 in Framing a Square Quilt. Sewing the borders to a rectangular quilt in this manner assures that the corners will match. There will be a seam at the center of the long strips (Diagram 5), but the design at that center will mirror-image as well, allowing the design to flow around the quilt. Diagram 5: The long borders on rectangular quilts have center seams. Applying Multiple Borders Jinny often designs quilts to make full use of the border prints. First, she will frame the quilt with the narrow border stripe, then add a coordinating fabric as a second border. The quilt is finished off with the wide stripe from the border print. Jinny personally measures and adds each border separately. However, when the middle border is a fabric that doesn t have to be matched at the corners, she recommends the following method as being a little faster: Sew the second border to the first and then measure and cut them as a single border in the steps above. (If the quilt is rectangular, sew the second border to the first after it has been pieced.) Measure, cut and sew the third border separately after the first two borders have been completed and sewn to the quilt. Binding the Quilt: When Jinny uses a border print to frame a quilt, she typically sews the binding to the back of the quilt and turns it to the front. This allows her to carefully hand-stitch the binding along a straight line printed on the border print fabric. For details, see Diagram 6: Applying multiple borders Adding Borders the Jinny Beyer Way-2 4

6 Red Fabric Requirements & Cutting Guide Fabric 1 ½ yard Cut one each of A, B, and E. Fabric 2 ½ yard Cut one each of B and C, and two of E. A B Fabric 3 ½ yard Cut one of A and two of C. C 3½" Fabric 4 ¾ yard Cut four strips 2¼" x WOF for Border 2, then cut three of D. Fabric 5 ½ yard Cut one of each A, B, D and E. Fabric 6 ½ yard Cut one each of A, B and C. Fabric 7 7 /8 yard 9½" D 4" E When cutting the pieces, be sure to position them as shown above, with the grainline arrow along the lengthwise grain. This will ensure that all the animals will be oriented correctly! Although these pieces are easily cut using a quilter s ruler and rotary cutter, you might choose to cut the shapes out of paper first. That will allow you to play with positioning them on the fabric so you can feature elements of the fabric designs Fabric 8 1½ yard


7 Teal Fabric Requirements & Cutting Guide Fabric 1 ¾ yard Cut four strips 2¼" x WOF for Border 2, then one each of A, B, and E. Fabric 2 ½ yard Cut one each of B and C, and two of E. Fabric 3 ½ yard Cut one of A and two of C Fabric 4 Cut three of D. ½ yard Fabric 5 ½ yard Cut one of each A, B, D and E Fabric 6 ½ yard Cut one each of A, B and C. Fabric 7 Fabric 8 7 /8 yard 1½ yard A B C 3½" ½" D 4" E When cutting the pieces, be sure to position them as shown above, with the grainline arrow along the lengthwise grain. This will ensure that all the animals will be oriented correctly! Although these pieces are easily cut using a quilter s ruler and rotary cutter, you might choose to cut the shapes out of paper first. That will allow you to play with positioning them on the fabric so you can feature elements of the fabric designs. 6
Shenandoah Baskets - Month 12 Quilt Assembly
 Shenandoah Baskets - Month 12 Quilt Assembly It s time to finish up the elements of the quilt top and put everything together! Step 1: Framing the Blocks Before being sewn together, each of the Shenandoah
Width Set 1 (A) Set 2 (B) Set 3 (A) Set 4 (B) Set 5 (A) Set 6 (B) Set 7 (A) Row 13 3/4" /8"
 Set 2 (B) Set 3 (A) Set 4 (B) Set 5 (A) Set 6 (B) Set 7 (A) Row 13 3/4 /8") Follow the chart below when piecing the strips. The numbers in the vertical columns under each set are the fabric numbers and correspond to the chart on page 2. Row Width Set 1 (A) Set 2 (B) Set 3 (A)
Follow the chart below when piecing the strips. The numbers in the vertical columns under each set are the fabric numbers and correspond to the chart on page 2. Row Width Set 1 (A) Set 2 (B) Set 3 (A)
Fourth of July Star A JINNY BEYER STUDIO Mini-Pattern
 Fourth of July Star A JINNY BEYER STUDIO Mini-Pattern Yardage is provided below (small/large). Instructions are provided for the small size with changes for the large size indicated in parentheses ().
Miyako Quilt Fabric Requirements
 Topaz Garnet Turquoise 3210-01 3214-05 3214-02 3211-05 3212-01 3208-06 3210-01 3214-05 3214-02 3209-02 3213-03 3208-03 Miyako Quilt Fabric Requirements 3210-01 3214-05 3214-07 3209-04 3213-04 3208-01 Wall
Strip-Set A2 1¼" Strip-Set A4. Strip-Set A5
 Rajasthan Jinny Beyer s Rajasthan quilt is made from four large blocks. The units in each block are fragmented into smaller pieces, allowing you to use a large variety of beautifully shaded fabrics from
Be sure to read the entire pattern before beginning. All seam allowances are ¼-inch. Press seams to one side. WOF = Width of Fabric
 Sophia Sophia is a blazing star quilt variation featuring fabrics inspired by Jinny s travels to Ukraine. The stars are beautifully shaded and the quilt also boasts intricate-looking but easy-to-make medallions
Finishes 80" square. Available in two colorways.
 Finishes 80" square. Available in two colorways. Jinny eyer s Chelsea quilt is based on an asymmetrical log cabin block so the construction is straightforward. Strongly contrasting colors on the two halves
Denim Collection. The fabrics capture the softness and texture of worn denim and feature both quiet and bold colors.
 Denim Collection Denim Star features fabrics from Jinny Beyer s Denim collection of almost-solids. The fabrics capture the softness and texture of worn denim and feature both quiet and bold colors. It
Fabric Requirements. Incl. binding. 2¾ yards Fabric 8. Queen. 1/2 yard. 1/2 yard. 3/4 yard. Fabric 6. Quilt. Fabric 7. Fabric 1. Fabric 2.
 Fabric Requirements Queen Quilt Lap Quilt Blue Purple Red Fabric 1 1/2 yard Fabric 1 1/4 yard 2201-01 (P1) 2201-01 (P1) 2202-02 (P72) Fabric 2 1 yard Fabric 2 1/3 yard 7424-06 (P2) 7424-06 (P2) 4795-21
Quilt finishes 90" square. Available in brown and hyacinth colorways.
 Quilt finishes 90" square. Available in brown and hyacinth colorways. orsica by Jinny Beyer features stunning compass blocks linked by log cabin variation blocks. Although all the compass blocks are the
Quilts finish 53" x 66" (rose) & 56" x 69" (teal)
 & 56 x 69 (teal)") Quilts finish 53" x 66" (rose) & 56" x 69" (teal) Jinny Beyer s May Baskets quilt is a classic basket design made completely new with her border print fabrics. The border print fabric is featured in three
Quilts finish 53" x 66" (rose) & 56" x 69" (teal) Jinny Beyer s May Baskets quilt is a classic basket design made completely new with her border print fabrics. The border print fabric is featured in three
Snowbirds. See more Jinny Beyer quilt designs featuring her Palette Collection of fabrics at:
 See more Jinny Beyer quilt designs featuring her Palette Collection of fabrics at: www.jinnybeyer.com Spectrum - 67" x 81½" Lotus - 98" x 98" Fabric Requirements Jinny Beyer Palette Collection 2" x 4"
Visit and
 Don't Miss These Exciting Patterns by Renowned Quilter Jinny Beyer. Each quilt features fabrics from the Jinny Beyer Palette, 150 tone-ontone blenders that shade together in a complete spectrum of color.
Miyako Table Runner. Fabric Requirements. Topaz Garnet Turquoise. Includes binding. 1/2 yard. 3/4 yard. 1/4 yard. 5/8 yard. Fabric 1.
 Miyako Table Runner Fabric Requirements Topaz Garnet Turquoise 3210-01 3210-01 3210-01 3214-05 3214-05 3214-05 3214-02 3214-02 3214-07 3211-05 3209-02 3209-04 3212-01 3213-03 3213-04 3208-06 3208-03 3208-01
Finishes Size: 95" x 95" 2000, 2015, RJR Fabrics. All rights reserved. r
 Finishes Size: 9" x 9" 000, 0, RJR Fabrics. All rights reserved. r0.06- New Moon features a mariner s compass block alternated with a traditional pineapple block. Set side-by-side and with carefully shaded
1¼ yards (autumn) 7/8 yard (twilight) 3/4 yard. Fabric 4. Fabric 5. 5/8 yard (twilight) 1 yard (autumn) 5/8 yard. Fabric 4.
 7/8 yard (twilight) 3/4 yard. Fabric 4. Fabric 5. 5/8 yard (twilight) 1 yard (autumn) 5/8 yard. Fabric 4.") Amber Waves Fabric Requirements Twin Quilt Wall/Lap Quilt Autumn Twilight Fabric 1 1/2 yard Fabric 1 1/2 yard 3200-05 3200-04 Fabric 2 1 yard (autumn) 1½ yards (twilight) Fabric 2 2/3 yard (autumn) 1 yard
Amber Waves Fabric Requirements Twin Quilt Wall/Lap Quilt Autumn Twilight Fabric 1 1/2 yard Fabric 1 1/2 yard 3200-05 3200-04 Fabric 2 1 yard (autumn) 1½ yards (twilight) Fabric 2 2/3 yard (autumn) 1 yard
Quilt finishes 40½" x 45½"
 Quilt finishes 0½" x ½" Jinny Beyer designed this striking wall quilt to feature fabrics from her first batik collection. Using the pre-cut ½" pixie strips means cutting and sewing the diamond units is
Available in two colorways (Winter, Summer as shown), and five sizes (miniature to King). 2003, 2015, RJR Fabrics. All rights reserved.
, and five sizes (miniature to King). 2003, 2015, RJR Fabrics. All rights reserved.") vailable in two colorways (Winter, Summer as shown), and five sizes (miniature to King). 00, 05, RJR Fabrics. ll rights reserved..05 Navajo Seasons is a bargello-style quilt that is created from two simple
vailable in two colorways (Winter, Summer as shown), and five sizes (miniature to King). 00, 05, RJR Fabrics. ll rights reserved..05 Navajo Seasons is a bargello-style quilt that is created from two simple
Medallion Table Runner. Fabric Requirements. *For separate backing fabric - ¼ yard for runner fabric and. Includes backing.
 Medallion Table Runner Fabric Requirements Fabric 1 1/4 yard 2203-03 (P#50) Fabric 2 1 yard* 8868-02 (P#51) Includes backing Fabric 3 1/4 yard 2204-04 (P#52) Fabric 4 1/4 yard 6740-06 (P#80) Fabric 5 3/4
Fabric Requirements. Note: If working from your stash, 6" x WOF is sufficent for Fabrics 1-5. Teal Magenta Old Gold Blue Russet
 Fabric Requirements Teal Magenta Old Gold Blue Russet Fabric 1 5866-71 (P17) 2202-02 (P72) 5866-71 (P17) 0498-11 (P144) 2201-04 (P75) Fabric 2 7132-22 (P16) 4795-21 (P61) 7132-22 (P16) 2200-07 (P143) 6740-05
Available in four colorways. Project finishes 14½" x 81".
 Available in four colorways. Project finishes 14½" x 81". Jinny Beyer s Diamond Chain Table Runner is a fast and fun project suitable for quilters of all skill levels. The pattern steps you through creating
Midnight Garden Table Runner. Blue Red. Cut three strips 4¼" x WOF. Cut four strips 1¾" x WOF. Cut four strips 1¾" x WOF. Cut two strips 4¼" x WOF.
 Midnight Garden Table Runner Fabric Requirements Blue Red 3421-005 3417-002 3418-001 3418-003 3417-006 9410-014 (P#48) 3420-002 3417-003 3415-002 3419-004 3421-009 3418-005 3418-003 3417-006 9410-014 (P#48)
Reflections: Jewel Tones Quilt featuring the Reflections Collection from EBI Fabric Corp.
 Reflections: Jewel Tones Quilt featuring the Reflections Collection from EBI Fabric Corp. Size: 54" x 54" Skill Level: Intermediate Design by Sasha K Studio Fabric Requirements & Cutting Instructions (A)
Foundations Fabrics 1-5 are used in Block 1; fabrics 6-9 and 11 are used in Block 2. Both blocks use fabrics 10 and 12.
 Kashmir Jinny Beyer s Kashmir quilt incorporates fabrics with the lush patterns and colors from the collection of the same name. The quilt is a log cabin variation that glows like a stained glass window.
Stars and Stripes. Finished Quilt Size: 65½" x 65½" Finished Block Size: 13" x 13"
 Stars and Stripes Finished Quilt Size: 65½" x 65½" Finished Block Size: 13" x 13" The red-white-and-blue color scheme gets you ready to celebrate all of those patriotic holidays! Materials Yardage is based
Shenandoah Baskets General Instructions
 General Instructions Before Starting Read these General Instructions before starting and refer to them as necessary when making each month s blocks. Illustrations show the dark background version of the
Colorway - Blue Colorway - Red/Purple Yardage. Fabric # Fabric Swatch Style # Fabric Swatch Style # 78 1 /2"square 98" square
 Coventry Designed by: Jinny Beyer Instructions and Graphics by: Kathryn S. Ramirez Finished Quilt Size: 78 1 /2" X 78 1 /2" or 98" X 98" Finished Block Size: 19 3 /4" For best results read all instructions
Fabric Requirements Estimated fabric requirements
 3625-010 3625-009 3628-006 3628-005 3626-004 3628-004 3627-007 3625-007 3626-003 3628-007 abric 1 1/4 yard abric 2 Dark 3/8 yard Light 2/3 yard (incl. Border 2) abric 3 5/8 yard abric 4 Dark 1 1 /8 yard
QTfabrics.com QT Fabrics All rights reserved Pg 1. Designed by: Georgie Gerl. SIZE 77" X 63" for ½"binding 76½" x 62½" for ¼" binding
 SIZE 77" X 63" for ½"binding 76½" x 62½" for ¼" binding Jerry Gadamus Pg 1 Finished Size: 77"x 63" 26649X One Panel FABRIC REQUIREMENTS 26652K 3/4YARD 26653 X 1/4 YARD 26650 R 1 5/8 or 2 YARDS 1 BOLT 1
Rosy Cheeks Quilt Finished Quilt Size: 54 ½" x 70 ½"
 Designed by Jocelyn Ueng Rosy Cheeks Quilt Finished Quilt Size: 54 ½" x 70 ½" Quilt Fabric Materials White Tonal Floral* Red Large Rose Floral Red and Black Floral Black Small Floral Black Small Diamonds
Love Grows Here Quilt
 SIZE 67½" X 81½" Pg 1 Finished Size: 67½"x 81½" 26298 H one 24 repeat 2/3 YARD Numbers within gray box = Number of Bolts needed to make 12 kits; based on continuous cuts FABRIC REQUIREMENTS 26299 H 7/8
59 x 74 quilt designed by Judy Livingston Graceful Moments fabric collection by Maywood Studio
 Graceful Stars 59 x 74 quilt designed by Judy Livingston Graceful Moments fabric collection by Maywood Studio Graceful Stars (59 x 74 ) Quilt Quilt designed by Judy Livinston. Graceful Moments fabric collection
PS Finished Size 51"x56"
 PS19820 Finished Size 51"x56" Finished Size 51"x 56" Quilters Basics Read instructions before beginning a project. All instructions include a ¼" seam allowance. Press as you go. Press seams in one direction.
Copyright holder gives pattern owner permission to make copies of the pattern. as needed for personal use.
 Copyright holder gives pattern owner permission to make copies of the pattern as needed for personal use. The Burano table runner is a simple project with big impact thanks to Jinny Beyer s beautifully
Finished Size: 60 x70
 Finished Size: 60 x70 Finished Size: 60" x 70" Finished Block Size: 10" x 10" Cutting Label pieces as they are cut Quilters Basics Read instructions before beginning a project. All instructions include
Old Glory One Stamp. Alternate Piano Key Border. Morning Glory Designs by Reeze L. Hanson Quilts of Valor Pattern 65 x 79
 Old Glory One Stamp Alternate Piano Key Border Morning Glory Designs by Reeze L. Hanson Quilts of Valor Pattern 65 x 79 Instructions for cutting and piecing Quilt Panel and Border 1 1. Trim the quilt panel
Finished Size: 75"x 75"
 Finished Size: 75"x 75" Finished Size: 75"x 75" Block Size: 1"x1" and 6"x6" Quilters Basics Read instructions before beginning a project. All instructions include a ¼" seam allowance. Press as you go.
Section 1, Center Section Make One. Fabric Fabric # of Cutting Directions ID Location Strips
 Please read all instructions carefully prior to beginning quilt. All piecing uses a very accurate scant quarter inch seam allowance. In this quilt, accuracy is absolutely critical, so sew several sample
Everyone's Favorite Snowman Tree Skirt & Wall Hanging
 Everyone's Favorite Snowman Tree Skirt & Wall Hanging Tree Skirt Approximate finished size: 54" x 54" Wall Hanging Approximate finished size: 20.5" x 30" Designed By: Janice Averill quiltingtreasures.com
Sassy Runner. Design by Wendy Sheppard Skill Level: Confident Beginner Number of Blocks: 8 Block Size: 8" x 8" (finished) quiltingtreasures.
 quiltingtreasures.") Approximate Size: 24½" x 42¼" Design by Wendy Sheppard Skill Level: Confident Beginner Number of Blocks: 8 Block Size: 8" x 8" (finished) 1 Studio 8 FABRIC REQUIREMENTS 24194 W 24195 N 24196 S 24196 N
Approximate Size: 24½" x 42¼" Design by Wendy Sheppard Skill Level: Confident Beginner Number of Blocks: 8 Block Size: 8" x 8" (finished) 1 Studio 8 FABRIC REQUIREMENTS 24194 W 24195 N 24196 S 24196 N
Finished Size: 71" x 82"
 Finished Size: 71" x 82" Fabric Requirements 38020-12 38027-11 38020-14 38022-14 38021-11 38023-13 Fabric 1 Fabric 5 Fabric 9 Fabric 13 Fabric 17 Background Fabric 21 Strip Set 1 ⅓ yd. ⅓ yd. 38021-12 38025-11
Cheri Good Quilt Design s Ribbon Star
 Cheri Good Quilt Design s Ribbon Star Designer: Cheri Good Quilt Designs Ribbon Star Size 56 x 56 #110A Ribbon Star Strip Quilt Supplies Finished quilt size: 56 x 56 Cotton thread to match fabrics Basic
All a Flutter Table Runner
 SIZE 48½" X 21½" Pg 1 Finished Size: 48½" x 21½" 26358 R FABRIC REQUIREMENTS 26359 P 26359 Q 26360 Q piecing only 1 BOLT 1 BOLT 1 BOLT 1 BOLT 26360 Q backing only 1-5/8 YARDS 26360 R includes binding 5/8
Hashtag Quilt. Washington Depot by Denyse Schmidt
 Featuring Washington Depot by Denyse Schmidt In this planned scrappy quilt, the florals and geometrics from the Washington Depot collection collide in an array of Hashtag Blocks in different print combinations.
... Had a Little Lamb
 ... Had a Little Lamb Quilt designed by Sue Harvey & Sandy Boobar of Pine Tree Country Quilts Finished size is approximately 50 x 56 A DIVISION OF HAMIL GROUP Quilt designed by Sue Harvey and Sandy Boobar
Patterns. Wallhanging & Chapel in the Pines. Deb Strain
 2 Patterns Wallhanging & Chapel in the Pines Deb Strain Chapel in the Pines Deb Strain Wallhanging 35 x 52 40 x 40 Cutting Directions Quilter Basics Read instructions before beginning a project. All instructions
General Information. Step 1 - Cutting. Fabric A - Cut (2) strips at 8-1/2 x WOF Sub-cut into (5) 8-1/2 squares Label Block A.
 strips at 8-1/2 x WOF Sub-cut into (5) 8-1/2 squares Label Block A.") General Information All seams are sewn with a 1/4 seam allowance. Pre-wash and press with spray starch before cutting. WOF = Width of Fabric. LOF = Length of fabric. Press seams open as much as possible
General Information All seams are sewn with a 1/4 seam allowance. Pre-wash and press with spray starch before cutting. WOF = Width of Fabric. LOF = Length of fabric. Press seams open as much as possible
All a Flutter Quilt SIZE 64½" X 79½" QTfabrics.com QT Fabrics All rights reserved. Pg 1. Designed by: Wendy Sheppard
 SIZE 64½" X 79½" Pg 1 26358 R 1/3 YARD Finished Size: 64½" x 79½" FABRIC REQUIREMENTS 26359 P 26359 Q piecing only 26359 Q backing only 5 YARDS 1 BOLT 1 BOLT 1 BOLT 4 BOLTS 26360 Q 26360 R includes binding
Making Double Fold Straight of Grain Quilt Binding
 Making Double Fold Straight of Grain Quilt Binding Tools and Supplies: Cutting mat, rotary cutter with a sharp blade, walking foot, 6x24 ruler, seam allowance guide, pencil, quilting gloves Be sure your
GO! Qube 8" Hugs & Kisses Baby Quilt Finished Size: 40" x 40"
 GO! Qube 8" Hugs & Kisses Baby Quilt Finished Size: 40" x 40" For use with GO! Qube Mix & Match 8" Block (55776) Fabrics are from the Cotton Couture Solids and assorted dot prints collections and are provided
Coastal Chic Batiks Collection by Monique Jacobs
 FREE Quilt Pattern 52" x 65" quilt designed by Monique Jacobs Coastal Chic Batiks Collection by Monique Jacobs Coastal Chic Batik Quilt Instructions For best results, read the pattern completely first.
Family Life Quilt. Design by Julia LaBauve Skill Level: Beginner Number of Blocks: 12. quiltingtreasures.com. Julia Cairns
 Design by Julia LaBauve Skill Level: Beginner Number of Blocks: 12 1 Approximate Size: 48½" x 56½" Julia Cairns 23744 QX 23742 X 23743 X 23745 S 23746 HG QUILT KIT REQUIREMENTS 12 Kits 18 Kits 24 Kits
Template B - Cut eight. Template D - Cut two. Template B - Cut eight. Template D - Cut two. Template A - Cut two. Fabric 3 1/4 yard.
 Fabric Requirements Estimated fabric requirements based on 40" usable WOF. 1 yard of backing also required; Fabric 2 suggested. Fabric 1 1/4 yard Template E - Cut one. 3625-010 3625-009 3628-006 3628-005
Palette Pizazz. Don t Miss Jinny Beyer s. Moon Glow! Moon Glow is designed to develop your quiltmaking skills and
 Palette Pizazz Fabric Requirements set Jinny Beyer Palette Pixie Strips in selected colorway Accent: ½ yard - Galaxy: 0-00 (Palette #) - Grasslands: -00 (Palette #) - Tropics: 9-0 (Palette #) - Sunset:
Sound Weaves. About Sound Weaves BY LONNI ROSSI. Free Pattern Download Available. Sound Weaves quilt designed by: Lonni Rossi. Quilt Size: 58" x58"
 Sound Weaves BY LONNI ROSSI Sound Weaves quilt designed by: Lonni Rossi Quilt Size: 58" x58" andoverfabrics.com About Sound Weaves Hand-drawn lines play against a flat color ground to simulate weaving.
Batting: 66" x 66" Coordinating thread Pink Animal Print: ½ yard
 Project Fabric Requirements Finished Quilt Size 60" x 60" Additional Supplies Needed Panel: 2024-64 1 panel Batting: 66" x 66" Stripe: 2025-64 Coordinating thread Pink Animal Print: 2026-22 ½ yard Quilting
Diamonds and Denim. Approximately 52 x 52. Quilt designed by Donna Russell
 Diamonds and Denim Approximately 52 x 52 1 Quilt designed by Donna Russell Please read through all of the instructions before you begin your project. Fabric Requirements: A. Pattern #24400-Blu1........2
 Stepping Stones Stepping Stones featuring fabrics from the River Mist collection from A B C D E F G Fabric Requirements Red 2099M-89... ⅔ yard 2100M-89... ⅔ yard 2102M-99... ⅔ yard 2105-88... ⅔ yard 2105-99...
GO! Qube 6" Rick Rack Flower Throw Quilt Finished Size: 46" x 46"
 GO! Qube 6" Rick Rack Flower Throw Quilt Finished Size: 46" x 46" Fabrics provided by Timeless Treasures For use with GO! Qube Mix & Match 6" Block (55775) and GO! Qube 6" Companion Set Classics (55779)
Red and Blue...and Roses, Too!
 #MakeItWithMarcusFabrics Diamonds Quilts 79 x 95 PAGE 2 of 7 Fabric Requirements & Cutting Instructions Version 1 Cream Border TEMPLATES - Page 6 and 7 Fabric A- Paisley Red 8400-0511 7/8 yard Fabric B-
Bird on a Wire A DIVISION OF HAMIL GROUP
 Bird on a Wire Quilt & Pillows designed by Sue Harvey & Sandy Boobar of Pine Tree Country Quilts. Approx. finished sizes: Quilt: 38 x 48 ; Pillows: 18 x 18. A DIVISION OF HAMIL GROUP Quilt designed by
Greek Square Table Runner
 Greek Square Table Runner Quilt Finished Size: 70-1/2" x 25-1/2" Block Finished Size: 12" Printing Options: Printer-Friendly Web Page or PDF Fabric Requirements: Dark: 1 yard Medium: 3/4 yard Light: 3/4
Chelsea. Quilt. quiltingtreasures.com 1. Christine Graf
 Designed By: Wendy Sheppard Specification: Confident Beginner Finished Size: 56" x 69" Finished Block Size: 10" x 10" (total of 12 blocks) 1 Christine Graf FABRIC REQUIREMENTS 23528 EA 24007 Q 24007 R
Tall Tales. Quilt designed by Sue Harvey and Sandy Boobar of Pine Tree Country Quilts Finished size is approximately 42" x 49"
 Tall Tales Quilt designed by Sue Harvey and Sandy Boobar of Pine Tree Country Quilts Finished size is approximately 42" x 49" A DIVISION OF HAMIL GROUP Quilt designed by Sue Harvey and Sandy Boobar of
Dazzling Diamonds Quilt
 Dazzling Diamonds Quilt Featuring the Vintage Finds - Vivid Brights Collection by Katia Hoffman for EBI Fabrics Corporation Designed & Patterned by Helle-May Cheney 2015 Helle-May Designs 51 x 51 Fabric
*fabric is directional **includes binding
 Day at the Park Featuring fabrics from the Dog Park collection by Sarah Frederking for Fabric Requirements (A) 2931-88*... 2 ¼ yards (B) 2935-16... ½ yard (C) 2937-16... ⅞ yard (D) 2933-88... ½ yard (E)
Quilt designed by Sue Harvey and Sandy Boobar of Pine Tree Country Quilts Yardages and Cutting
 Fowl Play 54" x 60" Quilt designed by Sue Harvey and Sandy Boobar of Pine Tree Country Quilts www.pinetreecountryquilts.com Yardages and Cutting Note: WOF means width of fabric from selvage edge to selvage
Snug as a Bug. Quilt designed by Sue Harvey & Sandy Boobar of Pine Tree Country Quilts Finished size is approximately 42" x 48"
 Snug as a Bug Quilt designed by Sue Harvey & Sandy Boobar of Pine Tree Country Quilts Finished size is approximately 42" x 48" A DIVISION OF HAMIL GROUP Quilt designed by Sue Harvey and Sandy Boobar of
Includes Binding. (If using WIDE Backing you will need 3 Yards)
") Sparkling Hexies Featuring the Effervescence Collection by Kaufman Design and Instruction by equilter and Larene Smith of The Quilted Button Approximate Finished Size: 73 x 88 General Information Skill
Sparkling Hexies Featuring the Effervescence Collection by Kaufman Design and Instruction by equilter and Larene Smith of The Quilted Button Approximate Finished Size: 73 x 88 General Information Skill
Beetles, Bees, and Butterflies
 Beetles, Bees, and Butterflies A Whimsical Row Quilt Designed by Debbie Beckwith Graves 48 ½" x 53" Featuring fabrics from The Happy Garden collection by Courtesy MHS Licensing for Materials Navy Happy
GO! Qube 9" City Life Quilt Finished Quilt Size: 48 1 / 8" x 64" Finished Block Size: 15 5 / 8" x 15 5 / 8"
 GO! Qube 9" City Life Quilt Finished Quilt Size: 48 1 / 8" x 64" Finished Block Size: 15 5 / 8" x 15 5 / 8" Fabrics are from the City Life Collection and are provided by Dear Stella. Dies Needed: GO! Qube
Notes - Please wash, dry & iron your fabric before beginning. - Sew all seams with an accurate 1/4 seam allowance. CUTTING INSTRUCTIONS
 Notes - Please wash, dry & iron your fabric before beginning. - Sew all seams with an accurate 1/4 seam allowance. CUTTING INSTRUCTIONS Indicates fabric pattern is directional on strips Fabric A: Horizontal
GO! Qube 8" Spools and Kites Quilt Finished Size: 44½" x 44½"
 GO! Qube 8" Spools and Kites Quilt Size: 44½" x 44½" For use with GO! Qube Mix & Match 8" Block (55776) Fabrics are from Robert Kaufman s Rhoda Ruth Collection by Elizabeth Hartman To make an 8" Block
Sunflower Garden Topper
 Quilt designed by: Sue Harvey and Sandy Boobar of Pine Tree Country Quilts Finished quilt size: 26" x 26" Finished block size: 6 ½" x 6 ½" Number of blocks: 9 Angela Anderson 1 FABRIC REQUIREMENTS Design
Sheep Sham. Pillow designed by Sue Harvey & Sandy Boobar of Pine Tree Country Quilts Finished size is approximately 26" x 26"
 Sheep Sham Pillow designed by Sue Harvey & Sandy Boobar of Pine Tree Country Quilts Finished size is approximately 26" x 26" A DIVISION OF HAMIL GROUP Pillow designed by Sue Harvey and Sandy Boobar of
Siesta in the Garden. Spring Fever by Jane Sassaman
 Featuring Spring Fever by Jane Sassaman This brightly colored quilt is reminiscent of south-ofthe-border handmade tiles, combined with bold stripe accents a garden delight. Collection: Technique: Skill
Handful of Stars. by Kim Diehl. Finished Quilt Size: 621/2" x 621/2" Finished Star Block Size: 8" x 8" A Free Project Sheet from
 Handful of Stars by Kim Diehl Finished Quilt Size: 621/2" x 621/2" Finished Star Block Size: 8" x 8" A Free Project Sheet from 49 West 37th Street, New York, NY 10018 tel: 212-686-5194 fax: 212-532-3525
Figgy Pudding #131. Finished quilt size is 69-1/2 x 69-1/2. Materials Needed:
 #131 Figgy Pudding Finished quilt size is 69-1/2 x 69-1/2 Materials Needed: 10 fat quarters 2-3/4 yards background fabric 1 fat quarter for corner blocks 1 yard border fabric 2/3 yard binding fabric 4-1/2
Wall Hanging. Featuring fabrics from the Cheeky Pumpkin collection by DT-K for. (E) ⅓ yard (B) Backing
 ⅓ yard (B) Backing") Cheeky Pumpkins Wall Hanging Featuring fabrics from the Cheeky Pumpkin collection by DT-K for Fabric Requirements (A) 2960P-99... (B) 2963-30... (C) 2966-99... (D) 2961-90... (E) 2965-44... ⅓ yard 1 panel
Cheeky Pumpkins Wall Hanging Featuring fabrics from the Cheeky Pumpkin collection by DT-K for Fabric Requirements (A) 2960P-99... (B) 2963-30... (C) 2966-99... (D) 2961-90... (E) 2965-44... ⅓ yard 1 panel
Uses Contempo s Anything Goes collection by Ann Lauer Finished Size: 57 x 57
 2016 Benartex, LLC It s easy to create your own art quilt with Ann Lauer s exciting new Anything Goes collection. Just follow the simple instructions and you ll have a fresh new modern wallhanging, perfect
e C Preservation Nineteenth in a Series Finished Quilt: 100"x100"
 ction for a Cau e l l o s C Preservation (H e 1830-1850 oward Marcus ) Nineteenth in a Series Finished Quilt: 100"x100" Collection for a Cause Preservation 1830-1850 (Howard Marcus) Dating to 1830, the
Texas Truffles. Size: 78" x 78"
 ................................................................................................................................................................... Texas Truffles Size: 78" x 78"................................................................................................
Fabrics by Jamie Kalvestran PRESENTS. Chickadee. Quilt designed by Jamie Kalvestran Quilt size: 63" x 63" makower uk
 Fabrics by Jamie Kalvestran PRESENTS Chickadee Quilt designed by Jamie Kalvestran Quilt size: 63" x 63" 12/18/12 makower uk www.andoverfabrics.com Introducing Andover Fabrics new collection: Chickadee
Joy-Love-Peace. Pattern Information QUILT 1. Featuring fabrics from the Joy-Love-Peace collection by Lucie Crovatto for
 Joy-Love-Peace QUILT 1 Featuring fabrics from the Joy-Love-Peace collection by Lucie Crovatto for Fabric Requirements (A) 3312P-88... 1 panel () 3312-11... 1 ⅛ yards (C) 3311-09... 1 ¼ yards () 3315-88...
GO! Qube 8" Twirling Petals Quilt Finished Size: 50" x 50"
 GO! Qube 8" Twirling Petals Quilt Finished Size: 50" x 50" Fabrics are from the Sugar Pie Collection by Lella Boutique and are provided by Moda Fabrics Dies Needed: GO! Qube Mix & Match 8" Block (55776)
Double Star. Featuring fabrics from the Reflections of a Civil War collection from Jodi Barrows for
 Double Star Featuring fabrics from the Reflections of a Civil War collection from Jodi Barrows for Fabric Requirements (A) 2795-33... 3 ¼ yards (B) 2796-88... 1 yard (C) 2797-77... ¾ yard (D) 2161-88...
Original Recipe. Large Chrysalis Lattice Quilt by Amy Smart
 Original Recipe Large Chrysalis Lattice Quilt by Amy Smart Hello, fellow Moda Bake Shoppers! My name is Amy Smart and I enjoy sharing my quilting fetish/addiction at my blog Diary of a Quilter {diaryofaquilter.com}.
Urban Shades. FABRICS BY Lonni Rossi. makower uk. Quilt designed and made by Lonni Rossi Machine quilted by Lisa Kaupp Finished size: 59" x 68"
 Urban Shades FARICS Y Lonni Rossi Quilt designed and made by Lonni Rossi Machine quilted by Lisa Kaupp Finished size: 59" x 68" makower uk 1384 roadway New York, NY 10018 (800) 223-5678 www.andoverfabrics.com
Chloe Collection by Maywood Studio
 70" x 82" quilt designed by Denise Russell for Maywood Studio Chloe Collection by Maywood Studio Chloe Quilt Instructions For best results, read the pattern completely first. Press in the direction of
 Once Upon a Time Finished Quilt Size 40" x 50" Featuring fabrics from the Once Upon a Time collection by Racoon Illustration for Fabric Requirements Once Upon a Time 7243-55...1 panel 7261-66... 3 8 yard
Domino Effect. Quilt 1 by Denise Russell. Skill Level: Advanced Beginner. Quilt size: 61 x 71. Free Project NOT FOR RESALE
 Domino Effect Quilt 1 by Denise Russell Quilt size: 61 x 71 Skill Level: Advanced Beginner Blank Quilting Corporation 49 West 37th Street New York, NY 10018 Tel: 800-294-9495 Fax: 212-679-4578 www.blankquilting.net
Photo location courtesy of Judith Batty. McCallsQuilting.com McCall s Quick Quilts 1
 Photo location courtesy of Judith atty. McCallsQuilting.com 017 McCall s Quick Quilts 1 Changing Lanes simple patches of color make this unusual quilt quick & colorful Designed and Sewn by Stephanie Sheridan
CHRISTMAS CANDY. Quilt Finished Size: 64" x 80" Block Finished Size: 8" x 8"
 CHRISTMAS CANDY Quilt design and instructions by Wendy Sheppard Specification: Advanced Beginner Quilt Finished Size: 64" x 80" Block Finished Size: 8" x 8" Cutting Instructions: From Fabric A, cut for
a Chocoholic b Cut squares as indicated:
 a Chocoholic b Quilt by Deb Mosa Finished Quilt Approximately: 50" x 50" - Finished Center Size: 36" x 36" Chocoholic fabrics by Exclusively Quilters - Style #3923 Fabric Requirements: Based on 44" wide
Baby, Throw and Queen Size Pattern
 Aloha Ripple Quilt Baby, Throw and Queen Size Pattern By Andrea Smith of Happy Cloud Creations Baby: 36 1/2 x 42 1/2 inches Throw: 60 1/2 x 70 1/2 inches Queen: 84 1/2 x 98 1/2 inches Basic Instructions
Susannah Bee Quilt. Quilt designed by Terri Butler Finished size is approximately 43" x 60" A DIVISION OF HAMIL GROUP
 Susannah Bee Quilt Quilt designed by Terri Butler Finished size is approximately 43" x 60" A DIVISION OF HAMIL GROUP Quilt designed by Terri Butler Materials and Cutting Note: WOF is width of fabric from
BAUBLES & BEADS. Quick & Easy Machine Piecing Techniques P109. FINISHED SIZE: 73 1/2" x 87" Designed by Annis Clapp Machine Quilted by Donna Akins
 BAUBLES & BEADS P109 Quick & Easy Machine Piecing Techniques FINISHED SIZE: 73 1/2" x 87" Designed by Annis Clapp Machine Quilted by Donna Akins fast2sew Ultimate Seam Guide BAUBLES & BEADS Read all instructions
Finished Size: 66"x66" Quilt is 66" x 66".
 Finished Size: 66"x66" Quilt is 66" x 66". Finished Size: 66" x 66". Quilter Basics Read instructions before beginning a project. All instructions include a ¼" seam allowance. Press as you go. Press seams
The Quilted Button, Mission Viejo, CA
 Into The Blue Hoffman California Fabrics Coming At You 3D Collection Finished Quilt Size: 59 x 72 2011 Copyright All Rights Reserved Design and Instruction by Larene Smith The Quilted Button, Mission Viejo,
HOW DOES YOUR GARDEN GROW Quilt
 HOW DOS YOUR GARDN GROW Quilt Size: 54 W x 66 H Designed by: Heidi Pridemore Level: Intermediate Free Pattern available on michaelmillerfabrics.com Materials "How Does Your Garden Grow" Quilt by Heidi