Decorative Stitches Buttonhole Stitch.
|
|
|
- Branden Andrews
- 6 years ago
- Views:
Transcription
1 Decorative Stitches THERE ARE TWO types of stitches-utility stitches used for basting, sewing, gathering, etc., and surface stitches that are used for fabric decoration. The utility stitches you most often need to use in making fabric furnishings are shown elsewhere. The stitches shown here you can use on table and bed linens, in making samplers, on crazy quilts-they have many uses, in fact, once you know how to make each perfectly. Here, just as with the "Fashion Aids," it is worthwhile to practice before you begin your work. You must learn how to make each stitch uniformly before you try to use it to decorate your fabric. Needlework was taught originally by means of samplers. The student learned the principle of the stitches by looking at another's sampler and making a matching one of her own. This she kept always, and she referred to it when she needed to remember how a stitch was made. Decorative samplers were also used to illustrate proverbs or sayings, to record important family dates and favored mottos, "Home, Sweet Home," being the most popular of the latter. The sampler we show here includes many of the stitches you will learn and use. Study the design and compare it with the stitches on the following pages. Twenty-four favored stitches are shown - that you will find useful throughout the years. Louisa F. Pesel, one of the authorities in needlework, believes that one should never try to tell how to make a stitch, but should rather illustrate how it is made. That is done for you here. In the illustrations,.note the position of the needle and thread for each stitch. Practice these stitches on a scrap of fabric and with a coarse thread, and be sure that you know how to make them perfectly before you begin work. shown. Repeat this until the entire edge is neatly finished. Buttonhole Stitch. The illustration shows in detail the stitch used in making a hand-finished buttonhole or for cut work embroidery. Use thread heavier than for sewing the fabric. Start with a back-stitch, bring the needle up on the right side as far from the edge as the depth you want your stitches to be, depending upon the fabric and the article you are making. Put the needle through from behind; bring it out alongside of the first stitch, at the same time bringing the thread under the needle as 1

2 Tie Tack. The illustration shows a tie tack which is used to tack the lining to your drapery. With a heavy-duty thread, make two stitches from 1" to 2" long by catching the double thread to the lining hem, then through one thickness of the drapery hem, then back through the lining. Then buttonhole-stitch over the threads as shown. This keeps the lining from sliding up. 2
3 3

4 4

5 5
6 6
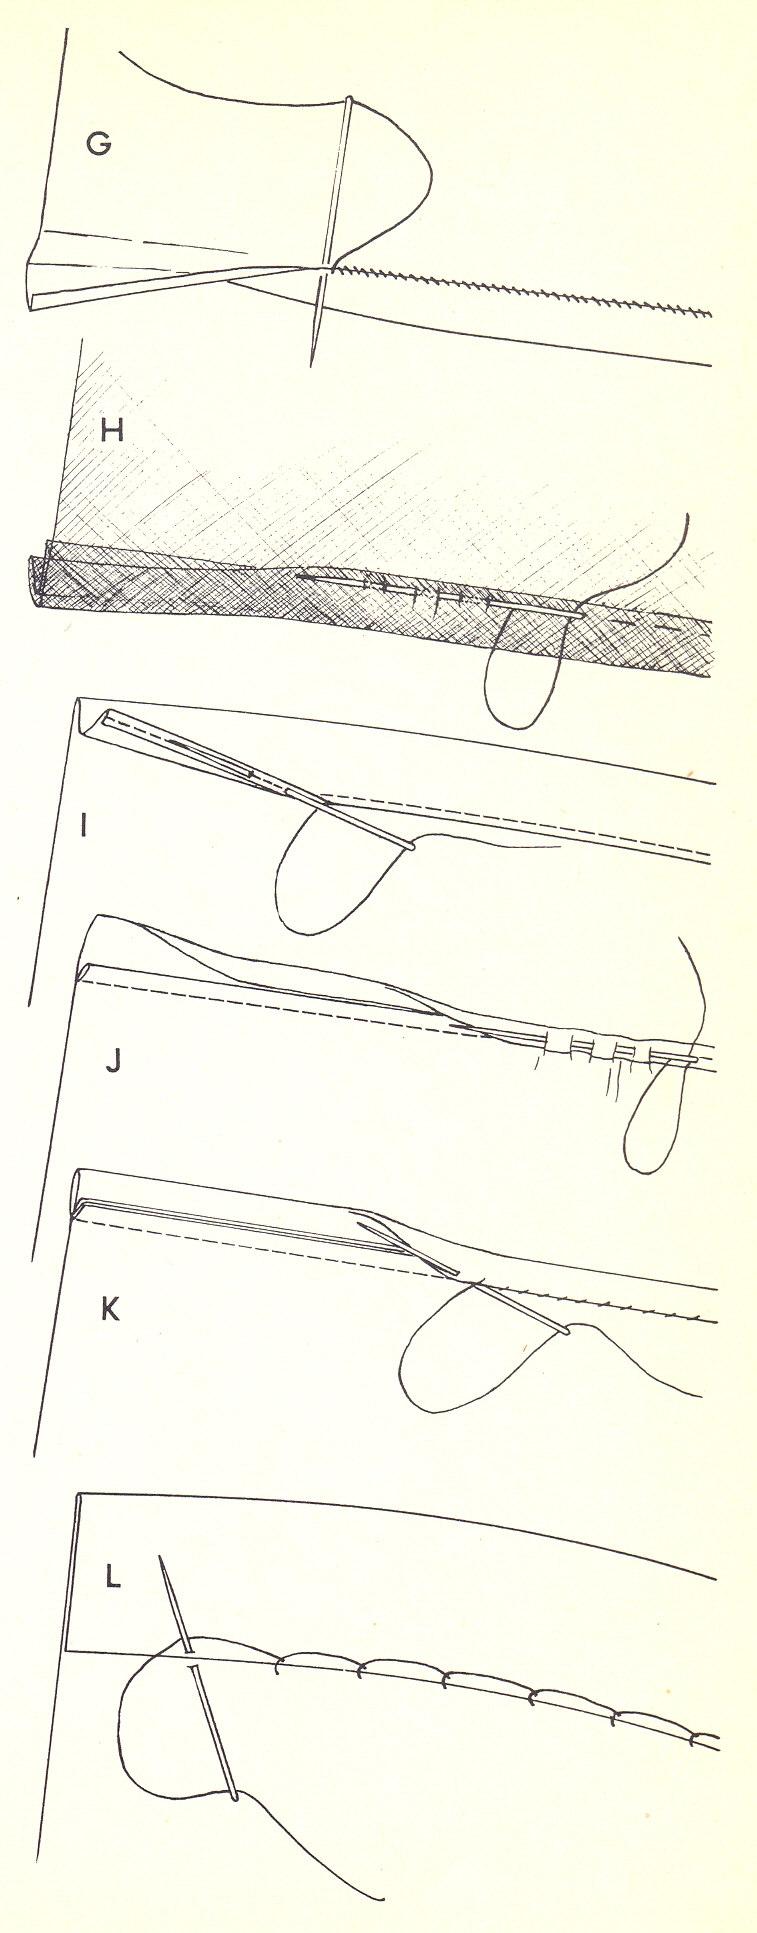
7 Basic Stitches WE SHOW YOU the essential stitches here in the form of a sampler. Each stitch is shown in the size most often used. If sewing is new to you, make a small sampler 01 these stitches just to be sure you can make them beautifully when you start on nice new fabric. These are the utility stitches used most often in construction. The long tack, which is used in putting linings in position, is shown in illustration G2. A. Running-Stitches. Someone asked why the name "running-stitch." Well, it could be called so for two reasons: The thread does run along the seam line of the fabric in even stitches that might be steps. Again the name may have been given because with the point of your needle you pick up a small bit of fabric and take from three to six stitches on the needle at one time, picking these up in little steps and doing this so quickly that it could easily be called running. You will have many occasions to use running-stitches in sewing. Practice until you can take up several stitches at a time on your needle before pulling your thread through, and learn to insert your needle along a thread of the fabric to insure a very straight line. Learn at the outset to make your stitches even. Some people start out painstakingly make tiny stitches and then, after a few inches, gallop along with stitches that are nothing less than basting stitches. Running-stitches should be even in size for the entire length of the seam and should be small-a scant 1/16 to ⅛ is ideal. The more sheer the fabric, the shorter the stitch, of course. Basting-Stitches. Basting-stitches should be called temporary stitches since they are almost invariably removed. They are used simply to hold edges in position until they are sewn together permanently. The length of your stitch and the kind of basting-stitch you use depend on the exactness of the work in hand, whether the fabric slips or slides or whether it holds together easily, also to some extent on your skill in handling the fabric under the presser foot of your machine. B. Even-Basting. Even-basting is a long running-stitch. The stitches can be ⅜ to ½ long. Take 3 stitches at a time on your needle before pulling the thread through - then repeat. Use even-basting when accurate work is necessary-especially for fabric that slips or sticks. C, Uneven-Basting. Uneven-basting is made by taking a small stitch, then a long stitch, and picking up the fabric again with the point of the needle so that your stitch itself is ½ to 1 or more long with the intervening stitch ¼ in length. It is used generally in making fabric furnishings as it goes more quickly than even-basting. D, Diagonal-Basting. Diagonal-basting is used when you need more strength in holding the fabric together than the even- or uneven-basting gives. For this you limply take a long stitch lengthwise on your fabric and than put your needle in straight downward, making a 7
8 short stitch of ⅛ to ¾ ; then put the needle in again at a distance beyond this that is convenient and right in length for the fabric. Sometimes diagonal-basting stitches are made 3" or 4" long, as in holding the material of a comfortable together for quilting or when a heavy drapery and lining are to be held together in preparation for stitching. For other purposes they are made ½" to 1" long. E. Pin-Basting. Many people who are expert in handling fabric pin the two edges of the fabric together. The pin heads point toward the seam edge (so that they may be removed as the stitching line reaches them) and the pins are placed 3" or 4" or 10" apart, depending upon the skill of the baster in handling the material and in using pins rather than basting. Pin-basting saves time and is very practical for the experts. After you have made fabric furnishings for a while, you will soon learn what you should baste with thread and what you can pin-baste. In factories, where skilled fingers are a requirement, girls can hold two pieces together so perfectly that they will come out even to a thread at the rod of a seam, doing it without so much as the aid of,ins, This requires practice in handling fabric-a "feeling" for fabric really. It is something to work for, but is not recommended except for one who sews a very great deal and has such a natural aptitude with fabric that she can handle it under the machine without its drawing, pulling or fulling the least bit. I, Back-Stitching. Looks like machine-stitching on the right side. It is one of the strongest hand-stitches. It is used in embroidery and should be used to terminate every row of hand-sewing that is to remain permanently. The top stitch-a short one-is taken backward; the under stitch is taken forward and is twice as long as the top one. G. Combination-Stitch. Is quicker than back-stitching because it consists of one backstitch and two or three running-stitches. You put the needle in each time for a back-stitch, and bring it out via the running-stitches. H. Hemming-Stitches. There are a variety of stitches suitable to "put down" a hem. At the top of the sampler is shown the running-hem, which looks like a running stitch on the right side, but shows tiny upright stitches on the wrong. The best way to make this is to pin the end of the hem to the table and hem toward you. Take up a thread of the fabric; then bring the needle under the hem and through to the outside. This type of hem is often used where machine-stitching would show, as on a brocade or heavy damask, and is an especially nice stitch to use when "putting a hem down" on the right side. I. Whipped-Hems. These are used when an edge is to be felled down quite flat-and when there is no reason for the stitches not to show. To make such hems, simply catch up one or two threads of the fabric and bring the needle through the creased edge of the hem. Repeat until the hem is finished. Experts learn to weave their needles along and take three stitches on the needle before they pull it through. A little practice in doing so pays big dividends in increased speed and evenness in work. 8
9 9
10 J. Overcasting. Often used as a decorative stitch and more often to prevent a raw edge from raveling, overcasting is necessary for materials that fray easily. To make it, insert the needle for each stitch from the under side of the fabric and bring it out' on the top side. Take several stitches on the needle; then pull it through. Repeat until all the edge is overcast and the diagonal stitches appear as shown. The space between the stitches should be a little greater than their depth. This rarely should be more than ¼", even when it is used for fabric furnishings. K. Overhanding. Originally fabrics were woven on small hand looms-some no wider than sash ribbons. In order to make such fabrics wide enough for garments, widths were joined together with the overhanding-stitch. A secure seam was necessary and one that would open out flat. Overhanding, even now, is usually used to sew two selvages together. It is used in joining pieces of fur. For our purposes it is especially useful in valances, pin cushions, ribbon sachets, etc., where two edges need to join securely with a scarcely visible stitch. To make it, baste the edges together, selvage edges lining up precisely. Whip over and over these, inserting the needle from the wrong side and taking a short stitch toward you. Place the stitches as close together as is consistent with the texture of the fabric you are using. Learn The Essential Seams IN DRESSMAKING the plain seam is used more than any other. It almost invariably forms the body seams of the garment. In fabric furnishings, it is used chiefly for piecing and that rarely because the width of fabrics for furnishings is usually correct for draperies and corded or welt seams are used for slip-covers. A plain seam is also used for joining drapery and lining materials, for flounces and ruffles. A. Plain Seams. For these you smooth two edges of fabric together on the table, slip the fabric together with your fingers so that it is not stretched or pulled, pin the edges and baste them together, the basting line a seam's width (usually ⅜") away from the edge. Place this basted seam line under your sewing machine presser foot and stitch either inside or outside the basting line. Never stitch directly on the basting thread because then it will be difficult for you to remove it. Before you start to stitch on a fabric you have not used before, practice stitching on a scrap of it-make a seam, check the length of the stitch, the tension, the thread. Be sure that you have a nice even stitch of the correct length. Stitches in fabric furnishings are usually slightly longer than stitches in garments that are going to have a great deal of strain on the seams. Where you use twelve to fourteen stitches to the inch in garments, you may use eight to ten stitches to the inch in fabric furnishings. The length of the stitch is governed, however, by the weight of the fabric and the daintiness or sturdiness of the work. Thick work requires a long stitch because the thickness shortens the stitch. For example if you are joining a lining and a drapery fabric together especially 10
11 if a cording is in between, a long stitch is desirable, but if you are making organdy curtains, you do not want a long stitch. 11
12 Remember, in order to stitch a straight seam, you must sit up to the machine, nose straight in line with the front. Pull your chair up to the machine-don't sit on its edge-and rest your arms on the machine so that there is no strain in the muscles of the arms. This ease of position enables you to concentrate muscle control in the tips of your fingers and therefore do much more skillful work than if your muscles were straining to hold your arms in position. To demonstrate the virtue of this point, just try-sit back from your machine and reach your arms out so that you feel the strain. Try holding fabric and using your fingers. Then pull yourself close to the machine, sit well back on your chair, sit upright, rest your arms on the table of the machine and notice how much easier it is for you to use your fingers for precise work. When stitching a seam, try to stitch in a straight line exactly as you do when you baste it; true seams always look nicer when they are pressed, always hang better and are well worth the little care that is required to make them. When you have made a plain seam, usually in draperies, flounces, etc., it is not necessary to fir the raw edge because it often is concealed. But, if raw edge is to show-decide the best method of finishing it. A favored group of finishes are given here. B. Overcast Seams. Overcast seams may be made with the two edges of the seam overcast together or the seam pressed open and each edge overcast separately. C. Pinked Seams. The seam edge may be pinked with pinking shears or by notching with the scissors. This is done, of course, before the seam is pressed open. D. Clean-Stitched Seams. A seam widely used in dressmaking, and in ready-made dresses especially, is the clean-stitched seam. It is practical for piecing seams in drapery fabrics that fray easily. Each edge of the seam is turned a scant ⅛" and stitched; a long stitch is used and the edge of the seam is stretched slightly to avoid tightening. E. Bound Seams. There are rare occasions when you need a bound seam for the hem edge of unlined draperies or where the seam is used as a decoration. To make it, you simply baste bias binding over the seam edge and stitch it in position. F. Lapped Seams. These are used for piecing interlinings and paddings or where a flat concealed joining is necessary. Simply lap one edge over the other ⅜ to ½ and stitch down the center of the overlap. G. French Seams. You will use a French seam many, many times, especially in sheer fabrics. To make this, you first stitch a narrow seam, making it on the right side of your fabric. Stitch nice and straight; then trim carefully any frayed edges, turn the fabric over and make another seam on the wrong side, a little wider than the first-just wide enough, in fact, to conceal all the raw edges of the first seam. If you are using organdy or lawn, you can crease the first seam with the finger to open it so as to get a nice smooth French seam. If you are using silk, it is advisable to press the first seam before making the second stitching. 12
13 H. Flat Fell Seams. For bedspreads and ruffled curtains, you will often have need of the flat fell seam. To make this, you move one edge of the fabric back to ⅜ to ½ ' from the edge to which it is going to be joined and stitch the two pieces together; then turn the raw edge of the wide side of the seam down ⅛, open out the fabric and stitch it flat as shown. I. Welt Seams. You make a welt seam in much the same way as you do a flat fell-the difference being that, when you make the seam, you place the right sides of the fabric together instead of the wrong sides, putting in your first row of stitching and then your second. Thus only one row of stitching shows on the right side. J. Upholsterers' Welt. This seam is really the French seam made to come to the right side of the fabric and is often used in slip-covers. For this you place the right sides of the fabric together and make your first seam, then you turn it and make a welt so that it comes to the right side. This is often only ⅛ deep, as it does not have to conceal all of the raw edges of the first seam as in the French seam. This seam you will use many times, and it is a good idea to practice making it until you know how to do it perfectly. It is especially useful to know how to go around curves or square a corner with such a seam. K. Corded and Piped Seams. Corded and piped seams, because of the several steps necessary to the making of them, are taken up where they are actually used for the first time in the making of specific fabric furnishings. A piped seam is made on the same principle as the corded by inserting a decorative edging between two edges of a seam. Edge Finishes There are many ways to finish edges. Choose the one that suits your fabric and your purpose. A. Frayed Taffeta Finish. Often when a light, fluffy effect is desired, as on a dressingtable skirt or cushion or occasionally on a valance, a frayed taffeta finish is used. To make this, you cut a true bias edge of taffeta, Then all you do is pull it between your thumb and fingers at regular intervals so that the little puffs are even in the bias length. Practice with a little piece of the fabric until the work looks uniform. B. Pinked or Notched Edges. These are often favored for taffeta and for glazed chintz. There are pinking shears that do the pinking very nicely and there is a sewing-machine pinker that is ever so practical. This is a particularly nice finish for scallops and for edges where you are using a plain-colored chintz and a flowered, one laid over the other. To pink such scallops, outline your scallops or points with pencil and then cut carefully with the pinking shears or pinker. C. Picot Edges. Picot edges should be done on a hemstitching machine. There are many small attachments for hemstitching. Where you have rows and rows of it to do, it is to 13

14 your advantage to take it either to the sewing-machine shop or to a professional hemstitching shop and have it done there. They charge you by the yard. Your part in having a good hemstitching job is to baste or mark with chalk very carefully where you want the hemstitching done. Be sure that a good operator does your work for you so that you will be satisfied with the result. Picot is simply hemstitching cut in two. If you have ruffles to do, place your ruffles so that you gain two rows of picot with one of hemstitching. If you want a 2½ ruffle, place your basting lines 5 apart, cut your picot, then cut your ruffles in half. 14
15 D. Italian Rolled Hem. Where you do not wish a stitching line to show, take a tiny slipstitch in the fabric and then another in the turned hem edge, taking three five stitches and then pulling your thread through these stitches are ⅛ inch in length and fairly close together, you will have a secure and attractive hem, particularly desirable for organdy; will launder especially well if the hem is straightened a little as it is roned. E. Overcast Seams. A hem popular for lingeries and home furnishings is one that is made simply by turning a narrow hem, the first turn a scant ⅛ inch and the second a little more than ⅛ inch, and then overcasting through this hem, taking several stitches on the needle at one time. This makes a nice finish and an attractive one especially if heavyduty thread is used. F. Shell Edges. On very dainty voile curtains, the shell edge is often used. The selvage is cut away and the hem turned first ⅛ inch and then ¼ to ½ inch; you make five or six tiny running-stitches and then an overhand - stitch to draw the hem edge down in line with the running-stitch. The overhand-stitches are taken from ½ to ¾ inch apart, the distance depending upon the depth of the hem. For a ⅛ inch hem you make your overhand-stitches ½ inch apart and for a ¼ inch hem, ¾ inch apart and so on. G. Napery Hem. Napery hems were originally used to hem napkins so that they would look the same on both the right and the wrong sides. The stitch here is really a series of overhand-stitches close together, the secret being that you use it only in firm fabrics. To make your hem, turn the raw edge in, turn the hem and then turn this hem back to the right side of the fabric exactly on the hem edge. Then, when you put the napery hem in, you catch the hem and the fabric at the same time, making the stitches very close together. When the hem is pressed, the stitches look the same on both sides. H. Milliner's Fold. Decide how wide you want the fold to be. A fold ⅜ inch wide is right for bedspread flounces, while a fold ½ to ¾ inch wide is better for a lamp shade, pillow top or tieback edge. To make a milliner's fold, turn the fabric to the right side, a little less than twice the width desired for the finished fold. Make a second turn, the width of the fold, bringing the folded edge to cover the raw edges. This will give you four thicknesses on the right side. From the wrong side, catch through three of these thicknesses, using uneven-basting-stitch-and matching thread, of course. I. Slip-Stitched Hems. Turn the hem, crease or stitch the raw edge of the hem down, take a tiny stitch in the fabric of the drapery or curtain and a long stitch in the hem edge. Make the stitches easy; never draw them tight. Stitches should not show on the right side. J. Tucked Hem. For a crisp fabric (such as net or maline) where a narrow edge is desired, make a tuck slightly narrower than you want the finished edge to be-1/16 ⅛ or ⅜ inch. Make the tuck far enough away horn the edge, so that you can fold it in to form a simulated binding, as shown. The tuck illustrated is a scant ⅛ inch wide; so it is made ⅜ inch from the edge. Catch the hem in place with small even-basting-stitches. 15
16 16
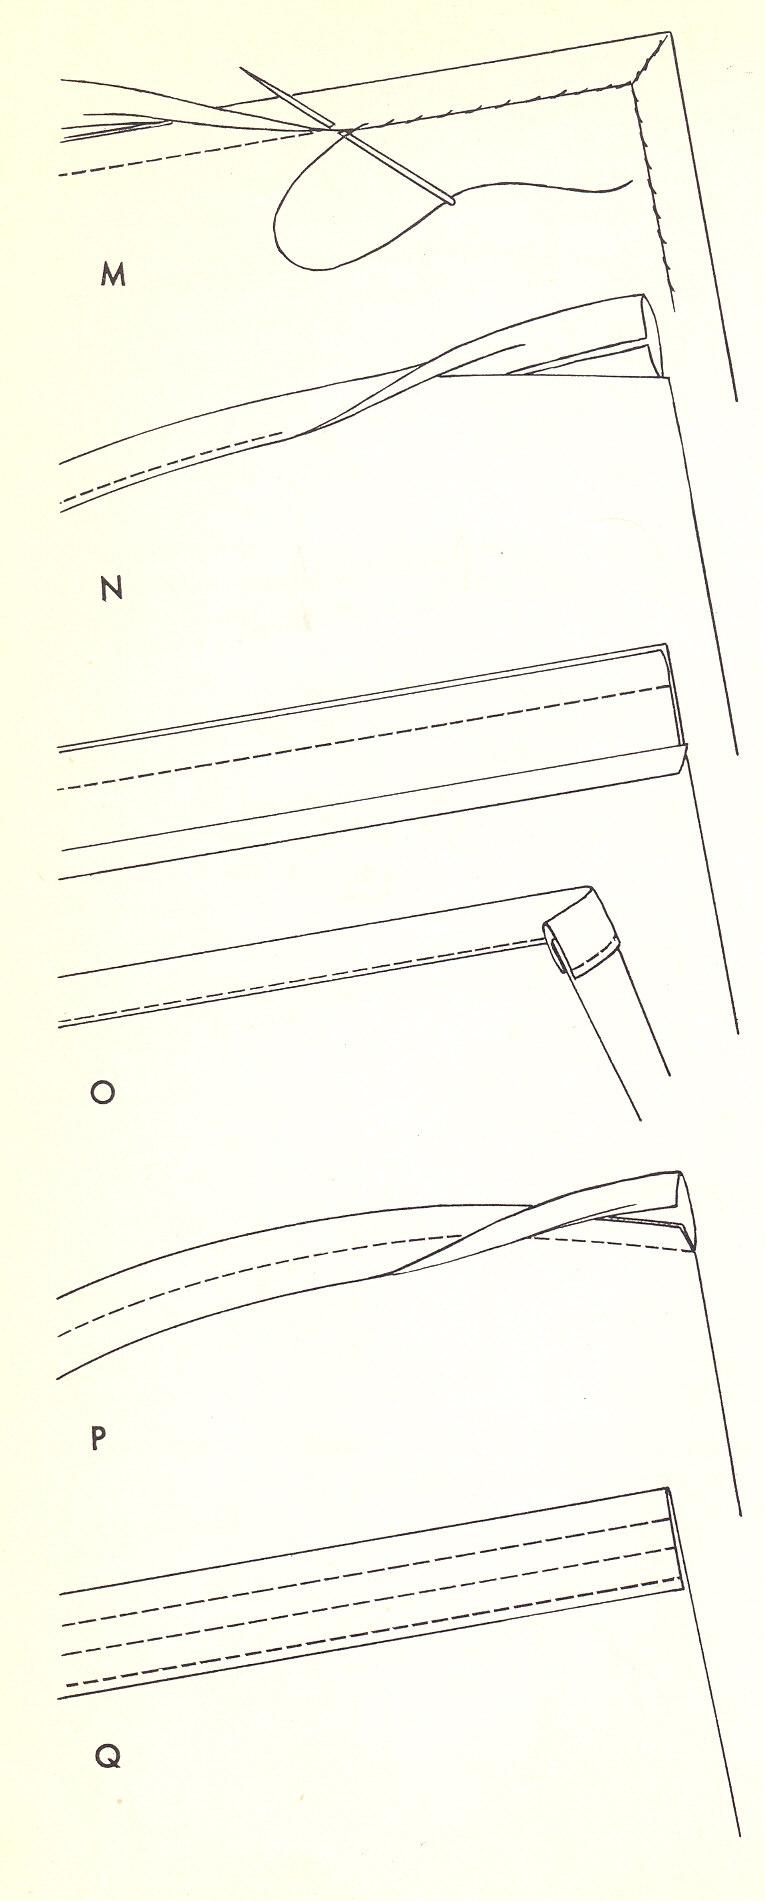
17 K. French fold Binding. Fold a true-bias strip in half lengthwise. Stitch the edges to the right side of the fabric, making the seam very narrow. Trim close to the seam. Turn the folded edge over and slip-stitch or whip it down, making your stitches as unnoticeable as you can. Press from the wrong side. The finished width should be from ⅛ to ¼. L. Half-Feather-Stitch Hem. This hem is used a very great deal in putting in drapery hems because it is little quicker than a slip-stitch and is particularly practical for corded, Jacquard or damask fabrics on which you can catch up a surface thread of the fabric with out catching into the fabric itself. You simply take a tiny thread in the fabric and bring the needle through the hem and over the thread. Work toward yourself for the effect illustrated. A little practice is needed do this hem nicely. It is used only where the hem comes to the wrong side and is not seen. M. Hand-Felled Binding. Often one edge of bias binding is stitched by machine to the right side of fabric and the other edge whipped down on wrong side as illustrated. This is an excellent way to bind quilts and draperies when thickness prevents using the machine binder and when a flat, smooth finish is necessary, you are using an edge having large shallow scallops ease the binding on-never stretch it. N. Machine Binding. The sewing-machine binder hold No.5 bias binding so that it may be applied without basting and with just one row of stitching. If you can hold it as easily as the binder does, then you use No.3 or No.4 (narrow) or Nos. 6 to 12 (wider), bias binding, doing this without the binding attachment and with just one row of stitching, as shown. O. Imitation French Binding. Stitch the true-bias piece on, as illustrated. Crease the other edge ¼ inch. Turn bias to the wrong side, extending the creased edge scant ⅛ inch beyond the first stitching line, as shown. Stitch from right side, stitching exactly on line where fabric joins binding. Press from the outside edge in. This will practically conceal the stitching line. Excellent for voiles and sheers where considerable binding is necessary to finish edges. P. Center-Stitched Binding. This is considered more decorative than plain binding. First, stitch right side true-bias piece to wrong side of fabric, using a ⅛ seam. Press seam up into the binding. Crease binding so as to bring free edge even with top edge of seam. Press fold down and to right side. Stitch directly through the center, as shown. A ruffle or lace may applied with the first stitching and binding brought over to conceal the joining. Q. Stitched Hem. Often in net or lawn or very fabric, the hem can be stitched with three or more rows as shown. Turn the hem allowance to position, baste. Place tissue on the wrong side; and stitch from the right side, making as many rows of stitching as you desire. Pull the paper away. Trim off any surplus in the hem width above the last row of stitching. 17
18 18
PRACTICAL STITCHES. Threading. Thread knotting
 Threading PRACTICAL STITCHES As sewing is based on needlework, the first lesson should be in threading and handling the needle. Thread dark thread into the needle against a light background and light thread
FOUNDATION ~ HAND & MACHINE STITCHES
 FOUNDATION ~ HAND & MACHINE STITCHES AIM ~ To show some of the many hand and machine stitches and their uses. ~ To show the necessity of some of the stitches when sewing seams. 3. SEAMS ~ Straight open
Making Slip Covers. Two, they must be made securely, so that they will bear hard use.
 Making Slip Covers Fabric-Covered Chairs, couches and stools have become an important part of decoration. Colors can be changed and color schemes emphasized, antiques or any beautiful furniture can be
Waist Finishing BOUND BUTTONHOLES
 Make samples Waist Finishing BOUND BUTTONHOLES Buttonholes are easy if made according to professional methods. They offer an excellent trimming for many dresses and often give that center of interest so
CHAIR COVER AND PILLOW A. 1 Front. 2 Side. 3 Arm Front. 4 Skirt Front. 5 Back. 6 Pillow CUTTING LAYOUTS CHAIR COVER AND PILLOW A
 ## PATTERN PIECES 4069 McCALL'S CRAFTS CHAIR COVER AND PILLOW A 1 Front 2 Side CHAIR COVER C,D 7 Guide PAGE 1 of 6 3 Arm Front 4 Skirt Front 5 Back 6 Pillow CUTTING LAYOUTS Cut other pieces first, allowing
Pockets; Seam Finishes
 Lessons 4, 5 Complete the sentences. 4. A zipper should be applied a facing has been applied, but a band has been applied to a garment. 5. Coil zippers are made of or. One advantage of them is the ease
Beginning Level (9-11 Years)
") OKLAHOMA COOPERATIVE EXTENSION SERVICE 4-H Fabrics & Fashions Construction Items Beginning Level (9-11 Years) Division of Agricultural Sciences and Natural Resources Oklahoma State University OKLAHOMA
OKLAHOMA COOPERATIVE EXTENSION SERVICE 4-H Fabrics & Fashions Construction Items Beginning Level (9-11 Years) Division of Agricultural Sciences and Natural Resources Oklahoma State University OKLAHOMA
MACHINE SEW HOW TO POT HOLDER. Project
 GET TO KNOW YOUR ING BY TRYING OUT THE VARIOUS STITCHES AVAILABLE, THEN TURN YOUR STITCH SAMPLER INTO A USEFUL. CUSTOMIZE YOUR PROJECT BY CHOOSING YOUR OWN FABRIC AND MATCHING OR CONTRASTING THREAD COLOURS.
MARKING SEWING LINES
 MARKING SEWING LINES Press mark seams Stitching a straight seam without a line to follow not only requires perfect cutting but also an accurate eye for gauging the correct distance between the cut edge
How To Measure & Hang Your Curtains The Correct Way
 How To Measure & Hang Your Curtains The Correct Way PLACE YOUR FIXTURES BEFORE MEASURING FOR CURTAINS AND DRAPERIES A VERY IMPORTANT PART of satisfactory curtains and draperies is the rods or fixtures
HOW TO MAKE A SLIPCOVER INSTRUCTIONS Instructions are for slipcovering a wing-back chair. The principle is the same for an arm chair or sofa.
 HOW TO MAKE A SLIPCOVER INSTRUCTIONS Instructions are for slipcovering a wing-back chair. The principle is the same for an arm chair or sofa. YOU WILL NEED: Slipcover fabric Piping cord Zipper Thread Ruler
Plain Seams and Seam Finishes
 Plain Seams and Seam Finishes Oregon 4-H Clothing Construction Fact Sheets: Basic Skills Level 1 Level 1 4-H 320-19 October 2014 A seam is the line of stitching that holds two fabric edges together. Plain
EC How to Make Slipcovers
 University of Nebraska - Lincoln DigitalCommons@University of Nebraska - Lincoln Historical Materials from University of Nebraska- Lincoln Extension Extension 1984 EC84-410 How to Make Slipcovers Margaret
4-H Fabrics & Fashions
 OKLAHOMA COOPERATIVE EXTENSION SERVICE 4-H Fabrics & Fashions Setting Your Stitch Length 1. Stitch, as shown, using six inches to one inch. --------------------------------------------------------------------------------------------------------------------
Suzan Lauder s Cushion Cover Reticule Designs: Cushion Cover Reticule Patterns #1 to #6
 Page 1 of 14 CUSHION COVER RETICULES #1 AND #2, PLUS BONUS RETICULE DUE TO OFF-CENTRE BACK ZIPPER (LIKE #5). TO CUT OUT THE PATTERN Patterns are at the end of this document. Pattern for Reticules #1 to
FACINGS. Facings are sections of material that finish the edge without protruding; a binding extends beyond the edge.
 Facings defined FACINGS Facings are sections of material that finish the edge without protruding; a binding extends beyond the edge. A facing can be made either wide or narrow and can be made on the wrong
Arrowhead stitch/arrow- Triangular stitch used as decoration when stitched loosely or to reinforce strain areas of a garment when stitched tightly
 Dictionary of Sewing Terms A Armscye- armhole Arrowhead stitch/arrow- Triangular stitch used as decoration when stitched loosely or to reinforce strain areas of a garment when stitched tightly Awl-hand-held
Tailoring. Tailoring is easy. Requires accuracy. Modern tailoring
 TAILORING TAILORING Tailoring Tailoring is easy A coat or suit can be made as easily as a silk dress if these rules for tailoring are followed accurately. More time is required for pressing and marking
Construction Cards Beginning Level (9-11 Years)
") Beginning Level (9-11 Years) Division of Agricultural Sciences and Natural Resources Oklahoma State University Beginning Level (9-11 Years) No. 801 Seam Finishes Seam finishes make clothes look neat on
Beginning Level (9-11 Years) Division of Agricultural Sciences and Natural Resources Oklahoma State University Beginning Level (9-11 Years) No. 801 Seam Finishes Seam finishes make clothes look neat on
PLEATS. Uses. Length of material. Hem pleats. Width of pleats
 PLEATS Uses Pleats are used both for trimming and to add fullness to the section in which they are placed. Single pleats are basted and made into the garment, while a series of pleats are usually made
Canadian Quilters Association Pattern: Quilting Tools Tote Bag
 Canadian Quilters Association Pattern: Quilting Tools Tote Bag Description: * Size: 24 x 28", storage for: 6 x 24" ruler and 18 x 24" cutting mat, and all other equipment. * Easy to carry to workshops
Bound and Determined:
 Think You Don t Have Time to Create Beautiful Quilts? From quick-quilt adaptations of classic patterns to fun, fresh novelty designs, McCall s Quick Quilts provides you with a treasury of time- and effort-saving
How to Make Gathers by Machine
 Published on Sew4Home How to Make Gathers by Machine Editor: Liz Johnson Thursday, 08 December 2016 1:00 We love to gather with friends and family to share good food and conversation. We enjoy gathering
Set-in Sleeves. Ziuty 0 750
 Set-in Sleeves Ziuty 0 750 When sleeves are attached to a garment's armhole with a seam, they are called "set-in sleeves." Design variations may change the size and shape of the top of the sleeve or both.
Brother PQ- Series Accessories
 Brother PQ- Series Accessories The PQ-series of high-speed straight stitch machines (1300, 1500 and 1500S) are designed to sew quickly and accurately with a wide variety of fabrics, even combinations of
Figuring the amount of fabric needed: 0 Measure the window and record each measurement A. Width inside frame B. Length inside frame C. Width outside f
 _ MAKING DOM-AN smut-s : 1 y,_ H z i. I i 1 ~ :... L illiqlgiilliillql' 'iiliilliill'idnz The Roman shade is a popular, versatile window treat ment. Its tailored appearance blends with many decorating
Jodie s Sewing Studio
 Jodie s Sewing Studio Friday s Kuspuk Pattern How to Use a Jodie s Sewing Studio Pattern For best results, study the pattern pieces first and read the notes in the margins and the terms on each piece.
Hems. Marjorie M. Baker, M.S., Extension Associate for Textiles and Clothing
 FCS2-320 Hems Marjorie M. Baker, M.S., Extension Associate for Textiles and Clothing Hems are an important part of any garment and can be handled in many ways. The manner in which a hem is handled depends
How to Make a Rolled Hem with Your Sewing Machine
 Published on Sew4Home How to Make a Rolled Hem with Your Sewing Machine Editor: Liz Johnson Tuesday, 20 January 2015 1:00 There's always a certain amount of hemming and hawing about having to hem. Just
Making Double Fold Straight of Grain Quilt Binding
 Making Double Fold Straight of Grain Quilt Binding Tools and Supplies: Cutting mat, rotary cutter with a sharp blade, walking foot, 6x24 ruler, seam allowance guide, pencil, quilting gloves Be sure your
Tab-Top Panel Curtains with Button Accents
 Published on Sew4Home Tab-Top Panel Curtains with Button Accents Editor: Liz Johnson Tuesday, 11 August 2015 1:00 To be perfectly honest, I hate to cover up my windows. Staring out into the world is one
pattern BONUS Ruffled Halter By LiesL Gibson {from page 41}
 ruffled halter This adorable halter has a simple pull-on style that s easy and fun for summer, featuring a casing formed by the first ruffle for a clean, uncluttered finish. For other fun looks, try making
CAMELOT FABRICS. 3. Draw a vertical line on the pointed end of each Strap, a tiny bit longer than the diameter of your buttons.
 Other Supplies - 2 buttons in coordinating color - paper printer - basic sewing supplies - sewing machine with buttonhole foot - iron & pressing surface - scissors & fabric shears - measuring tape - fabric
A. Preparing the fabric (not shown):
:") INSERTING ZIPPERS - CENTER INSERTION The zipper can be snapped on to the right or to the left side of the needle so that you can sew close to the zipper. When sewing on the right side of the zipper, attach
INSERTING ZIPPERS - CENTER INSERTION The zipper can be snapped on to the right or to the left side of the needle so that you can sew close to the zipper. When sewing on the right side of the zipper, attach
Jodie s Sewing Studio
 Jodie s Sewing Studio Children s Kuspuk Pattern How to Use a Jodie s Sewing Studio Pattern For best results, study the pattern pieces first and read the notes and terms on each piece. Pieces are labeled
COLLARS AND NECK LINES
 COLLARS AND NECK LINES Too low Neck lines are made in various designs, but they should often be modified to suit the type of individual who is to wear the garment. If the neck is low, it may be too low
Sew Classic for Children Children s Corner: Classic Sewing Magazine, Spring 2016
 Claire BY LEZETTE THOMASON Since 1978 Children s Corner has honored the classic traditions of children s garment sewing with timeless designs. The four original owners began a shop that designed and stitched
Sewing and Clothing ID
 Sewing and Clothing ID 1 Acrylic Ruler -- Ruler used in crafts and clothing showing different measurement. May come in different shapes and sizes. Aida Cloth Beautiful even-weave cloth, popular for cross
Be Crafty. Technique Tutorial. How to Use Polyester Horsehair Braid HELPFUL HINTS: Page 1
 Page 1 How to Use Polyester Horsehair Braid Horsehair braid is a flexible polyester mesh designed to reinforce and define both straight and curved hems, transforming a limp skirt edge into one with flair
WINDOW TREATMENT A (Cut by measurements provided)
") Page (8 pages) ADDITIONAL INFORMATION WINDOW TREATMENT A (Cut by measurements provided) WINDOW SIZES 6 4 48 CONTRAST LINING A (Cut by measurements provided) 45 / 7 /8 7 /8 9 7 /8 54 / 5 7 /8 7 /8 60 /
Page (8 pages) ADDITIONAL INFORMATION WINDOW TREATMENT A (Cut by measurements provided) WINDOW SIZES 6 4 48 CONTRAST LINING A (Cut by measurements provided) 45 / 7 /8 7 /8 9 7 /8 54 / 5 7 /8 7 /8 60 /
! ' ; ' I I I. University of Hawaii Cooperative Extension Service Circular 442 I I I I I I I I I I
 ..... DO - - - ----------- -,.. ic --------- ' ' ' - ------- University of Hawaii Cooperative Extension Service Circular 442 ~- ; -------------!.-------------. ' THE BOUND BUTTONHOLE is a slightly revised
Medieval Hand Stitching and Finishing Techniques
 Medieval Hand Stitching and Finishing Techniques by Lady Sidney Eileen of Starkhafn This handout is by no means comprehensive, but is instead intended to be a practical guide to hand stitching and hand
This versatile foot may also be used with zigzag and decorative stitches, as the guide does not extend through the needle opening.
 Ditch Quilting Foot (S) Linda Pidzamecky, Education Consultant, Janome Canada Ltd. Part Number: 200-341-002 The Ditch Quilting Foot is a very useful addition to your sewing machine, when you want a perfectly
oliver + s a free pattern from not for resale Girl s A-line sundress. Loose-fitting pull-on style with contrast yoke and bias ties at shoulder.
 a free pattern from not for resale Popover sundress sizes: 2, 3, 4, 5, 6, 7 + 8 Girl s A-line sundress. Loose-fitting pull-on style with contrast yoke and bias ties at shoulder. cutting layouts suggested
Original Recipe. Belle Layered Skirt for Toddlers by Anshu Jain
 Original Recipe Belle Layered Skirt for Toddlers by Anshu Jain Hello Moda Bake Shop readers. I am Anshu from Blooms And Bugs {bloomsnbugs.blogspot.com}. I mostly sew little girls clothes. Today I'll show
Fairfield County 4-H Clothing Projects Guide Guidelines for completing Clothing projects
 Fairfield County 4-H Clothing Projects Guide Guidelines for completing Clothing projects Read and complete activities and requirements in the project book. Decide which fabrics best suit the pattern you
5. Fold & press the Binding strip in half lengthwise, Wrong Sides facing, and unfold.
 OTHER TOOLS & SUPPLIES - 2/3 yd of pom-pom trim - paper printer - basic sewing supplies: - sewing machine - needle & coordinating thread - iron & pressing surface - scissors, fabric shears & pinking shears
4-H FCS Skill-a-thon Sewing and Clothing ID
 4-H FCS Skill-a-thon Sewing and Clothing ID Revised March 2011 1 Fabrics Aida Cloth Beautiful even-weave cloth, popular for cross stitch work, crewel embroidery, and other stitchery. Cotton Good material
How To Make A Quillow
 How To Make A Quillow A quillow is a quilt which folds into a built-in pocket, to form a pillow. Sizing: The measurements and fabric are for a 44" x 72" lap quilt which will fold into an 18" square. To
EC How to Make Braided Rugs
 University of Nebraska - Lincoln DigitalCommons@University of Nebraska - Lincoln Historical Materials from University of Nebraska- Lincoln Extension Extension 1962 EC62-1156 How to Make Braided Rugs Magdalene
- OUR TOP TIPS - Seam allowance is 1.5cm or 5/8 unless otherwise stated. Use the markings on the base of your machine to help you keep to this.
 - OUR TOP TIPS - Always check the size chart to work out which size is best suited to you. Sew Over It patterns tend to have less ease than other patterns as most of the designs are intended to have a
onstage tutu skirt a free pattern from not for resale
 a free pattern from not for resale onstage tutu skirt This very quick and easy-to-make tutu skirt is great for parties and special occasions, but it s equally appropriate for everyday wear. The pull-on
Making a Sewing Skills Notebook Oregon 4-H Sewing Construction Fact Sheets: Basic Skills Level 1
 Basic Skills 1 1 4-H 320-16-1 January 2018 Select at least five of the options below to include in your One Sewing Skills Notebook. 5/8 inch seam Turn A Corner Seam Pressed Open Stitch & Pinked Seam Finish
Heirloom Pillow with Wave Tucks and Woven Lace
 Published on Sew4Home Heirloom Pillow with Wave Tucks and Woven Lace Editor: Liz Johnson Monday, 01 May 2017 1:00 Perhaps best known as the provence of christening gowns and wedding ensembles, heirloom
Mini 4-H SEWING PROJECT
 Mini 4-H SEWING PROJECT Each Mini 4-H'er can take only one of the projects offered. All Mini 4-H Projects are entered on the Wednesday before the fair. Mini 4-H is open to 4-H'ers who are currently in
Blue Italian. Organdy Dress. Basic Bodice Dress with Center Panel Adaptation. From Pat Goldman & Susan Newberry of Chadwick Heirlooms
 Blue Italian Organdy Dress From Pat Goldman & Susan Newberry of Chadwick Heirlooms Basic Bodice Dress with Center Panel Adaptation Visit www.chadwickheirlooms.com to order fabrics, laces and materials
The Couture Dress with Susan Khalje
 Preparing A Muslin if you re creating a strapless garment without a defined waist, you must prepare two muslins: one for the outer garment, and one for the inner foundation garment. A muslin pattern, or
Glossary of Sewing Terms
 E-405 05-06 Glossary of Sewing Terms Fashion designers and seamstresses seem to have a vocabulary all their own. The following list is a collection of the more common terms used to describe the silhouettes,
STITCH FUNCTION MANUAL
 STITCH FUNCTION MANUAL TABLE OF CONTENTS I. Clothing Construction Functions Button Sewing... 6 Darning... 7 Staystitching... 8 French Seam... 8 Topstitching... 9 Zipper Insertion... 10 Piped (Corded)
seams and seam Finishes Carefully selected and wellconstructed Seams Standards
 FCS2-304 University of Kentucky College of Agriculture, Food and Environment Cooperative Extension Service Seams and Seam Finishes Linda Heaton and Marjorie M. Baker, Textiles and Clothing Carefully selected
ICT TRAINING MATERIAL For SLOW LEARNERS
 ICT TRAINING MATERIAL For SLOW LEARNERS Previous year university questions & answers, for the subject SEWING TECHNIQUES Prepared By J.MEKALA, B.E., MBA, Head, Dept of Fashion Technology Shrimathi Indira
YSR Everywear Tails Design by lila_
 1 YSR 12-10 Everywear Tails Design by lila_ PIECES 0 Print Check 1 Front Left 1x Fabric 2 Front Side Left 1x Fabric 3 Back Side 2x Fabric 4 Back 2x Fabric 5 Under Collar 2x Fabric 6 Upper Collar 2x Fabric
Table of Contents. Instructions: Rotary Cutting 3. Piecing Guidelines 5. Quilting, Stitch in the Ditch 6. Sample file. Bias Tape Application 8
 Table of Contents Instructions: Page: Rotary Cutting 3 Piecing Guidelines 5 Quilting, Stitch in the Ditch 6 Hand Sewing 7 Bias Tape Application 8 Projects: Nine Patch Potholder 9 Little Bag Purse 11 Circle
The Panty Pack Skill Level: Intermediate
 The Panty Pack Skill Level: Intermediate http://www.pellonprojects.com Designed By Michelle Dorsey Sewn By Michelle Dorsey What girly girl wouldn t want a special bag to hold her delicate undies when she
Three Tier Ombre Apron with Shabby Chic Style
 Published on Sew4Home Three Tier Ombre Apron with Shabby Chic Style Editor: Liz Johnson Tuesday, 11 April 2017 1:00 Ombre is a French word for shading or graduating. In fashion, it refers to the graduation
By: FBeenz.
 1PPicot edge a scarf By: FBeenz http://www.burdastyle.com/techniques/picot-edge-a-scarf PICOT: A picot is a loop of thread created for functional or ornamental purposes along the edge of lace, ribbon,
Intro to Sewing Coats: Chloe Coat. Chloe Coat. sizes 8-20
 Intro to Sewing Coats: Chloe Coat Chloe Coat sizes 8-20 Chloe Coat - Instructions - Please use these instructions alongside our online videos to help you sew your Chloe Coat. All the seam allowances are
Design, pattern, text and images are 2017 Anna Maria Horner and are intended for personal use.
 Introducing the Snuggle & Play Dress inspired by my feisty, littlest girl, Mary Anna, who loves being able to get dressed by herself every morning. The ease and comfort of the stretch knit top of the dress
Linda's Scallop Directions for Dear Jane Friends Copyright February
 Linda's Scallop Directions for Dear Jane Friends Copyright February 1999 email: linda@lindafranz.com Please Note: In February 1999, when I finished my Dear Jane Quilt, "In Time of Friendship," I put my
The Flake Family. Skill level - Intermediate. By Elizabeth Hill. Technique: Satin Stitch. Brand: Dual Duty XP. Crafting time: Day
 The Flake Family Skill level - Intermediate Technique: Satin Stitch Brand: Dual Duty XP Crafting time: Day Size Final Measurements: 21 1/2 x 25 1/2 Materials Dual Duty XP General Purpose thread Coats Rayon
Jorunn s Big Book of War Garb Volume Clan Yama Kaminari. Hakama for Swedes
 Jorunn s Big Book of War Garb Volume 1 2005 Clan Yama Kaminari Hakama for Swedes OK, before the Anachro narcs come for me, let me say right at the outset that these are wrong. I know they re wrong. But
Sample Packet. Directions: Describe the functions of the following basic parts of a sewing machine.
 Sample Packet NAME: Directions: Describe the functions of the following basic parts of a sewing machine. SEWING MACHINE PARTS: Needle stitch plate: Feed dog system: Presser foot: Bobbin case: Spool pin:
Clothing Construction
 Clothing Construction Item Type text; Book Authors Blake, Zella Publisher College of Agriculture, University of Arizona (Tucson, AZ) Download date 16/06/2018 10:08:00 Link to Item http://hdl.handle.net/10150/312018
Sewing Roll. Base Fabric. Base Fabric. Third Fabric. Second Fabric (Bottom Pockets) Pockets)
 Pockets)") You will need Brother Creative Sewing Pack (Free Motion Foot, Braiding Foot, Narrow Hem Foot, Piping Foot and Concealed Zipper Foot) Base fabric 1 x fat ¼ (50cm square) cut in half Second fabric 50cm x
You will need Brother Creative Sewing Pack (Free Motion Foot, Braiding Foot, Narrow Hem Foot, Piping Foot and Concealed Zipper Foot) Base fabric 1 x fat ¼ (50cm square) cut in half Second fabric 50cm x
raw edge selvage length of tunic
 If you know your way around a sewing machine, and have a passing familiarity with scissors, you can do this. The style fits, and looks good on just about everyone, saves fabric and prevents fighter's tear.
HEG Sewing With Denim
 University of Nebraska - Lincoln DigitalCommons@University of Nebraska - Lincoln Historical Materials from University of Nebraska- Lincoln Extension Extension 1988 HEG88-240 Sewing With Denim Rose Marie
Learn To Sew: Xtra EZ Pony Tail Bolster Pillow
 Published on Sew4Home Learn To Sew: Xtra EZ Pony Tail Bolster Pillow Editor: Liz Johnson Thursday, 17 October 2013 1:00 This finished pillow may look complex, but the steps are... as the name promises:xtra
Mini 4-H SEWING PROJECT
 Mini 4-H SEWING PROJECT Mini 4-H is open to youth who are currently in Kindergarten, first, or second grade at the time of their enrollment on 4HOnline. Enroll in Mini 4-H through the 4HOnline website
Stretchy Headbands: Pleated & Turban Styles
 Published on Sew4Home Stretchy Headbands: Pleated & Turban Styles Editor: Liz Johnson Tuesday, 15 March 2016 1:00 You've seen these awesome headbands everywhere. They're a go-to solution for yoga class,
Alternating Four Patch Quilt: 43 x 51 inches 20 blocks, 8 inch finished
 Free Pattern by Shirley Sandoz of Mystery Bay Quilt Design www.mysterybayquiltdesign.com or email shirley@mysterybayquiltdesign.com Alternating Four Patch Quilt: 43 x 51 inches 20 blocks, 8 inch finished
Six FUN! projects for those who are new to sewing, returning to sewing or just want to sharpen basic skills.
 Six FUN! projects for those who are new to sewing, returning to sewing or just want to sharpen basic skills. 1. Clutter Control Bags 2. 3-Button Book Cover 3. Fabric Stash Pincushion 4. Pocket Tissue Case
Part 17: Chapter 33 Trimming Over-Stuffed Pieces
 Part 17: Chapter 33 Trimming Over-Stuffed Pieces SOME of the chairs we have just described were provided with removable wooden panels, which simplified the finishing of the arms and wings. Fig. 267 shows
free pattern featuring Rayon Striped COLLECTION BY AGF Studio
 free pattern featuring Rayon Striped COLLECTION BY AGF Studio FABRICS DESIGNED BY AGF Studio Rayon Solids Rayon striped R-ST-5000 Classic Stripes RS-805 Honey R-ST-5001 Mariner Stripes RS-804 Aurora Red
Kitchen Curtains with Ribbon Ties
 Published on Sew4Home Kitchen Curtains with Ribbon Ties Editor: Liz Johnson Wednesday, 27 September 2017 1:00 Curtain panels are a perfect beginner project. They're fast, super simple, and you get a great
CLOTHING I TEST #350 MULTIPLE-CHOICE IDENTIFY THE LETTER OF THE CHOICE THAT BEST COMPLETES THE STATEMENT OR ANSWERS THE QUESTION.
 CLOTHING I TEST #350 MULTIPLE-CHOICE IDENTIFY THE LETTER OF THE CHOICE THAT BEST COMPLETES THE STATEMENT OR ANSWERS THE QUESTION. 1. A ROTARY CUTTER: A. Can only be used on woven fabrics. B. Should only
Sewing Vocabulary & Equipment
 Sewing Vocabulary & Equipment 1. Basting Stitch Long, temporary stitches used to hold pieces of fabric together. (Changed by twisting the stitch length knob.) Regular Stitch Length Basting Stitch Length
Copyright Bumblebee Linens LLC
 Crafts Instructions Included 1. Hankie Wedding Dress 2. Pillowcase Dress 3. Hankie Bonnet 4. Hankie Pin Cushion 5. Hankie Angel 6. Hankie Bunny 7. Pillowcase Reusable Grocery Bag 8. Linen Towel Drawstring
SHARING AND FURTHERING THE ART OF SEWING. Couture Waistband
 SHARING AND FURTHERING THE ART OF SEWING Couture Waistband A waistband on pants or skirt should be firm enough to support the weight of the garment and also to lie flat against the body. It also needs
Linda Brown, Sue Dittler, Sandy Miller, Lucy Ricardo, and Carole Thommen
 Linda Brown, Sue Dittler, Sandy Miller, Lucy Ricardo, and Carole Thommen Edited by: Sharon Reilly Teena Livsey YO-YO s especially ornament balls By: Lucy Ricardo Supply list: Scraps of fabric 1 ½ circle
Sewing Stylish Pillows Simplified! Created exclusively for Craftsy by Christine Haynes, Linda Reynolds and Julia Garza
 Sewing Stylish Pillows Simplified! Created exclusively for Craftsy by Christine Haynes, Linda Reynolds and Julia Garza Special Offer You ve unlocked savings! As an added bonus for downloading this eguide,
A few notes about PDF patterns from Designs by Jude...
 A few notes about PDF patterns from Designs by Jude.... This PDF pattern requires legal size paper (8.5 x 14 ) or A4 size paper (8.27 x 11.69, 210mm x 297mm). It will not print on standard letter. Patterns
{ FEATURING PARADISE COLLECTION}
 { FEATURING PARADISE COLLECTION} F R E E P R O J E C T S H E E T DESIGNED WITH LOVE BY DESIGNED WITH LOVE BY FABRICS DESIGNED BY PATRICIA BRAVO for ART GALLERY FABRICS Finished Size: 56.5" by 64.5" Block
Ruffle Bunnies: Fun Appliqué Kitchen Towels
 Published on Sew4Home Ruffle Bunnies: Fun Appliqué Kitchen Towels Editor: Liz Johnson Monday, 06 March 2017 1:00 These kitchen towel Ruffle Bunnies are ready to hop-to-it and help with your dish drying.
Lesson 2 CREATING THE SKIRT: LACE SHAPING
 1 Extension 1 Extension Lesson 2 CREATING THE SKIRT: LACE SHAPING For this lesson we will be working with the skirt pieces one skirt front and two skirt backs and your lace insertion. Are you ready to
CAUTION- SAVE THESE INSTRUCTIONS This product is for household use, or equivalent.
 Never operate this sewing machine if it has a damaged cord or plug, if it is not working properly, if it has been dropped or damaged, dropped into water. Return this sewing machine to the nearest authorized
Vintage Style Sweetheart Apron
 Published on Sew4Home Vintage Style Sweetheart Apron Editor: Liz Johnson Thursday, 18 August 2016 1:00 This apron is another Sew4Home design original, complete with a downloadable pattern that allows you
Pillowcases QUICK REFERENCE GUIDE: Organize your supplies and cut your fabric. Sew one side seam in a French seam: Attach the piping and the band:
 QUICK REFERENCE GUIDE: Organize your supplies and cut your fabric. Sew one side seam in a French seam: 1. First line of stitching: WRONG sides together, stitch a 3/8 inch seam. 2. Trim: Cut both seam allowances
Basic Sewing Portfolio. Name
 Basic Sewing Portfolio Name Back stitching Whip stitch Starting in the corner of a sample begin stitching diagonally. 3-4 stitches Hold up the back stitching lever and backstitch to the beginning. Release
EC Skirt and Dress Hems
 University of Nebraska - Lincoln DigitalCommons@University of Nebraska - Lincoln Historical Materials from University of Nebraska- Lincoln Extension Extension 1963 EC63-433 Skirt and Dress Hems Anna Marie
Encircled Throw Quilt Pattern
 Pattern Instructions Encircled Throw Quilt Pattern Geometrics are a favorite with quilters, with circles being a coveted favorite. This charming quilt pattern is designed to work with the Circles Sew Simple