S TA C K, SLASH & SASH. Quilting. Quilting 10+ unique projects
|
|
|
- Sophia Barnett
- 5 years ago
- Views:
Transcription

1 Quilting S TA C K, SLASH & SASH Quilting 10+ unique projects

2 S TA C K, S L A S H & SASH Quilting Edited by Carolyn S. Vagts


3 2 Introduction is all about creating uniquely beautiful quilts. Create 10 different projects using free-form piecing techniques. Once you ve conquered the concept of stacking and slashing blocks, you simply won t be able to stop. The possibilities are endless. Each time you make a quilt using one of these techniques it will be a one-of-a-kind creation. These amazing quilts are constructed using time saving methods and later trimmed to size. Increasing or decreasing the sizes is easy. Many of the projects could and should be done with existing fabrics. It s a wonderful way to put fabrics to work. The options are limitless. This is a no stress book. You won t have to worry about points and seams aligning. They re not supposed to. Many use precut fat quarters or strips. So gather up your fabrics, get out your sewing machine and quilting supplies and discover what fun you can have while doing free-form piecing. Table of Contents 3 Color Me Happy Table Set 9 Wonky Flowers 12 Pick Up Sticks 16 Tidal Waves 20 Fractured 25 Creative Curves 29 Wave Dancer 33 Welcome to My Neighborhood 37 Cross My Heart 42 Spooktacular Stacks Fractured, page 20 Wave Dancer, page 29

4 3 Color Me Happy Table Set Designed & Quilted by Chris Malone Turn your favorite strips of fabric into gorgeous accents with this unique table set. One table set won t be enough. You ll want to make more. Specifications Skill Level: Beginner Table Runner Size: 50" x 10" Place Mat Size: 16" x 14" Napkin Size: 17" x 17" Napkin Ring Size: 6" x 11/2" Table Runner Materials coordinating precut 5" squares 3/8 yard coordinating stripe 1/2 yard medium gray solid Backing to size Batting to size Thread 1/2 yard 22"-wide lightweight nonwoven interfacing Basic sewing tools and supplies Project Note The construction techniques used in this book are meant to produce random results. No two blocks or quilts will look the same, and your results probably will not look like the samples provided. Finished block and quilt sizes are approximate, and your completed project may not be the same as size listed. Cutting From precut 5" squares: Cut each square in half to make (21/2" x 5") A rectangles. From coordinating stripe: Cut 4 (21/4" by fabric width) strips for binding. From medium gray solid: Cut 1 (101/2" by fabric width) strip. Subcut 4 (8" x 101/2") B rectangles. From interfacing: Cut 5 (5" x 11") strips.
5 4 Assembly 1. Position one A rectangle right side up on the top edge of an interfacing strip (Figure 1). 4. Repeat steps adding a third A and reversing the angle (Figure 4). A 2. Layer and pin a second A right side down at an angle on the first A (Figure 2a). Flip second A down to check that it covers the interfacing strip (Figure 2b); rearrange if necessary. Flip piece back up. a. Figure 1 b. Figure 4 5. Continue in this manner until the interfacing is covered, using approximately eight different A rectangles. Trim the completed pieced A strip to 41/2" x 101/2" (Figure 5). 4 1 /2" 10 1 /2" Figure 2 3. Stitch through all layers along second A edge. Trim fabric seam allowance only to 1/4" referring to Figure 3. Press second A away from first A. 1 /4" Figure 3 Figure 5 6. Repeat steps 1 5 to make five A strips. 7. Stitch four B rectangles between five A strips into a row referring to the Assembly Diagram; press seams toward B. 8. Sandwich the batting between the pieced top and the prepared backing piece; baste layers together. Quilt as desired. 9. When quilting is complete, remove basting, and trim batting and backing even with raw edges of the pieced top. 10. Prepare binding and stitch to quilt front edges, matching raw edges, mitering corners and overlapping ends. Fold binding to back side and stitch in place to finish. B Color Me Happy Table Runner Assembly Diagram 50" x 10"
 A rectangles.")
6 Place Mat (set of two) Materials coordinating precut 5" squares 1/3 yard coordinating stripe 1 yard medium gray solid Batting to size Thread 3/8 yard 22"-wide lightweight nonwoven interfacing Basic sewing tools and supplies Cutting From precut 5" squares: Cut each square in half to make (21/2" x 5") A rectangles. From coordinating stripe: Cut 3 (21/4" by fabric width) binding strips.
 place mat backings. From batting: Cut 2 (16\" x 18\") rectangles. From interfacing: Cut 2 (5\" x 15\") strips. Assembly 1.")
7 6 From medium gray solid: Cut 1 (141/2" by fabric width) strip. Subcut 2 (101/2" x 141/2") B rectangles and 2 (21/2" x 141/2") C strips. Cut 1 (16" by fabric width) strip. Subcut 2 (16" x 18") place mat backings. From batting: Cut 2 (16" x 18") rectangles. From interfacing: Cut 2 (5" x 15") strips. Assembly 1. Follow Table Runner Assembly steps 1 5 using 5" x 15" interfacing rectangles and approximately 10 A rectangles to make a pieced A strip. Trim strip to 41/2" x 141/2". Repeat to make a second pieced A strip. 2. Stitch one pieced A strip between B rectangle and C strip to make place mat top referring to Assembly Diagram; press seams away from A. Repeat with remaining A, B and C. 3. For each place mat, sandwich a batting piece between the pieced top and a prepared backing piece; baste layers together. Quilt as desired. 4. When quilting is complete remove basting, and trim batting and backing fabric even with raw edges of the pieced tops. 5. Prepare binding and stitch to quilt front edges, matching raw edges, mitering corners and overlapping ends. Fold binding to back side and stitch in place to finish. C Color Me Happy Place Mat Assembly Diagram 16" x 14" Here s a Tip If you choose to use scraps instead of a purchased collection of precut 5" squares, try to choose prints that have a similar color palette. The actual patterns probably won t be very visible; only the colors need to coordinate. B Napkin & Napkin Ring (set of two) Materials Remaining A rectangles from table runner and place mats 5/8 yard coordinating print Batting scraps Thread Lightweight nonwoven interfacing scraps 2 (21/8"-long) pieces 1/8"-wide elastic 2 (3/4"-diameter) shank buttons or cover button kits Cutting From coordinating print: Cut 1 (18" by fabric width) rectangle. Subcut 2 (18") napkin squares. From remainder of rectangle, cut 2 (2" x 61/2") strips for napkin holder backs. From batting scraps: Cut 2 (2" x 61/2") strips. From interfacing scraps: Cut 2 (2" x 61/2") strips. Assembly 1. To make napkin ring, follow Table Runner Assembly steps 1 5 using 2" x 61/2" interfacing rectangle and 5 7 leftover A rectangles to make a pieced A strip. Trim the edges even with the interfacing. Repeat to make a second pieced A strip. 2. Baste an elastic loop on one end of each pieced A strip (Figure 6). Figure 6

8 7 3. To complete one napkin ring, layer a batting strip, backing, right side up, and a pieced A strip, right side down. Stitch all around, leaving a 21/2" opening on one long edge (Figure 7). 8. Repeat step 7 on remaining sides to complete Napkin hem. 9. Repeat steps 7 and 8 to make second Napkin. 2 1 /2" Color Me Happy Napkin Ring Placement Diagram 6" x 1 1 /2" Color Me Happy Napkin Placement Diagram 17" x 17" Figure 7 4. Trim batting close to seam, trim corners and turn right side out. Fold opening seam allowance to inside and slip-stitch closed. Press flat and topstitch 1/4" from all edges. The combination of bright prints with a solid gray reminds me of the weather some days here in the Pacific Northwest cloudy and dreary until the sun pops through! Colors me happy every time. Chris Malone Slipstitch 5. Position and stitch a button to end of napkin holder opposite elastic so the napkin ring ends will meet when button is slipped through elastic loop. Note: If using cover button kit, follow the manufacturer s directions to cover button with print fabric. 6. Repeat steps 3 5 to complete second napkin ring. 7. To make one napkin, fold and press 1/4" to wrong side of opposite sides of one print 18" square. Fold to wrong side again and press. Edgestitch along first folded edge making a 1/4" double-turned hem and referring to Figure 8. 1 /4" 1 /4" Figure 8
9
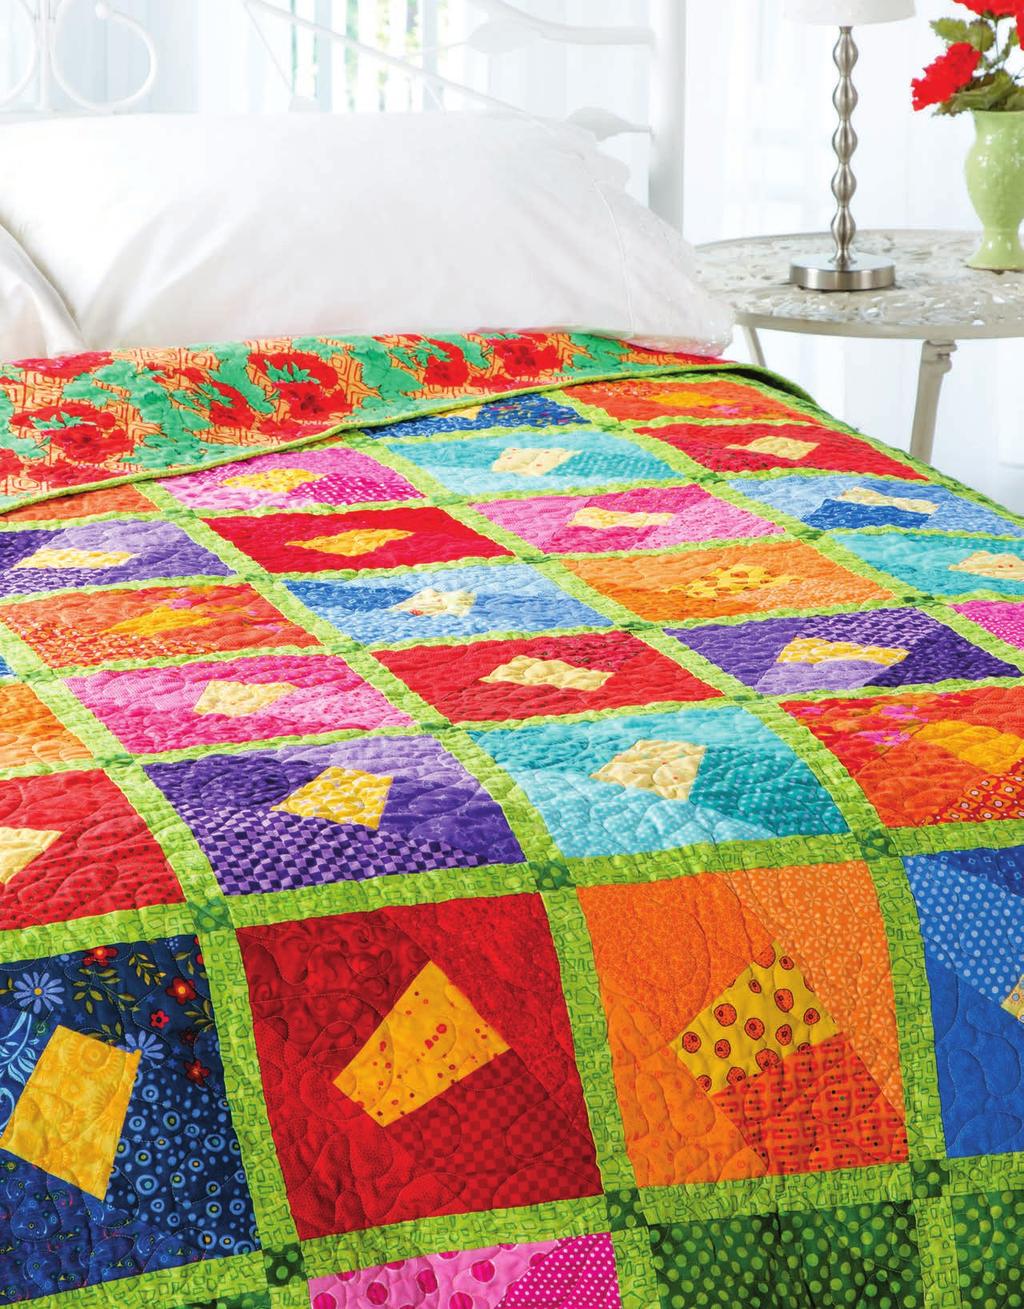
10 9 Wonky Flowers Design by Chris Malone Quilted by Jean McDaniel Stitch a colorful flower garden quilt using a fun and easy stacking technique. Specifications Skill Level: Confident Beginner Quilt Size: 651/2" x 841/2" Block Size: 81/2" x 81/2" finished Number of Blocks: 40 A E D Materials 40 (5") precut squares yellow prints 8 each (10") precut squares red, blue, pink, aqua, orange and violet tonals and prints 2 yards dark green print 2 yards light green print Backing to size Batting to size Thread 12" square ruler (optional) Basic sewing tools and supplies Here s a Tip Use leftover 10-inch precut squares for these blocks. Be careful with seam placement and allowances so the pieced blocks can be trimmed to 9" square. Project Note The construction techniques used in this book are meant to produce random results. No two blocks or quilts will look the same, and your results probably will not look like the sample provided. Finished block and quilt sizes are approximate, and your completed project may not be the same as size listed. Cutting From light green print: Cut 4 (9" by fabric width) strips. Subcut 110 (11/2" x 9") F sashing strips. Cut 8 (21/4" by fabric width) binding strips. Wonkey Flower 8 1 /2" x 8 1 /2" Finished Block Make 40 From dark green print: Cut 6 (9" by fabric width) strips. Subcut 23 (9") H squares. Cut 2 (11/2" by fabric width) strips. Subcut 48 (11/2") G squares. B Assembly 1. Carefully stack four same color family 10" precut squares right side up, matching edges. Here s a Tip Cut and assemble one set of four blocks at a time. A stack of four is easy to rotary-cut. 2. Referring to Figure 1a, make two cuts across opposite sides of the stacked squares at different angles. Label pieces A and C and slide away from center shape without disturbing the stacks (Figure 1b). a. Figure 1 b. C A C
11 10 Here s a Tip It is helpful to use two rulers when making cuts with opposing angles like the A and C cuts in the Wonky Flower blocks. You can move the rulers around until you are happy with the resulting angles and center wedge piece, and then make your cuts. 3. Make cuts at different angles across opposite sides of the center stacked piece to create a wedge shape at the center referring to Figure 2. Label end pieces B and D. Slide A and C back into their original positions. 9. Repeat steps 1 8 with a group of four same color family 10" precut squares and four 5" yellow squares to make a total of 40 Wonky Flower blocks. 10. Arrange and join six H squares, one Wonky Flower block and six F sashing strips to make an X row referring to Figure 4. Repeat to make two X rows. Press seams toward F. H F X Row Make 2 Y Row Make 4 Z Row Make 3 D B Figure 2 4. Keeping pieces right side up, remove the top B piece and place it on the bottom of the B stack. Remove the top two C pieces and the top three D pieces and place them on the bottom of the C and D stacks. Lay aside the center wedge pieces for another project. Note: Rearranging the pieces will create unique blocks with different colored pieces in different places in each block. 5. To cut the block centers, layer four 5" yellow print squares right sides up. Use a center wedge cut in step 4 as a template and position right side up centered on the yellow print squares and cut four E flower centers (Figure 3). Figure 3 6. Stitch E between B and D referring to the block diagram; press seams toward B and D. 7. Stitch A and C to the B-D-E unit, keeping A and C corners directly opposite referring to the block diagram; press seams toward A and C. 8. Trim the pieced unit to 9" square to complete a Wonky Flower block. E Figure Arrange and join two H squares, five Wonky Flower blocks and six F sashing strips to make a Y row, referring again to Figure 4; repeat to make four Y rows. 12. Arrange and join six Wonky Flower blocks, one H square and six F sashing strips to make a Z row, referring again to Figure 4; repeat to make three Z rows. Press seams in rows toward F. 13. Arrange and join seven F strips and six G squares to make a sashing row (Figure 5). Repeat to make 8 sashing rows. Press seams toward F. F G Sashing Row Make 8 Figure Arrange block rows and sashing rows referring to the Assembly Diagram for orientation. Press seams in one direction. 13. Sandwich the batting between the pieced top and the prepared backing piece; baste layers together. Quilt as desired. 14. When quilting is complete, remove basting, and trim batting and backing even with raw edges of the pieced top. 15. Prepare binding and stitch to quilt front edges, matching raw edges, mitering corners and overlapping ends. Fold binding to back side and stitch in place to finish.

12 11 I love bright colors and anything floral, so when I noticed that the cutting pattern resembled flowers, it was only natural to add a yellow center. The flowers in the border look like they are escaping the flower bed and spreading into the grass! Chris Malone Here s a Tip You can use a square ruler to square your blocks or position the block on a cutting mat and use a straight ruler in conjunction with the mat grid. Or make a square from template material, center it over the block and trim with a rotary cutter. Just be sure to trim to the indicated size which is ½" larger than the finished block size. Wonky Flowers Assembly Diagram 65 1 /2" x 84 1 /2"
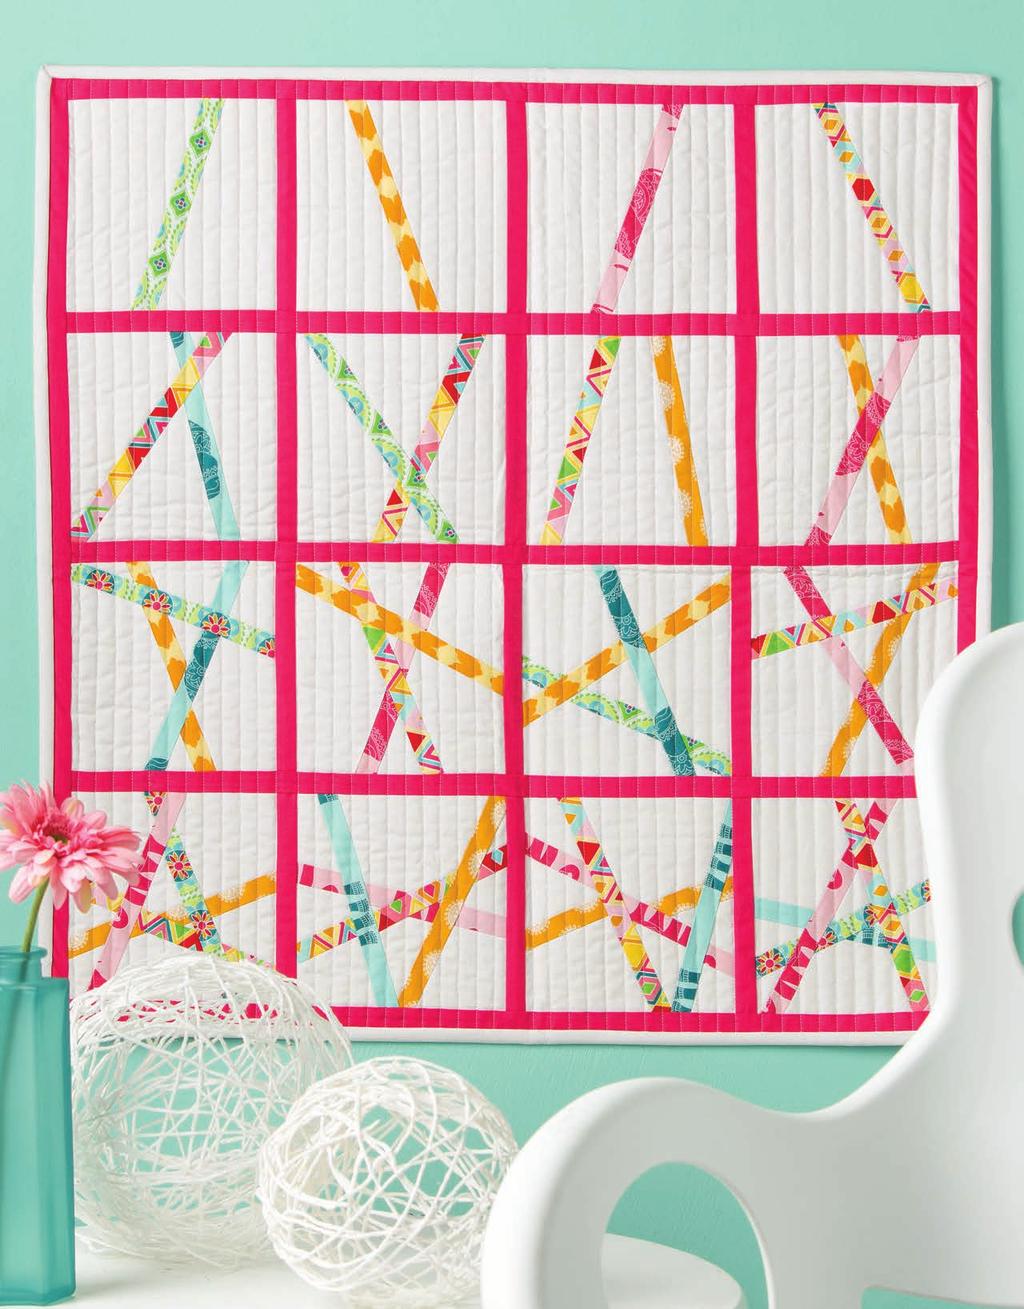
13 12 Pick Up Sticks Designed & Quilted by Jackie White Create a progressive image by stacking background blocks by rows and slashing them in different directions. Each row increases by one more slash to create a stunning wall hanging. Specifications Skill Level: Intermediate Quilt Size: 25" x 25" Block Size: 51/2" x 51/2" finished Number of Blocks: 16 Materials 7 fat eighths coordinating prints 1/2 yard bold coordinating solid 11/2 yards white solid or tonal Backing to size Batting to size Thread Basic sewing tools and supplies Project Notes The construction techniques used in this book are meant to produce random results. No two blocks or quilts will look the same, and your results probably will not look like the sample provided. Finished block and quilt sizes are approximate, and your completed project may not be the same as size listed. Here s a Tip Choose more than six coordinating but different prints for the sticks. Choose a combination of coordinating prints and solids. Or cut 1"-wide strips from scraps at least 10 12" long using a different color family for each block. Cutting From each fat eighth: Cut 8 (1" x 22") B stick strips. From bold coordinating solid: Cut 7 (1" by fabric width) C/D/E strips. Subcut 12 (1" x 6") C sashing strips. Subcut 5 (1" x 24") D sashing and border strips. Subcut 2 (1" x 25") E border strips. From white solid or tonal: Cut 3 (7" by fabric width) strips. Subcut 16 (7") A squares. Cut 3 (21/4" by fabric width) binding strips. Assembly 1. Stack two A squares right sides up and cut a diagonal slash close to the center of the squares (Figure 1a). Repeat with two more A squares but cut the diagonal slash in the opposite direction (Figure 1b). Center a. b. A Figure 1 2. Choose one slashed A square. Position and stitch a B strip along the diagonal edge of one section of the A square extending 1/2" past the A section on each end; press seam toward B (Figure 2). A Center Cut extra stick strips from fat eighths to provide more choices for combinations of each block. Use a bold solid for the sashing strips and borders. It will pull together an assortment of prints or scraps. A B Figure 2
14
15 14 3. Pin-mark the top of the first A section on B as shown in Figure Repeat to make four each three- stick blocks for row 3 and four- stick blocks for row 4 as shown in Figures 7 and 8. Figure 3 4. Positioning the top of the diagonal edge of the second A section at the pin on B, match the second A section diagonal and B edges; stitch together (Figure 4). Press seam toward B. Figure 7 Figure Arrange and join the four one-stick blocks with three C strips to make row 1 (Figure 9); press seams toward C. Repeat with remaining blocks and C sashing strips to make the remaining rows referring to the Assembly Diagram. C Figure 4 5. Repeat steps 2 4 with remaining slashed A squares, adding a variety of B strips. Trim all pieced A-B units to 6" square to complete four one- stick blocks for row Repeat steps 1 4 with four more A squares and a variety of B strips. Do not trim A-B units. 7. Make a second diagonal slash in the opposite direction of the first cut in each A-B unit referring to Figure 5. Figure 9 Here s a Tip Variety is easy with this design. Switch the background color from white to gray, black or navy. For a larger quilt, increase the size of the base squares and sashing proportionally. Larger squares can handle more sticks. Figure 5 8. Insert a B strip between the pieces of the A-B unit lining up the first B strip halves (Figure 6). Press and trim A-B unit to make a 6" square two- stick block. Mix up the blocks instead of ordering them from least sticks to most sticks in rows. Cut the stick strips in a variety of widths. Add some fun to the quilt back by using leftover stick strips to piece the quilt back in a similar manner as the front blocks. Figure 6 9. Repeat steps 6 8 to make four two- stick blocks for row Arrange and stitch rows 1 4 together alternately with D sashing strips top to bottom referring to the Assembly Diagram. 13. For borders, stitch a D strip to the top and bottom of the quilt and E strips to opposite sides.

16 Sandwich batting between the pieced top and the prepared backing piece; baste layers together. Quilt as desired. 15. When quilting is complete, remove basting, and trim batting and backing even with raw edges of the pieced top. 16. Prepare binding and stitch to quilt front edges, matching raw edges, mitering corners and overlapping ends. Fold binding to back side and stitch in place to finish. I was inspired by the clean modern look this quilt gave with hints of color dancing through it. With two boys, my house is never clean, yet in the quilt, the chaos looked fun! Jackie White E D Pick Up Sticks Assembly Diagram 25" x 25"
17 16 Tidal Waves Design by Bev Getschel Quilted by Lynette Gelling Assorted blue prints cut in gentle curves against a solid background give the illusion of steadily moving waves. Specifications Skill Level: Intermediate Quilt Size: 60" x 85" Materials 6 fat quarters assorted blue and aqua prints 5/8 yard coordinating print 32/3 yards white solid Backing to size Batting to size Thread 18" x 22" rectangle freezer paper Basic sewing tools and supplies Project Note The construction techniques used in this book are meant to produce random results. No two blocks or quilts will look the same, and your results probably will not look like the sample provided. Finished block and quilt sizes are approximate, and your completed project may not be the same as size listed. Cutting From coordinating print: Cut 8 (21/4" by fabric width) binding strips. From solid white: Cut 2 (601/2" by fabric width) lengths. Subcut 6 (101/2" x 601/2") A strips, 2 (51/2" x 201/2") B strips and 1 (51/2" x 101/2") C strip. Assembly 1. With 18" edges at top and bottom, iron fat quarters and stack right sides up. Even up top and bottom edges of fat quarter stack (Figure 1). Position and iron freezer paper wax side down onto top of stack. 22" 18" Figure 1 2. Draw gentle curves across the width of the fat quarter stack dividing it into five curved sections (Figure 2). Draw first and last curved lines approximately 41/2 5" from the trimmed edges. 4 1 /2" 5" Figure /2" 5" Here s a Tip Use colored pencils to draw gentle curves on the freezer paper attached to the fat quarters. Remember curves look best if they mirror or echo each other. If you are unhappy with the curves, switch to a different color and redraw. Cut on the colored line you are happy with.

18
19 18 3. Using a new blade in your rotary cutter, cut along the drawn lines and carefully remove freezer paper from top layer of each curved section. 4. To shuffle colors, switch first layer in first section to bottom of layers; switch second layer in second section to bottom. Continue switching layers in this manner for all sections. 5. Choose the top layer piece from each section and arrange on a flat surface with curves matching. Use a removable fabric marker to draw matching marks across the cuts and make 1/8" clips on inside curves referring to Figure Continue to add sections; stitching, clipping and pressing seam flat each time. Assemble six curved rectangles. Note: The ends of the completed rectangle may be uneven. This will be trimmed later. 8. Cut three 51/2" x 21" D strips from each curve pieced rectangle referring to Figure 5. 21" 5 1 /2" D 9. Overlap short ends of D strips right sides up. Draw a shallow curve and cut through all layers referring to Figure 6a. Mark and stitch strips together as in steps 5 and 6 (Figure 6b). Press seams open. a. Figure 5 Figure 3 6. Pin and stitch two sections together matching marks (Figure 4). Clip curves again if necessary and press seam flat. Figure 4 Here s a Tip Those little marks across the cut edges of the curves are a big deal when sewing the curves together. Even gentle curves can be difficult to match without them. Generously pin the curves together perpendicular to the seam line matching the marks. Clip the inner curve edges in about 1/8" to provide more give when matching and pinning. Figure Continue to piece D strips together, trimming if necessary, to make two each 51/2" x 601/2" D1, 51/2" x 301/2" D2 and 51/2" x 101/2" D3, and one 51/2" x 501/2" D4 pieced strips. 11. Stitch D2, B and D3 strips together to make a D-B row referring to Figure 7; press seams open. Repeat to make two rows. 12. Stitch D4 and C together referring to Figure 8 to make one D-C row; press seams open. C b. D2 D-B Row Make 2 Figure 7 D-C Row Make 1 Figure Arrange and stitch the A strips and D1, D-B and D-C rows together referring to the Assembly Diagram; press seams open. D4 B D3

20 Sandwich batting between the pieced top and a prepared backing piece; baste layers together. Quilt as desired. 15. When quilting is complete, remove basting and trim batting and backing fabric even with raw edges of the pieced top squaring up quilt if necessary. Blue and white are a traditionally fresh and clean combination; in this case they are used in a modern design. The title of this book inspired me. This is a fun technique often used in art quilts. Bev Getschel Here s a Tip Quilter Lynette Gelling suggests doubling a border quilting design to fill the white areas with a repeat wave pattern to reflect the designer s theme of this modern quilt. 16. Prepare binding and stitch to quilt front edges, matching raw edges, mitering corners and overlapping ends. Fold binding to back side and stitch in place to finish. A D1 Tidal Waves Assembly Diagram 60" x 85"
Cutting. Construction CREAMS
 Size: "x " Size: "x " Quilter Basics Please read all instructions before beginning. Label your cut pieces All instructions use ¼" seam allowance. Press all seams toward dark fabric. CREAMS Cutting Fabric
THE FLOWER FAIRIES. This is a free pattern provided by The Red Boot Quilt Company 2017 STRICTLY NOT FOR RESALE OR DISTRIBUTION
 THE FLOWER FAIRIES This is a free pattern provided by The Red Boot Quilt Company 2017 STRICTLY NOT FOR RESALE OR DISTRIBUTION The Red Boot Quilt Company The Red Boot Quilt Company THE FLOWER FAIRIES Approx.
Canadian Quilters Association Pattern: Quilting Tools Tote Bag
 Canadian Quilters Association Pattern: Quilting Tools Tote Bag Description: * Size: 24 x 28", storage for: 6 x 24" ruler and 18 x 24" cutting mat, and all other equipment. * Easy to carry to workshops
Scooter Strips Wall Hanging
 Scooter Strips Wall Hanging This wall hanging is a quirky take on the traditional log cabin quilt block. It uses fabric of different widths to make the central block off-centre. Adding border strips to
Handful of Stars. by Kim Diehl. Finished Quilt Size: 621/2" x 621/2" Finished Star Block Size: 8" x 8" A Free Project Sheet from
 Handful of Stars by Kim Diehl Finished Quilt Size: 621/2" x 621/2" Finished Star Block Size: 8" x 8" A Free Project Sheet from 49 West 37th Street, New York, NY 10018 tel: 212-686-5194 fax: 212-532-3525
Folk-Art Dish Garden
 Folk-Art Dish Garden Designed by Kim Diehl Finished quilt size: 20½" x 24½" Finished center block size: 11½" x 15½" ~ 1 ~ Materials ⅝ yard of tan print #1 for background 1 chubby sixteenth (9" x 11") each
THE FLOWER FAIRIES. The Red Boot Quilt Company
 THE FLOWER FAIRIES The Red Boot Quilt Company www.theredbootquiltcompany.com THE FLOWER FAIRIES Approx. Size 62in x 61in BEFORE THE FUN BEGINS Please read all instructions before you begin. Abbreviations.
QTfabrics.com QT Fabrics All rights reserved Pg 1. Designed by: Georgie Gerl. SIZE 77" X 63" for ½"binding 76½" x 62½" for ¼" binding
 SIZE 77" X 63" for ½"binding 76½" x 62½" for ¼" binding Jerry Gadamus Pg 1 Finished Size: 77"x 63" 26649X One Panel FABRIC REQUIREMENTS 26652K 3/4YARD 26653 X 1/4 YARD 26650 R 1 5/8 or 2 YARDS 1 BOLT 1
Uses Contempo s Anything Goes collection by Ann Lauer Finished Size: 57 x 57
 2016 Benartex, LLC It s easy to create your own art quilt with Ann Lauer s exciting new Anything Goes collection. Just follow the simple instructions and you ll have a fresh new modern wallhanging, perfect
Crazy Love. Crazy Love fabrics designed by Jennifer Paganelli for FreeSpirit. Quilt designed by Marsha Evans Moore. Size: 50 x 70
 Crazy Love Crazy Love fabrics designed by Jennifer Paganelli for FreeSpirit Quilt designed by Marsha Evans Moore Size: 50 x 70 Materials required: Fat quarters or ¼ yard of 21-25 of the following Crazy
Accent on Amish Welcome!
 Quilt Along Accent on Amish Welcome! Designed by The Staff of McCall s Quilting Made and Machine Quilted by Sheryl Martin Skill Level Beginner Finished Quilt Size 44H x 44H Number of Blocks & Finished
Fanfare SIZE 63½" X 75½" quiltingtreasures.com Quilting Treasures All rights reserved. Pg 1. Designed by: Wendy Sheppard
 SIZE 63½" X 75½" Pg 1 Finished Size: 63½"x 75½" 26060 Z 2 YARDS FABRIC REQUIREMENTS 26061 Q 1/4 YARD 26062 Q 2/3 YARD 26062 Z backing only 4-5/8 YARDS 2 BOLTS 1 BOLT 1 BOLT 4 BOLTS 26063 Q 3/8 YARD 26063
SPRING MANDALA Cushion
 SPRING MANDALA Cushion The Red Boot Quilt Company SPRING MANDALA Quilt The Red Boot Quilt Company www.theredbootquiltcompany.com SPRING MANDALA QUILT & CUSHION Approx. size Quilt 56 1/2in x 56 1/2in Cushion
All a Flutter Table Runner
 SIZE 48½" X 21½" Pg 1 Finished Size: 48½" x 21½" 26358 R FABRIC REQUIREMENTS 26359 P 26359 Q 26360 Q piecing only 1 BOLT 1 BOLT 1 BOLT 1 BOLT 26360 Q backing only 1-5/8 YARDS 26360 R includes binding 5/8
Charmed. Finished Size 48 x 60 Finshed Block 9
 Charmed Finished Size 48 x 60 Finshed Block 9 Materials Needed: 3 1/2 yards of the brown floral (8786-9), for blocks and backing 1 1/4 yards of the brown stripe (8792-9) 1 1/4 yards of the pink butterfly
Linda Brown, Sue Dittler, Sandy Miller, Lucy Ricardo, and Carole Thommen
 Linda Brown, Sue Dittler, Sandy Miller, Lucy Ricardo, and Carole Thommen Edited by: Sharon Reilly Teena Livsey YO-YO s especially ornament balls By: Lucy Ricardo Supply list: Scraps of fabric 1 ½ circle
Scrappy Firework Quilts. by Edyta Sitar for Laundry Basket Quilts
 Free Project for more basic quilting resources and patterns visit landauerpub.com Sewing Box Originally published in the book Scrappy Firework Quilts by Edyta Sitar for Laundry Basket Quilts Photos, illustrations
Fabric and Supplies. Featuring fabrics from the Ellie II collection by Sue Penn for.
 s r e h t a e F Elegant Featuring fabrics from the Ellie II collection by Sue Penn for Finished Quilt Size 50" x 50" Quilt design by Abigail Dolinger for Studioe Fabrics ay Black Colorw Fabric and Supplies
Happy Winter Snowman Quilt
 1 Happy Winter Snowman Quilt This quilt is sure to become a classic addition to your décor at Christmas time. Rows of fun snowmen and loving hearts are highlighted against a deep blue winter sky. The quilt
Finished Size: 75"x 75"
 Finished Size: 75"x 75" Finished Size: 75"x 75" Block Size: 1"x1" and 6"x6" Quilters Basics Read instructions before beginning a project. All instructions include a ¼" seam allowance. Press as you go.
Family Pillow. Cutting Instructions For Letters. Number of 1.5" White Squares. F 3 2 (1) 1.5 x 4.5 (1) 1.5 x 3.5. A 4 4 (2) 1.5 x 3.
 1.5 x 4.5 (1) 1.5 x 3.5. A 4 4 (2) 1.5 x 3.") Materials Needed 1/3 Yard Solid White (letters, Border 1) 1/3 Yard Solid Navy (letters, Border 2) 1 Yard Damask Print (Border 3, envelope pillow back) 2 Yards White Muslin (quilt sandwich, pillow) Quilt
Materials Needed 1/3 Yard Solid White (letters, Border 1) 1/3 Yard Solid Navy (letters, Border 2) 1 Yard Damask Print (Border 3, envelope pillow back) 2 Yards White Muslin (quilt sandwich, pillow) Quilt
All a Flutter Quilt SIZE 64½" X 79½" QTfabrics.com QT Fabrics All rights reserved. Pg 1. Designed by: Wendy Sheppard
 SIZE 64½" X 79½" Pg 1 26358 R 1/3 YARD Finished Size: 64½" x 79½" FABRIC REQUIREMENTS 26359 P 26359 Q piecing only 26359 Q backing only 5 YARDS 1 BOLT 1 BOLT 1 BOLT 4 BOLTS 26360 Q 26360 R includes binding
Crescendo Pin Wheel Quilt
 Crescendo Pin Wheel Quilt Pinwheel quilts are the perfect example of a quilt pattern inspired by a real object. Whimsical and decorative, pinwheel quilts create gorgeous motifs that any quilter will love.
Original Recipe. Original Recipe can be found at
 Original Recipe My name is Erica Jackman and I blog over at Kitchen Table Quilting. I am so happy to be sharing this project with you and I hope that you enjoy this fun little project that brings lots
Pixel Pillow Skill Level: Beginner
 Pixel Pillow Skill Level: Beginner Designed By Kati Spencer Sewn By Kati Spencer www.fromthebluechair.com This pillow is the perfect introduction to pixel piecing using very small squares. Sample use Essex
Cheri Good Quilt Design s Ribbon Star
 Cheri Good Quilt Design s Ribbon Star Designer: Cheri Good Quilt Designs Ribbon Star Size 56 x 56 #110A Ribbon Star Strip Quilt Supplies Finished quilt size: 56 x 56 Cotton thread to match fabrics Basic
Sewing Spools Wall Quilt
 Sewing Spools Wall Quilt Display a four-block wall hanging showcasing thread spool and sewing machine designs in your sewing space. Fabrics are from the Winsome collection by Kim Diehl for Henry Glass
Love Grows Here Quilt
 SIZE 67½" X 81½" Pg 1 Finished Size: 67½"x 81½" 26298 H one 24 repeat 2/3 YARD Numbers within gray box = Number of Bolts needed to make 12 kits; based on continuous cuts FABRIC REQUIREMENTS 26299 H 7/8
A Star in the Forest Table Topper 23 x 23 - A fat quarter project
 A Star in the Forest Table Topper 23 x 23 - A fat quarter project Read instructions before beginning. This project requires six fat quarters plus ¾ yard of backing fabric. Binding comes from one of the
Chili Pepper Quilt Patterns
 Chili Pepper Quilt Patterns Free Pattern ~ Cry Baby ~ Instructions Page 1 Chili Pepper Quilt Patterns ~ Cry Baby ~ Crib Quilt Finished Size: 39.5" x 50.5" Fabric A 1 st Bright Fabric Fabric B 2 nd Bright
Daisy Pocket Quilt. Sorting summertime items is easier with this simple pocket quilt. Completing the Quilt. Cutting
 Daisy Pocket Quilt Sorting summertime items is easier with this simple pocket quilt. DESIGN BY PHYLLIS DOBBS PROJECT SPECIFICTIONS Skill Level: Beginner Quilt Size: 42" x 52" MTERILS 2/3 yard multicolored
BUTTERFLY GARDEN. The Red Boot Quilt Company
 BUTTERFLY GARDEN The Red Boot Quilt Company www.theredbootquiltcompany.com BUTTERFLY GARDEN Approx. Size 89 1/2in length x 92 1/2in width BEFORE THE FUN BEGINS Please read all instructions before you begin.
Sondalo Table Runner
 www.fabriceditions.com Sondalo Table Runner Finished Size: 14½" x 54½" Supp lies Needed 2 Fabric Palette Sondalo Fat Quarter Bundles (18" x 21") (10 different designs) 16" x 56" Low-loft batting 17" x
Kimono Collection MATERIALS. Finished quilt size CUTTING
 Kimono Collection Colourful Japanese fabrics take the place of traditional paper in these tiny origami kimonos and a simple nine-patch quilt shows them off to perfection. MATERIALS Nine pieces of assorted
Finished Size: 60 x70
 Finished Size: 60 x70 Finished Size: 60" x 70" Finished Block Size: 10" x 10" Cutting Label pieces as they are cut Quilters Basics Read instructions before beginning a project. All instructions include
Beautiful Bouquet. Designed by Heidi Pridemore. Page All Rights Reserved The Whimsical Workshop
 O - 3/5/12 Designed by Heidi Pridemore #FR-032 Fabric Requirements: 1/3 yard of Green- for all 1/3 yard of Yellow- Daisy 1/3 yard of Orange- Daisy 1/4 yard of Pink- Poppy 1/4 yard of Yellow Print- Poppy
Section 1, Center Section Make One. Fabric Fabric # of Cutting Directions ID Location Strips
 Please read all instructions carefully prior to beginning quilt. All piecing uses a very accurate scant quarter inch seam allowance. In this quilt, accuracy is absolutely critical, so sew several sample
Blue Scrapflower Quilt
 1 Blue Scrapflower Quilt This fresh and colourful quilt uses only one block but because it is made in twenty-four different colourways, it gives the quilt a charming scrappy look. The quilt has a lovely
READY. SET. FAN FAVORITES PATTERNS
 READY. SET. FAN FAVORITES PATTERNS USING THE ACCUQUILT GO! GO! Big and GO! Fabric Cutter Friendly 4 FREE patterns $ 15 Value GO! Talk to the Animals Baby Quilt featuring Riley Blake Designs Fabric Download
LIVE.LOVE.SEW FEATURE BLOCKS B.O.M PROGRAM
 LIVE.LOVE.SEW FEATURE BLOCKS B.O.M PROGRAM FEATURE BLOCKS Congratulations on finishing your twelve Feature Blocks! It has been so much fun sewing along with you all this past year, learning more about
BABY QUILTS Using the AccuQuilt GO!
 Ready, Set, GO! BABY QUILTS Using the AccuQuilt GO! 7 FREE patterns INSIDE GO! Talk to the Animals Baby Quilt featuring Riley Blake Designs Fabric GO! Big & GO! Fabric Cutter Friendly 2017 AccuQuilt to
Artsy Bag. materials and tools. materials and tools
 materials and tools Created by Pat Bravo materials and tools ½ yard of main fabric* ½ yard of lining fabric* Pink, yellow, and blue fabric scraps* ½ yard of quilt batting 10 square of non-woven, ultralightweight
Love Always Quilt. Additional Supp lies Needed. Fabrics Needed. Finished Size: 44" x 58 ½" (113.03cm x cm)
") Love Always Quilt Finished Size: 44" x 58 ½" (113.03cm x 148.59cm) Fabrics Needed 3 Wishes Fabric Love Always Collection 1 Panel 13819-Multi (Bird & Flower Panel) 1 yd. (91.44cm) 13823-Purple (Purple Tonal)
Love Always Quilt Finished Size: 44" x 58 ½" (113.03cm x 148.59cm) Fabrics Needed 3 Wishes Fabric Love Always Collection 1 Panel 13819-Multi (Bird & Flower Panel) 1 yd. (91.44cm) 13823-Purple (Purple Tonal)
Old Glory One Stamp. Alternate Piano Key Border. Morning Glory Designs by Reeze L. Hanson Quilts of Valor Pattern 65 x 79
 Old Glory One Stamp Alternate Piano Key Border Morning Glory Designs by Reeze L. Hanson Quilts of Valor Pattern 65 x 79 Instructions for cutting and piecing Quilt Panel and Border 1 1. Trim the quilt panel
Coastal Chic Batiks Collection by Monique Jacobs
 FREE Quilt Pattern 52" x 65" quilt designed by Monique Jacobs Coastal Chic Batiks Collection by Monique Jacobs Coastal Chic Batik Quilt Instructions For best results, read the pattern completely first.
Daily Grind. Designed by: Janet Wecker Frisch. Approximate napkin size: 17 X 17. Approximate quilt size: 61 X 61
 Daily Grind Designed by: Janet Wecker Frisch Approximate quilt size: 6 X 6 Approximate napkin size: 7 X 7 2673 A 2674 A backing 2676 AJ also binding 2676 E Ap r 2672 A on :o ne si ze fit s m os t Approximate
Cut squares as indicated:
 Quilt Designed by Deb Mosa Finished Quilt Approx. 68 x 80 - Finished Block Size: 12 x 12 Night Owls fabrics by Exclusively Quilters - Style #3804 Fabric Requirements: Based on 42 wide fabric 2-1/4 yards
Make Templates: Trace templates onto template plastic. Cut out and label.
 Quilt Designed by Deb Mosa Finished Quilt Approx. 70 x 70 - Finished Center Size: 48 x 48 Cotillion fabrics by Exclusively Quilters - Style #3999 Fabric Requirements: Based on 44" wide fabric 3-3/4 yards
Christine Graf. Sausalito. Finished Quilt Size: 46½ x 54½. Finished Pillow Size: 18 x 18.
 Finished Quilt Size: 46½ x 54½ Finished Pillow Size: 18 x 18 22220 R 22221 S 22221 E 22216 J 22217 O 22221 O 22218 J 22220 G 22218 Z 22213 J 22215 J Sausalito Quilt FABRIC REQUIREMENTS Design Yards 22220
Central. Fabric. Dot to Dot Quilt. Supplies Needed. Instructions. Skill Level 2: Experience necessary. Project Instructions
 Fabric Project Instructions Central Dot to Dot Quilt Skill Level 2: Experience necessary Crafting Time: Weekend Project Supplies Needed 1 Fabric Central Dot Bundle 1 1 Fabric Central Dot Bundle 2 Fabric
Kitchen Crafts Hot Potatoes
 Half Apron Size: 28 W x 31 H Pot Holder Size: 9 x 6 ½ Placemat Size: 18 x 13 Tote Bag with Pockets Size: 21 W x 16 H x 6 D Designed by: Phyllis Dobbs Skill Level:Beginner Toaster Cover Size: 11 W x 8 H
Floral Frenzy Pillow. Time to Sew! Created By: Alison O Grady Level: Confident Beginner Time: 2-3 Hours
 Created By: Alison O Grady Level: Confident Beginner Time: 2-3 Hours Sewing is fun! Set aside some time out of your day to make this easy, no fuss pillow that showcases many great features of the Horizon
Floral Half Apron with Slash Pockets
 Published on Sew4Home Floral Half Apron with Slash Pockets Editor: Liz Johnson Monday, 03 July 2017 1:00 It may be a half apron, but it s full of pretty details. For yourself or as a delightfully easy
LITTLE BEARS. The Red Boot Quilt Company
 LITTLE BEARS The Red Boot Quilt Company www.theredbootquiltcompany.com LITTLE BEARS Approx. Size 68 1/2in x 70 1/2in BEFORE THE FUN BEGINS Please read all instructions before you begin. Abbreviations.
Fox Fun Mug Rug H I J. Figure 1
 one day only DESIGN BY JOANNA WILCZYNSKA Fox Fun Mug Rug Good things come in small packages. Create a cute coaster that may end up on a wall instead. ScRap- FRIENDLY PROJECT SPECIFICATIONS Skill Level:
 Bella! Finished Quilt Size 43" x 43" Featuring fabrics from the Bella Flora collection by Project Fabric Requirements 1550-33... 5 8 Yard 1551-66... 1 8 Yard 1552-33... ½ Yard 1553-33... ½ Yard 1554-33...
PLANNER COVER BY SARAH THOMAS OF SARIDITTY
 XXy asdf asdfy XXX Star Blazer PLANNER COVER BY SARAH THOMAS OF SARIDITTY Thank you for downloading this pattern for your Quilter s Planner. Sarah originally developed her Star Blazer Mini for Modern Quilts
Sapphire Sapphire Fabric Requirements: Cutting Directions:
 Quilt Designed by Deb Mosa Finished Quilt Approx. x - Finished Block Size: x Sapphire fabrics by Exclusively Quilters - Style #90 Fabric Requirements: Based on wi fabric -/ yards large (#00-0) yards (#00-)
BAUBLES & BEADS. Quick & Easy Machine Piecing Techniques P109. FINISHED SIZE: 73 1/2" x 87" Designed by Annis Clapp Machine Quilted by Donna Akins
 BAUBLES & BEADS P109 Quick & Easy Machine Piecing Techniques FINISHED SIZE: 73 1/2" x 87" Designed by Annis Clapp Machine Quilted by Donna Akins fast2sew Ultimate Seam Guide BAUBLES & BEADS Read all instructions
Sunny Sue Baby Quilt
 Sunny Sue Baby Quilt Designed & Quilted by Julie Weaver Use with: GO! Big GO! GO! Baby Make a nostalgic baby quilt that will surely please a new mother. The Sunbonnet Sue die makes cutting a breeze and
Sassy Runner. Design by Wendy Sheppard Skill Level: Confident Beginner Number of Blocks: 8 Block Size: 8" x 8" (finished) quiltingtreasures.
 quiltingtreasures.") Approximate Size: 24½" x 42¼" Design by Wendy Sheppard Skill Level: Confident Beginner Number of Blocks: 8 Block Size: 8" x 8" (finished) 1 Studio 8 FABRIC REQUIREMENTS 24194 W 24195 N 24196 S 24196 N
Approximate Size: 24½" x 42¼" Design by Wendy Sheppard Skill Level: Confident Beginner Number of Blocks: 8 Block Size: 8" x 8" (finished) 1 Studio 8 FABRIC REQUIREMENTS 24194 W 24195 N 24196 S 24196 N
Top 5 Favorite Free Sewing Patterns featuring a pattern from our friends at Riley Blake!
 ALLFREESEWING Top 5 Favorite Free Sewing Patterns featuring a pattern from our friends at Riley Blake! 1 Top 5 Favorite Free Sewing Patterns Copyright 2017 by Prime Publishing LLC All rights reserved.
set; press. Repeat to make 17 strip sets. Cut each strip set into 8 (21/2" x 41/2") B segments as shown in Figure 1.
 B segments as shown in Figure 1.") DESIGN BY SUE HARVEY Posy Patch Frayed edges form the petals in this garden of pastel posies. SPECIFICATIONS Skill Level: Confident Beginner Quilt Size: 56" x 72" Block Size: 8" x 8" Number of Blocks:
DESIGN BY SUE HARVEY Posy Patch Frayed edges form the petals in this garden of pastel posies. SPECIFICATIONS Skill Level: Confident Beginner Quilt Size: 56" x 72" Block Size: 8" x 8" Number of Blocks:
Notes - Please wash, dry & iron your fabric before beginning. - Sew all seams with an accurate 1/4 seam allowance. CUTTING INSTRUCTIONS
 Notes - Please wash, dry & iron your fabric before beginning. - Sew all seams with an accurate 1/4 seam allowance. CUTTING INSTRUCTIONS Indicates fabric pattern is directional on strips Fabric A: Horizontal
Color Wheel Patchwork Tree Skirt
 Published on Sew4Home Color Wheel Patchwork Tree Skirt Editor: Liz Johnson Tuesday, 10 November 2015 1:00 This is one of our favorite holiday projects. Maybe because the tree skirt is a Christmas classic.
Greek Square Table Runner
 Greek Square Table Runner Quilt Finished Size: 70-1/2" x 25-1/2" Block Finished Size: 12" Printing Options: Printer-Friendly Web Page or PDF Fabric Requirements: Dark: 1 yard Medium: 3/4 yard Light: 3/4
Cut squares as indicated:
 Quilt by Deb Mosa Finished Quilt Approximately: 52" x 52" - Finished Block Size: 9" x 9" Cupcake Cuties fabrics by Exclusively Quilters - Style #3893 Fabric Requirements: Based on 44" wide fabric 7/8 yard
Frou Frou Bag Intermediate
 Frou Frou Bag Intermediate Sewn By Sara Lawson http://www.sewsweetness.com This bag features ruffled flaps, snap closure and an adjustable strap. The small front pockets are 3-dimensional. Beautiful detailing
Little Aurora Borealis Quilt Size: 40 x 56 Design by: Marinda Stewart Level: CONFIDENT BEGINNER
 Little Aurora Borealis Quilt Size: 40 x 56 Design by: Marinda Stewart Level: CONFIDENT BEGINNER Free Pattern available on michaelmillerfabrics.com FABRIC REQUIREMENTS CX6574 Lipstick 7/8 yard CX6574 Fuchsia
- 1 - Sewing Directions: 1. Trim each 8-1/2 square with the Outer Edge Template. Trim each 6-1/2 square with the Quarter Circle Template.
 Quilt Designed by Lucy A. Fazely Finished Quilt Approx. 70 x 80 - Finished Block Size: 8 x 8 Sing the Blues fabrics by Exclusively Quilters - Style #4039 Fabric Requirements: Based on 42 wide fabric 1-2/3
Select nine fabrics that go nicely together. 1 light, 4 medium, and 4 dark prints.
 Kathy s Version of the Disappearing Nine Patch Quilt 46 ½ x 64 ½ This version uses nine fabrics, is stripped pieced, and has side borders only. As simple as pie to make and yet so warm and cozy. Use the
I Heart You Quilt By Ellen March for Sulky of America Featuring Spoonflower fabrics
 I Heart You Quilt By Ellen March for Sulky of America Featuring Spoonflower fabrics Quilt measurement: 6 x 0-/ Quilting done by Crystal Zagnoli of the Quilted Cricket Original Design for Sulky of America
Susannah Bee Quilt. Quilt designed by Terri Butler Finished size is approximately 43" x 60" A DIVISION OF HAMIL GROUP
 Susannah Bee Quilt Quilt designed by Terri Butler Finished size is approximately 43" x 60" A DIVISION OF HAMIL GROUP Quilt designed by Terri Butler Materials and Cutting Note: WOF is width of fabric from
A SPOOKY SLEEPOVER. This is a free pattern provided by The Red Boot Quilt Company The Red Boot Quilt Company
 A SPOOKY SLEEPOVER The Red Boot Quilt Company The Red Boot Quilt Company A SPOOKY SLEEPOVER Approx. Size 38 1/2in x 57 1/2in BEFORE THE FUN BEGINS Please read all instructions before you begin. Abbreviations.
Encircled Throw Quilt Pattern
 Pattern Instructions Encircled Throw Quilt Pattern Geometrics are a favorite with quilters, with circles being a coveted favorite. This charming quilt pattern is designed to work with the Circles Sew Simple
READY. SET. QUICK & EASY PATTERNS
 READY. SET. QUICK & EASY PATTERNS USING THE ACCUQUILT GO! GO! Big and GO! Fabric Cutter Friendly 6 FREE patterns INSIDE GO! X Marks the Spot Baby Quilt featuring Riley Blake Designs Fabrics Download FREE
Union Jack Variation Free Pattern Approximately 75-3/8 x 57
 Paper Pieces P.O. Box 68 Sycamore, IL 60178 Paper Pieces Precut Paper Shapes for English Paper Piecing 1-800-337-1537 US ONLY 1-815-899-0925 1-815-899-2900 Fax or Direct Line Union Jack Variation Free
Be sure to read the entire pattern before beginning. All seam allowances are ¼-inch. Press seams to one side. WOF = Width of Fabric
 Sophia Sophia is a blazing star quilt variation featuring fabrics inspired by Jinny s travels to Ukraine. The stars are beautifully shaded and the quilt also boasts intricate-looking but easy-to-make medallions
Happy Hot Dogs. 52 x 52 Quilt (8 ½ blocks)
") Happy Hot Dogs By 52 x 52 Quilt (8 ½ blocks) Cut 2 8 ½ strips white flower fabric, cut into 5 8 ½ squares Cut 1 8 ½ strip aqua flower fabric, cut into 4 8 ½ squares Cut 1 8 ½ strip white focal fabric,
Happy Hot Dogs By 52 x 52 Quilt (8 ½ blocks) Cut 2 8 ½ strips white flower fabric, cut into 5 8 ½ squares Cut 1 8 ½ strip aqua flower fabric, cut into 4 8 ½ squares Cut 1 8 ½ strip white focal fabric,
Wrap your favorite novel in a quilted cover to protect it and turn heads. It adjusts to fit any size paperback and has a handy bookmark.
 DESIGNED & QUILTED BY CINZIA ALLOCCA Mini Quilt Bookwrap SPECIFICATIONS Skill Level: Confident Beginner Bookwrap Size: 17" x 9" (excluding ties and bookmark) Wrap your favorite novel in a quilted cover
Vintage Turnovers. by Cute Quilt Patterns. Approximate Finished Size is 40 1/4 x 45
 Vintage Turnovers by Cute Quilt Patterns Approximate Finished Size is 40 1/4 x 45 This nostalgic quilt will remind you of days gone by. It is pieced quickly using 6 turnovers. With two pieced vertical
Materials for Peppermint Candy Pillow
 Peppermint Candy Pillow Tutorial This adorable Peppermint Candy Pillow by BERNINA Ambassador Nancy Mahoney will give your decor a new look, whether for your bed or a decorative pillow for your couch. The
PRETTY IN PINK. The Red Boot Quilt Company. This is a free pattern provided by The Red Boot Quilt Company 2017 STRICTLY NOT FOR RESALE OR DISTRIBUTION
 PRETTY IN PINK This is a free pattern provided by The Red Boot Quilt Company 2017 STRICTLY NOT FOR RESALE OR DISTRIBUTION The Red Boot Quilt Company The Red Boot Quilt Company PRETTY IN PINK Approx. Size
Creative Living with Sheryl Borden 6100 Series. Sewing & Fashion - Section I
 Creative Living with Sheryl Borden 6100 Series Sewing & Fashion - Section I Table of Contents Sewing & Fashion It s Hip to Be Square...I-3 Whirlin Dervish...I-3 Crayon Rolls...I-4 An Easy Way to Draw a
Original Recipe. Windy Days Quilt by Sarah Meyer
 Original Recipe Windy Days Quilt by Sarah Meyer Hi! I'm Sarah of SarahB Designs {sew.sarahbdesigns.net} and I'm so happy to bring you another fun Moda precut recipe! The classic pinwheel pattern is one
Escape Mini Bags Finished size: 8" x 10" x 2" Makes 2 Bags
 TM Escape Mini Bags Finished size: 8" x 10" x 2" Makes 2 Bags SUPPLIES NEEDED 2-1 Yard Cottons (Escape Brown Floral and ) 2 - ¼ Yard Cottons (Escape Green Floral) 3 8 yd. Pellon 987F Fusible Fleece 1 ½
Timber! Reading Pillow
 Timber! Reading Pillow Designed by Rachel Rossi Downloadable Version For more great patterns, fabrics, & tutorials be sure to visit www.rachelrossi.design Please Do not reproduce this pattern or create
Denim Collection. The fabrics capture the softness and texture of worn denim and feature both quiet and bold colors.
 Denim Collection Denim Star features fabrics from Jinny Beyer s Denim collection of almost-solids. The fabrics capture the softness and texture of worn denim and feature both quiet and bold colors. It
Under The S ea Table Runner
 Finished Size: 12" x 48" (30.48cm x 121.92cm) Under The S ea Supp lies Needed B efore you begin 3 Wishes Fabric Under the Sea Collection 1 yd. (91.44cm) 12281-Lt. Blue 3 8 yd. (34.29cm) 12289-Lt. Blue
SUNSHINE & DAISIES. The Red Boot Quilt Company
 SUNSHINE & DAISIES This is a free pattern provided by The Red Boot Quilt Company 2015 STRICTLY NOT FOR RESALE OR DISTRIBUTION The Red Boot Quilt Company www.theredbootquiltcompany.com SUNSHINE & DAISIES
Silver, slate, gunmetal, graphite. There are so many shades of gray. Tiny touches of color in blocks and binding add extra zing to an otherwise
 Silver, slate, gunmetal, graphite. There are so many shades of gray. Tiny touches of color in blocks and binding add extra zing to an otherwise monochrome quilt made with solid fabrics. PROJECTS All About
Apple Pie Contest Set
 DESIGN BY CRIS MALONE Apple Pie Contest Set SPECIFICATIONS Skill Level: Beginner Wall anging Size: " x " Pot older Size: 7" x 7" The apple pie baking contest is a big deal at designer Chris Malone s local
Impulse. 1/4 yard each very dark green (A), dark green (B),
, dark green (B),") design by LUCY A. FAZELY & MICHAEL L. BURNS Purple/Blue Impulse 12" x 12" Block Make 12 Blue/Green Impulse 12" x 12" Block Make 12 Orange/Red/Green Impulse 12" x 12" Block Make 12 Red/Purple Impulse 12"
design by LUCY A. FAZELY & MICHAEL L. BURNS Purple/Blue Impulse 12" x 12" Block Make 12 Blue/Green Impulse 12" x 12" Block Make 12 Orange/Red/Green Impulse 12" x 12" Block Make 12 Red/Purple Impulse 12"
Every Blooming Thing By Jill Finley
 Every Blooming Thing By Jill Finley Finished Size: 39 x 42 This charming little quilt has some piecing to create the watering can and flower border, but the focal point here is the beautiful appliqued
Cutting: From the background fabric, cut: From the roof fabric, cut: You'll also need to cut 9 cornerstones, 1" x 1". Make the birdhouse blocks:
 Hi there! I'm Jen Daly and I'm so happy to be back at the Moda Bake Shop today with my new mini charm pack project, Home Tweet Home. If you're feeling a little winter-weary, this sweet mini quilt is the
59 x 74 quilt designed by Judy Livingston Graceful Moments fabric collection by Maywood Studio
 Graceful Stars 59 x 74 quilt designed by Judy Livingston Graceful Moments fabric collection by Maywood Studio Graceful Stars (59 x 74 ) Quilt Quilt designed by Judy Livinston. Graceful Moments fabric collection
Ruffle Bunnies: Fun Appliqué Kitchen Towels
 Published on Sew4Home Ruffle Bunnies: Fun Appliqué Kitchen Towels Editor: Liz Johnson Monday, 06 March 2017 1:00 These kitchen towel Ruffle Bunnies are ready to hop-to-it and help with your dish drying.
SIZE: 55 1/2 W x 55 1/2 H QUILT DESIGNED BY marsha evans moore
 Date: Jan.28.16 nebula SIZE: 55 1/2 W x 55 1/2 H QUILT DESIGNED BY marsha evans moore FBRIC REQUIREMENTS Backing: 3 1/4 Yards K1302 Black 2 yards K1149 Dark Red 1/2 yard K1145 Light Red 5/8 yard K1226
Project: Sewing Spools Wall Quilt
 inspired by Stitcher s Studio from designer Alexia Marcelle Abegg of Green Bee Patterns (Alexiaabegg.squarespace.com) quilt tester: Laura Boehnke Display a four-block wall hanging showcasing thread spool
MODERNOLOGY FEATURING COLLECTION DESIGNED WITH LOVE BY
 { FEATURING MODERNOLOGY COLLECTION FREE PROJECT SHEET DESIGNED WITH LOVE BY } QUILT DESIGNED WITH LOVE BY Finished Size: 83" 90" BLOCK Size: 6" 6" sashing: 1" To download the instructions for this pattern