Filigree Pillow. Copyright 2010 Kaleidoscope Collections, LLC. All rights reserved.
|
|
|
- Delphia Welch
- 5 years ago
- Views:
Transcription
1 Filigree Pillow Copyright 2010 Kaleidoscope Collections, LLC. All rights reserved. Kaleidoscope Collections, LLC, PO Box , Fort Collins, CO PH: FAX: Website:


2 1 Filigree Pillow Materials Kaleidoscope Collections Kaleidoscope Kreator 3 Kaleidoscope Collections Filigrees Template Mini-Pack PC with inkjet printer Digital photo 3 sheets of 8½ x 11 cotton poplin inkjet fabric Fusible web Fat quarter of gold cotton fabric ½ yard of maroon cotton fabric 16¼ x 16¼ fusible fleece 16 pillow form Decorative rayon thread and quilting thread Note: Because color varies from printer to printer, we recommend that you first print the kaleidoscopes onto the fabric sheets, then select tonal fabrics to coordinate with the printed image. Trying to match inkjet prints to already chosen fabric will result in a lot of wasted ink and fabric sheets! On the Computer 1. Choose a photo based on the colors, not the subject. In Kaleidoscope Kreator, open the digital photo with File>Open Image. 2. Select a Filigree template shape. Click on the Select Kaleidoscope Shape button in the Toolbar (the button that looks like a pie wedge) to bring up the template shape selector. Click on the checkbox next to Filigrees under the Template Pack heading in the left column. Also, click the checkbox next to 16 under Number of Segments. (Figure 1) Then doubleclick on any 16-segment filigree shape to select. (The sample pillow was made with Filigree 4 (16).) 3. Create a kaleidoscope design. Move, rotate and/or resize the photo in the workspace and watch the Kaleidoscope Preview in the upper right corner of the screen. (Figure 2) Every time you move the photo in the workspace, the Preview will update with the current design based on the position of the photo in the template. Click on the Kaleidoscope Preview if you want to see a full-screen preview of the kaleidoscope.

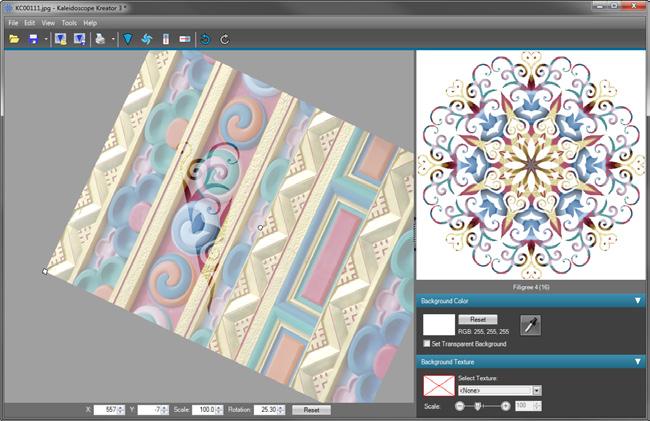
3 2 Figure 1. Figure 2.
4 3 4. Design the background fabric that will appear around and behind the filigree shape. There are two steps to designing the background: choosing a color and choosing a texture. a. To select a background color, click on the eyedropper button in the Background Color palette. Next, click on the photo in the workspace on a color that you think will complement the kaleidoscope design. The background color will change as soon as you click on the photo. (Figure 3) If you don t like the color, simply click on the eyedropper again and then on the photo. Repeat until you are happy with the color. b. To choose a texture, click on the Select Texture pull-down menu in the Background Texture palette. This will display a list of pre-defined textures. Choose a texture that won t compete with the kaleidoscope design. The Marble texture was used for this particular project. (Figure 4) You can adjust the scale of the texture with the Scale slider, if desired. Tip: After adding the texture, the color that you chose may appear muted. If so, you can adjust the background color by clicking on the color swatch in the Background Color palette. This will bring up the Select Color dialog box. To increase the intensity of the color, you will want to increase the saturation. Figure 5 shows that the color that was initially chosen for the background has a Saturation=218. The highest saturation value is 255. (Remember, you can always undo any change you don t like with the Undo button in the Toolbar.) Figure 3.

 Use File>Save Kaleidoscope to save the kaleidoscope design as a JPEG file as well, using the same base name as the workspace file.")
5 4 Figure Save your kaleidoscope design. Use File>Save Workspace to save your kaleidoscope design as a workspace file on your hard drive. A workspace file has a.kk3 extension and stores everything about your kaleidoscope design so that you can open it again later in Kaleidoscope Kreator. Save the workspace file using a name and location that will make it easy to find later. Figure 5. (Optional) Use File>Save Kaleidoscope to save the kaleidoscope design as a JPEG file as well, using the same base name as the workspace file. Having a corresponding JPEG file for each workspace allows you to quickly see the design in the thumbnail view of Windows Explorer, and makes it easier to manage your saved workspaces. Since this doesn t need to be a high-resolution image, a size of 400 or 600 pixels is sufficient.

6 5 6. Print three copies of the kaleidoscope onto inkjet fabric. This is accomplished through the Print Multiple function. Click on the little arrow next to the Print Kaleidoscope button in the Toolbar and choose Print Multiple to bring up the Print Multiple window. a. Make sure Maintain Proportions at the top left is checked, then enter 7.75 inches for the Width. (The Height will automatically update.) Enter a quantity of 1 and click the Add button. (Figure 6) b. Still in the Kaleidoscope Size section, change the Width to 6.25 inches. Enter a quantity of 2 and click the Add button. You will not see these kaleidoscopes appear immediately in the preview because they don t fit on the first page. Click on the right arrow button below the preview to see the second and third pages. (Figure 7) c. Uncheck Print Margins and Show Cutlines. d. Choose your printer in the Printer Settings section in the upper right of the window and click the Properties button to set the printer properties according to the inkjet fabric manufacturer s recommendations. Then click OK. e. In the Page Settings section in the lower right, set the Top and Left Margins to 0.25 inches. f. Click the Print button at the bottom right of the window to start printing. This will send all three pages to the printer. Put only one sheet of fabric in the printer at a time. Once the first page has printed, the printer will complain that it is out of paper. Simply put in the next fabric sheet at that time. Figure 6.

7 6 Figure 7. Cutting 1. From the gold fabric, cut: One 14¼ x 14¼ square 2. From the maroon fabric, cut: Two 1¾ x 14¼ strips for the outside border Two 1¾ x 16¾ strips for the outside border Two 12½ x 16¾ rectangles for the pillow back 3. Prepare the inkjet fabric for trimming. Peel the paper off of the inkjet fabric and follow the manufacturer s instructions to set the ink. Let fabric dry (if rinsed) and then apply fusible web to the back of each printed kaleidoscope. Make sure that the fusible web completely covers the printed edges of the kaleidoscopes. 4. Trim the kaleidoscopes. Trim away all of the white fabric around the printed kaleidoscopes. You don t need to worry about a seam allowance since they will be fused. Trim right on the printed edges. 5. Cut the smaller kaleidoscopes in half diagonally. For each of the smaller kaleidoscopes (the 6.25 kaleidoscopes), cut in half from corner to corner to create four half-square triangles.
 Open and place face up on ironing surface. You should be able to see the fold marks enough for placement of the kaleidoscopes, but not so much that the crease cannot be ironed out. 2.")
 The corners of the kaleidoscope should line up with the fold lines in the gold square. 3. Arrange the kaleidoscope triangles face up in the corners of the gold square.")

8 7 Assembly 1. Create placement lines on the gold fabric. First, fold the fold square in half vertically and gently finger press. Open the square and then fold in half again, this time horizontally. (Figure 8) Open and place face up on ironing surface. You should be able to see the fold marks enough for placement of the kaleidoscopes, but not so much that the crease cannot be ironed out. 2. Place the large (7¾ x 7¾ ) kaleidoscope on point in the center of the gold square. Place the kaleidoscope face up (with the fusible side towards the gold fabric.) The corners of the kaleidoscope should line up with the fold lines in the gold square. 3. Arrange the kaleidoscope triangles face up in the corners of the gold square. You will need to eye-ball this placement. The two sharp corners of the triangle should touch at the fold marks of the gold fabric. There will be about ½ between the edges of the center kaleidoscope and the long edges of the triangles. See Figure 9 for placement. 4. Fuse the kaleidoscopes to the gold fabric. Once you are happy with the placement of the kaleidsocopes, fuse them to the gold fabric. Tip: Don t use the cotton setting on your iron when working with inkjet printed fabrics as some inks may yellow if too much heat is applied. I have found that the medium (i.e. wool) setting works well. 5. Sew on the maroon border. First sew the 1¾ x 14¼ strips to the each side of the gold square (using a ¼ seam allowance). Press the seam allowances towards the maroon fabric. Then sew the 1¾ x 16¾ strips to the top and bottom. (Figure 10) 6. Applique around the edges of the kaleidoscopes. Use a decorative thread that closely matches the background color of the kaleidoscopes so as not to compete with the kaleidoscope design itself. (Figure 11 shows the applique stitches with maroon thread to match the kaleidoscope background color.) Figure 9. Figure 10. Figure 8.
 There should be about ¼ of maroon border extending past the fusible fleece on all sides.")

9 8 7. Apply fusible fleece to back. Place pillow top face down on ironing surface. Center the fusible fleece (with fusible side down) on pillow top. (The wrong side of the pillow and the fusible side of the fleece should be facing each other.) There should be about ¼ of maroon border extending past the fusible fleece on all sides. Fuse according to the manufacturer s directions. 8. Add decorative stitches to the pillow top and quilt as desired. Consider using some of the fancy stitches that come with your sewing machine to embellish the gold sashing strips between the kaleidoscopes. Figure 11 shows decorative stitches in gold. 9. Finish the pillow backs. Fold back ¼ (wrong sides together) along one 16¾ side of a 12½ x 16¾ piece of maroon fabric. Press. Fold under another 1 and press. Stitch just inside the ¼ fold to finish the edge. (Figure 12) Repeat for the second piece of 12½ x 16¾ maroon fabric. 10. Place the quilted pillow top face up on work surface. Place one of the pillow back pieces face down with finished edge positioned vertically and raw edges lined up with pillow top. Place second pillow back piece face down with raw edges lined up on opposite sides from the first piece. The back pieces should overlap roughly 4-6. (Figure 13) Pin in place and stitch around the outside edge with a ⅜ seam allowance. Note: In Figure 13, the side of the fabric with the butterflies is the wrong side of the fabric for this particular project. The pillow top and back pieces should be placed right sides together! 11. Trim the corners diagonally to remove bulk and turn pillow case inside out. Press and insert the pillow form. Figure 11. Figure 12. Figure 13.
Iris Table Topper/Back to Front Binding Tutorial Skill Level: Beginner
 Iris Table per/back to Front Binding Tutorial Skill Level: Beginner Designed by Alexandra Henry Made by Alexandra Henry www.artbyalexa.com This spring table topper will be a welcome addition to any decor.
Loves me Loves me not Designed and made by Suzan Pons
 Loves me Loves me not Designed and made by Suzan Pons 70 x 70 inches Fabric Requirements and Supplies Sashing & triangles: 1 ½ yards Background squares & borders: 3 ½ yards Bias binding: ½ yd. Flowers:
SPRING MANDALA Cushion
 SPRING MANDALA Cushion The Red Boot Quilt Company SPRING MANDALA Quilt The Red Boot Quilt Company www.theredbootquiltcompany.com SPRING MANDALA QUILT & CUSHION Approx. size Quilt 56 1/2in x 56 1/2in Cushion
A SPOOKY SLEEPOVER. This is a free pattern provided by The Red Boot Quilt Company The Red Boot Quilt Company
 A SPOOKY SLEEPOVER The Red Boot Quilt Company The Red Boot Quilt Company A SPOOKY SLEEPOVER Approx. Size 38 1/2in x 57 1/2in BEFORE THE FUN BEGINS Please read all instructions before you begin. Abbreviations.
 Fling by Laura Jones 57" x 68" Featuring fabrics from the E60-1439-GRY E60-1440-PUR E60-1441-PUR E60-1442-GRN E60-1443-TURQ E60-1444-PUR E60-1444-GRY (includes binding) collection by Materials 1 Yard 1
THE FLOWER FAIRIES. This is a free pattern provided by The Red Boot Quilt Company 2017 STRICTLY NOT FOR RESALE OR DISTRIBUTION
 THE FLOWER FAIRIES This is a free pattern provided by The Red Boot Quilt Company 2017 STRICTLY NOT FOR RESALE OR DISTRIBUTION The Red Boot Quilt Company The Red Boot Quilt Company THE FLOWER FAIRIES Approx.
A SPOOKY SLEEPOVER. The Red Boot Quilt Company
 A SPOOKY SLEEPOVER The Red Boot Quilt Company www.theredbootquiltcompany.com A SPOOKY SLEEPOVER Approx. Size 38 1/2in x 57 1/2in BEFORE THE FUN BEGINS Please read all instructions before you begin. Abbreviations.
Charmed. Finished Size 48 x 60 Finshed Block 9
 Charmed Finished Size 48 x 60 Finshed Block 9 Materials Needed: 3 1/2 yards of the brown floral (8786-9), for blocks and backing 1 1/4 yards of the brown stripe (8792-9) 1 1/4 yards of the pink butterfly
Sondalo Table Runner
 www.fabriceditions.com Sondalo Table Runner Finished Size: 14½" x 54½" Supp lies Needed 2 Fabric Palette Sondalo Fat Quarter Bundles (18" x 21") (10 different designs) 16" x 56" Low-loft batting 17" x
Daisy Pocket Quilt. Sorting summertime items is easier with this simple pocket quilt. Completing the Quilt. Cutting
 Daisy Pocket Quilt Sorting summertime items is easier with this simple pocket quilt. DESIGN BY PHYLLIS DOBBS PROJECT SPECIFICTIONS Skill Level: Beginner Quilt Size: 42" x 52" MTERILS 2/3 yard multicolored
THE FLOWER FAIRIES. The Red Boot Quilt Company
 THE FLOWER FAIRIES The Red Boot Quilt Company www.theredbootquiltcompany.com THE FLOWER FAIRIES Approx. Size 62in x 61in BEFORE THE FUN BEGINS Please read all instructions before you begin. Abbreviations.
Materials for Peppermint Candy Pillow
 Peppermint Candy Pillow Tutorial This adorable Peppermint Candy Pillow by BERNINA Ambassador Nancy Mahoney will give your decor a new look, whether for your bed or a decorative pillow for your couch. The
Pillow Party. Skill Level: Intermediate. Created by: Diane Kron, Software Project Manager
 Pillow Party QuiltWorks II from Designer s Gallery offers so many opportunities that it s hard to stop creating pillow after pillow. After you have completed this pillow, you will want to make several
Halloween Candy Bowl Skill Level: Beginner
 Halloween Candy Bowl Skill Level: Beginner Designed By Marni Weaver Sewn By Marni Weaver www.haberdasheryfun.com It s the season for ghost and goblins. Make this spooky Halloween candy bowl in just a few
Harmony Medallion Quilt
 Harmony Medallion Quilt Quilt Designed By: Shannon Ownby Approximate Finished Quilt Size: 71" x 75" Finished Block Size: 20" x 20" Number of Blocks: 5 quiltingtreasures.com quiltingtreasures All rights
Apple Pie Contest Set
 DESIGN BY CRIS MALONE Apple Pie Contest Set SPECIFICATIONS Skill Level: Beginner Wall anging Size: " x " Pot older Size: 7" x 7" The apple pie baking contest is a big deal at designer Chris Malone s local
 Flower Festival by Debbie Beckwith Graves 33" x 39" Featuring fabrics from the collection by Materials E30-BUNDLES-081 E60-1412-GRN E60-1414-ORG E60-1415-TURQ (backing) E60-1416-BLU (incl. binding) E60-1416-ORG
Happy Hot Dogs. 52 x 52 Quilt (8 ½ blocks)
") Happy Hot Dogs By 52 x 52 Quilt (8 ½ blocks) Cut 2 8 ½ strips white flower fabric, cut into 5 8 ½ squares Cut 1 8 ½ strip aqua flower fabric, cut into 4 8 ½ squares Cut 1 8 ½ strip white focal fabric,
Happy Hot Dogs By 52 x 52 Quilt (8 ½ blocks) Cut 2 8 ½ strips white flower fabric, cut into 5 8 ½ squares Cut 1 8 ½ strip aqua flower fabric, cut into 4 8 ½ squares Cut 1 8 ½ strip white focal fabric,
Happy Winter Snowman Quilt
 1 Happy Winter Snowman Quilt This quilt is sure to become a classic addition to your décor at Christmas time. Rows of fun snowmen and loving hearts are highlighted against a deep blue winter sky. The quilt
Rainbow Showers Quilt Skill Level: Beginner
 Rainbow Showers Quilt Skill Level: Beginner Designed By Cheryl Bush sewcando.blogspot.com A rainbow hued quilt with 3 dimensional, satin-stitched applique cloud, raindrops and umbrella, colorful border
SCRAPPY DAISIES. The Red Boot Quilt Company
 SCRAPPY DAISIES The Red Boot Quilt Company www.theredbootquiltcompany.com SCRAPPY DAISIES Approx. Size 70 1/2in x 70 1/2in This is a free pattern provided by The Red Boot Quilt Company 2018 STRICTLY NOT
My Sunflower Garden Quilt 1
 My Sunflower Garden Quilt 1 by Denise Russell Quilt size: 72 x 92 - Pillow size: 20 x 32 Skill Level: Intermediate 49 West 37th Street New York, NY 10018 Tel: 212-686-5194 - Fax: 212-532-3525 Toll Free:
Snooze Dog Bed Skill Level: Intermediate
 Snooze Dog Bed Skill Level: Intermediate Designed By Erin Erickson Sewn By Erin Erickson http://erinerickson.com Treat your pup right with a comfy custom bed. The cover is removable for easy washing. The
Quilt Cushion
 Quilt Cushion You need PFAFF Sewing Machine 21" x 44" (53 cm of 110 cm) wool tweed 6" x 44" (15 x 110 cm) dark lilac cotton 3" x 44" (8 x 110 cm) blue cotton 3" x 44" (8 x 110 cm) medium lilac cotton 7"
Shimmer Braid. Month 4
 Shimmer Braid Month 4 4 star blocks 1 center block Star Block Size 10 square = Finished Block Size. Finished means after it is sewn into the quilt. 10 ½ square = Unfinished Size. Unfinished means before
BUTTERFLY GARDEN. The Red Boot Quilt Company
 BUTTERFLY GARDEN The Red Boot Quilt Company www.theredbootquiltcompany.com BUTTERFLY GARDEN Approx. Size 89 1/2in length x 92 1/2in width BEFORE THE FUN BEGINS Please read all instructions before you begin.
GEESE AMONG THE STARS
 P REVERSE PAPER PIECING GEESE AMONG THE STARS Foundation Paper Piecing Made Easy Lap Size or Miniature Designed by Annis Clapp Machine Quilted by Donna Akins fastsew Ultimate Seam Guide GEESE AMONG THE
Flutterby Quilt Pattern
 Finished size approximately 51 square Flutterby Quilt Pattern Copyright Jacquelynne Steves Pink tone on tone (blocks, applique) 5/8 yard Peach tone on tone (blocks, applique, binding) 5/8 yard Print with
10/30/2014 Original Recipe can be found at
 Happy Halloween! Lisa Calle of {Vintage Modern Quilts} here today with a sweet and spooky mini quilt perfect for Halloween. This mini finishes at 21" square so if minis are not for you, it can easily be
Benartex Bows Table Runner A Foundation Pieced Design Skill Level: Beginner
 Benartex Bows Table Runner A Foundation Pieced Design Skill Level: Beginner Designed By Alexandra Henry Sewn By Alexandra Henry http://www.artbyalexa.com Use Pellon Stitch-N-Tear Lite to foundation piece
Sewing Spools Wall Quilt
 Sewing Spools Wall Quilt Display a four-block wall hanging showcasing thread spool and sewing machine designs in your sewing space. Fabrics are from the Winsome collection by Kim Diehl for Henry Glass
2018 Block of the Month
 2018 Block of the Month Month 1 Block: Red Roses Block size: 16 square (finished) Pieced background and appliqued flower wreath Copyright 2018 Morning Glory Designs, all rights reserved Fabric 1: Red =
DOTTI. The Red Boot Quilt Company
 DOTTI The Red Boot Quilt Company www.theredbootquiltcompany.com DOTTI Approx. Size 52 1/2in x 52 1/2in This is a free pattern provided by The Red Boot Quilt Company 2018 STRICTLY NOT FOR RESALE OR DISTRIBUTION
SUNSHINE & DAISIES. The Red Boot Quilt Company
 SUNSHINE & DAISIES This is a free pattern provided by The Red Boot Quilt Company 2015 STRICTLY NOT FOR RESALE OR DISTRIBUTION The Red Boot Quilt Company www.theredbootquiltcompany.com SUNSHINE & DAISIES
 Bella! Finished Quilt Size 43" x 43" Featuring fabrics from the Bella Flora collection by Project Fabric Requirements 1550-33... 5 8 Yard 1551-66... 1 8 Yard 1552-33... ½ Yard 1553-33... ½ Yard 1554-33...
Growler Getter. Supplies: ½ yard main fabric. ½ yard Insul-Shine. 8 x 10 piece of Fusible Fleece 2. ¼ yard or fat quarter of coordinating fabric
 Supplies: ½ yard main fabric ½ yard Insul-Shine 8 x 10 piece of Fusible Fleece 2 ¼ yard or fat quarter of coordinating fabric 1 9 x 12 sheet of Steam-A-Seam 2 1 yard nylon cord 1 cord stop Coordinating
feathered star block instructions : 8 x 8 12 x x 16 (center of quilt above) a paper piecing pattern by Jessie Zeigler Threaded Quilting Studio
 a paper piecing pattern by Jessie Zeigler Threaded Quilting Studio") No Y Seam by Jessie Zeigler Threaded Quilting Studio feathered star block instructions : 8 x 8 12 x 12 16 x 16 (center of quilt above) a paper piecing pattern Pattern Notes & Needs Skill level: intermediate
No Y Seam by Jessie Zeigler Threaded Quilting Studio feathered star block instructions : 8 x 8 12 x 12 16 x 16 (center of quilt above) a paper piecing pattern Pattern Notes & Needs Skill level: intermediate
Pinwheel Patch Quilt Pattern JacquelynneSteves.com
 Pinwheel Patch Quilt Pattern Approximate finished size 63 x 81. All seam allowances are 1/4". Fabric Requirements: Brown texture tone-on-tone 1 ½ yds Purple floral ½ yd Blue/green multi stripe 1 yd Blue
12 2½ strips strips ½ to 2½ strips. 42 1½ strips. 4 4 squares
 1 Block Finishing 216 There are 3 border finishes for the quilt: one fabric border, scrappy piano key border and scrappy multi horizontal To make the quilt larger, two more borders can be added as per
Party with Patrick. 12 x 18" Wall Hanging
 Party with Patrick Ghostly Greetings 12 x 18" Wall Hanging A fabric kit for creating this quilt is available at PatrickLose.com. These requirements are for non-directional prints. Appliqué Background Purple:
Circus Circus. Just Color! Fabric and Materials Needed. Featurning fabric from the Circus Circus collection. /Artworks! Licensing
 Circus Circus Panel: 2018-17 Flags and Blocks: 2019-11 Lt. Blue Tossed: 2020-11 Red Tossed: 2020-88 Yellow Print: 2021-4 Lt. Blue Tonal: 2023-11 *Med. Blue Tonal: 2023-17 Lime Tonal: 2023-66 Red Tonal:
MANY MINI CABINS REVERSE PAPER PIECING. Foundation Paper Piecing Made Easy P110. FINISHED SIZE: 14" x 14" Designed by Annis Clapp
 P1 REVERSE PAPER PIECING MANY MINI CABINS Foundation Paper Piecing Made Easy FINISHED SIZE: 1" x 1" Designed by Annis Clapp fastsew Ultimate Seam Guide P1 MANY MINI CABINS Read all instructions carefully
Uses Benartex s Butter ly Fandango by Ann Lauer Finished Size: 66 x 78
 2016 Ann Lauer for Benartex, LLC One Butter ly Fandango pinwheel plus applique squares equals a truly fanciful and striking quilt. Looks complex, but Ann s instructions make it fun and easy! Uses Benartex
Snowbirds. See more Jinny Beyer quilt designs featuring her Palette Collection of fabrics at:
 See more Jinny Beyer quilt designs featuring her Palette Collection of fabrics at: www.jinnybeyer.com Spectrum - 67" x 81½" Lotus - 98" x 98" Fabric Requirements Jinny Beyer Palette Collection 2" x 4"
Cuddle Coffee Sleeve Gift Card Holder Skill Level: Beginner
 Cuddle Coffee Sleeve Gift Card Holder Skill Level: Beginner Designed By Jennie Pickett Sewn By Jennie Pickett www.cloverandviolet.com Everyone loves a good cup of coffee and a visit with a friend. A perfect
Patches of Blue Quilt Along Blue Bell Block 5
 Patches of Blue Quilt Along Blue Bell Block 5 I hope your Mother s Day was full of blue skies, family time, and the most beautiful owers! The next block in our Quilt Along is one of my favorite quilting
Sawtooth Star Ornament with Applique Center
 Sawtooth Star Ornament with Applique Center Sawtooth Star with Applique Center Ornament/2 To make one Sawtooth Star Ornament with Applique Center you will need: 8 square of White or light colored background
piece o cake May the Lord Bless You Made for the 2012 AAQI Celebrity Quilt Auction By Becky Goldsmith
 piece o cake May the Lord Bless You Made for the 2012 AAQI Celebrity Quilt Auction By Becky Goldsmith May the Lord Bless You... 2012 Becky Goldsmith, Piece O Cake Finished quilt size: 16 x 16 This quilt
Notes - Please wash, dry & iron your fabric before beginning. - Sew all seams with an accurate 1/4 seam allowance. CUTTING INSTRUCTIONS
 Notes - Please wash, dry & iron your fabric before beginning. - Sew all seams with an accurate 1/4 seam allowance. CUTTING INSTRUCTIONS Indicates fabric pattern is directional on strips Fabric A: Horizontal
Heating Pad Cover Skill Level: Beginner
 Heating Pad Cover Skill Level: Beginner Designed By Madame Samm Sewn By Madame Samm www.sewwequilt.com Who doesn t want comfort when not feeling well? This adorable cover will bring a smile to your face
Terrie Sandelin Miniatures in Minutes (C&T Publishing)
") Terrie Sandelin Miniatures in Minutes (C&T Publishing) http://www.terriesandelin.com Large Notepad, finished size (closed): 9 3/4" by 12 1/4" Small Notepad, finished size (closed): 6 1/2" by 8 3/4" The
Terrie Sandelin Miniatures in Minutes (C&T Publishing) http://www.terriesandelin.com Large Notepad, finished size (closed): 9 3/4" by 12 1/4" Small Notepad, finished size (closed): 6 1/2" by 8 3/4" The
MERRY & BRIGHT SANTA SACKS
 MERRY & BRIGHT SANTA SACKS This is a free pattern provided by The Red Boot Quilt Company 2017 STRICTLY NOT FOR RESALE OR DISTRIBUTION The Red Boot Quilt Company MERRY & BRIGHT SANTA SACKS This is a free
This is an original pattern not intended for sale.
 I enjoy taking classic patterns and giving them a contemporary feel. I ve always admired orange peel quilts, and came up with a design for a lap quilt using two charm packs and machine appliqué. The gentle
PRETTY IN PINK. The Red Boot Quilt Company. This is a free pattern provided by The Red Boot Quilt Company 2017 STRICTLY NOT FOR RESALE OR DISTRIBUTION
 PRETTY IN PINK This is a free pattern provided by The Red Boot Quilt Company 2017 STRICTLY NOT FOR RESALE OR DISTRIBUTION The Red Boot Quilt Company The Red Boot Quilt Company PRETTY IN PINK Approx. Size
SINGER FUTURA Endless Hoop Pillow Wrap
 SINGER FUTURA Endless Hoop Pillow Wrap Enhance your room décor with an embroidered pillow wrap! This interchangeable band, created with the SINGER FUTURA endless hoop, has the look of hand-stitched cross
P layful Cuties 2 - Nursery Rhymes Quilt
 P layful Cuties 2 - Finished Size: 40 ½" x 46 ½" (102.87cm x 118.11cm) Nursery Rhymes Quilt Fabrics Needed 3 Wishes Fabric Playful Cuties 2 Collection ¾ yd (68.58cm) Gray Dots (13876-Gray) for Piecing
SMILE AND STAND TALL By Suzan Pons
 SMILE AND STAND TALL By Suzan Pons Size: 44 x 50 Main Fabric: about 40 assorted strips of batik fabric 2 ½ inches x 44 inches Inner Border: about 10 inches of contrasting fabric, WOF Side borders are 1
Batting: 66" x 66" Coordinating thread Pink Animal Print: ½ yard
 Project Fabric Requirements Finished Quilt Size 60" x 60" Additional Supplies Needed Panel: 2024-64 1 panel Batting: 66" x 66" Stripe: 2025-64 Coordinating thread Pink Animal Print: 2026-22 ½ yard Quilting
Kimono Collection MATERIALS. Finished quilt size CUTTING
 Kimono Collection Colourful Japanese fabrics take the place of traditional paper in these tiny origami kimonos and a simple nine-patch quilt shows them off to perfection. MATERIALS Nine pieces of assorted
Sapphires in the night
 Sapphires in the night This trendy raw edge appliqué quilt will shine, like Sapphires in the night, with a glowing profusion of blues! Start collecting all the blue batik fabrics you see and watch the
Created by Cathy
 Created by Cathy http://www.picklecreations.co.uk/ Description Sewing Caddy for your useful sewing items. Keep them to hand, or, make it easier to move to your various work stations. Could also be used
Full details of the products you ll need including the colours of Decracraft Felt, can be found on the next page.
 PATTERN BY Our light yet sturdy drawstring bag features a combination of stunning colours from our Decracraft Felt range. Create your own drawstring bag using this pattern. Full details of the products
Pompeii. Mist Colorway. Fabric Requirements: Cutting Instructions: Block Assembly:
 Pompeii Mist Colorway Quilt designed by Debby Kratovil for Blank Quilting Finished Quilt Size: 59" x 59" Block Size: 37 Center Star 8" Border Stars Fabric Requirements: Fabric A: 1 yd 6243-Cocoa (star
Rosewater. Sofa Quilt. SIZE 49" x 71" quiltingtreasures.com quiltingtreasures All rights reserved Pg 1. Designed by: Janice Averill
 Rosewater Sofa Quilt SIZE 49" x 71" quiltingtreasures.com quiltingtreasures All rights reserved Pg 1 24596 H 24599 D 24599 G 24599 H 24595 X 24597 P 24598 D KIT REQUIREMENTS 12 Kits 18 Kits 24 Kits Design
SuzysSitcom.com. Purrfect Love - 3 Easy Patterns! Create something beautiful! Included in this booklet are instructions and patterns to create :
 Purrfect Love Quilt Pattern SuzysSitcom.com Purrfect Love - 3 Easy Patterns! Create something beautiful! Included in this booklet are instructions and patterns to create : Purrfect Love Mug Mat - Size:
Spiegel Flying Geese Pillow. Step-by-Step Instructions. Erin Van Handel Sie macht
 Spiegel Flying Geese Pillow Step-by-Step Instructions Erin Van Handel Sie macht 1. ) Play Picasso Using colored pencils or markers, color a flying geese design. 9 in 4.5 in Original Your Design 2.) Choose
Printing & Assembling Quilted Frog Download Patterns
 Printing & Assembling Quilted Frog Download Patterns To open & print the pattern you will need Adobe Reader. Adobe Reader is a program you can obtain free of charge at: http://get.adobe.com/reader/?promoid=buigo
LIVE.LOVE.SEW FEATURE BLOCKS B.O.M PROGRAM
 LIVE.LOVE.SEW FEATURE BLOCKS B.O.M PROGRAM FEATURE BLOCKS Congratulations on finishing your twelve Feature Blocks! It has been so much fun sewing along with you all this past year, learning more about
Artistically Designed Crystal Pillow Created By: Nancy Fiedler Level: Intermediate
 Artistically Designed Crystal Pillow Created By: Nancy Fiedler Level: Intermediate Introduction: One image becomes many designs, with just one click of the mouse and you are on your way to having a designer
Seeing Double Fabric Magic Pocket Pillows Skill Level: Beginner
 Seeing Double Fabric Magic Pocket Pillows Skill Level: Beginner Designed By Alexandra Henry Sewn By Alexandra Henry Pellon Fabric Magic shrinks up to 30% creating texture on any project. Use it to make
SCRAPPY BEARS. The Red Boot Quilt Company
 SCRAPPY BEARS The Red Boot Quilt Company www.theredbootquiltcompany.com SCRAPPY BEARS Approx. size 27 1/2in x 27 1/2in This is a free pattern provided by The Red Boot Quilt Company 2018 STRICTLY NOT FOR
Butterfly Blooms Pillow
 Part of the... starburst jewel series www.fatquartershop.com Finished size: 14 ½" x 14 ½" Featuring the Creative Grids Starburst 30 Degree Triangle Ruler! Butterfly Blooms features Desert Bloom by Sherri
EmbroideryWorks Patriotic Appliquéd Table Runner
 EmbroideryWorks Patriotic Appliquéd Table Runner This appliquéd table runner is great for Memorial Day, 4 th of July, or any time you re feeling a little patriotic. Using the updated version of EmbroideryWorks
COTTONTAIL BUNNIES. The Red Boot Quilt Company
 COTTONTAIL BUNNIES This is a free pattern provided by The Red Boot Quilt Company 2017 STRICTLY NOT FOR RESALE OR DISTRIBUTION The Red Boot Quilt Company www.theredbootquiltcompany.com COTTONTAIL BUNNIES
FREE pattern available on our website, pbtex.com. Blast Off quilt by Heidi Pridemore Size: 62 square
 FREE pattern available on our website, pbtex.com Blast Off quilt by Heidi Pridemore Size: 62 square Blast Off Quilt by Heidi Pridemore using the Out of the World fabric collection by Jill McDonald for
Embroidered Binder Cover Carol A. Brown
 Embroidered Binder Cover Carol A. Brown Measure your Binder: 1. Height of binder. Add 1 to the height of the binder to allow for 1/4 seams at top and bottom plus allowance for the bulk of the seams inside
Bee Awesome Pillow. Created by: Susan Enderson, Educator
 Created by: Susan Enderson, Educator Skill Level: Intermediate Time: 4 hours Bee creative, bee productive or just bee awesome with this fun statement pillow. See how to combine purchased embroidery designs
Original Recipe. Quilted Chore Chart by Amber Johnson. It's that time of year again. Time to get back to a routine and find order in our houses again!
 Original Recipe Quilted Chore Chart by Amber Johnson It's that time of year again. Time to get back to a routine and find order in our houses again! 1 Punctuation Charm Pack 1 yellow fat quarter for "CHORES"
PINWHEEL STAR WORKSHOP QUILT
 PINWHEEL STAR WORKSHOP QUILT Finished Size: 9" x 9" FABRIC REQUIREMENTS fat quarter or less of each fabric Fabric A - Medium (or dark) print for center star Fabric B - Dark (or medium) print for pinwheels,
SINGER FUTURA TM Crayon Pouch
 SINGER FUTURA TM Crayon Pouch Send your student to school in style with this special crayon bag. In this project, you ll experiment with manipulating letters individually, including using some of the elastic
Finished Size: 75"x 75"
 Finished Size: 75"x 75" Finished Size: 75"x 75" Block Size: 1"x1" and 6"x6" Quilters Basics Read instructions before beginning a project. All instructions include a ¼" seam allowance. Press as you go.
Greek Square Table Runner
 Greek Square Table Runner Quilt Finished Size: 70-1/2" x 25-1/2" Block Finished Size: 12" Printing Options: Printer-Friendly Web Page or PDF Fabric Requirements: Dark: 1 yard Medium: 3/4 yard Light: 3/4
Sunshiney Day Tote & Zip Pouch
 Sunshiney Day Tote & Zip Pouch Sunshiney Day Tote 16 x 4 x 16 Yardage Requirements for Tote: 1/3 yd. Print 1 3/4 yd. Print 2 1 yd. Print 3 1 yd. Buckram 1 yd. Fusible Fleece (44 wide) 1/3 yd. Medium weight
PROJECT TITLE: Celtic Unity. PROJECT MAKER: Leanne Ballschmieter Quilted by: Emily Klein-Ballschmieter ISSUE: 28-05
 PROJECT TITLE: Celtic Unity PROJECT MAKER: Leanne Ballschmieter Quilted by: Emily Klein-Ballschmieter ISSUE: 28-05 PROJECT BLURB: Fascinated by the Celtic interlinked designs Leanne finally plucked up
Block 6: Canyonlands - Quilts For Kids Palette
 Block 6: Canyonlands - Quilts For Kids Palette 12 x 12 finished Fabrics: #100 Light Turquoise #87 Light Denim #8 Light Yellow #69 Dark Gold #36 Orange #101 Turquoise Additional supplies needed: Mechanical
TIGRESS BLOCK by Lone J. Minkkinen
 TIGRESS BLOCK by Lone J. Minkkinen Finished block size 9½" x 15" Instructions are for one raw-edge, fused quilt-liqué block. This block is fused and cut before stitching. Queen of India, 17¼" x 22½", by
Floriani Embroidery Project Drawstring Backpack
 Floriani Embroidery Project Drawstring Backpack Floriani Embroidery Project Drawstring Backpack Presented by RNK Distributing Supplies Needed: 1 yard 45 cotton print yard 45 coordinating cotton solid yard
Starry Scrappy Santa. Tiny 1"-finished squares are easily stitched into a background using a fusible 1" grid.
 DESIGN Y TAMMY CARLSON OF HAPPY HOLLOW DESIGNS Starry Scrappy Santa Tiny 1"-finished squares are easily stitched into a background using a fusible 1" grid. SpEcIFIcatIOnS Skill Level: Intermediate Quilt
Broken Hearts Mending Quilt Inspired by Marie Bostwick s A SINGLE THREAD READ THROUGH ALL THE INSTRUCTIONS BEFORE CUTTING AND SEWING.
 Broken Hearts Mending Quilt Inspired by Marie Bostwick s A SINGLE THREAD READ THROUGH ALL THE INSTRUCTIONS BEFORE CUTTING AND SEWING. Fabric Requirements Yardage Cut each fabric as follows: 6 pink fabrics
Finished Size: 60 x70
 Finished Size: 60 x70 Finished Size: 60" x 70" Finished Block Size: 10" x 10" Cutting Label pieces as they are cut Quilters Basics Read instructions before beginning a project. All instructions include
Mistletoe Mug Rug Skill Level: Beginner
 Mistletoe Mug Rug Skill Level: Beginner Designed By Alexandra Henry Sewn By Charlene Allison & Alexandra Henry http://www.artbyalexa.com Make this mug rug to give to a special loved one. The mug rug can
Growth Chart: Cut this yardage first from your bundle. For the background rectangles cut 3 pieces 9 x 12 1/2 and 2 pieces 9 x 12 1/4.
 Growing Fast, projects 4-6 in 9 months til baby Start with 1 fat quarter bundle of Little One by Robert Kaufman Fabrics which includes 10 fat quarters and 1 bib panel. You will be able to make all 3 projects
BEAR PAW MUG RUG Skill Level: Beginner
 BEAR PAW MUG RUG Skill Level: Beginner Designed & Stitched By Alexandra Henry The bear paw is a traditional quilt block pattern. Use it to make this easy little mug rug to brighten your morning coffee.
Patriotic Stars Block & Table Runner
 Patriotic Stars Block & Table Runner Approximate finished size 21 x 71 inches Designed by Cindy Roth Copyright 2017 Copyright 2017 Page 1 Patriotic Star Block & Table Runner Yardage Amounts Note: Amounts
Quilting Classroom. Jennie Rayment. 21st May 23rd am
 Quilting Classroom Jennie Rayment 21st May 23rd 2015 8.00 am Tools & Equipment Fuse away - it s fabric play! From bias tape to Broderie Perse, satin stitching to slip stitching, this show covers a multitude
Chili Pepper Quilt Patterns
 Chili Pepper Quilt Patterns Free Pattern ~ Cry Baby ~ Instructions Page 1 Chili Pepper Quilt Patterns ~ Cry Baby ~ Crib Quilt Finished Size: 39.5" x 50.5" Fabric A 1 st Bright Fabric Fabric B 2 nd Bright
mermaid quilt a sewing pattern by
 a sewing pattern by mermaid quilt This project is a simple and straightforward piece for applique lovers. I personally designed it for a coworker s daughter -- a sweet little girl who s current obsession
Flower Basket Star finished quilt size: 64" x 64"
 Flower Basket Star Fabric Requirements 2162-99 1⅝ yards 2164-22 ¼ yard 2164-77 ½ yard 2165-77 ⅜ yard 2165-88 ¼ yard 2166-33 1⅛ yards 2167-44 ¼ yard finished quilt size: 64" x 64" 2167-66 ¼ yard 2167-99
THIS LITTLE PIGGY Mystery Block-of-the-Month MONTH #1
 THIS LITTLE PIGGY Mystery Block-of-the-Month MONTH #1 The Red Boot Quilt Company The Red Boot Quilt Company THIS LITTLE PIGGY BOM MONTH #1 Approx. size block 17 1/2in BEFORE THE FUN BEGINS Please read
Featuring fabrics from the Carriage House collection by Pat Speth
 P R O J E C T by Pat Speth Featuring fabrics from the Carriage House collection by Pat Speth Carriage House Quilt Size 72" x 72" Block Size 14" 2007 Pat Speth Materials Light (background) fabrics - 10