Ready, Set, GO! SET YOUR TABLE. Using the AccuQuilt GO! GO! Let s Talk Turkey Placemats
|
|
|
- Laurel Darleen Harrison
- 5 years ago
- Views:
Transcription


1 Ready, Set, GO! SET YOUR TABLE Using the AccuQuilt GO! 8 FREE patterns INSIDE GO! Let s Talk Turkey Placemats GO! Big & GO! Fabric Cutter Friendly 2017 AccuQuilt to order call more accuquilt.com C1708C-01

2 GO! Let's Talk Turkey Placemats (Set of Two) Finished Size 18" x 12" Fabrics provided by Island Batik GO! Dies Used, Number of Shapes to Cut & Fabric Requirements Fabric Color Shape GO! Dies Used Number of Shapes to Cut Fabric Required NOTE: Apply fusible web to the wrong side of asterisked fabrics following manufacturer s instructions before cutting appliqué shapes. Orange GO! Dresden Plates (55071) Cut 1 6 W x 7¼ H rectangle. Lay Fat Eighth rectangle on pointed Dresden Plates and cut 4 pointed plates. *Orange GO! Holiday Accessories (55321) (use carrot shape to cut beaks) Cut 2 1 ¼ W x 1¾ H rectangles. Lay rectangles on ⅝"W x 1¼" H beaks and cut 2 beaks. Gold GO! Dresden Plates (55071) Cut 1 6 W x 7¼ H rectangle. Lay rectangle on pointed Dresden Plates and cut 4 pointed plates. Fat Eighth *Gold GO! Dresden Plates (55071) Cut 1 5¼ W x 4¾ H rectangle. Lay rectangle on round Dresden Plate and cut 2 round plates (clip off notches). Green GO! Dresden Plates (55071) Cut 1 6 W x 7¼ H rectangle. Lay rectangle on pointed Dresden Plates and cut 4 pointed plates. Green Light Brown Light Brown Medium Brown *Medium Brown GO! Strip Cutter-4½" (4" Finished) (55054) GO! Dresden Plates (55071) GO! Strip Cutter-1½" (1" Finished) (55024 or 55164) GO! Dresden Plates (55071) GO! Dresden Plates (55071) Cut 1 4½" x width of fabric (WOF) strip. Sub cut 4 10" strips Cut 1 6 W x 7¼ H rectangle. Lay rectangle on pointed Dresden Plates and cut 4 pointed plates. Cut 2 1½" x WOF strips. Sub cut 4 18" strips. Cut 1 6 W x 7¼ H rectangle. Lay rectangle on pointed Dresden Plates and cut 4 pointed plates. Cut 1 4½ W x 8¾ H rectangle. Lay rectangle over circles and cut 2 4" circles. ⅓ Yard ⅓ Yard Fat Eighth 2015 AccuQuilt PQ10675
 (55017 or 55014) Cut 1 6 W x 4¼ H rectangle. Lay rectangle on pointed Dresden Plates and cut 2 pointed plates. Cut 4 4 W x 2¼ H rectangles.")
3 Dark Brown *Dark Brown Dark Brown GO! Dresden Plates (55071) GO! Holiday Accessories (55321) (use snowman arms to cut turkey legs) GO! Strip Cutter-2½" (2" Finished) (55017 or 55014) Cut 1 6 W x 4¼ H rectangle. Lay rectangle on pointed Dresden Plates and cut 2 pointed plates. Cut 4 4 W x 2¼ H rectangles. Lay rectangles on legs and cut 4 legs. Cut 4 2½" x WOF strips for binding. (2 strips per placemat) ½ Yard Ecru GO! Big Square-10" (9½" finished) (55451) Cut 1 10½ x WOF strip. Fanfold the strip into 10½ widths. Cut 2 10" squares. Fat Quarter Additional Fabrics Needed: Fusible Web ⅜ yard Backing Fabric two pieces: 24" x 18" Batting two pieces: 24" x 18" Sewing Directions: 1. Lay out one ecru 10" square and two green 4½" x 10" strips in a row as shown. 2. Pin and sew row unit. Press seams toward strips. 3. Pin and sew one light brown 1½" x 18" strip to both the top and the bottom of the row unit. Press seams toward strips. Make two block units. Set aside. 4. Prepare 22 pointed petals (11 per placemat): Fold one pointed petal in half right sides together. Pin and stitch ¼" seam across folded end as shown, reinforcing stitching at both ends of seam. Trim corner at fold. Lightly press fold (wrong sides together). Press open seam allowance with tip of iron. Turn point right side out with point turner tool or blunt knitting needle. Press so seam allowance is in line with lightly pressed foldline. 5. Lay out two light brown pointed petals, two orange pointed petals, two gold pointed petals, two green pointed petals, two medium brown pointed petals, and one dark brown pointed petal to form a half circle AccuQuilt PQ10675

4 6. Sew pointed petals together using ¼" seam allowance, matching notches. Press seams in one direction around the half circle of pointed petals. 7. Position pieced petal unit on block unit using the placemat image as a guide. Pin, fuse, or baste in place. Machine appliqué around perimeter to secure. 8. Position, fuse and machine appliqué one medium brown circle, two dark brown legs, one gold round plate, and one beak on block unit to complete the turkey. 9. Choose your favorite method for the turkey eyes: Hand stitch French knots with dark brown floss Machine specialty stitch with dark brown thread Attach buttons Fuse and machine appliqué tiny dark brown circles 10. Repeat steps 5-9 for second placemat. Quilting & Finishing: 1. Layer batting between placemat top and backing. 2. Pin or baste layers together. 3. Quilt as desired. 4. Add dark brown fabric binding, mitering corners. 5. Repeat steps 1-4 for the second placemat AccuQuilt PQ10675

5 Fabric Color Fabric provided by Moda Fabrics GO! Flying Windmill Table Runner Finished Size 22" x 64" Finished Block Size 12" x 12" One Block White GO! Dies Used, Number of Shapes to Cut & Fabric Requirements Shape GO! Dies Used Number of Shapes to Cut Fabric Required GO! Flying Geese-3½ x 6½ (3 x 6 Finished) 32 3 finished half square 3/8 yard (55456 or 55009) triangles Pink GO! Strip Cutter-2½ (2 Finished) 1 (2½ x width of fabric strips 7/8 yard (55017 or 55014) (WOF) for sashing Sub cut into 3 2½ x 12½ rectangles Pink GO! Flying Geese-3½ x 6½ (3 x 6 Finished) (55456 or 55002) 22 6 finished quarter square triangles Pink GO! Flying Geese-3½ x 6½ (3 x 6 Finished) (55456 or 55009) 16 3 finished half square triangles Pink GO! Square-3½ (3 Finished) (55006) 4 Orange GO! Flying Geese-3½ x 6½ (3 x 6 Finished) 16 6 finished quarter square 1/2 yard (55456 or 55002) triangles Light GO! Flying Geese-3½ x 6½ (3 x 6 Finished) 60 3 finished half square 1 yard Orange (55456 or 55009) triangles Light Orange GO! Strip Cutter-2½ (2 Finished) (55017 or 55014) 5 2½ x WOF strips for binding Green GO! Flying Geese-3½ x 6½ (3 x 6 Finished) 16 6 finished quarter square 1 yard (55456 or 55002) triangles Green GO! Strip Cutter-2½ (2 Finished) (55017 or 55014) 3 2½ x WOF strips for inner border Green GO! Strip Cutter-2½ (2 Finished) (55017 or 55014) 2 2½ x WOF strips for inner border Additional Fabrics Needed Backing 28 x 70 Batting 28 x AccuQuilt PQ10401
6 Sewing Directions Windmill Variation Block 1. Pin and sew one pink and one light orange 3 finished half square triangle (HST) together as shown. Press seams toward orange triangle. Make four HST units. 2. Pin and sew one HST unit and two white 3 finished HSTs together as shown. Press seams toward white triangles. Make four combined units. 3. Pin and sew one orange and one green 6 finished quarter square triangle (QST) together as shown. Make four QST units. 4. Pin and sew one HST unit and one QST unit together as shown. Press seams toward QST unit. Make four quarter blocks. 5. Pin and sew quarter blocks into half blocks. Press seams open. Make two half blocks. 6. Pin and sew half blocks together to complete block. Press seams open. 7. Make a total of four Windmill Variation blocks. Flying Geese Border 1. Pin and sew one pink 6 finished QST and two light orange 3 finished HSTs together as shown to form a flying geese unit as shown. Make 22 flying geese units. 2. Pin and sew nine flying geese units together following table runner diagram. Press seams open. Make two flying geese border units. 3. Pin and sew two flying geese units together as shown. Press seams open. Make two flying geese pair border units. Table Runner Assembly 1. Pin and sew three pink 2½ x 12½ sashing strips between four Windmill Variation blocks following table runner diagram. Press seams toward sashing strips. 2. Pin and sew three green 2½ strips together end to end. Press seams open. Sub cut into two 2½ x 54½ lengths. 3. Pin and sew one green 2½ x 54½ inner border strip to each side of combined table runner center. Press seams toward inner borders AccuQuilt PQ10401

7 4. Pin and sew one flying geese border unit to each side of combined table runner center following orientation of flying geese in table runner diagram. Press seams toward inner borders. 5. Pin and sew one green 2½ x 22½ inner border strip to each end of combined table runner center. Press seams toward inner borders. 6. Pin and sew one green 2½ x 3½ rectangle and one pink 3½ square to each end of one flying geese pair border unit as shown. Press seams toward green rectangles. Make two combined border end units. 7. Pin and sew one combined border end unit to each end of combined table runner center following orientation of flying geese in table runner diagram. Press seams toward inner border. Quilting & Finishing 1. Layer batting between quilt top and backing. 2. Pin or baste layers together. 3. Model was custom machine quilted. 4. Add light orange binding strips, mitering corners AccuQuilt PQ10401

8 GO! Pick of the Patch Table Runner Finished Size 18½" x 57" Fabrics provided by RJR Fabrics GO! Dies Used, Number of Shapes to Cut & Fabric Requirements Fabric Color Shape GO! Dies Used Number of Shapes to Cut Fabric Required NOTE: Apply fusible web to the wrong side of asterisked fabrics following manufacturer s instructions before cutting appliqué shapes. *Assorted GO! Pumpkins (55323) Orange *Assorted Orange *Assorted Orange Green Brown Brown Harvest Print White White GO! Pumpkins (55323) GO! Pumpkins (55323) GO! Strip Cutter-2" (1½" Finished) (55025 or 55164) GO! Strip Cutter-1½" (1" Finished) (55024) GO! Strip Cutter-2½" (2" Finished) (55017 or 55014) GO! Strip Cutter-4½" (4" Finished) (55054) GO! Square-5" (4½" Finished) (55010) GO! Square-6½" (6" Finished) (55000) Cut 7 3½ W x 2½ H rectangles. Lay rectangles on short pumpkin and cut 7 short pumpkins. Cut 2 4 W x 4 H squares. Lay squares on wide pumpkin and cut 2 wide pumpkins. Cut 4 5 W x 3 5/8 H rectangles. Lay rectangles on tall pumpkin and cut 4 tall pumpkins. Cut 4 2 x width of fabric (WOF) strips. Sub cut one strip into 6 6 strips. Sub cut one strip in half, attach one half to both of the remaining WOF strips, trim each to 47½". Cut 3 1½ x WOF strips. Sub cut one strip into 2 9 strips. Sub cut one strip in half, attach one half to both of the remaining WOF strips, trim each to 49½". Cut 4 2½ x WOF for binding. Cut 4 4½" x WOF strips. Sub cut one strip into 2 11 strips. Sub cut one strip in half, attach one half to both of the remaining WOF strips, trim each to 49½". Cut 1 10½ x WOF strip. Fanfold the strip into 2 5½ widths. Cut 4 5" squares. (trimmed to 4½" squares after machine embroidery) Cut 1 7 x WOF strip. Fanfold the strip into 7 widths. Cut 2 6½" squares. (trimmed to 6" squares after machine embroidery) Assorted orange fabrics equal to ¼ yard included above included above 1/4 Yard 1/2 Yard included above 5/8 Yard 5/8 Yard included above 2015 AccuQuilt PQ10673
 (55451) From remaining 10½ x WOF strip, fanfold the strip into 10½ widths and cut 3 10\" squares.")
 GO!")
 GO!")
, machine appliqué each of the single pumpkin blocks.")

, machine appliqué one pumpkin block.")
9 White GO! Big Square-10" (9½" Finished) (55451) From remaining 10½ x WOF strip, fanfold the strip into 10½ widths and cut 3 10" squares. (trimmed to 9½"W x 6"H after machine embroidery) included above Additional Fabrics Needed: Backing 25 x 63 Batting 25 x 63 Fusible Web ⅓ Yard Additional Products Needed: GO! Pumpkin Triple #1 Embroidery Designs by V-Stitch Designs (VQ-PPT01) GO! Pumpkin Double #1 Embroidery Designs by V-Stitch Designs (VQ-PPD01) GO! Pumpkin Double #3 Embroidery Designs by V-Stitch Designs (VQ-PPD03) GO! Pumpkins Embroidery Designs by V-Stitch Designs (VQ-Pe) Sewing Directions: 1. Following the instructions provided with the GO! Pumpkins Embroidery by V-Stitch Designs (VQ-Pe), machine appliqué each of the single pumpkin blocks. Use the block images as a reference. Four short pumpkins on four white 5" squares. Trim to 4½" squares after machine embroidery. Two tall pumpkins on two white 6½" squares. Trim to 6" squares after machine embroidery. 2. Following the instructions provided with the GO! Pumpkin Triple #1 Embroidery Designs by V-Stitch Designs (VQ- PPT01), machine appliqué one pumpkin block. Use the block image as a reference. One short pumpkin, one wide pumpkin, one tall pumpkin on one white 10" square. Trim to 9½" W x 6" H after machine embroidery. 3. Following the instructions provided with the GO! Pumpkin Double #1 Embroidery Designs by V-Stitch Designs (VQ- PPD01), machine appliqué one pumpkin block. Use the block image as a reference. One short pumpkin and one wide pumpkin on one white 10" square. Trim to 9½" W x 6" H after machine embroidery AccuQuilt PQ10673
, machine appliqué one pumpkin block.")


10 4. Following the instructions provided with the GO! Pumpkin Double #3 Embroidery Designs by V-Stitch Designs (VQ- PPD03), machine appliqué one pumpkin block. Use the block image as a reference. One short pumpkin and one tall pumpkin on one white 10" square. Trim to 9½"W x 6"H after machine embroidery. 5. Lay out six green 2 x 6" sashing strips, two single tall pumpkin embroidery blocks, the triple pumpkin embroidery block and the two double pumpkin embroidery blocks in a row, as shown. 6. Pin and sew row. Press seams toward the sashing strips. 7. Pin and sew one green 2" x 47½" border strip on the top and one on the bottom of the row unit. Press seams toward the border strips. 8. Pin and sew one brown 1½ x 9" border strip on either side of the pieced row unit. Press seams toward the border strips. 9. Pin and sew one brown 1½ x 49½" border strip on the top and one on the bottom of the pieced row unit. Press seams toward the border strips. 10. Pin and sew one harvest print 4½ x 49½" border strip on the top and one on the bottom of the pieced row unit. Press seams toward the border strips. 11. Pin and sew one small pumpkin embroidered 4½ block on either side of one harvest print 4½ x 11" border strip. Press seams toward the border strip. Make two units. 12. Pin and sew one border unit with embroidered blocks on either side of the pieced row unit. Quilting & Finishing: 1. Layer batting between table runner top and backing. 2. Pin or baste layers together. 3. Quilt as desired. 4. Add brown binding, mitering corners AccuQuilt PQ10673
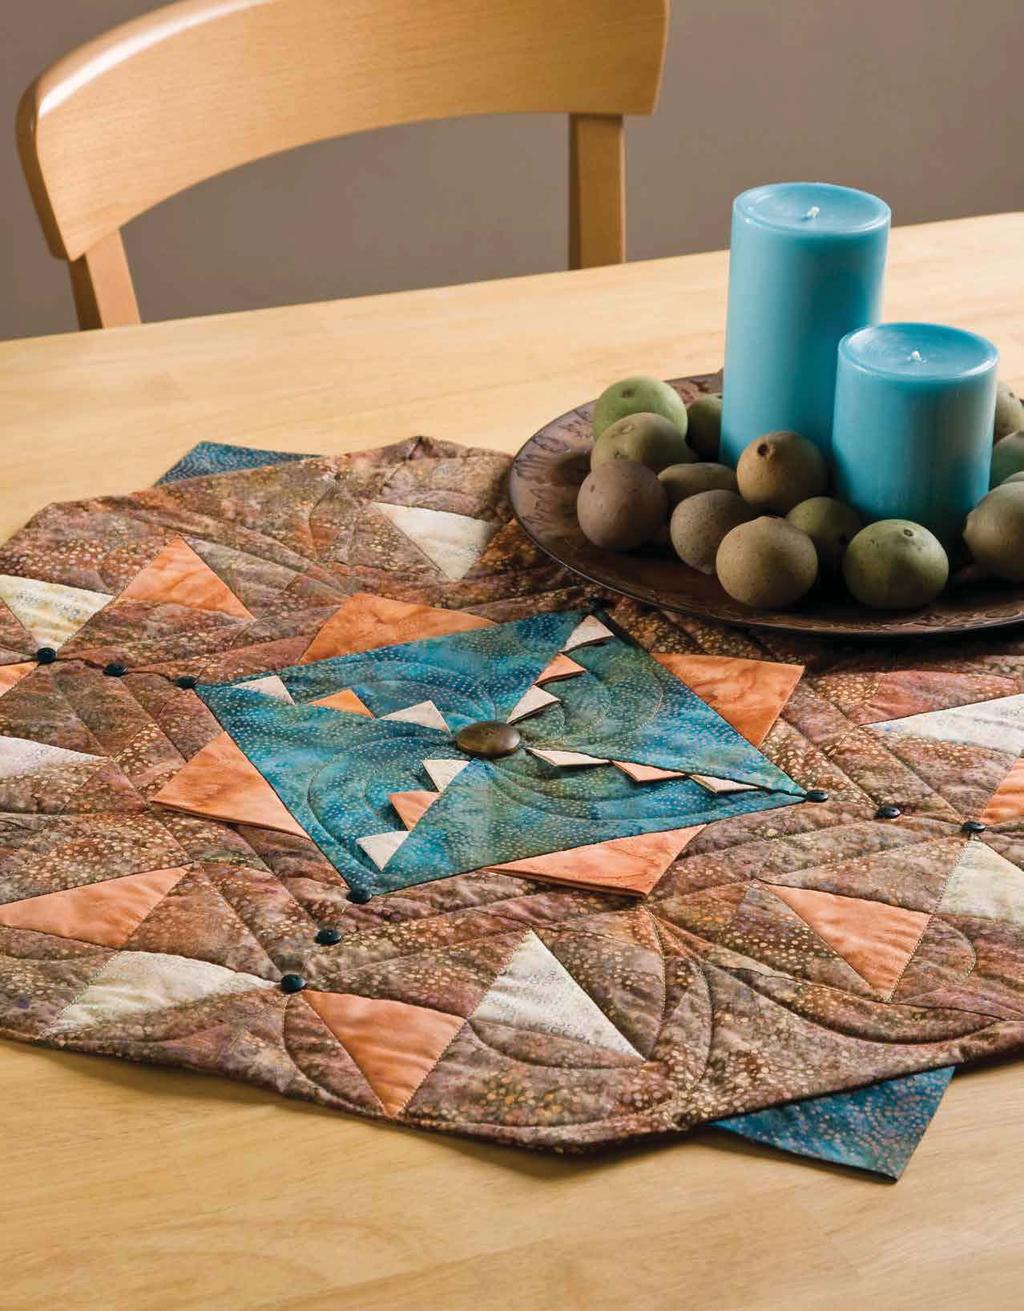
11 Use with: GO! Big GO! GO! Baby Points of Interest Designed & Quilted by Connie Kauffman Fold simple die-cut shapes to create dimension. Prairie points add interest and create movement in this earthy, yet elegant, table topper. Project Specifications Skill Level: Intermediate Quilt Size: 24" x 24" Block Size: 6" x 6" Number of Blocks: 8 and 4 Block 1 6" x 6" Block Make 8 Block 2 6" x 6" Block Make 4 Materials 3 8 yard tan batik ½ yard turquoise batik ½ yard orange batik 15 8 yards brown batik Batting 28" x 28" Neutral-color all-purpose thread Variegated quilting thread GO! Dies: B: GO! Square-3½" (3" Finished) (55006) C: GO! Half Square-6" Finished Square (55001) E: GO! Half Square-3" Finished Square (55009) F: GO! Square on Point-4¾" (4¼" Finished) (55019) 1 (11 8") brown button 12 (3 8") teal buttons Basic quilting tools and supplies Die-Cutting Instructions 1. Cut 1 8" x width of fabric (WOF) strip of brown batik and fan-fold 4½" wide. Die-cut 16 B squares using GO! Square-3½" (55006). 2. Cut 1 8" x WOF strip orange batik and fan-fold 4½" wide. Die-cut four B squares using GO! Square-3½" (55006). 3. Cut 1 8" x 23" strip tan batik and fan-fold 4½" wide. Die-cut eight B squares using GO! Square-3½" (55006). 4. Cut 1 7½" x WOF strip brown batik and fan-fold 7½" wide. Die-cut eight C triangles using GO! Half Square-6" Finished Square (55001). 5. Cut 1 7½" x WOF strip turquoise batik and fan-fold 7½" wide. Die-cut four C triangles using GO! Half Square-6" Finished Square (55001). 6. Cut 1 9½" x 18" strip brown batik and fan-fold 4½" wide. Die-cut 16 E triangles using GO! Half Square-3" Finished Square (55009). 7. Cut 1 9½" x 9" strip orange batik and fan-fold 4½" wide. Die-cut eight E triangles using GO! Half Square-3" Finished Square (55009). 8. Cut 1 9½" x 9" strip tan batik and fan-fold 4½" wide. Die-cut eight E triangles using GO! Half Square-3" Finished Square (55009). 9. Cut 1 10½" x 9" strip orange batik and fan-fold 5¾" wide. Die-cut four F squares using GO! Square on Point-4¾" (55019). 10. Cut 1 10½" x 9" strip turquoise batik and fan-fold 5¾" wide. Die-cut four F squares using GO! Square on Point-4¾" (55019). Additional Cutting Instructions 1. From brown batik cut a 28" x 28" square for backing. Making Small Prairie Points 1. Fold and press orange and tan B squares in half on both diagonals, referring to Figure 1. Make four orange and eight tan prairie points. Figure AccuQuilt Code PQ
. 1 /4\" Figure 3 Repeat steps 1 and 2 to make four sets of small prairie points. Set aside.")
12 2. Lay an orange prairie point between two tan points, overlapping edges as shown in Figure 2. Adjust positioning so that there is 1½" between triangle points as shown in Figure 2. Pin and baste through all points. 1 1 /2" Figure 2 3. Trim excess ¼" below basting (Figure 3). 1 /4" Figure 3 Repeat steps 1 and 2 to make four sets of small prairie points. Set aside. Note: Pay close attention to the direction of the folded triangles, it looks nice to have all folded edges going in the same direction in each set. To do this, keep prairie points organized and aligned in sets as you fold and press. Making the Blocks 1. Sew a brown E triangle to a tan E triangle along long edge (Figure 4). Press seam toward brown E. Repeat with a brown E triangle and an orange E triangle. Make eight of each color E/E squares (Figure 4). Make 8 Make 8 E 4. Using four each turquoise and orange F squares, fold squares in half on both diagonals and press to make a large prairie point, referring to Figure 1. Make four each orange and turquoise large prairie points. 5. Center and baste a large prairie point on each brown C triangle (Figure 7). Note: Turquoise points will lie flat on C triangles until project is turned right side out before quilting, when they will extend out from project corners. 2. Sew an E/E square to a brown B square. Repeat with all E/E squares, making eight B/E tan and B/E orange units (Figure 5). Make 8 Figure 4 Make 8 Figure 7 6. Sew turquoise C triangles to brown C triangles with orange prairie points, referring to Figure 8. Press seam toward brown C triangles. Repeat to make four C units. B C Figure 5 3. Sew a B/E tan unit to a B/E orange unit, referring to Block 1 diagram, to make eight Block 1 blocks. Referring to Figure 6, sew blocks together in (four) two-block units. Make 4 Figure 8 7. Center and baste a set of small prairie points on the turquoise side of C units, as shown in Figure 9, to complete a Block 2. Repeat to make four Block 2 blocks. Make 4 Figure 6 Figure AccuQuilt Code PQ
13
. Press seams toward C triangles.")

14 8. Referring to Figure 10 for orientation, sew four completed Block 2 blocks together to make the center unit. Completing the Quilt 1. Sew a turquoise prairie point C triangle to either side of a Block 1 unit (Figure 11). Press seams toward C triangles. Repeat to make a top and bottom row. Sew a Block 1 unit to either side of the center unit to make Tip Press the fabric before positioning it on the die to eliminate any wrinkles that could show up in the finished cuts. Figure AccuQuilt Code PQ
15 center row, referring to Figure 11. Press seams toward center unit. 4. Sew ¼" around quilt sandwich outside edges, leaving a 4" opening for turning. 5. Trim batting and backing to match quilt top and turn right side out through opening. 6. Press edges, turning opening seam allowance to inside. Press turquoise points away from quilt center. Hand-stitch opening closed. Quilt as desired. 7. Finish quilt by sewing large button at quilt center and 3 small buttons on each side, extending out from turquoise center corners as seen in Placement Diagram and project photo. Figure Sew top and bottom rows to the center row, again referring to Figure 11 for placement and orientation. Press seams in one direction. 3. Layer 28" x 28" batting, 28" x 28" backing piece, right side up; and the completed quilt top, right side down, on a flat surface and pin or baste around outside edge of quilt sandwich through all layers. Note: Make sure turquoise triangles are folded toward quilt center. Tip Don t waste that fabric! For easy scrap quilts, take all your project scraps and cut them into individual shapes before putting away your GO! cutter. Store the shapes in shoe boxes labeled with the type of shape in the box. The next time you need a scrap quilt, pull out the appropriate boxes and start stitching. Points of Interest Placement Diagram 24" x 24" AccuQuilt Code PQ
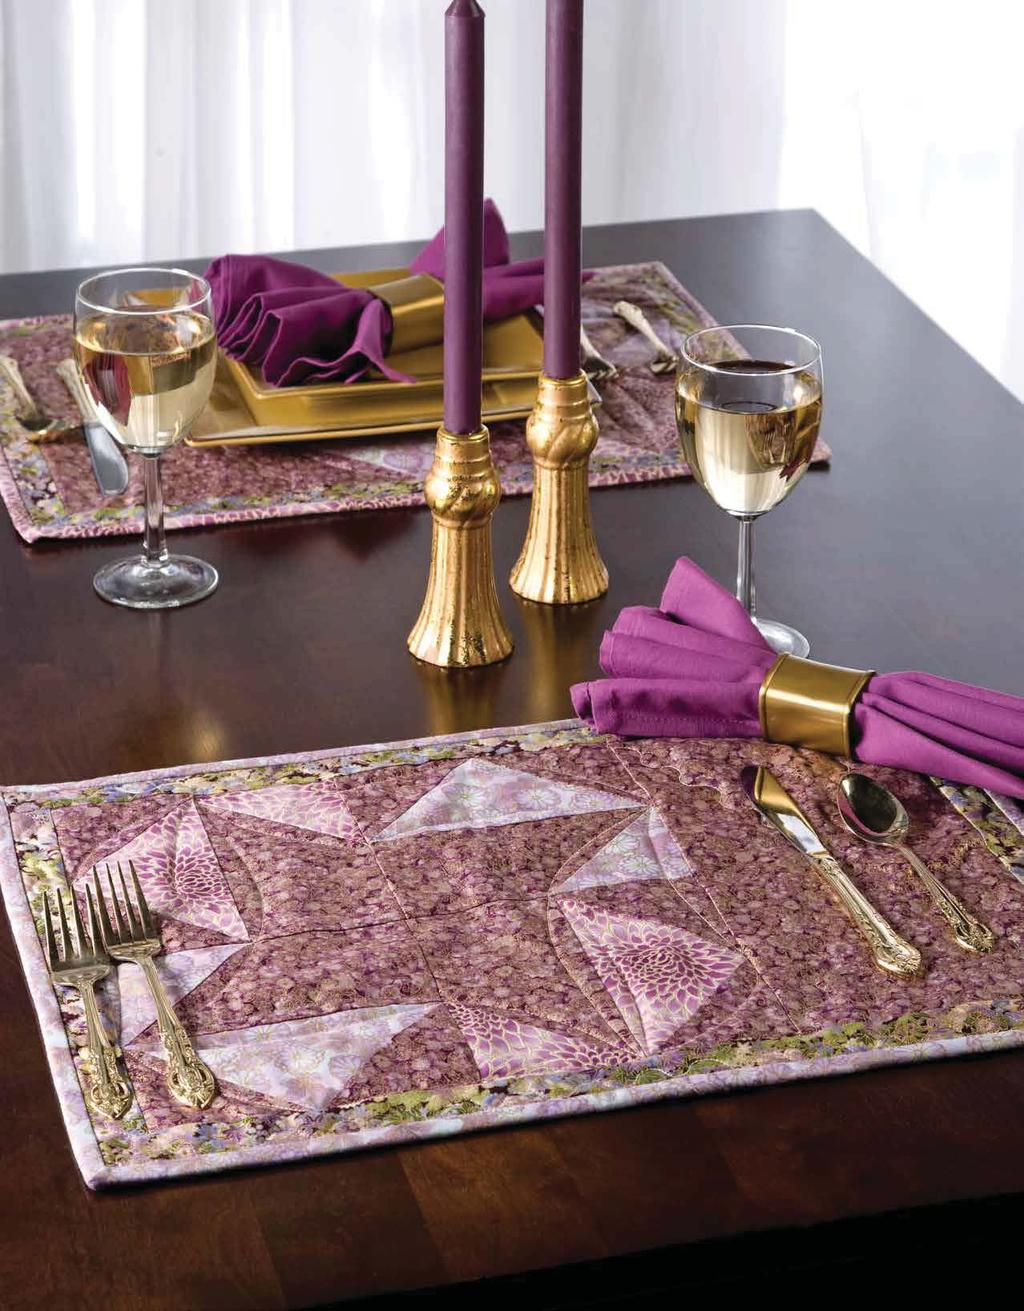
16 Use with: GO! Big GO! GO! Baby Imperial Gardens Place Mats Designed & Quilted by Jill Reber A set of elegant place mats comes together easily in an afternoon when using the AccuQuilt GO! cutter. Add some style to your dinner table tonight, or make a quick set for a friend. Project Notes Materials listed and instructions are for two place mats. Project Specifications Skill Level: Beginner Place Mat Size: 14" x 20" Block Size: 6" x 6" Number of Blocks: 4 and 4 Light 6" x 6" Block Make 4 Medium 6" x 6" Block Make 4 Materials 2 fat quarters medium purple 2 fat quarters light purple ¼ yard green print 1½ yard dark purple 2 pieces 18" x 24" batting Neutral-color all-purpose thread GO! Dies: B: GO! Square-3½" (3" Finished) (55006) D: GO! Quarter Square Triangle-6" Finished Square (55002) E: GO! Half Square Triangle-3" Finished Square (55009) H: GO! Rectangle-3½" x 6½" (3" x 6" Finished) (55005) Optional: GO! Strip Cutter-1½" (1" Finished) (55024) Optional: GO! Strip Cutter-2½" (2" Finished) (55017 or 55014) Basic quilting tools and supplies Die-Cutting Instructions 1. Cut 1 9" x width of fabric (WOF) strip dark purple and fan-fold 4½" wide. Die-cut 16 E squares using GO! Half Square Triangle-3" Finished Square (55009). 2. Cut 1 8" x 22" strip from each medium and light purple fat quarter. Die-cut four B squares from each strip using GO! Square-3½" (55006). 3. Cut 1 8" x 22" strip from each medium and light purple fat quarter. Die-cut four B squares from each strip using GO! Square-3½" (55006). 4. Cut 2 4½" x 22" strips from each medium and light purple fat quarter. Die-cut four D triangles from each strip using GO! Quarter Square Triangle-6" Finished Square (55002). Additional Cutting Instructions TIP: Use GO! Strip Cutter dies 1½", and 2½" to cut borders and binding. 1. Cut one 6½" by fabric width strip dark purple. Subcut into two I rectangles 6½" x 12½". 2. Cut two 18" x 24" rectangles dark purple for place mat backing. 3. Cut four 1½" by fabric width strips from green print for borders. Subcut four 1½" x 12½" J borders and four 1½" x 20½" K borders. 4. Cut four 2½" x 22" strips from light and medium purple for binding AccuQuilt Code PQ
17

18 Completing the Place Mats 1. Sew a dark purple E triangle to both sides of a light D triangle (Figure 1). Press seams toward E. Repeat to make four light purple flying geese units. E D Figure 1 2. Repeat step 1 with medium purple D triangles and dark purple E triangles to make four medium purple flying geese units. 3. Use a ruler to draw a diagonal line on the wrong side of each B square. Sew a B square to the left corner of each H rectangle stitching on diagonal line, referring to Figure 2. Trim seam to ¼" and press toward B (Figure 2). Repeat to make four light purple B/H units and 4 medium B/H units. 9. Layer, quilt and bind, using the light and medium purple 2½" strips. Note: Use medium purple strips for one place mat and light purple strips for second place mat. B B H Figure 2 4. Sew a light flying geese unit and light B/H unit together along one long edge, referring to Figure 3. Press seams toward B/H unit. Using light and medium purple units, make four Light blocks and four Medium blocks. I Light Make 4 Medium Make 4 Figure 4 Figure 3 5. Sew a Light and Medium block together, referring to Figure 4 for orientation. Repeat to make four rows, two for each place mat. 6. Sew two rows together for each place mat, again referring to Figure 4 for orientation of rows, to make two block units. 7. Sew I to the right side of each block unit, again referring to Figure 4. Press seams toward I. 8. Sew J borders to sides and K borders to top and bottom of place mat. Press seams toward borders. Repeat for second place mat. K Imperial Gardens Placement Diagram 14" x 20" J AccuQuilt Code PQ
 strips. 1 yard Finished (55258) Fanfold into 10¾ widths.")
 widths. Cut 16 Shape B. Light Blue D GO! Big Double Wedding Ring-12½ Finished (55258) Cut 3 2¾ x WOF strips. Fanfold into 3 widths. Cut 32 Shape D. Medium D GO!")
19 GO! Classic Double Wedding Ring Table Runner Finished Size 55" x 17" GO! Dies Used, Number of Shapes to Cut & Fabric Requirements Fabric Color Shape GO! Dies Used Number of Shapes to Cut Fabric Required One Block White A GO! Big Double Wedding Ring-12½ Cut 2 10¾ x width of fabric (WOF) strips. 1 yard Finished (55258) Fanfold into 10¾ widths. Cut 4 Shape A. White C GO! Big Double Wedding Ring-12½ Finished (55258) Cut 1 7¾ x WOF strip. Fanfold into 2¾ widths. Cut 13 Shape C. Light Blue B GO! Big Double Wedding Ring-12½ Cut 2 3 x WOF strips. Fanfold into 3 ½ yard Finished (55258) widths. Cut 16 Shape B. Light Blue D GO! Big Double Wedding Ring-12½ Finished (55258) Cut 3 2¾ x WOF strips. Fanfold into 3 widths. Cut 32 Shape D. Medium D GO! Big Double Wedding Ring-12½ Cut 3 2¾ x WOF strips. Fanfold into 3 ½ yard Blue Finished (55258) widths. Cut 32 Shape D. Medium Blue E GO! Big Double Wedding Ring-12½ Finished (55258) Cut 2 2¾ x WOF strips. Fanfold into 3 widths. Cut 20 Shape E. Medium D GO! Big Double Wedding Ring-12½ Cut 2 2¾ x WOF strips. Fanfold into 3 ½ yard Dark Blue Finished (55258) widths. Cut 20 Shape D. Medium Dark Blue E GO! Big Double Wedding Ring-12½ Finished (55258) Cut 3 2¾ x WOF strips. Fanfold into 3 widths. Cut 32 Shape E. Dark Blue B GO! Big Double Wedding Ring-12½ Cut 2 3 x WOF strips. Fanfold into 3 ½ yard Finished (55258) widths. Cut 16 Shape B. Dark Blue D GO! Big Double Wedding Ring-12½ Finished (55258) Cut 2 2¾ x WOF strips. Fanfold into 3 widths. Cut 20 Shape D. Additional Fabrics Needed Bias Binding ½ yard Backing 1¾ yards Batting 65 x 24 D E B A C A A A 2014 AccuQuilt PQ10410
. Press carefully to avoid distortion of shapes.")


20 Sewing Directions Arc Unit #1 1. Lay out shapes for one Arc Unit #1. Two medium dark blue Shape E, two medium blue Shape D and two light blue Shape D as shown. E D D D D E 2. Pin and sew together with an accurate ¼ seam allowance. Press seams in one direction. (It does not matter which direction, but be consistent). Press carefully to avoid distortion of shapes. Repeat steps 1 and 2 to make a total of two combined Arc Unit #1. 3. Mark ¼ points on one white Shape C as shown. 4. Pin and sew one white Shape C to one combined Arc Unit #1 matching ¼ points and notches, starting and stopping at the ¼ points. Press seams towards Shape C. E C D D D D E 5. Mark ¼ points on two dark blue Shape B squares as shown. B 6. Pin and sew one dark blue Shape B to each end of the remaining combined arc unit starting and stopping at the ¼ markings. 7. Pin and sew one combined arc unit with corner squares to combined arc shape with Shape C starting and stopping at the ¼ point of Shape B. Press seam toward Shape C. 8. Repeat steps 1 through 8 to make a total of eight Arc Unit #1 s. B B 9. Lay out shapes for one Arc Unit #2. Two medium blue Shape E, two medium dark blue Shape D and two dark Blue Shape D as shown. 10. Pin and sew together with an accurate ¼ seam allowance. Press seams in one direction. Repeat steps 9 and 10 to make a total of two combined Arc Unit #2. Arc Unit #2 E D D D D E 11. Mark ¼ points on one white Shape C as shown. 12. Pin and sew one white Shape C to one combined Arc Unit #2 matching ¼ points and notches, starting and stopping at the ¼ points. Press seams towards Shape C. 13. Mark ¼ points on two light blue Shape B squares as shown. B C 14. Pin and sew one light blue Shape B to each end of the remaining combined arc unit starting and stopping at the ¼ markings. 15. Pin and sew one combined arc unit with corner squares to combined arc with Shape C starting and stopping at the ¼ point of Shape B. Press seam toward Shape C. 16. Repeat steps 9 through 15 to make a total of five Arc Unit #2. B B 2014 AccuQuilt PQ10410

21 17. Lay out the eight Arc Unit #1 s, five Arc Unit #2 s, four white Shape A and remaining six light blue Shape B as shown. 18. Pin and sew one combined arc unit to one Shape A matching notches and ¼ points. Press seams towards Shape A or in the direction that makes the least bulk at the intersections. 19. Pin and sew another combined arc unit to another side of Shape A starting and stopping at the ¼ marks. Pin and sew edges of square Shape B together raw edge to ¼ point. 20. Continue to add combined arc units and Shape A in this manner to complete the runner. A A A A Quilting & Finishing 1. Layer quilt top with batting and backing. 2. Pin or baste layers together. 3. Model was custom machine quilted. 4. Attach bias binding, mitering the corners AccuQuilt PQ10410

22 2015 AccuQuilt PQ10510

 Diamond C From each 5/8 yard, cut one 5½ x WOF strip and six 7¾ x 6¾ rectangles. From each 5½ strip, sub cut 6 3 x 5½ rectangles.")

23 GO! Stretched Star Wide Table Runner Finished Size 18½" x 40½" Fabrics are Soho Solids provided by Timeless Treasures GO! Dies Used, Number of Shapes to Cut & Fabric Requirements Note: s are based on rough-cuts of 3 x 5½ rectangles for A triangles, 3¾ x 6¾ rectangles for B triangles and 5½ x 5¾ rectangles for C diamonds Fabric Color Shape GO! Dies Used Number of Shapes to Cut Fabric Required One Block Soho Solids Milk, Cream and White Triangle B GO! LeMoyne Star-9 Finished (55453) Diamond C From each 5/8 yard, cut one 5½ x WOF strip and six 7¾ x 6¾ rectangles. From each 5½ strip, sub cut 6 3 x 5½ rectangles. Cut 12 small A triangles from the rectangles. 5/8 yard of each color Soho Solids Canary, Gold, Chambray, Delft, Scarlet, Wine, Grass, Kelly, Spring, Avocado, Lilac and Pansy Soho Solids Daffodil, Orange and Red Triangle A Triangle B Triangle B GO! LeMoyne Star-9 Finished (55453) Diamond C GO! LeMoyne Star-9 Finished (55453) Diamond C From each 7¾ x 6¾ rectangles. Cut 2 small A triangles, 2 large B triangles and 2 C diamonds from the rectangles. Cut 2 large B triangles and 2 C diamonds from each 7 x 10 rectangle. Cut 2 7 x 10 rectangles from each fat eighth. Sub cut 2 large B triangles and 2 C diamonds from each 7 x 10 rectangle. One rectangle, 7 x 10 of each color One fat eighth (11 x 18 ) of each color Additional Fabrics Needed Binding and Backing 7/8 yard o Use GO! Strip Cutter-2¼ (1¾ Finished) (55053) for binding. Cut 3 2¼ x WOF strips for binding. Use remaining yardage for backing. Batting 24 x AccuQuilt PQ10510


24 Sewing Directions Note: Press all seams open, unless otherwise indicated. 1. Referring to the Assembly Diagram for color placement, organize the cut pieces for nine Stretched Star blocks. Each block requires two light and two dark color B triangles, two light and two dark color C diamonds, four white, milk, or cream B triangles, four white, milk, or cream C diamonds, and 8 white, milk or cream A triangles. 2. Lay out each block, making sure the edges of the dogeared corners are facing as shown in Diagram Sew each A Triangle to its corresponding C Diamond as shown in Diagram Align each B Triangle to the edge of the adjacent A/C unit. Start sewing from the outside edge to make the A/B/C units as shown in Diagram Sew two A/B/C units together along the long diagonal edge to complete each quarter unit as shown in Diagram Sew four quarter units together to make one complete Stretched Star block as shown in Diagram 5. Make 8 complete blocks. 7. Sew two quarter units together to make one half- Stretched Star block as shown in Diagram 6. Make 2 half-blocks. 8. Referring to the Assembly Diagram, arrange the 8 blocks and two half blocks into two vertical rows. Sew the blocks in each vertical row together, matching seams, then sew the two rows together AccuQuilt PQ10510


25 Quilting & Finishing 1. Layer the batting between the table runner top and backing, with the wrong sides facing the batting. Pin or baste the layers together. 2. Quilt as desired. Trim excess batting and backing even with the quilt top. 3. Sew the binding strips together along the short ends, using either straight or diagonal seams. Press the strip in half lengthwise, with wrong sides together. Stitch the binding to the quilt front, matching raw edges and mitering corners. Fold the binding to the quilt back, encasing the raw edges. Hand stitch the binding to the quilt back AccuQuilt PQ10510
 and GO! Square-5 (4½ Finished) (55010). To make, appliqué 20 green and 16 red orange peel shapes onto mixed white and off white squares.")
26 GO! Bloom Table Runner Finished Size 18½" x 45½" Fabrics are Soho Solids provided by Timeless Treasures Extra Orange Peel patches add dimension to this table runner made with GO! Orange Peel-4½ (55455) and GO! Square-5 (4½ Finished) (55010). To make, appliqué 20 green and 16 red orange peel shapes onto mixed white and off white squares. Create a background from the appliquéd blocks, placing 4 plain white/off white squares in the corners. Make each dimensional petal by placing two orange peel patches right side together, and stitching around the outer edges, leaving a 1½ opening for turning. Turn right side out, stitch the opening closed, and sew the petal in place on the runner, sewing a short seam through the center of the petal. Options: Echo the appliquéd background by fusing the dimensional petals together instead of turning, then stitch edges. Add extra dimension by adding batting to turned petals. Quilt turned and stuffed petals before stitching them to the background. GO! Dies Used, Number of Shapes to Cut & Fabric Requirements Note: *Apply fusible web to the wrong side of asterisked fabrics following manufacturer s instructions before cutting appliqué shapes. Fabric Color Shape GO! Dies Used Number of Shapes to Cut Fabric Required One Block Soho Solids Milk and White GO! Square-5 (4½ Finished) (55010) From each 3/8 yard, cut one 10½ x WOF strip. Fan-fold each strip at 5½ and cut 12 squares from each strip. 3/8 yard of each color Soho Solids White GO! Square-5 (4½ Finished) (55010) Cut one 10½ x WOF strip. Fan-fold the strip at 5½ and cut 12 squares. Cut four additional squares from remaining yardage. 1/2 yard *Soho Solids Lime, Spring and Avocado *Soho Solids Wine, Scarlet and Red *Soho Solids Red, Orange, Coral, Hibiscus and Caliente GO! Orange Peel-4½ (55455) GO! Orange Peel-4½ (55455) GO! Orange Peel-4½ (55455) From each ¼ yard, cut one 5 x WOF strip. Sub-cut each strip into 5 x 5 squares. Cut a total of 20 Orange Peel shapes. TIP: Use the GO! Square-5 (4½ Finished) (55010) to cut your 5 squares From each ¼ yard, cut one 5 x WOF strip. Sub-cut each strip into 5 x 5 squares. Cut a total of 16 Orange Peel shapes. TIP: Use the GO! Square-5 (4½ Finished) (55010) to cut your 5 squares From each ¼ yard, cut one 5 x WOF strip. Sub-cut each strip into 5 x 5 squares. Cut a total of 32 Orange Peel shapes. TIP: Use the GO! Square-5 (4½ Finished) (55010) to cut your 5 squares 1/4 yard of each color 1/4 yard of each color 1/4 yard of each color 2015 AccuQuilt PQ10511
 Sewing Directions Note: Press all seams open and use a ¼ seam allowance unless otherwise indicated. 1. Place each fusible-backed orange peel shape diagonally on one milk, cream, or white square, with each orange peel point 1/4\" from the square's corners.")

27 Additional Fabrics Needed Binding and Backing 1 3/8 yard o Use GO! Strip Cutter-2¼ (1¾ Finished) (55053) for binding. Cut 3 2¼ x LOF strips for binding. Use remaining yardage for backing. Batting 24 x 51 Fusible Web 3 yards (based on 17 width) Sewing Directions Note: Press all seams open and use a ¼ seam allowance unless otherwise indicated. 1. Place each fusible-backed orange peel shape diagonally on one milk, cream, or white square, with each orange peel point 1/4" from the square's corners. Fuse the orange peel shapes in place according to manufacturer's instructions. Make 20 lime, spring or avocado leaf blocks, and 16 wine, scarlet, or cherry petal blocks. 2. Straight or decorative stitch around the edges of each orange peel shape, securing the fused shapes to the block. 3. Referring to the Bloom Assembly Diagram, arrange the four remaining milk, cream, or white squares and the fused leaf and petal blocks into ten rows of four blocks each. 4. Sew the blocks in each row together along adjacent edges. 5. Sew the rows together, matching seams. 6. To make the dimensional petals, place two of the red, orange, punch, coral or hibiscus orange peel shapes right sides together, matching outer edges. Using a 1/4" seam allowance, stitch around the outer edge of the petal, leaving a 2" opening on one edge for turning as shown in Diagram 1. Note: For more dimensional petals, place a layer of batting beneath petals before sewing around the outer edge. Trim excess batting very close to stitching before turning. 7. Trim the seam allowance at each petal point, then turn the petal right side out. Smooth the curved seams and points. Press, tucking the seam allowances inside at the opening. Topstitch around the petal perimeter, close to 2015 AccuQuilt PQ10511


28 the outer edge, or hand stitch the opening closed. Add extra stitching to the petals, if desired. Make 16 dimensional petals. Quilting & Finishing 1. Layer the batting between the table runner top and backing, with the wrong sides facing the batting. Pin or baste the layers together. 2. Quilt as desired. Trim excess batting and backing even with the quilt top. 3. Sew the binding strips together along the short ends, using either straight or diagonal seams. Press the strip in half lengthwise, with wrong sides together. Stitch the binding to the quilt front, matching raw edges and mitering corners. Fold the binding to the quilt back, encasing the raw edges. Handstitch the binding to the quilt back. 4. Position the dimensional petals on the table runner, aligning the points of the dimensional petals with the seams between the runner s petal blocks, as shown in Diagram 2. Hand or machine stitch one end of each dimensional petal to the runner to secure the petals in place. Alternate Color Scheme 2015 AccuQuilt PQ10511
READY. SET. FAN FAVORITES PATTERNS
 READY. SET. FAN FAVORITES PATTERNS USING THE ACCUQUILT GO! GO! Big and GO! Fabric Cutter Friendly 4 FREE patterns $ 15 Value GO! Talk to the Animals Baby Quilt featuring Riley Blake Designs Fabric Download
BABY QUILTS Using the AccuQuilt GO!
 Ready, Set, GO! BABY QUILTS Using the AccuQuilt GO! 7 FREE patterns INSIDE GO! Talk to the Animals Baby Quilt featuring Riley Blake Designs Fabric GO! Big & GO! Fabric Cutter Friendly 2017 AccuQuilt to
READY. SET. QUICK & EASY PATTERNS
 READY. SET. QUICK & EASY PATTERNS USING THE ACCUQUILT GO! GO! Big and GO! Fabric Cutter Friendly 6 FREE patterns INSIDE GO! X Marks the Spot Baby Quilt featuring Riley Blake Designs Fabrics Download FREE
Ready, Set, GO! HOLIDAY PATTERNS. Using the AccuQuilt GO! FREE. patterns INSIDE. visit accuquilt.com to order call
 Ready, Set, GO! HOLIDAY PATTERNS Using the AccuQuilt GO! 14 FREE patterns INSIDE visit us @ accuquilt.com to order call 888.258.7913 GO! Hugs and Kisses Bed Runner Finished Size 81" x 27" Fabrics are from
MEET THE GO! CUTTERS: 90% faster than rotary cutting
 WHY YOU NEED A FABRIC CUTTER: a better way to cut TM Turn your patterns into quilts faster and more accurately with the AccuQuilt GO! fabric cutting systems. With over 200 piecing and appliqué shapes,
MEET THE GO! CUTTERS: 90% faster than rotary cutting
 WHY YOU NEED A FABRIC CUTTER: a better way to cut TM Turn your patterns into quilts faster and more accurately with the AccuQuilt GO! fabric cutting systems. With over 200 piecing and appliqué shapes,
GO! Qube 6" Stained Glass Quilt Finished Size: 42½" x 48½"
 GO! Qube 6" Stained Glass Quilt Finished Size: 4½" x 48½" For use with GO! Qube Mix & Match 6" Block (55775) Fabrics are from Timeless Treasure s Studio Basics Collection To make a 6" Block use GO! Qube
GO! Qube 6" Storm at Sea Throw Quilt Finished Size: 50" x 50"
 GO! Qube 6" Storm at Sea Throw Quilt Finished Size: 50" x 50" For use with GO! Qube Mix & Match 6" Block (55775) Fabrics are provided by Island Batik To make a 6" Block use GO! Qube Mix & Match 6" Block
GO! Qube 8" Spools and Kites Quilt Finished Size: 44½" x 44½"
 GO! Qube 8" Spools and Kites Quilt Size: 44½" x 44½" For use with GO! Qube Mix & Match 8" Block (55776) Fabrics are from Robert Kaufman s Rhoda Ruth Collection by Elizabeth Hartman To make an 8" Block
GO! Qube 9" Next Door Neighbor Quilt Finished Size: 44" x 44"
 GO! Qube 9" Next Door Neighbor Quilt Finished Size: 44" x 44" Fabrics are provided by Island Batik Dies Needed: GO! Qube Mix & Match 9" Block (777) GO! Quarter Square Triangle-4½" Finished Square (Shape
Folk-Art Dish Garden
 Folk-Art Dish Garden Designed by Kim Diehl Finished quilt size: 20½" x 24½" Finished center block size: 11½" x 15½" ~ 1 ~ Materials ⅝ yard of tan print #1 for background 1 chubby sixteenth (9" x 11") each
GO! Talk To The Animals Baby Quilt Finished Size 41" x 41"
 GO! Talk To The Animals Baby Quilt Finished Size 41" x 41" Fabrics provided by Riley Blake Fabrics GO! Dies Used, Number of Shapes to Cut & Fabric Requirements Fabric Color Shape GO! Dies Used Number of
MEET THE GO! CUTTERS: 90% faster than rotary cutting
 WHY YOU NEED A FABRIC CUTTER: a better way to cut TM Turn your patterns into quilts faster and more accurately with the AccuQuilt GO! fabric cutting systems. With over 200 piecing and appliqué shapes,
Fabric and Supplies. Featuring fabrics from the Ellie II collection by Sue Penn for.
 s r e h t a e F Elegant Featuring fabrics from the Ellie II collection by Sue Penn for Finished Quilt Size 50" x 50" Quilt design by Abigail Dolinger for Studioe Fabrics ay Black Colorw Fabric and Supplies
MEET THE GO! CUTTERS: 90% faster than rotary cutting
 WHY YOU NEED A FABRIC CUTTER: a better way to cut TM Turn your patterns into quilts faster and more accurately with the AccuQuilt GO! fabric cutting systems. With over 200 piecing and appliqué shapes,
GO! Qube 6" Rick Rack Flower Throw Quilt Finished Size: 46" x 46"
 GO! Qube 6" Rick Rack Flower Throw Quilt Finished Size: 46" x 46" Fabrics provided by Timeless Treasures For use with GO! Qube Mix & Match 6" Block (55775) and GO! Qube 6" Companion Set Classics (55779)
GO! Qube 12" Laura s Kitty Quilt Finished Size: 40" x 46"
 GO! Qube 12" Laura s Kitty Quilt Finished Size: 40" x 46" Fabrics are Little House on the Prairie Mansfield & Prairie Icons and provided by Andover Fabrics A charm pack of the Mansfield Collection, 3/4
GO! Qube 8" Twirling Petals Quilt Finished Size: 50" x 50"
 GO! Qube 8" Twirling Petals Quilt Finished Size: 50" x 50" Fabrics are from the Sugar Pie Collection by Lella Boutique and are provided by Moda Fabrics Dies Needed: GO! Qube Mix & Match 8" Block (55776)
 Flower Festival by Debbie Beckwith Graves 33" x 39" Featuring fabrics from the collection by Materials E30-BUNDLES-081 E60-1412-GRN E60-1414-ORG E60-1415-TURQ (backing) E60-1416-BLU (incl. binding) E60-1416-ORG
Figgy Pudding #131. Finished quilt size is 69-1/2 x 69-1/2. Materials Needed:
 #131 Figgy Pudding Finished quilt size is 69-1/2 x 69-1/2 Materials Needed: 10 fat quarters 2-3/4 yards background fabric 1 fat quarter for corner blocks 1 yard border fabric 2/3 yard binding fabric 4-1/2
Sunny Sue Baby Quilt
 Sunny Sue Baby Quilt Designed & Quilted by Julie Weaver Use with: GO! Big GO! GO! Baby Make a nostalgic baby quilt that will surely please a new mother. The Sunbonnet Sue die makes cutting a breeze and
GO! Qube 9" City Life Quilt Finished Quilt Size: 48 1 / 8" x 64" Finished Block Size: 15 5 / 8" x 15 5 / 8"
 GO! Qube 9" City Life Quilt Finished Quilt Size: 48 1 / 8" x 64" Finished Block Size: 15 5 / 8" x 15 5 / 8" Fabrics are from the City Life Collection and are provided by Dear Stella. Dies Needed: GO! Qube
Holidays with Our Homies
 Holidays with Our Homies Featuring Holiday Homies by Tula Pink Celebrate the holidays with Buck the dog, Gus the buck, and Ryan the goose in this whimsical saw tooth star quilt. Collection: Technique:
Quilt-As-You-Go King Size Carpenter Star
 Quilt-As-You-Go King Size Carpenter Star Pattern by Linda Dufresne Hobbystash.com Finished Size : 120 x 120 (Illustrated on a queen size bed as a bedspread) The top has been divided into 3 sections to
Kimono Collection MATERIALS. Finished quilt size CUTTING
 Kimono Collection Colourful Japanese fabrics take the place of traditional paper in these tiny origami kimonos and a simple nine-patch quilt shows them off to perfection. MATERIALS Nine pieces of assorted
PROJECT TITLE: Celtic Unity. PROJECT MAKER: Leanne Ballschmieter Quilted by: Emily Klein-Ballschmieter ISSUE: 28-05
 PROJECT TITLE: Celtic Unity PROJECT MAKER: Leanne Ballschmieter Quilted by: Emily Klein-Ballschmieter ISSUE: 28-05 PROJECT BLURB: Fascinated by the Celtic interlinked designs Leanne finally plucked up
Finished Size: 75"x 75"
 Finished Size: 75"x 75" Finished Size: 75"x 75" Block Size: 1"x1" and 6"x6" Quilters Basics Read instructions before beginning a project. All instructions include a ¼" seam allowance. Press as you go.
Fox Fun Mug Rug H I J. Figure 1
 one day only DESIGN BY JOANNA WILCZYNSKA Fox Fun Mug Rug Good things come in small packages. Create a cute coaster that may end up on a wall instead. ScRap- FRIENDLY PROJECT SPECIFICATIONS Skill Level:
My Sunflower Garden Quilt 1
 My Sunflower Garden Quilt 1 by Denise Russell Quilt size: 72 x 92 - Pillow size: 20 x 32 Skill Level: Intermediate 49 West 37th Street New York, NY 10018 Tel: 212-686-5194 - Fax: 212-532-3525 Toll Free:
Susannah Bee Quilt. Quilt designed by Terri Butler Finished size is approximately 43" x 60" A DIVISION OF HAMIL GROUP
 Susannah Bee Quilt Quilt designed by Terri Butler Finished size is approximately 43" x 60" A DIVISION OF HAMIL GROUP Quilt designed by Terri Butler Materials and Cutting Note: WOF is width of fabric from
Starstruck Throw. Design by Chris Malone Quilted by Jean McDaniel
 Starstruck Throw esign by hris Malone Quilted by Jean Mcaniel Use with: GO! Big GO! GO! Baby This design allows you to color-coordinate each block for an overall controlled scrappy look. Easy piecing and
GO! Qube 8" Hugs & Kisses Baby Quilt Finished Size: 40" x 40"
 GO! Qube 8" Hugs & Kisses Baby Quilt Finished Size: 40" x 40" For use with GO! Qube Mix & Match 8" Block (55776) Fabrics are from the Cotton Couture Solids and assorted dot prints collections and are provided
Coastal Chic Batiks Collection by Monique Jacobs
 FREE Quilt Pattern 52" x 65" quilt designed by Monique Jacobs Coastal Chic Batiks Collection by Monique Jacobs Coastal Chic Batik Quilt Instructions For best results, read the pattern completely first.
Lone Star Quilt from a Jelly Roll. Written by Donna Jordan for Jordan Fabrics Finished Size: 58 x 74
 Lone Star Quilt from a Jelly Roll Written by Donna Jordan for Jordan Fabrics Finished Size: 58 x 74 Required Materials: 36 2 ½ Strips WOF Background and border: 3 ½ yards Binding: 5 /8 yard Backing: 3
Spring Rain Bed Runner
 Use with: GO! Big GO! GO! Baby Spring Rain Bed Runner Designed by Vivian Peritts for AccuQuilt As seen in Modern Quilts Unlimited Spring 2016 issue www.accuquilt.com 888.258.7913 2016 AccuQuilt Code PQ11037
Old Glory One Stamp. Alternate Piano Key Border. Morning Glory Designs by Reeze L. Hanson Quilts of Valor Pattern 65 x 79
 Old Glory One Stamp Alternate Piano Key Border Morning Glory Designs by Reeze L. Hanson Quilts of Valor Pattern 65 x 79 Instructions for cutting and piecing Quilt Panel and Border 1 1. Trim the quilt panel
A Star in the Forest Table Topper 23 x 23 - A fat quarter project
 A Star in the Forest Table Topper 23 x 23 - A fat quarter project Read instructions before beginning. This project requires six fat quarters plus ¾ yard of backing fabric. Binding comes from one of the
set; press. Repeat to make 17 strip sets. Cut each strip set into 8 (21/2" x 41/2") B segments as shown in Figure 1.
 B segments as shown in Figure 1.") DESIGN BY SUE HARVEY Posy Patch Frayed edges form the petals in this garden of pastel posies. SPECIFICATIONS Skill Level: Confident Beginner Quilt Size: 56" x 72" Block Size: 8" x 8" Number of Blocks:
DESIGN BY SUE HARVEY Posy Patch Frayed edges form the petals in this garden of pastel posies. SPECIFICATIONS Skill Level: Confident Beginner Quilt Size: 56" x 72" Block Size: 8" x 8" Number of Blocks:
Handful of Stars. by Kim Diehl. Finished Quilt Size: 621/2" x 621/2" Finished Star Block Size: 8" x 8" A Free Project Sheet from
 Handful of Stars by Kim Diehl Finished Quilt Size: 621/2" x 621/2" Finished Star Block Size: 8" x 8" A Free Project Sheet from 49 West 37th Street, New York, NY 10018 tel: 212-686-5194 fax: 212-532-3525
Beetles, Bees, and Butterflies
 Beetles, Bees, and Butterflies A Whimsical Row Quilt Designed by Debbie Beckwith Graves 48 ½" x 53" Featuring fabrics from The Happy Garden collection by Courtesy MHS Licensing for Materials Navy Happy
 Bella! Finished Quilt Size 43" x 43" Featuring fabrics from the Bella Flora collection by Project Fabric Requirements 1550-33... 5 8 Yard 1551-66... 1 8 Yard 1552-33... ½ Yard 1553-33... ½ Yard 1554-33...
Cheri Good Quilt Design s Ribbon Star
 Cheri Good Quilt Design s Ribbon Star Designer: Cheri Good Quilt Designs Ribbon Star Size 56 x 56 #110A Ribbon Star Strip Quilt Supplies Finished quilt size: 56 x 56 Cotton thread to match fabrics Basic
Fall Appliqués #12601 / 6 Designs
 #12601 / 6 Designs Note: Some designs in this collection may have been created using unique special stitches and/or techniques. To preserve design integrity when rescaling or rotating designs in your software,
BUTTERFLY GARDEN. The Red Boot Quilt Company
 BUTTERFLY GARDEN The Red Boot Quilt Company www.theredbootquiltcompany.com BUTTERFLY GARDEN Approx. Size 89 1/2in length x 92 1/2in width BEFORE THE FUN BEGINS Please read all instructions before you begin.
Greek Square Table Runner
 Greek Square Table Runner Quilt Finished Size: 70-1/2" x 25-1/2" Block Finished Size: 12" Printing Options: Printer-Friendly Web Page or PDF Fabric Requirements: Dark: 1 yard Medium: 3/4 yard Light: 3/4
THE FLOWER FAIRIES. The Red Boot Quilt Company
 THE FLOWER FAIRIES The Red Boot Quilt Company www.theredbootquiltcompany.com THE FLOWER FAIRIES Approx. Size 62in x 61in BEFORE THE FUN BEGINS Please read all instructions before you begin. Abbreviations.
Photo location courtesy of Judith Batty. McCallsQuilting.com McCall s Quick Quilts 1
 Photo location courtesy of Judith atty. McCallsQuilting.com 017 McCall s Quick Quilts 1 Changing Lanes simple patches of color make this unusual quilt quick & colorful Designed and Sewn by Stephanie Sheridan
THE FLOWER FAIRIES. This is a free pattern provided by The Red Boot Quilt Company 2017 STRICTLY NOT FOR RESALE OR DISTRIBUTION
 THE FLOWER FAIRIES This is a free pattern provided by The Red Boot Quilt Company 2017 STRICTLY NOT FOR RESALE OR DISTRIBUTION The Red Boot Quilt Company The Red Boot Quilt Company THE FLOWER FAIRIES Approx.
SEASCAPES. Extra supplies needed: freezer paper, a fabric glue stick and liquid fabric glue, such as Roxanne's.
 SEASCAPES Quilt design by Linda Finch featuring the Seascape by Punch Studio collection produced by Hoffman California Fabrics Finished quilt size = 54 x 65½" Skill level: Intermediate/Experienced Extra
How to use your GO! Qube with this Pattern
 How to use your GO! Qube with this Pattern Use this chart to find which GO! Qube dies are compatible with the dies listed on the pattern 1 2 3 4 5 6 7 8 Quilt Shape By Number 1 2 3 4 6 7 8 5 GO! Qube Item
california poppies Designed and made by Sylvia Pippen paradise stitched sashiko & appliqué quilts FINISHED QUILT: 16 20
 2009 C&T Publishing from Paradise Stitched by Sylvia Pippen. Reproduciton or distribution of this material is strictly prohibited. california poppies FINISHED QUILT: 16 20 Designed and made by Sylvia Pippen
CHRISTMAS CANDY. Quilt Finished Size: 64" x 80" Block Finished Size: 8" x 8"
 CHRISTMAS CANDY Quilt design and instructions by Wendy Sheppard Specification: Advanced Beginner Quilt Finished Size: 64" x 80" Block Finished Size: 8" x 8" Cutting Instructions: From Fabric A, cut for
A SPOOKY SLEEPOVER. This is a free pattern provided by The Red Boot Quilt Company The Red Boot Quilt Company
 A SPOOKY SLEEPOVER The Red Boot Quilt Company The Red Boot Quilt Company A SPOOKY SLEEPOVER Approx. Size 38 1/2in x 57 1/2in BEFORE THE FUN BEGINS Please read all instructions before you begin. Abbreviations.
Nature's Studio Checkerboard Flowers
 By Larisa Key Finished Quilt Size: 68" x 79", Finished Block Size: 11" x 11" Classic Cottons Nature's Studio Fabrics - Style #3644 MATERIALS Yardage is based on 42" wide useable fabric 1-7/8 yd. of white
125 th Anniversary Quilt. Celebrating the BERNINA 125 th Anniversary!
 125 th Anniversary Quilt Celebrating the BERNINA 125 th Anniversary! : fabrics Fabric A: 5490M-33 Paisley Gold 1-5/8 yards Fabric B: Binding 5494M-07 1/2 yard Fabric G: 5490-07 highlights only for embroidered
Reflections: Jewel Tones Quilt featuring the Reflections Collection from EBI Fabric Corp.
 Reflections: Jewel Tones Quilt featuring the Reflections Collection from EBI Fabric Corp. Size: 54" x 54" Skill Level: Intermediate Design by Sasha K Studio Fabric Requirements & Cutting Instructions (A)
Accent on Amish Welcome!
 Quilt Along Accent on Amish Welcome! Designed by The Staff of McCall s Quilting Made and Machine Quilted by Sheryl Martin Skill Level Beginner Finished Quilt Size 44H x 44H Number of Blocks & Finished
Iris Table Topper/Back to Front Binding Tutorial Skill Level: Beginner
 Iris Table per/back to Front Binding Tutorial Skill Level: Beginner Designed by Alexandra Henry Made by Alexandra Henry www.artbyalexa.com This spring table topper will be a welcome addition to any decor.
Chloe Collection by Maywood Studio
 70" x 82" quilt designed by Denise Russell for Maywood Studio Chloe Collection by Maywood Studio Chloe Quilt Instructions For best results, read the pattern completely first. Press in the direction of
Includes Binding. (If using WIDE Backing you will need 3 Yards)
") Sparkling Hexies Featuring the Effervescence Collection by Kaufman Design and Instruction by equilter and Larene Smith of The Quilted Button Approximate Finished Size: 73 x 88 General Information Skill
Sparkling Hexies Featuring the Effervescence Collection by Kaufman Design and Instruction by equilter and Larene Smith of The Quilted Button Approximate Finished Size: 73 x 88 General Information Skill
QTfabrics.com QT Fabrics All rights reserved Pg 1. Designed by: Georgie Gerl. SIZE 77" X 63" for ½"binding 76½" x 62½" for ¼" binding
 SIZE 77" X 63" for ½"binding 76½" x 62½" for ¼" binding Jerry Gadamus Pg 1 Finished Size: 77"x 63" 26649X One Panel FABRIC REQUIREMENTS 26652K 3/4YARD 26653 X 1/4 YARD 26650 R 1 5/8 or 2 YARDS 1 BOLT 1
Happy Winter Snowman Quilt
 1 Happy Winter Snowman Quilt This quilt is sure to become a classic addition to your décor at Christmas time. Rows of fun snowmen and loving hearts are highlighted against a deep blue winter sky. The quilt
Cat's Night Out. Prepare Templates: Prepare templates as directed on the Template Pages.
 Quilt by Lucy A. Fazely & Michael L. Burns Finished Quilt: 78" x 80-1/2" - Finished Block Size: 6" to 12" Nature's Studio fabrics by Classic Cottons - Style #3644 Fabric Requirements: Based on 44" wide
SUMMER FOUR ALL SEASONS. Fabrics by Kim Schaefer. Quilt designed by Jean Ann Wright makower uk (800)
") FOUR ALL SEASONS SUMMER Fabrics by Kim Schaefer 1384 Broadway New York, NY 10018 Quilt designed by Jean Ann Wright makower uk (800) 223-5678 www.andoverfabrics.com Quilt size: 71" x 92" 8/26/10 Introducing
FOUR ALL SEASONS SUMMER Fabrics by Kim Schaefer 1384 Broadway New York, NY 10018 Quilt designed by Jean Ann Wright makower uk (800) 223-5678 www.andoverfabrics.com Quilt size: 71" x 92" 8/26/10 Introducing
Itty Bitty Baskets. As seen in Modern Quilts Unlimited Fall 2016 Issue # Designed by Missy Shepler for AccuQuilt
 Use with: GO! Big GO! GO! Baby Itty Bitty Baskets Designed by Missy Shepler for AccuQuilt As seen in Modern Quilts Unlimited Fall 2016 Issue #17 www.accuquilt.com 888.258.7913 2017 AccuQuilt Code PQ11052
SMILE AND STAND TALL By Suzan Pons
 SMILE AND STAND TALL By Suzan Pons Size: 44 x 50 Main Fabric: about 40 assorted strips of batik fabric 2 ½ inches x 44 inches Inner Border: about 10 inches of contrasting fabric, WOF Side borders are 1
Chili Pepper Quilt Patterns
 Chili Pepper Quilt Patterns Free Pattern ~ Cry Baby ~ Instructions Page 1 Chili Pepper Quilt Patterns ~ Cry Baby ~ Crib Quilt Finished Size: 39.5" x 50.5" Fabric A 1 st Bright Fabric Fabric B 2 nd Bright
Making the List. quilt pattern.
 Dear Stella fabrics are available online and in sewing and quilting shops worldwide. Ask for it at your local quilt shop! Finished quilt size: Approximately 54 1 /2" x 64 1 /2" quilt pattern DESIGNED BY
Ladybug. Fly Away Home quilt designed by Leigh Headington. Finished quilt: " x " Finished block: 12" square
 Ladybug Fly Away Home quilt designed by Leigh Headington Finished quilt: 64 1 2" x 76 1 2" Finished block: 12" square Fabric Requirements 3/8 yard Dot-C1820 Red 1/4 yard Fun-C3851 Black 1/4 yard Fun-C3851
Daily Grind. Designed by: Janet Wecker Frisch. Approximate napkin size: 17 X 17. Approximate quilt size: 61 X 61
 Daily Grind Designed by: Janet Wecker Frisch Approximate quilt size: 6 X 6 Approximate napkin size: 7 X 7 2673 A 2674 A backing 2676 AJ also binding 2676 E Ap r 2672 A on :o ne si ze fit s m os t Approximate
A SPOOKY SLEEPOVER. The Red Boot Quilt Company
 A SPOOKY SLEEPOVER The Red Boot Quilt Company www.theredbootquiltcompany.com A SPOOKY SLEEPOVER Approx. Size 38 1/2in x 57 1/2in BEFORE THE FUN BEGINS Please read all instructions before you begin. Abbreviations.
Pumpkins and Patches Wall Hanging 49 x 49 Black Gold Version by Denise Russell
 Cutting: Pumpkins and Patches Wall Hanging 49 x 49 Black Gold Version by Denise Russell From G8555-22G Ivory Gold: *Cut one 2-1/4 x WOF strip. Sub-cut nine 2-7/8 x 2-1/4 rectangles. From P7605-157G Verde
Notes - Please wash, dry & iron your fabric before beginning. - Sew all seams with an accurate 1/4 seam allowance. CUTTING INSTRUCTIONS
 Notes - Please wash, dry & iron your fabric before beginning. - Sew all seams with an accurate 1/4 seam allowance. CUTTING INSTRUCTIONS Indicates fabric pattern is directional on strips Fabric A: Horizontal
S TA C K, SLASH & SASH. Quilting. Quilting 10+ unique projects
 Quilting S TA C K, SLASH & SASH Quilting 10+ unique projects 141355 S TA C K, S L A S H & SASH Quilting Edited by Carolyn S. Vagts 2 Introduction is all about creating uniquely beautiful quilts. Create
Mr. Morris. The Original Morris & Co., Kelmscott
 Featuring The Original Morris & Co., Kelmscott The gentle curves in this quilt are nearly as easy to sew as the straight seams give it a try! Gorgeous William Morris prints provide awesome depth and interest,
Under The S ea Table Runner
 Finished Size: 12" x 48" (30.48cm x 121.92cm) Under The S ea Supp lies Needed B efore you begin 3 Wishes Fabric Under the Sea Collection 1 yd. (91.44cm) 12281-Lt. Blue 3 8 yd. (34.29cm) 12289-Lt. Blue
Gypsy Dreams. Quilt 2 by Denise Russell. Skill Level: Intermediate. Quilt size: 57 x 69. Free Project NOT FOR RESALE
 Gypsy Dreams Quilt 2 by Denise Russell Quilt size: 57 x 69 Blank Quilting Corporation 49 West 37th Street New York, NY 10018 Tel: 800-294-9495 Fax: 212-679-4578 www.blankquilting.net Skill Level: Intermediate
Double Wedding Ring Bed Runner
 Use with: GO! ig GO! GO! aby ouble Wedding Ring ed Runner esigned & Quilted by hris Malone The die-cut pieces make this difficult pattern a breeze to cut. Take a traditional Wedding Ring pattern and give
Impulse. 1/4 yard each very dark green (A), dark green (B),
, dark green (B),") design by LUCY A. FAZELY & MICHAEL L. BURNS Purple/Blue Impulse 12" x 12" Block Make 12 Blue/Green Impulse 12" x 12" Block Make 12 Orange/Red/Green Impulse 12" x 12" Block Make 12 Red/Purple Impulse 12"
design by LUCY A. FAZELY & MICHAEL L. BURNS Purple/Blue Impulse 12" x 12" Block Make 12 Blue/Green Impulse 12" x 12" Block Make 12 Orange/Red/Green Impulse 12" x 12" Block Make 12 Red/Purple Impulse 12"
Central. Fabric. Dot to Dot Quilt. Supplies Needed. Instructions. Skill Level 2: Experience necessary. Project Instructions
 Fabric Project Instructions Central Dot to Dot Quilt Skill Level 2: Experience necessary Crafting Time: Weekend Project Supplies Needed 1 Fabric Central Dot Bundle 1 1 Fabric Central Dot Bundle 2 Fabric
Royal Purple Blossoms
 Royal Purple Blossoms The cutwork and colors of this mat have a distinctly Oriental flair. Project Specifications Skill Level: Beginner Candle Mat Size: 17" diameter Fabric & Batting Fat quarter of light
Little Aurora Borealis Quilt Size: 40 x 56 Design by: Marinda Stewart Level: CONFIDENT BEGINNER
 Little Aurora Borealis Quilt Size: 40 x 56 Design by: Marinda Stewart Level: CONFIDENT BEGINNER Free Pattern available on michaelmillerfabrics.com FABRIC REQUIREMENTS CX6574 Lipstick 7/8 yard CX6574 Fuchsia
BAUBLES & BEADS. Quick & Easy Machine Piecing Techniques P109. FINISHED SIZE: 73 1/2" x 87" Designed by Annis Clapp Machine Quilted by Donna Akins
 BAUBLES & BEADS P109 Quick & Easy Machine Piecing Techniques FINISHED SIZE: 73 1/2" x 87" Designed by Annis Clapp Machine Quilted by Donna Akins fast2sew Ultimate Seam Guide BAUBLES & BEADS Read all instructions
Harmony Rose by Susan Edmonson
 Harmony Rose by Susan Edmonson 44" x 52" Harmony Roseby Harmony Rose Collection Featuring fabrics from the by for by Materials E60-1385-TAN E60-1386-TAN E60-1387-GRAY E60-1388-TAN E60-1389-RED E60-1390-RED
Sassy Runner. Design by Wendy Sheppard Skill Level: Confident Beginner Number of Blocks: 8 Block Size: 8" x 8" (finished) quiltingtreasures.
 quiltingtreasures.") Approximate Size: 24½" x 42¼" Design by Wendy Sheppard Skill Level: Confident Beginner Number of Blocks: 8 Block Size: 8" x 8" (finished) 1 Studio 8 FABRIC REQUIREMENTS 24194 W 24195 N 24196 S 24196 N
Approximate Size: 24½" x 42¼" Design by Wendy Sheppard Skill Level: Confident Beginner Number of Blocks: 8 Block Size: 8" x 8" (finished) 1 Studio 8 FABRIC REQUIREMENTS 24194 W 24195 N 24196 S 24196 N
SPRING MANDALA Cushion
 SPRING MANDALA Cushion The Red Boot Quilt Company SPRING MANDALA Quilt The Red Boot Quilt Company www.theredbootquiltcompany.com SPRING MANDALA QUILT & CUSHION Approx. size Quilt 56 1/2in x 56 1/2in Cushion
Project: Reversible Quilted Pillowcase
 Project: Reversible Quilted Pillowcase Pattern 65 FABRICS are from the Anything Goes collection by Ann Lauer for Benartex (benartex.com). of Meredith Corporation. Meredith Corporation 2017. All rights
Starry Scrappy Santa. Tiny 1"-finished squares are easily stitched into a background using a fusible 1" grid.
 DESIGN Y TAMMY CARLSON OF HAPPY HOLLOW DESIGNS Starry Scrappy Santa Tiny 1"-finished squares are easily stitched into a background using a fusible 1" grid. SpEcIFIcatIOnS Skill Level: Intermediate Quilt
Little Forest Quilt. 1. Use a rotary cutter and acrylic ruler to cut the number of pieces from each fabric as shown.
 Little Forest Quilt Finished Size: 40 ½" x 48 ½" (102.87cm x 123.19cm). Supplies Needed 3 Wishes Fabric Little Forest Collection 5 8 yd. (57.15 cm) - 12944-Gray 3 8 yd. (34.29cm) - 12949-Brown (binding)
Sunflower Garden Topper
 Quilt designed by: Sue Harvey and Sandy Boobar of Pine Tree Country Quilts Finished quilt size: 26" x 26" Finished block size: 6 ½" x 6 ½" Number of blocks: 9 Angela Anderson 1 FABRIC REQUIREMENTS Design
LEVEL: INTERMEDIATE SIZE: 40 SQUARE QUILT DESIGNED BY MARINDA STEWART
 Date: August 3, 2015 glitz sampler LEVEL: INTERMEDIATE SIZE: 40 SQUARE QUILT DESIGNED BY MARINDA STEWART FABRIC REQUIREMENTS 45 x 45 backing & batting MC6932 Aqua MC6930 Pink MC6930 Peach MC6930 Shell
Quilt designed by Sue Harvey and Sandy Boobar of Pine Tree Country Quilts Yardages and Cutting
 Fowl Play 54" x 60" Quilt designed by Sue Harvey and Sandy Boobar of Pine Tree Country Quilts www.pinetreecountryquilts.com Yardages and Cutting Note: WOF means width of fabric from selvage edge to selvage
Butter Churn Berry Blossoms
 Butter Churn Berry Blossoms by Kim Diehl Finished Quilt Size: 201/2" x 201/2" A Free Project Sheet from 1 49 West 37th Street, New York, NY 10018 tel: 212-686-5194 fax: 212-532-3525 Toll-free: 800-294-9495
Wrap your favorite novel in a quilted cover to protect it and turn heads. It adjusts to fit any size paperback and has a handy bookmark.
 DESIGNED & QUILTED BY CINZIA ALLOCCA Mini Quilt Bookwrap SPECIFICATIONS Skill Level: Confident Beginner Bookwrap Size: 17" x 9" (excluding ties and bookmark) Wrap your favorite novel in a quilted cover
Home HOME SWEET. Embroider whimsical cottages appliquéd in cheery fabrics to welcome spring into your home.
 HOME SWEET Home by Kim Hanson Embroider whimsical cottages appliquéd in cheery fabrics to welcome spring into your home. Download an appliqué cottage design free from cmemag.com/ freebies until Apr. 30,
GO! Cleopatra s Fan Table Runner
 GO! Cleopatra s Fan Table Runner Finished Size: 23" x 57" Dies Needed: GO! Qube Mix & Match 12" Block (55778) GO! Half Square Triangle-6" Finished Square (Shape 3) Additional Dies Needed GO! Cleopatra
Country Paradise Quilt 2 by Denise Russell
 Country Paradise Quilt 2 by Denise Russell Quilt size: 52-1/2 x 75-1/2 Blank Quilting Corporation 49 West 37th Street New York, NY 10018 Tel: 800-294-9495 Fax: 212-679-4578 www.blankquilting.net Skill
 Fling by Laura Jones 57" x 68" Featuring fabrics from the E60-1439-GRY E60-1440-PUR E60-1441-PUR E60-1442-GRN E60-1443-TURQ E60-1444-PUR E60-1444-GRY (includes binding) collection by Materials 1 Yard 1
Acrylic Ruler/Mat Tote Bag
 Acrylic Ruler/Mat Tote Bag Outside Pocket holds 12 1/2' and 16" square up rulers Inside pockets hold 6" x 24" ruler, 6" x 12" ruler, 6" x 6" ruler Plus the inside has pockets for other rulers, notions,
Award Ceremony Quilt a free pattern from Anna Maria Horner
 Award Ceremony Quilt a free pattern from Anna Maria Horner Award Ceremony Quilt by Anna Maria Horner My Honor Roll fabric collection is inspired by the idea of being good. The prints themselves took cues