Colorfil INSTRUCTIONS
|
|
|
- Leo Carr
- 5 years ago
- Views:
Transcription

1 Colorfil INSTRUCTIONS


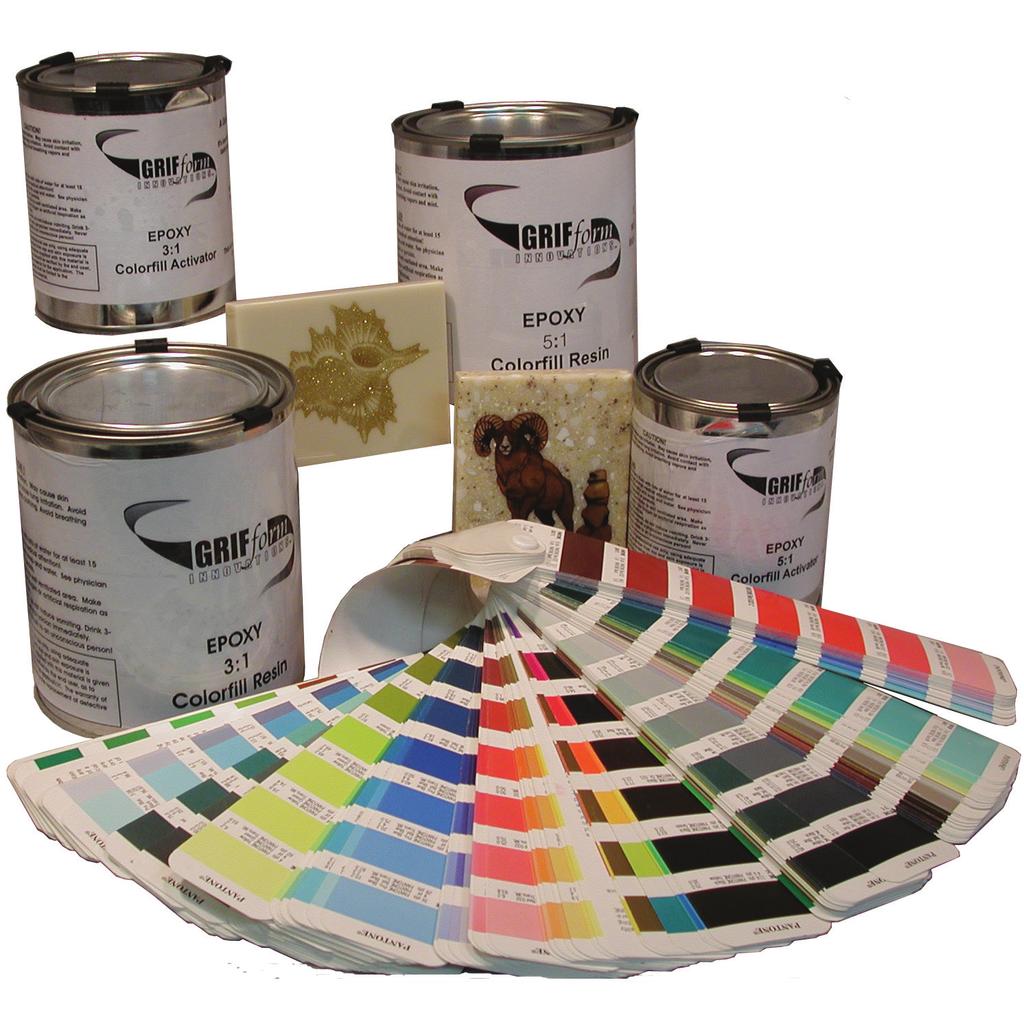
2 SUPPLIES REQUIRED: HOT AIR GUN DENATURED ALCOHOL CLEAN WHITE RAG NYLON BRISTLE SCRUB BRUSH (tooth brush) ORBITAL SANDER ORBITAL ABRASIVES SPRAY BOTTLE WITH WATER OPTIONAL: SCALES SANDING ERASER AIR COMPRESSOR COLORFIL SUPPLIES SUPPLIES PROVIDED: COLORFIL RESIN COLORFIL ACTIVATOR GLOVES PAPER CUPS STIR STICKS TOOTH PICKS INSTALLATION INSTRUCTIONS MATTE FINISH: 150; 180; 220, MAROON SCOTCH BRITE PAD HIGH GLOSS FINISH: 30 MICRON BUFFING WHEELS OR HAND HELD BUFFER/POLISHER BUFFING ROUGE OR COMPOUND FORMULAS TO DETERMINE RATIOS FOR COLOR FILL MIX: NOTE: Exact ratios are important in proper activation of the materials. Weighing is an easy way to measure ratios but volume can be used if scales are not available. DO NOT mix more than can be dispensed in 2-4 minutes. The larger the volume of material mixed with activator at one time, the faster the material will harden. DO NOT use the material once the exaltherm starts. 4:1 Weight of Colorfil Resin or volume divided by 4 then add that amount of Colorfil Activator for the total amount of Colorfil. Example: 12 grams of Colorfil Resin divided by 4 = 3 grams of Colorfil Activator. Add 12 grams of Colorfil Resin + 3 grams of Colorfil Activator = 15 grams total weight or volume. 5:1 Weight of Colorfil Resin or volume divided by 5 then add that amount of Colorfil Activator for the total amount of Colorfil. Example: 15 grams of Colorfil Resin divided by 5 = 3 grams of Colorfill Activator. Add 15 grams of Colorfil Resin + 3 grams of Colorfil Activator = 18 grams total weight or volume. COLORFIL PROCEDURE 1. Allow the Colorfil Resin and the Colorfil Activator to come to room temperature approximately 70 F. 2. Clean the part to receive the color fill with Denatured Alcohol and Scrub Brush then blow image out completely using a hot air gun or air compressor. 3. Measure proper amounts of Colorfil Resin and Colorfil Activator into the paper cups provided. Note: DO NOT mix batches larger than 4oz., because large amounts will activate too quickly. The larger the batch the faster it activates which could make it difficult to control leaving air bubbles trapped in the Colorfil. If your image is large, pour small measured portions of Colorfil Resin into a paper cups ahead of time and then add Colorfil Activator when you are ready to pour it into the image.


3 4. Pour pre-measured Colorfil Activator (see fig 4) into pre-measured Colorfil Resin. 5. Slowly rotate the paper cup containing the Colorfil mixture, while using the stir stick to gently scrape the material from the sides and bottom of the cup. Slowly and thoroughly mix the material. If the Colorfil is not completely mixed it will not activate properly. Take care not to add lots of air while mixing. DO NOT use an electric mixer. 6. Allow the cup of Colorfil material to rest a minute or two to allow air bubbles to rise to the top of the mixture and escape. 7. Pour the material in a puddle over the image. Use the stir stick as a spatula to generously spread color fill over the image. Remember, Colorfil will shrink so be sure to cover generously. 8. Use a Toothpick and trace around the image to help detach and release any trapped air bubbles in the image. Note: The material when overfilled will allow the air bubbles to float above the finished surface level. 9. Use a Hot Air Gun or Hair Dryer on low setting, with direct downward heat, to thin and release air bubbles. Take care not to overheat the image, it can warp and crack. Alternate between different areas of the image with a hot air gun to aid in releasing the air bubbles. DO NOT USE A PROPANE TORCH! 10. Allow the Colorfil object to cure over night. Temperature and humidity both play a part in how long it takes Colorfil to cure. You may force dry in a conventional oven set no higher than 110 F taking precaution, as it can cause warping of the part. Once the part is warped you will not be able to flatten or correct the item. DO NOT dispose of any remaining Colorfil until you have allowed it to cure. POTENTIALLY EXTREME FIRE HAZARD COULD RESULT IF LIQUID MATERIAL IS PLACED IN A TRASH CONTAINER


4 COLORFIL FINISHING MATTE FINISH STEP 1. Make sure to test the Colorfil to see if it is cured, by pressing your fingernail in the Colorfil. The Colorfil will not indent when Colorfil has cured. STEP 2. Using a Random Orbital Sander and 150 grit abrasive begin to sand off the excess Colorfil. STEP4. Change to 180 grit abrasive. Clean the image area using a white rag and spray bottle of water to thoroughly remove any dust and grit from the surface from the previous operation. STEP 5. Repeat the process, sanding with 220 grit to remove the previous grits obvious scratch patterns. Remember to thoroughly wipe with a damp cloth to clean between each sanding step. Note: DO NOT over sand. Leave a small amount to be removed on the next level of abrasive, until all grit levels have been achieved. STEP 3. Use a sanding eraser to clean off the built up material on the abrasive disc. Continue to sand until most of the excess Colorfil is removed. Step 6. For matte finish, use Maroon Scotch Brite Pad for buffing the surface. HIGH GLOSS FINISH Step 7. For high gloss finish omit step 6 and use 60 micron abrasive then 30 micron abrasive. Follow the same process as before. Step micron abrasive tends to load up quickly so place a clean rag on the surface of the sander and carefully rotate sander to remove build up. Note: Excessive pressure causes overheating which will load up the abrasive. Light pressure and frequent abrasive cleaning will speed up the process and require much less abrasive. Step 9. Clean with damp cloth.


5 Note: Hand held buffer may be used for these steps. Step 11. If using a buffing wheel, load the wheel with buffing rouge or polishing compound. Step 12. Hold the item firmly. Place image area against wheel to polish the image area. Step 13. Use a progressive polish process and continue until the desired finish is obtained. The part begin to shine and reflect light easily in the finish. The surface will polish to a hard high gloss if processed correctly and will appear monolithic with the surrounding materials. If a haze appears in the finish repeat steps Matte Finish High Gloss Finish DO NOT DISPOSE OF ANY REMAINING COLORFIL UNTIL YOU HAVE ALLOWED IT TO CURE. POTENTIALLY EXTREME FIRE HAZARD COULD RESULT IF LIQUID MATERIAL IS PLACED IN A TRASH CONTAINER. ONCE CURED AND HARDENED IT CAN BE DISPOSED OF IN A LANDFILL. Grifform Innovations PO Box 258 Glide, OR CFI /7/2017
TOOLS & SUPPLIES (Included in ProTops Tool Kit)
") TOOLS & SUPPLIES (Included in ProTops Tool Kit) Clean Paint/Mixing Sticks Graduated Mixing Buckets Standard Mixing Cups Nylon Paint Brush Propane Torch 3M Masking Gun Masking Film & Painter s Tape Disposable
TOOLS & SUPPLIES (Included in ProTops Tool Kit) Clean Paint/Mixing Sticks Graduated Mixing Buckets Standard Mixing Cups Nylon Paint Brush Propane Torch 3M Masking Gun Masking Film & Painter s Tape Disposable
SURFACE CASTING METHOD: For Molds & Core Boxes. Presented by: Hapco Inc.
 SURFACE CASTING METHOD: For Molds & Core Boxes Presented by: Hapco Inc. RAPIDFIL Detailed Specifications STEP 1 SPACER LAYER Apply a layer of ¼ foam to create a uniform ¼ thickness around the pattern.
1. Initial Precautions 2. Technical Precautions and Suggestions 3. General Information and Cure Stages 4. Understanding and Controlling Cure Time
 How to apply Arctic Silver Premium Thermal Adhesive 1. Initial Precautions 2. Technical Precautions and Suggestions 3. General Information and Cure Stages 4. Understanding and Controlling Cure Time 5.
SURFACE FINISH MAINTENANCE
 SURFACE FINISH MAINTENANCE SURFACE FINISH MAINTENANCE Lumec strongly recommends that you maintain your luminaires twice a year in order to prolong the appearance of the finished surface. By following this
How to make climbing grips. By,
 How to make climbing grips By, Items needed: * Items may be needed depending on your preference. - Carving Foam - Level Table - Cardboard - Pen - Ruler - Straight Edge - Box cutter - Hot melt glue gun
Paint and Decals. Adequate ventilation is required when working in a confined area with paint and paint-related chemicals.
 Service Guide Paint Repair Paint and Decals Utilimaster recommends that a professional body shop do all paint repairs. The service technician should read this entire procedure before working on the vehicle.
Embedding Techniques
 Biological Control Info Page Embedding Techniques Used to Preserve Biocontrol Agents and Invasive Plant Material into Crystal Clear Resin 2000 Forest Practices Branch Biocontrol Development Program Table
Tabletop Epoxy Resin Instruction Guide
 Table Top Epoxy Full Instructional Guide WARNING! You should read through ALL of these instructions BEFORE starting. These instructions are intended for Bar Tops, Table Tops, Artwork and Countertop applications.
EPOXY WARNING! PREPARATION
 EPOXY WARNING! It is extremely Important that you read ALL of the instructions. Our epoxy is uniquely formulated and is not the same as other epoxy you might have used in the past. PREPARATION These instructions
Installation Instructions
 Please read all instructions before installing products. STORAGE: Keep crates in the upright position. When unpacking, store panels flat in a clean dry place. BEFORE INSTALLATION: Check for damage that
Quality Marine Equipment Since Antifouling Paint For Metal Under The Waterline ROLLER. Application Instructions.
 Quality Marine Equipment Since 1981 Antifouling Paint For Metal Under The Waterline ROLLER Application Instructions www.antifoulingpaint.net THANK YOU! Thank you for selecting Velox Plus Antifouling Paint
Contents. pages 20-24: Installing Edge sinks into. custom laminate countertops page 8: Installing Edge sinks into postform laminate countertops
 Contents pages 2-8: Installing Edge sinks into custom laminate countertops page 8: Installing Edge sinks into postform laminate countertops pages 9-14: Installing Acrylic sinks into custom laminate countertops
Windshield Repair Instruction Manual
 Windshield Repair Instruction Manual 1 of 9 Table of Contents 1. Know the benefits of WSR... 3 2. Types of breaks... 3 3. Repair limitations... 3 4. Equipment introduction... 3 5. Safety... 4 6. Preparation
Designed for Vectric by Michael Tyler
 Project Tutorial Compatible with Current Version of: Featuring compatibility with nearly all CNC Machines Stone & Coral Inlay Vase Designed for Vectric by Michael Tyler It is our pleasure to provide our
Pouring A Clear Epoxy Table Top. By Bob Chambers and Keith Bryan
 Pouring A Clear Epoxy Table Top By Bob Chambers and Keith Bryan Keith and I recently partnered up to apply a clear epoxy finish to a Spanish cedar dresser top that he had built. If you're unfamiliar with
50 TIPS TO HELP YOU BE BETTER WITH RESIN. By Katherine Swift
 50 TIPS TO HELP YOU BE BETTER WITH RESIN By Katherine Swift 2016 Resin Obsession, LLC, all rights reserved Gainesville, FL 32606 www.resinobsession.com May not be shared in any form without permission
Steps and Resources for Composite Construction Mark Westlake
 Steps and Resources for Composite Construction Mark Westlake Hopefully the following information will help you avoid some of the learning curve that comes with a project of this complexity. Plug Construction
Amazing Clear Cast 80D Clear Epoxy
 Technical Data Sheet Amazing Clear Cast 80D Clear Epoxy Product Description: Alumilite's Amazing Clear Cast is a clear casting and coating system that cures to a rigid, durable, clear plastic. Use Amazing
INSTALLATION GUIDE VERSION 11/14
 INSTALLATION GUIDE VERSION 11/14 In this guide we will demonstrate effective techniques and methods for installing EDGE stainless steel sinks seamlessly in both laminate and solid surface. These techniques
COMPOSITES LAB MANUAL
 COMPOSITES LAB MANUAL Version 1 Lab 3: Surface Preparation, Wet Layup, and Vacuum Bagging The original version of this manual was a one student senior design project written by Katherine White, the Composite
Powermatic Model 31A Combination Belt-Disk Sander
 OPERATING PROCEDURE FOR: Powermatic Model 31A Combination Belt-Disk Sander INTRODUCTION: The combination belt-disk sander is used to sand the edges of boards. It can be used to smooth the edge or to remove
Building Instructions ARTEMIS Sailing Canoe Workshop and Tools Version 1.0 Brian Pearson / Dr. Axel Schmid Two Sawhorses. Workshop and Tools
 Building Instructions ARTEMIS Sailing Canoe Two Sawhorses Workshop Yes, you can build the ARTEMIS sailing canoe in the garage, with good lighting, and assuming a power supply. To have room to work it needs
Quality Marine Equipment Since Antifouling Paint For Metal Under The Waterline SPRAY. Application Instructions.
 Quality Marine Equipment Since 1981 Antifouling Paint For Metal Under The Waterline SPRAY Application Instructions www.antifoulingpaint.net Thank you for selecting Velox Plus Antifouling Paint to protect
Turning Acrylic Boxes
 Preparing the Molds/Mixing the Resin/Unmolding the Blanks Turning Acrylic Boxes Preparing the Molds 1. Prepare the Molds Use 2 PVC or ABS Pipe cut into 2 ½ sections. Flatten saw-marks off the bottom on
Sutherland Welles Ltd.
 Sutherland Welles Ltd. FLOOR INSTRUCTIONS MURDOCH S SYSTEM Floor Sanding Prep Murdoch s Uralkyd 500 Floor Finish Sanding Process First Sanding The initial cut either removes finish from an existing floor
Pettit Technical Bulletin Applying Topside Finishes
 What s better than a boat that looks good? The answer is simple, a boat that looks good and has superior protection from the elements all season long. Topside finishes do exactly that; provide your boat
SINGLE TURN INLAY JIM BRANDT
 SINGLE TURN INLAY JIM BRANDT 1 SINGLE TURN INLAY Single turn bands have proven difficult for some to master. Most people assume that the inlaid band is a separate thread of a different color, however,
ACCELERATED POLISH TEST FOR COARSE AGGREGATE
 Test Procedure for ACCELERATED POLISH TEST FOR COARSE AGGREGATE TxDOT Designation: Tex-438-A Effective Date: August 1999 1. SCOPE 1.1 Use this method to estimate the polish and relative wear of coarse
Titan Installation Instructions
 Titan Installation Instructions Introduction: This manual was written to cover the fabrication and installation of sink bowls and tub and shower surrounds in residential and commercial applications. As
2K Liquid Metal Paint Technical Data Sheet
 2K Liquid Metal Paint Technical Data Sheet DESCRIPTION Metal Veneers is a specially formulated liquid metal paint that s easy to use for even the most discombobulated novice paint user. Our carefully guarded
PROJECT BEGINNER/INTERMEDIATE METAL/RESIN
 PROJECT BEGINNER/INTERMEDIATE METAL/RESIN FCT-CR-091816_05 A photograph taken by the Hubble Space Telescope inspired the design of this 13 4 x 1½-in. (44 x 38 mm) pendant. 2009 Kalmbach Publishing Co.
FLEXITEEK INSTALLATION INSTRUCTIONS
 an Advanced Plastic Fabrications Company 99 marcus Blvd., 631.244.3620 631.231.4466fax FLEXITEEK INSTALLATION INSTRUCTIONS Before you begin, take your new Flexiteek deck out of the shipping package and
Seam Locations and Cutout Positioning. Material Review. Warehousing. Inspection
 HI-MACS Layout Before cutting the sheets you have ordered and received from your HI-MACS distributor, calculate the number, lengths, widths and elevation to double check the amount of material you will
EarthpaintTM. because you care
 828-258-2580 orders@earthpaint.net How To Machine Buff One Coat, Rainforest and Bio Poly into Wood Floors EarthpaintTM because you care Machine Buffed Finishes Basic Instructions Machine Buffing it typically
FAMOWOOD GLAZE COAT HIGH GLOSS CRAFT RESIN
 Eclectic Products, Inc. Manufacturing Facility 101 Dixie Mae Drive Pineville, Louisiana eclecticproducts.com 800.349.4667 ISO 9001:2015 Compliant Quality Management Systems Administration Office Eugene,
One Piece Fiberglass Mold Construction
 One Piece Fiberglass Mold Construction (This is just a SAMPLE of the Main Manual) Simple Fiberglass Molds Can Be Used For Making Duplicate Parts For Many Applications Including Hobby & Automotive. This
How to use a Touch Up Bottle & Brush
 How to use a Touch Up Bottle & Brush Tech Tips General Definitions Base Color (Basecoat): A color coat requiring a clear coat. Base Color provides color and appearance, while the clear coat provides gloss
Polymer Composites Incorporated
 Rod Ham s Project, A Lesson In Synergy The following is an excerpt from correspondence that I had with Mr. Rod Ham who contacted me and inquired about the use of our MAX CLR-HP-HP for a project he had
20th ANNUAL SKILLS MANITOBA COMPETITION PAINT COMPETITON COMPETITION DESCRIPTION
 20th ANNUAL SKILLS MANITOBA COMPETITION PAINT COMPETITON COMPETITION DESCRIPTION Break down of Students into 2 groups of 8 competitors maximum 4 Secondary and 4 Post- Secondary (2 ½ hour time blocks morning
BRUSH APPLICATION INSTRUCTIONS
 QUALITY MARINE EQUIPMENT SINCE 1981 Antifouling Paint For Metal Under The Waterline BRUSH APPLICATION INSTRUCTIONS www.antifoulingpaint.net TABLE OF CONTENTS Humidity & Drying Metal Surfaces... 1 Coverage
Top Polishing Instructions
 Top Polishing Instructions Materials Needed: For 2014 - Recommend Metabo PE12-175 7" Polisher NSI Solutions 300 grit turbo pad NSI Solutions 500 grit turbo pad NSI Solutions 1000 grit turbo pad NSI Solutions
Insta-DE Series Soft- padded Dry- erase Whiteboard Projection Screen
 Insta-DE Series Soft- padded Dry- erase Whiteboard Projection Screen User s Guide Product Features Ø Award winning and GREENGUARD certified VersaWhite material. Ø 1.1 gain with 180 degree wide viewing
E3 UV-30 Resist Film Instructions
 E3 UV-30 Resist Film Instructions For more information or to view instructions in color, visit www.sherrihaab.com Sherri Haab Designs 2016 Supplies needed: Metal plate to etch (copper, brass or silver)
Solid Laminate Worktops Installation and Aftercare Instructions
 Solid Laminate Worktops Installation and Aftercare Instructions Introduction: Their solid composition makes solid laminate, also called compact laminate, worktops easy to install and maintain. A solid
Freehand Back-Filling: Polymer Clay and Resin Tutorial
 Page 1 of 9 Eugena Topina, 2016 Freehand Back-Filling: Polymer Clay and Resin Tutorial This tutorial is offered for your personal use only. Please do not distribute. Back-filling is a simple and very versatile
Guidelines for working with
 Guidelines for working with 1. Sawing Circular Saws When using circular saws, only the circular saw blades that are not set are suitable for cutting PARAPAN. Hardened metal saw blades that have the greatest
Cold curing adhesive K-X280
 Instructions for use English Cold curing adhesive K-X280 A4048-1.0 en English 1 Safety instructions... 3 2 General information... 3 2.1 Scope of delivery for K-X280... 3 2.2 Accessories required for installation...
#70 grit sand Putty knives, sized as needed #1 fine gray sand Corner tools Milestone acrylic liquid
 Countertops Supplies Tools White and/or gray Milestone cement 12 inch steel trowel #70 grit sand Putty knives, sized as needed #1 fine gray sand Corner tools Milestone acrylic liquid Hock Universal tints
About the Technique. Please check the safety note which is at the end of the PDF before beginning to use this technique.
 About the Technique The bubble effect technique is an awesome technique for those artists who are really into creating textures. This effect will definitely make your work stand out from the crowd. The
PLEASE READ ALL INSTRUCTIONS BEFORE BEGINNING
 C R A N E C O M P O S I T E S Repair Techniques PLEASE READ ALL INSTRUCTIONS BEFORE BEGINNING These guidelines are provided in good faith, but without guarantee. The manufacturer and/or distributor of
Discover the Difference FRP PANEL SOLUTIONS REPAIR TECHNIQUES. fiberglass sidewall repair techniques
 Discover the Difference FRP PANEL SOLUTIONS REPAIR TECHNIQUES fiberglass sidewall repair techniques INDEX Supplies and Equipment 3 Paint, Fillers, and Fiberglass General Supplies Equipment High Gloss Automotive-Look
BLADE REPAIR INSTRUCTION BOOKLET
 BLADE REPAIR INSTRUCTION BOOKLET Contents Section I: Section II: Section III: Section IV: Section V: Section VI: Removing a Blade Refer to this section if you need to remove the blade from an oar shaft.
PAINTING AND DECORATING E2
 Unit no: 280 Unit title: Prepare a work area ready to commence decorating Credit Value 1 Guidance: For this unit, any area that is suitable for painting and decorating may be used. Safely prepare a work
EZYSTONE WORKSURFACES
 EZYSTONE WORKSURFACES Installation & Maintenance Instructions 1. Tools Required Worktop Edge Finishing Kit Pack 1-100mm Velcro Backing Pad Pack 2-100mm Diamond Dry Cut Velcro Discs (100 Grit Yellow) (200
OSMO Polyx-Oil 3054 Hardwax Oil Application Instructions for Hardwood Floors
 OSMO Polyx-Oil 3054 Hardwax Oil Application Instructions for Hardwood Floors 6.2011 REV OSMO North America 800-515-4168 info@osmona.com OSMO Polyx Oil (3054): Please read through the entire application
C O M P A N Y C O M P A N Y
 O p e r a t i n g M a n u a l F I N I S H E D S U R F A C E S Daily Maintenance 1. Remove gross soils (labels, gum) with a putty knife or scraper. 2. Sweep or dust mop floors. 3. Place Wet Floor signs
Mold Release, Break-In, Maintenance and Storage. Linda Bergstrom
 Mold Release, Break-In, Maintenance and Storage Linda Bergstrom Mold Release Requirements Form a barrier between the mold and molded part Provide a lubricating film which allows the molded part to be easily
CIRRUS AIRPLANE MAINTENANCE MANUAL MODELS SR22 AND SR22T CHAPTER 56-30: DOOR GENERAL. Door 56-30: DOOR. 1. General
 CIRRUS AIRPLANE MAINTENANCE MANUAL Door CHAPTER 56-30: DOOR GENERAL 56-30: DOOR 1. General The cabin door windows are manufactured of acrylic and adhesive bonded to the door structure. Replacement is accomplished
Shutter Installation Instructions
 Shutter Installation Instructions ITEMS YOU WILL NEED: Tape measure Framing square Screw gun Circular saw Caulk gun PL premium adhesive Exterior grade screws 1 ¾" Safety glasses Putty knife Window and
Optima 450 LED Edge-Lit Single-Sided Light Box. Installation Instructions INSTALLATION INSTRUCTIONS. Figure 1. Tools you ll need
 Installation Instructions Optima 450 LED Edge-Lit Single-Sided Light Box Figure 1 INSTALLATION INSTRUCTIONS Before you begin These instructions illustrate the Stylmark Optima 450 LED Edge-Lit Single-Sided
All aspects of the installation of maia are also covered in a DVD that is available to view on-line at
 41405015530 41405015730 41405016130 41405015930 41405015520 41405015720 41405016120 41405015920 41405016520 41405016530 B All aspects of the installation of maia are also covered in a DVD that is available
VELOX PLUS APPLICATION INSTRUCTIONS QUALITY MARINE EQUIPMENT SINCE 1981
 VELOX PLUS APPLICATION INSTRUCTIONS QUALITY MARINE EQUIPMENT SINCE 1981 VELOX PLUS TECHNICAL INFORMATION Please read all information and application instructions before beginning. Coverage Estimates Normal
HINTS & TIPS. Page 1. November 5, 2014 Mixed Media by Pébéo - Hints and Tips Version 1.2 GENERAL:
 Page 1 HINTS & TIPS GENERAL: Mixed Media by Pébéo paints may be used on Pébéo Liquid Art Panels, wood, artist grade composite wood surfaces (mdf and masonite), canvas, canvas panel, metal, glass, plastic,
Alterna Grouting Tiles & Planks
 Alterna Grouting Tiles & Planks Grouting Alterna Tiles and Planks Armstrong S-693 Premixed Sanded Acrylic Grout Soft rubber float Soft rubber Margin float White 3M pad Tile spacers Gloves Two- 5 Gallon
Step by Step Wing Bagging
 Step by Step Wing Bagging By Evan Shaw 073 589 9339 evanevshaw@gmail.com Preparing the Leading Edge 1. Cut cores. (Cutting of wing cores is covered in another article elsewhere) 2. Sand the LE to a nice
#85-2-5A: PAINT STRIPPING AND FINISH ANALYSIS AND CORRECTION - (Aug 7, 1985)
") #85-2-5A: PAINT STRIPPING AND FINISH ANALYSIS AND CORRECTION - (Aug 7, 1985) "Please discard previous bulletin 85-2-5 due to this updated information." The corrosion protection provided by the factory
#85-2-5A: PAINT STRIPPING AND FINISH ANALYSIS AND CORRECTION - (Aug 7, 1985) "Please discard previous bulletin 85-2-5 due to this updated information." The corrosion protection provided by the factory
Car Dress Woodwork Repair and Finishing
 Car Dress Woodwork Repair and Finishing Garth Pennington Osborne SA 5017 Contents Stripping the old finish Repairing wood and veneer Preparing for finishing Pore filling Staining Applying clear finish
The Path to a Perfect Finish. A guide to our most advanced line of gelcoat and paint refinishing products.
 The Path to a Perfect Finish A guide to our most advanced line of gelcoat and paint refinishing products. 1 Visit 3MMarine.com/buffing for more detailed product selection help. Choosing the right product
The Path to a Perfect Finish
 For more information contact your M representative, authorized distributor or visit MMarine.com Individual Product Instruction and Safety Information For individual product instructions and applicable
Learn to. Brush Paint Model Airplanes
 Learn to Brush Paint Model Airplanes Table of Contents Model Paints... 4 Brushes... 6 Workspace Setup... 7 Surface Preparation... 9 Painting Procedure... 10 Paintbrush Cleanup... 14 Masking... 15 Dry-brushing...
Eerie Halloween by Nunn Design
 Eerie Halloween by Nunn Design Approximate finished length: 20 inches Beads and other products needed for necklaces: 1 - Pewter Itsy Square Bezel Pendant with Flat Loop by Nunn Design - Antique Gold -
PROVIDED BY WINDY URTINOWSKI AND REPRESENT HIS PROCEDURE FOR OBTAINING A SUPERIOR FINISH USING BRODAK DOPE
 PROVIDED BY WINDY URTINOWSKI AND REPRESENT HIS PROCEDURE FOR OBTAINING A SUPERIOR FINISH USING BRODAK DOPE The TARGET is for a GREAT FINISH with 6-7 OUNCES of weight FROM BARE WOOD TO READY FOR SILVER
GlassCast Penny Floor Project Page 1
 GlassCast Penny Floor Project Page 1 How to lay and resin coat a Penny Floor Contents Introduction 3 Before You Begin 3 Gathering and Preparing the Pennies 3 Tools, Materials & Conditions 4 Epoxy Resin
POLYCARBONATE RECTIFICATION PROCEDURES
 POLYCARBONATE RECTIFICATION PROCEDURES A. TOOLS REQUIRED: 1. Random Orbital Sander or Power Drill (for use with Micro-Mesh) 2. Right Angle Polisher (rated at approx. 2500 RPM) or Power Drill (for use with
Finishes and Finishing Techniques
 Finishes and Finishing Techniques TED 126 Spring 2007 Review pages 147-150, 284-294 Finishes and finishing techniques The finishing process to choose depends partly on the type of wood and the appearance
SPA COSMETIC REPAIR WITH THE MMA SYSTEM (GRANITE, PEARL, METAL, or MARBLE COLORS)
") DESCRIPTION SPA COSMETIC REPAIR WITH THE MMA SYSTEM (GRANITE, PEARL, METAL, or MARBLE COLORS) The MMA repair system has been formulated for repairing marble and solid color spas. It is commonly used by
DESCRIPTION SPA COSMETIC REPAIR WITH THE MMA SYSTEM (GRANITE, PEARL, METAL, or MARBLE COLORS) The MMA repair system has been formulated for repairing marble and solid color spas. It is commonly used by
VICINITY WHITEBOARD PAINT. Installation Guidelines
 VICINITY WHITEBOARD PAINT Installation Guidelines Components Installation Kit Preparation Whiteboard Paint Aerated Stir Stick Drop Sheet Universal Undercoat Base Activator Cutting-In Roller Filling-In
Author: Sgt. Lumley, Andrew. Boot Polishing 101
 Boot Polishing 101 Author: Sgt. Lumley, Andrew Disclaimer: This guide is meant as a helpful how-to instructional to get you started. It will get you on the right track but everyone is different, what works
How to build a Javelin Skiff
 How to build a Javelin Skiff This is not your grandfather s plywood boat! The Javelin involves a high-tech type construction, called composite. The hull can be constructed with foam or plywood; these materials
Cleaning your painting tools
 Take care of your tools and your tools will help take care of your house Leading Innovation in Home Improvement www.rdproduct.com Cleaning your painting tools It s a dirty job but somebody has got to do
FAMOWOOD GLAZE COAT HIGH BUILD EPOXY COATING
 Eclectic Products LLC Manufacturing Facility 101 Dixie Mae Drive Pineville, Louisiana eclecticproducts.com 800.349.4667 ISO 9001:2008 Compliant Quality Management Systems Administration Office Eugene,
There s a trick to using only two prongs. Think Again! Think Two Prongs Can t Secure a Stone? Use sturdy, strategically placed prongs
 PROJECT INTERMEDIATE/ADVANCED METAL Think Two Prongs Can t Secure a Stone? Think Again! Use sturdy, strategically placed prongs to set a custom-cut stone. by Jessica Dow and Mark Anderson There s a trick
MUDGUN Drywall Finishing System
 Watch the demonstration video online at hydetools.com MUDGUN Drywall Finishing System Quick Start Guide Hyde Tools, Inc. / A Hyde Group Company / 800-872-4933 / custrelations@hydetools.com / hydetools.com
solid surfaces for every room Mirostone fabrication and installation guidelines solid surface February 2018
 solid surfaces for every room fabrication and installation guidelines February 2018 solid surface fabrication and installation guidelines It is a condition of the limited warranty that the following supplementary
Sealer, Primer, Isolation Coat, & Varnish
 Sealer, Primer, Isolation Coat, & Varnish A seal can be applied between the substrate and gesso/primer, or between the substrate and the first layer of paint if gesso is not desired. A seal may also be
Carbon Fiber Skinning Starter Kit
 CARBON WORKS www.gorillacarbons.com Carbon Fiber Skinning Starter Kit This Godzilla Carbonworks CF Skinning Starter Kit contains everything you need to take an original part (made from plastic, metal or
Materials Polishing Manual. By Thomas Perry Daniel Webster College Version 1 August 10, 2007
 Materials Polishing Manual By Thomas Perry Daniel Webster College Version 1 August 10, 2007 Materials Polishing Manual This manual describes how to use the equipment at Daniel Webster College to create
Refinishing Your Furniture
 Refinishing Your Furniture Charlotte Kirchner Many pieces of furniture-modern or old-can be refinished to become part of the decorative scheme of the home. Furniture should be of good wood, good lines,
Bedtime for Bondo MERA Training
 Bedtime for Bondo 2002 MERA Training Section 1: Making the Plug/Model This section will show the process of building a plug/model for a plaster mold.this will represent what the final fiberglass part
MOLD INSTRUCTION MANUAL
 Medi-RDT MOLD INSTRUCTION MANUAL Disclaimer: For use in prescription pharmacy compounding only, in accordance with applicable law. MEDISCA makes no warranty or representation regarding the use of this
Porcelite is ideal for objects requiring high resolution details. It s capable of printing at 25 micron layer thickness.
 fa is a UV-curable porcelain resin suitable for 3D printers that utilize SLA, DLP or CLIP technologies with UV wavelengths between 350-405 nm. Porcelite is ideal for objects requiring high resolution details.
Sketchpaint. Ideal for turning any smooth surface into a whiteboard. Ready to use in 5 days
 Sketchpaint Ideal for turning any smooth surface into a whiteboard SketchPaint - A whiteboard straight out of a tin! White Gloss or Transparent Finish Simple application Tin size available: 3m² or 6m²
Photo: Leslie Bruning - Bruning Sculpture Studio. Castalite
 Photo: Leslie Bruning - Bruning Sculpture Studio Castalite Castalite Castalite is a UV-curable ceramic shell resin suitable for 3D printers that utilize SLA, DLP or CLIP technologies with UV wavelengths
Wood Turning Finishing Process. Compiled And Presented by Pete Marken For The 2018 Segmented Woodturners Symposium St Louis Missouri.
 Wood Turning Finishing Process Compiled And Presented by Pete Marken For The 2018 Segmented Woodturners Symposium St Louis Missouri. Why spend the time and effort to apply the best finish you can to a
Fitting Fiberglass arches to MK 1 Escort
 Fitting Fiberglass arches to MK 1 Escort This is a fairly big job and not for the faint hearted. I got a mate who has done some glass work before, to help me. The method of fixture is varied. You could
INSTA-DE2 SCREEN SERIES
 Section 1: Screen Design 1.1 What is it for? INSTA-DE2 SCREEN SERIES Convert entire walls into a dry-erase whiteboard projection screen: The Insta-DE 2 is a wall covering film material that instantly converts
Insta-DE2a/2aF Series
 Insta-DE2a/2aF Series Self-Adhesive Dry-EraseFront Projection Screen Film with Frame Border and Pen Tray User s Guide Thank you for choosing the Insta-DE2a Series dry-erase whiteboard projection screen!
SUPERSEDED. NOT the LATEST REVISION
 Figure 1 OPTIMATE 2.5mm bayonet ceramic connector kits listed in Figure 1 are designed to be applied to fiber optic cable. Coupling Receptacle Kit 501381 1 is used to mate two bayonet connectors in free
Refurbishing Your Lincoln Mark VII Dew Wipes
 By Rick One_Way Eckenrode Refurbishing Your Lincoln Mark VII Dew Wipes A common flaw among Lincoln Mark VII s can be found at the top of both doors. The dew wipes (rubber weatherstrip that rests against
HAND TOOLS, ADHESIVES & CLEANING
 C HAND TOOLS, ADHESIVES & CLEANING FABRICATION MANUAL.............................. 26 MANUAL CUTTERS & EDGE SCRAPERS................. 26 DRILL BITS......................................... 27 ADHESIVES........................................