The CNC Tangent Die Cutter
|
|
|
- Victoria Craig
- 6 years ago
- Views:
Transcription

1 The CNC Tangent Die Cutter Instruction Book If you have any questions, please see a DM Staff Member


2 Digital Media Tutorial Written By John Eberhart Using the CNC Tangent Die Cutter The CNC Tangent Die Cutter is used to cut material up to 3/16 thick. Is uses a small steel blade fitted into a holder and rotates the blade as it cuts. Unlike like a laser cutter, this machine can cut with no kerf, no burnt edges, and it can cut flammable materials. Preparing your Cutting Blade: Edge of Blade To get the most life out of your blade, you should grind away a bit of the tip of the blade on the stone located at the machine. You also want this to be at a slight angle. This will help extend the life of the blade and help prevent the tip of the blade from breaking off. You should also grind away the little bur located at the back of the blade so it sits better in the tool holder. Grind the tip back way from the edge of the blade Loading your blade into the holder: Using the provided screwdriver, remove the tool holder from the cutting head assembly. Note: If you cannot get to the screw holding the head in place press this button and the heads will rotate so you can access the screw. If nothing happens, press the Remote/ Local button and try again. Loosen the thumb screw and insert the blade so the back side of the blade is in line with the center line of the holder. Also make sure it is fully seated in the holder. You will need to wiggle the blade in the holder to make sure it is all the way in. This blade is inserted backwards. Notice the difference in the blade s position relative to the blade holder. Finally, tightened the thumb screw that holds the blade.


3 Setting the Blade Depth: You need to set the depth of the blade to match the thickness of the material you are cutting. Too Low - It will not cut all the way through Too High - You can dull or break your blade To set the depth, loosen the thumb screw and twist the depth adjustment. You should be able to feel the tip of the blade as it just sticks beyond the material. Tighten the thumb screw and inset the blade holder back into the machine using the provided screwdriver. Setting the Height of the Cutter Head Assembly: Loosen the two knobs on the side of the head assembly. Height Adjustment Crank Push down on the plunger on the other side of the head assembly. Turn the crank on the top of the head assembly until the plunger just touches the top of the material. Test the plunger a couple of times and fine tune you depth. Tighten the two knobs. Note: If you do not set the head assembly to the correct depth of your material, you can/will break your blade.

4 Setting the Machine Origin: When you first turn on the machine, you need to set the origin. To do this, make sure the machine is in Local mode. You can change this by pressing the Remote/Local button. Move the cutting head to the position where you want the job to start cutting. You can move the head by pressing the arrow buttons. Remote/Local Button Arrow Buttons Move head to location where you want it to start cutting Press the Origin button to set the machine origin.


5 Exporting from Rhino to Illustrator CS6.5 This machine cuts files using illustrator. You need to export your CAD information as a DWG file and place that into Adobe Illustrator. This is an older version of Illustrator and exporting as an Adobe Illustrator file directly from Rhino does not work. Object to Make Unroll object in Rhino, convert to curves. Select Curves Choose File Export Selected Give the File a Name and under Save as Type Choose: Autocad.DWG Choose Options In the Options Window, under export Scheme, keep this set to Default
")


6 Open Adobe Illustrator (Need to do this at the machine located next to the cutter) Choose File-New to open a new Illustrator document. Set your document size to match the material size you wish to cut. Click OK Click File>Place to import the DWG file from Rhino.


7 Choose the DWG file to place. At the prompt, choose Original Size to keep the scale the same. DWG file imported into illustrator


8 Setting up file colors to cut from Illustrator You can organize your cutting, drawing, and creasing operations by either color or layer. We recommend by color. Unrolled 2D Shape, loaded in to Adobe Illustrator. I set different colors for cuts, creases, and lines I want to draw. Red = Draw Black = Cut Green = Crease Making a Dashed Line in Illustrator cut as a dashed line: If you make a stroke a dashed line in Illustrator, the Mimaki cutter will not recognize that as a dashed cut. It reads the pathways as vectors only. This is a trick to covert a dashed stroked line into a real dashed pathway. Select a line and make it a dashed line in Illustrator by setting its stroke. Select the dashed line and make its weight (thickness) very small. I.e. 0.01pt. This will prevent the Mimaki from cutting a noticeable double line.


9 With the dashed lines selected, choose Object>Flatten Transparency... In the Raster/Vector Balance, move the slider all the way to Vector. Click OK. There is now a new path around each dashed line. This will cause the Mimaki to cut the dashed lines twice instead of a single line. However, because it is a very narrow line it should not be a problem.


10 Launch Mimaki FineCut and click the Cut button. When you launch Adobe Illustrator. The Mimaki FineCut software should auto launch. If it does not, in Illustrator under the Window menu, choose Mimaki FineCut The following Window will appear. Click on the Cut button Click OK on these pop up warnings that might appear.

11 Make sure this says FC2 Series. If it does not - see a DM Staff person. The FineCut Interface Color or layer file organization option Illustrator file to be cut located on the cutting bed Different colors or layers can be used for different types of cuts Machine origin = Lower left corner of the machine Note: You can click on the file itself and scale and move it around on the cutting bed. Y Axis Y Axis X Axis X Axis

12 You can adjust the rotation, location, and size of your illustrator file in the Mimaki FineCut software. However, it is probably better to do this in illustrator before getting to this point Do not mess with these options. These tools are used to rotate the illustrator file, move it, and scale it to fit the board. Mirror is an option to check if you are cutting through thick materials such as C loop cardboard, foam core, or gator board. The cut quality is better on the back side of the material so if you mirror your file, it will cut it upside down. Illustrator file mirrored and rotated.


13 To choose the type of cut to use, click on the side arrow icon next to the color and layer tabs. At the pop up menu, choose Specify the Plot Condition On Each Color Note: If you organized your illustrator file by layers, you can do the same. The following window will appear, click OK to continue. To the right, you can choose the type of cut you would like to make. This is coordinated to the type of material you are cutting. Click the down arrow and choose the correct material.


14 Black Colors - Cutting E Loop Cardboard Red Colors - Drawing with the Pen Green Colors - Creasing the Cardboard Click on the plot icon to preview your cut and cut your job. Click on the preview button to see how your job will cut. You can choose how the machine will cut the lines. If you choose Each Color the machine will draw, crease, or cut by color, instead of randomly doing it.


15 Click Play to see the Cutting Simulation Sending the Job to the Machine: The machine has a remote mode and a local mode. Click the Remote/Local button to switch between the two. If you are sending a job from the computer, the machine has to be in remote mode. Press the CE button on the die cutting machine. Then the Remote/Local Button. Also press the Vacuum button to turn on the vacuum table.


16 Press the Plot button to send the job. The cutter head will move to the cutting position and start cutting. If you get this error window, it means you did not press the CE button and the Remote/ Local Button. Press those and try re-sending the plot. If it still does not work, please see a DM Staff Member for assistance. Piece Cut Out


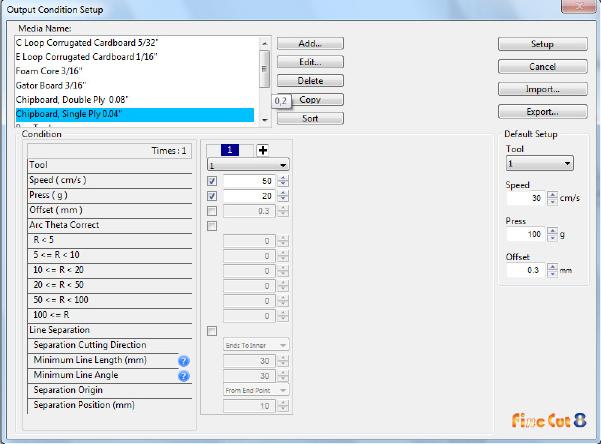
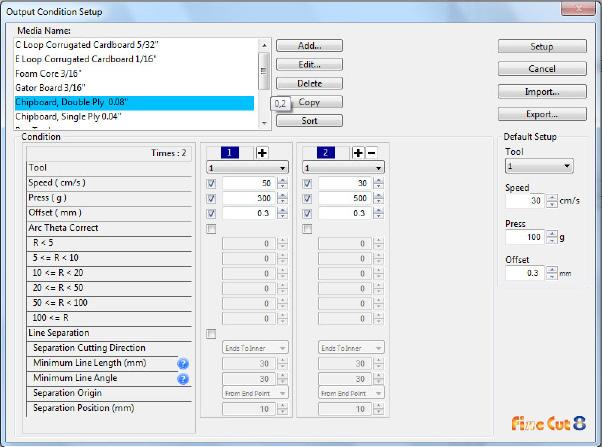
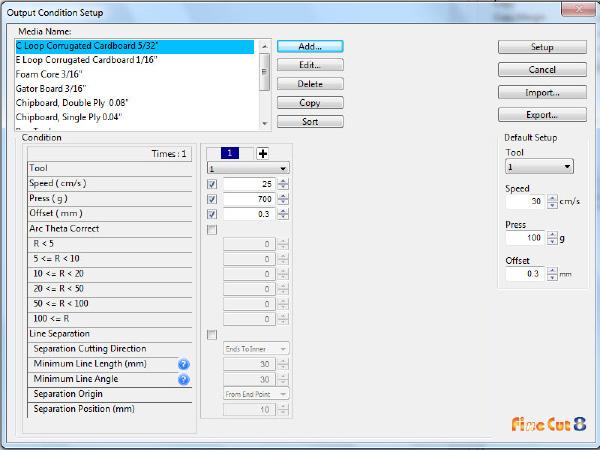
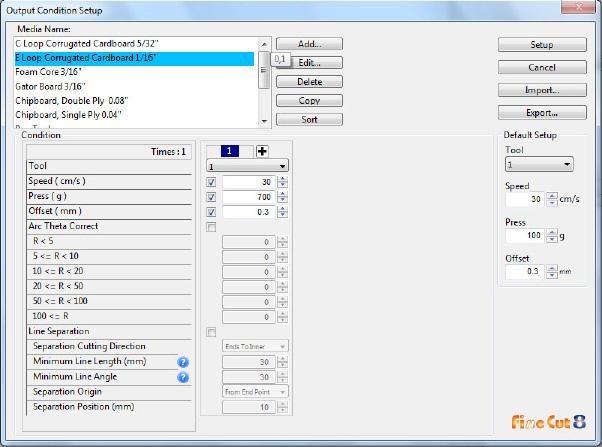
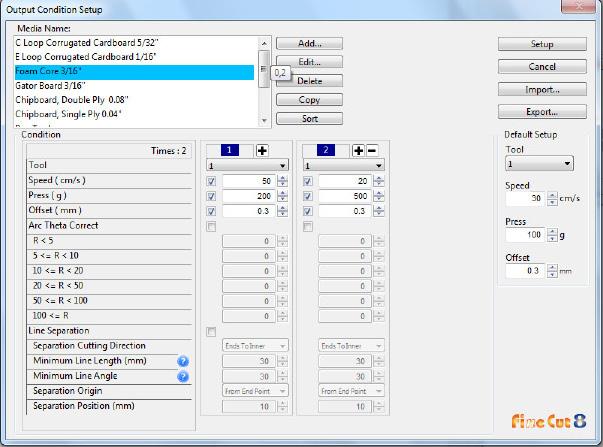
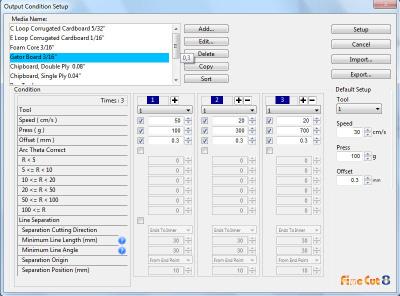
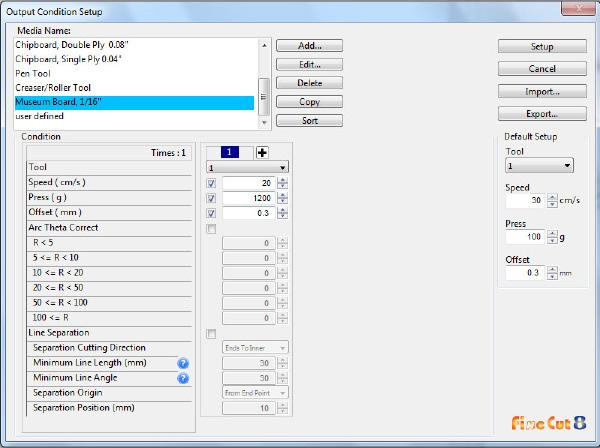
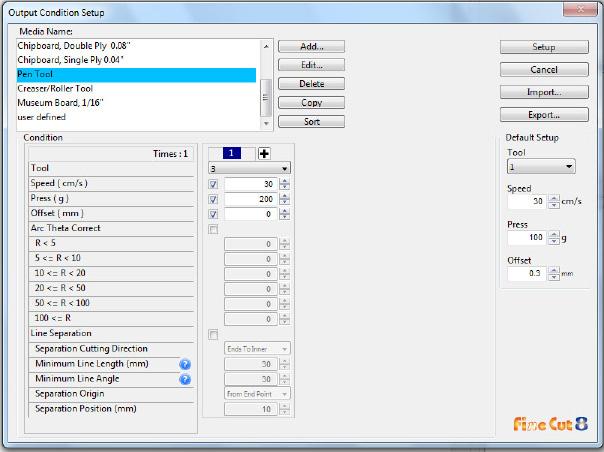
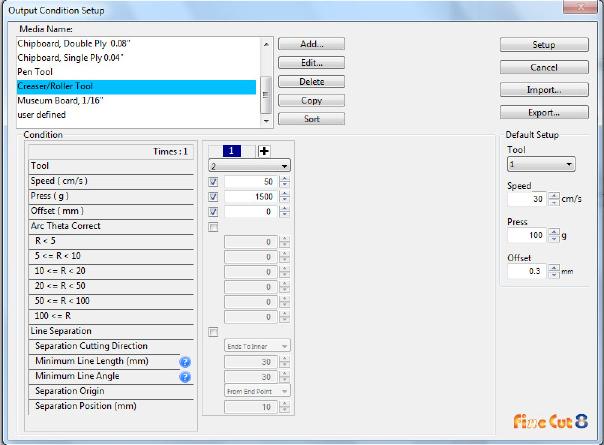
17 Creating Custom Material Profiles From the fly out Arrow, Choose Edit Plot Condition Click the Add Button to add a new material profile Give a new material profile name. Set the Speed and Pressure Settings. Click the Plus Button to add additional passes. Ie. More cut passes of the knife. Tool number sets the knife, pen or creaser to cut. 1= Knife Tool 2= Creaser Tool 3= Pen Tool
18
19
20
21
22
USER MANUAL Uninet LF-600 Digital die cutter for sheet labels
 USER MANUAL Uninet LF-600 Digital die cutter for sheet labels this product is certified: imark DIGITAL CUTTING SOFTWARE This software has been designed to effectively cut sheet labels. There are also functions
Digital Media Tutorial Written By John Eberhart
 MadCAM MadCAM 5.0: Large 4.1: Large & Medium CNC Tool CNC Path Tool Path Generator Generator Digital Media Tutorial Written By John Eberhart MadCAM is a tool path generator that works inside Rhino. It
GCC LaserPro Laser-cutter
 2/9/17 p. 1/10 Overview Reads Adobe Illustrator files Can cut: along a vector path (for lines, contours, etc) in a raster pattern (for filled areas) Can cut a variety of materials Examples: mat board,
TM Quick Start Guide
 TM Quick Start Guide Contacting Pazzles By Phone In the US: 866-729-9537 International: +1-208-922-3558 Phone Hours: Mon - Fri, 9am - 5pm Mountain Time By Email Customer Service: Technical Support: Sales:
CNC Turning Training CNC MILLING / ROUTING TRAINING GUIDE. Page 1
 CNC Turning Training www.denford.co.uk Page 1 Table of contents Introduction... 3 Start the VR Turning Software... 3 Configure the software for the machine... 4 Load your CNC file... 5 Configure the tooling...
Using Siemens NX 11 Software. The connecting rod
 Using Siemens NX 11 Software The connecting rod Based on a Catia tutorial written by Loïc Stefanski. At the end of this manual, you should obtain the following part: 1 Introduction. Start NX 11 and open
OPERATION MANUAL MIMAKI ENGINEERING CO., LTD.
 OPERATION MANUAL MIMAKI ENGINEERING CO., LTD. http://www.mimaki.co.jp/ E-mail:traiding@mimaki.co.jp D200674 About FineCut for CorelDRAW Thank you very much for purchasing a product of Mimaki. FineCut,
Create A Briefcase Icon
 Create A Briefcase Icon In this tutorial, I will show you how to create a briefcase icon with rectangles, ellipses, and gradients. This briefcase icon is great for web designs and user interfaces. Moreover,
Silhouette Connect Layout... 4 The Preview Window... 5 Undo/Redo... 5 Navigational Zoom Tools... 5 Cut Options... 6
 user s manual Table of Contents Introduction... 3 Sending Designs to Silhouette Connect... 3 Sending a Design to Silhouette Connect from Adobe Illustrator... 3 Sending a Design to Silhouette Connect from
IxD Lab, IT University in Copenhagen. March Lasercutting 101
 Lasercutting 101 File Storage The lasercutting PC has the common storage location T: mapped as a temporary volume. Use the folder T:\DIRTY_LAB_TEMP_STORAGE to transfer files between your own system and
Alibre Design Tutorial - Simple Extrude Step-Pyramid-1
 Alibre Design Tutorial - Simple Extrude Step-Pyramid-1 Part Tutorial Exercise 4: Step-Pyramid-1 [text version] In this Exercise, We will set System Parameters first. Then, in sketch mode, outline the Step
CNC Using the FlexiCam CNC and HMI Software. Guldbergsgade 29N, P0 E: T:
 CNC Using the FlexiCam CNC and HMI Software Guldbergsgade 29N, P0 E: makerlab@kea.dk T: +46 46 03 90 This grey box is the NC controller. Let s start by turning the red switch to the ON position, then press
Alibre Design Tutorial: Loft, Extrude, & Revolve Cut Loft-Tube-1
 Alibre Design Tutorial: Loft, Extrude, & Revolve Cut Loft-Tube-1 Part Tutorial Exercise 5: Loft-Tube-1 [Complete] In this Exercise, We will set System Parameters first, then part options. Then, in sketch
Cube in a cube Fusion 360 tutorial
 Cube in a cube Fusion 360 tutorial n Before using these instructions, it is helpful to watch this video screencast of the CAD drawing actually being done in the software. Click to link to the video tutorial.
X-Carve Quick Start & Resource Guide
 X-Carve Quick Start & Resource Guide X-Carve Manual and Guide X-Carve FAQs: https://inventables.desk.com/customer/en/portal/topics/820499-x-carve-faq/articles?b_id=9563 X-Carve Manual: http://x-carve-instructions.inventables.com/1000mm/
Half-Cut or Through Cut Always on the Cutting Edge
 Half-Cut or Through Cut Always on the Cutting Edge Mimaki s precise and reliable roll cutting plotters (Max. width 76 cm) (Max. width 130 cm) (Max. width 160 cm) PRODUCT GUIDE Terms of use The contents
Ladybird Project - Vacuum Mould
 - Vacuum Mould Prerequisite Mould drawn and saved as an STL file in SolidWorks Focus of the Lesson On completion of this exercise you will have: Opened an STL file Set Machining Constraints Set up Tools
Creo Extrude Tutorial 2: Cutting and Adding Material
 Creo Extrude Tutorial 2: Cutting and Adding Material 1. Open Creo Parametric 2. File > Open > extrudeturial (From Creo Extrude Tutorial 1) 3. Cutting Material a. Click Extrude Icon > Select the following
CNC: The Machine. Sullivan Fabrication Studio Version 5.1 (beta)
") CNC: The Machine Sullivan Fabrication Studio Version 5.1 (beta) TABLE OF CONTENTS Initial Setup... About the Knowledge Base........... Techno CNC Router... Mounting Material... Install Router Bit... Set
CNC: The Machine Sullivan Fabrication Studio Version 5.1 (beta) TABLE OF CONTENTS Initial Setup... About the Knowledge Base........... Techno CNC Router... Mounting Material... Install Router Bit... Set
Create a Stylized GPS Icon
 Home About Resources Contact Shop Tutorials Tips and Tricks Interviews Inspiration Create a Stylized GPS Icon Tutorials July 9th, 2009 Location based software and peripherals are very popular these days.
Tinker Tuesday Project - Fabric Engraving
 Tinker Tuesday Project - Fabric Engraving 1. Open CorelDRAW and create a new document. On the toolbar on the left side of the screen, select the Basic Shapes tool icon. This will allow you to create simple
Creo: Hole, Fillet, and Round Layout/Dimension Tutorial. By: Matthew Jourden Brighton High School
 Creo: Hole, Fillet, and Round Layout/Dimension Tutorial Layout of a Part with Holes 1. Open a blank drawing with your border and title block By: Matthew Jourden Brighton High School 2. Place the front,
The original photo. The final result.
 giving a photo painted edges In this Adobe Photoshop tutorial, we re going to combine a couple of different effects. First, we ll give the photo easy-tocreate painted edges, and then we ll make it look
Bruker Dimension Icon AFM Quick User s Guide
 Bruker Dimension Icon AFM Quick User s Guide August 8 2014 GLA Contacts Jingjing Jiang (jjiang2@caltech.edu 626-616-6357) Xinghao Zhou (xzzhou@caltech.edu 626-375-0855) Bruker Tech Support (AFMSupport@bruker-nano.com
Intro to CO 2 Laser Cutting
 MAKERSPACE Intro to CO 2 Laser Cutting What Can I Do With the CO 2 Laser? CO 2 laser cutters and engravers are excellent for making precise 2-dimensional cuts in a variety of materials, as well as engraving
PRODIM CT 3.0 MANUAL the complete solution
 PRODIM CT 3.0 MANUAL the complete solution We measure it all! General information Copyright All rights reserved. Apart from the legally laid down exceptions, no part of this publication may be reproduced,
Basic steps to time the Gammill quilting machine s rotary sewing hook
 Basic steps to time the Gammill quilting machine s rotary sewing hook 1.) Turn the machine off and unplug it. 2.) With the needle bar in the raised position, remove the bobbin and bobbin case. 3.) Remove
Operating the EOT-2 Oscillating Tangential Module Supplement to the WinCNC Operations Manual
 Operating the EOT-2 Oscillating Tangential Module Supplement to the WinCNC Operations Manual 5/12/2015 Laguna Tools 1 TABLE OF CONTENTS Electric oscillating tangential tool (EOT-2)... 3 EOT-2 Overview
Creating a Sketchbook in Sketchbook Designer based on a photo and Reusing it in AutoCAD
 Autodesk Design Suite 2012 Autodesk SketchBook Designer 2012 Tip Guides Creating a Sketchbook in Sketchbook Designer based on a photo and Reusing it in AutoCAD In this section you will learn the following:
There are two types of cove light in terms of light distribution inside a room
 DIALux evo Tutorials Tutorial 2 How to create a cove light detail In this tutorial you will learn the following commands. 1. Using help lines 2. Using ceiling. 3. Using cutout 4. Using Boolean operation
SAVING, LOADING AND REUSING LAYER STYLES
 SAVING, LOADING AND REUSING LAYER STYLES In this Photoshop tutorial, we re going to learn how to save, load and reuse layer styles! Layer styles are a great way to create fun and interesting photo effects
Drawing Layouts Paper space & Model Space
 Drawing Layouts Paper space & Model Space Users of Bricscad will have seen the tabs at the bottom left of the drawings area labelled: Model, Layout1, Layout2 but may not know how to use them or what they
Knife Jig SVM-45 (60533)
") Knife Jig SVM-45 (60533) KNIVES Min length of blade 60 mm (2 "). CARVERS DRAW KNIVES Positioning of Machine Note The height of the bench must not be too high when grinding knives. 550 650 mm (22 26") is
Knife Jig SVM-45 (60533) KNIVES Min length of blade 60 mm (2 "). CARVERS DRAW KNIVES Positioning of Machine Note The height of the bench must not be too high when grinding knives. 550 650 mm (22 26") is
Vinyl Cutter Instruction Manual
 Vinyl Cutter Instruction Manual 1 Product Inventory Inventory Here is a list of items you will receive with your vinyl cutter: Product components (Fig.1-4): 1x Cutter head unit complete with motor, plastic
Kitchen and Bath Design Tutorial
 Kitchen and Bath Design Tutorial This tutorial continues where the Interior Design Tutorial left off. You should save this tutorial using a new name to archive your previous work. The tools and techniques
Premier + Create Create Express Border Applique
 Premier + Create Create Express Border Applique Page 1 Learn to use the Create Express Border Wizard to create a beautiful applique. It s so quick and easy! You can audition your applique fabric right
Conversational CAM Manual
 Legacy Woodworking Machinery CNC Turning & Milling Machines Conversational CAM Manual Legacy Woodworking Machinery 435 W. 1000 N. Springville, UT 84663 2 Content Conversational CAM Conversational CAM overview...
Design Digital Lab INTRODUCTION TO LASER CUTTING
 Design Digital Lab INTRODUCTION TO LASER CUTTING Terminology Terms you may need to know Terminology Raster: The process where the laser beam makes a series of bi-directional, horizontal scan lines to produce
Kitchen and Bath Design Tutorial
 Kitchen and Bath Design Tutorial This tutorial continues where the Interior Design Tutorial left off. You should save this tutorial using a new name to archive your previous work. The tools and techniques
Kitchen and Bath Design Tutorial
 Kitchen and Bath Design Tutorial This tutorial continues where the Interior Design Tutorial left off. You should save this tutorial using a new name to archive your previous work. The tools and techniques
Starting Modela Player 4
 Tool Sensor Holder This tutorial will guide you through the various steps required of producing a single sided part using the MDX- 40 and Modela Player 4. The resulting part is a tool sensor holder that
US MH Vinyl Cutter and Plotter Computation + Construction Lab Iowa State University
 US MH Vinyl Cutter and Plotter Computation + Construction Lab Iowa State University US MH Vinyl Cutter and Plotter Material and Blades Oracal Cast and Calendered Sign Vinyl, Heat Transfer Material (Sister
Cut-True 16M Manual Paper Cutter
 Cut-True 16M Manual Paper Cutter 2/2013 OPERATOR MANUAL FIRST EDITION TABLE OF CONTENTS TOPIC PAGE Specifications 1 Safety Guidelines 1 Assembly 2 Overview 3 Description of Equipment Parts 3-4 Operation
ILLUSTRATOR BASICS FOR SCULPTURE STUDENTS. Vector Drawing for Planning, Patterns, CNC Milling, Laser Cutting, etc.
 ILLUSTRATOR BASICS FOR SCULPTURE STUDENTS Vector Drawing for Planning, Patterns, CNC Milling, Laser Cutting, etc. WELCOME TO THE ILLUSTRATOR TUTORIAL FOR SCULPTURE DUMMIES! This tutorial sets you up for
Manual LaserPro Mercury
 Manual LaserPro Mercury CONTENTS 1. OBJECTIVE p 2 2. INTRODUCTION AND MATERIALS p 2 3. PREPARING YOUR DRAWING p 3 4. WORK FLOW p 4 4.1. Preparation 4.2. Printing 4.3. On the laser cutter 4.4. Control 4.5.
Using the Roller-Type Rotary attachment...
 Using the Roller-Type Rotary attachment... Our customer was very interested in purchasing our laser machine, and also interested in using the roller-style rotary attachment. **** Make sure the main door
digitization station DIGITAL SCRAPBOOKING 120 West 14th Street
 digitization station DIGITAL SCRAPBOOKING 120 West 14th Street www.nvcl.ca techconnect@cnv.org DIGITAL SCRAPBOOKING With MyMemories Suite 6 The MyMemories Digital Scrapbooking software allows you to create
Quick Start Guide. Contents
 1 Quick Start Guide Contents Powering on the Machine Login/Password Entry Jaw Set Up High Security Cut by Code High Security Jaw Set Up Edge Cut Cut by Code Edge Cut Cut by Decode Cutter Replacement Tracer
so you want to get to know Onsrud... Onsrud1 : machine set up
 so you want to get to know Onsrud... Onsrud1 : machine set up What does CNC mean? CNC: Computer Numerical Control The router is controlled by a computer, that tells the router where to go through a series
Tinker Tuesday Project - Pumpkin Carving
 Tinker Tuesday Project - Pumpkin Carving 1. Acquire a small pumpkin (between six and seven inches tall excluding the stem). A full size pumpkin will not fit in the engraver. 2. Use a knife to remove the
Settings. ! The Preview Pane !!!!! THE PREVIEW PANE IMAGES & LAYERS PANE SETTINGS PANE SETTINGS WINDOW UNDO/REDO AND RESET
 Settings THE PREVIEW PANE IMAGES & LAYERS PANE SETTINGS PANE UNDO/REDO AND RESET SETTINGS WINDOW The Preview Pane When you first load an image, PhotoDonut calculates the preview scale to fit your image
Part 8: The Front Cover
 Part 8: The Front Cover 4 Earpiece cuts and housing Lens cut and housing Microphone cut and housing The front cover is similar to the back cover in that it is a shelled protrusion with screw posts extruding
Customized Foam for Tools
 Table of contents Make sure that you have the latest version before using this document. o o o o o o o Overview of services offered and steps to follow (p.3) 1. Service : Cutting of foam for tools 2. Service
Quick Guide to Gift and Jewelry Engraving
 Quick Guide to Gift and Jewelry Engraving Engraving a Pewter Tankard (Cylindrical Metal Objects) Cylindrical Engraving of Metal Objects Tools required for Cylindrical Engraving *1. The optional 1/8 (c2
STRONGMAN TOOLS SCROLL BENDERS
 STRONGMAN TOOLS SCROLL BENDERS Top- Large Scroll Bender Middle Medium Scroll Bender Bottom- Standard Scroll Bender with Banana Attachment. Scrolling Capacities (max) Std Scroller Flat Bar 40x5mm Square
Laser Alignment Guide
 Laser Alignment Guide Once the laser has been installed, you must align it. The alignment procedure is very precise and delicate. It is important to understand how the alignment is done and why it must
Considerations. image solid color for tracing make sure your traced shapes are a single solid color - Black RGB 0,0,0 or #000000
 2D Design Object Description Form Fit and Function (FFF) Design for laser cut elements.bmp or.jpg border at least 300 dpi allow 1/8 margin for boarder of the material image solid color for tracing make
Preliminary Version. Working with the Blade of the Opus1 Gouger Robin Driscoll October 2003
 Preliminary Version Working with the Blade of the Opus1 Gouger Robin Driscoll October 2003 One of the most interesting aspects of the Opus1 Gouger is the multitude of adjustments that are now easily in
Apollo Ring saw Instruction Manual
 Sharing your passion for making jewelry. Products. Service. Know-how. page 1 Assembly/Contents The Apollo Ring saw is shipped in two (2) boxes. One box contains the saw plus one or more blade cartridges.
Lab 1: Engineering Drawing, 3D Printing and Laser Cutting Innovation Fellows Program Bootcamp Prof. Steven S. Saliterman
 Lab 1: Engineering Drawing, 3D Printing and Laser Cutting Innovation Fellows Program Bootcamp Prof. Steven S. Saliterman In the following exercises you will learn basic drawing skills required for most
CorelDRAW X3 are supported. OPERATION MANUAL MIMAKI ENGINEERING CO., LTD.
 CorelDRAW X3 are supported. OPERATION MANUAL MIMAKI ENGINEERING CO., LTD. http://www.mimaki.co.jp E-mail:trading@mimaki.co.jp D201267 About FineCut Thank you very much for purchasing a product of Mimaki.
RR Series TM USER GUIDE. For Vinyl Express R Series Cutters
 RR Series TM USER GUIDE For Vinyl Express R Series Cutters Thank you for choosing an R Series cutter from SignWarehouse, Inc. Before using your cutter, we suggest you read this guide. It will guide you
Repairing Microsoft Wedge Touch Mouse Battery Cover Retaining Clip
 Repairing Microsoft Wedge Touch Mouse Battery Cover Retaining Clip Disassembly, repair and reassembly of Wedge Touch mouse when the battery cover will not stay closed. Also is a good guide to repair other
Hephestos 2 Levelling Guide
 Hephestos 2 Levelling Guide Version: V0.0.0 Author(s): BQ May 18 th 2018 Revised by: Approved by: Jon Goitia Effect date: 18/05/2018 Project: Hephestos 2 Changelog Version Date Changes Author V0.0.0 May
MadCAM 2.0: Drill Pattern Toolpath
 MadCAM 2.0: Drill Pattern Toolpath Digital Media Tutorial 2005-2006 MadCAM 2.0 can create a toolpath to drill holes directly into your material. The bit plunges in and out of the material without moving
Using the CMPE118 Laser Cutter
 Using the CMPE118 Laser Cutter Overview: As part of the CE118 course, you will use a MornTech MT-L1290 CNC laser cutting machine. This is a precision machine that allows you to cut geometry from a two-dimensional.ai
Lab 3 Introduction to SolidWorks I Silas Bernardoni 10/9/2008
 1 Introduction This lab is designed to provide you with basic skills when using the 3D modeling program SolidWorks. You will learn how to build parts, assemblies and drawings. You will be given a physical
OPERATING INSTRUCTIONS. for the labelcutter and labelfinisher. Secabo LC30
 OPERATING INSTRUCTIONS for the labelcutter and labelfinisher Secabo LC30 Congratulations on the purchase of your Secabo labelcutter! Please carefully read the operating manual to easily integrate your
LABORATORY MANUAL COMPUTER AIDED DESIGN LAB
 LABORATORY MANUAL COMPUTER AIDED DESIGN LAB Sr. No 1 2 3 Experiment Title Setting up of drawing environment by setting drawing limits, drawing units, naming the drawing, naming layers, setting line types
OPERATION MANUAL MIMAKI ENGINEERING CO., LTD.
 OPERATION MANUAL MIMAKI ENGINEERING CO., LTD. TKB Gotenyama Building, 5-9-41, Kitashinagawa, Shinagawa-ku, Tokyo 141-0001, Japan Phone: +81--5420-8671 Fax: +81--5420-8687 URL: http: // www.mimaki. co.
Figure 1: NC EDM menu
 Click To See: How to Use Online Documents SURFCAM Online Documents 685)&$0Ã5HIHUHQFHÃ0DQXDO 6 :,5(('0 6.1 INTRODUCTION SURFCAM s Wire EDM mode is used to produce toolpaths for 2 Axis and 4 Axis EDM machines.
Gouge Jig SVD-186 (SVD-186)
") Gouge Jig SVD-186 (SVD-186) TURNING TOOLS Bowl gouges Spindle gouges Turning cutters CARVING TOOLS Curved gouges Spoon-shaped gouges Back bent gouges Down bent gouges Curved V-tools Max tool width 36 mm
Gouge Jig SVD-186 (SVD-186) TURNING TOOLS Bowl gouges Spindle gouges Turning cutters CARVING TOOLS Curved gouges Spoon-shaped gouges Back bent gouges Down bent gouges Curved V-tools Max tool width 36 mm
Photo Within A Photo - Photoshop
 Photo Within A Photo - Photoshop Here s the image I ll be starting with: The original image. And here s what the final "photo within a photo" effect will look like: The final result. Let s get started!
MYGRAPHICSLAB: ADOBE ILLUSTRATOR CS6
 REFINE STROKES MYGRAPHICSLAB: ADOBE ILLUSTRATOR CS6 IN THIS LESSON, YOU WILL LEARN THAT: Defining the features of generated strokes is an important skill for creating illustrations Strokes can have: Different
Diane Burton, STEM Outreach.
 123D Design Tutorial: LED decoration Before using these instructions, it is very helpful to watch this video screencast of the CAD drawing actually being done in the software. Click this link for the video
Scanning Electron Microscope FEI INSPECT F50. Step by step operation manual
 Scanning Electron Microscope FEI INSPECT F50 Step by step operation manual Scanning Electron Microscope, FEI Inspect F50 FE-SEM-F Observation Flow Saving Data And Analysis Specimen preparation Error check
Lesson 6 2D Sketch Panel Tools
 Lesson 6 2D Sketch Panel Tools Inventor s Sketch Tool Bar contains tools for creating the basic geometry to create features and parts. On the surface, the Geometry tools look fairly standard: line, circle,
Managing images with NewZapp
 Managing images with NewZapp This guide is for anyone using the NewZapp Fixed editor as opposed to the Drag and Drop editor. The Image Manager is where images are uploaded and stored in your NewZapp account
Creo Revolve Tutorial
 Creo Revolve Tutorial Setup 1. Open Creo Parametric Note: Refer back to the Creo Extrude Tutorial for references and screen shots of the Creo layout 2. Set Working Directory a. From the Model Tree navigate
Creating Photo Borders With Photoshop Brushes
 Creating Photo Borders With Photoshop Brushes Written by Steve Patterson. In this Photoshop photo effects tutorial, we ll learn how to create interesting photo border effects using Photoshop s brushes.
Technical Training USG Saw Chain Grinder
 Technical Training USG Saw Chain Grinder 1 USG HOS The STIHL USG Universal Sharpener will sharpen all types of saw chain. This is by far the most versatile and accurate machine of its type on the market.
Using Siemens NX 11 Software. Sheet Metal Design - Casing
 Using Siemens NX 11 Software Sheet Metal Design - Casing Based on a YouTube NX tutorial 1. 1 https://www.youtube.com/watch?v=-siyi1vz87k A&M CAD in mechanical engineering 1 1 Introduction. Start NX 11
VisualCAM 2018 TURN Quick Start MecSoft Corporation
 2 Table of Contents About this Guide 4 1 About... the TURN Module 4 2 Using this... Guide 4 3 Useful... Tips 5 Getting Ready 7 1 Running... VisualCAM 2018 7 2 About... the VisualCAD Display 7 3 Launch...
Tinker Tuesday Project - Wood Book Covers
 Tinker Tuesday Project - Wood Book Covers 1. On the laser engraver computer, click on the folder icon on the task bar. Then, select Thaw Space and open the document titled Living Hinge Template. 2. Measure
Create A Mug. Skills Learned. Settings Sketching 3-D Features. Revolve Offset Plane Sweep Fillet Decal* Offset Arc
 Create A Mug Skills Learned Settings Sketching 3-D Features Slice Line Tool Offset Arc Revolve Offset Plane Sweep Fillet Decal* Tutorial: Creating A Custom Mug There are somethings in this world that have
Tinker Tuesday Project - Drinking Glasses
 Tinker Tuesday Project - Drinking Glasses 1. Open CorelDRAW and create a new document. Near the top left corner of the screen, click File, and then click Import on the resulting menu. Select an image from
Table of Contents CONTENTS
 Table of Contents CONTENTS Introduction... 2 Contact TKI... 2 Printer Features & Definitions... 3 Software Parameter Setup... 8 Setting Up A Printer Profile in Cura... 8 Printing Settings... 13 Printing
Adobe Illustrator Craft a Dramatic Vector Landscape Environment
 Adobe Illustrator Craft a Dramatic Vector Landscape Environment This tutorial will show the intermediate Adobe Illustrator artist how to make a dramatic landscape environment. You should have a basic understanding
RDworks and Basic Rabbit Laser Operation Tutorial
 RDworks and Basic Rabbit Laser Operation Tutorial File Setup Layer color is how the Rabbit Software designates different operations so, regardless of design software, you will want to organize geometry
K-band Waveguide BPF Design using Agilent EMPro Anurag Bhargava Application Consultant Agilent EEsof EDA
 K-band Waveguide BPF Design using Agilent EMPro 2013 Anurag Bhargava Application Consultant Agilent EEsof EDA Filter Specifications Center Frequency (Fc): 25 GHz 3dB Bandwidth: 150 MHz Rejection: 40 db
Setting up the Camera. AXIS Camera Manager Click on AXIS Camera Manager Icon:
 Content Page 1... Setting up the camera Page 7... AVS Camera Overview Page 8... AVS Application (App) Page 10... AVS License Page 11... AVS Jogging Controls Page 11... AVS Navigator Page 12... AVS Slider
IENG 475 Computer-Controlled Manufacturing Systems 2/7/2017. Lab 03: Manual Milling and Turning Operations
 I. Purpose Lab 03: Manual Milling and Turning Operations A.) B.) C.) D.) Provide an overview of safety considerations for the CNC Mill Provide manual experience using the laboratory s CNC Mill Provide
FC3920K and FC5539K Automatic Foam Cutting CNC Machines
 FC3920K and FC5539K Automatic Foam Cutting CNC Machines Disclaimer You accept all risks and responsibilities for looses, damages costs and other consequences resulting directly or indirectly from using
SCANNING IMAGES - USER S GUIDE. Scanning Images with Epson Smart Panel and PhotoShop [for Epson 1670 scanners]
![SCANNING IMAGES - USER S GUIDE. Scanning Images with Epson Smart Panel and PhotoShop [for Epson 1670 scanners]](/thumbs/89/98942649.jpg "SCANNING IMAGES - USER S GUIDE. Scanning Images with Epson Smart Panel and PhotoShop [for Epson 1670 scanners]") University of Arizona Information Commons Training 1 SCANNING IMAGES - USER S GUIDE Scanning Images with Epson Smart Panel and PhotoShop [for Epson 1670 scanners] p.2 Introduction and Overview Differences
University of Arizona Information Commons Training 1 SCANNING IMAGES - USER S GUIDE Scanning Images with Epson Smart Panel and PhotoShop [for Epson 1670 scanners] p.2 Introduction and Overview Differences
Bruker Dimension Icon AFM Quick User s Guide
 Bruker Dimension Icon AFM Quick User s Guide March 3, 2015 GLA Contacts Jingjing Jiang (jjiang2@caltech.edu 626-616-6357) Xinghao Zhou (xzzhou@caltech.edu 626-375-0855) Bruker Tech Support (AFMSupport@bruker-nano.com
Laser Cutting at CAP Fab Lab
 09/14/2015 Laser Cutting at CAP Fab Lab 1) Cut your material to 18 x 32 or smaller (or 18 x 24 for the smaller laser cutters). 2) Turn on the laser cutter (if it is not already on) by flipping the wall
UNIVERSITY OF WATERLOO Physics 360/460 Experiment #2 ATOMIC FORCE MICROSCOPY
 UNIVERSITY OF WATERLOO Physics 360/460 Experiment #2 ATOMIC FORCE MICROSCOPY References: http://virlab.virginia.edu/vl/home.htm (University of Virginia virtual lab. Click on the AFM link) An atomic force
Apple Photos Quick Start Guide
 Apple Photos Quick Start Guide Photos is Apple s replacement for iphoto. It is a photograph organizational tool that allows users to view and make basic changes to photos, create slideshows, albums, photo
Software manual. F-Mark software manual_e02
 Software manual F-Mark software manual_e02 CONTENTS imark software panel layout...1 Graphics file design...2 Layers for printing...3 Layers for Cutting...4 Save file for Cutting...5 Crop Marks position
CONTENTS PRECAUTIONS BEFORE STARTING OPERATION PREPARATION FOR OPERATION CAUTIONS ON USE OPERATION
 CONTENTS PRECAUTIONS BEFORE STARTING OPERATION ------------------------------------- 1 PREPARATION FOR OPERATION 1. Adjustment of needle bar stop position ---------------------------------------------------------