EBGLASS ADHESIVE SMART PDLC FILM 1. RECEIVING & HANDLING 2 STORAGE INSTALLATION INSTRUCTION
|
|
|
- Andra Lucas
- 5 years ago
- Views:
Transcription

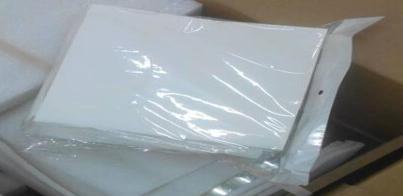
1 EBGLASS ADHESIVE SMART PDLC FILM INSTALLATION INSTRUCTION In order to fully understand and properly install the adhesive smart film, please read this installation guide in its entirety before commencing with installation. Please note that electrical work is also required to complete the installation and should be completed by a certified electrician. 1. RECEIVING & HANDLING 1.1 Before signing and accepting the shipment from the carrier, inspect the container (i.e. box, crate) for any signs of physical damage. If there is any indication of damage, it is critical to open the container and inspect the shipment in the presence of the carrier. If any damage is found, the shipping documents should be noted accordingly and signed by the driver as a witness. Photographs should also be taken as proof of damage and submitted to EBGLASS for review. Failure to do so will hold you personally liable for any damage to the product and alleviate the carrier and EBGLASS from any responsibility. 1.2 Carefully open container to prevent causing any damage to the film and handle with care Do not fold or crease the film as this will cause permanent damage to the product. The film must be kept loosely rolled or flat at all times (see images below). 1.4 Always use nitrile gloves when handling and installing the product. 1.5 When moving the film it is best to hold it as close to the corners as possible. It is beneficial to have 2 people move larger sheets to reduce risk of damage. Use adequate numbers of skilled workers (based on project size) who are trained and experienced in the necessary crafts. 1.6 When handling films take particular care with the edges to avoid de-lamination. 2 STORAGE Smart Film can sustain damage between delivery and installation; therefore care should be taken when the product is being handled, recommended guidelines for the handling of smart film included in this document. If the Film is not being installed immediately after un-crating, care must be taken to protect it and stored flat, out of direct sunlight, where the relative humidity is less than 80% and a near constant temperature between -20 and +60 degree in order to prevent the formation of condensation on the film.
 c. Silicone adhesive sealant d. Applicator squeegee/glass scraper e. Rubber Roller f. Lint free cloth (microfiber) g. Low adhesive tape (painters tape) h.")
. 3.")
2 3 INSTALLATION FILM 3.1 PREPARATION PLANNING & PREPARATION IS THE KEY TO A SUCCESSFUL INSTALLATION!!! Items/tools required: a. Nitrile gloves (or other non- powdered, lint- free gloves) b. Glass cleaner (non-ammonia based) c. Silicone adhesive sealant d. Applicator squeegee/glass scraper e. Rubber Roller f. Lint free cloth (microfiber) g. Low adhesive tape (painters tape) h. Packaging tape i. Wire mold / trim j. Ladder (if necessary) k. Electrical tester (switch cord) l. Soldering iron m. Electrical wire leads Remove smart film from container and place in a clean safe location near the installation area (preferably on a clean table top) Inspect each piece of film immediately prior to start of installation. Do not install film pieces which are improperly sized, have damaged edges or are deficient in any other manner Test each piece of film (with a switch cord) to ensure it operates properly. Please notify a EBGLASS representative immediately should there be an issue with the operation of the product Once all materials are gathered and product has been properly reviewed and tested, you can proceed with the installation of smart film. 3.2 EXECUTION Step 1: Thoroughly clean the surface of the glass with glass cleaner & squeegee, and ensure there are no particles/debris left on the glass. It is best to clean both sides of glass (if possible) in order to distinguish debris on application side. If necessary spray the glass with a 99% isopropyl alcohol and carefully use a window scraper or blade to remove any dirt from the surface of the glass. the surface needs to be COMPLETELY SMOOTH Using a lint free cloth, clean the glass surface meticulously with IPA (isopropyl alcohol) and leave to evaporate. NOTE: The cleaner you get the glass from the start, the quicker the installation time as there will be fewer air bubbles to deal with during installation. Glass must be completely dry prior to application of film.
 using a dry microfiber cloth and ensure it is free from dust or other contaminants.")
3 The following steps should be done in a clean, dry, dust free environment for best results. Step 2: With nitrile gloves on, wipe the protective liner (that protect the adhesive on the side already facing up) using a dry microfiber cloth and ensure it is free from dust or other contaminants. Note: Do not remove the protective liner (Self Adhesive Side) until you are ready to install the film. The protective liner (Non-Adhesive Side) should remain until installation is completed. Step 3: Before commencing installation ensure the film fits the area to be filmed by carefully positioning it against the surface whilst checking for the required clearances.note that there are 2 copper mesh tabs (bus bar) along one side of the film as specified by customer. Make sure that the film is oriented correctly so that the copper mesh tabs are located on the intended side. Copper tabs are not to come in contact with any metal framing or stops. Step 4: Peel back the first 2-3 of the protective liner from the electrical contact side. Step 5: Align the electrical contact side of the Smart Film with the top edge of the glass. Run your finger along the electrical contact side while pressing firmly on the film. The exposed adhesive will hold the film in position. Gently reposition if necessary. Step 6: Slowly pull away the protective liner and let the film self adhere to the glass surface. Use the roller to gently press on the film and adhere it to the glass as you continue to slowly pull away the liner. If you miss an air bubble, carefully lift the film and let it re-adhere to the glass under its own weight. Repeat the process until the entire film adheres to the glass and the installation is free of bubbles. Note: No hard scraping on the film. It may hurt the crystal inside of film. Step 7: Use the small squeegee gently work out any remaining small bubbles to the edges of the film, ensuring that the edges have good contact with the glass. NOTE: Should you need to lift the film from the glass once it has been fully applied, to avoid any damage to the edge of the film, use the tip of a fine blade (eg.. a scalpel or craft knife) to gently and carefully ease one of the bottom corners away from the glass, taking great care not to damage the silicone cling liner which adheres the film to the glass. NEVER use a thumb or finger nail, this will damage the corner of the film and possibly cause de-lamination. Step 8: Cut and Trim the film with a pair of stainless steel or titanium scissors. Do not use a razor blade or knife it could cause delamination of the film. After cutting and trimming, you need to use a cylinder to rolling press the cutting area edge, or it could cause high voltage and burn spot in cutting position, and even electric shocks. So it s strongly suggested EB GLASS finish all cutting for clients. Note: We always recommend you provide us the correct measurements so we can professionally cut to size at our facility eliminating any risk of material fault. Step 9: Remove the outer protective liner.
 and to one on the right (negative connection). Quickly test the film to ensure it is working before proceeding.")

. If you wish to use a metal wire mold we suggest you contact an electrician.")

4 Step 10: Connect electrical wiring to copper mesh tabs using a soldering iron (be sure to protect the film from potential solder drops). Solder a cable to one tab on the left (positive connection) and to one on the right (negative connection). Quickly test the film to ensure it is working before proceeding. Once you have tested it you can trim off the spare portion of the mesh tab. Note: you can also use wire nuts to connect wires to the copper mesh tab. Step 11: Use non-acid based silicone along the bus bar edge to hold the wire mold/trim in place. Using acid based silicone can cause irreparable damage to the film product. Step 12: Completely cover the bus bar area within existing frame or with Wire mold/trim (match existing finishes) to avoid exposure to electric shock. It is recommended to use a non-conductive wire mold (i.e. plastic). If you wish to use a metal wire mold we suggest you contact an electrician. Notch wire mold with dremel to accommodate wiring and attach prior to soldering. It is optional to cover remaining three edges with trim to meet any aesthetic requirements. Now the installation is completed, you can now do a final clean of the film with non-ammonia based cleaner and wipe down with a soft dry lint-free cloth. Never use any chemicals or abrasive cleaners on Film surface. The precise measurement of a window or glass panel is extremely important to the success of a smart film installation. The film comes pre-sized to fit and cannot be altered on site. If the measurement is too small, the film won t cover the entire glass area. However if your measurement is too large, the film won t fit within the allotted space. And when two or more films are being applied side by side on a single piece of glass, a gap of 0.5 to 1mm should be left to prevent an electrical short damaging the film edges.
5 4 Busbar And Its Wiring Broadly speaking, a Busbar is an electrically conductive rod, bar, or strip. In relation to Smart Film the Busbar is a conductive copper strip applied to one or two edges of the sheet of PDLC film prior to it being laminated between two panes of glass. The copper strip acts as the conduit for the stepped-down (48/60V AC) electrical current which activates the liquid crystals within the film. The current is spread by means of a conductive Indium Tin Oxide coating on the surface of the enclosing PET film. Some Smart Film panels may require more than one Busbar to ensure full and even distribution of the electrical current. Twin Wires Wires are soldered on to either end of each Busbar. They are twin (or dual) wires.this apparent 'double-up' is to compensate in the case of a wire becoming detached or dislodged during the panel's installation process. The busbar may be applied to the long or short edge/s, depending on your requirements. Some panels, depending on their proportions, may require two busbars. Acceptable Positioning of Busbars on Smart Film Panels Where the size ratio is under 1:3 (e.g. 800mm x 1600mm) -Busbar can be along any one edge. Where the size ratio is over 1:3 (e.g. 400mm x 1600mm) -Busbar MUST NOT be applied along one shorter edge only. -Busbar can be applied along one long edge only, or on any two edges.
6 5. CARE & MAINTENANCE Once the Smart Film has been installed, the glazing contractor should make provisions to ensure that the films are protected from possible damage caused by the construction practices of other trades. Special care must be taken during the initial cleaning, cleaning during the construction period, or when film surfaces are severely soiled, in order to prevent marking or damage caused by abrasive contaminants. In the event that the film surfaces become heavily contaminated with abrasive particles the surface of the film should initially be blown with a low pressure compressed air or electrical blower to remove as much of the contaminant as possible. Any remaining surface contamination should be removed by gently flicking the surface of the film with a soft bristled cleaning/dusting brush. Caution must be taken to ensure that any remaining abrasive materials do not become trapped and dragged across the film surface and the brush; otherwise the surfaces may be scratched. For routine cleaning the film surface can be cleaned with Soft IPA wipes and/or a PH neutral, non-abrasive liquid glass cleaning product applied SPARINGLY to lint free, clean, soft cloth. Do not allow any metal or hard parts of the cleaning equipment to contact the film surfaces. Please note that the plastic surface of the film can be marked or scratched if the care and cleaning instructions are not followed. NEVER ATTEMPT TO CLEAN SMART GLASS OR SMART FILM WITH A WET CLOTH AND BUCKET OR OTHER WINDOW CLEANING TECHNIQUE WHICH DRENCHES THE SURFACE OF THE GLASS OR FILM. THIS WILL CAUSE IRREPARABLE DAMAGE TO THE PRODUCT AND WILL INVALIDATE THE WARRANTY. To ensure many years of problem free operation we recommend that Smart film is operated continuously (switched clear) for no longer than 16 hours in any 24 hour period. Annual checks: We recommend that the client should check that all wiring is in good condition, framing materials are free of any damage and that the transformer and switch are in good visible order. The areas adjoining the Smart Glass including walls, ceilings and floors should be checked for structural integrity, excess humidity and temperature.


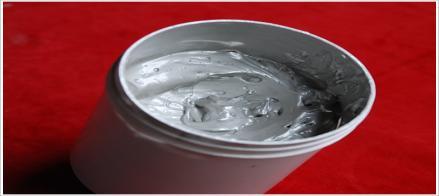
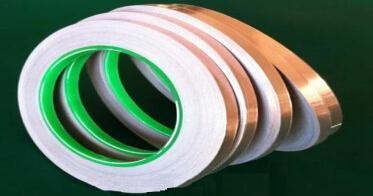


7 HOW TO INSTALL BUSBAR (You may also check our video link: 1.Tools & Material list: Knife & Tailor scissors Ethanol Wipe Conductive silver paste Copper foil Brush Wire 1


8 Adhesive tape 2. Install busbar Prepare the tools and material as above list. Use Tailor scissors to cut the smart film into size of customer request. Busbar position cutting: Cut from middle layer of film, Another side same process. (You can refer to our smart film sample. 2


9 Busbar cutting width: 7mm, Copper width 5mm. Wipe the both side surface of busbar cutting position with ethanol. Use brush to draw conductive silver paste onto the busbar cutting position (If it is too dense, you can use 99% ethanol to dilute conductive silver paste). 3


10 Make sure the conductive silver paste not touch the un-cut smart film edges. (You can use adhesive tape to cover the un-cut smart film edges.) Use dryer to dry the conductive silver paste. Put copper foil onto conductive silver paste. 4


11 Clean the surface of busbar with wipe Solder the wires onto busbar. Connect the film to power. 5
12 SMART GLASS/FILM PANEL Transformer(220VAC/110VAC-60VAC) Switch 220v/110v input Switch Remote control
13 SMART GLASS/FILM PANEL 60VAC OUT PUT 12VDC Remote controller 12VDC INPUT INVERTER REMOTE CONTROL MODULE

546")

14 No.280 Nanyi Road, Dongying, Shandong, China (0)
ADHESIVE SWITCHABLE FILM
 ADHESIVE SWITCHABLE FILM INSTALLATION GUIDE In order to fully understand and properly install the adhesive switchable film, please read this installation guide in its entirety before commencing with installation.
Application guidance for Printed Vinyl decals
 Paint Masks - Dry Rub Decals - Waterslides - Printed media Telephone: Website: email: +44(0)7872 181119 (mobile) http://www.flightlinegraphics.com sales@flightlinegraphics.com Application guidance for
DASH KIT INSTALLATION
 ÿÿÿÿÿ ÿÿÿÿÿÿÿÿÿÿÿÿ ÿÿÿ ÿÿÿÿÿ ÿÿ ÿÿÿ ÿÿÿÿÿÿÿÿÿÿÿÿÿÿ ÿÿÿÿÿÿÿÿÿÿ ÿÿÿÿ ÿÿÿÿ ÿÿ ÿÿÿÿÿ ÿÿÿÿÿÿÿÿ PROUDLY MADE IN THE USA DASH KIT INSTALLATION These instructions are aimed at the do-it-yourself installer. Read
PART NUMBER: T-R20 PACKAGE CONTENTS: GENUINE ACCESSORIES INSTALLATION INSTRUCTIONS Scuff Plate TOOLS REQUIRED: APPLICABLE MODELS: 2013 MAZDA CX-
 PART NUMBER: 0000-8T-R20 PACKAGE CONTENTS: GENUINE ACCESSORIES INSTALLATION INSTRUCTIONS TOOLS REQUIRED: APPLICABLE MODELS: 2013 MAZDA CX-5 FRONT SCUFF PLATE (Qty 2) 50% ISOPROPYL ALCOHOL/RESIDUE FREE
3M Impact Protection Profile Installation System Instructions
 3M Impact Protection Profile Installation System Instructions IMPORTANT: READ INSTRUCTIONS FOR USE BEFORE OPERATING Intended Use: The 3M Impact Protection Profile Installation System is for installing
CAVALIER. Shower Door Installation Instructions
 CAVALIER Shower Door Installation Instructions IMPORTANT DreamLine reserves the right to alter, modify or redesign products at any time without prior notice. For the latest up-to-date technical drawings,
Vinyl Installation Guide and Tips
 Vinyl Installation Guide and Tips Tools Needed: Squeegee; Grease Pencil (white or blue only!); 2" & 1/4" Masking Tape Prepare your surface and vinyl as outlined on back cover prior to employing this technique
Installing 3M DI-NOC Architectural Finishes on Doors
 Installation Guide Revision C, September 2017 Introduction The purpose of this installation guide is to establish a 3M-recommended procedure for installing 3M DI-NOC Architectural Finishes (the Product
Prel-Lam LC-LTI Liquid Crystal Laminated Glass
 Prel-Lam LC-LTI Liquid Crystal Laminated Glass 1. FEATURES Liquid crystal glass is laminated glass that is connected to a switch-operated electric circuit. The appearance of this glass changes depending
APPLICATION OF JAC FILMS
 1. Important points For reliable results, JAC films are best applied to smooth, dry and clean surfaces (metal, glass, paintwork, plastic etc.). It is essential to ensure that the surface is free from dirt
Mirrorcraft Project Especially for Dogs
 Mirrorcraft Project Especially for Dogs DIY Customized Pet Mirror Make a mirror photo frame to Display your Pets Photo Irene Jacobs April 2007 Mirrorcraft is a fun craft to easily create you own customized
Xyron Professional 2500 Laminating System
 Xyron Professional 2500 Laminating System Instruction Manual Provided By http://www.mybinding.com http://www.mybindingblog.com U S E R S G U I D E 2500 Adhesive Application & Laminating System The XM2500
Adhesive Application & Laminating System
 U S E R S G U I D E Adhesive Application & Laminating System The XM2500 is an economical and easy to use document finishing system. This versatile and non-electric system has been designed to laminate
Technical Information
 Technical Information Handling, Inspecting and Fabricating Pilkington Activ Self-Cleaning Glass Pilkington Activ Self-Cleaning Glass has a thin, clear, permanent, pyrolytic Titanium Oxide coating on one
Application of 3M Pressure Sensitive Films to 3M Panagraphics Substrates
 Instruction Bulletin 5.30 Release B, Effective October 2006 See bulletin change summary on last page Application of 3M Pressure Sensitive Films to 3M Panagraphics Substrates Preparation Points to Consider
Cleaning & Maintenance Advice Textured Glass.
 Cleaning & Maintenance Advice Textured Glass. Viridian ScalaTexture Viridian ScalaMirage Viridian ScalaDesign Viridian LuminaMist Cleaning of Glass This information is offered as general information only.
INSTALLATION MANUAL STORAGE
 IMVersion 1.1 INSTALLATION MANUAL GENERAL GUIDE: The information in this IM is intended to serve as a general guide to proper installation with no warranties intended or implied. Prime Panels assumes no
SUPER BLUE INSTRUCTIONS FOR INSTALLING
 Featuring STRIPENET REV. 09/01 PAGE 1 Super Blue, Super Blue 2 and StripeNet are registered trademarks of PRI. All other company and product names mentioned in this document are trademarks of their respective
GORETM SKYFLEXTM AEROSPACE MATERIALS
 Installation Guide GORE TM SKYFLEX TM Aerospace Materials effectively seal panels and protect against corrosion by minimizing damage caused by vibration and other mechanical forces. They can be installed
FLEX 28 / 32 / 42 x 72
 FLEX 28 / 32 / 42 x 72 SHOWER DOOR INSTALLATION INSTRUCTIONS IMPORTANT DreamLine reserves the right to alter, modify or redesign products at any time without prior notice. For the latest up-to-date technical
Aeon CLR Series EDGE FREE CLR Fixed Frame Screen w/ StarBright CLR (Ceiling Light Rejecting ) Front Projection Material
 Front Projection Material") Aeon CLR Series EDGE FREE CLR Fixed Frame Screen w/ StarBright CLR (Ceiling Light Rejecting ) Front Projection Material User s Guide Product Description: The Aeon CLR Series is an ultra-short throw fixed
Aeon CLR Series EDGE FREE CLR Fixed Frame Screen w/ StarBright CLR (Ceiling Light Rejecting ) Front Projection Material User s Guide Product Description: The Aeon CLR Series is an ultra-short throw fixed
INFINITY-Z SHOWER DOOR / TUB DOOR INSTALLATION INSTRUCTION. MODEL #s 01-Chrome
 INFINITY-Z SHOWER DOOR / TUB DOOR INSTALLATION INSTRUCTION IMPORTANT DreamLine reserves the right to alter, modify or redesign products at any time without prior notice. For the latest up-to-date technical
SLOT INSTALLATION GUIDE Indoor IP20
 Please read entire guide prior to starting installation. Sections: Pre-Installation Single Run Fed From Both Ends NOTES 1. IP40 and lower tape must be installed indoors only. Installing outdoors will void
QUATRA LUX SHOWER ENCLOSURE INSTALLATION INSTRUCTIONS
 QUATRA LUX SHOWER ENCLOSURE INSTALLATION INSTRUCTIONS IMPORTANT DreamLine reserves the right to alter, modify or redesign products at any time without prior notice. For the latest up-to-date technical
CIRRUS AIRPLANE MAINTENANCE MANUAL MODELS SR22 AND SR22T CHAPTER 56-30: DOOR GENERAL. Door 56-30: DOOR. 1. General
 CIRRUS AIRPLANE MAINTENANCE MANUAL Door CHAPTER 56-30: DOOR GENERAL 56-30: DOOR 1. General The cabin door windows are manufactured of acrylic and adhesive bonded to the door structure. Replacement is accomplished
PRIME SHOWER ENCLOSURE INSTALLATION INSTRUCTIONS
 PRIME SHOWER ENCLOSURE INSTALLATION INSTRUCTIONS IMPORTANT DreamLine reserves the right to alter, modify or redesign products at any time without prior notice. For the latest up-to-date technical drawings,
GENUINE PARTS INSTALLATION INSTRUCTIONS
 GENUINE PARTS INSTALLATION INSTRUCTIONS 1. 2. 3. 4. DESCRIPTION: APPLICATION: PART NUMBER: KIT CONTENTS: Kit G Coupe 999J2 JxxxxB4 (xxxx Designates model year and color) Item Qty. Description Part Number
5. Carefully remove the printer from the lower boxed foam support and place it on a solid, level base where it will be used
 PROJET 1200 QUICKSTART GUIDE Before you get started you will need: Lint-free paper towels A pair of nitrile gloves Saftety glasses OPENING YOUR PROJET 1200 NOTE: Make sure you save all of your packaging
WELDING. Section nine 9.1 CORRECT TOOLS
 Section nine 9.1 CORRECT TOOLS WELDING Polyflor strongly recommends vinyl sheet and 608mm vinyl tile floorings are welded, this includes the internal and external joints when the vinyl sheet is site cove
Insta-DE2a/2aF Series
 Insta-DE2a/2aF Series Self-Adhesive Dry-EraseFront Projection Screen Film with Frame Border and Pen Tray User s Guide Thank you for choosing the Insta-DE2a Series dry-erase whiteboard projection screen!
PolyCarb has good resistance to many chemicals. Some chemicals may harm the PolyCarb sheets. Contact us when in doubt about any chemical.
 Polycarbonate Panels This manual provides the basic information for working with and installing PolyCarb sheets. Due to their hollow core, prior preparation is needed before the actual installation, with
Roll Out Vinyl Installation Guide
 Sub-floor Requirements The contractor performing the installation of the performance vinyl flooring must ensure the proper quality of the sub-floor. The sub-floor must be clean, smooth, permanently dry,
Read and understand the requirements of this procedure Assist students with installation as needed
 1. PROCEDURE OVERVIEW This procedure is to be used for installation of bonded strain gages on reinforcing bars. It includes necessary materials and a recommended practice for surface preparation, installation,
UNIDOOR (STYLE B & C)
") UNIDOOR (STYLE B & C) SHOWER DOOR GLASS PANEL INSTALLATION INSTRUCTIONS IMPORTANT DreamLine TM reserves the right to alter, modify or redesign products at any time without prior notice. For the latest
UNIDOOR (STYLE B & C) SHOWER DOOR GLASS PANEL INSTALLATION INSTRUCTIONS IMPORTANT DreamLine TM reserves the right to alter, modify or redesign products at any time without prior notice. For the latest
Processing Guidelines ORAFOL Films for Aircraft Applications
 Page 1 of 11 Description This document describes the application and removal procedures for ORAFOL films for aircraft applications, in particular ORAJET 3967AC and ORACAL 970AC ORAFOL offers a wide range
ELEGANCE SHOWER DOOR/ENCLOSURE INSTALLATION INSTRUCTIONS. Style A Style B Style C Style D
 ELEGANCE SHOWER DOOR/ENCLOSURE INSTALLATION INSTRUCTIONS IMPORTANT DreamLine reserves the right to alter, modify or redesign products at any time without prior notice. For the latest up-to-date technical
TOYOTA PRIUS BODY SIDE MOLDING Preparation
 Preparation Part Number: PT938-47160-XX Kit Contents Item # Quantity Reqd. Description 1 1 Molding, LH Front Door 2 1 Molding, LH Rear Door 3 1 Molding, RH Front Door 4 1 Molding, RH Rear Door Hardware
FV44 & FV33 GRACE KIT INSTALLATION INSTRUCTIONS
 LIST OF INCLUDED PARTS QTY DESCRIPTION 1 GRACE KIT (NOT SHOWN) BAG ASSEMBLY, HANGING OVERLAY 4 S 4 LOCK WASHERS 4 8-32 SCREWS, SLOT HEAD BAG ASSEMBLY, CONNECTING OVERLAYS 4 10-32 X 1/2" SCREWS TOOLS REQUIRED
Applications Engineering Notes
 Applications Engineering Notes Document Title Document Number Operating Instructions for the US Conec AEN-1408 Revision Number 1.0 Effective Date December 15, 2011 THE USE OF SAFETY GLASSES FOR EYE PROTECTION
APPLICATION. General Instructions. Maintenance and Cleaning. Removal. Shelf Life, Storage and Shipping. 2 Product Bulletin ixc
 APPLICATION Note: For graphics larger than poster size, we recommend contacting a professional graphics installer for assistance. General Instructions Please review the General Instructions and Method:
Instructions for Installing Vinyl Stair Treads with Musson 3 Wide Double-Face Tape
 Instructions for Installing Vinyl Stair Treads with Musson 3 Wide Double-Face Tape (For No. 300 & No. 334 treads see special note in the Installation of Vinyl Stair Tread section below) Where To Install
VERTICAL STILE ABOVE HORIZONTAL TRIM VERTICAL STILE BELOW COVE BASE ADHESIVE. 1" [25.4mm] BASE DETAIL
![VERTICAL STILE ABOVE HORIZONTAL TRIM VERTICAL STILE BELOW COVE BASE ADHESIVE. 1 [25.4mm] BASE DETAIL](/thumbs/87/96020661.jpg "VERTICAL STILE ABOVE HORIZONTAL TRIM VERTICAL STILE BELOW COVE BASE ADHESIVE. 1 [25.4mm] BASE DETAIL") Please Read All sheet will be provided in stock sizes for field cutting. All trims will be provided in 8-0 stock lengths for field cutting. CEILING TRIM 1" [25.4mm] Acrovyn Interiors vinyl acrylic wall
Please Read All sheet will be provided in stock sizes for field cutting. All trims will be provided in 8-0 stock lengths for field cutting. CEILING TRIM 1" [25.4mm] Acrovyn Interiors vinyl acrylic wall
LuxCore Installation Instructions
 LuxCore Installation Instructions ATTENTION: LuxCore PANELS MUST BE ACCLIMATIZED FOR 24 HOURS BEFORE INSTALLATION PLEASE READ ALL INSTRUCTIONS PRIOR TO INSTALLATION The guidelines provided herein have
Application Notes! RIGID MATERIALS. Rigid material standards. Printing on Rigid Materials with the Gerber Solara ion & Gerber CAT UV
 Printing on Rigid Materials with the Gerber Solara ion & Gerber CAT UV This document instructs on the proper use of rigid materials when printing on the flat bed of the Gerber Solara ion & Gerber CAT UV.
INSTALLATION MANUAL STOREFRONT DOORS
 INSTALLATION MANUAL STOREFRONT DOORS www.aluflam-usa.com SYSTEM DESCRIPTION - Extruded and filled aluminum framing, tested and approved by UL - 3-3/8 frame depth - Clear, fire-rated safety glazing - Door
Fixed Upper Sash Replacement Guide for Andersen 400 Series Woodwright Springline Single-Hung Windows
 Fixed Upper Sash Replacement Guide for Andersen 400 Series Woodwright Springline Single-Hung Windows Manufactured Between September 2005 and October 2006 Read all instructions carefully before attempting
C6 Corvette Rear Spoiler Kit CDC #
 2005 2008 C6 Corvette Rear Spoiler Kit CDC # 0542 7002 01 Note: Read installation instructions before starting Kit Includes: 1 C6 Rear Spoiler 2 CHMSL Bracket # 0542-3500-01 2 Screw 4.2 x 1.41 x 25 # 30005
MICRO1L / MICRO2 / MICRO6 / MICRO140UV / MICROM0
 Application Guide MICROperforated Films APPLICATION AND REMOVAL Microperforated Films MICRO1L / MICRO2 / MICRO6 / MICRO140UV / MICROM0 REQUIRED ACCESSORIES QA squeegee (refer to our catalogue) QRigid for
Instructions for Making Repairs to 3M 8681HS Blade Tapes Installed on Enstrom Helicopter Blades.
 REPORT NO: TITLE: Instructions for Making Repairs to 3M 8681HS Blade Tapes Installed on Enstrom Helicopter Blades. MODEL NO: All PREPAIRED BY: P.B. dupont CHECKED BY: APPROVED BY: 1. SCOPE This specification
LED Thin Frame Fixed Frame Screen User Guide
 LED Thin Frame Fixed Frame Screen User Guide INTRODUCTION INTRODUCTION WARNING - Sharp Edges This product may contain sharp edges, please handle with care. Protective gloves are recommended. WARNING -
Figure 1 Photograph of a strain gage on a helical wire
 1. PROCEDURE OVERVIEW This procedure is to be used for installation of bonded strain gages on prestressing strand. It includes necessary materials and a recommend practice for surface preparation, installation,
PRISM LUX / PYRAMID SHOWER ENCLOSURE INSTALLATION INSTRUCTIONS
 PRISM LUX / PYRAMID SHOWER ENCLOSURE INSTALLATION INSTRUCTIONS IMPORTANT DreamLine reserves the right to alter, modify or redesign products at any time without prior notice. For the latest up-to-date technical
Installation Instructions
 Aspex Digitally Printed Wall Art PL PREMIUM HEAVY DUTY ADHESIVE ASPEX WALL ART DOUBLE SIDED FOAM TAPE Installation of Aspex Digitally Printed Wall Art with Foam Tape and PL Premium Adhesive. Maximum size
FRENCH LINEA PANEL SHOWER PANEL INSTALLATION INSTRUCTIONS
 FRENCH LINEA PANEL SHOWER PANEL INSTALLATION INSTRUCTIONS IMPORTANT DreamLine reserves the right to alter, modify or redesign products at any time without prior notice. For the latest up-to-date technical
GrafiWrap Vehicle Wrapping
 GrafiWrap Vehicle Wrapping What is GrafiWrap? GrafiWrap is the registered trade name for a combination of materials used in the wrapping of a vehicle. The GrafiWrap system is a sandwich made up of a cast
3M Scotchgard Surface Protection Film 2200
 Effective July 2016 Commercial Solutions Division 3M Scotchgard Surface Protection Film 2200 Product Bulletin / Instruction Bulletin Product Description 3M Scotchgard Surface Protection Film 2200 is a
Curium 19H Installation Instructions & Parts List
 Curium 19H Installation Instructions & Parts List Illustration Curium 19H Right Hand Page 1 of 15 01/07/2016 Revision 2.1 IMPORTANT This shower screen / enclosure must be installed by suitably qualified
FLEX ENCLOSURE SHOWER ENCLOSURE INSTALLATION INSTRUCTIONS
 FLEX Enclosure manual Ver 3 Rev 06/06 FLEX ENCLOSURE SHOWER ENCLOSURE INSTALLATION INSTRUCTIONS IMPORTANT DreamLine reserves the right to alter, modify or redesign products at any time without prior notice.
TOOLS & SUPPLIES (Included in ProTops Tool Kit)
") TOOLS & SUPPLIES (Included in ProTops Tool Kit) Clean Paint/Mixing Sticks Graduated Mixing Buckets Standard Mixing Cups Nylon Paint Brush Propane Torch 3M Masking Gun Masking Film & Painter s Tape Disposable
TOOLS & SUPPLIES (Included in ProTops Tool Kit) Clean Paint/Mixing Sticks Graduated Mixing Buckets Standard Mixing Cups Nylon Paint Brush Propane Torch 3M Masking Gun Masking Film & Painter s Tape Disposable
Thanks for shopping with Improvements! 7 ft. Wall Christmas Tree w/ Stand Item #419359
 Thanks for shopping with Improvements! 7 ft. Wall Christmas Tree w/ Stand Item #419359 IMPORTANT: RETAIN FOR FUTURE REFERENCE. READ CAREFULLY. PARTS LIST: NOTES: (1) Tree Section A (1) Tree Section B (1)
SHOWER ENCLOSURE INSTALLATION
 T F e34 x 46 s a QUATRA LUX 32 x 46 / ele A R r r fo SHOWER ENCLOSURE INSTALLATION I NSTRUCTIONS d e D v o r p IMPORTANT DreamLine reserves the right to alter, modify or redesign products at any time without
COMPOSITES LAB MANUAL
 COMPOSITES LAB MANUAL Version 1 Lab 3: Surface Preparation, Wet Layup, and Vacuum Bagging The original version of this manual was a one student senior design project written by Katherine White, the Composite
Easyfix. Easyglaze. Superglaze. Filmglaze
 Easyfix Easyglaze Superglaze Filmglaze Magnetglaze Magnetglaze Pro TUBEWAY (SALES) LTD are proud to offer six effective secondary double glazing systems to the general public. Each system is available
M A N U A L 6 June 2017
 M A N U A L 6 June 2017 What are Protection Films? These films are meant to protect the vulnerable parts of cars, bicycles, motorbikes, etc... They are transparent glossy, so the underlying colour remains
INSTALLATION INSTRUCTIONS
 INSTALLATION INSTRUCTIONS Roush Mustang Rear Valances This kit is intended for professional installation. Roush Performance 28400 Plymouth Road Livonia, MI 48150 1-800-59-ROUSH Application: Mustang 1999
FLEXITEEK INSTALLATION INSTRUCTIONS
 an Advanced Plastic Fabrications Company 99 marcus Blvd., 631.244.3620 631.231.4466fax FLEXITEEK INSTALLATION INSTRUCTIONS Before you begin, take your new Flexiteek deck out of the shipping package and
ESSENCE - H SHOWER / TUB DOOR INSTALLATION INSTRUCTIONS
 ESSENCE - H SHOWER / TUB DOOR INSTALLATION INSTRUCTIONS IMPORTANT DreamLine reserves the right to alter, modify or redesign products at any time without prior notice. For the latest up-to-date technical
CLEANING THE GALVO MIRRORS
 CLEANING THE GALVO MIRRORS Formlabs Customer Support can provide additional information on mirror cleaning and in some cases, provide the customer with the appropriate cleaning supplies. Tools: 2.5mm hex
Repairs. Chapter 10 Repairs 10. 1
 10 Repairs Chapter 10 Repairs 10. 1 Repairs As an installer, you will probably be called upon to repair damage to a resilient floor. Here are some of the most common problems and the recommended repairs
INSTALLATION INSTRUCTIONS
 SG57f GENUINE PARTS INSTALLATION INSTRUCTIONS. DESCRIPTION: Sunroof Wind Deflector. APPLICATION: Pathfinder; Frontier with no roof rails 3. PART NUMBER: 999D4-XR00 4. KIT CONTENTS: Item No. ) ) 3) 4) 5)
Sash Replacement Guide for Andersen 400 Series Tilt-Wash Transom Windows
 for Andersen 400 Series Tilt-Wash Transom Windows Read all instructions carefully before attempting this procedure. If you have any questions about your ability to complete this procedure, call Andersen
Elara NanoEdge Fixed Frame Screen User Guide
 Elara NanoEdge Fixed Frame Screen User Guide INTRODUCTION INTRODUCTION WARNING This product may contain sharp edges, please handle with care. Protective gloves are recommended. A minimum of two people
UNIDOOR-X TUB DOOR TUB DOOR INSTALLATION NSTRUCTIONS. MODEL #s D58580-##
 T F UNIDOOR-X TUB DOOR se A R a e l re TUB DOOR INSTALLATION I NSTRUCTIONS r o D ved f IMPORTANT DreamLine reserves the right to alter, modify or redesign products at any time without prior notice. For
Shutter Installation Instructions
 Shutter Installation Instructions ITEMS YOU WILL NEED: Tape measure Framing square Screw gun Circular saw Caulk gun PL premium adhesive Exterior grade screws 1 ¾" Safety glasses Putty knife Window and
INSTALLATION INSTRUCTIONS FOR STANDING SHOWER CABIN OWNER'S MANUAL PLEASE READ INSTRUCTIONS BEFORE PROCEEDING Packing List. Door (pc) 2. Hinge (2pc) 3
 2. Hinge (2pc) 3") VIGO INDUSTRIES INSTALLATION GUIDE FOR SHOWER ENCLOSURE ()! SAFETY PRECAUTIONS This Installation Guide uses the following symbols to indicate important information. Always observe the instructions indicated
VIGO INDUSTRIES INSTALLATION GUIDE FOR SHOWER ENCLOSURE ()! SAFETY PRECAUTIONS This Installation Guide uses the following symbols to indicate important information. Always observe the instructions indicated
Stained Glass Mission-Style Frame A stained glass project
 Stained Glass Mission-Style Frame A stained glass project Stained Glass Mission-Style Frame A Stained Glass Project PROJECT TITLE: Stained Glass Mission-Style Frame SKILL LEVEL: (Adult 1-5: 1 being the
FLEX 48 x 72 / 60 x 72
 FLEX 48 x 72 / 60 x 72 SHOWER DOOR INSTALLATION INSTRUCTIONS IMPORTANT DreamLine reserves the right to alter, modify or redesign products at any time without prior notice. For the latest up-to-date technical
LUXAR Anti reflective coated glass Handling Procedures for LUXAR
 LUXAR Anti reflective coated glass Handling Procedures for LUXAR - 1-29.03.99 Table of contents 0. Introduction of LUXAR 1. Transportation / Packing 2. Storage 3. Handling / Cutting 4. Treatment 5. Washing
Cleaning & Maintenance Advice Low emissivity (Low E) Coated Glass Clear, Toned and Super Toned.
 Coated Glass Clear, Toned and Super Toned.") Cleaning & Maintenance Advice Low emissivity (Low E) Coated Glass Clear, Toned and Super Toned. Viridian SmartGlass Viridian EnergyTech Viridian SolTech Viridian EVantage Viridian EnviroShield Performance
Cleaning & Maintenance Advice Low emissivity (Low E) Coated Glass Clear, Toned and Super Toned. Viridian SmartGlass Viridian EnergyTech Viridian SolTech Viridian EVantage Viridian EnviroShield Performance
Installation Instructions
 Installation Instructions Follow these simple instructions to install your OneDayCab! IMPORTANT: Unpack and check shipment for damage. Verify color, size and parts before demolition. Installation of interiors
Anti-reflective glass
 Anti-reflective glass SGG VISION-LITE Assembly, installation and maintenance October 2007 SAINT-GOBAIN N GLASS VISION SAINT-GOBAIN N GLASS VISION Assembly,, installation tion and maintenance Contents 1.
Installation Materials Required: Tools Required: 6" self-adhesive flashing. Shims. 3-foot level 6-foot level Tape measure 1/8" drill bit
 installation instructions for CUSTOM WOOD & FIBERGLASS EXTERIOR FOLDING DOOR SYSTEMs (JII101) Thank you for selecting JELD-WEN products. Attached are JELD-WEN s recommended installation instructions for
ESSENCE. Shower / Tub Door Installaion Instructions
 ESSENCE Shower / Tub Door Installaion Instructions IMPORTANT DreamLine reserves the right to alter, modify or redesign products at any time without prior notice. For the latest up-to-date technical drawings,
DURACRYL WALL INDEX INTRODUCTION. TOOLS AND MATERIALS REQUIRED. FLAT SHOWER WALL SIDE CONTOUR SHOWER WALL CORNER CONTOUR SHOWER WALL FLAT BATH WALL
 DURACRYL WALL FLAT SHOWER WALL SIDE CONTOUR SHOWER WALL CORNER CONTOUR SHOWER WALL FLAT BATH WALL INSTALLATION GUIDE INDEX PAGES Introduction 1 Tools and materials 1-2 Construction requirements - timber
MIRAGE-X / BELLA. Shower Door Installation Instructions
 MIRAGE-X / BELLA Shower Door Installation Instructions IMPORTANT DreamLine reserves the right to alter, modify or redesign products at any time without prior notice. For the latest up-to-date technical
Cardboard Model Buildings
 Cardboard Model Buildings Get more model kits from http://www.modelbuildings.org PRINTING & ASSEMBLY TIPS: These OO designs can easily be resized by reducing the print percentage as follows: OO scale is
DUZcart Cover Replacement Manual
 DUZcart Cover Replacement Manual Page 1 of 23 DUZcart Replacement Instructions, January 2012. Call 1-888-389-2278 ext. 523 for additional assistance. The following describes the removal and replacement
UNIDOOR X (STYLE L1)
") UNIDOOR X (STYLE L) SHOWER DOOR & GLASS PANEL INSTALLATION INSTRUCTIONS IMPORTANT DreamLine reserves the right to alter, modify or redesign products at any time without prior notice. For the latest up-to-date
UNIDOOR X (STYLE L) SHOWER DOOR & GLASS PANEL INSTALLATION INSTRUCTIONS IMPORTANT DreamLine reserves the right to alter, modify or redesign products at any time without prior notice. For the latest up-to-date
ENIGMA AIR ENCLOSURE
 ENIGMA AIR ENCLOSURE SHOWER ENCLOSURE INSTALLATION INSTRUCTION IMPORTANT DreamLine reserves the right to alter, modify or redesign products at any time without prior notice. For the latest up-to-date technical
Conversion, Application and Maintenance of the Avery Dennison Floor Marking System Instructional Bulletin #6.30
 Conversion, Application and Maintenance of the Avery Dennison Floor Marking System #6.30 (Revision 16) Dated: 12/31/14 1.0 Scope Due to the unique nature of the Floor Marking System, particular attention
Installation Instructions Stainless Steel Wall Panels
 Please read all instructions before installing wall panels. Always plan before you place! 1. Before installation: a. Acclimate Stain Steel Panels, Trim, adhesives and wall substrates to room temperature
Pilkington OptiView Protect. Pilkington OptiView. Handling and Processing Guidelines
 Clear float glass Pilkington OptiView Protect Pilkington OptiView Pilkington OptiView Protect Handling and Processing Guidelines Pilkington OptiView and Pilkington OptiView Protect 1. Product description
Technical Data Sheet: Casper Cloaking Film
 Technical Data Sheet: Casper Cloaking Film Applications Supported Horizontally mounted LED displays over 40" diag size Supported after field verification or not currently supported LED monitors smaller
Visions Tub Door & Backwall
 Visions Tub Door & Backwall TUB DOOR & BACKWALL INSTALLATION INSTRUCTIONS IMPORTANT DreamLine reserves the right to alter, modify or redesign products at any time without prior notice. For the latest up-to-date
PRISM SHOWER ENCLOSURE INSTALLATION INSTRUCTIONS
 PRISM SHOWER ENCLOSURE INSTALLATION INSTRUCTIONS IMPORTANT DreamLine reserves the right to alter, modify or redesign products at any time without prior notice. For the latest up-to-date technical drawings,
Fender Protectors. To ensure a successful installation, please read all of these instructions prior to starting.
 Fender Protectors To ensure a successful installation, please read all of these instructions prior to starting. General Instructions All Tough Stuff Protective Products use a waterproof contact adhesive.
UNIDOOR (STYLES B&C)
") UNIDOOR (STYLES B&C) SHOWER DOOR & GLASS PANEL INSTALLATION INSTRUCTIONS IMPORTANT DreamLine reserves the right to alter, modify or redesign products at any time without prior notice. For the latest up-to-date
UNIDOOR (STYLES B&C) SHOWER DOOR & GLASS PANEL INSTALLATION INSTRUCTIONS IMPORTANT DreamLine reserves the right to alter, modify or redesign products at any time without prior notice. For the latest up-to-date
Vinyl Windows Manufactured by VPI Quality Windows
 Vinyl Windows Manufactured by VPI Quality Windows Part Number: 531&591 Installation 531 & 591 SERIES SLIDING AND HUNG WINDOW INSTALLATION INSTRUCTIONS Installation Instructions for Typical Construction.
Panel Riser Kit Option 1. Installation Instructions 226BEE 0117CH
 Panel Riser Kit Option 1 Installation Instructions 226BEE 0117CH Before you Start Please read these instructions fully before starting. Although these instructions are comprehensive we always recommend
VITREO X SHOWER / TUB DOOR INSTALLATION INSTRUCTIONS
 VITREO X SHOWER / TUB DOOR INSTALLATION INSTRUCTIONS IMPORTANT DreamLine reserves the right to alter, modify or redesign products at any time without prior notice. For the latest up-to-date technical drawings,